An Introduction to Robotics and Java
|
|
|
- Shannon Chapman
- 8 years ago
- Views:
Transcription

1 An Introduction to Robotics and Java Programming
2 Copyright by RidgeSoft, LLC. All rights reserved. RidgeSoft, RoboJDE and IntelliBrain are trademarks of RidgeSoft, LLC. Java and all Java-based marks are trademarks or registered trademarks of Sun Microsystems, Inc. in the United States and other countries. All other brand or product names are trademarks of their respective owners. RidgeSoft, LLC PO Box 482 Pleasanton, CA Revision 2 ii

3 Table of Contents INTRODUCING THE INTELLIBRAIN-BOT... 1 INTELLIBRAIN-BOT EDUCATIONAL ROBOT DESIGN... 2 A HANDS-ON DEMONSTRATION... 5 SUMMARY EXERCISES PROGRAMMING THE INTELLIBRAIN-BOT CREATING A NEW PROJECT CONNECTING THE ROBOT TO YOUR COMPUTER RUNNING YOUR FIRST PROGRAM PROGRAMMING CONCEPTS DEBUGGING YOUR PROGRAMS SUMMARY EXERCISES MANEUVERING THE INTELLIBRAIN-BOT DIFFERENTIAL DRIVE ROBOTS PROGRAMMING SIMPLE MANEUVERS COMBINING SIMPLE MANEUVERS SUMMARY EXERCISES INTERACTING WITH THE INTELLIBRAIN-BOT USING TEXT OUTPUT USING LEDS USING THE THUMBWHEEL ARITHMETIC OPERATIONS USING PUSH BUTTONS LOGICAL OPERATORS AND BOOLEAN VARIABLES TEACHING THE ROBOT NEW TRICKS SWITCH STATEMENTS USING THE BUZZER PLAYING A TUNE USING A UNIVERSAL REMOTE CONTROL SUMMARY EXERCISES INTRODUCTION TO SENSING SONAR RANGE SENSING USING THE PING))) SENSOR SUMMARY EXERCISES LINE FOLLOWING LINE SENSING FOLLOWING A LINE USING ONE SENSOR FOLLOWING A LINE USING TWO SENSORS SUMMARY EXERCISES iii

4

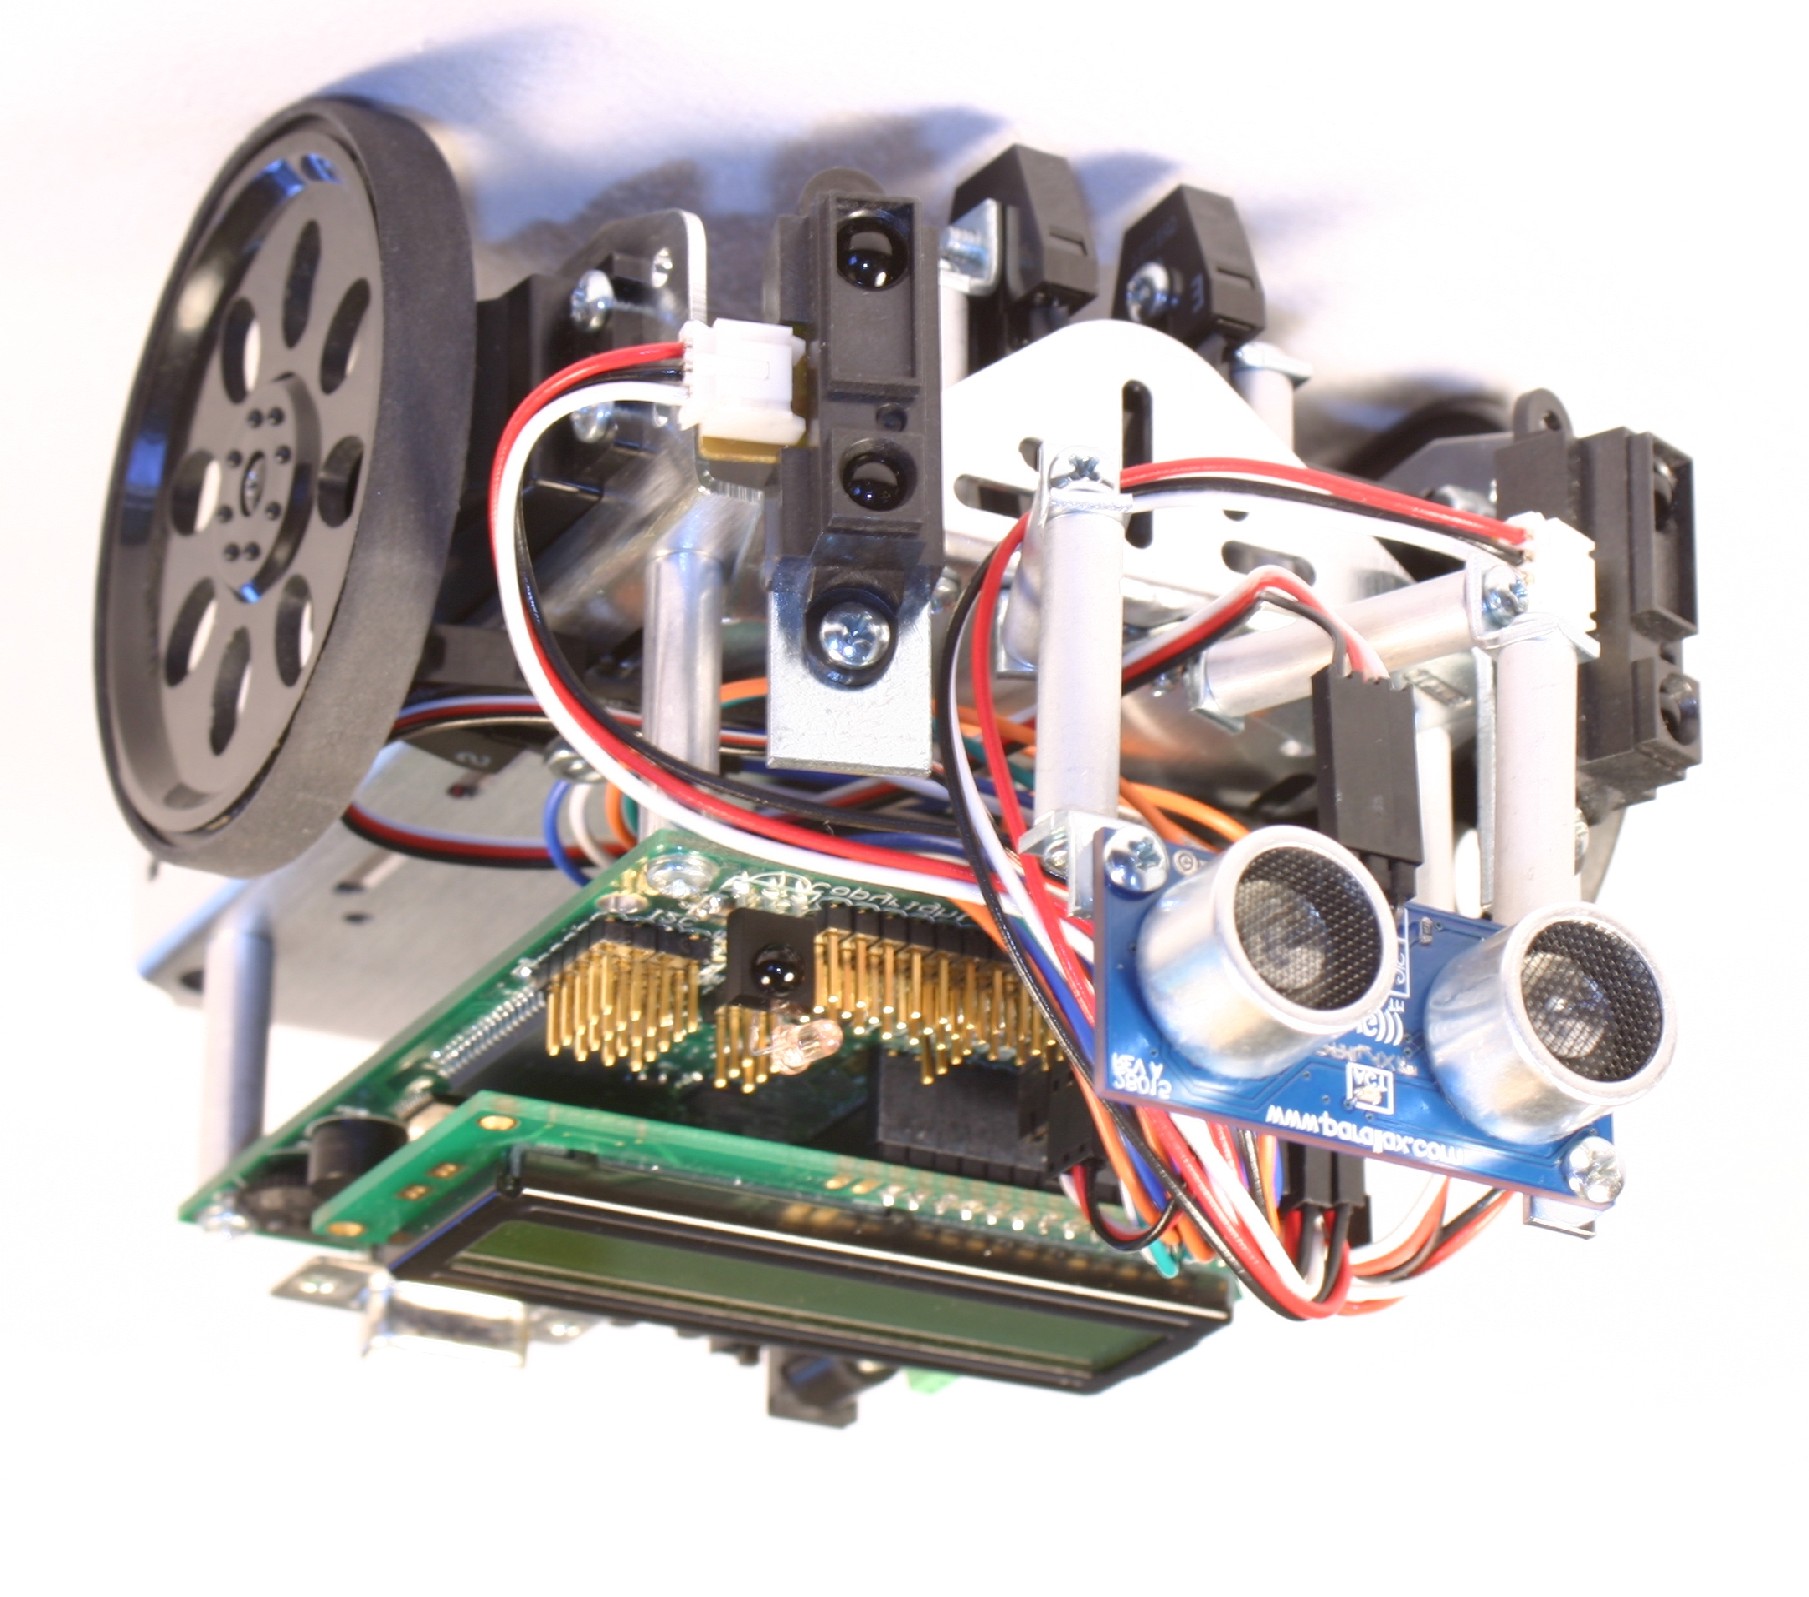
5 CHAPTER 1 Introducing the IntelliBrain-Bot Throughout this book we will be using the IntelliBrain -Bot Deluxe educational robot to learn about the emerging field of robotics. The IntelliBrain-Bot educational robot is a pre-designed mobile robot, which will allow us to focus our discussion primarily on robotics programming, using the companion Java -enabled robotics software development environment, RoboJDE. Before we get started programming the robot, let s first take a look at the mechanical and electronics components which make up the IntelliBrain-Bot educational robot. Aluminum chassis LCD IntelliBrain 2 robotics controller Ultrasonic range sensor Infrared wheel encoder sensor Infrared range sensor Drive wheel Servo motor Infrared line sensor Figure IntelliBrain-Bot Deluxe Educational Robot 1

6 IntelliBrain-Bot Educational Robot Design Figure 1-1 shows a fully assembled IntelliBrain-Bot Deluxe educational robot. As you can see in the figure, the robot is made up of the following major parts: IntelliBrain 2 robotics controller with LCD display aluminum chassis servo motors wheels assorted hardware sensors battery holder (not visible, under chassis) batteries (not visible, under chassis) Mechanics The IntelliBrain-Bot educational robot employs a simple mechanical design. An aluminum chassis fabricated from a single piece of sheet metal provides a sturdy central structure for the robot. Two motors mounted on the underside of the chassis drive the two large wheels, enabling the robot to move under its own power. A ball tail wheel supports the back end of the robot. The robotics controller, sensors, motors, tail wheel and battery holder mount directly on the chassis. COM2 Port - RS-232, 115.2K baud - CMUcam ready (6V regulated power) 8 Servo Ports - 5 with power - 3 signal only 7 Analog / Digital Inputs 13 Digital Inputs/Outputs Infrared Transmitter Infrared Receiver - Sony/Universal TV remote compatible 5 I 2 C Ports Java Programmable 16x2 LCD Display RoboJDE v1.5.0r1 Ready Atmel ATmega128 Microcontroller MHz - 128K flash program memory - 132K RAM - 4K bytes EEPROM 6 Programmable LEDs Buzzer 2 DC Motor Ports Thumbwheel Battery Power alkaline, NiCd, or NiMH batteries Wall Brick Power Connector Power Switch START STOP 2 Push Buttons COM1 Port - RS-232, 115.2K baud - Host interface or general purpose - Bluetooth ready (5V pin 9 power) Mounting Holes - IntelliBrain-Bot - Your custom robot - Lego grid compatible Figure IntelliBrain 2 Robotics Controller 2 IntelliBrain-Bot Educational Robot Design

7 IntelliBrain 2 Robotics Controller The IntelliBrain 2 robotics controller, depicted in Figure 1-2, is the IntelliBrain-Bot educational robot s brain. A Java program executing on the IntelliBrain robotics controller enables the robot to function independently, analyzing input from the robot s sensors and by controlling the robot s motors to achieve desired results. By creating and loading different programs you can program the robot to perform a wide range of functions. A program can be very simple or quite complex. A program may be as trivial as displaying your name on the LCD screen or as complex as a program that controls a search and rescue robot. Sensor and Motor Ports Sensors and motors connect to the IntelliBrain 2 robotics controller via input and output ports. As you can see in Figure 1-1 and Figure 1-2, most of these ports consist of connector pins along the front edge (top edge in Figure 1-2) of the controller board. Each port has three or four pins: ground, power and signal pins. The ports are arranged sideby-side across the forward edge of the controller s circuit board. Each port is marked by a label on the controller board, which indicates the type of port and the number of the port. Table 1-1describes the ports available on the IntelliBrain 2 robotics controller. Table IntelliBrain 2 Robotics Controller Ports Port Type Labels Description Analog A1-A7 Analog ports use an analog to digital converter to read a voltage between 0 and 5 volts and convert it to an integer value between 0 and 1023, where 0 corresponds to 0 volts and 1023 corresponds to 5 volts. Digital IO1-IO13 Digital ports input or output a Boolean (on/off or true/false) signal. When configured as an output, a digital port outputs 0 volts when it is off (false) and 5 volts when it is on (true). When configured as an input, a digital port returns a false value when the signal is low (nearest 0 volts) and true when the signal is high (nearest 5 volts). Servo S1-S8 Servo ports interface directly to hobby servo motors. Servo motors were originally developed for use in model airplanes and, due to their light weight, low cost and simple electronics, are now commonly used in small robots. Motor M1, M2 Motor ports interface directly with conventional DC motors, using pulse width modulation (PWM) to vary the power output by each motor. Serial COM1, COM2 Serial ports interface to more complex sensors such as cameras and Global Positioning System (GPS) devices. By attaching a Bluetooth serial adapter to a serial port the robot can communicate wirelessly to a host computer or other robots. The COM1 port also serves as the connection to a PC when developing a program using the RoboJDE development environment. Introducing the IntelliBrain-Bot 3

8 Port Type Labels Description I 2 C I2C I 2 C (pronounced i-two-c) ports interface to more advanced sensors and effectors such as compass sensors and speech synthesizers. There are five port headers for I 2 C devices. The I 2 C ports are not numbered individually because I 2 C device addressing is controlled in software, not by the physical connection. Infrared transmitter none The infrared transmitter provides a signal an on/off signal that can be detected by the infrared receiver (described below). This can be used for simple communication between robots to signal a Boolean (on/off) value, for example, signaling another robot to stop or go. Human Interface Features In addition to providing the ability to execute a Java program and to interface to sensors and motors, the IntelliBrain 2 robotics controller provides a number of features which make it easy to program the robot to interact with people. Table 1-2 lists these features. Table Human Interface Features Device Liquid Crystal Display Push Button Thumbwheel Buzzer Universal remote control receiver Light Emitting Diodes (LEDs) Description The Liquid Crystal Display (LCD) screen provides two, sixteen character lines of output. The LCD is useful to directly display sensor readings, providing an easy way to learn about and diagnose problems with sensors. The display is also useful for providing a simple menu-based user interface. Two push buttons, labeled START and STOP may be used like the buttons on a mouse, allowing a human to indicate choices. By default the buttons start and stop the Java program, but your program can use them for other purposes. The thumbwheel works like a volume control knob on a car stereo. It provides a means for users to vary the setting of an analog value, such as motor speed, or a way to scroll through screens of output on the LCD display. The buzzer can be programmed to beep, click or play a tune. The universal remote control receiver allows the program to take input from a universal remote control, giving a human the ability to remotely control the robot or provide a keyboard type input for a more sophisticated human interface. Seven LEDs provide visual indications to humans. Six of these can be turned on, off or blinked under program control to provide a visual indication to the user. Three of the program controlled LEDs are green and three are red. The left most LED is a power indicator, which illuminates green when power is on. It cannot be controlled by the program. The LEDs are numbered 1 through 6, starting with the LED to the right of the power LED. 4 IntelliBrain-Bot Educational Robot Design
 value, for example, signaling another robot to stop or go.")
9 Sensors The IntelliBrain-Bot Deluxe educational robot comes with seven sensors described in Table 1-3. Table 1-3 Sensor Wheel Encoder Sensor (2) Line Sensor (2) Infrared Range Sensor (2) Ultrasonic Range Sensor IntelliBrain-Bot Deluxe Educational Robot Sensors Description Two wheel encoder sensors sense movement of the robot s wheels. These sensors use reflected infrared light to sense if a hole or a spoke is in front of the sensor. Two line sensors mounted on the underside of the robot sense the presence of a non-reflective line. These sensors use infrared light to sense the reflectivity of the surface below the robot, allowing it to follow the course of a non-reflective, black line over a highly reflective, white background. Two infrared range sensors sense the distance to objects between 4 and 30 inches in front of the robot. These sensors measure the angle of reflection of a narrow beam of infrared light to determine the distance to objects within their range. They can be used to detect and avoid obstacles in the robot s path. One ultrasonic range sensor senses the distance to an object between 1.2 and 118 inches in front of the robot. This sensor measures distance by issuing a brief pulse of high frequency sound, a ping, and precisely measuring the time until the first echo returns. Using speed-of-sound calculations the distance to an object can be precisely determined. This sensor can be used to identify far off objects, walls and hallways. It is also can be used to create an invisible tractor beam, as you will observe later in this lesson. Batteries Chemical energy in the four AA batteries mounted in the battery holder, on the underside of the chassis, provides the energy to power the motors and electronics. A Hands-on Demonstration Now for some fun, let s take a few minutes to see what the IntelliBrain-Bot educational robot can do. Note: Your lab instructor should have loaded the IntelliBrain-Bot demo program into the flash memory of your robot and made sure the batteries are fully charged prior to this exercise. The demo program provides examples of the robot using various sensors to perform different behaviors. It also provides a simple user interface, demonstrating the use of the IntelliBrain 2 robotics controller s human interface features, as well as a Sony compatible universal remote control. Finally, it provides a simple means to verify that each sensor is properly connected and functioning correctly. Introducing the IntelliBrain-Bot 5

10 Using the IntelliBrain-Bot Demo Program The user interface of the IntelliBrain-Bot demo program enables you to toggle through a list of pre-programmed functions (behaviors) the robot can perform to select the function you want the robot to demonstrate. Try this by completing the following steps: 1. Switch the power on. The power switch is located toward the left side of the rear edge of the IntelliBrain 2 robotics controller, just left of the push buttons labeled START and STOP. Slide it toward the front of the robot. 2. Press the button labeled START. This will start the demo program. You should see the following displayed on the LCD screen: Select Function Do Nothing The first line of text is telling you to select a function for the robot to perform. The second line is the name of the function. 3. Press the button labeled STOP. The stop button is typically used to stop your Java program. However, it can also be used for other purposes. The demo program uses it to allow you to scroll through the list of functions. You should see the following displayed on the LCD screen: Select Function Play Tune 4. Press the STOP button repeatedly, observing the various functions which are available. The available functions are described in Table Continue to press the STOP button until the Play Tune function is displayed. 6. Press the START button. The robot will play Beethoven s tune, Ode to Joy, using the buzzer. 7. Switch the power switch to the off position. 6 A Hands-on Demonstration

11 Table 1-4 Function Do Nothing Play Tune Remote Control Navigate Forward Rotate 180 Navigate Square Random Dance Follow Line Avoid Obstacles Follow Object IntelliBrain-Bot Demo Program Functions Description The robot does not attempt to move. This allows you to test the sensors. You will find this is extremely useful for debugging sensor problems. Plays Beethoven s tune, Ode to Joy, using the buzzer. Allows you to remotely control the robot using a Sony compatible infrared remote control. Use the channel up button to move the robot forward, the channel down button to move it backward, the volume up button to rotate right and the volume down button to rotate left. (Requires a Sony compatible infrared remote control. Most universal remote controls will work if programmed for a Sony television.) Uses wheel encoder sensors and navigation classes (provided in the RoboJDE class library) to navigate the robot straight ahead 24 inches. Uses wheel encoder sensors and navigation classes to rotate the robot in place 180 degrees. Uses wheel encoder sensors and navigation classes to navigate the robot around a 16 inch square. Uses software generated random numbers to perform a dance made up of random steps. Uses line sensors to enable your robot to follow a black line on a white surface. Uses wheel encoder sensors, navigation classes, and infrared range sensors to navigate your robot 24 inches forward and back to where it started, avoiding obstacles along the way. Uses the ultrasonic range sensor to maintain a distance of 6 inches from an object in front of your robot, creating a tractor beam effect. Testing Sensors Once you have selected a function in the demo program and started it running, the LCD screen switches to displaying screens which give you a glimpse into the robot s view of the world. This will allow you to verify that all of the sensors are functioning properly. Let s peer into the robot s brain to verify each sensor is operating properly. 1. Switch the power on. 2. Press START. Do Nothing should appear on the second line of the display. If it doesn t, press STOP repeatedly until it displays. Introducing the IntelliBrain-Bot 7

12 3. Press START again. 4. Use your finger to rotate the thumbwheel, observing the different screens which display as you move the wheel. Table 1-5 Display IntelliBrainBot L Wheel R Wheel L Line R Line L Range R Range Sonar Range L Enc R Enc Pose The screens are described in Table 1-5. IntelliBrain-Bot Demo Program Screens Wheel Encoder Sensors Description Displays the program name and version. Displays the current raw analog values reported by the left and right wheel sensors. Turn a wheel and observe the change in the value reported by the associated sensor as spokes and holes pass in front of the sensor. Displays the current raw analog values reported by the left and right line sensors. Displays the current raw analog values reported by the left and right infrared range sensors. Displays the distance in inches to the nearest object in front of the sonar range sensor. Displays the current count values maintained by the encoders. Turn a wheel and observe the change in the count value. Note: the counter will not sense changes in direction when you turn the wheel by hand. Displays the x and y coordinates of the robot in inches from the starting point and the heading in radians, with zero being the direction the robot was facing when the program started. 5. Rotate the thumbwheel until you see the display referring to the wheel sensors. 6. Hold the robot in your right hand and use your left hand to slowly rotate the left wheel. Observe that the sensor reading displayed to the right of L Wheel varies between a low value of approximately 40 and a high value of approximately 1000 as you rotate the wheel. (The numbers are the readings of the sensors. In later chapters you will learn about how the IntelliBrain 2 controller uses its analog-todigital converter to sample sensor readings.) 7. Switch hands and repeat the previous step, this time testing the right wheel sensor. 8 A Hands-on Demonstration

13 Line Sensors 8. Rotate the thumbwheel until you see the display referring to the line sensors. 9. Set the robot down with the sensors over a bright white surface. For example, the white area of the line following poster. Observe that both line sensors report a reading, below Set the robot down with the sensors over a non-reflective black surface. For example, the black line on the line following poser. Observe that both line sensors report a high reading, above Set the robot down with one sensor over a bright white surface and the other sensor over a non-reflective black surface. For example, straddling the line on the line following poster. Observe that the sensor over the white surface reads low, while the sensor of the black surface reads high. Ultrasonic Range Sensor 12. Rotate the thumbwheel until you see the display referring to the left and right range sensors. 13. Hold the robot up such that there are no objects within four feet of the robot. Observe that both sensors read a very low value, typically less than Hold your hand approximately 3 inches in front of the left range sensor. Observe the left sensor reading is approximately Repeat the previous step for the right range sensor. Sonar Range Sensor 16. Rotate the thumbwheel until you see the display referring to the sonar sensor. 17. Hold your hand in front of the sonar sensor. Observe as you move your hand the distance value displayed on the screen tracks the distance your hand is from the sensor. Introducing the IntelliBrain-Bot 9

14 18. Switch the power off. Tractor Beam Demonstration The Follow Object function of the demo program implements an invisible tractor beam by using the sonar range sensor to maintain a fixed distance of 6 inches between the robot and an object ahead of it. 1. Set the robot on the floor with a few feet of clear space around it. 2. Start the demo program and select the Follow Object function. 3. Place your hand approximately six inches in front of the robot. 4. Slowly move your hand away from the robot. Observe the robot follows your hand forward. 5. Slowly move your hand toward the robot. Observe the robot backs away from you hand. 6. Switch the power off. Navigation Demonstration The demo program includes three functions which demonstrate the IntelliBrain-Bot educational robot s ability to navigate, Navigate Forward, Rotate 180, and Navigate Square. These functions use the wheel sensors to keep track of the robot s position. If it drifts off course, the program quickly compensates by adjusting power to the motors to steer it back on course. 1. Set the robot on the floor with at least 3 feet of clear space in front of it. 2. Start the demo program and select the Navigate Forward function. Observe the robot drives straight ahead for 2 feet, then stops. 3. Press STOP. 4. Set the robot on the floor and select the Rotate 180 function. Observe the robot turns in place approximately 180 degrees. 5. Press STOP. 6. Set the robot on the floor with at least 3 feet of clear space in all directions. 10 A Hands-on Demonstration

15 7. Select the Navigate Square function. Observe the robot drives in a 16 inch square pattern. 8. Switch the power off. Random Dance Demonstration The Random Dance function of the demo moves the robot in a never ending series of small random moves. Because the robot has equal probability to move any direction, it will not drift far from where it started as it performs this unusual dance. 1. Set the robot on the floor with a few feet of clear space around it. 2. Start the demo program and select the Random Dance function. Observe the robot dances about randomly, but doesn t drift far from where it started. 3. Switch the power off. Collision Avoidance Demonstration One of the primary uses of the infrared range sensor is to avoid collisions with objects in the robots path. The Avoid Obstacles function of the demo program demonstrates how the robot can steer around obstacles in its way. 1. Set the robot on the floor with three feet of clear space in front of it. 2. Place an object approximately the same size as the robot roughly one foot in front of the robot. 3. Start the demo program and select the Avoid Obstacles function. Observe the robot will drive to a point 2 feet ahead of it, detecting and steering around the obstacle in its path and then return to where it started. 4. Switch the power off. Line Following Demonstration In case you haven t guessed it already, the line sensors enable the robot to follow a line on the floor. You will need either a line following poster or a one inch wide strip of nonreflective black electrical tape on a white surface to complete this demonstration. 1. Set the robot on the floor over the black line. 2. Start the demo program and select the Follow Line function. Introducing the IntelliBrain-Bot 11

16 Observe the robot follows the line. 3. Switch the power off. Remote Control Demonstration The IntelliBrain-Bot educational robot can receive input from a universal remote control. You will need a universal remote control configured to control a Sony television to complete this demonstration. 1. Set the robot on the floor with several feet of clear space around it. 2. Start the demo program and select the Remote Control function. 3. Press and hold the next channel button for a moment. Observe the robot moves forward while you hold the button down. 4. Press and hold the previous channel button for a moment. Observe the robot moves backward while you hold the button down. 5. Press and hold the increase volume button for a moment. Observe the robot rotates clockwise while you hold the button down. 6. Press and hold the decrease volume button for a moment. Observe the robot rotates counter clockwise while you hold the button down. 7. Steer the robot around the room using these four control buttons. 8. Switch power off. Summary You should now be familiar with the features of the IntelliBrain-Bot educational robot and its construction. Through the hands-on demonstration you have seen many of the capabilities you will learn to program yourself in subsequent chapters. Exercises 1. Complete the parts list in Table 1-6 by inspecting the robot and filling in the missing information. 2. Locate the ports on the IntelliBrain 2 robotics controller and fill in Table Exercises

17 3. Locate the human interface features of the IntelliBrain 2 robotics controller and fill in Table Trace wires from each sensor and motor to the port on the IntelliBrain 2 robotics controller it connects to. Record the label and type of the port in Table Using the demo program experiment with each sensor and record the minimum and maximum reading you observe as you experiment with the sensor in Table Note the circumstances when you observed the minimum and maximum readings for each sensor. Introducing the IntelliBrain-Bot 13

18 Table IntelliBrain-Bot Deluxe Educational Robot Parts List Qty Part Description 1 Acts as the robot s brain by executing a Java programs and interfacing to sensors, motors and humans. 1 Aluminum chassis 2 Servo motor 2 Coverts torque of from the motor shaft to force to move the robot forward or back. 1 Ball tail wheel Tire Provides traction (friction) so the wheels don t slip. 2 Uses reflected infrared light to enable the robot to sense and follow a line on the floor. 2 Uses reflected infrared light to enable the robot to sense the distance to an object between 4 and 30 inches away. 1 Measures the time between high frequency sound pulses and their echoes to sense the distance to an object between 1.8 and 118 inches away. 2 Uses reflected infrared light to sense rotation of a wheel, enabling the robot to track its position monitoring wheel movement. Battery holder Holds the batteries on the underside of the chassis. 4 Batteries Aluminum standoff Used to mount the robotics controller, line sensors and ultrasonic range sensor. 1 corner bracket Used to mount infrared range sensors. Right angle bracket Used to mount line sensors and ultrasonic range sensor. Screws Used to fasten parts together. Nuts Used to fasten parts together. Washer Aluminum or nylon washer used in mounting sensors. Cotter pin Used to attach tail wheel. 14 Exercises

19 Table 1-7 IntelliBrain 2 Robotics Controller Ports Port Type Label(s) Location Servo motor Analog Digital I 2 C Motor Serial Table 1-8 IntelliBrain 2 Robotics Controller Human Interface Features Feature Label(s) Location Liquid Crystal - none - Display Push button Thumbwheel Buzzer Universal remote control receiver - none - Introducing the IntelliBrain-Bot 15

20 Table 1-9 IntelliBrain-Bot Deluxe Educational Robot Sensor and Motor Connections Sensor/Motor Port (Label) Port Type Left servo motor Right servo motor Left wheel encoder sensor Right wheel encoder sensor Left infrared range sensor Right infrared range sensor Left line sensor Right line sensor Ultrasonic range sensor 16 Exercises

21 Table 1-10 Sensor Readings Sensor Min Max Notes Left wheel encoder sensor Right wheel encoder sensor Left infrared range sensor Right infrared range sensor Left line sensor Right line sensor Ultrasonic range sensor Introducing the IntelliBrain-Bot 17
22
23 CHAPTER 2 Programming the IntelliBrain-Bot In the previous chapter you became familiar with the hardware features of IntelliBrain - Bot Deluxe educational robot. You also observed the robot in action by working with the demo program. In this chapter you will begin to learn about the software features of the robot, as well as robotics programming concepts, the focus of this book. You will use the RoboJDE Java -enabled robotics software development environment to create, build, load and run your first program. You will also learn debugging techniques which will help you quickly resolve problems with your program. Note: The RoboJDE development environment should be installed on the computer you will be using prior to proceeding with the hands-on activities in this chapter. Your lab instructor has most likely already taken care of this. However, if you are working on your own, follow the instructions in the RoboJDE User Guide to install the RoboJDE software. Creating a New Project To begin a new project you must create a new RoboJDE project file to store the project s properties. RoboJDE uses project files to make it easy for you to switch between different robotics software projects. Use the following procedure to create a project named MyBot: 1. Start the RoboJDE development environment from the Windows start menu. The default location on the start menu is start->all Programs->RoboJDE->RoboJDE. The RoboJDE Graphical User Interface (GUI) will appear. 2. Select File->New Project menu item in the RoboJDE GUI. The Project Properties dialog will appear. 3. Click the browse button to the right of the Project folder field. The Choose File dialog will appear. 19

24 4. Browse to and select the folder in which you want to create your project. Note: You can create a new folder by browsing to the location where you want to create a new folder then clicking on the create folder button. A folder titled New Folder will appear. Click on the new folder s name and change it to a name you choose. Then click on the folder icon to the left of the name to select it. Click OK. 5. Enter the name MyBot in the Main class field. 6. Click OK. The MyBot class will be created, as shown in Figure 2-1. Figure MyBot Project in RoboJDE 7. Using the mouse, select the text // Add your code here and replace it with System.out.println( YourName ); replacing YourName with your name, so your program looks similar to the following: public class MyBot { public static void main(string args[]) { System.out.println("Mr. Roboto"); Note: Java is very particular about details such as upper and lower case letters 20 Creating a New Project
25 and punctuation. Paying careful attention to these details will save you a lot of time and frustration debugging subtle errors in your programs! 8. Click the Save all button (see Figure 2-2) or select the File->Save All menu item. The Save dialog will appear with MyBot as the proposed file name. 9. Click the Save button to save your project. Open project Properties Save Save all Build Load Run Stop New Open Close Load location User Guide API Doc. Figure RoboJDE Tool Bar Your first program is now ready to try out. First you must connect the robot to your computer. This will enable you to download your program into the IntelliBrain 2 robotics controller s memory. Connecting the Robot to Your Computer RoboJDE communicates with the IntelliBrain-Bot educational robot via a serial port on your computer. All you need to do to establish a connection is connect a cable between the port labeled COM1 on the IntelliBrain 2 robotics controller and the serial port you will be using on your computer. Note: Your lab instructor should have already attached the cable to the serial port on your computer and configured appropriate settings in RoboJDE. However, if this is not the case, please consult the IntelliBrain 2 User Guide and RoboJDE User Guide for further instructions. Connect the robot to your computer by doing the following: 1. Locate the load button on the RoboJDE tool bar (see Figure 2-2) and note its state. When the RoboJDE GUI is unable to communicate with the robot the load button will appear gray, as it does in Figure 2-1. Since the robot is not currently connected to your computer the button is gray. 2. Gently attach the free end of the serial cable to the port labeled COM1 on the IntelliBrain 2 robotics controller. Programming the IntelliBrain-Bot 21
26 Note: The cable will slide on to the connector more easily if you gently rock the cable left and right as you press it on to the connector. Although the connector on the robot is quite sturdy, be careful not to apply excessive force, which may damage the robot. 3. Switch the power on. If the cable is connected properly and the RoboJDE communication settings are correct, the Load button will go from gray to green. If the Load button did not turn green, request help from your lab instructor to ensure the settings in RoboJDE (Tools->Settings) and the baud rate setting in the IntelliBrain 2 robotics controller are correct. In most cases the baud rate should be set to 115.2K in both the RoboJDE GUI and on the IntelliBrain 2 robotics controller. Also check to be sure the Serial Port setting in the RoboJDE GUI is the port the cable connects to on your computer. Finally, be sure the Board Type setting in the RoboJDE GUI is set to IntelliBrain. 4. Switch the power off. Running Your First Program Everything is now set to give your program a try. You will need to build it, download it and run it. Fortunately, this is much easier than it sounds only two mouse clicks! Do the following to give your program a try: 1. Switch the power on. 2. Click the Load button in the RoboJDE GUI. This will compile, link and load your program. You will see messages from the compiler and linker in the output window at the bottom of the RoboJDE GUI window. If you typed everything correctly, there will be no errors and the Load progress window will display briefly. If you made a mistake, you will see error messages in the output window. Once the Load progress window disappears, the LCD screen on the robot will display the following message on the second line: Ready RAM This indicates there is now a program loaded in Random Access Memory (RAM) which is ready to run. 3. Click the Run button on the RoboJDE tool bar to run your program. 22 Running Your First Program
27 Your program will run very quickly. If you watch the LCD screen you will see your name appear momentarily. Click the Run button again if you missed it. Also notice the RoboJDE GUI switched to its Run window, where your name was also output by your program. By default, any output to System.out goes to both the LCD screen and the RoboJDE Run window if the serial cable is connected. 4. Press the START button. This also runs your program, but without clearing the output in the RoboJDE Run window. Each time you press the START button another line displaying your name will appear. 5. Switch power off. Congratulations! You have now created and run your first robotics program! Programming Concepts If this is the first program you ve ever created or you are new to Java, you are probably a little vague on many of the concepts we ve covered so far. If you don t fully understand your program, rest assured, as you work through the hands-on lessons in this book your understanding will become clearer. What is a Program? A program is a series of instructions a computer executes in steps. The computer executes one step then proceeds on to the next step, executing it and proceeding on to the next step, and so on, repeating this process until it reaches the end of your program. Another way to think of a program is as a recipe. With a recipe, the chef is the computer. He or she executes the recipe by starting at the beginning and following the steps in order. Likewise, a computer executes your recipe (program) step by step. The Method Named main In the case of the IntelliBrain-Bot educational robot, the IntelliBrain 2 robotics controller is a small computer. It executes the steps of your program. It begins executing your program in the method named main. Look for the word main on the second line of the program you just created. This is the start of the main method. Your program begins executing on the line after this the line that contains your name. Your program is very simple. It has only one step, which prints your name. Once the robotics controller executes this step, it reaches the end of the main method and exits your program, which explains why your name was only displayed on the LCD screen for a split second. Programming the IntelliBrain-Bot 23
28 You can change this behavior by adding one more step to your program that will wait for the STOP button to be pressed. This will cause your program to display your name then wait for you to press the STOP button before exiting. Do this as follows: 1. Add the following import statement as the first line of your program import com.ridgesoft.intellibrain.intellibrain; This tells he compiler your program will be using the IntelliBrain class from the class library. 2. Add a statement to wait for the STOP button to be pressed after your name has been printed, so your program looks similar to the following: 3. Switch power on. import com.ridgesoft.intellibrain.intellibrain; public class MyBot { public static void main(string args[]) { System.out.println("Mr. Roboto"); IntelliBrain.getStopButton().waitPressed(); 4. Click the load button. 5. Click the run button in the RoboJDE GUI or press the START button on the robot. Observe your name does not disappear from the LCD screen. This is because your program is waiting for the STOP button to be pressed. 6. Press the STOP button. Observe your program has stopped running and your name is no longer displayed on the LCD screen. 7. Switch power off. Your program now includes two steps, one which tells the computer to display your name and another which tells the computer to wait for someone to press the STOP button. Your programming Process As you develop programs for your robot you will become very familiar with your programming process, which is illustrated in Figure 2-3. You will use this process over and over to program the IntelliBrain-Bot educational robot. Each time you create a new program or make a change to an existing program, you will complete the following steps: 24 Programming Concepts
29 1. Edit add, modify or delete steps in your program (use the RoboJDE edit window). 2. Build compile, link and download your program to the robot (click the load button). 3. Test test your program (click the run button on the RoboJDE tool bar or press the START button on the robot). Edit Build Test Class Library Edit MyBot.java MyBot.class MyBot$.hex Compile Link Load Figure 2-3 The IntelliBrain-Bot Educational Robot Programming Process You have now completed this process twice, once when you created your first program, and again when you added a step to it. You will repeat it many more times as you develop larger and more sophisticated programs. Most seasoned programmers develop programs iteratively, making only one small change at a time, testing it, then moving on to the next small change, and so on, until they have completed their project. Making and testing many small changes has an advantage over making fewer large changes. It is much easier to thoroughly test your changes, as well as find and fix problems, when you haven t made large changes. By keeping changes small, you focus your attention one very small area. If your program doesn t work after you have changed it, it will be easier to resolve the problem if you haven t made a large change. We recommend you follow this approach whenever possible, making and testing small changes, rather than attempting large changes. Behind the Scenes Let s take a close look at Figure 2-3 to examine what goes on behind the scenes. If you browse to the folder where you created your program you will see the following files: 1. MyBot.java the Java source file 2. MyBot.class the Java class file generated by the compiler 3. MyBot$.hex the executable file generated by the linker 4. MyBot.rjp a file containing the project s properties Programming the IntelliBrain-Bot 25
30 The text you entered into the RoboJDE edit window to define the MyBot Java class was saved in the file named MyBot.java. This is the Java source file for your main Java class, MyBot. When you clicked the load button, three things took place. The MyBot program was compiled, linked and loaded, as depicted in the block labeled Build in Figure 2-3. In the first step, the MyBot class was compiled from its source file, MyBot.java. This generated the Java class file, MyBot.class. In the second step, the MyBot.class file was linked with other classes MyBot references, which are included in the class library. The class named System, is a class from the class library which is referenced by your program. The linked program was stored in the executable file, MyBot$.hex. Finally, the executable file was transferred via the serial cable and loaded into the memory of the IntelliBrain 2 robotics controller, which allowed it to be run and tested. The compiler parses and analyzes the text in a Java source file and produces binary byte codes, which the RoboJDE Java virtual machine can execute. The virtual machine resides on the IntelliBrain 2 robotics controller and enables it to execute Java code rather than native machine code particular to the microcontroller chip at the core of the IntelliBrain 2 robotics controller. The linker assembles all of the classes that are needed to execute your program into a single file. While doing this, the linker also creates the necessary linkages between the classes. These linkages provide the virtual machine with the information it needs to understand how the classes interact to form your program. You only had to create one very small Java class to create your program, but your program cannot execute without including many more classes from the class library. You can see how many classes are included in the executable by reviewing the output from the linker at the bottom of the RoboJDE edit window. Surprisingly, your simple program references approximately fifty other classes from the class library! The classes in the library provide a rich foundation on which you create your programs. This allows you to focus your effort on the algorithms that control your robot, rather than getting bogged down in low level details. Debugging Your Programs If you are like most programmers, your programs will rarely work on the first try. Typically, once you finish making edits, you will find you are faced with one or more compilation errors. You will need to make further edits to your program to correct your errors. Once your program compiles and links successfully, you will be able to download it to the robot and run it, but you will frequently find it doesn t do what you expect. When this happens, you will need to analyze what your program is doing and determine what changes are necessary to make it do what you intend. The ability to debug problems is an essential programming skill. You will be able to complete your programming projects faster and your programs will often work better if you take the time to develop and apply debugging skills. In contrast, if you try to program without learning how to debug effectively, you will likely find programming a 26 Debugging Your Programs
31 frustrating experience. Take the time to analyze and understand problems. It will make you a better programmer and you will find programming more enjoyable! Compilation Errors In order to convert your programs from the text you enter, which is called source code, into Java byte codes the RoboJDE Java virtual machine can execute, the compiler needs to read your source code, understand it, and translate it to a form the virtual machine understands. Conceptually, this is similar to translating a document from a foreign language to your native language. In order to translate such a document you would apply your knowledge of the vocabulary and grammar of the foreign language to understand the source document. Once you understood it you could then express it s meaning using the vocabulary and grammar of your native language. Imagine if you were given the task of translating a document that was full of spelling errors, slang, poor grammar, punctuation errors and ambiguities. This would make your translation job much more difficult. It s likely you wouldn t have a lot of confidence that you could accurately communicate the thoughts and emotions of the author in your translated version. Similarly, the Java compiler isn t able to reliably convert your Java source code to executable code if it contains misspellings, incorrect grammar, words the compiler doesn t know, poor punctuation and ambiguities. Rather than trying to guess what you intended the Java compiler outputs an error message for each problem it encounters. Each error message indicates where in your source code the compiler encountered a problem followed by a message describing the problem. Let s run some experiments to see what the compiler does when you introduce errors into your program. Try the following: 1. Edit the fifth line of your program to replace the period between out and println with a comma so it looks like this: System.out,println("Mr. Roboto"); 2. Click the build button (wrench icon) on the RoboJDE tool bar. Observe the compilation error reported in the output pane at the bottom of the edit window. You will see an error message similar to the following: Found 1 syntax error in "MyBot.java": 5. System.out,println("Mr. Roboto"); ^ *** Syntax:. expected instead of this token The first line of the message indicates there is a syntax error in MyBot.java. The second line shows the problem line from your program and the number of the Programming the IntelliBrain-Bot 27
32 line, to the left. The third line indicates the location of the error in the problem line using a carat (^) character. The fourth line tells you what the problem is. In this case, the compiler expected a period instead of the token pointed to by the carat, a comma. 3. Select the menu item Edit->Go to Line in the RoboJDE GUI or enter Ctrl-G using the keyboard. The Go to Line dialog will appear. 4. Enter the number of the line with the error, 5 and click OK. RoboJDE will scroll to the line and highlight it. Since your program is very short, this may not seem necessary. When your programs get larger you will find this feature very useful. For example, if you had an error on line 327 of a 500 line program, you would really appreciate being able to jump right to the line rather than having to scroll around looking for it! 5. Correct the error and click the build button, again. There are too many possible compilation errors to discuss them all here. The key to debugging them is to carefully read the messages from the compiler and understand what they are telling you. Always scroll up to the first error message and try to fix it first. Subsequent error messages are often due the first problem. When you fix the first problem, it is often best to re-compile immediately because the fix may eliminate subsequent errors. Re-compiling is quick and easy, so don t hesitate to do it often. Just click the build button or load button on the RoboJDE tool bar. Exceptions and Stack Traces In addition to encountering errors when you compile your programs, the virtual machine, which executes your program on the robot, is able to catch many errors that can only be detected while your program is running. For example, if your program attempts to use more memory than is available, the virtual machine will detect the problem and throw an exception. There are many other types of exceptions, such as attempting to divide by zero, or attempting to use a reference to an object when the reference is null (not referring to any object). Without going into all of the details of exceptions, let s take a quick look at what you will see when an exception gets thrown. We make a small change in your program to switch to using a variable to keep track of your name, but we will introduce a bug while making this change. Do the following: 1. Insert the following line into your program as the second line: private static String myname; 28 Debugging Your Programs
33 This line creates a variable to keep track of you name. 2. Modify the printing statement in your program, replacing the quoted string containing your name with name of the new variable, so your program looks like this: import com.ridgesoft.intellibrain.intellibrain; public class MyBot { private static String myname; public static void main(string args[]) { System.out.println(myName); IntelliBrain.getStopButton().waitPressed(); 3. Switch the power on. 4. Click the load button to build and download your program. Click the run button. You will see the following in the run window: NullPointerException at java.io.printstream.print(printstream.java:44) at java.io.printstream.println(printstream.java:96) at MyBot.main(MyBot.java:5) at com.ridgesoft.intellibrain.startupthread.run(startupthread.java:31) This is the type of output you will see when your program causes an exception to be thrown. In this case, the exception is a NullPointerException. The lines that follow indicate exactly which statements in your program resulted in the exception being thrown. This is a stack trace. This stack trace shows your program was executing the PrintStream class s print method at line 44 of a file named PrintStream.java when an attempt to use a null reference (pointer) occurred. This class happens to be in the RoboJDE class library and is most likely not the source of problem, it s just where the problem showed up. The next line of the stack trace shows the print method was called by the println method, again in the PrintStream class. The third line of the stack trace indicates line 5 of the MyBot class called the println method. 5. Click the Edit tab in the lower left corner of the RoboJDE GUI. 6. Type Ctrl-G at the keyboard. 7. Enter 5, the line indicated in the stack trace, in the Go to Line dialog and click OK. This will show you the line in your program that was executing when the Programming the IntelliBrain-Bot 29
34 NullPointerException occurred. Examining this line you will see it does indeed cause the println method to execute, as the stack trace indicated. This is the line you just modified to switch to using the new variable you added. The NullPointerException must be due to this change. When you added the new variable to your program, we neglected to tell you to initialize the variable with your name, therefore, the variable is null. This is a bug. 8. Correct the bug by initializing the variable with a text string containing your name, similar to the following: private static String myname = "Mr. Roboto"; 9. Click the load button. 10. Click the run button. Observe your program once again works correctly! 11. Switch the power off. Debugging Using Print Statements Frequently your programs will compile and run just fine but still not work the way you expect. Often, the best way to solve these types of problems is to add print statements to your program. This will enable you to better understand what your program is doing. Being able to peer into your robot s mind is such a valuable debugging and test tool that it is a good idea to start by implementing these features first, knowing they will come in handy as you develop the main features of your program. For example, when working with a new sensor, a great place to start is by displaying the sensor s reading on the LCD screen. This allows you to check that the sensor is connected and functioning properly. Let s add a print statement to your program to indicate when the STOP button has been pressed. 1. Add the following print statement to your program immediately after the statement to wait for the button to be pressed. System.out.println("STOP pressed!"); 2. Click the load button to build and download your program. 3. Click the run button. Observe your program has printed your name in the RoboJDE Run window. 30 Debugging Your Programs
35 4. Press the STOP button. Notice, unfortunately, the new message you just added did not display. Your program is not working quite the way you may have expected! 5. Add another print statement just before the statement to wait for the button to be pressed. System.out.println("Waiting for STOP"); 6. Build and run your program again. Observe your new message does show up in the RoboJDE run window and on the LCD screen, but the message indicating the STOP button has been pressed still does not display. It turns out your program has a minor bug in it. The virtual machine, which executes your program, assumes by default it is responsible for monitoring the STOP button. When the button is pressed the virtual machine immediately stops your program rather than letting it continue. In this case, the new print statement never executed because the virtual machine stopped your program before it got to the print statement. This problem is easy to fix. 7. Insert the following statement just before the statement that prints Waiting for STOP: IntelliBrain.setTerminateOnStop(false); This tells the virtual machine it should not terminate your program when the STOP button is pressed. Your program should now be similar to the following: import com.ridgesoft.intellibrain.intellibrain; public class MyBot { private static String myname = "Mr. Roboto"; public static void main(string args[]) { System.out.println(myName); IntelliBrain.setTerminateOnStop(false); System.out.println("Waiting for STOP"); IntelliBrain.getStopButton().waitPressed(); System.out.println("STOP pressed!"); 8. Load and run your program. Programming the IntelliBrain-Bot 31
36 Observe, your program now prints all of the messages, as expected. You have debugged the problem! Other Methods of Debugging There are many other ways to debug your programs. In later chapters you will learn about programming the IntelliBrain controller s Light Emitting Diodes (LEDs) and its buzzer. These provide additional means of indicating what your program is doing. Summary Now that you have created your first program and made a number of modifications to it, you should be familiar with the process of programming the IntelliBrain-Bot educational robot. You should also be familiar with the types of errors you are likely to encounter as you continue to learn about programming the robot. If you encounter problems you are unable to resolve, refer back to this chapter to remind yourself of the debugging techniques you have learned. Exercises 1. Create a new project and program to output the message: Testing Briefly describe what a computer program is. 3. Describe the differences between a Java source file, a Java class file and an executable file. If you created a program with the main class named Test what would be the names of the source file, class file and executable file. 4. List the three main steps that comprise the programming process. 5. Describe what the compiler does. 6. Describe what the linker does. 7. Describe the purpose of the class library. 8. Describe what happens when you download a program to your robot. 9. Modify your program to introduce a compilation error. Write down the error message you receive. Describe how the message relates to the actual error in your program. Fix this error and introduce a different error, repeating this process until you have caused at least three different error messages to be emitted from the compiler. 10. If you were to receive an exception from a program with a stack trace containing the following line of text: at Test.main(Test.java:173), what does this tell you? How could you further investigate the source code that relates to this message? 32 Exercises
37 CHAPTER 3 Maneuvering the IntelliBrain-Bot Now that you are familiar with how to create, build and test programs for the IntelliBrain -Bot educational robot, you are probably eager to program your robot to do more than just display your name. We will now do just that, by learning how to program the robot to maneuver. In addition, you will also learn how to use the RoboJDE API documentation and other documentation to help you accomplish your programming tasks. You will also use a few more features the Java programming language. Differential Drive Robots The IntelliBrain-Bot educational robot uses a differential-drive system to enable it to move and steer. This may sound complicated, but it is really very simple. There are two wheels, powered by two independently controlled motors. Your program will control the speed and direction of the robot by controlling the power delivered to each of the motors. As illustrated in Figure 3-1, your program can make the robot perform a few basic maneuvers simply by controlling the direction of rotation of each of the motors. The robot will move forward when your program applies the same amount of power to both motors. The robot will rotate in place if your program applies the same amount of power to the motors but in the opposite direction. Applying reverse power to the left wheel and forward power to the right wheel will cause the robot to rotate counter-clockwise. Likewise, applying forward power to the left wheel and reverse power to the right wheel will cause the robot to rotate counter-clockwise. Rotate Counterclockwise Drive Forward Rotate Clockwise Figure Maneuvering a Differential Drive Robot 33
38 Programming Simple Maneuvers The IntelliBrain-Bot educational robot uses continuous rotation hobby servos for its motors. These motors are based on hobby servos, which were originally designed for use in model airplanes. Standard hobby servos have built-in control circuitry and mechanics designed to rotate the servo s output shaft to a specific position and hold that position. This works well for controlling a model airplane, but it isn t suitable for driving the wheels on a robot. Robotics researchers discovered hobby servers could be easily modified for continuous rotation, to provide inexpensive motors to drive the wheels of their robots. They did this by removing the mechanical stops and disabling the position sensing circuitry in the servos. Fortunately, this became so common that you can now buy servos manufactured for continuous rotation, eliminating the need to modify them yourself. The servos included in the IntelliBrain-Bot educational robot were manufactured as continuous rotation servos. While continuous rotation servos can power your robot s wheels just like conventional DC motors, they must be controlled using their built-in control circuitry. This circuitry includes a position input signal intended to communicate the desired position of the servo s output shaft. For continuous rotation servos the position signal actually controls the direction of rotation and amount of power applied to the motor. Rather than working directly with control signals of the servos, the RoboJDE class library provides a class, ContinuousRotationServo, which provides a wrapper, which enables your program to control the servos as if they were conventional motors. Before we get started writing a program to control the servos, let s first investigate the classes we will use from the class library. Using the Programming Documentation Before you embark on any programming project you first need to understand how to accomplish the task at hand. A good way to do this is to consult the programming documentation. The following documents that will help you understand how to program the IntelliBrain-Bot educational robot: the IntelliBrain 2 API Quick Reference, the IntelliBrain 2 User Guide and the RoboJDE Application Programming Interface (API) Documentation. The quickest way to learn about programming IntelliBrain 2 features is to consult the IntelliBrain 2 API Quick Reference. This can be found on the inside of the back cover of this book, or in the file IntelliBrain2API.pdf in docs folder where RoboJDE is installed. It is also available online at Take a moment to locate the quick reference document and identify information regarding programming the servo ports. Further details regarding the many features of the IntelliBrain 2 robotics controller are provided in the IntelliBrain 2 User Guide. Take a moment to locate this document and read the section regarding the servo ports. The IntelliBrain 2 User Guide is available at and on the CD-ROM that came with the robot. 34 Programming Simple Maneuvers

39 The RoboJDE API Documentation contains the most detailed programming information. It is essential that you become familiar with using the API documentation. You will refer to it frequently as you program the IntelliBrain-Bot educational robot. The RoboJDE API Documentation is in Javadoc format. This is the format used to document most Java APIs. Becoming proficient at using the RoboJDE API documentation will help you become proficient at using similar documentation for other Java programming projects. Figure API Documentation Button on RoboJDE Tool Bar API Doc. Click the API documentation button on the RoboJDE tool bar (shown in Figure 3-2) to display the API documentation in your web browser. This will launch your web browser and display the documentation, as shown in Figure Figure IntelliBrain API Documentation The documentation for the IntelliBrain class is the best place to start when you are learning about a feature you have not used before. You can display the documentation for the IntelliBrain class by scrolling to and clicking on the class name in the list of classes, as indicated by reference 1 in Figure 3-3. This will display documentation for the class in the pane on the right hand side. By browsing through the class documentation, you can find the methods to access various features of the IntelliBrain or IntelliBrain 2 robotics controller. Complete the following steps to learn about the programming interface you will be using to control the servo motors: 1. Locate the API documentation for the IntelliBrain class. Maneuvering the IntelliBrain-Bot 35
The Basics of Robot Mazes Teacher Notes
 The Basics of Robot Mazes Teacher Notes Why do robots solve Mazes? A maze is a simple environment with simple rules. Solving it is a task that beginners can do successfully while learning the essentials
How To Program An Nxt Mindstorms On A Computer Or Tablet Computer
 NXT Generation Robotics Introductory Worksheets School of Computing University of Kent Copyright c 2010 University of Kent NXT Generation Robotics These worksheets are intended to provide an introduction
Quick Start Guide to computer control and robotics using LEGO MINDSTORMS for Schools
 Quick Start Guide to computer control and robotics using LEGO MINDSTORMS for Schools www.lego.com/education/mindstorms LEGO, the LEGO logo and MINDSTORMS are trademarks of the LEGO Group. 2004 The LEGO
Tutorial for Programming the LEGO MINDSTORMS NXT
 Tutorial for Programming the LEGO MINDSTORMS NXT Table of contents 1 LEGO MINDSTORMS Overview 2 Hardware 2.1 The NXT Brick 2.2 The Servo Motors 2.3 The Sensors 3 Software 3.1 Starting a Program 3.2 The
Capacitive Touch Lab. Renesas Capacitive Touch Lab R8C/36T-A Family
 Renesas Capacitive Touch Lab R8C/36T-A Family Description: This lab will cover the Renesas Touch Solution for embedded capacitive touch systems. This lab will demonstrate how to setup and run a simple
Six-servo Robot Arm. DAGU Hi-Tech Electronic Co., LTD www.arexx.com.cn. Six-servo Robot Arm
 Six-servo Robot Arm 1 1, Introduction 1.1, Function Briefing Servo robot, as the name suggests, is the six servo motor-driven robot arm. Since the arm has a few joints, we can imagine, our human arm, in
Alarm Security Kit - NVR
 Alarm Security Kit - NVR EN The alarm configuration menu (see above right screenshot) allows you to configure and change settings for the PIR movement sensors, window/door sensors, remote controls (key
An Introduction to MPLAB Integrated Development Environment
 An Introduction to MPLAB Integrated Development Environment 2004 Microchip Technology Incorporated An introduction to MPLAB Integrated Development Environment Slide 1 This seminar is an introduction to
Programming in Access VBA
 PART I Programming in Access VBA In this part, you will learn all about how Visual Basic for Applications (VBA) works for Access 2010. A number of new VBA features have been incorporated into the 2010
INTRODUCTION TO SERIAL ARM
 INTRODUCTION TO SERIAL ARM A robot manipulator consists of links connected by joints. The links of the manipulator can be considered to form a kinematic chain. The business end of the kinematic chain of
SE05: Getting Started with Cognex DataMan Bar Code Readers - Hands On Lab Werner Solution Expo April 8 & 9
 SE05: Getting Started with Cognex DataMan Bar Code Readers - Hands On Lab Werner Solution Expo April 8 & 9 Learning Goals: At the end of this lab, the student should have basic familiarity with the DataMan
2/26/2008. Sensors For Robotics. What is sensing? Why do robots need sensors? What is the angle of my arm? internal information
 Sensors For Robotics What makes a machine a robot? Sensing Planning Acting information about the environment action on the environment where is the truck? What is sensing? Sensing is converting a quantity
Work with Arduino Hardware
 1 Work with Arduino Hardware Install Support for Arduino Hardware on page 1-2 Open Block Libraries for Arduino Hardware on page 1-9 Run Model on Arduino Hardware on page 1-12 Tune and Monitor Models Running
Additional Guides. TETRIX Getting Started Guide NXT Brick Guide
 Preparing the NXT Brick Now that a functional program has been created, it must be transferred to the NXT Brick and then run. This is a perfect time to take a look at the NXT Brick in detail. The NXT Brick
Your EdVenture into Robotics You re a Programmer
 Your EdVenture into Robotics You re a Programmer Introduction... 3 Getting started... 4 Meet EdWare... 8 EdWare icons... 9 EdVenture 1- Flash a LED... 10 EdVenture 2 Beep!! Beep!!... 12 EdVenture 3 Robots
Servo Info and Centering
 Info and Centering A servo is a mechanical motorized device that can be instructed to move the output shaft attached to a servo wheel or arm to a specified position. Inside the servo box is a DC motor
ezsystem elab16m Project 1F: Alarm System (Full Project description)
") ezsystem elab16m Project 1F: Alarm System (Full Project description) ezsystem The aim of ezsystem is to enable Creativity and Innovation at an early age in a Problem Based Learning (PBL) approach. ezsystem
ezsystem elab16m Project 1F: Alarm System (Full Project description) ezsystem The aim of ezsystem is to enable Creativity and Innovation at an early age in a Problem Based Learning (PBL) approach. ezsystem
Keep it Simple Timing
 Keep it Simple Timing Support... 1 Introduction... 2 Turn On and Go... 3 Start Clock for Orienteering... 3 Pre Start Clock for Orienteering... 3 Real Time / Finish Clock... 3 Timer Clock... 4 Configuring
Watch Your Garden Grow
 Watch Your Garden Grow The Brinno GardenWatchCam is a low cost, light weight, weather resistant, battery operated time-lapse camera that captures the entire lifecycle of any garden season by taking photos
Lab Experiment 1: The LPC 2148 Education Board
 Lab Experiment 1: The LPC 2148 Education Board 1 Introduction The aim of this course ECE 425L is to help you understand and utilize the functionalities of ARM7TDMI LPC2148 microcontroller. To do that,
Servo Motors (SensorDAQ only) Evaluation copy. Vernier Digital Control Unit (DCU) LabQuest or LabPro power supply
 Evaluation copy. Vernier Digital Control Unit (DCU) LabQuest or LabPro power supply") Servo Motors (SensorDAQ only) Project 7 Servos are small, relatively inexpensive motors known for their ability to provide a large torque or turning force. They draw current proportional to the mechanical
Servo Motors (SensorDAQ only) Project 7 Servos are small, relatively inexpensive motors known for their ability to provide a large torque or turning force. They draw current proportional to the mechanical
User Guide Reflow Toaster Oven Controller
 User Guide Reflow Toaster Oven Controller Version 1.5-01/10/12 DROTEK Web shop: www.drotek.fr SOMMAIRE 1. Introduction... 3 2. Preparation of THE REFLOW CONTROLLER... 4 2.1. Power supply... 4 2.2. USB
Animated Lighting Software Overview
 Animated Lighting Software Revision 1.0 August 29, 2003 Table of Contents SOFTWARE OVERVIEW 1) Dasher Pro and Animation Director overviews 2) Installing the software 3) Help 4) Configuring the software
Programming the VEX Robot
 Preparing for Programming Setup Before we can begin programming, we have to set up the computer we are using and the robot/controller. We should already have: Windows (XP or later) system with easy-c installed
Hypercosm. Studio. www.hypercosm.com
 Hypercosm Studio www.hypercosm.com Hypercosm Studio Guide 3 Revision: November 2005 Copyright 2005 Hypercosm LLC All rights reserved. Hypercosm, OMAR, Hypercosm 3D Player, and Hypercosm Studio are trademarks
PRODUCTIVITY THROUGH INNOVATION 600 CONTROL DIRECT DRIVE TECHNICAL/OPERATION MANUAL
 Rev. D PRODUCTIVITY THROUGH INNOVATION 600 CONTROL DIRECT DRIVE TECHNICAL/OPERATION MANUAL 10 BORIGHT AVENUE, KENILWORTH NEW JERSEY 07033 TELEPHONE: 800-524-0273 FAX: 908-686-9317 TABLE OF CONTENTS Page
T-BOXN12R. First steps with T-BOXN12R. You can make it wireless. Date: 2004-07-16 Version 1.0
 T-BOXN12R You can make it wireless First steps with T-BOXN12R Date: 2004-07-16 Version 1.0 Content 1. Purpose of this document... 3 2. T-BoxN12R overview... 4 3. First step... 5 3.1. Preparing your workshop
Software for Producing Rack Layouts and Purchase Orders
 1 Software for Producing Rack Layouts and Purchase Orders Welcome to RackTools: software that makes it simple and quick to specify Middle Atlantic Products. RackTools has been designed with one purpose
PM1122 INT DIGITAL INTERFACE REMOTE
 PM1122 INT DIGITAL INTERFACE REMOTE PM1122 INT front panel description: 1. Clear wireless remotes knob: push this button for more than 2 seconds to clear the list of all assigned wireless remote settings
Fi TV Gold Quick Start Guide
 Quick Start Guide Fi TV Gold Quick Start Guide Welcome to Fi TV! We re happy that you chose EPB Fiber Optics to bring the best movies, sports, news and television programming into your home and we will
LDG DTS-4/4R Desktop Coaxial Switch / Remote
 LDG DTS-4/4R Desktop Coaxial Switch / Remote LDG Electronics 1445 Parran Road, PO Box 48 St. Leonard MD 20685-2903 USA Phone: 410-586-2177 Fax: 410-586-8475 ldg@ldgelectronics.com www.ldgelectronics.com
(0008854) A981653 REV B. 4125 system setup and deployment quick start guide
 A981653 REV B. 4125 system setup and deployment quick start guide") (0008854) A981653 REV B 4125 system setup and deployment quick start guide OPERATION IN AIR Do not operate the system while the tow fish in air for extended periods. The system may be enabled to transmit
(0008854) A981653 REV B 4125 system setup and deployment quick start guide OPERATION IN AIR Do not operate the system while the tow fish in air for extended periods. The system may be enabled to transmit
Dr Robot C# Advance Sputnik Demo Program
 25 Valleywood Drive, Unit 20 Markham, Ontario, L3R 5L9, Canada Tel: (905) 943-9572 Fax: (905) 943-9197 Support@DrRobot.com Dr Robot C# Advance Sputnik Demo Program Version: 1.0.0 June 2008-1 - Copyright
SKP16C62P Tutorial 1 Software Development Process using HEW. Renesas Technology America Inc.
 SKP16C62P Tutorial 1 Software Development Process using HEW Renesas Technology America Inc. 1 Overview The following tutorial is a brief introduction on how to develop and debug programs using HEW (Highperformance
PhidgetInterfaceKit 8/8/8
 PhidgetInterfaceKit 8/8/8 Operating Systems: Windows 2000/XP/Vista, Windows CE, Linux, and Mac OS X Application Programming Interfaces (APIs): Visual Basic, VB.NET, C, C++, C#, Flash 9, Flex, Java, LabVIEW,
Diamante WiFi Wireless Communication User Guide. Linksys E1200
 Diamante WiFi Wireless Communication User Guide Linksys E1200 Release: February 2012; August 2011; February 2011 Patent Pending. Copyright 2012, Stenograph, L.L.C. All Rights Reserved. Printed in U.S.A.
Blender Notes. Introduction to Digital Modelling and Animation in Design Blender Tutorial - week 9 The Game Engine
 Blender Notes Introduction to Digital Modelling and Animation in Design Blender Tutorial - week 9 The Game Engine The Blender Game Engine This week we will have an introduction to the Game Engine build
STIM202 Evaluation Kit
 Table of contents: 1 FEATURES... 2 2 GENERAL DESCRIPTIONS AND SYSTEM CONTENTS... 2 3 SYSTEM REQUIREMENTS... 2 4 GETTING STARTED... 3 4.1 INSTALLATION OF NI-SERIAL CABLE ASSEMBLY DRIVER... 3 4.2 INSTALLATION
Your EdVenture into Robotics You re a Programmer
 Your EdVenture into Robotics You re a Programmer meetedison.com Contents Introduction... 3 Getting started... 4 Meet EdWare... 8 EdWare icons... 9 EdVenture 1- Flash a LED... 10 EdVenture 2 Beep!! Beep!!...
OWNERS MANUAL. Status Monitor. for Windows 95, 98, ME, NT 4, 2000 & XP. SIGNALCRAFTERS TECH, INC. www.signalcrafters.com
 OWNERS MANUAL Status Monitor for Windows 95, 98, ME, NT 4, 2000 & XP SIGNALCRAFTERS TECH, INC. www.signalcrafters.com 57 Eagle Rock Avenue, East Hanover, NJ 07936 Tel: 973-781-0880 or 800-523-5815 Fax:
The second goal is to provide a list of tips, tricks, and best known methods that have been discovered over the life span of the course.
 ECE1882 LEGO NXT Brick Programming Guide Introduction This document was written with two goals in mind. The first is to orient a new user to the graphical programming language used in the MindSpring NXT
How to read this guide
 How to read this guide The following shows the symbols used in this Quick start guide with descriptions and examples. Symbol Description Example P oint Reference Caution [ ] This symbol explains information
Firmware version: 1.10 Issue: 7 AUTODIALER GD30.2. Instruction Manual
 Firmware version: 1.10 Issue: 7 AUTODIALER GD30.2 Instruction Manual Firmware version: 2.0.1 Issue: 0.6 Version of the GPRS transmitters configurator: 1.3.6.3 Date of issue: 07.03.2012 TABLE OF CONTENTS
Freescale Semiconductor, I
 nc. Application Note 6/2002 8-Bit Software Development Kit By Jiri Ryba Introduction 8-Bit SDK Overview This application note describes the features and advantages of the 8-bit SDK (software development
Table of Contents Getting Started... 3 The Motors... 4 The Control Board... 5 Setting up the Computer with Mach3... 6 Starting up the Equipment...
 User Manual Table of Contents Getting Started... 3 The Motors... 4 The Control Board... 5 Setting up the Computer with Mach3... 6 Starting up the Equipment... 12 G-Code Example... 13 2 Getting Started
Bluetooth + USB 16 Servo Controller [RKI-1005 & RKI-1205]
![Bluetooth + USB 16 Servo Controller [RKI-1005 & RKI-1205]](/thumbs/40/21161302.jpg "Bluetooth + USB 16 Servo Controller [RKI-1005 & RKI-1205]") Bluetooth + USB 16 Servo Controller [RKI-1005 & RKI-1205] Users Manual Robokits India info@robokits.co.in http://www.robokitsworld.com Page 1 Bluetooth + USB 16 Servo Controller is used to control up to
Bluetooth + USB 16 Servo Controller [RKI-1005 & RKI-1205] Users Manual Robokits India info@robokits.co.in http://www.robokitsworld.com Page 1 Bluetooth + USB 16 Servo Controller is used to control up to
C4DI Arduino tutorial 4 Things beginning with the letter i
 C4DI Arduino tutorial 4 Things beginning with the letter i If you haven t completed the first three tutorials, it might be wise to do that before attempting this one. This tutorial assumes you are using
Leaf River Outdoor Products Vibrashine, Inc. P.O. Box 557 Taylorsville, MS 39168 (601) 785-9854 FAX (601) 785-9874 www.vibrashine.
 785-9854 FAX (601) 785-9874 www.vibrashine.") MULTI-CARD PICTURE VIEWER Model PV-2.5 Leaf River Outdoor Products Vibrashine, Inc. P.O. Box 557 Taylorsville, MS 39168 (601) 785-9854 FAX (601) 785-9874 www.vibrashine.com 2 THANKS and WELCOME What does
MULTI-CARD PICTURE VIEWER Model PV-2.5 Leaf River Outdoor Products Vibrashine, Inc. P.O. Box 557 Taylorsville, MS 39168 (601) 785-9854 FAX (601) 785-9874 www.vibrashine.com 2 THANKS and WELCOME What does
AVR Butterfly Training. Atmel Norway, AVR Applications Group
 AVR Butterfly Training Atmel Norway, AVR Applications Group 1 Table of Contents INTRODUCTION...3 GETTING STARTED...4 REQUIRED SOFTWARE AND HARDWARE...4 SETTING UP THE HARDWARE...4 SETTING UP THE SOFTWARE...5
Accurate Measurement of the Mains Electricity Frequency
 Accurate Measurement of the Mains Electricity Frequency Dogan Ibrahim Near East University, Faculty of Engineering, Lefkosa, TRNC dogan@neu.edu.tr Abstract The frequency of the mains electricity supply
Programming LEGO NXT Robots using NXC
 Programming LEGO NXT Robots using NXC This text programming language derived from C language is bended together with IDE BricxCC on standard firmware LEGO Mindstorms. This can be very convenient for those,
13 Managing Devices. Your computer is an assembly of many components from different manufacturers. LESSON OBJECTIVES
 LESSON 13 Managing Devices OBJECTIVES After completing this lesson, you will be able to: 1. Open System Properties. 2. Use Device Manager. 3. Understand hardware profiles. 4. Set performance options. Estimated
KiCad Step by Step Tutorial
 KiCad Step by Step Tutorial Copyright 2006 David Jahshan: kicad at iridec.com.au 2011 Update Copyright 2011 Phil Hutchinson Copyright: Please freely copy and distribute (sell or give away) this document
Analog control unit for mobile robots
 Analog control unit for mobile robots Soldering kit for experimentation For Fischertechnik robots and others Most diverse functions Requires no programming Patented sensor technology Summary We are pleased
The $25 Son of a cheap timer This is not suitable for a beginner. You must have soldering skills in order to build this kit.
 The $25 Son of a cheap timer This is not suitable for a beginner. You must have soldering skills in order to build this kit. Micro Wizard has been manufacturing Pinewood Derby timers for over 10 years.
EV3 Programming. Overview for FLL Coaches. A very big high five to Tony Ayad
 EV3 Programming Overview for FLL Coaches A very big high five to Tony Ayad 2013 Nature s Fury Coach Call Basic programming of the Mindstorm EV3 Robot People Introductions Deborah Kerr & Faridodin Lajvardi
Ohio University Computer Services Center August, 2002 Crystal Reports Introduction Quick Reference Guide
 Open Crystal Reports From the Windows Start menu choose Programs and then Crystal Reports. Creating a Blank Report Ohio University Computer Services Center August, 2002 Crystal Reports Introduction Quick
SA-9600 Surface Area Software Manual
 SA-9600 Surface Area Software Manual Version 4.0 Introduction The operation and data Presentation of the SA-9600 Surface Area analyzer is performed using a Microsoft Windows based software package. The
File Management Windows
 File Management Windows : Explorer Navigating the Windows File Structure 1. The Windows Explorer can be opened from the Start Button, Programs menu and clicking on the Windows Explorer application OR by
Vicon Flash Upgrade Software
 INSTRUCTION MANUAL Notes Refer to XX134 NO. XX134-13-01 REV. 1212 Vicon Flash Upgrade Software It is possible to upgrade software for the SurveyorVFT and Surveyor -Mini Camera Domes through a PC using
Tutorial for MPLAB Starter Kit for PIC18F
 Tutorial for MPLAB Starter Kit for PIC18F 2006 Microchip Technology Incorporated. All Rights Reserved. WebSeminar Title Slide 1 Welcome to the tutorial for the MPLAB Starter Kit for PIC18F. My name is
MANUAL FOR RX700 LR and NR
 MANUAL FOR RX700 LR and NR 2013, November 11 Revision/ updates Date, updates, and person Revision 1.2 03-12-2013, By Patrick M Affected pages, ETC ALL Content Revision/ updates... 1 Preface... 2 Technical
1. Make sure that no client accounts are open. 2. Click on Setup, then click Modem. The Modem Setup window will appear.
 SECURITY SYSTEM MANAGEMENT SOFTWARE FOR WINDOWS WINLOAD MODEM SETUP The modem setup is a very important step in the connection process. If the modem setup is not properly completed communication between
Step by step guide to installing your own Ku Band satellite dish
 Step by step guide to installing your own Ku Band satellite dish If you don't feel comfortable installing your own system, your local TV Aerial or Handyman can easily follow these helpful guidelines for
Wireless Home Security Alarm System AM 500
 Wireless Home Security Alarm System AM 500 12 MONTH GUARANTEE Installation & Operating Instructions INTRODUCTION The AM500 is a simple self-contained alarm system. It protects the home by sounding a siren
Building Robots with NXT and LEJOS. Introduc<on. What is the NXT Robot Pla@orm? Michael Wooldridge (mjw @ liv.ac.uk)
") Building Robots with NXT and LEJOS Introduc
Building Robots with NXT and LEJOS Introduc
Before you can use the Duke Ambient environment to start working on your projects or
 Using Ambient by Duke Curious 2004 preparing the environment Before you can use the Duke Ambient environment to start working on your projects or labs, you need to make sure that all configuration settings
Transmitter Interface Program
 Transmitter Interface Program Operational Manual Version 3.0.4 1 Overview The transmitter interface software allows you to adjust configuration settings of your Max solid state transmitters. The following
Getting to know your computer
 Getting to know your computer Introduction This is intended to be a very basic introduction to personal computers (PCs) which will enable you to: switch them on and off understand what is shown on the
Newton Backup Utility User s Guide. for the Windows Operating System
 Newton Backup Utility User s Guide for the Windows Operating System K Apple Computer, Inc. 1995 Apple Computer, Inc. All rights reserved. Under the copyright laws, this manual may not be copied, in whole
Quick Start Guide. MRB-KW01 Development Platform Radio Utility Application Demo MODULAR REFERENCE BOARD
 Quick Start Guide MRB-KW01 Development Platform Radio Utility Application Demo MODULAR REFERENCE BOARD Quick Start Guide Get to Know the MRB-KW01x Module UART Selector ANT 1 RFIO (TX/RX) USB 2.0 Serial
Chapter 3. Input and output. 3.1 The System class
 Chapter 3 Input and output The programs we ve looked at so far just display messages, which doesn t involve a lot of real computation. This chapter will show you how to read input from the keyboard, use
Ethernet Networking Installation & Operations Manual Humminbird ETHERNET
 Ethernet Networking Installation & Operations Manual 531906-2EN_A GPS Unit 1 Humminbird ETHERNET Unit 2 Thank You! Thank you for choosing Humminbird, the #1 name in marine electronics. Humminbird has built
Diamante WiFi Wireless Communication User Guide. CradlePoint CTR35
 Diamante WiFi Wireless Communication User Guide CradlePoint CTR35 Release: July 2011; March 2011 Patent Pending. Copyright 2011, Stenograph, L.L.C. All Rights Reserved. Printed in U.S.A. Stenograph, L.L.C.
To Purchase This Item, Visit BMI Gaming www.bmigaming.com 1-800-746-2255 + 1-561-391-7200. Operation Manual
 Operation Manual 90MAN 01 B Copyright 2008 Patent Pending All Rights Reserved Table of Contents Game Play 3 Game Set up 4 Technical Description 5 Programming 6 10 Error Codes 9 Electronic Components 11
Setting up your Gateway Media Center
 Setting up your Gateway Media Center Notices 2003 Gateway, Inc. All rights reserved. Gateway, Gateway Country, the Gateway stylized logo, and the black-and-white spot design are trademarks or registered
Introducing Your Cisco IP Phone
 CHAPTER 1 A Cisco IP Phone is a full-feature telephone that provides voice communication over the same data network that your computer uses. This phone functions much like a traditional analog phone, allowing
INSTRUCTION MANUAL All-In-One GSM Home Alarm System SB-SP7200-GSM
 INSTRUCTION MANUAL All-In-One GSM Home Alarm System SB-SP7200-GSM Revised: August 28, 2014 PRODUCT REFERENCE MOUNTING ACCESSORIES PIR / MOTION DETECTION UNIT MAIN UNIT POWER ADAPTER MOUNTING ACCESSORIES
Error! Bookmark not defined. Error! Bookmark not defined. Error! Bookmark not defined.
 Remote Lighting Kit Table of Contents Lighting Kit Overview 2 System Requirements 3 Basic Concepts of Wireless Routers and Networks 4 Basic Concepts of Network Light Bulbs 8 Planning Your Lighting Network
Config software for D2 systems USER S MANUAL
 DT-CONFIG SOFTWARE Config software for D2 systems USER S MANUAL CONTENTS 1. Introductions ------------------------------------------------------------------- 3 2. System Requirement and Connection ----------------------------------------
Universal Simple Control, USC-1
 Universal Simple Control, USC-1 Data and Event Logging with the USB Flash Drive DATA-PAK The USC-1 universal simple voltage regulator control uses a flash drive to store data. Then a propriety Data and
AC-115 Compact Networked Single Door Controller. Installation and User Manual
 AC-115 Compact Networked Single Controller Installation and User Manual December 2007 Table of Contents Table of Contents 1. Introduction...5 1.1 Key Features... 6 1.2 Technical Specifications... 7 2.
Productivity Software Features
 O P E R A T I O N S A N D P R O C E D U R E S F O R T H E P R O D U C T I V I T Y S O F T W A R E Productivity Software Features Remote CS-230 calibration and set-up on a personal computer. CS-230 calibration
DIY Y6. Build Manual V.A 2014
 DIY Y6 Build Manual V.A 2014 1 Contents Thanks for purchasing a DIY Y6! These instructions will show you how to assemble a Y6 using the Pixhawk autopilot system and ArduCopter/APM:Copter firmware. If you
Connect and Project: Using a Video Projector in the Classroom
 Connect and Project: Using a Video Projector in the Classroom Apple and Dell Laptops User Guide Training Module Version Date: 7/2008 1 Connect and Project: Using a Video Projector in the Classroom Video
DROFLY PRO V3 User Guide
 DROFLY PRO V3 User Guide 1/17 Table Of Contents 1/ INTRODUCTION 1.1/ Presentation 1.2/ Changes 2/ HARDWARE SETUP 2.1/ Setup on your frame 2.2/Connecting Flight Controller a. To BEC b. To Receiver c. To
Mirror Mount Video Monitor/Recorder with Front and Rear View Night Cameras PLCMDVR5
 Mirror Mount Video Monitor/Recorder with Front and Rear View Night Cameras PLCMDVR5 www.pyleaudio.com Instruction Manual Installation and Connection: 1. Please disconnect your car battery. 2. In the contents
Raptor K30 Gaming Software
 Raptor K30 Gaming Software User Guide Revision 1.0 Copyright 2013, Corsair Components, Inc. All Rights Reserved. Corsair, the Sails logo, and Vengeance are registered trademarks of Corsair in the United
WebFOCUS BI Portal: S.I.M.P.L.E. as can be
 WebFOCUS BI Portal: S.I.M.P.L.E. as can be Author: Matthew Lerner Company: Information Builders Presentation Abstract: This hands-on session will introduce attendees to the new WebFOCUS BI Portal. We will
House Design Tutorial
 Chapter 2: House Design Tutorial This House Design Tutorial shows you how to get started on a design project. The tutorials that follow continue with the same plan. When we are finished, we will have created
Setting Up the Cisco Unified IP Phone
 CHAPTER 3 This chapter includes the following topics, which help you install the Cisco Unified IP Phone on an IP telephony network: Before You Begin, page 3-1 Understanding the Cisco Unified IP Phone 7962G
Getting Started in Tinkercad
 Getting Started in Tinkercad By Bonnie Roskes, 3DVinci Tinkercad is a fun, easy to use, web-based 3D design application. You don t need any design experience - Tinkercad can be used by anyone. In fact,
MODELS 7007 Gorilla Cycle Alarm 7017 Gorilla Cycle Alarm with 2-way pager system 1017 2-way pager system
 MODELS 7007 Gorilla Cycle Alarm 7017 Gorilla Cycle Alarm with 2-way pager system 1017 2-way pager system Remote Control Motorcycle Alarm System Installation & Operation Instructions Sistema de Alarma de
understanding sensors
 The LEGO MINDSTORMS NXT 2.0 robotics kit includes three types of sensors: Ultrasonic, Touch, and Color. You can use these sensors to build a robot that makes sounds when it sees you or to build a vehicle
Getting started with the Super Brain Palm computer interface.
 Getting started with the Super Brain Palm computer interface. Step 1: Connect the RB502 interface cable to your Super Brain Palm Charger. Step 2: Connect the USB interface to your computers USB port. Step
USER S MANUAL. AXIS Mobile Monitor
 USER S MANUAL AXIS Mobile Monitor AXIS Mobile Monitor Overview Main window Main menu Find Devices Find Devices menu Monitor window Monitor menu Sequence window Sequence menu How to Use AXIS Mobile Monitor
Advanced Programming with LEGO NXT MindStorms
 Advanced Programming with LEGO NXT MindStorms Presented by Tom Bickford Executive Director Maine Robotics Advanced topics in MindStorms Loops Switches Nested Loops and Switches Data Wires Program view
Taurus Super-S3 LCM. Dual-Bay RAID Storage Enclosure for two 3.5-inch Serial ATA Hard Drives. User Manual March 31, 2014 v1.2 www.akitio.
 Dual-Bay RAID Storage Enclosure for two 3.5-inch Serial ATA Hard Drives User Manual March 31, 2014 v1.2 www.akitio.com EN Table of Contents Table of Contents 1 Introduction... 1 1.1 Technical Specifications...
Introduction Configuring Your HP Mouse Batteries Replacing the Batteries Mouse Sensor Technology Navigating the HP Mouse Control Center
 Introduction Congratulations on your purchase of an HP mouse. This mouse is the latest in a wide range of computer peripherals manufactured by HP. It is designed to provide you with the highest level of
Wash Select II to WashPay Integration Field Retrofit Installation Guide
 Wash Select II to WashPay Integration Field Retrofit Installation Guide Wash Select II Software Version 6.00 and above POS4000 Software Version 8.25 Unitec www.startwithunitec.com WASH SELECT II TO WASHPAY