Version 2.4. » User Manual. March 2016 Author Tecnoteca srl ENG.
|
|
|
- Pauline Holmes
- 9 years ago
- Views:
Transcription
1 Version 2.4» March 2016 Author Tecnoteca srl ENG

2 No part of this document may be reproduced, in whole or in part, without the express written permission of Tecnoteca s.r.l. CMDBuild uses many great technologies from the open source community: PostgreSQL, Apache, Tomcat, Eclipse, Ext JS, JasperReports, IReport, Enhydra Shark, TWE, OCS Inventory, Liferay, Alfresco, GeoServer, OpenLayers, Prefuse, Quartz, BiMserver. We are thankful for the great contributions that led to the creation of these products. CMDBuild is a project of Tecnoteca Srl. Tecnoteca is responsible of software design and development, it's the official maintainer and has registered the CMDBuild logo. In the project also the Municipality of Udine was involved as the initial customer. CMDBuild is released under AGPL open source license ( CMDBuild is a registered trademark of Tecnoteca Srl. Everytime the CMDBuild logo is used, the official maintainer "Tecnoteca srl" must be mentioned; in addition, there must be a link to the official website: CMDBuild logo: cannot be modified (color, proportion, shape, font) in any way, and cannot be integrated into other logos cannot be used as a corporate logo, nor the company that uses it may appear as author / owner / maintainer of the project cannot be removed from the application, and in particular from the header at the top of each page The official website is Page 2

3 Contents Introduction... 4 CMDBuild modules... 4 Available documentation... 5 Getting Started... 6 CMDBuild philosophy... 6 General Criteria... 7 How to use CMDBuild... 7 User Interface General design criteria Control elements Filling in forms for data editing Menu Simplified user interface Accessing the application PC Requirements Authentication Relations graph Visual area Toolbar in the top right Text area Toolbar at the bottom right Cards Card List Card TAB Details TAB Notes TAB Relations TAB History TAB Attachments TAB Map management BIM viewer Workflow cards Card TAB Relations TAB History TAB Dashboard Report Report types and features Utility features Password change Massive card editing Import CSV data Export CSV data APPENDIX: Glossary Page 3

4 Introduction Introduction CMDBuild is an Open Source web application designed to model and manage assets and services controlled by the ICT Department, therefore it handles the related workflow operations, if necessary according to ITIL best practices. The management of a Configuration Database (CMDB) means keeping up-to-date, and available to other processes, the database related to the components in use, their relations and their changes over time. With CMDBuild, the system administrator can build and extend its own CMDB (hence the project name), modeling the CMDB according to the company needs; the administration module allows you to progressively add new classes of items, new attributes and new relations. You can also define filters, "views" and access permissions limited to rows and columns of every class. CMDBuild provides complete support for ITIL best practices, which have become a "standard de facto" by now, a non-proprietary system for services management with process-oriented criteria. Thanks to the integrated workflow engine, you can create new workflow processes with external visual editors, and import / execute them inside the CMDBuild application according to the configured automatisms. A task manager integrated in the user interface of the Administration Module is also available. It allows to manage different operations (process starts, receiving and sending, connector executions) and data controls on the CMDB (synchronous and asynchronous events). Based on their findings, it sends notifications, starts workflows and executes scripts. CMDBuild includes also JasperReports, an open source report engine that allows you to create reports; you can design (with an external editor), import and run custom reports inside CMDBuild. Then it is possible to define some dashboards made up of charts which immediately show the situation of some indicators in the current system (KPI). CMDBuild integrates Alfresco, the popular open source document management system. You can attach documents, pictures and other files. Moreover, you can use GIS features to georeference and display assets on a geographical map (external map services) and / or an office plan (local GeoServer) and BIM features to view 3D models (IFC format). The system includes also a SOAP and a REST webservice, to implement interoperability solutions with SOA. CMDBuild includes two frameworks called Basic Connector and Advanced Connector, which are able - through the SOAP webservice - to sync the information recorded in the CMDB with external data sources, for example through automatic inventory systems (such as the open source OCS Inventory) or through virtualization or monitoring systems. Through the REST webservice, CMDBuild GUI Framework allows to issue custom webpages on external portals able to interact with the CMDB. A user interface for mobile tools (smartphones and tablets) is also available. It is implemented as multi-platform app (ios, Android) and linked to the CMDB through the REST webservice. CMDBuild modules The CMDBuild application includes two main modules: Page 4
, modeling the CMDB according to the company needs; the administration module allows you to")
5 Introduction the Administration Module for the initial definition and the next changes of the data model and the base configuration (relation classes and typologies, users and authorization, dashboards, upload report and workflows, options and parameters) the Management Module, used to manage cards and relations, add attachments, run workflow processes, visualize dashboards and execute reports The Administration Module is available only to the users with the "administrator" role; the Management Module is used by all the users who view and edit data. Available documentation This manual is dedicated to the Management Module, through which the IT service operators will be able to update and view cards, run processes, execute reports, georeference items and perform other utility features. You can find all the manuals on the official website ( system overview ("Overview Manual") system administration ("Administrator Manual") installation and system management ("Technical Manual") workflow configuration ("Workflow Manual") webservice details and configuration ( Webservice Manual ) connectors to sync data through external systems ( ConnectorsManual ) Page 5

6 Getting Started Getting Started CMDBuild philosophy A CMDB is a storage and consultation system that handles the information assets of a company. It is the official central repository and provides a consistent view of IT services. It is a dynamic system that represents the current situation and knowledge of information technology assets and related entities: hardware (computers, peripherals, networking, telephone equipment), software (basic, environment, application software), documents (projects, contracts, manuals) and other resources, internal and external. It is a monitoring system for the processes executed, described and managed through the workflow functions. CMDBuild is a robust, customizable and extensible CMDB solution. Providing an extensible solution means providing an open and dynamic system that can be easily designed, configured and extended by the system administrator in different phases in terms of types of objects to manage, attributes and relations. Since there are not two organizations that operate exactly on the same set of objects (assets) and, for each object, on the same information, we decided to set, as the primary CMDBuild feature, the system flexibility, developing features to configure the whole system: data model, processes, reports, external systems connectors, etc. To be more precise, the management features available in CMDBuild allow you to: display the data cards of a class or a view according to the available permissions (on the whole class or on subsets of rows and columns) carry out researches through the filter mechanisms available in the system, with the possibility of storing a search filter and reuse it later use the configured widgets to run specific card functions consult the relations among cards with a graphic tool or simply browsing the system insert or update data card, including the notes field with HTML editor create or edit relations among cards, including relations attributes upload card attachments georeference objects, maps or 2D plans through proper GIS functions georeference objects on 3D models through proper BIM functions view the list of pending and completed processes (workflow) refer to the dashboards defined in the system run predefined and custom reports (designed with IReport) change password import or export data in CSV format edit multiple cards at the same time enter the Administration Module (administrator role) Here is a diagram that explains terms and concepts introduced above in relation to the configuration of the data model. Page 6
, documents (projects, contracts, manuals) and other resources, internal and external.")
7 Getting Started General Criteria The use of the Management Module assumes that the system administrator has defined, using the Administration Module, an initial data model for the system. It is not necessary for the initial model to describe all the properties managed by the organization, it is indeed important to adopt a policy to gradually develop the system through successive phases in terms of cards and relations between them. We recommend you to start by managing a small but complete set of objects and relations and then extend the system once the knowledge and requirements have become clearer. CMDBuild expects that operators use the Management Module to manage cards according to the rules defined by the system administrator with the Administration Module. We recommend you to use CMDBuild: respecting procedures and permissions properly recording data cards: a database with missing information is not useful recording the new information, as soon as they are available, and updating the existing ones: an outdated system is not useful to anyone How to use CMDBuild The main purpose of CMDBuild is to: Page 7

8 Getting Started get updated information on each individual asset and relations with other assets or other elements of the system find out the state of each asset and of each relation in any previous time update the information stored in the system - cards and documents - either individually or with advanced functions for multiple changes assist the operator by defining processes and implementing wizards refer to the dashboards for the control of basic management parameters create useful reports for the analysis of daily operations or historical trends and statistics carry out automatic activities (notification s, workflow launch, script implementation) that follow operations (such as receiving, workflow launch, check on synchronous and asynchronous events) configured through the Task Manager available in the Administration Module The most widely used features, grouped in the "data cards" section, are : the consultation of the data cards of a class or a view, according to the available permissions (on the whole class or on subsets of rows and columns) the card search, specifying filters both on the data cards of the current class and on those of the relation classes, with the possibility of storing and reusing them card data overview, card relations and history perform specific functions (widget) configured for that card single or multiple card print graphical navigation of card relations card data update relations definition, including relations attributes card attachments upload card georeference (GIS) 3D model georeference The "Processes tab" has a powerful workflow engine for: process overview editing of pending processes The Dashboard section allows to: display the dashboard list configured in the system display the grids found in every dashboard, with the possibility of consulting the generated numbers The "Report" tab also provides a powerful print engine for: custom designed reports (ireport) data export in CSV format or as a SQL query The "Utilities" tab includes some wizard to handle operations such as: Page 8
 that follow operations (such as e-mail receiving, workflow launch, check on synchronous and asynchronous events) configured")
9 edit all class attributes import data from external CSV files export data to CSV password change Getting Started Page 9

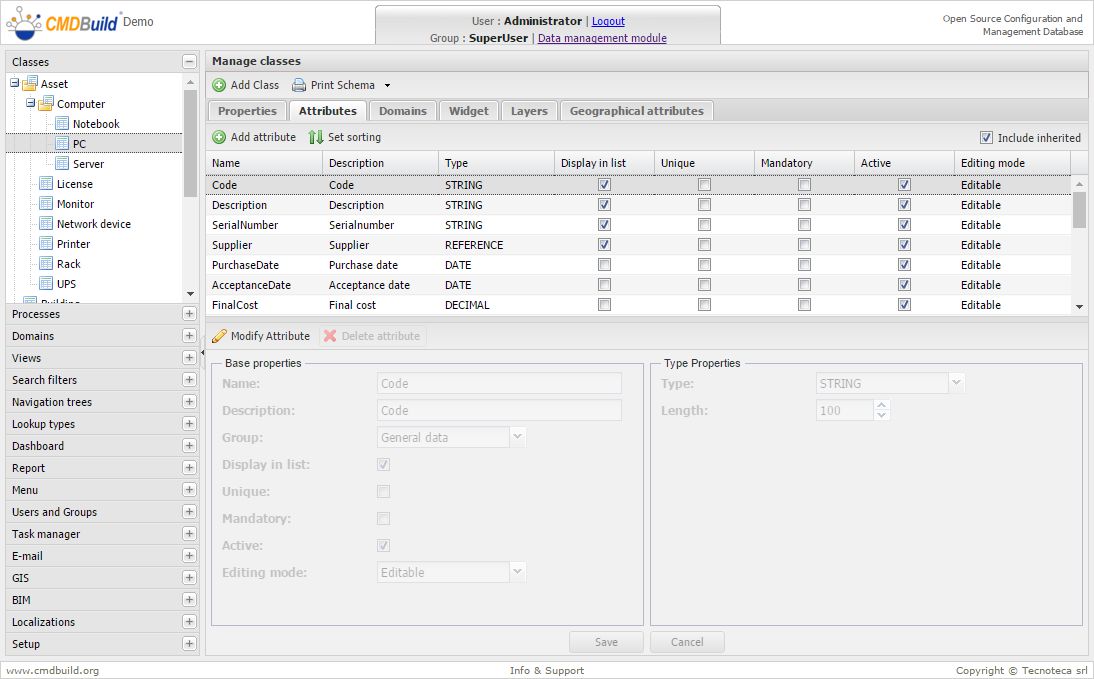
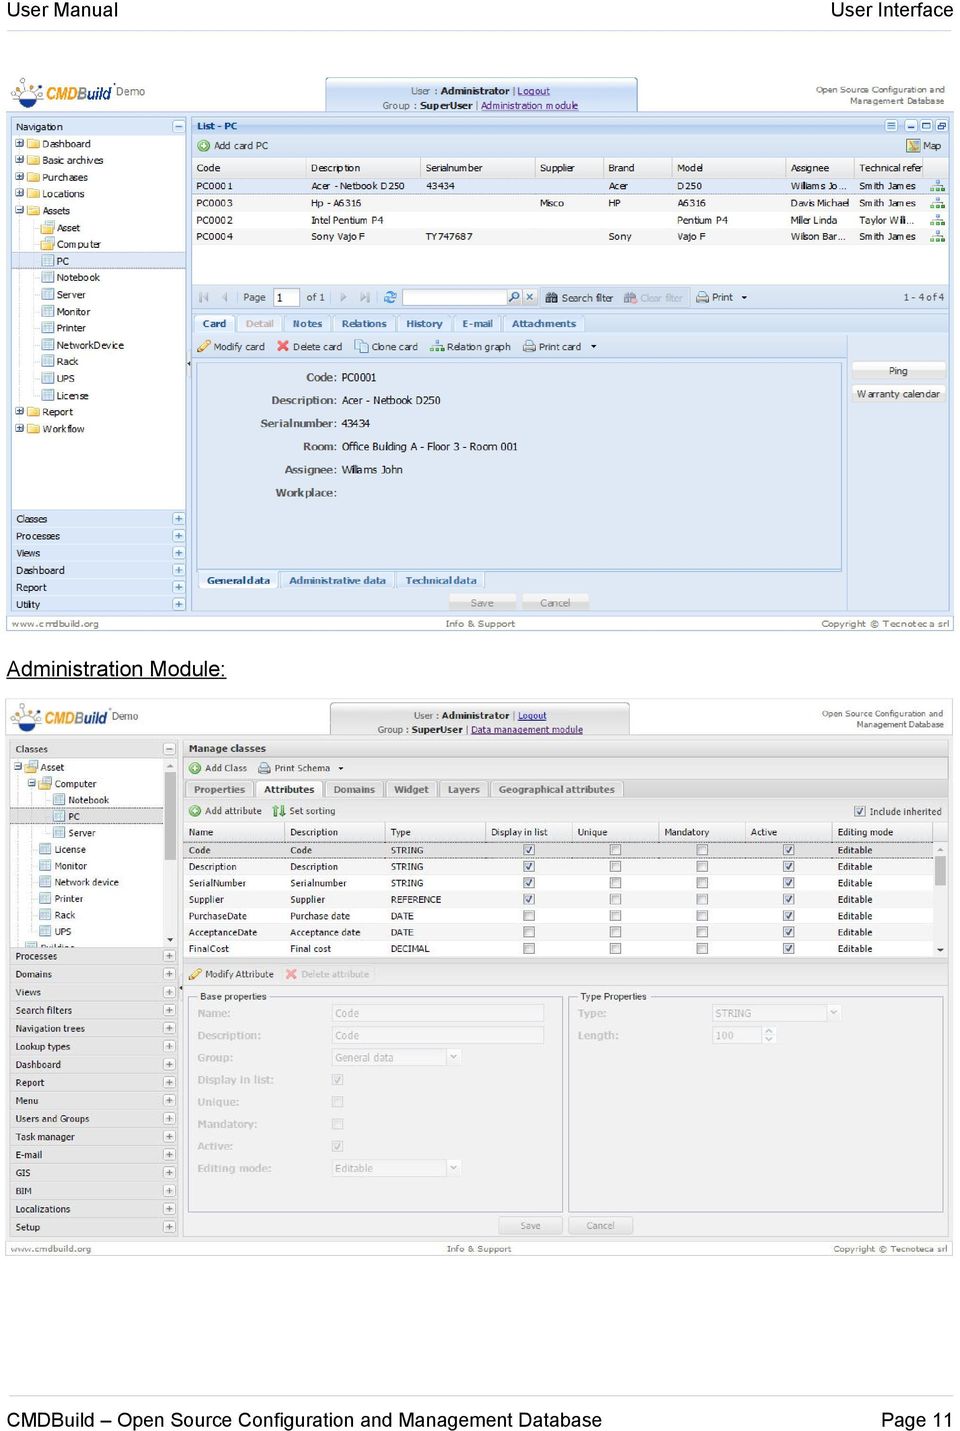
10 User Interface User Interface The user interface uses Ajax technology. This solution, part of the new Web 2.0 paradigm, provides a more intuitive application, improves interaction and gets faster responses from the system. General design criteria The user interface includes the following main elements: left side menu - "accordion" style - to access menus of Management and Administration modules data area in the top right corner, containing: add new card button sort options and column list (limited to the Management Module) Page functions, basic and advanced filters, print and export grid data (only for the Management Module) data area in the bottom right corner, containing: dedicated TAB to access specific card sections buttons to manage the selected item in the grid complete card - information and labels buttons to confirm or cancel the current operation links to related cards with the ability to insert, modify and delete (logical delete) data buttons on the right side corresponding to the widgets configured for the card On top of the page, in the header: CMDBuild logo (registered trademark Tecnoteca Ltd) on the left a central information panel with the current user and group; the panel shows the link to the Administration Module (only to system administrators) and Management Module button to logout (center panel) application name on the right A footer, containing: Official website URL application credits the copyright notice The details above are part of a standard setup but may differ in case of specific installations. We present now the details of the Management Module since the Administration Module has a dedicated manual. Here are two screenshots of the Management Module (blue shades) and Administration Module (shades of gray). Management Module: Page 10
 Page functions, basic and advanced filters, print and export grid data (only for the")

11 User Interface Administration Module: Page 11
12 User Interface Control elements Navigation chronology Top right there is an icon to access the chronology of those actions performed in the system starting from the last login and to enter a card you have already visited: navigation chronology This list shows the sequence of actions and the related type, function and detail. It allows even to return to the same position of the chosen row. Resizing the main areas The three main areas described above can be resized by clicking and dragging the layout borders. On pages with a standard layout (divided into upper and lower area) you can (only in Management Module) act more quickly using buttons located on the top right to: expand to full-height card details area expand to full-height the data grid restore standard layout Accordion menu The menu on the left side is accordion-style and allows the user to open / close each item of the first level with a simple click. Opening / closing a menu entry toggles the sub-elements of the selected entry. Grid management The standard data grid management (Management Module only) permits to: sort on a specific column with a mouse click see additional columns in the grid (among available ones) In some cases you can call special features associated with a row of the grid simply by double clicking on the item (open relations, open document in the attachments tab, etc.). There is also a button to print (PDF or CSV) data (rows and columns) that's currently displayed in the grid. Finally, using the "Map" button it is possible to switch between textual and geographical modes. Quick action on grid elements In some cases you can call special features associated with a row of the grid simply by double clicking on the item (open relations, open document in the attachments tab, etc.). Page 12
 you can (only in Management Module) act more quickly using buttons located on the top right to: expand to full-height card details")
13 User Interface Selection filter The selection filter, if defined, is available in two modes: quick search on all card attributes (not just those shown on the grid) advanced search filter, which provides advanced filtering (included the storing and the filter reuse) and will be described in individual use cases Interactive help In some cards (in particular in the process management) there is a button in the lower right corner that displays a panel with some compilation tips. Filling in forms for data editing Data cards compilation requires different fields: numeric or string type with simple content multiline text date type, with interactive calendar simple list select advanced list select (with filtering options) formatted text (with editor) you can then use the widgets (buttons) configured for the card. Every insert operation includes confirmation and cancellation buttons Menu Both Administration and Management modules work on the same objects, the first to set configuration options (data structures), the second to manage the information stored in these objects (cards). Both modules have an "Accordion" style menu and include the same entries, however for each entry there are different options in the two modules: lookup tables, definition of filters and views, users and groups, definition of menu, GIS configuration, configuration of base parameters in the Administration Module Page 13


, you can define a simplified interface for those")
14 User Interface navigation menu (list of items available to the current user, ordered in folders in a coherent and organized way) views, dashboards and utilities in the Management Module The Management Module provides an additional menu - the navigation menu - that includes a list of items available to the current user; it's possible to define a custom navigation menu using the Administration Module. Simplified user interface Through proper configuration parameters set in the Administration Module (Groups Management Configuration User Interface), you can define a simplified interface for those users' Groups that demand it. In particular, you can: hide one by one the headings of the accordion Menu placed in the left side of the page hide one by one all TABs of the cards and of the processes hide the accordion Menu itself when opening the page set an alternative display mode of the cards / processes list and of the insertion or update form of a card / process Page 14
, you can define a simplified interface for those")
15 User Interface Page 15

16 Accessing the application Accessing the application The Management Module is used by IT service operators and can be used to view and update the cards, run processes, execute reports and perform other utility operations. Obviously, the above activities are available only if the system has been correctly configured using the Administration Module. PC Requirements CMDBuild is a web-based application, so both modules are available using a standard web browser. The system user has to arrange on his/her processor only an updated web browser (Firefox up to version 43, Chrome up to version 48, Microsoft Explorer 8 or more recent up to version 10). The web architecture ensures complete usability to any IT organization that operates in multiple locations (ie collaborative workflow); any entrusted client can connect and interact with the system using a standard web browser. Authentication You must login to use the application. The login form requires a username, a password and eventually a language selection (if the application has been configured to handle multiple languages) Once the user has logged in, the system starts with the Management Module and only the users that have the required role can switch to Administration Module by clicking on the link on top of the page (visible by clicking on the information panel located in the center) Page 16
.")
17 Relations graph Relations graph Since this is a feature available in many situations, we describe now the details of the relation graph. The purpose of the function is to: supply a 3D visual and interactive representation of the graph of relations stored in CMDBuild for the displayed node(s) allow interactive analysis through filters on cards and relations, graph explosions, application of pre-defined filters (navigation trees), application of other pre-defined functions By designing the new displayer, we were looking for a solution that could grant an optimal result when viewing graphs that include (even high) number of nodes and relations. At the end we opted for the 3D choice, which offers one more spatial dimension to work on. The user interface is divided into a graphical area on the left and a text area on the right, which are synchronized. Furthermore, there are two toolbars, one on the top right and one at the bottom right. Page 17
 number of nodes and relations.")
18 Relations graph Visual area The visual representation of the graph includes: nodes, corresponding to the card "root" (to request the graph opening) and to the correlated cards. All of them are represented with a default icon or with icons that are previously uploaded into the system according to their class archi, corresponding to the relations among the nodes For each node and transition there is a tooltip with the main information related to the item. The selected nodes are highlighted in yellow. Available features in the visual area: selection of a node (click the right mouse button), with contextual presentation of the cards and of the relations in the text area on the right selection of adding nodes (click the left mouse button and hold CTRL) "explosion" of a node (double click), and opening of children nodes for the number of levels set in the toolbar at the bottom right explosion of the whole graph, and opening of all children nodes for the number of levels set through the slider of the toolbar at the bottom right zoom in the graph (mouse wheel), in order to explore some areas moving the whole graph (right button of the mouse) 3D rotation of the graph (click the right button and move the mouse on the page area) In the following screenshot you can see the result of the 3D rotation on the graph viewed on the previous page. Page 18
, with contextual presentation of the cards and of the relations in the text area on the right selection of")
19 Relations graph In the following screenshot you can see that, after double-clicking on a node, its relations are opened. Page 19

20 Relations graph Toolbar in the top right The toolbar available in the top right includes the following tools: Undo : it cancels the last operation Apply the current layout : it sets the layout of the first opening page Stop the current operation : it stops the current operation Center the image : it centers all nodes Center the layout on selection : it centers the graph onto the current element Select all nodes : it selects all nodes Delete selected nodes : it deletes the selected nodes Delete unselected nodes : it deletes the non-selected nodes Oped selected nodes : it opens the relations of all selected nodes for the number of levels set in the toolbar at the bottom right Reopen the graph from this node : it re-opens the graph from the selected node Select the subgraph that contains the selected elements : it selects the minimum sub-graph including the selected nodes Choose navigation tree : it applies one of the pre-defined navigation graphs In the two following screenshots you can see the result when applying a navigation tree to a graph. Page 20

21 Relations graph Page 21
22 Relations graph Text area In the text area you can see: the card with the main attributes (attributes "Base display", defined in the Administration Module) and list of relations defined for that card the card with all attributes, if necessary divided on various pages the list of cards corresponding the nodes displayed on the graph the list of classes owning the nodes displayed on the graph In the following screenshots you can view those data related to the node selected on the graph in the TAB Card, only with the main attributes and relations (first image) and with the complete card attributes. Note the opening of the relations with five levels (through the slider of the toolbar at the bottom). Page 22
23 Relations graph In the three following screenshots there are the nodes related to the cards selected in the TAB Cards list. Page 23
24 Relations graph Through the proper icon (character minus ), you can view only the selected data cards in the list (in the example, 7 elements out of 19): Through the field for the text search, you can even reduce the selected cards: Page 24
25 Relations graph In the following screenshot there are all nodes belonging to the classes selected in the TAB Classes. Below, under the text area, there are reiterative data above the number of nodes and the displayed relations. Page 25
26 Relations graph Toolbar at the bottom right The toolbar available at the bottom right includes the following tools: Open the properties panel : access to the configuration page Open the filter panel : access to the page of the filter setting Enable / disable tooltips on graph : enable / disable tooltips on nodes and relations Levels : number of relation levels to open if required Slider levels : another way to select the number of levels Labels : to show on no nodes, only on selected nodes or on all nodes Through the filter functions, you can select / deselect one or more classes and one or more domains and view the related results on the graph. Selection of classes: Page 26
27 Relations graph Results on the graph: Filter on domains: Page 27
28 Relations graph Here's the result after the application of labels on all graph nodes. The following screenshot shows the Setup panel (the settings are still valid during the current session, but they can be made persistent by the Administration Module). Page 28
 the Management Module offers, on the top right, the list (\"grid\") of cards of the selected class.")
 add columns to the grid (the default columns are defined in the")
29 Cards Cards Using the Management Module it's possible to access the information stored in the system, perform searches, update cards, create relations, see card history. Card List For all the entries in "Cards" menu (or for classes available in the navigation menu) the Management Module offers, on the top right, the list ("grid") of cards of the selected class. The details of the single highlighted card are shown on the bottom right corner. Cardlist management allows to: sort cards by clicking on column header (the first click will sort ascending, the second descending) add columns to the grid (the default columns are defined in the Administration Module). The list of available columns-attributes is shown by clicking on the column arrow (screenshot) use the page controls to move one page forward or backward, move to the first / last page, move to a specific page number reload grid data (refresh) access the "advanced" search system Page 29
30 define a new search filter, selecting attribute values for the card or for the related cards (see next paragraph) store the new search filter edit an existing filter clone an existing filter delete an existing filter delete a search filter perform a quick card search (search on all class attributes, included those that are not displayed) print (PDF or CSV) data (rows and columns) currently displayed in the grid change the page layout by clicking and dragging the layout borders switch to map view to display cards position on a map / plan Cards Definition of a new advanced search filter A filter lets you search for cards using multiple search criteria: search on all the attributes of the current class (the conditions must be simultaneously valid, that is "AND") with different operators and also by applying more conditions on the same attribute (in this case it will be considered as "OR") search on all the attributes of the classes related to the current card, either by selecting individual rows in the TAB "List" or by applying filters on the attributes of the related class search on all the attachments (text-based attachments) In the next example we extract computers having "Epson" or "Canon" brand and containing the string "Monitor" in their description. The search can be saved as filter and then reused by the same or other users who shared that filter with the administrator. Page 30
31 Cards In the next example we extract all computers assigned to by "Mary Johnson" or "Michael Davis" (the selected domain is "AssetAssignee"). Page 31
32 Cards Also in this case, you can save and reuse the search. The following example extracts all the computers in one of the two data center rooms (the domain is set to "Room asset"). The two selection types ("List" and "Filter" tabs) can be used simultaneously, i.e. it is always possible to narrow the list extracted by clicking on the checkboxes of the rows displayed. When the user confirms the search filter, the application searches matching cards; the columns shown are the ones defined in the Administration Module. Page 32
33 Cards Card TAB In addition to the card list (common to all subpages of this menu section), the Card TAB shows the list of attributes of the selected card. There is the possibility of performing the following operations: create a new card by clicking on the "Add card" button edit an existing card by selecting the row and clicking the "Modify card" button delete an existing card by selecting the row and clicking the "Delete card" button (logical delete) clone the current card open the relations graph for the selected card print current card The layout of cards containing a lot of attributes can be rearranged by splitting the information into data groups (in the screenshot the groups are "General", "Administrative data" and "Technical data"); using then the tabs (located on the top / bottom area - it depends on settings in the Administration Module) it's possible to open only the selected group of attributes. The fields shown during an insert or update operation are configured using the Administration Module. There are two "Editing modes" you can set in the Administration Module: "Editable" for editable attributes and "Read Only" for read-only attributes. Page 33
34 Cards Depending on the attribute type, the system uses in the form: standard input fields selection lists ("Lookup" fields type) reference fields with several options (see example below): select a value directly from the corresponding list or open the pop-up window to use advanced features ("list" and "filter" tabs as described in the previous paragraph) set values for domain attributes (those set in the Administration Module as "base display") date fields, with calendar widget When the list of attributes exceed the visible area height, a scroll bar on the right helps you scroll down the whole list. Using the form buttons you can confirm or cancel current operation. Any validation errors are highlighted using the current user language. In the example below there's a card with an HTML field and a reference field ("Supplier"); on the right there are four icons: the first opens the list with the names of the suppliers and lets you choose an option the second allows you to reset the value the third opens the advanced pop-up window (see below) the fourth provides access to the relation attributes (see below) Page 34
35 Cards Below you can find the popup for "Assignee" reference field value, with advanced filter functionalities: Below you can see a sample of management of those attributes defined on the "domain" where the Reference field "Technical reference" is configured (in the example the role of the asset's referent): Page 35
36 Cards Widget Widgets - which can be configured using the Administration Module - can be used to perform specific functions useful for the current card. On a common card, the following widgets can be configured: Create report: it allows to print a report Calendar: it shows the specified deadlines on a calendar Navigation tree: it allows to select one or more datacards through an interface based on a preconfigured navigation tree (subset of the domain graph) Start workflow: it allows to start the specified workflow by using a popup window (the workflow will then go ahead with the common CMDBuild functions) Ping: it performs a ping on the specified host Create or modify card: it allows to insert / edit a data card into a class that is different to the current one Further widgets can be used just within the workflows (see the Workflow Manual). Below you can see examples of pop-up windows that CMDBuild creates in case of "Ping" and "Calendar" widgets. Ping Using the "Ping" widget, you can run a "ping" command on the IP address of the current computer card and verify its reachability. Page 36
37 Cards Calendar Using the "Calendar" widget, you can check the warranties by opening the calendar at the end of the warranty date of the current computer card. Create report Page 37
38 Cards It allows to print a report among the ones designed with IReport and imported into CMDBuild. If the report includes certain parameters, they are required at rendering time. Create or Modify Card Page 38
39 Cards It allows you to enter (read-only or writable) a data card of interest in spite of the current one In the following example, starting from the card of a PC you can refer to every assignee's personal data Lock of a card in edit If the CMDBuild instance is configured with the active lock function and a user asks for a data card or a workflow to be edited ("Edit card" button), the system reserves the card / process instance to that user for the period defined in the configuration parameters. If another user tries to edit the same card / process instance in the same period, the following error message appears: The user [username] has edited the card for [n] seconds. The card or process instance will be automatically released as soon as the first user leaves the editing modality, through the button "Confirm" or "Cancel". Page 39
40 Cards Details TAB For certain classes it can be useful to manage cards using a "master-slave" schema, where "slave" cards are hierarchically related to "master" cards. This option can be enabled by using the "Master Detail" checkbox on the corresponding domain, and defining in the detail (slave) class a reference field that refers to the main class (master). In the following example we have configured a domain so that the assets located in a given room are connected, with a Master-Detail domain, to the room itself. As a consequence, the master card will show a further selection list (on the right) called "Details", which may include the name of one or more classes related to the "Master" class. When accessing the card list, an entry called "Asset" (the domain description) will appear, and when selecting that entry we will get, in the tab "Details", the list of assets located in the current room. There is the possibility of performing the following operations: create a new card using the button on the top of the screen edit card delete card (logical delete) open the relations graph for current card displays and allows the editing of the "Notes" field displays and allows you to manage documents attached to the card Page 40
41 Cards Notes TAB Using the "Notes" tab you can browse and update the "Notes" field, a field containing a description of the selected card. The "Notes" field is managed using an HTML editor that allows various formatting options (type, size and font color, text alignment, lists). Page 41
42 Cards Relations TAB The "Relations" TAB allows you to manage the relations of the current card. There is the possibility of performing the following operations: create a new relation for the current card open (move to) the related card (double click on the card row) edit relation linking a different card delete relation (logical delete) open or edit related card open the attachments of the linked card open the relations graph to see active relations The relations are grouped by domain, with the possibility of collapsing or expanding each group. By default, the groups containing a number of relations minor than the threshold set in the Administration Module are automatically expanded. The application shows also the attributes defined for the domain (if any). The relations tab is disabled if no domains involve the current class (directly or through a superclass). Page 42
43 Cards Create new relation To create a new relation you can click the "Add domain" button that shows the list of domains (relationship type) available for the current class. The application opens a popup window with a list of cards, so you can select a card to be connected either directly or by applying some filters in the "Filter" tab. Depending on the domain cardinality, you might be able to select more elements using checkboxes. In the next example we chose a card from the "Asset" class, then we selected the domain "provided by supplier" and then we selected the "Misco" entry from the list of available suppliers. Page 43
44 Cards By confirming the operation, we will have a relation between the asset and the supplier. Page 44
45 Cards Move to related card By clicking on the green arrow on the right or by double-clicking the row, the application moves to the "Relations" TAB of the related card. Edit relation The edit function uses the same tool described for the creation of a new relation. In this case, however, the domain maintains the original value. Delete relation Relation is deleted, but logical delete is performed (thus history is still available). Display related card The application shows in a pop-up window the related card with all its attributes. For example, this is the visualization of the supplier card connected to the PC. Open relations graph Please refer to the specific chapter at the beginning of this manual. Page 45
46 Cards History TAB Thanks to the "versioning" feature included in CMDBuild, the "History" TAB allows you to browse the history of the selected card. The card "versions" are displayed one per line, and you can expand / close the card details. For each "version" of the card the system shows: the starting date for that version the ending date for that version the user who made the change an icon to recognize attributes change or relations change in the first case, the attributes of the card for that specific "version", with highlighted changes (in green) in the second case, the code and description of the related card at that time ("version") Using the check Include relations you can consult the relation history. Page 46
47 Cards Page 47
48 Cards Attachments TAB The "Attachments" TAB allows you to view the documents attached to the current card. The application uses Alfresco DMS as storage system, however standard operations (such as attach, open, delete, etc.) take place using CMDBuild standard interface. When loading a new attachment, the user must select a document type from a drop-down list; this list must be defined using Administration Module (administrator has to create a specific Alfresco Lookup and set all the parameters into the Alfresco configuration page). There is the possibility of performing the following operations: upload a new attachment download attachment (open) edit attachment description delete attachment The integration of Alfresco DMS requires the creation of a specific CMDBuild area inside the Alfresco repository, creating a folder dedicated to the first level, a subfolder for each class and, inside, a subfolder for each card. The attachment feature is completely integrated in CMDBuild, so the use of Alfresco interface is not necessary. However, those wishing to use the Alfresco interface will find the same documents available in CMDBuild. Attachments upload The upload takes place using a file upload form, the fields are: attachment category (related to a specific lookup - see the configuration parameters in the Alfresco section of the Administration Module) file attachment description Page 48
49 Cards Attachments display The files attached to the current card are presented in this way: Page 49
50 Cards Map management By clicking on the "Map" button you can see or change the position of an object on the map (or plan); let's see how to configure the GIS feature in CMDBuild. The prerequisites are: PostGIS installation (please refer to technical documentation for version number) activation of PostGIS operations in your database (SQL scripts provided in the PostGIS documentation) The CMDBuild configuration requires: configuration - in the Administration Module - of at least one geographical attribute activation of a map service (Open Street Map or Google Maps or Yahoo! Maps) and / or activation of GeoServer GIS server for raster / vector files (plans, etc.) The GIS features available in CMDBuild, once you switch to map mode (button "Map" on the grid), include: switch to map mode back to "List" mode "zoom in" / "zoom out", using the mouse wheel or by using the map controls pan", by moving the mouse on the map Page 50


51 control layer, to activate a preconfigured map service and show one or more layers for the current class GIS navigation tree, to go into details of an item and to display those elements contained in the lower levels; you can also go into the related card by clicking on the green arrow on the right list of elements of the current class, to display those elements contained and to go into the related card by clicking on the green arrow on the right info, i.e. display the list of those elements set in a certain point of the map, which can be reached by pressing the left button more than two seconds; also in this case you can place into the related card by clicking on the green arrow on the right zoom level and current coordinates of the mouse cursor Cards GIS features for the current cards include: display cards on the map; the selected card appears with a yellow bullet while the other cards appear with the predefined attribute icon display the editing toolbar by entering card editing mode select the geographical attribute (if the current class has more than one) add a new geographic element or move an existing one (the addition of a new element automatically removes the previously defined element, causing its replacement) delete the existing geographic element for the current card Page 51
52 Cards Through the described functionalities, you can get an advanced management of the asset georeference. Sample of items set onto the plan: Page 52
 Such root class is recognized in the UI of CMDBuild.")

53 Cards BIM viewer The visible IFC models should be imported in advance into CMDBuild (or into its dedicated BIMserver repository), through its proper function available in the Administration Module. The IFC files include entities and relations of the represented model, starting from a root class (e.g. Building) Such root class is recognized in the UI of CMDBuild. In the card list it is supported by a special icon that starts the viewer. Once it starts, the 3D viewer will show you a pop-up window like the following one. The functions available in the 3D viewer of BIM are subdivided into the three headings of the accordion menu on the left: various controls described in the following table Page 53
 include: Camera:")
54 Cards list of layers that include the elements of the model, with the possibility of showing / hiding each of them hierarchical tree of each element of the model, with the possibility of showing / hiding each of them and moving in the card of the element closing the viewer window The detail functions available in the heading "Controls (first heading of the previous table) include: Camera: Reset: restore the initial checkpoint Front: show the model from the front checkpoint Side: show the model from the side checkpoint Top: show the model from the top checkpoint Mode Pan: it allows the movement of the model Rotate: it allows the rotation of the model Zoom: it zooms the model Expose: by selecting a building floor, you can extract it horizontally from the building body and efficiently view its features and its elements Page 54
55 Workflow cards Workflow cards CMDBuild workflow user interface provides, for all kinds of workflow: list of open / closed process instances (depending on the value selected in the combo) process details, in both read and write buttons to open sub-cards of the current workflow step to execute context-dependant operations (view, create or edit data cards, create relations, select related cards, upload attachments, etc.) a panel to display instructions for current workflow step (button on the right) We provide a specific manual (Workflow Manual) dedicated to the configuration and use of the workflow system. In this chapter there are only some general information and screenshots related to the directions for use through the Management Module This is a sample of form for a step that is part of a RfC management workflow. Just like the standard cards, workflow cards provide attributes, notes, relations and history. It's possible to interact with the CMDBuild workflow using simplified interfaces that might be easier to use for non-technical users. They can be used to open a new support ticket or to subscribe IT services or to validate any activities in authorization workflows. Talking of this, CMDBuild provide a tool for the implementation of external interfaces called CMDBuild GUI Framework, which interacts with CMDBuild through the webservice REST. Page 55
56 Workflow cards It allows an (almost) unlimited freedom when projecting the graphic layout, defined through an XML descriptor and with the possibility of intervening on the CSS, and it allows you to use it in portals based on different technologies, since it is developed in javascript / Jquery environment. On the other side, the GUI Framework configuration needs a javascript code customization, that is simplified thanks to predefined functions (communication, authentication logics, etc.) and to native graphic solutions (forms, grids, upload buttons and other widgets) Sample of interface for the advancement of a process. As an alternative, CMDBuild provides a standard solution to issue some features in the form of Portlet (standard JSR 268) in the open source Liferay portal. The portlet is able to access to CMDBuild through the SOAP webservice, adapting to the configuration of the related instance (menu, authorizations, data card structure, process flows, reports). The portlet includes the starting and progressing of a process, with consultation of active instances or completed instances, of data card management, (input, edit, cancellation) and report execution. Page 56
57 Workflow cards This solution is very advantageous because it can adapt to the related CMDBuild instance without developing a code for the management of the interaction between two environments. Its limit is its "self adaptability" itself that does not allow any kind of customization. Page 57
58 Workflow cards Card TAB By selecting the function of RfC process management, the system shows the RfC as open (or in the selected status chosen in the upper list: open, suspended, complete, aborted, all). Through the button Start Request for Change the Helpdesk can register a new request. Prior to fill in the form, the operator can refer to the operative instructions associable with every user activity (by working in the XPDL file which describes the process flow). Page 58
59 Workflow cards Widget Widgets configured using the Administration Module can be used to perform specific functions useful for the current user's activity. These widgets can be classified as follows: Create or modify card: create or modify a datacard in a specified class Manage relation: create, edit or link cards (create relations) to the main card Link card: select cards from a filtered list (the filter is specified using the CQL language), with a geographical extension to select dots and ploygons on the map Webservice: select a record from a list by querying an external webservice (e.g. databases used in the workflow) management (with parameter substitution, also obtained with CQL query) Attachment: attachment management Note: notes management with WYSIWYG editor Create report: run reports (the report may be attached to the process and sent via mail) Edit grid: compiling a table with several rows (data cards) and columns (data card attributes), with the possibility of adding or deleting rows or importing them from CSV files Start workflow: starting another selected static workflow (according to the definition of workflow) or a dynamic selected workflow (during the start of the workflow) Navigation tree: it allows to select one or more datacards through an interface based on a preconfigured navigation tree (subset of the domain graph) Page 59
60 Workflow cards Example 1: Link card The widget allows in this example to select one or more cards from a filtered list of assets (located in the predefined office). In this example, the workflow provides access to the workspace using the button: The work area in the Options TAB has the following interface (the select mode, single or multiple, can be modified): Example 2: Manage In this example, the workflow provides access to the workspace using the button: The work area in the Option TAB has the following interface: Page 60
61 Workflow cards It's possible to create automatically s using a preset template, fill it out manually, or incorporate free text in an automatically generated. Page 61
62 Workflow cards When you are writing an , you can attach documents by uploading them both from your own file system and from the ones filed in the document system integrated in CMDBuild. The fields To and CC can include one or more addresses; in case of several addresses the separator should be,. Example 3: Attachment management In this example, the workflow provides access to the workspace using the button: The work area in the Option TAB has the following interface: Page 62
63 Workflow cards Relations TAB About the processes cards, you can refer the relations created during the activity progress. The relations can be manually created from the user interface or direct from the system through automatisms based on APIs configured in the process. Page 63
64 Workflow cards History TAB Referring to the History TAB you can know the complete sequence of each single progress activity, their users, beginning and ending date. Such information can be used through report and dashboard to calculate and provide experience indexes (KPI) of the service effectiveness (SLA control). Page 64
65 Dashboard Dashboard CMDBuild includes the possibility of configuring one or more "dashboard" pages; each of them can be addressed to a different typology of aspects which should be controlled: asset situation, service desk performances, cost allocation, etc. Every dashboard is made up of a number of charts with different typologies: pie, bar, line, gauge chart. Like all CMDBuild components, also the dashboards are configured in the Administration Module and can be referred in the Management Module, both with the specific Dashboard heading of the accordion menu and in the Navigation Menu. For every dashboard chart you can perform the following operations: display or hide the controls to edit the possible provided parameters display the complete list of the values for the chart calculation update the chart display if required, edit the analysis parameters, and update the chart display Page 65
66 Dashboard In the following sample you can see how you can edit the valorization of the provided parameter in the bar chart, in this case the analysis class. In the following sample you can see how the value list for the bar chart calculation can be demanded and shown. Page 66
67 Dashboard The dashboards are performed through proper components of the Ext JS library, which the whole CMDBuild user interface is implemented with, and include some interaction mechanisms for the data reference. In the following sample, if you place the mouse on a pie chart area, the area will be highlighted and the corresponding numeric value will be presented. Page 67
68 Report Report CMDBuild includes and uses a powerful report engine (JasperReport) able to create dynamic reports that are designed using an external visual editor (ireport) and then imported using the Administration Module. The report engine supports these formats: PDF CSV, used to import data into spreadsheets ODT, used to import data into a word processor Report types and features IReport editor has the following features: text formatting options (font, text alignment, space, colour, etc.) standard elements definition (header, footer, column headings, summary, etc.) data grouping expressions evaluation computed fields advanced subreports management barcodes support geometric elements (lines, rectangles) images and charts (pie, bar, Gantt, etc.) Using these features it's possible to create and import in CMDBuild: tabular reports with groups and totals (multi-level option) reports with images and logos reports with statistics and graphs labels with barcodes Custom report parameters can be defined and then required at rendering time Before rendering, CMDBuild will present a popup with the required report parameters (i.e. computer name, date range, etc) Lookup and Reference parameters will be displayed automatically as a dropdown list with predefined values. Reports imported into CMDBuild can be executed: selecting the report from the navigation menu (if available) in the top-left column accessing the list of available reports (for the current user) by choosing the "Report" menu in the left column Screenshot of report selection / execution Page 68
69 Report Page 69
70 Utility features Utility features Some of the utility features are: password change massive card data editing CSV export CSV import Password change This operation allows the user to set a new password; the user has to insert the old password to confirm the change. User must insert the new password twice (to avoid typing errors). Page 70
71 Utility features Massive card editing This feature allows you to change the value of one or more attributes of a selected set of cards. At first you have to select a class from the ones available in the top left menu. Then you can create filters to select the cards you want to edit using both the quick filter or the advanced one (described on previous pages). Next you can manually select the single cards to apply the change, or you may select all the cards in the list by clicking the checkbox at the top of the last column. Once selected the cards, you have to select (checkbox) the attributes you want to change and insert the new value. Finally, you have to confirm the operation by clicking the "Confirm" button. Before performing the editing operation, the system shows the number of the cards that will be edited, demanding an acknowledgment or the cancellation of the operation. In the next example we change all the cards with "HP" brand, setting the "Acceptance date" to 06/09/2011. Page 71
72 Utility features Import CSV data The CSV (Comma Separated Value) file import is a useful feature that allows you to upload data to CMDBuild using a "wizard"; this is a fast way to upload a lot of cards into the application within few steps. This operation is performed through the user interface, as shown below, and not by querying the database, because we want the application to control and validate data before insertion. It is important to notice that the import operation always appends data, so imported cards are always added to the existing ones. The import operation includes these steps. Step 1 The first step includes: class selection (the import operation works only on a single class) CSV file selection fields separator selection: "," (comma) or ";" (semicolon) or " " ("pipe") Confirming the operation with the "Upload" button, the application will import data from the specified file, showing imported cards in the standard grid. Screenshot of user interface provided by the system. The first row of the CSV file will include the columns headings. The system will match only the columns in the CSV file with the attributes names (note: the name, Page 72
73 Utility features NOT the description) defined using Administration Module (i.e. the column name in the database table). The import function will propose the CSV file contents as table on the CMDBuild page, highlighting in red possible invalid rows (column name not identified, compulsory columns not present, data type invalid or not corresponding to the database, etc). Lookup attributes must match (uppercase/lowercase, blank spaces, etc.) the lookup description as stated, at registration time, in the Administration Module. Reference attributes must match the "Code" (note: "Code", NOT "Description") field of the related card (uppercase/lowercase, blank spaces, etc.). Dates must be written using dd/mm/yy format In the CSV file, only the rows with the column number provided in the heading row are considered valid: you have to pay attention not to insert any additional empty rows or columns in the CSV file. The example shows some errors on reference fields. Step 2 The next step is the correction of any highlighted errors, which can be done by double-clicking on the field and changing the value (as shown in the screenshot). Alternatively, it is possible to modify the CSV file and retry the import operation. Once resolved the errors, you can press the "Update" button to re-run data validation. Finally, if there are no errors, you will complete the operation by filing the cards in the database. Please, remember that the data import operation always appends data, so new cards are always added to the existing ones (otherwise it creates an error if there is a duplicate key). Below you can find a screenshot of the user interface provided by the system for the final loading. Page 73
74 Utility features Page 74
75 Utility features Export CSV data This feature allows you to create a CSV (Comma Separated Value) file that contains class data, using the selected field separator (possible separators are ",", ";" and " "). The browser will ask you to save or open the file using the application associated with the file extension "csv". Screenshot of user interface provided by the system. Page 75
76 APPENDIX: Glossary APPENDIX: Glossary ATTACHMENT An attachment is a file associated to a card. Attachments containing text (PDF, Open Office, Microsoft Word, etc.) are indexed in full text mode so that they can appear in search results. WORKFLOW STEP "Activity" means one of the steps of which the process consists. An activity has a name, an executor, a type, possible attributes and methods with statements (CMDBuild API) to be executed. A process instance is a single process that has been activated automatically by the application or manually by an operator. See also: Process ATTRIBUTE The term refers to an attribute of a CMDBuild class. CMDBuild allows you to create new attributes (in classes and domains) or edit existing ones. For example, in "supplier" class the attributes are: name, address, phone number, etc.. Each attribute corresponds, in the Management Module, to a form field and to a column in the database. See also: Class, Domain, Report, Superclass, Attribute Type BIM Method with the aim to support the whole life cycle of a building: from its construction, use and maintenance, to its demolition, if any. The BIM method (Building Information Modeling) is supported by several IT programs that can interact through an open format for data exchange, called IFC (Industry Foundation Classes). See also: GIS CI We define CI (Configuration Item) each item that provides IT service to the user and has a sufficient detail level for its technical management. CI examples include: server, workstation, software, operating system, printer, etc. See also: Configuration CLASS A Class is a complex data type having a set of attributes that describe that kind of data. A Class models an object that has to be managed in the CMDB, such as a computer, a software, a service provider, etc. Page 76
77 APPENDIX: Glossary CMDBuild allows the administrator - with the Administration Module - to define new classes or delete / edit existing ones. Classes are represented by cards and, in the database, by tables automatically created at the definition time. See also: Card, Attribute CONFIGURATION The configuration management process is designed to keep updated and available to other processes the items (CI) information, their relations and their history. It is one of the major ITIL processes managed by the application. See also: CI, ITIL DASHBOARD In CMDBuild, a dashboard corresponds to a collection of different charts, in this way you can immediately hold in evidence some key parameters (KPI) related to a particular management aspect of the IT service. See also: Report DATABASE The term refers to a structured collection of information, hosted on a server, as well as utility software that handle this information for tasks such as initialization, allocation, optimization, backup, etc.. CMDBuild relies on PostgreSQL, the most powerful, reliable, professional and open source database, and uses its advanced features and object-oriented structure. DOMAIN A domain is a relation between two classes. A domain has a name, two descriptions (direct and inverse), classes codes, cardinality and attributes. The system administrator, using the Administration Module, is able to define new domains or delete / edit existing ones. It is possible to define custom attributes for each domain. See also: Class, Relation DATA FILTER A data filter is a restriction of the list of those elements contained in a class, obtained by specifying boolean conditions (equal, not equal, contains, begins with, etc.) on those possible values that can be accepted by every class attribute. Data filters can be defined and used exceptionally, otherwise they can be stored by the operator and then recalled (by the same operator or by operators of other user groups, which get the permission to use them by the system Administrator) See also: Class, View Page 77
78 APPENDIX: Glossary GIS A GIS is a system able to produce, manage and analyse spatial data by associating geographic elements to one or more alphanumeric descriptions. GIS functionalities in CMDBuild allow you to create geometric attributes (in addition to standard attributes) that represent, on plans / maps, markers position (assets), polylines (cable lines) and polygons (floors, rooms, etc.). See also: BIM GUI FRAMEWORK It is a user interface you can completely customise. It is advised to supply a simplified access to the application. It can be issued onto any webportals and can be used with CMDBuild through the standard REST webservice. See also: Mobile, Webservice ITIL "Best practices" system that established a "standard de facto"; it is a nonproprietary system for the management of IT services, following a process-oriented schema (Information Technology Infrastructure Library). ITIL processes include: Service Support, Incident Management, Problem Management, Change Management, Configuration Management and Release Management. For each process, ITIL handles description, basic components, criteria and tools for quality management, roles and responsibilities of the resources involved, integration points with other processes (to avoid duplications and inefficiencies). See also: Configuration LOOKUP The term "Lookup" refers to a pair of values (Code, Description) set by the administrator in the Administration Module. These values are used to bind the user's choice (at the form filling time) to one of the preset values. With the Administration Module it is possible to define new "LookUp" tables according to organization needs. MOBILE It is a user interface for mobile tools (smartphones and tablets). It is implemented as multi-platform app (ios, Android) and can be used with the CMDB through the REST webservice. See also: GUI Framework, Webservice PROCESS The term "process" (or workflow) refers to a sequence of steps that realize an action. Each process will take place on specific assets and will be performed by specific users. A process is activated by starting a new process (filling related form) and ends when the last workflow step is executed. Page 78
79 APPENDIX: Glossary See also: Workflow step RELATION A relation is a link between two CMDBuild cards or, in other words, an instance of a given domain. A relation is defined by a pair of unique card identifiers, a domain and attributes (if any). CMDBuild allows users, through the Management Module, to define new relations among the cards stored in the database. See also: Class, Domain REPORT The term refers to a document (PDF or CSV) containing information extracted from one or more classes and related domains. CMDBuild users run reports by using the Management Module; reports definitions are stored in the database. See also: Class, Domain, Database CARD The term "card" refers to an element stored in a class. A card is defined by a set of values, i.e. the attributes defined for its class. CMDBuild users, through the Management Module, are able to store new cards and update / delete existing ones. Card information is stored in the database and, more exactly, in the table/columns created for that class (Administration Module). See also: Class, Attribute SUPERCLASS A superclass is an abstract class used to define attributes shared between classes. From the abstract class you can derive real classes that contain data and include both shared attributes (specified in the superclass) and specific subclass attributes. For example, you can define the superclass "Computer" with some basic attributes (RAM, HD, etc.) and then define derived subclasses "Desktop", "Notebook", "Server", each one with some specific attributes. See also: Class, Attribute ATTRIBUTE TYPE Each attribute has a data type that represents attribute information and management. The attribute type is defined using the Administration Module and can be modified within some limitations, depending on the data already stored in the system. CMDBuild manages the following attribute types: "Boolean", "Date", "Decimal", "Double", "Inet" (IP address), "Integer", "Lookup" (lists set in "Settings" / "LookUp"), "Reference" (foreign key), "String", "Text", "Timestamp". See also: Attribute Page 79
80 APPENDIX: Glossary VIEW A view not only includes the whole content of a CMDB class, it is a group of cards defined in a logical way. In particular, a view can be defined in CMDBuild by applying a filter to a class (so it will contain a reduced set of the same rows) or specifying an SQL function which extracts attributes from one or more related classes. The first view type maintains all functionalities available for a class, the second one allows the sole display and search with fast filter. See also: Class, Filter WEBSERVICE A webservice is an interface that describes a collection of methods, available over a network and working using XML messages. With webservices, an application allows other applications to interact with its methods. CMDBuild includes a SOAP and a REST webservice. WIDGET A widget is a component of a GUI that improves user interaction with the application. CMDBuild uses widgets (presented as "buttons") that can be placed on cards or processes. The buttons open popup windows that allow you to insert additional information, and then display the output of the selected function. Page 80
Version 2.4. » Administrator Manual. March 2016 Author Tecnoteca srl www.tecnoteca.com ENG. www.cmdbuild.org
 Version 2.4» March 2016 Author Tecnoteca srl www.tecnoteca.com ENG www.cmdbuild.org No part of this document may be reproduced, in whole or in part, without the express written permission of Tecnoteca
Decision Support AITS University Administration. Web Intelligence Rich Client 4.1 User Guide
 Decision Support AITS University Administration Web Intelligence Rich Client 4.1 User Guide 2 P age Web Intelligence 4.1 User Guide Web Intelligence 4.1 User Guide Contents Getting Started in Web Intelligence
Business Objects Version 5 : Introduction
 Business Objects Version 5 : Introduction Page 1 TABLE OF CONTENTS Introduction About Business Objects Changing Your Password Retrieving Pre-Defined Reports Formatting Your Report Using the Slice and Dice
MicroStrategy Analytics Express User Guide
 MicroStrategy Analytics Express User Guide Analyzing Data with MicroStrategy Analytics Express Version: 4.0 Document Number: 09770040 CONTENTS 1. Getting Started with MicroStrategy Analytics Express Introduction...
SAS BI Dashboard 4.4. User's Guide Second Edition. SAS Documentation
 SAS BI Dashboard 4.4 User's Guide Second Edition SAS Documentation The correct bibliographic citation for this manual is as follows: SAS Institute Inc. 2013. SAS BI Dashboard 4.4: User's Guide, Second
Business Portal for Microsoft Dynamics GP 2010. User s Guide Release 5.1
 Business Portal for Microsoft Dynamics GP 2010 User s Guide Release 5.1 Copyright Copyright 2011 Microsoft. All rights reserved. Limitation of liability This document is provided as-is. Information and
Salesforce Customer Portal Implementation Guide
 Salesforce Customer Portal Implementation Guide Salesforce, Winter 16 @salesforcedocs Last updated: December 10, 2015 Copyright 2000 2015 salesforce.com, inc. All rights reserved. Salesforce is a registered
Custom Reporting System User Guide
 Citibank Custom Reporting System User Guide April 2012 Version 8.1.1 Transaction Services Citibank Custom Reporting System User Guide Table of Contents Table of Contents User Guide Overview...2 Subscribe
SAS BI Dashboard 4.3. User's Guide. SAS Documentation
 SAS BI Dashboard 4.3 User's Guide SAS Documentation The correct bibliographic citation for this manual is as follows: SAS Institute Inc. 2010. SAS BI Dashboard 4.3: User s Guide. Cary, NC: SAS Institute
The open source solution for the Property & Facility Management www.openmaint.org
 1 The open source solution for the Property & Facility Management www.openmaint.org www.openmaint.org www.tecnoteca.com 2 What is openmaint openmaint is an enterprise solution for the Property & Facility
Umbraco v4 Editors Manual
 Umbraco v4 Editors Manual Produced by the Umbraco Community Umbraco // The Friendly CMS Contents 1 Introduction... 3 2 Getting Started with Umbraco... 4 2.1 Logging On... 4 2.2 The Edit Mode Interface...
EMC Documentum Webtop
 EMC Documentum Webtop Version 6.5 User Guide P/N 300 007 239 A01 EMC Corporation Corporate Headquarters: Hopkinton, MA 01748 9103 1 508 435 1000 www.emc.com Copyright 1994 2008 EMC Corporation. All rights
Content Author's Reference and Cookbook
 Sitecore CMS 6.5 Content Author's Reference and Cookbook Rev. 110621 Sitecore CMS 6.5 Content Author's Reference and Cookbook A Conceptual Overview and Practical Guide to Using Sitecore Table of Contents
Hamline University Administrative Computing Page 1
 User Guide Banner Handout: BUSINESS OBJECTS ENTERPRISE (InfoView) Document: boxi31sp3-infoview.docx Created: 5/11/2011 1:24 PM by Chris Berry; Last Modified: 8/31/2011 1:53 PM Purpose:... 2 Introduction:...
Business Insight Report Authoring Getting Started Guide
 Business Insight Report Authoring Getting Started Guide Version: 6.6 Written by: Product Documentation, R&D Date: February 2011 ImageNow and CaptureNow are registered trademarks of Perceptive Software,
Microsoft PowerPoint 2010
 Microsoft PowerPoint 2010 Starting PowerPoint... 2 PowerPoint Window Properties... 2 The Ribbon... 3 Default Tabs... 3 Contextual Tabs... 3 Minimizing and Restoring the Ribbon... 4 The Backstage View...
How To Write A Cq5 Authoring Manual On An Ubuntu Cq 5.2.2 (Windows) (Windows 5) (Mac) (Apple) (Amd) (Powerbook) (Html) (Web) (Font
 (Windows 5) (Mac) (Apple) (Amd) (Powerbook) (Html) (Web) (Font") Adobe CQ5 Authoring Basics Print Manual SFU s Content Management System SFU IT Services CMS Team ABSTRACT A summary of CQ5 Authoring Basics including: Setup and Login, CQ Interface Tour, Versioning, Uploading
Adobe CQ5 Authoring Basics Print Manual SFU s Content Management System SFU IT Services CMS Team ABSTRACT A summary of CQ5 Authoring Basics including: Setup and Login, CQ Interface Tour, Versioning, Uploading
BusinessObjects Enterprise InfoView User's Guide
 BusinessObjects Enterprise InfoView User's Guide BusinessObjects Enterprise XI 3.1 Copyright 2009 SAP BusinessObjects. All rights reserved. SAP BusinessObjects and its logos, BusinessObjects, Crystal Reports,
Build Your First Web-based Report Using the SAS 9.2 Business Intelligence Clients
 Technical Paper Build Your First Web-based Report Using the SAS 9.2 Business Intelligence Clients A practical introduction to SAS Information Map Studio and SAS Web Report Studio for new and experienced
Logi Ad Hoc Reporting System Administration Guide
 Logi Ad Hoc Reporting System Administration Guide Version 11.2 Last Updated: March 2014 Page 2 Table of Contents INTRODUCTION... 4 Target Audience... 4 Application Architecture... 5 Document Overview...
The Reporting Console
 Chapter 1 The Reporting Console This chapter provides a tour of the WebTrends Reporting Console and describes how you can use it to view WebTrends reports. It also provides information about how to customize
Intellect Platform - The Workflow Engine Basic HelpDesk Troubleticket System - A102
 Intellect Platform - The Workflow Engine Basic HelpDesk Troubleticket System - A102 Interneer, Inc. Updated on 2/22/2012 Created by Erika Keresztyen Fahey 2 Workflow - A102 - Basic HelpDesk Ticketing System
Increasing Productivity and Collaboration with Google Docs. Charina Ong Educational Technologist [email protected]
 Increasing Productivity and Collaboration with Google Docs [email protected] Table of Contents About the Workshop... i Workshop Objectives... i Session Prerequisites... i Google Apps... 1 Creating
Microsoft Access 2010 handout
 Microsoft Access 2010 handout Access 2010 is a relational database program you can use to create and manage large quantities of data. You can use Access to manage anything from a home inventory to a giant
Salesforce Classic Guide for iphone
 Salesforce Classic Guide for iphone Version 37.0, Summer 16 @salesforcedocs Last updated: July 12, 2016 Copyright 2000 2016 salesforce.com, inc. All rights reserved. Salesforce is a registered trademark
The open source solution for IT Asset Management: CMDB, workflow, interoperability www.cmdbuild.org
 1 The open source solution for IT Asset Management: CMDB, workflow, interoperability www.cmdbuild.org Tecnoteca Srl [email protected] www.tecnoteca.com The CMDBuild project CMDBuild was born in 2005,
PORTAL ADMINISTRATION
 1 Portal Administration User s Guide PORTAL ADMINISTRATION GUIDE Page 1 2 Portal Administration User s Guide Table of Contents Introduction...5 Core Portal Framework Concepts...5 Key Items...5 Layouts...5
OpenIMS 4.2. Document Management Server. User manual
 OpenIMS 4.2 Document Management Server User manual OpenSesame ICT BV Index 1 INTRODUCTION...4 1.1 Client specifications...4 2 INTRODUCTION OPENIMS DMS...5 2.1 Login...5 2.2 Language choice...5 3 OPENIMS
2/24/2010 ClassApps.com
 SelectSurvey.NET Training Manual This document is intended to be a simple visual guide for non technical users to help with basic survey creation, management and deployment. 2/24/2010 ClassApps.com Getting
WHAT S NEW IN WORD 2010 & HOW TO CUSTOMIZE IT
 WHAT S NEW IN WORD 2010 & HOW TO CUSTOMIZE IT The Ribbon... 2 Default Tabs... 2 Contextual Tabs... 2 Minimizing and Restoring the Ribbon... 3 Customizing the Ribbon... 3 A New Graphic Interface... 5 Live
Learn About Analysis, Interactive Reports, and Dashboards
 Learn About Analysis, Interactive Reports, and Dashboards This document supports Pentaho Business Analytics Suite 5.0 GA and Pentaho Data Integration 5.0 GA, documentation revision February 3, 2014, copyright
Managing your Joomla! 3 Content Management System (CMS) Website Websites For Small Business
 Website Websites For Small Business") 2015 Managing your Joomla! 3 Content Management System (CMS) Website Websites For Small Business This manual will take you through all the areas that you are likely to use in order to maintain, update
2015 Managing your Joomla! 3 Content Management System (CMS) Website Websites For Small Business This manual will take you through all the areas that you are likely to use in order to maintain, update
How To Change Your Site On Drupal Cloud On A Pcode On A Microsoft Powerstone On A Macbook Or Ipad (For Free) On A Freebie (For A Free Download) On An Ipad Or Ipa (For
 On A Freebie (For A Free Download) On An Ipad Or Ipa (For") How-to Guide: MIT DLC Drupal Cloud Theme This guide will show you how to take your initial Drupal Cloud site... and turn it into something more like this, using the MIT DLC Drupal Cloud theme. See this
How-to Guide: MIT DLC Drupal Cloud Theme This guide will show you how to take your initial Drupal Cloud site... and turn it into something more like this, using the MIT DLC Drupal Cloud theme. See this
JOOMLA 2.5 MANUAL WEBSITEDESIGN.CO.ZA
 JOOMLA 2.5 MANUAL WEBSITEDESIGN.CO.ZA All information presented in the document has been acquired from http://docs.joomla.org to assist you with your website 1 JOOMLA 2.5 MANUAL WEBSITEDESIGN.CO.ZA BACK
Infoview XIR3. User Guide. 1 of 20
 Infoview XIR3 User Guide 1 of 20 1. WHAT IS INFOVIEW?...3 2. LOGGING IN TO INFOVIEW...4 3. NAVIGATING THE INFOVIEW ENVIRONMENT...5 3.1. Home Page... 5 3.2. The Header Panel... 5 3.3. Workspace Panel...
Creating Interactive PDF Forms
 Creating Interactive PDF Forms Using Adobe Acrobat X Pro Information Technology Services Outreach and Distance Learning Technologies Copyright 2012 KSU Department of Information Technology Services This
Logi Ad Hoc Reporting Report Design Guide
 Logi Ad Hoc Reporting Report Design Guide Version 10.2 Last Updated: May 2012 Page 2 Table of Contents INTRODUCTION... 4 What is Logi Ad Hoc Reporting?... 5 CHAPTER 1 Getting Started... 6 Learning the
USER GUIDE. Unit 2: Synergy. Chapter 2: Using Schoolwires Synergy
 USER GUIDE Unit 2: Synergy Chapter 2: Using Schoolwires Synergy Schoolwires Synergy & Assist Version 2.0 TABLE OF CONTENTS Introductions... 1 Audience... 1 Objectives... 1 Before You Begin... 1 Getting
Logi Ad Hoc Reporting Report Design Guide
 Logi Ad Hoc Reporting Report Design Guide Version 11.2 Last Updated: March, 2014 Page 2 Table of Contents INTRODUCTION... 4 What is Logi Ad Hoc Reporting?... 5 CHAPTER 1 Getting Started... 6 Learning the
Email Marketing. User Guide. July 2012. Welcome to AT&T Website Solutions SM
 July 2012 Email Marketing User Guide Welcome to AT&T Website Solutions SM We are focused on providing you the very best web hosting service including all the tools necessary to establish and maintain a
Results CRM 2012 User Manual
 Results CRM 2012 User Manual A Guide to Using Results CRM Standard, Results CRM Plus, & Results CRM Business Suite Table of Contents Installation Instructions... 1 Single User & Evaluation Installation
NDSU Technology Learning & Media Center. Introduction to Google Sites
 NDSU Technology Learning & Media Center QBB 150C 231-5130 www.ndsu.edu/its/tlmc Introduction to Google Sites Get Help at the TLMC 1. Get help with class projects on a walk-in basis; student learning assistants
Bitrix Site Manager 4.1. User Guide
 Bitrix Site Manager 4.1 User Guide 2 Contents REGISTRATION AND AUTHORISATION...3 SITE SECTIONS...5 Creating a section...6 Changing the section properties...8 SITE PAGES...9 Creating a page...10 Editing
HOW TO USE THIS GUIDE
 HOW TO USE THIS GUIDE This guide provides step-by-step instructions for each exercise. Anything that you are supposed to type or select is noted with various types and colors. WHEN YOU SEE THIS Click Help
User Guide. Publication Date: October 30, 2015. Metalogix International GmbH., 2008-2015 All Rights Reserved.
 ControlPoint for Office 365 Publication Date: October 30, 2015 All Rights Reserved. This software is protected by copyright law and international treaties. Unauthorized reproduction or distribution of
Handout: Word 2010 Tips and Shortcuts
 Word 2010: Tips and Shortcuts Table of Contents EXPORT A CUSTOMIZED QUICK ACCESS TOOLBAR... 2 IMPORT A CUSTOMIZED QUICK ACCESS TOOLBAR... 2 USE THE FORMAT PAINTER... 3 REPEAT THE LAST ACTION... 3 SHOW
Cascade Server. End User Training Guide. OIT Training and Documentation Services OIT TRAINING AND DOCUMENTATION. oittraining@uta.
 OIT Training and Documentation Services Cascade Server End User Training Guide OIT TRAINING AND DOCUMENTATION [email protected] http://www.uta.edu/oit/cs/training/index.php 2013 CONTENTS 1. Introduction
Intellect Platform - Tables and Templates Basic Document Management System - A101
 Intellect Platform - Tables and Templates Basic Document Management System - A101 Interneer, Inc. 4/12/2010 Created by Erika Keresztyen 2 Tables and Templates - A101 - Basic Document Management System
DCA. Document Control & Archiving USER S GUIDE
 DCA Document Control & Archiving USER S GUIDE Decision Management International, Inc. 1111 Third Street West Suite 250 Bradenton, FL 34205 Phone 800-530-0803 FAX 941-744-0314 www.dmius.com Copyright 2002,
Novell ZENworks Asset Management 7.5
 Novell ZENworks Asset Management 7.5 w w w. n o v e l l. c o m October 2006 USING THE WEB CONSOLE Table Of Contents Getting Started with ZENworks Asset Management Web Console... 1 How to Get Started...
Internet Explorer 7. Getting Started The Internet Explorer Window. Tabs NEW! Working with the Tab Row. Microsoft QUICK Source
 Microsoft QUICK Source Internet Explorer 7 Getting Started The Internet Explorer Window u v w x y { Using the Command Bar The Command Bar contains shortcut buttons for Internet Explorer tools. To expand
SonicWALL GMS Custom Reports
 SonicWALL GMS Custom Reports Document Scope This document describes how to configure and use the SonicWALL GMS 6.0 Custom Reports feature. This document contains the following sections: Feature Overview
Copyright EPiServer AB
 Table of Contents 3 Table of Contents ABOUT THIS DOCUMENTATION 4 HOW TO ACCESS EPISERVER HELP SYSTEM 4 EXPECTED KNOWLEDGE 4 ONLINE COMMUNITY ON EPISERVER WORLD 4 COPYRIGHT NOTICE 4 EPISERVER ONLINECENTER
Asset Track Getting Started Guide. An Introduction to Asset Track
 Asset Track Getting Started Guide An Introduction to Asset Track Contents Introducing Asset Track... 3 Overview... 3 A Quick Start... 6 Quick Start Option 1... 6 Getting to Configuration... 7 Changing
Document Conventions... 2 Technical Requirements... 2. Logging On... 3 Logging Off... 3. Main Menu Panel... 4 Contents Panel... 4 Document Panel...
 Contents GETTING STARTED... 2 Document Conventions... 2 Technical Requirements... 2 LOGIN AND LOGOFF... 2 Logging On... 3 Logging Off... 3 USP-NF ONLINE HOME PAGE... 3 Main Menu Panel... 4 Contents Panel...
User Guide Version 5.1
 User Guide Version 5.1 Copyright 2010 Pearson Education, Inc. or its affiliate(s). All rights reserved. No part of this publication may be reproduced or transmitted in any form or by any means, electronic
WatchDox for Mac User Guide
 WatchDox for Mac User Guide Version 2.3.0 Confidentiality This document contains confidential material that is proprietary to WatchDox. The information and ideas herein may not be disclosed to any unauthorized
Getting Started - The Control Panel
 Table of Contents 1. Getting Started - the Control Panel Login Navigation Bar Domain Limits Domain User Account Properties Session Management 2. FTP Management Creating and Editing Users Accessing FTP
Strategic Asset Tracking System User Guide
 Strategic Asset Tracking System User Guide Contents 1 Overview 2 Web Application 2.1 Logging In 2.2 Navigation 2.3 Assets 2.3.1 Favorites 2.3.3 Purchasing 2.3.4 User Fields 2.3.5 History 2.3.6 Import Data
Database Forms and Reports Tutorial
 Database Forms and Reports Tutorial Contents Introduction... 1 What you will learn in this tutorial... 2 Lesson 1: Create First Form Using Wizard... 3 Lesson 2: Design the Second Form... 9 Add Components
NETWORK PRINT MONITOR User Guide
 NETWORK PRINT MONITOR User Guide Legal Notes Unauthorized reproduction of all or part of this guide is prohibited. The information in this guide is subject to change without notice. We cannot be held liable
6. If you want to enter specific formats, click the Format Tab to auto format the information that is entered into the field.
 Adobe Acrobat Professional X Part 3 - Creating Fillable Forms Preparing the Form Create the form in Word, including underlines, images and any other text you would like showing on the form. Convert the
Starting User Guide 11/29/2011
 Table of Content Starting User Guide... 1 Register... 2 Create a new site... 3 Using a Template... 3 From a RSS feed... 5 From Scratch... 5 Edit a site... 6 In a few words... 6 In details... 6 Components
Table of Contents. Part I Welcome. Part II Introduction. Part III Getting Started. Part IV The User Interface. Part V Quick Start Tutorials
 Contents I Table of Contents Part I Welcome 5 Part II Introduction 5 1 Overview... 5 2 Product... Levels 5 3 Technical... Support 6 4 Copyright... 7 Part III Getting Started 7 1 Installation... 7 2 Register...
EMC Smarts Network Configuration Manager
 EMC Smarts Network Configuration Manager Version 9.4.1 Advisors User Guide P/N 302-002-279 REV 01 Copyright 2013-2015 EMC Corporation. All rights reserved. Published in the USA. Published October, 2015
InfoView User s Guide. BusinessObjects Enterprise XI Release 2
 BusinessObjects Enterprise XI Release 2 InfoView User s Guide BusinessObjects Enterprise XI Release 2 Patents Trademarks Copyright Third-party contributors Business Objects owns the following U.S. patents,
IBM Information Server
 IBM Information Server Version 8 Release 1 IBM Information Server Administration Guide SC18-9929-01 IBM Information Server Version 8 Release 1 IBM Information Server Administration Guide SC18-9929-01
Mail Chimp Basics. Glossary
 Mail Chimp Basics Mail Chimp is a web-based application that allows you to create newsletters and send them to others via email. While there are higher-level versions of Mail Chimp, the basic application
WatchDox Administrator's Guide. Application Version 3.7.5
 Application Version 3.7.5 Confidentiality This document contains confidential material that is proprietary WatchDox. The information and ideas herein may not be disclosed to any unauthorized individuals
Synergy SIS Grade Book User Guide
 Synergy SIS Grade Book User Guide Edupoint Educational Systems, LLC 1955 South Val Vista Road, Ste 200 Mesa, AZ 85204 Phone (877) 899-9111 Fax (800) 338-7646 Volume 01, Edition 01 April 2010 Copyright
Using the Content Management System 05-02-12
 Using the Content Management System 05-02-12 Using the Content Management System Introduction 2 Logging In 3 Using the Editor 4 Basic Text Editing 5 Pasting Text 7 Adding Hyperlinks 8 Adding Images 9 Style
REUTERS/TIM WIMBORNE SCHOLARONE MANUSCRIPTS COGNOS REPORTS
 REUTERS/TIM WIMBORNE SCHOLARONE MANUSCRIPTS COGNOS REPORTS 28-APRIL-2015 TABLE OF CONTENTS Select an item in the table of contents to go to that topic in the document. USE GET HELP NOW & FAQS... 1 SYSTEM
Appspace 5.X Reference Guide (Digital Signage) Updated on February 9, 2015
 Updated on February 9, 2015") Appspace 5.X Reference Guide (Digital Signage) Updated on February 9, 2015 1 TABLE OF CONTENTS 2 What is Appspace For Digital Signage... 4 3 Access Appspace... 4 4 Best Practices and Notes... 4 5 Appspace
Appspace 5.X Reference Guide (Digital Signage) Updated on February 9, 2015 1 TABLE OF CONTENTS 2 What is Appspace For Digital Signage... 4 3 Access Appspace... 4 4 Best Practices and Notes... 4 5 Appspace
USC Aiken CMS Manual. A manual on using the basic functions of the dotcms system. Office of Marketing and Community Relations-USC Aiken
 USC Aiken CMS Manual A manual on using the basic functions of the dotcms system Office of Marketing and Community Relations-USC Aiken Table Of Contents Introduction/How to Use Manual... 2 Logging In...
Content Management System User Guide
 Content Management System User Guide support@ 07 3102 3155 Logging in: Navigate to your website. Find Login or Admin on your site and enter your details. If there is no Login or Admin area visible select
Ingeniux 8 CMS Web Management System ICIT Technology Training and Advancement ([email protected])
") Ingeniux 8 CMS Web Management System ICIT Technology Training and Advancement ([email protected]) Updated on 10/17/2014 Table of Contents About... 4 Who Can Use It... 4 Log into Ingeniux... 4 Using Ingeniux
Ingeniux 8 CMS Web Management System ICIT Technology Training and Advancement ([email protected]) Updated on 10/17/2014 Table of Contents About... 4 Who Can Use It... 4 Log into Ingeniux... 4 Using Ingeniux
isupport 15 Release Notes
 isupport 15 Release Notes This document includes new features, changes, and fixes in isupport v15. The Readme.txt file included with the download includes a list of known issues. New Features in isupport
Customer admin guide. UC Management Centre
 Customer admin guide UC Management Centre June 2013 Contents 1. Introduction 1.1 Logging into the UC Management Centre 1.2 Language Options 1.3 Navigating Around the UC Management Centre 4 4 5 5 2. Customers
UH CMS Basics. Cascade CMS Basics Class. UH CMS Basics Updated: June,2011! Page 1
 UH CMS Basics Cascade CMS Basics Class UH CMS Basics Updated: June,2011! Page 1 Introduction I. What is a CMS?! A CMS or Content Management System is a web based piece of software used to create web content,
Using the SAS Enterprise Guide (Version 4.2)
") 2011-2012 Using the SAS Enterprise Guide (Version 4.2) Table of Contents Overview of the User Interface... 1 Navigating the Initial Contents of the Workspace... 3 Useful Pull-Down Menus... 3 Working with
2011-2012 Using the SAS Enterprise Guide (Version 4.2) Table of Contents Overview of the User Interface... 1 Navigating the Initial Contents of the Workspace... 3 Useful Pull-Down Menus... 3 Working with
ACHieve Access 4.3 User Guide for Corporate Customers
 ACHieve Access 4.3 User Guide for Corporate Customers January 2015 Citizens Bank 1 February 2015 Table of Contents SECTION 1: OVERVIEW... 4 Chapter 1: Introduction... 5 How to Use This Manual... 5 Overview
Evaluator s Guide. PC-Duo Enterprise HelpDesk v5.0. Copyright 2006 Vector Networks Ltd and MetaQuest Software Inc. All rights reserved.
 Evaluator s Guide PC-Duo Enterprise HelpDesk v5.0 Copyright 2006 Vector Networks Ltd and MetaQuest Software Inc. All rights reserved. All third-party trademarks are the property of their respective owners.
How To Use Query Console
 Query Console User Guide 1 MarkLogic 8 February, 2015 Last Revised: 8.0-1, February, 2015 Copyright 2015 MarkLogic Corporation. All rights reserved. Table of Contents Table of Contents Query Console User
ELOQUA INSIGHT Reporter User Guide
 ELOQUA INSIGHT Reporter User Guide Copyright 2012 Eloqua Corporation. All rights reserved. July 2012 revision. Table of Contents Preface... 5 Introduction toeloqua Insight Business Intelligence... 6 Introduction
August 2014 Release Notes Version 14.0.72.6
 August 2014 Release Notes Version 14.0.72.6 i NOTICES ServicePRO Release Notes August 2014 HelpSTAR and ServicePRO are registered trademarks of Help Desk Technology International Corporation. This publication
Version 7 Editor s Manual
 Version 7 Editor s Manual Contents 1. Introduction... 3 2. Getting started with Umbraco... 2.1 Logging In and Out... 2.2 Umbraco Interface... 2.2.1 Initial View... 2.2.2 Various Screen Sizes... 2.3 Creating,
Chapter 15: Forms. User Guide. 1 P a g e
 User Guide Chapter 15 Forms Engine 1 P a g e Table of Contents Introduction... 3 Form Building Basics... 4 1) About Form Templates... 4 2) About Form Instances... 4 Key Information... 4 Accessing the Form
DroboAccess User Manual
 DroboAccess User Manual Release 8.2 The DroboAccess developers June 02, 2016 CONTENTS 1 DroboAccess 8.2 User Manual Introduction 1 2 Configuration of DroboAccess 8.2 3 2.1 Users, passwords and share management................................
Web Portal User Guide. Version 6.0
 Web Portal User Guide Version 6.0 2013 Pitney Bowes Software Inc. All rights reserved. This document may contain confidential and proprietary information belonging to Pitney Bowes Inc. and/or its subsidiaries
Manual English KOI Desktop App 2.0.x
 Manual English KOI Desktop App 2.0.x KOI Kommunikation, Organisation, Information Comm-Unity EDV GmbH 2010 Contents Introduction... 3 Information on how to use the documentation... 3 System requirements:...
BUSINESS OBJECTS XI WEB INTELLIGENCE
 BUSINESS OBJECTS XI WEB INTELLIGENCE SKW USER GUIDE (Skilled Knowledge Worker) North Carolina Community College Data Warehouse Last Saved: 3/31/10 9:40 AM Page 1 of 78 Contact Information Helpdesk If you
GUIDE. Web Client Application. Model: ER 4.0. Release 4.0.00 / Version No.: 1.01
 8e6R Enterprise Reporter USER GUIDE Web Client Application Model: ER 4.0 Release 4.0.00 / Version No.: 1.01 ii 8E6 TECHNOLOGIES, ENTERPRISE REPORTER WEB CLIENT USER GUIDE 8E6 ENTERPRISE REPORTER WEB CLIENT
Legal Notes. Regarding Trademarks. 2012 KYOCERA Document Solutions Inc.
 Legal Notes Unauthorized reproduction of all or part of this guide is prohibited. The information in this guide is subject to change without notice. We cannot be held liable for any problems arising from
Alkacon. OpenCms 8 User Manual
 Version: 1.3 Date: Wednesday, November 23, 2011 Table of Content Table of Content... 2 1 Why choose OpenCms 8?... 4 1.1 Create an entire website within minutes with OpenCms 8... 4 2 Getting Started...
Salient Dashboard Designer 5.75. Training Guide
 Salient Dashboard Designer 5.75 Training Guide Salient Dashboard Designer Salient Dashboard Designer enables your team to create interactive consolidated visualizations of decision support intelligence,
User s manual 1. Introduction 2. Installation & Requirements 3. Your Tom s Planner account & login 4. Open & Save 5. Grid 6. Blue timeline 7.
 User s manual 1. Introduction 3 2. Installation & Requirements 3 3. Your Tom s Planner account & login 4 4. Open & Save 4 5. Grid 6 Rows and groups 6 Columns 7 Time blocks 10 Icons 10 Comments 11 Dependencies
Getting Started with Mamut Online Desktop
 // Mamut Business Software Getting Started with Mamut Online Desktop Getting Started with Mamut Online Desktop Contents Welcome to Mamut Online Desktop... 3 Getting Started... 6 Status... 23 Contact...
How To Create A Powerpoint Intelligence Report In A Pivot Table In A Powerpoints.Com
 Sage 500 ERP Intelligence Reporting Getting Started Guide 27.11.2012 Table of Contents 1.0 Getting started 3 2.0 Managing your reports 10 3.0 Defining report properties 18 4.0 Creating a simple PivotTable
Richmond Systems. Self Service Portal
 Richmond Systems Self Service Portal Contents Introduction... 4 Product Overview... 4 What s New... 4 Configuring the Self Service Portal... 6 Web Admin... 6 Launching the Web Admin Application... 6 Setup