Big Red Cloud User Guide.
|
|
|
- Toby Bond
- 9 years ago
- Views:
Transcription
1 User Guide Big Red Cloud, 2012

2 Table of Contents Contact Us 4 Setting Up a New Company 5 Required Setup Data 5 Company Details 6 Bank Accounts 8 Analysis Categories 9 VAT Rates 11 Suppliers 13 Customers 15 Products 18 Cash Book Opening Balance 20 Changing Setup Info 21 Entering Transactions 22 Entering Transactions 22 Months 13, 14 and Debtor and Creditor Journals 24 Changing or Deleting Transactions 26 Sales Ledger 27 Sales Ledger Overview 27 Sales Book Overview 28 Sales Invoice Entry 29 Sales Transaction Entry 33 Reverse Charge VAT Invoice 36 Printing Sales Invoices 37 Printing Statements 38 Bank Payments 40 Bank Payments Overview 40 Bank Payments Book Entries 41 Regular Payments 44 Transfers between Bank Accounts 45 Cash Book 46 Cash Book Overview 46 Cash Receipts 48 Recording VAT on Cash Receipts 51 Cash Payments 52 Printing and Exporting 54 Transaction Reports 54 Exporting Reports to other Programs 55 Purchase Ledger 56 Purchases Book Overview 56 Purchases Transaction Entry 57 Purchases from EU Countries 60 VAT only Invoices 61 Reverse Charge Vat 62 View a Supplier Ledger Account 63 Purchase Ledger Reports 64 Bank Accounts 66 Bank Accounts Overview 66 Bank Reconciliation 67 Bank Reconciliation 67 p2

3 Preparing to do a Bank Reconciliation 68 Doing the Bank Reconciliation 70 VAT Returns 72 Standard VAT Report 72 Vat on Cash Receipts 74 VAT on Cash Receipts Overview 74 Cash Accounting VAT Reports 75 Receipts and Payments Allocation 77 Allocations Overview 77 Opening Balances 78 Allocating Receipts and Payments 79 Allocating to Credit Notes and Journals 81 Screen Displays and Reports 82 Setup Menu 83 Company Details 83 Nominal Accounts 84 Control Accounts 86 Analysis Categories 87 VAT Rates 88 Opening Cash Balances 89 Regular Payments 90 Options 91 Reference Settings 93 Lookup 94 Lookup Facility 94 Abbreviations 95 Utilities Menu 96 Form Design 96 Period Control 97 Nominal Ledger 98 Overview 98 Initial Setup of Nominal Ledger 99 Nominal Accounts 100 Control Accounts 102 Nominal Journals 104 Nominal Ledger Reports 106 Invoice and Statement Layouts 107 Changing Form Designs 107 p3


4 Contact Us big red cloud Rathdown Hall Upper Glenageary Road Glenageary Co. Dublin Within Ireland: Tel: Fax: Within the UK: Tel: Fax: Support : [email protected] Sales: [email protected] p4

5 Setting Up a New Company Required Setup Data Before you can enter transactions to Big Red Cloud you must setup: Analysis Categories (column headings) for each book - at least one category must be setup to use a book Vat Rates at least one for each type must be setup. The following must also be setup but can be done as required: Bank Accounts Suppliers and Customers Products Cash Book Opening Balance Select Setup on the top menu and select the required option The screen you should be looking at will be similar to that shown above. To complete the process of setting up the company you should now select each of the items in turn and enter the necessary information. p5

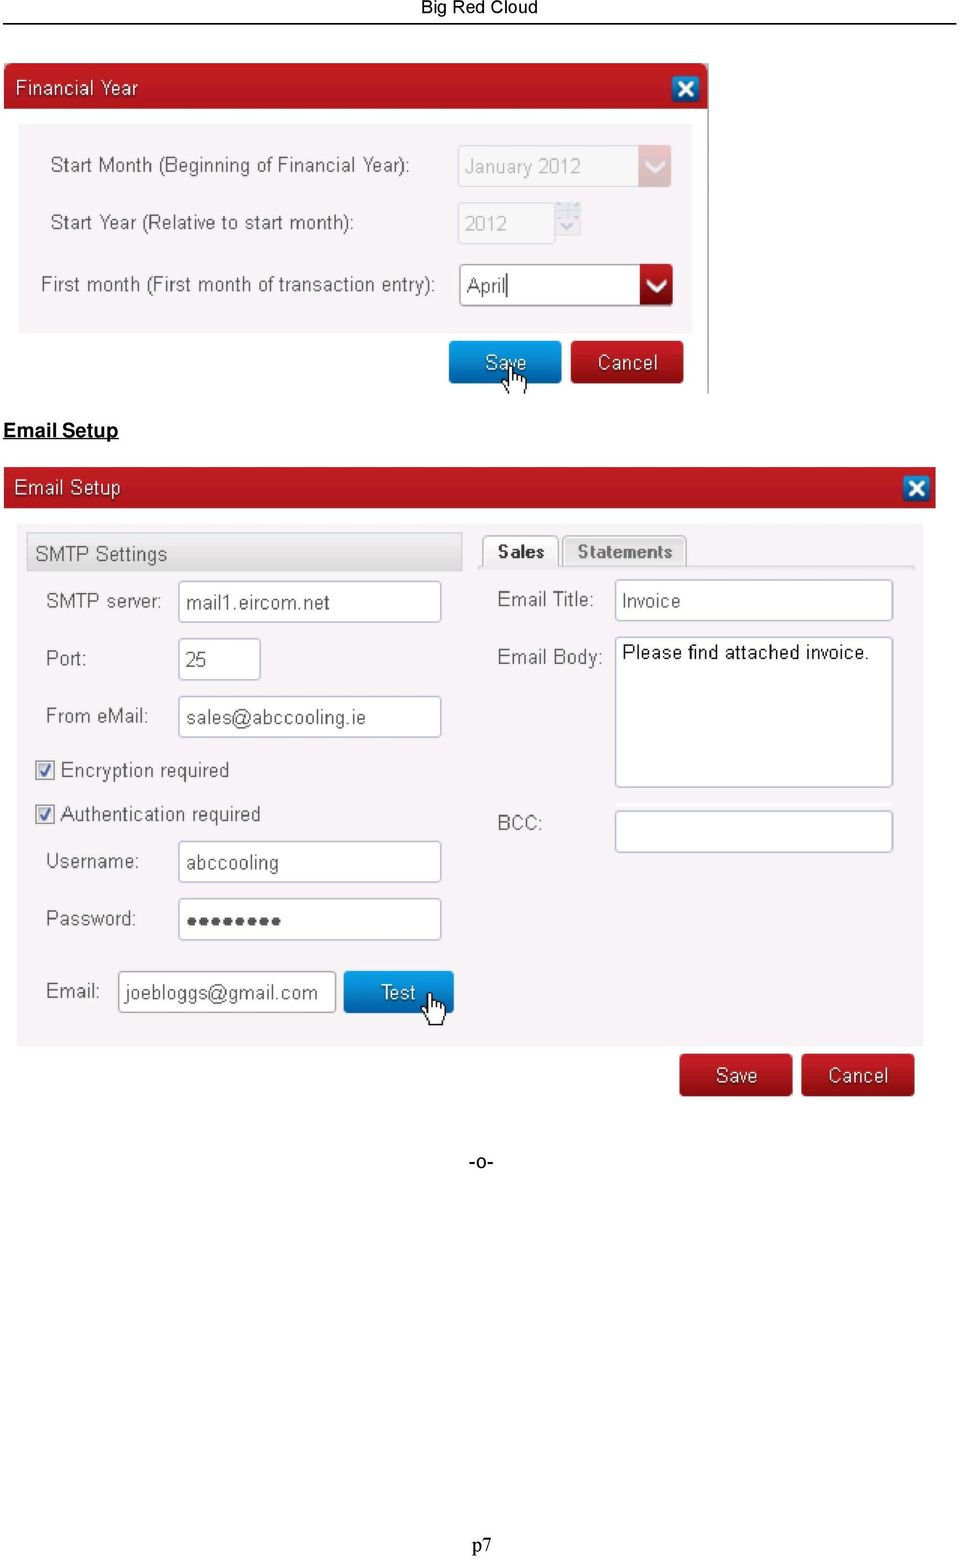
6 Company Details The Setup / Company Details menu gives the following options: General This information will already have been entered when the company was created. Financial Year This information will already have been entered when the company was created. Changes to the financial year cannot not be made after transactions are entered. p6

7 Setup p7

8 Bank Accounts Up to forty bank accounts can be maintained. When a Bank Account has been setup at least one Analysis Category must be assigned to it, see Setup: Analysis Categories To setup a Bank Accounts click on the Lookup icon and select the Bank Accounts tab. At the browse screen click on Add. A screen similar to the one below will be displayed: A/C Code You must assign a unique code to each Bank Account. Details Name of the bank account. You may wish to include the bank account number. Last Chq Enter the last six digits of the last cheque number written prior to starting to use Big Red Cloud. When entering cheques the Reference will default to the next cheque number. Nominal This will only be displayed when the Nominal is switched On. Enter the Nominal Account to be the Control Account for this Bank Account. You cannot assign a Nominal Account that already has transactions posted to it. Default Bank Account If you set-up more than one bank account, select the one used most frequently as the 'Default Bank Account' Opening Balance This is the reconciled (or true) bank balance rather than the balance from your bank statement. The difference lies in any cheques written or lodgements made before starting to use the system which have not yet appeared on a bank statement, i.e. outstanding items. p8


9 Analysis Categories To use any Book or Bank Account at least one Analysis Category must be setup. An Analysis Category is an heading under which an amount is analysed. Total Amount, Vat Rates etc. should not be entered here - this information is already setup. On the top menu select Setup / Analysis Categories. The warning below is displayed: The main issue with making changes to Analysis Categories after data is entered deleting categories as the category analysis for any transaction using a deleted category will be incorrect. Click Yes to display a screen similar to the one below: On the left-hand side is a list of the Books of Entry and any bank accounts that have been setup. Click on a book or bank account to see the Analysis Categories that have been setup. Up to 30 analysis categories can be setup for book or bank account. Enter the Category title and the Nominal Account Code (if applicable) and press the + sign on the right-hand side to save the Category entry. If you have come to Big Red Cloud from a hand-written bookkeeping system you can probably use most of the analysis headings you are already using. Headings such as Date, Amount, Vat etc. should not be included here. The categories can be added to or changed to suit your requirements. If you are unsure initially of what categories you require you can setup one and return later to add more. Your accountant may also be able to advise you on the category headings. User Defined Fields User Defined Fields are for additional items for information for each transaction that you wish specify. In the above example there are two User Defined Fields 'Stm Date' and 'Approved'. These will appear on the Bank p9

10 Payments Book transaction screen and the Statement Date and who approved the payment can be entered. Column Headings already available Each book has built-in headings already set up so these should not be repeated in the Analysis Categories. The standard heading are data such as: Date Transaction date A/C Code Account Code of Customer or Supplier Details Description or name of Customer or Supplier Amount Total amount of transaction Discount Amount of Discount Received or Allowed Ledger Amount posted to Customer's or Supplier's account Lodgement Amount lodged (Cash Book Payments) Bank A/C Bank A/c Code VAT Vat Amount Vat Analysis Break-down of Vat net amounts and rates p10


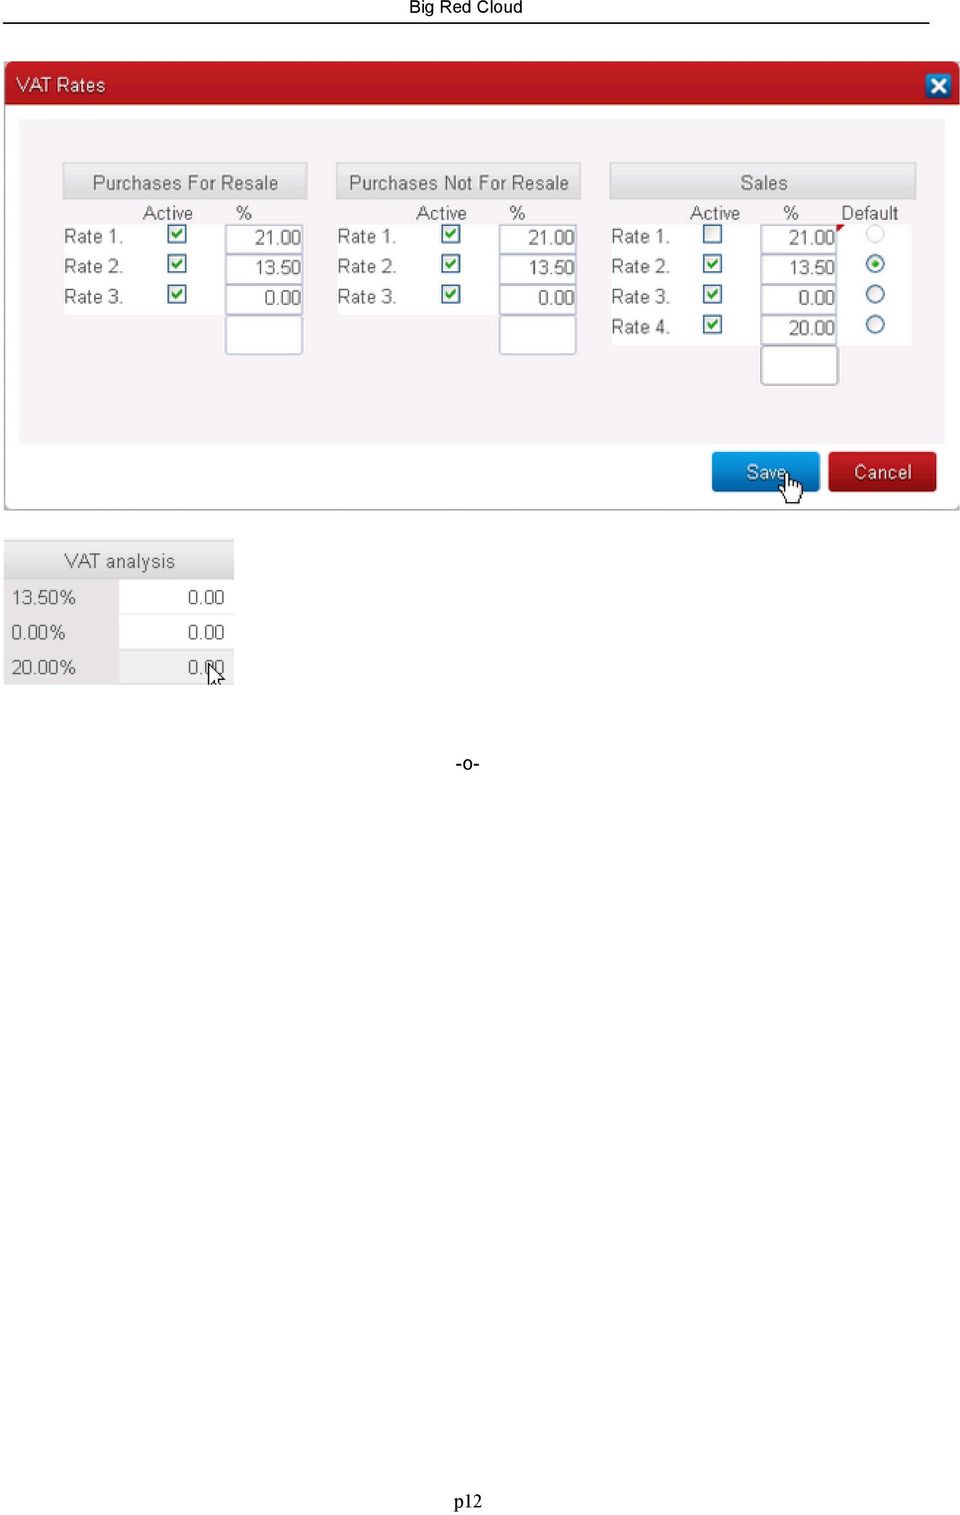
11 VAT Rates You must setup at least one Vat Rate. A Vat Rate of zero should be setup for transactions not subject to VAT. To Setup VAT Rates select Setup / Vat Rate from the top menu. A warning screen is displayed: Click 'Yes' to continue, a screen similar to the one below is displayed: Some businesses may not have any Purchases for Resale e.g. a Service Business. Enter the Purchases and Sales VAT Rates used in your business. Tick 'Active' to make a rate available for data entry. For Sales you can also select a Default Vat Rate, this is the rate Sales Invoices will default to. Changes to VAT Rates As a general rule VAT Rates should be added rather than changed. An existing rate can be changed rate if you are sure that there are no transactions in the system using that rate for example after the Year End has been run when Allocations are Off. When VAT Rates change you should add the new VAT Rate rather than change an existing one. This is particularly important when a change occurs after the start for your Financial Year or when Allocations is switched On as there may be transactions in the system that require the original rate. When a VAT Rate is no longer in use uncheck 'Active' so it is not available when entering data. For example the 21% rate is unchecked below and does not appear when Vat Analysis section of Sales transactions. p11


12 p12
13 Suppliers Before you can enter purchase invoices or details of payments to Suppliers, it is necessary to enter basic Supplier information into your Purchase Ledger By setting up a Supplier (or Creditor) you are creating a Purchase Ledger Account which is used to keep track of amounts owed and payments made to Suppliers. To set up Suppliers you will need their business Names and Addresses (and the Contact Names, Telephone and Fax numbers etc. if you wish to use them). You will also need a list of the opening balances on your Supplier accounts. Add a New Supplier Select Suppliers from the Setup menu or the Lookup Screen. At the Supplier browse screen click on Add A screen similar to the one below will be displayed: A/C Code You will be asked to specify a unique code for each Supplier. Each code can be up to 8 characters long and can consist of all numbers, all letters or a combination of both. If you are already using a coding system you may wish to retain it. If you wish to set up new codes we recommend that you consider the following: If using purely numeric codes pad out with zeroes 001, 002 etc. rather than simply 1, 2 etc. so that sorting will be consistent in reports and lookups. If you have a small number of Suppliers then consider using the first three or four letters of the Supplier name as a code e.g. GUI or GUIN for Guinness. With a larger number of accounts a combination of letters and numbers works well, e.g. G or GA for Gainers, G or GR for Groves & Co. etc. Our Code This is the code by which your Supplier identifies you. It is for memorandum purposes only. p13


14 Opening Balance The Opening Balance is the balance due when starting to use Big Red Cloud i.e. the First Month of Transaction Entry. For example your Financial Year may start in January but you may be starting to use Big Red Cloud in August and have set the First Month to August. To enter the Supplier s opening balance click at the button marked O/Balance. When satisfied with the accuracy of the balance either click on Ok to save and close. When Manual Allocations is not selected a screen similar to the one below is displayed. Enter the aged break-down, the total Balance is automatically updated. The Opening Balance screen for a Supplier (showing the Age Analysis method in use) p14

15 Customers Before you can enter sales invoices, or details of receipts from Customers, it is necessary to enter basic Customer information into your Sales Ledger. By setting up a Customer (or Debtor) you are creating a Sales Ledger Account which is used to hold details of sales made to and payments received from your Customers. To set up customers you will need their business Names and Addresses (and the Contact Names, Telephone and Fax numbers etc. if you wish to use them). You will also need a list of the opening balances on your Customer accounts. Add a New Customer Select Customers from the Setup menu or the Lookup Screen. At the Customer browse screen click on Add A screen similar to the one below will be displayed: A/c Code You will be asked to specify a unique code for each Customer. Each code can be up to 8 characters long and can consist of all numbers, all letters or a combination of both. If you are already using a coding system you may wish to retain it. If you wish to set up new codes we recommend that you consider the following: If using purely numeric codes pad out with zeroes 001, 002 etc. rather than simply 1, 2 etc. so that sorting will be consistent in reports and lookups. p15

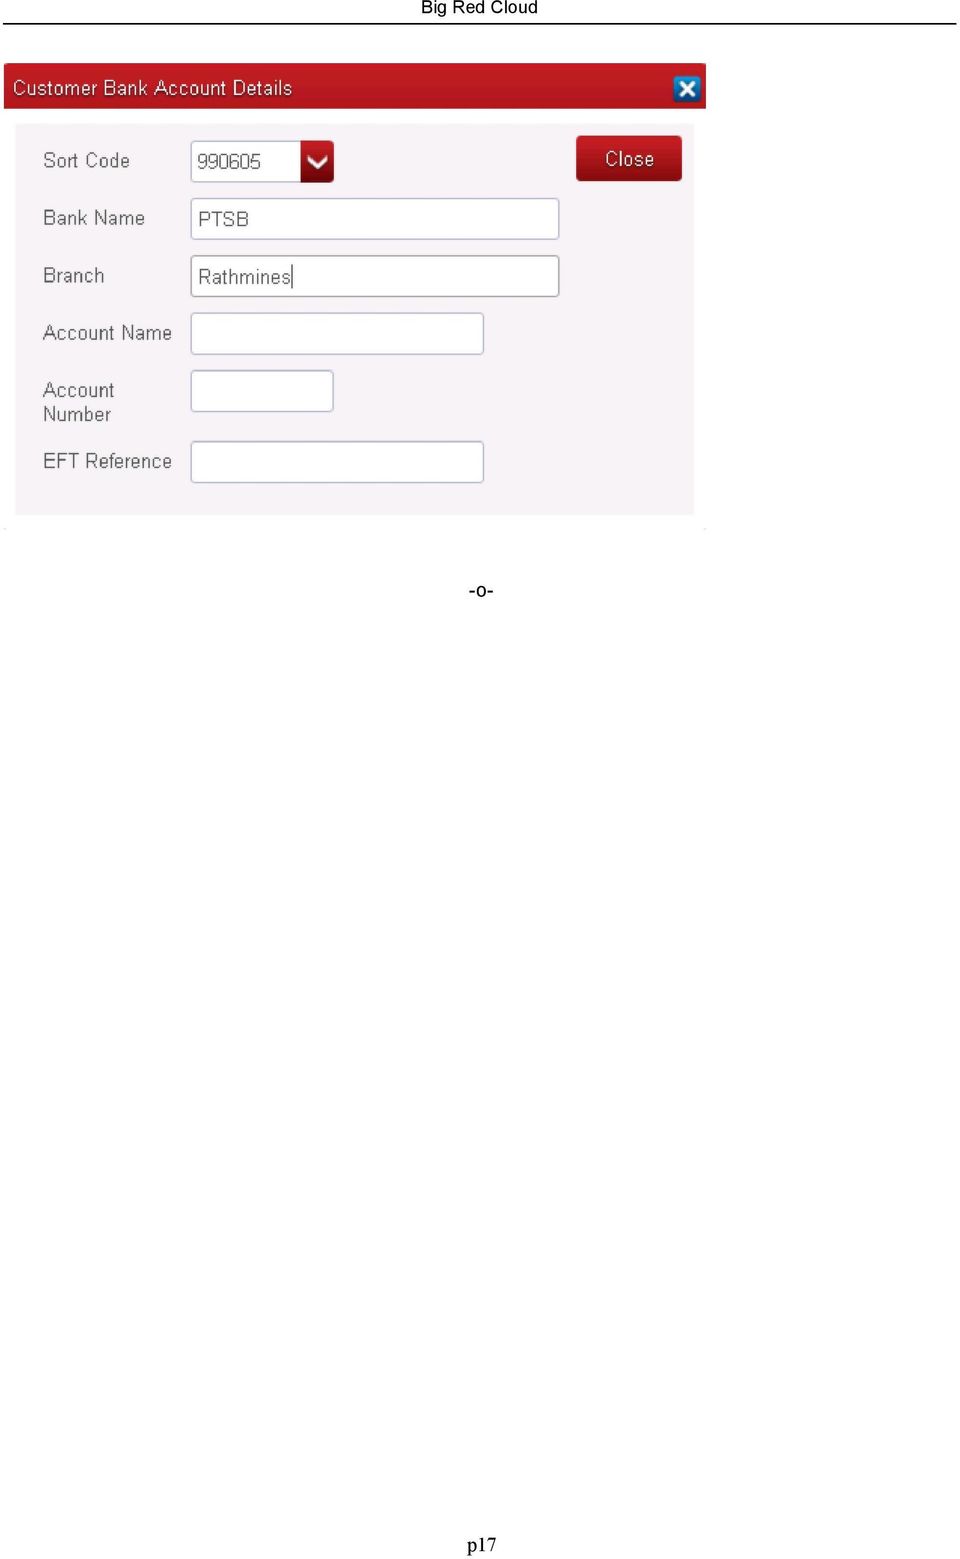
16 If you have a small number of Customers then consider using the first three or four letters of the Customer name as a code e.g. GUI or GUIN for Guinness. With a larger number of accounts a combination of letters and numbers works well, e.g. G or GA for Gainers, G or GR for Groves & Co. etc. Our Code This is the code by which your Customer identifies you. It is for memorandum purposes only. Opening Balance The Opening Balance is the balance due when starting to use Big Red Cloud i.e. the First Month of Transaction Entry. For example your Financial Year may start in January but you may be starting to use Big Red Book in August and have set the First Month to August. To enter the Customer s opening balance click at the button marked O/Balance. When satisfied with the accuracy of the balance either click on OK or press the letter O on the keyboard. When Manual Allocations is not selected a screen similar to the one below is displayed. Enter aged break-down, the balance is automatically updated. Opening Balance screen for a Customer (showing the Age Analysis method in use) Bank Click on the Bank button to maintain details of the customer's bank account. A screen similar to the one below is displayed. p16

17 p17

18 Products The Products Listing can be accessed from the Setup menu or from the Lookup screen Products tab. To Add a Product click on the Add button to display the following screen: Notes on setting up Product Codes Code This is a unique code up to 15 characters consisting of all numbers, all letters or a combination of both. Whether or not these Product Codes appear on your printed Invoices depends on which Invoice Layout you choose. For instance, an Accountant may wish to set up a code ACC1 with a description For professional services in preparing year end accounts etc. When creating an invoice he/she will want to use the feature to retrieve the standard description and fee, but not have the code ACC1 printed on the Invoice. The Product Code cannot be changed. Details Enter up to 8 lines of text to describe the Product or Service to be associated with this Product Code. This information will be printed on Invoices when you select this code from the Products File. Unit Price This is the price per unit of this Product or Service. Use default vat rate? Tick to always use the vat rate given for this product. If this is not ticked the system default Vat Rate as selected in Setup / Vat Rates will be the one assigned by default. Default vat rate If a default vat rate is to be used it is entered here, this entry is ignored if 'Use default vat rate?' is not ticked. p18

19 p19

 at the time of starting to use the system.")
20 Cash Book Opening Balance Initially Opening Balance for the Cash Book is entered in Setup / Cash Book Opening Balance. The balance is the balances as at the First Month of transaction entry. They will be updated as part of the Year-End Routine for subsequent financial years. The Cash Book Opening Balance is any money on hand (but not in the bank) at the time of starting to use the system. It would typically be the total of cash, cheques etc. received from customers but not lodged by the first of the month you start to use the system. p20
 at the time of starting to use the system.")
21 Changing Setup Info When you have set up the Big Red Cloud for your company you are ready to enter data. Most of the information you have entered can be changed at any time by selecting the relevant section from the Setup menu. However, there are a number of important exceptions to this: The Start Month of your accounting year, the Year itself and the First Month of transaction entry should not be changed once any entry has been made into any of the books. The Start Month itself cannot be changed once it has been set up initially. Analysis Categories cannot be deleted once they have been used in a transactions. However the heading can be changed but you should do so with great care. Amounts entered/analysed into a column will not automatically be moved if the position of a column is changed. These same principles apply to the changing/deletion of User Defined Fields. VAT Rates cannot be deleted once they have been used in transactions. New rates can be entered when required. p21

22 Entering Transactions Entering Transactions The general principles of data entry are the same for all transactions in the day books. The title bar shows you exactly where you are in the Big Red Cloud : the Name of the Company then the Version Number of your copy of the software, then a hyphen and the identity of the book e.g.[ Purchases Book] that is on open display. Browse Screen Transactions are presented in a listing or browse screen divided in months and the current month is always high-lighted if it is available. The twelve months of the Financial Year are named and the three months of the next year are number as months 13, 14 and 15. It is important to select the correct month for transactions. If and date is entered that is not in the month selected a warning is given, this can be ignored but entering data for one month into the wrong month tab can cause confusion as most report are by the month transactions are entered into rather than the transaction date. Data Entry Date This always defaults to the current system date. When transactions are entered consecutively the date last entered is retained. When the date field is selected the date can be changed one day at a time by using the + and - keys Note: If your chosen transaction date does not correspond with the period you have selected to work in then you will be advised of it by a Date Warning Message. Codes Wherever a code is required pressing down-arrow to the right of the field will bring up a list of the available items such as Customers, Suppliers, Products or Nominal Codes. Navigation The <tab> key and the <enter> or <return> key move to the next field. p22
23 Months 13, 14 and 15 As well at the 12 months of the current year each book of first entry also has a Month 13, 14 and 15. This is to allow for transactions for the following year while finalizing entries for the year just complete. Note: The Nominal Ledger is restricted to the 12 months of the current year. When the Year-End Routine is run all entries made in Month 13, 14 and 15 become the entries in Months 1, 2 and 3 in the new year and are posted to the Nominal Ledger. p23

24 Debtor and Creditor Journals Debtor and Creditor Journals are direct adjustments to the balance on a Supplier s or Customer s account without making a normal entry in one of the day books. An example would be where you have a Customer s account with a small balance which you wish to write off. This can be done by making a Debtors Journal entry. Most adjustments to a Supplier s or Customer s balance will be made by the issuing of invoices or credit notes by your Supplier or by you and these should be entered in the Purchases Book or Sales Book in the usual way. However, the following are examples of situations where an entry to a Creditors or Debtors Journal may be necessary: Where adjustments to your Purchase Ledger or Sales Ledger balances have been advised to you by your accountant as part of your annual audit Where the writing-off of a balance due has been agreed with a Supplier or Customer and no credit note has subsequently been issued Where you have agreed a reduction in a Creditor's (Supplier s) balance as payment for goods supplied by you to them. (This is often referred to as a contra or trade-in ). Where a debt due to you is unlikely to be paid but you may not wish to issue a credit note to your Customer Note: The examples given above in no way constitute formal advice. In any given instance you may wish to consult you accountant before proceeding to adjust a balance using these routines. To make entries in the Creditors/Debtors Journal: 1. Click on the Debtors or Creditor Journal icons or in the Books menu select Journal Adjustments, and then either Creditor Journals or Debtor Journals 2. On display is the Creditors Journal or Debtors Journal, the formats of which are identical. 3. To begin entering a transaction either click on the Add button or press the A key. A new window entitled Add a Creditors Journal or Add a Debtors Journal is displayed. You can now fill in the blank entry form with the details of each transaction. p24
25 Notes on Creditors/Debtors Journal entries Month Either accept the current month which is on display, or pick-and-click whichever previous month to which this Journal transaction relates. Date Enter transaction date. As described earlier, the program attaches more importance to the month of entry than it does to the date of the transaction. Reference On display is the next sequential number as generated automatically by the program.. (The Creditors and Debtors Journals each have their own sequences). Unless there is a good reason for not doing so, you should simply accept this next number and move on. (If you start to use the Big Red Cloud midway through your Financial Year and you have already made Journal adjustments, then you may wish to overwrite the displayed number in order to reset the sequence). A/C Code Enter either the Supplier Code or the Customer Code of the company whose account you wish to adjust. Name The relevant Supplier s or Customer s name will automatically display in this box. Detail Type in whatever you choose (maximum 40 characters) to describe the transaction or pick-and-click an Abbreviation from the drop-down list, then move on. Note: Abbreviations are added through the Lookup facility which has its own icon/button. For Creditors/Debtors Journal transactions a useful narrative to have available (in Abbreviations) would be Balance written off. Debit Enter the amount by which you wish to debit the account. If entering a Creditors Journal, debiting the account will reduce the amount you owe the Supplier. If entering a Debtors Journal, debiting the account will increase the amount the Customer owes you. Credit Enter the amount by which you wish to credit the account. If entering a Creditors Journal, crediting the account will increase the amount you owe the Supplier. If entering a Debtors Journal, crediting the account will reduce the amount the Customer owes you. Note: A single transaction must contain either a Debit entry or a Credit entry; it cannot contain both. p25
26 Changing or Deleting Transactions All transactions can be changed or deleted except where Allocations is On and a transaction has been allocated to an Invoice or Payment. The Change and Delete facilities should be used with care. If, for instance, a Vat Return has been made for a given period, changing amounts or deleting transactions would mean that an manual adjustment would be required in the next Return to account for the discrepancy. Similarly, you should avoid making changes to Lodgement or Bank Payment amounts for any month/period for which you have already successfully reconciled your bank account(s). In the case of voided cheques or cancelled Purchase/Sales invoices you may prefer to change the entry to show zero amounts rather than delete the whole transaction. This approach has the advantage of allowing the system to show a record of all reference numbers rather than having gaps in reference number sequences (e.g. a missing cheque number). p26
27 Sales Ledger Sales Ledger Overview The Sales Ledger maintains records of transactions between your business and individual Customers. When you set up a new Customer you are creating a Sales Ledger Account. This account is automatically updated you enter a Sales Invoice or make an entry in the Sales Book. It is also automatically updated when you record in the Cash Receipts Book details of receipts from a customer and any discount given. Looking up the Sales Ledger account for a Customer will show you a list of invoices and credit notes you have sent to that Customer, payments received, details of any adjustments made to the account (e.g. for discount given) and the balance owed by the Customer. Information in the Sales Ledger can be accessed in a variety of ways: examining a Sales Ledger Account on screen and displaying/printing reports and Debtor Statements. p27

28 Sales Book Overview There are two types of Sales Book transactions: Sales Transactions are the summary details of a sale, no details of individual items are entered. Sales Invoices have a detail line for each item sold. This is required to produce a Sales Invoice for the customer. In the Sales Book screen the LO (Layout Number) column is blank for Sales Transactions, for Sales Invoices it is '1' or '2'. Open the Sales Book by clicking on the icon or selecting Books / Sales Book from the top menu. Click on the month tab to select the month required, all sales book entries for that month are displayed. To change the order in which transactions are displayed click on the column heading required eg. click on the 'Date' column heading to order by date. p28

29 Sales Invoice Entry Sales Invoices have a detail line for each item sold. This is required to produce a Sales Invoice for the customer. At the Sales Book browse screen click on the Add button. You will then be asked to Select Entry Type, select Sales Invoices, click OK. A screen similar to the one below is displayed. Notes on Producing a Sales Invoice/Credit Note Header Information Copy Existing Entry This button allows the information from a different Sales Book entry to be taken and used in a new entry. When the button is pressed, you are asked for both the Reference Number and the Account Code of the invoice to be copied. With this information, the Big Red Cloud fills in the details of the new invoice, which can then be edited if necessary, and saved. Date Enter the Invoice/Credit Note date. As described earlier, the program attaches more importance to the month of entry than it does to the date of the transaction. However, the date you enter here can be important because in the Sales Ledger (unlike in the Sales Book) Invoices are listed in transaction date sequence. Inv/Crn This box defaults to Sales Invoice. When entering a Credit Note change to 'Sales Credit Note' by clicking on the arrow to the right and selecting Sales Credit Note. p29
30 Number The next sequential Invoice Number is displayed and can be over-written. If you have chosen to have the Invoice Number assigned as the transaction is saved then 'AUTO' is displayed instead and cannot be changed. To change this option see Setup / References Settings. Note: When the Invoice Number is changed manually, the system will treat the new invoice number as the new start point. To return to the original next number you should overwrite it and thereby reset the sequence. Your Reference This box may be used to record any Customer Reference Number or Name such as their Purchase Order Number, the Name of the person who ordered the goods etc. Depending on which Invoice Layout you select this may print out with the description P.O. Number or Your Ref. Our Reference This box may be used for any additional reference you may wish to enter, e.g. your Delivery Docket Number or the Sales Representative who took the order etc. Name such as their Purchase Order Number, the Name of the person who ordered the goods etc. Depending on which Invoice Layout you select this may print out with the description Delivery Docket No. or Our Ref. VAT Type If the Invoice you are creating is in respect of goods/services supplied within the same state and is subject to VAT in the normal way, i.e. it is a Domestic transaction, then you need take no action, simply move on. If the Invoice is for goods/services delivered outside the state then you will need to change it. From the drop-down list point-and-click at whichever of the two alternatives is appropriate: Other EU Foreign - Non EU VAT Exempt Sale is to another EU state Sale for export to anywhere other than the EU Customer is VAT Exempt It is important that all non-domestic transactions are correctly coded so as that the VAT Return figures for Other EU and Foreign Sales are correct Account You must enter a Customer s A/C Code. Press F7 or click on the arrow on the right to see a list of Customers or add a new one. Once you enter a Sales Ledger A/C Code the relevant Customer s name will automatically display on the line adjacent to this box. The remainder of the Address (or Delivery Address, where relevant) will display on the other lines. Comments If required, type in whatever words or phrases you wish into this one line box. Depending on which Invoice Layout you select, these Comments are printed in different places on the Invoice. Terms: Net 30 Days is a typical example. User Defined Fields If relevant, complete either or both of these boxes. Line Items To add a Line Item click on the Add button. p30

31 The screen to Add a New Line Item to an Invoice Product Product code is not mandatory. Details of a line item can be entered without a Product Code. Enter the Product Code directly or lookup Products by clicking on the down-arrow to the right of the field. All the details entered when the product was set up will appear, and can be adjusted for this invoice, if necessary. Details Enter up to eight lines of Detail to describe the Product or Service sold to the Customer. If you entered a Product Code above, the stored description will be entered for you. You can amend the displayed description if you wish. Tip: You cannot leave blank lines in the middle of the description. If you wish to leave a gap it is recommended you enter an asterisk * or a full stop at the beginning of an otherwise blank line. Quantity The program defaults to showing a Quantity one. In all circumstances a Quantity must be entered.. For Credit Notes the default Quantity must minus. Unit Price Enter the Unit Selling Price, excluding VAT, of the Product or Service sold. If you entered a Product Code above the stored Unit Selling Price will be entered for you, though you can amend it if you wish. If you have opted to allow a previously set-up product to allow gross pricing, you will find that the net amount has been calculated into this box from the gross amount set for that product. VAT Rate Accept the displayed VAT Rate for this Product Code or select the appropriate rate from the dropdown list. The Net Amount, VAT Amount and Gross Total boxes are automatically updated. Analysis Categories Analyse the Net Amount of this Product/Detail line into one (or more) of the various analysis headings. The program will not allow you to proceed until the total of the Analysis Category amounts equals the Net Amount. Tip: When entering amounts in the Analysis Categories, the full or remaining unallocated amount can be entered into the box you are currently at by pressing the Page Down (PgDn) key. If you have to add additional Line Items to the Invoice, repeat the procedure described above. p31
32 The original Add a Sales Invoice/Credit Note screen with the Header information will then display a line-by-line summary of the Details you have just entered. Towards the bottom right-hand-side you will see the Invoice s Total Net, Total VAT and (Gross) Total. If you require to Add further items you may do so. To Change or Delete any of the items, highlight whichever line/item is appropriate and proceed. You can now either Save, Print or Cancel the Invoice: Save has the effect of immediately entering the Invoice details into the Sales Book and the Sales Ledger. Print saves the Invoice and then Prints the invoice directly to the default printer. Cancel cancels this Invoice and makes no entries in the system. p32

33 Sales Transaction Entry Sales Transactions are the summary details of a sale, no details of individual items are entered. At the Sales Book browse screen click on the Add button. You will then be asked to Select Entry Type, select Sales Book Entries, click OK. A screen similar to the one below is displayed. Sales Book entry screen Notes on Sales Book Entries Date Enter transaction date. Reference If the number is AUTO then the next available reference number is assigned to this transaction and will be applied when the transaction is Saved. This is primarily for multi-user configurations to facilitate the allocation of sequential reference numbers. To change your preference see Setup / Reference Settings. If 'AUTO' is not displayed then it is the next Invoice No. If the reference number shown is not the one you want you can change it. Account In all circumstances you must enter a Customer s Account Code. You must enter a Customer s Account Code. Click on the down-arrow in the Account field to see a list of Customers or add a new one. Name Once you enter a Sales Ledger A/C Code the relevant Customer s name will automatically display in this box. p33
34 Detail This box, which you may skip if you do not wish to use it, allows you to further describe the transaction you are entering. Type in whatever you choose (maximum 40 characters) or select an Abbreviation from the drop-down list. Total Enter the VAT inclusive total of the invoice, i.e. the gross total. If you are entering a Credit Note, a negative amount must be entered. Total VAT Enter the total amount of VAT shown on the invoice, regardless of whether it comprises one or more % rates. If there is no VAT on the invoice enter a zero. If the invoice shows only a gross (VAT inclusive) total or is all at a single VAT rate, you may, if you wish to avoid having to calculate the VAT content skip this box and allow the program to do it for you when in the VAT Analysis boxes below. VAT Type If the Invoice you are creating is in respect of goods/services supplied within the same state and is subject to VAT in the normal way, i.e. it is a Domestic transaction, then you need take no action, simply move on. If the Invoice is for goods/services delivered outside the state then you will need to change it. From the drop-down list point-and-click at whichever of the two alternatives is appropriate: Other EU Foreign - Non EU VAT Exempt if the sale is to another EU state if the sale is for export to anywhere other than the EU if the customer is VAT Exempt It is important that all non-domestic transactions are correctly coded so as that the VAT Return figures for Other EU and Foreign Sales are correct VAT Analysis Into each of the VAT Analysis % boxes enter the net (VAT exclusive) amount relating to that VAT rate, as shown on the invoice. The program will not allow you to proceed until it is satisfied that the total of all these net amounts equals the difference between the invoice s gross Total and Total VAT, as already entered above. Note: When you have only one net amount entry left to make, place the cursor in the appropriate box then press the Page Down (PgDn) key. The system will calculate and write in the remaining (unallocated) amount. If you have opted to skip the Total VAT box (above), then proceed as follows: place the cursor in whichever box represents the VAT % rate which applies to what you have sold, then press the Page Up (PgUp) key. Provided you selected the correct VAT % rate box the entries will have been made for you and the program will have moved you on. Analysis Categories Enter net (VAT exclusive) amounts in one or more of the boxes, as relevant. The program will, again, not allow you to proceed until the total of the amount(s) entered equals the total net amount of the invoice. Note: When you have only one Analysis Category entry left to make, place the cursor in the appropriate box then press the Page Down (PgDn) key. The system will calculate and write in the remaining (unallocated) amount. Copy Existing Entry This button allows the information from a different Sales Book entry to be taken and used in a new entry. When the button is pressed, you are asked for both the Reference Number and the Account Code of the invoice to be copied. With this information, the Big Red Cloud fills in the details of the new invoice, which can then be edited if necessary, and saved. This feature is the same as that in the Purchases Book. p34
35 p35

36 Reverse Charge VAT Invoice Setting up a Sales Invoice Layout for Reverse Charge VAT For transactions subject to Reverse Charge VAT no VAT is charged, the Sales Invoice shows no VAT analysis details, it shows the VAT Registered Numbers of both parties and the a clear statement of who will account for the VAT. For a sub-contractor the statements is : "VAT ON THIS SUPPLY TO BE ACCOUNTED FOR BY THE PRINCIPAL CONTRACTOR". For scrap metal sales the statement is 'VAT on this supply to be accounted for by the recipient.' To facilitate this alternative Sale Invoice we have added the option to specify two Sales Invoice Layouts in Form Design The default invoice template is 'Invoice Template', when you select 'Type 2 Invoice Layout' in Sales Invoices 'Invoice Template 1' is used. Entering a Reverse Charge VAT Invoice When entering a sales transaction subject to Reverse Charge Vat, the net amount is analysed at the zero rate and the option Type 2 Invoice Layout is checked. p36

37 Printing Sales Invoices Click on the Print button in the Sales Invoice screen to print the displayed invoice directly to the default printer. To preview an invoice or print a batch of invoices select 'Print' at the bottom of the Sales Book screen. This screen is displayed: Select the required option: 1. Highlighted entry - Preview, Print or the currently high-lighted Invoice/Credit Note 2. Batch of entries - Preview, Print of a Batch of Invoices selected by Date or Reference (Invoice No.) If you are not positioned on a 'Sales Invoice' transaction 'Highlighted entry' option is not available. p37

38 Printing Statements Information from the Sales Ledger is used to produce Statements to be sent to Customers. Statements can be produced for one or more Customers and for a specified period. See Appendix A for samples of the different layouts available. To produce Debtor Statements: In the Reports menu select Sales Ledger and then Debtor Statements. Period From The current month will be displayed in the box entitled Period From. Accept it If you want your Statements to show all outstanding debts from prior months as one Balance brought forward, followed only by the details of the current month s entries and a closing balance. If you want to include the details from prior months entries then you can change the Period From month by clicking-and-picking. Period To The current month will also be displayed in the box entitled Period To. Accept it, or change it so as to reflect which previous month should end the period for which you want to produce Statements. Customers The customers for whom Statements are to be generated must be selected before displaying the statements. Click on the down-arrow in the Customers field to display the Customer lookup and select the customers to include. Minimum Balance The Minimum Balance defaults to A Statement will not be printed for Customers with a balance of this amount or less. The Minimum Balance can be changed as desired. Click 'Preview' to display the statements on-screen from where they can be printed or exported. Click ' ' to statements. p38
39 p39
40 Bank Payments Bank Payments Overview The Bank Payments Book, sometimes known as the Cheque Payments book, is used to record details of all transactions which represent money paid out of your bank account(s). So as well as the details of the cheques you write you should also enter details of whatever has been paid out in the form of any bank interest, bank charges, direct debits, standing orders, transfers between bank accounts etc. To open the Bank Payments Book click the Payments Book icon. At the foot of the screen is the name of your Default Bank Account. To change Bank Accounts click on the three buttons next to the name and select from the list of Bank Accounts. Opening (browse) screen of the Bank Payments Book p40

41 Bank Payments Book Entries To begin entering a transaction either click on the Add button. A new window entitled Add a Cheques Journal Entry will appear. Alongside this title is the name of the bank account you are working with and confirmation of which month/year you are in. Notes on Data Entry Regular Payment If the transaction being entered is a Regular Payment click at the button entitled Regular Payment. Displayed on screen is a list of all the Regular Payment transactions that you have already set up. Select whichever is appropriate and all the relevant boxes in your transaction are filled automatically. However, you may change any of the details If required. Then Save it and move on to the next transaction. See Regular Payments on how to setup a Regular Payment Reference This box displays the next cheque number for the particular bank account you are working in. As described in the section on Setup, the reference defaults to the next sequential number as you enter transactions. If the cheque number shown is the one you wish to attach to the entry you are about to make then you can accept it and move on. If the cheque number shown is not the one you wish to attach to this entry then you should change it by overwriting with a max of 6 digits, i.e. the last 6 of the cheque number. If the transaction being entered is not a cheque you can enter your own reference or select from the drop-down list of references. DD Direct Debit BD Bank Debit BC Bank Charge SO Standing Order LOAN Loan Repayment COR Correction TFER Transfer between Bank Accounts Transfer p41
42 If you are entering details of a transfer between bank accounts enter the code for the account into which funds have been transferred. To see a list of bank accounts click on the down arrow on the right-hand side of the field. Highlight the appropriate bank account then click Select to choose. Account If the payment made is a Ledger Cheque enter the Supplier Code here. Otherwise leave this box blank. A ledger payment (the term can include payments made by direct debit, standing order etc.) is a payment to a Supplier for whom you maintain an account in the Purchase Ledger. A non-ledger Payment is one made to someone with whom you do not run an account, (e.g. for VAT and tax returns, employees in the case of wages, transfers between bank accounts etc.) You may be more familiar with the terms Creditors Payments for ledger cheques and Ledger Card for Purchase Ledger Account. To see a list of Suppliers click on the arrow on the right-hand side of the field. At the screen entitled Lookup - Suppliers you can use any of the conventional means of scrolling through a list. There is a Search box a the bottom right of the window. As letters are entered into the Search box only the suppliers containing those letters are displayed. Having identified the correct Supplier, click Select or double click on the entry to select. Suppliers can be listed by Account Code or Name. Double click on the column title to select to order by that column. When a Supplier Code is entered the outstanding balance for that supplier is displayed in Ledger Balance. Payee You can type up to 40 characters of text to describe the transaction you are entering, e.g. employees names in the case of wages. If the transaction is either a Regular Payment or is to a Purchase Ledger A/C then the relevant name or details will automatically display in this box. When ready, move on. Note: The Abbreviations feature can be used to save typing and to standardize the input of text, e.g. employees names (for wages), Revenue Commissioners or Collector General (for tax payments) etc. Detail This box, which you may skip if you do not wish to use it, allows you to further describe the transaction you are entering and you may type in whatever you choose (maximum 40 characters). The drop-down list of Abbreviations is the same one that appears with the Payee box above. Total Enter the total amount of the payment. For non-purchase Ledger payments the total of all the amounts entered in the Analysis Categories (see below) must equal this figure. Discount Enter the amount of any discount you are receiving from the Supplier you are paying. Otherwise ignore it and move on. This box only applies to Purchase Ledger payments. Ledger When the payment being made is to a Supplier s Account then the amount you entered as Total will be copied into this box automatically. Once the transaction has been saved, this figure will be used to update the Purchase Ledger Account for that Supplier. Ledger Balance When creating a Cheques Journal Entry, when an Account Code is entered on the outstanding balance for that supplier is displayed in Ledger Balance. This is for information only so that you can see what is owed. Analysis Categories The system will only visit these boxes for non-purchase Ledger transactions. Enter appropriate amounts in one or more of the boxes. The total of the amount(s) entered must equal the figure placed in the Total box. Note: If you are only going to make an entry in one Analysis Category, or when you have only one Analysis Category entry left to make, place the cursor in the appropriate box then press the Page Down (PgDn) key. The amount remaining to be categorized in placed in the field. User Defined Field(s) p42
43 If in Setup / Analysis Categories you activated either or both of the User Defined Fields then you will now be prompted to make an entry or entries p43
44 Regular Payments You can use the Regular Payments facility when add a Bank Payment to minimize the amount of typing required when entering recurring/same detail transactions such as standing orders, payroll cheques etc. The details of the 'Regular Payment' are saved and can be used to update new Bank Payment Book transactions by clicking on the 'Regular Payments' button. To manage Regular Payments use the 'Regular Payments' option in the Setup menu. Select the 'Regular Payments' option, select the Bank Account and then Add, Change or Delete Regular Payments for that Bank Account. p44
45 Transfers between Bank Accounts The transfer of funds between two bank accounts is recorded in whichever Bank Payment Transactions is associated with the account from which the funds are being transferred. Entering such a transaction causes the following to happen: 1 The Bank Payments Book for the bank account from which the funds have been transferred (where you made the entry) is updated in the same way as any normal payment transaction. 2 The Bank Account from which the funds have been transferred is updated with details of the transfer, i.e. it reduces the balance of funds available. 3 The Bank Account into which the funds have been transferred is updated with details of the transfer, i.e. it improves the balance of funds available. p45

46 Cash Book Cash Book Overview To open the Cash Book click at the Cash Book icon. The Cash Book is displayed, the month tab selected will be for the current month if applicable. Cash Receipts are recorded on the left under the heading CASH IN. Cash Payments are on the right under the heading CASH OUT. There is a dividing line is between the two. The Date in the 'Cash In' panel applies to Receipts and Payments All the column headings (Date, Details, etc.) including your own titles for the Analysis Categories which, in Cash Receipts, begin to display after the Ref column. The scroll bar at the bottom of each panel will allow you to see the other column headings. The arrow keys, pointing up and down, on the keyboard will allow you to scroll up and down in the Cash Receipts book, to see earlier entries. Each horizontal line represents one transaction, the currently selected transaction (Receipt or Payment) is high-lighted. Note: In the Cash Book all entries are stored and displayed in transaction date sequence. Cash, In the bookkeeping sense, does not refer exclusively to notes and coins. Customers cheques, postal orders and direct debits etc. are all Cash Receipts and should be treated as such. However, not all payments are treated as Cash Payments, e.g. when you make a payment by cheque or direct debit etc. then you would enter the transaction in the Bank Payments Book rather than through the Cash Payments Book. Cash Book Balances When the Cash Book is open you will notice a number of figures in the grey area above the buttons near the foot of the screen. These figures are important as they provide a link between your Cash Receipt and Cash Payment entries and an understanding of what they represent is the key to ensuring that your Cash Book balance is correct. p46
47 All the figures on display relate exclusively to the month you are in, which is identified on the left. The opening and closing cash balances for that month are then shown. The closing balance represents the opening balance (as shown) plus all the Cash Receipts and less all the Cash Payments for that month. Therefore, if the month you are viewing is the current month and all your transactions are up-to-date and correct, this closing balances should equal the amount of cash-on-hand. You should check on a regular basis that the current closing balance is correct. If the balance shown does not equal the amount of cash-on-hand, check the following: Have all the entries been made correctly? Have you entered all relevant transactions? To assist you in keeping a balanced Cash Book you should use the Cash Book Totals report or the Cash Book Daily Summary which display daily/monthly summaries of Receipts and Payments, with opening and closing balances. p47

48 Cash Receipts The term Cash Receipts refers to all monies that come into your business, e.g. till receipts in the case of a cash retailer and/or payments to you from Customers for whom you maintain an Account in the Sales Ledger. Other occasional sources of Cash Receipts are: VAT refunds, insurance claims, income/dividends from investments, rent received and loans from banks etc. To begin entering a transaction click on the Receipts button. A new window entitled Add a Cash Receipt Entry and the current month/year is displayed. To make an entry to a different month you should Cancel or press the Esc key and select the tab for the required month before proceeding. You can now fill in the form with the details of the cash receipt. Notes on Cash Receipts entries Date Enter the transaction date, if the current date is not in the month tab currently selected the first day of month is display. This can be changed. Account If the receipt being recorded is a Ledger Receipt enter the Customer Code here. Otherwise leave this field blank. A ledger receipt is a payment from a Customer for whom you maintain an account in the Sales Ledger. To see a list of Customers click on down arrow to the right of the Account field or when the cursor is in the field press F7 This will display a window entitled Lookup - Customers you can use any of the conventional means of scrolling through a list. Alternatively, you can use the -Search- facility by typing one or more letters of a Customer s Name. Having identified the correct Account, click on Select or double click the row to select the Account. Name/Details When an Account Code is entered or selected the Customer's name is displayed in the Name/Details field. You can type up to 40 characters of text to describe the transaction you are entering, e.g. Shop Sales, Tuesday Sales, Till Receipts etc.. Note: the Abbreviations feature can be used to save typing and to standardize the input of text. p48
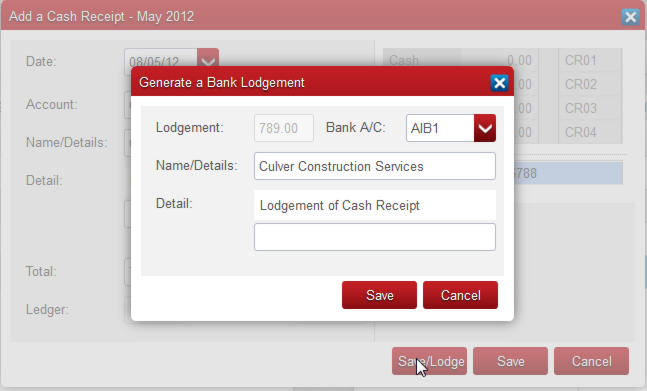
49 Detail This field allows you to further describe the transaction, maximum 40 characters. The drop-down list of Abbreviations is the same one that appears with the Name/Details box above. Total Enter the total amount received. The total of the amounts entered in all Analysis Categories (including ledger but excluding discount) must equal this figure. Discount This only applies if you are not using Allocations. This box only applies to ledger receipts. Enter the amount of any discount you are granting to a Customer who is making a payment to you on account. Otherwise, ignore it and move on. Quite often customers will take discount, e.g. by sending you a cheque for when they owe you If you do not intend to pursue them for the balance of 2.95 you should enter it here as discount, having entered 700 in the Total box. Both amounts will be posted to the Customer s Account in the Sales Ledger and, in this case, cause their account to show a zero balance. Note: The Lookup facility provides you with a short-cut to see the details on a Customer s account. When at the screen entitled Lookup - Customers highlight the appropriate Customer and activate the Ledger button. This will display the account balance and all the transactions in the form of a ledger card. Ledger For Ledger Receipts, Ledger is automatically updated with the Total amount Ledger Balance When creating a Cash Receipt the outstanding balance for that customer is displayed in Ledger Balance. This is for information only so that you can see what is owed. Analysis Categories Non-Ledger cash receipts are analysed into Analysis Categories. The sums entered must equal the Total amount Note: If you are only going to make analyse the total to one Analysis Category or when you have only one Analysis Category entry left to make, place the cursor in the appropriate field and then press Page Down (PgDn). The amount left to analyse will be entered. User Defined Field(s) If relevant, enter appropriate details into either or both of the User Defined Fields. Save or Cancel Provided you are satisfied with the accuracy of the transaction you can now Save it. To erase the whole transaction click on Cancel or press the Esc key. Save/Lodge Selecting this option saves the transaction you have just entered and generates an automatic Cash Payments entry to lodge that transaction to a bank account. You will be prompted to enter the account code for the relevant bank account. This option is very useful for electronic bank transactions and lodgements that get lodged individually. p49
50 p50
 details of receipts from customers are entered in the Cash Receipts Book. If you have answered Yes to the 'VAT on Cash Receipts?")
51 Recording VAT on Cash Receipts Using Method 2 (with Allocations) Cash Receipts are entered as usual and allocated against Sales Transactions. Using Method 1 (without Allocation) details of receipts from customers are entered in the Cash Receipts Book. If you have answered Yes to the 'VAT on Cash Receipts?' option during set-up, a VAT Analysis panel is displayed in the Cash Receipt entry screen, as below: When entering a Cash Receipt you must analyse the Gross amounts (i.e. inclusive of VAT) in the VAT Analysis. The sum of the amounts entered under the various VAT rates should therefore equal the amount entered as Total earlier on the screen. Note for Nominal users: As all the figures used in the VAT Analysis in the Cash receipts book are gross, postings made to a Nominal account are therefore also gross and the VAT control Account is not affected. To post the VAT element to the VAT Control Account a Nominal Journal adjustment will have to made. p51

52 Cash Payments The term Cash Payments refers to what happened to the money received by the business, e.g. most is usually lodged at the bank, but some might be paid out to Suppliers or as wages/expenses etc. In the Cash Book click on the Payments button. A screen entitled Add a Cash Payment Entry with the Month and Year of the current tab is displayed. Cash Payments input screen showing entries for a Lodgement to the bank Notes on Cash Payments entries Date Enter the transaction date, if the current date is not in the month tab currently selected the first day of month is display. This can be changed. Account If the payment being recorded is a Ledger Payment enter the Supplier Code here. Otherwise leave this box blank. A ledger payment is a payment to a Supplier for whom you maintain an account in the Purchase Ledger. Cash Payments to Suppliers are most common in the retail sector and other cash businesses, e.g. a grocery might make payments out of the till for daily bread deliveries etc. Ledger Balance When creating a Ledger Payment the outstanding balance for that supplier is displayed in Ledger Balance. This is for information only so that you can see what is owed. Name/Details If you have already entered a Supplier Account Code then the Supplier s name will automatically be display shown in this field. You can type up to 40 characters to describe the transaction you are entering, e.g. Wednesday Lodgement or Lodgement 32 (if your lodgement slips are numbered). Note: The Abbreviations feature can be used to save typing and to standardize the input of text. Detail This field allows you to further describe the transaction, maximum 40 characters. The drop-down list of p52
53 Abbreviations is the same one that appears with the Name/Details box above. Total Enter the total amount of the payment made. Discount This does not apply when Allocations is on. This box only applies to Ledger Payments. Enter the amount of any discount you are receiving from the Supplier. This figure, together with the Total above, will be posted to the Supplier s Account in the Purchase Ledger. Ledger For Ledger Payments, Ledger is automatically updated with the Total amount. Ledger Balance For Ledger Payments the Supplier's current balance is displayed. This is for information purposes only. Lodgement Enter the amount of any lodgement to the bank, this is only available for non-ledger Payments. Bank A/C If a Bank A/C is selected then the Lodgement field is enabled and the lodgement amount is entered, the amount can be entered by pressing PgDn in the field. Analysis Categories Any part of a Non-ledger payment not being lodged to a bank account is analysed in the Analysis Categories. The total of the amounts entered plus any lodgement amount must equal the figure in the Total field. User Defined Fields If relevant, enter appropriate details into either or both of the User Defined Fields.. p53

54 Printing and Exporting Transaction Reports From each of the books of original entry, Cash Book, Bank Payments Book, Sales and Purchases Books you can produce two kinds of transaction report: Detail Reports list all transactions for a given period. They show all the information you have entered such as Date, Reference Numbers (if any), the Total Amount, VAT (if any) and how you have analysed them under the various Analysis Categories. Summary Reports contain largely the same information but only show monthly totals for the period you specify. Produce Transaction Report - Bank Payments Details example On the Reports menu high-light Bank Payments and either 'Bank Payments Summary' or 'Bank Payments Details'. If you select Bank Payments Details a screen similar to below is displayed: The From and To boxes will default the the first and last months of the financial year. Click on on the drop-down arrow to select a different month if required. Bank A/c defaults to your Default Bank Account (or else the first one listed). To select a different bank account, enter the code for the bank account required or click on the down arrow to the right of the field to select from a list of available bank accounts. Click on Display to display the report on-screen. Reports can also be accessed on the browse screen. Click on the Reports button at the bottom of the screen. Detail and Summary Reports from the Purchases Book and Sales Book When generating reports from the Purchases and Sales Books there is a further option to generate an Analysis or VAT version. The program defaults to Analysis, select VAT when required. The Analysis option reports the details of the Analysis Categories, the VAT option reports the Vat Analysis Details. To see your Purchases or Sales broken down by Analysis Category, e.g. Stationery, Advertising, Repairs etc., choose Analysis. To see them reported according to the % VAT Rate, choose VAT. p54

55 Exporting Reports to other Programs All reports can be exported. To export, first print the report on-screen. Click on the Export button at the top of the report. For reports the export options are for Excel, PDF and Word. Choose the format you wish to export to. You will then be given to option to Open file in the relevant application or Save. For forms such as Debtors Statements and Invoices there are more export options. p55

56 Purchase Ledger Purchases Book Overview The Purchase or Creditors Ledger is used to maintain records of transactions between your business and individual Suppliers. You normally use the Purchase Ledger to find out how much you owe your Suppliers and to see details of your transactions with them. Other terms with which you may be familiar are Ledger Cards or Supplier Accounts. When you set up a new Supplier you are creating a Purchase Ledger Account. This account is automatically updated every time you make an entry in the Purchases Book recording details of an invoice or credit note received from that Supplier. It is also automatically updated when you record details of a payment to a Supplier in the Bank Payments Book or Cash Payments Book. Looking up the Purchase Ledger account for a Supplier will show you a list of invoices and credit notes you have received from that Supplier, a list of payments you have already made, details of any adjustments made to the account (e.g. for discount received) and the balance owed to the Supplier. To open the Purchases book click on the Purchases Book icon or select from the Books. A screen similar to the one below is displayed: Opening/browse screen of the Purchases Book p56

57 Purchases Transaction Entry At the Purchases Book browse screen click on the Add button. A screen entitled 'Add a Purchase Book Entry' plus the month / year selected in the browse screen is displayed: Notes on Purchases Book Entries Date Enter transaction date. As described earlier, the program attaches more importance to the month of entry than it does to the date of the transaction. However, the date you enter here can be important because in the Purchase Ledger (unlike here in the Purchases Book) invoices are listed in transaction date sequence. Reference The number shown in this box (maximum 6 digits) your reference and not the number printed on the Supplier s invoice. As you go about adding a series of invoices the program will automatically offer you the next number, made up of the last reference number used plus one. If the reference number shown is not the one you wish to attach to this entry then you should change it by over-writing with a maximum of 6 digits. Account You must enter a Supplier s Account Code. Click on the down-arrow in the Account field to see a list of Suppliers or add a new one. Name Once you enter a Supplier's Account Code the Supplier s name will automatically display in this box. Detail This box, which you may skip if you do not wish to use it, allows you to further describe the transaction you are entering. Type in whatever you choose (maximum 40 characters) or click on the down-arrow to select and Abbreviation from the drop-down list. Total p57
58 Enter the VAT inclusive total of the invoice, i.e. the gross total. If you are entering a Credit Note, key a minus sign in front of the total and in all subsequent amount boxes. Total VAT Enter the total amount of VAT shown on the invoice, regardless of whether it comprises one or more % rates. If there is no VAT on the invoice enter a zero. If the invoice shows only a gross (VAT inclusive) total or the VAT is all at a single rate you may, if you wish to avoid having to calculate the VAT content, skip this box and allow the program to do it for you when in the For Resale or Not For Resale boxes below. VAT Type If the invoice you are entering was issued within the same state and is subject to VAT in the normal way then you can leave the VAT Type as Domestic. If the invoice was issued outside the state or is not subject to the VAT in the normal way then you must select the appropriate VAT Type. From the drop-down list select the VAT Type applicable Other EU Invoice issued from another EU state (notional VAT will be applied) Foreign - Non EU Invoice was issued elsewhere in the world VAT Exempt Invoice was issued within the state but is VAT Exempt Reverse Charge Invoice received from a subcontractor on which you must account for the VAT For Resale and Not For Resale Whether the goods or services being purchased are For Resale or Not For Resale is entirely a matter for your own judgment. Into each of the VAT % boxes enter the net (VAT exclusive) amount relating to that VAT rate, as shown on the invoice. The program will not allow you to proceed until it is satisfied that the total of all these net amounts equals the difference between the invoice s gross Total and Total VAT, as already entered above. If the invoice you are entering contains a VAT element but shows only a gross (VAT inclusive) amount and you have opted to skip the Total VAT box (above), then proceed as follows: place the cursor in whichever box represents the VAT % rate which applies to the goods or services bought, then press the Page Up (PgUp) key. The net and VAT are calculated at the selected rates and the values entered. Analysis Categories Enter net (VAT exclusive) amounts in one or more of the fields, as relevant. The program will not allow you to proceed until the total of the amount(s) entered equals the total net amount of the invoice. If you are only going to make an entry in one Analysis Category, or when you have only one Analysis Category entry left to make, place the cursor in the appropriate box then press the Page Down (PgDn) key. The Category is updated with the remaining amount to analyse. User Defined Field(s) If relevant, enter appropriate details into either or both of the User Defined Fields. (Figure 2-8 above shows both fields as having been activated with the titles Job No and Dept No). Copy Existing Entry This button allows the information from a different Purchases Book entry to be taken and used in a new entry. When the button is pressed, you are asked for both the Reference Number and the Account Code of the invoice to be copied. With this information, the Big Red Cloud fills in the details of the new invoice, which can then be edited if necessary, and saved. p58

59 The screen to specify the Purchases Entry to be copied. p59
60 Purchases from EU Countries VAT is not charged on purchases from other EU countries when you supply your VAT Registered Number to the vendor.. However, you are required to keep records of these purchases and record Notional VAT as if the goods were purchased domestically. The example below shows the implications of this for your record keeping. Assume that you have purchased 200 of goods from Spain. Assume also that your domestic VAT rate for these goods would be 21%. The actual transaction that took place can be summarised as follows: A. Total amount of purchase: 200 Total VAT Applicable 0 Net 0% 200 Net 21% 0 However, the record of the transaction you are required to keep is as follows: B. Total amount of purchase: 200 Total VAT Applicable 42 Net 0% 0 Net 21% 200 When you select the VAT Type 'Other EU' the Total for the Invoice does not include the VAT element. The amount owed to the supplier is unchanged but the amount of Notional VAT is recorded for the VAT Reports and is reported separately in the Purchases Book Vat Analysis reports. p60

61 VAT only Invoices VAT-only invoices typically come from Customs or from freight shippers and relate to the VAT element for goods previously imported. They usually relate to goods imported from outside the EC. Typically an invoice with no VAT element will have already been received from the foreign supplier. The best approach to entering VAT-only invoices is to think of them in conjunction with the original invoice from the foreign supplier, and is best understood by example. In this case, an invoice has already been received without a VAT element, for 1,000, with the VAT Type entered as Foreign - Non-EU. For the VAT-only invoice which follows, the amount of VAT that would have been paid would have to be calculated manually, in this case it would be 210 at 21%. The VAT-only invoice works simply by entering the VAT amount, 210 as the Total and the Total VAT, but analysing the original net amount (1,000) at both the relevant VAT rate and at 0%. At 0%, it is entered as a minus figure to cancel the net amount out in the calculations and leave only the VAT amount. The following illustration demonstrates how the entry is made: Entry of a VAT-only invoice. Note: Note: There is no net amount appearing in the Analysis Categories as it is zero. This invoice, which has a zero net amount and a VAT amount, works in conjunction with the original net-only invoice to produce a gross balance. p61
62 Reverse Charge Vat Reverse Charge VAT - applies to Republic of Ireland only If you are Principal Contractor you may receive an Invoice from a subcontractor showing no VAT but stating that VAT on this supply to be accounted for by the Principal Contractor There is no VAT charged on this invoice but you must account for the VAT that would normally have been charged. If you are entitled to an Credit Input i.e. you would normally claim back VAT on such a sale, you should ensure the you tick Credit Input for Reverse Charge Vat? in Setup/Options When entering this invoice you must select VAT Type Reverse Charge and enter the VAT amount which would have been applicable to the transaction. The VAT is not included in the Total but is included in your VAT Returns. It is automatically included in the T2 (Purchases) section of the Standard VAT Report and will also be included in the T2 (Sales) section if the option 'Credit Input for Reverse Charge Vat' is selected in Setup / Options / Reverse Charge Vat p62

63 View a Supplier Ledger Account In the Lookup screen click on the Suppliers tab. Locate the supplier by scrolling through the suppliers or use the Search box to search by Account Code or Name. To view the Ledger double click on the Supplier row or click the button The Lookup screen showing a Supplier s Ledger A/C Details of a transaction can be viewed by clicking on the View button. To print the Ledger Account click on Print. p63

64 Purchase Ledger Reports There are a number of reports relating to the Purchase Ledger and the purpose and content of each will be described below. The Purchase Ledger Reports menu Ledger Accounts This report displays all transactions for specified Suppliers for a specified period. The format of the report is very similar to the Lookup - Suppliers option. It differs in that the report can be produced for more than one Supplier and it can be produced for a particular period (rather than for the whole Financial Year). Its most common uses are: to verify the correctness of Suppliers statements that you receive, and to produce for your accountant full details of Supplier Accounts at year end. It is particularly useful for comparing to Suppliers statements because its format is very similar to that used by most Suppliers. Aged Creditors This report lists the amount owing to each Supplier as of the end of a specified month and provides an aged analysis of the balance on each account. You can choose to exclude Suppliers with a zero balance as of the month specified. You can select the Period up to which transactions should be included. Transactions will be included based on the Period and not the transaction date. Negative balances are always applied progressively from the oldest eg. if a supplier owed you money from 3 months ago and there were no other transactions it would appear as a 'Current' balance. Calculating Aged Balances with Allocations Off: Invoices The transaction date determines its age as either Current, 1 Month old, 2 Months or 2 Months+; Payments Applied so as to reduce the oldest balance first. Credit Notes and Journals These will be treated either Invoices or Payments depending on which option you chose in Setup/Options Calculating Aged Balances with Allocations On: Balances are calculated based on the outstanding balance of invoices only on the date being aged to. Unallocated payments are shown separately. Creditors Listing This report lists the amount owing to each Supplier as of the end of a specified month. It also shows the turnover with each Supplier (i.e. the total of all invoices less credit notes received from that Supplier in the Financial Year-to-Date). You can choose to exclude Suppliers with a zero balance as of the month specified in the report. You can choose to exclude Suppliers with a zero balance as of the month specified. Creditors Control p64
, payments made, discounts received and adjustments made to accounts through Journal entries.")
65 This report provides a summary, for a specified period, of all the activity between your business and your Suppliers/Creditors. It shows summary totals for all purchase invoices (net of credit notes), payments made, discounts received and adjustments made to accounts through Journal entries. It is useful in providing a quick overview of aggregate totals for Purchase Ledger (i.e. Creditors) activity. The figures displayed on this report are calculated as follows: Opening Balance - The total of the balances owed to all Suppliers at the beginning of the chosen start month. Invoices - The total of all Suppliers invoices (less credit notes) entered in the Purchases Book for the specified period. Cheques, Cash and Discounts - The totals (respectively) of all payments entered to Suppliers Accounts through the Bank Payments and Cash Payments Books, and the total of any Discount Received as entered in both of these books. Journals - The total of adjustments made to Supplier s Accounts through Creditors Journal entries. A total in the Debit column would represent adjustments which reduced the amount owed to Suppliers. A total in the Credit column would represent adjustments which increased what you owed. Closing Balance - The total of the balances owed to all Suppliers at the end of the period specified. Journal Listing This report lists and totals the Creditor Journal adjustments made to Supplier Accounts. The list will only contain those entries made in the range of months which you specify at the start of each report. Supplier Opening Balances This report lists Suppliers opening balances at the start of your Financial Year. If you first began operating Big Red Cloud midway through a Financial Year, then the balances shown are those as at the beginning of your First Month of Entry. The report will not necessarily include all of the Suppliers who presently have an account in the Purchase Ledger since you may have added some new accounts after you started. You can choose to exclude Suppliers with a zero opening balance. Supplier Listing This is a list of the Account Codes / Names / Addresses / Contact Names / Addresses / Tel and Fax Numbers of all Suppliers that are presently set up in your Company. Unpaid/Unallocated Listing This report is only available when allocations is switched on. On selecting this report the following screen is displayed: Click on the down arrow to the right of the field to display a list of Suppliers and select the ones to included in the report. On the selection screen there are tick boxes to the left of suppliers names. To select or unselect all click on the box to the left of the report title. A listing is display of all the unpaid invoices and unallocated payments for each of the selected suppliers. p65
66 Bank Accounts Bank Accounts Overview Big Red Cloud allows you to maintain details of activities and balances of multiple bank accounts. To setup a Bank Account see Setup: Bank Accounts Unlike the most of the other books in Big Red Cloud, you do not make entries directly into bank accounts. Whenever you enter details of lodgements into the Cash Payments Book and details of cheques, direct debits etc. into the Bank Payments Book the entries are posted to the Bank Account. The bank account is therefore your record of activity and balances at the bank. p66
67 Bank Reconciliation Bank Reconciliation The Bank Account balance in Big Red Cloud will not usually correspond with the balance on a Bank Statement or when the account is checked online. This is due to Outstanding Items. These are items which are part of your records but have not yet appeared in the bank s records or items recorded by the bank such as interest or bank charges which have not yet been entered to Big Red Cloud. It is important to check the bank statement against your own records and account for any discrepancies. The process of accounting for discrepancies between the two balances is called Bank Reconciliation p67

68 Preparing to do a Bank Reconciliation When you receive a bank statement and prior to starting the reconciliation you should: 1. Ensure that your have entered into the Cash Payments Book the details of all lodgements made, and that your have entered into the Bank Payments Book details of all cheques etc. written. Normally the sources for these entries should be your lodgement slips and cheque stubs rather than the bank statement itself. The reason for this is that your records should represent, as far as is possible, an independent check of items that appear on the statement. 2. Scan through the bank statement to identify items which are not likely to already be in your records. Details of bank fees and charges and possibly direct debits are typical examples. Update your records with the necessary information e.g. details of bank fees and charges should be entered into the Bank Payments Bookl. Ticking Items Cleared Through the Bank The first task in doing a bank reconciliation is to identify outstanding items, i.e. transactions you have entered in your records but which have not yet appeared on a bank statement. The importance of this lies in the fact the difference between our balance and the statement balance should equal the total amount of outstanding items. The simplest way to do this is to mark-off or tick those entries that do appear on the bank statement. 1 Select Lookup/Bank Account or Setup/Bank Account 2 Highlight the bank account required and double click, click on the Ledger button. 3 The screen you should be looking at will be similar to this: Note the following: The Balance figure, near the bottom-right, represents the bank balance according to your records. It is calculated as the opening balance, plus all lodgements entered, minus all cheques etc. entered. Displayed in the middle of the screen is the list, in date order, of all transactions you have entered which affect this bank account. Each item that features on the bank statement should also appear p68
69 on this list. 4 You should now take each item in turn from the bank statement and find it on the list on the screen. You can scroll through the list using the arrow, Page Up and Page Down keys. When you have found the item on the screen you should check that its debit/credit amount is the same as it is on the bank statement. You can then tick it on the screen to indicate that it has cleared through the bank. You do highlight the line the and then either pressing the space-bar on the keyboard or double-click on it. As you do this the amount will be removed from the column headed O/Standing and a 'tick' will appear in the rightmost column on the screen. Note: Note: To avoid overlooking items on the bank statement you should, as you tick items on the screen, also tick them on the statement itself. The Outstanding figure, underneath Balance near the bottom-right, represents the total of all unticked items. This figure changes as you tick items. However, the Balance figure does not change as you tick. This is because whether or not an item has cleared through the bank does not affect what the balance is according to your records; only entering details of lodgements or cheques etc. can do that. All Items or Outstanding Only When you look up the Bank Ledger the list displayed will contain all the bank entries you have created since the beginning of the Financial Year as well as any items from previous years that were not reconciled before the year-end. All the previously ticked items will be displayed as well as those those still outstanding. To avoid looking at all items you can click on the 'Outstanding Only' button to display only unticked items. Only items 'unticked' at the start of the session will be displayed. p69

70 Doing the Bank Reconciliation Having done both the preparatory work and the ticking (see Preparing to do a Bank Reconciliation), your bank account records should be completely up-to-date. The bank balance in your records is termed the Actual or True Bank Balance since it is now more accurate than the statement balance. Any difference between the bank balance according to your records and the statement balance can now only be due to outstanding items. The bank reconciliation process itself simply consists of taking the statement balance, adding the total of outstanding items (i.e. unticked items) and seeing if the result is the same as the Actual Bank Balance. To do a Bank Reconciliation: Select the Bank Account to Reconcile in Lookup / Bank Accounts, Setup - Bank Accounts and click on the Reconcile button or select via Reports / Bank Accounts / Bank Reconciliation. You should now be looking at the Bank Reconciliation screen, similar to that shown below. Important Note: If you have been ticking off items from bank statements it is generally not possible to re-do a bank reconciliation for an earlier period. This is because all items for that period will have subsequently cleared through the bank and have been ticked, thus making it impossible to calculate the outstanding items total for that period. Include Entries Up To This will default to the current month. Select a different month as required. Bank Statement Date The date of the last calendar day in the month selected is displayed. Change to the actual Bank Statement Date if different. Bank Statement Balance (Minus if Overdrawn) Enter the balance on the bank statement. Total of Outstanding Entries This is the total amount of entries in the Bank Ledger which have not been 'ticked' as being on a Bank p70
71 Statement. Actual Bank Balance On entering the Bank Statement Balance the Total of Outstanding Entries is deducted to give the Actual Bank Balance. The difference between this and the Bank Ledger balance in Big Red Cloud is reported as a Discrepancy. *** Discrepancy *** This is the difference between the balance expected on your statement and the actual statement balance. It is normal for some value to appear here when your Big Red Cloud entries and your entries on your Bank Statement are fully reconciled the amount of Discrepancy will be zero. The most likely causes of discrepancies are: Items appearing on the bank statement which have not been entered into the Cash Payments or Bank Payments Books, for example bank charges Items which appear on the bank statement but which have not been ticked Items which have been ticked (in error) even though they have not yet appeared on a bank statement Discrepancies between the amounts for items on the bank statement and the amounts for the same items as shown in your records, e.g. due to an error in the amount recorded on a lodgement slip etc. An inaccuracy in the bank s opening balance, for example if the bank account had been set up with an unreconciled opening balance. This would only be a problem for first-time reconciliations Please Note: All discrepancies, however small, should be corrected. Bank Reconciliation Report When your Bank Account is fully reconciled you should print the Bank Reconciliation Report. This contains all the details that appear on the screen with a list of all outstanding item. It is recommended that you file this report with your bank statement. First Bank Reconciliation For the very first bank reconciliation, it is likely that there will be a few entries outstanding from the previous financial year which are not recorded in Big Red Cloud. As these will be incorporated in the bank account s reconciled opening balance and therefore seen as being cleared, they will cause a discrepancy. These entries should be kept on a separate list and ticked by hand as they clear; the discrepancy in the Big Red Cloud will reduce accordingly. p71
72 VAT Returns Standard VAT Report The Standard Vat Report calculates data for the VAT 3 Report from the Sales Book and Purchases Book for the period selected. The normal formula for calculating VAT payable for a period is: Total VAT collected on sales for the period minus Total VAT paid on purchases for the period Important Notice The owners, partners or directors of a business are solely responsible for the making of correct VAT returns to the Revenue Commissioners. Big Red Cloud accepts no responsibility for errors arising from the use of this program for the calculation of VAT liabilities. The Standard VAT Report (Republic of Ireland) The report is formatted to make it as easy as possible to fill out your VAT form, i.e. the totals to be entered in boxes T1, T2 etc. of the VAT3 form are separately identified. The report also includes a table of purchases and sales information for the Annual Return of Trading Details. To produce this report: 1. Select VAT from the top menu. 2. Select Standard VAT Calculations 3. On display in the box entitled From will be the first month of your Financial Year. Accept it or change it according to which should be the start month for your VAT report. 4. Accept or change what is shown in To so as to reflect which month should end the period for which you want to produce the VAT report. 5. Click on Display to display the report. p72
73 It is recommended that you file the report with your copy of the VAT return. It is also advisable to print and file a copy of the Purchases Book VAT Details and Sales Book VAT Details reports for the period in question. These will show the basis for your VAT return and will be useful to your accountant or in the event of a tax audit. p73
74 Vat on Cash Receipts VAT on Cash Receipts Overview For the Cash Basis of Accounting for VAT, VAT on Sales is based on Cash Received rather than on Sales Invoices. There are two ways in Big Red Book to account for VAT on a Cash Received Basis: Method 1: Analyse Cash Receipts for VAT when entering transactions To use this method in Setup / Options select Yes for 'VAT on Cash Receipts?' This option is only available when 'Receipts/Payments Manual Allocation?' is not selected. This method relies on you to analyse the VAT on Cash Receipts. When this option is switched on Cash Receipts and Opening Balances already entered will not have been analysed for VAT. If these transactions are to be include in a VAT Return made on the Cash Basis of Accounting for VAT they will have to be changed and the VAT Analysis made. Two additional reports to be available on the Cash Book Reports menu, Cash Book VAT Details and Cash Book VAT Summary. Cash Book VAT Details report lists entries made in the Cash Receipts Book and shows how each entry was analysed for VAT purposes. The user will have originally entered gross amounts (including VAT) for each receipt; this report shows the VAT and Net amounts calculated for each entry. The Cash Book VAT Summary report produces similar information but lists only Monthly Totals for the period specified. Method 2: Manual Allocation To use this method Allocations must be switched on in Setup / Options. It cannot be used with the VAT on Cash Receipts Option. When this option is selected VAT on Sales in will be based on the Cash Receipts allocated to sales transactions. p74

75 Cash Accounting VAT Reports Using Method 1 (without Allocations) An additional report is displayed on the VAT Menu - VAT on Cash Receipts. This report is similar to the VAT3 report but the Sales are taken from the Vat Analysis in the Cash Receipts Book rather than Sales Invoices. The report is formatted to make it as easy as possible to fill out your VAT form, i.e. the totals to be entered in boxes T1, T2 etc. of the VAT3 form are separately identified. Using Method 2 (with Allocations) VAT on Receipts are only included in a VAT submission when they have been allocated to a Sales transaction therefore all cash receipts should be allocated before making a submission. When a return is submitted all Receipts included in that return are flagged with the 'Return Code' assigned to the VAT submission and those transactions cannot be changed. To produce this report at the top menu select VAT / VAT on Cash Receipts A form similar to this is displayed: Cash Accounting VAT Details screen Select A Report Panel Sales Details and Summary reports can be printed to show what transactions have been or will be included in a VAT Return. The VAT3 Summary Report is formatted to make it as easy as possible to fill out on your VAT form, i.e. the totals to be entered in Box T1, Box T2 etc. of the VAT3 form are separately identified. The report also includes a table of purchases and sales information formatted so as to assist in the preparation of your Annual Return of Trading Details. Period Panel Select the period of the report. Please Note: While transactions after 'To' period will not be included in a preview report, all unsubmitted allocations up to that period will be included preview reports. For this reason care must be taken when making a first submission to ensure that old transactions which may already have been included in a VAT Return are excluded. This may involve making an initial 'fake' submission to pick up these transactions. Action Panel Preview a New Return When this option is selected the Reports will include all unsubmitted transactions up to the 'To' period selected Submit A Return p75
76 Select this option with VAT3 Summary Report and enter a Return Code. When you then click on Print you will be given the following warning: If you are happy that the transactions are correct you can click on Yes. Review An Existing Return Select the Return Code for the submission to be reviewed and the Periods for that return. Print the reports to be reviewed. Undoing a Cash Accounting VAT Return: If you wish to cancel a submission there is an option to Reverse VAT on Cash Receipts VAT Return in Utilities Menu. This option should used with caution. p76
77 Receipts and Payments Allocation Allocations Overview To manually allocate Receipts and Payments to Invoices select Yes to 'Receipts/Payments Manual Allocation? in Setup / Options. When Allocations is On each receipt from a Customer or payment to a Supplier is allocated to one or more invoices or journals. An alternative name for this method is Open Item, so called because individual invoices remains open to view on the ledger account until it is fully paid. It is a more detailed way of keeping track of Supplier's and Customer's accounts. p77

78 Opening Balances Opening Balances are calculated and maintained differently by Big Red Cloud depending on whether Allocation is On or Off. When Allocation is Off the opening balance is calculated at year end and the previous year's transactions are deleted. This is the 'Balance Brought Forward' method. With Allocation On customer's and supplier's Opening Balances are calculated from the outstanding balances of all transactions. Transactions are not deleted at Year End and a new Opening Balance is not created. When starting to use Big Red Cloud and setting up the opening balances for the first time you must to enter the details of each unpaid or part-paid invoice so that receipts can be properly allocated against them. Once an initial Year End Routine has been run on a company Open Balances cannot be entered directly as they are made up of the invoices, receipts/payments and journals entered in previous years. If an adjustment to an Opening Balance is required a debtors or creditors journal entry must be entered. Opening Balance screen when Allocations is On: p78

79 Allocating Receipts and Payments When a Receipt from and Customer or Payment to a Supplier is entered you are prompted to Allocate it against open Invoices for that Customer or Supplier. If there are no open invoices to be allocated to the following screen is displayed: If there are invoices to be allocated they are displayed on a screen similar to the following: In this case a payment of 800 has been entered this is displayed at 'Total Amount' and 'Unallocated' amount. Click on 'Auto Allocate' to allocate the full outstanding amount or full Unallocated amount to the high-lighted invoice. To allocate part of a payment or to enter a discount click on 'Allocate'. A screen similar to the following is displayed: p79

80 The receipt or payment does not have to be allocated at this point. Allocations can be viewed and changed later by selecting 'Allocations' on the browse screen. p80
81 Allocating to Credit Notes and Journals Credit Notes and Journals are seen by the system as Invoices and cannot therefore be allocated to Invoices. A Payment must be allocated to a Credit Note or Journal which then increases the amount of that payment that is available for allocation. p81
82 Screen Displays and Reports When Allocations is On, several screens/reports will appear slightly differently as follows: Cash Book and Bank Payments Book screens have a column entitled Unallocated. This column will display any amounts which have not yet been allocated to one or more invoices or written off as Discount; The Purchases Book and Sales Book have column entitled Unpaid, indicating that all or part of a particular invoice still has a balance remaining to be paid or written off as Discount The Sales Ledger and Purchases Ledger Reports menus both feature a report entitled Unpaid/Unallocated Listing, which is useful for checking what allocations still need to be made The Aged Creditors and Aged Debtors reports and Debtors Statements have column called Unallocated showing the total amount of unallocated payments. p82
83 Setup Menu Company Details See Company Details p83

84 Nominal Accounts For an overview of how the Nominal Ledger is operated see Nominal Ledger: Overview Before making changes to the setup of the Nominal Ledger see Initial Setup of Nominal Ledger Select Setup / Nominal Accounts to display a listing of the Nominal Accounts. Use the Add, Change, View and Delete buttons to maintain the Chart of Accounts. Deleting a Nominal Account A Nominal Account can only be deleted when there are no transactions posted to it. The Delete is only available when accessed via the Setup Menu. The Nominal Accounts are displayed sorted by Nominal Code or Description/Account Name. To change the display order click on Sort and select the order required. To view the transactions on a Nominal Account, select the account required and click on Ledger. p84

85 p85
86 Control Accounts See Nominal Ledger Control Accounts p86
87 Analysis Categories See Analysis Categories p87
88 VAT Rates See VAT Rates p88
89 Opening Cash Balances See Opening Cash Balances p89
90 Regular Payments The Bank Payments Book has a Regular Payments facility which allows you to minimize the amount of typing required when entering recurring/same detail transactions such as standing orders, payroll cheques etc. The procedure for setting up a Regular Payment is broadly similar to entering any transaction in the Bank Payments Book. Therefore it is recommended that, before attempting to set up any Regular Payments, you familiarize yourself on how to make entries to the Bank Payments Book. See Bank Payments Regular Payment for details. The Setup / Regular Payments option is used to Create, Modify or Delete Regular Payments. p90

91 Options Some of this information will already have been entered when the company was created. This following warning is displayed each time Setup / Options is selected The reason for this warning is that Allocations affects how Opening Balances are maintained and 'Vat on Cash Receipts' affects the Sales Vat reported in the Vat Report and also if Vat can be entered in the Cash Receipts book. In addition to the options given when the company was first created (see Creating a New Company) the following options are available: Enable VOCR Reporting? Enable VAT On Cash Receipts basis reporting When this option is selected, you will, if allocations are on be given the option of manually analyzing vat of Cash Receipts or basing VAT on Cash Received on allocation of Receipts If Allocations is Off then only the first option is available. Allow Entry of Gross Price in Invoicing? When this option is selected the Gross Price can be entered for a Sales Line Item and the system will calculate the unit price. p91
92 Margin Vat Scheme? When selected this option provides a facility in Sales Book entry to 'Calculate Margin Vat' for transactions on which Vat is only charged on the Margin i.e. Vat is only charged on the Sale Price less the Purchase Price. p92

93 Reference Settings When entering transactions the Reference defaults to the next sequential number for that book. This is displayed on screen when a transaction is added. Where there is more than one user entering data it may be preferable to assign the rference number as transactions are saved rather than as they are created to avoid missing or out-of-sequence references. Tick the books for which you require auto-generation. When this option is selected for a book the word AUTO appears in the Reference box when adding a transaction. p93

94 Lookup Lookup Facility Wherever a code is required in Big Red Cloud a lookup list is available by pressing the down-arrow to the right of the field. For a general lookup of the most frequently used data click on the Lookup icon The available lookup tabs will vary depending on the active options: All of these tabs, except for Abbreviations are also available on the Setup Menu. When accessed via the Lookup Menu the Delete option is generally not shown. p94

95 Abbreviations The Abbreviations file does not feature on the Setup menu and is only to be found in the Lookup facility. At various times when entering transactions into the system you will need to enter either a description, a name or some relevant details to help explain each transaction. For instance, when entering details of wages cheques you would want to enter the name of an employee, e.g. Joe Smith. The Abbreviations facility is designed to save you having to type the same text repeatedly. Using this feature you would set up Joe Smith in the Abbreviations file and, upon keying the letter j when entering the name details, you would be offered Joe Smith from the Abbreviations list. However, you are not restricted to names. You could set up texts for any recurring detail, such as Bar Sales, Cancelled Cheque, Collector General, Customs & Excise, Lodgement No. etc. Apart from saving you keystrokes this feature can, perhaps more importantly, help you standardize how names and descriptions are entered. If Joe Smith is used in the way described above, then Joe Smith is exactly what will appear as part of the description of every cheque for that employee, rather than as J. Smith sometimes and Smith, Joe etc. at other times. To create Abbreviations: 1. In the Lookup Screen click on the Abbreviations tab 2. Click the Add button 3. Into the one-line box type in the required text (maximum 40 characters). 4. To save the Abbreviation click Save. p95
96 Utilities Menu Form Design Form Design gives to facility to create or modify form layouts for Sales Invoices, Credit Notes and Customer Statements. See Selecting Form Layouts for details on choosing a form layout. For details on changing a form design see Changing Form Designs p96

97 Period Control Period Control allows you Close or 'Lock' any of the Books for any or all months. This will prevent anyone from Adding, Changing or Deleting any entry for that Month in that Book. This facility is particularly recommended when you keep company data for previous years. The Close All option can be used to protect all books and prevent someone from inadvertently adding or changing data in a closed year. It is also useful to ensure that after calculating and submitting a VAT Return or extracting periodic accounts for management purposes, changes or additions cannot be made accidentally.. To provide added security for Period Control, access to it can be controlled by the System Setup Password. p97
98 Nominal Ledger Overview The Nominal Ledger, sometimes known as the General Ledger is necessary if you wish to produce Nominal reports such as the Trial Balance, Trading and Profit & Loss and Balance Sheet reports. The Nominal Ledger is not essential to keep the standard day books in Big Red Cloud and is an option that is purchased in addition to the basic package. Whether the Nominal is On or Off all transactions are posted to the Nominal in the background. If the nominal has not been setup i.e. all categories assigned to a nominal account, bank accounts assigned to a nominal account etc. the data posted to the nominal will not be useful. p98
99 Initial Setup of Nominal Ledger No Nominal Journals should be entered, particularly Opening Balances, until this initial setup procedure of the Nominal Ledger complete. A number of steps are required to properly setup the Nominal Ledger: 1. Review the default Chart of Accounts, change as required 2. Review the default Control Accounts, change as required 3. Assign a Nominal Account to each Analysis Category 4. Assign a Nominal Account to each bank account 5. Generate the Nominal Ledger When Generate Nominal Ledger is run it posts all the transactions to the the correct Nominal Accounts. This is particularly important to update Nominal Accounts with Opening Balances. A standard set up Nominal Accounts are provided in Big Red Cloud. These can be added to or deleted to suit your company. Your accountant will be able to advise you on setting up the Chart of Nominal Accounts for your company. Once the Nominal codes have been setup and the 'Generate Nominal Ledger' run the Nominal option can be switched off again and the Nominal will be properly updated in the background. Default Chart Nominal Accounts To print the Chart of Accounts to screen click on the top menu select Reports / Nominal Ledger / Chart of Accounts. p99
100 Nominal Accounts You will need the information listed below for each Nominal Account you wish to set up. This list is followed by step-by-step instructions on how to enter this information. Nominal Code You must assign a unique code to each Nominal Account. Codes can be up to 4 characters long and consist of any combination of numbers, letters or other keyboard characters. If you are already using a coding system you may wish to retain it. If you wish to set up new codes it is suggested that they be purely numeric in the range 000 to 999, as used in the default Chart of Accounts, where the first digit represents the type of account. Description Give each account the title/description you wish to see used in the Nominal Ledger Reports. Although you may use up to 40 characters in each description, it is recommended that whenever relevant you use the accepted shorthand, e.g. Prov... to indicate Provision for... and Depn...to indicate Depreciation of... etc. Group Each account must be assigned to a group. There are 13 groups in all and they are shown on a drop-down list. The nature and purpose of each account should determine which group you select. These groups are used for the Nominal Ledger Reports. The table below shows where and in what sequence each group appears. Group Sales Cost Of Sales Overheads Distribution Financial Establishment Selling Other Income Fixed Assets Current Assets Current Liabilities Long Term Liabilities Capital & Reserves Nominal Ledger Report Trading Profit & Loss Trading Profit & Loss Profit & Loss Profit & Loss Profit & Loss Profit & Loss Profit & Loss Profit & Loss Balance Sheet Balance Sheet Balance Sheet Balance Sheet Balance Sheet To set up a Nominal Account: 1. Select the Nominal tab in Lookup 2. On the screen with the Nominal Accounts, click the Add button p100

101 3. Following the guidelines described above, fill in the form that appears on the screen and click on Save. Deleting a Nominal Account: A Nominal Account cannot be deleted whilst transaction activity remains on it even though the balance might be zero. p101

102 Control Accounts A Control Account is a Nominal Account which is updated with the total of all the transactions to a ledger or bank account. A default set of Control Accounts are setup with accounts from the default Chart of Accounts. The Debtors and Creditors Control Accounts cannot be changed once transactions have been entered to Big Red Cloud. If you wish to assign different Nominal Accounts to the Control Accounts you can do so in Setup / Control Accounts. A Control Account is a record in total of all the amounts entered in detail to the individual accounts of other ledgers. As an integral part of a Nominal Ledger the Control Accounts item only appears on the Setup menu when the Nominal is On There are 11 Control Accounts within the Big Red Cloud s Nominal Ledger as above. If you do not intend to use the default Control Accounts you should now assign your own using the procedure described below. Assigning a Nominal Account as a Control Account: Postings to Control Accounts are made automatically by the program upon a transaction being Saved. Except for the VAT Control Account you cannot post directly to a Control Account. When Control Account has had one or more entries posted to it, its icon will disappear off the Control Accounts list and its Nominal Account Code (shown in the box alongside) will grey out. At this point it cannot be changed Changes to some Control Accounts can usually be made after you have run the Financial Year End Procedure and before you have entered any transactions for the new-year. This is possible because there will not be any transactions in the system at that point. However, this will not be true if you are using the Months 13/14/15 facility by which you can enter transactions for the new-year before closing off the old one. To change a Control Account click on the box of the code you wish to change and enter the Nominal Account or click on arrow to the right of the field bring up a list of Nominal Accounts to select from p102
103 p103

104 Nominal Journals To make a direct adjustment to the balances on some Nominal Accounts without making an entry in the day books a Nominal Journal entry can be made. The type of adjustments usually made in this way are: Entering Opening Balances - note - these should NOT be entered for Control Accounts Posting Accruals and Prepayments Entering Depreciations and Provisions Re-valuing the Balance Sheet in line with Goodwill, Capital Appreciation/Depreciation, Stock Losses/Gains etc. Re-posting SUNDRY entries into their true account destinations Correcting postings wrongly analysed To make a Nominal Journal Adjustment: Click on the Nominal Journal icon Adjustment / Nominal Journals. Select Journals, then Add or from the top menu select Books / Journal Journal Adjustments Click on Journals to enter Journal Adjustments. Journals are entered in batches and the Debits and Credits must balance before a batch can be saved. Adjustments cannot be made to Control Accounts other than the Vat Control Account. Accruals and Prepayments All Accruals and Prepayments automatically reverse in the subsequent month. The Copy function can be used to copy batches to other months. When using the Journals function to make an entry which you will subsequently want to reverse, e.g. to record Opening and Closing Stock Balances for a period, then you should confine such an entry to its own p104
105 batch. Having then provided yourself with the relevant reports, you should Delete that batch when you reach the subsequent period. p105
106 Nominal Ledger Reports The Nominal Ledger Reports available from the Reports / Nominal Ledger Menu: p106

107 Invoice and Statement Layouts Changing Form Designs Select Utilities /Form Designer from the top menu. The following screen is displayed. To edit a Form Layout select the Form and click on the Edit button. To revert to the default Form Layout click on the Revert button. The Form Layout Designer displays layout of the form selected. A sample of screen-shot of the Form Designer: p107
108 Forms are divided into bands. Data can be moved around or deleted as required. Form Data All available data is shown on the right-hand side under Data Sources, Variables and System Variables. For Invoices there are two Data Sources, one has the line item data, the other has the vat break-down data. 1. Invoice1ItemsDataSource Invoice Line Item Data: 2. VatRatesDS Vat Rate break-down: p108

109 Variables / Static list the data generally printed in the top part of the invoice. Form Designer Bands: ReportTitleBand This part of the form has the Invoice or Statement header information such as invoice number, company logo, name, address and the customer's details. SalesInvoiceMainHeader This has the column headings for the invoice or statement line item information. MainDataBand; Data Source: Invoice Items This band has the Invoice Line Items. VatRatesMainHeader This has the column headings for the VAT Analysis table VatRatesDataBand; Data Source: VatRates This band has the vat analysis information p109
110 Big Red Cloud, 2012 w w w.bigredcloud.com
Big Red Book Accounts v5. www.bigredbook.com
 Big Red Book Accounts v5 www.bigredbook.com Big Red Book Compay, 2016 Table of Contents Welcome to Big Red Book 7 Contact Us 8 Registering Big Red Book 9 Switching to SEPA 11 Company Selection 12 Quick
Integrated Accounting System for Mac OS X
 Integrated Accounting System for Mac OS X Program version: 6.3 110401 2011 HansaWorld Ireland Limited, Dublin, Ireland Preface Standard Accounts is a powerful accounting system for Mac OS X. Text in square
Computer Helper Publishing, Inc. 800-533-5227 www.churchwindows.com
 Training 2010 Financial to Accounting Transition Book 3: Transactions & Corrections Computer Helper Publishing, Inc. 800-533-5227 www.churchwindows.com Book 3 Transactions & Corrections Basic Transactions...
AR Part 1: An Introduction to Accounts Receivable
 AR Part 1: An Introduction to Accounts Receivable Table of Contents 1. Overview... 3 2. Searching for a Customer... 4 3. Transactions... 6 4. Raising a sales invoice... 7 5. Completing a Transaction...
Integrated Invoicing and Debt Management System for Mac OS X
 Integrated Invoicing and Debt Management System for Mac OS X Program version: 6.3 110401 2011 HansaWorld Ireland Limited, Dublin, Ireland Preface Standard Invoicing is a powerful invoicing and debt management
Glossary of Accounting Terms
 Glossary of Accounting Terms Account - Something to which transactions are assigned. Accounts in MYOB are in one of eight categories: Asset Liability Equity Income Cost of sales Expense Other income Other
Welcome to Big Red Book User Guide Version 4
 Welcome to Big Red Book Version 4 Updated: September 2009 Contents! " ## $! % # %% $ % &'( ) & % * % #!(+!!! & #! $ $ % $ ( ('() $! " % "( Quick Start i Quick Start: Installation and Guide to Demonstration
Getting Started 7. The Customer Ledger 19
 Contents Contents 1 Getting Started 7 Introduction 8 Starting Sage 50 9 Sage 50 Desktop Views 10 Settings 11 Company Preferences 1 Currency & the Euro 15 Customer & Supplier Defaults 16 Finance Rates 18
Integrated Accounting System for Mac OS X and Windows
 Integrated Accounting System for Mac OS X and Windows Program version: 6.2 110111 2011 HansaWorld Ireland Limited, Dublin, Ireland Preface Books by HansaWorld is a powerful accounting system for the Mac
MSI Accounts Receivable Version 4.0
 MSI Accounts Receivable Version 4.0 User s Guide Municipal Software, Inc. 1850 W. Winchester Road, Ste 209 Libertyville, IL 60048 Phone: (847) 362-2803 Fax: (847) 362-3347 Contents are the exclusive property
LetMC.com Training Support Part 2 Issue 5.1 18/05/09 Accounting Irish Edition
 LetMC.com Training Support Part 2 Issue 5.1 18/05/09 Accounting Irish Edition (Tantum eruditi sunt liberi) Page 2 INTRODUCTION... 8 Payments and Deposits... 10 Taking Payments... 10 Make a Bank Deposit...
Getting Started with Sage One Start
 Getting Started with Sage One Start Contents Introduction Introduction...3 Sage One Start in more detail...4 Getting started setting up the business...5 Configuring the Chart of Accounts...5 Importing
Opening Balances Process for a business that is VAT registered using the standard scheme or is NOT VAT registered
 Opening Balances Process for a business that is VAT registered using the standard scheme or is NOT VAT registered Correct opening balances are the key to bookkeeping activities. If you do not enter them
Omni Getting Started Manual. switched on accounting
 Omni Getting Started Manual switched on accounting Omni Getting Started Table of Contents Install & Register... 3 Install and Register... 3 Omni Programs... 3 Users... 4 Creating Companies... 5 Create
Integrated Accounting, CRM and ERP System for Mac OS X, Windows, Linux, ios, Android and AIX
 Integrated Accounting, CRM and ERP System for Mac OS X, Windows, Linux, ios, Android and AIX Purchase Order Contract Register Program version: 7.2 140321 2014 HansaWorld Ireland Limited, Dublin, Ireland
How To Use Standard Pos On A Pc Or Macbook Powerbook 2.5.2.2 (Powerbook 2)
") Integrated Point of Sales System for Mac OS X Program version: 6.3.22 110401 2012 HansaWorld Ireland Limited, Dublin, Ireland Preface Standard POS is a powerful point of sales system for small shops and
Integrated Point of Sales System for Mac OS X Program version: 6.3.22 110401 2012 HansaWorld Ireland Limited, Dublin, Ireland Preface Standard POS is a powerful point of sales system for small shops and
Automated Inventory System
 Automated Inventory System User Manual Developed by USDA Food and Nutrition Service June 2009 (Incomplete) Table of Contents Welcome Menu Client Services Report System Inventory System Operations Tailgate
Your Guide to setting up Sage One Accounting from your Accountant. Setting Up Sage One Accounting
 Your Guide to setting up Sage One Accounting from your Accountant Setting Up Sage One Accounting 1 Contents Introduction Introduction...3 Quick Start Guide entering key business information...4 Set Up
Getting Started with POS. Omni POS Getting Started Manual. switched on accounting
 Omni POS Getting Started Manual switched on accounting i i Getting Started with Omni POS Table Of Contents Overview...1 Setting up POS...2 Initial Steps...2 Tellers...2 POS Clearing Account...3 Printing...4
Creditor Manual User Guide
 Creditor Manual User Guide Page 1 of 20 Table of Contents Introduction... 3 Set Up Control Files :... 4 Entity Codes... 4 Control Account Bank Account... 5 Create the Model Account... 5 Create the Posting
Reference Manual Agresso Accounts Payable
 Reference Manual Agresso Accounts Payable Contents Project background...1 Why Agresso?...1 Viewing Supplier Details...2 Scanning Invoices...5 Load Invoices...5 Invoice Registration...7 Overview...7 Purchase
Sage Accounting A Step by Step Guide
 Sage Accounting A Step by Step Guide Integra Accounting Limited Chartered Certified Accountants 5 Station Road Hinckley Leicestershire LE10 1AW Tel: 01455 238551 Email: [email protected]
Payco, Inc. Evolution and Employee Portal. Payco Services, Inc.., 2013. 1 Home
 Payco, Inc. Evolution and Employee Portal Payco Services, Inc.., 2013 1 Table of Contents Payco Services, Inc.., 2013 Table of Contents Installing Evolution... 4 Commonly Used Buttons... 5 Employee Information...
Sage 200 v5.10 What s New At a Glance
 Introducing Sage 200 v5.10 Sage 200 v5.10 What s New At a Glance Sage 200 v5.10 sees the release of a number of new features including support for Microsoft Vista (Business and Ultimate Edition) and Microsoft
Go to Tools General Ledger Setup Ledger Codes and Tab 5: Ledger Codes
 Debit Card Functionality in FMS6 The SIMS Spring 2015 release introduced functionality to assist schools to record the use of debit cards to pay for goods and services. Prior to this release, payments
Basic Training Manual Rev1.2
 Basic Training Manual Rev1.2 Prepared by Cron Systems Index Index Page 1 Important Information Page 2 Keyboard Layout Page 2-3 Doing a Sale Page 3-4 Void a Line Page 4 Reversal Page 4 Payout Page 4-5 Day
Introduction to Client Online. Factoring Guide
 Introduction to Client Online Factoring Guide Contents Introduction 3 Preparing for Go live 3 If you have any questions 4 Logging In 5 Welcome Screen 6 Navigation 7 Navigation continued 8 Viewing Your
Lesson 5: Voucher Entry in Tally.ERP 9
 Lesson 5: Voucher Entry in Tally.ERP 9 Lesson Objectives On completion of this lesson, you will be able to Describe the purpose of the Tally.ERP 9 Accounting Vouchers Create and alter Accounting Vouchers
SAP User Guide Create Purchase Orders
 IT Services Leicester Learning Institute Partnership SAP User Guide Create Purchase Orders Document Purpose This guide explains how to create a Purchase Order on SAP. This guide is not for staff in Chemistry
TheFinancialEdge. Configuration Guide for General Ledger
 TheFinancialEdge Configuration Guide for General Ledger 071012 2012 Blackbaud, Inc. This publication, or any part thereof, may not be reproduced or transmitted in any form or by any means, electronic,
ACCRUAL ACCOUNTING WORKFLOW
 ACCRUAL ACCOUNTING WORKFLOW TABLE OF CONTENTS COMPANY ACCOUNT NUMBERS... 2 POLICY ENTRY... 2 Agency Bill... 2 Direct Bill... 3 Transaction Detail... 3 CLIENT PAYMENTS... 4 Agency Billed Payment... 4 Direct
Accounting Startup in Mamut Business Software. Content
 ACCOUNTING STARTUP IN MAMUT BUSINESS SOFTWARE Accounting Startup in Mamut Business Software Content 1 WELCOME... 4 2 THE TOOLBAR EXPLAINED... 5 3 GETTING STARTED... 6 3.1 Navigating... 6 3.2 Accounting
Bank Reconciliation: Improvements for the Shelby v5 Spring 2006 Release
 Bank Reconciliation: Improvements for the Shelby v5 Spring 2006 Release After loading the spring 2006 release, you will notice a few major improvements to the Bank Reconciliation module that will assist
BACK OFFICE DATA ENTRY REVISION 1.2
 BACK OFFICE DATA ENTRY REVISION 1.2 Contents Contents... 1 BEACON BACK OFFICE SYSTEM... 3 DATA ENTRY... 3 Overview... 3 Receipt Entry... 4 Overview... 4 Debtor Receipt Entry Screen... 4 Debtor Receipt
QUICK DRIVING INSTRUCTIONS GUIDE
 QUICK DRIVING INSTRUCTIONS GUIDE Get ready to relax with VeBills You are now reaching the point where all that set-up pays off. By now VeBills is processing your bills and all that remains is to pay them.
February 2010 Version 6.1
 HansaWorld University Point Of Sales (POS) Training Material HansaWorld Ltd. February 2010 Version 6.1 Table Of Contents INTRODUCTION...5 What is Point Of Sales?...5 THE 4 DIFFERENT WAYS OF USING POS...6
ACS Version 10.6 - Accounts Payable
 ACS Version 10.6 - Accounts Payable Table Of Contents 1. Accounts Payable... 1 Accounts Payable Overview... 1 Accounts Payable Startup Outline... 2 Procedures Outline... 2 Customizing Program Defaults...
HansaWorld Enterprise
 HansaWorld Enterprise Integrated Accounting, CRM and ERP System for Macintosh, Windows, Linux, PocketPC 2002 and AIX Contracts 2004 HansaWorld (UK) Limited, London, England All rights reserved Program
LetMC.com Software Support. Part 2 Accounts
 LetMC.com Software Support Part 2 Accounts For use in Training only Not to be removed from Training Room (Tantum eruditi sunt liberi) Page 1 Client Manager Login... 5 Client Finance Login... 6 Client Administrator
SAP User Guide Invoice Verification
 IT Services Leicester Learning Institute Partnership SAP User Guide Invoice Verification Document Purpose This guide explains how to verify an invoice against a purchase order on SAP. A purchase order
Sales Order Processing new features
 Sage 200 Accounts v2009 is supplied with a new help system. The new help system is complemented by a comprehensive search facility across all of the accounting modules. We have provided this Sage 200 v5.1
How to: Account for Settlement Discount VAT Rule Changes from 1 st of April 2015
 How to: Account for Settlement Discount VAT Rule Changes from 1 st of April 2015 Users of Merlin who offer Settlement Discount to their Customers, or are given Settlement Discount by their Suppliers, will
SO-03 Sales Order Processing Administration
 SO-03 Sales Order Processing Administration SO03 SOP Administration Contents Contents...1 Overview...2 Objectives:...2 Who should attend?...2 Dependencies...2 Credits...3 Convert credit value only...4
COMMUNICATIONS... 1 COMMUNICATIONS...
 Communications COMMUNICATIONS... 1 COMMUNICATIONS... 2 MAINTAIN OWNERS... 3 COMMUNICATIONS MENU... 6 Activate TOPS imail... 6 Select Plan... 7 Contact Info... 7 Billing Info... 8 Setup... 9 Configure TOPS
Nexsure Training Manual - Accounting. Chapter 6
 Nexsure Training Manual - Accounting Journal Entries In This Chapter Journal Entry Definition Journal Entry Overview Adding Journal Entries Setting up Automatic Recurring Entries Using General Ledger Allocation
DIRECT PAYMENTS (ACH TRANSFER MODULE)
") DIRECT PAYMENTS (ACH TRANSFER MODULE) Direct payments is an add on module to utility billing that allows customers to pay their utility bill by a recur ACH payment. Please note that the term ACH (Automatic
DIRECT PAYMENTS (ACH TRANSFER MODULE) Direct payments is an add on module to utility billing that allows customers to pay their utility bill by a recur ACH payment. Please note that the term ACH (Automatic
Business Online Banking ACH Reference Guide
 Business Online Banking ACH Reference Guide Creating an ACH Batch Select ACH Payments on the left-hand side of the screen. On the Database List screen, locate the Database to be processed, and place a
Livestock Office Payments: Creditor Cashbook Transactions
 Livestock Office Payments: Creditor Cashbook Transactions 18/06/2015 Contents Paying Creditors - Find Creditors Due for Payment... 2 Payment Due Report... 2 Creditors Aged Trial Balance... 3 Processing
TheFinancialEdge. Configuration Guide for Accounts Payable
 TheFinancialEdge Configuration Guide for Accounts Payable 102312 2012 Blackbaud, Inc. This publication, or any part thereof, may not be reproduced or transmitted in any form or by any means, electronic,
AgencyPro. Cash Accounting Workflow
 AgencyPro Cash Accounting Workflow This document is a supplemental accounting guide to reiterate the general processes outlined during the first accounting training. Some of the outlined processes differ
Accounts Payable Back Office Reference Guide
 Accounts Payable Back Office Reference Guide Version 4 Copyright Orion Law Management Systems, Inc. All rights reserved Printed in the United States of America www.orionlaw.com All Rights Reserved. No
ACCOUNT RECEIVABLES TABLE OF CONTENTS
 ACCOUNT RECEIVABLES TABLE OF CONTENTS 1. SETUP CUSTOMER...2 2. CUSTOMER LISTING...6 3. CUSTOMER INVOICE...7 4. CUSTOMER INVOICE LISTING...12 5. ENTER CREDITS / REFUNDS...14 6. CUSTOMER CREDITS LISTING...20
How do I Sell A Used Item? How do I Close a Repair with Inventory Used? How do I Reprint Barcode Label? How do I edit Clock In/Out entries?
 1 How do I Sell A Used Item? Mouse over the List tab on the Dashboard. Click on Used Phone. Scroll through the list or enter item name or IMEI number in the search bar. Once item is found, click on the
2.1 Entering Transactions
 April 2.1 Entering Transactions You are now ready to start entering transactions. These can be divided into a variety of categories, as detailed below: (a) Sales Sales involve all sales that the organisation
Sage Accounts Production. Getting Started Guide
 Sage Accounts Production Getting Started Guide Copyright statement Sage (UK) Limited and Sage Hibernia Limited, 2013. All rights reserved. If this documentation includes advice or information relating
TriCore Secure Web Email Gateway User Guide 1
 TriCore Secure Web Email Gateway User Guide This document provides information about TriCore Secure Web Email Gateway. This document is for users who are authorized to send and receive encrypted email
Copyright 2006 Business Management Systems. Web Based ERP/CRM Software
 Web Based ERP/CRM Software INTRODUCTION...8 Features... 9 Services... 10 INSTALLATION...11 CUSTOMER FILE...12 Add Customer... 12 Modify Customer... 14 Add Ship To... 15 Modify Ship To... 16 Reports...
User Guide Setup, sales, purchase and support information for your Clear Books account
 User Guide Setup, sales, purchase and support information for your Clear Books account Digital Edition Contents 4 Chapter 1: Customising your Dashboard 7 Chapter 2: Setting up a Bank Account 12 Chapter
The End of Month Closing process cuts off all sub-journal postings for the month and should be performed at the conclusion of each month.
 End of Month Closing The End of Month Closing process cuts off all sub-journal postings for the month and should be performed at the conclusion of each month. Closing the month involves up to five steps:
BulkSMS Text Messenger Product Manual
 BulkSMS Text Messenger Product Manual 1. Installing the software 1.1. Download the BulkSMS Text Messenger Go to www.bulksms.com and choose your country. process. Click on products on the top menu and select
Overview - ecommerce Integration 2. How it Works 2. CHECKLIST: Before Beginning 2. ecommerce Integration Frequently Asked Questions 3
 Table of Contents: Overview - ecommerce Integration 2 How it Works 2 CHECKLIST: Before Beginning 2 ecommerce Integration Frequently Asked Questions 3 Stock Export for ecommerce 5 Configure Ascend Products
Blackbaud FundWare Accounts Receivable Guide VOLUME 1 SETTING UP ACCOUNTS RECEIVABLE
 Blackbaud FundWare Accounts Receivable Guide VOLUME 1 SETTING UP ACCOUNTS RECEIVABLE VERSION 7.50, JULY 2008 Blackbaud FundWare Accounts Receivable Guide Volume 1 USER GUIDE HISTORY Date Changes June 2000
Accounts. Step by Step Data Setup Wizard and How to Guide. online
 online Accounts Step by Step Data Setup Wizard and How to Guide Main Tel. 0845 450 7304 Support Tel. 0844 484 9412 Email [email protected] Free 30day trial www.liquidaccounts.com Page 1 Online Accounts
Microsoft Dynamics GP. Cashbook Bank Management
 Microsoft Dynamics GP Cashbook Bank Management Copyright Copyright 2010 Microsoft. All rights reserved. Limitation of liability This document is provided as-is. Information and views expressed in this
6 Managing Bank Accounts
 6 Managing Bank Accounts The Bank Account Screen allows you to add and maintain information for WinCruise bank accounts, including bank contact and account information, General Ledger accounts, checks,
Point of Sale Overview... 3. Till Setup... 4. General Tab... 4 Printer/Cash Drawer Tab... 6 Appearances Tab... 7 PC-EFTPOS Tab...
 Table of Contents Point of Sale Overview... 3 Till Setup... 4 General Tab... 4 Printer/Cash Drawer Tab... 6 Appearances Tab... 7 PC-EFTPOS Tab... 7 Post Code Validation... 9 Touch Screen Layout... 10 Creating
USER MANUAL (PRO-CURO LITE, PRO & ENT) [SUPPLIED FOR VERSION 3]
![USER MANUAL (PRO-CURO LITE, PRO & ENT) [SUPPLIED FOR VERSION 3]](/thumbs/39/19325006.jpg "USER MANUAL (PRO-CURO LITE, PRO & ENT) [SUPPLIED FOR VERSION 3]") Pro-curo Software Ltd USER MANUAL (PRO-CURO LITE, PRO & ENT) [SUPPLIED FOR VERSION 3] CONTENTS Everyday use... 3 Logging on... 4 Main Screen... 5 Adding locations... 6 Working with locations... 7 Duplicate...
Pro-curo Software Ltd USER MANUAL (PRO-CURO LITE, PRO & ENT) [SUPPLIED FOR VERSION 3] CONTENTS Everyday use... 3 Logging on... 4 Main Screen... 5 Adding locations... 6 Working with locations... 7 Duplicate...
CALCASIEU PARISH SCHOOL BOARD SCHOOL ACTIVITY FUNDS EPES ACCOUNTING PROCEDURES MANUAL
 CALCASIEU PARISH SCHOOL BOARD SCHOOL ACTIVITY FUNDS EPES ACCOUNTING PROCEDURES MANUAL TABLE OF CONTENTS CPSB SAF EPES Procedures Manual START UP 4 Log in 4 Main Screen 5 Exit 5 UTILITIES 5 Preferences
2) Point of Sale Handbook BASIC TRAINING WORKSHOP & REFERENCE MANUAL
 Point of Sale Handbook BASIC TRAINING WORKSHOP & REFERENCE MANUAL") 2) Point of Sale Handbook BASIC TRAINING WORKSHOP & REFERENCE MANUAL E4W Level 14 Last Revision on Wednesday, February 09, 2005 TRAINING ASSISTANCE Help is available to aid you in the operation of your
2) Point of Sale Handbook BASIC TRAINING WORKSHOP & REFERENCE MANUAL E4W Level 14 Last Revision on Wednesday, February 09, 2005 TRAINING ASSISTANCE Help is available to aid you in the operation of your
Rochester Institute of Technology. Oracle Training: Performing Inquiries and Requesting Reports in the Oracle Applications
 Rochester Institute of Technology Oracle Training: Performing Inquiries and Requesting Reports in the Oracle Applications Table of Contents Introduction Lesson 1: Lesson 2: Lesson 3: Lesson 4: Lesson 5:
Changing from Cash to Accrual Accounting
 Changing from Cash to Accrual Accounting Contents About Changing the Accounting Method Creating a Client Disb Recov (1210) Account Contacting LexisNexis PCLaw Technical Support Adjusting Disbursements
Getting Started with Sage 50 Accounts 2012
 Getting Started with Sage 50 Accounts 2012 Making the most of your software Hello, Thank you for purchasing Sage 50 Accounts 2012. This guide will help you to get started and make the most of your software.
Accounts Payable and Inventory Management
 Accounts Payable and Inventory Management 2013 SedonaOffice Users Conference Presented by: Lisa Gambatese & Laurie Goodrich Table of Contents Accounts Payable G/L Account Defaults (AP) 4 A/P Setup Processing
Electronic Financial Return
 Table of Contents The following manual is applicaple to events which began prior to December 19th 2014 Electronic Financial Return User Guide EC 20206 (06/13) EC 20206 1 Electronic Financial Return User
Getting started with Sage Accounts The online retailers guide
 Getting started with Sage Accounts The online retailers guide Contents Overview... 3 Which Sage Accounts package to use?... 3 Configuring Sage Accounts... 5 Nominal Codes... 5 Departments... 7 Bank Accounts...
Handout: Word 2010 Tips and Shortcuts
 Word 2010: Tips and Shortcuts Table of Contents EXPORT A CUSTOMIZED QUICK ACCESS TOOLBAR... 2 IMPORT A CUSTOMIZED QUICK ACCESS TOOLBAR... 2 USE THE FORMAT PAINTER... 3 REPEAT THE LAST ACTION... 3 SHOW
Title: Payables-Invoice Inquiry Document ID: PAY0010
 Title: Payables-Invoice Inquiry Document ID: PAY0010 Replaces: Invoice Inquiry (External), AP331 Date Modified: 08/07/2014 Purpose: This procedure details how to perform an Invoice Inquiry in Oracle Payables
NEXTGEN BUDGETARY ACCOUNTING TRAINING
 NEXTGEN BUDGETARY ACCOUNTING TRAINING TRANSACTIONS I. Vendor Maintenance II. III. IV. Requisition Entry - Routing Purchase Order Entry Accounts Payable - Invoice Entry V. Accounts Payable - Cash Disbursements
FSD. Finance One. User Manual. Accounts Receivable
 FSD Finance One User Manual Accounts Receivable Last Update: 15 th December 2011 Accounts Receivable Table of Contents AR2.0 Invoice Entry... 1 AR2.1 Manual Invoice Entry... 1 AR2.3 Manual Invoice Entry
Bank Manager Version 2... 3
 Table of Contents Bank Manager Version 2... 3 Bank Manager Overview... 4 Working with Bank Manager... 5 Converting Recurring Coding from Bank Manager Version 1 to Bank Manager Version 2 Mappings... 5 Download
Create a New Stock Item. Click Stock on top bar of buttons on main screen. To enter a new stock item onto the system click New.
 Chapter 6 Stock 139 140 Create a New Stock Item Click Stock on top bar of buttons on main screen. Stock Section To enter a new stock item onto the system click New. This will open the Stock Wizard. New
Sage 50 Accounts Construction Industry Scheme (CIS)
") Sage 50 Accounts Construction Industry Scheme (CIS) Copyright statement Sage (UK) Limited, 2012. All rights reserved We have written this guide to help you to use the software it relates to. We hope it
Sage 50 Accounts Construction Industry Scheme (CIS) Copyright statement Sage (UK) Limited, 2012. All rights reserved We have written this guide to help you to use the software it relates to. We hope it
North Dakota University System Accounts Payable Processes
 Accounts Payable Processes Voucher Post Pay Cycle Payment Post Training Manual 3130 Kilgore Road, Suite 400 Rancho Cordova, CA 95670 916.669.3720 www.maximus.com ACCOUNTS PAYABLE BATCH PROCESSES OVERVIEW...3
TheFinancialEdge. Journal Entry Guide
 TheFinancialEdge Journal Entry Guide 101811 2011 Blackbaud, Inc. This publication, or any part thereof, may not be reproduced or transmitted in any form or by any means, electronic, or mechanical, including
Getting Started Tutorial
 Getting Started Tutorial Welcome This tutorial will introduce you to the main functions of your AccountRight software. You can use this tutorial with the current version of MYOB AccountRight Basics. This
FINACS INVENTORY Page 1 of 9 INVENTORY TABLE OF CONTENTS. 1. Stock Movement...2 2. Physical Stock Adjustment...7. (Compiled for FINACS v 2.12.
 FINACS INVENTORY Page 1 of 9 INVENTORY TABLE OF CONTENTS 1. Stock Movement...2 2. Physical Stock Adjustment...7 (Compiled for FINACS v 2.12.002) FINACS INVENTORY Page 2 of 9 1. Stock Movement Inventory
Preparing for Bank Reconciliations
 Contents About Preparing for Bank Reconciliations What is Reconciled Preparing for the Reconciliation Selecting the Bank Account and Period About Preparing for Bank Reconciliations Bank Reconciliation
Microsoft Dynamics GP. Collections Management
 Microsoft Dynamics GP Collections Management Copyright Copyright 2010 Microsoft. All rights reserved. Limitation of liability This document is provided as-is. Information and views expressed in this document,
Sage 50 Accounting. Premium 2014 Level 2. Courseware 1616-1. For Evauluation Only. MasterTrak Accounting Series
 Sage 50 Accounting Premium 2014 Level 2 Courseware 1616-1 MasterTrak Accounting Series Sage 50 Premium Accounting 2014 Level 2 Lesson 2: Banking and Credit Cards Lesson Objectives In this lesson, you will
HorseTrak Accounting System
 HorseTrak Accounting System For Users of HT Gold and HT Deluxe General In this manual we explain the operation of the accounting features of HorseTrak Software. While teaching the principles of accounting
Accounting & Finance. Guidebook
 Accounting & Finance Guidebook January 2012 TABLE OF CONTENTS Table of Contents... 2 Preface... 6 Getting Started... 8 Accounting... 10 Accounting Welcome... 10 Sales Quotes... 11 New Sales Quote... 11
HansaWorld Enterprise
 HansaWorld Enterprise Integrated Accounting, CRM and ERP System for Macintosh, Windows, Linux, PocketPC 2002 and AIX Expenses Program version: 4.2 2004-12-20 2004 HansaWorld Ireland Limited, Dublin, Ireland
Point of Sale Procedures. Quick Reference
 Point of Sale Procedures Quick Reference Hard Copy Not Controlled Controlled Copy Available On-line Table of Contents How To Charge to Charge Accounts... 1 Closing an Open Check... 2 Creating a Recipe...
Merging Labels, Letters, and Envelopes Word 2013
 Merging Labels, Letters, and Envelopes Word 2013 Merging... 1 Types of Merges... 1 The Merging Process... 2 Labels - A Page of the Same... 2 Labels - A Blank Page... 3 Creating Custom Labels... 3 Merged
INVENTORY MANAGEMENT. TechStorm. http://www.gotechstorm.com/howto/inventorymanagement.pdf
 INVENTORY MANAGEMENT TechStorm http://www.gotechstorm.com/howto/inventorymanagement.pdf Inventory Management Table Of Contents Add Inventory Items In Tablet... 3 Transaction Flow for Adding Inventory in
Supply Chain Finance WinFinance
 Supply Chain Finance WinFinance Customer User Guide Westpac Banking Corporation 2009 This document is copyright protected. Apart from any fair dealing for the purpose of private study, research criticism
How to Configure and Use MRP
 SAP Business One How-To Guide PUBLIC How to Configure and Use MRP Applicable Release: SAP Business One 8.8 All Countries English October 2009 Table of Contents Purpose... 3 The MRP Process in SAP Business
SMALL BUSINESS ACCOUNTING. User Guide
 SMALL BUSINESS ACCOUNTING User Guide Welcome to QuickBooks We're going to help you get paid, pay others, and see how your business is doing. Use this guide to learn key tasks and get up and running as
All V7 registers support barcode printing, except the Sharp 410/420 1A ROM and that limitation is based upon the register.
 Tools Section Barcode Printing These are basic instructions for Version 7 Polling barcode printing. Users will need to have a PLU/UPC file containing either UPC-A, UPC-E, EAN 13 or EAN 8 numbers, label