Stealth Pos Gateway. Product Technical Documentation. Version : CS-005. Document Revision History :-
|
|
|
- David Watkins
- 10 years ago
- Views:
Transcription
1 Product Technical Documentation Stealth Pos Gateway Version : CS-005 Document Revision History :- Feb Release Mike Green 1

2 INDEX 1. Introduction This product version Supported POS systems on this version Supported video management systems (VMS) 3 2. Installing the Stealth POS Gateway (SPG) System requirements Installing the Microsoft.NET Framework Installing the SQL Server Express instance Checking that the SQL Server is running Installing the SPG application SPG Product key authentication Introduction to SPG product keys Auth Step 1 Product_Keys.INI Auth Step 2 AUTH_REQUEST.INI Auth Step 3 request Auth Step 4 Load Site_Info.INI Authentication by TeamViewer Note on future release authentication SPG Overview Controls on the main form Configuring SPG The Live Pos Monitor The archive investigation client Selecting POS events to review Review archived video Viewing events from within the Luxriot VMS Conclusion 85 2

3 1. INTRODUCTION The Stealth Pos Gateway is a middleware software product, which, provides integration between a retailers point of sale system and the video surveillance cameras monitoring the cashiers. The product provides an effective tool, which is used by the surveillance operator, to monitor point of sale transactions as they occur ( Live ) and/ or after the fact ( Archived ). Thus, assisting in reducing shrinkage at the point of sale and with resolving customer disputes. This document provides technical information on how to setup, use and manage the SPG. It is not a User Manual and should only be provided to the surveillance system technical integrator THIS PRODUCT VERSION This Stealth Pos Gateway product version, ( SPG CS-005 ), is used for the integration between pos systems that provide a means of integration via UDP/IP and the Luxriot Video Management System (VMS) SUPPORTED POS SYSTEMS ON THIS VERSION 3

4 1.3. SUPPORTED VIDEO MANAGEMENT SYSTEMS ( VMS ) This SPG version is designed for use with a Luxriot VMS system. NB :- Luxriot Version or later The Luxriot VMS system provides the means of viewing, archiving and managing the surveillance cameras pertaining to the installation. The SPG provides a link between the surveillance archive and the Pos transactional data. 2. INSTALLING THE STEALTH POS GATEWAY ( SPG ) NB :- Your Luxriot VMS Server may already come with the SPG software pre-installed. In which case you can skip this section. The SPG is a middleware application which provides the link between the POS transactional data and the VMS. This application is installed on the Luxriot VMS Client PC. The SPG is a single instance application and should be installed once on the VMS Client which is used by the investigation officer who will monitor and resolve pos transactions, disputes and investigations. For multi user pos investigations ( larger retail operations / chains ) use the Stealth PIC, ( Pos Investigation Client ), which is a multi-user server/ client pos investigation system. Generally the SPG is used on retail operations with less than 30 till points. For retail operations with more than 30 till points the Stealth-PIC must be used SYSTEM REQUIREMENTS This is a Microsoft Windows application and must be installed on a PC running a Windows 7 or later operating system. 4
 NB :- Your Luxriot VMS Server may already come with the SPG software pre-installed. In which case you can skip this section.")
5 This is a.net (DOTNET) application and requires a Microsoft.NET Framework Revision or later This application uses a Microsoft SQL Server Express 2008 database to store pos event and configuration data. It requires an Instance of SQL Server Express named SQLEXPRESSSPG to be running on the machine to allow it to operate. Let s begin the installation INSTALLING THE MICROSOFT DOTNET FRAMEWORK The SPG is an application which requires a Microsoft.NET Framework or later to operate. The installation media is included in your installation media pack in the folder :- Stealth Installation Media\SPG_Requirements. Or download from Microsoft at :- Or find it under downloads at Or download from our dropbox at :- ( Full Installation pack Includes.NET, SQL Express, SPG Installation media etc. ) QE-TWVvsa?dl=0 5

6 2.2.1 Run the.net Installation Package Read and accept license terms and Install. Note :- If the installer shows a repair or modify installation screen then.net or later is already installed on this machine. You can then cancel the.net installation and proceed to installing the SQL Server Express Instance. 6

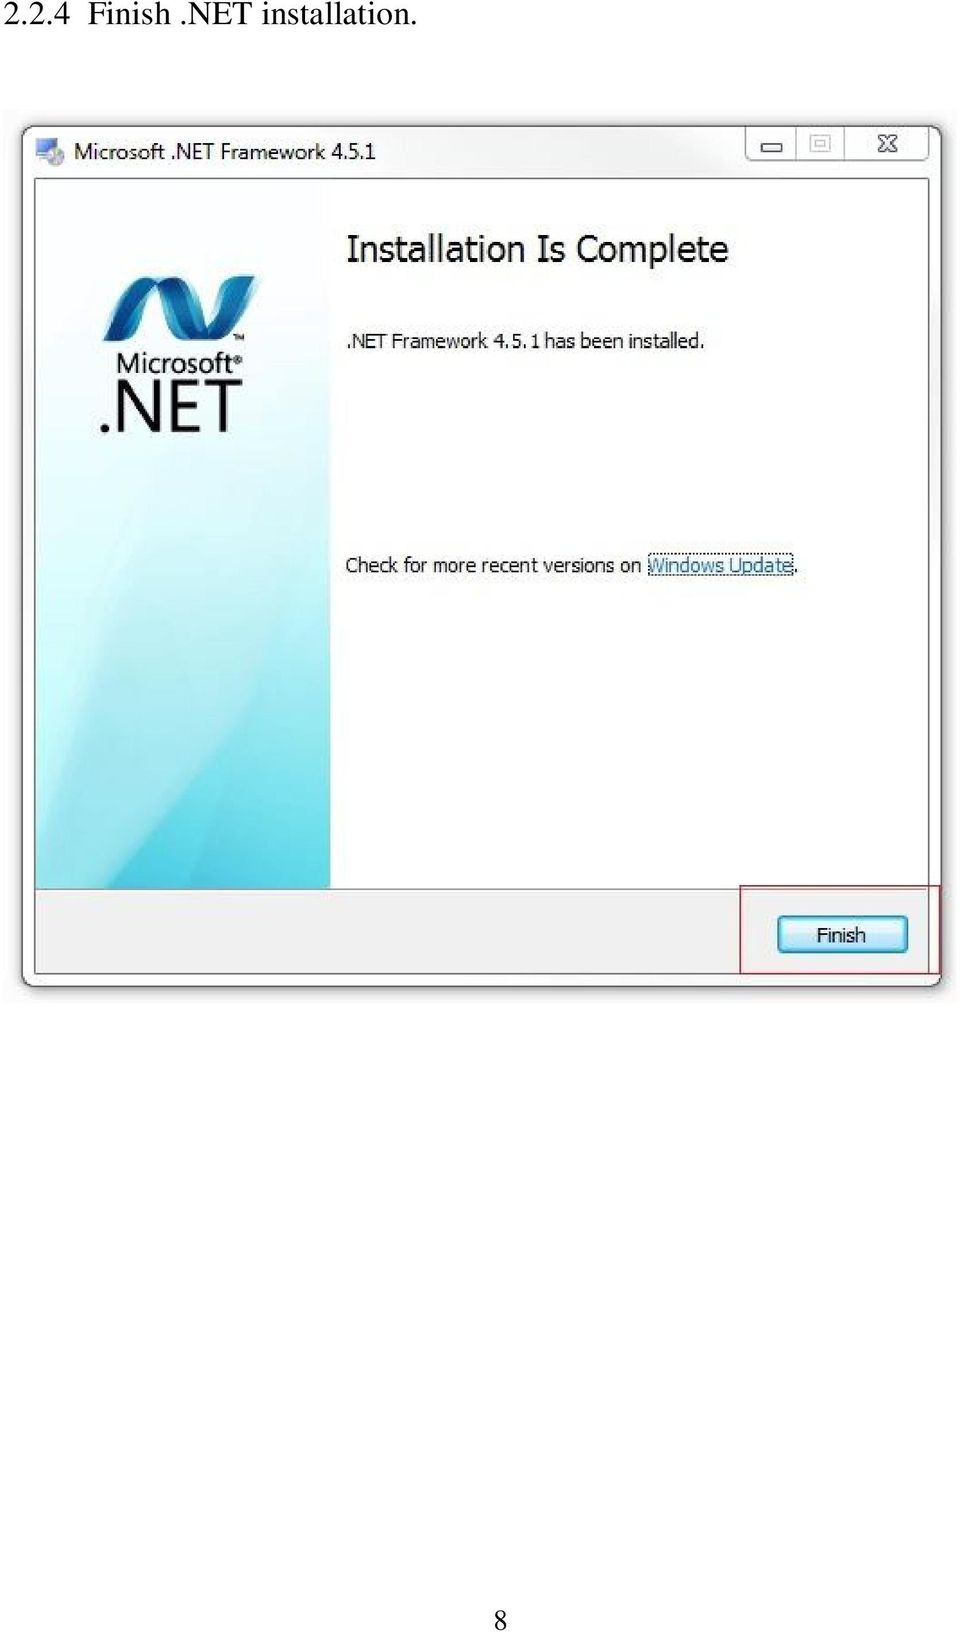
7 2.2.3 Wait for installation to complete. 7

8 2.2.4 Finish.NET installation. 8
9 2.3. INSTALLING THE SQL SERVER EXPRESS INSTANCE NAMED SQLEXPRESSSPG The SPG is an application which requires an Instance of SQL Server Express 2008 R2 to be installed on the host machine. NB :- You must install an instance of SQL SERVER EXPRESS 2008 R2. Not an earlier or later version. This application is developed on a Microsoft Visual Studio 2010 development environment. It uses LINQ for SQL Server to access the database. The installation media is included in your installation media pack in the folder :- Stealth Installation Media\SPG_Requirements. Or download from Microsoft at :- Or find it under downloads at Or download from our dropbox at :- ( Full Installation pack Includes.NET, SQL Express, SPG Installation media etc. ) QE-TWVvsa?dl=0 9

10 2.3.1 Run the SQL Server Express Installation Package NB :- There are a few important steps to take in this installation. Do not just skip through the installation defaults You are doing a new installation 10

11 2.3.3 Read, comply with and accept the Microsoft License Agreement. 11

12 Select All instance features and then click next. IMPORTANT :- Watch the next step You must Name the Instance :- SQLExpressSPG 12

13 Name the Instance SQLExpressSPG and then click next. IMPORTANT :- Watch the next step The SPG Application requires the SQL Server Browser service to be running. The default is disabled. You must set this to automatic. 13

14 Set the SQL Server Browser to Automatic and then click next. From this point onwards until the end of the SQL Server installation you Select default options. 14

15 Use Windows authentication mode (default) then click next. 15
")
16 No need to send errors to Microsoft. Just click next. 16

17 Complete SQL Server setup by clicking close. 17

18 2.4. Browse to services and make sure that you have an instance of SQL Server ( named SQLEXPRESSSPG ) running From the Start menu type in Services in the search box. Double click on Services. 18

19 In the services dialog make sure that you have an instance of SQL Server named SQLEXPRESSSPG, and that the Startup type is set to Automatic, and that the service Status is Started. 19

20 Check also that the SQL Server Browser service has a Startup type set to Automatic. If it is Disabled or Manual then set it to Automatic. For some reason the SQL Server Express installer may not set the SQL Server Browser type to Automatic. If it is Disabled then you need to enable it. Note :- The SPG Application will try to set this service startup type to Automatic if it is found to be disabled or manual. For completeness however, we suggest that you set it here. 20

21 Set the SQL Server Browser startup type to Automatic. 21
22 Start the SQL Server Browser service. 22
23 Verify that the SQLEXPRESSSPG and SQL Server Browser services have a Startup Type of Automatic and that both services are Started. The SQL Server instance SQLEXPRESSSPG which is required to save the Pos Events and SPG configuration data is now setup correctly and running. 23
24 2.5. INSTALLING THE STEALTH POS GATEWAY (SPG) APPLICATION. The SPG is an application which integrates the retail point of sale system ( Pos ) to the surveillance video management system ( VMS ). This application needs to be installed on the host Luxriot Client machine. The network topology must be such that the host machine is reachable by the retailers Pos Network and the Luxriot Server. ( May be the same Machine localhost ). The installation media is included in your installation media pack in the folder :- Stealth Installation Media\SPG_ CS-005. Or find it under downloads at Or download from our dropbox at :- ( Full Installation pack Includes.NET, SQL Express, SPG Installation media etc. ) QE-TWVvsa?dl=0 24
25 Run the Install Shield ( Windows Installer ) Read, understand and accept the Sunbird Technologies SOFTWARE LICENSE AGREEMENT. 25
26 Select the Installation Destination Folder and then click next. Tip :- The SPG application will install to a destination folder C:\Program Files (x86)\stealth\stealth Pos Gateway, by default. If you are installing this on a Windows 7 operating system then we suggest that you use the default destination folder. Windows 8 however makes it difficult to install or modify configuration text files (.INI ) in a protected Program Files folder. The SPG Application makes use of some.ini configuration files. If you install this application in the default folder then you will need to enable the Administrator account to modify files in this folder. If you do not wish to enable the Administrator account on the host machine, then we suggest that you Change the installation destination folder to install under a different path. eg. C:\MyProg\Stealth\Stealth Pos Gateway\ 26
27 Proceed with the installation. 27
28 Complete the SPG Installation. This completes the SPG application installation. You will now have an ICON on the desktop and in your start menu. These ICON s are used to launch the Stealth POS Gateway application. Important Note :- The POS Transaction Events are not loaded into the SQLSERVERSPG Database unless the SPG Application is running. The SPG application must therefore run at Startup and continuously run on the host PC. The SPG installer does not copy the SPG Shortcut to the Startup menu. You should do this manually. 28
29 SPG launch Icons on desktop and in the start menu. 29
30 Set Stealth POS Gateway launch shortcut to run minimized on launch. Right click on the Stealth POS Gateway shortcut on the desktop. Open the properties dialog. 30
31 Copy the Stealth POS Gateway launch shortcut to the host PC startup folder. 31
32 You have now completed the installation of the installation of the Stealth Pos Gateway ( SPG ) application. The next section deals with product key authentication. 32
33 3. SPG PRODUCT KEY AUTHENTICATION 3.1. Introduction to SPG Product Keys ( Licenses ) The Stealth Pos Gateway ( SPG ) application is licensed to operate for the number of tills ( pos terminals ) on the specific retail site. The SPG product is suitable for installations that have less than 30 tills and a single loss control investigation process. For retail operations with more than 30 tills you need to use the Stealth-PIC product, which, is a server/client based Pos Investigation Client ( PIC ), designed for unlimited tills at unlimited sites with unlimited simultaneous investigation officers. The SPG and PIC applications utilize the same Product Keys, which are purchased as a once off license for use on a specific till on a specific site for the life of the product. On an SPG installation a number of Product Keys ( from 1 to 30 ) are authenticated to run on the SPG application on the host pc. Please Note :- The authentication process marries the product keys purchased to the specific machine on which the SPG Application is installed. Before you do any of the following to the target machine you will first need to enquire from [email protected] what the consequences of the change will be. i) Change the primary hard drive of the host machine. ii) Add or remove network adaptors from the host machine. iii) Change the Motherboard / CPU of the host machine. iv) Re-Install the SPG application on the host machine. If the host machine fails you will need to support at [email protected] and supply the following information to ensure that the product keys can be re-installed on the replacement machine. 33
34 3.2. Authentication of Product Keys STEP 1 Copying the Product_Keys.ini file to the SPG installation folder. When you ordered your product keys for the specific installation, you will receive a file called Product_Keys.INI. This file contains your unique product keys for the specific installation. This file needs to be copied as is into the SPG application folder. Do not modify this file. It is watermarked. If you modify it then the authentication will fail. 34
35 If the application cannot find the Product_Keys.ini file, then, when you try to run it, it will abort with the following message :- Copy the PRODUCT_KEYS.INI file into the SPG application folder. Now try to run the SPG application again. 35
36 3.3. Authentication of Product Keys STEP 2 Generating the AUTH_REQUEST.INI File. When you first run the SPG Application it checks to see if it can find a valid SITE_INFO.INI installation. If not then it means that the product keys are yet to be authenticated. It will display a dialog box which prompts you to enter the site description. This site description must contain unique detail about the specific installation as this info is required for support purposes. Enter a Unique site description when prompted :- On entering the site name and clicking on OK the software will generate an authorisation request file ( AUTH_REQUEST.INI ) in the SPG application folder. 36
37 3.4. Authentication of Product Keys STEP 3 Sending the AUTH_REQUEST.INI file for authentication. Copy the AUTH_REQUEST.INI File from the SPG Application folder and to [email protected]. 37
38 If your product keys are valid and the site details are adequate to provide support then you will receive a mail with a SITE_INFO.INI file attached. You need to save this SITE_INFO.INI file and load it with the following and final step in the authentication process. 38
39 3.5. Authentication of Product Keys STEP 4 Loading the SITE_INFO.INI file onto the host machine. The SPG Application requires the SITE_INFO.INI file to be loaded into the following location on the target machine. ( SPG Host ) Note :- If more than one user will be using the SPG application then the Same SITE_INFO.INI file will need to be copied or loaded into the folder for that specific user. This file can simply be copied into the users profile. This may be a hidden folder, so, to simplify this process we have created a LoadSiteInfo application which loads the selected file into the current users profile. Simply select the SITE_INFO.INI file from your stored location and Save to current user 39
40 40
41 3.6. Authentication of Product Keys via TeamViewer. To simplify the Authentication Process this can be done via TeamViewer. If you are going to do this then please make an appointment by sending an to :- We will request the Teamviewer log in credentials at the appointed time and assist with the authentication remotely A note on future revision authentication. Future revisions from revision 006 onwards will support on-line automatic authentication via our website. Look out for future updates. This concludes the authentication process. You are now ready to configure the SPG system. 41
42 4. SPG OVERVIEW This manual is not a Luxriot configuration manual. It is limited to configuring the SPG to operate in conjunction with a Luxriot VMS system. Where necessary please refer to the Luxriot documentation. Note :- The SPG application makes use of the Luxriot SDK / API s and requires the Luxriot Client or later to be installed on the same machine as the SPG host. Even if the SPG Host is not a Luxriot VMS Client the client software must be installed as the installation loads various DLL files required when using the SDK The controls on the Main Form of the SPG Application. Once the SPG is authenticated properly it opens with the following main form. Please note the application takes a while to initially load. 42
43 Receive UDP Port This is a read only control which shows which UDP port the SPG is expecting to receive data on. Configuration of all of the parameters described here is dealt with in later chapters. In this section of the document we are giving you an overview of the main form controls. This version of the SPG is used only on POS systems that send the transaction data via UDP/IP. UDP is a one direction connectionless protocol where the Server sends UDP Packets to the Client and expects no response. The Server and Client are therefore often referred to as the Sender and Receiver. This version of the SPG is used only on POS systems where the POS system sends the transaction data for all POS terminals ( tills) to a single port. The POS terminal that is sending the message identifies itself within the UDP packet transmitted. So for this configuration all pos events are expected to be sent via UDP to the IP Address of the SPG host machine on port Pos System Type This is a read only control which shows the POS SYSTEM TYPE that is configured for this system. All POS SYSTEMS will send the data out in a different format ( Protocol ). Depending on the POS SYSTEM TYPE, in the configuration, the SPG application knows how to process the incoming UDP packets Luxriot server IP This is the IP Address, user name, password to connect to the Luxriot VMS server that is associated to the camera looking at each one of the up to 30 tills. Obviously these cameras can reside on a different VMS server, hence the separate connection for each. The format is :- localhost, admin, admin OR , Whatever, etc. 43
44 Till Name The name associated to each till. This would match the name By which the till is known in the store. e.g. Till 1, POS 01, 1234Till01 etc Target Device This is a drop-down list of the Camera Name that is associated to the specific till. This is configured during the POS mapping configuration which we deal with later VMS connection status bar This is a status bar which shows the status of the last connection to the VMS Button Reconnect to VMS server This is a button which is used to reconnect the SPG to the VMS Server specified in Luxriot Server IP01. i.e. First VMS Server. Usage is seldom but included in case the VMS is disconnected. ( The SPG does auto connect anyway but included for completeness.) Button Archive Investigation This button is used to open the Archive Investigation Form. Used to review / search for Pos Transactions and correlated video. Usage of this button is often. This is the heart of the SPG application. 44
45 Button Live Pos Watch This button is used to open the Live Monitor POS viewing form. Used to do Live Monitoring of cashier performance. Usage of this button is often Button System configuration This button is used to open the System configuration form. This form is password protected and is only used by the system administrator to configure the SPG application Button System information This button is used to show the SPG System information. Usage is seldom. Only used for system support by the system administrator / service provider support VMS Search Parameters Pane Pane which shows the progress of rendering POS events following a request to do so by the VMS. Usage seldom. The reviewing of Pos events is accomplished more through the Archive Investigation page than via VMS external event panes. 45
46 List boxes for General information List box 13 shows general technical information about UDP packets received. List box 14 shows general information about POS Transaction Events received. 46
47 4.2. Configuring the Stealth Pos Gateway ( SPG ) The SPG is configured using the configuration utility. We start with this because understanding the configuration is paramount Entering the configuration screen. You enter the configuration screen by clicking on the button on the main form. The configuration is password protected. When you click on the button an Enter Password dialog will pop-up, requesting you to enter the configuration password. Enter the configuration password and hit Enter or press The default configuration password is admin. This can be changed within the configuration. Do not forget your configuration 47
48 password or you will need to make a support call to [email protected]. We will only be able to rectify this with TeamViewer access to the SPG host machine The general configuration control panel Entering the correct configuration password will give you access to the general configuration control panel. This control panel is described in detail below The Generate a POS test event panel This panel is used to generate a test event to a Luxriot external event pane. Before you understand what this does you need to understand what as External event pane is. 48
49 When viewing video via the Luxriot VMS Client or Local Luxriot Connection you can open external event panes by clicking View then External event panes. The external event panes are windows that are registered by a third party application ( such as SPG ) on the Luxriot server to enable the SPG application to send text information to be displayed from within the Luxriot VMS. We will register external event panes when we get to the Easy map tills To VMS configuration menu. The generate a POS test event panel is purely a test tool to allow the system administrator to test the ability of the SPG to send messages to external event panes on the VMS. This will become very clear once you know how to register an external 49
50 event pane The Connect to VMS server panel This panel is used to establish a connection to a VMS server. This is only ever necessary if a connection is not already established. i.e. The VMS IP address, user name and password are not connected to the VMS that you wish to configure. Entering a valid Host, Username and Password will attempt to establish a connection to the VMS. The success OR failure of this attempt will be shown in the list box. For our demo system the VMS Server is on the local host IP with a username of admin and a password of admin. 50
51 The Manage database panel The Manage Database panel is accessed by clicking on the Manage database icon on the general configuration control panel. 51
52 This panel is a tool which can be used by the system administrator to manage the SQL Server Express Database, which stores the Pos transaction event data, and the configuration data required by the SPG. The SQL Express Database is in the SPG application folder and this is named SPG_Database.mdf This DataBase runs on the SQL Server Express instance SQLEXPRESSSPG. The SPG_Database.mdf has the following tables :- 52
53 The Events table stores POS transaction events that contains the following fields :- The Pane_Registration table stores external event source pane registration information in the following fields :- The Pane_Unregistration table stores external event source pane unregistration information in the following fields :- The POS_mapping table stores POS mapping parameters and contains the following fields :- 53
54 The SPG_Errors table shows errors during the operation of the SPG application. The fields are as follows :- The SPG_Warnings table shows warnings during the operation of the SPG application. The fields are as follows : Deleting records from the database tables. 54
55 The system administrator can delete records from the Database tables. This should never be necessary but the option is available. To delete records from a table : Select the table Select the time to search Database from. Note :- The database records are always displayed between date and time limits. You must therefore ALWAYS select a start time ( From ) which is earlier than the end time ( To ). If you want to search for all records then set the start time to January Execute the database search This will do a search of the database and display all records from the table selected, which occurred between the start time and the end time. 55
56 Searching the database The search of the database may take some time depending on the length of time between the start time and end time, and, the number of records that occurred within that time frame, The data grid view will be populated with all records found between the start time and end time found in the specified database table Selecting records to be removed. 56
57 If you now drag your mouse ( while holding the left button down ) within the LEFT MOST COLUMN of the data grid view then the records that you drag over will be selected. ( Release the mouse button when you are over the last record to be deleted. ) When records are selected a Trash icon will appear on the left of the data grid view. Click on the Trash icon to delete the selected records. Important Note :- Deleting of database records is not reversible. If You delete the records they are permanently deleted. Please do not delete records from the SPG_Errors or SPG_Warnings as these tables are only useful for technical support to show system errors or warnings. 57
58 The Map tills to VMS panel. This panel is used to configure the tills and to map them to the relevant camera etc. 58
59 Selecting tills to be configured in the mapping process. This control panel allows you to configure all of the tills that are authenticated on the SPG system. ( Max 30 tills ). 59
60 Select the tills to be configured using the tick box next to the line for that specific till. This will highlight the VMS Server IP, Till Name and Target Device lines. You can enter these edit boxes to enter the information required. Note :- The Target Device box has a drop down list. When you click on the drop down list it will show you all cameras associated to that VMS Server. You must pick the Camera associated to the till from this list. Do not just write in the target device box as the name must be exactly as the VMS camera name. Note :- Often you want to repeat the same information into the next tills parameters. This can be simplified by using the replication tool described below Event column titles The event column titles are the name of the columns in the External Event Pane and the Event data grid view. The SPG always writes the Event Description into the first column. 60
61 The SPG always writes Attached Warnings into the second column. The SPG always writes Attached Exceptions into the third column. Therefore we recommend that you always use the Pre-load recommended settings for your column names. Note :- SPG Version 005 which is covered in this document does not support complex data filters. Attached Warnings and Attached Errors are therefore not supported in this version and will never occur. Please however include these column names in your configuration so that the system is pre-configured for complex data filters Selecting text attributes for External Event Panes An external event pane is a window that is created and registered by third party systems ( such as the SPG) on the VMS system. 61
62 Registering an external event pane on the VMS allows you the ability to send data to this event pane for display within the VMS. SPG uses event panes and sends POS event data to these event panes. We register an event pane to always have 3 columns with the names specified in the pre-ceding paragraph. ( Event column titles ) Each one of these columns can be configured here to have different attributes. i.e. Background Colour, Text Colour, Bold, Italic and underline. Use the Colour picker or Tick boxes to set the attributes for each row type. Note :- The row types are pre-defined for Events, Warnings and Errors. We recommend that you use the attributes as shown in the configuration figure. 62
63 You can save the attribute configuration by clicking the button. You can load the defaults by clicking the button The Replication tool. The replication tool is simply provided to assist with the configuration by auto-copying data from one till configuration field to the other. Example :- If you want to make the Server IP settings for all tills , admin, admin it is a pain to type it into each tills field Configuring the POS system type and port. The pos system type and port is configured here. Select the POS Type from the drop down list. Configure the UDP listen port in the edit box. 63
64 Note :- If the POS system type does not appear in the drop-down list then it is not supported on this SPG Version. Please enquire from whether the POS system type that you are looking for is supported by another SPG/method Downloading the configuration parameters. External event panes on the VMS need to be registered / unregistered. If you for example register an external event pane called POS 01 And then you register another event pane called POS 01 then the VMS will have two event panes with this name. This will be confusing When you want to open them. NB/ It is therefore very important that you first unregister any event panes before you register new event panes. 64
65 On clicking the button the event pane for the specified till will be saved and a new database entry under Pos Mappings will be created. Note :- The last record in the Pos Mappings table in the database is the latest configuration record. All configurations are thus saved unless explicitly removed from the database. The save process will cycle through all selected tills. ( From 01 to 30 ). You can stop this process by clicking the button. 65
66 Changing the Configuration and Exit passwords The Set passwords panel is used to change the configuration and exit passwords for the SPG. Important Note :- The SPG application needs to be running for the POS transaction events to be logged to the database. Therefore the SPG application needs to be running all of the time. For this reason it is advisable to have an exit password enabled. If you forget the configuration password then you will need to book a support call via [email protected] to get us to reset the password to default. This is only possible via TeamViewer access at this stage, so, please try to keep the password handy. 66
67 67
68 5. The Live Pos Monitor The Live Pos Monitor client is opened by clicking on the on the main form. button This dialog is used by the surveillance operator to monitor pos transactions in live mode. i.e. as they occur. In a multi screen environment you can open up to three live pos monitor clients simultaneously, to monitor three different tills. 68
69 Important Note :- This software works best at a screen resolution of 1920 X The minimum screen resolution that it will operate on is 1024 X 768. To use the software to maximum effect ( which goes for the VMS also, you should use an environment with multiple monitors. Usually 2 or 3 ) 69
70 6. Archive Investigation Client. The archive investigation client is the heart of the SPG system. The archive investigation client is opened by clicking on the the main form of the SPG application. button on This client allows the surveillance operator the functionality to search the POS database and show the video from the VMS archive in correlation to the pos events occurring. This is used to verify that cashiers / tellers are entering the correct items at the point of sale. Also to solve customer queries quickly and efficiently by doing a review on receipt number etc. The archive investigation is basically a two step process :- i) You select the pos event / events that you want to review. ii) You review the selected events Selecting Pos Event / Events to Review. When you first select the Archive Investigation Client it opens a Search Pos Events window which allows you to search through the pos events database. Here you have two options :- You always need to select a pos terminal to review or all by ticking the relevant tick box. i) You can either do a straight time based search, by selecting the From and To date/time from the date/time pickers, and then clicking on the button. ii) OR you can do a filtered search. Here the event results are filtered and only the events within the search criteria are shown. 70
71 Doing a time based pos event search. For any of the POS event searches you must first start by selecting the POS terminal that you want to search for archived events on. Select the required POS terminal by ticking the tick box. If you wish to select all of the POS terminals then tick the Select all POS terminals box. 71
72 Next you need to select the Time/Date range that you want to cover with your search. From -> The date/time to start the search from. To -> The date/time to end the search at. Note :- The longer this period of time is, the longer the search will take. Click on the button to perform the search. 72
73 When the search is complete the data grid will be filled with all events that occurred on the specified POS terminal between the date/time limits. The verification box pops up to show you the list of selected items and asks for verification. Verifies the search and will load the video and events for review. Aborts the search and closes the verification window, waiting for a new search Doing a time based pos event search with a search string filter. For any of the POS event searches you must first start by selecting the POS terminal that you want to search for archived events on. Select the required POS terminal by ticking the tick box. If you wish to select all of the POS terminals then tick the Select all POS terminals box. Next you need to select the Time/Date range that you want to cover with your search. 73
74 From -> The date/time to start the search from. To -> The date/time to end the search at. Note :- The longer this period of time is, the longer the search will take. Now you type in search string that you want to search for and then click the button. Once the search is complete the following will be displayed :- 74
75 Notice that the populated data grid only shows events that are within the search criteria. ( i.e. In the example, events that included Transaction Number ) Or try to do the Search again but tick the box marked :- Show all but mark search string in red Notice now that the data grid is populated with all data within the time frame but events containing the search string are highlighted in red. You now proceed to select the events from the data grid that you wish to review. Tip :- Do this by pressing the left key of the mouse and dragging over the left most column of the data grid. Releasing the mouse button on the last event. 75
76 As you release the mouse you will notice that a new button popped up on the left of the data grid. This is the Review Video button. Pressing the button will open the Verification box 76
77 The verification box shows you the list of selected items and asks for verification. Verifies the search and will load the video and events for review. Aborts the search and closes the verification window, waiting for a new search. 77
78 6.2. Review Archived Video This window opens with the Video from the first event on the list and with the video paused. You can now use the video position controlling tools to play / forward / Rewind / pause the video The Video Review control buttons 78
79 PAUSE 1 SECOND FORWARD PLAY SPEED 1 X PLAY FAST FORWARD 2X 4X 6X 8X STOP 1 SECOND BACK REVERSE PLAY 1 X REVERSE PLAY FAST 2X 4X 6X 8X REVERSE OR FORWARD SPEED UP / DOWN 79
80 Current position Text to Video correlation. There are various parameters that you can set by tick boxes to change how the current data grid item is displayed on the video. These are selected by the tick boxes as shown above. The description next to the tick box describes the function. From the image following on the next page you can see that the current Item viewing is gray lighted, and, it is showing in the centre of the data grid as per the selection. 80
81 Forward or Reverse referencing the video to a POS event item. You can scroll down the data grid through the POS events and automatically select any event that you wish to review from. Select the event by Double Clicking the mouse while over it and the video will automatically move forward / backwards and pause at the new selected event. 81
82 82
83 7. Viewing events from within the Luxriot VMS. As dealt with in the configuration, the Luxriot VMS supports a method whereby third party systems such as the SPG can register and send text to an External Event Pane. This can be viewed in conjunction with the video on the Luxriot VMS. In Live viewing mode when you open the external event page registered it shows the external event pane with the live POS transactions. In Media Archive Investigation Search the SPG populates the External Event Pane as the review advances to the correct point. Also double clicking on the event in the event search pane will automatically set the video to review from that point. 83
84 84
85 8. Conclusion This concludes the technical document for the Integration of POS systems To the Luxriot VMS via a Stealth POS Gateway ( SPG ). This document does not cover specific requirements that may be required for the configuration of different POS systems to work on the SPG. Please refer to the POS system suppliers documentation and/or any documents on our website pertaining to integration to specific POS systems. Or alternatively contact [email protected] for technical assistance. To help us improve out product and documentation please send any errors or omissions that you struggle with to [email protected] END OF DOCUMENT 85
KViewCenter Software User Manual 2012 / 04 / 20 Version 2.2.1.0
 KViewCenter Software User Manual 2012 / 04 / 20 Version 2.2.1.0 Table of Contents Chapter 1. KViewCenter Interface... 5 1.1. Log in.... 5 1.2. Log out... 5 1.3. Control Panel... 6 1.4. Control Panel (Preview
Bitrix Site Manager ASP.NET. Installation Guide
 Bitrix Site Manager ASP.NET Installation Guide Contents Introduction... 4 Chapter 1. Checking for IIS Installation... 5 Chapter 2. Using An Archive File to Install Bitrix Site Manager ASP.NET... 7 Preliminary
PROJECTIONS SUITE. Database Setup Utility (and Prerequisites) Installation and General Instructions. v0.9 draft prepared by David Weinstein
 Installation and General Instructions. v0.9 draft prepared by David Weinstein") PROJECTIONS SUITE Database Setup Utility (and Prerequisites) Installation and General Instructions v0.9 draft prepared by David Weinstein Introduction These are the instructions for installing, updating,
PROJECTIONS SUITE Database Setup Utility (and Prerequisites) Installation and General Instructions v0.9 draft prepared by David Weinstein Introduction These are the instructions for installing, updating,
Creating client-server setup with multiple clients
 Creating client-server setup with multiple clients Coffalyser.Net uses a SQL client server database model to store all project/experiment- related data. The client-server model has one main application
SMS Database System Quick Start. [Version 1.0.3]
![SMS Database System Quick Start. [Version 1.0.3]](/thumbs/27/10030198.jpg "SMS Database System Quick Start. [Version 1.0.3]") SMS Database System Quick Start [Version 1.0.3] Warning ICP DAS Inc., LTD. assumes no liability for damages consequent to the use of this product. ICP DAS Inc., LTD. reserves the right to change this manual
SMS Database System Quick Start [Version 1.0.3] Warning ICP DAS Inc., LTD. assumes no liability for damages consequent to the use of this product. ICP DAS Inc., LTD. reserves the right to change this manual
NovaBACKUP. Storage Server. NovaStor / May 2011
 NovaBACKUP Storage Server NovaStor / May 2011 2011 NovaStor, all rights reserved. All trademarks are the property of their respective owners. Features and specifications are subject to change without notice.
Comodo LoginPro Software Version 1.5
 Comodo LoginPro Software Version 1.5 User Guide Guide Version 1.5.030513 Comodo Security Solutions 1255 Broad Street STE 100 Clifton, NJ 07013 Table of Contents 1.Introduction to Comodo LoginPro... 3 1.1.System
Configuring your email client to connect to your Exchange mailbox
 Configuring your email client to connect to your Exchange mailbox Contents Use Outlook Web Access (OWA) to access your Exchange mailbox... 2 Use Outlook 2003 to connect to your Exchange mailbox... 3 Add
Installation Guide for Pulse on Windows Server 2012
 MadCap Software Installation Guide for Pulse on Windows Server 2012 Pulse Copyright 2014 MadCap Software. All rights reserved. Information in this document is subject to change without notice. The software
EntroWatch - Software Installation Troubleshooting Guide
 EntroWatch - Software Installation Troubleshooting Guide ENTROWATCH SOFTWARE INSTALLATION TROUBLESHOOTING GUIDE INTRODUCTION This guide is intended for users who have attempted to install the EntroWatch
email-lead Grabber Business 2010 User Guide
 email-lead Grabber Business 2010 User Guide Copyright and Trademark Information in this documentation is subject to change without notice. The software described in this manual is furnished under a license
TECHNICAL NOTE. The following information is provided as a service to our users, customers, and distributors.
 page 1 of 11 The following information is provided as a service to our users, customers, and distributors. ** If you are just beginning the process of installing PIPSPro 4.3.1 then please note these instructions
Upgrading from MSDE to SQL Server 2005 Express Edition with Advanced Services SP2
 Upgrading from MSDE to SQL Server 2005 Express Edition with Advanced Services SP2 Installation and Configuration Introduction This document will walk you step by step in removing MSDE and the setup and
Team Foundation Server 2012 Installation Guide
 Team Foundation Server 2012 Installation Guide Page 1 of 143 Team Foundation Server 2012 Installation Guide Benjamin Day [email protected] v1.0.0 November 15, 2012 Team Foundation Server 2012 Installation
DiskPulse DISK CHANGE MONITOR
 DiskPulse DISK CHANGE MONITOR User Manual Version 7.9 Oct 2015 www.diskpulse.com [email protected] 1 1 DiskPulse Overview...3 2 DiskPulse Product Versions...5 3 Using Desktop Product Version...6 3.1 Product
Installation Guide for Pulse on Windows Server 2008R2
 MadCap Software Installation Guide for Pulse on Windows Server 2008R2 Pulse Copyright 2014 MadCap Software. All rights reserved. Information in this document is subject to change without notice. The software
Check current version of Remote Desktop Connection for Mac.. Page 2. Remove Old Version Remote Desktop Connection..Page 8
 CONTENTS SECTION 1 Check current version of Remote Desktop Connection for Mac.. Page 2 SECTION 2 Remove Old Version Remote Desktop Connection..Page 8 SECTION 3 Download and Install Remote Desktop Connection
Point of Sale 2015 Enterprise. Installation Guide
 Point of Sale 2015 Enterprise Installation Guide Contents About this guide 3 System Requirements - Microsoft SQL Server 2008 R2 Express 3 System Requirements - POS Enterprise 2015 (Administrator) 3 System
Central Management Software CV3-M1024
 Table of Contents Chapter 1. User Interface Overview...5 Chapter 2. Installation...6 2.1 Beginning Installation...6 2.2 Starting the CMS software...10 2.3 Starting it from the Start menu...10 2.4 Starting
Changing Your Cameleon Server IP
 1.1 Overview Technical Note Cameleon requires that you have a static IP address defined for the server PC the Cameleon server application runs on. Even if the server PC has a static IP address, you may
Hosting Users Guide 2011
 Hosting Users Guide 2011 eofficemgr technology support for small business Celebrating a decade of providing innovative cloud computing services to small business. Table of Contents Overview... 3 Configure
Site Monitor. Version 5.3
 Site Monitor Version 5.3 1 1 Table of contents 1 Table of contents... 2 2 Installation... 3 2.1 Components... 3 2.1.1 Monitoring Service... 3 2.1.2 Desktop User Interface... 3 2.1.3 Web User Interface...
Using SSH Secure Shell Client for FTP
 Using SSH Secure Shell Client for FTP The SSH Secure Shell for Workstations Windows client application features this secure file transfer protocol that s easy to use. Access the SSH Secure FTP by double-clicking
MultiClient Software Quick Guide
 MultiClient Software Quick Guide Introduction This document provides a quick overview of setting up and using the MultiClient. If you want to use a PC to view video from a video gateway, the PC must be
TANDBERG MANAGEMENT SUITE 10.0
 TANDBERG MANAGEMENT SUITE 10.0 Installation Manual Getting Started D12786 Rev.16 This document is not to be reproduced in whole or in part without permission in writing from: Contents INTRODUCTION 3 REQUIREMENTS
GP REPORTS VIEWER USER GUIDE
 GP Reports Viewer Dynamics GP Reporting Made Easy GP REPORTS VIEWER USER GUIDE For Dynamics GP Version 2015 (Build 5) Dynamics GP Version 2013 (Build 14) Dynamics GP Version 2010 (Build 65) Last updated
NovaBACKUP Storage Server User Manual NovaStor / April 2013
 NovaBACKUP Storage Server User Manual NovaStor / April 2013 2013 NovaStor, all rights reserved. All trademarks are the property of their respective owners. Features and specifications are subject to change
i -CEN S USER S Manual 2007. 08. 13.
 i -CEN S i -CEN'S USER S Manual 2007. 08. 13. i -CEN S Table of Contents Overview of i-cen S software... 4 1 Introduction of i-cen S... 4 2 Key Features... 5 3 Key Benefits... 5 4 System Specification...
Sharp Remote Device Manager (SRDM) Server Software Setup Guide
 Server Software Setup Guide") Sharp Remote Device Manager (SRDM) Server Software Setup Guide This Guide explains how to install the software which is required in order to use Sharp Remote Device Manager (SRDM). SRDM is a web-based
Sharp Remote Device Manager (SRDM) Server Software Setup Guide This Guide explains how to install the software which is required in order to use Sharp Remote Device Manager (SRDM). SRDM is a web-based
Quick Start Guide. Microinvest Warehouse Pro Light Restaurant
 Quick Start Guide Warehouse Pro Light Restaurant 2013 I. Application Installation During the initial installation of the product, the application gets to know the computer system, on which it shall work
TM Online Storage: StorageSync
 TM Online Storage: StorageSync 1 Part A: Backup Your Profile 1: How to download and install StorageSync? Where to download StorageSync? You may download StorageSync from your e-storage account. Please
Dial-up Installation for CWOPA Users (Windows Operating System)
") Dial-up Installation for CWOPA Users (Windows Operating System) 1 Table of Contents Download and Install Digital Certificates... 3 Internet Explorer 8/9 Certificate Installation.3 Windows XP Instructions
Dial-up Installation for CWOPA Users (Windows Operating System) 1 Table of Contents Download and Install Digital Certificates... 3 Internet Explorer 8/9 Certificate Installation.3 Windows XP Instructions
How To Install Database Oasis On A Computer Or Computer (For Free)
") INSTALLATION INSTRUCTIONS Table of Contents Installation Instructions 1 Table of Contents 1 System Requirements 2 Installation 3 Selecting where to Install the Professional Server 3 Installing Prerequisites
INSTALLATION INSTRUCTIONS Table of Contents Installation Instructions 1 Table of Contents 1 System Requirements 2 Installation 3 Selecting where to Install the Professional Server 3 Installing Prerequisites
IIS, FTP Server and Windows
 IIS, FTP Server and Windows The Objective: To setup, configure and test FTP server. Requirement: Any version of the Windows 2000 Server. FTP Windows s component. Internet Information Services, IIS. Steps:
StrikeRisk v6.0 IEC/EN 62305-2 Risk Management Software Getting Started
 StrikeRisk v6.0 IEC/EN 62305-2 Risk Management Software Getting Started Contents StrikeRisk v6.0 Introduction 1/1 1 Installing StrikeRisk System requirements Installing StrikeRisk Installation troubleshooting
Installation / Backup \ Restore of a Coffalyser.Net server database using SQL management studio
 Installation / Backup \ Restore of a Coffalyser.Net server database using SQL management studio This document contains instructions how you can obtain a free copy of Microsoft SQL 2008 R2 and perform the
Sage Intelligence Financial Reporting for Sage ERP X3 Version 6.5 Installation Guide
 Sage Intelligence Financial Reporting for Sage ERP X3 Version 6.5 Installation Guide Table of Contents TABLE OF CONTENTS... 3 1.0 INTRODUCTION... 1 1.1 HOW TO USE THIS GUIDE... 1 1.2 TOPIC SUMMARY...
2X ApplicationServer & LoadBalancer Manual
 2X ApplicationServer & LoadBalancer Manual 2X ApplicationServer & LoadBalancer Contents 1 URL: www.2x.com E-mail: [email protected] Information in this document is subject to change without notice. Companies,
Connecting to LRDC Fileserver Remotely Using Windows Vista/7 & SRemote VPN
 Connecting to LRDC Fileserver Remotely Using Windows Vista/7 & SRemote VPN October 2013 In order to access the LRDC file server remotely/off campus, or from Wireless Pittnet, you must first authenticate
Avalanche Remote Control User Guide. Version 4.1.3
 Avalanche Remote Control User Guide Version 4.1.3 ii Copyright 2012 by Wavelink Corporation. All rights reserved. Wavelink Corporation 10808 South River Front Parkway, Suite 200 South Jordan, Utah 84095
Neoteris IVE Integration Guide
 Neoteris IVE Integration Guide Published Date July 2015 The Secure Email Client upgrade option enables Neoteris IVE users to use standards based email clients to access corporate email from remote locations.
Installation Guide for Microsoft SQL Server 2008 R2 Express. October 2011 (GUIDE 1)
") Installation Guide for Microsoft SQL Server 2008 R2 Express October 2011 (GUIDE 1) Copyright 2011 Lucid Innovations Limited. All Rights Reserved This guide only covers the installation and configuration
Installation Guide for Microsoft SQL Server 2008 R2 Express October 2011 (GUIDE 1) Copyright 2011 Lucid Innovations Limited. All Rights Reserved This guide only covers the installation and configuration
Installation and Connection Guide to the simulation environment GLOBAL VISION
 Installation and Connection Guide to the simulation environment GLOBAL VISION Hardware and Software Requirements The following hardware specification is recommended for client machines: 2 GHz Pentium class
How To Use Senior Systems Cloud Services
 Senior Systems Cloud Services In this guide... Senior Systems Cloud Services 1 Cloud Services User Guide 2 Working In Your Cloud Environment 3 Cloud Profile Management Tool 6 How To Save Files 8 How To
QUANTIFY INSTALLATION GUIDE
 QUANTIFY INSTALLATION GUIDE Thank you for putting your trust in Avontus! This guide reviews the process of installing Quantify software. For Quantify system requirement information, please refer to the
Dovico Timesheet v12 INSTALLATION GUIDE
 v12 TABLE OF CONTENTS System Requirements... 1 NEW INSTALLATION... 2 UPGRADE from a previous version of Dovico Timesheet 5 System Requirements Deployment Options Either installed on your server or use
User Manual. Version 1.0.0.0. Yeastar Technology Co., Ltd.
 User Manual Version 1.0.0.0 Yeastar Technology Co., Ltd. Table of Contents 1 Introduction 3 2 Installing MySMS Software 4 3 Managing MySMS 9 3.1 Accessing MySMS 9 3.2 Multi-User Accounts 10 3.3 Managing
Portions of this product were created using LEADTOOLS 1991-2009 LEAD Technologies, Inc. ALL RIGHTS RESERVED.
 Installation Guide Lenel OnGuard 2009 Installation Guide, product version 6.3. This guide is item number DOC-110, revision 1.038, May 2009 Copyright 1992-2009 Lenel Systems International, Inc. Information
Desktop Deployment Guide ARGUS Enterprise 10.6. 5/29/2015 ARGUS Software An Altus Group Company
 ARGUS Enterprise 10.6 5/29/2015 ARGUS Software An Altus Group Company for ARGUS Enterprise Version 10.6 5/29/2015 Published by: ARGUS Software, Inc. 3050 Post Oak Boulevard Suite 900 Houston, Texas 77056
Neoteris IVE Integration Guide
 Neoteris IVE Integration Guide NESD-00090-00 CAY051402 The Secure Email Client upgrade option enables Neoteris IVE users to use standardsbased email clients to access corporate email from remote locations.
Creating Reports with Microsoft Dynamics AX SQL Reporting Services
 Creating Reports with Microsoft Dynamics AX SQL Reporting Services. Table of Contents Lab 1: Building a Report... 1 Lab Objective... 1 Pre-Lab Setup... 1 Exercise 1: Familiarize Yourself with the Setup...
ACS CLIENT SOFTWARE USER MANUAL
 ACS CLIENT SOFTWARE USER MANUAL 1 ACS USER GUIDE 1.1 System Requirement Recommended System Requirement OS CPU VGA RAM HDD WindowXP, Vista Pentium 4, 2Ghz 1024*768, 64MB 24bit color graphic card 1GB 20MB
ThinPoint Quick Start Guide
 ThinPoint Quick Start Guide 2 ThinPoint Quick Start Guide Table of Contents Part 1 Introduction 3 Part 2 ThinPoint Windows Host Installation 3 1 Compatibility... list 3 2 Pre-requisites... 3 3 Installation...
How To Upgrade Your Microsoft SQL Server for Accounting CS Version 2012.1
 How To Upgrade Your Microsoft SQL Server for Version 2012.1 The first step is to gather important information about your existing configuration. Identify The Database Server and SQL Server Version The
INSTALL AND CONFIGURATION GUIDE. Atlas 5.1 for Microsoft Dynamics AX
 INSTALL AND CONFIGURATION GUIDE Atlas 5.1 for Microsoft Dynamics AX COPYRIGHT NOTICE Copyright 2012, Globe Software Pty Ltd, All rights reserved. Trademarks Dynamics AX, IntelliMorph, and X++ have been
Pro Surveillance System 4.0. Quick Start Reference Guide
 Pro Surveillance System 4.0 Quick Start Reference Guide 1 Table of Contents 1) Overview 3 2) Initial Setup Adding a Connection..4 3) Viewing Live Cameras...6 4) Single or Multi Channel Playback..8 5) Predetermined
Working with SQL Server Integration Services
 SQL Server Integration Services (SSIS) is a set of tools that let you transfer data to and from SQL Server 2005. In this lab, you ll work with the SQL Server Business Intelligence Development Studio to
User guide. Business Email
 User guide Business Email June 2013 Contents Introduction 3 Logging on to the UC Management Centre User Interface 3 Exchange User Summary 4 Downloading Outlook 5 Outlook Configuration 6 Configuring Outlook
Infoview XIR3. User Guide. 1 of 20
 Infoview XIR3 User Guide 1 of 20 1. WHAT IS INFOVIEW?...3 2. LOGGING IN TO INFOVIEW...4 3. NAVIGATING THE INFOVIEW ENVIRONMENT...5 3.1. Home Page... 5 3.2. The Header Panel... 5 3.3. Workspace Panel...
Upgrading to Document Manager 2.7
 Upgrading to Document Manager 2.7 22 July 2013 Trademarks Document Manager and Document Manager Administration are trademarks of Document Logistix Ltd. TokOpen, TokAdmin, TokImport and TokExRef are registered
PRINT FLEET MANAGER USER MANUAL
 PRINT FLEET MANAGER USER MANUAL 1 Disclaimer of warranties and limitation of liabilities ( YES ) reserves all rights in the program as delivered. The program or any portion thereof may not be reproduced
How To Create An Easybelle History Database On A Microsoft Powerbook 2.5.2 (Windows)
") Introduction EASYLABEL 6 has several new features for saving the history of label formats. This history can include information about when label formats were edited and printed. In order to save this history,
Introduction EASYLABEL 6 has several new features for saving the history of label formats. This history can include information about when label formats were edited and printed. In order to save this history,
User Manual. Onsight Management Suite Version 5.1. Another Innovation by Librestream
 User Manual Onsight Management Suite Version 5.1 Another Innovation by Librestream Doc #: 400075-06 May 2012 Information in this document is subject to change without notice. Reproduction in any manner
BIGPOND ONLINE STORAGE USER GUIDE Issue 1.1.0-18 August 2005
 BIGPOND ONLINE STORAGE USER GUIDE Issue 1.1.0-18 August 2005 PLEASE NOTE: The contents of this publication, and any associated documentation provided to you, must not be disclosed to any third party without
PigCHAMP Knowledge Software. Enterprise Edition Installation Guide
 PigCHAMP Knowledge Software Enterprise Edition Installation Guide Enterprise Edition Installation Guide MARCH 2012 EDITION PigCHAMP Knowledge Software 1531 Airport Rd Suite 101 Ames, IA 50010 Phone (515)
Interworks. Interworks Cloud Platform Installation Guide
 Interworks Interworks Cloud Platform Installation Guide Published: March, 2014 This document contains information proprietary to Interworks and its receipt or possession does not convey any rights to reproduce,
for Networks Installation Guide for the application on the server July 2014 (GUIDE 2) Lucid Rapid Version 6.05-N and later
 Lucid Rapid Version 6.05-N and later") for Networks Installation Guide for the application on the server July 2014 (GUIDE 2) Lucid Rapid Version 6.05-N and later Copyright 2014, Lucid Innovations Limited. All Rights Reserved Lucid Research
for Networks Installation Guide for the application on the server July 2014 (GUIDE 2) Lucid Rapid Version 6.05-N and later Copyright 2014, Lucid Innovations Limited. All Rights Reserved Lucid Research
Network DK2 DESkey Installation Guide
 VenturiOne Getting Started Network DK2 DESkey Installation Guide PD-056-306 DESkey Network Server Manual Applied Cytometry CONTENTS 1 DK2 Network Server Overview... 2 2 DK2 Network Server Installation...
HC8 Installation Guide
 HC8 Installation Guide Table of Contents Welcome... 3 HC8 Installation Guide... 3 Introduction... 6 System Specifications:... 7 Type of Installers:... 7 HC8 Installation... 9 After Installation...22 Windows
Immotec Systems, Inc. SQL Server 2005 Installation Document
 SQL Server Installation Guide 1. From the Visor 360 installation CD\USB Key, open the Access folder and install the Access Database Engine. 2. Open Visor 360 V2.0 folder and double click on Setup. Visor
WhatsUp Gold v16.3 Installation and Configuration Guide
 WhatsUp Gold v16.3 Installation and Configuration Guide Contents Installing and Configuring WhatsUp Gold using WhatsUp Setup Installation Overview... 1 Overview... 1 Security considerations... 2 Standard
Agilent System Protocol Test Release Note
 Agilent System Protocol Test Release Note Release 6.0, Build 5.5.5.29 October 2006 This document provides information on fixes and known problems for the software released with this version. This version
Getting Started - The Control Panel
 Table of Contents 1. Getting Started - the Control Panel Login Navigation Bar Domain Limits Domain User Account Properties Session Management 2. FTP Management Creating and Editing Users Accessing FTP
Installation Guide: Delta Module Manager Launcher
 Installation Guide: Delta Module Manager Launcher Overview... 2 Delta Module Manager Launcher... 2 Pre-Installation Considerations... 3 Hardware Requirements... 3 Software Requirements... 3 Virtualisation...
for Networks Installation Guide for the application on the server August 2014 (GUIDE 2) Lucid Exact Version 1.7-N and later
 Lucid Exact Version 1.7-N and later") for Networks Installation Guide for the application on the server August 2014 (GUIDE 2) Lucid Exact Version 1.7-N and later Copyright 2014, Lucid Innovations Limited. All Rights Reserved Lucid Research
for Networks Installation Guide for the application on the server August 2014 (GUIDE 2) Lucid Exact Version 1.7-N and later Copyright 2014, Lucid Innovations Limited. All Rights Reserved Lucid Research
User Guide. Version 3.2. Copyright 2002-2009 Snow Software AB. All rights reserved.
 Version 3.2 User Guide Copyright 2002-2009 Snow Software AB. All rights reserved. This manual and computer program is protected by copyright law and international treaties. Unauthorized reproduction or
2. Manage the power of the target device
 Please have "MagicConnect user account list" that we sent you upon delivery time be ready at your hand Here, we take OS: Windows 7 Ultimate, Display method: category as a sample for describing this Quick
Professional Surveillance System User s Manual
 Professional Surveillance System User s Manual \ 1 Content Welcome...4 1 Feature...5 2 Installation...6 2.1 Environment...6 2.2 Installation...6 2.3 Un-installation...8 3 Main Window...9 3.1 Interface...9
Juris Installation / Upgrade Guide
 Juris Installation / Upgrade Guide Version 2.7 2015 LexisNexis. All rights reserved. Copyright and Trademark LexisNexis, Lexis, and the Knowledge Burst logo are registered trademarks of Reed Elsevier Properties
Evoko Room Manager. System Administrator s Guide and Manual
 Evoko Room Manager System Administrator s Guide and Manual 1 1. Contents 1. Contents... 2 2. Read this first! Introduction to this Guide... 6 3. User Guide... 6 4. System Architecture Overview... 8 ----
RSCCD REMOTE PORTAL TABLE OF CONTENTS: Technology Requirements NOTE
 RSCCD REMOTE PORTAL The RSCCD Remote Portal allows employees to access their RSCCD Email (via Outlook Web Access), Department (Public) Folders, Personal (H Drive) Folder, and the District Intranet from
Installing LearningBay Enterprise Part 2
 Installing LearningBay Enterprise Part 2 Support Document Copyright 2012 Axiom. All Rights Reserved. Page 1 Please note that this document is one of three that details the process for installing LearningBay
Remote Client Program... 3. Web Client... 39
 Remote Client / Web Client USER MANUAL T Series Digital Video Recorder Remote Client Program... 3 Remote Client Program Installation... 4 Remote Client... 6 Main Window... 6 Site Registration... 7 Group
SourceAnywhere Service Configurator can be launched from Start -> All Programs -> Dynamsoft SourceAnywhere Server.
 Contents For Administrators... 3 Set up SourceAnywhere... 3 SourceAnywhere Service Configurator... 3 Start Service... 3 IP & Port... 3 SQL Connection... 4 SourceAnywhere Server Manager... 4 Add User...
User Manual. 3CX VOIP client / Soft phone Version 6.0
 User Manual 3CX VOIP client / Soft phone Version 6.0 Copyright 2006-2008, 3CX ltd. http:// E-mail: [email protected] Information in this document is subject to change without notice. Companies names and data
Insight Video Net. LLC. CMS 2.0. Quick Installation Guide
 Insight Video Net. LLC. CMS 2.0 Quick Installation Guide Table of Contents 1. CMS 2.0 Installation 1.1. Software Required 1.2. Create Default Directories 1.3. Create Upload User Account 1.4. Installing
Partner. Sage Pastel. Accounting. Installation Guide
 Sage Pastel Accounting Partner Installation Guide Sage Pastel: +27 11 304 3000 Sage Pastel Intl: +27 11 304 3400 www.pastel.co.za www.sagepastel.com [email protected] [email protected] Sage Pastel Accounting
Contents. Introduction 3. Installation 4
 VMS User Manual Contents Introduction 3 Installation 4 Minimum Recommended Requirements 4 Login 4 Main Window 5 Menu Items 5 Toolbar Items 6 Play Bar Items 7 Configuration 8 Add network cameras/ digital
SOS SO S O n O lin n e lin e Bac Ba kup cku ck p u USER MANUAL
 SOS Online Backup USER MANUAL HOW TO INSTALL THE SOFTWARE 1. Download the software from the website: http://www.sosonlinebackup.com/download_the_software.htm 2. Click Run to install when promoted, or alternatively,
Hamline University Administrative Computing Page 1
 User Guide Banner Handout: BUSINESS OBJECTS ENTERPRISE (InfoView) Document: boxi31sp3-infoview.docx Created: 5/11/2011 1:24 PM by Chris Berry; Last Modified: 8/31/2011 1:53 PM Purpose:... 2 Introduction:...
User Guide. SysMan Utilities. By Sysgem AG
 SysMan Utilities User Guide By Sysgem AG Sysgem is a trademark of Sysgem AG. Other brands and products are registered trademarks of their respective holders. 2013 Sysgem AG, Lavaterstr. 45, CH-8002 Zürich,
MULTI-CLIENT Remote Monitor Center. User manual
 MULTI-CLIENT Remote Monitor Center User manual Contents 1.Multi-client introduction... 3 2.Main features... 4 3.Working Envoirment and installation... 4 4.Login... 4 5.Using procedures... Ошибка! Закладка
CompleteView Admin Console Users Guide. Version 3.0.0 Revised: 02/15/2008
 CompleteView Admin Console Users Guide Version 3.0.0 Revised: 02/15/2008 Table Of Contents Configuration... 3 Starting the Admin Console... 3 Adding a Server... 4 Monitoring Server Status... 6 Menus...
Table of Contents. CHAPTER 1 About This Guide... 9. CHAPTER 2 Introduction... 11. CHAPTER 3 Database Backup and Restoration... 15
 Table of Contents CHAPTER 1 About This Guide......................... 9 The Installation Guides....................................... 10 CHAPTER 2 Introduction............................ 11 Required
NVMS-1200. User Manual
 NVMS-1200 User Manual Contents 1 Software Introduction... 1 1.1 Summary... 1 1.2 Install and Uninstall... 1 1.2.1 Install the Software... 1 2 Login Software... 3 2.1 Login... 3 2.2 Control Panel Instruction...
Quick Start Guide NVR DS-7104NI-SL/W NVR. www.hikvision.com. First Choice For Security Professionals
 Quick Start Guide NVR DS-7104NI-SL/W NVR NOTE: For more detailed information, refer to the User s Manual on the CD-ROM. You must use your PC or MAC to access the files. www.hikvision.com Quick Start 1.
CRM Migration Manager 3.1.1 for Microsoft Dynamics CRM. User Guide
 CRM Migration Manager 3.1.1 for Microsoft Dynamics CRM User Guide Revision D Issued July 2014 Table of Contents About CRM Migration Manager... 4 System Requirements... 5 Operating Systems... 5 Dynamics
USING OUTLOOK WITH ENTERGROUP. Microsoft Outlook
 USING OUTLOOK WITH ENTERGROUP In this tutorial you will learn how to use Outlook with your EnterGroup account. You will learn how to setup an IMAP or POP account, and also how to move your emails and contacts
SimpleFTP. User s Guide. On-Core Software, LLC. 893 Sycamore Ave. Tinton Falls, NJ 07724 United States of America
 SimpleFTP User s Guide On-Core Software, LLC. 893 Sycamore Ave. Tinton Falls, NJ 07724 United States of America Website: http://www.on-core.com Technical Support: [email protected] Information: [email protected]
Network Setup Guide. 1 Glossary. 2 Operation. 1.1 Static IP. 1.2 Point-to-Point Protocol over Ethernet (PPPoE)
") Network Setup Guide 1 Glossary 1.1 Static IP Computers are communicated and recognized by their own unique IP addresses over the Internet. Static IP provided by your ISP (Internet Service Provider) means
Network Setup Guide 1 Glossary 1.1 Static IP Computers are communicated and recognized by their own unique IP addresses over the Internet. Static IP provided by your ISP (Internet Service Provider) means