Installation Instructions. For. Tuscan Solid Wood Flooring
|
|
|
- Britton Logan
- 10 years ago
- Views:
Transcription
1 solid wood floors Installation Instructions For Tuscan Solid Wood Flooring 1

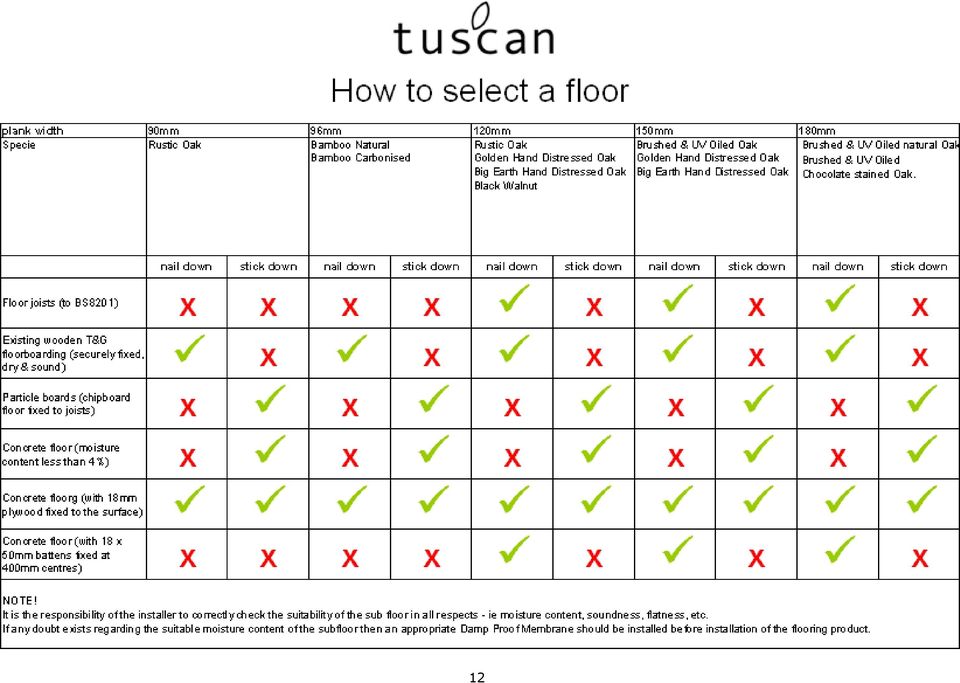
2 Installation Instructions for your new Tuscan Solid Wood Floor The key to long term performance of any floor is the quality of the installation and the immediate and ongoing care and maintenance procedures used on the floor. To help ensure correct installation, care and maintenance for this floor please ensure this guide is fully read and adhered to by your floor installer. Section 1 Preparation Important points for the correct installation of your Tuscan Solid Wood Floor Installer / owner responsibilities Pre installation procedures and job site inspection Storage and handling procedures Product acceptance checks Acclimatisation conformity process Tools needed for installation Sub floor requirements and types Important points owner / installer checklist. Select a floor table to help choose the most appropriate sub floors and installation method Section 2 Installation process General installation tips Installing the floor, steps 1 6 Completing the job Tuscan accessories Section 3 Care and Maintenance Maintenance immediately following installation Ongoing care and maintenance Important Do s and Dont s! Section 4 Warranty Information Limited 10 year warranty What to do if you have any problems 2

3 For the following products: Section 1 - Preparation 120mm 180mm width boards. Secret nail down or full bond stick down installation methods only. This solid wood flooring MUST NOT be installed in any way as a floating floor. It must be fixed to the sub floor by using the recommended Sika adhesive or secret nail fixings using an appropriate nailer. Note: Any short length specification product, i.e mm or mm, must not be installed directly onto floor joists. Short length spec products must be installed onto a solid sub floor only. If in doubt as to the length specification of your product contact your flooring supplier to clarify the specification before the installation method is decided upon. INSTALLER/OWNER RESPONSIBILITY Solid wood floors are a product of nature and therefore not perfect. Tuscan solid wood floors are manufactured in accordance with accepted industry standards, which permit grading deficiencies not to exceed 5%. These grading deficiencies may be of a manufacturing or natural type. This product is intended for use in residential property rooms only (excluding wet rooms, bathrooms, areas of high humidity, below ground basements and conservatories), and must be installed above wall DPC and ground level. The product is intended for residential use only and is not suitable for use in any type of commercial environment. It is the installers responsibility to carry out the final inspection of the floor to ensure the colour, grade, quality, manufacture and factory finish of the product is acceptable. Additionally, the inspection of all flooring must be done before installation. Carefully examine the flooring for colour, finish and quality before installing it. The installer must use reasonable selectivity and hold out or cut off pieces with deficiencies, whatever the cause. If the product is deemed not acceptable for any reason, do not install it and contact your supplier immediately. Prior to installation of any hardwood flooring product, the installer must determine that the job site environment and the sub surfaces involved meet or exceed all applicable industry and British standards. Recommendations regarding the construction of the materials used as well as local codes must be followed. These instructions recommend that the construction and sub floor be suitably dry, stiff, of suitable load bearing strength and flat. The manufacturer and distributor (being IDS), declines any responsibility for job failure resulting from or associated with sub-surface, sub flooring or job-site environmental deficiencies or lack of or incorrect sub floor preparations. 3

4 The use of stain, filler or putty stick for touching up and minor gap filling during installation should be accepted as a normal finishing procedure with real wood floors. A minimum 18mm expansion gap must be left around all perimeter edges of the flooring and any fixed objects within the floor area. When the flooring is ordered, 5% must be added to the actual square footage needed for cutting and grading allowance. Should any individual piece be doubtful as to grade, manufacture or factory finish, the installer should not use this piece. Use of appropriate products for correcting sub floor depressions or unevenness must be accepted as a normal industry practice. PRE-INSTALLATION PROCEDURES AND JOB SITE INSPECTION The building should be closed in with all outside doors and windows in place. All concrete, masonry, framing members, drywall, paint and other "wet" work should be thoroughly dry. The wall coverings should be in place and the painting completed. Basements and crawl/void spaces must be appropriately dry and well ventilated. Exterior ground works should be complete with surface drainage offering a minimum drop of 75mm over 3.0 lin mt to direct the flow of water away from the structure. All gutters and downspouts should be in place. Solid wood flooring must be installed on or above wall DPC and ground level. Do not install in bathrooms or any form of wet room, conservatory or high humidity environment room or below ground basements. Crawl spaces / sub floor voids must be a minimum of 600 mm from the ground to the underside of joists. Install a bitumen building paper moisture barrier that complies with BS1521, when installing a solid wood floor over suspended wooden floors at ground floor level (or floor joists), prior to installation of the flooring. This is to avoid the risk of moisture transfer or increased humidity affecting the sub floor or flooring from the air void beneath the floor. Ideally the joints of the barrier paper should be overlapped 150mm and taped. The void space should have perimeter venting equal to a minimum of 1.5% of the void space square of footage. These vents should be properly located to foster cross ventilation. Where necessary local regulations prevail. Also allow for conformity to part L of building regulations relating to the insulation of new and replacement floors. The sub floor must be checked for moisture content using the appropriate testing method and moisture meter and the appropriate moisture levels must be achieved before installation of the flooring (see sub floor requirements paragraph ). If any doubts exist in relation to the sub floor moisture levels and ongoing dryness of the sub floor then a suitable damp proof membrane should be installed prior to installing the flooring. Permanent air conditioning and heating systems should be in place and operational before installation. Check for central heating pipes within the sub floor and insulate any that are likely to heat the underside of the installed flooring to avoid individual board movement when pipes get hot. STORAGE AND HANDLING PROCEDURES The flooring should not be delivered until the building has been closed in with windows and doors in place and until sub floor bases, cement work, plastering and all other "wet" work is completed and dry. Solid wood flooring should be stored in the end use environment in which it is expected to perform and this should be an environmentally controlled room. 4

5 Handle and unload with care as claims for damages can not be accepted unless the distributor is notified within 72 hours of delivery of the goods. Stack the packs in such a manner to provide at least a 100mm air space under the cartons. The packs should also be stacked on dry battens rather than directly onto the sub floor. PRODUCT CHECKING AND ACCLIMATISATION PROCESS Flooring acceptance checks Within 72 hours of receiving the product, it must be checked to ensure it is correct and as ordered. Open one box fully and check to ensure it is the correct product, acceptable colour shade, and correct length specification. If there are any product queries or concerns at this stage DO NOT open any further boxes and contact your supplier within the specified time period above. If you are satisfied that the product is correct and suitable for the intended end use environment then remove the protective plastic wrapping only from the boxes and open the edges and ends of the boxes to aid the acclimatisation of the product in situ. Note: Very Important ACCLIMATISATION CONFORMITY PROCESS The flooring should be situated within the end use room / area it is to be installed in (subject to the room having normal atmospheric conditions i.e no wet trades in operation or drying substrates of any kind) and should have been unpacked correctly as per above details since receipt / delivery of the product. Permanent air conditioning and heating systems should be in place and operational. The installation site should have a consistent room temperature of between degrees celsius and a relative humidity environment of 35-55% R/H for 14 days prior, during and until occupied, to allow for proper acclimatisation. If installing over a wooden sub floor the moisture content of the sub floor must be checked prior to installation with an appropriate moisture meter and the moisture content of the wooden sub floor must not exceed 12% moisture content. If it does then a further period of acclimatisation must take place until the sub floor moisture content has reduced to below this figure. The flooring itself must also be moisture content checked from a various selection of boxes and should have a moisture content reading of between 8 12%. If this is not the case then a further period of acclimatisation must take place until an appropriate moisture content level has been achieved. The flooring and wooden sub floor are only suitably acclimatised when the moisture readings of both are within their own parameters stated above and when their moisture content levels are within 4% of each other. If this is not the case then a further acclimatisation period is required and the same tests must be carried out after the extra time period to check that conformity of the levels has been achieved. Only when this is the case should the flooring be installed. 5

6 RECCOMENDED TOOLS & PPE NEEDED FOR INSTALLATION Note: It is extremely important to use the correct nail gun adapters as well as the correct length barbed cleat nails. Improper fasteners, machines and air pressure can cause severe damage to the floor. The manufacturer of Tuscan Solid Wood Floor is not responsible for damage caused by use of improper tools or misuse. Broom Drill with 1/16" drill bit Tape measure Hammer Earplugs and safety glasses Chalk line and chalk Recommended solid wood floor cleaner (see maintenance instruction sheet) Hand saw / power saw Nail set 50mm Barbed cleat nails (to suit manual / pneumatic nailer being used) Moisture meter (wood, concrete or both) Appropriate manual or pneumatic nailer Undercut or jamb saw Gloves, boots & any other appropriate safety wear. For stick down installation refer to the Sika recommended instructions and associated tools. Guidelines for fastening machines Note: Minor occasional noises in mechanically fastened floors are not abnormal due to the structural movement caused by changes in the environmental conditions. Following these instructions can minimise these factors but offer no guarantee that the floor will not create minor occasional noises. General information for fastening machines: It is the installers responsibility to ensure an appropriate automatic nailer is used for installation. Avoid striking the edge of factory-finished products with the fastener s mallet. Edge crushing can occur, causing unsightly cracks and splinters. Use a block to hammer against if necessary. Faceplates should be covered with protective materials to prevent damage to the surface of the flooring. Any water damaged, swollen or delaminated sub flooring materials will not hold staples properly and must be repaired or replaced. General information for manual fastening machines: Improper adapter plate selection can cause severe edge damage. Ascertain that the proper adapter has been selected and properly installed for the thickness of the flooring being used. 6
 Moisture meter (wood, concrete or both) Appropriate manual or pneumatic nailer Undercut or jamb saw Gloves, boots & any")
7 General information for pneumatic fastening machines: Improper pressure settings and failure to use proper adapters can cause severe damage to the flooring. The correct adapter and air pressure setting will properly set the fastener in the nail pocket. Low air pressures may fail to properly set the staple and damage adjoining boards. Air pressures set too high may cause damage to the tongue, preventing installation of adjoining boards and cause blisters on the face of the flooring. Make certain that the compressor has a regulator in-line with the air hose for proper adjustment. Set pressure at 70 PSI to begin with and adjust until proper staple setting occurs. SUB FLOOR REQUIREMENTS CLEAN Scrape, hoovered or brushed clean, and smooth. Free of wax, paint, oil, sealers, surface coatings, old adhesives, curing agents and other debris. Check any sub floor surface coating that cannot be removed for adhesive compatibility when installing the floor in a stick down manner. Consult the adhesive manufacturer for advice and recommendations before installing the flooring. Note: Unclean, weak or contaminated sub floor surfaces can result in adhesive bonding failure. LEVEL/FLAT Within +/- 3mm of 3 lin metres. Sand high areas or joints. Flatten low spots with layers of plywood for wooded sub floors and use the recommended Sika levelling compound for concrete sub floors. Note: Uneven sub floors can result in popping, squeaking, hollow spots and premature failure of the floor. Note: Laminated resin/bitumen moisture barrier paper conforming to BS1521 acts as a moisture retarder and should be used when installing the flooring over an existing wooden suspended sub floor or when installing directly onto existing joists. This will minimise the risk of movement in the floor caused by changes in sub floor void moisture thereby reducing the risk of cupping, gapping, warping and shrinkage. In addition, the use of these materials can give the floor a more solid feeling, reduce sound transfer, prevent noise caused by minor irregularities and debris, and make it easier to slide the wood together across the surface of the sub floor. Note: Failure to protect the floor from excess moisture from below can result in the floor cupping, expanding and bridging. Shrinking due to an excessively dry sub floor can result in gapping and splitting of the boards. If in doubt as to the dryness or moisture content stability of the sub floor always install an appropriate precautionary damp proof membrane to eradicate the risk of moisture affecting the flooring. STRUCTURALLY SOUND Nail or screw any loose areas that squeak. Replace any water damaged, swollen or delaminated sub flooring or underlayments. Avoid or repair sub floors with excessive vertical movement prior to installing the flooring as deflection in the sub floor will cause deflection in the flooring itself which may lead to failure of the joints of the flooring. Note: Unsound sub floors could result in the flooring deflecting leading to squeaking, gapping and premature failure of the flooring. 7

8 DRY Check the moisture content of the sub floor with the appropriate moisture meter and carry out any remedial works to resolve damp or moisture issues before installation of the flooring. If installing over a concrete sub floor then a specific equilibrium relative humidity test conforming to B.S 8201:2011 should be carried out on the concrete sub floor to ensure that the concrete is suitably dry throughout its thickness to ensure that the sub floor is suitable to lay wood flooring over and that no risk of moisture vapour release from within the sub floor is present. If for any reason the sub floor cannot be correctly checked for moisture suitability install an appropriate liquid DPM such as Sika MB Primer to eradicate any risk of sub floor moisture affecting the boards post installation. Also check the concrete surface for strength and remove any fine particle laitance layer if it is present to ensure good compressive strength of the concrete surface. If any doubt exists with regard to the suitability of sub floor moisture content or strength suitability then an appropriate damp proof membrane should be installed over the sub floor before or a surface strength assessment should be conducted before installing the flooring. If in doubt have your sub floor checked by a professional prior to installation of your flooring. Note: Excessively moisture laden sub floors can result in the flooring cupping, expanding and bridging as wood is a naturally hygroscopic material that will always take in excess moisture available to it. SUB FLOOR TYPES Wooden sub floors Recommended wood sub floor types for nail down installation 18mm CDX grade minimum plywood 18mm OSB PS2 rated underlayment Existing 18mm solid wood flooring that has been checked for stability, dryness and soundness. Note: Any short length specification product, i.e mm or mm, must not be installed directly onto floor joists. Short length spec products must be installed onto a solid sub floor only. If in doubt as to the length specification of your product contact your flooring supplier to clarify the specification before the installation method is decided upon. Recommended wood sub floor types for stick down installation Refer to the enclosed Sika information pages Note: Do not install solid wood plank or strip over radiant heat sub floors (underfloor heating systems) as excessive movement resulting in shrinkage, gapping and lifting may occur. Do not install using the nail down method over chipboard or fibreboard sub floors. Make sure the existing floor or sub floor is dry and well nailed or screwed down every 150mm along each joist to avoid squeaking or popping before the floor is installed. The wood sub floor must not exceed 12% moisture content. Measure the moisture content of both sub floor and wood flooring to determine the correct moisture content with a reliable wood moisture meter. 8

9 The difference between the moisture content of the wood sub floor and the wood flooring at the point of installation must not exceed 4%. Optimum performance of solid wood flooring products occurs when there is little horizontal or vertical movement of the sub floor. The MINIMUM sub floor recommendations described above are for 400mm maximum centred joists. Ensure individual boards are supported by a minimum of two joists and use any short boards for finishing and starting rows where possible. When installing the product over existing floorboards lay the boards perpendicular to the existing floor boards to give the floor a more solid feel and avoid sun floor sagging. If laying the new floor in a perpendicular direction is not possible lay and mechanically fix plywood the existing sub floor before installing the boards. If the sub floor has excessive vertical movement (deflection) before installation of the floor it is likely it will do so after installation of the floor is complete. Deflection may cause the floor to become loose creating a noisy floor, i.e creaking, popping or squeaking or cause premature finish wear. Do not install this product over sub floors that do not meet these minimum criteria. Other spacing and spans as well as their engineering methods are the responsibility of the builder, installer, engineer, architect or consumer who is better able to evaluate the expected result based on site related performance. As flooring manufacturers / distributors we are unable to evaluate each sub floor system and therefore the responsibility for the appropriateness of the sub floor lies with the installer of the flooring. All underlayment panels should be spaced 4mm apart to insure adequate expansion space or have the space cut around the perimeter using a circular saw. When installing over existing wood floors parallel with the flooring, it may be necessary to install an additional layer of plywood to stabilize the flooring or install the wood floor at right angles. Applicable standards and recommendations of the construction and materials industries must be met or exceeded ie BS 8201: Concrete sub floors Solid flooring can be installed over concrete sub floors by using 2 methods: Nail down installation - once the appropriate nailing/sub floor surface has been installed (see recommended wood sub floor types above). Stick down installation using only the appropriate recommended SIKA ADHESIVES AS PER THE ENCLOSED SIKA INFORMATION PAGES. The concrete must be of high compressive strength. Check the concrete surface for strength and remove any fine particle laitance layer if it is present to ensure good compressive strength of the concrete surface. If in doubt have your sub floor checked by a professional prior to installation of your flooring. All concrete or mineral based sub floors should be tested for moisture content with an appropriate moisture or relative humidity meter which measures the moisture content / humidity throughout the slab and not just the surface face of the mineral slab. Concrete and other mineral slabs can hold moisture within them well below the surface until thoroughly dry. Furthermore all mineral based sub floors should have their relative humidity checked and recorded prior to installation by testing with an 9

10 appropriate mineral based humidity reader and humidity box and readings taken should conform to BS8201:2011 of below 65% relative humidity. The testing procedure for full compliance with British Standard BS8201: 2011 can be found in BS5325: 2001 and BS8203: Note: Visual checks are not reliable. Test several areas, especially near exterior walls and walls containing plumbing. A "dry" slab, as defined by these tests can be wet at other times of the year. These tests do not guarantee a dry slab will remain dry all of the time. If in doubt regarding the suitability of the concrete sub floor install an appropriate liquid DPM such as Sika MB Primer. Installing a secondary plywood sub floor If installing a secondary plywood sub floor for nailing purposes over a concrete sub floor, install a suitable bitumen core moisture barrier paper or sheet / DPM, joints overlapped by 150mm, over the existing primary sub floor followed by a plywood sub floor with a minimum thickness of 18mm. Allow a minimum 12mm perimeter expansion space for the plywood sub floor itself around all vertical objects and 4mm expansion space between all sub floor panels. The panel must be properly attached to the primary sub floor using at least one mechanical fastener per 300mm². 10

11 Important points for correct installation of your Tuscan solid wood floor Owner / Installer Checklist Check the product carefully following delivery of the flooring. Open at least one box and check for conformity to your order for correct product, acceptable colour shades, acceptable sizes, length spec, etc. Read the instructions in full, particularly in relation to acclimatisation of the boards. Ensure the correct checks are made to determine if acclimatisation has been achieved prior to installation. If you have any concerns at the receipt of goods stage contact your supplier of the goods and clarify any concerns before opening any further boxes and commencing installation of the boards. Claims for the product being unacceptable in any way that is apparent before or during installation will not be accepted. Make sure the sub floor is checked for appropriate flatness, soundness, and moisture content using the correct moisture testing equipment. Where installing over a concrete or mineral based sub floor, moisture content compliance to current British Standard BS.8201:2011 should be ensured. Recommendations for wood based sub floors can be found within the fitting instructions supplied. Use the correct tools. Having the appropriate tools makes the job easier and results in a better finish! Make sure the correct expansion gap facility is built into the floor as per the recommendations made within the fitting instructions. Maintain the floor correctly! Correct post-installation and ongoing maintenance will greatly enhance the performance of your new floor. Leave the enclosed maintenance details with the owner of the floor. Note: Claims for product failure will not be accepted if the cause of failure of the flooring relates to sub floor preparation, moisture or performance deficiencies, environmental moisture fluctuations, incorrect acclimatisation, installation or maintenance methods. 11

12 12
13 Section 2 - Installation General installation tips It is not recommended that this solid wood flooring be installed in any way as a floating floor it must be fixed to the sub floor by using the recommended Sika adhesive or secret nail fixings using an appropriate nailer. The floor should be installed from several cartons at the same time to ensure good colour and shade mixture. Be attentive to staggering the ends of boards at least 150mm in adjacent rows. This will help ensure a more favourable overall appearance of the floor. A minimum of an 18mm expansion gap around all perimeter edges of the flooring and fixed objects must be left during installation. Further in floor field expansion should be installed where a continual run of flooring exceeds 8 linear meters in length or width. Note: Lack of adequate expansion may cause buckling and lifting of the flooring during normal seasonal movement of the product. Large spans (i.e 8 lin m+) or flooring laid in areas of high humidity, require the addition of internal or field expansion. This can be accomplished by inserting a T expansion bar which allows for a minimum of 18mm expansion either side. It is further recommended that an expansion T bar is installed between all doorways to allow for potential varying movement of the floors within separate adjoining rooms. STEP 1 - DOORWAY AND WALL PREPARATION Undercut door casings / frames allowing for the minimum 18mm expansion gap. Remove any existing base or doorway thresholds. These items can be replaced after installation. Insert an expansion facility at all doorways by use of a complement T moulding strip. STEP 2 - ESTABLISH A STARTING POINT. WALL TO WALL INSTALLATION. Where possible, installation parallel to the longest wall is recommended for best visual effects. However the floor should be installed perpendicular to flooring joists, or perpendicular to existing wooden floorings unless the sub floor has been reinforced/ overlaid with plywood to reduce sub floor sagging. For random or alternate width products, use the widest plank for the first row. An 18mm minimum expansion gap must be left at all walls and any fixed item within the floor area. Using this 18mm measurement, in at least two places, measure out and snap a chalk line. Note: Always end glue only all boards that are 100mm or more in width with a PVA wood glue. This is to minimise the risk of header joints gapping after installation during seasonal environmental changes. STEP 3 - INSTALLING FIRST ROWS. WALL TO WALL INSTALLATION. NAIL DOWN METHOD (refer to enclosed Sika instructions for stick down method) 13

14 Use the longest, straightest boards available for the first two rows. Align the groove of the first board against the chalk line. The groove should be facing the starting wall. Pre-drill the nail holes 25mm from back (groove) edge, 25 50mm from each end, and at 150mm intervals at a 45 degree angle down through the nailing "pocket" on top of the tongue. Face nail the groove side where pre-drilled using a minimum 38mm length nail for this initial fixing. When complete, manually nail at a 45 degree angle through the tongue of the first row using 50mm barbed cleat nails. Continue manually nailing using this method with the following rows until the nailer can be used. End joints of adjacent rows should be staggered to a minimum of 150mm to ensure a more favourable overall appearance. STEP 4 DRY LAYING / RACKING THE FLOOR "Dry" lay (rack) the flooring to cover approximately two thirds of the room. This is to give a visual check of the flooring for suitability and to ensure correct header joint spacings are achieved and to avoid installing unacceptable or inappropriate boards. Begin dry laying (racking) the boards and visually inspect each board before locating it with the previous laid boards. Following location of the boards check for any unacceptable gapping or run out between boards and trim or remove objectionable boards before commencing fixing of them. Avoid pulling boards too tightly together on the sides, as they must move freely when fastening begins. Visually inspect the flooring, setting aside boards that need to have natural character or manufacturing flaws cut out. Use these boards for starting and finishing rows after objectionable characteristics have been cut out / removed. Mark the final board in each row and cut to suitable width and length allowing for 18mm expansion gaps. STEP 5 - INSTALLING THE FLOOR. NAIL DOWN METHOD. (refer to enclosed Sika instructions for stick down method) Fasten a sacrificial board to the floor. This is to check for surface damage, air pressure setting or manual hammer pressure, tongue damage etc. before proceeding. Make all adjustments and corrections before installation begins. Once proper adjustments have been made remove and destroy the board. Begin installation of the dry racked rows, in the order that the boards were checked and dry laid, using the nailer with minimum 50mm barbed cleat nails, fastening each board with at least two nails, proportionally more depending of board length, spaced mm apart and at least 38 mm from the ends (to avoid splitting). End joints of adjacent rows should be staggered 150mm when possible to ensure a more favourable overall appearance and to ensure structural weakness or squeaking boards are avoided. The last 1-2 rows will need to be face nailed where clearance does not permit blind nailing with the nailer. Pre drill and face nail on the tongue side following the nailing pattern used for the first row. Rip final row to fit and face nail. If the final row is 14

15 less than 25mm in width, it should first be glued to the previous uninstalled row and the two joined boards should be face nailed as one. STEP 6 COMPLETE THE JOB Remove all installation debris from the floor and brush off all dust etc. Clean the floor with the recommended wood flooring cleaner. Lacquered or U.V. Oiled floors Clean the floor as necessary using Bona Wood Floor Cleaner. Re-install / install any transition pieces that may be needed, such as reducer strips, T-mouldings, or thresholds. These products are available pre-finished to blend with your flooring. TUSCAN ACCESSORIES Combistar 3 in 1 profile Colour blended 3 in 1 multi purpose profile that allows for expansion gaps and a smooth transition between different floor coverings within your home. Veneer wrap scotia Conceals the expansion gap between the edge of the floor and the skirting board. Available in all Tuscan design finishes. Sika adhesives T55 and T53 are European manufactured adhesives specifically designed for gluing down hardwood flooring. 15

16 SIKA INSTALLATION INSTRUCTIONS 16

17 Section 3 Care and Maintenance Tuscan Solid Wood Flooring care and maintenance instructions Please leave these instructions with the owner of the floor. Correct care and maintenance of you Tuscan solid wood floor will help ensure your floor always looks its best and will aid its long term reliability and performance. For routine care and maintenance please follow these simple instructions: Initial Care immediately following installation Lacquered finish & UV Oiled finish flooring Remove any installation debris and brush / dust the floor. Clean the floor with Bona Wood Floor Cleaner taking care to use the correct type of flat mop and to follow the instructions on the container. This cleaner is available through your supplier of Tuscan solid wood floor. Ongoing care and maintenance Vacuum or sweep the floor weekly, or more if needed. The vacuum head must be brush or soft felt. Do not use a vacuum that has beater bars or a hard metal head. A floor swivel head flat mop with replaceable cloth cover is highly recommended to eliminate finer particles of dirt and grit that may build up on the floor. DO NOT clean your flooring using any form of steam mop as heat and humidity can damage your floor and its lacquer or oil finish Spillages and tracked in dirt should be wiped off the floor immediately. Periodically, or as is deemed necessary based on dirt build up etc thoroughly clean your floor by using the Bona Wood Floor cleaning product. 17

18 Things to do and be aware of: Do - Make use of door mats at all external entrances and over high traffic areas of the floor as this will significantly help to avoid dirt and grit being walked on to the floor. Do Use the stated Bona cleaning products as they are specifically designed to clean and maintain your wood floor. The use of other cleaning products cannot be confirmed as suitable for your Tuscan flooring product and therefore may invalidate your product warranty. Do - Use furniture protection pads under all furniture legs and feet as this will avoid damage being caused by the movement of furniture across the floor. Use workstation mats at desks, under desk chairs and in front of any furniture where continual to a small specific point on the floor to avoid damage and excessive or premature wear from castors and continual footfall in these areas. Do Try to keep the relative humidity within the room between 35 55% as this will minimise the floor s natural tendency to move during the seasons on the year. Small humidity meters can be purchased via many online companies and should be relatively inexpensive. Do - Protect your floor from constant direct sunlight where possible as areas subjected to constant sunlight will age and discolour at an accelerated rate compared to shaded areas of the floor. Be aware - If mats or rugs are laid on the floor occasionally reposition them to avoid discolouration forming beneath them and at their edges as the flooring ages. Be aware That your floor is a natural product and as such will show signs of movement i.e minor gapping, occasional creaking etc, during the various seasons of the year as it reacts normally to its environmental conditions. Be aware That shade and colour variance is also a normal feature of wooden flooring and that blending of the boards is a normal part of the wood floor installation process to ensure an overall blended acceptable appearance is achieved when fitted. Very Important don ts and things to avoid: Don t - Wet mop the flooring as this will cause excessive expansion of the floor and possible damage to the lacquered and or oiled surface finishes. Don t Use any form of steam mop or steam cleaning product on your Tuscan flooring as heat and humidity can affect a natural wood product and its surface finish. Don t - Walk on the floor in narrow hard, or stiletto type, heels as this may damage the surface of the flooring. Don t Slide heavy furniture or objects across the floor as this may also damage the surface. Don t Use ammonia based cleaners, acrylic finishes, wax based products, detergents, bleaches, polishes, abrasive soaps or cleaners, or any acidic based cleaners. These types of cleaners can etch or pit the surface of your flooring. Avoid - Letting pets with claws run across the flooring and always keep pets claws trimmed as animal claws may scratch the surface of the floor. Avoid Letting sunlight shine on the floor for long periods of time as this will accelerate ageing of the floor particularly if your room has large windows or patio doors. The use of curtains & blinds is recommended to reduce the effect of U.V. light ageing the floor. 18

19 Section 4 Warranty Information This Tuscan product comes with a limited 10 year residential warranty against manufacturing defect. To maintain the validity of your Tuscan warranty your Tuscan Solid Wood floor must be installed, cleaned and maintained in accordance with the published installation, care and maintenance details. Please note that any longer term renovation of your floor involving sanding and sealing will render the original warranty invalid. What to do if you have any problems. Should any problems be apparent with your Tuscan Solid Wood floor upon checking the floor prior to installation, you should immediately contact your supplier and advise them of the problem. If you have concerns of any kind do not start installation of the floor until your concerns have been clarified satisfactorily. If any problems with your floor arise after installation then firstly contact your installer to discuss. Your installer should be able to remedy the problem if it is installation related, or alternatively report the matter to his / your supplier of the flooring for further assistance. V

Please calculate with around 5% more square meters than needed because you will have material loss due to cutting and sorting.
 1. TEKA Soft Loc Installation Guide Thank you for having chosen TEKA Parquet. To guarantee a constant quality product TEKA engineered hardwood flooring is made out of selected wood species and runs only
How to Install Hardwood Flooring Over a Sub Floor
 How to Install Hardwood Flooring Over a Sub Floor Installation Preparation Instructions Read the entire instructions before starting your project. 1) INSPECT EACH PLANK (see fig. a) Wood is a natural product
How To Install Hardwood Flooring
 3/4" Solid Plank & Strip Products For Nail-Down Installation INSTALLER/OWNER RESPONSIBILITY Beautiful hardwood floors are a product of nature and therefore, not perfect. Our wood floors are manufactured
Euro Oak Installation
 STYLE TIMBER FLOOR Bring your life in style Euro Oak Installation Before Starting Installation Your floor has been manufactured with the best possible care. However we would still advise you to check the
Bella Cera Engineered Hardwood Flooring Installation Instructions. Check for Proper Color Selection Prior to Installation
 Bella Cera Engineered Hardwood Flooring Installation Instructions Check for Proper Color Selection Prior to Installation 1 Important Information before You Begin 1.1 Installer/Owner Responsibility Carefully
Prefinished 3/4 Solid (including various widths such as 3 1/4, 3 5/8, 4 3/4, 5 ) Nail-Down Installation Instructions
 Nail-Down Installation Instructions") Prefinished 3/4 Solid (including various widths such as 3 1/4, 3 5/8, 4 3/4, 5 ) Nail-Down Installation Instructions Thank you for choosing ARK Floors Exotic Hardwood Flooring. In order to meet warranty
Prefinished 3/4 Solid (including various widths such as 3 1/4, 3 5/8, 4 3/4, 5 ) Nail-Down Installation Instructions Thank you for choosing ARK Floors Exotic Hardwood Flooring. In order to meet warranty
Installation Instructions for staple/nail down applications
 Installation Instructions for staple/nail down applications General Notes Inspect all materials carefully before installation. Warranties do not cover materials with visible defects once they are installed.
INSTALLATION IMPORTANT INSTALLER/OWNER RESPONSIBILITY TOOLS & EQUIPMENT NEEDED FOR INSTALLATION PRE-INSTALLATION PROCEDURES & JOBSITE CONDITIONS
 IMPORTANT It is important that you read & understand the following information and instructions in their entirety before proceeding with installation. Please thoroughly inspect all Flooring products in
Installation for Wood Flooring
 Installation for Wood Flooring Tarkett wood flooring offers a beautiful variety of options from species and colour, to plank widths and finishes. We developed enhanced locking system, T-lock, and the best
ENGINEERED FLOORING INSTALLATION
 ENGINEERED FLOORING INSTALLATION ATTENTION! INSTALLER/OWNER RESPONSIBILITIES Beautiful hardwood floors are a product of nature and, therefore, they will show variations in color, grain, texture, and appearance.
How To Install Hardwood Flooring
 phone: 1.855.Ludaire e-mail: [email protected] Solid Flooring Installation Instructions These Instructions and Guidelines are for the typical installation of ¾ Pre-finished Solid Hardwood Flooring manufactured
Engineered Hardwood Flooring Installation Instructions
 Engineered Hardwood Flooring Installation Instructions Tip: Check for proper color selection and style prior to Installation. No claims will be accepted after installation Important Information before
SOLID FLOORING 3/4 INSTALLATION GUIDELINES
 SOLID FLOORING 3/4 INSTALLATION GUIDELINES Thank you for choosing Cikel Exotic Hardwood Flooring, a responsible choice. Please thoroughly review and adhere to the following installation instructions to
Country Series. 12.3mm V-Groove Edge Engineered Laminate Flooring. Laminate Flooring Care and Maintenance. Routine Cleaning
 Country Series 12.3mm V-Groove Edge Engineered Laminate Flooring Laminate Flooring Care and Maintenance Routine Cleaning Simply dust mop or vacuum with a soft brush or wood-floor accessory to keep your
Staple-Down, Glue-Down and Floating Installation IndusParquet 1/2" Engineered
 Staple-Down, Glue-Down and Floating Installation IndusParquet 1/2" Engineered Thank you for choosing IndusParquet ½" Engineered Hardwood Flooring. Protect your investment; review and adhere to the flooring
FLOOR MAINTENANCE GUIDE EXPECTATIONS AVOIDING PROBLEMS
 No. 8 Brands Hatch Close Kyalami Business Park Kyalami Tel: 011 466 0701 Fax: 011 466 2919 Email: [email protected] FLOOR MAINTENANCE GUIDE EXPECTATIONS AVOIDING PROBLEMS Please keep this folder
RESIDENTIAL HARDWOOD WARRANTIES
 RESIDENTIAL HARDWOOD WARRANTIES Limited Warranties for Prefinished Solid and Engineered Hardwood Floors Manufacturing Defects Century Flooring* ("Century") hereby warrants to the original buyer ("Buyer"),
Hardwood Flooring. Urbania Flooring
 Engineered Hardwood Flooring Installation Guide for Urbania Flooring BEFORE STARTING THE INSTALATION - Please take the time to read and ensure that you understand the information contained in this document.
WATER AND WOOD DON T MIX KEEPING YOUR TRIÂNGULO HARDWOOD FLOOR BEAUTIFUL SCRATCHES, INDENTATIONS AND GOUGES
 WATER AND WOOD DON T MIX Using any of the following items to maintain your wood floor will void all manufacturer warranties! Water Oil Soap Vinegar, Ammonia Household Detergent Wax Furniture Polish Dust
HARDWOOD WARRANTIES Limited Warranty for Prefinished Solid, Engineered, and Longstrip Floors Manufacturing Defects Finish Warranty
 HARDWOOD WARRANTIES Limited Warranty for Prefinished Solid, Engineered, and Longstrip Floors Manufacturing Defects Mohawk* ("Mohawk") hereby warrants to the original buyer ("Buyer"), the goods to be free
INSTALLATION INSTRUCTIONS
 INSTALLER/OWNER RESPONSIBILITIES Hardwood flooring is a product of nature and its inherent beauty stems from the fact that each piece is unique with no two pieces the same. Due to the fact that this flooring
Engineered Installation Instructions
 Engineered Installation Instructions Please read all instructions carefully before attempting installation. Improper installation may void the warranty. PRODUCT USE DIVINE Flooring Engineered products
Daybreak Acacia. 25yr Residential Wear Warranty
 - Wide Leaf Acacia - Handsculpted - Tongue & Groove - Random Lengths - 8 Layer Urethane Finish - High Color Variation JANUARY 2013 HARDWOOD - WIDE LEAF SOLID Daybreak Acacia 3/4 Solid Handsculpted, Tongue
How To Level A Subfloor
 Skill Level: INTERMEDIATE Give these projects a try if you're a confident DIYer with a good working knowledge of a variety of tools. They can take a day or more to complete. If you can build a birdhouse
ENGLISH Installation guidelines for 10mm Engineered LOC flooring
 ENGLISH Installation guidelines for 10mm Engineered LOC flooring A. INTRODUCTION General statement Congratulations with your new floor. Store the boards in the room where they will be installed for at
If you hire a Professional Wood Fitter. If fitting the Wood Floor yourself (DIY)
") WOOD FLOORING GUIDE WHILE A REASONABLY COMPETENT DIY ENTHUSIAST CAN SUCCESSFULLY FIT BOTH LAMINATED AND ENGINEERED CROSS-PLY FLOORING, TILE GIANT RECOMMEND THAT ONLY AN EXPERIENCED PROFESSIONAL WOOD FITTER
WOOD FLOORING GUIDE WHILE A REASONABLY COMPETENT DIY ENTHUSIAST CAN SUCCESSFULLY FIT BOTH LAMINATED AND ENGINEERED CROSS-PLY FLOORING, TILE GIANT RECOMMEND THAT ONLY AN EXPERIENCED PROFESSIONAL WOOD FITTER
Grand Mesa Plus LAMINATE - WIRE BRUSHED. GAGVGM81012A Prairie. GAGVGM80012NA Colorado. GAGVGM84012A Pecan Rustic. GAGVGM85012A Saddle Walnut
 MARCH 2015 Grand Mesa Plus LAMINATE - WIRE BRUSHED Specifications 12.3mm 6.5 wide x 47-13/16 long 19.42 sf/ctn 48 ctn/plt Triple Plate Embossing Wire Brushed Texture Micro-Bevel & Waxed Edges Warranty
0800 30 50 90 www.bamboodirect.co.nz
 Guide To Bamboo Flooring 1. Frequently Asked Questions 2. Installation Tips 3. Maintaining your Bamboo Floor 4. Why Bamboo Direct? COPYRIGHT 2009 BAMBOO DIRECT Frequently Asked Questions 1. Are Bamboo
INSTALLATION GUIDE. Imago Installation Guide - January 2008 1
 INSTALLATION GUIDE IMAGO Floors are very sensitive to ambient humidity conditions, since all wood flooring will expand and contract as relative humidity varies. In order to keep the flooring manufacturer
Columbia flooring will resist fading from exposure to sunlight or artificial light.
 LIMITED LIFETIME WARRANTY AND MAINTENANCE FOR RESIDENTIAL USE Columbia is so confident in the design and durability of our Columbia flooring products and accessories, that we back them with a Limited Lifetime
The length of this warranty varies by product. Please see product sample or your retailer for duration of this warranty on specific products.
 RESIDENTIAL ENGINEERED HARDWOOD LIMITED WARRANTY Limited Warranties for Q Wood Brand Locking Engineered Hardwood Floors with Opulux Performance Enhanced Finish Manufacturing Defects Q Wood by Quick Step
INSTALLATION INSTRUCTIONS FOR LAMINATE FLOORING
 INSTALLATION INSTRUCTIONS FOR LAMINATE FLOORING Introduction Laminate flooring is designed to be a floating floor that may be installed over virtually any type of sub floor. It is not nailed or glued to
Engineered T&G Hardwood Flooring. Installation, Care and Warranty Guide
 Engineered T&G Hardwood Flooring Installation, Care and Warranty Guide Warranty coverage may be voided due to failure to strictly abide by all the installation instructions and recommendations in this
Laminate Flooring T-Lock Angle-Drop Installation Instructions
 TECHNICAL SERVICE Laminate Flooring T-Lock Angle-Drop Installation Instructions March 23, 2012 Read all instructions carefully before beginning installation. Make sure that the instructions are the most
Installation Instructions, Care and Maintenance Guide & Warranty Information for Engineered Woods
 Installation Instructions, Care and Maintenance Guide & Warranty Information for Engineered Woods We thank you very much for selecting EarthWerks Hardwood Flooring. We sincerely hope your new environment
Care and Warranty Guide
 Care and Warranty Guide Keeping Your Olive Wood Floor Beautiful for Generations C a r i ng Fo r Yo u r T u s c a n y Olive Wo o d Fl o o r Tuscany Olive Wood flooring can last for generations with minimal
Care and Maintenance for Wood Flooring
 Care and Maintenance for Wood Flooring The finishing technology used for Tarkett wood floorings makes them the best choice for easy maintenance. To preserve all the beauty of your Tarkett wood flooring,
www.gaylordhardwoodflooring.com
 Chapter 16 Problems, Causes, and Cures Problem: Cupping Cause: Flooring absorbing excessive moisture on underside, causing expansion with raised edges. / Not leaving enough expansion space around perimeter.
Installation Instructions. BR-111 Solid Collection 5/16"
 Installation Instructions installation guidelines Installation In addition to these guidelines, follow the specific installation instructions provided in this manual for each BR-111 product line. Nailing
HOW-TO LAY HARDBOARD OR PLYWOOD FLOOR OVERLAY
 HOW-TO HOW-TO LAY HARDBOARD OR PLYWOOD FLOOR OVERLAY Most floor coverings, if laid over uneven wooden floors, will wear unevenly and look unsightly. The answer is to cover the old boards with hardboard
LAMINATE LAMINATE FLOOR CARE AND MAINTENANCE. Routine Maintenance. Minor Repair Instructions: Glueless Laminate Board Replacement Repairs
 LAMINATE FLOOR CARE AND MAINTENANCE Routine Maintenance 1. Use a damp cloth to blot up spills as soon as they happen. Never allow liquids to stand on your floor. 2. For tough spots, such as oil, paint,
How To Warranty Shawfloors
 HARD SURFACE WARRANTIES, CARE & MAINTENANCE LAMINATE shawfloors.com 1 CONTENTS LAMINATE Care & Maintenance 3 Warranty 4 Shaw represents a promise of outstanding performance, unique styling and overall
INSTALLATION INSTRUCTIONS Pre finished Solid plank "INSTALLATION IMPLIES ACCEPTANCE"
 INSTALLATION INSTRUCTIONS Pre finished Solid plank IMPORTANT: PROCEED WITH A VISUAL INSPECTION OF THE STRIPS BEFORE INSTALLATION. ONCE INSTALLED, THE STRIPS ARE CONSIDERED ACCEPTED BY THE INSTALLER AND
VINYL CLICK FLOORING INSTALLATION GUIDE
 VINYL CLICK FLOORING INSTALLATION GUIDE Owner/Installer Responsibility Prior to installing a single board, you or the installer must determine that the job-site environment and the sub-surfaces meet the
Engineered Hardwood Flooring. Installation, Care and Warranty Guide
 Engineered Hardwood Flooring Installation, Care and Warranty Guide Warranty coverage may be lost due to failure to strictly abide by all the installation instructions and recommendations in this manual.
Annapolis Valley - Engineered Floors - Installation Instructions
 Annapolis Valley - Engineered Floors - Installation Instructions OWNER/INSTALLATION TECHNICIAN RESPONSIBILITIES: Order Quantity: When the flooring is ordered, a minimum of 5% (recommended 7% - 10%) must
Minor Cracks in Horizontal Surfaces
 Cracks, chips and broken or flaking areas in concrete are not only unsightly, they can lead to further deterioration of the surface. The result is a costly replacement project as opposed to a simple repair.
T H A N K Y OU F O R Y OUR P U R C H A S E O F A N E S S E N T I A V A N I T Y, P L E A S E R E A D T H E S E V A N I T Y C A R E A N D I N S T A L L
 T H A N K Y OU F O R Y OUR P U R C H A S E O F A N E S S E N T I A V A N I T Y, P L E A S E R E A D T H E S E V A N I T Y C A R E A N D I N S T A L L AT I O N I N S T R U C T I O N S C A R E F U L LY CAR
INSTALLATION GUIDELINES wood floors
 INSTALLATION GUIDELINES wood floors INSTALLATION GUIDELINES - WOOD FLOORS SUBJECT PAGE GENERAL INFORMATION PRIOR TO INSTALLATION WHAT KIND OF INSTALLATION SHOULD YOU USE? 1 Floating Installations Glue-Down
INSTALLATION RECOMMENDATIONS. Outdoor Rubber Tiles
 INSTALLATION RECOMMENDATIONS Outdoor Rubber Tiles Prior to Installation: The Outdoor Rubber Tiles and accessory transition pieces intended for this installation have been shipped to you via a freight carrier
SCHWARTZ WATER-BASE WOOD FLOOR SEALER AND WATER-BASE PREMIIUM WOOD FLOOR FINISH
 !! SCHWARTZ WATER-BASE WOOD FLOOR SEALER AND WATER-BASE PREMIIUM WOOD FLOOR FINISH A Complete Guide for Preparation, Application, Curing and Maintenance for use with Schwartz H 2 O Water-base Floor Finish
Basement Window Installation Guide Hopper and Sliding
 Basement Window Installation Guide Hopper and Sliding americancraftsmanwindows.com Project Requirements: Installation must comply with all applicable building codes. Existing window frame, wall and weatherresistant
Your guide to home maintenance. Flat Roofs
 Your guide to home maintenance Flat Roofs Your guide to home maintenance is a series of information leaflets that gives you all the information you need to keep your home in tiptop condition. Flat Roofs
Engineered Oak Flooring
 Engineered Oak Flooring Installation, Care and Warranty Guide Warranty coverage may be lost due to failure to strictly abide by all the installation instructions and recommendations in this manual. This
Window Installation Instructions
 Caution The correct installation methods of windows in full frame or insert applications is critical towards achieving the tested performance of the window and longterm enjoyment and energy savings for
Guide Specifications for Maple Flooring Systems
 Guide Specifications for Maple Flooring Systems MFMA Guide Specification for Resilient Pre-Engineered Fixed Panel System Purpose This Guide Specification is designed to assist in the production of actual
TARKETT WOOD COLLECTIONS Products Specification
 TARKETT WOOD COLLECTIONS Products Specification 1. PROPRIETARY PRODUCT/MANUFACTURER 1.1. Proprietary Product: Wood flooring products with multilayer construction are designed for durability and residential
Active and Passive Sash Replacement
 for Andersen Gliding Windows Read all instructions carefully before attempting this procedure. If you have any questions about your ability to complete the procedure, call Andersen at 1-888-888-7020 for
Bathroom Installation Guide
 Bathroom Installation Guide Step-by-step installation of your cabinets We do a lot of groundwork to make it as simple as possible for you to assemble and install your new bathroom furniture yourself. We
Replacement Window Installation Guide Non-Impact & Impact Resistant Windows without Nailing Fin
 Replacement Window Installation Guide Non-Impact & Impact Resistant Windows without Nailing Fin americancraftsmanwindows.com Project Requirements: Failure to follow these instructions may void product
Sun Windows General Information Sun New Construction Window Installation Instructions
 Sun Windows General Information Section 1 G F H H H A. Apply Weather Resistive Barrier B. Apply Sill Flashing Tape C. Place Waterproof Sill Shims D. Caulk Back of Nail Fin Sides & Top, Set Window, Fasten
Knauf Aquapanel Interior. Tile Backing. Cement board for wet areas. Will not deteriorate in water. Easy to score and snap
 Tile Backing Will not deteriorate in water Easy to score and snap Resistant to mould and mildew Knauf Aquapanel Interior Cement board for wet areas Knauf Aquapanel Interior Cement Board Drywall for Wet
DIY CABINET REFACING INSTALLATION GUIDE
 DIY CABINET REFACING INSTALLATION GUIDE CABINET REFACING INSTALLATION Are you ready to reface your outdated cabinets? This guide will show you how to install your new Facelifters Cabinet Refacing Products
WOOD FLOORING MAINTENANCE MANUAL
 10026 Talley Lane, Houston, TX 77041 Phone: 713-939-0157 Fax: 713-939-9621 WOOD FLOORING MAINTENANCE MANUAL REMEMBER: Your wood floor is new and is still acclimating to its new environment; HVAC controls
INSTALLATION INSTRUCTION - INSTRUCCIONES DE INSTALACION FOR DOUBLE-HUNG VENT REPLACEMENT WINDOW
 Vinyl Windows and Doors Manufactured by Pella Corporation INSTALLATION INSTRUCTION - INSTRUCCIONES DE INSTALACION FOR DOUBLE-HUNG VENT REPLACEMENT WINDOW Lea las instrucciones en español en el reverso.
INSTRUCTION FOR ASSEMBLY. 150x180 v Traditional sauna cabin
 INSTRUCTION FOR ASSEMBLY 150x180 v Traditional sauna cabin 1. SAUNA PLAN 1800 LIGHT UNDER THE BENCH VENTILATION OUTLET UPPER BENCH 600 1500 LOWER BENCH 400 700 1656 956 HEATER 366 381 690 815 Light switch
Residential Roofing Guide
 Residential Roofing Guide TABLE OF CONTENTS Building Detail and Accessories...... 1 Panel Introduction and Handling...... 2 Cutting and Trimming.... 3 Roof Preparation..... 3 Roof Slope..... 3 Re-roofing...
INSTALLATION INSTRUCTIONS for Vinyl Windows with Integral Nailing Fin (JII001)
") Thank you for selecting JELD-WEN products. Attached are JELD-WEN s recommended installation instructions for Vinyl windows with an integral nailing fin. While the use of these installation instructions
Thank you for selecting JELD-WEN products. Attached are JELD-WEN s recommended installation instructions for Vinyl windows with an integral nailing fin. While the use of these installation instructions
Engineered Hardwood Flooring Installation Instructions
 Engineered Hardwood Flooring Installation Instructions Glue: All profiles Nail: 3/8", 1/2", 3/4" Staple: 3/8", 1/2" Float: 1/2" Engineered Planks and Strips can be installed over most subfloors, and are
Installation guide. ENGINEERED and LOC. 1/2 in and 3/4 in (13 mm and 19 mm) INNOVATION TRADITION PERFECTION
 INNOVATION TRADITION PERFECTION") Installation guide ENGINEERED and LOC 1/2 in and 3/4 in (13 mm and 19 mm) INNOVATION TRADITION PERFECTION It is important to read the installation instructions, maintenance guide and warranty document
Installation guide ENGINEERED and LOC 1/2 in and 3/4 in (13 mm and 19 mm) INNOVATION TRADITION PERFECTION It is important to read the installation instructions, maintenance guide and warranty document
Cupped Floor STEP 1. Flooring absorbing excessive moisture on the underside causes expansion and cupping with the edges raised.
 BEHAVIOR OF FLOORING If it s not marked NOFMA, it s not certified. Cupping and Crowning Cupped Floor STEP 1. Flooring absorbing excessive moisture on the underside causes expansion and cupping with the
Herringbone Pattern Flooring
 Herringbone Pattern Flooring If it s not marked NOFMA, it s not certified. Handling, Storage, Installation and Tips Herringbone is generally manufactured from 3/4 x 2 ¼ or ¾ x 1-1/2 standard tongue & groove
3/4 Solid Hardwood Flooring Installation Instructions
 3/4 Solid Hardwood Flooring Installation Instructions Solid Hardwood Flooring can be installed over most properly prepared subfloors, making them suitable for installation on or above grade levels where
The Solid Wood Flooring Company Unit 1 Helena Court, Hampton Street, Tetbury, Gloucestershire GL8 8JN
 The Solid Wood Flooring Company Unit 1 Helena Court, Hampton Street, Tetbury, Gloucestershire GL8 8JN London Office: The Building Centre, Store Street WC1E 7BT Tel: 01666 504015 Fax: 05603 146907 Mobile:
WATERPROOFING OF REINFORCED CONCRETE FLAT ROOF 12
 WATERPROOFING OF REINFORCED CONCRETE FLAT ROOF 12 87 88 GOOD INDUSTRY PRACTICES 12 WATERPROOFING OF REINFORCED CONCRETE FLAT ROOF 12.1 BACKGROUND Most roofs in Singapore are constructed using reinforced
The existing roof angle change terminations and flashings when sound and intact can be reused.
 January 2, 2015 Summary Specification Re-Skinning an Existing Roof Maintenance and Repair Warranty Upgrade for Up to 30 Years Re-Skinning Over an Existing Roof with a New C-EPDM Membrane Using The Existing
Installing Window and Door Mouldings
 Installing Window and Door Mouldings About Window and Door Mouldings The trim around windows and doors greatly influences the look and style of your interior. They also bridge the gaps and cover spaces
Installation Instructions Waterproof Core Vinyl Planks
 Installation Instructions Waterproof Core Vinyl Planks Products Included Approved Grade Levels Approved Installation Methods Waterproof Core Vinyl Planks Click Lock Joint Above Grade. On Grade. Below Grade.
WATERPROOFING FOR CONCRETE STRUCTURES
 MANUAL OF CONTRACT DOCUMENTS FOR ROAD WORKS VOLUME 1 SPECIFICATION FOR ROAD WORKS SERIES 2000 WATERPROOFING FOR CONCRETE STRUCTURES Contents Clause Title Page 2001 General 2 2002 Protection of Bridge Deck
Important Information
 Single Door Quadrant Instruction Manual ESQ Important Information Toughened glass is completely safe for use in our shower enclosures and bath screens; providing our products are installed according to
Foundation Experts, LLC Specializes in Foundation Repair and Waterproofing
 1 Most basements show some signs of leaking and cracking. Through the years, problems with water, poor soils, grading, drainage and possible settling affect the integrity of a basement. Being able to recognize
3/8 and 1/2 Engineered Installation Instructions & Lifetime Warranty
 Thank you for choosing Lifescapes Engineered Flooring. You have made a wonderful investment and it is important to protect it. In order to meet warranty requirements and to ensure a successful installation,
Armstrong Do-It-Yourself Tile Installation System
 Armstrong Do-It-Yourself Tile Installation System What tools will I need to install my tile floor? You'll need just the basics: - floor tile (make sure you have enough tile to finish the job) - adhesive
Carpet Tile Installation Guidelines
 NOTICE FAILURE TO FOLLOW THESE GUIDELINES CAN RESULT IN VOIDING THE CARPET WARRANTY. Installation Guidelines The following instructions should be reviewed prior to installation. Shaw Industries will not
INSTALLATION INSTRUCTIONS for Bifold Doors (JII103)
") Thank you for selecting JELD-WEN products. Attached are JELD-WEN s recommended installation instructions for premium composite, hollow and solid core molded Bifold Doors. Bifolds are designed for fast
Thank you for selecting JELD-WEN products. Attached are JELD-WEN s recommended installation instructions for premium composite, hollow and solid core molded Bifold Doors. Bifolds are designed for fast
Maintenance Guide. for your Mercier prefinished floor. 1-866-448-1785 www.mercierwoodflooring.com PRINTED IN CANADA SP-CAREGUBIL 10-12
 PRINTED IN CANADA SP-CAREGUBIL 10-12 Maintenance Guide for your Mercier prefinished floor 1-866-448-1785 www.mercierwoodflooring.com For lasting satisfaction You have chosen the best prefinished flooring
SHAW HARDWOOD FLOORING LIMITED WARRANTY
 SHAW HARDWOOD FLOORING LIMITED WARRANTY This Shaw Hardwood Floor comes with a: Lifetime structural integrity limited warranty 15 year, 20 year, 25 year or lifetime limited warranty depending on the selling
STAIR TREAD & RISER INSTALLATION GUIDELINES
 STAIR TREAD & RISER INSTALLATION GUIDELINES ARTISTIC FINISHES DOES NOT WARRANTY THE COMPLETENESS OR ACCURACY OF ANY INSTALLATION. THE INSTALLATION CONTRACTER MUST HAVE THE EXPERIENCE AND KNOWLEDGE TO COMPLETE
WOODLINE PARQUETRY 25 Year Warranty
 WOODLINE PARQUETRY 25 Year Warranty LIFE TIME STRUCTURAL WARRANTY WOODLINE PARQUETRY offers you a Lifetime Structural Warranty. WOODLINE PARQUETRY warrants that, under normal residential conditions and
RACQUETBALL, HANDBALL OR SQUASH COURTS AND GYMNASIUM WALL SURFACES
 1807 Elmwood Avenue, Suite 275 Buffalo, New York 14207 (800) 543-5155 RACQUETBALL, HANDBALL OR SQUASH COURTS AND GYMNASIUM WALL SURFACES Fiberesin Wall System Provide materials and labor to complete courts
INSTALLATION INSTRUCTIONS Masters Choice Bamboo floors
 INSTALLATION INSTRUCTIONS Masters Choice Bamboo floors IMPORTANT: PROCEED WITH A VISUAL INSPECTION OF THE STRIPS BEFORE INSTALLATION. ONCE INSTALLED, THE STRIPS ARE CONSIDERED ACCEPTED BY THE INSTALLER
SAMPLE INSTRUCTIONS. Best Barns USA Assembly Book. the Denver. 12'x 12' or 12'x16' Revised November 29, 2010
 Best Barns USA Assembly Book Revised November 29, 2010 SAMPLE INSTRUCTIONS the Denver 12'x 12' or 12'x16' Manufactured by Reynolds Building Systems, Inc. 205 Arlington Drive Greenville, PA 16125 724-646-3775
QWALL 4 ACRYLIC SHOWER WALL INSTALLATION INSTRUCTIONS
 QWALL 4 ACRYLIC SHOWER WALL INSTALLATION INSTRUCTIONS IMPORTANT DreamLine TM reserves the right to alter, modify or redesign products at any time without prior notice. For the latest up-to-date technical
FOUNDATION INSULATING SYSTEM, INCLUDING WATERPROOFING AND DAMP PROOFING
 FOUNDATION INSULATING SYSTEM, INCLUDING WATERPROOFING AND DAMP PROOFING insulation installed on foundation walls must be separated from the building interior with a code approved thermal barrier. Foam