Guide to Using AMS 4.0 Marking Software
|
|
|
- Hugh Hopkins
- 10 years ago
- Views:
Transcription
1 Guide to Using AMS 4.0 Marking Software

2

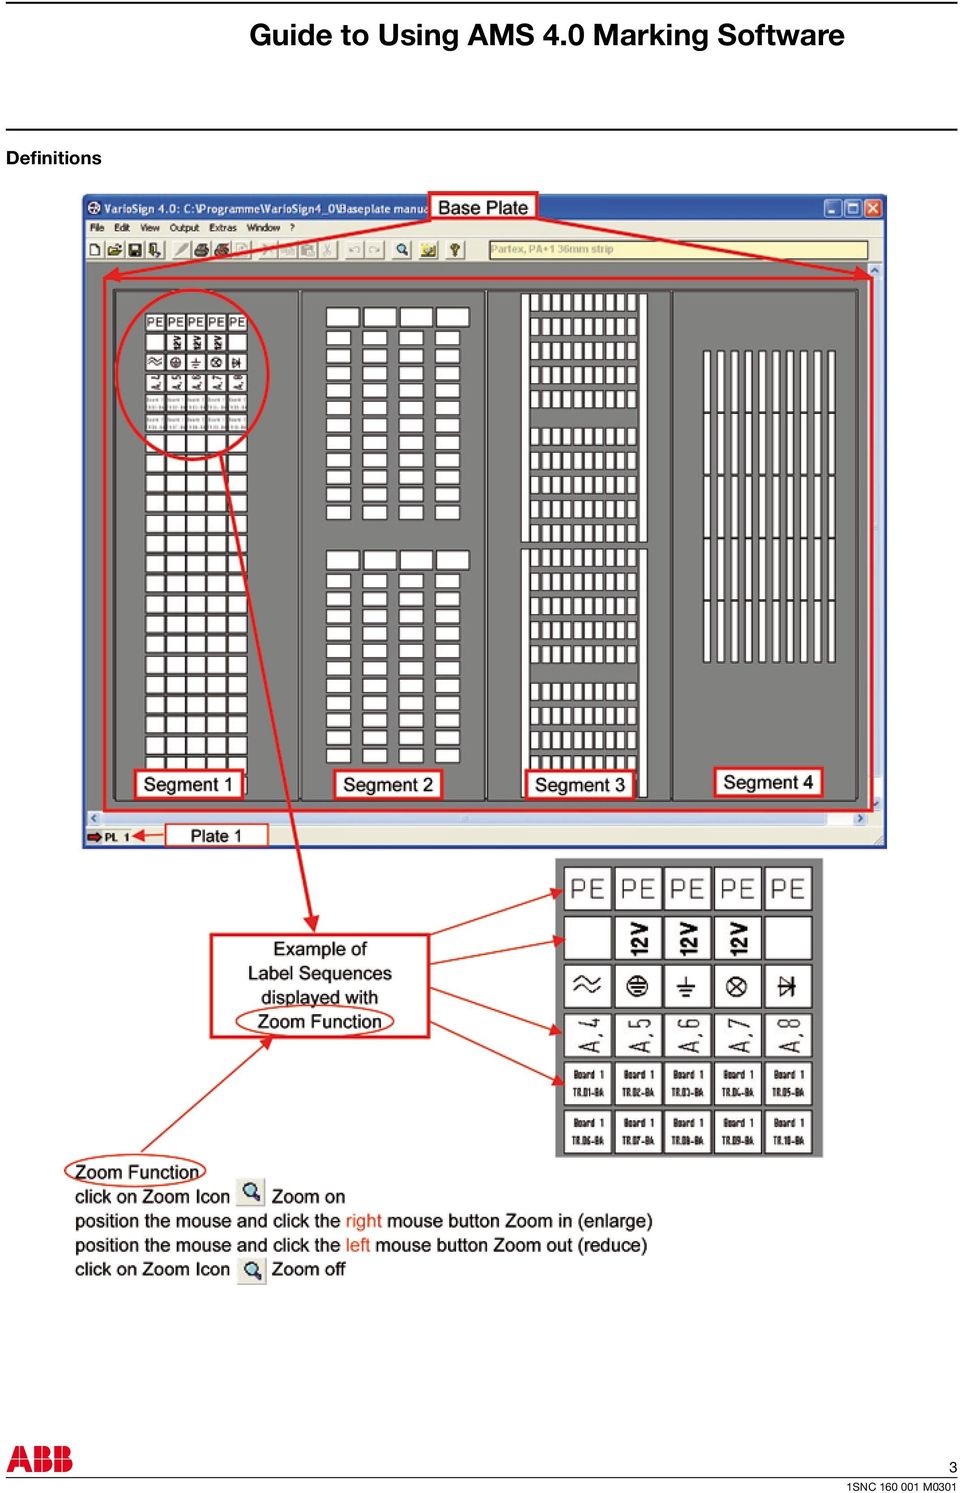
3 Guide to Using AMS 4.0 Marking Software Contents System Requirements...2 Software Installation...2 Selecting the Output Device and Changing Settings...2 Definitions... Getting used to the Software...4 Create a new project...4 Open an existing project...4 Selecting tags / marking elements...4 Marking the selected tags / marking elements...5 One-time, multiple and serial modes...6 Importing files...7 Row labeling...8 Marking of endless strips...8 Copying functions...10 Zoom function...11 Preferences...11 No. of projects and base plates allowed...11 Information menu >?...12 Starting the Print Job with the Plotter...12 Scale Factor...14 Designing new Tags...14 Example for same sized tags...15 Example for different sized tags...16 Engraving Tags...17 Engraving with VP 500 Engraver...17 Starting the Engraving...18 Calibrating the Plotter...20 Firmware update of the plotter...20

4 System Requirements Pentium II PC (200 MHz or higher) 64 MB RAM CD-ROM drive VGA graphics adapter and monitor (256 colors, resolution 640 x 480) Operating system: Windows 98, ME, NT, 2000, XP Mouse If you like to connect another output device in the future, like the plotter (half size) Engraver, you can always get back to the window from the menu bar > File and choose > New. The plotter is default set as standard output device, connected through the USB. In addition, the plotter has a parallel port, to be used with the software. Software Installation First close all other applications. Insert the software CD into the CD-ROM drive of your PC. The installation will start automatically. Please follow the on-screen instructions. If the auto-start feature has been switched off on your PC, please start the set-up program by double-clicking. When the installation is complete, connect the plotter to the PC with the parallel interface cable or USB cable and switch the plotter on. Selecting the Output Device and Changing Settings Now start the program by a double click on the symbol located on the desktop. Before working with the software, you must first install the plotter you intend to use. To do this, select the output device in the window. As example, if you are using the plotter select the output device and check the click box as Use always this type of Printer 1. You will not be asked any more in the future. With the button Accept 2 the setting will be saved and the window be closed. For using you need to change the output to parallel, go to the main menu bar > Output > Output device and check the Interface tab. Confirm LPT1 4 as the new interface port and click on Apply. Connect the parallel cable on both ends and switch on the plotter, the software will recognize the plotter accordingly If you click this box, you set the plotter you want to use. Once selected, you cannot return to back. 2

5 Definitions
6 Getting Used to the Software Our prime concern when developing this software was that users should be able to carry out all labeling jobs quickly and easily. For this reason, every task follows the same basic pattern: Create a new Project shown on the screen together with the available marker cards. If you confirm with No, all available elements and manufacturer 2 Open an existing Project Selecting tags / marking elements Marking the selected tags / marking elements One-time, multiple and serial modes Importing files Row labeling Marking of endless strips Copying functions Zoom function Preferences No. of projects and base plates allowed Information menu >? Create a new Project The plotter has an integrated support plate recognition system included. The software reads the code of each field, starting with the left support plate. Assuming the plotter is turned on, the communication cable is connected and support plates are placed on the plotter itself, the software pre-selects the marker cards already. If you click on the icon New Project of the menu bar, or select > File and > New from the main menu, the message comes up, if you like to use the recognition system and read the support plates. are presented in the list to be selected from 2. After changing the support plate on the plotter or after deleting a segment within the software, you could click on the icon Rescan support plates and read the new support plates. Open an existing Project If you click on the icon Open Project of the menu bar, or select > File and > Open from the main menu, existing projects could be loaded. You are able to work with up to 10 different projects at the same time and could use all the Copy and Paste functions between them. Selecting tags / marking elements After you double click on one of the segments on the screen, a list of the available marker you can work with and select from comes up. Just choose the type you have placed on the support plate and the selection will be presented on the screen. After you confirm with Yes 1, the support plates are recognized and 1 4

7 If the no. of marker presented are not sufficient in order to complete your job on one base plate (holding up to 4 support plates), new base plates with respective support plates could be added upon your convenience. In order to do so, please select > Edit and > Add Plate 4 from the main menu or use the right mouse button. Marking the selected tags / marking elements Double-click the tag or element where the labeling process is to begin. This opens the labeling dialog box, which contains all the setting options. In order to open the edit window, please click on the first tag to start with, use the right mouse button and choose > Labeling from the menu or start typing a character on the keyboard (check under > Option from the menu first). The exact description of the selected tag and the number of tags available both appear in the top line of the dialog box 5. An outline of the selected marking element is shown in the top third of the box 6. Angle and text alignment options are found next to this diagram 7. The number of lines per tag can also be specified here 8. Note that the program will only allow options that are appropriate for the selected element. The various tabs for different methods of data input and import appear in the middle of the box 9. This is where you can enter all the data and text for one-time, multiple, and serial marking, and files to be imported from different programs, as well as text for custom labeling (for example, row labeling). 4 The font, font width, font size, line spacing, tip width of the plotter pen, and plotting speed settings can be adjusted in the lower part of the box 10. The values match the chosen marking element, but can be altered within reasonable limits A new blank base plate comes up to be used with more segments. Up to 16 base plates could be used in one project (max. 10 projects in one file). To move from one base plate to the other just click on their names in the lower left corner. Base plates could also be renamed just with a double click, or moved in the position to each other with drag and drop

8 A warning message is displayed if text length exceeds the size of the tag 1. This enables you to adjust the font, font size or font width so that the text fits onto the tag or element. From a certain font height upward, only capital letters and certain special characters are allowed in order to make best use of the available labeling area. In such cases the following warning is displayed: If the number of repetitions exceeds the number of tags available, the following warning is displayed: Not enough tags selected to fit your request and the number of repetitions must either be corrected or more tags must be provided for labeling by confirming with Yes. Only upper case letters, special characters and symbols are allowed Characters as "g, j, y, Ä, Ö, Ü" are not allowed in order to make best use of the labeling area. Restore Default values If you change parameters (font types, text height, line numbers etc.) for each element this data will be stored in a separate file. If you choose the element again, you will find the previously used parameter settings. Click Default values 2, if you want to restore the original settings. Note: After updating the software the user's specific parameters remain valid. Clicking OK transfers the labeling to the tags. If sequential numbering is to be carried out, after selecting the number of lines you must specify the line in which the sequential numbering is to appear. To allow this, the Series check box to the right of the line is activated 7. Checking this box then activates the Consecutive no. button 8 and prevents input in the editing field. Clicking the Consecutive no. button opens a further window, allowing serial marking to be entered One-time, multiple and serial modes By choosing the tab for one-time, multiple, and serial modes, corresponding sequences of text, numbers, characters and symbols can be entered. At the right-hand corner of the marking window you will find a large choice of symbols which can be selected by a click 4. The number of lines opened for editing corresponds to the number of lines set per tag 5. Text can now be entered. The number of tags to be labeled with the same text should be entered in the Repeat field 6. The data input is shown in the preview window 7. Here the start value, final value, preceding text (prefix), following text (suffix), step size, counting method, and number of repetitions can be entered, the counting method can be chosen to be in ascending order. The count could be chosen in decreasing nos. (start value higher than final value) or increasing nos. (start value lower than final value) If the series labeling job specified exceeds the number of tags available, the following warning is displayed: Not enough tags marked for labeling 5 6 The number of tags must either be reduced for example, by changing the final value or more tags must be provided for labeling. The sequences entered are listed in the preview window 10. Clicking OK returns you to the previous window, and any necessary parameter changes can be made there. 6

9 Clicking OK again transfers the labeling to the tags. You can edit the data in the preview window. It is possible to delete texts, insert empty rows and special symbols or other texts 11. Note: If you want to insert more data in series, sequences cannot be shown and edited in the series modus You can now copy either part or all of the table and use it for marking. Please follow these steps: Use the mouse to select individual or multiple cells, individual or multiple columns, individual or multiple rows 14, and click the Copy marked range button 15. Importing files After choosing the Import file tab, data can be imported from other files. Data can be imported from other CAD/CAE programs, text files, or spreadsheet programs. An efficient import function is available to allow extraction of the required data from a range of file formats. 14 Clicking the Browse button 12 makes it possible to locate the file to be imported. Click to select the file name, and then click Open to access the file for importing The data will be inserted into the editing field 16, and you can check whether the copied data is correct. It is possible to edit the data in this window, like input of new data, delete data, correct data and copy data. A window will now open displaying the data for importing, in table format. The default separators are "space" and "tab" sign. If the table is divided up in such a way that the data cannot be copied, you can reset one or both of the default separators by a click. You can also select and preview another separator in the combo box list 1 until you find a suitable setting, or enter your own sign. 16 The original setting can be restored at any time. If you want to import an Excel, an Access or an E-Plan file, the program will automatically recognize the format and open the first worksheet for importing. This is the default setting. You can also select other sheets from the file. 7

10 The following functions exist to aid data import 1 : Overwrite existing data If you enable this function, newly copied data will automatically overwrite previously copied data. If this function has not been enabled, the data will be appended to the existing data. Ignore null values If this function is enabled, cells containing no data will not be imported. Left to Right This function allows the import sequence to be changed. In the default setting, the data is transferred by column from top to bottom. If the left-to-right function is enabled, the data is transferred by row from left to right. 1 2 The import filter is specially designed for the import of files created by former software programs, supporting a direct import of a complete marker card. There is no select from available, the file is recognized and opened in the background upon importing the data. The software opens the dedicated segment on a new base plate and transfers the labeling to the tags accordingly. Post import of the data, all edit functions can be used as previously described. Special import formats are available at sales support. Row labeling After choosing the row labeling tab, marking can be easily carried out on individual row. Please ensure that you have selected complete row, since otherwise proper labeling will not be possible. The editing field is used to enter the text to be printed on the row. The characters for each tag must be separated by commas for example, ab, cd, ef, symbol, symbol means print ab on the first tag, cd on the second tag, ef on the third tag, "symbol" on the forth tag and "symbol" on the fifth tag. Clicking OK transfers the labeling to the tags. Data can also be easily imported from files using Copy and Paste and the Windows Clipboard. To do this, open the relevant file and copy the data to the Clipboard. When the original file has been closed, the data on the Clipboard can be pasted into the editing field on the righthand side of the import box 2 either by pressing the Ctrl V keys or by using the shortcut menu which pops up after clicking the right mouse button. After the data has been transferred to the preview window, it can be modified as required. Available functions include deleting data, inserting data, etc. Clicking OK transfers the labeling to the tags. If the number of requested tags exceeds the number of tags available, the following warning is displayed: Not enough tags selected to fit your request and the number of imported tags must either be corrected or more tags must be provided for labeling. Another direct import function is available from the main menu, select > File and > Import file. Marking of endless strips This software has special features for marking of endless strips: Strip partitioning Marking complete strip Marking strip section Copy a strip Insert a strip If you choose strip-material, the above mentioned functions for sectioning and marking of strips are available on the menu > Edit. By clicking you can select the strip you wish to mark. Note: In order to mark a section of strip you have to prepare it first via menu > Edit > Strip partitioning. 8

11 Note: The space available for marking is calculated on the lowest element-width. Should you request an individual marking on the various element-widths, please choose this marking possibility over the menu by selecting > Edit > Marking strip section. Strip partitioning You can open a window via > Edit > Strip partitioning which allows you to divide the strip into various sections 4. First put in the width of the strip and then the amount of elements required in that width and confirm by pressing the button Append. Thereafter you can select and add further sections with different widths 5. If you wish to insert a section between other sections you have to mark-out the section before which you want to insert. Marking strip section Mark-out the strip section you want to work on by clicking. Via menu > Edit > Marking strip section you can open the labeling window and can select the print. This function allows you to completely utilize the available element-width. Then press the button Insert to start the process. You can delete sections by marking-out the section and pressing the Delete button. At the bottom part of the window you can check strip-length already occupied 6 and the remaining strip-length 7. After completion of sectioning press OK button and the strip will show up with the corresponding divisions. 4 Note: Cut markings can be added to the print output. The settings are made in the print output menu (see chapter Printing Tags ). Copy strip / Insert strip Mark-out the strip you wish to copy by clicking. Via menu > Edit > Copy strip 9 you can prepare the copy process. Now click to the strip onto which you want the data to be inserted. Via menu > Edit > Paste strip 10 the data will be inserted Marking complete strip Mark-out the required strip by clicking. Via the menu > Edit > Marking complete strip you can get to the labeling window 8 in which you can select the type of marking. This function allows you to carry out marking in multiple and serial mode in various element-widths. 8 9

12 Copying functions To avoid having to repeatedly enter the same or similar sequences, the program provides a multiple number of copying functions: Copying a complete segment with tags Choose the segment with a mouse click. Press the right mouse button, select in the menu > Copy segment and activate it. Copying a marking sequence Select a sequence by clicking it with the left mouse button. Now click the right mouse button and choose > Copy marking (only tags with text) 1 from the shortcut menu. Then use the left mouse button to select the element where the copied sequence is to be inserted. Open the shortcut menu by right-clicking and choose > Paste marking 2. If desired, the sequence can be altered. The copy/paste functions can also be accessed via the icons on the toolbar or by choosing > Edit from the menu bar. 1 2 Go to the destination segment and click the mouse to activate it. Press the right mouse button and select in the menu > Paste segment 4. Using the menu bar > Edit and sub menus copy and paste works in the same way as described above. Copying several marking sequences To copy several sequences, you can use the Shift - key to extend and select the area to be copied. Copy and paste as described above. Note: Simultaneous copying of multiple sequences to other types of tags is not possible. Copying parts of marking sequences To copy individual markings from within sequences follow these steps: Hold down the Ctrl - key and select all the labels you wish to copy by clicking them with the left mouse button. Copy and paste as described above. 4 Note: Simultaneous copying of partial marking from multiple sequences to other types of tags is not possible. Copying of marking with empty signs If you want to copy a range of tags, including non marked tags, mark these and click the right mouse button, select in the menu > Copy marking (including signs without text). Copy and paste as described above. 10

13 Copying an entire base plate Choose > Edit from the menu bar, followed by > Copy Plate 5. 5 Zoom function In order to activate or deactivate the zoom function, choose > View > Zoom function from the menu bar or click on the icon. Click on the icon once and move the mouse to the position on the base plate you like view differently. With the left mouse click the position will be taken as new screen center and enlarged. A new click on the icon will deactivate the function, continuing to work with the current zoom. The click with the right mouse button reduces the screen by a given zoom factor. Preferences Choose > Extras > Options from the menu bar for opening the window to select form. To select the language please check the next window coming up 7. Before the plot starts a message comes up, reminding you how to treat the plotter pens. If you don t like to have it come up please check the mark 8. Choose again > Edit from the menu bar, followed by > Paste Plate 6. The whole plate will be copied automatically. If you select a tag ready for labeling, you can just start to enter the character on the keyboard as first character accepted, the labeling window opens and the character is placed on the selected tag. If you don t like to have it in place please check the mark Copying of texts onto other tag sizes In some cases, the copying function of text to other tag sizes is disabled. It is only allowed to copy in a common sense. The preview of the print must fit on the tag, like writing angle and text size. In general only one sequence can be copied at a time. Note: All copy functions described can also be used between projects. No. of projects and base plates allowed Choose > Windows from the menu bar in order to receive the overview of your actual project no. and base plates activated. In total you can have up to 10 different projects 10 and up to 16 base plates 11 from each project open and work with

14 Information menu >? Choose >? from the menu bar to receive further information about the system. If you select >? >Support plates 1, a window with different lists comes up, showing the actual available support plates, the description and part no. If you select >? >Online-help, a description of general features of the software is available. You can click within the software at any time on the icon or open the help file from the menu bar >? > Online-Help 2. The information window opens from the menu bar >? > Information with important information about the software version, the release of the database and the firmware of the plotter. To close the window, click on the OK button. 1 2 Following new information are displayed and adjustments could be selected from: In the top part of the window the selected plotter and interface are indicated 4. The next click box you can check to activate or deactivate priming the plotter pen on one of the fields left or right of the Pen Station. The next field of the window indicates the recognized support plates, placed on the plotter. Are those different from the ones chosen for this project, the necessary support plate for this job is indicated in red 5. The right side of the window is used to show the different plotter pens to be used for this job, also with a color indication according to the standard color coding of the plotter pens Starting the Print Job with the plotter Once all the data for printing the job are entered, please click on the printer icon in the menu bar. Prior to starting the real print, the software verifies, if the selected support plates are identical with the ones placed on the plotter, the recognition system starts to talk to the plotter for short time. Therefore the plotter needs to be turned on and the data cable connected. If the support plates recognized are different from the ones selected for the job, a warning message comes up on the screen. If you want to proceed, you need to confirm. If the tip of the pen used is larger than.5 mm a message comes up, telling that the standard pen sizes (.18 mm to.5 mm) for this job will be different. 12

15 Different print options could be set up in the lower part of the window 7 : If you print on endless strips, additional adjustments are subject to be checked Use one Plotter Pen Size only In order to execute this job, two or more pens to be used might be indicated. If you like to use one tip size, please check this box and select the respective Pen. Use Pen inserted in Pen Holder Once checked this box, no Pen will be picked up from the Pen Station. The pen directly inserted into the Pen Holder will be used. This option could be used, if pens used are different from the EK- Team Pens, although they might have a HP compatible outside dimension, but will not fit into the Pen Station of the plotter. Insert a cutting line No 8 : no cutting line is printed Yes 9 : cutting lines are printed after each tag length Final 10 : cutting line is printed after the last tag of the whole strip length The print job starts with a click on the OK Button. The software checks again if the selected support plates are placed on the plotter. If not, a warning message comes up to be confirmed, either continue or cancel. Use one Plotter Speed only In order to execute this job, different speeds (10 to 40 mm per second) could be selected from the data entry. In order to work with one speed selection only, please check this box and select the respective speed. Print selected tags only If you check this box, only the tags marked before are subject to be printed. Select a sequence: Just click in the edit window on the sequence once and it is marked. Select multiple sequences: Just click in the edit window on the first sequence once, hold down the Shift Button and click on the next sequence ones etc. and all are marked. Select single tags: Hold down the Ctrl Button and just click in the edit window on the single tag or multiple tags once and they are marked. Print selected segments only If you check this box, only the segments marked before are subject to be printed. Just click in the edit window on the segment once and it is marked. In order to mark two or more segments, hold down the Ctrl Button and click on each segment once. In case the already started job should be stopped, please click on the icon Stop Plot in the menu bar. The printout will be interrupted and the data (if any left) in the print spooler of the PC will be deleted. The plotter turns into the Stop Mode and the internal buffer of the plotter can be deleted by pressing the Clear buffer Key 11 on the operation panel. In order to send a new job to the plotter, the plotter must be turned back into the active mode by pressing the Stop Key 12 once on the operation panel, the red light turns off at the plotter panel. Other plotter connected might be different in the operation, please refer to the instruction manual

16 Scale factor The data created from each individual tag for the database was carefully investigated, although they are not frequently checked. There could be a chance for the printable tags to receive by the time a slight mechanical deviation, spec. in the scale factor, means the distance from one tag to the next in both of the directions x and y. Temperature and humidity at the work bench could influence the distance as well as new production series and different production techniques during the process like material and temperature changes. Covering the complete x and y dimension of the marker card, deviations of > 1 mm are noticeable. In order to be able to correct the settings a special function is provided under menu > Extras > Elements> Scale factor. Once a segment with a marker card is placed on the plotter the first upper left tag 1 should be checked, if the print is centered in both directions (see also chapter "Calibrating the Plotter"). There after the last tag at the lower right corner 2 needs to be printed in the same manner. If not printed exactly the same, the scale factor for this particular card is not perfectly correct. 1 Scale in x-direction Scale in y-direction With the button Pen Up /Down the plotter pen or magnifying tool can be lowered in order to find exactly the correct spot of the beginning of the last tag at the lower right corner. You can move the arm of the plotter with the four cursor buttons in the pre-selected steps from mm up to 10 mm, the default value is 0.1 mm. After completion you must press the button Accept in order to save the changes to the user file within the database, the general database is always kept original. Closing the window moves the plotter arm back to the previous position. The next start of the software will take the changed information from the user database. You can return to the original values by clicking the Reset button. The complete dimension in x and y direction can be changed with the correction of the scale factor. Re-check the result of the print again by printing the last tag at the lower right corner, centered in both directions. Designing new Tags This part of the program allows you to design own tags and elements. In order to open the program, choose > Extras and > Elements from the main menu. There are two versions available designing new tags: Design tags with same size Design tags with different sizes 2 In order to correct the scale factor select one tag on the segment and choose > Extras > Elements and > Scale factor from the menu. The tags are changing into red and the plotter moves with the inserted pen or magnifying tool to the lower right corner to the point of the beginning of the last tag. If you like to design e.g. a label sheet with same sized labels in a matrix, use > Design tags with same size. If you like to design e.g. a serial no. plate with different sized label areas, use > Design tags with different sizes. Note: Designing tags is only possible with a plotter as output device selected. If you are working with the engraving feature, the software suggests to use either the half (DIN A4) or full size (DIN A) plotter. The use of the design program is described below, after saving, the designed elements are available for labeling in the folder > User defined under Producer (manufacturer)

17 Example for designing a label sheet (matrix) with same sized labels Open the designer from the main menu with > Extras > Elements > Design tags with same size as described above. The following window appears: with a click on the button New a new element can be named in the window under <Untitled> 5. It is useful to work with the element recognition system of the plotter in order to find the element more easy later on. For the element you want to design, enter a new name and if you don t want to use the element recognition system, select the type of support plate for the sheet 6. You can select between a quarter size, half size or full size support plate. Pre-selected is the plate for sheets (half size plate). Further you can select in the lower left part of the window, if the new designed material is for plotting only or plotting and engraving 7. 8 If you have entered minimum the no. tags (label) in each direction 9, please click on the Take measurements button. A new window opens up, providing buttons and entry windows, in order to take all relevant measurements for the new element Note: Engraving is only possible on dedicated support plates. Once selected, click on the Edit button. A new window opens up 8, where you can enter the data of the tag (size of the label), if known 10. You can always take the measurements using the plotter system, if the data is not available. You need only to enter the nos. of tags in x and y direction. All other data necessary for the program can be taken with the plotter system. Please enter the no. of tags in x and y direction as shown in the window 9. If available enter also the size of the tag (label) and the distance to the next tag. You can always correct the data later on, if the exact nos. are not present at the moment. Always take the start position of the first tag with the plotter system! Please follow the steps for taking measurements: Determine the exact position of the first tag 12 on the label sheet. In order to do so, please click on the most left button Initial position of the window. The arm of the plotter moves to its upper left corner limit (zero position). From there you can move the arm with the pen inserted to the upper left corner of the first tag with the cursor buttons 1. You can select the size per step in mm in the upper right area of the window 14. Please check with the Pen Up/Down button 15 the correct position after you moved the pen to the initial point of the tag. The respective co-ordinates are shown in real nos. in the x- and y- window based on the zero position Further on, you can decide on the labeling direction of the tags. For the sequence for plotting or engraving you can choose between upper left to upper right (by row) or upper left and lower left (by column) 11. Attention: It is essential for continuing the design to switch on the plotter and have the support plate with the label sheet placed on. Insert a plotter pen directly into the pen holder of the plotter. 15

18 Determine now the exact position at the lower right corner of the first tag 1. Just repeat the steps as for the upper left corner, described above. You can find the new element for labeling in the folder > User defined under Producer 5. 1 As next step, determine now the exact position of the upper left corner of the last tag (size of matrix) 2. Take the initial position in the same manner as described above. 5 2 After completion of the three steps all measurements are taken for the element. In order to save the data for the new element, please click on Accept. The window "Take corner measurements of tags" will be closed and you are back to the previous window. Note: All new elements in the folder User defined will continue to be available after program updates. Example for designing a serial no. plate with different sized label areas Open the designer from the main menu with > Extras > Elements > Design tags with different sizes. The same window appears, as described before for designing tags with the same size. Please click on the button Accept in the window and the new designed element will be shown. Now you can check, if all the data where taken correctly. Any up-coming error or warning message at this point means, please re-check the data manually or allow the automatic correction by the program. Click on the button Close 4 in order to terminate the designer program. All adjustments will be done in the same manner. After clicking on the button Edit a similar window appears, just with an additional function. Now you have the ability to implement different sized labeling areas 5. Each new area or field needs to have an own name. Taking the measurements is now similar to the previous sample of the label sheet matrix. 5 4 Note: The new labeling areas could be part of a label sheet (matrix) as well as a single area. 16

19 Please click on the button Accept in the previous window and the new designed element will be shown. Now you can check, if all the data where taken correctly. Further adjustments using the engraving tool are available by clicking on the button Adjustment Engraving Tool 6. 6 Following adjustments for the engraving unit could be made and selected from. Any up-coming error or warning message at this point means, please re-check the data manually or allow the automatic correction by the program. Click on the button Close in order to terminate the designer program. You can find the new element for labeling in the folder > User defined under > Producer. In case the labeling is not exactly centered, you are allowed to edit the new designed elements at any time. Open the designer program again, choose the element or part of the element you want to change and click on the button Edit for making the adjustments. Note: All new elements in the folder User defined will continue to be available after program updates. Engraving Tags Please select the output device first in order to start the engraving with the engraver (see also chapter "Selecting the Output Device and Changing Settings"). The steps getting used to the software are not changed using the engraver. Just where the functions are different or additional a new description is implemented into the manual as described in the following. Size of tool 7 Engraving needle in the size of.2 mm up to 1 mm could be selected from Engraving speed 8 Adjustments of 5 mm/s up to 20 mm/s could be selected from Revolution per minute (RPM) 9 Adjustments of 5,000 up to 50,000 RPM for the engraving spindle could be selected from Penetration speed 10 Adjustments of 0.5 mm/s up to 5 mm/s could be selected from in steps of.1 mm/s The type of the tool and the penetration depth will be suggested according to the selected engraving material Engraving with the plotter engraver Double-click the tag or element where the engraving process is to begin This opens the labeling dialog box, which contains all the setting options. In order to open the edit window, please click on the first tag to start with, use the right mouse button and choose > Labeling from the menu (see also chapter "Marking the selected tags / marking elements") or start typing a character on the keyboard (check under > Extras > Option from the menu first). Restore Default values: If you change the above parameters for each element the data will be stored in a separate file. If you choose the element again, you will find the previously used parameter settings. Click Default values 12, if you want to restore the original settings. Note: After updating the software the user s specific parameters remain valid. 17

20 Starting the Engraving Once all the data for engraving the job are entered, please click on the printer icon in the menu bar (Print / Plot / Engrave). Various engraving options could be set in the middle part of the window 4 : Prior to starting the real engrave, the software verifies, if the VE 500 is connected correctly and switched on and if the selected support plates are identical with the ones placed on the VP 500 Engraver. The recognition system starts to talk to the VP 500 Engraver for short time. Therefore the VP 500 Engraver needs to be turned on, the data cable connected and the Controller VEC 500 and the Vacuum Cleaner VC 500 connected with the respective cables. If this is not the case a warning message comes up on the screen, you need to confirm. Please re-check the installation with all cable connections and recycle the power of the VP 500 Engraver. This message pops up only if the engraving unit is not ready. If the support plates recognized are different from the ones selected for the job, a warning message comes up on the screen. If you want to proceed, you need to confirm. Following new information are displayed and adjustments could be selected from: 2 1 In the top part of the window the selected plotter and the used interface is indicated 1. The field below in the window indicates the recognized support plates, placed on the plotter. Are those different from the ones chosen for this project, the necessary support plate for this job is indicated in red Only one engraving tool and depth to be used In order to execute this job, two or more engraving needles to be used might be indicated. If you like to use one needle size and penetration depth only, please check this box. Only one engraving speed to be used In order to execute this job, different engraving speeds (5 to 20 mm per second) could be selected from the data entry. In order to work with one speed selection only, please check this box and select the respective engraving speed. Only one revolution speed (RPM) to be used In order to execute this job, different revolution speeds (5000 to RPM) for the engraving spindle could be selected from the data entry. In order to work with one selection only, please check this box and select the respective revolution speed. Only one penetration speed to be used In order to execute this job, different penetration speeds (0.5 mm to 5 mm per second) for the engraving needle could be selected from the data entry. In order to work with one selection only, please check this box and select the respective penetration speed. All selected tags will be engraved If you check this box, only the tags marked before are subject to be engraved. Select a sequence Just click in the edit window on the sequence once and it is marked. Select multiple sequences Just click in the edit window on the first sequence once, hold down the Shift Button and click on the next sequence ones etc. and all are marked. Select single tags Hold down the Ctrl Button and just click in the edit window on the single tag or multiple tags once and they are marked. All selected segments will be engraved If you check this box, only the segments marked before are subject to be engraved. Just click in the edit window on the segment once and it is marked. In order to mark two or more segments, hold down the Ctrl Button and click on each segment once. The right side of the window is used to show the different engraving needles to be used for this job, also with a color indication. 18

21 Various options for the frame are available in the lower part of the window 5 : There after the software reminds you by a message to verify, if the selected engraving needle is inserted into the spindle. This message needs to be confirmed with a click on the OK Button and the engraving job starts. 5 6 In case the already started engraving job should be stopped, please click on the icon Stop Plot in the menu bar. The engraving will be interrupted and the data (if any left) in the print spooler of the PC will be deleted. The VP 500 Engraver turns into the Stop Mode and the internal buffer of the VP 500 Engraver can be deleted by pressing the Clear buffer Key 7 on the plotter operation panel. Engrave frame around lettering With this option selected, a frame will be engraved around the lettering. First the lettering will be engraved. Thereafter the engraving process stops asking you in a message box to change the engraving needle or to alter the engraving depth. All frames around the tags will be engraved, even if they don t carry any lettering. In order to send a new job to the VP 500 Engraver, the plotter must be turned back into the active mode by pressing the Stop Key 8 on the operation panel, the red light turns off at the VP 500 panel. Alternative the power of the VP 500 can be re-cycled by pressing the OFF and ON button. All existing data will be deleted and the zero position realigned. Engrave frame only With this option selected, the frame will be engraved only without the lettering. This selection is useful engraving multiple depths on thicker material. Using first a lower penetration depth and for the second run the final setting. Round frame corners With this option selected, you can select in a combo box various radius settings for the corner engraving of the frame. Possible settings for the radius are between 1 mm and 5 mm in.5 mm steps. 7 The engraving job starts with a click on the OK Button. The software checks again if the selected support plates are placed on the plotter. If not, a warning message comes up to be confirmed, either continue or cancel. 8 For further information, please refer to the operating instructions of the plotter. 19
22 Calibrating the Plotter The plotter is calibrated during the production. In case of small deviations, like the printout is not correctly in the center of the marker, the plotter could be calibrated manually. In order to do so, please make sure there are no parts on the plot field, like ball-pen, not proper mounted support plates etc., then go to the menu > Output > Output device and choose > Calibration 1. The arm moves into the center position. In the window on the screen you have 4 cursor buttons 2 in order to move the setting in either direction, in steps.025 mm up to 10 mm, the default setting is.1 mm. Firmware update of the plotter With this option you are able to update the existing firmware of the plotter. It is necessary e.g. if you are using a plotter already, purchased in 2005 or earlier and now wanted to use the engraving feature. In order to download a new version, please follow the steps as described: Start the program software and switch on the plotter. Make sure the plotter is connected with the interface cable to the PC and the interface is selected correctly (see chapter "Selecting output device and changing settings") Each click in the button will move the Pen holder connected to the arm into the desired direction. After the changes made, hit the Calibrate button and the new settings are stored in the software. Please check again during the next print, if necessary use the calibration function again until the output performance is satisfied. Use always the first tag at the upper left corner of the segment (see also chapter "Scale factor"). The Reset button takes you back to the original setting. Choose from the main menu > Output > Output devices the tab > Firmware update. The upcoming window shows the actual firmware in nos 4. A later version of the firmware is shown in the field below with a higher no 5. Now you can update to the next level of the firmware. If the later version is not in the pre-selected folder, please use the Browse button 6 to search for in another folder. With a click on the button Update 7 a new message window opens up. You are asked to switch the plotter into the download mode. Although the other output devices you might want to use are precalibrated, because of the different starting point, the calibration procedure as described is essential with those other devices. 20
23 In order to do so, turn off the plotter, hold down the button Clear buffer 8 and the button STOP 9 together and press ON again. The control LEDs STOP and Clear buffer are on. 8 9 Confirm the setting with the OK button and the update process starts. A new message opens up telling you the plotter will turn off automatically after completion. Confirm with the OK button. In order to check if the new firmware is stored correctly in the plotter, turn on the plotter again and choose from the main menu > Output > Output devices the tab > Firmware update. In the field Actual firmware version should now be the no. of the latest version. 21
24 As part of its on-going product improvement, ABB reserves the right to modify the characteristics or the products described in this document. The information given is not-contractual. For further details please contact the ABB company marketing these products in your country. 1SNC M PDF ABB France Automation Products Division Export Department 10, rue Ampère Z.I. - B.P. 114 F Chassieu cedex / France Tel. : + (0) Fax : + (0)
Instruction manual. testo easyheat Configuration and Analysis software
 Instruction manual testo easyheat Configuration and Analysis software en 2 General Information General Information This documentation includes important information about the features and application of
SAT Easy Print Label printing software
 User guide SAT Easy Print Label printing software Version 3.40 SAT Easy Print user guide I. Minimum configuration required...4 II. III. IV. Software installation...4 1. Prerequisites...4 2. Parameter...4
GX-2009 Data Logger Management Program Operator s Manual
 GX-2009 Data Logger Management Program Operator s Manual Part Number: 71-0163RK Revision: C Released: 3/19/12 www.rkiinstruments.com Warranty RKI Instruments, Inc. warrants gas alarm equipment sold by
DUKANE Intelligent Assembly Solutions
 PC Configuration Requirements: Configuration Requirements for ipc Operation The hardware and operating system of the PC must comply with a list of minimum requirements for proper operation with the ipc
Software User's Guide
 Software User's Guide Brother QL-series The contents of this guide and the specifications of this product are subject to change without notice. Brother reserves the right to make changes without notice
TimeValue Software Due Date Tracking and Task Management Software
 User s Guide TM TimeValue Software Due Date Tracking and Task Management Software File In Time Software User s Guide Copyright TimeValue Software, Inc. (a California Corporation) 1992-2010. All rights
Appointment Scheduler
 EZClaim Appointment Scheduler User Guide Last Update: 11/19/2008 Copyright 2008 EZClaim This page intentionally left blank Contents Contents... iii Getting Started... 5 System Requirements... 5 Installing
Software User's Guide
 BROTHER QL-500/550/650TD/1050/1050N Software User's Guide QL-500 QL-650TD QL-550 QL-1050/1050N 1 Contents Contents....................................................................................2................................................................................4
Version 4.1 USER S MANUAL Technical Support (800) 870-1101
 870-1101") ESSENTIAL FORMS Version 4.1 USER S MANUAL Technical Support (800) 870-1101 401 Francisco St., San Francisco, CA 94133 (800) 286-0111 www.essentialpublishers.com (c) Copyright 2004 Essential Publishers,
ESSENTIAL FORMS Version 4.1 USER S MANUAL Technical Support (800) 870-1101 401 Francisco St., San Francisco, CA 94133 (800) 286-0111 www.essentialpublishers.com (c) Copyright 2004 Essential Publishers,
NETWORK PRINT MONITOR User Guide
 NETWORK PRINT MONITOR User Guide Legal Notes Unauthorized reproduction of all or part of this guide is prohibited. The information in this guide is subject to change without notice. We cannot be held liable
Trace.Net OTDR Test Management Software User s guide
 Trace.Net OTDR Test Management Software User s guide 2007-2009, AFL Telecommunications, all rights reserved. TRAC-01-1000 Revision B, 2009-06-10 Specifications are subject to change without notice. I Contents
testo easyheat Configuration and Analysis software Instruction manual
 testo easyheat Configuration and Analysis software Instruction manual en 2 General Information General Information This documentation includes important information about the features and application of
NDA-30141 ISSUE 1 STOCK # 200893. CallCenterWorX-Enterprise IMX MAT Quick Reference Guide MAY, 2000. NEC America, Inc.
 NDA-30141 ISSUE 1 STOCK # 200893 CallCenterWorX-Enterprise IMX MAT Quick Reference Guide MAY, 2000 NEC America, Inc. LIABILITY DISCLAIMER NEC America, Inc. reserves the right to change the specifications,
BIGPOND ONLINE STORAGE USER GUIDE Issue 1.1.0-18 August 2005
 BIGPOND ONLINE STORAGE USER GUIDE Issue 1.1.0-18 August 2005 PLEASE NOTE: The contents of this publication, and any associated documentation provided to you, must not be disclosed to any third party without
6. If you want to enter specific formats, click the Format Tab to auto format the information that is entered into the field.
 Adobe Acrobat Professional X Part 3 - Creating Fillable Forms Preparing the Form Create the form in Word, including underlines, images and any other text you would like showing on the form. Convert the
Basic Excel Handbook
 2 5 2 7 1 1 0 4 3 9 8 1 Basic Excel Handbook Version 3.6 May 6, 2008 Contents Contents... 1 Part I: Background Information...3 About This Handbook... 4 Excel Terminology... 5 Excel Terminology (cont.)...
Quick Start Using DASYLab with your Measurement Computing USB device
 Quick Start Using DASYLab with your Measurement Computing USB device Thank you for purchasing a USB data acquisition device from Measurement Computing Corporation (MCC). This Quick Start document contains
Cabcharge Australia Limited, 2005. Cabcharge TMS Help Manual
 Cabcharge TMS Help Manual Cabcharge Australia Limited, 2005 p1 p2 Table of Contents Welcome to TMS 5 A Brief Overview 6 Getting Started 8 System Requirements 8 Downloading Statement Data 9 Set up your
Intro to Excel spreadsheets
 Intro to Excel spreadsheets What are the objectives of this document? The objectives of document are: 1. Familiarize you with what a spreadsheet is, how it works, and what its capabilities are; 2. Using
WebEx Remote Access User s Guide
 About This Guide This guide introduces you to WebEx Remote Access and its features. This guide assumes that you have a user account for your Remote Access service. Note To obtain a user account, contact
Cart Interface Installation & Control Board Manual for M38 XP and RX Carts and Legacy M39 Carts
 Rubbermaid Medical Solutions Cart Interface Installation & Control Board Manual for M38 XP and RX Carts and Legacy M39 Carts REVISED FEBRUARY 25, 2010 Filename: Cart Interface Installation & Control Board
Legal Notes. Regarding Trademarks. 2012 KYOCERA Document Solutions Inc.
 Legal Notes Unauthorized reproduction of all or part of this guide is prohibited. The information in this guide is subject to change without notice. We cannot be held liable for any problems arising from
QUICK START GUIDE. SG2 Client - Programming Software SG2 Series Programmable Logic Relay
 QUICK START GUIDE SG2 Client - Programming Software SG2 Series Programmable Logic Relay SG2 Client Programming Software T he SG2 Client software is the program editor for the SG2 Series Programmable Logic
Retain Planner Quick Start Guide
 M Retain Planner Quick Start Guide www.retaininternational.com Contents Table of Contents 1 Introduction 3 1.1 About Retain Resource Planning... System 4 1.2 System requirements... 5 1.3 Installing Retain
ZebraDesigner Pro. User Guide. 13857L-003 Rev. A
 ZebraDesigner Pro User Guide 13857L-003 Rev. A 2 2011 ZIH Corp. The copyrights in this manual and the software and/or firmware in the printer described therein are owned by ZIH Corp. and Zebra s licensors.
Ohio University Computer Services Center August, 2002 Crystal Reports Introduction Quick Reference Guide
 Open Crystal Reports From the Windows Start menu choose Programs and then Crystal Reports. Creating a Blank Report Ohio University Computer Services Center August, 2002 Crystal Reports Introduction Quick
Statgraphics Getting started
 Statgraphics Getting started The aim of this exercise is to introduce you to some of the basic features of the Statgraphics software. Starting Statgraphics 1. Log in to your PC, using the usual procedure
Legal Notes. Regarding Trademarks. Model supported by the KX printer driver. 2010 KYOCERA MITA Corporation
 Legal Notes Unauthorized reproduction of all or part of this guide is prohibited. The information in this guide is subject to change for improvement without notice. We cannot be held liable for any problems
Trace600 OTDR Test Management Software User s guide
 Trace600 OTDR Test Management Software User s guide T e s t & I n s p e c t i o n A Trace600 OTDR Test Management Software User s guide T e s t & I n s p e c t i o n 2002, AFL Telecommunications, all rights
Task Force on Technology / EXCEL
 Task Force on Technology EXCEL Basic terminology Spreadsheet A spreadsheet is an electronic document that stores various types of data. There are vertical columns and horizontal rows. A cell is where the
Installation and Operating Instructions for the iks Aquastar Winsoft Demo-Software V0.1. System requirements
 Installation and Operating Instructions for the iks Aquastar Winsoft Demo-Software V0.1 List of contents System requirements... 1 Installation... 2 Operation... 2 Connecting your PC to the iks aquastar...
Excel 2007 Basic knowledge
 Ribbon menu The Ribbon menu system with tabs for various Excel commands. This Ribbon system replaces the traditional menus used with Excel 2003. Above the Ribbon in the upper-left corner is the Microsoft
Instructions for Use. CyAn ADP. High-speed Analyzer. Summit 4.3. 0000050G June 2008. Beckman Coulter, Inc. 4300 N. Harbor Blvd. Fullerton, CA 92835
 Instructions for Use CyAn ADP High-speed Analyzer Summit 4.3 0000050G June 2008 Beckman Coulter, Inc. 4300 N. Harbor Blvd. Fullerton, CA 92835 Overview Summit software is a Windows based application that
MICROSOFT OUTLOOK 2010 WORK WITH CONTACTS
 MICROSOFT OUTLOOK 2010 WORK WITH CONTACTS Last Edited: 2012-07-09 1 Access to Outlook contacts area... 4 Manage Outlook contacts view... 5 Change the view of Contacts area... 5 Business Cards view... 6
Decision Support AITS University Administration. Web Intelligence Rich Client 4.1 User Guide
 Decision Support AITS University Administration Web Intelligence Rich Client 4.1 User Guide 2 P age Web Intelligence 4.1 User Guide Web Intelligence 4.1 User Guide Contents Getting Started in Web Intelligence
Table of Contents. 1. Overview... 3. 1.1 Materials Required. 3 1.2 System Requirements. 3 1.3 User Mode 3. 2. Installation Instructions..
 Table of Contents 1. Overview..... 3 1.1 Materials Required. 3 1.2 System Requirements. 3 1.3 User Mode 3 2. Installation Instructions.. 4 2.1 Installing the On Call Diabetes Management Software. 4 2.2
Excel 2003 Tutorial I
 This tutorial was adapted from a tutorial by see its complete version at http://www.fgcu.edu/support/office2000/excel/index.html Excel 2003 Tutorial I Spreadsheet Basics Screen Layout Title bar Menu bar
Printer setup and first steps
 Printer setup and first steps Contents: PrintJet II:... 3 Install printer driver... 3 Calibrating the PrintJet II... 3 Setting marker types... 6 Calibrating the marker type:... 7 PrintJet PRO:... 12 Install
Korosi Monitoring System (KMS) Software Manual
 Software Manual") PT. KOROSI SPECINDO Corrosion Monitoring System Eng. Doc. No.: KS-MNL-KMS Korosi Monitoring System (KMS) Software Manual Revision Date Prepared Approved Description 0 23/05/2008 ES JH Issued for approval
PT. KOROSI SPECINDO Corrosion Monitoring System Eng. Doc. No.: KS-MNL-KMS Korosi Monitoring System (KMS) Software Manual Revision Date Prepared Approved Description 0 23/05/2008 ES JH Issued for approval
EXCEL PIVOT TABLE David Geffen School of Medicine, UCLA Dean s Office Oct 2002
 EXCEL PIVOT TABLE David Geffen School of Medicine, UCLA Dean s Office Oct 2002 Table of Contents Part I Creating a Pivot Table Excel Database......3 What is a Pivot Table...... 3 Creating Pivot Tables
Introduction to MS WINDOWS XP
 Introduction to MS WINDOWS XP Mouse Desktop Windows Applications File handling Introduction to MS Windows XP 2 Table of Contents What is Windows XP?... 3 Windows within Windows... 3 The Desktop... 3 The
Ansur Test Executive. Users Manual
 Ansur Test Executive Users Manual April 2008 2008 Fluke Corporation, All rights reserved. All product names are trademarks of their respective companies Table of Contents 1 Introducing Ansur... 4 1.1 About
INTRODUCTION TO EXCEL
 INTRODUCTION TO EXCEL 1 INTRODUCTION Anyone who has used a computer for more than just playing games will be aware of spreadsheets A spreadsheet is a versatile computer program (package) that enables you
Cyberex BCM-SFCM Configurator/Monitor User's Manual
 BRANCH/SUBFEED CIRCUIT MANAGEMENT Cyberex BCM-SFCM Configurator/Monitor User's Manual Updated: 04/01/13 Thomas & Betts Power Solutions 5900 Eastport Boulevard Richmond, VA 23231-4453 Tel: 800-238-5000
Creating and Managing Online Surveys LEVEL 2
 Creating and Managing Online Surveys LEVEL 2 Accessing your online survey account 1. If you are logged into UNF s network, go to https://survey. You will automatically be logged in. 2. If you are not logged
1. Installing The Monitoring Software
 SD7000 Digital Microphone Monitor Software manual Table of Contents 1. Installing The Monitor Software 1.1 Setting Up Receivers For Monitoring 1.2 Running The Application 1.3 Shutdown 2. The Detail Monitoring
BID2WIN Workshop. Advanced Report Writing
 BID2WIN Workshop Advanced Report Writing Please Note: Please feel free to take this workbook home with you! Electronic copies of all lab documentation are available for download at http://www.bid2win.com/userconf/2011/labs/
Avery Dennison UK Consumer Helpline: 0800 80 50 20 Consumer email: [email protected]
 Avery DesignPro for PC Frequently Asked Questions General Information Questions Q: What are the system requirements for DesignPro? A: The following is required to run DesignPro: Microsoft Windows VistaTM,
WHAT S NEW IN OUTLOOK 2010 & HOW TO CUSTOMIZE IT
 WHAT S NEW IN OUTLOOK 2010 & HOW TO CUSTOMIZE IT THE RIBBON... 2 CONTEXTUAL TABS... 4 THE FILE TAB... 4 DIALOG BOXES... 5 MINIMIZING THE RIBBON... 5 CUSTOMIZING THE RIBBON... 6 CUSTOMIZING THE QUICK ACCESS
LABEL MATRIX7 VERSION. www.teklynx.com. Japan Corporate Headquarters 414-535-6200. Canada. Europe. United States. Asia. Setting the Standard
 366 LM 7 QSG_4_04REV 4/2/04 1:54 PM Page 1 T E K LY NX LABEL MATRIX7 VERSION Setting the Standard United States Canada Europe Asia Japan Corporate Headquarters 414-535-6200 905-771-4104 33-562-601-080
How To Create A Powerpoint Intelligence Report In A Pivot Table In A Powerpoints.Com
 Sage 500 ERP Intelligence Reporting Getting Started Guide 27.11.2012 Table of Contents 1.0 Getting started 3 2.0 Managing your reports 10 3.0 Defining report properties 18 4.0 Creating a simple PivotTable
STATGRAPHICS Online. Statistical Analysis and Data Visualization System. Revised 6/21/2012. Copyright 2012 by StatPoint Technologies, Inc.
 STATGRAPHICS Online Statistical Analysis and Data Visualization System Revised 6/21/2012 Copyright 2012 by StatPoint Technologies, Inc. All rights reserved. Table of Contents Introduction... 1 Chapter
Instruction manual. testo easyemission Software
 Instruction manual testo easyemission Software en 2 General Information General Information This documentation includes important information about the features and application of the product. Please read
Migrating to Excel 2010 from Excel 2003 - Excel - Microsoft Office 1 of 1
 Migrating to Excel 2010 - Excel - Microsoft Office 1 of 1 In This Guide Microsoft Excel 2010 looks very different, so we created this guide to help you minimize the learning curve. Read on to learn key
Table Of Contents. System Monitoring... 14 System Monitoring Display...14 Monitoring Zones...15 About Areas (partitions)...15 Area Status Display...
...15 Area Status Display...") Quick Start Table Of Contents Getting Started... 2 NEware Editions...2 Installing NEware...3 Installing Languages...3 Connecting to NEware...3 Changing Your IP100 Password...4 User Codes... 5 Master Feature...5
Quick Start Table Of Contents Getting Started... 2 NEware Editions...2 Installing NEware...3 Installing Languages...3 Connecting to NEware...3 Changing Your IP100 Password...4 User Codes... 5 Master Feature...5
Advanced Presentation Features and Animation
 There are three features that you should remember as you work within PowerPoint 2007: the Microsoft Office Button, the Quick Access Toolbar, and the Ribbon. The function of these features will be more
testo EasyClimate Software Instruction manual
 testo EasyClimate Software Instruction manual 2 1 Contents 1 Contents 1 Contents... 3 1.1. About this document... 5 2 Specifications... 5 2.1. Use... 5 2.2. System requirements... 6 3 First steps... 6
SB101 SMART Board 101
 SB101 SMART Board 101 Pieces and Parts SMART Board with cable connected to a laptop or desktop computer LCD projector with cable connected to the computer Computer SMART Board cable (use the appropriate
Universal Simple Control, USC-1
 Universal Simple Control, USC-1 Data and Event Logging with the USB Flash Drive DATA-PAK The USC-1 universal simple voltage regulator control uses a flash drive to store data. Then a propriety Data and
How To Use Senior Systems Cloud Services
 Senior Systems Cloud Services In this guide... Senior Systems Cloud Services 1 Cloud Services User Guide 2 Working In Your Cloud Environment 3 Cloud Profile Management Tool 6 How To Save Files 8 How To
A Guide To Using. Box-Office 2000. Version 2. By Nortech Software. The main booking screen
 A Guide To Using Box-Office 2000 Version 2 By Nortech Software The main booking screen Contents Features 4 Event Bookings...4 Ticket Book Printing & Layouts...4 Installation 5 Requirements...5 Software
Basic Pivot Tables. To begin your pivot table, choose Data, Pivot Table and Pivot Chart Report. 1 of 18
 Basic Pivot Tables Pivot tables summarize data in a quick and easy way. In your job, you could use pivot tables to summarize actual expenses by fund type by object or total amounts. Make sure you do not
Installation and Operation Manual Portable Device Manager, Windows version
 Installation and Operation Manual version version About this document This document is intended as a guide for installation, maintenance and troubleshooting of Portable Device Manager (PDM) and is relevant
SMART BOARD USER GUIDE FOR PC TABLE OF CONTENTS I. BEFORE YOU USE THE SMART BOARD. What is it?
 SMART BOARD USER GUIDE FOR PC What is it? SMART Board is an interactive whiteboard available in an increasing number of classrooms at the University of Tennessee. While your laptop image is projected on
Creating Fill-able Forms using Acrobat 8.0: Part 1
 Creating Fill-able Forms using Acrobat 8.0: Part 1 The first step in creating a fill-able form in Adobe Acrobat is to generate the form with all its formatting in a program such as Microsoft Word. Then
How To Write Tvalue Amortization Software
 TimeValue Software Amortization Software Version 5 User s Guide s o f t w a r e User's Guide TimeValue Software Amortization Software Version 5 ii s o f t w a r e ii TValue Amortization Software, Version
DATAVIZ, INC. User Manual for Android 2/10/2014
 DATAVIZ, INC. Documents To Go User Manual for Android 2/10/2014 Contents Documents To Go for Android... 4 Introduction... 4 Installation and Activation... 5 Installing Documents To Go for Android... 5
Microsoft Access 2010 handout
 Microsoft Access 2010 handout Access 2010 is a relational database program you can use to create and manage large quantities of data. You can use Access to manage anything from a home inventory to a giant
Working with Excel in Origin
 Working with Excel in Origin Limitations When Working with Excel in Origin To plot your workbook data in Origin, you must have Excel version 7 (Microsoft Office 95) or later installed on your computer
Embroidery Fonts Plus ( EFP ) Tutorial Guide Version 1.0505
 Tutorial Guide Version 1.0505") Embroidery Fonts Plus ( EFP ) Tutorial Guide Version 1.0505 1 Contents Chapter 1 System Requirements.................. 3 Chapter 2 Quick Start Installation.................. 4 System Requirements................
Embroidery Fonts Plus ( EFP ) Tutorial Guide Version 1.0505 1 Contents Chapter 1 System Requirements.................. 3 Chapter 2 Quick Start Installation.................. 4 System Requirements................
Page 1 S5.5 Monitoring Software Manual Rev 1.2 for Software Ver 1.0
 Trantec S5.5 Monitoring Software Manual Initial Setup Minimum PC Requirements 1.6 GHz CPU, 256 MB Memory, 1 available USB port, Windows XP Recommended PC >2.0 GHz CPU, 512 MB (XP) 1 GB (Vista) memory,
Windows XP Managing Your Files
 Windows XP Managing Your Files Objective 1: Understand your computer s filing system Your computer's filing system has three basic divisions: files, folders, and drives. 1. File- everything saved on your
Plotting: Customizing the Graph
 Plotting: Customizing the Graph Data Plots: General Tips Making a Data Plot Active Within a graph layer, only one data plot can be active. A data plot must be set active before you can use the Data Selector
Addendum Advanced POS Printer Drivers
 Addendum Advanced POS Printer Drivers Overview With the introduction of version 4.0, The General Store now supports the use of advanced, manufacturer s printer drivers for certain point of sale printers.
Reduced Quality Sample
 Access 2007 Essentials PART ONE Mobile MOUSe Access 2007 Essentials Version # 1.1 Part One 08/08/2010 11:20 About this Course Microsoft Access is the database application included with Microsoft Office.
 UX3600/NT/NTL/NTS Quick Start Guide This Quick Start Guide will explain how to connect and communicate with the EAW UX3600, NTL720, NTS250, KFNT, and JFNT powered speakers. Table of Contents 1. Downloading
Software Application Tutorial
 Software Application Tutorial Copyright 2005, Software Application Training Unit, West Chester University. No Portion of this document may be reproduced without the written permission of the authors. For
LEGENDplex Data Analysis Software
 LEGENDplex Data Analysis Software Version 7.0 User Guide Copyright 2013-2014 VigeneTech. All rights reserved. Contents Introduction... 1 Lesson 1 - The Workspace... 2 Lesson 2 Quantitative Wizard... 3
Parallels Desktop for Mac
 Parallels Software International, Inc. Parallels Desktop for Mac Quick Start Guide 3.0 (c) 2005-2007 Copyright 2006-2007 by Parallels Software International, Inc. All rights reserved. Parallels and Parallels
Outlook Tips & Tricks. Training For Current & New Employees
 Outlook Tips & Tricks Training For Current & New Employees The workshop will help build the necessary skills needed to begin using Microsoft Outlook 2010. The participant will learn how to create e-mail
Table of Contents. INTRODUCTION...v. How to Use This Manual...v Terms Used in this Manual...v Fonts Used in this Manual...v
 Table of Contents INTRODUCTION...v How to Use This Manual...v Terms Used in this Manual...v Fonts Used in this Manual...v PC Hardware Requirements...vi Software Installation...vii Installing DataWorker
Creating Drawings in Pro/ENGINEER
 6 Creating Drawings in Pro/ENGINEER This chapter shows you how to bring the cell phone models and the assembly you ve created into the Pro/ENGINEER Drawing mode to create a drawing. A mechanical drawing
Quick Start Guide. Highly customizable automated trading Automate your trades according to rules and models you create.
 POWER E*TRADE PRO EXCEL MANAGER Quick Start Guide We are pleased to announce the launch of Excel Manager, an exciting new feature in Power E*TRADE Pro that leverages the flexibility of Microsoft Excel
SMART Board Interactive Whiteboard Setup with USB Cable
 SMART Board Interactive Whiteboard Setup with USB Cable The instructions below are for the SMART Board interactive whiteboard 500 series and apply to both desktop and laptop computers. Ready Light USB
Software for Producing Rack Layouts and Purchase Orders
 1 Software for Producing Rack Layouts and Purchase Orders Welcome to RackTools: software that makes it simple and quick to specify Middle Atlantic Products. RackTools has been designed with one purpose
Monitoring Network DMN
 Monitoring Network DMN User Manual Table of contents Table of contents... 2 1. Product features and capabilities... 3 2. System requirements... 5 3. Getting started with the software... 5 3-1 Installation...
Table of Contents. Part I Welcome. Part II Introduction. Part III Getting Started. Part IV The User Interface. Part V Quick Start Tutorials
 Contents I Table of Contents Part I Welcome 5 Part II Introduction 5 1 Overview... 5 2 Product... Levels 5 3 Technical... Support 6 4 Copyright... 7 Part III Getting Started 7 1 Installation... 7 2 Register...
SoundLAB Software Download Software from the Bogen website: www.bogen.com/software
 SPLM DIGITAL SOUND PRESSURE LEVEL METER SoundLAB Software INSTALLATION & INSTRUCTION MANUAL Download Software from the Bogen website: www.bogen.com/software Specifications are subject to change without
PTPhoneManager II. User guide
 COMMUNICATION AT ITS BEST PTPhoneManager II User guide Communications A member of PEIKER group DOCUMENT PEI TEL Communications GmbH - PTPhoneManager II - 2 - T ABLE OF CONTENTS Table of contents Table
Section 4. Mastering Folders
 Section 4 Mastering Folders About This Section Section 3: Working with Receipts introduced you to the Receipts Grid area of the Receipt Organizer window (the lower of the two grids). In the Receipts Grid,
DESIGN A WEB SITE USING PUBLISHER Before you begin, plan your Web site
 Page 1 of 22 DESIGN A WEB SITE USING PUBLISHER Before you begin, plan your Web site Before you create your Web site, ask yourself these questions: What do I want the site to do? Whom do I want to visit
Excel Project Creating a Stock Portfolio Simulation
 Background Vocabulary Excel Project Creating a Stock Portfolio Simulation 1. What is a stock? A stock is a share in the ownership of a corporation, a large business organization. A stock, also, represents
Integrated Accounting System for Mac OS X and Windows
 Integrated Accounting System for Mac OS X and Windows Program version: 6.2 110111 2011 HansaWorld Ireland Limited, Dublin, Ireland Preface Books by HansaWorld is a powerful accounting system for the Mac
OPTAC Fleet Viewer. Instruction Manual
 OPTAC Fleet Viewer Instruction Manual Stoneridge Limited Claverhouse Industrial Park Dundee DD4 9UB Help-line Telephone Number: 0870 887 9256 E-Mail: [email protected] Document version 4.0 Part Number:
IT Quick Reference Guides Using Windows 7
 IT Quick Reference Guides Using Windows 7 Windows Guides This sheet covers many of the basic commands for using the Windows 7 operating system. WELCOME TO WINDOWS 7 After you log into your machine, the
How to make a line graph using Excel 2007
 How to make a line graph using Excel 2007 Format your data sheet Make sure you have a title and each column of data has a title. If you are entering data by hand, use time or the independent variable in
Web Intelligence User Guide
 Web Intelligence User Guide Office of Financial Management - Enterprise Reporting Services 4/11/2011 Table of Contents Chapter 1 - Overview... 1 Purpose... 1 Chapter 2 Logon Procedure... 3 Web Intelligence
Blackbaud FundWare Accounts Receivable Guide VOLUME 1 SETTING UP ACCOUNTS RECEIVABLE
 Blackbaud FundWare Accounts Receivable Guide VOLUME 1 SETTING UP ACCOUNTS RECEIVABLE VERSION 7.50, JULY 2008 Blackbaud FundWare Accounts Receivable Guide Volume 1 USER GUIDE HISTORY Date Changes June 2000