TD-W8960N 300Mbps Wireless N ADSL2+ Modem Router
|
|
|
- Roy Pitts
- 8 years ago
- Views:
Transcription
1 TD-W8960N 300Mbps Wireless N ADSL2+ Modem Router Rev:

2 COPYRIGHT & TRADEMARKS Specifications are subject to change without notice. is a registered trademark of TP-LINK TECHNOLOGIES CO., LTD. Other brands and product names are trademarks or registered trademarks of their respective holders. No part of the specifications may be reproduced in any form or by any means or used to make any derivative such as translation, transformation, or adaptation without permission from TP-LINK TECHNOLOGIES CO., LTD. Copyright 2011 TP-LINK TECHNOLOGIES CO., LTD. All rights reserved.

3 FCC STATEMENT This equipment has been tested and found to comply with the limits for a Class B digital device, pursuant to part 15 of the FCC Rules. These limits are designed to provide reasonable protection against harmful interference in a residential installation. This equipment generates, uses and can radiate radio frequency energy and, if not installed and used in accordance with the instructions, may cause harmful interference to radio communications. However, there is no guarantee that interference will not occur in a particular installation. If this equipment does cause harmful interference to radio or television reception, which can be determined by turning the equipment off and on, the user is encouraged to try to correct the interference by one or more of the following measures: Reorient or relocate the receiving antenna. Increase the separation between the equipment and receiver. Connect the equipment into an outlet on a circuit different from that to which the receiver is connected. Consult the dealer or an experienced radio/ TV technician for help. This device complies with part 15 of the FCC Rules. Operation is subject to the following two conditions: 1) This device may not cause harmful interference. 2) This device must accept any interference received, including interference that may cause undesired operation. Any changes or modifications not expressly approved by the party responsible for compliance could void the user s authority to operate the equipment. Note: The manufacturer is not responsible for any radio or tv interference caused by unauthorized modifications to this equipment. Such modifications could void the user s authority to operate the equipment. FCC RF Radiation Exposure Statement This equipment complies with FCC RF radiation exposure limits set forth for an uncontrolled environment. This device and its antenna must not be co-located or operating in conjunction with any other antenna or transmitter. To comply with FCC RF exposure compliance requirements, this grant is applicable to only Mobile Configurations. The antennas used for this transmitter must be installed to provide a separation distance of at least 20 cm from all persons and must not be co-located or operating in conjunction with any other antenna or transmitter.

4 CE Mark Warning This is a class B product. In a domestic environment, this product may cause radio interference, in which case the user may be required to take adequate measures. National Restrictions This device is intended for home and office use in all EU countries (and other countries following the EU directive 1999/5/EC) without any limitation except for the countries mentioned below: Country Restriction Reason/remark Bulgaria France None Outdoor use limited to 10 mw e.i.r.p. within the band MHz General authorization required for outdoor use and public service Military Radiolocation use. Refarming of the 2.4 GHz band has been ongoing in recent years to allow current relaxed regulation. Full implementation planned 2012 Italy Luxembourg Norway None None Implemented If used outside of own premises, general authorization is required General authorization required for network and service supply(not for spectrum) This subsection does not apply for the geographical area within a radius of 20 km from the centre of Ny-Ålesund Russian Federation None Only for indoor applications Note: Please don t use the product outdoors in France. This device has been designed to operate with the antennas listed below, and having a maximum gain of 3 dbi. Antennas not included in this list or having a gain greater than 3 dbi are strictly prohibited for use with this device. The required antenna impedance is 50 ohms. To reduce potential radio interference to other users, the antenna type and its gain should be so chosen that the equivalent isotropically radiated power (e.i.r.p.) is not more than that permitted for successful communication.

5 DECLARATION OF CONFORMITY For the following equipment: Product Description: 300Mbps Wireless N ADSL2+ Modem Router Model No.: TD-W8960N Trademark: TP-LINK We declare under our own responsibility that the above products satisfy all the technical regulations applicable to the product within the scope of Council Directives: Directives 1999/5/EC The above product is in conformity with the following standards or other normative documents ETSI EN V1.7.1: 2006 ETSI EN V1.8.1:2008& ETSI EN V1.3.2:2008 EN :2006 EN :1995+A1:2001+A2:2005 EN :2006 Recommendation 1999/519/EC EN62311:2008 Directives 2004/108/EC The above product is in conformity with the following standards or other normative documents EN 55022:2006 +A1:2007 EN 55024:1998+A1:2001+A2:2003 EN :2006 EN :1995+A1:2001+A2:2005 Directives 2006/95/EC The above product is in conformity with the following standards or other normative documents EN :2006 Person is responsible for marking this declaration: Yang Hongliang Product Manager of International Business South Building, No.5 Keyuan Road, Central Zone, Science & Technology Park, Nanshan, Shenzhen, P. R. China

6 CONTENTS Package Contents...1 Chapter 1. Product Overview Overview of the Router Main Features Panel Layout The Front Panel The Back Panel... 5 Chapter 2. Connecting the Router System Requirements Installation Environment Requirements Connecting the Router... 6 Chapter 3. Quick Installation Guide Configuring the PC Quick Installation Guide Chapter 4. Configuring the Router Login Device Info Quick Setup Advanced Setup Layer2 Interface WAN Service LAN MAC Clone NAT Security Parental Control Quality of Service Traffic Control Routing DNS DSL... 59

7 UPnP Interface Grouping LAN Ports IPSec Wireless Basic Security MAC Filter Wireless Bridge Advanced Station info Diagnostics Management Settings System Log SNMP Agent TR-069 client Access Control Update Firmware Reboot...99 Appendix A: FAQ Appendix B: Configuring the PC Appendix C: Specifications Appendix D: Glossary Appendix E: Technical Support...115

8 Package Contents The following contents should be found in your package: One TD-W8960N 300Mbps Wireless N ADSL2+ Modem Router One power Adapter for TD-W8960N 300Mbps Wireless N ADSL2+ Modem Router Quick Installation Guide One RJ45 cable Two RJ11 cables One ADSL splitter One Resource CD for TD-W8960N 300Mbps Wireless N ADSL2+ Modem Router, including: This User Guide Other Helpful Information Make sure that the package contains the above items. If any of the listed items are damaged or missing, please contact your distributor. 1

9 Chapter 1. Product Overview Thank you for choosing the TD-W8960N 300Mbps Wireless N ADSL2+ Modem Router. 1.1 Overview of the Router The TD-W8960N 300Mbps Wireless N ADSL2+ Modem Router integrates 4-port Switch, Firewall, NAT-Router and Wireless AP. Powered by 2x2 MIMO technology, the Wireless N Router delivers exceptional range and speed, which can fully meet the need of Small Office/Home Office (SOHO) networks and the users demanding higher networking performance. The TD-W8960N 300Mbps Wireless N ADSL2+ Modem Router utilizes integrated ADSL2+ transceiver and high speed MIPS CPU. The Router supports full-rate ADSL2+ connectivity conforming to the ITU and ANSI specifications. In addition to the basic DMT physical layer functions, the ADSL2+ PHY supports dual latency ADSL2+ framing (fast and interleaved) and the I.432 ATM Physical Layer. Incredible Speed The router provides up to 300Mbps wireless connection with other n wireless clients. The incredible speed makes it ideal for handling multiple data streams at the same time, which ensures your network stable and smooth. The performance of this n wireless Router will give you the unexpected networking experience at speed 650% faster than g. It is also compatible with all IEEE g and IEEE b products. Multiple Security Protections With multiple protection measures, including SSID broadcast control and wireless LAN 64/128 WEP encryption, Wi-Fi protected Access (WPA2-PSK, WPA-PSK), as well as advanced Firewall protections, the TD-W8960N 300Mbps Wireless N ADSL2+ Modem Router provides complete data privacy. Flexible Access Control The Router provides flexible access control, so that parents or network administrators can establish restricted access policies for children or staff. It also supports Virtual Server and DMZ host for Port Triggering, and then the network administrators can manage and monitor the network in real time with the remote management function. Simple Installation Since the Router is compatible with virtually all the major operating systems, it is very easy to manage. Quick Setup Wizard is supported and detailed instructions are provided step by step in this user guide. Before installing the Router, please look through this guide to know all the Router s functions. 2

10 1.2 Main Features Complies with IEEE n to provide a wireless data rate of up to 300Mbps One RJ11 LINE port, four 10/100M Auto-Negotiation RJ45 LAN ports, supporting Auto MDI/MDIX Quick response semi-conductive surge protect circuit, reliable surge-protect function AFE to support Annex A and L deployments Provides external splitter Multi-user sharing a high-speed Internet connection Connecting the internet on demand and disconnecting from the Internet when idle for PPPoE Provides WPA/WPA2, WPA-PSK/WPA2-PSK data security, TKIP/AES encryption security Provides 64/128-bit WEP encryption security and wireless LAN ACL (Access Control List) Adopts Advanced DMT modulation and demodulation technology Adopts 300M wireless LAN transmission technology Supports access control, parents and network administrators can establish restricted access policies based on time of day for children or staff Supports Virtual Server, Port Triggering and DMZ host Supports UPnP, Dynamic DNS, Static Routing Supports bridge mode and Router function Supports Web management Supports firmware upgrade Supports Flow Statistics Supports QSS (Quick Secure Setup) Built-in firewall supporting IP address filtering, MAC address filtering and parental control Built-in DHCP server 3

11 1.3 Panel Layout The Front Panel The Router s LEDs are located on the front panel. Figure 1-1 The Router s LEDs and the QSS button are located on the front panel (View from left to right). LED Explanation: Name Status Indication Power Internet ADSL WLAN LAN 1,2,3,4 QSS On Off On Flash Off On Flash Off On Flash Off On Flash Off On Flash Off The modem router is powered on. The modem router is off. Please ensure that the power adapter is connected correctly. The network is available with a successful Internet connection. There is data being transmitted or received via the Internet. There is no successful Internet connection or the modem router is operating in Bridge mode. Please refer to Note 2 for troubleshooting. ADSL line is synchronized and ready to use. The ADSL negotiation is in progress. ADSL synchronization fails. Please refer to Note 1 for troubleshooting. Wireless is enabled but no data is being transmitted. The modem router is sending or receiving data over the wireless network. Wireless function is disabled. There is a device connected to this LAN port. The modem router is sending or receiving data over this LAN port. There is no device connected to this LAN port. A wireless device has been successfully added to the network by QSS function. QSS handshaking is in process and will continue for about 2 minutes. Please press the QSS button on other wireless devices that you want to add to the network while the LED is flashing. The QSS function is disabled or the wireless device fails to be added to the network in 2 minutes after QSS function is enabled. Please refer to QSS (WPS) Setup for more information. 4

12 1. If the ADSL LED is off, please check your Internet connection first. Refer to 2.3 Connecting the Router for more information about how to make Internet connection correctly. If you have already made a right connection, please contact your ISP to make sure if your Internet service is available now. 2. If the Internet LED is off, please check your ADSL LED first. If your ADSL LED is also off, please refer to Note 1. If your ADSL LED is GREEN ON, please check your Internet configuration. You may need to check this part of information with your ISP and make sure everything have been input correctly. Refer to 4.2 Device Info for more information The Back Panel The Router's ports, where the cables are connected, and RESET button are located on the back panel. Figure 1-2 LINE: Connect to the Modem Port of Splitter or to the telephone line. 1, 2, 3, 4 (LAN): The ports (1, 2, 3, 4) connect the Router to the local PC(s). RESET: There are two ways to reset the Router's factory defaults. 1) Use the Restore Default function on Management -> settings -> Restore Default page in the router's Web-based Utility. 2) Use the Factory Default RESET button: With the Router powered on, use a pin to press and hold the RESET button for at least 5 seconds. And the Router will reboot to its factory default settings. POWER: The Power plug is where you will connect the power adapter. ON/OFF: The switch for the power. Wireless Antennas: To receive and transmit the wireless data. 5

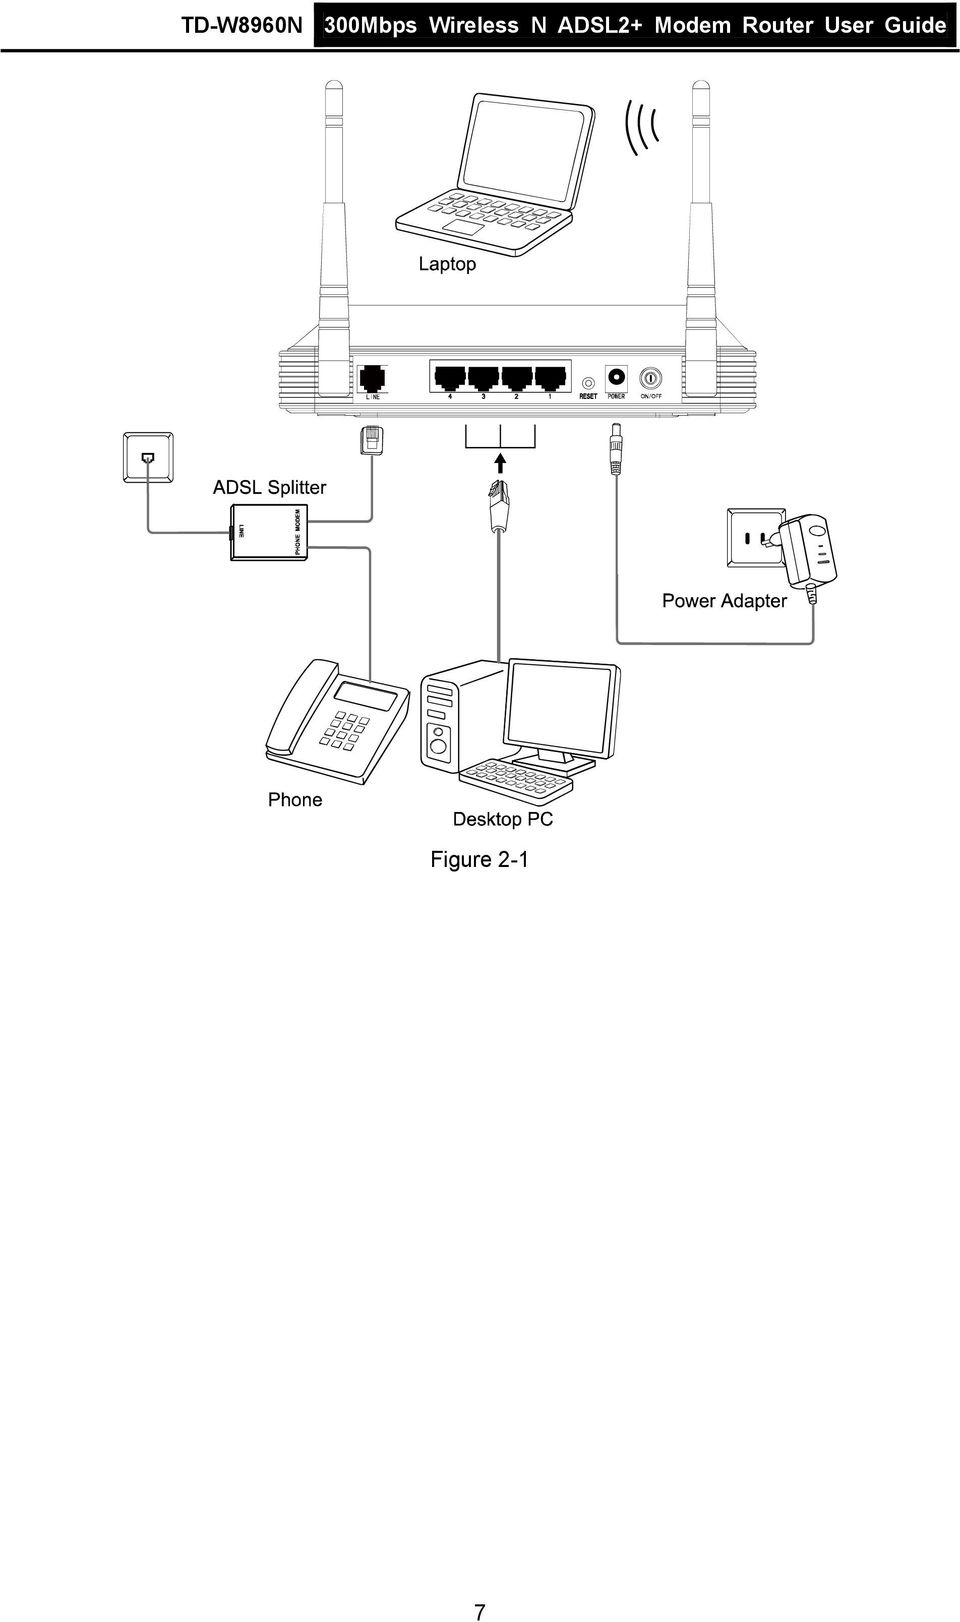
13 Chapter 2. Connecting the Router 2.1 System Requirements Broadband Internet Access Service (DSL/Cable/Ethernet). PCs with a working Ethernet Adapter and an Ethernet cable with RJ45 connectors. TCP/IP protocol on each PC. Web browser, such as Microsoft Internet Explorer, Mozilla Firefox or Apple Safari. 2.2 Installation Environment Requirements Place the Router in a well ventilated place far from any heater or heating vent Avoid direct irradiation of any strong light (such as sunlight) Keep at least 2 inches (5 cm) of clear space around the Router Operating temperature: 0 ~40 (32 ~104 ) Operating Humidity: 10% ~ 90% RH (non-condensing) 2.3 Connecting the Router Back to LED Explanation Before installing the Router, please make sure your broadband service provided by your ISP is available. If there is any problem, please contact your ISP. After that, please install the Router according to the following steps. Don't forget to pull out the power plug and keep your hands dry. 1. Locate an optimum location for the Router. The best place is usually at the center of your wireless network. 2. Adjust the direction of the antenna. Normally, upright is a good direction. 3. Connect your PC and Switch/Hub in your LAN to the LAN Ports of the Router. (If you have a wireless NIC and want to have wireless connection, please skip this step.) 4. Connect the telephone line to the Line port on the Router. Or you can access the Internet and make calls at the same time by using a separate splitter to divide the data and voice. The external splitter has three ports: LINE: Connect to the wall jack PHONE: Connect to the phone sets MODEM: Connect to the ADSL LINE port of device Plug one end of the twisted-pair ADSL cable into the ADSL LINE port on the rear panel of device. Connect the other end to the MODEM port of the external splitter. 5. Connect the power adapter to the power plug of the Router, and the other end into an electrical outlet. The electrical outlet shall be installed near the device and shall be easily accessible. 6. Turn on the ON/OFF switch to power the device. It will start to work automatically. 6
 of clear space around the Router Operating temperature: 0 ~40 (32 ~104 ) Operating Humidity: 10% ~ 90% RH (non-condensing) 2.")
14 Figure 2-1 7
15 Chapter 3. Quick Installation Guide This chapter will show you how to configure the basic functions of your TD-W8960N 300Mbps Wireless N ADSL2+ Modem Router using Quick Setup Wizard within minutes. 3.1 Configuring the PC After you directly connect your PC to the TD-W8960N or connect your adapter to a Hub/Switch which has connected to the Router, you need to configure your PC s IP address. Follow the steps below to configure it. Here takes Windows XP for example. For more details, please refer to Appendix B. Step 1: Click the Start menu on your desktop, right click My Network Places, and then select Properties (shown in Figure 3-1). Figure 3-1 Step 2: Right click Local Area Connection (LAN), and then select Properties. 8

16 Figure 3-2 Step 3: Select General tab, highlight Internet Protocol (TCP/IP), and then click the Properties button. Figure 3-3 9

17 Step 4: Configure the IP address as Figure 3-4 shows. After that, click OK. Figure 3-4 You can configure the PC to get an IP address automatically, select Obtain an IP address automatically and Obtain DNS server address automatically in the screen above. Now, you can run the Ping command in the command prompt to verify the network connection. Please click the Start menu on your desktop, select run tab, type cmd or command in the field and press Enter. Type ping on the next screen, and then press Enter. If the result displayed is similar to the screen below, the connection between your PC and the Router has been established. Figure

18 If the result displayed is similar to the screen shown below, it means that your PC has not connected to the Router. You can check it following the steps below: Figure 3-6 1) Is the connection between your PC and the Router correct? The LEDs of LAN port which you link to the device and the LEDs on your PC's adapter should be lit. 2) Is the TCP/IP configuration for your PC correct? If the Router's IP address is , your PC's IP address must be within the range of ~ Quick Installation Guide With a Web-based utility, it is easy to configure and manage the TD-W8960N 300Mbps Wireless N ADSL2+ Modem Router. The Web-based utility can be used on any Windows, Macintosh or UNIX OS with a Web browser, such as Microsoft Internet Explorer, Mozilla Firefox or Apple Safari. 1. To access the configuration utility, open a web-browser and type the default address in the address field of the browser. Figure 3-7 After a moment, a login window will appear, similar to the Figure 3-8. Enter admin for the User Name and Password, both in lower case letters. Then click the OK button or press the Enter key. 11

19 Figure 3-8 1) Do not mix up the user name and password with your ADSL account user name and password which are needed for PPP connections. 2) If the above screen does not pop up, it means that your Web-browser has been set to a proxy. Go to Tools menu Internet Options Connections LAN Settings, in the screen that appears, cancel the Using Proxy checkbox, and click OK to finish it. 2. After your successful login, you will see the Login screen as shown in Figure 3-9. Click Quick Setup menu to access Quick Setup Wizard. Figure Change the VPI or VCI values which are used to define a unique path for your connection. If you have been given specific settings for this to configuration, type in the correct 12

20 values assigned by your ISP. Here we select PPPoE WAN Link Type for example, enter the Username and Password given by your ISP, and then click Next. Figure 3-10 The Quick Setup Wizard will guide you to configure the WAN Service over ATM interface. 4. On the Wireless Configurations screen, we use the default SSID, select Network Authentication (take Mixed WPA2/WPA-PSK Personal for example), set a Pre-Shared Key, and then click Save to continue. 13

21 Figure 3-11 All the existed ATM&WAN service will be cleared after clicking the Save button on this Quick Setup page. 5. You will see the Finish screen below, click Reboot to save these settings. Figure Now, your ADSL Modem Router has been configured and is rebooting. Please do not power off the Router while it s rebooting. 14
22 Figure You will see the current configuration has been added to Layer2 Interface list (4.4.1 Layer2 Interface) shown in Figure 3-14 and WAN Service list (4.4.2 WAN Service) shown in Figure Figure 3-14 Figure 3-15 More detailed configurations please refer to Layer2 Interface and WAN Service. 15
23 Chapter 4. Configuring the Router This chapter will show each Web page's key function and the configuration way. 4.1 Login After your successful login, you will see the six main menus on the left of the Web-based utility. On the right, there are the corresponding explanations and instructions. The detailed explanations for each Web page s key function are listed below. 4.2 Device Info Choose Device Info menu, there are six submenus under the main menu: Summary, WAN, Statistics, Route, ARP and DHCP. This Device Info section mainly introduces the elementary information about the Router and its current settings in use. Click any of them, and you will be able to view the corresponding information. Choose Device Info Summary, you will see the Summary screen (shown in Figure 4-1). The first table indicates the information about the version including Software and Hardware. The second table displays the current status of the TD-W8960N connection. This information will vary depending on the settings of the Router configured on the Advanced Setup screen. 16
24 Figure 4-1 Click the other submenus under the main menu Device Info, and you will be able to view the corresponding information about WAN, Statistics, Route, ARP and DHCP. 4.3 Quick Setup Please refer to Section 3.2 Quick Installation Guide. 4.4 Advanced Setup Choose Advanced Setup, there are many submenus under the main menu. Among the submenus, Layer2 Interface, WAN Service, LAN etc. are default menus, while NAT, IP/MAC filtering of the Security, Quality of Service and DNS will appear only when you select some corresponding functions. Click any one of them, and you will be able to configure the corresponding function. 17
25 This Advanced Setup section mainly introduces how to configure the Router for adequate use. The detailed explanations for each subsection are provided below. To completely configure the WAN Interface, you need to first select the Layer2 Interface (4.4.1 Layer2 Interface) according to the connection ISP provides you, and then to select the type of the connection (4.4.2 WAN Service) for the further configuration Layer2 Interface Choose Advanced Setup Layer2 Interface, and you can select WAN Service Interface (layer2 interface) over ATM interfaces or ETH interface. ATM Interface: Configure the Router to access Internet as an ADSL user. ISP provides you VPI (Virtual Path Identifier), VCI (Virtual Channel Identifier) settings and the DSL Interface with RJ11 connector. (Figure 2-1) ETH Interface: Configure the Router to access Internet as an Ethernet user. ISP provides you Broadband Internet Service and the Ethernet Interface with RJ45 connector ATM interface Choose Advanced Setup Layer2 Interface ATM interface, you can Configure ATM interfaces on the screen below. 18
26 Figure 4-2 Remove: Select the check box in the table on the screen above and then click the Remove button, the corresponding interface will be deleted in the table. If the interface is used by the configuration of the WAN Service, you need to remove the corresponding WAN Service entry first before you can remove it here. Add: Click the button, and you can add a new interface in the next screen. 19
27 Figure 4-3 VPI/VCI: the VPI and VCI values provided by your ISP. Do not change them unless it was required by your ISP. DSL Link Type: Select a DSL Link Type which is provided by your ISP. The options include EoA (it is for PPPoE, IPoE, and Bridge), PPPoA (PPP over ATM) and IPoA (IP over ATM). Encapsulation Mode: The mode of the data processing over the Link Type you have selected. Uses the default setting, if you are not sure. Service Category: Select the type of the service assigned by your ISP in the drop-down list. The default type is UBR Without PCR. Connection Mode: Select the connection mode for EoA option of DSL Link Type. The options include Default mode for single service over one connection, VLAN MUX Mode for multiple Vlan service over one connection, and MSC Mode for Multiple Service over one connection. Enable Quality of Service: If you want to adopt QoS (Quality of Service) for the connection, please select check box. Enabling packet level QoS for PVC improves performance for selected classes of applications. While QoS consumes system resources; therefore the number of PVC(s) will be reduced. Besides 20
28 this, it cannot be set for the connection type of CBR and Real-time VBR. If you select the QoS service, the Quality of Service menu will be added to the Web-based Utility, the detailed configuration will be described in Quality of Service ETH interface Choose Advanced Setup Layer2 Interface ETH Interface, you can configure ETH WAN interfaces on the screen below. Figure 4-4 To make sure the ETH port available, you should first choose Advanced Setup LAN Ports to enable the Virtual LAN Ports feature. Add: Click the Add button, and you can add a new interface in the next screen. Figure 4-5 ETH port: Select an ETH port to configure as the WAN port. Select Connection Mode: Choose a connection mode for the port. Click Apply/Save to save your settings and then you will see the screen similar to Figure
29 Figure 4-6 Remove: Select the check box in the table on the screen above and then click the Remove button, the corresponding interface will be deleted in the table. One ETH is allowed to configure as the layer 2 WAN Interface WAN Service Choose Advanced Setup WAN Service, and you will see the WAN Port Information Table in the screen similar to Figure 4-7, which describes the WAN port settings and the relevant manipulation to each interface. After you add a new Lay2 Interface, please follow the instructions below to complete the further configuration of WAN Interface. There are five different configurations for the connection types, which are PPPoE, IPoE, Bridge, PPPoA, and IPoA. You can select the corresponding types according to your needs. Figure
30 1) The following section adopts different VPI, VCI to introduce further configuration for the different connection types, if you need to change the configuration of ATM PVC (VPI/VCI), you should go to the previous section (4.4.1 Layer2 Interface) to configure them again. 2) ETH and ATM service can not coexist. If the ETH Interface had configured, you cannot configure any other WAN service over the ATM Interface until the ETH Interface is deleted ATM-EoA-PPPoE If your ISP provides a PPPoE connection and you need to use an ATM Interface, follow the steps below to add a WAN service over a selected ATM interface: 1. Add a new ATM interface and select EoA option for DSL Link Type ( ATM interface). 2. Click the Add button on the screen Figure 4-7 and you will enter the next screen as shown in Figure 4-8. Click Next. Figure Select the WAN service type in Figure 4-9. If your ISP provides a PPPoE connection, select PPPoE option. You can create a service name for the Service Description or leave it the default name. Click Next. Figure
31 4. Enter the following parameters and then click Next. Figure 4-10 PPP Username/Password: Enter the User Name and Password provided by your ISP. These fields are case-sensitive. PPPoE Service Name: Enter the Service Name if it was provided by your ISP. If you leave it blank, the default name will be the same as the Service Description on the previous screen. Authentication Method: Select the Authentication Method from the drop-down list, the default method is AUTO, and you can leave it as a default setting. If you are not sure about the PPP IP extension and PPP Debug Mode etc. below, please don t select these options. MTU Size: Maximum Transmission Unit Size. Check this box then you can change the MTU size. The default MTU value is 1480 Bytes. It is not recommended that you change the default value unless required by your ISP. Enable Fullcone NAT: It is a type of NAT, if not enabled, the default NAT will act. Dial on demand (with idle timeout timer): The Router will cut off the Internet connection after it has been inactive for a specific period of time (idle timeout), and it will automatically re-establish the connection as soon as you attempt to access the Internet again. If your Internet is charged by time you may want to select this option in order to save money. PPP IP extension: Select this option to get the public IP address from the PPP server to your 24
32 PC, and the NAT and SPI Firewall will be closed. Sometimes you can think it as bridge while PPP dialing in the router. It s a special feature deployed by some ISP. Unless your ISP specifically requires this setup, do not select it. Use Static IPv4 Address: If your ISP gives you a static WAN, Gateway and DNS IP address, select this option to enter them manually. Enable PPP Debug Mode: Select this option to debug the PPP function and you can see many PPP log information in the System Log. Only PPP has this debug Mode. Bridge PPPoE Frames Between WAN and Local Ports: Select this option to start PPP connection in your local PC. Enable IGMP Multicast Proxy: IGMP (Internet Group Management Protocol) is used to manage multicasting on TCP/IP networks. Some ISPs use IGMP to perform remote configuration for client devices, such as the Router. The default value is disabled, and if you are not sure, please contact your ISP or just leave it. 5. Select a preferred wan interface as the system default gateway in Figure 4-11 and click Next. Figure Configure the DNS Server Addresses on the screen below and click Next. Figure 4-12 Obtain DNS info from a WAN Interface: You can select this option to automatically get DNS server information from the selected WAN interface. Use the following Static DNS IP Address: You can select this option to manually enter the primary and /or optional secondary DNS server IP addresses provided by your ISP. 25
33 If only single PVC with IPoA is configured, you must enter static DNS server IP addresses. 7. On the next screen you will see the detailed settings you ve made. Please click the Apply/Save button to save these settings. Figure On the next screen you will see the WAN Port Information Table with the new configuration. Figure 4-14 Remove: Select the check box in the table above and then click Remove, the corresponding interface will be deleted in the table. 26
34 ATM-EoA-IPoE If your ISP provides an IPoE connection and you need to use an ATM Interface, follow the steps below to add a WAN service over a selected ATM interface: 1. Add a new ATM interface and select EoA option for DSL Link Type ( ATM interface). 2. Click the Add button on the screen (as shown Figure 4-7). Select WAN Service Interface over ATM PVC on the next screen (as shown Figure 4-8). 3. If your ISP provides an IPoE connection, select IPoE option for the WAN service type on the screen (as shown Figure 4-9), and click Next button to continue. 4. Enter parameters in the following blanks to configure the WAN IP Address and click Next. Figure 4-15 Obtain an IP address automatically: Select this option, the Router will be able to obtain IP network information dynamically from a DHCP server provided by your ISP. 1) The response message from a DHCP server typically contains a number of configuration parameters (DHCP options) for the Router. The DHCP options include IP network information, and also the vendor-specific options. In some cases, the Router is implemented to perform user-defined operations (as shown below). You can implement your own treatment of all such options. 2) If the Router is functioning as a DHCP client, it must identify itself in option 61 (client-identifier) in every DHCP message. DUID/IAID is portion of option 61. Option 60 Vendor ID: The option code 60 used to identify Vendor class. Option 61 IAID: IAID (Identity Association ID) assigns an Identity Association ID to individual interfaces. In cases where the device is functioning with a single DHCP client identity, it must use value 1 for IAID for all DHCP interactions. In cases where the device is functioning with multiple DHCP client identities, the values of IAID have to start at 1 for the first identity and be incremented for each subsequent identity. For example, the device may use IAID value 1 for the first physical interface and value 2 for the second. 27
35 Alternatively, the device may use IAID value 1 for the virtual circuit corresponding to the first connection object in the data model and value 2 for the second connection object in the data model. Option 61 DUID: Specifies the name of the interface whose link-layer address the server is to use as its DUID (DHCP Unique Identifier). You must enter a value for this parameter or the server will not start. When the server starts, the DUID is written to the system log. Option 125: The option 125 allows DHCP server to be pre-configured with policy for handling classes of devices in a certain way without requiring DHCP server to be able to parse the unique format used in client-identifier option. Use the following IP Address: If you are provided with a static IP/gateway Address, please select this option, and then enter the WAN IP Address, WAN Subnet Mask and WAN gateway IP Address manually. 5. You will see the next screen as below. You can enable the NAT, SPI Firewall, and IGMP Multicast, if you are not sure about the settings, just leave the default settings. Click Next. Figure 4-16 Enable NAT: This technology translates the IP addresses of a local area network to a different IP address for the Internet. If this Router is hosting your network s connection to the Internet, please select the check box. If another Router exists in your network, you don t need to select the option. Enable SPI Firewall: A SPI firewall enhances network s security. Select the option to use a firewall, or else without a firewall. Enable IGMP Multicast: This is disabled by default. This setting will not allow IGMP (Internet Group Management Protocol) packets to be forwarded to the LAN. IGMP is used to manage multicasting on TCP/IP networks. Most users will not need to enable this. Some ISPs use IGMP to perform remote configuration for client devices, such as the Router. If you are unsure, check with your ISP. If you select the Enable NAT checkbox, the NAT menu will be added to the Web-based Utility. We will describe the detailed configuration in NAT. 28
36 6. Select a preferred WAN interface as the system default gateway and click Next. Figure Configure the DNS Server Addresses on the screen as follows. Figure 4-18 If only single PVC with IPoA is configured, you must enter static DNS server IP addresses. 8. On the next screen (as shown Figure 4-19) you will see the detailed settings you ve made. Please click the Apply/Save button to save these settings. 29
37 ATM-EoA-Bridging Figure 4-19 If you want to adopt the Bridge service and you need to use an ATM Interface, follow the steps below to add a WAN service over a selected ATM interface: 1. Add a new ATM interface and select EoA option for DSL Link Type (see ATM interface). 2. Click the Add button on the screen Figure 4-7. Select WAN Service Interface over ATM PVC on the next screen (as shown Figure 4-8). 3. Select Bridging option for the WAN service type on the screen (as shown Figure 4-9), and click Next button to continue. 4. On the screen (as shown Figure 4-13) you will see the detailed settings you ve made. Please click the Apply/Save button to save these settings ATM-PPPoA If your ISP provides a PPPoA connection and you need to use an ATM Interface, follow the steps below to add a WAN service over a selected ATM interface: 1. Add a new ATM interface and select PPPoA option for DSL Link Type (see ATM interface). 2. Click the Add button on the screen Figure 4-7 and the next configuration is similar to PPPoE, (see section ATM-EoA-PPPoE). The difference is that you don t need to set the PPPoE Service Name and Bridge PPPoE Frames Between WAN and Local Ports on the screen of Figure
38 ATM-IPoA If your ISP provides an IPoA connection and you need to use an ATM Interface, follow the steps below to add a WAN service over a selected ATM interface. 1. Add a new ATM interface and select IPoA option for DSL Link Type (see ATM interface). 2. Click the Add button on the screen Figure 4-7 and the next configuration is similar to IPoE (see section ATM-EoA-IPoE). The difference is that you have to manually set the Static IP Address on the screen of Figure 4-15, and the Static IP Address for DNS Server on the screen of Figure ETH and ATM service can not coexist. If the ATM Interface had configured, you cannot configure any other WAN service over the ETH Interface until the ATM Interface is deleted ETH-PPPoE If your ISP provides a PPPoE connection and you need to use an ETH Interface, follow the steps below to add a WAN service over a selected ETH interface: 1. Add a new ETH interface on the screen of ETH interface. 2. Click the Add button on the screen Figure 4-7 and the following configuration is similar to PPPoE over ATM interface (see section ATM-EoA-PPPoE) ETH-IPoE If your ISP provides an IPoE connection and you want to use an ETH Interface, follow the steps below to add a WAN service over a selected ETH interface: 1. Add a new ETH interface on the screen of ETH interface. 2. Click the Add button on the screen Figure 4-7 and the next configuration is similar to IPoE over ATM interface (see section ATM-EoA-IPoE) ETH-Bridge If you want to adopt the Bridge service and you need to use an ETH Interface, follow the steps below to add a WAN service over a selected ETH interface: 1. Add a new ETH interface on the screen of ETH interface. 2. Click the Add button on the screen Figure 4-7 and the next configuration is similar to Bridge over ATM interface (see section ATM-EoA-Bridg). For ETH-PPPoE, ETH-IPoE and ETH-Bridge, the Bridging option will display in the screen of Figure 4-20 only when VLAN MUX Mode is selected for Connection Mode on the screen of Figure 4-5. You have to set the 802.1P Priority and 802.1Q VLAN ID. 31
39 Figure LAN Choose Advanced Setup LAN, and you will see the LAN screen (shown in Figure 4-21), the section allows you to configure the Router s LAN ports settings. 32
40 Figure 4-21 IP Address: You can configure the Router s IP Address and Subnet Mask for LAN Interface. IP Address: Enter the Router s local IP Address, then you can access to the Web-based Utility via the IP Address, the default value is Subnet Mask: Enter the Router s Subnet Mask, the default value is Enable IGMP Snooping: If you select the option, please choose the IGMP Mode: Standard Mode or Blocking Mode. DHCP Server: These settings allow you to configure the Router s Dynamic Host Configuration Protocol (DHCP) server function. The DHCP server is enabled by default for the Router s Ethernet LAN interface. DHCP service will supply IP settings to computers which are configured to automatically obtain IP settings that are connected to the Router though the Ethernet port. When the Router is set for DHCP, it becomes the default gateway for DHCP client connected to it. Keep in mind that if you change the IP address of the Router, you must change the range of IP addresses in the pool used for DHCP on the LAN. 33
41 Start IP Address: Enter a value for the DHCP server to start with when issuing IP addresses. Because the default IP address for the Router is , the default Start IP Address is , and the Start IP Address must be or greater, but smaller than End IP Address: Enter a value for the DHCP server to end with when issuing IP addresses. The End IP Address must be smaller than The default End IP Address is Leased Time (hour): The Leased Time is the amount of time in which a network user will be allowed connection to the Router with their current dynamic IP address. Enter the amount of time, in hours, then the user will be leased this dynamic IP address. After the dynamic IP address has expired, the user will be automatically assigned a new dynamic IP address. The default is 24 hours. Static IP Lease List: The function allows you to specify a reserved IP address for a PC on the LAN, that PC will always obtain the assigned IP address each time when it accesses the DHCP server. Reserved IP addresses should be assigned to servers that require permanent IP settings. Click the Add Entries button, and then you will set the rule in the screen as below. Figure 4-22 MAC Address: The MAC address of the computer on the LAN which you want to reserve an IP. IP Address: The IP address you want to reserved to the computer. Configure the second IP Address and Subnet Mask: You can configure the Router s second IP Address and Subnet Mask for LAN Interface through which you can also access to the Web-based Utility as the default IP Address and Subnet Mask. UPnP, DHCP Server and the second IP Address are not available for the connection type of Bridging here, they won t display on the preceding screen since only Bridging is selected MAC Clone Choose menu Advanced Setup MAC Clone, you can configure the MAC address of the WAN Interface as shown below. The WAN Interface List displays the Lay2 Interfaces you have configured on the section Layer2 Interface and its default MAC Address. If you have not configured corresponding WAN 34
42 Service for the interface on the section WAN Service, the blank for MAC Address will display Need a corresponding WAN Service. The last one of WAN Interface List displays your PC s current address. Figure 4-23 Type the new value for the WAN Interface who s MAC Address you want to change, and click Save/Apply. You can select corresponding WAN Interface from the drop-down list and click Clone button to clone your current PC MAC, and then click Save/Apply. Click Restore Default button to restore the WAN Interface s default MAC Address. Only the WAN Ports can use MAC Address Clone function. All the clone MAC addresses must not be the same with each other NAT NAT (Network Address Translation) allows you to share one WAN (Wide Area Network) IP address for multiple computers on your LAN (Local Area Network). When you select PPPoA or PPPoE for the WAN Setup, or when you select Enable NAT for the type of IPoA and IPoE connection (4.4.2 WAN Service), you will see the NAT menu in the Web-based Utility (shown in Figure 4-24). Choose Advanced Setup NAT, there are three submenus under the main menu: Virtual Servers, Port Triggering and DMZ Host. Click any of them, and you will be able to configure the corresponding function. 35
43 Virtual Servers Figure 4-24 Choose Advanced Setup NAT Virtual Servers, you can set up virtual servers on the screen below (shown in Figure 4-25). Virtual servers can be used for setting up public services on your LAN, such as DNS, and FTP. A virtual server is defined as a service port, and all requests from the Internet to this service port will be redirected to the computer specified by the server IP. Any PC that was used for a virtual server must have a static or reserved IP Address because its IP Address may change when using the DHCP function. Figure 4-25 Virtual Server Table: The table indicates the information about the Virtual Server entries. Server Name: This is the name of the Virtual Server. It is exclusive and must be filled in. External Port Start: The base number of External Ports. You can type a service port or leave it blank. External Port End: The end number of External Ports. You can type a service port or leave it blank. Protocol: The protocol used for this application, TCP, UDP, or TCP/UDP. Internal Port Start: The base number of Internal Ports. You can type a service port or leave it blank. Internal Port End: The end number of Internal Ports. You can type a service port or leave it blank. Server IP Address: The IP Address of the PC providing the service application. WAN Interface: The WAN Service Interface providing the service application. Add: Click the Add button to add a new entry. 36
44 Remove: Select the check box in the table (shown in Figure 4-25) and then click the Remove button, then the corresponding entry will be deleted in the table. To add a virtual server entry: 1. Click the Add button on the preceding screen Figure 4-25, and then you will see the new Virtual Server in the next screen as shown in Figure Figure Select the Interface which you want to use from the drop-down list. 3. Select the service which you want to use from the drop-down list. If the list does not have the service you need, type the name of the custom service in the text box. 4. Type the IP Address of the computer in the Server IP Address text box. 5. Enter the External Port Start, External Port End, Internal Port Start and Internal Port End in the table, and then select the protocol used for this Virtual Server, TCP, UDP or All. 6. Click Save/Apply to enable virtual server and then you will see your setting as shown in Figure
45 If you select the service from the drop-down list, the External Port Start, External Port End, Internal Port Start, Internal Port End and the Protocol will be added in the table automatically. You only need to enter the Server IP Address for the Virtual Server Port Triggering Choose Advanced Setup NAT Port Triggering, you can set Port Triggering on the screen (shown in Figure 4-27). Some applications require that specific ports in the Router's firewall should be opened for access by remote devices. Port Trigger dynamically opens up the 'Open Ports' in the firewall when an application on the LAN initiates a TCP/UDP connection to a remote device using the triggering ports. The Router allows the remote party from the WAN side to establish new connections back to the application on the LAN side using the open ports. A maximum 32 entries can be configured. Figure 4-27 Port Triggering Table: The table indicates the information about the Port Triggering entries. Application (Name): This is the name of the Port Triggering. It is exclusive and must be filled. Trigger: It includes the Protocol and the Start and End value of the Trigger Ports. Open: It includes the Protocol and the Start and End value of the Open Ports. WAN Interface: The WAN Service Interface setting the Port Triggering. Add: Click the button to add a new entry. Remove: Select the check box in the table (shown in Figure 4-27) and then click the Remove button, then the corresponding entry will be deleted in the table. To add a new Port Triggering: 1. Click the Add button in Figure 4-27, and then you will see the new Port Triggering in the next screen as shown in Figure
46 Figure Select the application from the drop-down list. If the list does not have the application that you want, select the Custom application radio button, and type the name of the custom application in the text box. 3. Enter the Trigger Port Start, Trigger Port End, Open Port Start and Open Port End in the table, and then select the Trigger protocol and Open protocol, TCP, UDP or All. 4. Click Save/Apply to enable the settings and then you will see you settings as shown in Figure If you select the application from the drop-down list, the External Port Start, External Port End, Internal Port Start, Internal Port End and the Protocol will be added in the table automatically DMZ Host Choose Advanced Setup NAT DMZ Host, you can set up DMZ Host on the screen (shown in Figure 4-29). The DMZ host feature can make a local host be exposed to the Internet for a special-purpose service, such as online gaming or video conferencing. 39
47 To add a new DMZ Host: Figure 4-29 You can enter the computer's IP address and then click Save/Apply to activate the DMZ host you set on this page. DMZ host forwards all the ports at the same time. Any PC whose port is being forwarded must have its DHCP client function disabled and should have a new static IP Address assigned to it because its IP Address may change while using the DHCP function Security Choose Advanced Setup Security, and you will see the security screen including IP Filtering and MAC Filtering (only effective in Bridging mode) submenus IP Filtering Figure 4-30 The IP address filtering feature makes it possible for administrators to control user's access to the Internet, which is based on user's IP. The IP address filtering includes Outgoing and Incoming, the detailed descriptions are provided below. IP Filtering - Outgoing Choose Advanced Setup Security IP Filtering Outgoing, you can configure Outgoing Filtering rules on the screen (shown in Figure 4-31). 40
48 The Outgoing IP Filtering feature allows you to control some IP traffic from LAN to access to some specifically addresses. By default, all outgoing IP traffic from LAN is allowed, but some IP traffic can be BLOCKED by setting up filters. Set up an Outgoing IP Filtering rule: Figure Click the Add button in Figure 4-31, and you will see the next screen as shown in Figure Figure Enter the Filter name for the rule, it is exclusive and must be filled. 3. Select the protocol: TCP/UDP, TCP, UDP or ICMP in the drop-down list for the connection between the Source IP address and Destination IP address. 4. Enter a Source IP Address in dotted-decimal notation format and then type the Source Subnet Mask and Source Port (port or port: port) in the text boxes separately. 5. Enter a Destination IP Address in dotted-decimal notation format and then type the Destination Subnet Mask and Destination Port (port or port: port) in the text boxes separately. 6. Click Save/Apply to save this entry. 41
TD-W8960N Wireless N ADSL2+ Modem Router
 Wireless N ADSL2+ Modem Router Rev: 1.0.0 1910010174 COPYRIGHT & TRADEMARKS Specifications are subject to change without notice. is a registered trademark of TP-LINK TECHNOLOGIES CO., LTD. Other brands
TL-R460 Cable/DSL Router
 Cable/DSL Router Rev: 2.0.0 1910010471 COPYRIGHT & TRADEMARKS Specifications are subject to change without notice. is a registered trademark of TP-LINK TECHNOLOGIES CO., LTD. Other brands and product names
TL-R402M Cable/DSL Router
 Cable/DSL Router Rev: 3.0.2 1910010053 COPYRIGHT & TRADEMARKS Specifications are subject to change without notice. is a registered trademark of TP-LINK TECHNOLOGIES CO., LTD. Other brands and product names
TD-W8950ND 150Mbps Wireless Lite N ADSL2+ Modem Router
 TD-W8950ND 150Mbps Wireless Lite N ADSL2+ Modem Router Rev: 1.0.0 1910010316 COPYRIGHT & TRADEMARKS Specifications are subject to change without notice. is a registered trademark of TP-LINK TECHNOLOGIES
TD-8610/TD-8610B External ADSL2+ MODEM
 TD-8610/TD-8610B External ADSL2+ MODEM Rev: 1.0.2 1910010011 COPYRIGHT & TRADEMARKS Specifications are subject to change without notice. is a registered trademark of TP-LINK TECHNOLOGIES CO., LTD. Other
DSL-2600U. User Manual V 1.0
 DSL-2600U User Manual V 1.0 CONTENTS 1. OVERVIEW...3 1.1 ABOUT ADSL...3 1.2 ABOUT ADSL2/2+...3 1.3 FEATURES...3 2 SPECIFICATION...4 2.1 INDICATOR AND INTERFACE...4 2.2 HARDWARE CONNECTION...4 2.3 LED STATUS
TD-8840T ADSL2+ Modem Router
 TD-8840T ADSL2+ Modem Router Rev: 4.0.0 1910010648 COPYRIGHT & TRADEMARKS Specifications are subject to change without notice. is a registered trademark of TP-LINK TECHNOLOGIES CO., LTD. Other brands and
TD-8616 ADSL2+ Modem. Rev: 2.0.0 1910010591
 ADSL2+ Modem Rev: 2.0.0 1910010591 COPYRIGHT & TRADEMARKS Specifications are subject to change without notice. is a registered trademark of TP-LINK TECHNOLOGIES CO., LTD. Other brands and product names
COPYRIGHT & TRADEMARKS FCC STATEMENT EC DECLARATION OF CONFORMITY (EUROPE) SAFETY NOTICES
 SAFETY NOTICES") COPYRIGHT & TRADEMARKS Specifications are subject to change without notice. is a registered trademark of TP-LINK Technologies Co., Ltd. Other brands and product names are trademarks or registered trademarks
COPYRIGHT & TRADEMARKS Specifications are subject to change without notice. is a registered trademark of TP-LINK Technologies Co., Ltd. Other brands and product names are trademarks or registered trademarks
- 1 - Wireless Modem Router User Guide
 - 1 - Wireless Modem Router User Guide Copyright Statement is the registered trademark of Shenzhen Tenda Technology Co., Ltd. All the products and product names mentioned herein are the trademarks or registered
TD-8810 External ADSL2+ Router
 External ADSL2+ Router Rev: 1.1.2 1910010007 COPYRIGHT & TRADEMARKS Specifications are subject to change without notice. is a registered trademark of TP-LINK TECHNOLOGIES CO., LTD. Other brands and product
TL-WR340G TL-WR340GD 54Mbps Wireless Router
 TL-WR340G TL-WR340GD 54Mbps Wireless Router Rev: 1.0.4 1910010400 COPYRIGHT & TRADEMARKS Specifications are subject to change without notice. is a registered trademark of TP-LINK TECHNOLOGIES CO., LTD.
ADSL MODEM. User Manual V1.0
 ADSL MODEM User Manual V1.0 CONTENTS 1.OVERVIEW... 3 1.1 ABOUT ADSL... 3 1.2 ABOUT ADSL2/2+... 3 1.3 FEATURES... 3 2 SPECIFICATION... 4 2.1 INTERFACE INTRODUCTION... 4 2.1.1 INDICATOR AND INTERFACE...
TL-WA5210G 2.4GHz High Power Wireless Outdoor CPE
 TL-WA5210G 2.4GHz High Power Wireless Outdoor CPE Rev: 1.0.0 1910010274 COPYRIGHT & TRADEMARKS Specifications are subject to change without notice. is a registered trademark of TP-LINK TECHNOLOGIES CO.,
TD-W8960N 300Mbps Wireless N ADSL2+ Modem Router
 TD-W8960N 300Mbps Wireless N ADSL2+ Modem Router REV: 6.0.0 1910011225 COPYRIGHT & TRADEMARKS Specifications are subject to change without notice. is a registered trademark of TP-LINK TECHNOLOGIES CO.,
TL-WR743ND 150Mbps Wireless AP/Client Router
 Rev: 1.0.0 1910010341 COPYRIGHT & TRADEMARKS Specifications are subject to change without notice. is a registered trademark of TP-LINK TECHNOLOGIES CO., LTD. Other brands and product names are trademarks
TL-WA701ND 150Mbps Wireless Lite N Access Point
 150Mbps Wireless Lite N Access Point Rev: 2.0.1 1910010272 COPYRIGHT & TRADEMARKS Specifications are subject to change without notice. is a registered trademark of TP-LINK TECHNOLOGIES CO., LTD. Other
ADSL2/2+ Wireless-N Router 150Mbps plus
 ADSL2/2+ Wireless-N Router 150Mbps plus User s Manual Cod. KN.2R Warning The manufacturer is under no circumstances liable for any unauthorised modifications made to the product by the user or any other
User Manual. PePWave Surf / Surf AP Indoor Series: Surf 200, E200, AP 200, AP 400. PePWave Mesh Connector Indoor Series: MC 200, E200, 400
 User Manual PePWave Surf / Surf AP Indoor Series: Surf 200, E200, AP 200, AP 400 PePWave Mesh Connector Indoor Series: MC 200, E200, 400 PePWave Surf AP Series: Surf AP 200-X, E200-X, 400-X PePWave Surf
TL-WR543G 54M Wireless AP Client Router
 54M Wireless AP Client Router Rev: 1.0.2 I 1910010062 COPYRIGHT & TRADEMARKS Specifications are subject to change without notice. is a registered trademark of TP-LINK TECHNOLOGIES CO., LTD. Other brands
TL-WA801ND 300Mbps Wireless N Access Point
 300Mbps Wireless N Access Point Rev: 1.0.0 1910010218 COPYRIGHT & TRADEMARKS Specifications are subject to change without notice. is a registered trademark of TP-LINK TECHNOLOGIES CO., LTD. Other brands
Chapter 3 Connecting the Router to the Internet
 Chapter 3 Connecting the Router to the Internet This chapter describes how to set up the router on your Local Area Network (LAN) and connect to the Internet. It describes how to configure your DG834GT
TL-R860 Cable/DSL Router
 TL-R860 Cable/DSL Router Rev: 1.0.2 1910010010 COPYRIGHT & TRADEMARKS Specifications are subject to change without notice. is a registered trademark of TP-LINK TECHNOLOGIES CO., LTD. Other brands and product
How To Set Up A Router With A Network Address Barring (Networking) On A Pc Or Ipad On A Network With A Router On A Macbook Or Ipa On A Computer Or Ip Address On A Router (Netware) On
 On A Pc Or Ipad On A Network With A Router On A Macbook Or Ipa On A Computer Or Ip Address On A Router (Netware) On") 54M Wireless Router Rev:1.0.0 COPYRIGHT & TRADEMARKS Specifications are subject to change without notice. is a registered trademark of TP-LINK TECHNOLOGIES CO., LTD. Other brands and product names are
54M Wireless Router Rev:1.0.0 COPYRIGHT & TRADEMARKS Specifications are subject to change without notice. is a registered trademark of TP-LINK TECHNOLOGIES CO., LTD. Other brands and product names are
TD-W8961ND 300Mbps Wireless N ADSL2+ Modem Router
 300Mbps Wireless N ADSL2+ Modem Router Rev: 1.0.4 1910010481 COPYRIGHT & TRADEMARKS Specifications are subject to change without notice. is a registered trademark of TP-LINK TECHNOLOGIES CO., LTD. Other
COPYRIGHT & TRADEMARKS
 COPYRIGHT & TRADEMARKS Specifications are subject to change without notice. is a registered trademark of TP-LINK Technologies Co., Ltd. Other brands and product names are trademarks or registered trademarks
TL-WR340G/TL-WR340GD User Guide 54M Wireless Router
 User Guide 54M Wireless Router Rev:1.0.2 COPYRIGHT & TRADEMARKS Specifications are subject to change without notice. is a registered trademark of TP-LINK TECHNOLOGIES CO., LTD. Other brands and product
TL-WR941N TL-WR941ND Wireless N Router
 TL-WR941N TL-WR941ND Wireless N Router Rev: 1.0.0 COPYRIGHT & TRADEMARKS Specifications are subject to change without notice. is a registered trademark of TP-LINK TECHNOLOGIES CO., LTD. Other brands and
TL-R860 Cable/DSL Router
 TL-R860 Cable/DSL Router Rev: 1.0.2 1910010010 COPYRIGHT & TRADEMARKS Specifications are subject to change without notice. is a registered trademark of TP-LINK TECHNOLOGIES CO., LTD. Other brands and product
TL-WR340G/TL-WR340GD User Guide 54M Wireless Router
 User Guide 54M Wireless Router Rev: 1.0.2 1910010064 COPYRIGHT & TRADEMARKS Specifications are subject to change without notice. is a registered trademark of TP-LINK TECHNOLOGIES CO., LTD. Other brands
TL-WR641G 108M Wireless Router
 108M Wireless Router Rev: 1.1.0 19100100141 COPYRIGHT & TRADEMARKS Specifications are subject to change without notice. is a registered trademark of TP-LINK TECHNOLOGIES CO., LTD. Other brands and product
TD-W8968 300Mbps Wireless N USB ADSL2+ Modem Router
 TD-W8968 300Mbps Wireless N USB ADSL2+ Modem Router REV: 4.0.0 1910011227 COPYRIGHT & TRADEMARKS Specifications are subject to change without notice. is a registered trademark of TP-LINK TECHNOLOGIES CO.,
TL-WA830RE 300Mbps Wireless N Range Extender
 300Mbps Wireless N Range Extender Rev: 1.0.0 1910010538 COPYRIGHT & TRADEMARKS Specifications are subject to change without notice. is a registered trademark of TP-LINK TECHNOLOGIES CO., LTD. Other brands
Preface. Manual Revisions. Trademarks
 Preface D-Link reserves the right to revise this publication and to make changes in the content hereof without obligation to notify any person or organization of such revisions or changes. Manual Revisions
FCC STATEMENT. FCC RF Radiation Exposure Statement. CE Declaration of Conformity
 FCC STATEMENT This equipment has been tested and found to comply with the limits for a class B digital device, pursuant to part 15 of the FCC Rules. These limits are designed to provide reasonable protection
AC 1200. Wireless Dual Band ADSL2+ Modem Router. Highlights
 AC 1200 Wireless Dual Band ADSL2+ Modem Router Highlights 1200Mbps Wireless Speed 300Mbps on 2.4GHz + 867Mbps on 5GHz Broad Coverage Two external antennas provide maximum omni-directional wireless coverage
TL-R600VPN. SafeStream TM Gigabit Broadband VPN Router. Rev: 1.0.0 1910010557
 SafeStream TM Gigabit Broadband VPN Router Rev: 1.0.0 1910010557 COPYRIGHT & TRADEMARKS Specifications are subject to change without notice. is a registered trademark of TP-LINK TECHNOLOGIES CO., LTD.
TL-WA730RE 150Mbps Wireless Range Extender
 150Mbps Wireless Range Extender Rev: 1.0.0 1910010310 COPYRIGHT & TRADEMARKS Specifications are subject to change without notice. is a registered trademark of TP-LINK TECHNOLOGIES CO., LTD. Other brands
TL-WR642G 108M Wireless Router
 108M Wireless Router Rev:1.1.0 1910010142 COPYRIGHT & TRADEMARKS Specifications are subject to change without notice. is a registered trademark of TP-LINK TECHNOLOGIES CO., LTD. Other brands and product
TL-WR642G 108M Wireless Router
 108M Wireless Router Rev:1.0.1 1910010005 COPYRIGHT & TRADEMARKS Specifications are subject to change without notice. is a registered trademark of TP-LINK TECHNOLOGIES CO., LTD. Other brands and product
TL-WR340G TL-WR340GD 54Mbps Wireless Router
 TL-WR340G TL-WR340GD 54Mbps Wireless Router Rev: 1.0.5 1910010474 COPYRIGHT & TRADEMARKS Specifications are subject to change without notice. is a registered trademark of TP-LINK TECHNOLOGIES CO., LTD.
TL-WR743ND 150Mbps Wireless AP/Client Router
 Rev: 1.0.0 1910010341 COPYRIGHT & TRADEMARKS Specifications are subject to change without notice. is a registered trademark of TP-LINK TECHNOLOGIES CO., LTD. Other brands and product names are trademarks
TL-PS310U Single USB 2.0 Port MFP and Storage Server
 TL-PS310U Single USB 2.0 Port MFP and Storage Server Rev: 2.0.0 1910010313 Contents Chapter 1 Introduction... 1 1.1 Product Overview...1 1.2 Network Management...1 1.3 Components and Features...1 1.4 Hardware
Quick Installation Guide DSL-2750U/NRU. 3G/ADSL/Ethernet Router with Wi-Fi and Built-in Switch
 DSL-2750U/NRU 3G/ADSL/Ethernet Router with Wi-Fi and Built-in Switch BEFORE YOU BEGIN Delivery Package Router DSL-2750U/NRU Power adapter RJ-11 telephone cable Straight-through Ethernet cable (CAT 5E)
How To Set Up A Router With A Sim Sim Sims (Netlan) And A Sims 2 (Netnet) (Netline) (Lan) (Ipo) (Wired) (Wireless) (Powerline) And Sim
 And A Sims 2 (Netnet) (Netline) (Lan) (Ipo) (Wired) (Wireless) (Powerline) And Sim") 54Mbps Wireless ADSL2+ Modem Router Rev: 1.0.0 1910010453 COPYRIGHT & TRADEMARKS Specifications are subject to change without notice. is a registered trademark of TP-LINK TECHNOLOGIES CO., LTD. Other brands
54Mbps Wireless ADSL2+ Modem Router Rev: 1.0.0 1910010453 COPYRIGHT & TRADEMARKS Specifications are subject to change without notice. is a registered trademark of TP-LINK TECHNOLOGIES CO., LTD. Other brands
TD-W8961ND Wireless N ADSL2+ Modem Router
 TD-W8961ND Wireless N ADSL2+ Modem Router Rev: 1.0.1 1910010351 COPYRIGHT & TRADEMARKS Specifications are subject to change without notice. is a registered trademark of TP-LINK TECHNOLOGIES CO., LTD. Other
Overview. Introduction
 Table of Contents Manual... 1 Overview... 3 Introduction... 3 Package Contents... 4 System Requirements... 4 Hardware Overview... 5 Rear Panel... 5 Front Pannel... 6 Features... 7 Configuration... 8 Log
AC 750. Wireless Dual Band ADSL2+ Modem Router. Highlights
 AC 750 Wireless Dual Band ADSL2+ Modem Router Highlights 750Mbps Wireless Speed 300Mbps on 2.4GHz + 433Mbps on 5GHz Broad Coverage 2 external antennas provide maximum omni-directional wireless coverage
TL-R488T Load Balance Broadband Router
 Load Balance Broadband Router Rev: 1.1.2 COPYRIGHT & TRADEMARKS Specifications are subject to change without notice. is a registered trademark of TP-LINK TECHNOLOGIES CO., LTD. Other brands and product
WLAN600 Wireless IP Phone Administrator s Guide
 WLAN600 Wireless IP Phone Administrator s Guide Trademark Acknowledgement All brand names are trademarks or registered trademarks of their respective companies. Disclaimer This document is supplied by
GHz 2.4 802.11g. Wireless-G. User Guide. ADSL Gateway with 2 Phone Ports WIRELESS WAG54GP2. Model No.
 GHz 2.4 802.11g WIRELESS Wireless-G ADSL Gateway with 2 Phone Ports User Guide Model No. WAG54GP2 Copyright and Trademarks Specifications are subject to change without notice. Linksys is a registered trademark
Ovislink OV504WN User Manual. Ver 1.0
 Ovislink OV504WN User Manual Ver 1.0 Contents 1 Safety Precautions... 1 2 Overview... 2 2.1 Application... 2 2.2 Features... 2 2.3 Standards Compatibility and Compliance... 3 3 Hardware Description and
TL-R480T SMB Broadband Router
 SMB Broadband Router Rev: 1.1.2 1910010056 COPYRIGHT & TRADEMARKS Specifications are subject to change without notice. is a registered trademark of TP-LINK TECHNOLOGIES CO., LTD. Other brands and product
Broadband Router ESG-103. User s Guide
 Broadband Router ESG-103 User s Guide FCC Warning This equipment has been tested and found to comply with the limits for Class A & Class B digital device, pursuant to Part 15 of the FCC rules. These limits
BiPAC 7404V series. VoIP/(802.11g) ADSL2+ (VPN) Firewall Router. Quick Start Guide
 ADSL2+ (VPN) Firewall Router. Quick Start Guide") BiPAC 7404V series VoIP/(802.11g) ADSL2+ (VPN) Firewall Router Quick Start Guide VoIP/(802.11g) ADSL2+ (VPN) Firewall Router For more detailed instructions on configuring and using the Billion VoIP/(802.11g)
BiPAC 7404V series VoIP/(802.11g) ADSL2+ (VPN) Firewall Router Quick Start Guide VoIP/(802.11g) ADSL2+ (VPN) Firewall Router For more detailed instructions on configuring and using the Billion VoIP/(802.11g)
TL-MR3420 3G/3.75G Wireless N Router
 Rev: 1.0.0 1910010314 COPYRIGHT & TRADEMARKS Specifications are subject to change without notice. is a registered trademark of TP-LINK TECHNOLOGIES CO., LTD. Other brands and product names are trademarks
NOTICE. All brand and product names are the trademarks of their respective owners. Copyright 2011 All rights reserved.
 X7N USER MANUAL NOTICE This document contains proprietary information protected by copyright, and this Manual and all the accompanying hardware, software, and documentation are copyrighted. No part of
TL-WR740N TL-WR741ND 150Mbps Wireless N Router
 TL-WR740N TL-WR741ND Rev: 3.0.0 1910010520 COPYRIGHT & TRADEMARKS Specifications are subject to change without notice. is a registered trademark of TP-LINK TECHNOLOGIES CO., LTD. Other brands and product
Prestige 623R-T. Quick Start Guide. ADSL Dual-link Router. Version 3.40
 Prestige 623R-T ADSL Dual-link Router Quick Start Guide Version 3.40 February 2004 Introducing the Prestige The Prestige 623R-T ADSL Dual-link Router is the ideal all-in-one device for small networks connecting
TD-8840 User Guide ADSL2+ Modem Router
 TD-8840 User Guide ADSL2+ Modem Router Rev: 2.0.1 1910010192 COPYRIGHT & TRADEMARKS Specifications are subject to change without notice. is a registered trademark of TP-LINK TECHNOLOGIES CO., LTD. Other
Wireless Broadband Router. Manual
 Wireless Broadband Router Manual 1 Introduction... 4 Features... 4 Minimum Requirements... 4 Package Content... 4 Note... 4 Get to know the Broadband Router... 5 Back Panel... 5 Front Panel... 6 Setup
N150 WiFi Router (N150R)
") Easy, Reliable & Secure N150 WiFi Router (N150R) User Manual 350 East Plumeria Drive San Jose, CA 95134 USA August 2012 202-11000-01 v1.0 Trademarks Brand and product names are trademarks or registered
Easy, Reliable & Secure N150 WiFi Router (N150R) User Manual 350 East Plumeria Drive San Jose, CA 95134 USA August 2012 202-11000-01 v1.0 Trademarks Brand and product names are trademarks or registered
TL-WR1043N TL-WR1043ND Wireless N Gigabit Router
 TL-WR1043N TL-WR1043ND Rev: 1.0.0 1910010216 COPYRIGHT & TRADEMARKS Specifications are subject to change without notice. is a registered trademark of TP-LINK TECHNOLOGIES CO., LTD. Other brands and product
MN-700 Base Station Configuration Guide
 MN-700 Base Station Configuration Guide Contents pen the Base Station Management Tool...3 Log ff the Base Station Management Tool...3 Navigate the Base Station Management Tool...4 Current Base Station
A Division of Cisco Systems, Inc. Broadband Router. with 2 Phone Ports. Voice Installation and Troubleshooting Guide RTP300. Model No.
 A Division of Cisco Systems, Inc. Broadband Router with 2 Phone Ports Voice Installation and Troubleshooting Guide Model No. RTP300 Copyright and Trademarks Specifications are subject to change without
TP-LINK TD-W8901G. Wireless Modem Router. Advanced Troubleshooting Guide
 TP-LINK TD-W8901G Wireless Modem Router Advanced Troubleshooting Guide Released on 2009.09.25 Version 1.0 Content Summary... 3 Troubleshooting Flow Chart and Resolutions... 3 Check 1... 3 Check 2... 4
300Mbps Wireless N VoIP VDSL/ADSL Modem Router
 300Mbps Wireless N VoIP VDSL/ADSL Modem Router TD-VG5612 Highlights Fast Broadband Speeds Up to 100Mbps broadband speeds, ideal for smooth streaming media and online gaming Cost-Effective VoIP Supports
TG-3468 Gigabit PCI Express Network Adapter
 TG-3468 Rev:2.0.0 1910010580 COPYRIGHT & TRADEMARKS Specifications are subject to change without notice. is a registered trademark of TP-LINK TECHNOLOGIES CO., LTD. Other brands and product names are trademarks
How To Get A Wireless Router For Free From $99.99 On Amazon.Com (For A Limited Time) (For An Extra $99) ( For A Long Distance) (On A 2.99/99) For A Year
 (For An Extra $99) ( For A Long Distance) (On A 2.99/99) For A Year") AC 750 Wireless Dual Band Gigabit ADSL2+ Modem Router Highlights 750Mbps Wireless Speed 300Mbps on 2.4GHz + 433Mbps on 5GHz Broad Coverage 3 external detachable antennas provide maximum omni-directional
AC 750 Wireless Dual Band Gigabit ADSL2+ Modem Router Highlights 750Mbps Wireless Speed 300Mbps on 2.4GHz + 433Mbps on 5GHz Broad Coverage 3 external detachable antennas provide maximum omni-directional
Quick Installation Guide DSL-2750U. 3G/ADSL/Ethernet Router with Wi-Fi and Built-in Switch
 DSL-2750U 3G/ADSL/Ethernet Router with Wi-Fi and Built-in Switch BEFORE YOU BEGIN Delivery Package Router DSL-2750U Power adapter DC 12V/1A RJ-11 telephone cable Ethernet cable (CAT 5E) Splitter (brochure).
Wireless Router Setup Manual
 Wireless Router Setup Manual NETGEAR, Inc. 4500 Great America Parkway Santa Clara, CA 95054 USA 208-10082-02 2006-04 2006 by NETGEAR, Inc. All rights reserved. Trademarks NETGEAR is a trademark of Netgear,
WLAN660 Wireless IP Phone Administrator s Guide
 FEDERAL COMMUNICATIONS COMMISSION This device complies with Part 15 of the FCC Rules. Operation is subject to the following two conditions: (1) this device may not cause harmful interference, and (2) this
Table of Contents. D-Link DSL-2640U User Manual 1
 Table of Contents D-Link DSL-2640U User Manual 1 Table of Contents PACKAGE CONTENTS... 4 SYSTEM REQUIREMENTS... 4 FEATURES... 5 HARDWARE OVERVIEW... 7 Connections... 7 LEDs... 8 INSTALLATION... 9 BEFORE
Quidway W1000 Series Wireless Access Device WA1003A Wireless ADSL Access Point User Manual
 Quidway W1000 Series Wireless Access Device WA1003A Wireless ADSL Access Point User Manual HUAWEI Quidway W1000 Series Wireless Access Device WA1003A Wireless ADSL Access Point User Manual Quidway W1000
TW100-BRV204 VPN Firewall Router
 TW100-BRV204 VPN Firewall Router Cable/DSL Internet Access 4-Port Switching Hub User's Guide Table of Contents CHAPTER 1 INTRODUCTION... 1 TW100-BRV204 Features... 1 Package Contents... 3 Physical Details...
ENHWI-N3. 802.11n Wireless Router
 ENHWI-N3 802.11n Wireless Router Product Description Encore s ENHWI-N3 802.11n Wireless Router s 1T1R Wireless single chip can deliver up to 3x faster speed than of 802.11g devices. ENHWI-N3 supports home
TD-8811 ADSL2+ Modem Router
 ADSL2+ Modem Router Rev: 1.0.2 1910010224 COPYRIGHT & TRADEMARKS Specifications are subject to change without notice. is a registered trademark of TP-LINK TECHNOLOGIES CO., LTD. Other brands and product
Broadband Phone Gateway BPG510 Technical Users Guide
 Broadband Phone Gateway BPG510 Technical Users Guide (Firmware version 0.14.1 and later) Revision 1.0 2006, 8x8 Inc. Table of Contents About your Broadband Phone Gateway (BPG510)... 4 Opening the BPG510's
DSL-584T ADSL2+ Router User Guide
 DSL-584T ADSL2+ Router User Guide January 2006 ESL584TEU.A1G FCC Warning This device complies with part 15 of the FCC Rules. Operation is subject to the following two conditions: (1) This device may not
WL830RT4 Wireless G Broadband Router
 WL830RT4 Wireless G Broadband Router User Manual VERSION 1.0 Contents About the Manual... 6 About the Router... 7 Specifications...8 Requirements...9 Device Design...9 Front Panel...9 Rear Panel...10 Getting
Broadband ADSL2+ Modem DM111PSPv2
 Broadband ADSL2+ Modem DM111PSPv2 User Manual 350 East Plumeria Drive San Jose, CA 95134 USA August 2011 202-10913-01 v1.0 2011 NETGEAR, Inc. All rights reserved No part of this publication may be reproduced,
Table of Contents. D-Link DSL-2730U User Manual 1
 Table of Contents D-Link DSL-2730U User Manual 1 Table of Contents PACKAGE CONTENTS... 4 SYSTEM REQUIREMENTS... 4 FEATURES... 5 HARDWARE OVERVIEW... 7 Connections... 7 LEDs... 8 INSTALLATION... 9 BEFORE
Front LEDs... 2 Rear Ports... 3 BASIC INSTALLATION... 4 Connecting Your Router... 5 Network Configuration... 6
 0 P a g e Table of contents Front LEDs... 2 Rear Ports... 3 BASIC INSTALLATION... 4 Connecting Your Router... 5 Network Configuration... 6 Gateway Configuration... 11 Accessing your gateway... 11 Displaying
TL-PS310U Single USB 2.0 Port MFP and Storage Server
 Single USB 2.0 Port MFP and Storage Server REV3.0.0 1910010947 COPYRIGHT & TRADEMARKS Specifications are subject to change without notice. is a registered trademark of TP-LINK TECHNOLOGIES CO., LTD. Other
DSL-G604T Install Guides
 Internet connection with NAT...2 Internet connection with No NAT, IP Un-number...6 Port Forwarding...12 Filtering & Firewall Setup...20 Access Control... 21 DMZ Setup... 26 Allow Incoming Ping... 27 How
User Manual X5668 / X5668U. ADSL2+ Gateway with 4-port Ethernet Switch 802.11b/g Wireless AP Optional one USB 2.0 host port
 User Manual X5668 / X5668U ADSL2+ Gateway with 4-port Ethernet Switch 802.11b/g Wireless AP Optional one USB 2.0 host port Issue 1.1 6 h May. 2008 I Inteno Broadband Technology AB Tel: +46 8 579 190 00
AIP-W512. 802.11n Packet Travel Router. Rev: 1.0.0
 802.11n Packet Travel Router Rev: 1.0.0 FCC STATEMENT This equipment has been tested and found to comply with the limits for a Class B digital device, pursuant to part 15 of the FCC Rules. These limits
P-660HN-51. 802.11n Wireless ADSL2+ 4-port Gateway DEFAULT LOGIN DETAILS. Firmware Version 1.10 Edition 1, 9/2010. IP Address: http://192.168.1.
 P-660HN-51 802.11n Wireless ADSL2+ 4-port Gateway Firmware Version 1.10 Edition 1, 9/2010 DEFAULT LOGIN DETAILS IP Address: http://192.168.1.1 User Name: admin Password: 1234 www.zyxel.com Copyright 2010
WR1500N 150Mbps Wireless N Router
 WR1500N 150Mbps Wireless N Router 1910020625 REV 2.1.0 FCC STATEMENT This equipment has been tested and found to comply with the limits for a Class B digital device, pursuant to part 15 of the FCC Rules.
Nokia Siemens Networks. CPEi-lte 7212. User Manual
 Nokia Siemens Networks CPEi-lte 7212 User Manual Contents Chapter 1: CPEi-lte 7212 User Guide Overview... 1-1 Powerful Features in a Single Unit... 1-2 Front of the CPEi-lte 7212... 1-2 Back of the CPEi-lte
RedRapid X WIRELESS MODEM ROUTER. Quick Installation Guide (DN-7060)
") RedRapid X WIRELESS MODEM ROUTER Quick Installation Guide (DN-7060) 1. Product Introduction Congratulations on purchasing this Wireless N ADSL2/2+ Router. This router is a cost-effective ADSL2+ router,
RedRapid X WIRELESS MODEM ROUTER Quick Installation Guide (DN-7060) 1. Product Introduction Congratulations on purchasing this Wireless N ADSL2/2+ Router. This router is a cost-effective ADSL2+ router,
C2-010/C2-010-I ADSL2+ Router
 s C2-010/C2-010-I ADSL2+ Router User s Manual Rev: 1.3 2005/1210 No part of this publication may be reproduced in any form by any means without the prior written permission. Other trademarks or brand names
N300 Wireless ADSL2+ Modem Router DGN2200M Mobile Edition
 N300 Wireless ADSL2+ Modem Router DGN2200M Mobile Edition User Manual 350 East Plumeria Drive San Jose, CA 95134 USA November 2011 202-10604-02 v1.0 2011 NETGEAR, Inc. All rights reserved No part of this
TW100-BRF114 Firewall Router. User's Guide. Cable/DSL Internet Access. 4-Port Switching Hub
 TW100-BRF114 Firewall Router Cable/DSL Internet Access 4-Port Switching Hub User's Guide Table of Contents CHAPTER 1 INTRODUCTION...1 TW100-BRF114 Features...1 Package Contents...3 Physical Details...
TL-MR3220 3G/3.75G Wireless Lite N Router
 Rev: 1.0.0 1910010350 COPYRIGHT & TRADEMARKS Specifications are subject to change without notice. is a registered trademark of TP-LINK TECHNOLOGIES CO., LTD. Other brands and product names are trademarks
UIP1868P User Interface Guide
 UIP1868P User Interface Guide (Firmware version 0.13.4 and later) V1.1 Monday, July 8, 2005 Table of Contents Opening the UIP1868P's Configuration Utility... 3 Connecting to Your Broadband Modem... 4 Setting
LevelOne. User Manual. FBR-1430 VPN Broadband Router, 1W 4L V1.0
 LevelOne FBR-1430 VPN Broadband Router, 1W 4L User Manual V1.0 Table of Contents CHAPTER 1 INTRODUCTION... 1 VPN BROADBAND ROUTER FEATURES... 1 Internet Access Features... 1 Advanced Internet Functions...
PCMCIA Wireless LAN Card User s Manual
 PCMCIA Wireless LAN Card User s Manual Rev 1.0 Regulatory compliance FCC Warning This equipment has been tested and found to comply with the limits for a Class B digital device, pursuant to part 15 of
TD-W9980 N600 Wireless Dual Band Gigabit VDSL2 Modem Router
 N600 Wireless Dual Band Gigabit VDSL2 Modem Router Rev: 1.0.0 1910010923 COPYRIGHT & TRADEMARKS Specifications are subject to change without notice. is a registered trademark of TP-LINK TECHNOLOGIES CO.,
 Setup The Setup screen is the first screen you will see when accessing the Gateway. Most users will be able to configure the Gateway and get it working properly using only the settings on this screen.