IT Administrator Guide for Mass Deployment of WebEx Productivity Tools
|
|
|
- Jonathan Smith
- 10 years ago
- Views:
Transcription
1 IT Administrator Guide for Mass Deployment of WebEx Productivity Tools Version 2.0

2 COPYRIGHT Cisco and/or its affiliates. All rights reserved. WEBEX, CISCO, Cisco WebEx, the CISCO logo, and the Cisco WebEx logo are trademarks or registered trademarks of Cisco and/or its affiliated entities in the United States and other countries. Third-party trademarks are the property of their respective owners. U.S. Government End User Purchasers. The Documentation and related Services qualify as "commercial items," as that term is defined at Federal Acquisition Regulation ("FAR") (48 C.F.R.) Consistent with FAR and DoD FAR Supp through , and notwithstanding any other FAR or other contractual clause to the contrary in any agreement into which the Agreement may be incorporated, Customer may provide to Government end user or, if the Agreement is direct, Government end user will acquire, the Services and Documentation with only those rights set forth in the Agreement. Use of either the Services or Documentation or both constitutes agreement by the Government that the Services and Documentation are commercial items and constitutes acceptance of the rights and restrictions herein. Last updated: ii
 (48 C.F.R.) 2.101. Consistent with FAR 12.212 and DoD FAR Supp.")
3 Table of Contents Copyright Introduction...1 WebEx Productivity Tools features list...1 Packages of WebEx Productivity Tools...1 Normal installation Silent installation by administrator...2 Silent installation by using the command line...2 Silent uninstallation by using the command line Silent installation via SMS...4 Limitations for silent installation...4 Advertising WebEx Productivity Tools using the SMS per-system unattended program Pre-installation steps Installation steps... 5 Removing Productivity Tools components by using the SMS per-system unattended program Pre-installation steps Installation steps...15 Adding Productivity Tools components by using the SMS per-system unattended program Pre-installation steps Installation steps...17 Uninstalling Productivity Tools using the SMS per-system uninstall program Pre-installation Steps Installation steps...20 Advertising the program to update the new version of WebEx Productivity Tools Pre-installation steps Installation steps Creating a package from a definition Installing WebEx Notes scripts using the Admin Tool Installing the WebEx Lotus Notes Integration Admin Tool Creating a new mail template Assigning the newly created WebEx mail template to one user or multiple users Assigning a new WebEx template to a single user Assigning the WebEx Lotus Notes Integration template to multiple users...31 Appendix A: Lotus Notes Integration tool and templates WebEx Lotus Notes Integration Admin Tool using the nwinstal command Deleting the WebEx Lotus Notes Integration mail template file Appendix B: Known issues Appendix C: Registry and files installed iii

4

5 1.0 INTRODUCTION This document is designed to help your organization understand the tasks involved in installing WebEx Productivity Tools (PT). The WebEx Productivity Tools Installation Guide is a comprehensive guide that covers various types of installations, including a single-computer installation and large-scale installations via Microsoft Systems Management Server 2003 (SMS). WebEx Productivity Tools features list WebEx Integration to Outlook WebEx Integration to Lotus Notes WebEx One-Click Meeting o Microsoft Windows right-click menus o WebEx toolbar for Microsoft Office o Microsoft Excel o Microsoft PowerPoint o Microsoft Word o WebEx button for Internet Explorer o WebEx button for Firefox WebEx instant messenger Integration o Microsoft Office Communicator, MSN, Windows Messenger o Lotus Sametime o Yahoo! Messenger o Google Talk o AOL o Skype Packages of WebEx Productivity Tools For Microsoft Outlook users: ptools.msi This package contains all components of WebEx Productivity Tools. For IBM Lotus Notes users: WebEx Productivity Tools for Lotus Notes consists of two parts, the WebEx script on the Domino server in the user s mail database, and the WebEx binary files in the Notes folder on the user s PC: ptdomtl.msi This package contains the WebEx Admin Tool for Integration to Lotus Notes. It inserts the WebEx script into the mail template. This script is for use by the Domino administrator. ptoolsniclient.msi This package contains all binary components of WebEx Productivity Tools ptoolsni.msi This package contains all components of WebEx Productivity Tools and can insert the WebEx script if the user has Manager or Designer privileges for Notes. The user s template will be locked, and cannot be refreshed. Your WebEx site administrator can determine which package to use. If the Do not allow user to update the mail template on Domino server option is selected in the WebEx site administration options, the WebEx download page will use ptoolsniclient.msi; if that option is not selected, the WebEx download 1

6 page will use ptoolsni.msi. The following figure shows this option, which is available on the Productivity Tools page of the site administration options: Normal installation Every domain user can install WebEx Productivity Tools on his or her desktop by running the MSI package directly. 2.0 SILENT INSTALLATION BY ADMINISTRATOR If you are the domain administrator, you can log on to a user s computer and help a normal user install or uninstall WebEx Productivity Tools using silent mode. Silent installation by using the command line If you are the domain administrator, follow these steps to install WebEx Productivity Tools by using the command line: Log on to user s computer. Download the MSI package to some location and then opens the Window Command Prompt. (On Windows Vista, you must use run as administrator to open it.) Run the MSI command to install WebEx Productivity Tools silently. Restart computer after installation is recommended. This sample command shows how to install all components with the MSI package ptoolsniclient.msi. msiexec.exe /q /i "ptoolsniclient.msi" SITEURL=" OI=1 NI=1 OC=1 OFFICE=1 IE=1 FIREFOX=1 RMENU=1 YAHOO=1 SKYPE=1 AOL=1 SAMETIME=1 MSN=1 GTALK=1 This sample command shows how to install all components with the MSI package ptools.msi: msiexec.exe /q /i "ptools.msi" SITEURL=" OI=1 OC=1 OFFICE=1 IE=1 FIREFOX=1 RMENU=1 YAHOO=1 SKYPE=1 AOL=1 SAMETIME=1 MSN=1 GTALK=1 2

7 Table 1: Table of Productivity Tools Flags Parameter Name Value (Default?) Description. OI 1 Enable Outlook Integration 0 (Default) Disable Outlook Integration NI 1 Enable Lotus Notes Integration 0 (Default) Disable Lotus Notes Integration OC 1(Default) Enable One-Click 0 Remove One-Click from desktop and start menu OFFICE 1 Enable WebEx Toolbar for Microsoft Office (Word, Excel, PowerPoint) 0 (Default) Disable WebEx Toolbar for Microsoft Office (Word, Excel, PowerPoint) IE 1 Enable WebEx button for Internet Explorer 0 (Default) Disable WebEx button for Internet Explorer FIREFOX 1 Enable WebEx Firefox button 0 (Default) Disable WebEx Firefox button RMENU 1 Enable right-click menu 0 (Default) Disable right-click menu YAHOO 1 Enable instant messenger integration for Yahoo 0 (Default) Disable instant messenger integration for Yahoo SKYPE 1 Enable instant messenger integration for Skype 0 (Default) Disable instant messenger integration for Skype AOL 1 Enable instant messenger integration for AOL 0 (Default) Disable instant messenger integration for AOL SAMETIME 1 Enable instant messenger integration for Sametime 0 (Default) Disable instant messenger integration for Sametime MSN 1 Enable instant messenger integration for MSN, Microsoft Office Communicator, and Windows Messenger 0 (Default) Disable instant messenger integration for MSN, Microsoft Office Communicator, and Windows Messenger GTALK 1 Enable instant messenger integration for GoogleTalk 0 (Default) Disable instant messenger integration for GoogleTalk Silent uninstallation by using the command line If you are the domain administrator, follow these steps to uninstall WebEx Productivity Tools by using the command line: 3
 Disable WebEx button for Internet Explorer FIREFOX 1 Enable WebEx Firefox button 0 (Default) Disable WebEx Firefox button RMENU 1 Enable")
8 1. Download the MSI package to some location and opens the Windows Command Prompt. (On Windows Vista, you must use run as administrator to open it.) 2. Run the MSI command to uninstall WebEx Productivity Tools silently. This sample shows how to uninstall all components with the MSI package ptoolsniclient.msi: msiexec.exe /q /x "ptoolsniclient.msi" This sample shows uninstall all components with MSI package ptools.msi: msiexec.exe /q /x "ptools.msi" 3.0 SILENT INSTALLATION VIA SMS Limitations for silent installation SMS per-user mode cannot be supported. The WebEx Integration to Lotus Notes has these limitations: o The WebEx ball does not appear on Lotus Notes toolbar if WebEx Productivity Tools are installed with a silent installer. o When the second user logs in the system, that user has to enter his or her account on WebEx Settings dialog box before Lotus Notes Integration can be used. If WebEx Productivity Tools are installed with silent installation, the Tools tab cannot be enabled and site settings cannot be updated after a user switches to a different site. If you install WebEx Productivity Tools on a machine where MSN, Sametime, and Lotus Notes are not installed, the corresponding options on the Tools tab are turned off and dimmed. If the SMS administrator wants to add a feature for WebEx Productivity Tools, the administrator must run the REMOVE command first and then run the ADDSOURCE command, even though the feature has not been installed before. If a user logs on to a computer with remote desktop while their administrator advertises the package, he or she must restart the computer to make sure WebEx Productivity Tools will work normally. After silent installation, all of the instant messenger integrations will not be effective until user logs off the computer and logs on back again. After an administrator removes the Sametime integration, a user can continue to use it until the user logs off the computer and logs on back again. Advertising WebEx Productivity Tools using the SMS per-system unattended program Pre-installation steps If you are the SMS administrator, follow these steps to advertise WebEx Productivity Tools using the SMS per-system unattended program: 1. Disable Auto Install and Auto Update in the WebEx Site Administration options: 4

9 o Log on to the Site Administration page and navigate to Site Settings Productivity Tools. o Turn off the Automatically install Productivity Tools when hosts log in to the site option and the Automatically update Productivity Tools option when new versions are available options. 2. If the Lotus Notes Integration is enabled, install WebEx scripts for Lotus Notes. If Lotus Notes Integration is included in the installation, and if the Lotus Notes Integration option is selected, the Domino administrator must install WebEx Notes Scripts using the Admin Tools for Notes User. Refer to Installing WebEx Notes scripts using the Admin Tool Installation steps If you are the SMS administrator, follow these steps to install WebEx Productivity Tools: 1. Create a package from the definition. Refer to Creating a package from a definition. 2. Change the program options for Per-system unattended before advertisement. a. Open the SMS administrator console and navigate to Site Database Packages WebEx Communications, Inc WebEx Productivity Tools 1.0.xx English Programs. The administrator should right-click the Per-system unattended option and then click Properties to open the Per-system unattended Program Properties dialog box. b. On the Properties dialog box, click the Environment tab. For the Program can run option, select Only when a user is logged on. For the Run mode option, select Run with administrative rights. (Do not turn on Allow users to interact with this program.) 5

10 c. On the Properties dialog, click the General tab. d. Append an additional parameter to the command line option to specify some options for WebEx Productivity Tools: Append SITEURL= to specify the WebEx Site URL used by your company. Append Productivity Tools flags to specify which component is enabled for WebEx Productivity Tools. The parameters should be uppercase and the default value is 0 (Disabled). 6

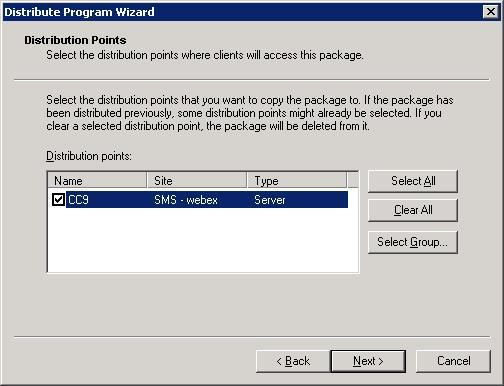
11 In the following example, the initial command line is msiexec.exe /q ALLUSERS=2 /m MSIZWPBY /i "ptoolsniclient.msi" Append Productivity Tools flags and parameters to the command line: msiexec.exe /q ALLUSERS=2 /m MSIZWPBY /i "ptoolsniclient.msi" SITEURL=" OI=1 NI=1 OC=1 OFFICE=1 IE=1 FIREFOX=1 RMENU=1 YAHOO=1 SKYPE=1 AOL=1 SAMETIME=1 MSN=1 GTALK=1 Refer to Table 1: Table of Productivity Tools Flags on page 3 for a list of the WebEx Productivity Tools flags. 2. Advertise the program: a) Open the SMS administrator console and navigate to Site Database Packages WebEx Communications, Inc WebEx Productivity Tools 1.0.xx English Programs. b) Right-click Per-system unattended. c) Choose All Tasks Distribute Software. 7
 Open the SMS administrator console and navigate to Site Database Packages WebEx Communications, Inc WebEx Productivity Tools 1.0.")
12 d) Click Next in the Distribute Program Wizard. 8


13 e) Select the SMS Server. 9

14 f) Select the collection. g) Specify the advertisement name. 10


15 h) Specify whether the advertisement should apply to subcollections. 11


16 i) Specify when the program will be advertised. j) Specify whether to assign the program. 12
 Specify whether to")
17 k) Click Finish on the Completing the Distribute Program Wizard page. 13

18 l) Navigate to the \Site Database\System Status\Advertisement Status directory and check the advertisement status. m) If you enable notification, the user will see the following message after the program has been advertised. The assigned program will run silently. 14

19 Removing Productivity Tools components by using the SMS per-system unattended program Pre-installation steps If you are the Domino administrator, and if Lotus Notes Integration is included in this installation, you must remove Notes Scripts using Admin Tools for Notes User before installing. Refer to Installing WebEx Notes scripts using the Admin Tool Installation steps If you are the SMS administrator, follow these steps to remove Productivity Tools components: 1. Create a new program and copy all the options from the per-system unattended program created in section 4.1, and then update the command line: a. Open the SMS administrator console and navigate to Site Database Packages WebEx Communications, Inc WebEx Productivity Tools 1.0.xx English Programs. b. Right-click the blank area and then choose New Program. c. Input the program name and default command line. 15

20 d. In the Properties dialog box, click the Environment tab. For the Program can run option, select Only when a user is logged on. For the Run mode option, select Run with administrative rights. (Do not turn on Allow users to interact with this program). e. Update the command-line on the General tab. Append REMOVE to the command line and specify the features that need be removed. Parameter Name Value Description REMOVE OI,NI,OFFICE,IE, Specify features of FIREFOX,RMENU,PTIM, Productivity Tools to be SAMETIME removed. (Separated by commas. Quotes are required) If you want to remove RMENU and OFFICE, you should use the following sample command line: msiexec.exe /q ALLUSERS=2 /m MSII5HK3 /i "ptools.msi" REMOVE="OFFICE,RMENU" The PTIM value is for the WebEx integration to instant messengers. You can use PTIM as shown in the following sample command line: msiexec.exe /q ALLUSERS=2 /m MSII5HK3 /i "ptools.msi" REMOVE="PTIM" 16
 If you want to remove RMENU and OFFICE, you should use the following sample command line: msiexec.exe /q ALLUSERS=2 /m MSII5HK3 /i \"ptools.")
21 2. Advertise the program to the specified collection of work machines in the domain. WebEx Productivity Tools will be updated on these machines silently. Refer to the steps in Silent installation via SMS. 3. WebEx Productivity Tools will be updated on these machines silently. Adding Productivity Tools components by using the SMS per-system unattended program. You are the SMS administrator and you want to add a component for Productivity Tools, you must run REMOVE first and then run ADDSOURCE, even though the component has not been installed before Pre-installation steps If you are the Domino Administrator and if Lotus Notes Integration is included in this installation, you must install Notes Scripts using Admin Tools for Notes User. Refer to Install WebEx Notes Scripts using the Admin Tool Installation steps If you are the SMS administrator, follow these steps to install WebEx Productivity Tools: 1. Create a new program named Add-phase1 and copy all the options from per-system unattended program created in section 4.1, and then update the command line: a) Open the SMS administrator console and navigate to Site Database Packages WebEx Communications, Inc WebEx Productivity Tools 1.0.xx English Programs. b) Right-click the blank area and then choose New Program. c) Enter the program name and default command line. 17
22 d) On the properties dialog and click the Environment tab. For the Program can run option, select Only when a user is logged on. For the Run mode option, select Run with administrative rights. (Do not turn on Allow users to interact with this program). e) Update the command line on the General tab: Append REMOVE to the command line and specify the features that need be added. Parameter Name Value Description REMOVE OI,NI,OFFICE,IE, Specify features of FIREFOX,RMENU,PTIM, Productivity Tools to be SAMETIME removed. (Separated by commas) If you want to add RMENU, OFFICE, and PTIM, (the PTIM value is for the WebEx integration to instant messengers), you must REMOVE them first, even if they are not already installed. See the following sample command line: msiexec.exe /q ALLUSERS=2 /m MSII5HK3 /i "ptools.msi" REMOVE="OFFICE,RMENU,PTIM" 2. Advertises the program to the specified collection of work machines in the domain. Refer to Advertising WebEx Productivity Tools using the SMS per-system unattended program. 18
23 3. Create a second program name Add-phrase2 and copy all the options from per-system unattended program, which was created in section 4.1, and then update the command line: a) Open the SMS administrator console, navigate to Site Database Packages WebEx Communications, Inc WebEx Productivity Tools 1.0.xx English Programs. b) Right click the blank area and then select New Program. c) Enter the program name and default command line. d) On the Properties dialog, click the Environment tab. For the Program can run option, select Only when a user is logged on. For the Run mode option, select Run with administrative rights. (Do not turn on Allow users to interact with this program.) e) On the Properties dialog, click the Advanced tab. Turn on Run another program first and select program Add-phase1. f) Update the command line on the General tab. Append ADDSOURCE to the command line and specify the features that need be added. 19
24 Parameter Name Value Description ADDSOURCE OI,NI,OFFICE,IE, Specify features of FIREFOX,RMENU,PTIM, Productivity Tools to be SAMETIME removed. (Separated by commas. Quotes are required) If you want to add RMENU, OFFICE, and YAHOO, use the following sample command line: msiexec.exe /q ALLUSERS=2 /m MSII5HK3 /i "ptools.msi" ADDSOURCE="OFFICE,RMENU,PTIM" OFFICE=1 RMENU=1 YAHOO=1 4. Advertise the program to the specified collection of work machines in the domain. Refer to the steps in Advertising WebEx Productivity Tools using the SMS per-system unattended program on page WebEx Productivity Tools will be updated on these machines silently. Uninstalling Productivity Tools using the SMS per-system uninstall program Pre-installation Steps If you are the domino administrator and if Lotus Notes Integration is included in this installation, you must uninstall Notes Scripts using Admin Tools for Notes Users. Refer to Installing WebEx Notes scripts using the Admin Tool Installation steps If you are the SMS administrator, follow these steps to uninstall WebEx Productivity Tools using the SMS per-system uninstall program: 1. Use the SMS Installation package created in section Advertises the per-system uninstall program to uninstall WebEx Productivity Tools. 3. WebEx Productivity Tools will be uninstalled on these machines silently. Advertising the program to update the new version of WebEx Productivity Tools Pre-installation steps If you are the WebEx site administrator, follow these steps before advertising the program to update the new version of WebEx Productivity Tools: 1. Disable automatic installation and automatic update on the WebEx service Web site. 20
25 Log on to the Site Administration page, navigate to Site Settings Productivity Tools, and turn off the Automatically install Productivity Tools when hosts log in to the site and Automatically update Productivity Tools when new versions are available options. 2. If you are the Domino administrator and if Lotus Notes Integration is included in this installation, you must update Notes Scripts using Admin Tools for Notes Users. Refer to Installing WebEx Notes scripts using the Admin Tool Installation steps If you are the SMS administrator, follow these steps to advertise the program to update the new version of WebEx Productivity Tools: 1. Create a new SMS installation package using the WebEx Productivity Tools MSI package. Refer to Creating a package from a definition. 2. The SMS administrator changes the program options for Per-system unattended before advertisement. Refer to Adding Productivity Tools components by using the SMS per-system unattended program.. 3. The SMS Administrator advertises the program. Refer to Advertising WebEx Productivity Tools using the SMS per-system unattended program. 4. The old WebEx Productivity Tools will be removed and the new WebEx Productivity Tools will be installed silently. 4.0 CREATING A PACKAGE FROM A DEFINITION If you are the SMS administrator, follow these steps to create a package from a definition: 1. Open the SMS Administrator Console and navigate to Site Database Package. 2. Right click Package. 3. Choose New Package From Definition. 21
26 3. On the Create Package from Definition wizard, click Next. 22
27 4. Click the Browse button to locate and select the WebEx Productivity Tools MSI package. 23

28 5. Select Always obtain files from a source directory. 6. Select Source directory location. The directory path is the folder where contains the install package. 24


29 7. Click Finish. 25
30 8. Navigate to Site Database Packages WebEx Communications, Inc WebEx Productivity Tools 1.0.xx English Programs. There are six default programs available. 5.0 INSTALLING WEBEX NOTES SCRIPTS USING THE ADMIN TOOL The following steps describe how to deploy WebEx scripts for Lotus Notes Integration on a Domino Server Installing the WebEx Lotus Notes Integration Admin Tool To deploy WebEx Lotus Notes Integration on a Domino Server, you must be a Domino Administrator. As a Domino Administrator, you should use the ptdomtl.msi file, which is available on Download section of the Support page, to install the WebEx Lotus Notes Integration Admin Tool on the following systems: The Lotus Notes Client computer, where the Domino administrator is the active user. The Domino Server (Optional required only if the Domino Server is on a separate computer from the Lotus Notes client of the Domino Administrator). The installation of the WebEx Lotus Notes Integration Admin Tool copies the following files to the Lotus Notes directory (for both the Lotus Notes Client and the Domino Server): Lcppn30.dll Webex.nsf ptniscpt.xml 26

31 ptnires.dll ptniupd.exe Nwinstal.exe After the Admin Tool is installed, a shortcut is also automatically added to the Windows Start menu (Start- >Programs->WebEx->WebEx NI Admin Tool). The WebEx Lotus Notes Integration Admin Tool is a command-line application. At the Windows command prompt, run the Admin Tool from the directory where the Lotus Notes Client is installed. For example, if the Lotus Notes Client is installed under D:\Program Files\lotus\notes, run the Admin Tool from that directory. To begin using this tool, you can type nwinstal -? at the command prompt to view Help, as shown in the following figure: 27
32 Creating a new mail template Once the WebEx Lotus Notes Integration Admin Tool is installed, use the Admin Tool to create a new template to use with the WebEx Lotus Notes Integration. On the Lotus Notes administrator Notes client machine, create a new WebEx mail template based on an existing Notes mail template. To create a WebEx mail template based on the mail6.ntf file, type the following command: nwinstal c [path]mail6.ntf The [path] variable is the relative path to the directory that is specified for the Directory parameter in the notes.ini file on the Domino Server. You need to include the [path] variable only if the path for the mail template file is not the same as the path specified for the Directory parameter. For example, if the mail template file is located in the D:\Lotus\Domino\Data directory, and the Directory parameter is specified as Directory=D:\Lotus\Domino\Data, the directory paths are the same, and you do not need to include additional path information. In this case, the command should be nwinstal c mail6.ntf If, however, the mail template file is located in the D:\Lotus\Domino\Data\silver directory, and the Directory parameter is specified as Directory=D:\Lotus\Domino\Data, the directory paths are not the same, and you need to include additional path information. In this case, the command should be nwinstal c silver\mail6.ntf The following figure shows the output of the nwinstal c mail6.ntf command: 28
33 After the command has run successfully, a new template file named wbxmail.ntf is created on the Domino Server. The wbxmail.ntf template file is created in the directory that is defined in the notes.ini file on the Domino Server. In the previous example, the wbxmail.ntf file is created in the D:\Lotus\Domino\Data directory. See the following figure: 29
34 Assigning the newly created WebEx mail template to one user or multiple users The following sections explain how to assign a newly created WebEx template to a single user or to multiple users. Note: It is strongly recommended that you back up all mail templates before replacing the WebEx Mail template file. When using the commands to assign WebEx mail template to users, you must type the commands from the Domino Server machine Assigning a new WebEx template to a single user If you are assigning a new WebEx template to a single user, on the Domino Server machine, switch to the Domino Administrator Server Console, and then type the following command: load nwinstal r [path]\[user].nsf [mail template file].ntf The [path] variable is the relative path to the directory that is specified for the Directory parameter in the notes.ini file on the Domino Server. You need to include the [path] variable only if the path for the mail template file is not the same as the path specified for the Directory parameter. 30

35 Example: Suppose you want to insert a script for user test1. The user s mail file name is test1.nsf, The user s original template is mail6.ntf. To replace the user s original template mail6.ntf with the new WebEx mail template wbxmail.ntf, you would type the following command: load nwinstal r [path]test1.nsf wbxmail.ntf The following figure shows the output of this command: In the event that there is an issue with the new WebEx mail template, and you need to revert back to original mail template mail6.ntf, you can revert back to it by typing the following command: load nwinstal r [path]test1.nsf mail6.ntf Assigning the WebEx Lotus Notes Integration template to multiple users Follow these steps to assign multiple users to the newly created WebEx template: 1. Generate a user list. In the Domino Server Console, type the following command: load convert l c:\temp\maillist.txt This command creates a text file that lists all of the mail databases in the c:\temp directory as maillist.txt. You can edit the file to remove those users you don t want to install the WebEx script at this time. The following figure shows the maillist.txt file. 31
36 2. After you have created the maillist.txt text file with the user database list, you can use the -l command to install or uninstall the WebEx Lotus Notes Integration script for all users in the list. For example, to install the WebEx mail template file wbxmail.ntf for all users in the list, type the following command: load nwinstal l c:\temp\maillist.txt wbxmail.ntf The following figure shows the output of this command: 32
37 If you run into any issues with WebEx template, you can restore the original mail6.ntf template. Type the following command to restore the original template: load nwinstal l c:\temp\maillist.txt mail6.ntf The following figure shows the output of this command: 33
38 APPENDIX A: LOTUS NOTES INTEGRATION TOOL AND TEMPLATES WebEx Lotus Notes Integration Admin Tool using the nwinstal command The WebEx Lotus Notes Integration Admin Tool has been created with a purpose: 1. To install or remove the WebEx Lotus Notes Integration script for an individual user s mail database. 2. To create a new WebEx mail template based on a specific template. After you have run the Admin Tool, deploy the Lotus Notes Integration client installer to the user s Lotus Notes client either by pushing MSI, using the Software Distribution tool, or asking users to run MSI by themselves. Note: To run this tool, you must be a Lotus Notes Domino Administrator. In addition, the installed Lotus Notes software must be version or later. 34
39 The following text explains the options that are available with the nwsinstal Admin Tool. You can also view information about these options by typing nwinstal -? at the command prompt to view Help. Syntax: Where: Commands available to be run on a Lotus Administrator computer: nwinstal -? nwinstal c [path]filename nwinstal i [path]filename nwinstal u [path]filename Commands available to be run on a Domino Server computer running on the Windows operating system: nwinstal -r [path]destination-filename source-filename nwinstal -l [path]user-list-filename source-filename [path] The relative path to the directory that is specified for the Directory parameter in the notes.ini file on the Domino Server. You need to include the [path] variable only if the path for the mail template file is not the same as the path specified for the Directory parameter. For example, suppose the Directory parameter in the notes.ini file is Directory=D: \Lotus\Domino\Data. If the user s mail file is joe.nsf and it is located in the D:\Lotus\Domino\Data\mail directory, you should type the following command: nwinstal i mail\joe.nsf If the company mail template file is named mail6.ntf, and it is located in the D:\Lotus\Domino\Data directory, you should type the following command: nwinstal c mail6.ntf -? Displays Help. -c Creates a WebEx Lotus Notes Integration mail template file based on the mail template you choose. For example, if you are creating a WebEx mail template based on the mail6.ntf file, you should type the following command: nwinstal c [path]mail6.ntf Note: The new template file is named wbxmail.ntf. This newly created file is stored in the same location as defined in the Directory parameter of the notes.ini file on the Domino server (in the previous example, it is D:\Lotus\Domino\Data). You can use a Lotus Notes Domino command to refresh the user mail database with the WebEx Lotus Notes Integration template (see the Lotus Notes Help for details). For example, the following command inserts the WebEx Lotus Notes Integration script into a user s mail database from the WebEx mail template: 35
40 load convert [path]user.nsf * wbxmail.ntf -r Inserts the WebEx Lotus Notes Integration script from a WebEx mail template into a user mail database. For example, the following command inserts a Lotus Notes Integration script on the user Joe s mail database joe.nsf from the wbxmail.ntf WebEx mail template file, type the following command: nwinstal r [path]joe.nsf wbxmail.ntf -l Inserts the WebEx Lotus Notes Integration script from a WebEx mail template into the mail databases of the users who are listed in the maillist.txt mail user list file. For example, to insert the Lotus Notes Integration script for the users on the file c:\temp\maillist.txt from wbxmail.ntf WebEx mail template file, type the following command: nwinstal l c:\temp\maillist.txt wbxmail.ntf Note: To generate a user list, in Domino Server Console, type the following command: load convert l c:\temp\maillist.txt If necessary, edit the maillist.txt file to include only the users you want. -i Inserts the WebEx Lotus Notes Integration script into a user s mail database without creating a WebEx mail template file. Note: This command can be used only for users with Notes Editor access level. For example, to insert the WebEx Lotus Notes Integration script into the user Joe s mail database file joe.nsf, type the following command: nwinstal i [path]joe.nsf -u Removes the WebEx Lotus Notes Integration script from a user mail database file. Note: This command can be used only for user with Notes Editor access level. For example, to remove the Lotus Notes Integration script from the user Joe s mail database file joe.nsf, type the following command: nwinstal u [path]joe.nsf Deleting the WebEx Lotus Notes Integration mail template file If your company is no longer using Lotus Notes Integration and you need to delete the WebEx Lotus Notes Integration template, you can locate it on the Domino Server, make sure it is not being used, and then delete it. 36
41 APPENDIX B: KNOWN ISSUES After you install the WebEx Lotus Notes Integration, the user may see the following security warning dialog when opening the calendar: Note: In the previous figure, the signer is listed as admin/webex, but the name of the signer will be different for your company. The signer name usually appears in the format <name of administrator>/<company name>. The security warning appears because WebEx Lotus Notes Integration inserts a script or program that is signed by the Domino administrator. To prevent this warning from appearing, you can allow users to select the Start trusting the signer to execute this action option to accept the signer. The administrator can also modify the security settings on the Execution Control List to prevent this security warning from appearing. The administrator should select the following options under Allow on the Security Settings-> Execution Control List dialog box: Access the current database Access the environment variables Access to external programs 37
42 The following figure shows the settings the administrator should make on the Execution Control List: APPENDIX C: REGISTRY AND FILES INSTALLED Registry Keys are stored under HKEY_CURRENT_USER\Software\WebEx\ProdTools. Folder File list Description Program Files\ \WebEx\Productivity Tools ptmain9.dll, ptmain10.dll, ptmain11.dll, ptmain12.dll, ptolkadd.dll, Files for WebEx Integration to Outlook. Program Files \WebEx\Productivity Tools Program Files \WebEx\Productivity Tools ptwbxoni.exe, ptoniui.dll, ptoi3res.dl, ptwbxurl.dll ndbwbxpt.dll, ptnwinto.dll, ptnwintc.dll, ptniadpt.dll, ptniscpt.xml, Files for user interface of WebEx Integration to Outlook and WebEx Integration to Lotus Notes. Files for WebEx Integration to Lotus Notes. ptniscpt.xml includes all WebEx Lotus Notes 38
43 Folder File list Description ptwnictl.dll, ptnwcfg.exe, ptnires.dll, ptniupd.exe, lcppn30.dll, Scripts. It is used by normal install and check for update only. Program Files \WebEx\Productivity Tools Program Files \WebEx\Productivity Tools Program Files \WebEx\Productivity Tools Program Files \WebEx\Productivity Tools ptoneclk.exe, ptocres.dll, ptusredt.dll, ptextend.dll, ptocnote.dll, ptexmeet.dll, install.rdf, lcppn30.dll, ptinst.exe, ptsrv.exe, ptupdate.exe, ptgpcdec.dll, ptgpcext.dll, ptiegpc.dll, ptinstck.dll, ptmgr.dll, ptsknmgr.dll, ptres.dll, msvcp60, libeay32.dll ptwbxrm.dll, ptonres.dll ptwbxms.dll, Ptonres.dll Ptonecli.dll Ptonres.dll PTIM.exe, PTIMHook.dll, PTIMRes.dll, com.wbx.realtime.meeting_ jar, ptwbxjni.dll Files for WebEx One-Click Meeting. ptsrv.exe is shared by all components of WebEx Productivity Tools. Microsoft Windows rightclick menu WebEx toolbar for Microsoft Office WebEx button for Internet Explorer WebEx integration to instant messengers: o Microsoft Office Communicator, MSN, Windows Messenger o Lotus Sametime o Yahoo! Messenger o Google Talk o AOL o Skype 39
44 Folder File list Description Program Files \WebEx\Productivity Tools Ptonres.dll, chrome.manifest, Install.rdf, Chrome\ocplugin.jar, Components\OCFF.dll, Components\IOcFf.xpt (T26)WebEx button for Firefox (From T27)WebEx Toolbar for Firefox Lotus Notes installed directory Lotus Sametime installed directory ndbwbxpt.dll, ptnwinto.dll, ptnwintc.dll, ptniadpt.dll, ptniscpt.xml, ptwnictl.dll, ptnwcfg.exe, ptnires.dll, ptniupd.exe, lcppn30.dll, ptoniui.dll, ptwbxoni.exe, ptwbxurl.dll, ptoi3res.dll com.wbx.realtime.meeting_ jar ptwbxjni.dll WebEx Integration to Lotus Notes Integration. ptniscpt.xml includes all WebEx Lotus Notes Scripts. It is used by normal install and check for update only. WebEx Integration to Lotus Sametime. 40
IT Administrator Guide for Mass Deployment of WebEx Productivity Tools. Installation Guide for Administrators
 IT Administrator Guide for Mass Deployment of WebEx Productivity Tools Installation Guide for Administrators COPYRIGHT 1997-2015. Cisco and/or its affiliates. All rights reserved. WEBEX, CISCO, Cisco WebEx,
Downloading and Mass Deploying Applications
 Downloading and Mass Deploying Applications Use of this product requires additional applications that must be downloaded to your users' computers. You can download and mass deploy these applications using
WebEx Integration to Outlook. User Guide
 WebEx Integration to Outlook User Guide 072310 Copyright 1997 2010 Cisco and/or its affiliates. All rights reserved. WEBEX, CISCO, Cisco WebEx, the CISCO logo, and the Cisco WebEx logo are trademarks or
Setting Up a One-Click Meeting
 Chapter 10 10 Setting Up a One-Click Meeting If you want to... get an overview of starting a One-Click Meeting from your WebEx service Web site specify settings for your One-Click Meeting install WebEx
Site Administration. User s Guide
 Site Administration User s Guide Copyright 1997-2008. WebEx Communications, Inc. All Rights Reserved. WEBEX and the WEBEX LOGO are trademarks or registered trademarks of WebEx Communications, Inc. in the
WebEx Integration to Lotus Notes. Users Guide
 WebEx Integration to Lotus Notes Users Guide 072310 Copyright 1997 2010 Cisco and/or its affiliates. All rights reserved. WEBEX, CISCO, Cisco WebEx, the CISCO logo, and the Cisco WebEx logo are trademarks
Site Admininstration. User Guide
 Site Admininstration User Guide Copyright 1997 2011 Cisco and/or its affiliates. All rights reserved. WEBEX, CISCO, Cisco WebEx, the CISCO logo, and the Cisco WebEx logo are trademarks or registered trademarks
WebEx Meeting Center User Guide
 WebEx Meeting Center User Guide For Hosts, Presenters, and Attendees 8.17 Copyright 1997 2010 Cisco and/or its affiliates. All rights reserved. WEBEX, CISCO, Cisco WebEx, the CISCO logo, and the Cisco
PowerMapper/SortSite Desktop Deployment Guide v2.11. 1. Introduction
 PowerMapper/SortSite Desktop Deployment Guide v2.11 1. Introduction... 1 2. Architecture... 2 3. Independent Certification... 2 4. Setup.exe Command Line... 2 5. Registry Settings... 3 6. Deployment using
Site Administration. User s Guide
 Site Administration User s Guide Copyright 1997-2010. Cisco and/or its affiliates. All rights reserved. WEBEX, CISCO, Cisco WebEx, the CISCO logo, and the Cisco WebEx logo are trademarks or registered
XMap 7 Administration Guide. Last updated on 12/13/2009
 XMap 7 Administration Guide Last updated on 12/13/2009 Contact DeLorme Professional Sales for support: 1-800-293-2389 Page 2 Table of Contents XMAP 7 ADMINISTRATION GUIDE... 1 INTRODUCTION... 5 DEPLOYING
Cisco WebEx Training Center
 Cisco WebEx Training Center User Guide Training Center 5.17 Copyright 1997 2010 Cisco and/or its affiliates. All rights reserved. WEBEX, CISCO, Cisco WebEx, the CISCO logo, and the Cisco WebEx logo are
Remote Support. User Guide 7.23
 Remote Support User Guide 7.23 Copyright 1997 2011 Cisco and/or its affiliates. All rights reserved. WEBEX, CISCO, Cisco WebEx, the CISCO logo, and the Cisco WebEx logo are trademarks or registered trademarks
XEROX, The Document Company, the stylized X, and the identifying product names and numbers herein are trademarks of XEROX CORPORATION.
 Version 9.0 Scan to PC Desktop v9.0 Network Installation Guide Document version 4.0 This document provides instructions for installing the software associated with Scan to PC Desktop in a network environment.
Adobe Acrobat 9 Deployment on Microsoft Systems Management
 Adobe Acrobat 9 Deployment on Microsoft Systems Management Server white paper TABLE OF CONTENTS 1. Document overview......... 1 2. References............. 1 3. Product overview.......... 1 4. Installing
WebEx Meeting Center User Guide
 WebEx Meeting Center User Guide For Hosts, Presenters, and Participants 8.17 Copyright 1997 2010 Cisco and/or its affiliates. All rights reserved. WEBEX, CISCO, Cisco WebEx, the CISCO logo, and the Cisco
Cisco WebEx Meeting Center on the iphone
 Cisco WebEx Meeting Center on the iphone Quick Start Guide Version 2 Copyright 1997 2010 Cisco and/or its affiliates. All rights reserved. WEBEX, CISCO, Cisco WebEx, the CISCO logo, and the Cisco WebEx
Tool Tip. SyAM Management Utilities and Non-Admin Domain Users
 SyAM Management Utilities and Non-Admin Domain Users Some features of SyAM Management Utilities, including Client Deployment and Third Party Software Deployment, require authentication credentials with
Cisco WebEx Mail Administrator's Guide
 Cisco WebEx Mail Administrator's Guide Copyright 1997-2009 Cisco Systems, Inc. and/or its affiliated entities. All rights reserved. WEBEX, CISCO, Cisco WebEx, the CISCO logo, and the Cisco WebEx logo are
Version 10.0 50-951A-10312
 Version 10.0 50-951A-10312 2 of 19 Scan to PC Desktop v10.0 Network Installation Guide Document version 4.0 This document provides instructions for installing the software associated with Scan to PC Desktop
White Paper. Deployment of ActiveX Controls via Microsoft Windows Active Directory. Fabasoft Folio 2015 Update Rollup 2
 White Paper Fabasoft Folio 2015 Update Rollup 2 Copyright Fabasoft R&D GmbH, Linz, Austria, 2015. All rights reserved. All hardware and software names used are registered trade names and/or registered
ACTIVE DIRECTORY DEPLOYMENT
 ACTIVE DIRECTORY DEPLOYMENT CASAS Technical Support 800.255.1036 2009 Comprehensive Adult Student Assessment Systems. All rights reserved. Version 031809 CONTENTS 1. INTRODUCTION... 1 1.1 LAN PREREQUISITES...
Foxit Reader Deployment and Configuration
 Copyright 2004-2015 Foxit Software Incorporated. All Rights Reserved. No part of this document can be reproduced, transferred, distributed or stored in any format without the prior written permission of
SmartDraw Installation Guide
 SmartDraw Installation Guide System Requirements Your computer must meet these requirements in order to run SmartDraw: Windows Vista, XP or 2000 256MB RAM 3GB free hard disk space Installation Options
WebEx Meeting Center User Guide
 WebEx Meeting Center User Guide For Hosts, Presenters, and Participants 8.23 Copyright 1997 2011 Cisco and/or its affiliates. All rights reserved. WEBEX, CISCO, Cisco WebEx, the CISCO logo, and the Cisco
Both MS Windows 2000 Server and MS System Management Server (SMS) support this type of network installation.
 support this type of network installation.") Network Installation of OmniPage Pro 12 Office Introduction Network installation enables a system administrator to push applications out to client computers without the need to visit each client system.
Network Installation of OmniPage Pro 12 Office Introduction Network installation enables a system administrator to push applications out to client computers without the need to visit each client system.
Administering Jive for Outlook
 Administering Jive for Outlook TOC 2 Contents Administering Jive for Outlook...3 System Requirements...3 Installing the Plugin... 3 Installing the Plugin... 3 Client Installation... 4 Resetting the Binaries...4
Enterprise Vault Installing and Configuring
 Enterprise Vault Installing and Configuring Enterprise Vault 6.0 Legal Notice Copyright 2005 Symantec Corporation. All rights reserved. Symantec, the Symantec Logo, VERITAS, the VERITAS Logo, and Enterprise
Getting Started Guide
 Getting Started Guide www.exclaimer.com Contents About This Guide... 2 Mail Disclaimers Overview... 3 What Does Exclaimer Mail Disclaimers Do?... 3 But That s Not All... 3 And There s More... 3 How Does
How To Install Outlook Addin On A 32 Bit Computer
 Deployment Guide - Outlook Add-In www.exclaimer.com Contents About This Guide... 3 System Requirements... 4 Software... 4 Installation Files... 5 Deployment Preparation... 6 Installing the Add-In Manually...
Getting Started Guide
 Getting Started Guide www.exclaimer.com Contents About This Guide... 2 Signature Manager Overview... 3 How does it Work?... 3 But That s Not All... 4 And There s More... 4 Licensing... 5 Licensing Information...
HOW TO SILENTLY INSTALL CLOUD LINK REMOTELY WITHOUT SUPERVISION
 HOW TO SILENTLY INSTALL CLOUD LINK REMOTELY WITHOUT SUPERVISION Version 1.1 / Last updated November 2012 INTRODUCTION The Cloud Link for Windows client software is packaged as an MSI (Microsoft Installer)
MSI Admin Tool User Guide
 MSI Admin Tool User Guide Introduction The MSI Admin Tool is a utility which allows you to pre-configure your Read&Write installation package prior to installation. The tool is primarily designed to be
WebEx Event Center User's Guide
 WebEx Event Center User's Guide Copyright 1997-2013 Cisco and/or its affiliates. All rights reserved. WEBEX, CISCO, Cisco WebEx, the CISCO logo, and the Cisco WebEx logo are trademarks or registered trademarks
About This Guide... 4. Signature Manager Outlook Edition Overview... 5
 Contents About This Guide... 4 Signature Manager Outlook Edition Overview... 5 How does it work?... 5 But That's Not All...... 6 And There's More...... 6 Licensing... 7 Licensing Information... 7 System
Cisco WebEx Node Management System. Administrator s Guide
 Cisco WebEx Node Management System Administrator s Guide Copyright 1997 2011 Cisco and/or its affiliates. All rights reserved. WEBEX, CISCO, Cisco WebEx, the CISCO logo, and the Cisco WebEx logo are trademarks
WebEx Event Center User's Guide
 WebEx Event Center User's Guide Version 6.5 Copyright 1997 2010 Cisco and/or its affiliates. All rights reserved. WEBEX, CISCO, Cisco WebEx, the CISCO logo, and the Cisco WebEx logo are trademarks or registered
DriveLock Quick Start Guide
 Be secure in less than 4 hours CenterTools Software GmbH 2012 Copyright Information in this document, including URL and other Internet Web site references, is subject to change without notice. Unless otherwise
How To Deploy Lync 2010 Client Using SCCM 2012 R2
 prajwaldesai.com http://prajwaldesai.com/how-to-deploy-lync-2010-client-using-sccm-2012-r2/ How To Deploy Lync 2010 Client Using SCCM 2012 R2 Prajwal Desai In this post we will see how to deploy Lync 2010
4cast Client Specification and Installation
 4cast Client Specification and Installation Version 2015.00 10 November 2014 Innovative Solutions for Education Management www.drakelane.co.uk System requirements The client requires Administrative rights
Adobe Acrobat 9 Deployment on Microsoft Windows Group Policy and the Active Directory service
 Adobe Acrobat 9 Deployment on Microsoft Windows Group Policy and the Active Directory service white paper TABLE OF CONTENTS 1. Document overview......... 1 2. References............. 1 3. Product overview..........
VERITAS Backup Exec TM 10.0 for Windows Servers
 VERITAS Backup Exec TM 10.0 for Windows Servers Quick Installation Guide N134418 July 2004 Disclaimer The information contained in this publication is subject to change without notice. VERITAS Software
OneStop Reporting 3.7 Installation Guide. Updated: 2013-01-31
 OneStop Reporting 3.7 Installation Guide Updated: 2013-01-31 Copyright OneStop Reporting AS www.onestopreporting.com Table of Contents System Requirements... 1 Obtaining the Software... 2 Obtaining Your
System Administration Training Guide. S100 Installation and Site Management
 System Administration Training Guide S100 Installation and Site Management Table of contents System Requirements for Acumatica ERP 4.2... 5 Learning Objects:... 5 Web Browser... 5 Server Software... 5
Universal Management Service 2015
 Universal Management Service 2015 UMS 2015 Help All rights reserved. No parts of this work may be reproduced in any form or by any means - graphic, electronic, or mechanical, including photocopying, recording,
STATISTICA VERSION 9 STATISTICA ENTERPRISE INSTALLATION INSTRUCTIONS FOR USE WITH TERMINAL SERVER
 Notes: STATISTICA VERSION 9 STATISTICA ENTERPRISE INSTALLATION INSTRUCTIONS FOR USE WITH TERMINAL SERVER 1. These instructions focus on installation on Windows Terminal Server (WTS), but are applicable
WebEx Event Center User's Guide
 WebEx Event Center User's Guide Version 6.5 Copyright 1997-2009. WebEx Communications, Inc. All rights reserved. Cisco, WebEx, and Cisco WebEx are registered trademarks or trademarks of Cisco Systems,
Rogue Wave HostAccess 7.40J Installation Guide... 1
 Rogue Wave HostAccess 7.40J Installation Guide... 1 Rogue Wave HostAccess 7.40J Installation Guide... 1 HostAccess Installations... 2 Standard Installation - Desktop and Windows Terminal Server/Citrix
Administration Guide ActivClient for Windows 6.2
 Administration Guide ActivClient for Windows 6.2 ActivClient for Windows Administration Guide P 2 Table of Contents Chapter 1: Introduction....................................................................12
User Document. Adobe Acrobat 7.0 for Microsoft Windows Group Policy Objects and Active Directory
 Adobe Acrobat 7.0 for Microsoft Windows Group Policy Objects and Active Directory Copyright 2005 Adobe Systems Incorporated. All rights reserved. NOTICE: All information contained herein is the property
Test Note Phone Manager Deployment Windows Group Policy Sever 2003 and XP SPII Clients
 Test Note Phone Manager Deployment Windows Group Policy Sever 2003 and XP SPII Clients Note: I have only tested these procedures on Server 2003 SP1 (DC) and XP SPII client, in a controlled lab environment,
Maintaining the Content Server
 CHAPTER 7 This chapter includes the following Content Server maintenance procedures: Backing Up the Content Server, page 7-1 Restoring Files, page 7-3 Upgrading the Content Server, page 7-5 Shutting Down
Autograph 3.3 Network Installation
 Eastmond Publishing Ltd (Autograph) PO Box 46, Oundle, Peterborough, PE8 4JX, UK Tel: +44 (0)1832 273444 Fax: +44 (0)1832 273529 Email: [email protected] Web: www.autograph-maths.com Technical
Foxit Reader Deployment and Configuration
 Copyright 2004-2016 Foxit Software Incorporated. All Rights Reserved. No part of this document can be reproduced, transferred, distributed or stored in any format without the prior written permission of
Administrator s Guide
 MAPILab Disclaimers for Exchange Administrator s Guide document version 1.8 MAPILab, December 2015 Table of contents Intro... 3 1. Product Overview... 4 2. Product Architecture and Basic Concepts... 4
White Paper. Network Installation of ScanSoft PDF Create! 2
 White Paper Network Installation of ScanSoft PDF Create! 2 Introduction Network installation enables a system administrator to push applications out to client computers without the need to visit each client
Web Security Service
 Webroot Web Security Service Desktop Web Proxy Configuration Guide Webroot Software, Inc. 385 Interlocken Crescent Suite 800 Broomfield, CO 80021 www.webroot.com Desktop Web Proxy Configuration Guide September
Administration Guide. . All right reserved. For more information about Specops Gpupdate and other Specops products, visit www.specopssoft.
 . All right reserved. For more information about Specops Gpupdate and other Specops products, visit www.specopssoft.com Copyright and Trademarks Specops Gpupdate is a trademark owned by Specops Software.
Symantec AntiVirus Corporate Edition Patch Update
 Symantec AntiVirus Corporate Edition Patch Update Symantec AntiVirus Corporate Edition Update Documentation version 10.0.1.1007 Copyright 2005 Symantec Corporation. All rights reserved. Symantec, the Symantec
Network Install Guide for the enterprise version of Nuance PDF Products
 Network Install Guide for the enterprise version of Nuance PDF Products Product version: 8 Last update: May 11, 2012 Nuance Communications, Inc. All rights reserved. Subject to change without prior notice.
Jabra PC Suite Mass Deployment Guide
 Jabra PC Suite Mass Deployment Guide Revision 16 / 2014-01-17 Introduction This guide explains how to deploy Jabra PC Suite using Microsoft Installer Packages (MSI). The instructions in this guide refer
INSTALLATION AND CONFIGURATION GUIDE
 INSTALLATION AND CONFIGURATION GUIDE Revision 3.0 (November 11, 2009) Based on version 8.11 Net Control 2. Installation and Configuration Guide. 2 The software described in this book is furnished under
WebEx. Remote Support. User s Guide
 WebEx Remote Support User s Guide Version 6.5 Copyright WebEx Communications, Inc. reserves the right to make changes in the information contained in this publication without prior notice. The reader should
Out n About! for Outlook Electronic In/Out Status Board. Administrators Guide. Version 3.x
 Out n About! for Outlook Electronic In/Out Status Board Administrators Guide Version 3.x Contents Introduction... 1 Welcome... 1 Administration... 1 System Design... 1 Installation... 3 System Requirements...
Dell Recovery Manager for Active Directory 8.6. Quick Start Guide
 Dell Recovery Manager for Active Directory 8.6 2014 Dell Inc. ALL RIGHTS RESERVED. This guide contains proprietary information protected by copyright. The software described in this guide is furnished
Cisco WebEx Connect Administrator s Guide
 For more information: In the U.S.: 800.374.2441 www.intercall.com [email protected] In Canada: 877.333.2666 www.intercall.ca Cisco WebEx Connect Administrator s Guide 2009. WebEx Communications, Inc.
Automating client deployment
 Automating client deployment 1 Copyright Datacastle Corporation 2014. All rights reserved. Datacastle is a registered trademark of Datacastle Corporation. Microsoft Windows is either a registered trademark
Virtual CD v10. Network Management Server Manual. H+H Software GmbH
 Virtual CD v10 Network Management Server Manual H+H Software GmbH Table of Contents Table of Contents Introduction 1 Legal Notices... 2 What Virtual CD NMS can do for you... 3 New Features in Virtual
Inter-Tel Web Conferencing and Remote Support
 MITEL Inter-Tel Web Conferencing and Remote Support User Guide Notice This user guide is released by Inter-Tel (Delaware), Incorporated as a guide for end users. It provides information necessary to use
Intelligent Power Protector User manual extension for Microsoft Virtual architectures: Hyper-V 6.0 Manager Hyper-V Server (R1&R2)
") Intelligent Power Protector User manual extension for Microsoft Virtual architectures: Hyper-V 6.0 Manager Hyper-V Server (R1&R2) Hyper-V Manager Hyper-V Server R1, R2 Intelligent Power Protector Main
Intelligent Power Protector User manual extension for Microsoft Virtual architectures: Hyper-V 6.0 Manager Hyper-V Server (R1&R2) Hyper-V Manager Hyper-V Server R1, R2 Intelligent Power Protector Main
Citrix Systems, Inc.
 Citrix Systems, Inc. Notice The information in this publication is subject to change without notice. THIS PUBLICATION IS PROVIDED AS IS WITHOUT WARRANTIES OF ANY KIND, EXPRESS OR IMPLIED, INCLUDING ANY
SMART Sync 2011. Windows operating systems. System administrator s guide
 SMART Sync 2011 Windows operating systems System administrator s guide Trademark notice SMART Sync, smarttech and the SMART logo are trademarks or registered trademarks of SMART Technologies ULC in the
Trend Micro Incorporated reserves the right to make changes to this document and to the products described herein without notice.
 Trend Micro Incorporated reserves the right to make changes to this document and to the products described herein without notice. Before installing and using the software, please review the readme files,
MailStore Outlook Add-in Deployment
 MailStore Outlook Add-in Deployment A MailStore Server installation deploys the MailStore Outlook Add-in as a Windows Installer package (MSI) that can be installed on client machines using software distribution.
Using Entrust certificates with Microsoft Office and Windows
 Entrust Managed Services PKI Using Entrust certificates with Microsoft Office and Windows Document issue: 1.0 Date of issue: May 2009 Copyright 2009 Entrust. All rights reserved. Entrust is a trademark
Symantec Mail Security for Domino
 Getting Started Symantec Mail Security for Domino About Symantec Mail Security for Domino Symantec Mail Security for Domino is a complete, customizable, and scalable solution that scans Lotus Notes database
User Manual. Onsight Management Suite Version 5.1. Another Innovation by Librestream
 User Manual Onsight Management Suite Version 5.1 Another Innovation by Librestream Doc #: 400075-06 May 2012 Information in this document is subject to change without notice. Reproduction in any manner
INSTALLATION AND CONFIGURATION GUIDE
 Net Control 2 STANDARD EDITION INSTALLATION AND CONFIGURATION GUIDE Revision 3.01 (January26, 2012) Based on version 10.0 Net Control 2 STANDARD. Installation and Configuration Guide. 2 The software described
TIBCO Fulfillment Provisioning Session Layer for FTP Installation
 TIBCO Fulfillment Provisioning Session Layer for FTP Installation Software Release 3.8.1 August 2015 Important Information SOME TIBCO SOFTWARE EMBEDS OR BUNDLES OTHER TIBCO SOFTWARE. USE OF SUCH EMBEDDED
Active Directory Federation Services
 Active Directory Federation Services Installation Instructions for WebEx Messenger and WebEx Centers Single Sign- On for Windows 2008 R2 WBS29 Copyright 1997-2013 Cisco and/or its affiliates. All rights
How To Enable A Websphere To Communicate With Ssl On An Ipad From Aaya One X Portal 1.1.3 On A Pc Or Macbook Or Ipad (For Acedo) On A Network With A Password Protected (
 On A Network With A Password Protected (") Avaya one X Portal 1.1.3 Lightweight Directory Access Protocol (LDAP) over Secure Socket Layer (SSL) Configuration This document provides configuration steps for Avaya one X Portal s 1.1.3 communication
Avaya one X Portal 1.1.3 Lightweight Directory Access Protocol (LDAP) over Secure Socket Layer (SSL) Configuration This document provides configuration steps for Avaya one X Portal s 1.1.3 communication
NETWRIX EVENT LOG MANAGER
 NETWRIX EVENT LOG MANAGER ADMINISTRATOR S GUIDE Product Version: 4.0 July/2012. Legal Notice The information in this publication is furnished for information use only, and does not constitute a commitment
Administrator s Guide
 Attachment Save for Exchange Administrator s Guide document version 1.8 MAPILab, December 2015 Table of contents Intro... 3 1. Product Overview... 4 2. Product Architecture and Basic Concepts... 4 3. System
Education Software Installer 2011
 Education Software Installer 2011 Windows operating systems System administrator s guide Trademark notice SMART Notebook, SMART Document Camera, SMART Response, SMART Sync, SMART Classroom Suite, Senteo,
Printer Driver Installation Manual
 Printer Driver Installation Manual Copyrights Any unauthorized reproduction of the contents of this document, in part or whole, is strictly prohibited. Limitation of Liability SATO Corporation and its
Moxa Device Manager 2.3 User s Manual
 User s Manual Third Edition, March 2011 www.moxa.com/product 2011 Moxa Inc. All rights reserved. User s Manual The software described in this manual is furnished under a license agreement and may be used
Web-Access Security Solution
 WavecrestCyBlock Client Version 2.1.13 Web-Access Security Solution UserGuide www.wavecrest.net Copyright Copyright 1996-2014, Wavecrest Computing, Inc. All rights reserved. Use of this product and this
Installing Sage SalesLogix on Microsoft Windows 8, Windows Server 2012, and Internet Explorer 10 Version 8.0.0.02 Developed by Sage SalesLogix User
 Installing Sage SalesLogix on Microsoft Windows 8, Windows Server 2012, and Internet Explorer 10 Version 8.0.0.02 Developed by Sage SalesLogix User Assistance Installing Sage SalesLogix on Microsoft Windows
SAS 9.3 Foundation for Microsoft Windows
 Software License Renewal Instructions SAS 9.3 Foundation for Microsoft Windows Note: In this document, references to Microsoft Windows or Windows include Microsoft Windows for x64. SAS software is licensed
FileMaker Pro 11. Network Install Setup Guide
 FileMaker Pro 11 Network Install Setup Guide 2007 2010 FileMaker, Inc. All Rights Reserved. FileMaker, Inc. 5201 Patrick Henry Drive Santa Clara, California 95054 FileMaker is a trademark of FileMaker,
Wavecrest Certificate
 Wavecrest InstallationGuide Wavecrest Certificate www.wavecrest.net Copyright Copyright 1996-2015, Wavecrest Computing, Inc. All rights reserved. Use of this product and this manual is subject to license.
Aspera Connect User Guide
 Aspera Connect User Guide Windows XP/2003/Vista/2008/7 Browser: Firefox 2+, IE 6+ Version 2.3.1 Chapter 1 Chapter 2 Introduction Setting Up 2.1 Installation 2.2 Configure the Network Environment 2.3 Connect
Installing Microsoft Exchange Integration for LifeSize Control
 Installing Microsoft Exchange Integration for LifeSize Control September 2005 Part Number 132-00002-001, Version 1.1 Copyright Notice Copyright 2005 LifeSize Communications. All rights reserved. LifeSize
Dell UPS Local Node Manager USER'S GUIDE EXTENSION FOR MICROSOFT VIRTUAL ARCHITECTURES Dellups.com
 CHAPTER: Introduction Microsoft virtual architecture: Hyper-V 6.0 Manager Hyper-V Server (R1 & R2) Hyper-V Manager Hyper-V Server R1, Dell UPS Local Node Manager R2 Main Operating System: 2008Enterprise
Automatic Network Deployment
 White paper Automatic Network Deployment Easy way to manage add-in deployment February 2012 Version 1.3 Standss (South Pacific) Limited Contents Introduction... 3 Getting Started... 3 Installing MSI Package
For Active Directory Installation Guide
 For Active Directory Installation Guide Version 2.5.2 April 2010 Copyright 2010 Legal Notices makes no representations or warranties with respect to the contents or use of this documentation, and specifically
IBM WebSphere Application Server Version 7.0
 IBM WebSphere Application Server Version 7.0 Centralized Installation Manager for IBM WebSphere Application Server Network Deployment Version 7.0 Note: Before using this information, be sure to read the
CTERA Agent for Windows
 User Guide CTERA Agent for Windows September 2013 Version 4.0 Copyright 2009-2013 CTERA Networks Ltd. All rights reserved. No part of this document may be reproduced in any form or by any means without