Contents. 2 Getting started. 4 Overview of the controls and display 5 Listening to radio 6 Using radio presets 7 Using the alarms
|
|
|
- Garry Wilkerson
- 7 years ago
- Views:
Transcription
1
2 Safety Instructions 1. Keep the radio away from heat sources. 2. Do not use the radio near water. 3. Avoid objects or liquids getting into the radio. 4. Do not remove screws from or open the radio casing. 5. Fit the mains adapter to an easily accessible socket, located near the radio and ONLY use the mains power adapter supplied. Warranty information Imagination Technologies Ltd. warrants to the end user that this product will be free from defects in materials and workmanship in the course of normal use for a period of two years from the date of purchase. This guarantee covers breakdowns due to manufacturing or design faults; it does not apply in cases such as accidental damage, however caused, wear and tear, negligence, adjustment, modification or repair not authorised by us. Should you have a problem with your unit please contact your supplier or contact Pure Support at Disclaimer Imagination Technologies Limited makes no representation or warranties with respect to the content of this document and specifically disclaims any implied warranties of merchantability or fitness for any particular purpose. Further, Imagination Technologies Limited reserves the right to revise this publication and to make changes in it from time to time without obligation of Imagination Technologies Limited to notify any person or organization of such revisions or changes. Trademarks Siesta Mi Series 2, Pure, the Pure logo, Imagination Technologies, and the Imagination Technologies logo are trademarks or registered trademarks of Imagination Technologies Limited. Copyright Copyright 2012 Imagination Technologies Limited. All rights reserved. No part of this publication may be copied or distributed, transmitted, transcribed, stored in a retrieval system, or translated into any human or computer language, in any form or by any means, electronic, mechanical, magnetic, manual or otherwise, or disclosed to third parties without the express written permission of Imagination Technologies Limited. Version 2 March Disposal of Waste Electrical & Electronic Equipment This symbol on the product or on its packaging indicates that this product should not be treated as household waste. Instead it should be handed over to a suitable collection point for the recycling of electrical and electronic equipment. By ensuring this product is disposed of correctly, you will help prevent potential negative consequences for the environment and human health, which could otherwise be caused by inappropriate waste handling of this product. The recycling of materials will help to conserve natural resources. For more detailed information about recycling of this product, please contact your local council office, your household waste disposal service or the shop where you purchased the product.

3 Contents 2 Getting started 2 Position aerial and connect power 3 Select language 3 Autotune 3 Navigating menus and options 3 Adjusting the volume 4 Overview of the controls and display 5 Listening to radio 6 Using radio presets 7 Using the alarms 7 Setting a radio alarm 8 Setting a tone alarm 9 Switching an alarm on/off 9 Snoozing a sounding alarm 9 Cancelling a sounding alarm 10 Using the sleep timer 11 Basic options 11 Changing the information shown on screen 11 Autotune 12 Setting the time and date 13 Changing the time format 13 Changing the snooze time 13 Changing the language 14 Advanced options 14 Version 14 Upgrade 14 Reset 15 Technical specifications 1

4 Getting started Thank you for purchasing Siesta Mi Series 2. This manual should help you get your product up and running in no time and tells you how to use all the great features. If you need any further assistance, please visit the support pages on our website at Position aerial and connect power 1. Fully uncoil the aerial wire. 2. Hook the aerial wire underneath the cable guide on the base. 3. Connect the small end of the supplied mains cable into the Micro USB socket on the base. 4. Hook the mains cable underneath the cable guide on the base. 5. Position the aerial wire vertically. 6. Plug the mains adaptor into a live mains socket. 7. Siesta Mi will switch on. Note: If Time not set is displayed on the screen after Siesta Mi initially switches on, press Standby. Mains cable Aerial wire Cable guide 2

5 LANGUAGE ENGLISH Select language 1. Press Select. 2. Use the scroll < > buttons to view the different language options. 3. Press Select to choose the language shown. SCAN FM 35 Autotune Siesta Mi will perform an autotune for digital stations and tune to a station when complete. The number of stations found is displayed during an autotune. Menu Stations/Select Navigating menus and options To navigate and select menu options: 1. Press Menu. 2. Use the scroll < > buttons to scroll to the required option and press Select to access the option. 3. Press Menu again to exit all menus. Adjusting the volume Use Vol + and Vol - to adjust the volume level. VOL 11 3

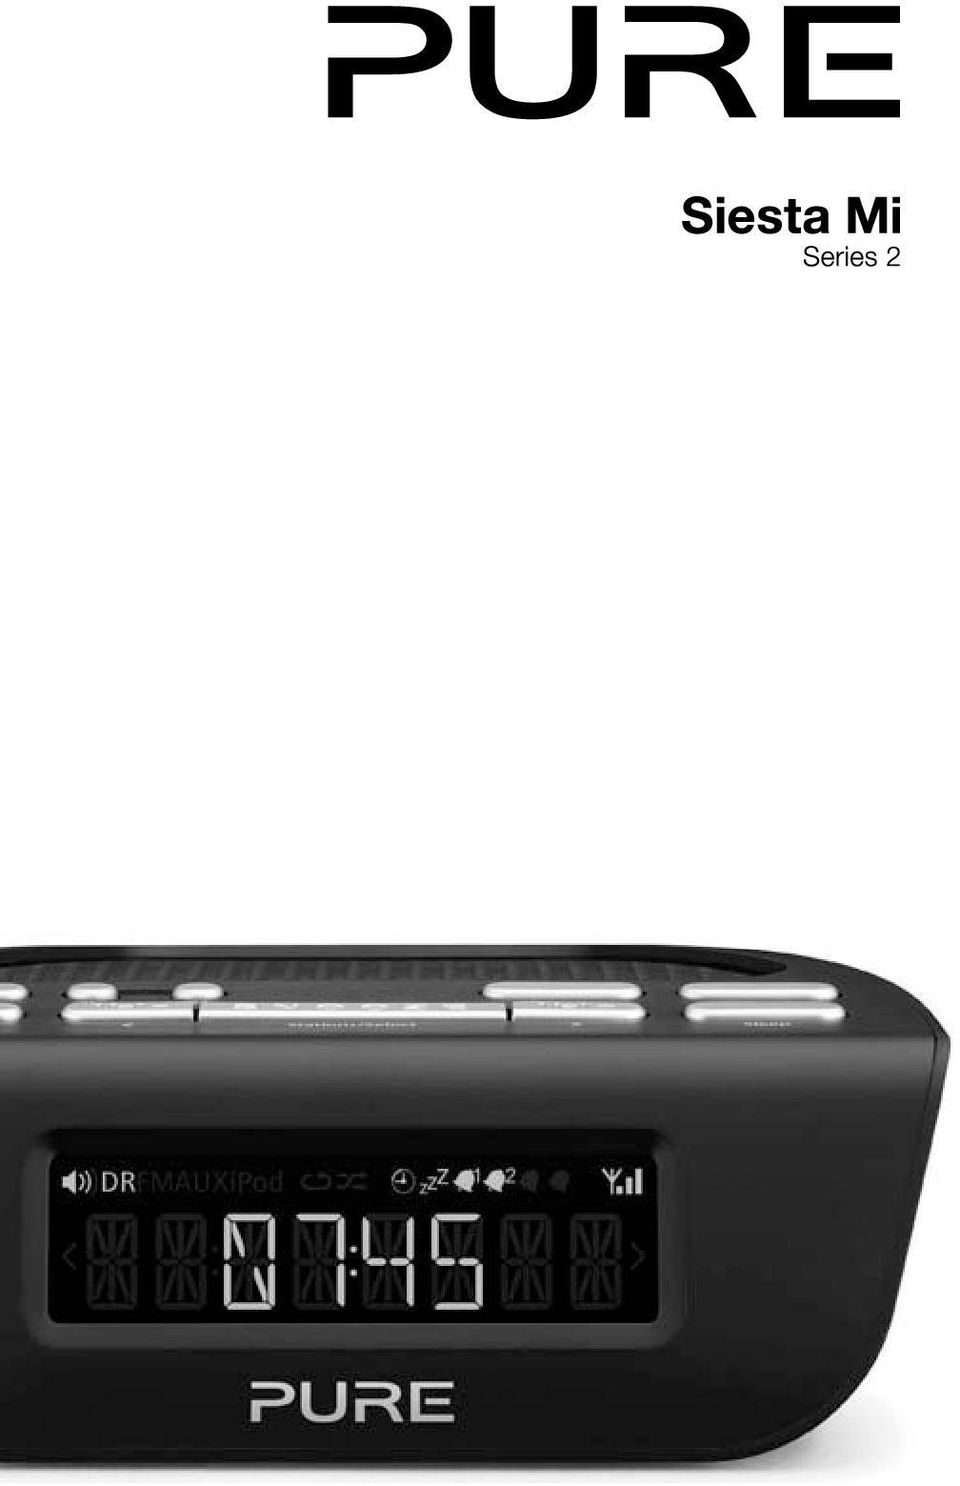
6 Overview of the controls and display Controls Source Switch between Digital and FM radio 1/ 2 Presets Set or cancel individual alarms Store and select preset stations Menu Enter/exit options menu Standby Switch between standby and on Display < Stations/Select > Browse and select radio stations Scroll, change and confirm menu options SNOOZE Snooze an alarm Vol +/- Adjust the volume Sleep Set the sleep timer Source indicator Displays the current radio source: indicates digital radio FM indicates FM Sleep timer Displayed when the sleep timer is set Snooze indicator Signal strength Indicates the current signal strength 4 Volume/mute Volume level Text area Displays menus, settings, station information and clock Alarm indicators : 1136 AM AM/PM indicator Scroll left/right Displayed when scrolling is possible

7 Listening to radio DIGITAL DIGITAL ABSOLUTE Stations/Select BBC R6M Selecting digital radio Press Source until Digital is displayed on the screen. Changing stations 1. Press Stations so that the < > symbols are shown on the display. 2. Scroll < > to the desired station. 3. Press Select to tune into the station. FM FM Selecting FM radio Press Source until FM is displayed on the screen. FM 88 \ 88 FM Stations/Select 93 \ 25 Seek tuning 1. Press Stations so that the < > symbols are shown on the display. 2. Hold either the scroll up or scroll down < > button until Siesta Mi starts to automatically scan for the next station. The scan will stop when a station with a strong signal is found. Manual tuning 1. Press Stations so that the < > symbols are shown on the display. 2. Scroll < > to the required frequency. 5

8 Using radio presets Store up to 8 digital and 8 FM radio stations for quick access and for use as options as radio alarms. ABSOLUTE Presets ABSOLUTE EMPTY 1 Presets ABSOLUTE Storing a radio preset 1. Tune into the station that you want to store. 2. Press Presets so that the < > symbols are shown on the display. 3. Scroll < > to the required Preset (1-8). 4. Press and hold Presets or Select to store the radio station as a preset. Note To overwrite a radio preset, tune into the station that you want to store and follow the above steps. Selecting a radio preset 1. Press the Presets button. 2. Scroll < > to the station that you want to listen to. 3. Press Select to tune to the station. 6

9 Using the alarms Siesta Mi has two alarms. The alarms switch the radio on (if in standby) and tune to a digital or FM radio station or sound a tone. AL1 ON : 1215 : 1215 DAILY DIGITAL LAST USE VOL 11 SAVED 1 Setting a radio alarm 1. Press the 1or 2 button. 2. Scroll < > to On and press Select. 3. Scroll < > to set the hour for the alarm and press Select. 4. Scroll < > to set the minute for the alarm and press Select. 5. Scroll < > to specify one of the following alarm frequency options: Daily, Once, Weekends and Weekdays and press Select to confirm. 6. Scroll < > to specify FM or Digital and press Select to confirm. 7. Scroll < > to specify which station should be played when the alarm goes off. You have the option of selecting one of your preset stations or you can select Last Used to select the station that you were last listening to. Press Select to confirm. 8. Use Vol + and Vol - to set the volume the radio will play at when the alarm sounds and press Select to confirm. 9. One of the alarm icons will appear on the display to show that an alarm is set. 7

10 AL1 ON : 1215 : 1215 DAILY TONE SAVED 1 Setting a tone alarm 1. Press the 1or 2 button. 2. Scroll < > to On and press Select. 3. Scroll < > to set the hour for the alarm and press Select. 4. Scroll < > to set the minute for the alarm and press Select. 5. Scroll < > to specify the alarm frequency and press Select to confirm. The available options are: Daily Once Weekends Weekdays 6. Scroll < > to specify Tone and press Select to save the alarm. One of the alarm icons will appear on the display to show that an alarm is set. 8

11 Switching an alarm on/off 1. Press the button of the alarm ( 1/ 2) to toggle the alarm on/off. 2. Press Select when the screen displays the option that you want to set. 3. One of the alarm icons will appear when an alarm is set : Snoozing a sounding alarm 1. Press the Snooze button to snooze a sounding alarm for the specified time (default 9 mins). See page 13 for more information on setting the snooze time.the snooze icon will display on the screen. 2. The alarm will reactivate after the snooze time has expired. 1 AL1 OFF Cancelling a sounding alarm 1. Press Standby or the 1or 2 button. 2. The screen will display AL1 OFF or AL2 OFF to indicate that the alarm has been cancelled. Note If you do not cancel or snooze a sounding alarm, the alarm will automatically switch off after sixty minutes. 9

12 Using the sleep timer You can use the sleep timer to switch off the radio after a specified period of time. 15 MIN 1. Press Sleep until the time you want to set the sleep timer to (15-90 minutes) is displayed on the screen. 2. Press Select to set the sleep timer screen. ABSOLUTE 3. The sleep timer icon will appear when a sleep timer is set. Note To cancel the sleep timer function, scroll until SLP OFF is displayed on the screen using the above steps. 10

13 Basic options DISPLAY STATION TEXT TIME AUTOTUNE SCAN 43 Changing the information shown on screen 1. Press Menu. 2. Scroll < > to Display and press Select. 3. View the options using the scroll buttons: Station Displays the station name. Text Displays the scrolling text from the radio station. Time Displays the time. Autotune You can use the autotune function to automatically scan for new digital radio stations and remove inactive ones. Note Autotune is only visible when you have selected Digital as the radio source. 1. Press Menu. 2. Scroll < > to Autotune and press Select. 3. The number of stations found will be displayed during the autotune. 4. When the autotune has finished, Siesta Mi will tune to the last station that you were listening to. 11

14 CLOCK SET TIME : 1115 : 1115 DATE 1 MNTH 12 YEAR 11 : : Setting the time and date The time and date on Siesta Mi are automatically set by the FM or digital radio signal. If the time/date does not update automatically, you can manually set it using this option. Note Any time or date updates received by an FM or a digital broadcast will override manual settings. To set the time/date manually: 1. Press Menu. 2. Scroll < > to Clock.and press Select. 3. Scroll < > to Set Time and press Select. 4. Scroll < > to set the hour and press Select. 5. Scroll < > to set the minute and press Select. 6. Scroll < > to set the day of the month and press Select. 7. Scroll < > to set the month and press Select. 8. Scroll < > to set the year and press Select to save your changes. 12

15 CLOCK 12/24 HR 24 HOUR CLOCK SNOOZE Changing the time format 1. Press Menu. 2. Scroll < > to Clock and press Select. 3. Scroll < > to 12/24 Hr and press Select. 4. Scroll < > to the required time format and press Select. Changing the snooze time 1. Press Menu. 2. Scroll < > to Clock and press Select. 3. Scroll < > to Snooze and press Select. 4. Scroll < > to adjust the Snooze time and press Select to save your changes. LANGUAGE ENGLISH FRANCAIS Changing the language 1. Press Menu. 2. Scroll < > to Language and press Select. 3. Scroll < > to the required language and press Select to save your changes. DEUTSCH ITALIANO 13

16 Advanced options V6 \ 0 V1 \ 0 UPGRADE V1 \ 0 RESET CONFIRM Version Press and hold Menu to display the software version on the screen. Upgrade Contact Pure technical support ( for more information on how to update Siesta Mi to the latest software version. Reset Resetting your Siesta Mi removes all presets, stored stations and alarm/timer settings and resets all other options to default settings. To reset Siesta Mi to default settings: 1. Ensure your aerial is fully extended and vertical. 2. Press and hold Menu until you see the firmware version number on screen. 3. Scroll < > to Reset and press Select. 4. Press Select again to confirm that you want to reset the Siesta Mi to default settings. 14

17 Technical specifications Radio Audio Connectors Dimensions (mm) Power Power Consumption Approvals Digital and FM. UK products receive DAB and FM; non-uk products receive DAB/DAB+/ DMB-Radio/FM depending on region 1W RMS Full-range 2.5 drive unit 5V Mini USB power adapter socket (also for software updates) 50 high x 145 wide x 146 deep V AC to 5V (800mA) DC Mini USB external power adapter Standby:<1W CE marked. Compliant with the EMC and Low Voltage Directives (2004/108/EC and 2006/95/EC) ETSI EN compliant 15

18 Pure Warranty Statement for Australia This statement replaces any reference to warranty which may be contained elsewhere within this manual. What do you need to do now? Option 1: You can register your purchase on-line at register/register.asp Option 2: Or you can do nothing other than keep your proof of purchase as evidence of your purchase date. This proof of purchase would need to be presented if warranty service was ever required. If you have any questions about your warranty you can call us toll free: What s covered by this warranty? Pure agrees to refund, repair or replace, at your election, without charge to you, any part found to be defective during the warranty period. If equipment has been used according to its accompanying instruction manual and is used in a domestic situation, a two year warranty period applies. How do you make your claim? Call for instructions on how to return your Pure product for warranty service or go to: and complete the contact us form. What s NOT covered by this warranty? Under this express warranty Pure will not be liable for loss or damage of any kind whatsoever, whether direct, indirect, incidental, consequential or otherwise. Replacement of parts due to normal wear and tear Products with serial number defacement, modification or removal Water damage or corrosion caused by dampness Any damage or deterioration due to shipments Any damage or deterioration due to shipment Any product which has been subjected to misuse, abuse or accident Australian consumers The benefits to the consumer given by this express warranty are in addition to other rights and remedies of the consumer under a law in relation to the goods or services to which this warranty relates. Our goods come with guarantees that cannot be excluded under the Australian Consumer Law, You are entitled to a replacement or refund for a major failure and for compensation for any other reasonably foreseeable loss or damage. You are also entitled to have the goods repaired or replaced if the goods fail to be of acceptable quality and the failure does not amount to a major failure. Pure is distributed and supported in Australia by PIONEER ELECTRONICS AUSTRALIA PTY LTD, 5 ARCO LANE, HEATHERTON, VICTORIA,

19 Pure Imagination Technologies Ltd Home Park Estate Kings Langley Herts, WD4 8LZ United Kingdom Pure Australasia Pty Ltd PO Box 5049 Wonga Park Victoria 3115 Australia

20 % Printed on 100% recycled paper 103JP

Pure Warranty Statement for Australia
 Pure Warranty Statement for Australia This statement replaces any reference to warranty which may be contained elsewhere within this manual. What do you need to do now? Option 1: You can register your
Pop Maxi with Bluetooth
 Pop Maxi with Bluetooth Pure Warranty Statement for Australia This statement replaces any reference to warranty which may be contained elsewhere within this manual. What do you need to do now? Keep your
DAB+ / FM Tuner Model: TU-201
 DAB+ / FM Tuner Model: TU-201 Instruction Manual www.pulse-audio.co.uk 1 Safety Information The lightning bolt within a triangle is intended to alert the user to the presence of dangerous voltage levels
Digital Radio/DAB+/FM RDS digital clock radio with dual alarm Operating instruction
 381SE1D-A Digital Radio/DAB+/FM RDS digital clock radio with dual alarm Operating instruction GB Contents Controls... 2-3 Using the clock radio for the first time... 4 Operating your clock radio... 5 Selecting
DAB+ Digital Alarm Clock Radio with Dock for iphone
 DAB+ Digital Alarm Clock Radio with Dock for iphone BCR33DABIP The Gold Technical Support Line: 1902 215 259 (Charges will apply at $2.95 per minute) www.bushaustralia.com.au Safety Instructions Ensure
Safety instructions. Copyright. Disclaimer. Trademarks. Credits
 Safety instructions Keep the radio away from heat sources. Do not use the radio near water. Avoid objects or liquids getting into the radio. Do not remove screws from or open the radio casing. Unplug the
7 Digital Photo Frame Instructional Manual
 7 Digital Photo Frame Instructional Manual aluratek.com mnl M10084 ADPF07SF Copyright 2010 Aluratek, Inc. All Rights Reserved. Table of Contents Frame Control Close-up... Package Contents... Getting Started...
DR 70 Portable Digital DAB+ and FM Radio Receiver User Manual English Please read carefully before using this product
 DR 70 Portable Digital DAB+ and FM Radio Receiver User Manual Please read carefully before using this product 15 1 Table of Contents 1 Table of Contents... 16 2 Safety Instructions:... 17 3 Specification:...
PG-01instruction manual
 PG-01instruction manual DIGITAL RADIO fairbank house ashley road altrincham WA14 2DP united kingdom t: +44 (0)161 924 0300 f: +44 (0)161 924 0319 e: sales@intempodigital.com www.intempodigital.com PG-01
H203D 中文 GB Version 1
 H203D 中 GB文 Version 1 Contents Installing batteries... 4 Using the AC adapter (not supplied)... 5 Setting the clock... 6-7 Updating your radio - DAB... 8 Selecting a station - DAB... 9 Secondary services
Alarm Clock USER GUIDE
 Alarm Clock USER GUIDE Jazwares, Inc. 2012 CONTENTS Please read the instructions along with the Alarm Clock carefully before you use it, so that you can operate it conveniently. WELCOME & Warnings Page
Touch Nightball DAB Radio
 Touch Nightball DAB Radio DAB/FM Radio Alarm Clock Nightball DRAFT 1.indd 1 7/11/07 17:13:21 co n t e n t s Introducing the Touch Nightball DAB Radio 3 What is DAB Digital Radio? 3 Where to put your radio
8 Digital Photo Frame Instructional Manual
 8 Digital Photo Frame Instructional Manual aluratek.com mnl M10126 ADMPF108F Copyright 2012 Aluratek, Inc. All Rights Reserved. Table of Contents Frame Close-up... Remote Control Close-up... Package Contents...
ROBERTS. Enjoy Listening. DAB / FM RDS Digital Clock Radio with large display. Please read this manual before use
 ROBERTS Enjoy Listening DAB / FM RDS Digital Clock Radio with large display Please read this manual before use Contents Controls... -3 Using the clock radio for the fi rst time...4 Operating your clock
In-Car Digital Radio Adaptor User Guide
 S1000-DAB In-Car Digital Radio Adaptor User Guide Table of Content INTRODUCTION... 1 CONTENTS OF PACKAGE... 2 INSTALLATION...3 OVERVIEW OF CONTROLS AND CONNECTORS... 5 STARTING UP THE SYSTEM... 7 USING
DAB+/FM/AM Digital Radio
 DAB+/FM/AM Digital Radio TR82DAB Instruction Book Toll Free Warranty and Service: 1800 509 394 The Gold Technical Support Line: 1902 215 259 (Charges will apply at $2.95 per minute for gold technical support
Controls (front) 1. Loudspeaker 2. Light button 3. Band button 4. Auto tune button 5. Alarm button 6. LCD display
 1. Loudspeaker 2. Light button 3. Band button 4. Auto tune button 5. Alarm button 6. LCD display") GB Contents Controls... 2-4 Mains operation... 5 Operating your radio... 6 Selecting a station DAB... 7 Display modes DAB... 8 Finding new stations - DAB... 9 Secondary services DAB... 9 Manual tuning
GB Contents Controls... 2-4 Mains operation... 5 Operating your radio... 6 Selecting a station DAB... 7 Display modes DAB... 8 Finding new stations - DAB... 9 Secondary services DAB... 9 Manual tuning
Introduction and Contents
 Introduction and Contents Thank you for buying this Bush product, which is designed to give you many years of trouble-free service. You may already be familiar with using a similar unit, but please take
User Manual TuneCast Auto for ipod
 User Manual TuneCast Auto for ipod Introduction Congratulations and thank you for purchasing the innovative TuneCast Auto from Belkin. This product is designed to power, charge, and transmit audio from
GCR1880DAB Digital Alarm Clock Radio User Guide
 GCR0DAB Digital Alarm Clock Radio User Guide IMPORTANT: Please read all instructions carefully before use and keep for future reference. Introduction Thank you for buying this Goodmans Digital Alarm Clock
Weather Radio Alarm Clock
 1200093 User s Guide Weather Radio Alarm Clock Thank you for purchasing your Weather Radio Alarm Clock from RadioShack. Please read this user s guide before installing, setting up, and using your new weather
Alarm Clock USER GUIDE
 Alarm Clock USER GUIDE Jazwares, Inc. 2010 1 CONTENTS Please read the instructions along with the alarm clock carefully before you use it, so that you can operate it conveniently. WELCOME, Safety Tips
User Guide. DCR1401B/G Crescendo DAB alarm clock radio
 User Guide DCR1401B/G Crescendo DAB alarm clock radio IMPORTANT SAFETY INFORMATION CAUTION! RISK OF ELECTRIC SHOCK DO NOT OPEN TO REDUCE THE RISK OF ELECTRIC SHOCK DO NOT REMOVE COVER (OR BACK) This symbol
User Manual. Humidity-Temperature Chart Recorder. Model RH520
 User Manual Humidity-Temperature Chart Recorder Model RH520 Introduction Congratulations on your purchase of the Extech RH520 Temperature + Humidity Chart Recorder. The RH520 measures and displays Temperature,
15 Digital Photo Frame Instructional Manual
 15 Digital Photo Frame Instructional Manual aluratek.com mnl M10054 ADMPF315F Copyright 2011 Aluratek, Inc. All Rights Reserved. Table of Contents Frame Close-up... Remote Control Close-up... Package Contents...
DAB & FM RADIO Installation Manual
 Size: 105x145mm 105g copper paper DAB & FM RADIO Installation Manual Model: 10798 10799 10800 10801 Thank you for purchasing this AGK DAB/FM radio. Please read the instructions and warnings carefully before
DAB Radio. Instruction Manual L55DAB10
 DAB Radio Instruction Manual L55DAB10 L55DAB10_IB_110810_Zell.indd 1 L55DAB10_IB_110810_Zell.indd 2 Contents Unpacking...5 Product Overview...6 Top View... 6 Rear View... 6 Power Source...7 Battery Power...
AM / FM Tuner + RDS. Model: TU-101. www.pulse-audio.co.uk
 AM / FM Tuner + RDS Model: TU-101 www.pulse-audio.co.uk 1 Safety Information The lightning bolt within a triangle is intended to alert the user to the presence of dangerous voltage levels within the product
Register your product and get support at. www.philips.com/welcome AS111. User manual
 Register your product and get support at www.philips.com/welcome AS111 User manual Contents 1 Important 4 Safety 4 English 2 Your docking speaker for AndroidTM 5 Introduction 5 What's in the box 5 Overview
JTAGjet. series SIGNUM SYSTEMS CORPORATION. USB 2.0 Driver for JTAGjet and ADM51. Installation Instructions
 JTAGjet series SIGNUM SYSTEMS CORPORATION USB 2.0 Driver for JTAGjet and ADM51 Installation Instructions COPYRIGHT NOTICE Copyright (c) 2011 by Signum Systems Corporation. All rights are reserved worldwide.
User manual. Your best protection against theft and loss. (Android) Made for
 Made for") User manual Made for Your best protection against theft and loss (Android) Warranty SCOPE OF THE WARRANTY Subject to legal provisions, the responsibility of SECU4 under this warranty is limited to the
User manual Made for Your best protection against theft and loss (Android) Warranty SCOPE OF THE WARRANTY Subject to legal provisions, the responsibility of SECU4 under this warranty is limited to the
DX-395. FM/AM/SW1/SW2 PLL Synthesized Receiver OWNER S MANUAL. Cat. No. 20-225. Please read before using this equipment.
 20-225.fm Page 1 Wednesday, August 4, 1999 10:07 AM Cat. No. 20-225 OWNER S MANUAL Please read before using this equipment. DX-395 FM/AM/SW1/SW2 PLL Synthesized Receiver 20-225.fm Page 2 Wednesday, August
User Guide. CR-111IP Clock radio with dock for ipod
 User Guide CR-111IP Clock radio with dock for ipod IMPORTANT SAFETY INFORMATION CAUTION! RISK OF ELECTRIC SHOCK DO NOT OPEN TO REDUCE THE RISK OF ELECTRIC SHOCK DO NOT REMOVE COVER (OR BACK) This symbol
2 YEAR WARRANTY S7200PAU USE & CARE MANUAL ADVANCED CERAMIC TECHNOLOGY. To register your product go to www.remington-products.com.
 USE & CARE MANUAL PLEASE READ PRIOR TO USE To register your product go to www.remington-products.com.au ADVANCED CERAMIC TECHNOLOGY 2 YEAR WARRANTY S7200PAU 1 IMPORTANT SAFEGUARDS Warning: When the straightener
Vibrating Alarm Clock VAC500
 Vibrating Alarm Clock VAC500 Keep this user guide for future reference. Always retain your proof of purchase in case of warranty service and register your product on line at: AUSTRALIA: www.oricom.com.au
August International Ltd United Kingdom Telephone: +44 (0) 845 250 0586 www.augustint.com
 845 250 0586 www.augustint.com") August International Ltd United Kingdom Telephone: +44 (0) 845 250 0586 www.augustint.com EN FR DE IT ES FM Radio and Music Alarm Clock Radio-Réveil FM et Lecteur de Musique Musikanlage und Radiowecker
August International Ltd United Kingdom Telephone: +44 (0) 845 250 0586 www.augustint.com EN FR DE IT ES FM Radio and Music Alarm Clock Radio-Réveil FM et Lecteur de Musique Musikanlage und Radiowecker
DAB1001. Wireless Digital Radio Interface. Installation & User Guide
 DAB1001 Wireless Digital Radio Interface Installation & User Guide Contents Contents... 2 Introduction... 3 Contents of Package... 4 Installation... 5 Product Overview... 5 Installation Procedure... 5
AM/FM PLL Clock/Table Radio
 12-1632.fm Page 1 Wednesday, May 10, 2000 10:57 AM Cat. No. 12-1632 OWNER S MANUAL Please read before using this equipment. AM/FM PLL Clock/Table Radio 12-1632.fm Page 2 Wednesday, May 10, 2000 10:57 AM
CD / DAB / FM Digital Sound System with dock for ipod and iphone
 Enjoy Listening ROBERTS CD / DAB / FM Digital Sound System with dock for ipod and iphone Please read this manual before use Contents Introduction...2-9 Sound 00 Sound System features...3 Controls and connections...4-5
DAB DIGITAL RADIO MODEL: CANVAS USER MANUAL
 DAB DIGITAL RADIO MODEL: CANVAS USER MANUAL 1 Welcome 2 Your DAB Digital Radio 2.1 In The Box 2.2 Front View 2.3 Top View 2.4 Rear View 3 Quick Setup 4 Features POWER button 4.5 FM mode choosing menu options
DIGITAL ALARM CLOCK RADIO
 DIGITAL ALARM CLOCK RADIO INSTRUCTION MANUAL For information and support, www.lenco.eu CR3302 LENCO ENG FM ONLY IM 98 x1 1 11/5/2009 9:14:35 CAUTION RISK OF ELECTRIC SHOCK DO NOT OPEN WARNINGS ATTENTION
user s manual Battery Case model #: SPB3200 Battery Case Charger for Samsung Galaxy S 4
 user s manual model #: SPB3200 Charger for Samsung Galaxy S 4 What s Included Unpack the battery case and make sure all accessories are put aside so they will not be lost. hello. USB to Micro USB Cable
CR9971 2 Band Auto Set Dual Alarm Clock Radio ROBERTS. Sound for Generations. Please read this manual before use
 ROBERTS Sound for Generations CR9971 2 Band Auto Set Dual Alarm Clock Radio Please read this manual before use Contents Contents... 1 Controls...2-5 Switching on... 6 Setting the time manually... 6 Setting
Quick Installation Guide TK-209K TK-409K
 Quick Installation Guide TK-209K TK-409K Table of of Contents Contents English... 1. Before You Start... 2. How to Connect... 3. Operation... 1 1 2 4 Troubleshooting... 5 Version 09.07.2006 1. Before You
2GB MP3 Player USER GUIDE
 DO NOT FORMAT UNIT under FAT. 2GB MP3 Player USER GUIDE Jazwares, Inc. 2010 CONTENTS Please read the instructions along with the MP3 Player carefully before you use it, so that you can operate it conveniently.
USER GUIDE. Publication AP7080. Allen & Heath 1 XONE:1D User Guide
 USER GUIDE Publication AP7080 Allen & Heath 1 XONE:1D User Guide Limited One Year Warranty This product is warranted to be free from defects in materials or workmanship for period of one year from the
User Manual (English)
") User Manual (English) Table of Contents General Safety Information...2 Fueltank UNO Components...3 Charging the Fueltank UNO...4 Using the Fueltank UNO...5 Power Saving Mode...6 Checking the Fueltank UNO
User Manual (English) Table of Contents General Safety Information...2 Fueltank UNO Components...3 Charging the Fueltank UNO...4 Using the Fueltank UNO...5 Power Saving Mode...6 Checking the Fueltank UNO
User Guide. DAB-109CR DAB Digital Radio alarm clock
 User Guide DAB-109CR DAB Digital Radio alarm clock IMPORTANT SAFETY INFORMATION CAUTION! RISK OF ELECTRIC SHOCK DO NOT OPEN TO REDUCE THE RISK OF ELECTRIC SHOCK DO NOT REMOVE COVER (OR BACK) This symbol
DAB+P Smart DAB Radio Receiver Quick Start Guide
 DAB+P Smart DAB Radio Receiver Quick Start Guide v.1.1 DBP-9201-2 INTRODUCTION The Dension DAB+P device is a universal solution for listening to your favorite DAB (Digital Audio Broadcast) stations everywhere
Internet Radio New Style Edition 5 21.09.06 7690. BT Internet Radio. User Guide
 BT Internet Radio User Guide Welcome to your BT Internet Radio Listen to thousands of radio stations from around the world, with every type of music you can imagine. Stations checked and updated daily.
Portable Bluetooth Speaker. Quick Start Guide. Model: BTS201
 Portable Bluetooth Speaker Quick Start Guide Model: BTS201 Disclaimer All the information, design and specifications contained in this manual were correct at the time of publication. However, as the product
Important Safety Instructions
 PR-D7 GB Revision 1 Important Safety Instructions 1. Read these instructions. 2. Keep these instructions. 3. Heed all warnings. 4. Follow all instructions. 5. Do not use this apparatus near water. 6. Clean
LCD5500Z / PKP-LCD v3.x Installation Instructions
 LCD5500Z / PKP-LCD v3.x Installation Instructions TM Introduction The LCD5500Z / PKP-LCD keypad displays system status using an LCD screen. The keypad can be used on PowerSeries security systems with up
MACTek Corporation. USB HART Interface. Users Manual
 MACTek Corporation USB HART Interface DM01003100AA February, 2003 LIMITED WARRANTY VIATOR Interface for HART MACTek Corporation warrants this Interface and all of its component against defects in materials
Gibson Dark Fire System Quick Start
 Gibson Dark Fire System Quick Start Installation and Authorization Windows XP RIP Console Native Instruments Guitar Rig 3 Ableton Live 7 Lite Gibson Studio Edition Owner s Manual Version 1.1 1 Important
Stereo Bluetooth In-Car FM Transmitter. Owner s Manual. Model BTC008
 Stereo Bluetooth In-Car FM Transmitter Owner s Manual Model BTC008 Thank you for choosing the Alva FM transmitter Model BTC008. Please read this user s manual carefully before use. Features Play Smartphone
DUALIT KITCHEN RADIO INSTRUCTION MANUAL GB 10/06
 DUALIT KITCHEN RADIO INSTRUCTION MANUAL GB 10/06 CONTENTS SAFETY PRECAUTIONS... 3 / 4 PACKAGE CONTENTS... PARTS AND CONTROLS... RADIO HOUSING CONTROLS INPUTS AND OUTPUTS QUICK START... SETTING UP... CLOCK
Quick Operation Guide DAB, DAB + und DMB USB Digital Receiver Albrecht DR 403
 Quick Operation Guide DAB, DAB + und DMB USB Digital Receiver Albrecht DR 403. 1 Note Thank you for purchasing the DAB/ DMB receiver. This Quick Guide is to guide you to the software installation of the
DAB/FM personal digital radio with OLED display
 DAB/FM personal digital radio with OLED display ROBERTS Enjoy Listening Please read this manual before use Contents Controls... 3-4 Using the AC adaptor... 5-6 Keylock function... 7-8 Navigation... 9-10
Pocket DAB & FM Radio with Speaker
 Pocket DAB & FM Radio with Speaker P MODEL: GDPRDAB USER MANUAL 1 Welcome 2 Your DAB Digital Radio 2.1 In The Box 2.2 Front View 2.3 Rear View 3 Quick Setup 3.1 Power On and Autoscan 3.2 Changing DAB Stations
Hi, let s get started. Sound Rise Wireless Speaker & Alarm Clock
 Hi, let s get started. Sound Rise Wireless Speaker & Alarm Clock Welcome to your new Sound Rise! We created Sound Rise for music lovers like you. Start the day with your favorite tunes, rock out while
ENGLISH FRANÇAIS DEUTSCH ESPAÑOL ÐÓÑÑÊÈÉ
 ÐÓÑÑÊÈÉ ESPAÑOL DEUTSCH FRANÇAIS ENGLISH ÐÓÑÑÊÈÉ ESPAÑOL DEUTSCH FRANÇAIS ENGLISH ÐÓÑÑÊÈÉ ESPAÑOL DEUTSCH FRANÇAIS ENGLISH ÐÓÑÑÊÈÉ ESPAÑOL DEUTSCH FRANÇAIS ENGLISH ÐÓÑÑÊÈÉ ESPAÑOL DEUTSCH FRANÇAIS ENGLISH
STANDBY SCAN PRESET ALARM ENTER SNOOZE MODE INFO/MENU. User Guide. DR1402 DAB Radio
 STANDBY SCAN PRESET MODE INFO/MENU ALARM ENTER SNOOZE User Guide DR1402 DAB Radio IMPORTANT SAFETY INFORMATION CAUTION! RISK OF ELECTRIC SHOCK DO NOT OPEN TO REDUCE THE RISK OF ELECTRIC SHOCK DO NOT REMOVE
Installation Guide Wireless 4-Port USB Sharing Station. GUWIP204 Part No. M1172-a
 Installation Guide Wireless 4-Port USB Sharing Station 1 GUWIP204 Part No. M1172-a 2011 IOGEAR. All Rights Reserved. PKG-M1172-a IOGEAR, the IOGEAR logo, MiniView, VSE are trademarks or registered trademarks
AGS. Owner's Manual. Xantrex Automatic Generator Start Control System
 AGS Owner's Manual Xantrex Automatic Generator Start Control System TABLE OF CONTENTS INTRODUCTION...3 Main Features...3 Safety Summary...3 THINGS YOU SHOULD KNOW...4 THEORY OF OPERATION...5 System...5
CR9986 ROBERTS. Dual Alarm CD Clock Radio. Sound for Generations. Please read this manual before use
 ROBERTS Sound for Generations CR9986 Dual Alarm CD Clock Radio Please read this manual before use Contents Contents... Controls... - Switching on and setting the time... 4 Listening to the radio... 5 Compact
ASUS GX900 Gaming Mouse
 ASUS GX900 Gaming Mouse User Manual 15G06S002000 E5887 First Edition (V1) July 20 Copyright 20 ASUSTeK Computer Inc. All Rights Reserved. No part of this manual, including the products and software described
7 High-Resolution Digital Photo Frame
 TM 16-1003 User s Guide 7 High-Resolution Digital Photo Frame One demo photo included, as illustrated Please read this user s guide before using your new photo frame. Package contents Photo Frame AC Adapter
PS42309C INSTRUCTION MANUAL
 7-Day Digital Timer Model Number: PS42309C INSTRUCTION MANUAL 7-Day Digital Timer Warranty Details The product is guaranteed to be free from defects in workmanship and parts for a period of 12 months from
ALARM CLOCK RADIO FOR ipod/iphone
 ALARM CLOCK RADIO FOR ipod/iphone Owner's Manual PLEASE READ BEFORE OPERATING THIS EQUIPMENT. Model: CMB3215 1 Meijer.com 2 Meijer.com 3 Meijer.com 4 Meijer.com instructions. Adjust qualified service.
Bosch Temperature Controllers Operation HANDBOOK
 MODELS YPRM67XBN-Main Controller (Premium) YPRS67XBN -Bathroom Controller (Premium) YPRM66XB -Main Controller (standard) YPRS66XB -Bathroom Controller (standard) YPRM67XB -Main Controller (Premium) YPRS67XB
Model: HD11-ARC. Installation Guide
 Model: HD11-ARC Installation Guide 1 Contents Application Diagram... 3 Installation... 3 Description... 3 Features... 4 Remote control guide... 5 Audio Selection...6 EDID Emulator... 6 Mounting Tabs...
DAB digital/fm radio. Instruction manual
 DAB digital/fm radio Instruction manual DAB digital/fm radio Thank you for purchasing this DAB digital/fm radio. Please read the instructions and warnings carefully before use to ensure safe and satisfactory
inmarsat.com/isatphone
 inmarsat.com/isatphone 1. Coverage and Warranty period Inmarsat Global Limited ( Inmarsat ) offers this limited warranty (this Warranty ) to the first end-user purchaser (the Purchaser ) of any new IsatPhone
Wake-up Light. Always here to help you. www.philips.com/welcome HF3510. User manual Manuel d utilisation. Register your product and get support at
 Always here to help you Register your product and get support at www.philips.com/welcome Question? Contact Philips Wake-up Light HF3510 User manual Manuel d utilisation IMPORTANT SAFETY INSTRUCTIONS WARNING
RD-27 ROBERTS. FM RDS/DAB digital radio with. Sound for Generations. Please read this manual before use
 ROBERTS RD-7 Sound for Generations FM RDS/DAB digital radio with Please read this manual before use Contents Controls... Battery operation... 3 Mains operation... 3 Operating your radio - DAB... 4 Selecting
QUICK INSTALLATION. 8-Port Telephony Gateway. Model: SPA8000
 QUICK INSTALLATION 8-Port Telephony Gateway Model: SPA8000 Table of Contents Connect................................................. 4 Regulatory Information....................................12 WEEE
Retro Radio. Operation Guide. Operation Guide. Guía de funcionamiento Guia de Operação. Guide d utilisation Betriebsanleitung.
 Retro Radio Operation Guide Guida Operativa Operation Guide Guide d utilisation Betriebsanleitung Guía de funcionamiento Guia de Operação GB View Quest Retro DAB+ Operation Guide 2 View Quest Retro DAB+
REVIVE DAB/FM ALARM CLOCK RADIO
 kitsound.co.uk REVIVE DAB/FM ALARM CLOCK RADIO USER MANUAL JB. 3208 / Made in China. KitSound 2014. Christchurch, Dorset. BH23 4FL We are craftspeople. We are musicians. We are KitSound And we all commit
RD-11 ROBERTS. FM RDS/DAB digital radio with. Sound for Generations. Please read this manual before use
 ROBERTS Sound for Generations RD- FM RDS/DAB digital radio with Please read this manual before use Contents Controls... Battery operation... 3 Mains operation... 3 Operating your radio - DAB... 4 Selecting
AVerMedia AVerKey imicro User s Manual
 FCC NOTICE This device has been tested and found to comply with the limits for a Class B digital device, pursuant to Part 15 of the FCC Rules. These limits are designed to provide reasonable protection
User's Guide. Integrating Sound Level Datalogger. Model 407780. Introduction
 User's Guide 99 Washington Street Melrose, MA 02176 Phone 781-665-1400 Toll Free 1-800-517-8431 Visit us at www.testequipmentdepot.com Back to the Extech 407780 Product Page Integrating Sound Level Datalogger
Wireless Mouse USER GUIDE. for Mac. www.targus.com/us/formac ONE YEAR LIMITED WARRANTY N2953
 AMW43US / 410-1514-001C N2953 www.targus.com/us/formac 2008 Manufactured or imported by Targus Group International, Inc. (for U.S. sales: 1211 North Miller Street, Anaheim, CA 92806 USA, for Australia
Wormhole Switch JUC400
 For MAC & Windows OS Wormhole Switch JUC400 User Manual JUC400 Ver4.0 Required Environments Windows - OS: Windows 7 / Vista / XP / 2000 - Available USB port (USB 2.0 is recommended) - CPU: Intel Pentium
BTH240 Wireless Bluetooth Headphone
 BTH240 Wireless Bluetooth Headphone User Manual 2012 Kinivo LLC. All rights reserved. Kinivo is a trademark of Kinivo LLC. Bluetooth word mark and the Bluetooth logo are registered trademarks of Bluetooth
DR601. User s Manual. English. D-22952 Lütjensee D-63303 Dreieich
 DR601 User s Manual English ALAN Electronics GmbH ALAN Electronics GmbH Dovenkamp 11 Daimlerstr. 1 k D-22952 Lütjensee D-63303 Dreieich Hotline: Phone: (+49) 6103 9481 30 Fax: (+49) 6103 9481 60 email:
USB Freeview TV Receiver
 DVB-T205 V3.0 August International Ltd United Kingdom Telephone: +44 (0) 845 250 0586 www.augustint.com USB Freeview TV Receiver Thank you for buying this August product. You may already be familiar with
Nest Learning Thermostat Installation Guide. Installation step-by-step
 Nest Learning Thermostat Installation Guide Installation step-by-step Contents Compatibility. 3 In the box. 4 Before you start. 5 Choose an installation method. 6 Replacing an existing wired thermostat.
VIBRATION WATCH with:
 Vibration Alarm won't disturb others. Beep Alarm option VIBRATION WATCH with: Auto Reload Countdown Timer can be set for seconds, minutes & hours. Use for reminders such as medical conditions, medication,
HYDRA Z Owner s Manual
 HYDRA Z usb audio bridge Thank you for buying the Audiobyte Technologies Hydra Z digital to digital converter. You have now one of the finest USB audio interfaces available on the market. The Hydra Z was
ROBERTS. Enjoy Listening. DAB/FM RDS digital portable radio. Please read this manual before use
 ROBERTS Enjoy Listening DAB/FM RDS digital portable radio Please read this manual before use Contents Controls... 2-3 Battery operation...4 Using the AC adaptor...5 Operating your radio - DAB...6 Selecting
BroadBand PowerShield. User Manual
 BroadBand PowerShield User Manual 990-0375G 12/2006 Chapter 1 General Information The PowerShield provides a power source for broadband telephony and other DC applications. Safety This Safety Guide contains
PRODUCT WARRANTY. Page 20
 PRODUCT WARRANTY Manufactured equipment is warranted to be free from defects in material and workmanship for a period of twelve (12) months from date of manufacture as indicated by the date stamp and/or
Flarm LED indicator. Version 1.1
 Flarm LED indicator Version 1.1 LXNAV d.o.o. Kidričeva 24a, 3000 Celje, Slovenia tel +386 592 33 400 fax +386 599 33 522 info@lxnav.com www.lxnav.com 1 Important Notices 3 1.1 Limited Warranty 3 2 Packing
User Manual THR840DUK Digital Thermostat
 User Manual THR840DUK Digital Thermostat 50051982-001 Rev. A WARNING: This product must be correctly installed and configured to work properly (see pages 12-24). If you are not experienced in wiring electrical
Universal Wireless Effects Controller USER S GUIDE SA115
 Universal Wireless Effects Controller USER S GUIDE SA115 Welcome Thank you for purchasing this Hot Hand 3 Universal Wireless Effects Controller. We hope that the new functionality of the Hot Hand 3 unit
www.burntec.com User's Guide Integrating Sound Level Datalogger Model 407780
 User's Guide Integrating Sound Level Datalogger Model 407780 Introduction Congratulations on your purchase of the Extech 407780 Integrating Sound Level Meter. The 407780 with programmable integrating time
1 Plug in your extender near your router 2 Wireless connection to router 3 Move extender to optimum location
 User Guide 1 Plug in your extender near your router 2 Wireless connection to router 3 Move extender to optimum location Dual-Band Wi-Fi Extender 600 Follow the steps in this guide to set up your kit. If
for DNE-K07 Reference and Installation Manual
 for DNE-K07 Reference and Installation Manual TABLE OF CONTENTS INTRODUCTION...2 Specifications... 3 Navigation... 3 INSTALLATION...4 Viewing Angle... 4 Keypad Cover Clearance... 4 Mounting the Metal
Wireless Keyboard & Optical Mouse. User Manual
 Wireless Keyboard & Optical Mouse User Manual Table of Contents Introduction... 1 Software Compatibility... 1 Product Features... 2 Quick Installation Setup for PS/2 Connections (PC-only)... 5 Quick Installation