Dining Tables by Kim Carleton Graves
|
|
|
- Delilah Greer
- 7 years ago
- Views:
Transcription
1 This is an excerpt from the book Dining Tables by Kim Carleton Graves Copyright 2001 by The Taunton Press

2
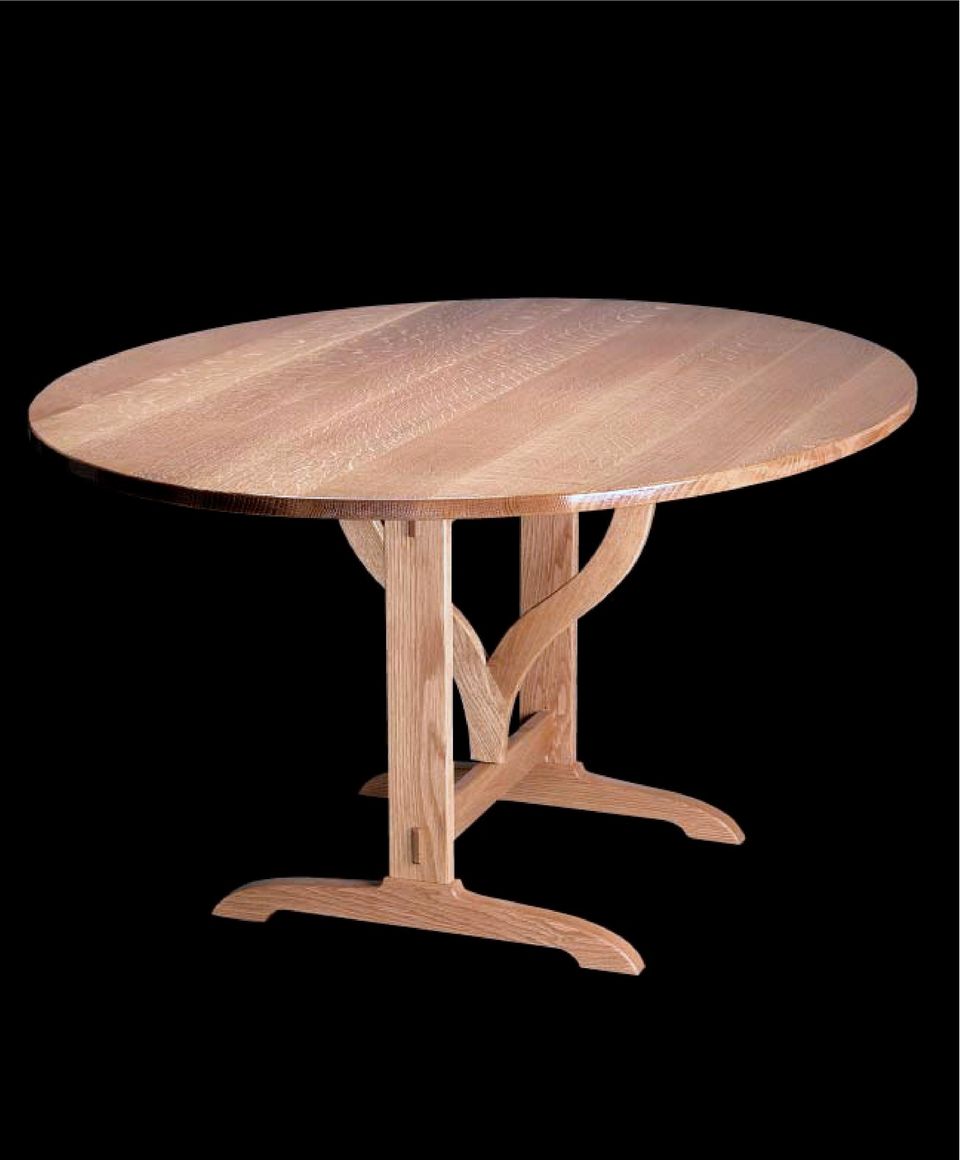
3 Vineyard Table The vineyard table is almost as old a design as the trestle table, dating back 300 years or more. Some sources claim these tables were used by grape pickers in French vineyards for working lunches, while others say they were used in wineries for wine tastings. Both stories may be true, since the tables fold easily for storage and transportation. The central harp spins around on one set of dowels and the tabletop flips on a second set of dowels to create a remarkably compact package. Neal White of San Jose, California, designed and built this table as a second table for family gatherings at his house. He found it too useful to stow away between occasions, and it s taken up permanent residence in his living room. The vineyard table is similar to the trestle table on p. 40 except that hinges have replaced the joints between the legs and cleats, and the tabletop is held level by a beautiful harp-shaped support. I love the look of the figured white oak in this table, but the original tables were made by carpenters from whatever woods were available locally. Like all trestle tables, this one is easily modified to suit the builder s taste and talents. Vineyard tabletops are typically round or elliptical, but you can make the top for this table in almost any size or shape as long as the width clears the feet when the table is flipped. 57

4 Vineyard Table THE VINEYARD TABLE is similar to a trestle table in construction, except that the cleats are hinged instead of joined to the legs, allowing the tabletop to flip down or be removed for storage and transportation. The harp-shaped structure pivots outward to support the tabletop when the tabletop is set up for use. Top Cleat Harp Dowel Leg Stretcher Foot Footpad 58 V INEYARD T ABLE

5 END VIEW SIDE VIEW 32" 1" 1 7 /8" 1 1 /2" 16" 3 3 /16" 3 /4" dia. 3 1 /2" R 1 3 /8" 3 /4" dia. 2 1 /2 " 1 1 /4 " 2" 3 3 /16" 2" 27" 22 1 /2 " 27" 1 /2" 2 1 /2 " 2" 2 3 /4" 3 3 /4" 1" 2 3 /4 " 4 7 /16" 25" 2 3 /4" 1" 1 1 /2 " 1 /2 " HARP 19 1 /2" 2" /16" 4 1 /2" V INEYARD T ABLE 59

6 Building the Table Step-by-Step CUT LIST FOR VINEYARD TABLE Tabletop and Leg Assembly 1 Tabletop 60 in. x 46 in. x 1 in. 2 Legs 27 in. x in. x 1 in. 2 Feet 25 in. x in. x in. 4 Footpads 1 5 in. x 1 in. x in. 2 Stretchers in. x in. x 1 in. 2 Cleats 32 in. x in. x 1 in. 2 Harp legs in. x in. x 1 in. 1 Harp cross bar in. x 2 in. x 1 in. 2 Leveling blocks 1 5 in. x in. x 2 in. Hardware 2 Hardwood wooden dowels in. diameter x 3 in. 2 Hardwood wooden dowels in. diameter x 3 in. 4 Steel wood screws in. by #10 1 The leveling blocks and footpads can be cut from the foot cutoffs. 2 See Sources of Supply on p The elaborate pattern-cutting techniques described for other projects in this book can be used for this table. However, since vineyard tables are traditionally simple, carpenter-made furniture, I ve chosen to stick to basic tools and techniques. A jigsaw, coping saw, or bandsaw is all you need to cut out the parts; scrapers, planes, and sandpaper can be used to sculpt them to final shape. Mortise-and-tenon joints hold the legs and stretchers together, but the lap joint, a very basic joint, is used for the harp pieces, and doweled hinges are used for the moving parts. Another new but simple technique introduced here is drawing the ellipse for the tabletop. The most challenging task is to fit the pieces together so that the tabletop opens and closes easily and remains level when open. Since every table is slightly different, adjustments to the dowels and leveling blocks should be made dynamically. Making the Parts Preparing the stock The critical dimensions in this table are the lengths of the legs, the widths of the feet, and the lengths of the stretchers. If these aren t equal, the trestle won t be square. In addition, the width of the tabletop must clear the feet when the table is flipped up for storage. The shape of the tabletop determines how much clearance you have. Rectangular tables have about 45 in. of clearance, while round tables have nearly 49 in. because the curved shape clears the feet. 1. Begin with 8/4 rough stock for the feet and footpads and 6/4 rough stock for all other parts. Although 5/4 might work, you would risk not being able to get all the parts out. 2. Crosscut the trestle parts 2 in. oversize in length. Face-joint and edge-joint the boards and plane them to finished 1-in. thickness, then rip the parts to finished width. 3. Cut all tabletop boards to the same length. When cutting to rough length, leave them several inches oversize. Face-joint and edge the boards, then rip them to width and plane to finished thickness. Making the tabletop 1. Glue up boards for the tabletop in a rectangular shape, arranging and aligning the boards to get the best match for color and grain. Clamp the tabletop, using plenty of clamps (see the sidebar on the facing page), and allow the glue to cure overnight. 60 V INEYARD T ABLE

7 How Many Clamps? The object of clamping is to put pressure on all of the surfaces being glued. Imagine clamp pressure as radiating 45 degrees on either side from the point of application. If the clamps are spaced too far apart, as shown in illustration a below, there may be little or no pressure at some points on the glueline. Moving the outer clamps toward the center, as shown in b, solves the problem in the middle but creates new low-pressure areas near the edges. Some woodworkers recommend springing the boards so they meet at the ends but gap slightly in the center. The board acts as a combination spring and caul, closing the gaps. I prefer using enough clamps to provide pressure at all points on the gluelines, as shown in c. In this example, I needed five clamps to get enough pressure. With a panel the same size and narrower boards, I would have needed even more clamps. No pressure area Low pressure area Overlap pressure Good overlap pressure in all areas Good pressure Not enough pressure a b c 2. After the glue cures, remove the clamps and place the tabletop upside down on your workbench. 3. Draw an ellipse on the underside of the tabletop as described in the sidebar on p. 62, and cut out the ellipse using a jigsaw or coping saw. 4. Finish shaping the ellipse with a belt sander held against the edge or a sanding block with 80-grit sandpaper. Making the feet 1. Cut the feet to final length. 2. Mark out the 1 2-in. mortises with a mortising gauge, making sure the mortise is centered on the foot, and cut them out with a mortising machine or chisel. 3. Glue the footpads to the feet and allow the glue to cure overnight (see photo A). V INEYARD T ABLE 61

8 Drawing an Ellipse Every ellipse has two foci, or focus points. The sum of the distances to the two foci is equal from any point on the ellipse. Following this definition, you can lay out an ellipse with two nails, a pencil, and a piece of string. By varying the position of the nails and the length of the string, you can generate an infinite number of ellipses. To generate the ellipse for this table, draw a in. line on the underside of the tabletop, centered along the long axis. Place a small finishing nail at each end of the line to mark the foci. Next, draw a line crossing the center of the first line at right angles. Mark a point 23 in. along this line this will be the end of the table s short axis. Take a piece of string about 100 in. long, tie it in a loop, and put the loop around the nails. Adjust the position of the knot so that a pencil held against the taut string will hit the point you ve marked. (The loop of string, once adjusted, should measure in.) Finally, draw the ellipse. Hold the pencil here. As the pencil moves, the ellipse is formed. String Put small finishing nails at the two foci. 46" /4" 19 1 /4" 23" 60" 62 V INEYARD T ABLE

9 4. Enlarge the illustration below to full size or create a pattern of your own, then trace it onto the feet. 5. Using a bandsaw or coping saw, cut out the feet, then plane, scrape, or sand the edges smooth. Photo A: Clamp across the joints to register the sides of the footpads with the sides of the feet. Making the legs 1. Cut both legs to final length. 2. Mark out the mortises for the top and bottom stretchers, then cut these with a mortising machine or mortising chisel. 3. At the top of each leg, lay out a in. square. Draw diagonals between the corners to find the center of the square. Use a compass to draw a half-circle at the top of each leg (see photo B). 4. Mark the shoulders of the bottom tenons and use a table saw to establish the shoulder line. 5. Using a tenon jig and the table saw, remove the tenon cheeks. Sneak up on the final width so the tenons will fit snugly into the mortises of the feet without binding. PATTERNS FOR CURVED PARTS Foot Cleat Harp leg 1 in. = 1 square V INEYARD T ABLE 63
. 4.")
10 Photo B: Mark the outside circle before drilling the pivot hole. Photo C: Forstner bits leave clean entry holes even in difficult wood. Back up the exit hole with a piece of scrap so the exit is clean. 6. Use a bandsaw or coping saw to cut out the half-circle. 7. Sand the half-circle to shape using a sanding block with 80-grit paper. 8. Drill out a 3 4-in. dowel hole at the marked center, using a Forstner bit as shown in photo C (see Sources of Supply on p. 183). Don t use a paddle or high-speed bit for this hole you won t get clean or accurate results. Making the stretchers 1. Cut the two stretchers to length. 2. Find the center of the top edge for both stretchers, then drill 1 2-in. holes 1 in. deep at both spots to accept the pivot dowels on the harp. 3. Mark the shoulders on one end of a stretcher. Set a stop on your miter gauge, and cut the shoulders for all four tenons on your table saw. 4. Using a tenon jig, cut the tenons. The tenons should fit snugly into the leg mortises. You don t want a loose fit here, so sneak up on the fit until it s just right. 64 V INEYARD T ABLE

11 Using a Mortising Chisel A mortising chisel is thicker than an ordinary chisel; the extra thickness allows the chisel to self-jig once the mortise is started. It also absorbs the stresses of mortising. You can order the chisels, and the wooden mallet used with them, by mail from specialty tool catalogs (see Sources of Supply on p. 183). Body positioning is the trick to successful use of a mortising chisel. Just as you tune woodworking machinery, you must also train your body to use hand tools. Start by laying out the mortise with a marking gauge, combination square, and marking knife. The knife lines are important because they delineate the top and bottom of the mortise. Clamp the workpiece to your bench so that it s on your right side if you re right-handed or on your left side if you re left-handed. Position the chisel at the far end of the mortise with the bevel facing you, and hold it with your nondominant hand. Align your body with the workpiece (see the top photo). If you do this correctly, the chisel will be vertical. Holding the wooden mallet in your dominant hand, hit the chisel hard with a single whack. Don t be shy and tap-tap-tap on the chisel. The chisel should cut 1 8 in. or more into the wood with each blow. Next, reposition the chisel 1 8 in. closer to you and whack it again. Pry the chisel toward you, and the chip between the first and second cut will come out (see the bottom photo). Keep working down the mortise until you get to the near end. Reverse the chisel so the bevel faces away from you, then cut the other shoulder of the mortise square. Now reverse the chisel to its original position and go back to the far end of the mortise. Continue the mortising operation until the mortise is deep enough. The width of the chisel acts to jig the tool in the mortise that s already cut. If you position your body correctly, and you aren t shy about whacking the chisel, hand-mortising can be very fast and accurate. V INEYARD T ABLE 65

12 SCREW HOLES FOR ATTACHING CLEATS TO TABLETOP 1 /8" through hole ( wobbled out for wood movement) 3 /8" hole by 1 /4" deep (plugged after installing screw) Photo D: If you cut your own plugs, you can match the grain direction and make the plugs almost invisible. Clamp the stock to the drill-press table so the workpiece doesn t spin. Tip: For the harp legs, the two lap joints are on the same side. The two halves of the harp are identical. Making the cleats 1. Mark the positions for the pivot holes. 2. Mark the positions for the in. radius circles. 3. Either enlarge the illustration on p. 63 to full size or make up your own shape, then mark the pattern onto the cleats. 4. With a 3 4-in. Forstner bit, drill out the pivot holes. 5. Saw out the pattern using a bandsaw or coping saw, getting as close as you dare to the line. Mill up to your lines using planes, scrapers, and sanding blocks with 80-grit sandpaper. 6. Mark for and drill the four tabletop attachment screw holes on the cleat bottoms. First drill the plug recesses 3 8 in. in diameter by 1 4 in. deep and 3 in. from each cleat end. Through the center of each recess, drill a hole 1 8 in. in diameter all the way through the cleat, wobbling out the bottom slightly to allow for seasonal wood movement (see the illustration above). 7. Using a 3 8-in. plug cutter as shown in photo D, make four plugs from scrap. Making the harp The harp is assembled with lap joints that are glued but not screwed or pinned together. Cutting them can be complicated because they are angled, but if you follow the sequence you won t have any trouble. As always, cut the joinery while the workpieces are still square, then cut out the shapes. 1. Practice this joint on scrap wood first. Put a dado set on your table saw, and using two pieces of scrap the same thickness as the harp pieces, mark half the width on each of them. Raise the dado set so it just meets the halfwidth line, and make two cuts in the scrap using a miter gauge (see photo E). Test the joint, adjusting the height of the dado set until you achieve a perfect fit. Adjusting height dynamically is much more accurate than trying to measure. Now that the scrap joint fits, you re ready to cut your money joints. 2. Cut the two harp legs to length. 3. Rotate your miter gauge counterclockwise, setting it to a heavy 61 degrees. Set a stop block on the miter gauge, and cut the shoulder of the lap joint for the top joint on one leg. Repeat the process for the second leg, then 66 V INEYARD T ABLE

13 Photo E: Cut the joint slightly thick, then turn the practice piece over to see the difference between the blade and the remaining work. remove the stop block and cut out the waste on both top joints. 4. Rotate your miter gauge clockwise, setting it to a heavy 57 degrees. Set a stop block on the miter gauge, and cut the shoulder of the lap joint for the bottom joint. Repeat for the second harp leg, then remove the stop block and cut out the waste on both joints. 5. Glue the two harp legs together while they re still square. 6. Now that the bottom joint is finished, mark out and cut the harp shape. Enlarge the illustration on p. 63 to full size or make your own design and trace it onto the workpiece. Cut out the design using a bandsaw or coping saw. 7. Make sure the shoulders of the two top laps are perpendicular. Set the fence on your table saw so you just slightly trim the front shoulder, then flip the harp and trim the other leg (see photo F). 8. Measure across the top of the legs of the harp and cut the cross bar to final length. 9. The measurement for the two laps on the cross bar probably won t be identical, since bandsawing out the harp is not an accurate method of making symmetrical parts, so take a measurement for one of the shoulders from one leg of the harp using a combination HARP LAYOUT Glue up the workpieces while they're still square. That way you can glue up across the joint, using the nibs to hold the clamps. The lines of the harp are purely decorative, so don't worry about making them exact. Your only concern is to fit the top bar accurately between the legs. Do this by trial. V INEYARD T ABLE 67

14 Tip: Be sure to cut the two lap joints on opposite sides of the harp cross bar. Photo F: Run the harp against the fence and cut the top shoulders square. square. Transfer it to one end of the cross bar, then repeat the procedure and transfer the measurement to the other end of the cross bar. 10. Set a stop on your miter gauge so that one shoulder on the cross bar is correctly positioned. Cut the shoulder using the dado set (see photo G). Reset the stop for the second shoulder, then turn the workpiece around and upside down so that the cut you just made faces up, and cut the second shoulder. Remove the stop and cut out the waste on the two joints. 11. Mark the center of the bottom edge of the cross bar and drill a 1 2-in. hole there. Fit that hole with a 3-in. by 1 2-in. hardwood dowel and glue it in place. Fit the cross bar to the harp leg assembly with the dowel facing down and glue and clamp it. 12. When the glue is dry, cut off the two top nibs using a handsaw. Sand the top flush with an 80-grit sanding block. Photo G: Fitting the bar into the opening between the legs is tricky. It s easiest to cut both shoulders until the bar just fits. Use paper shims to microadjust the stop. Tip: Once you ve drilled the hole for the dowel, the cross bar is no longer symmetrical. 68 V INEYARD T ABLE

15 Photo H: After you ve glued the cross bar to the harp and cut off the nibs, run the cross bar against the fence to cut the harp bottom. This ensures that the bottom is parallel to the cross bar. Tip: Make sure the pivot holes on the stretchers are facing up. 13. To cut the bottom of the harp, run the top rail of the harp against the table-saw fence, cutting off the bottom. This ensures that the bottom is parallel with the top (see photo H). 14. Turn the harp upside down and find the center of the harp bottom. Drill a 1 2-in. hole into the bottom and fit that hole with another 3-in. by 1 2-in. hardwood dowel. Glue the dowel into place. Assembling and Finishing Up Sanding Sand the legs, feet, stretchers, cleats, tabletop, and harp to 220 grit, using a random-orbit sander on the flat surfaces and sanding blocks on the curves. Start with a belt sander on the tabletop, using a 150-grit belt, then finish up with the random-orbit sander. Break all of the edges using a sanding block so the edges are comfortable to touch. Assembling the trestle The top stretcher must be inserted through the harp before the trestle assembly is glued up. If you forget, you won t be able to get the harp on. As usual, doing a dry glue-up will prevent problems from arising when you re gluing for real. 1. Assemble both leg structures dry to make sure everything fits together properly. Use waxed paper between the leg and glue blocks so the blocks don t stick to the leg, and dryclamp the assembly to make sure you have everything in order. 2. Spread PVA glue into the foot mortises on one leg structure and then onto the tenons on the leg. Insert the tenons, then clamp the structure, making sure all the joints are tight. Repeat for the other leg structure. 3. Measure for square across the diagonals and correct any deviation. 4. Spread glue into the four leg mortises and onto the stretcher tenons. Insert the stretcher V INEYARD T ABLE 69

16 LEVELING BLOCKS 5 2 The thickness will vary depending upon the individual table. 1 1 /8" 1" 3 /4" 1 3 /8" Countersunk screw holes tenons into one of the leg structures and hammer them home using a dead-blow hammer. 5. Place the harp, which is already assembled, through the top stretcher. 6. Insert the tenons into the second leg and clamp the structure, using clamp blocks on both sides of the exposed mortise to get good clamp pressure. Make sure the trestle sits square on a flat surface. If it doesn t, adjust the clamp pressure. 7. Remove excess glue and allow the glue to cure overnight. 8. Remove the clamps and, using a sharp chisel, chamfer the edges of the exposed tenons, which should show about 1 4 in. on each side of the legs. Attaching the cleats to the tabletop With the trestle complete, you can fit the cleats to the underside of the tabletop. It is easier and faster to do this dynamically than to try to measure them. 1. Set the trestle on the floor, and insert a 3-in. by 3 4-in. hardwood dowel through the hole in one of the cleats and into one of the legs. The dowel should stand slightly proud of the surfaces. Cut it to correct length using a handsaw, and chamfer the edges of the dowels slightly using sandpaper or a chisel to make them easy to insert. The dowels should be sized to go in and out of the holes with finger pressure. Sand them to size if needed. 70 V INEYARD T ABLE

17 2. Attach the other cleat to the other leg. 3. Turn the tabletop upside down onto your workbench, then put the trestle, with cleats attached, upside down on the overturned tabletop. Prop up the trestle so it doesn t fall over. Center the trestle on the top. 4. Predrill for screws and screw the cleats into the top, using in. by #10 steel wood screws. 5. Pull out the pivot dowels and remove the trestle. Glue 3 8-in. wooden plugs into the screw holes. When the glue is dry, cut off the plugs, then level using a sharp chisel followed by sanding. Adjusting the harp The harp should pivot on the dowels in their holes, rather than resting on the stretchers. You can accomplish this by adjusting the length of the dowels so that when they are seated in their holes they raise the harp slightly above the stretchers. 1. Mount the harp into the holes in the stretchers. 2. Measure the distance between the harp and the stretchers and subtract 1 8 in. The correct dowel length between harp and stretchers is 1 8 in., so you re cutting off the extra dowel length, leaving only the 1 8 in. 3. After taking the harp out of the holes, cut off the amount you calculated from both dowels. 4. Remount the harp. The harp should now be riding 1 8 in. above the stretchers. 5. If the harp doesn t swing freely, sand the dowels with 80-grit sandpaper on a sanding block until it does. Leveling the table The final step is to install the leveling blocks and level the tabletop in relation to the trestle. Rough dimensions for the leveling blocks are given in the illustration on the facing page, but the final dimensions should be calculated dynamically from the finished table. 1. Remount the trestle on the tabletop, which should still be upside down. 2. Pivot the harp so it is perpendicular to the legs, and use shims to level the trestle until the two legs of the harp are equidistant from the bottom of the table. Measure that leveling distance, which corresponds to the 1-in. measurement shown in the illustration on the facing page. If your measured leveling distance is greater than 1 in., add the difference to the thickness of the leveling block. If it is less than 1 in., subtract that difference. 3. Make two leveling blocks at the calculated thickness. Bandsaw out the slopes and sand them smooth with 80-grit paper and a sanding block. 4. To test the fit, flip the tabletop level, pivot the harp open, and put the blocks into place. The blocks will be held in place for the moment by the pressure between the tabletop and harp. If the block is too thin, add a piece of veneer or cardboard between it and the table; if it s too thick, plane off the bottom. 5. Position the blocks and predrill for the two screws, making sure to countersink the heads. Then glue and screw the blocks to the bottom of the table with in. by #10 steel wood screws. Finishing Traditionally, vineyard tables were often unfinished, though some had oilcloth covers held on with a strip of wood tacked to the edge. (If you see nail holes around the edge of an antique vineyard table, you ll know what they were for.) A tung oil finish gives this table a natural look while still protecting it from the elements. If you ve made the table from scrap or multiple species of wood, you might want to paint it. Milk paint (see Sources of Supply on p. 183) followed by oil will create a period look. See appendix 1 on pp for details. V INEYARD T ABLE 71

Gate Leg Drop Leaf Table Plans
 Preparing the table top blanks: Cut and glue enough 3/4 stock to make three panels 40 long by 24 wide (they will be cut to final size at a later time). While the glue dries we will work on the legs. Preparing
The tablesaw may be your shop s most valuable cutting. Crosscut Sleds. Foolproof. Innovative approach guarantees perfect results
 Foolproof Crosscut Sleds Innovative approach guarantees perfect results B Y A L A N T U R N E R The tablesaw may be your shop s most valuable cutting tool, but for precise, repeatable crosscuts it needs
Ladder Shelf Plans Final dimensions: 25 L x 21 W x 72 H
 Ladder Shelf Plans Final dimensions: 25 L x 21 W x 72 H Copyright 2011. MLCS Woodworking. Page 1 Router bits and supplies needed: 3/8 Rabbeting bit (#10691) 1 Bottom Cleaning bit (#7941) Top and Bottom
Children s Furniture Projects
 This is an excerpt from the book Children s Furniture Projects by Jeff Miller Copyright 2002 by The Taunton Press www.taunton.com CHILD S ROCKER KIDS ARE ALWAYS IN MOTION. It s not easy to get them even
Router Table Plans. www.bobsplans.com
 www.bobsplans.com Router Table Plans Increase the capabilities of your router with this weekend project. Features a sliding fence with EZ-Mount clamps. These clamps are simple to make and grip tightly
How to Build a Poker Table
 How to Build a Poker Table www.pokertablematerials.com 10-Person Poker Table- 96 x 48 These are step by step instructions for building a poker table. The table will measure 48" x 96" and have a 4" wide
COMPLIMENTARY WOODWORKING PLAN
 COMPLIMENTARY WOODWORKING PLAN Adirondack Chair This downloadable plan is copyrighted. Please do not share or redistribute this plan in any way. It has been created for Wilton Tools, a division of WMH
Building an Off-Center Fixture for Turning Pendants
 Building an Off-Center Fixture for Turning Pendants Turning a pendant off-center with most available metal pendant chucks means that you will have a significant amount of mass off center, which will limit
Home Storage Projects
 This is an excerpt from the book Home Storage Projects by Paul Anthony Copyright 2001 by The Taunton Press www.taunton.com KITCHEN WORK STATION IN MANY KITCHENS, counter space is at a premium. There just
How to Build Your Own CornHole Game
 How to Build Your Own CornHole Game DIMENSIONS Here is a diagram with the basic measurements for the Cornhole board game. SUPPLIES 1/2 thick sheet of plywood one 4 x4 or two 2 x4 s 8 long 2 4 s (4) 4 1/2
Raised Panel Doors Made Simple With Freud s 2+2 Raised Panel Bit Set
 Raised Panel Doors Made Simple With Freud s 2+2 Raised Panel Bit Set Congratulations on your purchase of Freud s world class 2 + 2 Raised Panel Bit Set. This revolutionary design combines two small wings
The Hive Bodies. In the Beekeeper s Work Shop. Building a Bee Hive: The Hive Bodies. by Stephen E. Tilmann
 The Hive Bodies In the Beekeeper s Work Shop The hive body is the heart of a managed bee hive colony (Figure 1). It is where the queen lays her eggs, the house bees raise the brood and the workers store
www.cornholesupplies.com
 www.cornholesupplies.com How To Build Regulation Cornhole Boards Home of the Original Cornhole Bags and Boards Supply List: 1-4' X 8' Piece of Plywood (pre sanded) 4-2" X 4" X 8' Studs (2 by 4s make sure
Installing Window and Door Mouldings
 Installing Window and Door Mouldings About Window and Door Mouldings The trim around windows and doors greatly influences the look and style of your interior. They also bridge the gaps and cover spaces
Making Wooden Hinges
 Making Wooden Hinges By Alex Reid - www.mokkou.jp Materials and tools used - 3.2mm straight router bit - 1/8 round-over router bit - Flush-cut straight bit (with bearing on bottom) - Finger-joint jig -
SHELVES. www.tedswoodworking.com
 SHELVES It's rare that bookshelves look as interesting as the objects you display on them. After all, how much can you decorate the edges of your shelves and sides? This unit is unusual because the shelves
Build a Precision. Crosscutting Sled
 Build a Precision Crosscutting Sled On-the-money, splinter-free crosscuts are well within your grasp using most well-made tablesaws, but you do have to do a few things to ensure great results cut after
Stair Parts Installation. Tricks
 Stair Parts Installation Tips & Tricks Introduction Your DIY staircase guide Welcome to the Stairpart home installation guide. Your stairway is both a functional and focal point in your home, so keeping
Picnic Table Plans. Made out of a single sheet of plywood, it s also portable! By Kevin Ayer. This children's picnic table would
 Picnic Table Plans Made out of a single sheet of plywood, it s also portable! By Kevin Ayer Materials One 4- by 8-foot sheet of 3 4-inch AC plywood Twelve 11 4-inch wood screws Primer and exterior paint
Hive Top Ventilation Shims
 Hive Top Ventilation Shims When preparing your bee hives for the winter, it is very important to provide for ventilation at the top of the hive. Through out the winter, the bees are expelling a lot of
Go-kart for little race-drivers
 Go-kart for little race-drivers Drill and drive. Go-kart What it lacks in speed, it more than makes up for in fun: the go-kart will excite little race-drivers. 1 Introduction It s only a go-kart, but it
Complete Dovetail Jig Instructions
 Complete Dovetail Jig Instructions 18 15 1 12 13 8 (22818) 19 17 16 4 3 6 14 5 9 9 11 10 2 PARTS LIST - COMPLETE DOVETAIL JIG Introduction Your new dovetail jig will cut Full Through Dovetails and three
RECLINE IN THE SUMMERTIME Get comfortable on the patio or deck with this sturdy reclining lounge chair
 RECLINE IN THE SUMMERTIME Get comfortable on the patio or deck with this sturdy reclining lounge chair As early as the eighth century B.C., the Greeks used a piece of furniture called the kline, for lounging
HOW-TO LAY HARDBOARD OR PLYWOOD FLOOR OVERLAY
 HOW-TO HOW-TO LAY HARDBOARD OR PLYWOOD FLOOR OVERLAY Most floor coverings, if laid over uneven wooden floors, will wear unevenly and look unsightly. The answer is to cover the old boards with hardboard
FREEBIRD THE ORIGINAL D.I.Y. ORNITHOPTER! Tools and Glue. Required Materials
 Do not try to make your ornithopter using "household materials". If you want it to fly, you have to build it right. FREEBIRD THE ORIGINAL D.I.Y. ORNITHOPTER! Wingspan: 16 inches Weight: 1/4 ounce The Ornithopter
Chapter 3 Installing Over-the-Post Railing on an L-Shaped Stair
 49 Chapter 3 Installing Over-the-Post Railing on an L-Shaped Stair In this chapter: The Over-the-Post Balustrade System Determining the Rail Centerline Using Rail Bolts Making a Pitch Block Laying Out
TOOLS FOR SELF RELIANCE REFURBISHING SHEET No 2. Registered Charity No 280437. Saws for Woodworking
 Registered Charity No 280437 Saws for Woodworking Issued December 2002 Registered Charity No 280437 page no 1 SAW TYPES Rip saw For cutting along the grain Crosscut saw [A smaller version is known as a
DINING OUT. Build this outdoor table and bench set. TEXT AND PHOTOS BY NEAL BARRETT Photo by Eugene Thompson
 DINING OUT Build this outdoor table and bench set. TEXT AND PHOTOS BY NEAL BARRETT Photo by Eugene Thompson http://popularmechanics.com/home_improvement/furniture/2001/4/table_and_bench_set/print.phtml
Garage Workbench Plans
 www.bobsplans.com Garage Workbench Plans Every home woodworker knows the importance of making efficient use of the available space in his or her shop. This workbench is designed to provide the maximum
Cedar Cottage Doghouse Plans
 Overlapping cedar shingles add an element of charm to this medium size doghouse. The walls, floor, and trim are constructed of solid cedar, making it naturally weather resistant and provides excellent
DIY CABINET REFACING INSTALLATION GUIDE
 DIY CABINET REFACING INSTALLATION GUIDE CABINET REFACING INSTALLATION Are you ready to reface your outdated cabinets? This guide will show you how to install your new Facelifters Cabinet Refacing Products
Pole Lathe and Shave Horse Design
 Pole Lathe and Shave Horse Design These pictures and accompanying words are Copyright Michael Hughes February 2002. They are not to be re-produced, in part or whole, without permission from the author.
Introduction to Door Construction
 Entry Door Construction Made Simple with Freud s Entry & Interior Door Router Bit System Congratulations on your purchase of Freud s Entry & Interior Door Router Bit System. This unique set allows you
A Simple Approach to Raised-Panel
 A Simple Approach to Raised-Panel 82 FINE HOMEBUILDING Wainscot BY GARY STRIEGLER Stock molding and MDF panels transform a room 1 2 3 4 3 5 6 Raised-panel wainscot speaks of a time when craftsmen had an
Panel/Hand Saw Kit Assembly Instructions
 Panel/Hand Saw Kit Assembly Instructions PLEASE READ THE FOLLOWING INSTRUCTIONS BEFORE BEGINNING Brief Summary You will be performing the following Tasks: 1. Determining the degree of shaping laying out
Pepper Mill Instructions by Fred Kachelhofer
 by Fred Kachelhofer I have seen Nick Cook turn a pepper mill twice and read his article posted at http://www.nickcookwoodturner.com/articles.htm (follow link and then click on Pepper Mill ). I have had
Black Wolf POCKET BILLIARD TABLE INSTALLATION MANUAL. SERVICE DEPARTMENT P.O. BOX 68 BRISTOL, WI 53104
 Black Wolf TM POCKET BILLIARD TABLE INSTALLATION MANUAL www.brunswickbilliards.com SERVICE DEPARTMENT P.O. BOX 68 BRISTOL, WI 53104 51-905710-000 SEPTEMBER 2010 NOTE: Please use the instructions in this
Assembly Instructions Basic Folding-Leg Box Frame Style
 Assembly Instructions Basic Folding-Leg Box Frame Style Basic Folding Leg Cornhole Board Concept 1 2 12 3 1 2 3 15 16 4 1 4 52 9 R1 3 4 6 21 48 12 1 4 Bolt Washer 9 13 16 35 Washer Double Nut CornholePlayers.net
Taking Wainscot Up Stairs
 Taking Wainscot Up Stairs raised MDF panels and stock moldings bring this elegant trim detail to the rest of the house BY GARY STRIEGLER I credit a lot of the success of my business to the trimwork we
HOW TO INSTALL A BEAUTIFUL NEW KITCHEN
 HOW TO INSTALL A BEAUTIFUL NEW KITCHEN Easy to follow step-by-step kitchen cabinet installation TOOL AND MATERIAL LIST Hammer Pry bar Screwdriver Phillips Flathead Level Tape measure Pencil Straight edge
Making Laminated Rolling Pins
 Making Laminated Rolling Pins Introduction Why go to the trouble to make a rolling pin when you can go down to your local discount store and buy one that works just fine for less than $5? As wood turners,
Hoosier Step Stool. America s leading woodworking authority. Step by Step construction instruction. A complete bill of materials.
 America s leading woodworking authority Step by Step construction instruction. Hoosier Step Stool A complete bill of materials. Exploded view and elevation drawings. How-to photos with instructive captions.
Threaded-lid. Acorn. project that won t fall far from the lathe
 Threaded-lid Acorn A The fun Woodturner s project that won t fall far from the lathe By Nick Cook Above: Rich texturing to a 53 4" x 31 2" acorn box enhances the appeal of the Willard Baxter acorn shown
These instructions will show you how to install an internal door into a non-loadbearing partition wall. The instructions are split into three parts.
 No 8 in the series of 'How to' brochures produced by PlaceMakers, New Zealand How to Frame and Hang a Door These instructions will show you how to install an internal door into a non-loadbearing partition
BUILD A TABLETOP LOOM
 BUILD A TABLETOP LOOM From 1" x 2" stock (actual 3/4" x 1"1/2) cut: 4 pieces 15" long 4 pieces 5"1/2 long Use the above to make 2 frames for the front and back of the loom. From 1" x 4" stock (actual 3/4"
Vinyl Brick Mould Field Installation Instructions All Vinyl and Vinyl Clad Windows
 Vinyl Brick Mould Field Installation Instructions All Vinyl and Vinyl Clad Windows Viewed from the exterior. IMPORTANT: Please read before you begin installation. TABLE OF CONTENTS AND TOOL / MATERIAL
KITCHENS. Tip PAGE 1 FITTING YOUR KITCHEN GUIDE. How to mark out a kitchen. Tools required for installing a kitchen STEP ONE STEP TWO STEP THREE
 FITTING YOUR KITCHEN GUIDE How to mark out a kitchen PAGE 1 Before starting on the installation, measure 870mm from the lowest point of the floor and mark a datum line around the room to indicate where
Speed-Mat Rectangle Cutter
 Speed-Mat Rectangle Cutter 1 Honeycomb baseboard. 2 Left hold down. 14 3 Bottom hold down. 4 4 Left / right rule. 8 5 8 5 Left / right rule pointer. 1 6 Top / bottom rule. 7 Top / bottom rule pointer.
The JIG is UP Or A couple hours up front pays in the long run.
 Ed Simon Page 1 of 5 The JIG is UP Or A couple hours up front pays in the long run. A large part of the fun of beekeeping is the construction and assembly of the equipment. Since it is a hobby, I decided
Here is your set of Detailed Plans from Copyright 2004 All Rights Reserved
 Here is your set of Detailed Plans from Copyright 2004 All Rights Reserved Materials for the House Here is the list of materials you will need to construct the basic house then to cover it with roofing
INSTALLATION INSTRUCTIONS for Bifold Doors (JII103)
") Thank you for selecting JELD-WEN products. Attached are JELD-WEN s recommended installation instructions for premium composite, hollow and solid core molded Bifold Doors. Bifolds are designed for fast
Thank you for selecting JELD-WEN products. Attached are JELD-WEN s recommended installation instructions for premium composite, hollow and solid core molded Bifold Doors. Bifolds are designed for fast
Wine Rack & Glass Storage Bench Chris Gardner
 Wine Rack & Glass Storage Bench Chris Gardner Quantity Length Width Material Part 2 48 16 3/4 birch plywood top, bottom 2 14 16 3/4 birch plywood sides 2 14 13 3/4 birch plywood support dividers 2 3 15
Wooden hinges for boxes using the Leigh F3 template on the D4R Pro jig.
 Wooden hinges for boxes using the Leigh F3 template on the D4R Pro jig. Al Navas, Sandal Woods-Fine Woodworking Country Club, Missouri, USA Part 1 a simple prototype Direct link to the original article:
Dave s Sheet Metal Bending Brake
 Dave s Sheet Metal Bending Brake I started building a Zenith CH601XL from plans in mid January 2006. After several failed attempts to bend the rudder spar I ended up going to a local sheet metal shop for
Surviving Glue-Ups. No movie chase scene could provide. A guide to stress-free gluing and clamping. Compliments of Fine Woodworking
 Compliments of Fine Woodworking Surviving Glue-Ups A guide to stress-free gluing and clamping B y G a r y R o g o w s k i No movie chase scene could provide as many heart-pounding thrills as gluing up
HONING LATHE DUPLICATOR CUTTERS
 Lay the flat face of the cutter or bit on the flat top surface of the hone with the rest of the cutter overhanging the edge. Rub the cutter or bit up and down the hone (Figure 24-44). Be sure to hold the
Lathe Milling Attachment
 Lathe Milling Attachment By L C. MASON BY CLEVERLY stacking cold-rolled flat stock together, T-slots and slide for this lathe milling attachment are made without costly machinery. In fact, only two tools,
FRAMED & MOUNTED TILE MURAL
 Page 1 of 5 There is no denying that tile murals have taken the sublimation industry by storm. The unique ability to take a customer s artwork or high resolution photograph, tile it using your software
SHOP NOTES METAL SHAPER FOR YOUR SHOP
 SHOP NOTES METAL SHAPER FOR YOUR SHOP A METAL SHAPER is indispensable for certain machining operations where flat surfaces must be produced within very close limits, such as machining flats on castings,
How To Level A Subfloor
 Skill Level: INTERMEDIATE Give these projects a try if you're a confident DIYer with a good working knowledge of a variety of tools. They can take a day or more to complete. If you can build a birdhouse
PROJECT PLAN. Stackable shelves
 PROJECT PLAN Stackable shelves This article originally appeared in The Family Handyman magazine. For subscription information, visit www.familyhandyman.com Please note that pages that appeared in the magazine
FTC 2015-2016 DIY Mountain Build Guide
 FTC 2015-2016 DIY Mountain Build Guide Assembly Instructions Check out the DIY2015-2016 Prints and BoM for individual part details. Release 1.0 9/10/15 Page 1 This guide and Bill of Materials are for constructing
Total Quantity: IMPORTANT: Plans are to be used with 3 x6 Plexiglass (SKU #298-017).
.") # Materials: Quantity Each: 4x4x8 3 2x4x8 2 2x8x8 1 4x8x3/4 plywood 1 3 x6 corkboard (can be 18 of the 1 x1 pieces) 1 3 x6 plexiglass 1 8 door casing 3 Primer 1 qt. Total Quantity: TIPS FOR SUCCESSFUL
# Materials: Quantity Each: 4x4x8 3 2x4x8 2 2x8x8 1 4x8x3/4 plywood 1 3 x6 corkboard (can be 18 of the 1 x1 pieces) 1 3 x6 plexiglass 1 8 door casing 3 Primer 1 qt. Total Quantity: TIPS FOR SUCCESSFUL
BUILDINGA 1/10 SCALE FLATBED TRAILER
 VOLUME 1, ISSUE 1 BUILDINGA 1/10 SCALE FLATBED TRAILER BUILT, DESIGNED & WRITTEN BY NATHAN MYERS MATERIALS: FEATURES: While the design was kept simple to allow anyone to be able to build their own trailer,
Rudder Repair and refinish
 Rudder Repair and refinish Montgomery 23 Dauntless The before photograph A receipt found inside the boat showed a previous owner had enlisted a boat yard to perform maintenance on the rudder by shortening
Best Barns USA Assembly Book
 Best Barns USA Assembly Book Revised November 27, 2013 the Easton - R 12'x 20' Manufactured by Reynolds Building Systems, Inc. 205 Arlington Drive Greenville, PA 16125 724-646-3775 This manual is copyrighted.
WHI 90-Minute Rated Veneered Door Frame Installation Instructions
 No. 940-03-10 INSTALLATION INSTRUCTIONS 90 MINUTE RATED VENEERED DOOR FRAME DOOR REQUIREMENTS: Consult the door manufacturer to make sure that the doors are qualified for the hardware to be installed,
30 minutes in class, 2 hours to make the first time
 Asking questions and defining problems Developing and using models Planning and carrying out investigations 30 minutes in class, 2 hours to make the first time 3 12 x 24 x ¾ inch plywood boards 1 x 12
Woodturning Project Tutorials by Larry Hancock. 2004, 2005 Larry Hancock, turnedtreasures.com. Gavel Turning
 Woodturning Project Tutorials by Larry Hancock 2004, 2005 Larry Hancock, turnedtreasures.com Gavel Turning Before you can start to turn a gavel the design, size, and wood need selected. The design I used
Gear PEPSI CAN STOVE INSTRUCTIONS
 Gear PEPSI CAN STOVE INSTRUCTIONS [NOTE: Updated Instructions are now available. The new stove is less likely to develop flame leaks and the fuel/air mixture is improved. Instructions for a simmer ring
REDWOOD. Adirondack Chair. Naturally beautiful Easy to use Practical and economical Durable and stable Resistant to decay and insects
 B U I L D I T W I T H REDWOOD Adirondack Chair R E D W O O D Naturally beautiful Easy to use Practical and economical Durable and stable Resistant to decay and insects Adirondack Chair BUILD THE CHAIR
Modular Locomotive System Instruction Manual for HBK8 George Body Kit
 Modular Locomotive System Instruction Manual for HBK8 George Body Kit Roundhouse Engineering Co. Ltd. Units 6-10 Churchill Business Park. Churchill Road, Wheatley. Doncaster. DN1 2TF. England. Tel. 01302
How to Install Hardwood Flooring Over a Sub Floor
 How to Install Hardwood Flooring Over a Sub Floor Installation Preparation Instructions Read the entire instructions before starting your project. 1) INSPECT EACH PLANK (see fig. a) Wood is a natural product
Magnetic Levitation Track Construction Instruction Manual August 2012
 This document is intended to be used by Science Olympiad teams to assist them in building a magnetically-levitated track that will meet all specifications in the event rules for Magnetic Levitation and
Easy Six Cube Bookshelf. Copyrighted Material. Page 1
 Compare to: Land of Nod Cube Collection, 6 Cube Bookshelf Skill Level: Beginner Easy Six Cube Bookshelf I love the storage cubes in kids rooms because they give you an opportunity to have your children
Build a Trade-Show Booth for Under $200!
 Build a Trade-Show Booth for Under $200! This corner booth, with a seven foot front and sweeping 4x8 backdrop, assembles in less than 20 minutes and can be built in one weekend. Materials Tools 4 x8 x3/4
AwanaGames Circle. Official. Diagram 1. Key to diagram: Pin & Striped Bean Bag C Diagonal or Starting Line. B Scoring Pins, or Center.
 Official AwanaGames Circle Diagram 1 The AwanaGames Circle is 30 feet in diameter surrounded by a 37-40 foot square. Each team is designated by a color and occupies a quarter-circle or one side of that
HSC 2001 - Industrial Technology Band 4/5 INDUSTRIAL TECHNOLOGY FOLIO
 Statement of Intent I intend to construct a slim boy which will suit my needs and will be compatible with my furniture in my bedroom in my house. This will be very handy and useful to everyone in my home.
Brick Veneer Construction
 Brick Veneer Construction Check list of suggested tools & support items Claw hammer Tape measure 3/4" [19 or 20] Wood chisel Wood or plastic shims Pry bar Utility knife Caulking and caulking gun Power
CAST IRON THE BASICS. Heatline - Cast Iron Radiators SMOOTH FLAT FILE TO REMOVE ANY SWARF. ONE TIME. ASSEMBLY. JOINTS SHOULD BE TIGHTENED.
 CAST IRON THE BASICS 1. DO NOT LIFT ON YOUR OWN. 2. ONLY LIFT THE RADIATOR VERTICALLY. 3. DO NOT LIFT MORE THAN 8/10 SECTIONS AT ANY ONE TIME. 4. POSITION THE RADIATOR BEFORE FINAL ASSEMBLY. 5. THIS PRODUCT
REDI-EXIT COMMERCIAL FIRE DOOR AND EXTERIOR DOOR KITS INSTALLATION GUIDELINES
 REDI-EXIT COMMERCIAL FIRE DOOR AND EXTERIOR DOOR KITS INSTALLATION GUIDELINES Tools Required Tape Measure Hammer Slotted Screw Driver #2 & #3 Philips Screw Driver 3-4 Foot Level 12 Pry Bar Cold Chisel
3. Choose between an easy table (24 inches wide) and a hard table (20 inches wide).
 and a hard table (20 inches wide).") Ultra Carpetball Plans Version 2.0 The Best (And Only) Free Carpetball Plans On The Web By Matthew Campbell Instructions: 1. Read these instructions all the way through and look at all the diagrams before
Ultra Carpetball Plans Version 2.0 The Best (And Only) Free Carpetball Plans On The Web By Matthew Campbell Instructions: 1. Read these instructions all the way through and look at all the diagrams before
Assembly and Usage Instructions
 Assembly and Usage Instructions A Product 5885 West Van Horn Tavern Road Columbia, MO 65203 www.caldwellshooting.com Instruction #1001667 Limited Warranty Every Caldwell product is warrantied to be free
1 Door Tall Unit ASSEMBLY GUIDE. Page 1 of 9. WARNING: Contains small parts, keep out of reach of children.
 Page 1 of 9 ASSEMBLY GUIDE 1 Door Tall Unit IMPORTANT Before Commencing Assembly: Read all instructions COMPLETELY Ensure all listed parts are present If any parts are missing from Parts List 1, please
Biscuit Joiner BISCUIT JOINER- SETUP AND FEATURES
 Biscuit Joiner Most woodworking projects require at least some assembly. This is especially true for projects such as tables, cabinets or bookcases where wide panels must first be built up from several
KITCHEN INSTALLATION GUIDE
 KITCHEN INSTALLATION GUIDE The step-by-step guide to installing your new kitchen right The materials and tools you ll need This brochure is your guide to preparing and installing your new kitchen. Inside
DE Frame with C Series Sidelight
 TOOLS REQUIRED Tape measure 6' magnetic level 3' magnetic level Screw gun with clutch adjusted #2 phillips tip #3 phillips tip Screwdriver (used to adjust frame on will using oval slots) Pry Bar Powder
COMPACT ELITE MAT CUTTER
 INSTRUCTION MANUAL MODEL 350-1 COMPACT ELITE MAT CUTTER INSTRUCTIONS AND OPERATION MANUAL 32in (81cm) mat cutting system with bevel & straight cutters, production stops and 20 in (51 cm) squaring bar.
2. This is a close up of a typical area where the rocker is rusted out leaving holes under where the rocker moulding would be..
 ROCKER PANELS 55,56,57 CHEVY REPLACEMENT Do not throw away any pieces when you first remove them. There are many supports that are not reproduced and will need to be used again. When disassembling try
Ceiling Mounted Folding Attic Ladders Installation Instructions
 Ceiling Mounted Folding Attic Ladders Installation Instructions WARNING Before you start installing your new Louisville Ceiling Mounted Folding Attic Ladder, you must read and understand the following:
MGB Chrome Bumper Conversion
 MGB Chrome Bumper Conversion Installation Instructions For 1974 1/2-1980 MGB This kit requires cutting, welding, and painting. Professional installation recommended. Note: Every MGB body is slightly different
a Wall Railing Hanging Get it at the right height and make sure it's fastened to the framing; someone's life may depend on it Handrails and code
 Hanging a Wall Railing Get it at the right height and make sure it's fastened to the framing; someone's life may depend on it BY SEBASTIAN EGGERT Handrails and code A graspable handrail is required for
CHARISMA SHOWER/TUB DOOR INSTALLATION INSTRUCTIONS
 CHARISMA SHOWER/TUB DOOR INSTALLATION INSTRUCTIONS IMPORTANT DreamLine reserves the right to alter, modify or redesign products at any time without prior notice. For the latest up-to-date technical drawings,
All seam allowances are 1/2 unless otherwise noted. All pattern pieces include the seam allowance. Please read all instructions before beginning.
 This structured bag has lots of pretty detailing. It s large enough to carry all of your essentials as well. Make it in a great patchwork, or stick to a single fabric! All seam allowances are 1/2 unless
Router Table. Operating Procedures for
 Operating Procedures for Router Table INTRODUCTION: The router table is a very versatile tool. It can be used to cut a molding profile, cut workpieces to match the shape of a pattern and cut a molding
Gravity Racing Challenge STEM Team Competition Open Class High School Division Car Assembly Plans And Rules
 Gravity Racing Challenge STEM Team Competition Open Class High School Division Car Assembly Plans And Rules 1 Table Of Contents Introduction...Page 3 Floorboard...Page 4 Step One Steering Stop Installation...Page
SUPER SHED. Indoor shelter for your outdoor tools.
 SUPER SHED Indoor shelter for your outdoor tools. Not everyone needs a garden shed. But, if you've no more space on your garage wall for that new leaf rake, if you can't find your potting trowel because
How To Use A Festool Multiifunction Table
 Getting the Most out of the Festool Multifunction Table by Jerry Work Table of Contents: Introduction Set up - How the various components work together Building the large MFT Squaring, clamping and work
Composite Stone Veneer
 Composite Stone Veneer Installation Guide Ver 1 Jun 2015 www.compstone.com Composite Stone Veneer Installation Guide Contents Introduction & Overview 3 Required Tools 4 Optional Tools 4 Attachment Guidelines:
Guidelines for Earthquake Bracing of Residential Water Heaters
 Guidelines for Earthquake Bracing of Residential Water Heaters Department of General Services Division of the State Architect 1102 Q Street, Suite 5100 Sacramento, CA 95814 Phone: (916) 324-7099 Fax: (916)