POLYCHEM OPERATION MANUAL SPARE PARTS LIST B800 BATTERY POWERED PLASTIC STRAPPING TOOL POLYCHEM CORPORATION
|
|
|
- Peter Archibald Franklin
- 7 years ago
- Views:
Transcription
1 POLYCHEM OPERATION MANUAL SPARE PARTS LIST B800 BATTERY POWERED PLASTIC STRAPPING TOOL Ed. 10/11 POLYCHEM CORPORATION 6277 Heisley Road * Mentor, Ohio Tel.: * Fax: * READ ALL INSTRUCTIONS BEFORE OPERATING THE TOOL

2 TABLE OF CONTENTS 1) Safety instructions 2) Technical data 3) Warranty and liability 4) Installation-accessories 5) Operating elements / adjustments 6) Operation 7) Servicing and cleaning 8) Troubleshooting 9) Layout spare parts list 1) SAFETY INSTRUCTIONS READ THE OPERATING INSTRUCTIONS CAREFULLY WEAR EYE, FACE, AND HAND PROTECTION WHEN OPERATING THE TOOL. GENERAL SAFETY INSTRUCTIONS : The tool must be used by properly trained people. Failure to follow the operating instructions or improper use could cause strap breakage, injuries, or package damages. Check tool daily, do not use tool with worn or damaged parts. Use original spare parts for replacement. Never modify any tool part. Do not put fingers, hands or other body parts between the strap and package during the cycle. It is your responsibility to check the seal joints made by your tool. Training about the weld time adjustment will be useful to check the seal quality in order to avoid severe injury. Never move goods with bad quality seals. Only use specific strap dispenser to dispense the strap. Keep your working area clean and always use the tool in good balance and safety conditions. Never use straps as a means of pulling or lifting goods. Always use a proper safety strap cutter and keep other people and yourself at a safe distance from strap, always stand to side of strap, away from direction of strap trajectory once cut. Hold the upper strap portion and pay attention that the lower strap will snap forward away from you. Improper operation, excessive tensioning, use of non recommended strap, or sharp corners on the package could cause a loss of strap tension and/or strap breakage that could lead to packaging failure or injury. The following is recommended; use edge protectors if package has sharp corners, place the strap correctly around a properly positioned package, stand in safety position (on one side of strap) during strapping cycle, and use the correct strap quality, width, thickness, and break strength as recommended in this manual. Please save this manual, as it is a part of the tool. This tool is manufactured without any substances which could be dangerous to health. National instructions must be observed for disposal of all the parts.

3 2) TECHNICAL DATA TOOL SIZE Length: 12.4 Width: 5.5 Height: 7.2 Weight with battery: 8.4 lbs POWER REQUIREMENT Battery PERFORMANCES Max.Tension force: Tensioning speed: Sealing: Joint strength: Level sound emission. Measurement type A (2003/10/CE) 14.8V - 3A/h LI-PO 4000N 12mt/m Friction weld seal 80% plastic strap strength* 81 db (A) Vibrations at handle (2002/44/CE) 2.2 ms 2 * depends of strap quality Working temperature: The tool should be used between 0C (32F) and +45C (+113 F). When using in low temperatures the display may signal low battery. In this case insert the battery for 2 mins. in charger for a "refreshing". CHART OF TYPES ITEM MODEL STRAP THICKNESS PP-PET - 5/ T B800-5/8-3/4 PET - 3/ ) WARRANTY CONDITIONS AND LIABILITY Polychem Corporation warrants all its tools & battery chargers during a period of 4 months from the shipping date document. Warranty includes free replacement of faulty parts. The warranty is not valid in case of improper use, lack of maintenance, tampering, arbitrary modifications and reparations, use of non original parts, disregard of instructions of the operation manual, or missing serial number.the warranty excludes the wear parts shown on spare parts list.no compensation can be claimed for production shutdowns and for damages to people and objects due to tools defects. Polychem Corporation reserves the right to modify the tools and documentation without any obligation to update previous ones. Polychem Corporation warrants all its batteries during a period of 120 days from the shipping date document. The manufacturer is committed to replace it with a free battery only when there are manufacturing defects that make it unfit for use.
 and +45C (+113 F). When using in low temperatures the display may signal low battery.")
4 4) INSTALLATION / ACCESSORIES The LI-PO (Lithium-Polymer) battery comes fully charged. In order to begin, insert the battery in the tool until it locks in place with the security lever. Illustrated in the following figure. SECURITY LEVER TOOL ACCESSORIES IT IS RECOMMENDED TO ONLY USE POLYCHEM ACCESSORIES BATTERY: SAFETY INSTRUCTIONS: Only use the battery for our strapping tool and only recharge it with our battery charger. If used for other purposes or applications our warranty will be void. Failure to follow the operating instructions or improper use could cause injuries and battery damage. The battery is supplied fully charged. The lithium polymer rechargeable battery can be charged at any time without reducing its service life; interrupting the charging procedure does not cause damage. To use and charge the battery, please follow the operating instructions. Check battery daily; do not use it with worn or damaged parts. Do not disassemble it, never modify any part, do not connect the positive (+) and negative (-), it may result in a short circuit. Do not transport or store the battery with metal objects. Do not try to charge it with a different charger. Do not put metal keys between contacts. Do not use the battery for purposes other than those specified. Battery must not be left in charging mode without supervision. Do not throw the battery into a fire, do not store at high temperature or direct sunlight, and do not put in microwave oven or a pressure cooker. Keep it away from any exposed flame. Do not dip the battery in water, and protect it from humidity. Do not apply impact to the battery, or throw, drop, drill it. In case of smoke or fire immediately stop using it and replace it. In case electrolyte comes into contact with eyes or hands, immediately rinse thoroughly with clean water and consult a physician. The battery must be recycled or disposed of in an environmentally friendly way. Defective or dead batteries must be recycled according to national / local guidelines. TECHNICAL DATA : Li-Po (Lithium-Polymer) 14.8V 3.0 Ah Weight : 1 lb. Part # - B800BAT Charge time is 30 min. Operating environment charging and discharging: 0C (32F) and +45C (+113 F) SERIAL NUMBER

5 BATTERY CHARGER: SAFETY INSTRUCTIONS: Only use the charger to charge our lithium polymer battery. If used for other purposes or applications the warranty and liability is void. The charger should be used by properly trained people. Failure to follow the operating instructions or improper use could result in injuries or battery damage. Check charger and main supply cable daily; do not use it with worn or damaged parts. Do not disassemble it or modify any part. Check the contacts before using. Do not put metal keys between contacts. Do not use for purposes other than those specified. BATTERY MUST NOT BE LEFT IN CHARGING MODE WITHOUT SUPERVISION. Do not store at high temperature, direct sunlight, do not cover fan clefts. Do not dip it in water and protect from humidity. Do not apply impact, or throw or drop or drill it. In case of fire or smoke immediately stop using and replace it. Place the charger on flat, non flammable and heat resistant surface. Keep away from any volatile and flammable substance. Disconnect from main power supply when not in use. Service should be done by authorized dealers. The Charger must be recycled or disposed of in an environmentally friendly way according to the national / local guidelines. CHARGING PROCESS: Put the battery into the charger correctly (do not invert the polarity), the charge will start automatically and the signalling led becomes RED. It will remain in this condition up to 80% of the charge then the signalling led will become blinking GREEN, this indicates the charge is 80% to 99% complete. The charging process is complete when the signalling led is solid GREEN; remove the battery from charger. FAILURE: If the signaling led is blinking RED it indicates that the temperature of the battery is not sufficient for charging or its voltage is lower than 10.4V and therefore the battery will not charge. Let the battery return to normal temperature and try again. If the charge does not start contact the service center. TECHNICAL DATA: PART # - 400CHG Input : 110V - 230V 50/60Hz 80W Output : 16V 5A ATTENTION: This battery charger is only used with Li-Po 14.8V batteries. LED OF SIGNALLING RED LED: BATTERY CHARGING LEVEL 0 TO 80% BLINKING GREEN LED: BATTERY CHARGING LEVEL 80% TO 99% GREEN LED: CHARGE COMPLETE BLINKING RED LED: HIGH BATTERY TEMPERATURE NOTE: REMOVE THE BATTERY FROM THE CHARGER ONCE THE CHARGE IS COMPLETE.

6 WEARING PLATE: The tool can be equipped with a stainless steel plate to protect the base against excessive wear when using it on abrasive surfaces like bricks, concrete, stones, etc... The part number for the kit is SUSPENSION HOOK: The tool can be equipped with a two position suspension hook (horizontal or vertical). The hook is fixed to the tool by two screws (see picture below). The part number for the hook is
.")
7 5) OPERATING ELEMENTS AND ADJUSTMENTS DO NOT OPERATE THE TOOL WITHOUT STRAP, YOU COULD DAMAGE THE FEEDWHEEL AND THE WELDING / CUTTING GROUP LED OF SIGNALLING BUTTON 1 TENSIONING LEVER 3 RELEASE LEVER LEVER 2 CUTTING / WELDING AMBER AMBER BLINKING LED OF SIGNALLING TOOL IN OPERATION TOOL IN STAND-BY Programming (pic.a): In order to make adjustments (welding/cut and tension) first push the tension button with the feed wheel open to activate the board. Then at the same time press the S+ (Welding) and T+ (Tension) keys for approximately 10 sec. like illustrated in pic.a. This will illuminate the LED that indicates the value of the welding time, in order to switch to the tension adjustment you must press the T+ or T- key. Welding - cutting time adjustment (pic.b): The welding/cut time can be adjusted by pressing on the S+ or S key depending on the quality and the dimensions of the strap. Pressing the + key will increase the welding time, pressing the key will decrease the welding time. After 10 sec. the data will be stored into the memory of the card. Adjusting strap tension (pic.c) : The tension of the strap can be adjusted by pressing on the T+ or T key depending on the quality and the dimensions of the strap. Pressing the + key will increase the tension level, pressing the key will decrease the tension level. After 10 sec. the data will be stored into the memory of the card.
 and T+ (Tension) keys for approximately 10 sec. like illustrated in pic.a. This will illuminate the LED that indicates the value of the welding time, in order to switch to the tension adjustment you must press the T+ or T- key.")
8 ( A ) ( B ) WELDING ADJUST KEYS ( C ) TENSION ADJUST KEYS Adjusting welding area: Adjust the screws for uneven welds(pic.e1-e2).if the weld is mostly on the external strap side (pic.e3) slightly unscrew the external screw or slightly screw in the internal screw for a uniform weld(pic.e4). If weld is mostly on the internal strap side(pic.e5) slightly unscrew the internal screw or slightly screw in the external screw for a uniform weld(pic.e6). (E1) (E2) (E3) (E4) (E5) (E6)

9 6) OPERATION Put the strap around the package as shown (fig. F1). Overlap the straps with the lead end on the bottom and hold the straps in left hand (make sure the strap is clean, & oil & grease free); to open the tool squeeze the release lever. Insert the straps in the tool making sure they are overlapped and aligned against the strap guides (fig. F1). Press the tension button to start tensioning, when the desired tension is obtained release the button (After reaching tension the tension button can be depressed up to 3 more times before the welding must be initiated) (fig. F2). To start the welding, pull the welding lever. The tool will now weld and cut the strap and cool the weld (fig. F3). AFTER the amber LED lights up and the ringing sound of the tool that indicates the end of the welding cycle, it is possible to remove the strap (fig. F4). Damage may be caused to the tool and strap if the tool is opened before the ringing sound is made. After welding, the LED on the keypad shows the level of the battery charge remaining. Example: charged battery (fig. F5) battery nearly discharged with approximately 2 cycles left (fig. F6). The last 2 bars on the right indicate the battery is discharged (fig. F7). To replace the battery or to recharge the same one, remove the battery from the tool by depressing the release key and pulling the battery upwards (fig. F8). ( F1 ) ( F2 ) ( F3 ) ( F4 ) ( F5 ) ( F6 ) ( F7 ) ( F8 )

10 Seal check: A regular seal quality control is very important and it can be examined visually as follows: G1) short sealing time/ not enough G2) right sealing time/ correct G3) too long sealing time/ wrong ( G1 ) NO seal strength insufficient ( G2 ) Yes -- right ( G3 ) NO seal strength affected 7) SERVICING - CLEANING BEFORE PERFORMING ANY SERVICE ON THE TOOL, REMOVE THE BATTERY FROM THE TOOL Periodically clean the tool from strap dust, particularly the feed wheel, the gripper plates and the cutter by using compressed air. Bottom plate gripper replacement To change the gripper plate continue as follows: Remove front strap guide (fig. H1), remove two gripper screws (fig. H2), remove the gripper plate (fig. H3). Install new gripper plate and reassemble in reverse order. ( H1 ) ( H2 ) ( H3 )
, remove two gripper screws (fig. H2), remove the gripper plate (fig. H3).")
11 Welding foot replacement To change the welding foot continue as follows: Remove screw and cover (pic. L1), remove the oscillating foot pin (pic. L2) remove the foot with the aid of one clamp and replace it (pic. L3). Reassemble in reverse order. ( L1 ) ( L2 ) ( L3 ) 8) TROUBLESHOOTING PROBLEM REMEDY After inserting the battery and pushing the tension button the tool doesn t work Check the battery contacts in the rear of the tool and / or if there are disconnected wires Check the microswitch under the push button check the battery charge status (led lights on keyboard) The tension of the strap is too low on the package Check tension value on keypad; Check the battery charge / efficiency Check if the tension motor is damaged or worn out ( contact the after sale service) Check the gearbox ( contact the after sale service) Check the electronic card (contact the after sale service) The feedwheel slips and mills strap Check if the feedwheel and grippers are dirty or damaged. Adjust the motor power too much tension force. Check if the strap qualities are right for the strapping tool and application The strap is breaking during tension Adjust the tension it may be too high. Check if the strap qualities are right for the strapping tool and application. Check for sharp edges on the package. The seal is not aligned Adjust the motor power too much tension force. Check if the strap qualities are right for the strapping tool and application. Check strap size and adjust the guides. Check the alignment. The lower strap isn t locked between the gripper and feewheel so the tool walks during the tension Check if the gripper is dirty or damaged. Adjust the tension value for the quality of strap. Tensioning problem the strap relaxes after tensioning Check for damage to feed wheel or the locking mechanism ( contact the after sale service) The sealing isn t enough; the upper strap isn t completely cut; the cutting isn t constant Check the sealing time, may be too short, adjust it on keypad Check if the sealing foot and / or the cutter are damaged or worn out perform maintenance Check if the sealing foot is dirty or slips on strap Check if the strap relaxes after tensioning Check the battery charge / efficiency Check if the strap qualities are right for the strapping tool and application
 The tension of the strap is too low on the package Check tension")
12 Check if the sealing motor is worn out (contact the after sale service) Check the electronic cards (contact the after sale service) Too much seal time; the strap is breaking during the sealing cutting Improper weld timing adjustment, may be too long, adjust it. Both straps are cut during the sealing cycle Check if the gripper plate (under the sealing foot) is dirty or damaged (clean or replace it) Check if the strap is over tensioned. Improper weld time adjustment, may be too long, adjust it. The motor doesn t start when the sealing lever is activated Check if the welding start microswitch is worn out, or the welding cam doesn t touch the switch. After the cycle it is impossibile to remove the tool from the package and the opening lever is too hard to move Check if the opening group is working or is locked (when you squeeze the opening lever the strap tension should be released ) (contact the after sale service) Check the gearbox (contact the after sale service) Check if there are some defective parts in the opening lever group and / or mechanical obstructions. It is difficult to adjust the tension or welding time, doesn t stay consistent There are probably keyboard or electronic card problems / (contact after sale service) Progressive problems with the battery life Check the battery charge, try to recharge and check if the battery charger is working properly. May be that the battery is at the recharge limit. May be that the internal cells are damaged or worn out. Test tool with a different battery The charger will not start to recharge the battery The battery is damaged- do not use The battery voltage is lower than 10V check by electric tester; Check if the charger is still running.

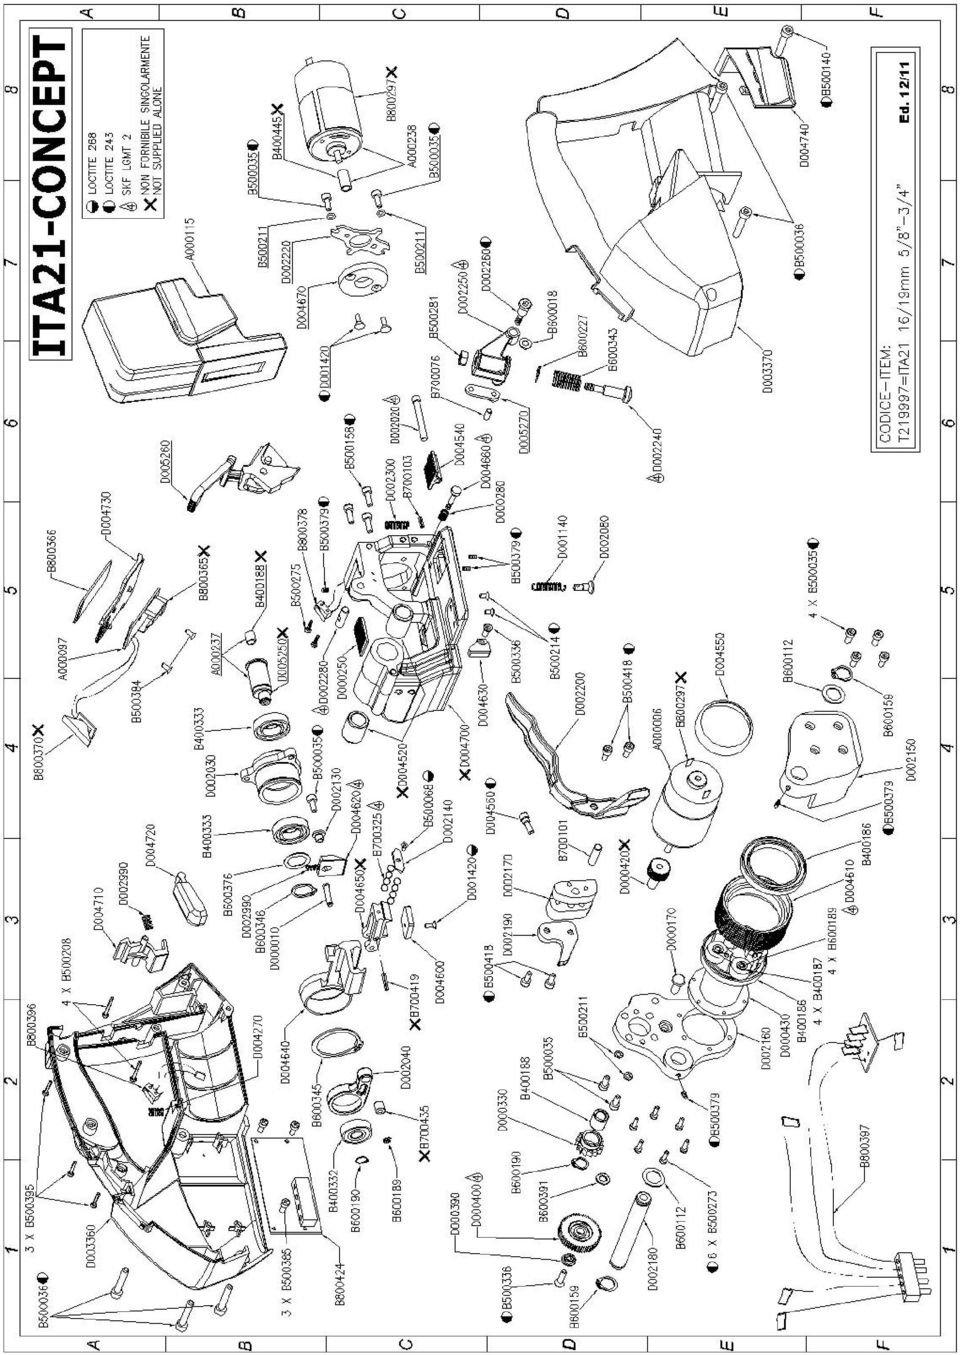
13 9) LAYOUT-SPARE PARTS LIST Ed. 12/11 POLYCHEM PART NUMBER ITEM DESCRIPTION QNTY A TENSION MOTOR GROUP 1 * A SIGNAL CARD WITH LIGHT 1 * B800BAT A BATTERY 3A/h 1 * A ECCENTRIC SHAFT ASSEMBLED A WELDING MOTOR ASSEMBLED 1 * B BEARING RS B ROLLER BEARING 5X8X B FREEWHEEL INA HF B BEARING 609 ZZ SKF B BEARING ZZ B SCREW M4X B SCREW M5X B SCREW M3X8 UNI B SCREW M5X B SCREW M4X B SCREW BN ,5X20 KA B LOCK. WASHER B SCREW M4X B SCREW M3X B SCREW M2X B SELFLOCK. NUT M6 D985 5S B SCREW M4X B SCREW M4X B SCREW 2.9X B SCREW 2.9X B SCREW 3.5X16 3 * B SCREW TCEI UNC10-24X3/8" B B WASHER PS 10x5x0, B WASHER PS12X18X0.5 DIN B CIRCLIP A12 DIN B CIRCLIP RA3.2 DIN B CIRCLIP D B CUP WASHER CB12.5X6.2X0.7 D B SPRING G ISO B CIRCLIP D34 UNI B CIRCLIP D15 UNI7435 R B WASHER PS 15X21X B WASHER PS 6X21X B PIN 4X12 DIN B PIN 6X28 DIN B ELASTIC PIN 3x10 UNI B SPHERE DIAM.5mm B KEYBOARD 1 * B WELDING MICROSWITCH 1 * B TENSION MICROSWITCH 1 * B POWER CABLES KIT B ELECTRONIC POWER CARD 1 * D PIN 1

14 POLYCHEM PART NUMBER ITEM DESCRIPTION D GEAR SHAFT 1 QNTY D STRAP LOCKER 1 * D REAR STRAP GUIDE SPRING D FREEWHEEL SUPPORT D LOCKING COVER D GEAR D EPICICLOIDAL GEARBOX D TENSION SPRING D SPECIAL SCREW M4x D WELDING FOOT PIN D FLANGE D CONNECTING ROD D SPRING SUPPORT D CUTTER GUIDE D COVER D FEEDWHEEL SUPPORT D LEVER SUPPORT D MOTOR FLANGE D SHAFT D HOOK D OPENING LEVER D WELDING MOTOR FLANGE D SPRING PIN D SPRING SUPPORT D SUPPORT PIN D WELDING LEVER PIN D WELDING GROUP SPRING 1 * D BAT. RELEASE / CUTTER SPRING 2 * D RIGHT COVER D LEFT COVER D TENSION BUTTON SPRING 1 * D WELDING FOOT 1 * D TENSION MOTOR PROTECTION D OPENING LEVER SPRING SCREW D WELDING PLATE 1 * D FEEDWHEEL 1 * D CUTTER 1 * D FRONT STRAP GUIDE D SUPPORT D WELDING FOOT SUPPORT D REAR STRAP GUIDE D CENTERING RING FOR WELDING MOTOR D BATTERY RELEASE LEVER D TENSION BUTTON D KEYBOARD SUPPORT D BLADE COVER D WELDING LEVER 1 WEARING PART * PART THAT SHOULD BE STOCKED

15
16

17 CE DECLARATION OF CONFORMITY POLYCHEM declares under own responsibility that the under mentioned machinery, to which this declarations refers, is in conformity with CEE 98/37 Directive and successive modifications, as well as with standards EN , EN , EN , EN , EN ,EN MODEL: Series B800 MACHINE TYPE: BATTERY POWERED PLASTIC STRAPPING TOOL POLYCHEM CORPORATION 6277 Heisley Road Mentor, Ohio Tel.: Fax:

TABLE-TYER / TABLE-TYER SS POWER STRAPPING MACHINES 04/12/07
 TABLE-TYER / TABLE-TYER SS POWER STRAPPING MACHINES 04/12/07 CONGRATULATIONS Thank you for purchasing your Table-Tyer Strapping Machine. The Table-Tyer has been designed to be a reliable, maintenance free
OPERATOR S MANUAL 18 VOLT, 1 HOUR CHARGER
 OPERATOR S MANUAL 18 VOLT, 1 HOUR CHARGER P110 Your battery charger has been engineered and manufactured to Ryobi s high standard for dependability, ease of operation, and operator safety. When properly
ZAPPY 3 OWNER S MANUAL. Read this manual completely before riding your Electric ZAPPY 3.
 ZAPPY 3 OWNER S MANUAL Read this manual completely before riding your Electric ZAPPY 3. TECHNICAL INFORMATION Model No. : ZAPPY 3 Product size Type of motor Motor power Battery type Battery Charger Charging
Edge 28B. Simple. Clean. PARTS LIST KENT model: 908 4703 010 146 3087 000(1)2007-01
2007-01") PARTS LIST KENT model: 908 4703 010 Simple. Clean. 2007-01 2 2007-01 TABLE OF CONTENTS 1 DESCRIPTION PLAN GENERAL VIEW 2-3 CHASSIS SYSTEM 4-5 SIDE BROOM ASSEMBLY 6-7 HOPPER SYSTEM 8-9 TRANSMISSION SYSTEM
PARTS LIST KENT model: 908 4703 010 Simple. Clean. 2007-01 2 2007-01 TABLE OF CONTENTS 1 DESCRIPTION PLAN GENERAL VIEW 2-3 CHASSIS SYSTEM 4-5 SIDE BROOM ASSEMBLY 6-7 HOPPER SYSTEM 8-9 TRANSMISSION SYSTEM
DIAMOND Retractable Rodding Robot Model SPRAYROD-R
 2004-12-21 2 1 (23) DIAMOND Retractable Rodding Robot Model SPRAYROD-R 2004-12-21 2 2 (23) Table of contents 1 TECHNICAL DESCRIPTION...4 1.1 MAIN DETAILS...5 1.2 COMPONENTS DESCRIPTION...5 1.2.1 Pneumatic
BACKPACK SPRAYERS. MODEL NOS: KSP16 & KSP20 Part Nos: 3402270 & 3402275 OPERATING & MAINTENANCE INSTRUCTIONS GC04/12
 BACKPACK SPRAYERS MODEL NOS: KSP16 & KSP20 Part Nos: 3402270 & 3402275 OPERATING & MAINTENANCE INSTRUCTIONS GC04/12 INTRODUCTION Thank you for purchasing this CLARKE Sprayer, designed for use only with
ELECTRIC BICYCLE USER MANUAL
 ELECTRIC BICYCLE USER MANUAL 1 Main Technical Parameters and Specification Weight: 23 kg Wheel size: 20 Maximum speed: 25 km/h E BIKE URBAN Range: Up to 45km (with pedal assist) Type: lithium Voltage:
Number Wheeler P/N Description Set Rex P/N Notes 1 603500 Base 1 J001 2 603501 Support, Right 1 J002 3 603502 Support, Left 1 J003 4 600328 Nut (M8)
") 1 603500 Base 1 J001 2 603501 Support, Right 1 J002 3 603502 Support, Left 1 J003 4 600328 Nut (M8) 4 5 600130 Spring Washer (8mm) 4 6 600344 Roll Pin (M6x30) 4 7 600129 Socket Hd Cap Screw (M8x25) 4 8
1 603500 Base 1 J001 2 603501 Support, Right 1 J002 3 603502 Support, Left 1 J003 4 600328 Nut (M8) 4 5 600130 Spring Washer (8mm) 4 6 600344 Roll Pin (M6x30) 4 7 600129 Socket Hd Cap Screw (M8x25) 4 8
OWNER S MANUAL. Model AE150/AE300/AE500 1.5AMP MULTI-USE SMART BATTERY CHARGER READ ENTIRE MANUAL BEFORE USING THIS PRODUCT
 Model AE150/AE300/AE500 MULTI-USE SMART BATTERY CHARGER Certified by Californiia BCS Regulations AE300E AE500E 5AMP MULTI-USE AUTOMOTIVE BATTERY CHARGER 3AMP MULTI-USE SMART BATTERY CHARGER AE500E 5AMP
MODEL T200-F18 MODEL T125-F18 Finish Nailers
 P MODEL T200-F18 MODEL T125-F18 Finish Nailers IMPORTANT! DO NOT DESTROY It is the customer s responsibility to have all operators and service personnel read and understand this manual. OPERATING MANUAL
OPERATING INSTRUCTION MANUAL FOR S-240 HYDRAULIC CUTTERS WITH PARTS LIST
 HUSKIE TOOLS, INC. OPERATING INSTRUCTION MANUAL FOR S-240 HYDRAULIC CUTTERS WITH PARTS LIST GENERAL INFORMATION GUIDE FOR S-240 CUTTER The following steps are guidelines for safe operation of the Huskie
4.3-inch Back-Up Camera
 TM 4.-inch Back-Up Camera Model No.: PKC0BU4 Owner s Manual and Warranty Information Read these instructions completely before using this product. Retain this Owner s Manual for future reference. INTRODUCTION
IMPORTANT SAFETY RULES TO FOLLOW
 WARNING FLOOR & CARPET CLEANER Any piece of equipment can be dangerous if not operated properly. YOU are responsible for the safe operation of this equipment. The operator must carefully read and follow
12 Volt 30 Amp Digital Solar Charge Controller
 12 Volt 30 Amp Digital Solar Charge Controller User s Manual WARNING Read carefully and understand all INSTRUCTIONS before operating. Failure to follow the safety rules and other basic safety precautions
RC HELICOPTER INSTRUCTION MANUAL
 AGE 14+ RC HELICOPTER INSTRUCTION MANUAL 1. Smart R/C system 2. Full scale remote control 3. Omnidirectional flight 4. Smooth hover performance 5. Newly designed electricity saving functionality 6. Longer
OPERATING INSTRUCTIONS
 GB OPERATING INSTRUCTIONS Automatic Wedge Welding Machine Please read operating instructions carefully before use and keep for further reference. APPLICATION The is an automatic wedge welding machine for
OPERATION MANUAL SAFETY PRINCIPLES, OPERATION AND MAINTENANCE FOR BRICKLAYER S PULLEY
 BRANO a.s, 747 41 Hradec nad Moravicí The Czech Republic tel.:+420 553 632 318, 553 632 345 fax:+420 553 632 407, 553 632 151 http://www.brano.cz info@brano.cz OPERATION MANUAL SAFETY PRINCIPLES, OPERATION
ROTOR LOADER OWNER S MANUAL
 ROTOR LOADER OWNER S MANUAL ROTOR LOADER OWNER S MANUAL WARNING IMPORTANT SAFETY INSTRUCTIONS AND GUIDELINES. Misuse of paintball equipment may cause serious injury or death. QUICK SET-UP GUIDE BATTERY
National- Spencer Inc.
 9-27-2010 National- Spencer Inc. 19.2V HEAVY DUTY GREASE GUN PRODUCT SPECIFICATION Charger Input Power 110 VAC Battery Output Power 19.2V Battery Capacity 1500 MAH Battery Pack Charge Time 1 Hour Maximum
Operating Instruction Manual For S-40B Hydraulic Cutters With Parts List
 HUSKIE TOOLS, INC. Operating Instruction Manual For S-40B Hydraulic Cutters With Parts List GENERAL INFORMATION GUIDE FOR S-40B CUTTER The following steps are guidelines for safe operation of the Huskie
ELECTRIC BICYCLE OWNER S MANUAL
 ELECTRIC BICYCLE OWNER S MANUAL For Owners of EG Athens 250 Electric Bicycle Table of Contents Descriptions: Page Installation Instructions 2 How to install the bicycle out of the box 2 Operation Instructions
Amps Per Bank. Total Output. Battery System. Model Name. 6 amps 12 amps 10 amps 20 amps 30 amps 40 amps 15 amps 30 amps 45 amps
 Model Name Total Output Amps Per Bank Battery System Pro XL Dual Pro XL Pro SE Dual Pro SE Three Bank Pro SE Four Bank Pro SE Pro Charger Dual Pro Charger Three Bank Pro Charger 6 amps 12 amps 10 amps
10 TON HYDRAULIC PRESS
 10 TON HYDRAULIC PRESS Model Nos. CSA10F and CSA10B OPERATING & MAINTENANCE INSTRUCTIONS 0200 SPARE PARTS and SERVICING Please contact your nearest dealer, or CLARKE International, on one of the following
Volkswagen Jetta, Golf, GTI 1999, 2000 Brake System 46 Brakes - Mechanical Components (Page GR-46)
") 46 Brakes - Mechanical Components (Page GR-46) Front brakes Brake pads, removing and installing Brake pads, removing and installing FN 3 brake caliper, servicing FS III brake caliper, servicing Rear wheel
46 Brakes - Mechanical Components (Page GR-46) Front brakes Brake pads, removing and installing Brake pads, removing and installing FN 3 brake caliper, servicing FS III brake caliper, servicing Rear wheel
REPAIR INSTRUCTIONS UNDER BODY CYLINDER (UM, UL)
") Table of contents 1. Introduction... 3 1.1. Scope of use... 3 1.2. General remarks... 3 1.3. Contact Hyva... 3 1.4. Precautions... 4 1.5. Spare parts... 4 1.5.1. Prior to use... 4 1.6. Recycling and Reuse
Table of contents 1. Introduction... 3 1.1. Scope of use... 3 1.2. General remarks... 3 1.3. Contact Hyva... 3 1.4. Precautions... 4 1.5. Spare parts... 4 1.5.1. Prior to use... 4 1.6. Recycling and Reuse
8" BENCH GRINDER OWNER'S MANUAL
 8" BENCH GRINDER OWNER'S MANUAL WARNING: Read carefully and understand all INSTRUCTIONS before operating. Failure to follow the safety rules and other basic safety precautions may result in serious personal
758 Heavy-duty Ratchet Guy Wire Cutter
 INSTRUCTION MANUAL 758 Heavy-duty Ratchet Guy Wire Cutter Read and understand all of the instructions and safety information in this manual before operating or servicing this tool. Register this product
3. Loosen 3 x grub screws in the Dec end cap and unscrew the cap and counterweight shaft. NEQ6 Belt Modification Kit.
 NEQ6 Belt Modification Kit. Thank you for your purchase. Please read these instructions fully before fitting. Your package should contain 2 off 47 & 2 off 12 tooth aluminium pulleys 2 off belts 6mm wide
Multi-Pitch Pitching Machine USER MANUAL
 Multi-Pitch Pitching Machine USER MANUAL TABLE OF CONTENTS Thank you for purchasing the Cimarron Multi-Pitch Pitching Machine. The Cimarron Multi-Pitch Pitching Machine is a high performance pitching machine
MBSAW. Meat Cutting Band Saw With Meat Grinder Assembly & Operating Instructions
 06/2011 MBSAW Meat Cutting Band Saw With Meat Grinder Assembly & Operating Instructions READ ALL INSTRUCTIONS AND WARNINGS BEFORE USING THIS PRODUCT. This manual provides important information on proper
Nokia Wireless Keyboard (SU-8W) User Guide
 User Guide") Nokia Wireless Keyboard (SU-8W) User Guide DECLARATION OF CONFORMITY We, NOKIA CORPORATION declare under our sole responsibility that the product SU-8W is in conformity with the provisions of the following
Nokia Wireless Keyboard (SU-8W) User Guide DECLARATION OF CONFORMITY We, NOKIA CORPORATION declare under our sole responsibility that the product SU-8W is in conformity with the provisions of the following
WIRELESS SENSOR BATTERY REPLACEMENT INSTRUCTIONS For Safewatch Residential Control Panels
 www.adt.ca WIRELESS SENSOR For Safewatch Residential Control Panels Your ADT Safewatch QuickConnect, SafeWatch 3000 or Vista Series residential security system may be installed with wireless sensors, such
Ingenico. User Guide 5100M. Secure transaction and payment solutions
 User Guide Ingenico 5100M Secure transaction and payment solutions Ingenico 5100 M Contents 1 Presentation... 5 1.1 Overview of Ingenico 5100... 6 1.2 Keyboard details and functionality... 7 2 Use...
TT TOYS TOYS - OWNER S MANUAL. We are delighted that you have decided to purchase this TT Toys Toys children s car.
 TT TOYS TOYS - OWNER S MANUAL We are delighted that you have decided to purchase this TT Toys Toys children s car. This owner s manual contains important information for the safe assembly, handling and
INSTRUCTION MANUAL HYDRAULIC GATE TRANSMISSION SYSTEM ECO240-ECO360
 INSTRUCTION MANUAL HYDRAULIC GATE TRANSMISSION SYSTEM ECO240-ECO360 IMPORTANT SAFETY INSTRUCTIONS WARNING! To reduce the risk of injury or death it is important to closely follow all of the following instructions.
CHARGING SYSTEMS INTERNATIONAL
 CHARGING SYSTEMS INTERNATIONAL INSTALLATION AND OPERATING INSTRUCTIONS FOR THE FOLLOWING BATTERY CHARGING SYSTEMS: MODELS MAX AMPS/BANK NO. OF BANKS BATTERY SYSTEM PRO XL 6 1 12 DUAL PRO XL 6 2 12/24 PRO
400 Amp Rechargeable Jump Start System RAC-HP082
 400 Amp Rechargeable Jump Start System RAC-HP082 MAINTENANCE Always inspect the tool before use to ensure the cables are in good condition and the clamps are clean and free from corrosion. Keep clean by
3 WATT LED SPOTLIGHT Model No. SLM - 3801
 3 WATT LED SPOTLIGHT Model No. SLM - 3801 OWNER'S MANUAL Customer Service Tel: 1-800-268-3319 Superex Canada Ltd, Toronto,M2H 3B8 Made in China Table of Contents A). Important Safety Instructions B). Charging
GUTTER MACHINE CONTROLS STANDARD
 GUTTER MACHINE CONTROLS STANDARD Note: determine what type of control package is installed on the machine. --more-- All operators should familiarize themselves with the appropriate controls prior to any
TIG INVERTER INSTRUCTION MANUAL
 TIG INVERTER INSTRUCTION MANUAL Contents Warning General Description Block Diagram Main Parameters Circuit Diagram Installation and Operation Caution Maintenance Spare Parts List Troubleshooting 3 4 4
ELECTRIC BICYCLE OWNER S MANUAL
 ELECTRIC BICYCLE OWNER S MANUAL For Owners of EG Bali 500EX and EG Milan 500EX Electric Bicycle Table of Contents Descriptions: Page Installation Instructions 2 How to install the bicycle out of the box
PIPELINE INSPECTION COMPANY LTD. Portable Holiday Detectors. OPERATING INSTRUCTIONS SPY PORTABLE HOLIDAY DETECTORS Models 780, 785, & 790
 PIPELINE INSPECTION COMPANY LTD. Portable Holiday Detectors OPERATING INSTRUCTIONS SPY PORTABLE HOLIDAY DETECTORS Models 780, 785, & 790 Safety Disclaimer Only trained and responsible personnel should
Number Wheeler P/N Description Set Rex P/N Notes
 1 604041 Base 1 4041 2 604042 Base Cover 1 4042 3 608849 Washer (M5) 2 4 600124 Spring Washer (M5) 2 5 600329 Rd Hd Machine Screw (M5x8) 2 6 604047 Strainer 1 4047 7 600204 Rd Hd Machine Screw (M6x10)
1000-LB. TRAILER JACK OWNER S MANUAL
 1000-LB. TRAILER JACK OWNER S MANUAL WARNING: Read carefully and understand all INSTRUCTIONS before operating. Failure to follow the safety rules and other basic safety precautions may result in serious
TRIMMING UNIT/DIAMOND MACHINE TST.13
 TRIMMING UNIT/DIAMOND MACHINE TST.13 REFERENCE BOOK rel. 02.15 TRIMMING UNIT/DIAMOND MACHINE TST.13 REL. 02.15 ENGLISH LANGUAGE 1 MACHINE DESCRIPTION TST.13 was designed and built for processing methacrylate.
Number Wheeler P/N Description Set Rex P/N Notes
 1 607051 Base 1 A050 2 607052 Motor Cover 1 A052 3 600778 Socket Hd Cap Screw (M8x60) 2 4 607053 Scrap Receiver 1 A053 5 607054 Tank Upper Cover 1 A054 6 607055 Oil Pot 1 A055 7 607056 Strainer 1 A056
GE Wireless Devices Battery Replacement
 60-506-319.5 Crystal Smoke Detector Two 9V Duracell 9V 1. Twist counter-clockwise until detector become loose from base. 2. Replace batteries observing correct polarity. 3. Replace detector by twisting
User s Manual Before using the inverter, you need to read and save the safety instructions.
 User s Manual Before using the inverter, you need to read and save the safety instructions. STI SERIES (STI200, STI300, STI500, STI700, STI1000) Power Frequency Pure Sine Wave Inverter The information
OWNER S MANUAL. Permolock C3. Docking system for Power wheelchair in vehicle
 OWNER S MANUAL US Permolock C3 Docking system for Power wheelchair in vehicle How to contact Permobil Head Office of the Permobil group Permolock C3 Docking system for electric wheelchair in vehicle Produced
15GAL STEEL OIL DRAIN WITH 110V PUMP
 15GAL STEEL OIL DRAIN WITH 110V PUMP OWNER S MANUAL WARNING: Read carefully and understand all ASSEMBLY AND OPERATION INSTRUCTIONS before operating. Failure to follow the safety rules and other basic safety
Operating Manual Please Read Before Operating Unit
 Operating Manual Please Read Before Operating Unit Model RT2S Wire Stripper & Component Lead Cleaner Service and All Spare Parts Available The Eraser Company, Inc. PO Box 4961/ Oliva Drive Syracuse, NY
Installation and Operating Instructions (for chargers shown below)
") Installation and Operating Instructions (for chargers shown below) For additional information please call our Technical Support Group 800.742.2740 PRO CHARGING SYSTEMS, LLC 1551 Heil Quaker Boulevard,
Installation and Operating Instructions (for chargers shown below) For additional information please call our Technical Support Group 800.742.2740 PRO CHARGING SYSTEMS, LLC 1551 Heil Quaker Boulevard,
If you are familiar with these matters, then you can use this manual as a work of reference.
 PRODUCT CODE : MFX0370 VERSION : 1.0 DATE : 16.12.2013 User documentation MAGICFX Confetti Gun 1. FOREWORD Congratulations! You have bought a great new product from MAGICFX. The MAGIC FX Confetti Gun is
FJ2. 2 Ton Trolley Floor Jack Assembly & Operating Instructions
 FJ2 2 Ton Trolley Floor Jack Assembly & Operating Instructions READ ALL INSTRUCTIONS AND WARNINGS BEFORE USING THIS PRODUCT. This manual provides important information on proper operation & maintenance.
MP-4V Heavy Duty Riveter / 39048
 MP-4V Heavy Duty Riveter / 39048 This newly designed heavy-duty air/hydraulic riveter is ergonomically designed with the professional in mind. The light weight 3.7 lbs. well balanced MP-4V includes a Vacuum
LITHIUM BALANCE CHARGER
 LITHIUM BALANCE CHARGER A Microprocessor controlled, high-performance charger for NiCd/NiMH/LiPo/Pb batteries with an integral individual voltage balancer (LiPo only) Operating Manual Please read this
INFRARED QUARTZ WALL HEATER
 INFRARED QUARTZ WALL HEATER MODEL NO: IQ2000 PART NO: 6939004 MOUNTING & OPERATION INSTRUCTIONS GC0715 INTRODUCTION Thank you for purchasing this CLARKE Infrared Wall Heater. Before attempting to use this
Battery Charger For Nickel Cadmium and Nickel-Metal Hydride Rechargeable Batteries Model PSN Series
 Battery Charger For Nickel Cadmium and Nickel-Metal Hydride Rechargeable Batteries Model PSN Series Operating Instructions WARNING CONCERNING THE REMOVAL OF COVER: CAUTION: TO PREVENT THE RISK OF ELECTRIC
Operation manual and Spare parts list 1400 - EL PUMP. November
 Operation manual and Spare parts list 1400 - EL PUMP 10 GB November 1 KIMADAN A/S KIMADAN A/S 2 Operational manual and spare parts list 1400 El-pump 15, 20, 25 HP 5 30 kw 6 1. Description.. 3 2. Installation
Bulb Replacement REPLACING BULBS WARNING
 Bulb Replacement REPLACING BULBS Check the operation of all exterior lamps before you drive the vehicle. Caution: Before attempting to replace a bulb, ensure that both the affected lamp and the vehicle's
HYDRAULIC LIFT TABLE CART 2200-LB.
 HYDRAULIC LIFT TABLE CART 2200-LB. OWNER S MANUAL WARNING: Read carefully and understand all MACHINE ADJUSTMENT AND OPERATION INSTRUCTIONS before operating. Failure to follow the safety rules and other
DANGER DANGER. General Information. Safety Is Your Responsibility. Ordering Parts. Contact Information
 Safety Safety Is Your Responsibility DANGER To avoid personal injury or death, carefully read and understand all instructions pertaining to the Anthony Liftgates product. Do not attempt to install, operate,
Weatherproof Tournament Table Tennis Table
 Weatherproof Tournament Table Tennis Table Owner s Manual Model Number 7035-590 Absolutely Weatherproof Printed on 100% recycled paper.! Made in Germany Thank you for purchasing our high quality KETTLER
13 Watt PORTABLE SOLAR POWER KIT
 3 Watt PORTABLE SOLAR POWER KIT User s Manual Thank you for purchasing a Sunforce Portable Solar Power Kit. Please read these instructions carefully and thoroughly before using the product. Your new Portable
SCHWINTEK IN-WALL SLIDEOUT TROUBLESHOOTING AND COMPONENT REPLACEMENT
 Troubleshooting Error Codes During operation when an error occurs, the board will use the LEDs to indicate where the problem exists. For motor specific faults, the green LED will blink once for Motor 1,
OPL BASIC. Dosing System for Professional Laundry machines. Contents
 OPL BASIC Dosing System for Professional Laundry machines Contents 1 Getting Started. Page 2 2 Installation. Page 4 3 Set Up & Operation. Page 8 4 Maintenance & Accessories. Page 10 5 Troubleshooting Page
BBWX1 Satellite Weather Receiver. Installation and Maintenance Guide
 BBWX1 Satellite Weather Receiver Installation and Maintenance Guide Rev FUSA 15JUL2007 Table of Contents Safety Precautions 3 Disclaimer. 3 Contents of Package. 4 Tools Required..4 Installation General
Fisher 1052 Size 20 Diaphragm Rotary Actuator with F and G Mounting Adaptation
 Instruction Manual 1052 Size 20 Actuator (F & G) Fisher 1052 Size 20 Diaphragm Rotary Actuator with F and G Mounting Adaptation Contents Introduction... 1 Scope of manual... 1 Description... 1 Specifications...
Cable Drum Machine. Operation Manual BC260 SERIES. Cleans 1 1/4" to 3" lines up to 50'
 Cable Drum Machine Operation Manual BC260 SERIES Cleans 1 1/4" to 3" lines up to 50' Used For: Sink, Shower & Floor Drains 42FM " WARNING - Read All Instructions, When Using Electric Tools, Basic Safety
It's large enough to handle most welding job shop projects, yet small enough to make it a worth while home-workshop tool
 It's large enough to handle most welding job shop projects, yet small enough to make it a worth while home-workshop tool H Craft Print Project No. 272 ERE'S a metal bender that will enable you to bend
OWNER S MANUAL Table Tennis Table Patent Pending
 OWNER S MANUAL Table Tennis Table Patent Pending Be sure to write your model number and serial number here for future reference. You can find these numbers printed on the bottom of the table. MODEL # T8179
#12 Professional Meat Grinders
 #12 Professional Meat Grinders MG-203100 (52021040) Manual Instruction Thank you, and congratulations on purchasing the Non-corrosive electric meat grinder. Your grinder comes complete with everything
OPERATING INSTRUCTIONS FOR
 OPERATING INSTRUCTIONS FOR MEDECO KEY MACHINES FOR MEDECO ORIGINAL, BIAXIAL, MEDECO 3, KEYMARK CLASSIC & KEYMARK X4 PRODUCTS MEDECO HIGH SECURITY LOCKS ASSUMES NO RESPONSIBILITY FOR INJURY OR PROPERTY
2-SLICE COOL TOUCH TOASTER
 2-SLICE COOL TOUCH TOASTER PLA0405 Instruction Manual Due to on-going product improvements, specifications and accessories may change without notice. Actual product may differ slightly to that depicted.
FC6 FOOT CONTROLLER OWNER S MANUAL
 FC6 FOOT CONTROLLER OWNER S MANUAL Congratulations and thank you for purchasing the KORG FC6 Foot Controller. To get the most out of this advanced instrument (?) for the longest possible time, we recommend
R02GA. July 31, 2002. Dear Blue Bird Owner:
 R02GA July 31, 2002 Dear Blue Bird Owner: This notice is sent to you in accordance with the requirements of the National Traffic and Motor Vehicle Safety Act. Blue Bird Body Company has determined that
SELF-STEERING AXLE TABLE OF CONTENTS
 SELF-STEERING AXLE TABLE OF CONTENTS Section 1 - Introduction Section 2 - Pre-Installation Check List Section 3 - Ride Height Adjustments Section 4 - Suspension Mount Section 5 - Axle Mount Section 6 -
Slicers LEADER A350G/L - A370G/L AUTOMATIC GRAVITY FEED. Instructions for use and maintenance
 Slicers LEADER A350G/L - A370G/L AUTOMATIC GRAVITY FEED Instructions for use and maintenance Edition June 2012 LIST OF CONTENTS Page 1. INTRODUCTION...2 1.1 Purpose of the manual... 2 1.2 Keeping the manual...
INFRARED REMOTE CONTROL HELICOPTER
 3 CHANNEL GYROSCOPIC STABILIZATION TECHNOLOGY FOR SMOOTH HANDLING INFRARED REMOTE CONTROL HELICOPTER Please read these instructions carefully before using the helicopter Safety Instructions 1. Please keep
Quickie Rhapsody Service Manual
 Quickie Rhapsody Service Manual 2006 Sunrise Medical Inc. 101976 Rev A Quickie Rhapsody Service Manual Contents Introduction... 0.1 VR2 Controller... 0.2 Plugs/Connectors... 0.3 Basic Tool List & Main
BC-5000 OPERATIONS MANUAL BATTERY CAPACITY TESTER COFKO LLC.
 BC-5000 BATTERY CAPACITY TESTER OPERATIONS MANUAL COFKO LLC. COPYRIGHT 2010 1 UNPACKING As you unpack your new BC-5000 battery capacity tester, inspect the tester for signs of shipping damage. If shipping
Odyssey of the Mind Technology Fair. Simple Electronics
 Simple Electronics 1. Terms volts, amps, ohms, watts, positive, negative, AC, DC 2. Matching voltages a. Series vs. parallel 3. Battery capacity 4. Simple electronic circuit light bulb 5. Chose the right
Mobile Data Power Model: MDP-25
 Mobile Data Power Model: MDP-25 Topic Section Features... 2 Operational Features Summary... 2 Back-up Battery Power Internal Charger Voltage Spike Protection RF Noise Filtering Warning of Imminent Loss
CYMAQ Marking System AS200 + DS7050 N-14
 CYMAQ Marking System AS200 + DS7050 N-14 Serial Number: 13716 CYMAQ www.cymaq.com INDEX 1. PRESENTATION AND GENERAL POINTS 1.1. General Points 1.2. Identification plate 2. MACHINE CHARACTERISTICS 2.1.
CappController Pipette Controller. Operation Manual Version: 1.2. www.capp.dk
 CappController Pipette Controller Operation Manual Version: 1.2 www.capp.dk skal vises her. Table of Content 1. Safety Precautions... 1 2. General Description... 2 3. Getting Started... 4 3.1. Recharging
Service Manual. COMPACT LINE THERMAL PRINTER CT-P292/293 Series. Revision 1.00 2010.2.15
 Service Manual COMPACT LINE THERMAL PRINTER CT-P292/293 Series Revision 1.00 2010.2.15 REVISIONS Rev No. Date Page Comment 1.00 2010/2/15 Newly issued CITIZEN is a registered trademark of CITIZEN HOLDINGS
USER INSTRUCTIONS FOR 10 LITRE PORTABLE DEHUMIDIFIER MODEL NO. DHMD102
 USER INSTRUCTIONS FOR 10 LITRE PORTABLE DEHUMIDIFIER MODEL NO. DHMD102 THANK YOU FOR CHOOSING YOUR NEW DEHUMIDIFIER. BEFORE USING THE UNIT READ THESE INSTRUCTIONS FULLY AND RETAIN THEM FOR FUTURE REFERENCE
FLOORTEC R 680 B. Part List US-English. Model: FLOORTEC R 680 B
 Model: Part List US-English Table of Contents General view 3 Rotomolded assembly 5 Chassis assembly 7 Drive assembly 9 Steering assembly 11 Control pedals assembly 13 Waste container assembly 15 Filter
Kurzweil KORE 64. ROM Expansion Board for the PC3 and PC3K
 Kurzweil KORE 64 ROM Expansion Board for the PC3 and PC3K Installation Instructions August 1, 2012 2012 Young Chang Co., Ltd. All rights reserved. Kurzweil is a product line of Young Chang Co., Ltd. Kurzweil,
Sport Ice Elektro 124
 Sport Ice Elektro 124 Operation Manual 2007/4 V2.1 Introduction The Sport Ice Elektro 124 is an ice resurfacing machine designed to be used on small ice surfaces. The machine has been designed to produce
Instruction Manual. Image of SP-3015 & SP-3815. Important Safeguards. Automatic Dispensing Hot Water Pot with Reboil Function
 Important Safeguards READ ALL INSTRUCTIONS BEFORE USE. Instruction Manual Automatic Dispensing Hot Water Pot with Reboil Function Image of SP-3015 & SP-3815 SP-3015: 3.0L SP-3815: 3.8L SP-3017: 3.0L (Stainless
Installation Guide 2010 BMW S1000RR Full Exhaust System
 Installation Guide 2010 BMW S1000RR Full Exhaust System!! THIS PRODUCT IS DESIGNED FOR USE IN CLOSED COURSE RACING AND IS NOT INTENDED FOR HIGHWAY USE!! Congratulations on the purchase of your new TaylorMade
How To Use A Power Supply Unit (Upu)
") BRAVER UPS (Uninterruptible Power System) User s Manual Safety CAUTION! This UPS utilizes voltages that may be hazardous. Do not attempt to disassemble the unit. The unit contains no user replaceable parts.
BRAVER UPS (Uninterruptible Power System) User s Manual Safety CAUTION! This UPS utilizes voltages that may be hazardous. Do not attempt to disassemble the unit. The unit contains no user replaceable parts.
OWNER S MANUAL BIG BEAR VORTEX FAN MODEL #BB-1 INTRODUCTION OPERATION SAFETY SERVICE WARRANTY CONTACT SPECIFICATIONS TROUBLESHOOTING
 OWNER S MANUAL BIG BEAR VORTEX FAN MODEL #BB-1 INTRODUCTION OPERATION SAFETY SERVICE WARRANTY CONTACT SPECIFICATIONS TROUBLESHOOTING PLEASE READ AND SAVE THESE INSTRUCTIONS - 2 - INTRODUCTION TO THE BIG
E&P HYDRAULICS Remote control EPRC-01 Level System Camper
 USER S GUIDE E&P HYDRAULICS Remote control EPRC-01 Level System Camper 1 Copyright 2012, E&P Hydraulics This manual is copyrighted, with all rights reserved. Under the copyright laws, this may not, in
Operating Manual Color Changing Fountains
 Operating Manual Color Changing Fountains 1-877-80-PONDS www.atlanticwatergardens.com Introduction Thank you for purchasing Atlantic s Color Changing Fountains overflowing features that glow from within.
Written By: Walter Galan
 ipad 2 GSM LCD Replacement Replace the LCD in your ipad 2 GSM. Written By: Walter Galan INTRODUCTION Use this guide to replace a broken LCD. TOOLS: iopener (1) Phillips #00 Screwdriver (1) Plastic Opening
TITAN 13 x 2 ½ BRAKES
 INSTALLATION INSTRUCTION AND SERVICE MANUAL Actuator/Trailer Dealer - Please provide these instructions to the consumer. Consumer - Read and follow these instructions. Keep them with the trailer for future
Polaris 9300 & 9400 Series Robotic Cleaner
 Polaris 9300 & 9400 Series Robotic Cleaner Zodiac Pool Systems, Inc. 1-800-822-7933 www.zodiacpoolsystems.com Regional Extension Instructor ext. Sales Representatives ext. ext. Service Manager ext. ext.