G 2500 VH /06
|
|
|
- Kristina Norris
- 7 years ago
- Views:
Transcription
1 G 2500 VH /06
2 HIGH PRESSURE WASHER OPERATOR MANUAL Model Overview 3 Important Safety Instructions 4 Assembly Instructions 6 Operating Instructions 7 Using the Accessories 8 Working with Detergents 9 Taking a Break 10 Shutting Down & Clean-Up 10 Winterizing and Long-Term Storage 10 Maintenance Instructions 11 Cleaning Tips 11 Troubleshooting 14 Specifications Operating pressure 2500 PSI Water volume 2.4 GPM Detergent suction GPM Engine 5.5 HP Honda GCV 160 Part No Serial no. Safety Alert Symbols DANGER indicates an imminently hazardous situation which, if not avoided, will result in death or serious injury. indicates a potentially hazardous situation which, if not avoided, could result in death or injury. indicates a potentially hazardous situation which, if not avoided, may result in minor or moderate injury or in property damage incidents. Owner/User Responsibility The owner and/or user must have an understanding of the manufacturer s operating instructions and warnings before using this pressure washer. Warning information should be emphasized and understood. If the operator is not fluent in English, the manufacturer s instructions and warnings shall be read to and discussed with the operator in the operator s native language by the purchaser/owner, making sure that the operator comprehends its contents. Owner and/or user must study and maintain for future reference the manufacturers instructions. Kärcher Customer Support USA Call: for help or visit our website: Please take a moment to register your pressure washer online at Kärcher Customer Service CDN Call: for help or visit our website: Kärcher Customer Support Mexico Call: for help or visit our website: 2 English

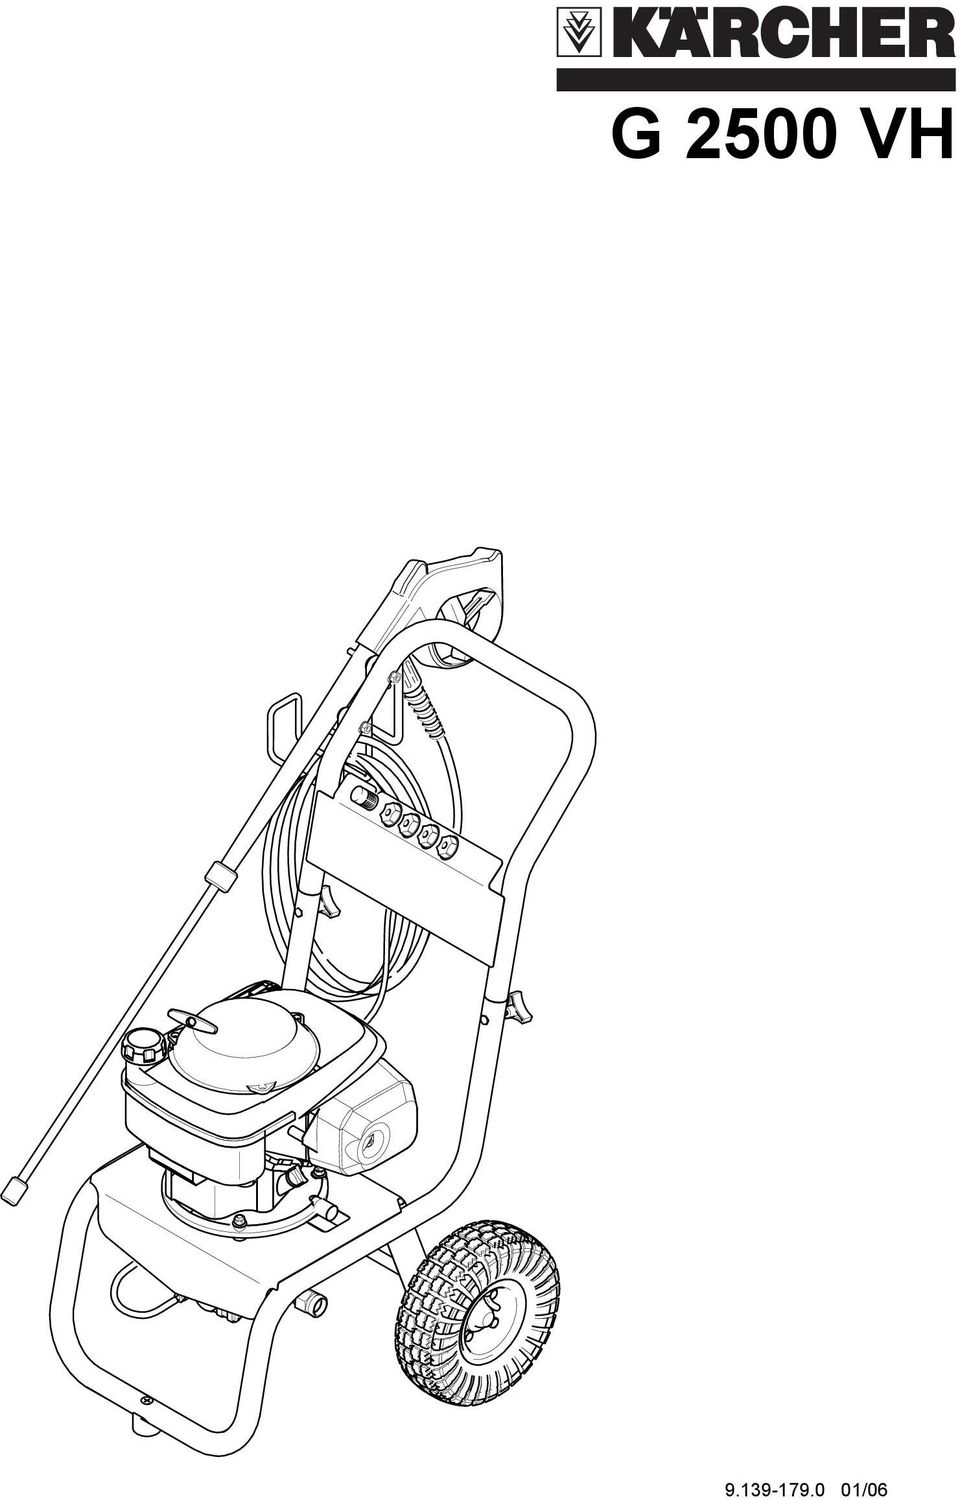
3 1 Handle 2 Trigger gun 3 Trigger gun safety lock 4 High pressure hose 5 Gas tank 6 Spray wand 7 Dipstick MODEL OVERVIEW 8 Water inlet with garden hose connector 9 High pressure outlet 10 Detergent suction tube with filter 11 Quick connect nozzles 12 Water inlet filter For engine details see engine manual. English 3

4 Read the operating instructions of the engine manufacturer before start-up and follow the safety instructions carefully. When using this product basic precautions should always be followed, including the following: Read all the instructions before using the product. To reduce the risk of injury, close supervision is necessary when a product is used near children. Know how to stop the product and bleed pressures quickly. Be thoroughly familiar with the controls. Stay alert watch what you are doing. Do not operate the product when fatigued or under the influence of alcohol or drugs. Keep operating area clear of all persons. Do not overreach or stand on unstable support. Keep good footing and balance at all times. Wear safety goggles. Follow the maintenance instructions specified in the manual. Risk of Injection or Injury Do Not Direct Discharge Stream At Persons. High pressure jets can be dangerous if misused. The jet must not be directed at persons, animals, electrical devices, or the unit itself. Do not spray electrical connections, electrical outlets or fixtures. Risk Of Explosion Do not spray flammable liquids. 4 English IMPORTANT SAFETY INSTRUCTIONS Do not use acids, alkaline, solvents, or any flammable material in this product. These products can cause physical injuries to the operator and irreversible damage to the machine. Gun Kicks Back Hold with both hands. The Trigger Gun Safety Lock prevents the trigger from accidentally being engaged. This safety feature DOES NOT lock trigger in the ON position. Risk of Asphyxiation Use this product only in a well ventilated area. Operate and fuel machine in a well ventilated area, free of devices featuring an open pilot or flame such as boilers, water heaters, etc. Risk of Fire Do not add fuel when the product is operating. Do not operate if fuel has been spilled. Instead, move the machine to a different location and avoid creating sparks. The machine has hot surfaces which can cause burns. Operate the unit in a safe environment and away from children. Do not touch hot surfaces or allow accessories to contact hot surfaces. Do not allow the high pressure hose to come into contact with the muffler guard. Do not leave the machine running unattended. Avoid tipping the machine on its side. SAVE THESE INSTRUCTIONS

5 WATER SUPPLY (Cold Water Only) When connecting the water inlet to the water supply mains, local regulations of your water company must be observed. In some areas the unit must not be connected directly to the public drinking water supply. This is to ensure that there is no feedback of chemicals into the water supply. Direct connection via a receiver tank or backflow preventer, for example, is permitted. Dirt in the feed water will damage the unit. To avoid this risk, we recommend fitting a water filter. Garden hose must be at least 5/8 inch in diameter. Flow rate of water supply must not fall below 2.5 GPM (gallons per minute). Flow rate can be determined by running the water for one minute into an empty 5-gallon container. The water supply temperature must not exceed 104 F/40 C. Never use the pressure washer to draw in water contaminated with solvents, e.g. paint thinners, gasoline, oil, etc. Always prevent debris from being drawn into the unit by using a clean water source. Do not operate pressure washer without the water turned on. English 5
.")
6 STEP 1: Attach the handle to the frame of the pressure washer. Align holes, insert bolts, and tighten with knobs. ASSEMBLY INSTRUCTIONS STEP 5: Attach the wand to the spray gun. STEP 2: Mount the gun/hose storage handle. STEP 6: Pull the spring-loaded collar of the wand back to insert your choice of quick connect nozzle. STEP 3: Fasten the rubber grommets in the nozzle holder. STEP 7: Release the collar and push the nozzle until the collar clicks. STEP 4: Place the quick connect nozzles in the nozzle holder. High pressure in nozzle area. Risk of injury caused by improperly locked nozzle. Make sure you hear a click when inserting the nozzle tip into the wand. Pull the nozzle to make sure it is seated properly before operating your unit. 6 English

7 STEP 8: Attach the high pressure hose to the spray gun. CAUTION Do not run the engine with a high or low oil level as this can cause engine damage. If you have further questions regarding the engine, please refer to the engine manual included with the unit. STEP 1: Check oil level. Oil level should always be between the FULL and ADD marks on the dipstick. Be sure the machine is level when checking the oil level. (Refer to the engine s operating manual for seasonal grades.). We recommend that the oil be changed after the first 5 hours of use, then once every 50 hours. STEP 2: Fill gas tank with unleaded gasoline. Do not use leaded gasoline. STEP 3: Connect the high pressure hose to the unit s high pressure outlet. STEP 4: Connect garden hose to unit s water inlet. OPERATING INSTRUCTIONS STEP 5: Connect garden hose to the cold water source and turn water on completely. Do not use hot water. STEP 6: Unlock the Safety lock. Trigger the gun to eliminate trapped air, wait for a steady flow of water to emerge from the spray nozzle. STEP 7: Open fuel valve. Pull the choke rod to the ON position (on a warm engine, leave the choke rod in the OFF position). STEP 8: Move the engine stop switch to the ON position. For engine details see engine manual. STEP 9: Pull the starter handle. If the engine fails to start after 3 pulls, squeeze the trigger gun to release pressure, and repeat step. After the engine warms up enough to run smoothly, move choke rod to OFF position. English 7

8 Quick connect nozzles The color-coded quick connect nozzles provide a wide array of spray widths from 0 to 65 and are easily accessible when placed in the convenient rubber nozzle holder. 0 spray angle = Red nozzle For particularly stubborn accumulation of grime. Not recommended for soft materials like sidings, decks, painted surfaces, cars. 25 spray angle = Green nozzle For dirt accumulation over a large surface. USING THE ACCESSORIES High pressure in nozzle area. Risk of injury caused by improperly locked nozzle. Make sure you hear a click when inserting the nozzle tip into the wand. Pull the nozzle to make sure it is seated properly before operating your unit. (See ASSEMBLY INSTRUCTIONS: Step 6 and Step 7) To avoid serious injury never point spray nozzle at yourself, other persons or animals. 40 spray angle = White nozzle For moderate dirt accumulation over a large surface. 65 spray angle = Black detergent nozzle For operating with detergent or cleaning with negligible pressure. 8 English

9 Detergents can only be applied with the black detergent nozzle. STEP 1: Install the black detergent nozzle for detergent application at low pressure. STEP 2: Fill a container with Kärcher detergent. Place the filter end of detergent suction tube into the container. STEP 3: With the engine running, pull trigger to operate unit. Liquid detergent is drawn into the unit and mixed with water. Apply detergent to work area. Do not allow detergent to dry on surface. STEP 4: Always draw fresh water through the detergent suction tube when the cleaning job is done, to rinse/flush any remaining detergents from the injection system. For best results see Cleaning Tips for specific information on how to clean different surfaces. Detergents This unit has been designed for use with cleaning detergents recommended by the manufacturer. The use of other cleaning detergents may affect the operation of the machine and void the warranty. WORKING WITH DETERGENTS Always Use Kärcher Detergent for Best Results Kärcher biodegradable detergents are specially formulated to protect the environment and your pressure washer. The special formula won t clog the suction tube filter and will protect the internal parts of the pressure washer for a longer life. For Kärcher Detergents, check your retailer or visit our website: Kärcher detergents available in USA / Mexico: All Purpose & Vehicle Cleaner Exterior House Cleaner Deck & Patio Cleaner Heavy Duty Degreaser Kärcher detergents available in Canada: Vehicle Wash Pressure Wash Deck & Fence Wash Degreaser Never use: Bleach, Chlorine products and other corrosive chemicals Liquids containing solvents (i.e., paint thinners, gasoline, oils) Tri-sodium phosphate products Ammonia products Acid-based products These chemicals will harm the unit and will damage the surface being cleaned. English 9

10 TAKING A BREAK..five minutes or more STEP 1: Move the engine stop switch to the OFF position. For engine details see engine manual. STEP 1: Remove detergent suction tube from container and insert into 1 gallon of fresh water. Siphon water at low pressure for one minute. STEP 2: Move the engine stop switch to the OFF position. Close the fuel valve. STEP 3: Turn off the water source. STEP 4: Press trigger to release water pressure. 1: Disconnect all water connections. 2: Turn on the machine for a few seconds, until the water which had remained in the pump exits, turn off immediately. 3: Do not allow high pressure hose to become kinked. 4: Store the machine and accessories in a room which does not reach freezing temperatures. DO NOT store near furnace or other sources of heat as it may dry out the pump seals. STEP 2: Release trigger and engage gun safety lock. SHUTTING DOWN & CLEAN-UP STEP 5: Release trigger and engage gun safety lock. STEP 6: Disconnect the garden hose from the water inlet on the unit. STEP 7: Disconnect the high pressure hose from the high pressure outlet. WINTERIZING AND LONG-TERM STORAGE Failure to follow the above directions will result in damage to the pump assembly and accessories. Kärcher also recommends the regular practice of using a pump protector like Kärcher Pump Guard to help during storage in the winter months. 10 English

11 Kärcher pump Initial Use All Kärcher pumps ship with oil already inside direct from the factory. There is no need to add oil. Pump Inspection You should routinely make a visual inspection of the pressure washer s pump. If you notice oil leaking around the pump seals, you should take the pressure washer to a Kärcher-Authorized Service Center for repair. (You can locate a service center in your area online at MAINTENANCE INSTRUCTIONS CLEANING TIPS Pump Maintenance The pump on your Kärcher pressure washer does not require maintenance. Any attempts to service or alter the pump may damage your pressure washer and void your product warranty. Engine Carry out maintenance tasks for the engine according to the specifications provided in the operating instructions provided by engine manufacturer. Deck Cleaning (with or without detergent). Pre-rinse deck and surrounding area with fresh water. If using Kärcher Deck Wash, apply to surface at low pressure. For best results, limit your work area to smaller sections of approximately 25 square feet. Allow Deck Wash to remain on surface 1-3 minutes. Do not allow detergent to dry on surface. Rinse at high pressure in a long sweeping motion keeping the spray nozzle approximately 3-6 inches from the cleaning surface. Always clean from top to bottom and from left to right. When moving on to a new section of the cleaning surface, be sure to overlap the previous section to eliminate stop marks and ensure a more even cleaning result. Do not use Dirtblaster spray nozzle on wood surface as it may cause damage. House Siding (with or without detergent). Pre-rinse cleaning surface with fresh water. If using Kärcher Pressure Wash, apply to surface at low pressure (for best results, limit your work area to sections of approximately 6 feet and always apply detergent from bottom to top). Allow Pressure Wash to remain on surface 1-3 minutes. Do not allow detergent to dry on surface, if surface appears to be drying, simply wet down surface with fresh water. If needed, use special wash brush attachment (not included) to remove stubborn dirt. Rinse at high pressure from top to bottom in an even sweeping motion keeping the spray nozzle approximately 6 inches from the cleaning surface. Do not use Dirtblaster spray nozzle on siding as it may cause damage. English 11
 MAINTENANCE INSTRUCTIONS CLEANING TIPS Pump Maintenance The pump on your Kärcher pressure washer does not require maintenance.")
12 Cement Patios, Brick and Stone (with or without detergent). Pre-rinse cleaning surface with fresh water. If using Kärcher Pressure Wash or Degreaser, apply to surface at low pressure. For best results, limit your work area to smaller sections of approximately 25 square feet. Allow Pressure Wash or Degreaser to remain on surface 1-3 minutes. Do not allow detergent to dry on surface. Rinse at high pressure in a sweeping motion keeping the spray nozzle approximately 3-6 inches from the cleaning surface. Always clean from top to bottom and from left to right. For removing extremely stubborn stains, use the Dirtblaster Nozzle. Cars, Boats & Motorcycles (with or without detergent). Pre-rinse vehicle with fresh water. If using Kärcher Touchless Vehicle Wash, apply to surface at low pressure. For best results, clean one side of vehicle at a time and always apply detergent from bottom to top, do not allow detergent to dry on surface. If needed, use special wash brush attachment (not included) to remove stubborn dirt. Rinse at high pressure in a sweeping motion keeping the spray nozzle approximately 6-8 inches from the cleaning surface (distance should increase when rinsing pin-striping or other sensitive surfaces). Always clean from top to bottom and from left to right. For best results, wipe surface dry with a chamois or soft dry cloth. Do not use Dirtblaster spray nozzle on vehicles as it may cause damage. Barbecue Grills, Outdoor Power Equipment & Gardening Tools (with or without detergent). Pre-rinse cleaning surface with fresh water. If using Kärcher Pressure Wash or Degreaser, apply detergent at low pressure. Allow Pressure Wash to remain on surface 1-3 minutes. Do not allow detergent to dry on surface. Rinse at high pressure keeping the spray nozzle approximately 3-6 inches from the cleaning surface. For removing extremely stubborn dirt, it may be necessary to move the spray nozzle even closer to the surface for greater dirt cutting action. Do not use Dirtblaster spray nozzle on cloth, plastic or other sensitive surfaces as it may cause damage. Patio & Lawn Furniture (with or without detergent). Pre-rinse furniture and surrounding area with fresh water. If using Pressure Wash, apply to surface at low pressure. Allow Pressure Wash to remain on surface 1-3 minutes. Do not allow detergent to dry on surface. If needed use special Wash Brush Attachment (not included) to remove stubborn dirt. Rinse at high pressure in a sweeping motion keeping the spray nozzle approximately 3-6 inches from the cleaning surface. For best results, clean from top to bottom and from left to right. Do not use Dirtblaster spray nozzle on patio or lawn furniture as it may cause damage. 12 English
. Pre-rinse vehicle with fresh water.")
13 Recommendations Before cleaning any surface an inconspicuous area should be cleaned to test spray pattern and distance for maximum cleaning results. If painted surfaces are peeling or chipping, use extreme caution as pressure washer may remove the loose paint from the surface. When using on surfaces which might come in contact with food, flush surfaces with plenty of drinking water. For additional cleaning tips, visit our website at home Optional Accessories Optional accessories are available to further enhance your cleaning capabilities. These accessories are accurate as of the printing date of this manual. Please check our website for pricing and up-todate information. Extension Hose Dirtblaster spray nozzle English 13

14 Remove the spark plug cable to prevent accidental ignition of the engine before making any repair. TROUBLESHOOTING Symptom Cause Solution Engine will not No gasoline Fill gas tank start Choke is not in the correct position. Slide choke lever out to closed position. Water pressure built up in the machine. Squeeze the trigger to release the pressure. For additional engine problems refer to the engine manual. Unit does not reach high Diameter of garden hose is too small. Replace with a 5/8 inch or larger garden hose. pressure. Water supply is restricted. Check garden hose for kinks, leaks and blockage. Not enough inlet water supply. Turn water on full force. Check garden hose for kinks, leaks or blockage. Water inlet filter is clogged. Remove filter and rinse out in warm water. Black detergent nozzle is attached. Remove black detergent nozzle and attach high pressure nozzle Output pressure varies high and low. Not enough inlet water supply. Pump is sucking air. Water inlet filter is clogged. Spray nozzle is obstructed. Calcified gun, hose or spray wand. Turn water on full force. Check garden hose for kinks, leaks or blockage. Check that hoses and fittings are air tight. Turn off machine and purge pump by squeezing trigger gun until a steady flow of water emerges through the nozzle. Remove filter and rinse out in warm water. Blow out or remove debris with a fine needle. Run distilled vinegar through detergent suction tube. 14 English

15 Symptom Cause Solution No detergent. Detergent suction tube not properly Check connection. connected to the machine. Detergent is too thick. Dilute detergent, for best results use Kärcher detergent. Filter on detergent suction tube Run warm water through filter is clogged. to remove debris. Damaged or clogged detergent Remove obstruction or replace suction tube. detergent suction tube. A high pressure nozzle is attached. Replace with black detergent nozzle. Spray nozzle is obstructed. Blow out or remove debris with fine needle. Garden hose Loose fittings. Tighten fittings. connection leaks. Missing/worn rubber washer. Insert new washer. Spray wand leaks. Spray wand not properly attached. Turn the swivel nut of the gun clockwise until connection is tight. Broken o-ring or plastic insert. Call Customer Support Pump is noisy. Pump is sucking air. Check that hoses and fittings are air tight. Turn off machine and purge pump by squeezing trigger gun until a steady flow of water emerges through the nozzle. Water leaks from pump (up to 10 drops per minute is permissible). Oil Drip. Loose fittings. Water seals are damaged or worn. Thermal protection device is activated. Tighten fittings. Call Customer Support Thermal protection device will auto reset. Do not run pump for more than 5 minutes without spraying. Oil seals are damaged or worn. Call Customer Support If you encounter any additional difficulties not listed, please call for help or visit our website. USA: Canada: Mexico: English 15

G 2400 HH. English 9.139-158 (09/04)
") G 2400 HH English 9.139-158 (09/04) High Pressure Washer Operator Manual Overview... 3 Precautions... 4 Assembly Instructions... 5 Operating Instructions... 6 Using the Accessories... 7 Working with Detergents...
G 2400 HH English 9.139-158 (09/04) High Pressure Washer Operator Manual Overview... 3 Precautions... 4 Assembly Instructions... 5 Operating Instructions... 6 Using the Accessories... 7 Working with Detergents...
G2600XH G2800XH 8.750-854.0 12/10F
 G2600XH G2800XH 8.750-854.0 12/10F HIGH PRESSURE WASHER OPERATOR MANUAL Model Overview 3 Important Safety Instructions 4 Assembly Instructions 5 Operating Instructions 8 Using the Accessories 9 Working
National- Spencer Inc.
 9-27-2010 National- Spencer Inc. 19.2V HEAVY DUTY GREASE GUN PRODUCT SPECIFICATION Charger Input Power 110 VAC Battery Output Power 19.2V Battery Capacity 1500 MAH Battery Pack Charge Time 1 Hour Maximum
Heavy Duty Pressure Washer Kit RAC-HP021
 Heavy Duty Pressure Washer Kit RAC-HP021 If faults cannot be remedied, contact the Helpline on 020-83916767 Helpline@hilka.co.uk GUARANTEE This product is guaranteed for domestic use for a period of 12
15GAL STEEL OIL DRAIN WITH 110V PUMP
 15GAL STEEL OIL DRAIN WITH 110V PUMP OWNER S MANUAL WARNING: Read carefully and understand all ASSEMBLY AND OPERATION INSTRUCTIONS before operating. Failure to follow the safety rules and other basic safety
IMPORTANT SAFETY INSTRUCTIONS: READ SAFETY WARNINGS AND OPERATING INSTRUCTIONS CAREFULLY SAVE THESE INSTRUCTIONS
 Pressure Washer Owner s Manual This Manual Contains Important Safety Instructions and Operating Instructions Models: P1450S, P1750S, P1450S-CAN, P1750S-CAN P1600S, P1800S, P1600S-BB, P1800S-BB, P1600S-CAN,
FASCINATION 700 HVLP TANNING PRO SYSTEM USER MANUAL
 FASCINATION 700 HVLP TANNING PRO SYSTEM USER MANUAL Congratulations on choosing the Fascination 700 HVLP Tanning Pro System! Your system includes the following items: 1 Fascination 700 HVLP Tanning Pro
SBC90. Abrasive Blast Cabinet Assembly & Operating Instructions
 SBC90 Abrasive Blast Cabinet Assembly & Operating Instructions READ ALL INSTRUCTIONS AND WARNINGS BEFORE USING THIS PRODUCT. SAVE THESE INSTRUCTIONS FOR FUTURE REFERENCE. This manual provides important
San josé OWNER S MANUAL
 San josé OWNER S MANUAL Assembling & operating manual San josé 30 mbar - PORTABLE GAS BARBECUE 1. 2. 3. Improper installation, adjustment, alteration, service or maintenance can injury or property damage.
Back Pack Sprayer. Operator's Manual MODELS MS - 40 MS - 50
 Back Pack Sprayer Operator's Manual MODELS MS - 40 MS - 50 WARNING DANGER Read rules for safe operation and all instructions carefully. ECHO provides this Operator's Manual which must be read and understood
FJ2. 2 Ton Trolley Floor Jack Assembly & Operating Instructions
 FJ2 2 Ton Trolley Floor Jack Assembly & Operating Instructions READ ALL INSTRUCTIONS AND WARNINGS BEFORE USING THIS PRODUCT. This manual provides important information on proper operation & maintenance.
CTV-1500 Cooling Tower Vacuum Operating & Maintenance Manual
 CTV-1500 Cooling Tower Vacuum Operating & Maintenance Manual Goodway Technologies Corporation 420 West Avenue Stamford, CT 06902-6384 (203)359-4708 Sales: 1-800-333-7467 Customer Service: 1-800-370-2855
MINI-BRUTE II HOT WATER POWER WASHER MODEL# MBII
 MINI-BRUTE II HOT WATER POWER WASHER MODEL# MBII Operator s Manual INTRODUCTION Thank you for selecting this power washer from Simpson. Your power washer has been manufactured using the most advanced components
Voltmaster Trash Pumps Model TSP2, TSP3 and TSP4
 Model TSP2, TSP3 and TSP4 Owner s Manual July 2010 Table of Contents 1 Introduction...................................................... 1 1.1 Read before using..............................................
Operator s Manual. PUMP Model: PAC25 SAVE THIS MANUAL FOR FUTURE REFERENCE. Distributed by: Pacer Pumps
 Operator s Manual PUMP Model: PAC25 CAUTION: Before using this product, read this manual and follow all Safety Rules and Operating Instructions. SAVE THIS MANUAL FOR FUTURE REFERENCE Distributed by: Pacer
PAINT SPRAY GUN WASHER
 PAINT SPRAY GUN WASHER 94996 ASSEMBLY AND OPERATING INSTRUCTIONS Visit our website at: http://www.harborfreight.com Read this material before using this product. Failure to do so can result in serious
123 Industrial Loop Road Paynesville, MN 56362 Phone: 1-800-864-1649 www.master-mfg.com MASTER MANUFACTURING MASTER GARDNER
 123 Industrial Loop Road Paynesville, MN 56362 Phone: 1-800-864-1649 www.master-mfg.com MASTER MANUFACTURING MASTER GARDNER Part Number PCD E3 009B MM Rev 1 Nov. 2010 INTRODUCTION The purpose of this manual
123 Industrial Loop Road Paynesville, MN 56362 Phone: 1-800-864-1649 www.master-mfg.com
 123 Industrial Loop Road Paynesville, MN 56362 Phone: 1-800-864-1649 www.master-mfg.com INTRODUCTION The purpose of this manual is to assist you in the assembly, operation and maintenance of your sprayer
USER INSTRUCTIONS FOR 10 LITRE PORTABLE DEHUMIDIFIER MODEL NO. DHMD102
 USER INSTRUCTIONS FOR 10 LITRE PORTABLE DEHUMIDIFIER MODEL NO. DHMD102 THANK YOU FOR CHOOSING YOUR NEW DEHUMIDIFIER. BEFORE USING THE UNIT READ THESE INSTRUCTIONS FULLY AND RETAIN THEM FOR FUTURE REFERENCE
Bottom Loading Water Dispenser
 Bottom Loading Water Dispenser Model # 601000 TO REDUCE THE RISK OF INJURY AND PROPERTY DAMAGE, USER MUST READ THIS MANUAL BEFORE ASSEMBLING, INSTALLING & OPERATING DISPENSER. SAVE THIS MANUAL FOR FUTURE
Tankless Water Heater
 Tankless Water Heater USER S INFORMATION MANUAL Models WGRTNG199 / WGRTLP199 WGRTCNG199 / WGRTCLP199 NOTICE: Westinghouse reserves the right to make product changes or updates without notice and will not
USER S, MAINTENANCE and SERVICE INFORMATION MANUAL
 CONTENTS SAFETY INFORMATION................ 2 FOR YOUR SAFETY....................... 2 SYSTEM OPERATION.................. 2 THERMOSTATS........................... 2 INTERMITTENT IGNITION DEVICE...........
tire inflator with pressure gauge
 tire inflator with pressure gauge Model 95583 Assembly And Operation Instructions Due to continuing improvements, actual product may differ slightly from the product described herein. 3491 Mission Oaks
Cleaning Instructions, Pilot Replacement and Valve Change. Model No.: 233010 Natural Gas
 Cleaning Instructions, Pilot Replacement and Valve Change Model No.: 233010 Natural Gas 8mm open-end wrench 9mm open-end wrench 10mm open-end wrench 12mm open-end wrench 13mm open-end wrench Phillips screw
Cleaning Instructions for Burner, Pilot Assembly, and Emitter Screen. Series: 150000 200605 LP Gas
 Cleaning Instructions for Burner, Pilot Assembly, and Emitter Screen Series: 150000 200605 LP Gas Tools needed Bottle brush Non-abrasive scouring pad Small utility brush Heavy-duty pipe cleaners Air hose
English. Symbols used to mark instructions...3. Congratulations...5 Getting the best results...5. Warnings...6 Operating Procedure...
 2 Contents Components Attachments Guidance Installation Operation Maintenance Service Technical Troubleshooting Symbols used to mark instructions...3 Included Attachments...4 Congratulations...5 Getting
MODEL G300 BRAKE BLEEDER
 MODEL G300 BRAKE BLEEDER Installation, Operation & Repair Parts Information Branick Industries, Inc. 4245 Main Avenue P.O. Box 1937 Fargo, North Dakota 58103 REV060616 P/N: 81-0035G 1 THIS PAGE INTENTIONALLY
CARING FOR YOUR WATER HEATER
 http://waterheatertimer.org/troubleshoot-rheem-tankless-water-heater.html Water Heater Inspections CARING FOR YOUR WATER HEATER Venting System (Direct Vent Only) The venting system should be inspected
123 Industrial Loop Road Paynesville, MN 56362 Phone: 1-800-864-1649 www.master-mfg.com
 123 Industrial Loop Road Paynesville, MN 56362 Phone: 1-800-864-1649 www.master-mfg.com INTRODUCTION The purpose of this manual is to assist you in the assembly, operation and maintenance of your sprayer
OPERATOR S MANUAL 18 VOLT, 1 HOUR CHARGER
 OPERATOR S MANUAL 18 VOLT, 1 HOUR CHARGER P110 Your battery charger has been engineered and manufactured to Ryobi s high standard for dependability, ease of operation, and operator safety. When properly
Not required for most applications Not required for most applications High pressure (12-803 provided) High pressure (12-803 provided)
 High pressure (12-803 provided)") ELECTRIC FUEL PUMPS P/N 12-801-1, 712-801-1, 12-802-1, 712-802-1, 12-815-1, & 712-815-1 FUEL PRESSURE REGULATORS P/N 12-803, 12-501, 12-804, 12-500, & 15812NOS Installation Instructions THESE INSTRUCTIONS
ELECTRIC FUEL PUMPS P/N 12-801-1, 712-801-1, 12-802-1, 712-802-1, 12-815-1, & 712-815-1 FUEL PRESSURE REGULATORS P/N 12-803, 12-501, 12-804, 12-500, & 15812NOS Installation Instructions THESE INSTRUCTIONS
- 2 - IMPORTANT SAFETY REMINDERS
 USER MANUAL IMPORTANT SAFETY REMINDERS This appliance should only be used for domestic cleaning, as described in this user guide. Please ensure that this guide is fully understood before operating the
orlando OWNER S MANUAL
 orlando OWNER S MANUAL 2 Assembling & operating manual Orlando 30 mbar - PORTABLE GAS BARBECUE 1. 2. 3. Improper installation, adjustment, alteration, service or maintenance can injury or property damage.
Line to Refrigerator Ice/Water Dispenser
 Standard 18 Line to Refrigerator Ice/Water Dispenser Pump Module Bottled Water How The System Works The FLOJET Bottled Water Dispensing System was designed to pump water from a commercially available 5-gallon
Garage Pro USER S GUIDE 18P0 SERIES. 3 Safety Instructions. Product View. Assembly 5-6. Operation 6-9. Maintenance and Care 10-12.
 3 Safety Instructions Garage Pro V A C U U M USER S GUIDE 18P0 SERIES 4 Product View 5-6 Assembly 6-9 Operation 10-12 Maintenance and Care 13 Troubleshooting 14 Consumer Services 15 Replacement Parts 16
SWIMMING POOL HEAT PUMP
 SWIMMING POOL HEAT PUMP Installation & User Manual Model HP40B HP50B HP65B Hayward Pool Products Canada, Inc. T: 1-888-238-7665 www.haywardpool.ca CONTENT I. Application 4 II. Features 4 III. Technical
MAC FAUCETS. Owner s Manual. Models: FA444
 MAC FAUCETS Owner s Manual Models: FA444 Installation procedure: 1. Take a moment to view drawings and read special Installation note on page 3 of this manual before proceeding with installation. Connect
HYLA NST Cleaning System
 Owner s Manual HYLA NST Cleaning System The HYLA NST Cleaning System aspirates and cleans the air through a waterbased filtration process. The system is intended for household use only. Applications: Usual
3 WATT LED SPOTLIGHT Model No. SLM - 3801
 3 WATT LED SPOTLIGHT Model No. SLM - 3801 OWNER'S MANUAL Customer Service Tel: 1-800-268-3319 Superex Canada Ltd, Toronto,M2H 3B8 Made in China Table of Contents A). Important Safety Instructions B). Charging
IMPORTANT SAFETY INSTRUCTIONS WARNING READ AND SAVE THESE OPERATING AND SAFETY INSTRUCTIONS BEFORE USING THIS HEATER.
 THERMAWAVE CERAMIC HEATER Model HZ-850 Series Model HZ-860 Series IMPORTANT SAFETY INSTRUCTIONS WARNING READ AND SAVE THESE OPERATING AND SAFETY INSTRUCTIONS BEFORE USING THIS HEATER. Warning Failure to
USER MANUAL. Bottom Loading Bottled Water Dispenser SAVE THIS MANUAL FOR FUTURE USE. Model # 900172
 Model # 900172: Page 1 USER MANUAL Bottom Loading Bottled Water Dispenser Model # 900172 TO REDUCE THE RISK OF INJURY AND PROPERTY DAMAGE, USER MUST READ THIS MANUAL BEFORE ASSEMBLING, INSTALLING & OPERATING
NITROUS TRANSFER PUMP INSTRUCTIONS
 NITROUS TRANSFER PUMP INSTRUCTIONS SAFETY TIPS Never directly inhale nitrous oxide. When inhaled in large quantities, nitrous oxide can cause respiratory ailments or in extreme cases, death by suffocation.
Sewer Jetter GuideSM. How to Unclog Drains with Your Pressure Washer. Use this Guide To:
 Sewer Jetter GuideSM How to Unclog Drains with Your Pressure Washer Use this Guide To: Learn how a sewer jetter works Find out if a sewer jetter can help solve your plumbing problem Choose the right pressure
accidents which arise due to nonobservance and the safety information herein.
 20 GALLON COMPRESSOR Model: 7342 CALIFORNIA PROPOSITION 65 WARNING: You can create dust when you cut, sand, drill or grind materials such as wood, paint, metal, concrete, cement, or other masonry. This
MAP COFFEE MIA CAPSULE COFFEE MACHINE INSTRUCTION MANUAL MODEL: CM4725. Read this manual thoroughly before using and save it for future reference
 MAP COFFEE MIA CAPSULE COFFEE MACHINE INSTRUCTION MANUAL MODEL: CM4725 Read this manual thoroughly before using and save it for future reference Purchase MAP capsules at Harvey Norman stores nationwide
CDS TROUBLESHOOTING SECTION I. VACUUM. 1.0. Weak vacuum at wand. Gauge reads normal (10hg to 14hg)
") CDS TROUBLESHOOTING SECTION I. VACUUM 1.0. Weak vacuum at wand. Gauge reads normal (10hg to 14hg) 1.1. Clogged hoses or wand tube. Disconnect hoses and carefully check for an obstruction. 1.2. Excessive
CDS TROUBLESHOOTING SECTION I. VACUUM 1.0. Weak vacuum at wand. Gauge reads normal (10hg to 14hg) 1.1. Clogged hoses or wand tube. Disconnect hoses and carefully check for an obstruction. 1.2. Excessive
Get Cleaning... User Guide Vax Careline: (UK) 0844 412 8455 (ROI) 1-800 928 308. Carpet Washer. vax.co.uk. Rapide Ultra series
 0844 412 8455 (ROI) 1-800 928 308. Carpet Washer. vax.co.uk. Rapide Ultra series") W90-RU & W89-RU Series User Guide v1.4.qxd:user guide 2/3/11 10:03 Page 1 Carpet Washer User Guide Vax Careline: (UK) 0844 412 8455 Get Cleaning... What s your Vax model number? (Located on the top flap
W90-RU & W89-RU Series User Guide v1.4.qxd:user guide 2/3/11 10:03 Page 1 Carpet Washer User Guide Vax Careline: (UK) 0844 412 8455 Get Cleaning... What s your Vax model number? (Located on the top flap
INVERTER GENERATOR OWNER S MANUAL FOR YOUR SAFETY PLEASE READ THESE INSTRUCTIONS CAREFULLY AND RETAIN THEM FOR FUTURE USE.
 INVERTER GENERATOR OWNER S MANUAL FOR YOUR SAFETY PLEASE READ THESE INSTRUCTIONS CAREFULLY AND RETAIN THEM FOR FUTURE USE. GENERATOR SAFETY EXHAUST GAS PRECAUTIONS Only use outdoors! Exhaust fumes can
PC1130 Electric Air Compressor
 Senco Products Inc. 8485 Broadwell Road Cincinnati, Ohio 45244 PC1130 Electric Air Compressor Operating Instructions 2006 by Senco Products, Inc. Warnings for the safe use of this tool are included in
MODEL T-4 TRENCHER. Operators Manual
 DO NOT THROW AWAY IMPORTANT MANUAL MODEL TRENCHER Operators Manual P.O.BOX 290 San Bernardino, CA. 92402 Phone (909) 478-5700 (800) 922-4680 Fax (909) 478-5710 E-mail: sales@groundhoginc.com www.groundhoginc.com
SYSTEM Inverter Air Conditioners
 OPERATION MANUAL SYSTEM Inverter Air Conditioners MODEL Ceiling Suspended type FXHQ12MVJU FXHQ24MVJU FXHQ36MVJU Read these instructions carefully before installation. Keep this manual in a handy place
IMPORTANT SAFETY RULES TO FOLLOW
 WARNING FLOOR & CARPET CLEANER Any piece of equipment can be dangerous if not operated properly. YOU are responsible for the safe operation of this equipment. The operator must carefully read and follow
Tech. Services: (800) 477-8326 Fax: (800) 765-8326 Order Entry: (800) 541-1418 Fax: (800) 288-7031 Internet Address: http://www.powerteam.
 477-8326 Fax: (800) 765-8326 Order Entry: (800) 541-1418 Fax: (800) 288-7031 Internet Address: http://www.powerteam.") ORIGINAL INSTRUCTIONS Form No.102842 5 SPX Hydraulic Technologies 5885 11th Street Rockford, IL 61109-3699 USA Tech. Services: (800) 477-8326 Fax: (800) 765-8326 Order Entry: (800) 541-1418 Fax: (800)
ORIGINAL INSTRUCTIONS Form No.102842 5 SPX Hydraulic Technologies 5885 11th Street Rockford, IL 61109-3699 USA Tech. Services: (800) 477-8326 Fax: (800) 765-8326 Order Entry: (800) 541-1418 Fax: (800)
PEDAL CAR - GO CART ASSEMBLY & OPERATING INSTRUCTIONS
 PEDAL CAR - GO CART 42822 ASSEMBLY & OPERATING INSTRUCTIONS 3491 Mission Oaks Blvd., Camarillo, CA 93011 Visit our Web site at: http://www.harborfreight.com Copyright 2000 by Harbor Freight Tools. All
Design Utility Lever Thermostatic Bath Shower Mixer
 Design Utility Lever Thermostatic Bath Shower Mixer Installation Instructions & User Guide Please keep these instructions for future reference and request of replacement parts General Information Thank
BACKPACK SPRAYERS. MODEL NOS: KSP16 & KSP20 Part Nos: 3402270 & 3402275 OPERATING & MAINTENANCE INSTRUCTIONS GC04/12
 BACKPACK SPRAYERS MODEL NOS: KSP16 & KSP20 Part Nos: 3402270 & 3402275 OPERATING & MAINTENANCE INSTRUCTIONS GC04/12 INTRODUCTION Thank you for purchasing this CLARKE Sprayer, designed for use only with
Technical Guide 08/15/14
 Technical Guide 08/15/14 1 Table of Contents Contact information.3 Identifying your system..4-8 Model Number Serial number location Parts of your fuel system..9-14 Fuel pump diagram Wire harness schematics
Get Cleaning... User Guide Vax Careline: (UK) 0844 412 8455 (ROI) 1-800 928 308. Multifunction. vax.co.uk. 6131 Series. What s your Vax model number?
 0844 412 8455 (ROI) 1-800 928 308. Multifunction. vax.co.uk. 6131 Series. What s your Vax model number?") 6131 Series User Guide v1.1-06.09.10:user guide 09/09/2010 11:42 Page 1 User Guide Vax Careline: (UK) 0844 412 8455 Multifunction Get Cleaning... What s your Vax model number? 6 1 3 1 What s your serial
6131 Series User Guide v1.1-06.09.10:user guide 09/09/2010 11:42 Page 1 User Guide Vax Careline: (UK) 0844 412 8455 Multifunction Get Cleaning... What s your Vax model number? 6 1 3 1 What s your serial
MODEL #12006. Introduction
 THE ORIGINAL PECO POWER SPRAYER PECO OWNER S MANUAL MODEL #12006 (Q0080) Revised: 1/8/2014 PECO POWER SPRAYER MODEL #12006 TABLE OF CONTENTS SECTION PAGE SECTION PAGE INTRODUCTION - - - - - - - - - - -
Safety, Operation and Maintenance Manual with Parts List
 Safety, Operation and Maintenance Manual with Parts List 20-Gallon Wet/Dry Vac Important Information and Safety Instructions PLEASE READ BEFORE USE! # 961130020 9/10-Rev 1 20-Gallon Wet/Dray Vac TABLE
STREAMLINE. Products for the Pure Water Cleaning Industry INSTRUCTION MANUAL
 STREAMLINE Products for the Pure Water Cleaning Industry INSTRUCTION MANUAL PRODUCT DENVER Honda Powered Pressure Washing Bowser. TANK SIZES 450Ltr, 600Ltr, 800Ltr WARRANTY Covered for one year from recorded
staple gun with 5/16 Long staples
 staple gun with 5/16 Long staples Model 95718 Assembly And Operation Instructions Due to continuing improvements, actual product may differ slightly from the product described herein. 3491 Mission Oaks
SOLAR PV SYSTEM MAINTENANCE GUIDE
 SOLAR PV SYSTEM MAINTENANCE GUIDE GUYANA HINTERLANDS STAND-ALONE SOLAR PV INSTALLATIONS IMPROVING HEALTH FACILITY INFRASTRUCTURE (IHFI) GUYANA CONTRACT NO. EPP-I-00-03-00008-00, TASK ORDER 07 APRIL 2013
12V Diesel Transfer Pump
 12V Diesel Transfer Pump Item 66784 Read this material before using this product. Failure to do so can result in serious injury. SAVE THIS MANUAL. When unpacking, make sure that the product is intact and
CHROME FRONT BRAKE MASTER CYLINDER KIT
 -J075 REV. 009-0-0 CHROME FRONT BRAKE MASTER CYLINDER KIT GENERAL Kit Number 5-99D, 5-99D Models These Chrome Master Cylinder Kits are designed to replace the original equipment front brake master cylinder
Extrusion Flo-Valve INSTRUCTIONS-PARTS LIST. 3000 psi (210 bar) Maximum Working Pressure. Model 204 355, Series K. Rev.
 Maximum Working Pressure. Model 204 355, Series K. Rev.") INSTRUCTIONS-PARTS LIST INSTRUCTIONS This manual contains important warnings and information. READ AND KEEP FOR REFERENCE. 306 586 Rev. D Supercedes B Extrusion Flo-Valve Model 204 355, Series K 3000 psi
INSTRUCTIONS-PARTS LIST INSTRUCTIONS This manual contains important warnings and information. READ AND KEEP FOR REFERENCE. 306 586 Rev. D Supercedes B Extrusion Flo-Valve Model 204 355, Series K 3000 psi
Instruction Manual. Window Wiper AFW900. (Read carefully before use)
") Instruction Manual Window Wiper AFW900 (Read carefully before use) When using electrical appliances, basic precautions should always be followed, including the fact READ ALL INSTRUCTIONS IN THIS MANUAL
Instruction Manual Window Wiper AFW900 (Read carefully before use) When using electrical appliances, basic precautions should always be followed, including the fact READ ALL INSTRUCTIONS IN THIS MANUAL
Your safety and the safety of others are very important.
 NATURAL GAS TO PROPANE CONVERSION KIT 090 INSTALLATION INSTRUCTIONS FOR ALTITUDES 0 -,00 FT. ONLY PROPANE CONVERSION KIT SAFETY... INSTALLATION REQUIREMENTS... Tools and Parts... LP Gas Requirements...
Pressure Washer Operation Manual for model VR2500
 Record All Information and attach sales receipt here for future reference: Purchase Date: Pressure Washer Operation Manual for model VR2500 Serial #: Do Not return this product to the retailer! Questions?
3000 PSI Pressure Washer. Operator s Manual
 3000 PSI Pressure Washer Operator s Manual This pressure washer is rated in accordance to the Pressure Washer Manufacture Association (PWMA) standard PW101 (Testing and Rating Performance of Pressure Washers).
Pet hair clipper. Model 96822. Diagrams within this manual may not be drawn proportionally.
 Pet hair clipper Model 96822 Cleaning And Operation Instructions Diagrams within this manual may not be drawn proportionally. Due to continuing improvements, actual product may differ slightly from the
Model 854/856. Operating and Assembly Manual. Palmor Products Inc. 5225 Serum Plant Road Thorntown, IN 46071
 Model 854/856 Operating and Assembly Manual Palmor Products Inc. 55 Serum Plant Road Thorntown, IN 46071 3/31/2015 SAFETY RULES Remember, any power equipment can cause injury if operated improperly or
ClearView 100. Instruction Manual
 ClearView 100 Instruction Manual Important Safeguards This appliance is not intended for use by children or infirm persons without supervision. Young children should be supervised to ensure that they do
Operation Manual. Pressure Washer. for models ZR2700 ZR3200 ZR3600
 Record all information for future reference: Purchase Date: Operation Manual for models ZR2700 ZR3200 ZR3600 Model #: Serial #: Questions? 1-800-888-2468 Learn more about your pressure washer and register
Installation Instructions 4508 4508S
 SYMPHONY Spread Lavatory Faucet with Speed Connect Drain Congratulations on purchasing your American Standard faucet with Speed Connect drain, a feature found only on American Standard faucets. Speed Connect
VACUUM CLEANER INSTRUCTION MANUAL
 VACUUM CLEANER INSTRUCTION MANUAL MODEL: SVC9702 PLEASE READ THIS MANUAL CAREFULLY BEFORE USING AND KEEP IT PROPERLY FOR FUTURE USE 1 Safety Cautions: WARNING: To reduce the risk of fire, electrical shock,
1000-LB. TRAILER JACK OWNER S MANUAL
 1000-LB. TRAILER JACK OWNER S MANUAL WARNING: Read carefully and understand all INSTRUCTIONS before operating. Failure to follow the safety rules and other basic safety precautions may result in serious
PC1131 Electric Air Compressor
 Senco Products Inc. 8485 Broadwell Road Cincinnati, Ohio 45244 PC1131 Electric Air Compressor Operating Instructions 2006 by Senco Products, Inc. Warnings for the safe use of this tool are included in
SunMaxx Solar Filling Station Operating Instructions
 SunMaxx Solar Filling Operating Instructions Content 1. Declaration of conformity... 2 2. Introduction... 2 3. Transportation and unpacking... 4 4. Mounting and commissioning... 5 5. End of operation...
Pressure Washer Operations Manual
 Pressure Washer Operations Manual WARNING RISK OF INJECTION OR SEVERE INJURY TO PERSONS. KEEP CLEAR OF NOZZLE. CAUTION READ OPERATOR S MANUAL THOROUGHLY PRIOR TO USE. HIGH PRESSURE SPRAY CAN CAUSE SERIOUS
Pressure Washer Operations Manual
 Pressure Washer Operations Manual WARNING RISK OF INJECTION OR SEVERE INJURY TO PERSONS. KEEP CLEAR OF NOZZLE. CAUTION READ OPERATOR S MANUAL THOROUGHLY PRIOR TO USE. HIGH PRESSURE SPRAY CAN CAUSE SERIOUS
SAFETY & OPERATING INSTRUCTIONS
 SAFETY & OPERATING INSTRUCTIONS EDLUND TOMATO LASER, Models ETL -316, -140 & -380 READ AND UNDERSTAND THIS MANUAL AND ALL INSTRUCTIONS BEFORE OPERATING THIS SLICER. 159 Industrial Parkway, Burlington,
HYDRAULIC LIFT TABLE CART 2200-LB.
 HYDRAULIC LIFT TABLE CART 2200-LB. OWNER S MANUAL WARNING: Read carefully and understand all MACHINE ADJUSTMENT AND OPERATION INSTRUCTIONS before operating. Failure to follow the safety rules and other
12V Portable Diaphragm Compressor Operating and Maintenance Instructions
 12V Portable Diaphragm Compressor Operating and Maintenance Instructions (Part No. DC2) Part No. Serial Number Date Purchased Table of Contents Page Safety Messages...2 Guidelines for Product Use...2 Operation
Cleaning Instructions for Burner, Pilot Assembly, and Emitter Screen Series: 220000-450000
 Cleaning Instructions for Burner, Pilot Assembly, and Emitter Screen Series: 220000-450000 10 mm open end wrench 12 mm open end wrench 9/16 open end wrench 5/8 open end wrench 11/16 open end wrench 9/16
TWO BURNER PROPANE CAMPING STOVE
 OWNER S MANUAL ASSEMBLY AND OPERATING INSTRUCTIONS TWO BURNER PROPANE CAMPING STOVE WARNING READ AND FOLLOW ALL WARNINGS AND INSTRUCTIONS IN THIS MANUAL TO AVOID PERSONAL INJURY OR PROPERTY DAMAGE. Propane
SL280UHV SERIES GAS FURNACE WARNING
 2010 Lennox Industries Inc. Dallas, Texas, USA 506677 01 11/2010 Supersedes 506409 01 SL280UHV SERIES GAS FURNACE Litho U.S.A. FIRE OR EXPLOSION HAZARD. Failure to follow safety warnings exactly could
Chapter 7 Hydraulic System Troubleshooting
 Chapter 7 Hydraulic System Troubleshooting General The following troubleshooting information is provided as a general guide to identify, locate and correct problems that may be experienced with the hydraulic
Please keep this manual for f uture reference.
 GAS WATER/AGUA Congratulations! You've just purchased a new Marey Portable tankless water heater and will soon begin to enjoy the benefits of going tankless. Take the time to thoroughly read and understand
SCREAMIN' EAGLE "HEAVY BREATHER" PERFORMANCE AIR CLEANER KIT
 REV. 2015-04-23 SCREAMIN' EAGLE "HEAVY BREATHER" PERFORMANCE AIR CLEANER KIT GENERAL Kit Numbers 29299-08, 29098-09 Models For model fitment information, see the P&A Retail Catalog or the Parts and Accessories
Instruction manual for Firstline FCS12000CH
 Instruction manual for Firstline FCS12000CH Contents Introduction... 2 Safety Awareness... 3 Safety Awareness... 4 Name of Parts... 5 Name of Parts... 6 Remote Controller Preparation... 7 Operation of
12 Volt 30 Amp Digital Solar Charge Controller
 12 Volt 30 Amp Digital Solar Charge Controller User s Manual WARNING Read carefully and understand all INSTRUCTIONS before operating. Failure to follow the safety rules and other basic safety precautions
SHHH AIR COMPRESSOR Model Nos. SHHH2 - SHHH2/9 - SHHH3/9 - SHH3/24
 SHHH AIR COMPRESSOR Model Nos. SHHH2 - SHHH2/9 - SHHH3/9 - SHH3/24 OPERATING & MAINTENANCE INSTRUCTIONS 1205 PARTS & SERVICE For Spare Parts and Service,please contact your nearest dealer, or CLARKE International,
MBSAW. Meat Cutting Band Saw With Meat Grinder Assembly & Operating Instructions
 06/2011 MBSAW Meat Cutting Band Saw With Meat Grinder Assembly & Operating Instructions READ ALL INSTRUCTIONS AND WARNINGS BEFORE USING THIS PRODUCT. This manual provides important information on proper
SMD Rework Station TABLE OF CONTENTS
 SMD Rework Station Thank you for purchasing the Hakko 50B SMD Rework Station. The Hakko 50B is designed to solder and desolder surface mounted devices with hot air. Please read this manual before operating
UNIT 7: PLUMBING KEY CONCEPTS. 1. Identify tools for plumbing. 2. Location of shutoff valves for the main and individual fixtures
 KEY CONCEPTS 1. Identify tools for plumbing 2. Location of shutoff valves for the main and individual fixtures 3. How water is supplied to your home 4. How waste water is removed and treated 5. Common
Flat Bottom Long Ram Hydraulic Jack
 Flat Bottom Long Ram Hydraulic Jack 3 Ton 8 Ton 36468 36469 ASSEMBLY & OPERATING INSTRUCTIONS 349 Mission Oaks Blvd., Camarillo, CA 930 Visit our Web site at http://www.harborfreight.com TO PREVENT SERIOUS
Sport Ice Elektro 124
 Sport Ice Elektro 124 Operation Manual 2007/4 V2.1 Introduction The Sport Ice Elektro 124 is an ice resurfacing machine designed to be used on small ice surfaces. The machine has been designed to produce
INSTALLATION MANUAL MODEL RP-100
 INSTALLATION MANUAL FOR 24 VALVE 5.9L CUMMINS POWERED DODGE TRUCKS 2003 THROUGH 2004.5 MODEL RP-100 READ THESE INSTRUCTIONS THOROUGHLY BEFORE BEGINNING INSTALLATION 5400 BUSINESS 50 WEST SUITE 8 573 635-0555
OPERATION MANUAL. Total Heat Exchanger HRV (Heat Reclaim Ventilation) (Ceiling mounted duct type)
 (Ceiling mounted duct type)") OPERATION MANUAL (Ceiling mounted duct type) VAM50FB VAM500FB VAM650FB VAM800FB VAM000FB VAM500FB VAM000FB 8 7 6 9 5 7 5 0 6 8 6 9 0 5 5 7 7 6 7 A A B B 5 6 5 6 7 VAM50F VAM800F VAM500F VAM500F VAM000F
OPERATION MANUAL (Ceiling mounted duct type) VAM50FB VAM500FB VAM650FB VAM800FB VAM000FB VAM500FB VAM000FB 8 7 6 9 5 7 5 0 6 8 6 9 0 5 5 7 7 6 7 A A B B 5 6 5 6 7 VAM50F VAM800F VAM500F VAM500F VAM000F