Vantage Point Access Control Software
|
|
|
- Owen Merritt
- 9 years ago
- Views:
Transcription
1 Contents Ch.1 Preparation... 5 Vantage Point Software Selection.. 5 Vantage Point Software Structure.. 5 Vantage Point System Configuration. 6 Ch.2 Installation..7 Vantage Point Program Installation 7 Installation of Microsoft SQL Server Configuration of Microsoft SQL Server Installation of Microsoft SQL Server 2008 Management Studio 17 License Registration.. 24 Ch.3 Setting up Vantage Point. 25 Setting Flow. 25 Database Connection 26 Languages and Skins. 28 Log-in.. 29 Ch.4 Quick Device Registration.. 30 Device Search. 30 Device Network Management.. 31 Ch.5 Device Information Management. 33 Controller Management. 33 Door Management. 35 Reader Management 37 Biometrics (Iris, Fingerprint) Reader Management. 40 Input Device Management.. 41 Output Device Management.. 43 Functions (Batch/Time/Initialization) 45 Functions (Global Anti-Passback). 47 Device Event Operation Management (Controller Event)..48 Device Event Operation Management (Reader Event). 50 Device Event Operation Management (Input Event). 52
2 Contents Ch.6 Card Holder Management. 54 Integrated Search 54 Card Holder Management Biometrics (Iris, Fingerprint) Management.. 57 Time Schedule Management. 59 Access Rights Management 60 Batch Process (Card Holder Batch Upload).. 61 Batch Process (Card Holder s Information Batch Modification) Batch Process (Card Holder s Information Import). 63 Batch Process (Card Holder s Photo Import).. 64 Ch.7 View.. 65 Event Monitoring Door / Input / Output Monitoring and Control. 66 Ch.8 Report.. 67 Access Event Report.. 67 Card Holder Report.. 69 Access Right Report.. 70 Ch.9 Management Tool.. 71 User Account Management. 71 Ch.10 Communication. 72 Communication Status Ch.11 Graphic Map. 74 Graphic Map Management. 74 Graphic Map Monitoring.. 75
3 Ch.1 Preparation Vantage Point Software Selection Sensor Access offers two version of Vantage Point softwares. Vantage Point Manager (Express) is the free version and Vantage Point Manager (Professional) is commercial version. Please check the difference between them to select the one you need. Vantage Point Express Vantage Point Professional Type Free Version Commercial version Client/Server No Yes(limitless Client) Max. Door. Num. Up to 32 Doors Up to 400 Doors Database Microsoft SQL server Microsoft SQL server License No license Key Activation Vantage Point Manager Software Structure Vantage Point Manager software is designed in modular based architecture. Individually operating each module, it delivers higher speed and more stable performance in comparison with other brand software that operates all functions in one. Additionally its modular based architecture enhances its scalability and flexibility in terms of its functionality for future expansion and/or modification.
 limited to single user operation only and the other is Vantage Point Manager (Professional) that operates in multi-users of server/client.")
4 Vantage Point Manager System Diagram Vantage Point is presented in two different versions. One is Vantage Point (Express) limited to single user operation only and the other is Vantage Point Manager (Professional) that operates in multi-users of server/client. The following diagrams are of Vantage Point Manager Express and Professional

5 Ch.2 Installation Vantage Point Installation This Chapter shows how to install Vantage Point Manager Software. Vantage Point Manager program runs on Microsoft.NET Framework 4.0. Therefore it will install.net Framework 4.0 automatically if it is not already installed on the PC you are installing Vantage Point Manager. You must complete any windows updates and install anti-virus programs to use Vantage Point stably. 1. Execute Vantage Point install file (setup.exe). 2. It shows Microsoft.NET Framework 4 installation window. Click Accept. 3. Wait for the installation process. 4. Click Next.

6 5. Enter the install folder. Select everyone and click Next. 6. Click Next. 7. Click Close. 8. Once installed you can see the icons of the software in Start->All Programs->Sensor Access->Vantage Point

7 Installation of Microsoft SQL Server 2008 This chapter explains how to install database server for Vantage Point software. Microsoft SQL Server 2008 must be installed before using Vantage Point software. SQL Server 2008 has SQL Server 2008 Express, thefree version and SQL Server 2008 Standard/Enterprise; commercial version. In this document, it presents the installation of free version SQL Server 2008 Express. Users may select free version or commercial version depending on system requirement of each project. You must complete windows updates to use Microsoft SQL Server 2008 stably. 1. To install Microsoft SQL SERVER 2008, follow the below steps. To install Microsoft SQL Server 2008 you must have administrative rights on the computer. If.NET Framework 4.0 is not installed, download Microsoft.Net Framework 4.0 or install. You can pass over this step if you installed Vantage Point manager. Link: If Windows XP, Sever 2003 operating system, download Windows installer 4.5 or install this from CD. Link: 2. Download free version SQL Server 2008 Express from Microsoft website or CD Download SQLEXPR_x86.exe(32bit/64bit version) or SQLEXPR_x64.exe(64bit version). Or install this from CD. Link: 3. Click Installation -> New installation or add features to an existing installation in its installation window.
8 3. Click Installation -> New installation or add features to an existing installation in its installation window. 4. Check I accept the license terms and click Next.
9 5. Click Install. 6. Check all functions and click Next..

10 7. Select Default instance, click Next. 8. Change Account Name of SQL Server Database Engine to NT AUTHORITY\SYSTEM and Startup Type to Automatic. Click Next..
11 9. Select Mixed Mode on Account Provisioning tap and type in log in password for SQL Server. (You must remember this password.). In Specify SQL Server administrators, click Add Current user to add. Click Next. 10. Click Next.

12 11. Click Install to install. 12. Click Next to finish..

13 Configuration of Microsoft SQL Server 2008 Management Studio You must configure SQL Sever components to use Microsoft SQL Server If Vantage Point Manager or SQL Sever Manager Studio can not access to SQL Server 2008, confirm below configurations. 1.Configure SQL Server Execute Start->Programs->Microsoft SQL Server 2008->Configuration Tools->SQL Server Configuration Manager in windows. 2. In SQL Server Configuration Manager, move SQL Server Configuration Manager(Local)->SQL Server Network Configuration->Protocols for MSSQLSERVER.

14 3. In Protocols for MSSQLSERVER, set Shared Memory, Named Pipes, TCP/IP, and VIA Enabled. At each protocol, choose Enabled clicking with the right mouse button. 4. In SQL Server Configuration Manager, move SQL Server Services. And Restart SQL Server service finishing configurations.
15 Installation of Microsoft SQL Server 2008 Management Studio Microsoft SQL Server 2008 Management Studio is an integrated environment for accessing, configuring, managing, administering, and developing all components of SQL Server. It is not necessary, but recommended. 1. Follow below steps to install Microsoft SQL SERVER 2008 Management Studio. To install Microsoft SQL Server 2008 you must have administrative rights on the computer. If.NET Framework 4.0 is not installed, download Microsoft.Net Framework 4.0 or install this from CD. You can pass over this step if you installed Smart-X manager. If Windows XP, Sever 2003 operating system, download Windows installer 4.5 or install this from CD. Link: If Windows XP, Sever 2003, Vista, download Windows PowerShell 1.0 or install this from CD. - Windows PowerShell 1.0 for Windows Server 2003, Windows XP Link: - Windows PowerShell 1.0 for Windows Vista Link: 2. Download Microsoft SQL SERVER 2008 Service Pack or install from CD. Download SQLManagementStudio_x86_KOR.exe (32Bit/64bit OS version) or install from CD. Link:

16 3. When the installation window appears, click Installation -> New installation or add features to an existing installation.


17 4. Click Install. 5. Select Perform a new installation of SQL Server 2008.


18 6. Agree with the License and click Next. 7. Select all components. Then click Next.

19 8. Click Next. 9. Click Install.
20 10. Click Next finishing installation.
 on SQL Server log in window. Select SQL Server for Authentication. Select in sa for Login box.")
21 11. Execute Start->Programs-> Microsoft SQL Server > SQL Server Management Studio in windows. 12. Select (local) on SQL Server log in window. Select SQL Server for Authentication. Select in sa for Login box. Type in password. Click Connect.

22 13. The window shows as below picture, when SQL Server 2008 is properly installed.
, run the Vantage Point program. 2. It shows License code does not match. Click [OK]. 3.")
23 License registration License registration needs only for Vantage Point (Professional). Once installing and running Vantage Point (Professional), it requires license registration. 1. Start-> Programs->SensorAccess->Vantage Point (Professional), run the Vantage Point program. 2. It shows License code does not match. Click [OK]. 3. License window comes with a user code of eight sets of 4 digit code. Please send us the user code and basic site information (Country, Company Name and Contact) via to [email protected] We send activation code within 24hours. button. 4. Once received activation code, input the code and click activation 5. If the code is in accord, it completes activation and click ok.

24 Ch.3 Setting up Vantage Point This chapter explains how to make basic settings, its database connection, theme, and log-in. Setting Flow
. 2. Type in the named instance of the installed Microsoft SQL Server.")
25 Database connection In order to log into the system, it requires database connection setup. Check IP address of the PC installed Microsoft SQL Server, SQL Server log-in ID and password. 1. Click Quick Setting Start->Programs->SensorAccess-> Vantage Point (Express or Professional). 2. Type in the named instance of the installed Microsoft SQL Server. This can be obtained from management studio s connection screen 3. Type in SQL Server log-in ID. Generally use sa (sa: system admin). 4. Type in SQL Server connection password. 5. Click Connection Test bar to check if the database setting is made correctly. 6. In case of the first connection to the database there is no database and it asks if you would like to create database. Click Yes.
26 Important For database creation, SQL Server and Vantage Point (Express or Professional) should be installed in same PC. If they are installed in two separate PCs Vantage Point cannot create the database. Menu Database Server Log-in ID Password Connection Test Description IP address of the PC installed Microsoft SQL Server. Account to make connection to Microsoft SQL Server. Password of Log-in account of Microsoft SQL Server. Check if the Microsoft SQL Server connection setting is properly made and if there is no database, it creates a new one.

27 Languages and Skins Select language and skin to use in Vantage Point. 1. Select language to use. 2. Select skin type to use. Menu Language Skin Description Select language to use; English, Spanish, Korean and more Select skin type. It provides seven skin types to choose as user s preference.

28 Log-in Create an account to use the system. 1. Type login ID: Default is: admin 2. Type password. Default is: admin 3. Click login. Menu Login ID Password Description Account to use the system Password of the account to use the system

29 Ch.4 Quick Device Setup The system can search VC4/2 controllers connected to the network in Device search tap of Quick Device Setup. In this chapter it explains how to define and to change network setup and location of controllers searched. Device Search Searches controllers connected in the network. 1. Click search. 2. Once it shows controllers searched, double click the controller to define on the upper side list, and then it moves from the upper side list to the bottom. Vantage Point searches controllers only in the same network. If controllers are in another network, for initial configuration connect the controllers in the same network. Search by specific IP address can be used only after making network data setting in a same network. Once set the network data, connect the controller in a network and input IP address and click search button.

30 3. Repeat step 2 for each controller setting moving the controllers from upper list to the bottom. Device Network Management Change the controllers network data 1. Select controller to change network data in the list. 2. Change IP address, Subnet Mask, Gateway and port number Device Type, MAC Address cannot be changed. Web port is a port for a connection via web browser. Connection Password is a password for the software to make connection to a VC4/2 controller. Please keep this password since the software cannot make communication with controllers if the password is not correct. The default password is set as If you require to change the password, it has to be an 8 digit number. 3. Click Network info Setup to save the data, the controller will now become highlighted 4. Once the network data is set and the controller is highlighted click save to register the controller and initiate communication
31 Ch.5 Device Information Management In this chapter it explains how to make controller setting with details and to register controllers individually. Controller Management Vantage Point provides menus to make settings of controller details. Once the controllers are registered and in communication, detailed settings for each controller, door, reader, input and outputs can be made in the Device Management as follows 1. Select a controller from device list. 2. Enter detailed data of the controller in controller tab. 3. Click Save. 4. Once the data for the controller tab is saved you can set the door management, reader management, input device management and output device management in order. 5. Once all the settings are done, click the upload button to upload to controllers. Upload can be processed only when the communication module is running.
32 Menu New Description To add controllers manually Save To save setting data revised or added Delete To delete controllers Upload To transmit setting data to controllers Controller type Select controller model installed Controller name Give a name to each controller IP address Input IP address of each controller Subnet Mask Input subnet Mask Gateway Input gateway Port Define port to use for connection among Smart-X Manager and controllers. The default port is 2005 Web Port Define port for web browser connection to controllers. Its default value is 80. Controller password Connection Password is a password for the software to make connection to a VPC2/4 controller. Please keep this password since the software cannot make communication with controllers if the password is not correct. The default password is set as If changing password, t has to be an 8 digit number. Door control type 2 Door control: to make controller initial setting as door control with entrance and exit reader. 4 Door control: to make controller initial setting as door control with entrance and exit button. Event overwrite Disable: When event buffer memory is full, new event data will not be stored. Enable: When event buffer memory is full, new event data will be overwritten erasing the oldest event data.

33 Door Management Vantage Point provides a settings menu for door management. 1. Select a door in the Device list. 2. Enter detailed door data in door management screen 3. Click Save. 4. To apply the detailed door setting immediately, go to controller management tab and click upload. Menu Description Save Door Name Location (Area) Location (Floor) Entry Reader Save setting data Give a name to doors (Don t duplicate the names) Select location where the door is. If there is no location, click and add a location. Select floor where the door is. If there is no floor option, click and add a floor. Select the reader used for entrance. Exit Reader Select the reader used for exit. (If the controller is set as 4 door control, it shows as non-available.) Exit Device Door Contract Door Lock Select exit button (or other input device) for exit of the door. Select door contact input. Select door lock.

34 Reader Management Vantage Point provides a menu to set reader data in reader management tap. 1. Select a reader to set in device list. 2. Set detailed reader data in the reader management tap. 3. Click Save. 4. To apply the detailed reader setting immediately, go to controller management tap and click upload.
35 Menu Save Reader name Reader enable Entry/Exit Operating Mode Operating Mode Timeschedule Reader Operating Timeschedule Description Save reader setting data. Give a name to readers. (Do not duplicate their names) Select reader enable/disable. Select if the reader is used for entry or exit. Select the operating mode of access approvals in reader. Card recognition, Card recognition and entering password, Entering PIN If operating mode of reader is card recognition and entering password, you can set up the time schedule. At specified time, reader operates only card recognition mode and at the outside of the time reader operates card recognition and entering password mode. By setting time schedule, you an let reader operate only at specified time. Functions- Anti-Passback Mode Setting of Anti-Passback mode Soft Anti-Passback: When anti-passback occurs, A card holder is normally allowed to enter but event manager marks this anti-passback as an event. Timed Anti-Passback: When the same card is recognized twice within a specified time that has been set, anti-passback occurs. You can also set a time for Anti Passback to reset Hard Anti-Passback: When anti-passback occurs A card holder is not allowed to enter and the event manager marks this anti-passback as an event. Functions- Timed Anti-Passback Delay Time Functions- Duress Mode Code If you use Timed Anti-Passback, you can set a delay time enabling anti-passback when a second card pass occurs after first card pass Set four digit code that is to be used in Duress mode. If you are threatened by someone and you have to open the door using Duress mode, The door is open but this situation is notified to the event manager as emergency. Functions- Supervisor Data If you use a reader that has supervisor function, you can set data to confirm whether reader and controller are connected each other. Functions- Decreasing Value of Credit If you use credit function, you can set the amount of credit decrement when reader recognizes card. EX) If a card holder has credits and the amount of decrement is 1000 credits, after one reading the card holder s credit will be changed to 9000 credits.
36 Menu Functions- Reader Try Out Count Functions- Reader Try Out Reset Time Functions- Arm Delay Time Levels- Access Level Levels- Operating Mode Level Levels- Anti-Passback Level Levels- Anti-Passback Mode Level Description You can set the number denied card pass events to generate an alarm when unauthorized person tries to enter. E.G.) When reader try out count is set 3, if an unauthorized person tries to enter consecutively 3 times, the forth reading generates alarm. You can set a time to reset the number of readings after reader try out occurs. E.G.) When reader try out reset time is set 5 seconds, if an unauthorized person tries to enter more than reader try out count, after 5 seconds the person can try again to enter within reader try out count. You can set an alarm delay time for putting a reader in the alarm mode E.G.) If the alarm delay time is set 5 seconds, after 5 seconds from setting alarm mode using alarm setting card reader is set to alarm mode. You can set access level of reader. If a card holder s level is higher than access level the card holder is allowed to enter. If card holder s level is equal or lower than access level the card holder is not allowed to enter. Batch controlling is available by grouping card holders as their levels. By changing reader or card holder s access level you can rapidly and efficiently control approvals to card holders. If you set reader s access level higher without revise of card holder s information, card holders that are equal or lower than reader s access level are not allowed to enter. E.G.) Reader1 s access level is 3, card holder A s access level is 4 -> allowed to enter Reader1 s access level is changed to 4 or 5, card holder A s access level is 4 -> not allowed to enter You can set operating mode (card recognition, card + password etc.) level. If card holder s reader operating mode is higher than operating mode level set at a reader the reader will operate at the card holder s reader operating mode If card holder s reader operating mode is equal or lower than the reader s operating mode the reader will continue to operate at the reader s operating mode level Batch controlling is available by grouping card holders as their levels. By changing reader s or card holder s reader operating mode level, you can rapidly and efficiently control card holder s operating mode. You can set anti-passback level. If a card holder s anti-passback level is higher than reader s anti-passback level the card holder is controlled by whether the card holder uses anti-passback. If a card holder s antipassback level is equal or lower than reader s anti-passback level the card holder is controlled by whether reader uses anti-passback. Batch controlling is available by grouping card holders as their levels. By changing reader or card holder s anti-passback level, you can rapidly and efficiently control card holder s anti-passback usage. You can set anti-passback mode (Hard, Soft, Timed etc.) level. If a card holder s anti-passback mode level is higher than reader s anti-passback mode level the card holder is controlled by card holder s anti-passback mode level. If the card holder s anti-passback mode level is equal or lower than a reader s anti-passback mode level the card holder is controlled by reader s anti-passback mode level. Batch controlling is available by grouping card holders as their levels. By changing reader or card holder s anti-passback mode level, you can rapidly and efficiently control card holders anti-passback mode level.
37 Menu Levels- Arm/Disarm Level Levels- Card holder Level Levels- PIN Level Description You can set arm/disarm level. If a card holder s arm/disarm level is higher than that of a reader the card holder can set arm/disarm. If card holder s arm/disarm level is equal or lower than that of a reader thecard holder can t set arm/disarm. Batch controlling is available by grouping card holders as their levels. By changing reader or card holder s arm/disarm level, you can rapidly and efficiently control card holders arm/disarm usage. You can set card holder level (access right). If the visitor level of a card holder is higher than visitor level of reader the visitor is allowed entrance. If visitor level of a card holder is equal or lower than visitor level of reader the visitor has to enter with another card holder who is set as a guide. Also the visitor level of the card holder who is set as guide must higher than that of reader. Batch controlling is available by grouping card holders as their levels. By changing reader s or visitor s visitor level, you can rapidly and efficiently control approvals of visitors. You can set reader s PIN usage level. If a card holder s PIN level is higher than reader s PIN level, the reader operates by whether the card holder uses a PIN. If card holder s PIN level is equal or lower than reader s PIN level it operates by reader s PIN mode.

38 Biometrics (Iris, Fingerprint) Reader Setting 5. Select Reader from the Device List 6. Select Reader tab. 7. Click Fingerprint Device tab. 8. Select Fingerprint Device Mode. You can select TSG-750 or TSG Mark Enable option. 10. Input Fingerprint Device ID, IP Address of Fingerprint Device and Port number. 11. Click Connection Test button to check device connection. 12. Click Save button. 13. In case of Iris device select Iris Device tab. 14. Select icam7000 Series from Model. 15. Mark Enable option. 16. Input IP Address of Iris(iCam) device. 17. Input Security ID, User ID and Password. 18. Click Connection Test button to check device connection. 19. Click Save button.

39 Input device management Vantage Point provides setting menus for an input device. 1. Select an input device to set in device list. 2. Set detailed data in the input device management. 3. Click save button. 4. To apply the detailed input device setting immediately go to controller management tap and click upload.
40 Option Save Description Save the input device settings Input Device Name Enter input device name (Device name can t be duplicated) Location(Area) Select the location (area) of the input device. If there is no location (area), click to enroll. Location(Floor) Select the location (floor) of the input device. If there is no location (floor), click to enroll. Input Device Type Input Device Point Type (NO, NC) Input Operation Time schedule Select input device type. Select device point type (NO, NC). Select operation time schedule of input device. During the set time, receives input device s signal. Door Contact Alarm Enable When the input device type is a door contact if events occur such as door opening, forced door opening, and etc., you can set whether generates alarm or not. Door Lock When the input device type is a door contact, you can set what output device is related to the door lock. Door-Open Too Long Alarm Delay Time(sec.) When input device type is door contact, you can set the delay time to sound an alarm when door is too long open. Door-Forced-Open Alarm Delay Time(sec.) Input 4 Status Function Enable When input device type is a door contact, you can set delay time to alarm when door is forced open. You can set whether you will use input 4 states (ON/OFF/CUT/SHORT).
41 Output Device Management Vantage Point provides setting menus for output device 1. Select an output device to set in the device list. 2. Set detailed data in the output device management screen 3. Click save button. 4. To apply the detailed output device setting immediately go to controller management tap and click upload
42 Menu Description Save Save output setting data. Output Device Name Location(Area) Enter output device name. (Device name can t duplicated) Select the location (area) of output device. If there is no location (area), click to enroll. Location(Floor) Select the location (floor) of output device. If there is no location (floor), click to enroll. Output Device Type Select output device type. Output Times schedule Output Time schedule Option Select operation time schedule of output device. During the set time, the output device is ON. Select operating option of output device in time schedule. It operates depending on set option.

43 Functions (Time / Initialization) Point provides a setting menu for controller initialization and time setting. 1. Select a controller to set in device list. 2. Select date/time setup or initialization. 3. In the case of initialization, select initialization type. Caution! Depending on initialization type, all settings may be initialized.
44 Type Initialization Type Description Full Initialization : All data is changed as factory release data. But, network information is not changed. Network information is initialized by switching on 4 th initialization switch of controller. ID Data Initialization : All ID information stored in controller is deleted. Event Data Initialization : All event information stored in controller is deleted. Reader Data Initialization : All setting information about reader stored in controller is changed as factory release data. System Data Initialization : All setting information about controller stored in controller is changed as factory release data. Input / Output Information Initialization : All setting information about input/output stored in controller is changed as factory release data. Timeschedule Data Initialization : All information about timeschedule stored in controller is deleted. All used time schedules are not applied. Holiday Data Initialization : All holiday data stored in controller are deleted. The holiday data used in controller are not applied. Input Device Information Initialization : All input device information stored in controller is changed as factory release data. Output Device Information Initialization : All output device information stored in controller is changed as factory release data. Anti-Passback Initialization : Anti-passback information used in controller is changed as factory release data. Arm Initialization : Alarm information used in controller is changed as factory release data.

45 Functions (Global Anti-Passback) You can initialize and set the time of devices. 1. Select a reader to apply functions anti-passback. 2. In the reader list, select readers that can enter after allowed by selected reader. 3. Click save to save. 4. To apply set information to controller, click upload to upload controller.

46 Device Event Operation Management Vantage Point provides a menu to set output operation for each event of controller, of reader, of input device. 1. Click output operating management button on the bottom of device list in the Device Management window. 2. Select controller in the device list. 3. Select system event type 4. Select an output to set in the local operating set up, and enter setting value as needed. 5. Click save button.
47 Option Controller Event Operating Local Operating Setup Output Device Operating mode Time-ON Description Select event type that takes place in controller. The output that the controller operates. The output device that operates when event occurs in controller. ON: activate the output continuously OFF: deactivate the output CLOCK: activate the output for a determined duration periodically STAY: maintain the current status of the output Time-ON serve only with operating mode ON or CLOCK. 0: no action 1~600 sec.: activate for the duration set unlimited: activate continuously Time-OFF Time-OFF serve only with operating mode CLOCK 0: no action 1~600sec.: activate for the duration set Unlimited: activate continuously Repetition Repetition serve only with operation mode ON or CLOCK 0: activate one time only 1~600 : Repeatedly activate output for the set time for ON or for the duration set for CLOCK Unlimited: Continuously repeat the output operation set with

48 Device Event Operation Management (Reader Event) Vantage Point provides a menu to set the operating mode for the events of controller, reader and of the input device. 1. Click output operating management button on the bottom of device list in the Device Management window. 2. Select reader in the device list. 3. Select system event type 4. Select an output to set in the local operating set up, and enter setting value as needed. 5. Click Apply.
49 Option Reader Event Operating Operating mode Description Select event type that occurs in selected reader. ON: activate the output continuously OFF: deactivate the output CLOCK: activate the output for a determined duration periodically STAY: maintain the current status of the output Time-ON Time-ON serve only with operating mode ON or CLOCK. 0: no action 1~600 sec.: activate for the duration set unlimited: activate continuously Time-OFF Time-OFF serve only with operating mode CLOCK 0: no action 1~600sec.: activate for the duration set Unlimited: activate continuously Repetition Repetition serve only with operation mode ON or CLOCK 0: activate one time only 1~600 : Repeatedly activate output for the set time for ON or for the duration set for CLOCK Unlimited: Continuously repeat the output operation set with ON or CLOCK
50 Device Event Operating Management (Input Device Event Operating) Vantage Point provides a menu to set operating mode for the events of controller, of reader and of input device. 1. Click output operating management button on the bottom of device list in the Device Management window. 2. Select input in the device list. 3. Select system event type 4. Select an output to set in the local operating (basic) set up, and enter setting value as needed. 5. Select an output to set in the local operating (Advanced) set up, and enter setting value as needed. 6. Click Apply.
51 Option Local Operating(Basic) Local link Operating link (Advanced) Description Output operation setting for each input status (ON/OFF/CUT/Short) Output operation setting to follow input operating (while input device is on, output stay on and once input turns off, output follows turning off.). Operating mode ON: activate the output continuously OFF: deactivate the output CLOCK: activate the output for a determined duration periodically STAY: maintain the current status of the output Time-ON Time-ON serve only with operating mode ON or CLOCK. 0: no action 1~600 sec.: activate for the duration set unlimited: activate continuously Time-OFF Time-OFF serve only with operating mode CLOCK 0: no action 1~600sec.: activate for the duration set Unlimited: activate continuously Repetition Repetition serve only with operation mode ON or CLOCK 0: activate one time only 1~600 : Repeatedly activate output for the set time for ON or for the duration set for CLOCK Unlimited: Continuously repeat the output operation set with ON or CLOCK

52 Ch.6 Card Holder Management Vantage Point provides a menu to manage cardholders & cardholder data. Time schedule setting, access right and batch process. Integrated Search Integrated search provides quick and easy review for cardholder data, Time Schedule data, Access group data. 1. Set search type and condition. 2. Click Search. 3. Double clicking the searched data opens its management window...
53 Card Holder Management Vantage Point provides a menu to manage basic data of cardholder, access card and access right. 1. Click New to register new cardholder. 2. Enter name, ID and personal data of the card holder. 3. Upload picture of the cardholder if needed Move to the Access card #1 tab. 5. To register multiple cards for one cardholder go to access card #2, #3. 6. Enter basic info and set its functions. 7. Set access right. Access right can be set one among #1~#3.
54 Option Description Card Type Card No. Password Access Right #1 You can set card type of cardholder.. Normal Access: A cardholder having normal card.. Visitor: As a visitor type, if visitor level is higher than reader s visitor level, visitor can be allowed solely but if not, visitor has to enter with guide.. Arm: A person having this card can set alarm mode of reader.. Disarm: A person having this card can off alarm mode of reader.. Arm/Disarm: A person having this card can set/off alarm mode of reader.. Master: A person having this card is checked only whether the person is registered by controller and other control values (level, time schedule, Anti-passback etc.) are not processed.. Lost: A person having this card is operated as set lost output. Enter card number or PIN number assigned to card holder. Enter password of cardholder. Assign access right to cardholder.
55 Option Description Access Right #2 Access Right #2 Enrollment Date Expiration Date Credit Card Operating Mode Assign access right to cardholder. Assign access right to cardholder. Set start date of period when cardholder can use assigned access right within. Set end date of period when cardholder can use assigned access right within. Give credit to cardholder. Set card operating mode of cardholder. To use this, operating mode level of cardholder must be higher than reader. Card(or PIN) Mode, Card(or PIN) and Password Mode 8. Move to advanced options. 9. Set level information. 10. Click save. 11. Click upload to upload controller. Uploading operates when communication program (main program) is executed.
56 Type Access Level Description Set access level of cardholder. If access level of cardholder is higher than that of reader access is granted If access level of cardholder is equal or lower than that of reader access is not granted Anti-Passback Level Batch controlling is available by grouping card holders as their levels. By changing reader or card holder s access level, you can rapidly and efficiently control card holder s access. If you make the access level of reader higher without revise card holder s information the card holders that are lower or equal than access level of reader are not allowed access E.G) Access level of reader1 is 3, access level of card holder A is 4 -> Access granted Access level of reader1 is changed to 4 or 5, access level of card holder A is 4 -> Access is disallowed Set anti-passback availability level. If card holder s anti-passback level is higher than the reader s anti-passback level, the card holder is controlled by whether the card holder uses anti-passback. If the card holder s anti -passback level is equal or lower than the reader s anti-passback level, the card holder is controlled by whether reader uses anti-passback. Arm/Disarm Level Batch controlling is available by grouping card holders as their levels. By changing reader or card holder s anti-passback level, you can rapidly and efficiently control card holder s antipassback usage. You can set arm/disarm level of reader. If a card holder s arm/disarm level is higher than that of reader, the card holder can set arm/disarm. If the card holder s arm/disarm level is equal or lower than that of reader, the card holder can t set alarm/disarm. Card holder Level Batch controlling is available by grouping card holders as their levels. By changing reader or card holder s arm/disarm level, you can rapidly and efficiently control card holders arm/ disarm usage. You can set card holder level (access right). If the visitor level of a card holder is higher than the visitor level of the reader, the visitor is allowed access. If visitor level of a card holder is equal or lower than visitor level of the reader the visitor has to enter with another card holder who is set as a guide. Also visitor level of the card holder who is set as a guide must be higher than that of reader. Batch controlling is available by grouping card holders as their levels. By changing reader s or visitor s visitor level, you can rapidly and efficiently control approvals of visitors.

57 Biometrics (Iris, Fingerprint) Enrollment and Management 12. Input Card Holder information and select Access Card #1 tab. 13. If using fingerprint select Fingerprint Management button. 14. If you use fingerprint USB scanner to enrol fingerprint click Scan By USB device button. 15. Once the fingerprint scan window comes up click Scan Fingerprint button to enrol fingerprint. In this case you can see fingerprint image. 16. Click Get Fingerprint Data to receive fingerprint data from device and store the data in database. 17. Click Register button to send fingerprint data to another devices.

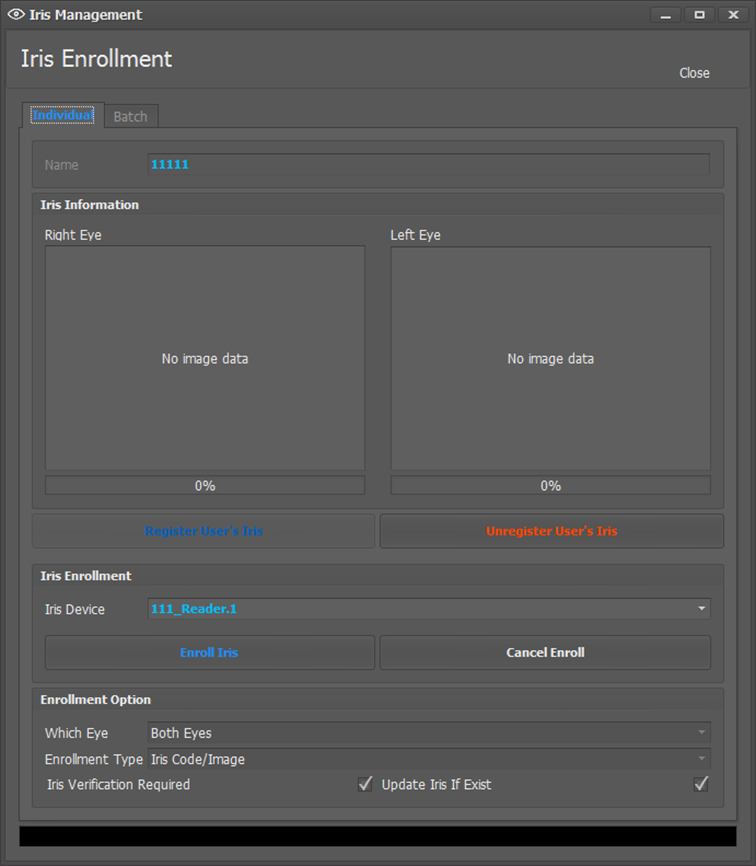
58 18. In case of Iris device click Iris Management button 19. Select Iris Device for registration from Iris Device. 20. Click Enrol Iris to enrol Iris data. Once registration is done iris images will be displayed. 21. Click Register User s Iris button to send iris data to another iris devices.
59
 6. Click Save.")
60 Time Schedule Management Vantage Point provides a menu to schedule validation of access for cardholders, operation of input and output by day. 1. Click new to add schedule. 2. Enter Time Schedule name. 3. Set schedule by day. 4. Use copy/paste button to recreate same schedule. 5. Click holiday to register one (To add holiday click button on the right side..) 6. Click Save. 7. Click upload to send to controllers. Uploading operates when communication program (main program) is executed.

61 Access Right Management Vantage Point provides a menu to register access right areas to access for card holders. 1. Click new. 2. Enter name of access right. 3. Select doors to access from door list. 4. Select Time Schedule to apply. 5. Double click on the door or click button to register.. 6. Click save button.

62 Batch Process (Card Holder Batch Upload) Vantage Point provides a menu to search cardholder data with various conditions and to send to controllers in batches. 1. Enter search condition. 2. Click search. 3. Select controllers to send in controller list. 4. Click batch upload.

63 Batch Process (Card Holder Batch Modification) You can batch change cardholder information by variety conditional searching. 1. Insert conditions in search condition. 2. Click search. Select cardholder information in search results. Multiple selection of cardholder information is available. Pushing CTRL or SHIFT and selecting, you can select multiple cardholders In the batch modification list, select information to modify and click apply. Background color of changed information is changed. 3. Click save to save changed information.
64 Batch Process (Card Holder Data Batch Import) You can import huge cardholder data that are stored in text or excel file to system. Caution: Import file must satisfy below conditions. Data Format: ID, name, company(null available), department(null available), title(null available), card(or PIN), password(null available or four figure number) File Type: CSV(Comma Delimited), TEXT(Comma Delimited), Excel Workbook(xls, xlsx) If you use excel file, Microsoft Excel must be installed. If there is no Microsoft Excel, store data of Excel as CSV or TEXT to use. 1. Select file stored cardholder data. 2. Change imported data directly if you need to change. 3. Access right is basically set ALL right. If you want to change, select cardholder and change access group. 4. Click register to save cardholder data.
65 Batch Process (Card Holder s Photo Batch Import) You can import huge cardholder data that are stored in text or excel file to system. It imports photo images of cardholders matching cardholder ID. P Photo image file name must be ID.
66 Ch.7 View It is window to monitor access event, input/output status and communication status. Event monitoring It shows access event with picture in real time, door status and communication status.
67 Door / Input / Output Device Monitoring and Control It provide menu to monitor and control status of access, reader, output device. In case of door, you can lock or unlock the door lock with lock /unlock button. In case of reader, with arm disarm button, you can arm or disarm. In case of output devices, with on/off buttons, you can activate or deactivate them. Also it shows input status (on/off/short/cut) and communication status in real time.
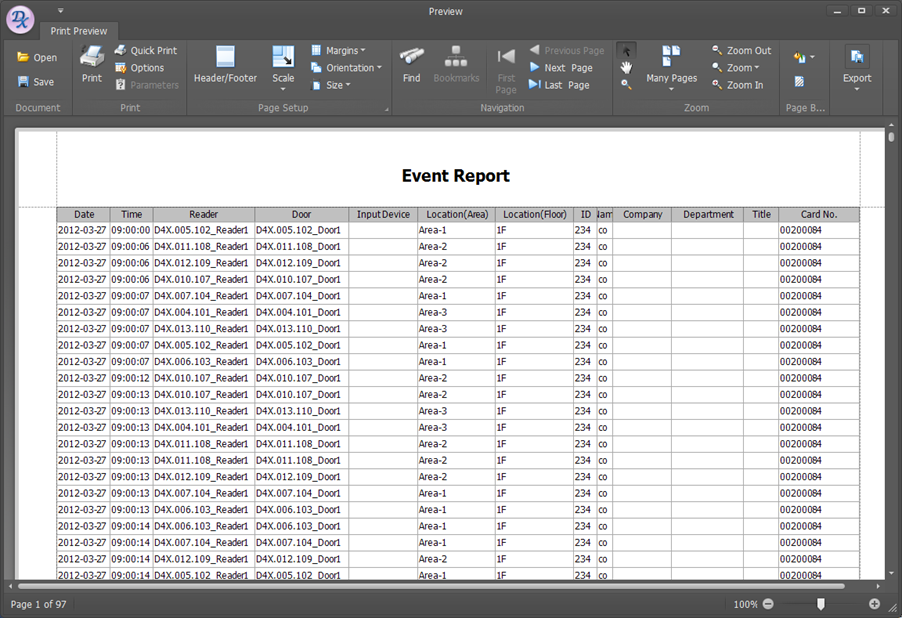
68 Ch.8 Report Vantage Point provides a menu to create report of cardholder data, access event and access right by cardholder or by door. Access Event Report You can search events and create report by time, event type, area and cardholder data. 1. Enter conditions. 2. Click search. 3. It shows the result on the bottom side. Columns of search results can be moved or hided. And columns can be displayed in groups. You can see associated menus by clicking with the right mouse button in a column. 4. Click pre-view. Pre-view is shown as like columns in search results. 5. Click print.
69
70 Card Holder Report Vantage Point provides a menu to search cardholder data and to create its report. 1. Enter conditions to search. 2. Click search. 3. It shows the result on the bottom side. 4. Click pre-view and click print. Columns of search results can be moved or hided. And columns can be displayed in groups. You can see associated menus by clicking with the right mouse button in a column.

71 Access Right Report Vantage Point provides a menu to search and to create report of access right by cardholder or by door. 1. Enter conditions to search. 2. Click search. 3. It shows the result on the bottom side. 4. Click pre-view and click print. Columns of search results can be moved or hided. And columns can be displayed in groups. You can see associated menus by clicking with the right mouse button in a column.
 3. Enter name of the user. 4. Enter ID.")
72 Ch.9 Management Tool Vantage Point provides a menu to register user accounts to manage the system User Account Management User account management window provides menu to set log in account and permissions for each functions. 1. Click new to create a user account. 2. Check administrator box to give right to create/modify/delete an account) 3. Enter name of the user. 4. Enter ID. This ID will be the program log-in ID. 5. Enter password. 6. Enter password one more time. 7. Check on the box in application part to give permission for each function. 8. Click save button.

73 Ch.10 Communication It shows communication status and its logs. Communication Status Shows controller status of connection, communication and operation. Description Connection Status If the controller is connected by socket with communication program. Communication Status If the controller is actually sending and receiving data with communication program.
74 Communication Log Used for recording and showing communication module status log.
75 Ch.11 Graphic Map Graphic map is a function that displays devices installed at specific areas and floors as graphics. You can set and monitor devices installed at specific areas and floors. In the main screen, execute Graphic Map. Graphic Map Definition Graphic map definition is a function to set devices installed at specific areas and floors. 1. Select area and floor to set graphic map. 2. By clicking open image, select a relevant location image. 3. Select Graphic Map options. 4. In the item list, double click the items to mark in Graphic Map. 5. Drag the items in Graphic Map to the locations you want. 6. Click save to save.
76 Graphic Map Monitoring Graphic Map Monitoring is a function that monitors events occurring at controller in the Graphic Map. 1. When an event occurs at controller, set graphic map automatically shows. 2. If you need to display graphic map manually, select location. 3. If you select Fix a Graphic Map, it shows only selected location s events. 4. In the Graphic Map Monitoring, you can control the devices (doors, door locks, output devices). 5. To remove devices in the device list, click status in the list. 6. To control devices in the Graphic Map, double click the device in the Graphic Map.
AS-525. AxTrax Access Control Management Software. Software Manual
 AS-525 AxTrax Access Control Management Software Software Manual August 2010 Table of Contents Table of Contents 1. Introduction... 5 1.1 System Features... 5 1.1.1. Access Control... 6 1.1.2. Access
Immotec Systems, Inc. SQL Server 2005 Installation Document
 SQL Server Installation Guide 1. From the Visor 360 installation CD\USB Key, open the Access folder and install the Access Database Engine. 2. Open Visor 360 V2.0 folder and double click on Setup. Visor
Volume. EverAccess. User s Manual
 Volume 1 EverAccess User s Manual FLEX Series Access Control Management Software Flex1.0 EVERFOCUS ELECTRONICS CORPORATION Flex1.0 Instruction Guide 2004 Everfocus Electronics Corp 1801 Highland Ave Duarte
How To Connect A300 To A300 Time Clock On A Pc Or Mac Computer
 1 TABLE OF CONTENTS INTRODUCTION CHAPTER 1 ESTABLISHING A CONNECTION TO TIME CLOCK 1.1 INSTALLATION OF SOFTWARE 1.2 CONNECT TIME CLOCK TO PC 2 1.2.A..VIA USB CABLE CONNECTION 2-5 1.2.B... VIA TCP/IP NETWORK
About This Manual. 2 About This Manual
 Ver.4.1 Important This System Guide applies to RadiNET Pro Ver. 4.1. Please read this System Guide and the User s Manual on the RadiNET Pro CD-ROM carefully to familiarize yourself with safe and effective
Easy Setup Guide for the Sony Network Camera
 -878-191-11 (1) Easy Setup Guide for the Sony Network Camera For setup, a computer running the Microsoft Windows Operating System is required. For monitoring camera images, Microsoft Internet Explorer
Access Control Management System User s Manual
 Access Control Management System User s Manual V1.0.0 Table of Contents 1 Product Overview... 3 1.1 Overview... 3 1.2 System Requirement... 3 2 Client Installation... 4 3 Login System... 7 3.1 Login...
Intelli-M Access Quick Start Guide
 Intelli-M Access Quick Start Guide Before You Begin The Intelli-M Access software can be used in conjunction with the eidc. Use Intelli-M Access to manage, view, and report activity through an eidc controlled
i -CEN S USER S Manual 2007. 08. 13.
 i -CEN S i -CEN'S USER S Manual 2007. 08. 13. i -CEN S Table of Contents Overview of i-cen S software... 4 1 Introduction of i-cen S... 4 2 Key Features... 5 3 Key Benefits... 5 4 System Specification...
USER GUIDE. Ethernet Configuration Guide (Lantronix) P/N: 2900-300321 Rev 6
 P/N: 2900-300321 Rev 6") KRAMER ELECTRONICS LTD. USER GUIDE Ethernet Configuration Guide (Lantronix) P/N: 2900-300321 Rev 6 Contents 1 Connecting to the Kramer Device via the Ethernet Port 1 1.1 Connecting the Ethernet Port Directly
KRAMER ELECTRONICS LTD. USER GUIDE Ethernet Configuration Guide (Lantronix) P/N: 2900-300321 Rev 6 Contents 1 Connecting to the Kramer Device via the Ethernet Port 1 1.1 Connecting the Ethernet Port Directly
Table Of Contents. System Monitoring... 14 System Monitoring Display...14 Monitoring Zones...15 About Areas (partitions)...15 Area Status Display...
...15 Area Status Display...") Quick Start Table Of Contents Getting Started... 2 NEware Editions...2 Installing NEware...3 Installing Languages...3 Connecting to NEware...3 Changing Your IP100 Password...4 User Codes... 5 Master Feature...5
Quick Start Table Of Contents Getting Started... 2 NEware Editions...2 Installing NEware...3 Installing Languages...3 Connecting to NEware...3 Changing Your IP100 Password...4 User Codes... 5 Master Feature...5
Portions of this product were created using LEADTOOLS 1991-2009 LEAD Technologies, Inc. ALL RIGHTS RESERVED.
 Installation Guide Lenel OnGuard 2009 Installation Guide, product version 6.3. This guide is item number DOC-110, revision 1.038, May 2009 Copyright 1992-2009 Lenel Systems International, Inc. Information
User s Manual for Fingerprint Door Control Software
 User s Manual for Fingerprint Door Control Software Foreword The naissance of F7 indicated that fingerprint reader enters into professional door control domain. That s why we developed this software to
SQL Server 2008 R2 Express Installation for Windows 7 Professional, Vista Business Edition and XP Professional.
 SQL Server 2008 R2 Express Installation for Windows 7 Professional, Vista Business Edition and XP Professional. 33-40006-001 REV: B PCSC 3541 Challenger Street Torrance, CA 90503 Phone: (310) 303-3600
Bosch ReadykeyPRO Unlimited Installation Guide, product version 6.5. This guide is item number DOC-110-2-029, revision 2.029, May 2012.
 Bosch ReadykeyPRO Unlimited Installation Guide, product version 6.5. This guide is item number DOC-110-2-029, revision 2.029, May 2012. Copyright 1995-2012 Lenel Systems International, Inc. Information
Table of Contents. CHAPTER 1 About This Guide... 9. CHAPTER 2 Introduction... 11. CHAPTER 3 Database Backup and Restoration... 15
 Table of Contents CHAPTER 1 About This Guide......................... 9 The Installation Guides....................................... 10 CHAPTER 2 Introduction............................ 11 Required
USING THE MODEL IQ 1000 INTELLICLOCK
 USING THE MODEL IQ 1000 INTELLICLOCK The IQ 1000 is an advanced model of time clock with many features and benefits designed to offer you a wide range of options in how you collect your time and attendance
File Management Utility User Guide
 File Management Utility User Guide Legal Notes Unauthorized reproduction of all or part of this guide is prohibited. The information in this guide is subject to change without notice. We cannot be held
CM HOST CM CardTransporter Fuel Communication and Management Software 10.10.06 Software version up to 3.1
 CM HOST CM CardTransporter Fuel Communication and Management Software 10.10.06 Software version up to 3.1 CM Host Manual For CardMaster Fuel Control www.cardlockvending.com customers call 888-487-5040
User Manual V1.0. Remote Software
 User Manual V1.0 Notice: The information in this manual was current when published. The manufacturer reserves the right to revise and improve its products. All specifications are therefore subject to change
QUANTIFY INSTALLATION GUIDE
 QUANTIFY INSTALLATION GUIDE Thank you for putting your trust in Avontus! This guide reviews the process of installing Quantify software. For Quantify system requirement information, please refer to the
Install Pocket Inventory in a Windows Server 2003 R2 Standard Environment
 One Blue Hill Plaza, 16th Floor, PO Box 1546 Pearl River, NY 10965 1-800-PC-AMERICA, 1-800-722-6374 (Voice) 845-920-0800 (Fax) 845-920-0880 Install Pocket Inventory in a Windows Server 2003 R2 Standard
3.5 LAN HDD Enclosure User s Manual
 3.5 LAN HDD Enclosure User s Manual NOTE: 1. USB and LAN can t be used at the same time. 2. HDD should be formatted as FAT32. Please check Disk utility section in this manual. 3. For internet FTP usage,
FUSION Installation Guide
 FUSION Installation Guide Version 1.0 Page 1 of 74 Content 1.0 Introduction... 3 2.0 FUSION Server Software Installation... 3 3.0 FUSION Client Software Installation... 10 4.0 FUSION NIM Software Installation...
DOMUSBOX. User guide. Index
 DOMUSBOX User guide Index Introduction... 2 1. Installing SEAV DOMUS... 4 1.1 Activating DomusBox... 4 1.2Drawing the environments in DomusWeb... 5 1.3Connecting DomusBox to the devices...9 1.4Configuration
S-SupremaConfigurationGuide-DOC 7/23/2014. Suprema Biometrics Configuration Guide ACS OnSite Aparato
 S-SupremaConfigurationGuide-DOC 7/23/2014 Suprema Biometrics Configuration Guide ACS OnSite Aparato Page 2 Suprema Configuration Guide ACS OnSite Aparato Table of Contents 1. SUPREMA BIOSTAR CONFIGURATION...
IX Support Tool Setting Manual
 IX System IP network-compatible intercom IX Support Tool Setting Manual Software version 2.0.0.0 or later Before configuring and using the system, read Setting Manual and Operation Manual (PDF) carefully.
Installing SQL Express. For CribMaster 9.2 and Later
 Installing SQL Express For CribMaster 9.2 and Later CRIBMASTER USER GUIDE Installing SQL Express Document ID: CM9-031-03012012 Copyright CribMaster. 1996, 1997, 1998, 1999, 2000, 2001, 2002, 2003, 2004,
Model 288B Charge Plate Graphing Software Operators Guide
 Monroe Electronics, Inc. Model 288B Charge Plate Graphing Software Operators Guide P/N 0340175 288BGraph (80207) Software V2.01 100 Housel Ave PO Box 535 Lyndonville NY 14098 1-800-821-6001 585-765-2254
Contents. 1 VPN Remote Access Service
 Contents 1 VPN Remote Access Service Record of Revisions Reference numbers are shown at the bottom left corner on the back cover of each manual. Date Reference No. Revised Contents February, 2015 1075NE0
Print/Scan System (U)
") Print/Scan System (U) KM-3035/4035/5035 Network Scanner Operation Guide ALWAYS read this Operation Guide thoroughly before use. After reading, maintain it in good condition and keep it
Print/Scan System (U) KM-3035/4035/5035 Network Scanner Operation Guide ALWAYS read this Operation Guide thoroughly before use. After reading, maintain it in good condition and keep it
Partizan Access Control Management User Manual. Version 2.0.0, 14 August 2015
 Partizan Access Control Management User Manual Version 2.0.0, 14 August 2015 Abstract This document is the Software User Manual (SUM) for the Partizan Access Control Management project and was made according
Upgrading from MSDE to SQL Server 2005 Express Edition with Advanced Services SP2
 Upgrading from MSDE to SQL Server 2005 Express Edition with Advanced Services SP2 Installation and Configuration Introduction This document will walk you step by step in removing MSDE and the setup and
BillQuick Installation Guide for Microsoft SQL Server 2005 Express Edition
 Time Billing and Project Management Software Built With Your Industry Knowledge BillQuick Installation Guide for Microsoft SQL Server 2005 Express Edition BQE Software, Inc. 2601 Airport Drive Suite 380
Intel Active Management Technology with System Defense Feature Quick Start Guide
 Intel Active Management Technology with System Defense Feature Quick Start Guide Introduction...3 Basic Functions... 3 System Requirements... 3 Configuring the Client System...4 Intel Management Engine
How To Use 1Bay 1Bay From Awn.Net On A Pc Or Mac Or Ipad (For Pc Or Ipa) With A Network Box (For Mac) With An Ipad Or Ipod (For Ipad) With The
 With A Network Box (For Mac) With An Ipad Or Ipod (For Ipad) With The") 1-bay NAS User Guide INDEX Index... 1 Log in... 2 Basic - Quick Setup... 3 Wizard... 3 Add User... 6 Add Group... 7 Add Share... 9 Control Panel... 11 Control Panel - User and groups... 12 Group Management...
1-bay NAS User Guide INDEX Index... 1 Log in... 2 Basic - Quick Setup... 3 Wizard... 3 Add User... 6 Add Group... 7 Add Share... 9 Control Panel... 11 Control Panel - User and groups... 12 Group Management...
for Networks Installation Guide for the application on the server July 2014 (GUIDE 2) Lucid Rapid Version 6.05-N and later
 Lucid Rapid Version 6.05-N and later") for Networks Installation Guide for the application on the server July 2014 (GUIDE 2) Lucid Rapid Version 6.05-N and later Copyright 2014, Lucid Innovations Limited. All Rights Reserved Lucid Research
for Networks Installation Guide for the application on the server July 2014 (GUIDE 2) Lucid Rapid Version 6.05-N and later Copyright 2014, Lucid Innovations Limited. All Rights Reserved Lucid Research
Dokmee Enterprise Installation
 Dokmee Enterprise Installation 1 P a g e 1. Install Microsoft SQL on a server or local computer that everyone can access. Make sure that you have.net Framework 4.0 installed. If you go to the link below,
DIGICLIENT 8.0 Remote Agent Software
 DIGICLIENT 8.0 Remote Agent Software MODEL: D17800 Series Instruction Manual English Version 1.0 Copyright 2007 Digimerge Technologies Inc Table of Contents Table of Contents About the DigiClient 8.0...
Portions of this product were created using LEADTOOLS 1991-2010 LEAD Technologies, Inc. ALL RIGHTS RESERVED.
 Installation Guide Lenel OnGuard 2010 Installation Guide, product version 6.4. This guide is item number DOC-110, revision 1.045, May 2010 Copyright 1995-2010 Lenel Systems International, Inc. Information
Appendix A. CMS(Client Management Software)
") Appendix A. CMS(Client Management Software) A-1. Install CMS for Windows PC CMS is a program for communication between DVR and PC to control signal and video. Insert the enclosed CD, and go to CD-ROM Drive
Appendix A. CMS(Client Management Software) A-1. Install CMS for Windows PC CMS is a program for communication between DVR and PC to control signal and video. Insert the enclosed CD, and go to CD-ROM Drive
1 System requirements (minimum)
") Metrohm AG CH-9101 Herisau Switzerland Phone +41 71 353 85 85 Fax +41 71 353 89 01 [email protected] www.metrohm.com Installation 1 System requirements (minimum) Operating system RAM Memory Interface Windows
Metrohm AG CH-9101 Herisau Switzerland Phone +41 71 353 85 85 Fax +41 71 353 89 01 [email protected] www.metrohm.com Installation 1 System requirements (minimum) Operating system RAM Memory Interface Windows
NVMS-1200. User Manual
 NVMS-1200 User Manual Contents 1 Software Introduction... 1 1.1 Summary... 1 1.2 Install and Uninstall... 1 1.2.1 Install the Software... 1 2 Login Software... 3 2.1 Login... 3 2.2 Control Panel Instruction...
Install SQL Server 2014 Express Edition
 How To Install SQL Server 2014 Express Edition Updated: 2/4/2016 2016 Shelby Systems, Inc. All Rights Reserved Other brand and product names are trademarks or registered trademarks of the respective holders.
ZKTime5.0 Attendance Management Software User Manual
 ZKTime5.0 Attendance Management Software User Manual Version: 1.4 Date: April. 2013 Software version: Build 149 About this Manual: This manual provides ZKTime5.0 software operation instruction, for example
Accounting Manager. User Guide A31003-P1030-U114-2-7619
 Accounting Manager User Guide A31003-P1030-U114-2-7619 Our Quality and Environmental Management Systems are implemented according to the requirements of the ISO9001 and ISO14001 standards and are certified
User Manual of Web Client
 User Manual of Web Client 1 Index Chapter 1 Software Installation... 3 Chapter 2 Begin to Use... 5 2.1 Login and Exit... 5 2.2 Preview Interface Instruction... 6 2.3 Preview Image... 7 Chapter 3 Playback...
Basic Software Setup Guide. www.easyclocking.com
 1 Basic Software Setup Guide www.easyclocking.com 2 Table of Contents Software registration 3 How to connect the time clock.. 5 How to turn the time clock on 5 Defining the type of connection... 5 TCP/IP
Kokii BatteryDAQ. BMS Software Manual. Battery Analyzer Battery DAS
 Kokii BatteryDAQ BMS Battery Analyzer Battery DAS Updated: October 2008 Caution: High Voltage Exists on Battery Power and Sampling Connectors! Please refer to device installation and operation manual for
Config software for D2 systems USER S MANUAL
 DT-CONFIG SOFTWARE Config software for D2 systems USER S MANUAL CONTENTS 1. Introductions ------------------------------------------------------------------- 3 2. System Requirement and Connection ----------------------------------------
Clock Link Installation Guide. Detailed brief on installing Clock Link
 Clock Link Installation Guide Detailed brief on installing Clock Link 1 Table of Contents 1. Overview... 3 2. Configuring the Time Clock... 3 Instructions:... 3 2.1 IP Address Setup... 3 2.2 Subnet Mask
Central Management System
 Central Management System Software Installation Guide Ver. 1.5.0.101115.001 ... ii System Introduction... 3 Client/Server Architecture...3 System Requirements... 4 System Setup...4 Multiple Monitor Configuration...5
LOREX CLIENT 2.2 Integrated Remote Agent Software
 LOREX CLIENT 2.2 Integrated Remote Agent Software Instruction Manual English Version 1.0 MODEL: L15LD420 / L17LD420 Series Copyright 2008 LOREX Technology Inc. www.lorexcctv.com Table of Contents Table
X Series Application Note 43:
 X Series Application Note 43: Using the Remote Viewing & Web Pages of the X - Series & GR Series Recorders The Remote Viewing function of the X-Series and GR Series Recorders provide the user with the
How To Create An Easybelle History Database On A Microsoft Powerbook 2.5.2 (Windows)
") Introduction EASYLABEL 6 has several new features for saving the history of label formats. This history can include information about when label formats were edited and printed. In order to save this history,
Introduction EASYLABEL 6 has several new features for saving the history of label formats. This history can include information about when label formats were edited and printed. In order to save this history,
Time Attendance V1.0
 Time Attendance V1.0 User Manual Page 1 TABLE OF CONTENTS 1. TIME ATTENDANCE...5 2. SOFTWARE INSTALLATION...6 3. SETTING UP THE TIME ATTENDANCE System...7 3.1 Set Password...7 3.2 Login...8 3.3 Setup -
BabyWare Imperial PC Software
 Overview (see page 1) Things You Should Know (see page 1) Getting Started (see page 2) Licenses and Registration (see page 6) Usernames Passwords and Login (see page 7) BabyWare Imperial PC Software Overview
WUA-0605 300Mbps Wireless USB Network Adapter
 WUA-0605 300Mbps Wireless USB Network Adapter User Manual V1.0 Certification FCC CE FCC Statement This equipment has been tested and found to comply with the limits for a Class B digital device, pursuant
Flowlink Pro Server Software Installation Guide
 Flowlink Pro Server Software Installation Guide Part #69-2543-274 ii Flowlink Pro Server Installation Guide COPYRIGHT 2006, 2014 Teledyne Isco, Inc. 4700 Superior St., Lincoln, Nebraska, U.S.A. 68504 Phone:
CENTAUR. Access Control Software Version 4.2 REFERENCE MANUAL
 CENTAUR Access Control Software Version 4.2 REFERENCE MANUAL Copyright (C) 2006-2008 CDVI Americas LTD. All rights reserved. Centaur access control system software is protected by copyright law and international
SQL EXPRESS INSTALLATION...
 Contents SQL EXPRESS INSTALLATION... 1 INSTALLING SQL 2012 EXPRESS... 1 SQL EXPRESS CONFIGURATION... 7 BILLQUICK DATABASE... 9 SQL Express Installation The Microsoft SQL Server 2012 Express software is
Access Control Unit User s Guide
 NetAXS Access Control Unit User s Guide The configurations described in this document have not been reviewed by Underwriters Laboratories Inc. June 2007 2007 Honeywell. All rights reserved. 800-00233,
Desktop Programmer (DTP)
") INSTALLATION Desktop Programmer (DTP) Keypads & Readers Contents Set up the System...1 RCI DTP Contents...1 Install the System...2 Initialize the Program...2 Initialize the Door Locks...3 Add a User...4
INSTALLATION Desktop Programmer (DTP) Keypads & Readers Contents Set up the System...1 RCI DTP Contents...1 Install the System...2 Initialize the Program...2 Initialize the Door Locks...3 Add a User...4
How To Set Up A Xerox Econcierge Powered By Xerx Account
 Xerox econcierge Account Setup Guide Xerox econcierge Account Setup Guide The free Xerox econcierge service provides the quickest, easiest way for your customers to order printer supplies for all their
Fingerprint Identity User Manual for the Griaule Biometric Framework 040-0103-01 Rev 1.00
 Fingerprint Identity User Manual for the Griaule Biometric Framework 040-0103-01 Rev 1.00 www.griaulebiometrics.com Brazil Phone: 55-19-3289-2108 USA Phone: (408) 490 3438 Fingerprint Identity Index Getting
Out n About! for Outlook Electronic In/Out Status Board. Administrators Guide. Version 3.x
 Out n About! for Outlook Electronic In/Out Status Board Administrators Guide Version 3.x Contents Introduction... 1 Welcome... 1 Administration... 1 System Design... 1 Installation... 3 System Requirements...
ImagineWorldClient Client Management Software. User s Manual. (Revision-2)
") ImagineWorldClient Client Management Software User s Manual (Revision-2) (888) 379-2666 US Toll Free (905) 336-9665 Phone (905) 336-9662 Fax www.videotransmitters.com 1 Contents 1. CMS SOFTWARE FEATURES...4
ImagineWorldClient Client Management Software User s Manual (Revision-2) (888) 379-2666 US Toll Free (905) 336-9665 Phone (905) 336-9662 Fax www.videotransmitters.com 1 Contents 1. CMS SOFTWARE FEATURES...4
SiteCount v2.0 Revised: 10/30/2009
 SiteCount v2.0 Revised: 10/30/2009 Copyright 2009, Traf-SYS, Inc. Contents Introduction... 4 Requirements... 4 General... 4 Software... 4 Hardware... 4 Fulfilling Software Requirements... 5 Installation
CX Series. Video Recording Server. Quick Start Guide CX784 / CX788 / CX7816. Version 1.05.00
 CX Series Video Recording Server CX784 / CX788 / CX7816 Quick Start Guide Version 1.05.00 Contents 1.Introduction...1 1.1.Packages Contents...1 1.2.Hardware Features...2 1.3.Functional Features...4 1.4.Hard
Quick Start Guide. DVR DS-7200HWI-SH Series DVR. www.hikvision.com. First Choice For Security Professionals
 Quick Start Guide DVR DS-7300HWI-SH Series DVR DS-7200HWI-SH Series DVR NOTE: For more detailed information, refer to the User s Manual on the CD-ROM. You must use your PC or MAC to access the files. www.hikvision.com
Functional Specification Document
 Functional Specification Document Access Control Technology Unit C1 South City Business Centre Tallaght Dublin 24 Ireland Ph: + 353 (0) 1 4662570 Web: www.accesscontrol.ie Index Introduction 1.1 Hardware
Print Audit 6 - SQL Server 2005 Express Edition
 Print Audit 6 - SQL Server 2005 Express Edition Summary This is a step-by-step guide to install SQL Server 2005 Express Edition to use as a database for Print Audit 6. Pre-Requisites There are a few pre-requisites
TCP/IP MODULE CA-ETHR-A INSTALLATION MANUAL
 TCP/IP MODULE CA-ETHR-A INSTALLATION MANUAL w w w. c d v g r o u p. c o m CA-ETHR-A: TCP/IP Module Installation Manual Page Table of Contents Introduction...5 Hardware Components... 6 Technical Specifications...
Sharp Remote Device Manager (SRDM) Server Software Setup Guide
 Server Software Setup Guide") Sharp Remote Device Manager (SRDM) Server Software Setup Guide This Guide explains how to install the software which is required in order to use Sharp Remote Device Manager (SRDM). SRDM is a web-based
Sharp Remote Device Manager (SRDM) Server Software Setup Guide This Guide explains how to install the software which is required in order to use Sharp Remote Device Manager (SRDM). SRDM is a web-based
Legal Notes. Regarding Trademarks. 2012 KYOCERA Document Solutions Inc.
 Legal Notes Unauthorized reproduction of all or part of this guide is prohibited. The information in this guide is subject to change without notice. We cannot be held liable for any problems arising from
BulkSMS Text Messenger Product Manual
 BulkSMS Text Messenger Product Manual 1. Installing the software 1.1. Download the BulkSMS Text Messenger Go to www.bulksms.com and choose your country. process. Click on products on the top menu and select
Fiery E100 Color Server. Welcome
 Fiery E100 Color Server Welcome 2011 Electronics For Imaging, Inc. The information in this publication is covered under Legal Notices for this product. 45098226 27 June 2011 WELCOME 3 WELCOME This Welcome
Standalone recorder instruction
 Standalone recorder instruction 1,Product profile... 2 2. Hardware interface... 2 2.1 2 &4 &8 channel standalone recorder front panel... 2 2.2 8&16 channel standalone recorder device interface... 3 3,
testo easyheat Configuration and Analysis software Instruction manual
 testo easyheat Configuration and Analysis software Instruction manual en 2 General Information General Information This documentation includes important information about the features and application of
RPM Utility Software. User s Manual
 RPM Utility Software User s Manual Table of Contents 1. Introduction...1 2. Installation...2 3. RPM Utility Interface...4 1. Introduction General RPM Utility program is an RPM monitoring, and management
Multi Client (Integration)
") Multi Client (Integration) Installation and User s Guide Ver 12.10.x *All contents of this document may change without prior notice. INDEX 1. Index 01 2. Introduction 02 3. Installation 03 4. Using Multi
Multi Client (Integration) Installation and User s Guide Ver 12.10.x *All contents of this document may change without prior notice. INDEX 1. Index 01 2. Introduction 02 3. Installation 03 4. Using Multi
Advanced Event Viewer Manual
 Advanced Event Viewer Manual Document version: 2.2944.01 Download Advanced Event Viewer at: http://www.advancedeventviewer.com Page 1 Introduction Advanced Event Viewer is an award winning application
Apps for Android. Apps for iphone & ipad INS584-3
 Apps for iphone & ipad INS584-3 Apps for Android Android is a trademark of Google Inc. iphone is a trademark of Apple Inc., registered in the U.S. and other countries. ipad is a trademark of Apple Inc.,
User s Guide for version 5 Page
 Network Management Interface Catalog VPi 32.15E For use with these ATS products: 7000 & 4000 Series (Group 5 Controller) Series 300 (Group 1 Controller), and 940, 962, 436, 434, 447, 448 (Group 6A/7A Control
AliOffice 2.0 Installation Guide
 January 25, 2012 AliOffice 2.0 Installation Guide Overview This document contains instructions for installing AliOffice and readying the application for the completion and submission of compliance evaluations.
Chapter 1 Downloading Images to Your Computer (Windows)
") Software User Guide For the safe use of your camera, be sure to read the Safety Precautions thoroughly before use. Types of software installed on your computer varies depending on the method of installation
Software User Guide For the safe use of your camera, be sure to read the Safety Precautions thoroughly before use. Types of software installed on your computer varies depending on the method of installation
Installation Manual Version 8.5 (w/sql Server 2005)
") C ase Manag e m e n t by C l i e n t P rofiles Installation Manual Version 8.5 (w/sql Server 2005) T E C H N O L O G Y F O R T H E B U S I N E S S O F L A W Table of Contents - 2 - Table of Contents SERVER
C ase Manag e m e n t by C l i e n t P rofiles Installation Manual Version 8.5 (w/sql Server 2005) T E C H N O L O G Y F O R T H E B U S I N E S S O F L A W Table of Contents - 2 - Table of Contents SERVER
3.5 EXTERNAL NETWORK HDD. User s Manual
 3.5 EXTERNAL NETWORK HDD User s Manual Table of Content Before You Use Key Features H/W Installation Illustration of Product LED Definition NETWORK HDD Assembly Setup the Network HDD Home Disk Utility
Help. F-Secure Online Backup
 Help F-Secure Online Backup F-Secure Online Backup Help... 3 Introduction... 3 What is F-Secure Online Backup?... 3 How does the program work?... 3 Using the service for the first time... 3 Activating
NETWORK PRINT MONITOR User Guide
 NETWORK PRINT MONITOR User Guide Legal Notes Unauthorized reproduction of all or part of this guide is prohibited. The information in this guide is subject to change without notice. We cannot be held liable
ENTBUS PLUS SOFTWARE FOR ENERGY MONITORING AND RECORDING INSTALLATION AND OPERATING MANUAL
 ENTBUS PLUS SOFTWARE FOR ENERGY MONITORING AND RECORDING INSTALLATION AND OPERATING MANUAL Foreword Entbus services manage the collection of information and storing this information in the database. Services
TCMS V2 WITH OFIS SCANNER
 1 TCMS V2 WITH OFIS SCANNER SUGGESTIONS & SOLUTIONS FOR TCMS V2 2 A FINGERTEC OFIS SCANNER DRIVER INSTALLATION 3 Installing FingerTec Ofis Scanner Software 3 B FINGERTEC OFIS SCANNER ACTIVATION STEP 8
Scan System (F) Operation Guide Set-up Edition
 Operation Guide Set-up Edition") Scan System (F) Operation Guide Set-up Edition This Operation Guide mentions that 1650 is a 16 ppm (prints per minute) machine, 2050 is a 20 ppm (prints per minute) machine and 2550 is a 25 ppm (prints
Scan System (F) Operation Guide Set-up Edition This Operation Guide mentions that 1650 is a 16 ppm (prints per minute) machine, 2050 is a 20 ppm (prints per minute) machine and 2550 is a 25 ppm (prints
Preface Version 1.0 (1808. rev. 2)
") A brand that is integrated into Samsung s network products, stands for a convenient world (Polis) made safe (Polis) through Samsung s superior network performance (Internet protocol). With products, clear
A brand that is integrated into Samsung s network products, stands for a convenient world (Polis) made safe (Polis) through Samsung s superior network performance (Internet protocol). With products, clear
Personal Call Manager User Guide. BCM Business Communications Manager
 Personal Call Manager User Guide BCM Business Communications Manager Document Status: Standard Document Version: 04.01 Document Number: NN40010-104 Date: August 2008 Copyright Nortel Networks 2005 2008
Important. Please read this User s Manual carefully to familiarize yourself with safe and effective usage.
 Important Please read this User s Manual carefully to familiarize yourself with safe and effective usage. About This Manual This manual describes how to install and configure RadiNET Pro Gateway and RadiCS
V2.0 Attendance System Hardware Suite Guide Instructions Manual
 CONTENTS TA920 V2.0 Attendance System Hardware Suite Guide Instructions Manual Chapter One - Introduction 1.1 Communication Port 5 1.2 Power Source Control. 5 1.3 Attendance Users. 6 1.4 Registering Ways..
Easy Data Centralization with Webster. User Guide
 Easy Data Centralization with Webster User Guide CONTENTS 3-4 1 Introducing Webster Webster - An Introduction 5-14 2 Installing & Configuring Webster Installing the System Configuring Webster 15-18 3 Managing
Access to remote DVR from IE USER S MANUAL CONTENT
 Access to remote DVR from IE CONTENT... 2 Preface... 2 1. Introduction... 2 2. System requirement and executing environment... 2 2.1. Supported operating System:... 2 2.2. Hardware requirement (recommend):...
FrontDesk Installation And Configuration
 Chapter 2 FrontDesk Installation And Configuration FrontDesk v4.1.25 FrontDesk Software Install Online Software Activation Installing State Related Databases Setting up a Workstation Internet Transfer