Standalone recorder instruction
|
|
|
- George Beverly Taylor
- 10 years ago
- Views:
Transcription
1 Standalone recorder instruction 1,Product profile Hardware interface &4 &8 channel standalone recorder front panel &16 channel standalone recorder device interface , Hardware connection port standalone recorder port standalone recorder port standalone recorder with SD card port standalone recorder with hard disk port standalone recorder , Standalone Recorder IP Instruction , If your computer IP is x, directly add standalone recorder default IP on the software 6 4.2, If your computer IP is not x, there are 2 ways to run the software at the first time Solution 1, Add IP: x and gateway: in your computer... 6 Solution 2, Use telephone key to change the standalone recorder IP and gateway Change IP after connecting software successfully , WEB for Standalone recorder (only use in IE browser) , Security setting on IE browser , LAN: Login in WEB on IE browser Install Active control files Live time monitor Search, Play, download , RDMC Software installation: manage one device , Standalone recorder RDMC software operation instruction Run RDMC.exe in C:\RDMC Add Standalone recorder IP address on the software , Software function introduction Main interface Standalone recorder RDMC list interface Monitor Live monitor on the main software interface Live monitor on the list software interface Search Terminal Search Local Search Statistics Customer System Setting Permission Setting Add Terminal IP: Recording set... 32

2 Update Embedded Update terminal program files Update terminal recording system time Update Terminal IP Embedded settings Read embedded version Database (only for second development) , G729 Voice decoder installation , Center Management software instruction(manage multiple devices) , Others ,Product profile Standalone recorder does not need to connect the computer, only connect power to record. Adopt high resistance parallel connection, can record all kinds of analog telephone, audio signaling. Store the calls info in the SD card or SATA hard disk. The device develops on Linux OS. Anti-virus. It is more stable. There are 2/4/8/16 channels to choose. Support internet search, play, monitor, backup, multiple places to install, centralized management. It is easy to install and operate, stable and reliable. It widely use in finance security, public security, call center, electric power and traffic area and so on which need to record the telephone conversations. 2. Hardware interface &4 &8 channel standalone recorder front panel LINE1 LINE2 : connect one-to-two connector, can be 4 port telephone line port. 2&4 channel : connect one-to- four connector, can be 8 port telephone line port 8 Channel RESET: reset default IP and default user and password (Attention:when need to reset default setting(default IP, user name, user password, port number): press reset button over 4 seconds; less then 4 seconds, only restart the device). ETHERNET : connect RJ45 network connection line USB : connect to serial port line to check the device when the device has error (This serial port line is specially


3 made by ourself ) +5V/DC : connect 5V direct-current power supply (5V/3A) SD : connect SD card, maximum is 32G &16 channel standalone recorder device interface Front panel Rear panel On-off: Power switch ( Attention: When turn off device, you need to press on-off switch firstly, then pull out the power line after 4 seconds, or else the calls may miss or the hard disk may be broken) DC 12V/3A: connect power Channel port: connect telephone line SD card: can use SD card and hard disk store the voice files at the same time RESET: reset default IP and default user and password and port number SPK: do not use this port now NET: connect network cable VGA: invalid now SMDR IN: Connect serial line to check the device when the device has error. Or connect serial port line on this port to record trunk line to get extension info. USB: do not use this port now 3, Hardware connection 2 port standalone recorder: directly connect telephone line to Line1 and Line2.

4 4 port standalone recorder: one-to-two RJ11 connector connect to Line1-2 and Line3-4, put the telephone line parallel connect to one-to-two RJ11 connector. The maximum to connect is 4 telephone lines. 8 port standalone recorder with SD card: directly put the telephone line parallel connect from port 1 to port 8

5 8 port standalone recorder with hard disk: directly put the telephone line parallel connect from port 1 to port 8 16 port standalone recorder: one-to-two RJ11 connector connect to Line1 and Line8, put the telephone line parallel connect to one-to-two RJ11 connector. The maximum to connect are 16 telephone lines. Connect network line to ETHERNET port. Connect power to DC 12V/3A port. It will install ok after connect power. (8 and 16 port standalone recorder need to turn on the power switch)

6 4, Standalone Recorder IP Instruction 4.1, If your computer IP is x, directly add standalone recorder default IP on the IE browser address bar or our software. Standalone recorder default IP is , If your computer IP is not x, there are 2 ways to run the WEB/ software at the first time. Solution 1, Add IP: x and gateway: in your computer (x can be set 2~255, not 230) in Windows XP Click Start -> My network Places->Properties
 4.2.1 in Windows XP Click Start -> My network Places->Properties")
7 Right click Local Area Connection-> Properties

8 Click Internet Protocol (TCP/IP) -> Properties Click Advanced

9 Click Add

10 // Add IP address: x Subnet mask as default value

11 // Add gateway: // after add IP X and gateway in your computer, add the standalone recorder default IP ( ) in the software in Windows 7 Add IP: x and gateway: in your computer (x can be set 2~255, not 230) Right click network icon -> Open Network and Sharing Center

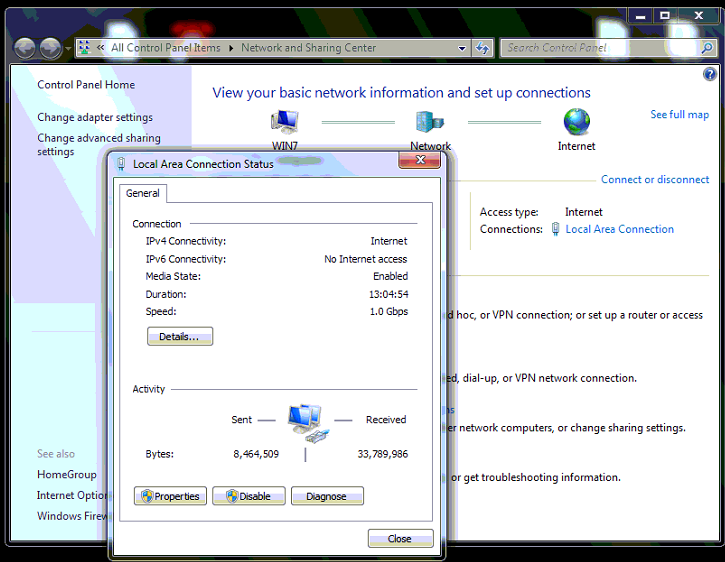
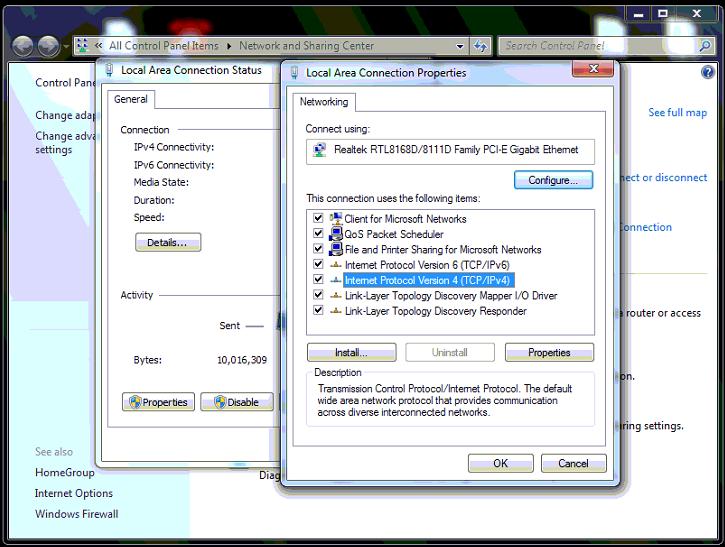
12


13 // Add IP address: x Subnet mask as default value // Add gateway:

14 // after add IP X and gateway in your computer, add the standalone recorder default IP ( ) in the IE browser or our software (RDMC or Center Manager software).


15 Solution 2, Use telephone key to change the standalone recorder IP and gateway Ping the new IP you want to change on your PC: Click Start -> Run -> input ping t After connecting telephone line to standalone recorder and connect device power, press the follow telephone key to change device IP and gateway (May need to press several times until ping the new IP ok): Modify IP and gateway: press the follow key : ## #192*168*1*230#192*168*1*1## Attention: the IP you want to change instead of 192*168*1*230 the gateway you want to change instead of 192*168*1*1 Detail instructions: Press key: ##12Standalone recorder hardware user password#ip address#gateway address## ; (For example: standalone recorder default user password: , standalone recorder IP change as , standalone recorder gateway change as , so press the follow key : ## #192*168*1*230#192*168*1*1##) Press ## press 12 ( function code) press standalone recorder hardware user password (default password is ; if you changed the device password, please press the modified password) press # Press IP address (format: 192*168*1*230, use * instead of. ) Press # Press gateway address (format: 192*168*1*1, use * instead of. ) Press ## After change the new IP ok (ping new IP to test if change ok), connect the new IP on the software.

.")
16 Change IP after connecting software successfully. Firstly, open RDMC Click System setting -> Update Embedded->click IP-> change IP, Mask, Gateway-> Start update (When it show update file successfully). IP address: standalone device new IP Mask: standalone device subnet mask Gateway: standalone device new gateway Please set the above information to match your network settings (check you network IP: Start-> run-> input cmd -> input ipconfig /all ) Finally, you must click Reboot Terminal button. The new IP will come into effect after 1 minute. After change IP, connect the new IP on the software to work.
 Finally, you must click Reboot Terminal button.")

17 5, WEB for Standalone recorder (only use in IE browser) 5.1, LAN: Login in WEB on IE browser: input standalone recorder IP on IE browser address bar (LAN): , then enter Default user name: admin Password: admin, then click Connect. 5.2 Install Active control files: (Our plugin has been certified by Microsoft security, please feel free to use) gxem_ocx.cab, LoadRD.cab


18 5.3 Live time monitor Click Monitor to real time listen the voice file.

19 5.4 Search, Play, download, Backup all, Export Play 5.5 Device Parameter setting


20 5.5.1 Logout : logout WEB Change Login in password Change device IP Channel parameter settings

21 Channel: select one channel in the standalone recorder Read Channel Value: get the channel parameter value Save Channel Value: save the channel new parameter value Local No.: set the telephone line local number Record mode: Voice: voice control Voltage: Voltage control (default setting) Key: key control Start record key: when key recording control way, the keys to start record (default #111#) End record key: when key recording control way, the keys to end record (default #222#) Voice sensitivity: detect the voice when the voice volume reaches parameter value (default 20, be valid when use voice control) Voice Pick Off time: the time length for each the channel s call finish recording. Unit is second (Be valid when use voice control) Enabled AGC: Automatic gain control AGC Value: Automatic gain control value (default value 1400) Pick up time(ms): After the time (parameter value) of hook-off, the standalone recorder judges it a pick up. The default value is 120 ms Pick off time(ms): After the time (parameter value) of hook-on, the standalone recorder judges it a pick off. The default value is 500 ms Pick up voltage (V): Pick up voltage (4~18V) Pick off voltage (V): pick off voltage (18v ~46V) Fixed time restart device: set the time to restart the device Work time 1: set device recording time. Default recording time : 00:00-24:00 Work time 2: set device recording time Update device time to match with the computer time.

22 5.5.6 Check device firmware version Restart device (need restart device after set new parameter) 6, RDMC Software installation: manage one device You can get software installation application from our CD or downloading it from our company website. Open our software folder, click setup.exe to start to install, do it according to the prompt. Do not need to restart computer after finish installation. The default installation directory: C:\RDMC. RMDC folder 6.0, Standalone recorder RDMC software operation instruction 6.1 Run RDMC.exe in C:\RDMC; or click Run-> all programs-> RDMC->Recording Manager System Standalone recorder default IP address: After install standalone recorder client software, it locates in C:\ RDMC, default IP address
, see the follow image Default user name: admin, password: admin The function menu show grey when do not login in")
23 Run C:\ RDMC\RDMC.exe, and login in Central Manage system (Default user name: admin, password: admin), see the follow image Default user name: admin, password: admin The function menu show grey when do not login in the software. All the operations can be operated after login in the software. 6.2 Add Standalone recorder IP address on the software: after login in the software, click System-> Add Terminal IP, input IP address (default: ), Terminal name and Terminal password (default: ), select use default port, click Add.

24 After adding IP address, Total channels, Line status and disk free space info will show on the main screen. It shows the standalone work ok. Telephone line connect ok Not connect telephone line No connect standalone recorder
 Start record Mode: Voice Start record Mode: Key 6.3.")
25 Double click Minimize window, will return max window 6.3, Software function introduction: Main interface: Central management system manage a standalone recorder. It will show different telephone lines on the main screen. See the follow image Start record Mode: voltage (default) Start record Mode: Voice Start record Mode: Key Standalone recorder RDMC list interface Click Main screen will enter list screen.

26 6.3.3 Monitor Live monitor on the main software interface: click Monitor and click the telephone icon. The frame will become white colour when can monitor Live monitor on the list software interface: When need to monitor one channel calls, click Monitor-> double click the channel you want to monitor, then the channel will turn yellow.

27 6.3.4 Search Terminal Search: search the recorded files in this standalone recorder Can search according to different conditions. Click start to play the recorded files in the standalone recorder Click will download the recorded file you chose to the local computer s disk (Use this menu when do not choose real time download recorded files, and can use Shift or Ctrl key to choose several files to download). The downloading progress will show on the interface.

28 Delete the recorded files from the standalone recorder (if not administrator, user need permission). 9 Convert the voice file to.wav or MP3 format Export Excel,.txt file Local Search search the recorded files which have downloaded to the local computer. Convert the voice file to.wav or MP3 format Delete the recorded files from the computer (if not administrator, user need permission).

29 6.3.5 Statistics statistics duration, call times and so on. Click Statistics to enter the follow interface Customer : Click Customer to manage the customer information.

30 6.3.7 System Setting Permission Setting: manage the system operator s permission. Add Terminal IP: can add, modify, delete standalone recorder device. Recording set: Choose the language and set the store path for the recorded files. Update Embedded: update standalone recorder hardware file and change IP by central manage system Embedded setting: Channel parameter setting. Read embedded version (need to click the right top triangle to get): can check the hardware version to see if the update is ok after system update. Database(only for second development): add My SQL, MS SQL or other SQL Permission Setting: manage the system operator s permission and modify terminal password. Can add different user and give them login in software password and permission.
.")
31 You can modify the standalone recorder hardware password (The user can modify terminal device password which have Permissions setting rights.). Standalone recorder hardware terminal password (default: )
32 Add Terminal IP: can add, modify, delete standalone recorder IP to connect hardware. Input IP address (default: ), Terminal name and Terminal password (default: ), Select Use default port, click Add. Attention: if your PC s IP is not x, you can add a IP X and gateway on your PC firstly Recording set (Set language, file path setting and download setting)

33 Set language and file path Choose language Auto: show the language according the operation system s language. ENG: English USER: Software language can be edited by the user Embedded recording files save path You can choose the save path (\C\D\E\F\G\H\I\J\K\L\M\N:\Recorder). It will store the recorded files from standalone recorder by downloading Download setting. -> Real time download the standalone recorder s recorded files Only select this check box, will automatically download recorded files when the calls end. -> Every day at * time to start to download (fixed time) When select this check box, you must also need to select the above box (Real time download the standalone recorder s recorded files) to fixed time download the recorded files. -> Download strategy Automatically download the recent * days s recorded files.

34 Only click this check box, will automatically download the recent * days recorded files ->, Click Save to set. When you choose Real time download the standalone recorder s recorded files, you can search and play the recorded files after the calls end on the Local search interface Update Embedded (all the files need to update are in C:\RDMC\pubfile) In Update standalone recorder interface, you can update hardware files, set system time, change IP address Update terminal program files: update the system file(such as: gxem_record,gxcfg.ini, gxv729.bin,gx_dsp_drv.ko) Browse and select the update file, then click Start Upate. When it show update file successfully, you must click Reboot Terminal button. It will come into effect after restart standalone recorder s recording system software Update terminal recording system time: firstly choose the IP address, then click Start update to renew the time of the standalone recorder Update Terminal IP IP address: standalone device new IP Mask: standalone device new subnet mask Gateway: standalone device gateway Please set the above information to match your network setting

35 When it show update file successfully, you must click Reboot Terminal button. It will come into effect after 1 minute Embedded settings Choose the IP address on the left, Upload configuration: show the channel setting Download Configuration: write channel setting on the standalone recorder device. Total channel: show the standalone recorder s total channels (2/4/8/16) Storage medium: SD card/ Hard disk Device restart time: **:** hh:mm : the device will automatically self-inspection at this time. Time Out Times(s): connect device timeout Main Port:12345 Web Port:80 Local number: You can set the local number to easily recognize telephone user and search the calls record. Channel Name: You can set the channel name to easily recognize telephone number user and search the calls record. Channel Record: Yes (record); NO (This channel do not record) Record mode: Voice: voice control Voltage: Voltage control (default setting)
 Audio hook on time: the time length for each the channel s call finish")
36 Key: key control Keying start key: when key recording control way, the keys to start record (default #111#) Keying over key: when key recording control way, the keys to end record (default #222#) Audio sensitivity: detect the voice when the voice volume reaches parameter value (default 20, be valid when use voice control) Audio hook on time: the time length for each the channel s call finish recording. Unit is second (Be valid when use voice control) DTMF sensitivity: Normal/ high/ highest AGC enabled: Automatic gain control AGC Value: Automatic gain control value (default value 1400) Cancel password: During talking, input this password, will stop recording and delete this recorded file. First and last word must be # (default value #3333#) Dial length: Integer; When recording finish, will delete the recording files if the dial number length is less than the parameter value. Default value is 0 (0 means this setting do not invalid) Hook-off time: After the time (parameter value) of hook-off, the standalone recorder judges it a pick up. The default value is 120 ms Hook-on time: After the time (parameter value) of hook-on, the standalone recorder judges it a pick off. The default value is 500 ms Hook off (V): Pick up voltage (4~18V) Hook on (V): pick off voltage (18v ~46V)

37 No display prefix No. : when the first digital for income or out call is same as the added digital, it will do not display and delete these digitals. Such as firstly dial 9 when call out in the company. After setting it there will be not show 9 on the software interface and recorded files. No Record No.: when the incoming and out call are same as the added the telephone number, it will do not record these telephone number calls. The maximum is to set 20 telephone numbers not to record. Every telephone number is less than 15 digitals Read embedded version Click Read embedded version, can check all standalone recorder s hardware version Database (only for second development)
38 7, G729 Voice decoder installation You need to install voice decoder software G729 (after installation, the recorded files can be directly played by Windows media player in the computer): open G729 folder, right click G729aACM.inf, choose install to auto install. G729 folder 8. Center Management software instruction 8.1, No need install software. Only need to install SetupOCX.bat when run software at the first time. 8.2, Login in
, and rename by yourself. 8.4, Add new device 8.")
39 Default use name: admin Default password: admin 8.3, Add new area (Right click), and rename by yourself. 8.4, Add new device 8.5, input standalone recorder IP info

40 8.6, Device login in Select Auto login in device when run. If do not select this option, you need to login in device firstly after you open software every time. 8.7, Show channel status after login in

41 8.8, Monitor 8.9, Play

42 8.10, Search 8.11, Download Default local PC path: C:\RecordFiles\ You can change the path by yourself
. 9.")
43 8.12, Backup Default local PC path: C:\RecordFiles\ You can change the path by yourself 8.13, Check hardware version 9, Others 9.1, RDMC and WEB can not run in a PC at the same time 9.2, RESET: reset device default IP and default user and password and port number (press this reset button over 4 seconds; less then 4 seconds, only restart the device). 9.3 On-off: Power switch: need to press on-off switch firstly, then pull out the power line after 4 seconds. Or else the calls may miss or the hard disk may be broken.
Ultra Thin Client TC-401 TC-402. Users s Guide
 Ultra Thin Client TC-401 TC-402 Users s Guide CONTENT 1. OVERVIEW... 3 1.1 HARDWARE SPECIFICATION... 3 1.2 SOFTWARE OVERVIEW... 4 1.3 HARDWARE OVERVIEW...5 1.4 NETWORK CONNECTION... 7 2. INSTALLING THE
3.5 EXTERNAL NETWORK HDD. User s Manual
 3.5 EXTERNAL NETWORK HDD User s Manual Table of Content Before You Use Key Features H/W Installation Illustration of Product LED Definition NETWORK HDD Assembly Setup the Network HDD Home Disk Utility
Allworx Installation Course
 VPN Hello and welcome. In the VPN section we will cover the steps for enabling the VPN feature on the Allworx server and how to set up a VPN connection to the Allworx System from your PC. Page 1 VPN The
DRO-210i LOAD BALANCING ROUTER. Review Package Contents
 DRO-210i LOAD BALANCING ROUTER Review Package Contents Make sure that the package contains the following items. DRO-210i Load Balancing Router 2 Straight Ethernet Cables 1 Cross Over Ethernet Cable 1 Power
Setting Up Your FTP Server
 Requirements:! A computer dedicated to FTP server only! Linksys router! TCP/IP internet connection Steps: Getting Started Configure Static IP on the FTP Server Computer: Setting Up Your FTP Server 1. This
Prestige 202H Plus. Quick Start Guide. ISDN Internet Access Router. Version 3.40 12/2004
 Prestige 202H Plus ISDN Internet Access Router Quick Start Guide Version 3.40 12/2004 Table of Contents 1 Introducing the Prestige...3 2 Hardware Installation...4 2.1 Rear Panel...4 2.2 The Front Panel
3.5 Mobile LAN Disk. User Guide
 3.5 Mobile LAN Disk User Guide Contents 1. Hardware...2 1.1 Power...2 1.2 Ports...2 1.3 Reset Button...2 1.4 LEDs...2 1.5 Front View...3 1.6 Rear View...3 2. Installation....... 4 2.1 Requirements 4 2.2
Deploying Windows Streaming Media Servers NLB Cluster and metasan
 Deploying Windows Streaming Media Servers NLB Cluster and metasan Introduction...................................................... 2 Objectives.......................................................
Moxa Device Manager 2.0 User s Guide
 First Edition, March 2009 www.moxa.com/product 2009 Moxa Inc. All rights reserved. Reproduction without permission is prohibited. Moxa Device Manager 2.0 User Guide The software described in this manual
Prestige 623R-T. Quick Start Guide. ADSL Dual-link Router. Version 3.40
 Prestige 623R-T ADSL Dual-link Router Quick Start Guide Version 3.40 February 2004 Introducing the Prestige The Prestige 623R-T ADSL Dual-link Router is the ideal all-in-one device for small networks connecting
ivms-4200 Client Software Quick Start Guide V1.02
 ivms-4200 Client Software Quick Start Guide V1.02 Contents 1 Description... 2 1.1 Running Environment... 2 1.2 Surveillance System Architecture with an Performance of ivms-4200... 3 2 Starting ivms-4200...
SATO Network Interface Card Configuration Instructions
 SATO Network Interface Card Configuration Instructions Table of Contents 1. Reset of wired/wireless interface card... 3 2. Installing the All-In-One Utility (recommended)... 4 3. Configuring wired/wireless
Internet Access to a DVR365
 Configuration Details : Internet Access to DVR365 Page : 1 Internet Access to a DVR365 These instructions will show you how to connect your DVR365 to the internet via an ADSL broadband modem/router. The
1. Hardware Installation
 4 Port 10/100M Internet Broadband Router with USB Printer server Quick Installation Guide #4824904AXZZ0 1. Hardware Installation A. System Requirement Before you getting started, make sure that you meet
Prestige 660R-6x Read Me First
 Prestige 660R-6x Read Me First Prestige Rear Panel Connections DSL PORT CONNECTION Connect the DSL port on the Prestige to the wall jack using the included DSL cable (telephone wire). Connect the micro
Vantage RADIUS 50. Quick Start Guide Version 1.0 3/2005
 Vantage RADIUS 50 Quick Start Guide Version 1.0 3/2005 1 Introducing Vantage RADIUS 50 The Vantage RADIUS (Remote Authentication Dial-In User Service) 50 (referred to in this guide as Vantage RADIUS)
3.5 LAN HDD Enclosure User s Manual
 3.5 LAN HDD Enclosure User s Manual NOTE: 1. USB and LAN can t be used at the same time. 2. HDD should be formatted as FAT32. Please check Disk utility section in this manual. 3. For internet FTP usage,
DVG-2101SP VoIP Telephone Adapter
 This product can be set up using any current web browser, i.e., Internet Explorer 6 or Netscape Navigator 6.2.3. DVG-2101SP VoIP Telephone Adapter Before You Begin 1. If you purchased this VoIP Telephone
V310 Support Note Version 1.0 November, 2011
 1 V310 Support Note Version 1.0 November, 2011 2 Index How to Register V310 to Your SIP server... 3 Register Your V310 through Auto-Provision... 4 Phone Book and Firmware Upgrade... 5 Auto Upgrade... 6
Network Attached Storage User Manual
 http://www.icybox.de IB-NAS902 Network Attached Storage User Manual Content Content... 2 Introduction... 3 SMB... 3 FTP... 3 DHCP... 3 More than a NAS... 3 Package content... 4 Take a look at the IB-NAS902...
Remote Backup Software User Manual V 2.0
 Remote Backup Software User Manual V 2.0 Table of Contents Chapter 1 Welcome to Remote Backup Software... 2 1.1 Overview... 2 1.2 Computer Disposition Request... 2 1.3 Convention... 2 Chapter 2 Installing
MAGIC TH6. System Configuration SW Version 2.000
 MAGIC TH6 System Configuration SW Version 2.000 1 Basic Settings Starting the Windows PC Software Line interface settings Operating Mode Audio lines Hold Signal Signal Processing Database Connection 2
USER MANUAL GUIMGR Graphical User Interface Manager for FRM301/FRM401 Media Racks
 USER MANUAL GUIMGR Graphical User Interface Manager for FRM301/FRM401 Media Racks CTC Union Technologies Co., Ltd. Far Eastern Vienna Technology Center (Neihu Technology Park) 8F, No. 60 Zhouzi St. Neihu,
Quick Installation Guide Network Management Card
 Rev.1.1 www.cyberpowersystems.com Quick Installation Guide Network Management Card Intelligent Network Management Card allows UPS to be managed, monitored, and configured via SNMP Card Configuration Tool
Installing the Microsoft Network Driver Interface
 Installing the Microsoft Network Driver Interface Overview This guide explains how to install the PictureTel Live200 Microsoft Network Driver Interface (NDIS) software you have downloaded from PictureTel's
Keri USB-A Connection and Configuration
 Step 1 - Connect the KPC-1 cable to the K-USB. NOTE: The form of the USB converter may vary, so the unit you receive may not be identical to the one displayed here. Step 2 Plug the USB Connector of the
c. Securely insert the Ethernet cable from your cable or DSL modem into the Internet port (B) on the WGT634U. Broadband modem
 on the WGT634U. Broadband modem") Start Here Follow these instructions to set up your router. Verify That Basic Requirements Are Met Assure that the following requirements are met: You have your broadband Internet service settings handy.
Start Here Follow these instructions to set up your router. Verify That Basic Requirements Are Met Assure that the following requirements are met: You have your broadband Internet service settings handy.
Remote Backup Software
 Remote Backup Software User Manual UD.6L0202D1044A01 Thank you for purchasing our product. This manual applies to Remote Backup software, please read it carefully for the better use of this software. The
64-Bit Compatibility with Micromeritics Applications
 Tech Tip 7 64-Bit Compatibility with Micromeritics Applications Micromeritics products are designed to operate in most Microsoft Windows environments. However, more current versions of Microsoft Windows,
ADSL Router Quick Installation Guide Revised, edited and illustrated by Neo
 ADSL Router Quick Installation Guide Revised, edited and illustrated by Neo A typical set up for a router PCs can be connected to the router via USB or Ethernet. If you wish to use a telephone with the
User s Manual Network Management Card
 User s Manual Network Management Card RMCARD202 Intelligent Network Management Card allows a UPS system to be managed, monitored, and configured Version 1.0 E-K01-SNMP005-0 TABLE OF CONTENTS Introduction
T3 Mux M13 Multiplexer
 T3 Mux M13 Multiplexer User Manual [Type the abstract of the document here. The abstract is typically a short summary of the contents of the document. Type the abstract of the document here. The abstract
GV-Data Capture V3 Series User's Manual
 GV-Data Capture V3 Series User's Manual Before attempting to connect or operate this product, please read these instructions carefully and save this manual for future use. 2006 GeoVision, Inc. All rights
4. Rear View. Function Switches 1. Fixed IP 2. DHCP Floating IP 3. Auto IRIS (DC Driver LENS) 4. Fixed LENS (AES)
 4. Fixed LENS (AES)") 4. Rear View 5 1.STATIC IP 2.DHCP 3.DC IRIS Mini USB 1 2 3 4 5 6 1. ALM-RST 2. ALM-IN 3. ALM-OUT 4. GND 5. RS485-6. RS485 + 1 2 3 4 5 6 7 DC Power Input: DC Jackψ2.1, DC12V---0.5A or higher. LAN/WAN Network
4. Rear View 5 1.STATIC IP 2.DHCP 3.DC IRIS Mini USB 1 2 3 4 5 6 1. ALM-RST 2. ALM-IN 3. ALM-OUT 4. GND 5. RS485-6. RS485 + 1 2 3 4 5 6 7 DC Power Input: DC Jackψ2.1, DC12V---0.5A or higher. LAN/WAN Network
Coolmax CN-590 Network Storage Solution
 Coolmax CN-590 Network Storage Solution Model Name Controller hip CPU OS Memory Interface CN-590 S2892 150MHz RTOS 8MB SDRAM / 1MB NOR Flash LAN Standard 10/100Base-TX Auto MDI/MDI-X Connector Type RJ-45
Connecting the DG-102S VoIP Gateway to your network
 Contents of Package: DG-102S VoIP Station Gateway Power adapter CD-ROM, including User s Manual Quick Install Guide Requirements: RS-232 Console Cable Two RJ-45 CAT-5 Straight-Through Cables For more information
Guide for Updating Firmware and Troubleshooting Connection Issues
 Guide for Updating Firmware and Troubleshooting Connection Issues This document provides detailed instructions for updating firmware and for troubleshooting for connection issues with Raspberry Pi board.
ZyXEL IP PBX Support Note. ZyXEL IP PBX (X2002) VoIP. Support Notes
 VoIP. Support Notes") ZyXEL IP PBX (X2002) VoIP Support Notes Version 1.00 October 2008 1 Contents Overview ZyXEL IP PBX Support Note 1. How to manage and maintain your IPPBX?...3 1.1 Firmware Upgrade..3 1.2 Backing up your
ZyXEL IP PBX (X2002) VoIP Support Notes Version 1.00 October 2008 1 Contents Overview ZyXEL IP PBX Support Note 1. How to manage and maintain your IPPBX?...3 1.1 Firmware Upgrade..3 1.2 Backing up your
1 Minimum system requirements
 Metrohm AG CH-9101 Herisau Switzerland Phone +41 71 353 85 85 Fax +41 71 353 89 01 [email protected] www.metrohm.com Installation MagIC Net 2.x 1 Minimum system requirements Operating system RAM Memory
SA-9600 Surface Area Software Manual
 SA-9600 Surface Area Software Manual Version 4.0 Introduction The operation and data Presentation of the SA-9600 Surface Area analyzer is performed using a Microsoft Windows based software package. The
PC/POLL SYSTEMS Version 7 Polling SPS2000 Cash Register TCP/IP Communications
 PC/POLL SYSTEMS Version 7 Polling SPS2000 Cash Register TCP/IP Communications PC/POLL SYSTEMS supports native TCP/IP polling for the SPS2000 cash register. It is recommended users have the register updated
Addonics T E C H N O L O G I E S. NAS Adapter. Model: NASU2. 1.0 Key Features
 1.0 Key Features Addonics T E C H N O L O G I E S NAS Adapter Model: NASU2 User Manual Convert any USB 2.0 / 1.1 mass storage device into a Network Attached Storage device Great for adding Addonics Storage
If you need additional assistance please contact our Technical Support Center at 24 hours a day, 7 days a week.
 Cisco SPA 2100 Phone Adapter Installation Manual Index Installation of the Cisco SPA 2100 Phone Adapter to NationPhone P. 1 Index, before you begin, and what is included P.2 Installing the NationPhone
24 Port Gigabit Ethernet Web Smart Switch. Users Manual
 24 Port Gigabit Ethernet Web Smart Switch Users Manual Content Web Smart Switch Configure login -------------------------------- 2 Configuration System Configuration ---------------------------------------------------
CallFinder. Model CF220 DID Adapter Quick Start Guide
 CallFinder Model CF220 DID Adapter Quick Start Guide CallFinder Model CF220 DID Enabler Quick Start Guide P/N 82000160, Revision A Copyright 2004 by Multi-Tech Systems, Inc. All rights reserved. This publication
OPERATION MANUAL. MV-410RGB Layout Editor. Version 2.1- higher
 OPERATION MANUAL MV-410RGB Layout Editor Version 2.1- higher Table of Contents 1. Setup... 1 1-1. Overview... 1 1-2. System Requirements... 1 1-3. Operation Flow... 1 1-4. Installing MV-410RGB Layout
Optimum Business SIP Trunk Set-up Guide
 Optimum Business SIP Trunk Set-up Guide For use with IP PBX only. SIPSetup 07.13 FOR USE WITH IP PBX ONLY Important: If your PBX is configured to use a PRI connection, do not use this guide. If you need
Chapter 6 Using Network Monitoring Tools
 Chapter 6 Using Network Monitoring Tools This chapter describes how to use the maintenance features of your Wireless-G Router Model WGR614v9. You can access these features by selecting the items under
Linksys Gateway SPA2100-SU Manual
 Linksys Gateway SPA2100-SU Manual Manuel de l'utilisateur Table of Contents Looking for Basic Setup Instructions?... 3 Most Recent Version of this Manual... 3 Advanced Setup Instructions... 4 Wiring Your
Internet Telephony PBX system IPX-1980
 Internet Telephony PBX system IPX-1980 Quick Installation Guide Table of Contents 1. Package Contents... 3 2. Hardware Installation... 4 2.1 Safety Instruction... 4 2.2 Front panel... 4 2.3 LED & Button
LOREX CLIENT Remote Software 4.0
 LOREX CLIENT Remote Software 4.0 Instruction Manual English Version 2.0 MODEL: L20WD800 Series www.lorexcctv.com Copyright 2008 LOREX Technology Inc. Table of Contents Table of Contents Software Installation...
Network Video Recorder. Operation Manual
 Network Video Recorder Operation Manual Content 1 Product Description... 1 1.1 Product Overview... 1 1.2 Specification... 1 2 Product Structure Introduction... 2 2.1 Back Interface... 2 2.2 Front Panel...
LifeSize Networker Installation Guide
 LifeSize Networker Installation Guide November 2008 Copyright Notice 2006-2008 LifeSize Communications Inc, and its licensors. All rights reserved. LifeSize Communications has made every effort to ensure
The PostBase Connectivity Wizard
 The PostBase Connectivity Wizard The PostBase Connectivity Wizard allows you to easily set up your PostBase postage machine to suit your organization s arrangements. This document will guide you through
Volume AGKSOFT. Wayne Nucleus Back Office Software. Nucleus Guide
 Volume N AGKSOFT Wayne Nucleus Back Office Software Nucleus Guide Configuring Your Back Office PC The Back Office PC requires 2 network cards to connect to the Nucleus & internet at the same time. On some
Networking. General networking. Networking overview. Common home network configurations. Wired network example. Wireless network examples
 Networking General networking Networking overview A network is a collection of devices such as computers, printers, Ethernet hubs, wireless access points, and routers connected together for communication
4-441-095-12 (1) Network Camera
 Network Camera") 4-441-095-12 (1) Network Camera SNC easy IP setup Guide Software Version 1.0 Before operating the unit, please read this manual thoroughly and retain it for future reference. 2012 Sony Corporation Table
4-441-095-12 (1) Network Camera SNC easy IP setup Guide Software Version 1.0 Before operating the unit, please read this manual thoroughly and retain it for future reference. 2012 Sony Corporation Table
MDM Mass Configuration Tool User s Manual
 User s Manual First Edition, October 2010 www.moxa.com/product 2010 Moxa Inc. All rights reserved. Reproduction without permission is prohibited. User s Manual The software described in this manual is
Guide to Installing BBL Crystal MIND on Windows 7
 Guide to Installing BBL Crystal MIND on Windows 7 Introduction The BBL Crystal MIND software can not be directly installed on the Microsoft Windows 7 platform, however it can be installed and run via XP
Chapter 4 Management. Viewing the Activity Log
 Chapter 4 Management This chapter describes how to use the management features of your NETGEAR WG102 ProSafe 802.11g Wireless Access Point. To get to these features, connect to the WG102 as described in
KViewCenter Software User Manual 2012 / 04 / 20 Version 2.2.1.0
 KViewCenter Software User Manual 2012 / 04 / 20 Version 2.2.1.0 Table of Contents Chapter 1. KViewCenter Interface... 5 1.1. Log in.... 5 1.2. Log out... 5 1.3. Control Panel... 6 1.4. Control Panel (Preview
USER GUIDE. Web Interface
 USER GUIDE Web Interface 1. Overview... 4 2. Install and Set Up... 4 2.1. Charge your Wi-Fi HDD... 4 2.2. For Mac users... 5 2.3. Connect your Wi-Fi HDD to your computer (no Internet connection required)...
USER GUIDE. Ethernet Configuration Guide (Lantronix) P/N: 2900-300321 Rev 6
 P/N: 2900-300321 Rev 6") KRAMER ELECTRONICS LTD. USER GUIDE Ethernet Configuration Guide (Lantronix) P/N: 2900-300321 Rev 6 Contents 1 Connecting to the Kramer Device via the Ethernet Port 1 1.1 Connecting the Ethernet Port Directly
KRAMER ELECTRONICS LTD. USER GUIDE Ethernet Configuration Guide (Lantronix) P/N: 2900-300321 Rev 6 Contents 1 Connecting to the Kramer Device via the Ethernet Port 1 1.1 Connecting the Ethernet Port Directly
Chapter7 Setting the Receiving PC for Direct Upload. Setting the Receiving PC for Direct Upload... 148 For Windows... 148 For Macintosh...
 Chapter7 Setting the Receiving PC for Direct Upload Setting the Receiving PC for Direct Upload... 148 For Windows... 148 For Macintosh... 153 Setting the Receiving PC for Direct Upload This section explains
AudioCodes Mediant 1000 Configuration Guide
 AudioCodes Mediant 1000 Configuration Guide 2010 FaxBack, Inc. All Rights Reserved. NET SatisFAXtion and other FaxBack products, brands and trademarks are property of FaxBack, Inc. Other products, brands
Getting Started KX-TDA5480
 4-Channel VoIP Gateway Card Getting Started KX-TDA5480 Model KX-TDA0484 Thank you for purchasing the Panasonic 4-Channel VoIP Gateway Card, KX-TDA5480/KX-TDA0484. Please read this manual carefully before
CPEi 800/825 Series. User Manual. * Please see the Introduction Section
 CPEi 800/825 Series User Manual * Please see the Introduction Section Contents Introduction...iii Chapter 1: CPEi 800/825 User Guide Overview... 1-1 Powerful Features in a Single Unit... 1-2 Front of the
User s Manual of DVR DVS Remote Client Software V 4.0.1
 User s Manual of DVR DVS Remote Client Software V 4.0.1 Index Version description...4 1 Introduction...8 2 Software Install, Uninstall and use...9 2.1 Install remote client software ver4.0.1...9 2.2 Uninstall
How To Remotely View Your Security Cameras Through An Ezwatch Pro Dvr/Camera Server On A Pc Or Ipod (For A Small Charge) On A Network (For An Extra $20) On Your Computer Or Ipo (For Free
 On A Network (For An Extra $20) On Your Computer Or Ipo (For Free") How to Remotely View Security Cameras Using the Internet Introduction: The ability to remotely view security cameras is one of the most useful features of your EZWatch Pro system. It provides the ability
How to Remotely View Security Cameras Using the Internet Introduction: The ability to remotely view security cameras is one of the most useful features of your EZWatch Pro system. It provides the ability
RAM: 2 Gb Hard Drive: 168 hours of recording per Gb of disk space available NIC : 2 NIC cards required for IP Recording.
 This guide describes the installation procedures for the BackOffice software when used with the MultiCorder Hardware as a centralized Call Recording and storage solution. The complete MultiCorder BackOffice
PREFACE http://www.okiprintingsolutions.com 07108001 iss.01 -
 Network Guide PREFACE Every effort has been made to ensure that the information in this document is complete, accurate, and up-to-date. The manufacturer assumes no responsibility for the results of errors
To perform Ethernet setup and communication verification, first perform RS232 setup and communication verification:
 PURPOSE Verify that communication is established for the following products programming option (488.2 compliant, SCPI only): DCS - M9C & DCS M130, DLM M9E & DLM-M9G & DLM M130, DHP - M9D, P series, SG,
Configuring CyberData VoIP Ceiling Speakers
 NetVanta Unified Communications Technical Note Configuring CyberData VoIP Ceiling Speakers Introduction The CyberData Voice over IP (VoIP) ceiling speaker connects to existing local area networks (LANs)
Voice Over Internet Protocol (VoIP) Configuration
 Configuration") (VoIP) Configuration ENGINEERING REPORT No: 02-003 Introduction This report describes interfacing the IPCS VoIP Gateway Model EGW-902 to an ESTeem Model 192E Wireless Ethernet radio modem in a demonstration
(VoIP) Configuration ENGINEERING REPORT No: 02-003 Introduction This report describes interfacing the IPCS VoIP Gateway Model EGW-902 to an ESTeem Model 192E Wireless Ethernet radio modem in a demonstration
Section 5: Installing the Print Driver
 Section 5: Installing the Print Driver In This Section Print Driver Installation for USB Connection Using the Ethernet Connection and a Crossover Cable Print Driver: The Epilog print driver is the software
NAS SERVER FOR EXTERNAL HDD
 NAS SERVER FOR EXTERNAL HDD Quick Installation Guide DN-70230 System requirement Operating system and software: Windows 2000, XP, 2003, Vista, Mac OS X or above, Linux Required hardware resources: 10/100
NNAS-D5 Quick Installation Guide
 NNAS-D5 Quick Installation Guide NOTE: By default, LAN0 (eth0) is set to DHCP. If a DHCP server is available or detected, LAN0 will be assigned a DHCP IP address. If a DHCP server is not available, LAN0
MZK-NAS01SG User s Manual. Version. 1.0
 MZK-NAS01SG User s Manual Version. 1.0 Foreword Explanation of the Signals In order to let you set up and use this product correctly, please pay attention when reading or browsing the manual as you see
LevelOne VOI-9000. H.323 VoIP Gatekeeper. User Manual
 LevelOne VOI-9000 H.323 VoIP Gatekeeper User Manual Quick Guide Step 1: Broadband (ADSL/Cable Modem) Connections For VOI-9000 A. Connect VOI-9000 RJ45 LAN port to Router/ADSL as one of the following connections.
Prestige 324. Prestige 324. Intelligent Broadband Sharing Gateway. Version 3.60 January 2003 Quick Start Guide
 Prestige 324 Intelligent Broadband Sharing Gateway Version 3.60 January 2003 Quick Start Guide 1 Introducing the Prestige The Prestige is a broadband sharing gateway with a built-in four-port 10/100 Mbps
Quick Installation Guide DSL-2750U. 3G/ADSL/Ethernet Router with Wi-Fi and Built-in Switch
 DSL-2750U 3G/ADSL/Ethernet Router with Wi-Fi and Built-in Switch BEFORE YOU BEGIN Delivery Package Router DSL-2750U Power adapter DC 12V/1A RJ-11 telephone cable Ethernet cable (CAT 5E) Splitter (brochure).
User Manual of Web Client
 User Manual of Web Client 1 Index Chapter 1 Software Installation... 3 Chapter 2 Begin to Use... 5 2.1 Login and Exit... 5 2.2 Preview Interface Instruction... 6 2.3 Preview Image... 7 Chapter 3 Playback...
SOP085 - HELLER OVEN SOFTWARE INSTALLATION PROCEDURE. For version 6.2.x.x
 SOP085 - HELLER OVEN SOFTWARE INSTALLATION PROCEDURE For version 6.2.x.x DATE REV ECN - DESCRIPTION OF CHANGE Initials 02/20/2014 INT ECN 140003-001 TP For version 6.2.x.x Rev. INT Page 1 of 16 Basic PC
Quick Start Guide NVR DS-7104NI-SL/W NVR. www.hikvision.com. First Choice For Security Professionals
 Quick Start Guide NVR DS-7104NI-SL/W NVR NOTE: For more detailed information, refer to the User s Manual on the CD-ROM. You must use your PC or MAC to access the files. www.hikvision.com Quick Start 1.
Chapter 6 Using Network Monitoring Tools
 Chapter 6 Using Network Monitoring Tools This chapter describes how to use the maintenance features of your RangeMax Wireless-N Gigabit Router WNR3500. You can access these features by selecting the items
EXPRESSCLUSTER X for Windows Quick Start Guide for Microsoft SQL Server 2014. Version 1
 EXPRESSCLUSTER X for Windows Quick Start Guide for Microsoft SQL Server 2014 Version 1 NEC EXPRESSCLUSTER X 3.x for Windows SQL Server 2014 Quick Start Guide Document Number ECX-MSSQL2014-QSG, Version
Firewall VPN Router. Quick Installation Guide M73-APO09-380
 Firewall VPN Router Quick Installation Guide M73-APO09-380 Firewall VPN Router Overview The Firewall VPN Router provides three 10/100Mbit Ethernet network interface ports which are the Internal/LAN, External/WAN,
Multi-Homing Dual WAN Firewall Router
 Multi-Homing Dual WAN Firewall Router Quick Installation Guide M73-APO09-400 Multi-Homing Dual WAN Firewall Router Overview The Multi-Homing Dual WAN Firewall Router provides three 10/100Mbit Ethernet
ImagineWorldClient Client Management Software. User s Manual. (Revision-2)
") ImagineWorldClient Client Management Software User s Manual (Revision-2) (888) 379-2666 US Toll Free (905) 336-9665 Phone (905) 336-9662 Fax www.videotransmitters.com 1 Contents 1. CMS SOFTWARE FEATURES...4
ImagineWorldClient Client Management Software User s Manual (Revision-2) (888) 379-2666 US Toll Free (905) 336-9665 Phone (905) 336-9662 Fax www.videotransmitters.com 1 Contents 1. CMS SOFTWARE FEATURES...4
BROADBAND INTERNET ROUTER USER S MANUAL. Version 1.0. - Page 1 of 13 -
 Version 1.0 - Page 1 of 13 - 10/100M Broadband Router GETTING TO KNOW 2 3 4 1 5 7 6 - Page 2 of 13 - LED Indicator S/N Indicator Function 1 Power LED (Green) LED lights up steadily indicate that the power
USER GUIDE FOR ANDROID DEVICES
 USER GUIDE FOR ANDROID DEVICES Compatibility: Android 2.3 or higher 1. Overview... 4 2. Install and Set Up... 4 2.1. Charge your Power Connect... 4 2.2. Charge your smartphone battery with Power Connect...
Wireless Presentation System User s Manual
 Wireless Presentation System User s Manual (Model Name: WPS-Dongle) Version: 3.0 Date: August 19, 2009 Table of Contents 1. Overview...3 2. Quick Start...4 3. Windows Client Utility...7 3.1 Starting Program...7
DSL Installation Guide
 DSL Installation Guide Thank you for choosing Integra Telecom s DSL service! Introduction This guide will walk you through the DSL installation process and will help you configure a computer to access
How To Use 1Bay 1Bay From Awn.Net On A Pc Or Mac Or Ipad (For Pc Or Ipa) With A Network Box (For Mac) With An Ipad Or Ipod (For Ipad) With The
 With A Network Box (For Mac) With An Ipad Or Ipod (For Ipad) With The") 1-bay NAS User Guide INDEX Index... 1 Log in... 2 Basic - Quick Setup... 3 Wizard... 3 Add User... 6 Add Group... 7 Add Share... 9 Control Panel... 11 Control Panel - User and groups... 12 Group Management...
1-bay NAS User Guide INDEX Index... 1 Log in... 2 Basic - Quick Setup... 3 Wizard... 3 Add User... 6 Add Group... 7 Add Share... 9 Control Panel... 11 Control Panel - User and groups... 12 Group Management...
Compuprint 4247 Serial Matrix Printers
 Compuprint 4247 Serial Matrix Printers Remote Printer Management Utility for Serial Matrix Printers MAN10300-00.00 First edition (October 2011) This edition applies to the Compuprint 4247 printers and
3.1 RS-232/422/485 Pinout:PORT1-4(RJ-45) RJ-45 RS-232 RS-422 RS-485 PIN1 TXD PIN2 RXD PIN3 GND PIN4 PIN5 T+ 485+ PIN6 T- 485- PIN7 R+ PIN8 R-
 RJ-45 RS-232 RS-422 RS-485 PIN1 TXD PIN2 RXD PIN3 GND PIN4 PIN5 T+ 485+ PIN6 T- 485- PIN7 R+ PIN8 R-") MODEL ATC-2004 TCP/IP TO RS-232/422/485 CONVERTER User s Manual 1.1 Introduction The ATC-2004 is a 4 Port RS232/RS485 to TCP/IP converter integrated with a robust system and network management features
MODEL ATC-2004 TCP/IP TO RS-232/422/485 CONVERTER User s Manual 1.1 Introduction The ATC-2004 is a 4 Port RS232/RS485 to TCP/IP converter integrated with a robust system and network management features
F453. TiF453. User guide 10/11-01 PC
 F453 TiF453 User guide 10/11-01 PC 2 TiF453 User guide Contents 1. Hardware and Software requirements 4 2. Installation 4 1.1 Minimum Hardware requirements 4 1.2 Minimum Software requirements 4 3. Fundamental
Connecting to the Internet. LAN Hardware Requirements. Computer Requirements. LAN Configuration Requirements
 Connecting to the Internet LAN Hardware Requirements Computer Requirements LAN Configuration Requirements Installation Performed by Time Warner Cable Technician Connecting via Ethernet Connecting via USB
Ethernet Interface Manual Thermal / Label Printer. Rev. 1.01 Metapace T-1. Metapace T-2 Metapace L-1 Metapace L-2
 Ethernet Interface Manual Thermal / Label Printer Rev. 1.01 Metapace T-1 Metapace T-2 Metapace L-1 Metapace L-2 Table of contents 1. Interface setting Guiding...3 2. Manual Information...4 3. Interface