CAQH ProView. Practice Manager Module User Guide
|
|
|
- Corey Dean
- 9 years ago
- Views:
Transcription
1 CAQH ProView Practice Manager Module User Guide

2 Table of Contents Chapter 1: Introduction... 1 CAQH ProView Overview... 1 System Security... 2 Chapter 2: Registration... 3 Existing Practice Managers... 3 New Users Administrators... 3 New Users Child Accounts... 4 Self- Registration... 4 Creating a CAQH ProView Username and Password... 6 Forgotten Username and/or Password... 8 Chapter 3: Home Page Chapter 4: Manage User Manage Account Manage Users Add User Edit User Search for User Chapter 5: Manage Practice Add List Credentialing Contact Practice Location Hospital Affiliation Professional Liability Insurance Chapter 6: Manage Provider List Chapter 7: Bulk Upload Creating a Bulk Upload File Uploading a Bulk Upload File Chapter 8: Export Select Provider(s) to Export Select Sections for Export Single Provider Export Multiple Providers Export Using Saved Sections Review Export Information Export Summary Page Export Confirmation APPENDIX Provider Status CAQH Practice Manager Support Center Desk Information... 47

3 Chapter 1: Introduction The purpose of this document is to assist you as a Practice Manager in using the CAQH ProView Practice Manager Module. The Practice Manager Module is designed for office managers, allowing for common information to be entered at one time for multiple providers. There is no need to fill out redundant information for each healthcare provider practicing in your office. CAQH ProView Overview CAQH ProView is the healthcare industry s premier resource for providers to self- report professional and practice information to payers, hospitals, large provider groups and health systems. CAQH ProView eliminates duplicative paperwork for these organizations that may require provider profile information for claims administration, credentialing, directory services, and more. If you are an office manager or clinic administrator who assists with gathering information for credentialing or other administrative purposes for multiple providers, the CAQH ProView Practice Manager Module may facilitate your data entry process. The CAQH ProView Practice Manager Module can be accessed at The following steps provide you with a high- level overview of the process flow when using the CAQH ProView Practice Manager Module. 1. A provider is added to the CAQH ProView system either by self- registration or via a health plan request. 2. Using the CAQH ProView Practice Manager Module, a Practice Manager completes common sections for multiple providers. 3. The Practice Manager adds the applicable providers to the Provider List. 4. The Practice Manager exports the applicable sections and indicates which providers from the Provider List the data should be exported to. 5. The provider logs into CAQH ProView, reviews the available exported data, and then can choose to import the data into the data profile. 6. The provider completes any remaining required fields and the authorization section, which allows health plans access to the data profile. 7. The provider completes the attestation and uploads any required supporting documentation. 8. CAQH reviews the provider s supporting documentation for quality. 9. The provider status is marked Initial Profile Complete or Reattestation. (See Appendix for full list of provider statuses). 10. The completed provider data profile is available to the Participating Organization. This document will provide additional information and helpful tips for each of the steps that relate to the Practice Manager Module. To learn how providers use CAQH ProView, please refer to the CAQH ProView Provider User Guide. 1 P age

4 System Security The confidentiality and security of provider information and the privacy of system users are critical priorities for CAQH. CAQH has implemented information security policies, standards, guidelines, processes, procedures, and best practices to strengthen its security program and to protect its information assets. CAQH ProView is designed to be compliant with laws and regulations relating to the privacy of individually identifiable information. The CAQH ProView solution is housed in secure datacenters where multiple physical and electronic safeguards are implemented. Secure Internet access to application screens, use of passwords, certificates, and powerful Secure Socket Layer (SSL) encryption are used to help ensure only authorized use of the system. Only authenticated users have access to their restricted data over connections that automatically encrypt all information exchanges. Virus detection mechanisms are used to help ensure that the database and the websites are free of viruses. Routine encrypted back- ups protect volatile system data and are secured in an off- site storage facility. 2 P age

5 Chapter 2: Registration Registration is required for all Practice Managers to obtain access to the CAQH ProView Practice Manager Module. Existing Practice Managers For Practice Managers who were previously registered with the CAQH Universal Provider Datasource (UPD), go to the CAQH ProView Practice Manager Module at (see Figure 01). You can initially sign- in and register with CAQH ProView by entering your UPD username and password and clicking Sign In. You will be prompted to update your username and password at this time. Refer to Creating a CAQH ProView Username and Password on page 6 of this guide for the next steps in the process. New Users Administrators If you were not previously registered with the UPD, you may begin the self- registration process by accessing CAQH ProView at (see Figure 01) and selecting Click here to register for CAQH ProView. All users who self- register will automatically be established as Administrator user accounts, which allows for access to add or edit child user accounts. FIGURE 01 3 P age

6 New Users Child Accounts Once the Administrator has established an account, the Administrator will be able to add other Administrators or Basic Users to the same account. A Basic User cannot add or edit other users, but will have all other privileges and views as the Administrator. When a new user is created in the portal by the Administrator, CAQH ProView will send an to the address of the newly created user. New users will complete their registration with the CAQH ProView Practice Manager module by selecting the link contained in the e- mail. You will be prompted to update your username and password at this time. Refer to Creating a CAQH ProView Username and Password on page 6 of this guide for the next steps in the process. Self- Registration Users who self- register with the Practice Manager Module will need to complete the CAQH ProView Practice Manager Self Registration screen. This includes completing your practice information (see Figure 02). The fields marked with an asterisk (*) are required. FIGURE 02 4 P age

7 You will also need to provide your user account information (see Figure 03). In this section, you can indicate if you would like more information about the Bulk Upload functionality. The Bulk Upload functionality allows large practice groups (more than 50 providers) the ability to upload a data file to the common provider profile sections with the Practice Manager Module. CAQH will process this data file electronically. Refer to Chapter 7: Bulk Upload for more information on this functionality. FIGURE 03 5 P age

8 Creating a CAQH ProView Username and Password CAQH ProView users will be asked to create a username and password. If you were an existing UPD registered user, you may also be prompted to update your username and password to meet CAQH ProView requirements (see Figure 04). FIGURE 04 CAQH ProView users will also be asked security questions to faciliate account access in case of a forgotten username and/or password. Select three security questions and provide unique answers for each (see Figure 05). Then select Submit. FIGURE 05 6 P age

9 If you indicated you would like more information about the Bulk Upload functionality, you will see the following screen (see Figure 06). Click the link to proceed to the Sign- In page. FIGURE 06 7 P age

10 Forgotten Username and/or Password If you forgot your Username, you may select the Forgot Username link on the CAQH ProView sign- in page. Enter your address to receive your username in an (see Figure 07). FIGURE 07 If you forgot your Password, you may select the Forgot Password link on the CAQH ProView sign- in page. Enter your username and address to reset password (see Figure 8). An with a link will be sent to you to reset your password. FIGURE 08 8 P age
.")
11 Once you select the link in the sent to you, enter and re- enter your new password, then select Reset Password (see Figure 09). FIGURE 09 The Password Change confirmation (see Figure 10) will appear when your password has been successfully reset. You can then log into CAQH ProView using your new password. FIGURE 10 9 P age

12 Chapter 3: Home Page You will see the CAQH ProView Practice Manager Module Home page after a successful login (see Figure 11). Tip: If you need assistance on the Home page, you can access the Help link that is displayed in the top right hand corner on the Home page. FIGURE 11 The Home page displays five components: 1. Exports The Exports section displays a summary of recent exports, the related user who performed the export, and the date exported. 2. Manage Users This section displays a list of most recent users, their roles and statuses. Only Administrators can view the Manage Users section. 3. Message Center The Message Center section displays messages related to your account. 10 P age

13 4. Activity Log The Activity Log section displays recent users who have logged into the account and recent activity within the account. 5. Bulk Upload Exceptions This section displays a list of Exception Reports from a Bulk Upload processed file. Only users with Bulk Upload access can view the Bulk Upload Exceptions section. In addition, to these components, across the top of the Home page is a navigation menu, which allows you to navigate to the four sections of the Practice Manager Module (see Figure 12): Manage Users Administrator Users can click here to add or edit account users (see Chapter 4). Manage Practice Click here to enter information common across multiple providers (see Chapter 5). Manage List Click here to add, edit, and delete providers on your provider list (see Chapter 6). Export Click here to begin the export data process to multiple or individual provider accounts (see Chapter 8). FIGURE 12 A drop- down menu also is available next to the user s name in the upper right- hand corner (see Figure 13). FIGURE P age
. Manage Practice Click here to enter information common across multiple providers (see Chapter 5).")
14 From this drop- down menu, you can perform the following: 1. My Account Click here to edit or update personal account information. Note: the fields marked with an asterisk (*) are required. Select Save when you are finished updating your information (see Figure 14). FIGURE Resources Click here to access system reference materials, such as the Bulk Upload File Specifications. 3. Change Password Click here to update your password. 4. Security Questions Click here to update your security questions. 5. Activity Log Click here to view your activity log, which shows you the types of activities you have completed recently, along with the date and time of those activities. You are able to select the arrow next to the Activity Subject to expand the activity details (see Figure 15 below). 12 P age

15 FIGURE P age

16 Chapter 4: Manage User If you are an Administrator, you will have access to the Manage User section, where you have the ability to add, edit or delete user accounts. From the Home Page, click on Manage Users on the top navigation bar to begin the process (see Figure 16). FIGURE 16 From the Manage Users drop- down menu bar, you can perform the following: Manage Account Click here to edit or update your personal account information. Note: the fields marked with an asterisk (*) are required. Select Save when you are finished updating your information (see Figure 17). FIGURE P age
 are required.")
17 Manage Users Click here to add new users to your account, edit user roles and privileges, and search and view user profiles (see Figure 18). FIGURE 18 Add User An Administrator can create new Administrators or Basic Users by accessing the Add User link on the left- hand navigation pane. The Add User screen will appear (see Figure 19 below). 15 P age

18 FIGURE 19 To add a user, complete the fields and click on Add User. Fields marked with an asterisk (*) are required. At the bottom of the screen, you may define the user role as another Administrator or as a Basic User. The only difference between these roles is that Administrators are able to view the Manage Users section. You can also select the check box if the user needs Bulk Upload functionality. If the check box is selected, the system will notify CAQH to review the user s account for Bulk 16 P age

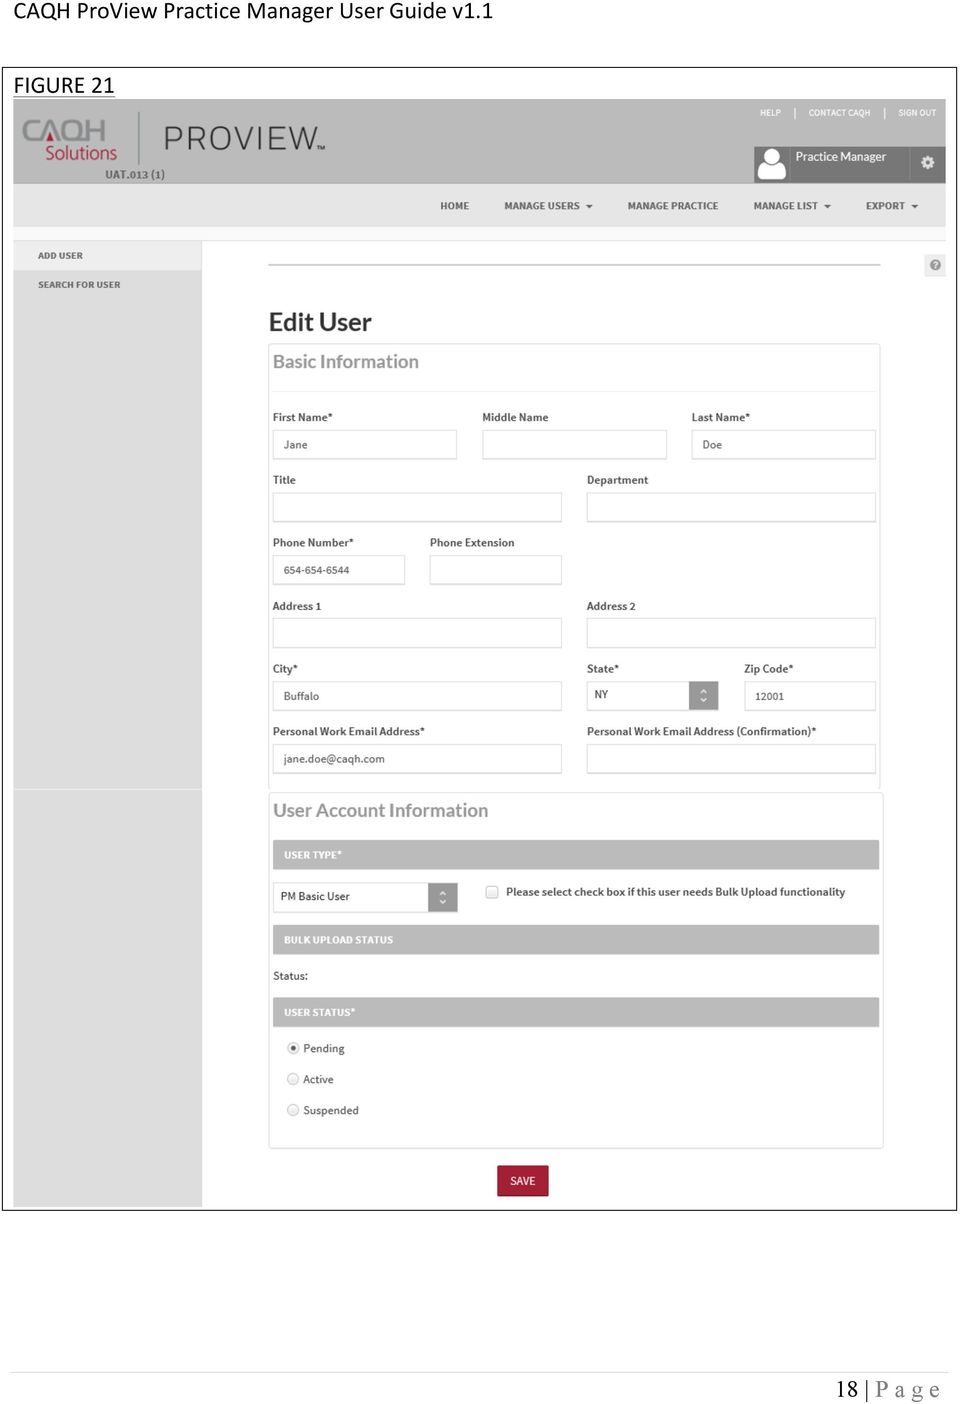
19 Upload functionality. CAQH will then review the user before granting or denying Bulk Upload functionality. Meanwhile, the user status will be set to Pending. Edit User The Administrator can edit user information by selecting a user name in the Manage Users screen (see Figure 20). FIGURE 20 The Edit User screen will display (see Figure 21 below). Here you can edit the user s account information, their user role (Administrator or Basic), and their user status (Pending, Active, or Suspended). 17 P age
.")
20 FIGURE P age
21 Search for User An Administrator can search for a user by selecting Search for User and completing any of the following fields (see Figure 22): Username User Type: PM Admin/PM Basic User First Name Last Name User Status: Pending, Active or Suspended E- mail Address FIGURE 22 A Search Results screen will display a list of users that meet your search criteria. You are able to select a user s name to view more details on that user (see Figure 23 below). 19 P age
22 FIGURE P age
23 Chapter 5: Manage Practice From the Home Page, click on Manage Practice on the top navigation bar to begin to enter data common across multiple providers (see Figure 24). You are able to create and save the four common provider profile information sections which include the following: Credentialing Contact Practice Location Hospital Affiliation Professional Liability Insurance. FIGURE 24 Tips: 1. Throughout the system, fields that a provider will be required to enter prior to attestation are indicated with a red asterisk (*). 2. If you need assistance, you can access the? link that is displayed on the right hand side of the screen. 3. Use Go to previous section or Save & Continue to page forward or backward within sections. 4. It is important to click on the Save & Continue button to save your information. If you close the browser without clicking Save & Continue, you will lose your information. On the first login, the user will not see any lists or common data (see Figure 25). FIGURE P age
24 Add List From the screen above, select Add List to create a practice group name and its associated practice state. In the CAQH ProView Practice Manager Module, you will need to maintain state- specific lists to drive any state mandated or voluntary form questions. Once you have added that information, select Save (see Figure 26). FIGURE 26 The following screen will display, summarizing the practice groups you have created (see Figure 27). Click Add List to add an additional practice group to your list. Click Edit to edit the name of a practice group within your list. Click Delete to delete the practice group from your list. Use the + sign to expand and view the common sections within each practice group. FIGURE P age
25 Within each practice group, there are four common sections where you may enter data for multiple providers (see Figure 28). 1. Credentialing Contact: used to create multiple Credentialing Contacts within each list. 2. Practice Location: used to create multiple Practice Locations within each list (see Figure 29 below as example). 3. Hospital Affiliation: used to create multiple Hospital Affiliations within each list. 4. Professional Liability Insurance (PLI): used to create multiple Professional Liability Insurance accounts within each list. The information entered and saved in each of these sections can be exported to a single provider or multiple providers. To expand within each section, use the show more (+) button for a specific list. To add data to a section, click Add. FIGURE P age
26 When you click on the show more (+) button, the applicable section will expand. Figure 29 below shows an example of the Practice Location section expanded. Within each section you can perform the following: Select Edit to edit the information within a practice location. Select Copy to create a duplicate of a practice location and its related information. Select Delete to remove a practice location. Please note that by selecting Delete, all information entered for that practice location will be deleted. FIGURE 29 The following pages provide helpful tips on completing each of the four common sections. 24 P age
27 Credentialing Contact Select Add or Edit to enter information for a credentialing contact. The Credentialing Contact section (see Figure 30) asks for specific contact information for your providers credentialing contacts, e.g. name, address, phone number, and . FIGURE P age
28 Practice Location Select Add or Edit to enter information for a practice location. The Practice Location section (see Figure 31) asks for detailed information regarding your providers practice location(s) including general contact information, hours, covering colleagues, practice limitations, accessibility and services provided. Tips: 1. Throughout the screens, required fields that providers must complete prior to their attestation are indicated with a red asterisk (*). To export data, all required fields do not need to be completed by a practice manager, but they will be required before the provider can attest. 2. Use Go to previous section or Save & Continue to page forward or backward within sections. 3. It is important to click on the Save & Continue button to save your information. If you close the browser without clicking Save & Continue, you will lose your information. 4. Questions presented to you may vary based on the provider s primary practice state. FIGURE 31 The subsections are listed below and may vary based on the practice state. General Information o Physician Group/Practice Name Please enter the Practice Name as it appears on a provider s claim submission so it will match the name for the location that is known to 26 P age
29 o Address participating organizations with whom the provider contracts. In most cases, this will not be the practitioner s name. In some cases, this may be the name as it appears on the W9. CAQH requests that you enter the appropriate address for the actual physical location of the practice. If you do not have a physical practice location, you may enter a P.O. Box; however, please note that health plans intend to use this information for their directories. If you would like to enter a P.O. Box for the billing address, please enter this information in the Billing Contact section at the bottom of this page. o Group Medicaid Number o Group Medicare Number o NPI Type 2 o Phone Numbers o Phone Coverage o Tax Identification Number Hours o Office Hours o Patients Enter your provider s group National Provider Identification Number Coverage & Contact o Colleagues o Covering Colleagues o Mid- Level Practitioners Indicate the types of patients accepted into the practice Mid- level practitioners include: P.A. (physician's assistant), N.M.W (nurse midwife), N.P (nurse practitioner), or R.N.F.A (registered nurse first assistant). o Office Manager or Business Staff Contact o Billing Contact o Payment and Remittance Practice Limitations o Limitation A limitation is any restriction the practice has set on the gender or age of the patient population. o Gender Limitations o Age Limitations o Other Limitation Accessibility o ADA Accessibility The Americans with Disabilities Act (ADA) ensures access to the physical environment for people with disabilities. The ADA Standards establish design requirements for the construction and alteration of facilities subject to the law. These enforceable standards apply to places of public 27 P age
30 accommodation, commercial facilities, and state and local government facilities. o Handicapped Accessibility o Public Transportation Accessibility o Other Accessibility Services o Disabled Accessibility Services o Services Indicate what services are provided at this practice location Clinical Laboratory Improvement Amendments (CLIA) - Diagnostic testing helps health care providers screen for or monitor specific diseases or conditions. It also helps assess patient health to make clinical decisions for patient care. The Clinical Laboratory Improvement Amendments (CLIA) regulate laboratory testing and require clinical laboratories to be certificated by their state as well as the Center for Medicare and Medicaid Services (CMS) before they can accept human samples for diagnostic testing. Laboratories can obtain multiple types of CLIA certificates, based on the kinds of diagnostic tests they conduct. o Interpretation Services 28 P age
31 Hospital Affiliation Select Add or Edit to enter information for a hospital affiliation. The Hospital Affiliation section (see Figure 32) asks for detailed information regarding your providers hospital affiliations, including the hospital address, phone number, start and end dates, and department director information. Tips: 1. Throughout the screens, required fields that providers must complete prior to their attestation are indicated with a red asterisk (*). To export data, all required fields do not need to be completed by a practice manager, but they will be required before the provider can attest. 2. Use Go to previous section or Save & Continue to page forward or backward within sections. 3. It is important to click on the Save & Continue button to save your information. If you close the browser without clicking Save & Continue, you will lose your information. 4. Questions presented to you may vary based on the provider s primary practice state. FIGURE P age
32 Professional Liability Insurance The Professional Liability Insurance section (see Figure 33) asks for detailed information regarding your providers professional liability insurance. Select Add or Edit to enter information for your providers professional liability insurance. Tips: 1. Required fields that providers must complete prior to their attestation are indicated with a red asterisk (*). To export data, all required fields do not need to be completed by a practice manager, but they will be required before the provider can attest. 2. Questions presented to you may vary based on the provider s primary practice state. FIGURE 33 The questions asked in this section include the following: Self- insured o Self- insured providers are protected from professional liability claims by a program of self- insurance where expense payments and those to satisfy 30 P age
33 professional liability claims are made from a self- insurance trust fund. In other words, self- insured providers are not transferring financial risk for professional liability claims, and expenses to defend those claims, to an insurance carrier. Insurance name o If your provider does not carry professional liability insurance, select Not Insured in the Carrier/Self Insured Name. The remaining fields do not need to be completed. In addition, the provider will not be required to submit a professional liability insurance face sheet. However, the provider may need to submit a letter of credit to the health plan in lieu of the required professional liability insurance face sheet. If you have questions regarding your state s regulations, please refer to your affiliated health plan for clarification. o If your provider also has coverage under a Patient Compensation Fund, you still must complete all the questions in the Current Professional Liability Carrier section as they relate to the provider s primary malpractice carrier. Address Phone number Original effective date Current effective date Current expiration date Policy number Type of coverage o Note: Individual coverage is any malpractice liability insurance coverage that is not shared by other providers, such as a group, IPA or hospital policy. Amount of coverage per occurrence Amount of coverage per aggregate 31 P age
34 Chapter 6: Manage Provider List From the Home Page, click on Manage List on the top navigation bar to access and manage the list of providers associated with your account (see Figure 34). FIGURE 34 Click on Manage Provider List to view the list of providers associated with your account (see Figure 35). For new users, upon initial login, the Manage Provider List will not contain any providers. Once a list is established, the Manage Provider List will be populated. You can delete providers from your list by clicking on the selection box next to a provider and then selecting Delete. You can also download the entire list to an Excel sheet by selecting the Download to Excel button. FIGURE P age
35 Click on Search for a Provider to search for a provider from the CAQH ProView database. This navigates to a search page to enter search criteria, including the provider s name, CAQH Provider ID, NPI, etc. (see Figure 36). FIGURE 36 The Search Results page is displayed after a successful search is completed (Figure 37). FIGURE 37 If the selected search criteria filters do not show any results, the system will inform you. 33 P age
36 You can select providers from the search results and add them to your provider list by selecting the check box next to a provider and then selecting the Add Provider(s) button at the bottom of the results page. Alternatively, you can utilize the select all checkboxes in the header row to select all providers at once. 34 P age
37 Chapter 7: Bulk Upload This section provides details to users who have been granted access by CAQH to submit a file through the Bulk Upload functionality. The purpose of the Bulk Upload functionality is to assist large practices with the data entry process of the common data profile sections. The Bulk Upload functionality allows large practice groups, with greater than 50 providers, to upload a data file for all providers. Creating a Bulk Upload File The Bulk Upload Submission Instructions are located on the Resources page, accessible from the drop- down menu on the top right of the Home page (see Figure 38). This document provides the file template and file specification requirements for the Bulk Upload file. The submitted Bulk Upload file may contain new records, changed records or deleted records. CAQH ProView will process each record, identifying any changes based on the Action Flag. FIGURE 38 The Bulk Upload file must be named as listed in the table below. File Name Description Frequency Delimiter ProviderBulkUpload_YYYY_MM_DD The file name will be required Ad hoc Pipe _HH_MM.txt when submitted by PM user. delimited Uploading a Bulk Upload File You can submit the Bulk Upload File to an Incoming folder in the CAQH ProView secure FTP server or through the Bulk Upload page on the portal. For users with access to the Bulk Upload feature, you can access the bulk upload feature on the portal by clicking on Bulk Upload from the Manage List navigation menu (see Figure 39 below). 35 P age
38 FIGURE 39 Click on Browse to select the file you would like to upload (see Figure 40). If desired, you can add a text description of your file. Select Submit to submit the file for processing. When a Bulk Upload file is submitted that does not meet basic validations, the system creates a bulk upload exceptions report. This report will include any provider data that could not be processed because the file format did not meet the required file specifications. FIGURE P age
39 You can submit multiple Bulk Upload files; however, the files will be processed in the order in which they were received. Once the file is processed, the data will automically be exported to the individual provider data profiles. The provider will be able review the data and chose to import the data if desired. The provider will still need to complete any remaining outstanding required fields and complete the attestation process. 37 P age
40 Chapter 8: Export From the Home Page, click Export on the top navigation bar to begin the process of exporting your data to provider accounts (see Figure 41). FIGURE 41 Select Provider(s) to Export The initial step in the Export process is to select the provider(s) from your Provider List (see Figure 42). You have the ability to select a provider or a group of providers from the Provider List created in the Manage Provider List section. As the Provider List may be lengthy, you can use the search feature to narrow the results. FIGURE P age
41 You can search for a provider by the following: CAQH Provider ID CAQH Provider Type NPI TIN First Name Last Name Select from the drop down list and enter additional search criteria in the text box then select Search. You can also Add or Clear Search criteria using the relevant buttons. To export the provider information for a different state, select the Yes radio button, and then select the desired state from the drop down menu (see Figure 43). If a provider has multiple practice states, you will have to export the data individually by each state. FIGURE 43 Once you have selected the provider(s) to export data to, select Add to Export. 39 P age
42 Select Sections for Export The second step to the export process is to select the sections for export. Single Provider Export When exporting to a single provider, additional data profile sections are available to you to export. If a single provider with a single practice state is selected for export, the system will automatically load the applicable state s application form for data entry. If you indicated only one provider for export, the following screen will display (see Figure 44 below). FIGURE 44 Select the sections for export by selecting the checkbox that corresponds to each section. Below are the nine application sections you can choose to export to a single provider: 1. Personal Information 2. Professional IDs 3. Education 4. Professional Training 5. Specialties 6. Credentialing Contact 40 P age
43 7. Practice Location 8. Hospital Affiliations 9. Professional Liability Insurance (PLI) You must also indicate if you would like to export saved sections from the Manage Practice section of the Practice Manager Module. This includes the following common data profile sections: Credentialing Contact Professional Liability Insurance (PLI) Practice Location Hospital Affiliation information If you select No, the above four sections (if you selected all four) will be presented to you for data entry once you select Continue. If you select Yes, then you must select the Practice List that contains the provider profile information you will be exporting. Select Continue. Multiple Providers Export If you indicated multiple providers for export, the following screen will display (see Figure 45 below). When exporting to multiple providers, you will only be able to select from the four common data profile sections for export (Credentialing Contact, Practice Location, Hospital Affiliations, and Professional Liability Insurance). The checkboxes for the sections available for single provider exports will not be active. Select the sections for export by selecting the checkbox that corresponds to each section. 41 P age
44 FIGURE 45 You must also indicate if you would like to export saved sections from the Manage Practice section of the Practice Manager Module. If you select No, the above four sections (if you selected all four) will be presented to you for data entry once you select Continue. If you select Yes, then you must select the Practice List that contains the provider profile information you will be exporting. Select Continue. Using Saved Sections If you choose to use saved common data, the selected common sections will be populated using the saved common sections stored in Manage Practice (see Figure 46 below). On the page below, you must drag and drop the common provider information by section over to export. You can drag and drop as many sections as displayed and also have the option to Undo your selection. Once finished, select Complete Import & Save. 42 P age
45 FIGURE 46 Review Export Information During this export stage, you have the ability to input and/or review information within the sections you selected for export. Note: If you selected a single provider to export and selected to export any of the sections applicable only to the single provider export, i.e. Personal Information, Professional IDs, Education, Professional Training, or Specialty, these sections will be presented to you at this time to complete. The data you enter into these sections will not be saved for future use in your Practice Manager account. Tips: 1. Throughout the screens, required fields that providers must complete prior to their attestation are indicated with a red asterisk (*). To export data, all required fields do not need to be completed by a practice manager, but they will be required before the provider can attest. 2. Use Go to previous section or Save & Continue to page forward or backward within sections. 3. It is important to click on the Save & Continue button to save your information. If you close the browser without clicking Save & Continue, you will lose your information. 4. Questions presented to you may vary based on the provider s primary practice state. 43 P age
46 Export Summary Page This page shows you which providers were selected, as shown below, in addition to the sections you previously chose to save (See Figure 47). Once you have verified the following information, select Export. After the data is exported, you will not be able to see any changes to the data that the provider may make. You are able to see a record of the export in the Activity Log and the Export History Log on the Home page. NOTE: During future exports, the only provider profile information that is saved in the Practice Manager Module is information that is stored in the four common sections (Credentialing Contact, Practice Location, Hospital Affiliation, and Professional Liability Insurance). FIGURE P age
47 Export Confirmation The Export Successful screen is displayed only if the export of information is successful and available to the selected providers as shown below (see Figure 48). Selecting OK will bring you back to the Home page. FIGURE P age
48 APPENDIX Provider Status Provider statuses are defined below and are system populated or manually changed by the CAQH ProView Support Center based on the status of the provider s data profile: Status New Provider Initial Outreach Return Mail Undeliverable Alternate Outreach First Provider Contact Application Problem Application Data Submitted Initial Application Complete Re- Attestation Expired Attestation Opt out Provider Retired Provider Deceased Definition Provider has been entered into system but has not been sent a registration kit. Provider has been sent outreach but has not yet registered. Registration kit mailing is returned from USPS due to poor mailing address, provider no longer at the address, etc. Unable to outreach to provider due to lack of valid information. For example, invalid address. Provider has been messaged at a secondary location after attempts are made to primary office location. Provider has called or logged into CAQH ProView. Problem letter ( ) outstanding. Provider has progressed through CAQH ProView and "attested". Still waiting for supporting documents. Information has been attested to and supporting documents received. After the provider has reached initial application complete, and the provider is keeping information current and "attesting". After attestation is greater than 120 days old. Provider has asked to be removed from the CAQH database. Support Center is contacted that provider has retired from practice. Support Center is notified that provider is deceased. 46 P age
49 CAQH Practice Manager Support Center Desk Information CAQH Practice Manager Support Center: Phone: Help Desk Hours: Monday Thursday: 7 AM 9 PM (EST) Friday: 7 AM 7 PM (EST) 47 P age
50 Revision Log Version Updates Version 1 Original Version 1.1 Updated System Security section. Updated Chapter 7 Bulk Upload to clarify the action steps still required by the provider after a bulk upload file is processed. Updated Appendix Provider Status table to reflect accurate names for provider status, specifically Application Problem, Application Data Submitted, and Initial Application Complete. 48 P age
CAQH ProView. Provider User Guide
 CAQH ProView Provider User Guide Table of Contents CHAPTER 1: Introduction... 1 CAQH ProView Overview... 1 Getting Started... 1 System Security... 2 CHAPTER 2: Registration... 3 New Users... 3 Existing
CAQH ProView. Practice Manager and Provider Frequently Asked Questions
 CAQH ProView Practice Manager and Provider Frequently Asked s *s related to the CAQH ProView Practice Manager Module begin on page 2. *s on the CAQH ProView system for providers begin on page 6. 1 P age
EXPRESSPATH PROVIDER PORTAL USER GUIDE AUGUST 2013
 EXPRESSPATH PROVIDER PORTAL USER GUIDE AUGUST 2013 2013-2020 Express Scripts, Inc. All rights reserved. No part of this publication may be reproduced or transmitted in any form or by any means, electronic
Welcome to SharpConnect
 Welcome to SharpConnect User Guide for Sharp Health Plan Brokers Version 1.1 www.sharphealthplan.com SharpConnect User Guide for Brokers page 1 TABLE OF CONTENTS Page I. Introduction to SharpConnect...
Blue Cross Blue Shield of Michigan and Blue Care Network
 Blue Cross Blue Shield of Michigan and Blue Care Network Provider Enrollment and Change Self-Service User Guide January 2011 Blue Cross Blue Shield of Michigan and Blue Care Network of Michigan are nonprofit
Stewart Secure Email User Guide. March 13, 2015
 Stewart Secure Email User Guide March 13, 2015 Table of Contents Introduction... 1 What is secure email?... 1 Why secure email?... 1 What is personal, non-public information?... 1 How is my data protected?...
Secure Messaging Quick Reference Guide
 Secure Messaging Quick Reference Guide Overview The SHARE Secure Messaging feature allows a SHARE registered user to securely send health information to another SHARE registered user. The Secure Messaging
Your Archiving Service
 It s as simple as 1, 2, 3 This email archiving setup guide provides you with easy to follow instructions on how to setup your new archiving service as well as how to create archiving users and assign archiving
How Board Members and State Employees Utilize the Security Portal to Access PDMP. July 30, 2014 Version 2 Software Release Version 3.4.
 How Board Members and State Employees Utilize the Security Portal to Access PDMP July 30, 2014 Version 2 Software Release Version 3.4.11 Table of Contents How to Access PDMP via the ADPH Security Portal...
Provider OnLine. Log-In Guide
 Provider OnLine Log-In Guide Table of Contents 1 LOG-IN ACCESS... 3 1.1 ENTERING THE USER ID AND PASSWORD... 4 1.2 OVERVIEW AND PURPOSE OF TRICIPHER... 5 1.2.1 Log-in for Users Who Are Active, But Not
Wisconsin Medicaid Electronic Health Record Incentive Program for Eligible Professionals
 P- Wisconsin Medicaid Electronic Health Record Incentive Program for Eligible Professionals June 15,2015 User Guide i Table of Contents 1 Introduction... 1 2 Before You Begin... 2 2.1 Register
Getting Started. Getting Started with Time Warner Cable Business Class. Voice Manager. A Guide for Administrators and Users
 Getting Started Getting Started with Time Warner Cable Business Class Voice Manager A Guide for Administrators and Users Table of Contents Table of Contents... 2 How to Use This Guide... 3 Administrators...
A Guide to Submitting Invoices for Related Services
 A Guide to Submitting Invoices for Related Services and SETSS via the Vendor Portal Updated 3/2013 Table of Contents Chapter 1 Overview Pages 1 6 Chapter 2 Vendor Portal Registration Pages 7 9 Chapters
Quick Start Guide. Hosting Your Domain
 Quick Start Guide Hosting Your Domain http://www.names.co.uk/support/ Table of Contents Web Hosting... 3 FTP (File Transfer Protocol)... 3 File Manager... 6 SiteMaker... 7 2 Please keep these documents
Transitioning from TurningPoint 5 to TurningPoint Cloud - LMS 1
 Transitioning from TurningPoint 5 to TurningPoint Cloud - LMS 1 A Turning Account is a unique identifier that is used to tie together all software accounts and response devices. A Turning Account is required
User Manual. Rate and Benefits Information System
 Centers for Medicare & Medicaid Services Center for Consumer Information and Insurance Oversight Rusty Shropshire 7501 Wisconsin Avenue Bethesda, MD 20814 Rate and Benefits Information System User Manual
EDI Insight Manual. Training Manual. Presented By
 EDI Insight Manual Training Manual Presented By EDI Insight Manual 2 Step 1 Upload File: Select the file to transmit on the eceno claims transmission screen and click connect. Login to EDI Insight, when
Wisconsin Medicaid Electronic Health Record Incentive Program for Eligible Hospitals
 P-00358D Wisconsin Medicaid Electronic Health Record Incentive Program for Eligible Hospitals User Guide i Table of Contents 1 Introduction... 1 2 Before You Begin... 2 2.1 Register with Centers for Medicare
User Manual for Web. Help Desk Authority 9.0
 User Manual for Web Help Desk Authority 9.0 2011ScriptLogic Corporation ALL RIGHTS RESERVED. ScriptLogic, the ScriptLogic logo and Point,Click,Done! are trademarks and registered trademarks of ScriptLogic
GRS Advantage Website User Reference Guide
 GRS Advantage Website User Reference Guide This document describes how to use the GRS Advantage Website. Table of Contents GRS Advantage Website... 2 Accessing the Website... 2 Requesting Access to the
U.S. Bank Secure Mail
 U.S. Bank Secure Mail @ Table of Contents Getting Started 3 Logging into Secure Mail 5 Opening Your Messages 7 Replying to a Message 8 Composing a New Message 8 1750-All Introduction: The use of email
NYS OCFS CMS Manual CHAPTER 1...1-1 CHAPTER 2...2-1 CHAPTER 3...3-1 CHAPTER 4...4-1. Contract Management System
 NYS OCFS CMS Manual C O N T E N T S CHAPTER 1...1-1 Chapter 1: Introduction to the Contract Management System...1-2 Using the Contract Management System... 1-2 Accessing the Contract Management System...
BHW Program Portal for Site Points of Contact User Guide
 BHW Program Portal for Site Points of Contact User Guide Last Revised: June 6, 2015 1 Contents Part 1: Purpose of the BHW Program Portal for Site Points of Contact... 5 What is a Site Point of Contact?...
Surplus Lines Online User Guide
 Surplus Lines Online User Guide Missouri Department of Insurance, Financial Institutions and Professional Registration Contents Summary... 1 Site Address... 1 Account Management... 2 Account Registration...
How to Utilize the Security Portal to Access PDMP (User Guide for Practitioners, Pharmacists, CRNPs, Physician Assistants, Law Enforcement, and CNMs)
") How to Utilize the Security Portal to Access PDMP (User Guide for Practitioners, Pharmacists, CRNPs, Physician Assistants, Law Enforcement, and CNMs) July 30, 2014 Version 2 Software Release Version 3.4.11
How to Utilize the Security Portal to Access PDMP (User Guide for Practitioners, Pharmacists, CRNPs, Physician Assistants, Law Enforcement, and CNMs) July 30, 2014 Version 2 Software Release Version 3.4.11
1 CoverMyMeds User s Guide User s Guide
 1 CoverMyMeds User s Guide User s Guide 2 CoverMyMeds User s Guide TABLE OF CONTENTS Overview 3 Starting a Request 3 Using a Key 4 Completing the Request 5 Address Books 5 Required and Important Tags 5
UCB erequest IIS Requestor - Quick Reference Guide
 UCB erequest - CONTENTS 1 INTRODUCTION... 3 2 HOW TO REGISTER AND LOG-IN... 3 2.1 REGISTER TO RECEIVE AN EXTERNAL REQUESTOR USER ID AND PASSWORD... 3 2.2 LOGIN WITH USER ID AND PASSWORD... 5 3 HOW TO SUBMIT
TPA-Trading Partner Account User Guide. for. State of Idaho MMIS
 TPA-Trading Partner Account User Guide for State of Idaho MMIS Date of Publication: 4/8/2016 Document Number: RF019 Version: 11.0 This document and information contains proprietary information and copyrighted
EDI Support Services
 EDI Support Services Iowa Medicaid Web Portal The web portal uses the Internet to transport transactions for the Iowa Medicaid line of business only. The web portal provides access to submit and receive
Cox Business Premium Online Backup USER'S GUIDE. Cox Business VERSION 1.0
 Cox Business Premium Online Backup USER'S GUIDE Cox Business VERSION 1.0 Table of Contents ABOUT THIS GUIDE... 4 DOWNLOADING COX BUSINESS PREMIUM ONLINE BACKUP... 5 INSTALLING COX BUSINESS PREMIUM ONLINE
The Cancer Institute NSW Grants Management System User Guide
 The Cancer Institute NSW Grants Management User Guide Version 1.1 12 February 2016 Contents 1. Registration 2 2. Login to the Institute s GMS 3 3. Forgot password 3 4. The home page 4 5. Creating a profile
Virtual Data Centre. User Guide
 Virtual Data Centre User Guide 2 P age Table of Contents Getting Started with vcloud Director... 8 1. Understanding vcloud Director... 8 2. Log In to the Web Console... 9 3. Using vcloud Director... 10
Institution/Department Administrator Manual
 ETS Major Field Tests Institution/Department Administrator Manual Updated: December 2010 Table of Contents 1.0 WELCOME... 1 1.1 INTRODUCTION... 1 1.2 COMPUTER HARDWARE AND SOFTWARE REQUIREMENTS... 1 2.0
IIS, FTP Server and Windows
 IIS, FTP Server and Windows The Objective: To setup, configure and test FTP server. Requirement: Any version of the Windows 2000 Server. FTP Windows s component. Internet Information Services, IIS. Steps:
Council of Ontario Universities. COFO Online Reporting System. User Manual
 Council of Ontario Universities COFO Online Reporting System User Manual Updated September 2014 Page 1 Updated September 2014 Page 2 Table of Contents 1. Security... 5 Security Roles Defined in the Application...
mywcb Online User Guide
 WCB REV NOVEMBER, 2014 mywcb Online User Guide for Employers ebusiness Support Team Phone: 780-498-7688 Fax: 780-498-7866 Email: [email protected] Hours: 8:00 a.m. to 4:30 p.m., Monday through
Transitioning from TurningPoint 5 to TurningPoint Cloud - NO LMS 1
 Transitioning from TurningPoint 5 to TurningPoint Cloud - NO LMS 1 A Turning Account is a unique identifier that is used to tie together all software accounts and response devices. A Turning Account is
Physician Quality Reporting System (PQRS) Physician Portal
 Physician Portal") The American College of Radiology Physician Quality Reporting System (PQRS) Physician Portal User Guide January 29, 2016 American College of Radiology 1891 Preston White Drive Reston, VA 20191-4397 Copyright
The American College of Radiology Physician Quality Reporting System (PQRS) Physician Portal User Guide January 29, 2016 American College of Radiology 1891 Preston White Drive Reston, VA 20191-4397 Copyright
CAQH Solutions TM EnrollHub TM Help Getting Started. Table of Contents
 CAQH Solutions TM EnrollHub TM Table of Contents 1 HELP GETTING STARTED 2 1.1 ENROLLH UB DESCRIPTION AND BENEFITS 3 1.2 PRODUCT OVERVIEW 3 1.3 PROVIDER USERS 4 1.4 COMMON TERMS 5 1.5 QUICK START 8 1.6
NYS OCFS CMS Contractor Manual
 NYS OCFS CMS Contractor Manual C O N T E N T S CHAPTER 1... 1-1 Chapter 1: Introduction to the Contract Management System... 1-2 CHAPTER 2... 2-1 Accessing the Contract Management System... 2-2 Shortcuts
HealthCare Administrative Solutions, Inc. Credentialing Manual
 HealthCare Administrative Solutions, Inc. Credentialing Manual HCAS 2013 Disclaimer This manual is intended to provide general information about provider credentialing procedures. The information contained
Optum Patient Portal. 70 Royal Little Drive. Providence, RI 02904. Copyright 2002-2013 Optum. All rights reserved. Updated: 3/7/13
 Optum Patient Portal 70 Royal Little Drive Providence, RI 02904 Copyright 2002-2013 Optum. All rights reserved. Updated: 3/7/13 Table of Contents 1 Patient Portal Activation...1 1.1 Pre-register a Patient...1
Guarantee Trust Life Insurance Company. Agent Portal www.gtlic.com. Agent Portal Guide
 Guarantee Trust Life Insurance Company Agent Portal www.gtlic.com Agent Portal Guide Rev. 3/2014 Table of Contents Log in to Agent Portal... 3 Obtain Quote... 4 Print Quote... 5 Save and Retrieve Quote...
Maryland Electronic Health Records (EHR) Incentive Program Registration and Attestation System. Provider User Guide. Version 3
 Incentive Program Registration and Attestation System. Provider User Guide. Version 3") Maryland Electronic Health Records (EHR) Incentive Program Registration and Attestation System Provider User Guide Version 3 January 2014 Table of Contents Table of Figures... 3 Introduction... 4 Getting
Maryland Electronic Health Records (EHR) Incentive Program Registration and Attestation System Provider User Guide Version 3 January 2014 Table of Contents Table of Figures... 3 Introduction... 4 Getting
Gate City Bank Online Business Banking i
 Gate City Bank Online Business Banking i Table Of Contents Table of Contents Online Business Banking... 5 Online Business Banking Overview... 5 Features and Services... 5 FREE* Online Business Banking...
BUSINESS SERVICES ONLINE. Registration and Access to Services. Handbook
 If you are navigating using only the keyboard or using an assistive device and need help, visit our Navigation Instructional page for alternative views and navigation. Warning: If you select this link,
State of Nevada Unemployment Insurance Tax. Guide to Online Employer Self Service
 State of Nevada Unemployment Insurance Tax Guide to Online Employer Self Service 09/25/2015 Table of Contents Guide to Online Employer Self Service Getting Started... 4 Introduction... 4 Getting Help...
INFORMATION SYSTEMS SERVICE NETWORKS AND TELECOMMUNICATIONS SECTOR. User Guide for the RightFax Fax Service. Web Utility
 INFORMATION SYSTEMS SERVICE NETWORKS AND TELECOMMUNICATIONS SECTOR User Guide for the RightFax Fax Service Web Utility August 2011 CONTENTS 1. Accessing the Web Utility 2. Change Password 3. Web Utility:
POINT OF SALES SYSTEM (POSS) USER MANUAL
 USER MANUAL") Page 1 of 24 POINT OF SALES SYSTEM (POSS) USER MANUAL System Name : POSI-RAD System Release Version No. : V4.0 Total pages including this covering : 23 Page 2 of 24 Table of Contents 1 INTRODUCTION...
Page 1 of 24 POINT OF SALES SYSTEM (POSS) USER MANUAL System Name : POSI-RAD System Release Version No. : V4.0 Total pages including this covering : 23 Page 2 of 24 Table of Contents 1 INTRODUCTION...
Practitioner Profile Data Download Guide May 2015
 Practitioner Profile Data Download Guide May 2015 The following guide can be used to download practitioner profile data from the Florida Department of Health s website: http://www.flhealthsource.gov/.
ForwardHealth Provider Portal Professional Claims
 P- ForwardHealth Provider Portal Professional Claims User Guide i Table of Contents 1 Introduction... 1 2 Access the Claims Page... 2 3 Submit a Professional Claim... 5 3.1 Professional Claim Panel...
owncloud Configuration and Usage Guide
 owncloud Configuration and Usage Guide This guide will assist you with configuring and using YSUʼs Cloud Data storage solution (owncloud). The setup instructions will include how to navigate the web interface,
Drake Hosted User Guide
 Drake Hosted User Guide Last Revision Date: 11/23/2015 Support.DrakeSoftware.com (828) 524-8020 Drake Hosted User Guide Copyright The Drake Hosted User Guide, Drake Tax Software, and any other related
webforms Quick Reference
 Page 1 of 9 webforms Quick Reference Version 6.0 Background & Overview webforms is the latest addition to the Progressive B2B product range. Ideal for s who are yet to become EDI (Electronic Data Interchange)
ewebextra OfficeMate Integration User s Guide
 ewebextra OfficeMate Integration User s Guide April 2014 2014 Eyefinity, Inc. All rights reserved. Eyefinity, OfficeMate, ewebextra, and ExamWRITER are registered trademarks of Eyefinity, Inc. All other
E-FILE. Universal Service Administrative Company (USAC) Last Updated: September 2015
 Last Updated: September 2015") E-FILE USER GUIDE This document providers E-File users with an overview of E-File account management, managing entitlements, and instructions on how to submit forms, such as the FCC Form 498, FCC Form
E-FILE USER GUIDE This document providers E-File users with an overview of E-File account management, managing entitlements, and instructions on how to submit forms, such as the FCC Form 498, FCC Form
ActivHealthCare EDI User Guide
 ActivHealthCare EDI User Guide Table of Contents Page Enrollment 2 Preparing Your Management Software 3 Claims Submission for AHC Network Affiliates 4 Online Entry Tool 7 Claims Follow-Up 8 Frequently
Erie 1 BOCES/WNYRIC. Secure File Transfer. Upload/Download Wizard
 Erie 1 BOCES/WNYRIC Secure File Transfer Upload/Download Wizard Revised June 3, 2014 These instructions were created using Internet Explorer Version 11. If you are a using a Firefox or Chrome browser you
What is e-services? Registered User Portal RUP
 IRS e-services Registration Process What is e-services? Suite of products designed for tax professionals and taxpayers to do business with IRS electronically Includes: Registration e-file Application Preparer
Bahamas Tax Information Exchange Portal Documentation
 Bahamas Tax Information Exchange Portal Documentation This sub section of the Portal Documentation covers the following Topics: Portal Overview Portal Login Account Status Reportable Account File Processing
Campus Solutions Self Service: Student Quick Reference Guide
 Campus Solutions Self Service: Student Table of Contents Introduction to Step Sheets... 4 Getting Started in CUNYfirst... 5 Activate My CUNYfirst Account... 6 Log into My CUNYfirst Account... 10 Sign Out
Provider Services Portal (PSP) Enrollment & Functionality Manual Provider Services Portal (PSP) Enrollment & Functionality Manual
 Enrollment & Functionality Manual Provider Services Portal (PSP) Enrollment & Functionality Manual") Provider Services Portal (PSP) Enrollment & Functionality Manual 1 Table of Contents PSP Website Home page... 3 PSP Enrollment... 3 E-Authentication Identity Proofing... 3 User Password Security and Protection...
Provider Services Portal (PSP) Enrollment & Functionality Manual 1 Table of Contents PSP Website Home page... 3 PSP Enrollment... 3 E-Authentication Identity Proofing... 3 User Password Security and Protection...
DI SHAREPOINT PORTAL. User Guide
 DI SHAREPOINT PORTAL User Guide -1- TABLE OF CONTENTS PREFACE... 3 SECTION 1: DI PORTAL ACCESS... 4 REQUEST USER ACCESS... 4 To register... 4 SIGNING IN TO THE PORTAL... 8 To sign in to the DI Portal...
Mitigation Planning Portal MPP Reporting System
 Mitigation Planning Portal MPP Reporting System Updated: 7/13/2015 Introduction Access the MPP Reporting System by clicking on the Reports tab and clicking the Launch button. Within the system, you can
ValueOptions Provider Guide to using Direct Claim Submission
 ValueOptions Provider Guide to using Direct Claim Submission www.valueoptions.com Table of Contents Introduction 1 Submitting a New Claim 3 Searching for Claims 9 Changing or Re-processing a claim 13 Submitting
Beginning Billing Workshop Secure Web Portal 837P. Colorado Medicaid 2016
 Beginning Billing Workshop Secure Web Portal 837P Colorado Medicaid 2016 Centers for Medicare & Medicaid Services Medicaid Medicaid/CHP+ Medical Providers Xerox State Healthcare Training Objectives Web
Account Access User Guide
 Account Access User Guide Available within AgriPoint How to manage your accounts online, anytime, anywhere. Rev. 10/12/2015 This guide is designed to familiarize you with the features and options available
My Business Account. User Guide: Getting Started
 My Business Account User Guide: Getting Started Last Updated: 6/2013 Verizon Wireless 2013 1 Logging in 3 Create a Secret Question and Answer (first time logging in only) 5 Terms of Use Page (first time
IQSweb Reference G. ROSS Migration/Registration
 ROSS Migration/Registration Contents IQSweb V3.0.1 ROSS Connection Requirements... 2 Test Agency Network Connectivity to ROSS... 3 FIREWALL Exceptions... 3 FIREWALL Exception Justification... 4 ROSS Interface
1. Open the preferences screen by opening the Mail menu and selecting Preferences...
 Using TLS encryption with OS X Mail This guide assumes that you have already created an account in Mail. If you have not, you can use the new account wizard. The new account wizard is in the Accounts window
OMDC Online Application Portal (OAP) - Quick Start Guide
 - Quick Start Guide") OMDC Online Application Portal (OAP) - Quick Start Guide 1. INTRODUCTION This guide offers the quickest way to get you started on the OMDC Online Application Portal (OAP). Before you begin, step through
OMDC Online Application Portal (OAP) - Quick Start Guide 1. INTRODUCTION This guide offers the quickest way to get you started on the OMDC Online Application Portal (OAP). Before you begin, step through
Version 10.3. End User Help Files. GroupLink Corporation 2014 GroupLink Corporation. All rights reserved
 Version 10.3 End User Help Files GroupLink Corporation 2014 GroupLink Corporation. All rights reserved GroupLink and everything HelpDesk are registered trademarks of GroupLink Corporation. The information
Version 11.0.1. End User Help Files. GroupLink Corporation 2015 GroupLink Corporation. All rights reserved
 Version 11.0.1 End User Help Files GroupLink Corporation 2015 GroupLink Corporation. All rights reserved GroupLink and everything HelpDesk are registered trademarks of GroupLink Corporation. The information
1 of 10 1/31/2014 4:08 PM
 1 of 10 1/31/2014 4:08 PM copyright 2014 How to backup Microsoft SQL Server with Nordic Backup Pro Before creating a SQL backup set within Nordic Backup Pro it is first necessary to verify that the settings
Claim Features Training
 Claim Features Training Molina Healthcare s Web Portal The Web Portal is secure and available 24 hours a day, seven days a week. Register for access to our Web Portal for selfservices, including: Submit
RoomWizard Synchronization Software Manual Installation Instructions
 2 RoomWizard Synchronization Software Manual Installation Instructions Table of Contents Exchange Server Configuration... 4 RoomWizard Synchronization Software Installation and Configuration... 5 System
CONTENTS. SETUP SECURITY ENHANCEMENTS... 17 Existing User... 17 New User (Enrolled by Employer or Self)... 21
... 21") HEALTH SAVINGS ACCOUNT SUBSCRIBER WEBSITE GUIDE CONTENTS BROWSER COMPATIBILITY... 2 ONLINE ENROLLMENT... 3 Online Enrollment Process... 3 REGISTERING YOUR ACCOUNT FOR ONLINE ACCESS... 12 INDIVIDUAL ENROLLMENT...
HEALTH SAVINGS ACCOUNT SUBSCRIBER WEBSITE GUIDE CONTENTS BROWSER COMPATIBILITY... 2 ONLINE ENROLLMENT... 3 Online Enrollment Process... 3 REGISTERING YOUR ACCOUNT FOR ONLINE ACCESS... 12 INDIVIDUAL ENROLLMENT...
!"#$ Stonington Public Schools Parents Guide for InfoSnap Online Enrollment. for Returning. Students. August. Online Enrollment.
 Stonington Public Schools Parents Guide for InfoSnap Online Enrollment for Returning Students August!"#$ Explains how to complete Returning Student Enrollment forms Online through the PowerSchool Parent
ewebextra OfficeMate Integration User s Guide
 ewebextra OfficeMate Integration User s Guide September 2013 2013 Eyefinity, Inc. All rights reserved. Eyefinity, OfficeMate, ewebextra, and ExamWRITER are registered trademarks of Eyefinity, Inc. All
Directory and Messaging Services Enterprise Secure Mail Services
 Title: Directory and Messaging Services Enterprise Secure Mail Services Enterprise Secure Mail Services for End Users Attention: Receivers of Secure Mail Retrieval of Secure Mail by the Recipient Once
Administrator Instructions for Link2CDMS Contractor Document Management System
 Table of Contents Administrator Instructions for Link2CDMS Contractor Document Management System Getting Started... 2 Viewing Your Approvals Dashboard... 2 Specifying Contractor Approval Status... 7 Adding
DarwiNet Client Level
 DarwiNet Client Level Table Of Contents Welcome to the Help area for your online payroll system.... 1 Getting Started... 3 Welcome to the Help area for your online payroll system.... 3 Logging In... 4
OHIO DEPARTMENT OF EDUCATION Connected Ohio Records for Educators (CORE) My Educator Profile User Manual
 My Educator Profile User Manual") OHIO DEPARTMENT OF EDUCATION Connected Ohio Records for Educators (CORE) My Educator Profile User Manual CON N E C T E D O H I O R E C O R D S F O R E D U C A T O R S My Educator Profile User Manual September
OHIO DEPARTMENT OF EDUCATION Connected Ohio Records for Educators (CORE) My Educator Profile User Manual CON N E C T E D O H I O R E C O R D S F O R E D U C A T O R S My Educator Profile User Manual September
ProjectWise Explorer V8i User Manual for Subconsultants & Team Members
 ProjectWise Explorer V8i User Manual for Subconsultants & Team Members submitted to Michael Baker International Subconsultants & Team Members submitted by Michael Baker International ProjectWise Support
PMP AWAR X E. User Support Manual V 1.2
 PMP AWAR X E User Support Manual V 1.2 04/09/2014 1 Contents 1 What Is a Requestor?... 3 2 Registration... 3 2.1 Registration Process... 3 2.2 Registering as a Delegate... 7 2.3 Email Verification... 11
Table of Contents 1. Contents...1
 Table of Contents 1. Contents...1 1.1 Introduction/Getting Started...1 1.1.1 Creating an Account...1 1.1.2 Logging In...2 1.1.3 Forgotten Password...2 1.1.4 Creating a New Project...3 1.2 My Projects...3
Patient Portal. Accessing the Patient Portal. How to Begin: Enter first and last name, date of birth and create a user name and password.
 Patient Portal How to Begin: If you provided an email address when you registered as a patient, you can expect an email after your discharge that will be sent directly from CPSI, our Electronic Health
CONTRACT MANAGEMENT SYSTEM USER S GUIDE VERSION 2.7 (REVISED JULY 2012)
") CONTRACT MANAGEMENT SYSTEM USER S GUIDE VERSION 2.7 (REVISED JULY 2012) VERSION 2.6 (REVISED APRIL 2012)... I INTRODUCTION... 5 Helpful Hints... 5 Pop-Up Blockers... 5 Users... 6 CPUC Staff Administrator...
CONTRACT MANAGEMENT SYSTEM USER S GUIDE VERSION 2.7 (REVISED JULY 2012) VERSION 2.6 (REVISED APRIL 2012)... I INTRODUCTION... 5 Helpful Hints... 5 Pop-Up Blockers... 5 Users... 6 CPUC Staff Administrator...
Educational Data System (EDS) Administration Manual and Policy
 Administration Manual and Policy") Educational Data System (EDS) Administration Manual and Policy Randy Dorn State Superintendent of Public Instruction Prepared by OSPI Customer Support Greg Beck, Application Development Director Information
Educational Data System (EDS) Administration Manual and Policy Randy Dorn State Superintendent of Public Instruction Prepared by OSPI Customer Support Greg Beck, Application Development Director Information
Table of Contents. Welcome... 2. Login... 3. Password Assistance... 4. Self Registration... 5. Secure Mail... 7. Compose... 8. Drafts...
 Table of Contents Welcome... 2 Login... 3 Password Assistance... 4 Self Registration... 5 Secure Mail... 7 Compose... 8 Drafts... 10 Outbox... 11 Sent Items... 12 View Package Details... 12 File Manager...
Maryland Electronic Health Records (EHR) Incentive Program Registration and Attestation System. Provider User Guide. Version 2
 Incentive Program Registration and Attestation System. Provider User Guide. Version 2") Maryland Electronic Health Records (EHR) Incentive Program Registration and Attestation System Provider User Guide Version 2 December 2012 Table of Contents Table of Figures... 3 Introduction... 4 Getting
Maryland Electronic Health Records (EHR) Incentive Program Registration and Attestation System Provider User Guide Version 2 December 2012 Table of Contents Table of Figures... 3 Introduction... 4 Getting
About Data File Exchange
 Methods for Service Providers to maintain accurate employer data September 2012 Tax and General Accounting Unemployment Insurance State of Wisconsin Contents Introduction Submitting a File through Secure
REGISTER OF COMPANIES, ENTERPRISES AND BUSINESS
 RWANDA BUSINESS REGISTRY PROJECT REGISTER OF COMPANIES, ENTERPRISES AND BUSINESS NAMES USER MANUAL Online user Version: 1.0 March 9 th 2010 NORWAY REGISTERS DEVELOPMENT AS TABLE OF CONTENTS 1 INTRODUCTION...
Tutorial for Creating a DEBA Lawyer Directory Listing
 Tutorial for Creating a DEBA Lawyer Directory Listing *This tutorial is for creating a listing using a laptop or desktop. If you are using a mobile device or a small screen, your experience may be different.
EMPLOYEE SELF-SERVICE DIRECT DEPOSIT PROCEDURES
 EMPLOYEE SELF-SERVICE DIRECT DEPOSIT PROCEDURES STEP 1: To access Employee Self Service, login to Lawson by entering your District User ID and Password. STEP 2: Click on the down arrow next to Employee
ACT State Testing Online Services Tutorial
 ACT State Testing Online Services Tutorial Back-up Test Supervisor Version Released July, 2009 2009 by ACT, Inc., All rights reserved. Back-up Test Supervisor Online Profile Form Introduction The Back-up