School Mail System. - Access through Outlook Web Access. User Guide FOR. Education Bureau (EDB)
|
|
|
- Derek Malone
- 10 years ago
- Views:
Transcription
1 School Mail System - Access through Outlook Web Access User Guide FOR Education Bureau (EDB) Version: May 2013 The Government of the Hong Kong Special Administrative Region The contents of this document remain the property of and may not be reproduced in whole or in part without the express permission of the Government of the HKSAR

2 Distribution List Copy No. 1 Distribution of Controlled Copy Holder Education Bureau, The Government of the Hong Kong Special Administrative Region 2 Project Team, Microsoft (Hong Kong) Limited Prepared By: Doc. Effective Date: Prepared By: Date: Copy No: Doc. Expiry Date: Reviewed By: Date: Page 2
 Limited Prepared By: Doc.")
3 Amendment History Change Number Revision Description Sections Affected Revision Number Date 1 Add a Section on Archive Mails February Update the Archive Mails section following the introduction of the new mail purging solution by the vendor 3 Add a Section on Encrypt Mails upon the launch of the encryption solution for transmission among School Mail System Users and between Lotus Notes users and School Mail System users. Update the Archive Mails section to specify users can archive mails locally using Outlook. Update the Add Attachment section to specify the attachment filtering policy adopted by the bureau. 4 Update a picture on how to set up Out of Office Assistant November May June Update pictures on Login and Logout after launch of UAG Portal Minor update to reflect changes of standard mailbox sizes Update the step on Change Intranet / OWA Password after launch of UAG Portal 5.1.A , 5.24, , June Update workstation requirements May 2014 Page 3

4 Table of Contents 1. PURPOSE SCOPE SYSTEM SUMMARY OBJECTIVES SYSTEM FUNCTIONS WORKSTATION REQUIREMENT COMPUTER HARDWARE COMPUTER SOFTWARE OUTLOOK WEB ACCESS OPERATING INSTRUCTIONS (BASIC) LOGIN AND LOGOUT REGIONAL SETTINGS SIGNATURE CREATE AND SEND MAIL DRAFT MAIL ADDRESS BOOK SEARCH (BASIC VERSION) ADDRESS BOOK SEARCH (ADVANCED VERSION) USE ENCRYPTION IN READING AND SENDING MAIL REQUEST FOR READ RECEIPT READ MAIL REPLY MAIL FORWARD MAIL PRINT MAIL ARCHIVE MAIL DELETE MAIL RECOVER DELETED MAIL ADD ATTACHMENT SAVE ATTACHMENT FOLDER MANAGEMENT FLAG AND REMINDER COLOR CATEGORIES SET UP OUT OF OFFICE ASSISTANT CHANGE INTRANET/OWA PASSWORD MAILBOX SPACE INDICATOR OUTLOOK WEB ACCESS OPERATING INSTRUCTIONS (ADVANCED) CALENDAR TASKS RULES PERSONAL CONTACTS MAILBOX DELEGATION OPEN OTHER S MAILBOX APPENDIX I INTERNET EXPLORER SETTINGS ENABLE JAVASCRIPT ENABLE COOKIES DO NOT SAVE ENCRYPTED PAGE APPENDIX II SCHOOL MAIL SYSTEM NEW FEATURES NEW FEATURES Page 4

5 1. PURPOSE The document provides necessary information to guide users to access and use their School Mail System mailbox through Outlook Web Access (OWA). Page 5
.")
6 2. SCOPE This document covers the Outlook Web Access (OWA) and usage from the end user perspective. Page 6

7 3. SYSTEM SUMMARY 3.1. OBJECTIVES In order to facilitate electronic communication within the EDB, School Mail System is established to provide Electronic Mail service for school users. School users can use this service to communicate with EDB and other Internet mail users SYSTEM FUNCTIONS The system would support common functions including: 1. Compose, forward, reply, delete mails, including Internet mails, and return receipt; 2. Handle file attachments; 3. Use directory for locating mail recipients within EDB (EDB Contacts); 4. Use directory for locating mail recipients within the Government (Whole Government Address List) 5. Provide Single-sign-on with EDB Portal (Common Logon System) account. The system would allow users to communicate with other mail users in the Government, which includes: 1. Send and receive with EDB Office users. 2. Share directory information with other systems in the same B/D; 3. Support the exchange of s with users across B/Ds under the existing Government Communication Network (GCN) messaging infrastructure; 4. Comply with the requirements of GCN for communication across Bureau or Departments Page 7
 5. Provide Single-sign-on with EDB Portal (Common Logon System) account.")
8 4. WORKSTATION REQUIREMENT 4.1. COMPUTER HARDWARE Hardware Requirements: Recommended for better performance -- Pentium IV 1 GHz with 512 MB of memory Minimum requirement -- Pentium III 733 MHz with 256 MB of memory 4.2. COMPUTER SOFTWARE Supported Operating Systems: Windows 7 Windows Vista Supported Browsers: Internet Explorer 7.0 or above. Note: JavaScript and cookies should be enabled in the browsers for running the OWA client without error. In addition, Security property "Do not save encrypted pages to disk" under Advanced options of Internet Explorer should not be checked. Please refer to Appendix I for details. Page 8

. Type in your EDB Portal account and password accordingly and then click Logon.")
9 5. OUTLOOK WEB ACCESS OPERATING INSTRUCTIONS (BASIC) You can access your OWA with a workstation which can access the Internet LOGIN AND LOGOUT A. Login Outlook Web Access 1. Logon EDB Intranet through via the EDB Portal Logon Page ( Type in your EDB Portal account and password accordingly and then click Logon. For non-edb Portal users, simply use your Windows LAN account to logon. 2. After logon EDB Intranet, you can access OWA through [User Services] -> [Check My ] -> [School Mail System]. Page 9


10 OR You can launch the following URL for the OWA login direct and type in your login name and password. B. Logout Outlook Web Access For information security consideration, it is highly recommended to log off OWA after using it, especially if you are using common or shared workstation to login your OWA. 1. Click [Log Off]. Log Off 2. Click the box [Log Off]. And then click [Close Windows]. Page 10

11 5.2. REGIONAL SETTINGS According to your need, you can set your preferred timezone and mailbox language in Regional settings. A. Timezone Timezone for Hong Kong is GMT +8:00. It is suggested to use this timezone for your settings unless you have specific needs (e.g. if you are working out of Hong Kong, other timezone settings may be required). 1. To configure regional settings, click [Options] on the top right hand corner. 2. On the left pane, click [Regional Settings]. 3. If you find the time for the received is not correct due to the incorrect timezone settings, you can select the current timezone in this option setting. 4. Click [Save] to save your setting. B. Language 1. Follow Steps 1 and 2 above. 2. Select the language. Preferred languages are English (United States) and Chinese (HKSAR). 3. Click [Save] to save your setting. Page 11
![To configure regional settings, click [Options] on the top right hand corner. 2. On the left pane, click [Regional Settings]. 3.](/docs-images/41/6255648/images/page_11.jpg "If you find the time for the received email is not correct due to the incorrect timezone settings, you can select the current timezone in this option setting. 4. Click [Save] to save your setting. B.")
12 5.3. SIGNATURE In OWA, user can preset their desired signature. 1. To set signature, click [Options] on the top right hand corner. 2. On the left pane, click [Messaging]. In the [ Signature] section, type your desired signature. Check the checkbox [Automatically include my signature on outgoing messages]. Click [Save] to save your setting. Enter signature here Page 12
![On the left pane, click [Messaging].](/docs-images/41/6255648/images/page_12.jpg "In the [E-mail Signature] section, type your desired e-mail signature.")
![5.4. CREATE AND SEND MAIL 1. To reach your mailbox by clicking [Mail] -> [Inbox].](/docs-images/25/6255648/images/13-0.png "Inbox Mailbox 2. Click [New] and [Message]. Then, a blank mail message box will pop up.")
13 5.4. CREATE AND SEND MAIL 1. To reach your mailbox by clicking [Mail] -> [Inbox]. Inbox Mailbox 2. Click [New] and [Message]. Then, a blank mail message box will pop up. Page 13
![[Inbox]. Inbox Mailbox 2.](/docs-images/41/6255648/images/page_13.jpg "Click [New] and [Message].")
![3. If you want to have the Bcc field, you can click [Options] and tick the [Show Bcc] checkbox. 4. Type recipients addresses in the [To/Cc/Bcc] fields.](/docs-images/25/6255648/images/14-0.png "You may just enter the mail aliases of the recipients (for users whose e-mail addresses are available in your address book) and click the [tick] button to validate the")
14 3. If you want to have the Bcc field, you can click [Options] and tick the [Show Bcc] checkbox. 4. Type recipients addresses in the [To/Cc/Bcc] fields. You may just enter the mail aliases of the recipients (for users whose addresses are available in your address book) and click the [tick] button to validate the addresses. Page 14
 and click the [tick] button to")

15 5. Or, you can choose the users from the address books (i.e. EDB Address book or Whole Government Address book). For details on the use of the address books, please refer to Section 5.6 and Type in subject & mail body. 7. You may attach file(s) in your mail (Please refer to Section 5.16 for the detailed steps). 8. Click [Send]. Page 15
 in your mail (Please refer to Section 5.")
![Note: a). Before you send the mail, you can check the spelling by pressing the spelling check icon Click [OK].. Then select the language for the spell checking.](/docs-images/25/6255648/images/16-0.png "The words with spelling error will be underlined. Right click the underlined word. Right click the underlined word. Select the correct word or your preferred action. b).")
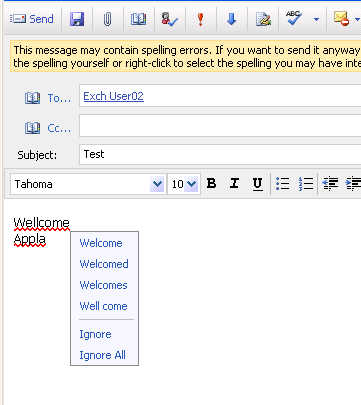
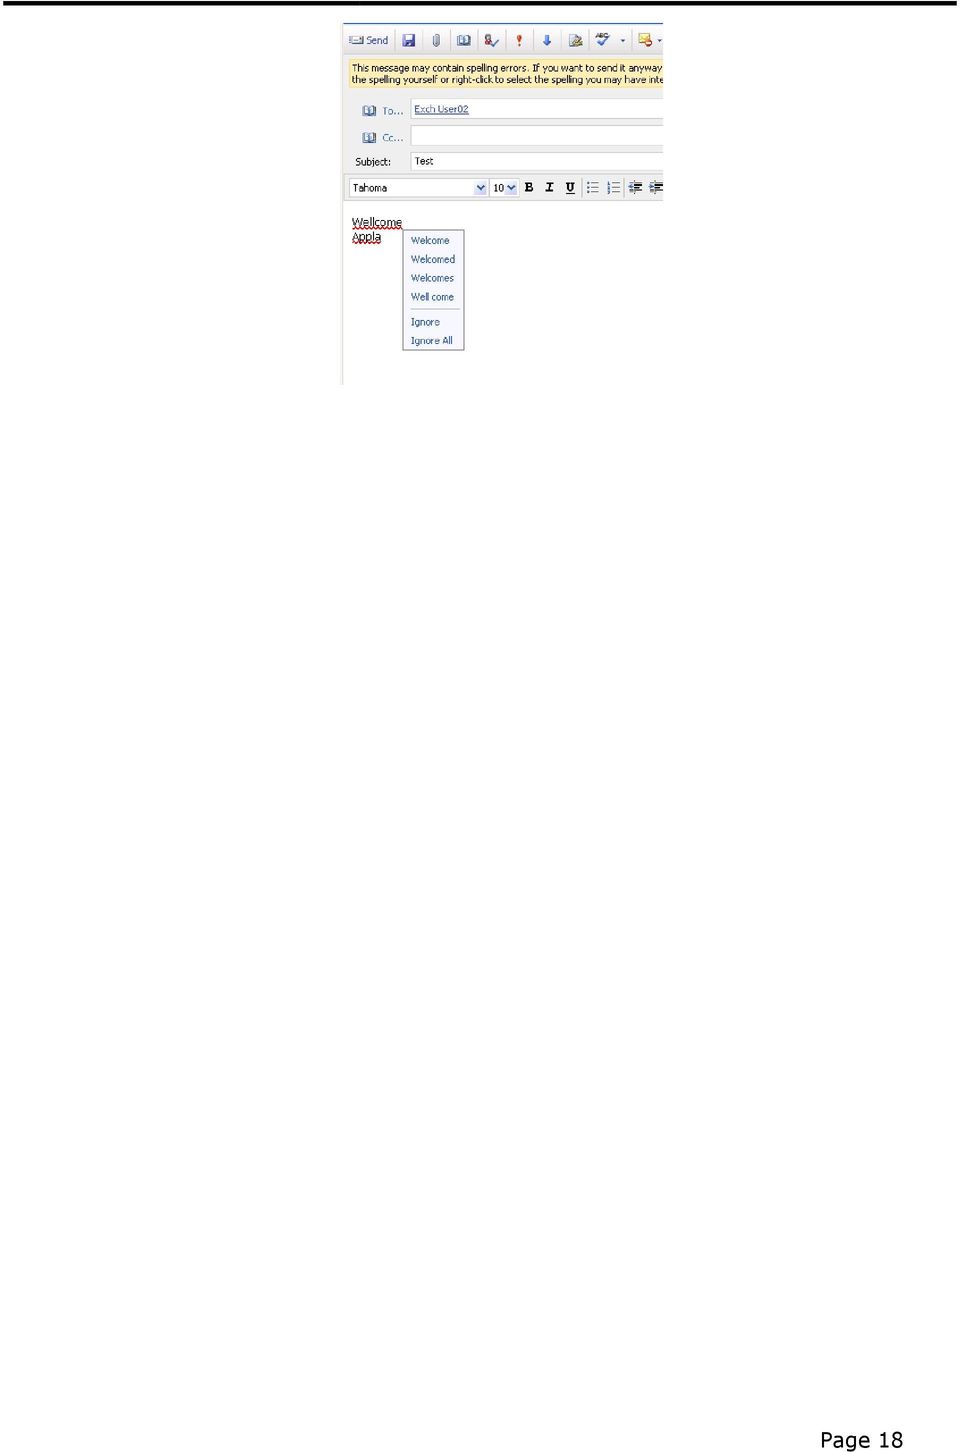
16 Note: a). Before you send the mail, you can check the spelling by pressing the spelling check icon Click [OK].. Then select the language for the spell checking. The words with spelling error will be underlined. Right click the underlined word. Right click the underlined word. Select the correct word or your preferred action. b). School Mail System also provides a feature to do the spell checking automatically before sending . You can configure this setting by clicking [Options] on the top right hand corner: Page 16

![Click [Spelling]. Tick the checkbox [Always check spelling before sending]. Click [Save].](/docs-images/25/6255648/images/17-0.png "To test the setting, you may compose a testing e-mail with some wrong spelled words. Click [Send]. The words with spelling error will be underlined.")
17 Click [Spelling]. Tick the checkbox [Always check spelling before sending]. Click [Save]. To test the setting, you may compose a testing with some wrong spelled words. Click [Send]. The words with spelling error will be underlined. Right-click the underlined word. Select the correct word or preferred action. Page 17

18 Page 18
![5.5. DRAFT MAIL In the new mail window, check the [Save] icon,](/docs-images/25/6255648/images/19-0.png "the current mail will then be saved in the [Drafts] folder.")
19 5.5. DRAFT MAIL In the new mail window, check the [Save] icon, the current mail will then be saved in the [Drafts] folder. Page 19

![5.6. ADDRESS BOOK SEARCH (BASIC VERSION) 1. Click [Address Book] icon on the right top banner or that beside [To/Cc/bcc] field in a new mail. 2. Click [Show other address list]. 3.](/docs-images/25/6255648/images/20-0.png "Select the address book that you want to use. 01 EDB Address Book (This address book contains all EDB users mail address.")
20 5.6. ADDRESS BOOK SEARCH (BASIC VERSION) 1. Click [Address Book] icon on the right top banner or that beside [To/Cc/bcc] field in a new mail. 2. Click [Show other address list]. 3. Select the address book that you want to use. 01 EDB Address Book (This address book contains all EDB users mail address.) 02 Whole Government Address Book (This address book contains the mail address of all Government users, including EDB users. You can locate users of other Government Bureau/Departments in this address book.) Important Note: The information in Whole Government Address Book is contributed by individual Bureau or Department. EDB Administrator does not hold responsibility for the accuracy of the information. 4. Enter keyword (e.g. ying) in the search text field. Press <Enter>. Searching results will be displayed. Page 20
 Important Note: The information in Whole Government Address Book is contributed by individual Bureau or Department.")

21 5. You can right-click the selected contact object. And perform the action that you would like. Open Read the details of the contact object; New Message Create a new message for this contact object; New Meeting Request to Contact Create a new meeting request for this contact object; Add to Contacts Add this contact object information to your contact list. 6. If the address book is opened through clicking the [Address Book] icon beside [To/Cc/Bcc] field in a new mail, you may directly input the target mail address(es) to the [To/Cc/Bcc] field by highlighting the concerned address(es) and clicking [To/Cc/Bcc] button at the bottom of the address book. The address(es) will then be added to the relevant field. Click the [To/Cc/Bcc] to add the address(es). Highlight the selected address(es). 7. Close the address book after finishing the searching. Page 21
22 Note: This is a basic version of the address book search. Only limited searching criteria and function is provided. Keyword will be lookup in the following order: - DisplayName; - First Name; - Last Name; - address. Page 22
![5.7. ADDRESS BOOK SEARCH (ADVANCED VERSION) Besides the basic version of the address book search, you may use [Address Book (Advanced)] which provides more searching attributes and flexibilities to](/docs-images/25/6255648/images/23-0.png "search the target address(es). 1. Click [Address Book (Advanced)]. 2. Select the address book that you want to use: 01 EDB Address Book (This address book contains all EDB users mail address.")
23 5.7. ADDRESS BOOK SEARCH (ADVANCED VERSION) Besides the basic version of the address book search, you may use [Address Book (Advanced)] which provides more searching attributes and flexibilities to search the target address(es). 1. Click [Address Book (Advanced)]. 2. Select the address book that you want to use: 01 EDB Address Book (This address book contains all EDB users mail address.) 02 Whole Government Address Book (This address book contains the mail address of all Government users, including EDB users. You can locate users of other Government Bureau/Departments in this address book.) Important Notes: The information in Whole Government Address Book is contributed by individual Bureau or Department. EDB Administrator does not hold responsibility for the accuracy of the information. 3. In the searching criteria box, enter the specific data that you want to search, for example, ying in the field of [Last Name] or Tsuen Wan Govt Primary Page 23
![School in the field of [Company/School]. Click [Find]. The searching results will be displayed. Notes: For the field Title, square blanket [ ] should be used, for example, EO[AA]1. 4.](/docs-images/25/6255648/images/24-0.png "Click on the result entry and the corresponding details will be displayed in the right-pane. Details of the result entry. 5.")
24 School in the field of [Company/School]. Click [Find]. The searching results will be displayed. Notes: For the field Title, square blanket [ ] should be used, for example, EO[AA]1. 4. Click on the result entry and the corresponding details will be displayed in the right-pane. Details of the result entry. 5. If you want to mark the object for your mail delivery, double-click the entry and the corresponding mail address and display name will be copied to the upper right textbox pending for further action. Page 24
![6. Then, click the button [Send to Clipboard]. The address(es) in the textbox will be sent to the clipboard. 7.](/docs-images/25/6255648/images/25-0.png "If there is a pop up asking you if you want to allow the webpage to access your clipboard, click [Allow access]. 8.")
25 6. Then, click the button [Send to Clipboard]. The address(es) in the textbox will be sent to the clipboard. 7. If there is a pop up asking you if you want to allow the webpage to access your clipboard, click [Allow access]. 8. Open a new and perform paste action to input your searching result in the clipboard to the corresponding address field (e.g. To, Cc or Bcc). 9. Click [Check Name] icon. 10. Click [Send] icon to send the to the target address(es). 11. Close the address book after finishing the searching. Page 25

26 5.8. USE ENCRYPTION IN READING AND SENDING MAIL School Mail System users can exchange encrypted s with other School Mail System users and Lotus Notes users. Before encryption can work, you must download and install the S/MIMIE certificate (Note: S/MIMIE certificate is one kind of e-certificate and all EDB s S/MIME certificates are generated internally by EDB Administrator) to your School Mail System account first. For details, please refer the user guide on Encryption Solution for Use among School Mail System Users which is available at the Intranet ( through the path Information Directory -> E. Information Technology --> 7. Office Systems User Guide -> Office Systems & s -> 5. School Mail System -> b. Encryption Solution for Use among School Mail System Users. The procedures to send encrypted through School Mail System are: 1. After drafting the mail, click [To] to select mail recipient. 2. Choose the target mail recipient. You can send encrypted to recipient with message [The recipient has a valid digital ID for encrypting messages] shown on the Address Book. Click [OK] to continue. 3. Click the Encrypt button as circled below to enable the encryption function. Click Send to send out the mail. Page 26
 While School Mail System users can send encrypted mails to all EDB users (including school and office users), the target recipient may not able to open the mail unless he/she has installed")
27 4. To decrypt any encrypted received, you can open the mail as normal as any encrypted will be decrypted automatically once your Certificate is correctly installed. Note: (1) While School Mail System users can send encrypted mails to all EDB users (including school and office users), the target recipient may not able to open the mail unless he/she has installed the appropriate S/MIME certificate. (2) The procedures for Lotus Notes users to use S/MIME certificate can be found at the document Encryption Solution for Use between Lotus Notes Users and School Mail System Users available at the Intranet ( through the path Information Directory -> E. Information Technology --> 7. Office Systems User Guide -> Office Systems & s -> 2. Lotus Notes - > l. Encryption Solution for Use between Lotus Notes Users and School Mail System Users. Page 27
![5.9. REQUEST FOR READ RECEIPT Note: This option works only if target recipient mail system supports this feature. 1. In the new mail window, click the [Options] box on the top right hand corner. 2.](/docs-images/25/6255648/images/28-0.png "Tick the checkbox for [Request a read receipt for this message]. Then click [OK]. 3. Draft and send the e-mail as usual. 4.")
28 5.9. REQUEST FOR READ RECEIPT Note: This option works only if target recipient mail system supports this feature. 1. In the new mail window, click the [Options] box on the top right hand corner. 2. Tick the checkbox for [Request a read receipt for this message]. Then click [OK]. 3. Draft and send the as usual. 4. When the recipient receives and opens your , his/her mailbox will generate an automatic response telling that he/she has read the You will then get the read receipt response from the recipient. Page 28
29 Important Note: The default setting for OWA users of Read receipt response is set to Auto Response. This setting can be modified by user. But users are suggested not to modify this setting. Page 29
30 5.10. READ MAIL 1. To read your mail, click [Mail] -> [Inbox]. Your [Inbox] folder will open and display any messages you have received. 2. Mail would be bolded if it has not been read. 3. Double click on the selected roll to open the mail. 4. The selected mail would then be shown in a new pop up window. Page 30
![5.11. REPLY MAIL 1. Open the mail. 2. Click [Reply] or [Reply to All] button. 3. Type in mail body and click [Send] to send the e-mail.](/docs-images/25/6255648/images/31-0.png "Note: When user clicks the [Reply] or [Reply to All] button, the School Mail System will automatically remove the attachments, if any, embedded from")
31 5.11. REPLY MAIL 1. Open the mail. 2. Click [Reply] or [Reply to All] button. 3. Type in mail body and click [Send] to send the . Note: When user clicks the [Reply] or [Reply to All] button, the School Mail System will automatically remove the attachments, if any, embedded from the reply. Page 31
![5.12. FORWARD MAIL 1. Open the mail. 2. Click [Forward] button 3.](/docs-images/25/6255648/images/32-0.png "Type in mail body and the address of the recipient(s).")
32 5.12. FORWARD MAIL 1. Open the mail. 2. Click [Forward] button 3. Type in mail body and the address of the recipient(s). Click [Send] to send the . Page 32

33 5.13. PRINT MAIL 1. Open the mail. 2. Click the [print] button. 3. Choose the printer and click [OK]. Page 33

34 5.14. ARCHIVE MAIL 1. Except mails under [Managed Folders -> Archive], all mails in the [Inbox] and other folders and their sub-folders older than 180 days will not be retained in School Mail System and will be purged regularly. 2. To retain the useful mail(s), you should move those useful mails to the [Archive] folder which can be found under the [Managed Folders] just below the [Junk ] folder. 3. s kept in this [Archive] folder will not be purged. 4. You can create sub-folders under this [Archive] folder as usual following the procedures stipulated in Section 5.19 on Folder Management. Mails inside the sub-folders of [Archive] folder will not be purged as well. 5. Mails under this [Archive] folder and their sub-folders will be counted against the storage quota (User may follow the procedures in Section 5.24 on Mailbox Space Indicator to view the latest space usage information). 6. For your reference, upon clicking the [Archive] folder, you will see the policy statement of the folder just above the middle section of the OWA page. You may hide the policy statement by clicking the [Click to hide] option. Note: Besides moving the mails to the [Archive] folder, users can also archive the useful mails onto workstation/removable storage media locally using Office Outlook. For details, please refer to the relevant setup guides which are available under EDB Intranet ( through the path Page 34
35 Information Directory -> E. Information Technology --> 7. Office Systems User Guide -> Office Systems & s -> 7. School Mail System -> c. Outlook 2003 Setup Guides / d. Outlook 2007 Setup Guides / e. Outlook 2010 Guides". Page 35
![5.15. DELETE MAIL 1. Click the mail to be deleted so that it is highlighted. 2. Click the [Delete] button on the tool bar to delete the selected mail(s). 3.](/docs-images/25/6255648/images/36-0.png "You can also opt to right-click the selected e-mail(s) and click [Delete] on the pop up box to delete the mail(s). 4.")
36 5.15. DELETE MAIL 1. Click the mail to be deleted so that it is highlighted. 2. Click the [Delete] button on the tool bar to delete the selected mail(s). 3. You can also opt to right-click the selected (s) and click [Delete] on the pop up box to delete the mail(s). 4. The mail(s) would be removed from [Inbox] and would be stored in [Deleted Items] box. 5. Go to the [Deleted Items] folder. Right click this folder and click the [Empty Deleted Items] option to delete all the mails therein. Note: a). Any mails in the [Deleted Items] folder will be emptied from the folder automatically if they have been retained in the [Deleted Items] folder for more than 48 hours. b). All mails cleaned from the [Deleted Items] folder can be recovered where necessary if they have not been permanently deleted. Please refer to Section 5.15 for details. Page 36
![5.16. RECOVER DELETED MAIL 1. By using the [Recover Deleted Items] option, user can recover the deleted mails from the [Deleted Items] folder if they have not yet been permanently deleted.](/docs-images/25/6255648/images/37-0.png "To do so, click [Options] on the top right hand corner. 2. On the left pane, click [Deleted Items]. Select the e-mails that you want to recover. Then click [Recover to Deleted Items Folder].")
37 5.16. RECOVER DELETED MAIL 1. By using the [Recover Deleted Items] option, user can recover the deleted mails from the [Deleted Items] folder if they have not yet been permanently deleted. To do so, click [Options] on the top right hand corner. 2. On the left pane, click [Deleted Items]. Select the s that you want to recover. Then click [Recover to Deleted Items Folder]. If you click [Permanently Delete], the selected mails will be deleted permanently. Click this link to recover deleted mail. Click this link to delete s permanently. 3. If you want to empty the Deleted Items folder every time when you logoff, you can select the option [Empty the Deleted Items folder on logoff]. Page 37
![Note: Mail System will purge mails older than 180 days, no matter whether they have been read or not, for the folders [Inbox], [Sent Items], [Deleted Items] and their sub-folders](/docs-images/25/6255648/images/38-0.png "of the mailbox in the periodic server housekeeping exercise. Any mail cleaned by Mail System purging policy or by clicking the [Permanently Delete] option cannot be recovered.")
38 Note: Mail System will purge mails older than 180 days, no matter whether they have been read or not, for the folders [Inbox], [Sent Items], [Deleted Items] and their sub-folders of the mailbox in the periodic server housekeeping exercise. Any mail cleaned by Mail System purging policy or by clicking the [Permanently Delete] option cannot be recovered. Page 38
![5.17. ADD ATTACHMENT You can attach file(s) to a mail. 1. In a message window, click the [Attachment] icon and then click [Browse] to select the file(s) to be attached. 2.](/docs-images/25/6255648/images/39-0.png "If you want to attach more files, you can click [Choose more files]. 3. Click [Attach] and the selected file(s) would be attached to the mail.")
39 5.17. ADD ATTACHMENT You can attach file(s) to a mail. 1. In a message window, click the [Attachment] icon and then click [Browse] to select the file(s) to be attached. 2. If you want to attach more files, you can click [Choose more files]. 3. Click [Attach] and the selected file(s) would be attached to the mail. Note: For sake of security and stability of server performance, the EDB mailing system executes attachment filtering policy to filter out the following two kinds of attachment from routing through the system: a) attachment s size is too large, making the size of the mail exceed 10MB. If you send a mail exceeding 10MB, subject to the size of the mail you have sent, a system message may prompt up informing you that the message could not be sent or you may receive a Delivery Failure Report telling you that the mail could not be sent due to the oversizing of the mail. Page 39

40 b) the attachment type is one of those which could easily spread virus or worm. The attachment will be blocked and deleted by the system in the process of delivery, and therefore become non-executable, while the message itself will continue to be delivered to the recipients. For recipients of the Notes (not applicable to Notes Users viewing at Domino Web Access client) and School Mail System, we have a customized message to inform them of the attachment deletion; however, such notice is not available for Notes recipients with Domino Web Access client only and recipients with mail systems outside the EDB. The following table lists the major file types that will be blocked under the attachment filtering policy of the EDB mailing system. However, the list is by no means exhaustive. File types.ade.adp.asx.bas.bat.chm.com.cpl.crt.exe.hlp.hta.inf.ins.js.jse.jsp.lnk.mda.mdb.mde.mdt.mdw.mdz.msc.msi.msp.mst.ops.pcd.pif.prf.reg.scf.scr.sct.shb.shs.url.vb.vbe.vbs.wk1.wk2.wk3.wk4.wks.wsc.wsf.wsh Page 40
41 If you have configured your workstation to hide the file extension, you may wish to follow the below steps to reset the workstation so that all file extensions will be unhidden and you can view the file type of an attachment easily. 1. In [Control Panel 控 制 台 ] 2. Double click [Folder options 資 料 夾 選 項 ] 3. Click [View 檢 視 ]. Then, uncheck the checkbox [Hide known file types extension 隱 藏 已 知 檔 案 的 附 檔 名 ] and click [OK]. Page 41

42 5.18. SAVE ATTACHMENT 1. Right-click the attachment that you want to save and then click [Save as]. 2. And then, choose the location and click [Save]. Page 42

43 5.19. FOLDER MANAGEMENT A. Mail Folders OWA comes with a set of default folders, which allows you to organize your mails, as well as your personal contacts and calendar: [Calendar] Displays your calendar items. [Contacts] Displays contacts you have created. [Deleted Items] Where messages marked for deletion are stored. [Drafts] Where you can save a message until you are ready to send it. [Inbox] - Where new messages appear. [Junk ] - It is the folder where junk mails are stored. You will see in Section 6.3 of this guide on how a rule can be set to identify incoming mails from a particular address or having particular text be blocked from your [Inbox] folder and be sent to the Junk Folder directly. [Managed Folder Archive] Where you can archive the useful mails. [Notes] Display notes that you have created. [Outbox] Display messages waiting to send. [Sent Items] Store the sent messages. [Sync Issues] If Exchange ActiveSync (Access of the mailbox through mobile device) is used, error related to the message synchronization will be stored. [Tasks] Display task that you have created. [Search Folders] It is a virtual folder that provides a view of all messages that match specific search criteria. Since the searching function is not available for OWA users, please ignore this folder.. B. Create Folders 1. Select the location that you want to create folder. Then, right-click that location and select [Create New Folder]. 2. A textbox will be available for you to enter the folder name. Enter the name for the folder and the new folder will be created. Page 43
 directly to your target folder. D. Delete Folder 1.")
44 C. Move Mail to Folder 1. Select the mail(s) to be moved; 2. Drag and drop the mail(s) directly to your target folder. D. Delete Folder 1. Right-click the folder you want to delete. 2. Select [Delete] from the menu. Page 44

45 5.20. FLAG AND REMINDER It is a tool which helps you to remind yourself to follow up on specific items in your mailbox on a specified pre-set date. A. Follow Up Flag 1. Select the mail that you want to mark as Follow Up and click [Follow Up] icon on the right corner of the row. 2. Or you can open the mail, and click [Follow Up] icon on the tool bar. 3. Then select the desired due date, for example, today, tomorrow, next week, etc. as appropriate. 4. After you mark the follow-up flag, you can sort those messages which have been flagged with Follow Up according to the flag due date and flag start date: [Flag Due Date] Sorts the messages based on the due date of the flag. [Flag Start Date] Sorts the messages based on the date that the flag was added; Page 45
![5. To clear the flag, select the mail and click [Follow Up] flag. The follow up flag will change to a tick icon. B. Reminder 1. In addition to the flag, you can add reminder to mails.](/docs-images/25/6255648/images/46-0.png "To do so, right click the selected mail and select [ Set Date and Reminder] from the menu. 2. You can also use the [Mark Complete], [Clear Flag], and [Set Default Flag] functions.")
46 5. To clear the flag, select the mail and click [Follow Up] flag. The follow up flag will change to a tick icon. B. Reminder 1. In addition to the flag, you can add reminder to mails. To do so, right click the selected mail and select [ Set Date and Reminder] from the menu. 2. You can also use the [Mark Complete], [Clear Flag], and [Set Default Flag] functions. Page 46
47 5.21. COLOR CATEGORIES This tool helps you to organize items in your mailbox. Each category is assigned with a color. You can apply a category to a mail, a calendar item, a contact, and or a task according to their contents, sender, etc, to suit your special needs. 1. Open a mail that you want to apply category. Click the Color Categories icon. 2. Select the color (e.g. Green) that your want to apply. 3. Categories applied. 4. You can search your mails which have been applied with color category. Tick the Category checkbox and select the selected category (e.g. Green Category). Click search icon. Page 47

48 5. Result displayed. Page 48
49 5.22. SET UP OUT OF OFFICE ASSISTANT 1. Click the icon [Options] on the top right hand corner. 2. Select the option [Out of Office Assistant]. 3. On the right pane, you can enable or disable the Out of Office Assistant. [Do not send Out of Office auto-replies] By choosing this option, [Out of Office Assistant] will be disabled. [Send Out of Office auto-replies] By choosing this option, [Out of Office Assistant] will be enabled and auto-replies will be delivered to those senders within EDB School Mail System. You can specify the effective time range for the [Out of Office Assistant]. Page 49
50 Type the auto-reply message here. 4. Type your Out of Office auto-reply message in the concerned textbook. 5. For non-edb School Mail System senders, which is named as External Sender in OWA, (e.g. EDB Notes users or senders from other domains like you have to tick one of the following checkboxes appropriately before they will receive the auto-replies. [Send Out of Office auto-replies only to senders in my Contacts List] By choosing this option, Out of Office auto-replies will be available to the External Senders that exists in your contacts list. [Send Out of Office auto-replies to anyone outside my organization] By choosing this option, Out of Office auto-replies will be available for any External Sender. Type the auto-reply message for External Sender here. You may use the same Out of Office message for Internal Senders to reply the External Senders. Or you can make another Out of Office message to reply the external senders by typing your message in the above text box.. 6. Click [Save] to save your settings. Page 50


51 5.23. CHANGE INTRANET/OWA PASSWORD 1. Type in your EDB Portal account and password accordingly and then click Logon. For non-edb Portal users, simply use your Windows LAN account to logon. 2. Click the drop down menu as shown below and click Change my password 3. You ll be taken to the Change Password screen. Enter your current password and type your new password twice and click Save. Your password will be changed accordingly. Page 51

52 5.24. MAILBOX SPACE INDICATOR Each School Mail System mailbox has a storage quota. User may check the latest space usage information of the mailbox by using the Mailbox Space Indicator function. 1. Locate your mailbox name at the left pane and move the mouse to it. The latest mailbox space information will then be shown up. 1. Move the mouse and point it to the mailbox name. 2. Mailbox space usage information box will appear. 2. If your mailbox space is almost full (i.e. >90%), mailbox space usage information textbox will appear on top of the left pane after you login into your OWA. 3. Besides, system message will be generated by the system alerting those users that their mailbox are almost full (i.e. >90%). This message will be sent at around 1:00a.m. everyday. Page 52

53 6. OUTLOOK WEB ACCESS OPERATING INSTRUCTIONS (ADVANCED) 6.1. CALENDAR 1. To access the Calendar, you can click the [Calendar] icon on the left pane. 2. Choose your desired calendar view, including view by day/week/month. The highlighted cell in the Calendar is the date for current day. Page 53
![3. Select the date for the event and click the [New] icon.](/docs-images/25/6255648/images/54-0.png "Then, select [Appointment] or [Meeting Request]. 4.")
54 3. Select the date for the event and click the [New] icon. Then, select [Appointment] or [Meeting Request]. 4. Or you can double-click the relevant cell of the date or time to create your event directly. Page 54
. 6.")
55 5. The icons on the tool bar: - Add attachment to this event. - Set this event as a recurrent event. - Spell Checking. - Invite Attendee to your event or appointment. - Set the importance (High or Low). 6. If you want to check your availability, you can click the tab [Scheduling Assistant]. Page 55
![7. After checking, you can back to appointment screen and click [Save and Close] to save your event. You will see the new event is created in the calendar already. 8.](/docs-images/25/6255648/images/56-0.png "If you want to update or delete the event, you can double-click the event. Then, update or delete the event: Update Modify and save it. Delete Click the delete icon to delete it. 9.")
56 7. After checking, you can back to appointment screen and click [Save and Close] to save your event. You will see the new event is created in the calendar already. 8. If you want to update or delete the event, you can double-click the event. Then, update or delete the event: Update Modify and save it. Delete Click the delete icon to delete it. 9. If you received a calendar task (Meeting Request) and think it is useful for your Page 56

57 counterpart, you can forward the calendar task to your counterpart and mark his/her calendar. To do so, click [Forward]. 10. Enter the recipient information and click [Send] to send it. Page 57
![6.2. TASKS 1. In OWA, you can create task to remind yourself that you have some tasks that you need to do. On the left pane, click the [Tasks] icon.](/docs-images/25/6255648/images/58-0.png "2. In the [Tasks] section, click [New] icon to create a new task. 3. Enter your task details. Then click [Save and Close] to save your task. Page 58")
58 6.2. TASKS 1. In OWA, you can create task to remind yourself that you have some tasks that you need to do. On the left pane, click the [Tasks] icon. 2. In the [Tasks] section, click [New] icon to create a new task. 3. Enter your task details. Then click [Save and Close] to save your task. Page 58

59 4. After you have completed the task, you can mark the task as completed by clicking the follow up flag. 5. You can also open the task and update task status or details. Click [Save and Close] to save your update. 6. If you want to delete the task, click the delete icon. Page 59
![6.3. RULES In OWA, user can create rules to act automatically on new messages you receive that meet certain conditions. 1. To create rules, click [Options] on the top right hand corner. 2.](/docs-images/25/6255648/images/60-0.png "On the left pane, click [Rules]. The following shows an example how to move e-mails from a specified user to a specified folder like [Junk E-Mail] folder: a).")
60 6.3. RULES In OWA, user can create rules to act automatically on new messages you receive that meet certain conditions. 1. To create rules, click [Options] on the top right hand corner. 2. On the left pane, click [Rules]. The following shows an example how to move s from a specified user to a specified folder like [Junk ] folder: a). Create a new mail rule by click the [New Rule] button. b). Select [Move messages from someone to a folder]. c). In the [Name] field, enter the Rule Name (e.g. From Exch User 02) Page 60
61 d). Click the link [people or distribution lists]. e). Enter the user address or select it from address book. Click [OK]. f). Click the link [specified]. g). Select or create your target folder for mail delivery. Click [OK]. Page 61
![h). Click [Save] to save the rule. i). If you want to delete the rule, you can select the rule and click the delete button. j).](/docs-images/25/6255648/images/62-0.png "If you found some senders always sending spam mails to you and you want to filter such e-mails to [Junk E-mail] folder, you can use the steps above to create a rule and move spam mail to Junk E-mail")
62 h). Click [Save] to save the rule. i). If you want to delete the rule, you can select the rule and click the delete button. j). If you found some senders always sending spam mails to you and you want to filter such s to [Junk ] folder, you can use the steps above to create a rule and move spam mail to Junk folder. k). Clean up the [Junk Mail] folder or any folders which are used to store filtered mails regularly as appropriate. Page 62
![6.4. PERSONAL CONTACTS 1. Click [Contact] in the left menu. 2. Click [New] > [Contact]. 3.](/docs-images/25/6255648/images/63-0.png "Under the [Profile] tag, enter information of the new contact entry. Click [Save and Close].")
63 6.4. PERSONAL CONTACTS 1. Click [Contact] in the left menu. 2. Click [New] > [Contact]. 3. Under the [Profile] tag, enter information of the new contact entry. Click [Save and Close]. Page 63

64 4. Finish the creation of a new contact entry. 5. If you want to edit any contact entry, you can double-click the contact entry and then update the details. Click [Save and Close] to save your updating. Page 64
65 6. If you want to delete any contact entry, you can highlight the contact entry and then click the delete icon. Page 65
66 6.5. MAILBOX DELEGATION 1. Click [Mailbox Delegation] in the left menu. 2. If you want to share your mailbox to other user, locate the [Mailbox Delegation Settings] section. Then look up user by using the search box [Display Name] or [Account Name] and click [Lookup]. Page 66
67 3. In the searching results, select the mailbox that you want to delegate. Then, select the folders (i.e. [Inbox], [Calendar], [Contacts] and [Tasks]) that you want to delegate. There are two level of permissions, [None] or [Reviewer], available for share. If you set the permission to [Reviewer], the delegated user can open your delegated folder as Read-Only. If you set the permission to [None], the delegated user is not allowed to access such folder at all. After finish setting the permission, click [Share]. 4. Under [Existing Permission Settings] section, you can find the summary of your mailbox delegation records. 5. If you want to remove the delegation for any user, locate the entry and click [Remove]. If you want to reset the delegation for any user, you also need to remove such delegation entry first. Then configure the permission for such user again. Page 67
![6.6. OPEN OTHER S MAILBOX 1. Click [Mailbox Delegation] in the left menu. 2.](/docs-images/25/6255648/images/68-0.png "If an user has shared his/her mailbox for your access, you can open other s mailbox by using the section [Open Other s Mailbox].")
68 6.6. OPEN OTHER S MAILBOX 1. Click [Mailbox Delegation] in the left menu. 2. If an user has shared his/her mailbox for your access, you can open other s mailbox by using the section [Open Other s Mailbox]. Firstly, look up the user by using the search box [Display Name] or [Account Name]. Then, click [Lookup]. 3. In the searching results, select the mailbox that you want to open. Then, select the folder type ([Inbox], [Calendar], [Contacts] or [Tasks]). Click [Open]. 4. The delegated mailbox will be opened. Page 68
69 Page 69
![7. APPENDIX I INTERNET EXPLORER SETTINGS 7.1. ENABLE JAVASCRIPT 1. In Internet Explorer (IE), click [Tools] > [Internet Options]. 2.](/docs-images/25/6255648/images/70-0.png "Move to [Security] tab. Click [Custom Level]. 3. Locate and ensure [Scripting] > [Active scripting] > [Enable] is checked. Click [OK].")
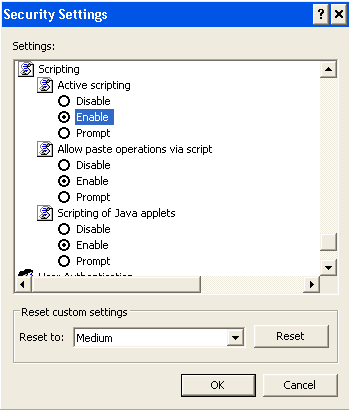
70 7. APPENDIX I INTERNET EXPLORER SETTINGS 7.1. ENABLE JAVASCRIPT 1. In Internet Explorer (IE), click [Tools] > [Internet Options]. 2. Move to [Security] tab. Click [Custom Level]. 3. Locate and ensure [Scripting] > [Active scripting] > [Enable] is checked. Click [OK]. Page 70
71 Page 71
![7.2. ENABLE COOKIES 1. In IE, click [Tools] > [Internet Options]. 2. Move to [Privacy] tab. Click [Advanced]. 3.](/docs-images/25/6255648/images/72-0.png "Ensure the checkbox for [Override automatic cookie handing] is NOT checked. If this checkbox is checked, uncheck it.")
72 7.2. ENABLE COOKIES 1. In IE, click [Tools] > [Internet Options]. 2. Move to [Privacy] tab. Click [Advanced]. 3. Ensure the checkbox for [Override automatic cookie handing] is NOT checked. If this checkbox is checked, uncheck it. Click [OK]. Page 72

73 4. However, if the above setting does not work in your case, you can tick the checkbox. Select [Accept] for both options of [First-party Cookies] and [Third-party Cookies]. Then tick the checkbox [Always allow session cookies] and click [OK]. Page 73
![7.3. DO NOT SAVE ENCRYPTED PAGE 1. In IE, click [Tools] > [Internet Options]. 2.](/docs-images/25/6255648/images/74-0.png "Move to [Advanced] tab. Tick the checkbox for [Do not save encrypted pages to disk].")
74 7.3. DO NOT SAVE ENCRYPTED PAGE 1. In IE, click [Tools] > [Internet Options]. 2. Move to [Advanced] tab. Tick the checkbox for [Do not save encrypted pages to disk]. Click [OK]. Page 74
75 8. APPENDIX II SCHOOL MAIL SYSTEM NEW FEATURES 8.1. NEW FEATURES The School Mail System provides the following new features when compared to the previous iplatform System: Color categories Set different Auto-replies for Internal/External senders through Out of Office Assistant Out Of Office Assistant scheduling Recover deleted items Set/Use signatures Spell Checking Address Book Lookup Calendar Forward meeting request to related counterparts User Interface/Productivity Flag mails for follow-up Reminders Create task list Note: Please note that the above list just covers some major features and is not exhaustive. -END- Page 75
School Mail System. - Access through Office 365 Exchange Online. User Guide FOR. Education Bureau (EDB)
") School Mail System - Access through Office 365 Exchange Online User Guide FOR Education Bureau (EDB) Version: 1.0 May 2015 The Government of the Hong Kong Special Administrative Region The contents of
School Mail System - Access through Office 365 Exchange Online User Guide FOR Education Bureau (EDB) Version: 1.0 May 2015 The Government of the Hong Kong Special Administrative Region The contents of
Outlook Web Access (OWA) User Guide
 User Guide") Outlook Web Access (OWA) User Guide September 2010 TABLE OF CONTENTS TABLE OF CONTENTS... 2 1.0 INTRODUCTION... 4 1.1 OUTLOOK WEB ACCESS SECURITY CONSIDERATIONS... 4 2.0 GETTING STARTED... 5 2.1 LOGGING
Outlook Web Access (OWA) User Guide September 2010 TABLE OF CONTENTS TABLE OF CONTENTS... 2 1.0 INTRODUCTION... 4 1.1 OUTLOOK WEB ACCESS SECURITY CONSIDERATIONS... 4 2.0 GETTING STARTED... 5 2.1 LOGGING
Outlook 2007 - Exchange
 Information Technology MS Office Outlook 2007 Users Guide Outlook 2007 - Exchange Mail, Calendar, Contacts, Notes & Tasks Folders IT Training & Development 677-1700 [email protected] TABLE OF CONTENTS
Using Outlook WebAccess
 Using Outlook WebAccess Outlook Toolbars - Terminology Update all folders New Move/Copy Reply Forward Check for New Messages Help Show/Hide Folders Delete Reply to All Show/Hide Reading Pain Search Address
Outlook 2010. Mail, Calendar, Contacts, Notes & Tasks. User Guide
 User Guide Outlook 2010 Mail, Calendar, Contacts, Notes & Tasks IT Training (818) 677-1700 [email protected] www.csun.edu/it/training CSUN IT Training YouTube Channel http://www.youtube.com/user/csuninfotech
Using Outlook Web App
 Using Outlook Web App About Outlook Web App Using a web browser and the Internet, Outlook Web App (OWA) provides access to your Exchange mailbox from anywhere in the world at any time. Outlook Web App
BCSD WebMail Documentation
 BCSD WebMail Documentation Outlook Web Access is available to all BCSD account holders! Outlook Web Access provides Webbased access to your e-mail, your calendar, your contacts, and the global address
Microsoft Office 365 Outlook Web App (OWA)
") CALIFORNIA STATE UNIVERSITY, LOS ANGELES INFORMATION TECHNOLOGY SERVICES Microsoft Office 365 Outlook Web App (OWA) Winter 2015, Version 2.0 Table of Contents Introduction...3 Logging In...3 Navigation
CALIFORNIA STATE UNIVERSITY, LOS ANGELES INFORMATION TECHNOLOGY SERVICES Microsoft Office 365 Outlook Web App (OWA) Winter 2015, Version 2.0 Table of Contents Introduction...3 Logging In...3 Navigation
Email User Manual. [Outlook Web App 2013]
![Email User Manual. [Outlook Web App 2013]](/thumbs/30/14055838.jpg "Email User Manual. [Outlook Web App 2013]") [Outlook Web App 2013] Central Information Systems Division March 2014 Table of Contents 1. To Login... 4 2. To Logout... 5 3. Change Password... 5 4. Email Messaging... 6 4.1 Create a New Mail... 6 4.2
[Outlook Web App 2013] Central Information Systems Division March 2014 Table of Contents 1. To Login... 4 2. To Logout... 5 3. Change Password... 5 4. Email Messaging... 6 4.1 Create a New Mail... 6 4.2
Connecting to LUA s webmail
 Connecting to LUA s webmail Effective immediately, the Company has enhanced employee remote access to email (Outlook). By utilizing almost any browser you will have access to your Company e-mail as well
CITY OF BURLINGTON PUBLIC SCHOOLS MICROSOFT EXCHANGE 2010 OUTLOOK WEB APP USERS GUIDE
 CITY OF BURLINGTON PUBLIC SCHOOLS MICROSOFT EXCHANGE 2010 OUTLOOK WEB APP USERS GUIDE INTRODUCTION You can access your email account from any workstation at your school using Outlook Web Access (OWA),
Using Webmail. Document Updated: 11/10. Technical Manual: User Guide. The Webmail Window. Logging In to Webmail. Displaying and Hiding the Full Header
 Using Webmail Technical Manual: User Guide Webmail is supported in the following browsers: Windows Internet Explorer 6, Internet Explorer 7, Firefox 2, and Firefox 3 Mac OSX Safari 2, Safari 3, Firefox
Microsoft Outlook Web App Quick Reference Card
 Microsoft Outlook Web App Quick Reference Card Accessing Outlook Web App You can access your mailbox through any browser that supports HTML 3.2 and ECMA. To access your mailbox, enter your OWA web address/url
Training Manual. Version 6
 Training Manual TABLE OF CONTENTS A. E-MAIL... 4 A.1 INBOX... 8 A.1.1 Create New Message... 8 A.1.1.1 Add Attachments to an E-mail Message... 11 A.1.1.2 Insert Picture into an E-mail Message... 12 A.1.1.3
Outlook Web Access E-mail
 Outlook Web Access E-mail A. Accessing the mailbox via the Internet 1. Open your browser Firebox or Internet Explorer 2. In the URL address location box, key mail.asbury.edu for students and mail2.asbury.edu
Outlook Web App OWA Quick Guide. Getting you up to speed quickly.
 Outlook Web App OWA Quick Guide Getting you up to speed quickly. Information Services 8-1-2014 Contents Exploring the OWA (Outlook Web App) User Interface... 2 Getting Started... 2 Mail... 6 Creating and
Entourage - an Introduction to E-mail
 Entourage - an Introduction to E-mail Version 2004 for Macintosh Table of Contents What is Entourage Starting Entourage The Navigation Pane Getting Help Creating and Sending a Message Using the UI Exchange
If you encounter difficulty or need further assistance the Archdiocesan help desk can be reached at (410) 547-5305, option 1. Email Access Methods:
 547-5305, option 1. Email Access Methods:") ArchMail (www.archbalt.org/archmail) is a centrally hosted email system for the employees of the Archdiocese. To simplify employee access multiple methods for accessing email have been established. This
ArchMail (www.archbalt.org/archmail) is a centrally hosted email system for the employees of the Archdiocese. To simplify employee access multiple methods for accessing email have been established. This
Student Office 365 Outlook Web App OWA Quick Guide. Getting you up to speed quickly.
 Student Office 365 Outlook Web App OWA Quick Guide Getting you up to speed quickly. Information Services 9-5-2014 Contents Logging into the CWU Student Outlook Web App... 3 Getting Started with Office
Microsoft Office 365 Outlook Web App (OWA)
") CALIFORNIA STATE UNIVERSITY, LOS ANGELES INFORMATION TECHNOLOGY SERVICES Microsoft Office 365 Outlook Web App (OWA) Spring 2013, Version 1.0 Table of Contents Introduction...3 Signing In...3 Navigation
CALIFORNIA STATE UNIVERSITY, LOS ANGELES INFORMATION TECHNOLOGY SERVICES Microsoft Office 365 Outlook Web App (OWA) Spring 2013, Version 1.0 Table of Contents Introduction...3 Signing In...3 Navigation
EMAIL QUICK START GUIDE
 IT Services Microsoft Outlook 2010 EMAIL QUICK START GUIDE Contents What is Outlook?...2 Quick Guide to Email...2 Create a new e-mail message...2 Forward or reply to an e-mail message...2 Creating new
Email -- Reading and Printing Email
 Email -- Reading and Printing Email Checking for New Email By default, webmail checks for new email automatically. If you want to manually check for new email, click the Check Email button. Or, click the
Microsoft Outlook 2010. Reference Guide for Lotus Notes Users
 Microsoft Outlook 2010 Reference Guide for Lotus Notes Users ContentsWelcome to Office Outlook 2010... 2 Mail... 3 Viewing Messages... 4 Working with Messages... 7 Responding to Messages... 11 Organizing
Microsoft Outlook 2003 Basic Guide
 Microsoft Outlook 2003 Basic Guide Table of Contents Introduction... 2 Getting Help... 2 Exploring Outlook... 3 Drop-Down Menus... 3 Navigation Pane... 4 Folder Pane... 7 Reading Pane... 7 Toolbars...
OWA - Outlook Web App
 OWA - Outlook Web App Olathe Public Schools 0 Page MS Outlook Web App OPS Technology Department Last Revised: May 1, 2011 Table of Contents MS Outlook Web App... 1 How to Access the MS Outlook Web App...
Office Outlook web access Reference Guide
 U TO R E XC H A N G E : C a l e n d a r i n g a n d e m a i l u p g r a d e w i t h M i c r o s o f t E xc h a n g e Office Outlook web access Reference Guide To log in, go to owa.utoronto.ca. You will
Outlook Web Access (OWA) with Exchange Server 2007 (Windows version)
 with Exchange Server 2007 (Windows version)") Outlook Web Access (OWA) with Exchange Server 2007 (Windows version) 1. Login into your Baylor email account via a web browser such as Internet Explorer, Fire Fox, or Netscape. The web URL is still http://mail.baylor.edu/
Outlook Web Access (OWA) with Exchange Server 2007 (Windows version) 1. Login into your Baylor email account via a web browser such as Internet Explorer, Fire Fox, or Netscape. The web URL is still http://mail.baylor.edu/
Using Webmail. Document Updated: 9/08. Technical Manual: User Guide. The Webmail Window. Displaying and Hiding the Full Header.
 Using Webmail Technical Manual: User Guide Webmail is supported in the following browsers: Windows Internet Explorer 6, Internet Explorer 7, Firefox 2, and Firefox 3 Mac OSX Safari 2, Safari 3, Firefox
Outlook Web Access User Guide
 Table of Contents Title Page How to login...3 Create a new message/send attachment...5 Remove the reading pane...10 Calendar functions...11 Distribution lists...11 Contacts list...13 Tasks...18 Options...19
OUTLOOK WEB APP (OWA): MAIL
: MAIL") Office 365 Navigation Pane: Navigating in Office 365 Click the App Launcher and then choose the application (i.e. Outlook, Calendar, People, etc.). To modify your personal account settings, click the Logon
Office 365 Navigation Pane: Navigating in Office 365 Click the App Launcher and then choose the application (i.e. Outlook, Calendar, People, etc.). To modify your personal account settings, click the Logon
Outlook Web Access Tipsheets
 You can use a Web browser to access your Outlook mailbox from any computer with an Internet connection. You can use Outlook Web Access with Microsoft Internet Explorer, Mozilla Firefox and many other browsers.
Lotus Notes Client Version 8.5 Reference Guide
 Lotus Notes Client Version 8.5 Reference Guide rev. 11/19/2009 1 Lotus Notes Client Version 8.5 Reference Guide Accessing the Lotus Notes Client From your desktop, double click the Lotus Notes icon. Logging
Web Mail Guide... Error! Bookmark not defined. 1 Introduction to Web Mail... 4. 2 Your Web Mail Home Page... 5. 3 Using the Inbox...
 Powered by Table of Contents Web Mail Guide... Error! Bookmark not defined. 1 Introduction to Web Mail... 4 1.1 Requirements... 4 1.2 Recommendations for using Web Mail... 4 1.3 Accessing your Web Mail...
Outlook Web Access End User Guide
 Outlook Web Access End User Guide Page 0 Outlook Web Access is an online, limited version of an Outlook client which can be used to access an exchange account from a web browser, without having an Outlook
Outlook Web App McKinney ISD 5/27/2011
 Outlook Web App McKinney ISD 5/27/2011 Outlook Web App Tutorial Outlook Web Access allows you to gain access to your messages, calendars, contacts, tasks and public folders from any computer with internet
Outlook Web App OWA. Let s take a look at the new features and functionality available on OWA. Feature & Functionality Description User experience
 Outlook Web App OWA Let s take a look at the new features and functionality available on OWA. Feature & Functionality Description User experience Logon Screen User logon screen for Outlook Web App (OWA)
Using Webmail. Technical Manual: User Guide. Document Updated: 1/07. The Webmail Window. Displaying and Hiding the Full Header.
 Using Webmail Technical Manual: User Guide The Webmail Window To save an attachment: 1. Click once on the attachment name. Or, if there are multiple attachments, click the Save icon to save all attachments
Microsoft Outlook Web Access Overview
 Microsoft Outlook Web Access Overview Table of contents Logging on to Outlook Web Access... 3 The sections of Outlook Web Access... 4 The Inbox Toolbar... 4 How to sections... 5 Email Basics... 5 Use the
WHAT S NEW IN OUTLOOK 2010 & HOW TO CUSTOMIZE IT
 WHAT S NEW IN OUTLOOK 2010 & HOW TO CUSTOMIZE IT THE RIBBON... 2 CONTEXTUAL TABS... 4 THE FILE TAB... 4 DIALOG BOXES... 5 MINIMIZING THE RIBBON... 5 CUSTOMIZING THE RIBBON... 6 CUSTOMIZING THE QUICK ACCESS
O UTLOOK 2003 HELP SHEET MAIL. Opening the program. Mail
 O UTLOOK 2003 HELP SHEET MAIL Opening the program At Work Double-click the icon on your desktop. Or click the Start button. If this icon is displayed, click on it. If it is not displayed, click Start,
Outlook 2010 and 2013
 Outlook 2010 and 2013 Email Setup Account Types 2 Exchange account 3 POP account 5 Maintenance Setting up an Email signature 7 Checking Email Storage 8 Archiving Emails 9 Sharing Calendars Giving Access
Outlook 101. Use and Manage Your Outlook Email Account. 2006 Terence Peak, UIW Dept. of Instructional Technology
 Outlook 101 Use and Manage Your Outlook Email Account What you will learn today Difference Between OWA and Outlook Client Mail Options Contacts Managing Outlook Calendar Options Tasks Outlook Web Access
Webmail Instruction Guide
 Webmail Instruction Guide This document is setup to guide your through the use of the many features of our Webmail system. You may either visit www.safeaccess.com or webmail.safeaccess.com to login with
Outlook Web Access (OWA or WebMail) Frequently Asked Questions
 Frequently Asked Questions") Outlook Web Access (OWA or WebMail) Frequently Asked Questions If you are a part-time staff member, adjunct faculty member, or Villanova student, you will access your Villanova email using a program called
Outlook Web Access (OWA or WebMail) Frequently Asked Questions If you are a part-time staff member, adjunct faculty member, or Villanova student, you will access your Villanova email using a program called
Outlook 2013 ~ e Mail Quick Tips
 The Ribbon: Home tab New Email to send a new mail New Items to send a new mail, a new appointment, a new meeting, a new contact, a new task, a new Lync Meeting Ignore to ignore a request Clean Up to clean
Guidelines for using e-mail account through OWA
 Guidelines for using e-mail account through OWA Logon to Outlook Web Access (OWA), UNITEN User E-mail. UNITEN User E-mail account is accessible through out the world. It is also known as OWA (Outlook Web
Webmail User Guide. The Webmail Window. Logging In to Webmail. Displaying and Hiding the Full Header. Printing an Email. Composing a New Email
 Webmail User Guide Rev: November, 2012 Webmail is supported in the following browsers: Windows Internet Explorer 6, Internet Explorer 7, Firefox 2, and Firefox 3 Mac OSX Safari 2, Safari 3, Firefox 2,
700 Fox Glen Barrington, Illinois 60010 ph: [847] 842-9570 fx: [847] 842-0190 www.excaltech.com [email protected]. Webmail System User Guide
![700 Fox Glen Barrington, Illinois 60010 ph: [847] 842-9570 fx: [847] 842-0190 www.excaltech.com support@excaltech.com. Webmail System User Guide](/thumbs/28/12481810.jpg "700 Fox Glen Barrington, Illinois 60010 ph: [847] 842-9570 fx: [847] 842-0190 www.excaltech.com support@excaltech.com. Webmail System User Guide") 700 Fox Glen Barrington, Illinois 60010 ph: [847] 842-9570 fx: [847] 842-0190 www.excaltech.com [email protected] Webmail System User Guide Last Updated November 14, 2013 -2- Table of Contents Welcome
700 Fox Glen Barrington, Illinois 60010 ph: [847] 842-9570 fx: [847] 842-0190 www.excaltech.com [email protected] Webmail System User Guide Last Updated November 14, 2013 -2- Table of Contents Welcome
Outlook Web Access -User Guides-
 Nilai University College (Nilai Education Sdn. Bhd) Outlook Web Access -User Guides- Prepared By IT Department (Infrastructure Team) VERSION: 1.0 All rights reserved. This document is a proprietary product
Microsoft Outlook 2013 -And- Outlook Web App (OWA) Using Office 365
 Using Office 365") 1 C H A P T E R Microsoft Outlook 2013 -And- Outlook Web App (OWA) Using Office 365 1 MICROSOFT OUTLOOK 2013 AND OUTLOOK WEB ACCESS (OWA) Table of Contents Chapter 1: Signing Into the Microsoft Email System...
1 C H A P T E R Microsoft Outlook 2013 -And- Outlook Web App (OWA) Using Office 365 1 MICROSOFT OUTLOOK 2013 AND OUTLOOK WEB ACCESS (OWA) Table of Contents Chapter 1: Signing Into the Microsoft Email System...
STAFF MAIL. User Guide. Please see the next page for an important note
 STAFF MAIL User Guide Please see the next page for an important note Important note: This user guide was written to support the use of the original Staffmail system. A newly rewritten version is in preparation
Beginners Guide. Entourage 2004
 Beginners Guide to Entourage 2004 Table of Contents Computer Services Introduction... 2 New e-mail service at NUI, Galway... 2 Online Documentation... 2 The Entourage Window... 3 Creating a Signature File...
New Features in Outlook Web Access
 New Features in Feature and functionality Logon Screen Navigation Description User logon screen for Navigation in resembles navigation in Microsoft Office Outlook 2007. Drag-and-Drop Move items by dragging
Microsoft Outlook 2010
 Microsoft Outlook 2010 Prepared by Computing Services at the Eastman School of Music July 2010 Contents Microsoft Office Interface... 4 File Ribbon Tab... 5 Microsoft Office Quick Access Toolbar... 6 Appearance
COOK COUNTY OFFICE 365 MIGRATION USER GUIDE
 COOK COUNTY OFFICE 365 MIGRATION USER GUIDE Dear Cook County Office 365 User: Your mailbox is schedule to be migrated to Microsoft s Office 365 platform. Page 1 TABLE OF CONTENTS 01. PRE-MIGRATION RECOMMENDATIONS
Email User Guide. Contents. Information Systems and Technology Dawson College v 1.3, 15 November 2013
 Information Systems and Technology Dawson College v 1.3, 15 November 2013 Contents 1 Overview... 2 2 Access... 2 2.1 Outlook... 2 2.2 Outlook Web Access (OWA)... 3 2.3 Outlook for Mac... 4 2.4 Other email
MICROSOFT OUTLOOK 2010
 MICROSOFT OUTLOOK 2010 George W. Rumsey Computer Resource Center 1525 East 53rd, Suite 906 Chicago, IL 60615 (773) 955-4455 www.computer-resource.com [email protected] What Is Outlook?... 1 Folders... 2
OWA User Guide. Table of Contents
 OWA User Guide Table of Contents 1. Basic Functionality of Outlook Web Access... 2 How to Login to Outlook Web Access (OWA)... 2 Change Password... 3 Mail... 3 Composing Mail... 5 Attachments - Web Ready
To install ZCO. Once you have the above information and the ZCO.msi installation file, use the following instructions to install ZCO.
 How to Install and Use Zimbra Connector for Outlook The Zimbra Connector for Outlook (ZCO) provides real time two-way synchronization of email messages, folders including the Chats folder, tags, contacts,
Prepared by Mythtech Limited OFFICE 365 EMAIL MIGRATION MANUAL GUIDELINE
 Prepared by Mythtech Limited OFFICE 365 EMAIL MIGRATION MANUAL GUIDELINE Table of Contents Change Password... 1 Send New Email... 2 Forward E-mail... 3 Reply E-mail... 4 Archive old emails... 5 Office
Amazon WorkMail. User Guide Version 1.0
 Amazon WorkMail User Guide Amazon WorkMail: User Guide Copyright 2016 Amazon Web Services, Inc. and/or its affiliates. All rights reserved. Amazon's trademarks and trade dress may not be used in connection
Zimbra Connector for Microsoft Outlook User Guide 7.1
 Zimbra Connector for Microsoft Outlook User Guide 7.1 March 2011 Legal Notices Copyright 2005-2011 VMware, Inc. All rights reserved. This product is protected by U.S. and international copyright and intellectual
Migrating to Microsoft Exchange with Outlook 2007 and Outlook Web Access
 Migrating to Microsoft Exchange with Outlook 2007 and Outlook Web Access Jeff Pankin Information Services and Technology This document will focus on key differences when moving to Exchange using Outlook
PolyU Email Service. MS Outlook 2010. User Manual
 PolyU Email Service MS Outlook 2010 User Manual Version 1.0 Last Update: 5 October 2015 PolyU Email: www.polyu.edu.hk/email ITS HelpCentre Support: www.polyu.edu.hk/hots ITS HelpCentre Support Hotline:
RSCCD REMOTE PORTAL TABLE OF CONTENTS: Technology Requirements NOTE
 RSCCD REMOTE PORTAL The RSCCD Remote Portal allows employees to access their RSCCD Email (via Outlook Web Access), Department (Public) Folders, Personal (H Drive) Folder, and the District Intranet from
Microsoft Outlook 2013 Part 1: Introduction to Outlook
 CALIFORNIA STATE UNIVERSITY, LOS ANGELES INFORMATION TECHNOLOGY SERVICES Microsoft Outlook 2013 Part 1: Introduction to Outlook Fall 2014, Version 1.0 Table of Contents Introduction...3 Starting Outlook...3
Outlook Live Basics. for Students
 Outlook Live Basics for Students 2 Outlook Live for Support Staff Outlook Live for Support Staff 3 Getting Started... 6 Signing into your Outlook Account... 6 Migrating your Account... 8 Address Book...
Outlook Managing Your Items
 Course Description Managing your items is essential if you want Outlook to run as efficiently and effectively as possible. As with any filing system the longer you put off doing anything the larger the
CONTENTS. Introduction... 3. Outlook at a glance... 3. Configure Outlook 2010 on-campus... 3. Creating Folders... 4. Sorting Emails...
 OFFICE OF INFORMATION TECHNOLOGY Academic Technology Unit Microsoft Outlook 2010 Basics Workbook CONTENTS Introduction... 3 Outlook at a glance... 3 Configure Outlook 2010 on-campus... 3 Creating Folders...
Sign in to Outlook Web App
 Getting Started with Outlook Web App Sign in to Outlook Web App Sign in to Outlook Web App Go to Microsoft Online Services webpage at https://login.microsoftonline.com/ 1. Login with your UTHSC email address
Email at Bradford - Outlook
 This document provides guidance for staff using Office 365 with Microsoft Outlook 2010 for email at the University of Bradford. The University of Bradford retains copyright for this material, which may
Changes to Skillnet Group Emails. Outlook and Outlook Express Users
 Changes to Skillnet Group Emails Skillnet Group emails are moving from the current provider to our own exchange mail server. This will mean that you will have a much improved web-mail system and almost
Outlook Email. User Guide IS TRAINING CENTER. 833 Chestnut St, Suite 600. Philadelphia, PA 19107 215-503-7500
 Outlook Email User Guide IS TRAINING CENTER 833 Chestnut St, Suite 600 Philadelphia, PA 19107 215-503-7500 This page intentionally left blank. TABLE OF CONTENTS Getting Started... 3 Opening Outlook...
Email access via the Internet. Outlook Web Access
 Email access via the Internet Outlook Web Access SiX Document Title/ Search Keyword(s): Email access via the Internet Outlook Web Access Service Group: E-Learning & Information Management Contact Details:
Outlook 2013 ~ Advanced
 Mail Using Categories 1. Select the message that for the category. 2. Select the appropriate category. 3. The category color displays next to the message. Renaming Categories 1. Select a message. 2. Select
Outlook. Getting Started Outlook vs. Outlook Express Setting up a profile Outlook Today screen Navigation Pane
 Outlook Getting Started Outlook vs. Outlook Express Setting up a profile Outlook Today screen Navigation Pane Composing & Sending Email Reading & Sending Mail Messages Set message options Organizing Items
Zimbra Connector for Outlook User Guide. Release 6.0
 Zimbra Connector for Outlook User Guide Release 6.0 Network Edition August 2010 Legal Notices Copyright 2005-2010 Zimbra, Inc. All rights reserved. Zimbra and the Zimbra logo are trademarks of Zimbra.
The online email environment
 The online email environment These are the options for the selected application. Navigation Pane is comprised of a folders list and oneclick access to your Inbox, Calendar, Contacts, and Tasks folders
Microsoft Outlook Web Access Handbook
 Microsoft Outlook Web Access Handbook Introduction Outlook Web access allows you to use a web browser (Internet Explorer or Firefox) to read your email, send email, and check your online calendar. This
Module One: Getting Started... 6. Opening Outlook... 6. Setting Up Outlook for the First Time... 7. Understanding the Interface...
 2 CONTENTS Module One: Getting Started... 6 Opening Outlook... 6 Setting Up Outlook for the First Time... 7 Understanding the Interface...12 Using Backstage View...14 Viewing Your Inbox...15 Closing Outlook...17
Henrico County Public Schools
 Henrico County Public Schools Presents: The New Web Based E-Mail Solution DRAFT Table of Contents Table of Contents...2 Logging Into Outlook Web Access...4 Overview..5 Navigating the Outlook Components...5
Using Your New Webmail
 1 Using Your New Webmail Contents Compose a New Message... 3 Add an Attachment... 5 Insert a Hyperlink... 6 Forward an Email... 7 Search Email... 8 Download Email from an existing POP3 Account... 9 Move
Working with Mail (Hosted Exchange)
") TM Control Panel User Guide Working with Mail (Hosted Exchange) 1 Working with Mail (Hosted Exchange) TM offers Microsoft Exchange hosting as a powerful messaging solution allowing you to create and manage
TM Control Panel User Guide Working with Mail (Hosted Exchange) 1 Working with Mail (Hosted Exchange) TM offers Microsoft Exchange hosting as a powerful messaging solution allowing you to create and manage
USING MICROSOFT OUTLOOK 2013
 USING MICROSOFT OUTLOOK 2013 Staff Development Technology 0 P a g e TABLE OF CONTENTS Outlook 2013 Ribbon... 1 Viewing Inbox... 1 Background Color and Themes... 2 INBOX... 3 Reading Pane... 3 Turn off/on
Using Microsoft Office 2013: Outlook. Gerry Kruyer
 Using Microsoft Office 2013: Outlook Table of Contents Outlook 2013 Ribbon... 4 Viewing Inbox... 4 Folders... 4 Home Tab... 5 Background Colour and Themes... 5 Inbox... 6 Reading Pane... 6 Turn off/on
Grapevine Mail User Guide
 Grapevine Mail User Guide Table of Contents Accessing Grapevine Mail...2 How to access the Mail portal... 2 How to login... 2 Grapevine Mail user guide... 5 Copying your contacts to the new Grapevine Mail
Outlook Web Access (OWA) - Using Calendar and Email on the Web
 - Using Calendar and Email on the Web") Outlook Web Access (OWA) - Using Calendar and Email on the Web You can access OWA through a web browser on any computer connected to the internet. This guide is intended to help with the most common tasks
Outlook Web Access (OWA) - Using Calendar and Email on the Web You can access OWA through a web browser on any computer connected to the internet. This guide is intended to help with the most common tasks
Zimbra Connector for Microsoft Outlook User Guide. Network Edition 7.0
 Zimbra Connector for Microsoft Outlook User Guide Network Edition 7.0 February 2011 Legal Notices Copyright 2005-2011 VMware, Inc. All rights reserved. This product is protected by U.S. and international
PolyU Staff Email Service. Outlook 2011 Client. For Mac. Setup Guide
 PolyU Staff Email Service Outlook 2011 Client For Mac Setup Guide Version 1.3 Last Update: 16 January 2013 PolyU Staff Email: www.polyu.edu.hk/email ITS HelpCenter Support: www.polyu.edu.hk/hots ITS Help
PolyU Staff Email Service. Outlook Web App (OWA) User Guide
 User Guide") PolyU Staff Email Service Outlook Web App (OWA) User Guide Version 2.2 Last Update: 23 December 2014 PolyU Staff Email: www.polyu.edu.hk/email ITS HelpCentre Support: www.polyu.edu.hk/hots ITS HelpCentre
PolyU Staff Email Service Outlook Web App (OWA) User Guide Version 2.2 Last Update: 23 December 2014 PolyU Staff Email: www.polyu.edu.hk/email ITS HelpCentre Support: www.polyu.edu.hk/hots ITS HelpCentre
Web Mail Classic Web Mail
 April 14 Web Mail Classic Web Mail Version 2.2 Table of Contents 1 Technical Requirements... 4 2 Accessing your Web Mail... 4 3 Web Mail Features... 5 3.1 Home... 5 3.1.1 Mailbox Summary... 5 3.1.2 Announcements...
How to access your email via Outlook Web Access
 How to access your email via Outlook Web Access 1) Open your internet browser and type in the following address: www.law.miami.edu * Aol users must minimize their browser and use Internet Explorer 6.0+
Microsoft Exchange 2010 Email Training. Microsoft Outlook 2007 Outlook Web App
 Microsoft Exchange 2010 Email Training Microsoft Outlook 2007 Outlook Web App Table of Contents INTRODUCTION 1.1 What Does Microsoft Exchange Do? 1.2 Advantage/Disadvantage 1.3 Outlook 2007 vs. Outlook
Webmail 6.0 User guide
 Webmail 6.0 User guide Table of Contents Overview...4 What is WebMail 6.0?...4 Login to WebMail 6.0...4 The WebMail 6.0 Main Screen...5 Main Menu...6 Secondary Menu...6 Feature Details...6 Home...7 1)
Archiving Your Mail in Outlook 2007
 About Archiving Archiving Your Mail in Outlook 2007 All messages, contact information, calendars and other data you create in Microsoft Outlook 2007 are kept in your mailbox on the Exchange (FIUmail) server.
Outlook 2010 Desk Reference Guide
 Outlook 2010 Desk Reference Guide Version 1.0 Developed by OR/WA IRM Please remember to print back-to-back. July 12, 2011 Microsoft Outlook 2010 This document has been developed by OR/WA IRM staff to provide
https://mail.wheelock.edu
 The Wheelock College Guide to Understanding Microsoft Outlook Web Access Maintained by: Wheelock College Department of Information Technology Version 1.1 June 2006 https://mail.wheelock.edu This document
Email. Help Documentation. This document was auto-created from web content and is subject to change at any time. Copyright (c) 2013 SmarterTools Inc.
 2013 SmarterTools Inc.") Help Documentation This document was auto-created from web content and is subject to change at any time. Copyright (c) 2013 SmarterTools Inc. Email Email Overview SmarterMail users can send and receive
Help Documentation This document was auto-created from web content and is subject to change at any time. Copyright (c) 2013 SmarterTools Inc. Email Email Overview SmarterMail users can send and receive
Catholic Archdiocese of Atlanta Outlook 2003 Training
 Catholic Archdiocese of Atlanta Outlook 2003 Training Information Technology Department of the Archdiocese of Atlanta Table of Contents BARRACUDA SPAM FILTER... 3 WHAT IS THE SPAM FILTER MS OUTLOOK PLUG-IN?...