{Title of document} Morae Recorder. User Guide. Release 3.2. January TechSmith Corporation. All rights reserved.
|
|
|
- Ginger James
- 7 years ago
- Views:
Transcription
1 {Title of document} Morae Recorder Release 3.2 January TechSmith Corporation. All rights reserved. 1
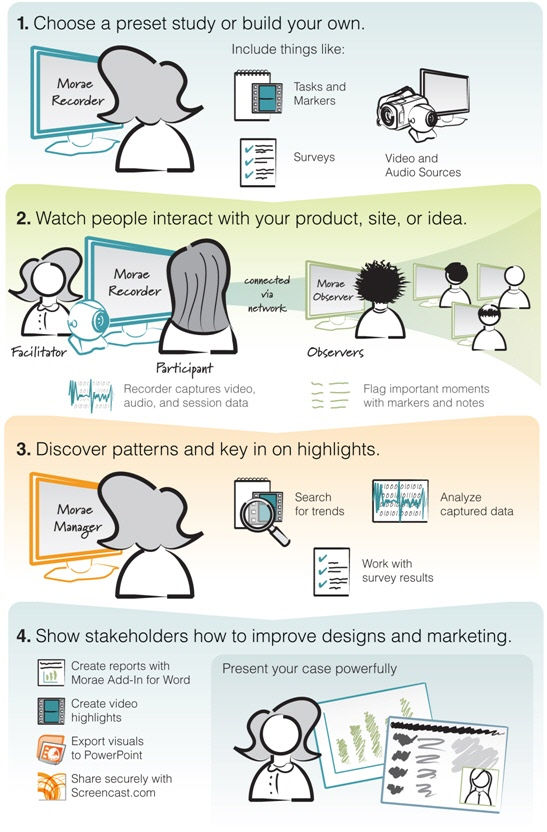
2 Welcome to Morae Morae is the premier software for deeply understanding customer experiences and sharing those insights clearly and powerfully. From usability testing to focus groups and beyond, Morae helps you transform designs and marketing to make things people love. Want to test your design? Morae makes it easy to pinpoint usability problems in software applications, websites, prototypes, or mobile devices. Install Morae on a laptop to test at a conference or in the field! The software captures every nuance of your testing session. See the look on a participant s face, hear the frustration in her voice, and discover hidden problems in your product or site. Search across recordings, automatically calculate and graph standard metrics, and more. Doing market research? Use Morae with up to two video cameras to record a focus group or in-depth interview. Type notes and flag important moments as you go all your observations are indexed to the digital video on your hard drive, eliminating hours of tedious work. When it s time to present your findings, simply drag and drop video clips to produce a highlight reel. Export charts, screenshots, and videos in standard formats or send them directly to Microsoft Office with a click! Work faster, more flexibly, and deliver stronger results with Morae. Morae consists of three applications Morae Recorder, Morae Observer and Morae Manager. These three applications work together to record, observe, log, analyze and share a user s experience. Morae Overview Quick Overview of Morae Applications System Requirements Getting Help with Morae Welcome to Morae Recorder Get to Know Morae Recorder Study Configurations Define Recording Details Define Study Details Tips and Reference Information Morae Overview Morae reduces the amount of work needed, not only at setup, but also during the data logging, analysis, reporting and presentation stages. Based on TechSmith s patented Rich Recording Technology (RRT), Morae is a complete solution that records the computer screen and camera video and also automatically creates a synchronized index of events occurring behind the scenes in applications and in the operating system. You can search screen and video recordings for specific events that occurred like when a user viewed a Web page, clicked a link, pressed a certain key, opened a dialog box or viewed specific text. You can easily perform in-depth analysis, log tasks, create reports and quickly create video presentations to share. See also Quick Overview of Morae Applications. 2
3 3
.")
4 Quick Overview of Morae Applications Morae includes three applications: Morae Recorder, Morae Observer, and Morae Manager. These components work together to provide an easy-to-use, total recording system based on TechSmith s patented Rich Recording Technology (RRT). Record Morae Recorder Utilizing RRT, Morae Recorder creates a complete chronicle of the events that occur behind the scenes in applications and the operating system, as well as the onscreen and keyboard activity of the user. These data streams are recorded in sync with video of the user (through a web camera or other camera device) and audio of the user (through a microphone). Because Recorder runs silently in the background, it never disturbs the user. Recorder captures only the input streams you specify during configuration. Recorder saves the recording in a file format you can open in Morae Manager for analysis. Observe and Log Morae Observer Morae Observer provides support for one or multiple computers to connect over a network to a computer running Recorder. This flexibility allows your entire usability team to observe the screen and camera video and hear the audio of the user, streaming from the Recorder source computer. Anyone logged into an Observer computer can add markers during recording complete with text notes. Tasks are logged by one Observer designated as the task logger. Observer automatically saves and indexes the markers and tasks with the accompanying video and audio streams. The camera video, screen video and audio streams can be saved locally in a WMV file for immediate playback. Utilizing multiple Observers, usability teams can conduct collaborative user experience testing. Analyze, Graph, and Share Morae Manager 4

5 Within Morae Manager, you can start new projects and edit existing projects, configure Recorder settings, open and analyze recordings, create graphs of your analysis and metrics and create a presentation video. Rich Recording Technology automatically indexes the screen and video recordings collected by Recorder, allowing you to easily search through recordings in Morae Manager. You can isolate tasks, important points in the video, add text notes, annotate with audio and quickly create video highlights to share. You can display the screen video with the video of the user as a picture-in-picture image. System Requirements These are the same for all three Morae components on desktops and laptops. Minimum Windows XP or Vista 2.0 GHz Pentium M, 3.0 GHz Pentium 4, or equivalent processor 1 GB RAM or more Dedicated video card with at least 64MB of dedicated video memory PCI Express graphics DirectX version 9.0 or later Windows-compatible sound card, microphone, and speakers Approximately MB disk space per minute for recording and highlight video creation Networked computer with 10 Mbps (Required for Observer) Microsoft Windows compatible FireWire (IEEE 1394) card for DV cameras Bluetooth-capable computer or Bluetooth adapter (Required for logging with a remote) Wii Remote (Required for logging with a remote) Recommended Windows XP or Vista 2.0 GHz Core 2 Duo or equivalent processor 2 GB RAM or more Dedicated video card with at least 128MB of dedicated video memory PCI Express x16 graphics DirectX version 9.0c or later Windows-compatible sound card, microphone, and speakers Approximately MB disk space per minute for recording and highlight video creation Networked computer with 100 Mbps or higher (Required for Observer) 5
6 Microsoft Windows compatible FireWire (IEEE 1394) card for DV cameras Bluetooth-capable computer or Bluetooth adapter (Required for logging with a remote) Wii Remote (Required for logging with a remote) Getting Help with Morae Several resources are available to help when you run into questions or problems with Morae. Morae Help Files Each of the Morae components has its own Help file. Recorder, Observer, and Manager s Help files contain detailed information describing how to use Morae. Access the Help files through the Help menu or Help buttons found in the user interface. To open a help topic for the screen or area you are currently using, press <F1> on your keyboard. Morae Learning Center For additional help, videos, and tutorials see the Morae Learning Center. TechSmith Technical Support We provide help with Morae installation-related issues at no cost. If you experience problems installing Morae, search our Knowledge Base. If you don t find your answer there, use the Contact Support tab in the Knowledge Base to send your question to TechSmith Technical Support. TechSmith Web Site Additional support resources are available online at TechSmith s website. Balloon Tips and Tip Dialogs Morae provides balloon tips (in Manager only) and tip dialogs (in Manager and Recorder). Both types of tips contain helpful information and recommendations related to the task you are trying to complete. Balloon tips appear only the first couple of times you complete a particular task and then they automatically stop appearing. To reset the balloon tips, choose Help > Reset Balloon Tips. Tip dialogs always appear unless you disable one or more of the dialogs manually. To disable all of the tip dialogs: Recorder Choose Tools > Preferences and remove the checkmark from the Show all tips option. Manager Choose File > Preferences and remove the checkmark from the Show all tips option. You can disable an individual tip dialog by removing the checkmark from the Show tip again option in the lower left-hand corner of the dialog box. 6
7 Welcome to Morae Recorder Install Morae Recorder on a computer to record a participant s experience, including audio comments, screen video, and/or camera video. When recording the computer screen, Recorder also captures all system activity, including mouse clicks, web page changes, and other application information. Recorder automatically synchronizes the video and the data, creating a complete digital record of the user experience. When recording from camera(s) only, you can log the session with Recorder. For more information on logging on the computer running Recorder, see Log a Session. How to Use Morae Recorder Get to Know the Recorder Interface Study Configurations Recording Details Study Details Video and Audio Sources Recorder Preferences Rich Recording Technology Using Rich Recording Technology (RRT), Recorder creates a complete chronicle of the events that occur behind the scenes in applications and the operating system, as well as the onscreen and keyboard activity of the user. This data is recorded in sync with video and audio of the user. After importing recordings into Morae Manager, you can search the recording files for the items captured with RRT. See also How Rich Recording Technology (RRT) Works. How to Use Morae Recorder Use Morae Recorder to set up study configurations and record sessions. The general process of using Recorder is: 1. Create or open a study configuration. A study configuration defines a group of related recordings. Recordings in a study share the same Study Details including tasks, markers, and surveys. 2. Verify Recording Details. 3. Start recording. 4. Record session. If you are recording from camera(s) only, you can log the session on the computer running Recorder. If you are recording the screen, you can log the session with a Wii Remote. 5. Stop recording. 6. Process and save recordings. 7
8 Study Configurations Define Study Details Define Recording Details Video and Audio Sources Log a Session 8

9 Get to Know the Recorder Interface Use the following figure to become familiar with the main parts of the Recorder interface. To get started recording a session, see How to Use Morae Recorder. Recorder Toolbar Quickly access common Recorder functions. For more information, see Recorder Toolbar. Record Button Click to start a recording. Recorder provides flexible options to start Recorder depending on your equipment and participant setup. For more information, see Recording Start Settings and Recording Stop Settings. Recording Details Preview the selected Recording Details. Click Modify Recording Details to define how to record sessions. For more information, see Define Recording Details. Video and Audio Sources View and select the sources for the main video, Picture-in-Picture (PiP) video, and 9
10 audio. For more information, see Video and Audio Sources. Audio Monitor View and adjust the audio level. For more information, see Adjust Audio Level. Study Details Study Details define the study including the study name, session instructions, tasks, markers, and surveys. For more information, see Define Study Details. Preview Window View the selected main and PiP video sources. Wii Remote Battery Display Shows if Wii Remote is attached and how much battery life is remaining. For more information on how to use the Wii Remote with Morae, see Configure Wii Remote for Logging and Log with a Wii Remote. For more information on the different parts of the Recorder interface, see the following: Welcome to Morae Recorder Dialog Box Recorder Toolbar Recording Details Study Details Video and Audio Sources How to Use Morae Recorder 10

11 Welcome to Morae Recorder Dialog Box File > New Study Configuration The Welcome to Morae Recorder dialog box allows you to create or open a configuration. Get to Know the Recorder Interface Recorder Toolbar Create a Test Recording Recording Details Study Details Video and Audio Sources Recorder Preferences How to Use Morae Recorder 11
12 Recorder Toolbar Recorder Toolbar Button Description Creates a new study configuration file. For more information, see Study Configurations. Opens a previously saved study configuration file. Saves the current study configuration in a file. Creates a 15 second test recording, allowing you to preview the audio and video to be captured. For more information, see Create a Test Recording. Opens the Batch Process Recordings dialog box. For more information see Batch Process Recording Files. Opens the Morae Learning Center web site in your default browser. Opens the Morae help system. Get to Know the Recorder Interface Welcome to Morae Recorder Dialog Box Create a Test Recording Recording Details Study Details Video and Audio Sources Recorder Preferences How to Use Morae Recorder Create a Test Recording Recorder s Test Recording option creates a recording that includes all of the data streams for the Capture Options defined in the study configuration. A message appears describing any problems with the current configuration so you can correct them prior to beginning an actual recording session. When the 15-second test recording is complete, the screen video, camera video, Picture in Picture (PIP), and/or audio streams immediately play back. The test playback confirms if Recorder is accurately capturing the video and audio. This test also silently checks the other configuration settings chosen. A Test Recording does not confirm Recorder Start and Stop Option settings. If you are satisfied with the test recording and have not received any error messages, you can proceed to record with those settings. To Run a Test Recording 1. Click the Test Recording button in the Recorder toolbar. 2. A dialog box appears asking if you want to continue with the test recording. Click Yes. 3. Recorder minimizes to a tray icon. The test recording begins immediately and proceeds for 15 seconds. 12
. 5.")
13 If you maximize Morae Recorder, you see a recording message appears in the Camera Preview pane and the status bar confirms a recording is being made. 4. During the test recording, create some sound and activity for Recorder to capture (i.e., speak into the microphone and actively interact with the computer). 5. At the end of the 15 seconds, the test video plays back and includes the screen video, camera video PIP and audio from the temporary test file. When the playback is complete, the window closes automatically. The test recording is not saved for later viewing. Get to Know the Recorder Interface Welcome to Morae Recorder Dialog Box Recorder Toolbar Recording Details Study Details Video and Audio Sources Recorder Preferences How to Use Morae Recorder Recording Details Recording Details define how and what to record during a session. These settings can vary for recordings within a study. When you save a study configuration, Recording Details are saved in the study configuration but you can change them for individual recordings, as needed. For example, if you need to run one session without capturing screen text, you can change that setting in Recording Details. Define Recording Details Get to Know the Recorder Interface Welcome to Morae Recorder Dialog Box Recorder Toolbar Create a Test Recording Study Details 13

14 Video and Audio Sources Recorder Preferences How to Use Morae Recorder Study Details Study Details define the study information, including study name, tasks, markers, and surveys. When you save a study configuration, Study Details are saved in the study configuration and must be the same for all recordings in a study. Define Study Details Get to Know the Recorder Interface Welcome to Morae Recorder Dialog Box Recorder Toolbar Create a Test Recording Recording Details Video and Audio Sources Recorder Preferences How to Use Morae Recorder Video and Audio Sources Video and Audio Sources show the selected video and audio sources. There is also an audio monitor and video preview to help you set up your session. Video and Audio Sources are affected by the hardware connected to the computer when Recorder is opened. 14
15 Video and Audio Sources Get to Know the Recorder Interface Welcome to Morae Recorder Dialog Box Recorder Toolbar Create a Test Recording Study Details Video and Audio Sources Recorder Preferences How to Use Morae Recorder Recorder Preferences Preferences in Recorder are set in the Preferences dialog box. These settings are global, and apply to all recordings. The Preferences dialog box is located under Tools > Preferences. Use the following figure to become familiar with the Recorder Preference options. 15

16 Default output folder Defines where to store recording files. This is a global setting for Recorder, all recording files are saved in this folder. By default, the folder is C:\\...My Documents\Morae folder on the Recorder source computer system. Temporary output folder Defines the folder that temporarily holds Recorder output during recording. The temporary files are automatically deleted when the output file is written. We recommend using a local drive for temporary file storage. Choosing a temporary directory located on a network drive may cause performance problems. Recorder hotkeys Defines the hotkey combination to start and stop Recorder and to deliver a survey to participants from the keyboard Start/stop Recorder hotkey: Choose any combination of Ctrl, Alt, Shift and any of the keys available in the dropdown menu to create a custom hotkey to start and stop Recorder. The default hotkey combination is <Ctrl + Alt + Shift + F9>. Display survey hotkey: Choose any combination of Ctrl, Alt, Shift and any of the keys available in the dropdown menu to create a custom hotkey to deliver a survey to participants. The default hotkey combination is <Ctrl + Alt + Shift + F8>. The F12 key cannot be selected alone as a hotkey. 16
17 Observer Communication Ports Shows the currently selected communication ports for communicating with Morae Observer. The port defined for Observer must match the main communication port defined here. If not, they will not be able to connect. See Change the Communication Ports for more information. Change Ports Allows you to change your communication port if the default ports are not available in your network. If you change the main communication port, be sure to tell all observers. They have to enter this port number before they can connect to Recorder. See Change the Communication Ports for more information. Recorder Display Options Morae provides several display options for Recorder during a session. Minimize to System Tray appears as a tray icon when a recording begins. Right-click on the tray icon to access a menu of Recorder control options (Start, Stop, Show Recorder and Exit Recorder). To make Recorder visible again, double-click on the tray icon. Minimize to Taskbar Recorder appears on the Windows taskbar while recording. Hide completely: Recorder is completely hidden. To show Recorder again, use the hotkey combination <Ctrl + Alt + Scroll Lock>. Show all tips Enables the general program tip dialogs that appear throughout Recorder. Restore Default Restores the Default and Temporary output folders and Performance options to their default settings. Get to Know the Recorder Interface Welcome to Morae Recorder Dialog Box Recorder Toolbar Create a Test Recording Recording Details Study Details Video and Audio Sources How to Use Morae Recorder Change the Communication Ports In some cases, Recorder and Observer cannot connect on the default communication ports of 5555 and In this case, the study configuration in Recorder and the communication port in Observer must be set to an alternative port number. If you change the main communication port in Recorder, all observers must set the same port to connect. Make sure to give the port number to all potential observers. Observers do not need to know the high quality streaming port number. To use alternative ports: 17
18 1. Contact your system administrator to determine which ports to use. 2. In Recorder, select Tools > Preferences. 3. When the Preferences dialog box opens, click Change Ports. 4. Enter the port numbers in the fields. Click Restore Default to return to the default communication ports. 5. Open Observer. In the Connect to Recorder dialog box, click Change Port. Enter the new main communication port number. Observers do not need to enter the high quality streaming port. This is handled automatically by Recorder and Observer. 18
19 6. Click OK to apply the selected port and return to the Connect to Recorder dialog box. 19
20 Study Configurations The ideas of the study and the study configuration are important to understand when working with Morae. For information on working with study configurations, see Template Study Configurations, Create a Study Configuration, and Modify a Study Configuration. What Is a Study? A study involves recording, observing, and logging multiple user research sessions, analyzing the results, and sharing the results with stakeholders. In Morae, recordings in a study share a common study configuration file (.mrcfg), which includes the Study Details: tasks, markers, and surveys. Because the recordings in a study use the same configuration, you can compare and analyze the recordings in Manager. For example, when all the sessions use the same tasks, you can compare the time it took to complete a task across multiple participants. You can search for tasks, markers, events, and more across all recordings in a study. To make sure that all recordings have the same Study Details, define and save a study configuration prior to recording any sessions. If you need to combine recordings with different configurations into a single study, you can merge the recordings in Manager. You can also choose to have more than one study in a single Manager project file. See the Morae Manager Help for more information. What is a Study Configuration? A study configuration file (.mrcfg) defines study-specific information including Study Details and Recording Details. Only recordings with the same study configuration can be searched and graphed together in Morae Manager. Study Details must be the same for all recordings in a study and include: Study name, description, and instructions Tasks definitions and instructions Marker definitions and instructions Survey definitions and associations Recording Details do not have to be the same for all recordings in a study and include: File saving and processing options Video sources What data to capture Who logs tasks How to start and end recordings 20

21 Template Study Configurations Recorder includes template study configurations to help you define Study Details and Recording Details for different kinds of studies. Templates contain sample tasks, markers, and surveys, along with Recording Details pre-configured for different types of user research. Template Study Configuration Default study configuration Focus Groups Hardware or Mobile Device Study Paper Prototype Study Software or Web Usability Study Unmoderated Usability Study Description Contains only basic task and marker settings. Records the screen and a PiP video of the participant. Record focus groups or in depth interviews. Use up to two cameras and log notes on the computer running Morae Recorder. Test hardware device (cell phone, handheld, etc.) Point the primary camera at the hardware device, and the PiP camera at the participant. Record low fidelity prototypes that can t be displayed on a computer. Point the primary camera at the paper prototype, and the PiP camera at the participant. Use for a moderated usability test of a Web site or software. Records the screen and a PiP video of the participant. Use to conduct unmoderated tests. The participant interacts with onscreen study and task instructions, and tasks are automatically logged using AutoPilot. Create a Study Configuration Modify a Study Configuration Create a Study Configuration 1. Open Recorder. The Welcome to Morae Recorder dialog box opens. 2. Select Create a new study configuration based on. 3. Select a template study configuration from the dropdown list. 4. Click OK. The template study configuration opens in Recorder. 5. Click Modify Study Details to open the Study Details dialog box. 21

22 6. In the Study Details dialog box, define the study details and click OK. 7. Click Modify Recording Details to open the Recording Details dialog box. 8. In the Recording Details dialog box, define the recording details and click OK. 9. Choose File > Save Study Configuration to save the study configuration. Template Study Configurations Modify a Study Configuration Modify a Study Configuration 1. Open Recorder. The Welcome to Morae Recorder dialog box opens. 2. Select Open a saved study configuration. 3. Select a recently used file from the dropdown list or click Browse to locate a file on your computer. 4. Click OK. The study configuration opens in Recorder. 5. Click Modify Study Details to open the Study Details dialog box. 6. In the Study Details dialog box, define the study details and click OK. If you modify study details, new recordings will not automatically match recordings previously made using this study configuration. You can merge these recordings later into a single study in Manager. For more information, see the Morae Manager Help. 7. Click Modify Recording Details to open the Recording Details dialog box. 8. In the Recording Details dialog box, define the recording details and click OK. 9. Choose File > Save Study Configuration to save the study configuration. Template Study Configurations Create a Study Configuration 22
23 Define Recording Details Recorder > Modify Recording Details button Recording Details define how to record a session with Morae. In the Recording Details dialog box, define the following: File Details Capture Options AutoPilot Settings Task Logger Settings AutoPilot Settings Recording Start Settings Recorder Stop Settings Observer Settings Recording Details apply to a specific test environment or participant set up. Recording Details do not have to be the same for all recordings in a study. 23

24 File Details Recorder > Modify Recording Details button > File Details 24

25 The fields in the Recording File Details settings of the Recording Details dialog box define the recording name, folder, and description, along with the file processing options. Capture Options AutoPilot Settings Task Logger Settings Recording Start Settings Recorder Stop Settings Observer Settings Recording Name, Recording Folder, and Description Each recording (.rdg) needs a unique name. Define the file name, location and description for a recording in one of the following ways: Before you record in the File Details settings. After you create a recording, if you use the Prompt for details when recording stops option. You cannot save a recording without a name. You can lose the data from a recording if the test participant, or anyone else, closes the dialog prompting for these details after the recording stops. For information on the processing options, see Processing. Define File Details before Recording If you choose to define the File Details before you record, put information in these fields to name the recording file, define the folder to save the recording, and describe details about the recording (optional.) 25

26 Define File Details after Recording The recording is finished; the Recording File Details dialog box appears. Put information in these fields to name the recording file, define the folder to save the recording, and describe details about the recording (optional.) You can also choose processing options in this dialog box. 26
 Recording Name, Recording Folder, and Description. Prompt for File Details When Recording Stops You cannot save a recording without a name.")
27 Processing Choose one of these options for processing recordings: Prompt for File Details When Recording Stops Password Protect Recording Files Defer Processing of Recordings (You can start the next recording immediately.) Recording Name, Recording Folder, and Description. Prompt for File Details When Recording Stops You cannot save a recording without a name. You can lose the data from a recording if the test participant, or anyone else, closes the dialog prompting for these details after the recording stops. Enable the Prompt for file details when recording stops checkbox if you do not want to define the file name, folder, and description prior to recording. At the end of recording, Recorder prompts you to Define File Details after Recording. Password Protect Recording Files Defer Processing of Recordings Password Protect Recording Files Enable the Password protect recording file checkbox to lock the recording files if your recordings include sensitive material. You can define the password before the recording starts or after it ends. 27
28 Remember your password. After you assign a password, you cannot open the recording in Manager without the password. TechSmith cannot retrieve your password or open the recording file, if you forget your password. Password Protect a Recording File before Recording 1. Enable the Password protect recording file checkbox and click OK. 2. When the recording starts, Recorder prompts you to select and verify a password. Password Protect a Recording File after Recording 1. Enable the Prompt for details when recording stops checkbox and click OK. 2. When the recording stops and the Recording File Details dialog box opens, enable the Password protect recording file checkbox. 3. The Enter Recording File Password dialog box opens and prompts you to enter and confirm a password. Passwords are case sensitive and can include letters, numbers and symbols in any combination. There is no maximum length for passwords. Prompt for File Details When Recording Stops Defer Processing of Recordings Defer Processing of Recordings If you defer the final processing, your data is not at an increased risk of being lost or damaged if a crash occurs. Recorded data is written to disk immediately during recording whether you choose to defer final processing or not. Final processing involves compressing the files into an archive. By default, Recorder writes out and verifies each recording (.rdg) file immediately after a recording is completed. Depending on the length and content of the recording, this processing can take some time. Enable the Defer processing of recordings checkbox to defer recording processing, which allows you to start another recording immediately and save recordings in the Batch Processing Queue to later process several recordings at one time. Use the Defer processing of recordings option with the Automatically restart Recorder option to automatically run repeated recordings or conduct several recordings without waiting for file processing in between. Prompt for File Details When Recording Stops Password Protect Recording Files Batch Process Recording Files When you complete a series of recordings and are ready to process them: 1. Click Process Deferred Recordings or File > Process Deferred Recordings. The Batch Process Recordings dialog appears. 2. Select the recording files to process in Recording queue. The recording files that you do not select remain in the list. 28

29 3. Click OK to process the selected recordings. When processing is complete, the Batch Processing Results dialog appears. This dialog gives summary information about each recording file, including whether it was successfully processed and where it is saved. Capture Options Recorder > Modify Recording Details button > Capture Options In Capture Options, define the main video source, Picture-in-Picture option, mouse video effects, and the data to capture during recording. The fields in the Capture Options of the Recording Details dialog box define the data you want Recorder to include in the recording. Use this data later in Manager for analysis and graphs. File Details AutoPilot Settings Task Logger Settings Recording Start Settings Recorder Stop Settings Observer Settings 29
 video. These options are also available on the main interface in Video and Audio Sources.")
30 Main Video Source and Picture-in-Picture Define if you are recording the computer screen or camera video as the main video source for your recording and if you want to include a Picture-in-Picture (PiP) video. These options are also available on the main interface in Video and Audio Sources. If you change the main video source or PiP options in the Recording Details dialog box, options selected in Video and Audio Sources update automatically. Mouse Video Effects Data Mouse Video Effects Define which, if any, mouse video effects to include in the recordings. Mouse video effects help clarify mouse when you analyze recordings in Manager. The mouse video effects do not appear on the participant s screen or in the Observer during recording. The effects appear when you import the recording in Manager. Main Video Source and Picture-in-Picture Data Data Define which kinds of data you record. Choose to capture or exclude: Mouse clicks Keystrokes Screen text 30

31 By default, Recorder captures all of this data. If you are dealing with sensitive or proprietary information, you may need to exclude some data from capture. For example, if the test deals with user names and passwords, you can choose to exclude keystrokes. By excluding keystrokes, the recording will not capture the password. Main Video Source and Picture-in-Picture Mouse Video Effects AutoPilot Settings Recorder > Modify Recording Details button > AutoPilot The checkboxes in the AutoPilot Settings of the Recording Details dialog box define if and how you want to use AutoPilot. At End of Recording Enable the Start a new AutoPilot recording automatically checkbox to set up AutoPilot for a new recording as soon as one recording ends. To make sure that a participant cannot get to the Recorder interface, select a password to exit an AutoPilot test. To return to Recorder at the end of a session, click Exit Session on the AutoPilot test Start screen and enter the password, if needed. Timeout Options If you use AutoPilot to run an unmoderated test, someone may not finish a session. Enable the checkbox and enter the amount of time you want AutoPilot to wait until ending the session. Enable AutoPilot 31

32 Enable this checkbox to turn on AutoPilot. When you enable AutoPilot, other Recording Details update to to provide the recommended configuration. These updated settings appear in yellow. Click Why did my settings change? to see which settings changed and why. Click Undo Changes to return to the previous settings. AutoPilot File Details Capture Options Task Logger Settings Recording Start Settings Recorder Stop Settings Observer Settings Task Logger Settings Recorder > Modify Recording Details button > Task Logger The task logger is the one observer who can log tasks for each recording. The task logger can also be the recording computer for screen and video recordings if a Wii Remote is used to log tasks. Only the task logger can mark the start and end of tasks. You can also choose to let any observers or only the task logger send surveys. Who Should Be The Task Logger? Designate the Task Logger Designate Who Sends Surveys File Details Capture Options 32
33 AutoPilot Settings Recording Start Settings Recorder Stop Settings Observer Settings Who Should Be The Task Logger? Recorder > Modify Recording Details button > Task Logger When defining the task logger, choose one of the following options. First Observer connected Use this option if you only have one Observer or everyone connecting to the session could log tasks. If the task logger disconnects Observer from the session, intentionally or not, the next Observer who connects automatically becomes the task logger. Designated Observer Use this option if you know exactly who you want to log the tasks. If the designated task logger disconnects Observer from the session, whether intentionally or not, no one else can log tasks. If the task logger re-connects, he or she can again log tasks. See Designate the Task Logger. The task logger name must match the name entered in Observer. For example, if you enter only a first name in the Recoding Details and the Observer enters a first and last name, they will not be designated as task logger. AutoPilot Use this option with AutoPilot. As the participant clicks Start Task and End Task in AutoPilot, it logs the corresponding markers in the recording. When you enable AutoPilot, the Recording Details update to set AutoPilot to log tasks. Recording computer (Local Logger) This option only available when the main video source is set to Video. Use this option if you record camera as the Main video source and want to log the session on the same computer you are recording on. You do not need to have any Observers connected to log a camera video-based session. If desired, you can also log the test using a Wii Remote. Recording computer (Wii Remote) This option only available when the main video source is set to Screen. Use this option if you record screen as the Main video source and want to log the test using a Wii Remote. This setting allows you to log on the same computer you are recording on. You do not need to have any Observers connected to log a camera video-based session; you can log tasks and markers with the Wii Remote alone. Task Logger Settings Designate the Task Logger 33

34 Designate the Task Logger Recorder > Modify Recording Details button > Task Logger To designate a specific task logger by name: 1. Select the Observer option. 2. Select Designate the task logger. 3. Enter the name of the task logger. 4. Click OK. When the task logger connects to Recorder, the Observer name must match the name designated in Recorder. Task Logger Settings Who Should Be The Task Logger? Designate Who Sends Surveys You may want to allow only the task logger to send surveys to the recording computer. Select Task logger only to make sure that post-task surveys are sent only after the task is complete. To designate who can send surveys: Enable Any Observer to allow all observers to send surveys during a session Enable Task logger only to allow only the task logger to send surveys during a session. 34
35 Recording Start Settings Recorder > Modify Recording Details button > Recording Start Recorder provides flexible options to start Recorder depending on your equipment and participant set up. The following table describes the available options to start a recording. Start Option Manually Description Recording starts when you click the Start button or use the hotkey combination <Ctrl + Alt + Shift + F9>. Start Button Based on an event Recording starts when a certain event occurs. Choose one of the event types from the dropdown menu: Mouse Click Recording starts at the click of the mouse. Application Launch Recording starts when the specified application launches, for example when the participant launches Internet Explorer. Application Exit Recording starts when the participant exits a specified application. In an application - Click the Browse button to find the application s executable name (for example IEXPLORE.EXE). Mouse click Application Launch At a specific Date/Time Recording starts at a particular date and time. Leave the box next to the Date field unchecked if you want the recording to start at that time on any date. Recorder must be running at the time the recording is set to begin. A time-based start only occurs one time. After the recording is complete, you must click Start again to set Recorder to wait for the next time-based start. A time-based start can be set up to 49 days in advance of the recording. If the time has already passed for today, the recording starts at the specified time tomorrow. Application Exit 35
36 Using Observer Recording starts when an Observer clicks Start the recording button on Observer s toolbar. Click the Start button in Recorder to wait for the start signal from Observer. If you leave the Observer name field blank, any Observer can start Recorder. You need to return to the Recorder computer between recordings to click Start. To avoid this additional interaction with Recorder, see Automatically Restart Recorder. AutoPilot Click the Start button to launch the AutoPilot interface. Recording starts when the participant clicks Start after reading the study instructions in AutoPilot. Recorder Start AutoPilot Start File Details Capture Options AutoPilot Settings Task Logger Settings Recorder Stop Settings Observer Settings Automatically Restart Recorder Enable the Automatically restart Recorder checkbox to automatically restart Recorder after each recording, using the same recording settings. The Automatically restart Recorder option does not work if you use the following Start and Stop options: - Manual start - Time based start with a date specified - Time based stop with a date specified - Event based start on a mouse click To automatically restart Recorder: 1. In Recorder, click the Modify Recorder Details button. The Recording Details dialog box appears. 2. Click Recording Start and select the Recorder Start Setting. 3. Enable the Automatically restart Recorder checkbox. 4. Click File Details. 5. Disable the Prompt for details when recording stops checkbox. This prevents the Recording file details dialog from appearing after each recording. 6. Enable the Defer processing of recordings checkbox. This places the recording files in a queue for later processing. 36
37 When you are finished with a series of automated recordings, go back to Recorder and batch process the recording files (File > Process Deferred Recordings). For more information, see Batch Process Recording Files. Recorder sequentially numbers the recording files by adding a number to the file name entered in the Recording Folder field. For example, if you entered Test in the Recording name field, the recording names are test.rdg, test rdg and test-0002.rdg, etc. Recorder Stop Settings Recorder > Modify Recording Details button > Recording Stop Morae provides several options to choose how and when recordings stop. Stop recordings manually or use one of the automated stop options. The following table describes the available options to stop a recording. Stop Recorder Option Manually Based on an event Description Recording stops when you click the Stop button, use the hotkey combination <Ctrl + Alt + Shift + F9>, or right-click the tray icon and choose Stop from the menu. You can always stop Recorder manually, even if you selected another stop option. Recording stops when a certain event occurs. Choose one of the event types from the dropdown menu: Application Launch Recording stops when the specified application launches, for example when the participant launches Internet Explorer. Application Exit Recording stops when the participant exits a specified application. In an application - Click the Browse button to find the application s executable name (for example IEXPLORE.EXE). Stop Button Application Launch Time based After Recording stops at a particular date and time. Leave the date field disabled to stop the recording at the specified time today. If this time has already passed for today, the recording stops at the specified time tomorrow. A time-based stop only occurs one time. After that recording is complete, you must click the Start button again to set Recorder to wait for the next time-based start. A time-based stop can be set up to 49 days in advance of the recording. Recording stops after number of hours entered. The dropdown list only shows durations up to 2.0 hours, you can type in up to 1176 hours (49 days). Application Exit 37
38 Using Observer Recording stops when an Observer clicks Stop the recording button on Observer s toolbar. If you leave the Observer name field blank, any Observer can stop Recorder. AutoPilot You need to return to the Recorder computer between recordings to click Start. To avoid this additional interaction with Recorder, see Automatically Restart Recorder. If you automatically restart, you click Start in Recorder once and then the Observer user who has control of Recorder can start and stop recordings repeatedly, without returning to the Recorder computer. Recording ends when: You click Stop in Recorder. A participant clicks OK in AutoPilot after completing the session tasks and surveys. A participant clicks Exit Session in AutoPilot to leave a session at any time. Enable the Start a new AutoPilot recording automatically checkbox to set up AutoPilot for a new recording as soon as one recording ends. See AutoPilot Settings. Recorder stop AutoPilot stop Leave AutoPilot File Details Capture Options AutoPilot Settings Task Logger Settings Recording Start Settings Observer Settings Observer Settings Recorder > Modify Recording Details > Observers With Morae, you can allow one or multiple computers to connect over a network to a computer running Recorder. All observers can view the recording and log markers during a session. This flexibility allows your entire team to observe the screen and camera video and hear the audio of the user, streaming from the Recorder computer. To allow Observers to connect to Recorder: 1. Enable the Allow Observer checkbox. 2. Enter the amount of time Recorder waits for pending (unfinished) tasks and markers before ending the recording. By default, Recorder waits 60 seconds. 3. Click OK. 38
39 File Details Capture Options AutoPilot Settings Task Logger Settings Recording Start Settings Recorder Stop Settings 39
40 Define Study Details Recorder > Modify Study Details Study Details define the study including the study name, session instructions, tasks, markers, and surveys. In the Study Details dialog box, define the following: Study name, description, and instructions Tasks definitions and instructions Marker definitions and instructions Survey definitions and associations The study-specific information defined in the Study Details dialog box should be the same for all recordings in a study. If you modify study details, new recordings will not automatically match recordings previously made using this study configuration. You can merge these recordings later into a single study in Manager. For more information, see the Morae Manager Help. Configure Wii Remote for Logging To Define a Task To Define a Marker Create a Survey Using Custom Questions Create a Survey Using System Usability Scale Questions 40

41 Define the Study Description Modify Study Details > Description tab File > New or Open > Study Configuration > Modify Study Details > Description tab The fields in the Description tab of the Study Details dialog box define the study name, description, and instructions. You can open the configuration in the Morae Add-In for Microsoft Office Word and drop the study details into a Word file to create handouts for participants. See Create Session Handouts for more information. Study Name and Study Description The name and description appear in Recorder and are available when you import recordings into Manager. Put information in these fields to describe why and when you would want to use this configuration. It will help you to choose the correct study configuration for a session. Study Instructions The study name and instructions appear on the computer running AutoPilot. They are presented to the participant before they begin a session. You can also pull these instructions into Microsoft Word to create handouts if you are not using AutoPilot to run your session. Put information in this field to describe the scenario or any special instructions for the participant. Define the Study Tasks Define the Study Markers Define the Study Surveys 41
42 Define the Study Tasks Recorder > Modify Study Details > Task Definitions tab The fields in the Task Definitions tab of the Study Details dialog box define the task names, descriptions, instructions, and success scores. You can open the configuration in the Morae Add-In for Microsoft Office Word and drop the task definitions and instructions into a Word file to create handouts for participants. See Create Session Handouts for more information. For information on working with tasks and success definitions in the Task Definitions tab, see Modify Task and Success Score Definitions. To Define a Task Click Add to create a new task. Enter a name and description for the task. Enter participant instructions for the task. Click OK. 42

43 Hover over the Defined link to see a preview of the instructions. Define the Study Description Define the Study Markers Define the Study Surveys 43
44 Task Name and Description The task name and description appear when observing a session. If you are the task logger, once you start a task, you choose the task from a dropdown list. Put information in these fields to give the task logger enough information to quickly select the correct choice when starting a task. After importing recordings into Manager, tasks become the basis for graphs created in Manager. You are also able to search across recordings for events or markers that occur during a given task. Task Instructions Success Score Modify Task and Success Score Definitions Task Instructions Task instructions appear on the computer running AutoPilot. The task instructions are presented to the participant to guide them through a session. After reading a task, the participant clicks Start Task, which automatically starts the designated task. After completing the task, the participant clicks End Task, which automatically stops the designated task. While working on a task, the participant can show or hide the instructions as needed. You can also pull these instructions into Microsoft Word to create handouts if you are not using AutoPilot to run your session. Put information in this field to describe the task for the participant. Task Name and Description Success Score Modify Task and Success Score Definitions Success Score Success scores apply to all the tasks in a study. If you are the task logger, after you stop a task, indicate the score by clicking the appropriate circle. You can also use the arrow or number keys to select a score as long as the Score column has focus. You can use the default completion rate scores or create your own scale. After importing recordings into Manager, you can quickly create a task score graph to automatically calculate and visually display the completion rate. Completion rate is a standard metric used to analyze usability tests. Task Name and Description Task Instructions Modify Task and Success Score Definitions 44
45 Modify Task and Success Score Definitions Once you save a study configuration, adding or modifying anything on this tab changes your study configuration. You will need to merge recordings if you want them in the same study in Manager. See the Morae Manager Help. In the Task Definitions tab, use the following icons to modify the tasks and success scores. Button Use Click Add to create a new task or success definition. You can also click in an empty row to add a new task or success definition. Select a task or success definition and click Edit to modify the task name and description or success definition. You can also double-click in a field to edit it. Select a task or success definition and click Remove to delete a task or success definition. You can also select a row and press Delete to remove a task or success definition. Select a task and click Move Up to move a task up in the list. If your tasks are numbered, moving the task does not change the number. Select a task and click Move Down to move a task down in the list. If your tasks are numbered, moving the task does not change the number. Your descriptions appear as tooltips in Recorder. Task Name and Description Task Instructions Success Score 45

46 Define the Study Markers Recorder > Modify Study Details > Marker Definitions tab The fields in the Marker Definitions tab of the Study Details dialog box define the marker colors, types, definitions, and scores. Looking for a way to log a session discretely while facilitating a session? You can configure a Wii Remote to log markers. For more information, see Configure Wii Remote for Logging. Markers allow you to flag important points in a recording including errors, quotes, and the start and end of tasks. For example, you can create markers for Participant actions Participant comments and questions Observations about how the participant performs a task Interesting comments or actions to include in a highlight video You can open the configuration in the Morae Add-In for Microsoft Office Word and drop the marker definitions into a Word file to use to prior to a session. For example, you may want share the markers with observers prior to the session to give them an idea what to watch for. See Create Session Handouts for more information. For information on working with markers and score definitions in the Marker Definitions tab, see Modify Marker and Marker Score Definitions. To Define a Marker Click Add to create a new marker. Select a color and type (letter) and add a description to define the marker. Observers can use <Ctrl+ [letter]> as a keyboard shortcut to log tasks in Observer, where [letter] is the letter assigned in the Type column. Defined markers are available to observers as hotkeys. The hotkey is <CTRL + Type (letter)>. Observers can set undefined markers with <CTRL + Space>. 46
47 Define the Study Description Define the Study Tasks Define the Study Surveys 47

48 Marker Color, Type, and Definition The marker color, type, and definition appear when observing a session. People observing with Morae Observer can enter markers and add notes to these markers during the recording. By adding markers and notes during a session, you can save time analyzing and automatically create graphs after importing the recordings into Morae Manager. If you cannot add markers and notes during a session, you can do so in Manager. Color distinguishes the markers on the Manager Timeline. Type is a letter that is used in combination with CTRL as a keyboard shortcut for entering a marker in Observer. Definition explains to observers what each marker should be used to flag during a session. Marker Scores Modify Marker and Marker Score Definitions Marker Scores Marker scores apply to all markers in a study. After entering a marker, observers can include a score. For example, if you use marker scores for errors, analysis would determine the average severity of the errors. You can use the default marker scores or create your own scale. After importing recordings into Manager, you can create marker score graphs to automatically calculate and visually display the marker severity rate. Marker Color, Type, and Definition Modify Marker and Marker Score Definitions 48
49 Modify Marker and Marker Score Definitions Once you save a study configuration, adding or modifying anything on this tab changes your study configuration. You will need to merge recordings if you want them in the same study in Manager. See the Morae Manager Help. In the Marker Definitions tab, use the following icons to modify the markers and score scores. Button Use Click Add to create a new marker or marker score definition. You can also click in an empty row to add a new marker or marker score definition. Select a marker or marker score definition and click Edit to modify the marker color, type, and description or marker score definition. You can also double-click in a field to edit it. Select a marker or marker score definition and click Remove to delete a marker or marker score definition. You can also select a row and press Delete to remove a marker or marker score definition. Select a marker and click Move Up to move a marker up in the list. Select a marker and click Move Down to move a marker down in the list. Marker Color, Type, and Definition Marker Scores Configure Wii Remote for Logging Recorder > Modify Study Details > Marker Definitions tab > Configure Wii Remote Facilitators with only one computer, or those who are working alone, can mark important moments during the session easily and quickly using a remote to set markers and start or end tasks without disrupting the participant. This frees up staff-time, allows for faster analysis, and doesn t require network privileges at remote testing sites. Having problems connecting? Go straight to Troubleshooting. Requirements Wii Remote You must purchase a Wii Remote to use this feature. Currently, the Wii Remote is the only supported remote device for use with Morae. Wii Remotes can usually be purchased for around $40 from many major retail, toy, or online stores. Bluetooth Capability 49

50 To use a Wii Remote to log tasks and create markers, your computer needs Bluetooth capability. Many laptops have Bluetooth functionality; most desktops will require a Bluetooth adapter of some kind. Configure the Wii Remote To configure the Wii Remote, click Modifiy Study Details > Marker Definitions tab > Configure Wii Remote. The Wii Remote is configured by study and can be configured when the Wii Remote is not connected to Recorder. The Configure Wii Remote dialog window can be viewed in Observer, but settings cannot be changed. The Wii Remote configuration is a part of the study configuration. The Configure Wii Remote dialog box can be opened directly from the Wii Remote after it is connected to Recorder by pressing the button. Connect the Wii Remote 1. To make the Wii Remote findable by your computer, push and continue to hold both the and buttons on the Wii Remote. The blue LED lights on the Wii Remote flash, indicating the Wii Remote is ready to connect. 50
51 It is important that you continue to hold the buttons down during this entire process. 2. Open Bluetooth Devices located in the Windows Control Panel (click Classic View in the Windows Vista operating system to find this more easily.) 3. Click Add on the Devices tab. 4. The Bluetooth Device Wizard displays available devices. Select the Wii Remote, which should show up as a Nintendo device, and click Next. 5. Select Don t use a passkey and click Next. Windows gives a notification when it has connected to the Wii Remote. You can now release the buttons. The lights on the Wii Remote will continue to flash until it connects to Recorder. 6. Start Recorder. Recorder automatically connects to the Wii Remote. A battery indicator appears in the Recorder status bar. If Recorder is unable to connect to the Wii Remote, an error message is displayed. Close Recorder and attempt to connect again. Reconnect the Wii Remote Anytime your computer or the Wii Remote is turned off, you will need to reconnect the Wii Remote before you can use it again. Follow the same instructions given above to connect the Wii Remote. Troubleshooting The Wii Remote does not appear in the list of available Bluetooth devices to choose from: The Wii Remote is not broadcasting. Make sure that it has batteries installed. When you hold the 1 and 2 buttons down, some or all of the LEDs should begin flashing. If they do not, consult the manual that came with your Wii Remote. The LEDs must flash during the entire connection process. A dialog appears asking me to restart my computer: This occurs if you have Morae open when connecting to the Wii Remote. Windows cannot replace drivers that are currently in use by Morae to talk to the Wii Remote. You should select the Restart Later option as it is not necessary to restart your session. A notification with a red X appears telling me the drivers could not be installed and the Wii Remote then turns off: This may happen if Morae is already open. Close Morae and then follow these steps. 1. Open the Bluetooth device dialog box. 2. Select the Wii Remote from the list of peripherals and then select Properties. 3. Press and hold the 1 and 2 buttons on the Wii Remote as above, then select Services. 4. Select Drivers for keyboard, mice, etc. and click OK. 5. If a notification appears with a green check saying that the drivers were installed, you may release the buttons on the Wii Remote and start Morae. Otherwise, you should start the connection process from the beginning. You can also use the Wii Remote to log in Observer. See the Morae Observer Help for more information. The marks Nintendo and Wii are marks owned by Nintendo of America, Inc. and Nintendo of America, Inc. is in no way affiliated or associated with TechSmith nor has it sponsored the content of the materials or the products or services referenced in the same. 51
52 Log with a Wii Remote Log a Session 52

53 Define the Study Surveys Recorder > Modify Study Details > Survey Definitions tab Survey Definitions tab of the Study Details dialog box lists the surveys available in a study and associates a survey with a point in the session, such as the end of the task. You can either Create a Survey Using Custom Questions or Create a Survey Using System Usability Scale Questions. Morae includes the ability to deliver multiple surveys during a session. The participant answers are captured and saved with the recording file. When you import the recordings into Manager, you can review, adjust, analyze, and graph survey responses. You can open the configuration in the Morae Add-In for Microsoft Office Word and drop surveys into a Word file to create handouts for participants. See Create Session Handouts for more information. Define the Study Description Define the Study Tasks Define the Study Markers Survey Name The survey name appears as the title of a survey dialog box and identifies a survey in the study configuration. You can only edit the name of an existing survey in the Survey Definition tab. To create a new survey, click the Add button. For information on how to create a new survey, see Create a Survey Using Custom Questions and Create a Survey Using System Usability Scale Questions. Survey Association 53
54 Choose to associate surveys with session events. Session events include the beginning and end of the recording, as well as the end of each defined task. By associating a survey with a session event, it is linked to that event. AutoPilot automatically displays surveys when the associated session event occurs. Observer readies the survey associated with the current session event. Click Send Survey to display the survey. 54

55 Create a Survey Using Custom Questions Recorder > Modify Study Details > Survey Definitions tab > Add To create a new survey: 1. In the Survey Definitions tab, click Add. The Survey Definition dialog box opens. 2. Enter the Survey Details. You can also modify survey names and associations in the Survey Definitions tab of the Study Details dialog box. 3. Select Custom Questions. For information on creating a survey using the SUS questions, see Create a Survey Using System Usability Scale Questions. 4. Define questions for the survey. For more on adding questions and the available types, see Survey Question Types. 5. When you finish adding questions, click OK to close the Survey Definition dialog box. Create a Survey Using System Usability Scale Questions Survey Question Types 55

56 Create a Survey Using System Usability Scale Questions Recorder main interface > Modify Study Details > Survey Definitions tab > Add The System Usability Scale (SUS) is freely available for use in usability assessment and is used for a variety of research projects; the only prerequisite for its use is that any published report must acknowledge the source of the measure. Acknowledgements SUS was developed as part of the usability engineering program in integrated office systems development at Digital Equipment Co Ltd., Reading, United Kingdom. Morae only allows you to use the SUS questions once in a study. You cannot modify the SUS questions. To create a survey using the SUS questions: 1. In the Survey Definitions tab, click. The Survey Definition dialog box opens. 2. Enter the Survey Details. You can modify survey names and associations in the Survey Definitions tab. 3. Select Standard System Usability Scale (SUS) questions (one SUS survey per study). For information on creating a survey using custom questions, see Create a Survey Using Custom Questions. 4. Click OK to close the Survey Definition dialog box. 56
 questions to populate your surveys. You can use the SUS questions only once in a study.")
57 Create a Survey Using Custom Questions Survey Question Types Survey Question Types Recorder > Modify Study Details > Survey Definitions tab > Survey Definition > Add Create custom questions or use the System Usability Scale (SUS) questions to populate your surveys. You can use the SUS questions only once in a study. Custom Question Types You can create various types of questions including Custom Survey Question Type Scale Example Select one answer Select one or more answers Freeform only answer Create a Survey Using Custom Questions Create a Survey Using System Usability Scale Questions Scale Question For a Scale question in a custom survey, you can define the question, the scale from 1-10, the labels for each end of the scale. 57

58 You can add a freeform answer to the Scale custom questions. 58

59 Select One Question For a Select One question in a custom survey, you can define the question, the answers where participants can only select one answer and if you want to include a freeform comment. You can add a freeform answer to the Select one custom question. 59
60 Select One or More Question For a Select One or More question in a custom survey, you can define the question, the answers where participants can select one or more of the answers and if you want to include a freeform comment. You can add a freeform answer to the Select one or more answers custom questions. 60

61 Freeform Question For a Freeform question in a custom survey, you can define the question and have the participants enter a text answer or ask for participant comments. 61
62 Video and Audio Sources The Video and Audio Sources pane allows you to view and select the sources for the main video, Picture-in- Picture (PiP) video, and audio. You can also adjust the audio level and preview the selected video sources. Video and Audio Sources are affected by the hardware connected to the computer when Recorder opens. Always verify the selected sources prior to recording start. Quick Tips for Setting Video and Audio Sources Record from the screen, camera, screen and camera, or two cameras. For more on the video options, see Choose Video Sources. You can flip your camera video, both vertically and horizontally, so you can set up your camera out of the way of the participant. To flip camera video, click Modify camera settings. If the audio is going into the red in the Audio monitor, move the audio slider to the left. For more on audio levels, see Adjust Audio Level. Click Test Recording in the Recorder toolbar to create a 15-second video test recording to verify the video and audio. For more information, see Create a Test Recording. Need to save disk space? You can change the size and frame rate of the recording. See Modify Video Settings. 62

63 Morae chooses the recommended codec for screen and camera video. If you want to use a specific codec, see Screen Video Compression Setup Options or Camera Camera Video Compression Setup. If your video is too dark or you want to zoom in, some cameras allow you to adjust these settings. To change the camera properties and preview the results, see Camera Properties Options. Choose Video Sources Examples Choose Audio Source Modify Video Settings Camera Video Settings Choose Video Sources Use the dropdown lists to select from the various video sources. You can choose both a Main Video and a PiP Video, or just a main video source. To see examples screenshots of the various options, see Examples. If you record both main and PiP videos, after you import the recording into Manager, you can produce highlight videos with or without the PiP included. You can also adjust the location of the PiP. Main Video Select a video source and click Modify screen video/camera settings to adjust the video settings. For the main video source, select from screen or camera. You have the following options: Screen (Primary Monitor): Record the desktop of the monitor set as the primary monitor. You can set the primary monitor in Start > Control > Display > Settings tab. Screen (Entire Desktop): Record the desktop of all monitors connected to the computer. The more monitors you record, the larger the recording file size. Screen (Region): Select and record a portion of the desktop. If you have multiple monitors, but only want to record from one that is not the primary monitor, use Screen (Region) to select the desktop of only one monitor. For more information, see Select a Region. Camera: Select from the connected cameras. To set up a configuration without the session cameras connected, select Camera (Not plugged in) to set a camera as the main video. Save the configuration and reopen it once a camera is attached. The camera is automatically selected as the main video source. 63

64 PiP Video Select a video source and click Modify camera settings to adjust the video settings. For the PiP video source, you can select a camera. You have the following options: None: Do not record a PiP video. Camera: Select from the connected cameras. To set up a configuration without the session cameras connected, select Camera (Not plugged in) to include a PiP video. Save the configuration and reopen it once a camera is attached. The camera is automatically selected as the PiP video source. Examples Select a Region Choose Audio Source Modify Video Settings Camera Video Settings 64

65 Examples The following show example configurations as seen in the Preview Window. Choose Video Sources Select a Region Choose Audio Source Modify Video Settings Camera Video Settings 65

66 Select a Region To record only a portion of the full computer desktop, choose to record any rectangular Region of the desktop. You may want to record a region for any of the following reasons: You want to capture one monitor that is not the primary monitor. You want to capture an area that spans more than one monitor but do not want to record the entire desktop. You are only interested in what happens in one area of the desktop, possibly in one application. (Saves file size while recording at full size.) To record a region: 1. Open Recorder. 2. Select Screen (Region) in the Main video source dropdown list. 3. Define the rest of the study configuration. 4. Click the Record button. The Region Selection dialog box opens. 5. Modify the selected region by: Click and drag the corners of the region box. Click the center of the region to move the entire region. Click Select Region in the Region Selection dialog box. Click and drag to select a region. 6. After you select the correct region, click Record in the Region Selection dialog box to begin recording. 66
67 Choose Video Sources Examples Choose Audio Source Modify Video Settings Camera Video Settings Choose Audio Source Use the dropdown list to select from the various audio sources or choose not to record audio. You can also use the Adjust Audio Level to view and adjust the audio level. Use the dropdown list to select the audio source. You have the following options: None: Do not record audio. Audio Devices: Select from the available audio devices, including stand-alone microphones, computer sound cards, and camera microphones. Adjust Audio Level 67

68 Use the Audio Monitor to view and adjust the audio level. Use the following to help you adjust the audio level. Before each recording, create a test recording to verify audio levels. Good Audio Level Low Audio Level High Audio Level Modify Video Settings Click Modify screen video/camera settings depend on the video sources you select. Screen Video Settings How to Choose the Recording Compression Camera Video Settings to adjust the video settings. The exact settings available 68
69 Screen Video Settings In the Screen Video dialog box, choose the compression and performance options that match your recording situation. The Screen Video options apply to the capture of screen video only and not to the video input from a camera. Need help choosing a compression options? See How to Choose the Recording Compression. The following are the settings available when you use screen as the main video source. Option Lossless video (recommended) Full motion video Custom compression (advanced) Video Compression Setup Frame rate Disable display acceleration during capture Remove desktop wallpaper during capture Restore Default Description and Use Provides the best quality video recording for most situations. If your screen video contains full motion (such as video playback), this option may increase recording file size. Provides good quality with full motion recordings while keeping the recording file sizes down. Select a custom codec. We do not recommend selecting this option unless you are an advanced codec user. Opens the Video Compression Setup dialog box with a list of available codecs. You can also adjust any compression settings. For more information, see Screen Video Compression Setup Options. Enter the frame rate (in frames per second). The default setting is five frames per second. We recommend keeping this default. Disables hardware acceleration during recording. Checking this box generally results in better screen video recordings. Disables any desktop wallpaper on the Recorder computer. Checking this box generally results in better compression of recording files and better system performance. Restores the screen video options to the default settings. Screen Video Compression Setup Options 69

70 In the Video Compression Setup dialog box, you can change your screen video codec selection and adjust compression quality and key frame rate. Additional configuration options for the codec may be available by clicking the Configure button in the Video Compression Setup dialog box. For more information on codecs, see Codecs in Morae. The contents of this dialog box may differ and certain options may be disabled, depending on the screen video codec chosen. Each codec has unique configuration options. For more information about a particular codec's options, consult the documentation from the company providing that codec. The following table describes the Video Compression Setup dialog box. Option Compressor Compression quality Key frame every (n) frames Data rate (KB/Sec) Configure Select the codec from the dropdown list. Description Configures the codec to compress at a lower image quality and create a smaller file size, or compress at a higher image quality, resulting in a larger file size. Adjust the compression quality using the slider bar. For higher quality, move the bar to the right. For lower quality, move the bar to the left. Specify how often to record a key frame. We recommend that you accept the default value for the codec. The codec places key frames at regular intervals, either spacing them by number of seconds or number of frames. Each codec has an optimized key frame setting. Determine the number of bytes of data the codec transmits or receives in one second. A higher data rate results in better quality and larger file sizes. If this option is available for the codec, place a checkmark in the adjacent box and specify the data rate in Kb/Sec. Set configuration options for the selected compressor. For more information, see Configure Video Compression Setup. Configure Video Compression Setup 70
71 The Configure button in the Video Compression Setup dialog box allows you to customize the compression settings for the video codec. This table describes the TSCC codec. Each codec has its own unique configuration options. For information on each of those options, consult the manufacturer's documentation. Option Compression Control Default Description and Use Use the slider bar to choose faster compression (resulting in a larger file size) or better compression (resulting in a smaller file size). In all cases, the TSCC video codec is 100% lossless. Typically, you want faster compression during recording and a smaller file size when producing/editing. Resets the Compression Control slider to its default configuration. How to Choose the Recording Compression There are three options for selecting a screen recording codec: Lossless video Full motion video Custom Use the following guidelines to choose a codec: Compression Option Lossless video When to Use In most cases, select this option when recording computer screen-based sessions. This option produces the highest quality recordings, but may create extremely large files if Full motion video Custom The screen has a lot of motion (such as a video playing) Camera is the main video source Select this option if you are recording Camera as the main video source A screen with a lot of motion (such as a video playing) Only for advanced users. If you choose custom video compression settings, you may not be able to record or use the recording in Manager. Camera Video Settings In both the Main Camera Settings and PiP Camera Settings dialog boxes, choose the compression and performance options that match your recording situation. 71

72 The following are the settings available when you use a camera as either the main or PiP video source. Camera Tab Option Flip Camera Properties Main Camera Video Format Flip the video vertically, horizontally, or both. Description and Use Opens the Camera Properties dialog box to adjust various aspects of video quality, such as brightness, contrast, sharpness, RGB values, etc. For more information, see Camera Properties Options. Opens the Camera Video Format dialog box to adjust variables such as frame rate and output size. For more information, see Camera Video Format. Camera Properties Options The camera manufacturer provides the information in Camera Properties dialog box and the options available in the dialog box vary. In general, you can adjust various aspects of image quality, such as brightness, contrast, gamma, sharpness, RGB values and exposure. The preview in the Main Camera Settings dialog box updates so that you can immediately see how the settings affect the video. For more information about the options in the camera Properties dialog box, consult the camera manufacturer. 72
73 We recommend using the default settings for your camera. The defaults are optimized to give you the best overall video quality. Camera Video Format In the Camera Video Format dialog box, select the size of the video, the framerate, and the codec. Option Video Size Description and Use Use the default sizes or lower the size for smaller video and file size. The dimensions given with the Video Size slider are approximate and actually video size may vary depending on your camera properties. Framerate Select the framerate for the camera. The value of Max depends on your camera properties. If your captured video is choppy, try lowering the framerate setting. Full motion video Custom compression Video Compression Setup Restore Default Selects the recommended default camera video codec (Windows Media Video). Selects a custom camera video codec. We do not recommend selecting this option unless you are an advanced codec user. Opens the Video Compression Setup dialog box to browse through a list of available codecs. For more information, see Camera Video Compression Setup. Returns the options on this dialog box to the default settings. Camera Video Compression Setup In the Video Compression Setup dialog box, you can change your camera video codec selection and adjust compression quality and key frame rate. Additional configuration options for the codec may be available by clicking the Configure button in the Video Compression Setup dialog box. For more information on codecs, see Codecs in Morae. The contents of this dialog box may differ and certain options may be disabled, depending on the codec chosen. Each codec has unique configuration options. For more information about a particular codec's options, consult the documentation from the company providing that codec. 73
74 The following table describes the Video Compression Setup dialog box. Option Compressor Compression quality Key frame every (n) frames Data rate (KB/Sec) Configure Select the codec from the dropdown list. Description Configures the codec to compress at a lower image quality and create a smaller file size, or compress at a higher image quality, resulting in a larger file size. Adjust the compression quality using the slider bar. For higher quality, move the bar to the right. For lower quality, move the bar to the left. Specify how often a key frame is recorded. We recommend that you accept the default value for the codec you have chosen. The codec places key frames at regular intervals, either spacing them by number of seconds or number of frames. Each codec has an optimized key frame setting. Determine the number of bytes of data the codec transmits or receives in one second. A higher data rate results in better quality and larger file sizes. If this option is available for the codec, place a checkmark in the adjacent box and specify the data rate in Kb/Sec. Set configuration options for the selected compressor. For more information, see Configure Video Compression Setup. Configure Video Compression Setup The Configure button in the Video Compression Setup dialog box allows you to customize the compression settings for the video codec. This table describes the TSCC codec. Each codec has its own unique configuration options. For information on each of those options, consult the manufacturer's documentation. Option Compression Control Default Description and Use Use the slider bar to choose faster compression (resulting in a larger file size) or better compression (resulting in a smaller file size). In all cases, the TSCC video codec is 100% lossless. Typically, you want faster compression during recording and a smaller file size when producing/editing. Resets the Compression Control slider to its default configuration. 74

75 AutoPilot Morae AutoPilot presents study and task instructions along with surveys right on the computer running Recorder. By default, AutoPilot logs the start and end of tasks automatically, while Observers can still connect and log markers. Uses of AutoPilot There are many reasons to use AutoPilot. Here are some examples: You do not have someone to log tasks with Observer. You want to conduct unmoderated sessions. You want to log tasks automatically. You want to present surveys automatically. You want to avoid the need print task and survey paperwork. For more information on how an AutoPilot session works, see Run an AutoPilot Session. Set Up AutoPilot To set up Recorder to use AutoPilot, you can either Use the Unmoderated Usability Study Template or Add AutoPilot to a Study Configuration. 75
76 Use the Unmoderated Usability Study Template 1. Open Recorder. The Welcome to Morae Recorder dialog box opens. 2. Select Create a new study configuration based on. 3. Select the Unmoderated Usability Study template from the dropdown list. 4. Click OK. The template study configuration opens in Recorder. 5. Click Modify Study Details to open the Study Details dialog box. 6. In the Study Details dialog box, modify the study details making sure to include the following: Description tab: Fill in the Study Instructions field with directions for the participant. This could include an introduction to the test along with scenario information. Task Definitions tab: Select an existing task and click Edit to open the Task Details dialog box. Fill in the Instructions field for all tasks. Include the task and any information a participant needs to complete the task, such as a user name and password. 76

77 Survey Definitions tab: Create and associate surveys with session events, such as the end of Task 1. Only associated surveys automatically display with AutoPilot. 7. Click OK. The Recording Details are set up to run sessions with AutoPilot, record the screen and PiP, automatically restart after a recording ends, defer recording processing, and allow Observers. If you need the change these settings, click Modify Recording Details. 8. Save the study configuration file. Add AutoPilot to a Study Configuration 1. Click Modify Recording Details to open the Recording Details dialog box. 2. In the Recording Details dialog box, click AutoPilot. 77

78 3. Select to Enable AutoPilot. 4. When you enable AutoPilot, all other settings needed to run an AutoPilot session automatically change to provide the recommended configuration. 5. Modify any other recording details and click OK. 6. Save the study configuration file. 78

79 Run an AutoPilot Session The following is the step by step of how an AutoPilot session works. 1. Open Recorder. The Welcome to Morae Recorder dialog box opens. 2. Select Open a saved study configuration and open your saved AutoPilot study configuration. 3. Click the Record button. 4. AutoPilot starts and displays the study instructions. The participant clicks Start. 5. The first task displays. The participant reads the task and clicks Start Task. Recorder automatically starts the first task. 6. The AutoPilot window collapses and the participant works on the task. The participant can click Show Instructions to view the task instructions for the task. 7. The participant finishes the task and clicks End Task. Recorder automatically ends the task. 8. If there is a survey associated with the end of the task, it displays before moving to the next task. 9. The participant finishes the survey and clicks Done. 10. The next task displays. This process continues until the participant reaches the end of the test. 11. After the participant clicks End Task for the final task, if there is a survey associated with the end of the test, it displays. 79

80 12. When the final survey is complete, a thank you message appears. The participant clicks OK to end the test. 13. If you have enabled the Start a new AutoPilot recording automatically option, a new test will appear and start recording when the participant clicks Start. To exit the automatic restart and return to Recorder, click Exit Session. If prompted, enter the password set in the Recording Details. Create Handouts With the help of the Morae Add-In for Word, you can use a study configuration to create paper handouts for your sessions. To create session handouts from a study configuration: 1. In Recorder, create a study configuration, making sure to enter the Study Instructions and Task Instructions in the Study Details dialog box. 2. Save the study configuration. 3. Open Microsoft Word and the Morae Task Pane. In Word 2003, click the Show Morae Wnd button in the Word toolbar to open or close the Morae Task Window. In Word 2007, by default, the Morae Task Pane opens with Word. Open or close the Morae Task Pane with the check box in Add-Ins tab > TechSmith Morae group. 4. In the Morae Task Pane, click Browse to locate the saved study configuration file (.mrcfg). 5. All available study components open in the Morae Task Pane. Click and drag the task Instructions and surveys to the open Word file. 80

81 6. Add page breaks and text formatting, as needed. 7. Save and print the handouts. Study Components Available in the Morae Add-In for Microsoft Word 81

82 Log a Session When recording only camera video, you are able to log on the computer running Recorder. You can log markers, marker scores, and add text notes to save with the recording file. You can set up the Study Configuration to allow the person logging with Recorder or an Observer to logs tasks and task scores. At the end of a session, the tasks and task scores are saved with the recording. The components used when logging with the computer running Recorder are: Customize Observer for Your Session Get to Know the Log Quick Tips for Logging a Session Markers Tasks Surveys Log with a Wii Remote View Recording Details View Your Notes and Markers Right After a Session 82
83 Get to Know the Log When logging, Recorder includes a Log displayed like a spreadsheet with rows and columns. The Log displays all markers entered in Observer during the recording. If you are the logging tasks, the Log also displays the tasks.the Log allows you to send surveys, if applicable. Quick Tips for Logging a Session There are several different ways to log markers. Review Different Ways to Log a Marker. Only the task logger can view and log tasks. See How to Log a Task. You can rearrange the columns in the log in the most convenient order for you. During recording, you can go back and edit previously logged markers. Once you end a task you can change which task it is logged as. You can, however, change or update the note or score associated with the task. You can only change the task after you import it into Manager. The markers and tasks defined in the study configuration are available to log. See Define a Study Configuration in Recorder for information on setting up a study configuration. If you are on your own to facilitate and log a session, you may want to Log with a Wii Remote. Log marker and task scores to use in Manager during analysis. For example, if you log marker scores, you can create a graph that automatically calculates error severity rate. While you can add markers, tasks, and scores in Manager after importing the recording, you will save time by logging tasks and markers during a session. You can save a copy of the Log after each session as a.txt file to print or open in other applications (i.e. Microsoft Excel). See View Your Notes and Markers Right After a Session. Your descriptions appear as tooltips in Recorder. 83

84 Get to Know the Log Markers Tasks Surveys View Recording Details Markers Use markers to quickly log important points in a recording. During analysis, you can quickly find and review the markers to identify points of interest. You can set an unlimited number of markers in a recording. Markers are recording-specific (defined in the study configuration) and all observers for a recording use the same set of pre-defined markers to work with. During recording, you can go back and edit previously logged markers and tasks. You can also edit or add markers, tasks, or scores in Manager after importing the recording. Different Ways to Log a Marker When you see a point in the recording to mark, do one of the following to log a marker: Choose <Ctrl+ [letter]> on the keyboard. This only works for markers that are defined in the study configuration. Choose <Ctrl + Space> on the keyboard to insert an undefined marker. Select a type in the Marker Type column to define. In the Marker Type column, enter the letter of a marker. Pick a marker from the drop-down list in the Marker Type column. Click a defined Type button in the Marker Definitions window. 84

85 Choose the Marker menu and select the letter (Type) from the menu. Defined markers appear at the top of the menu. Log a marker with a Wii Remote Get to Know the Log Quick Tips for Logging a Session Tasks Surveys View Recording Details Tasks While each observer can log markers, marker scores, and text notes, only the task logger can log tasks and task scores. The task logger is defined in the study configuration. For more information, see Define Task Logger Options. 85

86 The task logger logs tasks using the tasks logging controls of the log as the participant performs tasks during the recording. If you start a task too early, click the Restart button to restart the task. After you start a task, click Cancel to abort the task. A Canceled Task icon appears in the log. If you end a task too early, click Start and select Add to <task name> in the dropdown list. Each time you log an Undefined Task, another Undefined Task appears in the dropdown. Undefined tasks are numbered and you can define them later in Manager. While you can add markers, tasks, and scores in Manager after importing the recording, you will save time by logging tasks and markers during a session. How to Log a Task 1. In the task logging controls, click Start Task. 2. Select a task from the Log as drop-down list. 3. Add an optional note. 4. Add markers during the task, as needed. 5. Click End Task. 6. Select a Score. 7. Send a task survey, if applicable. (See How to Deliver Surveys.) 86

87 Get to Know the Log Quick Tips for Logging a Session Markers Surveys View Recording Details Surveys You can open (deliver) surveys anytime during the recording. While logging, read the survey questions to the participant and enter the answers in the open survey, or have the participant fill out the surveys on the computer running Recorder. You can later graph the answers in Manager. You can have multiple surveys. Some ways to use surveys include, but are not limited to Pre-session demographic questionnaire Task completion survey Post-test satisfaction survey Session follow-up questions Create and associate with session events, such as the end of a task, in the study configuration. See Define the Study Surveys for information about setting up surveys. How to Deliver Surveys To deliver a survey 1. Select the survey from the survey dropdown list. When end a task, the survey associated with that task is automatically selected in the dropdown list. 2. Click Send Survey. If you send the wrong survey, you can click Recall to close the survey. 87
88 Quick Tips for Surveys Surveys are available at the top of the Log and in the Recording Control menu. Surveys appear in the order they are entered into the study configuration. If linked to a session event, a survey is selected in the survey dropdown list when that session event occurs. For example, at the end of Task 1, the survey associated with the end of Task 1 is selected in the survey dropdown list. If you send the wrong survey, you can Recall a survey before it is complete. If a survey is already complete, you can send a survey again. Select a survey marked done and click Send Survey. Any answers already filled in are not removed, but you can adjust the answers, if needed. Get to Know the Log Quick Tips for Logging a Session Markers Tasks View Recording Details Log with a Wii Remote Facilitators with only one computer, or those who are working alone, can mark important moments during the session easily and quickly using a remote to set markers and start or end tasks without disrupting the participant. This frees up staff-time, allows for faster analysis, and doesn t require network privileges at remote testing sites. To configure the Nintendo Wii Remote, see Configure Wii Remote for Logging. 88
89 Requirements Wii Remote You must purchase a Wii Remote to use this feature. Currently, the Wii Remote is the only supported remote device. Wii Remotes can usually be purchased for around $40 from many major retail, toy, or online stores. Bluetooth Capability To use a Wii Remote to log tasks and create markers, your computer needs Bluetooth capability. Many laptops have Bluetooth functionality; most desktops will require a Bluetooth adapter of some kind. Connect the Wii Remote 1. To make the Wii Remote findable by your computer, push and continue to hold both the and buttons on the Wii Remote. The blue LED lights on the Wii Remote flash, indicating the Wii Remote is ready to connect. It is important that you continue to hold the buttons down during this entire process. 2. Open Bluetooth Devices located in the Windows Control Panel (click Classic View in the Windows Vista operating system to find this more easily.) 3. Click Add on the Devices tab. 4. The Bluetooth Device Wizard displays available devices. Select the Wii Remote, which should show up as a Nintendo device, and click Next. 5. Select Don t use a passkey and click Next. Windows gives a notification when it has connected to the Wii Remote. You can now release the buttons. The lights on the Wii Remote will continue to flash until it connects to Recorder. 6. Start Recorder. Recorder automatically connects to the Wii Remote. A battery indicator appears in the Recorder status bar. If Recorder is unable to connect to the Wii Remote, an error message is displayed. Close Recorder and attempt to connect again. See also Troubleshooting. Reconnect the Wii Remote Anytime your computer or the Wii Remote is turned off, you will need to reconnect the Wii Remote before you can use it again. Follow the same instructions given above to connect the Wii Remote. How to Log With the Remote You can use the remote to log in one of two ways, depending what kind of main video source you use. Screen-based session When logging during a screen recording, you will not see any feedback on the screen. The Wii Remote lights flash to show that you logged a marker or task. Before logging a session, be sure to familarize yourself with the Wii Remote Configuration available in Recorder. Go to Modify Study Details > Marker Definitions > Configure Wii Remote to access this dialog. Camera video-based session You can also use a remote to interact with the log when recording camera as the main video source. To view the remote configuration to see what buttons set which markers, go to View > Wii Remote Configuration. The buttons on the remote work in the same way as using hotkeys. To log a marker or 89
90 task, push the corresponding button on the Wii Remote, as defined in the Wii Remote Configuration dialog box. Troubleshooting The Wii Remote does not appear in the list of available Bluetooth devices to choose from: The Wii Remote is not broadcasting. Make sure that it has batteries installed. When you hold the 1 and 2 buttons down, some or all of the LEDs should begin flashing. If they do not, consult the manual that came with your Wii Remote. The LEDs must flash during the entire connection process. A dialog appears asking me to restart my computer: This occurs if you have Morae open when connecting to the Wii Remote. Windows cannot replace drivers that are currently in use by Morae to talk to the Wii Remote. You should select the Restart Later option as it is not necessary to restart your session. A notification with a red X appears telling me the drivers could not be installed and the Wii Remote then turns off: This may happen if Morae is already open. Close Morae and then follow these steps. 1. Open the Bluetooth device dialog. 2. Select the Wii Remote from the list of peripherals and then select properties. 3. Press and hold the 1 and 2 buttons on the Wii Remote as above, then select Services from the dialog. 4. Select Drivers for keyboard, mice, etc. and select Ok. 5. If a notification appears with a green check saying that the drivers were installed, you may release the buttons on the Wii Remote and start Morae. Otherwise, you should start the connection process from the beginning. You can also use the Wii Remote to log in Observer. See the Morae Observer Help for more information. The marks Nintendo and Wii are marks owned by Nintendo of America, Inc. and Nintendo of America, Inc. is in no way affiliated or associated with TechSmith nor has it sponsored the content of the materials or the products or services referenced in the same. View Your Notes and Markers Right After a Session After observing and logging a session, you may want quick access to the notes and markers created during the session. Use the following procedures to save and view your markers and notes. Save Your Notes and Markers View Your Notes and Markers Save Your Notes and Markers 1. During a session, enable Marker > Prompt to save copy of log. (This option is enabled by default.) 90
.")
91 2. Proceed with the session, logging markers and notes. When you stop the recording, you are prompted to save your log. 3. Browse to the location to save your log and click Save. The file is saved as a text only file (.txt). View Your Notes and Markers You can open your log as plain text in a program such as Microsoft Word or Microsoft Notepad, or for easier viewing, as a table in Microsoft Excel. To open a.txt file in Excel: 1. Open Excel and choose Windows Vista: Office button > Open Windows XP: File > Open. 2. Choose Text Files in the Files of type dropdown list. 3. Navigate to and select the log file and click Open. 4. A message appears that Excel does not recognize the file format. Click OK to continue. 91

92 5. Follow the steps in the Text Import wizard. The log opens in Excel. 92

93 View Recording Details View > Recording Details The Recording Details dialog box displays data about the current recording session. Get to Know the Log Quick Tips for Logging a Session Markers Tasks Surveys 93
 Marker Definitions Window Adjust the")
94 Customize Logging for the Session To help you view the recording more easily, Morae allows you to customize how you view and log a session. See the following topics for more information about the various ways to customize the interface: Adjust the View of the Recording Session Picture in Picture (PiP) Marker Definitions Window Adjust the View of the Recording Session To make it easier to view the recording, you may need to adjust the way the video appears. You can view the screen and/or camera video being captured in several ways. Normal View (default) Full Screen View Scale to Fit View Try the different views to find one that works well for your test. You can adjust the view at any time, prior to and during a recording. Normal View (default) By default, the interface opens in the Normal view. This view shows the recording activity within a regular window. The toolbar, status bar, menu bar, Marker Definitions window, and PIP window are visible by default. Full Screen View 94

95 The Full Screen view fills the entire screen with the recording and a floating toolbar appears. To toggle the Full Screen view on/off, do one of the following: Click the Full Screen button. Use the <Alt + Enter> hotkey. Choose View > Full Screen. Scale to Fit View 95

96 If the recording is larger than the Viewing window, choose the Scale to Fit view. This view fits the entire recording into the Viewing window. This option is available in both Normal and Full Screen view. To toggle the Scale to Fit option on or off, do one of the following: Click the Toggle Scale-to-Fit button. Use the <Ctrl + Alt + S> hotkey. Choose View > Scale to Fit. Picture in Picture (PiP) Marker Definitions Window 96

97 Picture in Picture (PiP) When recording begins, a window containing the Picture in Picture (PiP) camera video appears by default in the lower right-hand corner of the Viewing window. You can move and resize the PiP window in the Viewing window. PiP is best viewed with the Scale to Fit option turned on. If you can t find the PiP window, choose View > Scale to Fit and the PIP window appears in the lower right-hand corner. PIP Window Action To move the PiP window To resize the PiP window To hide or show the PiP window Description Click in the PiP window and drag it to a different location. 1. Point at a corner of the window with your cursor and grab the handles that appear. 2. Drag the corner out or in to make the window larger or smaller. Choose View > Picture in Picture (PIP). Adjust the View of the Recording Session Marker Definitions Window 97

98 Marker Definitions Window The Marker Definitions window displays the markers defined in the study configuration that you can use to log events and tasks during the recording. To log a marker, click a button in the Type column. The Marker Definitions window is visible by default. To hide the marker definitions, choose View > Marker Definitions. Adjust the View of the Recording Session Picture in Picture (PiP) 98
99 Troubleshoot Observer to Recorder Connection Issues Trouble connecting to Recorder? Here are some answers to common questions: I cannot establish a connection between Observer and Recorder. What should I do? I got disconnected during a session. What should I do? My video is lagging behind the test. Can I make the video play in Observer in real-time? We cannot use the default Main Communication Port. Can I change it? I cannot establish a connection between Observer and Recorder. What should I do? If you cannot connect, check the following items:: Is Recorder installed and open on the recording computer? Is the Recorder computer name (or IP address) entered in the Connect to Recorder dialog box correct? If the computer name does not work, use the full domain name or IP address. For information on finding the computer name or IP address, see Choose the Recorder Computer Name or IP Address in the Morae Observer Help. Is there another Observer connected with the same user name? Are the Recorder and Observer computers connected to the same LAN or WAN network? Contact your system administrator for network problems. Are the Observer and Recorder applications running the same version of Morae? Do you have Windows XP Service Pack 2? This includes its own firewall. When prompted the first time you run Recorder, select to Unblock the firewall. Is there a firewall on the network? Ask your system administrator if there is a firewall blocking the connection. Are Recorder and Observer set up to use the same communication ports? The communication protocol used by Morae is TCP/IP with listening ports established on ports 5555 and The system administrator may have to intentionally allow traffic through these ports in order for Observer to connect to Recorder. If these ports are already in use, you can use different ports, as long as both Recorder and Observer are set up to use the same ports. For more information, see Change the Recorder and Observer Communication Port. I got disconnected during a session. What should I do? At anytime during the session, if you get disconnected, you can reconnect to the same session. 1. In Observer, click Connect to a Recorder to open the Connect to Recorder dialog box. 2. Click Connect. You reconnect to the same session. My video is lagging behind the test. Can I make the video play in Observer in real-time? Depending on the Observer options you choose, you may experience a video delay in Observer. For more information, see Video Delay in Observer in the Morae Observer Help. 99
100 We cannot use the default Main Communication Port. Can I change it? In some cases, Recorder and Observer cannot connect on the default communication port (5555). In this case, the study configuration in Recorder and the communication port in Observer must be set to an alternative port number. If you change the post in Recorder, all observers must set the same port to connect. Make sure to give the port number to all potential observers. To use an alternative main communication port: 1. Contact your system administrator to determine which port to use. 2. In Recorder, select Tools > Preferences. 3. When the Preferences dialog box opens, enter the port number in the Communication port field. Observers do not need to enter the high quality streaming port. This is handled automatically by Recorder and Observer. 4. Open Observer. In the Connect to Recorder dialog box, click Change Port. Enter the new port number. Click Test Port to verify that you can connect to Recorder with this port. Click Restore Default to return to the default port (5555)
101 5. Click OK to apply the selected port and return to the Connect to Recorder dialog box. If you have any problems with connecting on an alternative port, please contact the person who set up the session and your system administrator
102 Tips and Reference Information This section contains additional information based on some frequently asked user questions. The topics covered in this section include: How Rich Recording Technology (RRT) Works Check for Upgrade Settings Options Morae Player Recording File Recovery Options Codecs in Morae Morae Recorder COM Server Morae Recorder Plug-Ins Morae Recorder Plug-Ins Recorder plug-ins are created by 3 rd party developers to capture additional data in the recording such as specific user interface interactions. Please visit the Morae website for more information. Record Silently Morae File Types Morae File Sizes Managing Recording Files How Rich Recording Technology (RRT) Works During recording, Rich Recording Technology (RRT) collects and fuses two types of information: video input (camera video, screen video and microphone audio) and data input (keyboard entry, screen text, mouse clicks and system and application events). Morae Observer input is optional. The video streams are precisely correlated in time with the data streams. For example, where the data streams identify when a particular toolbar button is pressed in a specific application, the screen recording shows the user pressing the toolbar button. The synchronized video and data streams are saved in a recording file you can open within Morae Manager. When the recording file is opened and indexed by Morae Manager, users can conduct a search of the data input streams, select one of the search results and then see a specific event highlighted visually in the indexed screen video, which appears in the Player window. Check for Upgrade Settings Options Morae Player Recording File Recovery Options Codecs in Morae Morae Recorder COM Server Morae Recorder Plug-Ins Check for Upgrade Settings Options All three components of Morae have an automatic Check for Upgrade feature. The first time you open a component after installation, you are asked if you want Morae to check for available upgrades on the TechSmith site
103 To manually check for an upgrade, choose Help > Check for Upgrade > Check Now. To change the settings for the automatic Check for Upgrade, choose Help > Check for Upgrade > Settings. The Check for Upgrade Settings dialog appears. The following options are available in all three components of Morae: Enable automatic check for upgrade - Morae automatically checks for available upgrades. If you disable this option, Morae does not check for upgrades. Days between checks Define how often you want Morae to check for available upgrades by entering the number of days. Prompt before checking for upgrade - Morae displays a dialog asking whether you want to check for available upgrades. If you disable this option, the Check for Upgrade runs silently in the background (without prompting you). Restore Default - Returns the settings in this dialog to the default values. How Rich Recording Technology (RRT) Works Morae Player Recording File Recovery Options Codecs in Morae Morae Recorder COM Server Morae Recorder Plug-Ins Morae Player Start > All Programs > Morae > Morae Player Morae Player is a standalone video player, optimized for playing screen recordings. Morae Player always plays videos at 100% of their original size so that they remain readable. The Player is a single.exe file that does not need any setup, nor does it use the registry or any configuration files. Command line options allow Morae Player to be invoked in various ways from CD-ROMs, multimedia authoring tools and scripting languages or batch files. The command line options are listed in Morae Player Command Line Customizations. Morae Player only plays AVI video files. Morae Player has built-in support for the TechSmith Screen Capture Codec (TSCC). This means that an AVI encoded with the TSCC codec always plays in the Morae Player, even if the TSCC codec is not installed on the system. Any other audio or video codecs required by the AVI file must be installed before Morae Player can play the video. Morae Player does not setup any shell associations to become the default AVI player. Morae Player Playback Controls 103
 360 KB of hard-disk space for program installation Basic Windows multimedia and AVI file support must be installed.")
104 Morae Player System Requirements To run Morae Player, your system must meet the following requirements: Microsoft Windows 98, Me, NT, 2000, XP or later version. Windows-compatible sound card and speakers (recommended) 360 KB of hard-disk space for program installation Basic Windows multimedia and AVI file support must be installed. This is normally installed by default with Windows. The standard Windows MCI Microsoft Video for Windows must be installed. To check if the Windows MCI Microsoft Video for Windows is installed: 1. Choose Start > Control Panel > Sounds and Audio Devices > Sounds and Audio Devices > Hardware tab. 2. Double-click on Media Control Devices. 3. Click on the Properties tab. The (MCI) Microsoft Video for Windows should appear. Any audio or video codecs required by your AVI files must be installed. To check if a codec is installed: 1. Choose Control Panel > Sounds and Audio Devices> Sounds and Audio Devices > Hardware tab. 2. Double-click on the Audio Codecs or Video Codecs category. Click on the Properties tab the installed codecs. How Rich Recording Technology (RRT) Works Check for Upgrade Settings Options Recording File Recovery Options Codecs in Morae Morae Recorder COM Server Morae Recorder Plug-Ins 104
Presentations and PowerPoint
 V-1.1 PART V Presentations and PowerPoint V-1.2 Computer Fundamentals V-1.3 LESSON 1 Creating a Presentation After completing this lesson, you will be able to: Start Microsoft PowerPoint. Explore the PowerPoint
UNIFIED MEETING 5 HELP
 UNIFIED MEETING 5 HELP Table of Contents Conference Manager... 1 About Conference Manager... 1 From Conference Manager, you can... 1 Signing in to Conference Manager... 2 To sign in to the Conference
Using an Edline Gradebook. EGP Teacher Guide
 Using an Edline Gradebook EGP Teacher Guide Table of Contents Introduction...3 Setup...3 Get the Gradebook Web Plugin... 3 Using Your Web Gradebook... 4 Using the Web Gradebook on a Shared Computer...
Getting Started with Vision 6
 Getting Started with Vision 6 Version 6.9 Notice Copyright 1981-2009 Netop Business Solutions A/S. All Rights Reserved. Portions used under license from third parties. Please send any comments to: Netop
Technical Overview of Morae : Usability testing software with insight you can share
 Technical Overview of Morae : Usability testing software with insight you can share Functionality that you could previously only obtain by combining multiple hardware and software products is now fully
Unified Messaging. User Guide
 Unified Messaging User Guide Notice This user guide is released by Inter-Tel, Inc. as a guide for end-users. It provides information necessary to use Unified Messaging v2.2. The contents of this user
Windows XP Pro: Basics 1
 NORTHWEST MISSOURI STATE UNIVERSITY ONLINE USER S GUIDE 2004 Windows XP Pro: Basics 1 Getting on the Northwest Network Getting on the Northwest network is easy with a university-provided PC, which has
Cassette2CD Wizard User's Manual
 Cassette2CD Wizard User's Manual Table of Contents 1. Installation Instructions a. Connecting tape-deck to the computer b. Installing the Software 2. Using Cassette2CD Wizard a. Setting up and Testing
Deposit Direct. Getting Started Guide
 Deposit Direct Getting Started Guide Table of Contents Before You Start... 3 Installing the Deposit Direct application for use with Microsoft Windows Vista... 4 Running Programs in Microsoft Windows Vista...
BIGPOND ONLINE STORAGE USER GUIDE Issue 1.1.0-18 August 2005
 BIGPOND ONLINE STORAGE USER GUIDE Issue 1.1.0-18 August 2005 PLEASE NOTE: The contents of this publication, and any associated documentation provided to you, must not be disclosed to any third party without
User Guide. emoney for Outlook
 User Guide emoney for Outlook Table of Contents INTRODUCTION... 2 SYSTEM REQUIREMENTS... 2 Required Installations... 2 INSTALLATION PROCESS... 2 FIRST TIME SETUP... 8 EMONEY CLIENT PANE... 17 Client Contact
Software Usability Testing with Morae. Updated May, 2009
 Software Usability Testing with Morae Updated May, 2009 Contents Introduction... 4 Software or Web site Usability Testing Considerations... 5 Set Up the Test... 6 1. Create a Study Configuration... 7 2.
Quick Start Using DASYLab with your Measurement Computing USB device
 Quick Start Using DASYLab with your Measurement Computing USB device Thank you for purchasing a USB data acquisition device from Measurement Computing Corporation (MCC). This Quick Start document contains
Content Author's Reference and Cookbook
 Sitecore CMS 6.5 Content Author's Reference and Cookbook Rev. 110621 Sitecore CMS 6.5 Content Author's Reference and Cookbook A Conceptual Overview and Practical Guide to Using Sitecore Table of Contents
Help. F-Secure Online Backup
 Help F-Secure Online Backup F-Secure Online Backup Help... 3 Introduction... 3 What is F-Secure Online Backup?... 3 How does the program work?... 3 Using the service for the first time... 3 Activating
VMware Horizon FLEX User Guide
 Horizon FLEX 1.5 This document supports the version of each product listed and supports all subsequent versions until the document is replaced by a new edition. To check for more recent editions of this
Roth IRA Conversion Evaluator
 Roth IRA Conversion Evaluator Quick Start Guide 2009, WoltersKluwer. All Rights Reserved. Page 1 of 36 Table of Contents Roth IRA Conversion Evaluator Quick Start Guide Getting Started... 3 About the Roth
Introduction to Adobe Connect Video Conferencing System
 Introduction to Adobe Connect Video Conferencing System Adobe Connect is the Australian National University's web conferencing solution for staff and students. It has been integrated with the University's
Table of Contents. Page 3
 Welcome to Exchange Mail Customer Full Name Your e-mail is now being delivered and stored on the new Exchange server. Your new e-mail address is @rit.edu. This is the e-mail address that you should give
Appointment Scheduler
 EZClaim Appointment Scheduler User Guide Last Update: 11/19/2008 Copyright 2008 EZClaim This page intentionally left blank Contents Contents... iii Getting Started... 5 System Requirements... 5 Installing
Internet Explorer 7. Getting Started The Internet Explorer Window. Tabs NEW! Working with the Tab Row. Microsoft QUICK Source
 Microsoft QUICK Source Internet Explorer 7 Getting Started The Internet Explorer Window u v w x y { Using the Command Bar The Command Bar contains shortcut buttons for Internet Explorer tools. To expand
Copyright 2006 TechSmith Corporation. All Rights Reserved.
 TechSmith Corporation provides this manual as is, makes no representations or warranties with respect to its contents or use, and specifically disclaims any expressed or implied warranties or merchantability
Appendix A. CMS(Client Management Software)
") Appendix A. CMS(Client Management Software) A-1. Install CMS for Windows PC CMS is a program for communication between DVR and PC to control signal and video. Insert the enclosed CD, and go to CD-ROM Drive
Appendix A. CMS(Client Management Software) A-1. Install CMS for Windows PC CMS is a program for communication between DVR and PC to control signal and video. Insert the enclosed CD, and go to CD-ROM Drive
USER MANUAL SlimComputer
 USER MANUAL SlimComputer 1 Contents Contents...2 What is SlimComputer?...2 Introduction...3 The Rating System...3 Buttons on the Main Interface...5 Running the Main Scan...8 Restore...11 Optimizer...14
Introduction to Windows XP Operating System
 Introduction to Windows XP Operating System Introduction to Windows XP Operating System Document Syllabus Course Description: This workshop will introduce basic Windows operating system concepts. Using
VISUAL QUICK START GUIDE ADOBE CONNECT PRO 8
 VISUAL QUICK START GUIDE ADOBE CONNECT PRO 8 Getting started with Adobe Connect meetings Create and Access Your Meetings 1. Navigate to : https://brookdalecc.adobeconnect.com in your web browser. 2. Log
Handout: Word 2010 Tips and Shortcuts
 Word 2010: Tips and Shortcuts Table of Contents EXPORT A CUSTOMIZED QUICK ACCESS TOOLBAR... 2 IMPORT A CUSTOMIZED QUICK ACCESS TOOLBAR... 2 USE THE FORMAT PAINTER... 3 REPEAT THE LAST ACTION... 3 SHOW
Step One. Step Two. Step Three USING EXPORTED DATA IN MICROSOFT ACCESS (LAST REVISED: 12/10/2013)
") USING EXPORTED DATA IN MICROSOFT ACCESS (LAST REVISED: 12/10/2013) This guide was created to allow agencies to set up the e-data Tech Support project s Microsoft Access template. The steps below have been
USING EXPORTED DATA IN MICROSOFT ACCESS (LAST REVISED: 12/10/2013) This guide was created to allow agencies to set up the e-data Tech Support project s Microsoft Access template. The steps below have been
SMART BOARD USER GUIDE FOR PC TABLE OF CONTENTS I. BEFORE YOU USE THE SMART BOARD. What is it?
 SMART BOARD USER GUIDE FOR PC What is it? SMART Board is an interactive whiteboard available in an increasing number of classrooms at the University of Tennessee. While your laptop image is projected on
owncloud Configuration and Usage Guide
 owncloud Configuration and Usage Guide This guide will assist you with configuring and using YSUʼs Cloud Data storage solution (owncloud). The setup instructions will include how to navigate the web interface,
HP CLASSROOM MANAGER. Empowering teachers, engaging students. QuickStart Guide for Teachers
 HP CLASSROOM MANAGER Empowering teachers, engaging students QuickStart Guide for Teachers Copyright 2011 Hewlett-Packard Development Company, L.P. The information contained herein is subject to change
User Guide for Windows 10
 User Guide for Windows 10 System requirements E10684 First Edition July 2015 To facilitate a smoother transition from your previous operating system, read the system requirements below before upgrading
Introduction To Microsoft Office PowerPoint 2007. Bob Booth July 2008 AP-PPT5
 Introduction To Microsoft Office PowerPoint 2007. Bob Booth July 2008 AP-PPT5 University of Sheffield Contents 1. INTRODUCTION... 3 2. GETTING STARTED... 4 2.1 STARTING POWERPOINT... 4 3. THE USER INTERFACE...
Table of Contents. Speedi WIN Online Page 1 of 44 Speedi-WIN Online Install Instructions
 Speedi WIN Online Page 1 of 44 Speedi-WIN Online Install Instructions Table of Contents Logging on to Speedi-WIN Online... 3 Installing Citrix Receiver... 7 Launching Speedi-WIN Online... 11 Existing Speedi-WIN
VHS2DVD Wizard User's Manual
 VHS2DVD Wizard User's Manual Table of Contents 1. Installation Instructions a. Installation Package Contents b. Installation Instructions c. Setting Up the Computer for Video Capturing i. Adjust the Screen
SnagIt Add-Ins User Guide
 Version 8.1 User Guide By TechSmith Corp. User Guide User Guide Contents User s Guide 1 Overview...1 Word, PowerPoint, and Excel Add-Ins...2 Outlook Add-In...2 Internet Explorer / Windows Explorer Add-In...2
ACS CLIENT SOFTWARE USER MANUAL
 ACS CLIENT SOFTWARE USER MANUAL 1 ACS USER GUIDE 1.1 System Requirement Recommended System Requirement OS CPU VGA RAM HDD WindowXP, Vista Pentium 4, 2Ghz 1024*768, 64MB 24bit color graphic card 1GB 20MB
Microsoft Word 2010. Revising Word Documents Using Markup Tools
 Microsoft Word 2010 Revising Word Documents Using Markup Tools Preface Word provides several markup tools that make document collaboration easy. Color coding, highlighting, and the ability maintain multiple
LevelOne MUS-1001. 1GB Smart Flash. User Manual V1.0.0-0610
 LevelOne MUS-1001 1GB Smart Flash User Manual V1.0.0-0610 CONTENT CHAPTER 1 INTRODUCTION...4 1.1 About this Manual...4 1.2 Support Services...5 CHAPTER 2 PRODUCT OVERVIEW...6 2.1 Package Contents...6 2.2
IT Quick Reference Guides Using Windows 7
 IT Quick Reference Guides Using Windows 7 Windows Guides This sheet covers many of the basic commands for using the Windows 7 operating system. WELCOME TO WINDOWS 7 After you log into your machine, the
Vodafone PC SMS 2010. (Software version 4.7.1) User Manual
 User Manual") Vodafone PC SMS 2010 (Software version 4.7.1) User Manual July 19, 2010 Table of contents 1. Introduction...4 1.1 System Requirements... 4 1.2 Reply-to-Inbox... 4 1.3 What s new?... 4 2. Installation...6
Vodafone PC SMS 2010 (Software version 4.7.1) User Manual July 19, 2010 Table of contents 1. Introduction...4 1.1 System Requirements... 4 1.2 Reply-to-Inbox... 4 1.3 What s new?... 4 2. Installation...6
Microsoft PowerPoint 2010
 Microsoft PowerPoint 2010 Starting PowerPoint... 2 PowerPoint Window Properties... 2 The Ribbon... 3 Default Tabs... 3 Contextual Tabs... 3 Minimizing and Restoring the Ribbon... 4 The Backstage View...
DIGICLIENT 8.0 Remote Agent Software
 DIGICLIENT 8.0 Remote Agent Software MODEL: D17800 Series Instruction Manual English Version 1.0 Copyright 2007 Digimerge Technologies Inc Table of Contents Table of Contents About the DigiClient 8.0...
How To Use Senior Systems Cloud Services
 Senior Systems Cloud Services In this guide... Senior Systems Cloud Services 1 Cloud Services User Guide 2 Working In Your Cloud Environment 3 Cloud Profile Management Tool 6 How To Save Files 8 How To
Copyright JAVS 1981-2010
 2 About This Manual This manual will provide a comprehensive look at the JAVS Viewer 7 and Viewer 7 Pro software applications. The first part of the manual will cover Viewer 7 and its features followed
Sanako Study 1200 USER GUIDE
 Sanako Study 1200 USER GUIDE Copyright 2015 Sanako Corporation. All rights reserved. Microsoft is a registered trademark. Microsoft Windows Vista, Windows 7 and Windows 8 are trademarks of Microsoft Corporation.
WebEx. Remote Support. User s Guide
 WebEx Remote Support User s Guide Version 6.5 Copyright WebEx Communications, Inc. reserves the right to make changes in the information contained in this publication without prior notice. The reader should
Load Bulletin ADP, Inc. Dealer Services 1950 Hassell Road Hoffman Estates, IL 60169-6308
 Load Bulletin ADP, Inc. Dealer Services 1950 Hassell Road Hoffman Estates, IL 60169-6308 Make sure the media label contains this number: NP-ASP-AE1.0 ADP Network Phone ASP Assistant Enterprise Loading
WebEx Remote Access User s Guide
 About This Guide This guide introduces you to WebEx Remote Access and its features. This guide assumes that you have a user account for your Remote Access service. Note To obtain a user account, contact
ASUS WebStorage Client-based for Windows [Advanced] User Manual
![ASUS WebStorage Client-based for Windows [Advanced] User Manual](/thumbs/40/21159954.jpg "ASUS WebStorage Client-based for Windows [Advanced] User Manual") ASUS WebStorage Client-based for Windows [Advanced] User Manual 1 Welcome to ASUS WebStorage, your personal cloud space Our function panel will help you better understand ASUS WebStorage services. The
ASUS WebStorage Client-based for Windows [Advanced] User Manual 1 Welcome to ASUS WebStorage, your personal cloud space Our function panel will help you better understand ASUS WebStorage services. The
Skype for Business User Guide
 Skype for Business User Guide Contents Accessing Skype for Business... 2 Starting Skype for Business on your desktop... 2 Subsequent access to Skype for Business... 3 Changing Skype for Business startup
Getting Started with WebEx Access Anywhere
 Getting Started with WebEx Access Anywhere This guide provides basic instructions to help you start using WebEx Access Anywhere quickly. This guide assumes that you have a user account on your meeting
Getting Started with Microsoft Office Live Meeting. Published October 2007 Last Update: August 2009
 Getting Started with Microsoft Office Live Meeting Published October 2007 Last Update: August 2009 Information in this document, including URL and other Internet Web site references, is subject to change
Installing Lync. Configuring and Signing into Lync
 Microsoft Lync 2013 Contents Installing Lync... 1 Configuring and Signing into Lync... 1 Changing your Picture... 2 Adding and Managing Contacts... 2 Create and Manage Contact Groups... 3 Start an Instant
Salesforce Classic Guide for iphone
 Salesforce Classic Guide for iphone Version 37.0, Summer 16 @salesforcedocs Last updated: July 12, 2016 Copyright 2000 2016 salesforce.com, inc. All rights reserved. Salesforce is a registered trademark
Operating Systems. and Windows
 Operating Systems and Windows What is an Operating System? The most important program that runs on your computer. It manages all other programs on the machine. Every PC has to have one to run other applications
User Guide. Laplink Software, Inc. User Guide MN-LLE-EN-05 (REV. 2/2010) h t t p : / / w w w. l a p l i n k. c o m / h e l p
 h t t p : / / w w w. l a p l i n k. c o m / h e l p") 1 Laplink Software, Inc. Customer Service/Technical Support: Web: http://www.laplink.com/help E-mail: CustomerService@laplink.com User Guide Laplink Software, Inc. 14335 NE 24th Street, Suite 201 Bellevue,
1 Laplink Software, Inc. Customer Service/Technical Support: Web: http://www.laplink.com/help E-mail: CustomerService@laplink.com User Guide Laplink Software, Inc. 14335 NE 24th Street, Suite 201 Bellevue,
Getting Started with Microsoft Office Live Meeting. Published October 2007
 Getting Started with Microsoft Office Live Meeting Published October 2007 Information in this document, including URL and other Internet Web site references, is subject to change without notice. Unless
OFFICE KEYBOARD (MT1210 & MT1405) OFFICE FEATURES
 OFFICE FEATURES") OFFICE KEYBOARD (MT1210 & MT1405) OFFICE FEATURES Thank you for purchasing OFFICE KEYBOARD. This User s manual contains all information that helps you to operate your keyboard. Please keep the software
OFFICE KEYBOARD (MT1210 & MT1405) OFFICE FEATURES Thank you for purchasing OFFICE KEYBOARD. This User s manual contains all information that helps you to operate your keyboard. Please keep the software
WebEx Meeting Center User's Guide
 WebEx Meeting Center User's Guide Table of Contents Accessing WebEx... 3 Choosing the scheduler that works for you... 6 About the Quick Scheduler Page... 6 About the Advanced Scheduler... 8 Editing a scheduled
Maxtor OneTouch User's Guide
 EXTERNAL HARD DRIVE Maxtor OneTouch User's Guide TM II P/N:20259600 i Contents 1 Introduction................................................. 1 Maxtor OneTouch II Drive Components............................
Chief Architect X6. Download & Installation Instructions. Chief Architect, Inc. 6500 N. Mineral Dr. Coeur d Alene, Idaho 83815 www.chiefarchitect.
 Chief Architect X6 Download & Installation Instructions Chief Architect, Inc. 6500 N. Mineral Dr. Coeur d Alene, Idaho 83815 www.chiefarchitect.com Contents Chapter 1: Installation What s Included with
Toolbar User Guide. Release 17.0
 Toolbar User Guide Release 17.0 Cox Communications Policies Terms and Conditions Customer Obligations/911 Disclaimer Refer to item (8) of the Cox Communications Policies, Terms and Conditions, Customer
Quick Reference Guide 1 Lync for Mac 2011 Using Lync 2011 Client
 Quick Reference Guide 1 Lync for Mac 2011 Using Lync 2011 Client r Lync for Mac 2011 is the latest instant messaging (IM) client from Microsoft for the Macintosh platform and is the upgrade to Microsoft
13 Managing Devices. Your computer is an assembly of many components from different manufacturers. LESSON OBJECTIVES
 LESSON 13 Managing Devices OBJECTIVES After completing this lesson, you will be able to: 1. Open System Properties. 2. Use Device Manager. 3. Understand hardware profiles. 4. Set performance options. Estimated
Icecream Screen Recorder. User Manual
 Icecream Screen Recorder User Manual 2016 1. Overview System Requirements OS Icecream Screen Recorder is compatible with the following versions of Windows: Windows Vista, Windows 7, Windows 8 and Windows
Getting Started on the Computer With Mouseaerobics! Windows XP
 This handout was modified from materials supplied by the Bill and Melinda Gates Foundation through a grant to the Manchester City Library. Getting Started on the Computer With Mouseaerobics! Windows XP
Welcome to Bridgit @ CSU The Software Used To Data Conference.
 Welcome to Bridgit @ CSU The Software Used To Data Conference. Overview SMART Bridgit software is a client/server application that lets you share programs and information with anyone, anywhere in the world.
Digital telephony. Softphone Getting Started Guide. Business Edition TEL-GDA-AFF-002-0902
 Digital telephony Business Edition Softphone Getting Started Guide TEL-GDA-AFF-002-0902 Contents ABOUT THIS GUIDE 3 911 EMERGENCY SERVICES 3 DOWNLOADING THE SOFTWARE 3 CONFIGURING THE SOFTWARE 5 INITIALIZING
Personal Call Manager User Guide. BCM Business Communications Manager
 Personal Call Manager User Guide BCM Business Communications Manager Document Status: Standard Document Version: 04.01 Document Number: NN40010-104 Date: August 2008 Copyright Nortel Networks 2005 2008
Event Record Monitoring and Analysis Software. Software Rev. 3.0 and Up. User s Guide
 Event Record Monitoring and Analysis Software Software Rev. 3.0 and Up User s Guide 2 Contents Contents Chapter 1: About ERMAWin 4 Chapter 2: Overview 5 About this Manual 5 System Requirements 5 Installing
Hot Spot (Unsecured) Wireless Access Initial Setup and Login for MCC_HOTSPOT
 Wireless Access Initial Setup and Login for MCC_HOTSPOT") CLIENT INSTRUCTIONS PRIMARY KNOWLEDGE AREA Hot Spot (Unsecured) Wireless Access Initial Setup and Login for MCC_HOTSPOT Wireless Windows XP service pack 2 Purpose: Wireless Initial Setup sets the parameters
CLIENT INSTRUCTIONS PRIMARY KNOWLEDGE AREA Hot Spot (Unsecured) Wireless Access Initial Setup and Login for MCC_HOTSPOT Wireless Windows XP service pack 2 Purpose: Wireless Initial Setup sets the parameters
Microsoft Lync 2010 The Essentials
 Microsoft Lync 2010 The Essentials Training User Guide Syed Ali Raza Director IT NUML Email : saraza@numls.edu.pk Engr Fazal-i-Hassan UC Specialist Email : fhassan@numls.edu.pk August 29, 2011 MICROSOFT
MS Live Communication Server managed by TELUS. Getting Started Guide. v. 1.0
 MS Live Communication Server managed by TELUS Getting Started Guide v. 1.0 Table of Contents Getting Connected...1 Managing Contacts...2 Searching for a Contact...2 Adding a Contact to Your Contacts List...2
RingCentral for Desktop. UK User Guide
 RingCentral for Desktop UK User Guide RingCentral for Desktop Table of Contents Table of Contents 3 Welcome 4 Download and install the app 5 Log in to RingCentral for Desktop 6 Getting Familiar with RingCentral
Symantec Enterprise Vault
 Symantec Enterprise Vault Guide for Microsoft Outlook 2003/2007 Users 10.0 Light Outlook Add-In Symantec Enterprise Vault: Guide for Microsoft Outlook 2003/2007 Users The software described in this book
THE GOVERNMENT OF THE REPUBLIC OF SINGAPORE MINISTRY OF MANPOWER WP ONLINE. Technical Guidelines
 THE GOVERNMENT OF THE REPUBLIC OF SINGAPORE MINISTRY OF MANPOWER WP ONLINE Technical Guidelines Last Updated: 12-July-2013 Content 1. Technical Guidelines... 3 1.1 Minimum PC Configuration... 4 1.2 Internet
Introduction to MS WINDOWS XP
 Introduction to MS WINDOWS XP Mouse Desktop Windows Applications File handling Introduction to MS Windows XP 2 Table of Contents What is Windows XP?... 3 Windows within Windows... 3 The Desktop... 3 The
User s Guide for Polycom CX7000 Systems
 User s Guide for Polycom CX7000 Systems 1.1 August 2012 3725-63878-001/C Trademark Information Polycom, the Polycom Triangles logo, and the names and marks associated with Polycom s products are trademarks
NVMS - 1000 USER MANUAL. Version 2.1.0
 NVMS - 1000 USER MANUAL Version 2.1.0 Contents 1 Software Introduction... 1 1.1 Summary... 1 1.2 Operation Environment... 1 1.3 Install and Uninstall... 2 1.3.1 Install the Software... 2 1.3.2 Uninstall
Avaya one-x Mobile User Guide for iphone
 Avaya one-x Mobile User Guide for iphone 18-602788 Issue 1 February 2008 2008 Avaya Inc. All Rights Reserved. Notice While reasonable efforts were made to ensure that the information in this document was
NDA-30141 ISSUE 1 STOCK # 200893. CallCenterWorX-Enterprise IMX MAT Quick Reference Guide MAY, 2000. NEC America, Inc.
 NDA-30141 ISSUE 1 STOCK # 200893 CallCenterWorX-Enterprise IMX MAT Quick Reference Guide MAY, 2000 NEC America, Inc. LIABILITY DISCLAIMER NEC America, Inc. reserves the right to change the specifications,
Simple Computer Backup
 Title: Simple Computer Backup (Win 7 and 8) Author: Nancy DeMarte Date Created: 11/10/13 Date(s) Revised: 1/20/15 Simple Computer Backup This tutorial includes these methods of backing up your PC files:
Embroidery Fonts Plus ( EFP ) Tutorial Guide Version 1.0505
 Tutorial Guide Version 1.0505") Embroidery Fonts Plus ( EFP ) Tutorial Guide Version 1.0505 1 Contents Chapter 1 System Requirements.................. 3 Chapter 2 Quick Start Installation.................. 4 System Requirements................
Embroidery Fonts Plus ( EFP ) Tutorial Guide Version 1.0505 1 Contents Chapter 1 System Requirements.................. 3 Chapter 2 Quick Start Installation.................. 4 System Requirements................
ENLTV-FM3. PCI TV Tuner Adapter with FM Radio. User s Guide
 ENLTV-FM3 PCI TV Tuner Adapter with FM Radio User s Guide User s Notice No part of this manual, including the products and software described in it, may be reproduced, transmitted, transcribed, stored
HP WEBCAM 3100 HP WEBCAM 3110 USER S GUIDE
 HP WEBCAM 3100 HP WEBCAM 3110 USER S GUIDE Version 1.0.EN Part number: 603528-001 Copyright 2010 Hewlett-Packard Development Company, L.P. The information contained herein is subject to change without
Charter Business Desktop Security Administrator's Guide
 Charter Business Desktop Security Administrator's Guide Table of Contents Chapter 1: Introduction... 4 Chapter 2: Getting Started... 5 Creating a new user... 6 Recovering and changing your password...
User guide. Tax & Accounting. Version 4.1. Last updated April 16, 2010. Copyright 2010 Thomson Reuters/ONESOURCE. All Rights Reserved
 Onesource Fileroom User guide Version 4.1 Last updated April 16, 2010 Tax & Accounting Copyright 2010 Thomson Reuters/ONESOURCE. Proprietary Materials No use of these Proprietary materials is permitted
Using your Bluetooth laptop with the Logitech wireless hub
 Using your Bluetooth laptop with the Logitech wireless hub 2003 Logitech, Inc. Contents Introduction 3 Product compatibility 3 About this guide 4 Get connected 5 Connecting your Bluetooth laptop 5 Checking
Microsoft Migrating to PowerPoint 2010 from PowerPoint 2003
 In This Guide Microsoft PowerPoint 2010 looks very different, so we created this guide to help you minimize the learning curve. Read on to learn key parts of the new interface, discover free PowerPoint
Esi-Mail. Setup and User s Guide. Visit http://www.esiusers.com for up-to-date help. 0450-0479 Rev. A
 Esi-Mail Setup and User s Guide 0450-0479 Rev. A Visit http://www.esiusers.com for up-to-date help. Table of contents Introduction... 1 About this guide... 1 System requirements... 2 ESI hardware requirements...
How To Use The Workstation Program On A Pc Or Mac Or Macbook Or Macintosh (Aero) With A Computer Or Ipa (A2) With An Ipa Or Ipad (A3) With The Powerpoint 2.
 With A Computer Or Ipa (A2) With An Ipa Or Ipad (A3) With The Powerpoint 2.") Mirasys NVR 6.1 User s Guide CONTENTS Contents... 2 Before you start... 3 Introduction... 6 Logging in... 9 User interface... 13 Navigator... 16 Cameras... 25 Video outputs... 41 Digital outputs... 46
Mirasys NVR 6.1 User s Guide CONTENTS Contents... 2 Before you start... 3 Introduction... 6 Logging in... 9 User interface... 13 Navigator... 16 Cameras... 25 Video outputs... 41 Digital outputs... 46
SQL Server 2005: Report Builder
 SQL Server 2005: Report Builder Table of Contents SQL Server 2005: Report Builder...3 Lab Setup...4 Exercise 1 Report Model Projects...5 Exercise 2 Create a Report using Report Builder...9 SQL Server 2005:
All Rights Reserved. Copyright 2006
 All Rights Reserved Copyright 2006 The use, disclosure, modification, transfer, or transmittal of this work for any purpose, in any form, or by any means, without the written permission of the copyright
MAXTOR ONETOUCH III MINI EDITION FOR WINDOWS VISTA. User s Guide
 MAXTOR ONETOUCH III MINI EDITION FOR WINDOWS VISTA User s Guide MAXTOR ONETOUCH III MINI EDITION WINDOWS VISTA USER S GUIDE Contents Windows Installation Introduction...................................................
Using Microsoft Office XP Advanced Word Handout INFORMATION TECHNOLOGY SERVICES California State University, Los Angeles Version 1.
 Using Microsoft Office XP Advanced Word Handout INFORMATION TECHNOLOGY SERVICES California State University, Los Angeles Version 1.0 Spring 2004 Contents Advanced Microsoft Word XP... 3 Customizing Word
Backups User Guide. for Webroot SecureAnywhere Essentials Webroot SecureAnywhere Complete
 Backups User Guide for Webroot SecureAnywhere Essentials Webroot SecureAnywhere Complete Webroot Software, Inc. 385 Interlocken Crescent Suite 800 Broomfield, CO 80021 www.webroot.com Version 8.0.1 Webroot
USING SKYPE FOR BUSINESS USER S GUIDE
 U N I V E R S I T Y O F S O U T H E R N C A L I F O R N I A USING SKYPE FOR BUSINESS USER S GUIDE OCTOBER 2015 U N I V E R S I T Y O F S O U T H E R N C A L I F O R N I A 2015 UNIVERSITY OF SOUTHERN CALIFORNIA.
For Organizers (Hosts) at OSU
 at OSU") Adobe Connect Pro 9.1 Overview For Organizers (Hosts) at OSU Getting Started 1. Access Adobe Connect Pro Central via this URL: http://oregonstate.adobeconnect.com 2. Login using your email address and
Adobe Connect Pro 9.1 Overview For Organizers (Hosts) at OSU Getting Started 1. Access Adobe Connect Pro Central via this URL: http://oregonstate.adobeconnect.com 2. Login using your email address and
Premier Installation 2013.1 Guide for SQL Server Administrators
 for Depreciation, Tracking, Planning, and Reporting Premier Installation 2013.1 Guide for SQL Server Administrators Premier Installation Guide Version 2013.1 Contents Chapter 1. Introduction Supported