Marking Films and C.A.S. Decoration Application Guide
|
|
|
- Kenneth Robertson
- 7 years ago
- Views:
Transcription

1 Marking Films and C.A.S. Decoration Application Guide
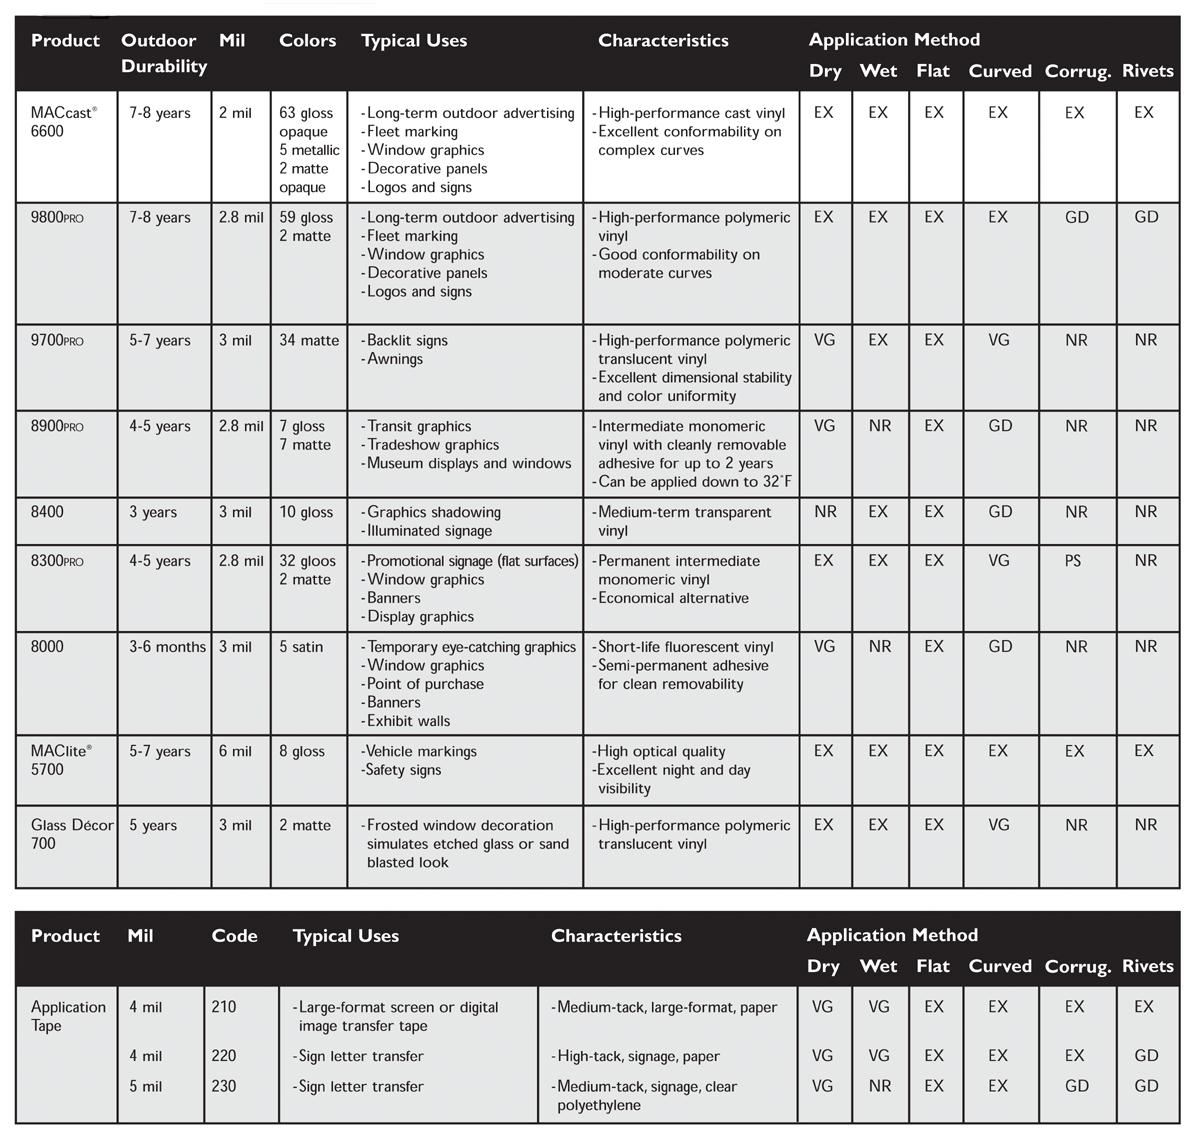
2 High Performance Films Typical Applications: Fleet & Container Markings 5-8 Years Long Life Exterior or Interior Markings Decorative & Vehicle Striping Window Graphics Decorative Panels Illuminated Signs Awnings & Scrims Thermal Transfer Printing 6600 x x x x x 9800Pro x x x x x 9700Pro x x x x x Glass Décor 700 x MAClite 5700 x x x x x Intermediate and Specialty Films 2-3 Years Intermediate Life Exterior or Interior Markings Typical Applications: Promotional Launches Exhibition Displays Short Term Vehicle Markings Window Graphics Short Term (6-12 months) Banners Thermal Transfer Printing MACal 8300Pro x x x x x x MACal 8900Pro x x x x x MACal 8400 x x x x MACal 8000 (6-month) x x x 2
3 2. Storage Mactac provides a two-year storage capability for MACmark films on condition that it has been kept at temperatures between F (15 to 25 C) and at a humidity of 40 to 60%. Temperature F (15 25 C) Humidity 40 60% Avoid directly exposing the vinyl to high temperatures (near radiators, in direct sunlight, etc.) OK NOT OK Any partly used rolls should be kept upright or hung on racks. At no time should they be placed on their sides as this could lead to a large matt section appearing throughout the entire roll. 3
4 3. Cutting out shapes OK NOT OK Use a knife with a sharp blade. Blunt or worn knives will result in untidy cuts (known as jagged edging ). OK Knife MACmark Vinyl Adhesive Backing Cut to the correct depth. The knife should cut all the way through the vinyl and the adhesive. NOT OK Knife If the cut is not deep enough (the vinyl and/or if the adhesive is not cut all the way through), the letters and logos that you have cut out could be pulled away during stripping. NOT OK Knife If cuts are too deep, then the backing could split when the letters or logos are being transferred onto the tape. NOT OK Applying too much pressure when using a blunt knife could result in the knife bouncing off the backing paper, which means that the adhesive will not be cut all the way through. 4
5 4. Weeding your graphic: Maximum 1 hour Temperature : F (15-23 C) Mactac recommends weeding as soon as the shapes have been cut out. This is because the thickness of the adhesive layer could result in it resealing itself if the vinyl is left for several hours before weeding, or if it has been exposed to temperatures above 78 F(25 C). ±30 For best weeding results, use a peeling angle of approximately 30 and pull at a steady speed. 5
6 5. Applying Application Tape: The application tape should preferably be laminated using a laminator. If this is not possible, then use the following procedure: 1. Adhesive side Roll theat out on a table with the adhesive facing upwards. Cut a band wider than the lettering/ logo to be transferred. 2. Squeegee Place the lettering / logo on the AT. Squeegee the reverse 2 1 Backing MACmark Vinyl side of the MACmark vinyl backing with a stiff plastic squeegee, working outwards from the center. 3. Needle Bubble MACmark Vinyl Backing Turn the layers over and prick any air bubbles trapped between the application tape and the vinyl using a needle or a cutter (bubbles could cause wrinkling when applying MACmark to your surface). 4. MACmark Vinyl Backing Cut the AT to the same size as the MACmark vinyl. To carry the MACmark vinyl with the AT on it to the place where it is to be applied, roll it up with a diameter of at least 3 inches, with the AT facing outwards, or carry it flat. 6
7 6. Surface Preparation: If the adhesive is not in good contact with a clean dry surface, it will not stick and results in premature failure. Even if they appear clean, all surfaces should be cleaned using the procedure below: Clean with soapy water, then rinse with clean water (do not leave any traces of soap on the surface). Clean away any petrochemical contaminates (tar, oil, grease, etc.) using a good automotive cleaner and wax remover. Wipe down with isopropyl alcohol. Dry the surface using a clean lint free, dry cloth or paper towel, before the isopropyl alcohol has had a chance to evaporate. 7. Applying MACmark vinyl to the substrate: A wet or dry application technique may be used. The method chosen should suit the size of the decorative feature to be applied and the complexity of the surface to be decorated. The dry application is the most reliable method. 7

8 7.1. Wet method: This method of application produces very little initial adhesion. This allows the user to position the vinyl where he or she wants and avoids air bubbles and folds. The adhesion will gradually increase after several hours as the water evaporates. The final adhesion will be reached after 24 or 48 hours. It is not advisable to apply MACmark vinyls using the wet method in temperatures lower than 60 F (15 C). Advantages of the wet method: Allows MACmark to be applied to surfaces in high ambient temperatures >78 90 F (>25-32 C). It makes it easier to apply large sections of MACmark on flat or slightly curved surfaces. Wet applications will go much faster and easier if a professional application fluid is used instead of soap and water. However, if soap is the only option then prepare a solution of soapy water with one capful, or less, of detergent to 5 gallons of water and pour it into a spray bottle. 8
9 2. Application Fluid Substrate Use the spray bottle to wet the entire substrate surface (do not use a sponge or a cloth as these can leave dust, fluff, etc.). 3. ±30 Backing Make sure the adhesive film is flat on a table. MACmark Pull the backing off it (and not the reverse) at an angle of Application Fluid MACmark Wet the adhesive all over using a spray bottle. 5. MACmark Surface Place MACmark graphic on the wet substrate surface. 9
10 6. ±3 inch 1 2 Squeegee Substrate Squeegee horizontally, working from the center outwards to the left and then the right stopping ±3 inches from the top edge of the vinyl. Apply enough pressure to squeeze out any water trapped between the MACmark adhesive and the substrate surface. (MACmark) Squeegee the last 3 inches of the top edge working from the center outwards, to the left and then the right. Continue to squeegee horizontally moving from the center outwards with overlapping movements. Check that no pockets of water have been trapped. If this is the case, scrape from the center to the edge in order to squeeze it out. Wipe the vinyl and the edges. 8. ±30 It is advisable to wait between 30 and 90 minutes MACmark (depending on the ambient temperature) before removing the application tape. Pull it off at a steady speed, at approximately 30. Substrate 9. Squeegee MACmark 24 hours later squeegee the film again, paying particular attention to the edges. Substrate 10
11 Dry method Dry application is a safer application method because the marking film reaches its final adhesion more quickly than during wet application. This application method should be used on three-dimensional surfaces that require the vinyl to be shaped (over rivet heads, corrugations, welded areas, etc.). The lowest temperature at which MACmark vinyls should be applied on flat or slightly curved surfaces is 50 F (10 C). The lowest temperature at which MACmark should be applied on three-dimensional surfaces, which require the vinyl to be shaped, is 65 F (18 C). Hot air will need to be used. Small surface areas (< 5 ft² or 0.5 m²) 1. Positioning Tape MACmark Surface Place the application tape on top of the lettering or logo. Position the lettering or the logo WITHOUT REMOVING THE BACKING, using positioning tape at each end. 2. MACmark Cut one edge of the positioning tape. Peel the backing off. Backing 11
 trapped between the MACmark and the substrate.")
12 Position the lettering or the logo once again on the spot marked by the piece of positioning tape. Squeegee quickly and firmly from the center outwards in overlapping movements. Pull the AT off at steady speed, at an angle 30. Prick any air bubbles (*) trapped between the MACmark and the substrate. (*) In the event that tiny bubbles of air get trapped between the MACmark vinyl and the substrate surface (bubbles that have a diameter <2-mm), there is no need to do anything since they will disappear of their own after few days thanks to the vinyl s porosity. If the bubbles are over 2 mm in diameter, use the following procedure: 1 - try to collect the bubbles together without putting the vinyl out of shape. 2 - prick the bubble at one end. 3- squeeze the air out from the side opposite the opening. 12

13 Large flat surfaces (>10ft² or 1 m²) : hinge method For surfaces of this kind, it is absolutely necessary to apply AT to the lettering or logo. Position the lettering or the logo WITHOUT REMOVING THE BACKING by using a piece of positioning tape at each end. Make a hinge perpendicular to the largest dimension of the letters or logo, no more than 1yd. (1m) away from any one of the edges. 3. Cut the positioning tape. Fold one half on top of the other. Remove and cut the backing as far as the hinge. 13

14 Fold the hinge back making sure that you leave a space between the MACmark vinyl and the substrate surface (angle of ±20 ) in order to avoid it sticking too soon. Squeegee firmly from the center outwards in overlapping movements. Repeat the same set of actions for the other section of the lettering or logo. Remove the AT at a steady speed, at a cleaving angle of between 0 and 30. Prick any air bubbles trapped between the MACmark and the substrate and squeegee once more. 14
15 3 dimensional surfaces : Rivets 1. ±3 cm MACmark 9800Pro Rivet Apply the MACmark, using the dry method described earlier, to the whole area of the surface of application, leaving a ±3 cm gap between the vinyl and the substrate, around rivets. 2. Remove the application tape at a steady speed and a cleaving angle of 0 to Collect the bubble around the rivet without putting the vinyl out of shape. Prick several holes in the vinyl around the rivet. 4. Squeeze out any air trapped between the MACmark and the rivet using your finger. Press the vinyl down hard around the rivet using a rivet brush or plastic squeegee and a heat gun or hot air blower (air temperature of ±300 C). 5. Cutter MACmark Finish off by cutting the MACmark around the rivet using a cutter. 15
16 3 dimensional surfaces: corrugations 1. Temperature angled surface : C The ambient temperature and the angled surface of the object must be between 18 and 25 C. Clean the substrate surface and remove any grease using isopropyl alcohol Tape MACmark 9800 Finger or Brush Tape MACmark 9800 Apply MACmark 9800Pro using application tape through the 3 dimensional surface. Use your finger or a stiff bristle nylon brush, (cut off to approximately ¾ ) along the lines of the corrugations to make the vinyl conform to the curved surface. The application tape is used to give more stability to the vinyl during the first stages of application. 16
17 4. MACmark 9800 Remove the AT. Prick and squeeze out any air bubbles that appear. 5. Once 100% of the vinyl is in contact with the surface, heat the vinyl with heat gun or hot air blower (air temperature: C). This reinforces the initial adhesion. The decoration should not be exposed to temperatures lower than 10 C during the first 3-4hours. If you need to apply a second color, leave the first MACmark 9800color applied for 20 to 30 minutes, then apply the second color. Using a double layer of vinyl increases the risk of the vinyl peeling off. Heat should be used, as described earlier, in order to minimize the chances of this happening. Adhesion to plastics such as ABS, PP or rubber is always difficult. Do not decorate surfaces of this kind if you require long-life decoration. 17
18 Finishing your Graphics 8.1 Seams 8.2 Applying Edge Sealer 8.3 Cleaning Seams will hold moisture and flex resulting in a pre-mature failure of your graphic. All seams must be be slit the entire length of the substrate. If the seam is caulked the graphic will not adhere. The section of the graphic must be cut and removed. Edge sealing is required wherever your graphic is going to be repeatedly exposed to liquids that will attach the adhesive, such as fuel, solvents, milk, etc. Using a ¼ brush and an edge sealing varnish, brush along the edge in smooth, continuous motion. Make sure the entire edge is sealed. Use a wet non-abrasive type cleaner. Similar to ones used for painted surfaces. Strong acid, strong alkaline or strong solvent cleaners will damage your graphics. 18
19 Removing the vinyl 1. Heat the vinyl to a temperature of F (70-80 C) using a hot air blower (air temperature of ±575 F or 300 C). 2. Peel off the MACmark in small pieces at a time. 3. Chemical products for easier vinyl removal are also available through your distributor in the shops. Follow the manufacturer s Instructions carefully. 4. Any residue of adhesive can be removed by rubbing with a towel soaked in isopropyl alcohol or adhesive remover. 19

20 20
21 For more information regarding Mactac products or graphic solutions, call , or visit and MAC1766 (11/14)
VC 104+ Rigid Grade / Rigid Grade Imagine VC 104 Rigid Grade Commercial Customised
 Page 1 of 6 instructions VC 104+ Rigid Grade / VC 104+ Rigid Grade Imagine / (for the rest of this document referred to as VC 104) can be applied to new and used trucks and trailers with painted rigid
Application Instructions for Avery Dennison Films SF100-843-S LTR EZ RS, Conform Chrome
 Application Instructions for Avery Dennison Films SF100-843-S LTR EZ RS, Conform Chrome Instructional Bulletin #4.00.2 (Revision 0) Dated: 04/05/2012 1.0 Consult Product Data Bulletin Before starting application,
Scotchgard Multi-Layer Protective Film 1004
 Scotchgard Multi-Layer Protective Film 1004 3 Technical Bulletin September, 2008 Scotchgard Multi-Layer Protective Film 1004 Application Kit (3M Part No. 70-0710-4666-1) includes: (clockwise) Heavy Duty
DASH KIT INSTALLATION
 ÿÿÿÿÿ ÿÿÿÿÿÿÿÿÿÿÿÿ ÿÿÿ ÿÿÿÿÿ ÿÿ ÿÿÿ ÿÿÿÿÿÿÿÿÿÿÿÿÿÿ ÿÿÿÿÿÿÿÿÿÿ ÿÿÿÿ ÿÿÿÿ ÿÿ ÿÿÿÿÿ ÿÿÿÿÿÿÿÿ PROUDLY MADE IN THE USA DASH KIT INSTALLATION These instructions are aimed at the do-it-yourself installer. Read
Surface Decoration. Design techniques used to put on the surface of the pottery. Slip Oxides Glaze Embossed Incised Wax on wet Altered from the wheel
 Surface Decoration Design techniques used to put on the surface of the pottery. Slip Oxides Glaze Embossed Incised Wax on wet Altered from the wheel Slip How to apply slip Colored slip is intended to add
INSTALLATION RECOMMENDATIONS. Outdoor Rubber Tiles
 INSTALLATION RECOMMENDATIONS Outdoor Rubber Tiles Prior to Installation: The Outdoor Rubber Tiles and accessory transition pieces intended for this installation have been shipped to you via a freight carrier
SCENIC VIEW SV 10 SECTION 08 87 13 SOLAR CONTROL FILMS
 PART 1 GENERAL SCENIC VIEW SV 10 SECTION 08 87 13 SOLAR CONTROL FILMS 1.1 SUMMARY A. Optically clear dual reflective, neutral sputtered and aluminum metallized polyester film for solar control. 1.2 RELATED
Sterile Dressing Change with Tegaderm CHG for Central Venous Catheter (CVC)
") Sterile Dressing Change with Tegaderm CHG for Central Venous Catheter (CVC) The dressing protects your catheter site. It also helps prevent infection at the site. Keep your dressing clean and dry at all
Sterile Dressing Change with Tegaderm CHG for Central Venous Catheter (CVC) The dressing protects your catheter site. It also helps prevent infection at the site. Keep your dressing clean and dry at all
Contents. Introduction... A Note About Heatsinks... Precautions...
 Contents Introduction... A Note About Heatsinks... Precautions... Application Instructions... Heatsink Preparation... CPU Preparation... Tinting the Heatsink and Metal cap... Applying Thermal Compound...
Solvent Cementing Instructions For Plastic Pipe & Fittings
 Solvent Cementing Instructions For Plastic Pipe & Fittings Description Solvent cementing is the process of fusing plastic pipe and fittings by the use of an adhesive containing a suitable active solvent
Marine Product Guide. Set Sail with Unlimited Graphic Opportunities. MACtac TAKES YOU THERE.
 Marine Product Guide Set Sail with Unlimited Graphic Opportunities. MACtac TAKES YOU THERE. Sublime Gloss & Matte White Ultramarine Blue Banana Yellow Vivid Blue Flash Orange Apple Green Spicy Red Green
Table of Contents Markers...1
 Table of Contents Markers...1 Introduction...1 Color Surge Paper...2 Color Surge\Neon Explosion/Glow Board/Color Wave Markers...3 Dry Erase Markers...9 Erasable Markers...15 Ice Markers...23 Markers...34
1. Initial Precautions 2. Technical Precautions and Suggestions 3. General Information and Cure Stages 4. Understanding and Controlling Cure Time
 How to apply Arctic Alumina Premium Ceramic Thermal Adhesive 1. Initial Precautions 2. Technical Precautions and Suggestions 3. General Information and Cure Stages 4. Understanding and Controlling Cure
Acrylic Walls Installation Instructions
 Acrylic Walls Installation Instructions IMPORTANT Please read carefully the following instructions before installing your shower acrylic walls. If you have any questions on this shower acrylic walls installation
Contents. Introduction... A Note About Heatsinks... Precautions...
 Contents Introduction... A Note About Heatsinks... Precautions... Application Instructions... Heatsink Preparation... CPU Preparation... Tinting the Heatsink... Applying Thermal Compound... Attaching the
FAQs. 19. Does the sub floor need to be level before I install my new direct-to-stud bathtub or shower base?
 1. Where is the serial number of my tub located? 2. What can I use to clean my tub or shower? 3. What is an Above Floor Rough-in? 4. Can I replace my towel bar? 5. What are grommets? 6. Why do some bathing
Tested to BS 6375: Part 1: 1989 and achieved a weathertightness classification of 2000 Pa (Special)
") THE B6 GLAZING SYSTEM GLAZING SYSTEMS FOR SEPTEMBER 2013 THE B6 HEEL BEAD SEAL SECURITY GLAZING SYSTEM Page 1 DESCRIPTION The B6 Heel Bead Seal Security Glazing System is suitable for installing all types
THE B6 GLAZING SYSTEM GLAZING SYSTEMS FOR SEPTEMBER 2013 THE B6 HEEL BEAD SEAL SECURITY GLAZING SYSTEM Page 1 DESCRIPTION The B6 Heel Bead Seal Security Glazing System is suitable for installing all types
QWALL 4 ACRYLIC SHOWER WALL INSTALLATION INSTRUCTIONS
 QWALL 4 ACRYLIC SHOWER WALL INSTALLATION INSTRUCTIONS IMPORTANT DreamLine TM reserves the right to alter, modify or redesign products at any time without prior notice. For the latest up-to-date technical
Recommended Procedures for Use of YSI Water Quality Monitoring Instruments during Oil Spills
 Recommended Procedures for Use of YSI Water Quality Monitoring Instruments during Oil Spills Overview: This is a guidance document that is intended for users of YSI 6-Series sondes and handheld instruments
BENTLEY ELEMENTS COLLECTION LVT
 This document refers to the following products: Product Size Installation direction Seams treatment Elements Tiles See specifications 90 None Elements Planks See specifications Stair Step None Note: This
BUTTERFLY SHOWER DOOR INSTALLATION INSTRUCTIONS
 BUTTERFLY SHOWER DOOR INSTALLATION INSTRUCTIONS IMPORTANT DreamLine reserves the right to alter, modify or redesign products at any time without prior notice. For the latest up-to-date technical drawings,
Sikaflex Sealant Installation. Sika Corporation
 Sikaflex Sealant Installation 1 Critical Success Factors Substrate preparation If done properly would probably eliminate 95% of all call backs Most common mode of sealant failure Must remove all weak material
Selection, Use, and Care of Brushes
 Wood Finishing & Refinishing Fact Sheet #2 Selection, Use, and Care of Brushes Dr. Leona K. Hawks Home Furnishings and Housing Specialist 1995 HI 22 Good results in wood refinishing depend to a large extent
Armstrong Do-It-Yourself Tile Installation System
 Armstrong Do-It-Yourself Tile Installation System What tools will I need to install my tile floor? You'll need just the basics: - floor tile (make sure you have enough tile to finish the job) - adhesive
Shower Walls and Tub Surrounds
 Reverso en español TEC Skill Set How-To Project Guide Shower Walls and Tub Surrounds 3 Steps to a Beautiful Tile Surface! 1. Prepare the surface 2. Set the tile 3. Grout and caulk H.B. Fuller Construction
OLD BRICK ORIGINALS KILN-FIRED THIN BRICK VENEER Installation Guide. GeneralShale.com
 OLD BRICK ORIGINALS KILN-FIRED THIN BRICK VENEER Installation Guide GeneralShale.com OLD BRICK ORIGINALS THIN BRICK VENEER Page 2 INTRODUCTION Check local building codes for proper installation guidelines
How to become an Operation Christmas Child Shoe Box Character
 How to become an Operation Christmas Child Shoe Box Character SUPPLIES A large rectangular box (to look like a shoe box) Cardboard or foam strips, 2 wide, for the lid Large printed Boy or Girl shoe box
How to Install Drop Ceiling Panels
 How to Install Drop Ceiling Panels Both Ceilume s 0.013 thick Feather-Light and 0.030 thick Signature Ceiling Tiles can be installed in an approved ceiling suspension system using standard 15/16 face T-bar
Minor Cracks in Horizontal Surfaces
 Cracks, chips and broken or flaking areas in concrete are not only unsightly, they can lead to further deterioration of the surface. The result is a costly replacement project as opposed to a simple repair.
Tractor Painting Tips
 Keeping your tractor or equipment well kept & free from rust & corrosion will extend the life of your investment & help retain its value for a longer period of time. It can be difficult, in many cases,
Pipe and Equipment Insulations. Zeston. PVC Insulated Fitting Covers Installation Instructions for Hot, Cold and USDA Piping Systems
 Pipe and Equipment Insulations Zeston PVC Insulated Fitting Covers Installation Instructions for Hot, Cold and USDA Piping Systems Zeston PVC Insulated Fitting Covers Installation Instructions for Hot,
Installing Window Trim and Door Trim
 Installing Window Trim and Door Trim Tools and Supplies You'll Need Screws or Finish Nails use screws or nails that are long enough to go through the Ledger and firmly attach to the wall behind it. If
Brisa UV Gel Enhancements Sculpted on a Tip
 Step-by-Step Guide Brisa UV Gel Enhancements Sculpted on a Tip 90 MIN A service designed for problem nails with no natural nail extension edge, requiring length and re-design. STEP 1: P.R.E.P. f. Apply
BLADE REPAIR INSTRUCTION BOOKLET
 BLADE REPAIR INSTRUCTION BOOKLET Contents Section I: Section II: Section III: Section IV: Section V: Section VI: Removing a Blade Refer to this section if you need to remove the blade from an oar shaft.
3M Thermally Conductive Adhesive Transfer Tapes
 Technical Data July 215 3M Thermally Conductive Adhesive Transfer Tapes 885 881 8815 882 Product Description 885, 881, 8815 and 882 are designed to provide a preferential heat-transfer path between heat-generating
FREEBIRD THE ORIGINAL D.I.Y. ORNITHOPTER! Tools and Glue. Required Materials
 Do not try to make your ornithopter using "household materials". If you want it to fly, you have to build it right. FREEBIRD THE ORIGINAL D.I.Y. ORNITHOPTER! Wingspan: 16 inches Weight: 1/4 ounce The Ornithopter
Vinyl Installation Guide. Everything You Need to Know
 Vinyl Installation Guide Everything You Need to Know SpeedGraphics.net 2000 Table of Contents Assumptions 3 Tools 3 Surface Preparation 4 Positioning 5 Installation 6 Hinge Free Horizontal and Vertical
Aspect Metal Peel & Stick Tile Installation Guide
 Aspect Metal Peel & Stick Tile Installation Guide Proper surface preparation is essential for a successful project Failure to follow recommended surface preparation instructions may void the warranty Read
DIY CABINET REFACING INSTALLATION GUIDE
 DIY CABINET REFACING INSTALLATION GUIDE CABINET REFACING INSTALLATION Are you ready to reface your outdated cabinets? This guide will show you how to install your new Facelifters Cabinet Refacing Products
Central Venous Catheter (CVC) Sterile Dressing Change - The James
 Sterile Dressing Change - The James") PATIENT EDUCATION patienteducation.osumc.edu Central Venous Catheter (CVC) Sterile Dressing Change - The James A dressing protects your catheter site and helps reduce the risk of infection. You will need
PATIENT EDUCATION patienteducation.osumc.edu Central Venous Catheter (CVC) Sterile Dressing Change - The James A dressing protects your catheter site and helps reduce the risk of infection. You will need
INSTALLATION INSTRUCTIONS FOR RIGID VINYL WALLCOVERING
 INSTALLATION INSTRUCTIONS FOR RIGID VINYL WALLCOVERING HIGH IMPACT, PROTECTIVE, STAIN-RESISTANT RIGID VINYL WALLCOVERING SHEETS FOR: HEALTHCARE/ELDERCARE FACILITIES LODGING & HOSPITALITY RETAIL ESTABLISHMENTS
Care and Operation of Your New Windows
 Care and Operation of Your New Windows Congratulations Alside Windows feature the trademarks of exceptional window design unsurpassed quality, functional beauty and maintenance freedom. We believe your
Construction. Sikadur-Combiflex. Sealing system for cracks and problem joints with large movements DESCRIPTION
 Sikadur-Combiflex REVISED JULY 2002 Sealing system for cracks and problem joints with large movements Construction DESCRIPTION USES ADVANTAGES The Sikadur-Combiflex joint sealing system consists of two
Tundra Series Windows January 2016
 Tundra Series Windows January 2016 New Construction Installation Instructions Nail Fin, J-Fin and Brickmold Aplications product. ATTENTION! Read and understand all installation instructions before installing
PR11 Plastic Repair, Adhesive
 Uniform Procedures For Collision Repair PR11 Plastic Repair, Adhesive 1. Description This procedure describes methods for making adhesive repairs to most types of exterior and interior automotive plastics.
PNEUMATIC - HIGH PRESSURE FLAT-FORM HEAVY LIFTING BAGS
 PLEASE READ AND UNDERSTAND THIS MANUAL BEFORE USING SAVA LIFTING BAGS PNEUMATIC - HIGH PRESSURE FLAT-FORM HEAVY LIFTING BAGS & INFLATION ACCESSORIES SAFETY, OPERATION AND MAINTENANCE INSTRUCTIONS NON-COMPLIANCE
FRAMED & MOUNTED TILE MURAL
 Page 1 of 5 There is no denying that tile murals have taken the sublimation industry by storm. The unique ability to take a customer s artwork or high resolution photograph, tile it using your software
Read and understand all installation instructions and precautions before installing. GENERAL APPLICATION INSTRUCTIONS
 AC TOPSEAL SELF-ADHERED, GRANULAR SURFACED, SINGLE PLY, LOW SLOPE ROLLED ROOFING 3 X 33.3 = 100 SQ. FT. 10 YEAR MATERIAL LIMITED WARRANTY For Use on Porches / Sheds / Utility Buildings / Accessory Buildings
GRAPHICS OWNERS MANUAL
 GRAPHICS OWNERS MANUAL 1 ABOUT CONTENTS FLEET GRAPHICS 4 VEHICLE WRAPS & GRAPHICS 6 Image Works Media is an established vinyl graphics company that provides products and services across North America.
GUIDE SPECIFICATION COMBINATION SURFACE SYSTEM FOR NEW HOT MIX ASPHALT TENNIS COURTS I. PART 1 - GENERAL
 COMBINATION SURFACE SYSTEM FOR NEW HOT MIX ASPHALT TENNIS COURTS I. PART 1 - GENERAL 1.1 SUMMARY A. This section is a part of the entire set of Contract Documents and shall be coordinated with the applicable
Removing paint. Project Guide. Difficulty. Experience/Time. Novice: 60 min. Experienced: 35 min. Pro: 20 min.
 Removing paint Difficulty Experience/Time Novice: 60 min. Experienced: 35 min. Pro: 20 min. Removing old paint can be challenging, however there are several options available to help make the process easier
You have just purchased the most portable and economical spray chrome system in the world!
 You have just purchased the most portable and economical spray chrome system in the world! The Chrome FX Gun comes attached directly to the pots making it extremely mobile and capable of performing on
Care and Maintenance for Wood Flooring
 Care and Maintenance for Wood Flooring The finishing technology used for Tarkett wood floorings makes them the best choice for easy maintenance. To preserve all the beauty of your Tarkett wood flooring,
Technical Data Sheet. Whiteboard Film 3M WH-111. Product Description. Product Characteristics. Revision G, September 2015
 Technical Data Sheet Revision G, September 2015 Product Description 3M, the Product, is a unique architectural finish with a writable and erasable surface that can be used to convert interior surfaces
GUIDELINES FOR HANDLING FABRICATION INSTALLATION AND CLEANING
 GUIDELINES FOR HANDLING FABRICATION INSTALLATION AND CLEANING TRANSPORTATION, RECEIVING & STORAGE Before unloading the truck, verify the weight of the cases/stoces and confirm that the handling equipment
PAINT. PAINTING WALLS... 115 -Interior Walls -Exterior Walls PAINTING DOORS... 117 CLEAN UP... 118
 PAINT PAINTING WALLS...... 115 -Interior Walls -Exterior Walls PAINTING DOORS... 117 CLEAN UP....... 118 112 Basic Construction Safety SAFETY TALK #1: Drink plenty of water and watch for dehydration! When
USER INSTRUCTIONS FOR 10 LITRE PORTABLE DEHUMIDIFIER MODEL NO. DHMD102
 USER INSTRUCTIONS FOR 10 LITRE PORTABLE DEHUMIDIFIER MODEL NO. DHMD102 THANK YOU FOR CHOOSING YOUR NEW DEHUMIDIFIER. BEFORE USING THE UNIT READ THESE INSTRUCTIONS FULLY AND RETAIN THEM FOR FUTURE REFERENCE
Vinyl Composition Tile Installation System
 Vinyl Composition Tile Installation System Product Gauge Size Vinyl No-Wax (Dry Back) Urethane No-Wax (Dry Back) 0.045" (1.1 mm) 0.080" (2.0 mm) IMPERIAL TEXTURE 0.094" (2.4 mm) STONETEX ChromaSpin COMPANION
Instructions for Using the Watch Works Tool Kit to Change a Watch Battery
 Instructions for Using the Watch Works Tool Kit to Change a Watch Battery Click on this link http://www.allamericanwatches.com/site/626101/product/e2306-a to purchase the Watch Battery Replacement Tool
SEAMS SEAMING USING SEAM TAPE
 SEAMING USING SEAM TAPE SEAMS The membrane should be positioned so that the width of the seam is 3. Remove excess chalk from a chalk line by snapping the line into the air and then chalk a line one-quarter
Installation System. Existing Resilient Sheet Floors
 Vinyl Composition Tile Installation System Product Adhesive/Full Spread Adhesive/Tile-On Comment Imperial Texture MultiColor RAVE Stonetex Companion Square Feature Tile/Strips ARTEFFECTS SAFETY ZONE Vinyl
Care and Handling of Your VAIO Computer
 Care and Handling of Your VAIO Computer Proper Handling Use your computer on a clean dry, stable surface. Use only specified peripheral equipment and interface cables or you may experience problems. When
Gear PEPSI CAN STOVE INSTRUCTIONS
 Gear PEPSI CAN STOVE INSTRUCTIONS [NOTE: Updated Instructions are now available. The new stove is less likely to develop flame leaks and the fuel/air mixture is improved. Instructions for a simmer ring
SEE HOW TO MAKE LIME PLASTER WHY USE LIME? PATTI STOUTER, BUILD SIMPLE INC. FEBRUARY 2013
 SEE HOW TO MAKE LIME PLASTER PATTI STOUTER, BUILD SIMPLE INC. FEBRUARY 2013 WHY USE LIME? Lime plaster forms a light, clean, and durable surface that is resistant to weather and mold. A thin layer attaches
K2 STONE NATURAL VENEER
 INTRODUCTION WHAT IS K2 NATURAL THINSTONE VENEER? Natural K2 Stone veneer is real stone, cut 1 inch thick, making it light enough to be installed as a veneer. Sometimes referred to as thin veneer, thin
CHARISMA SHOWER/TUB DOOR INSTALLATION INSTRUCTIONS
 CHARISMA SHOWER/TUB DOOR INSTALLATION INSTRUCTIONS IMPORTANT DreamLine reserves the right to alter, modify or redesign products at any time without prior notice. For the latest up-to-date technical drawings,
INSTRUCTIONS FOR USE HUMIRA 40 MG/0.8 ML SINGLE-USE PEN
 INSTRUCTIONS FOR USE HUMIRA (Hu-MARE-ah) (adalimumab) 40 MG/0.8 ML SINGLE-USE PEN Do not try to inject HUMIRA yourself until you have been shown the right way to give the injections and have read and understand
Sun Windows General Information Sun New Construction Window Installation Instructions
 Sun Windows General Information Section 1 G F H H H A. Apply Weather Resistive Barrier B. Apply Sill Flashing Tape C. Place Waterproof Sill Shims D. Caulk Back of Nail Fin Sides & Top, Set Window, Fasten
T R A N S F E R A B L E F U L LY
 HSTOPS A WALL OF WATER 22 FT. HIG! F U L LY T R A N S F E R A B L E RESISTS10 PSI ! 1 F U L LY T R A N S F E R A B L E HSTOPS A WALL OF WATER 22 FT. HIG RESISTS10 PSI Guaranteed To Stop Water Even Under
Reasons for reissue are in Section 6, REVISION SUMMARY.
 Figure 1 This instruction sheet covers the application of OPTIMATE FSMA Fiber Optic Connector Types 905 and 906 for data and telecommunications applications. Base part numbers which apply to each type
Commercial/Residential Linoleum Sheet Installation System
 Commercial/Residential Linoleum Sheet Installation System COMMERCIAL USE ONLY Product MARMORETTE GRANETTE COLORETTE UNI WALTON LINORETTE Gauge 0.080" (2.0 mm) 0.100" (2.5 mm) 0.125" (3.2 mm) 0.100" (2.5
Latex 3000 Tips and Tricks
 Latex 3000 Tips and Tricks Getting the best results with self-adhesive vinyl on the HP Latex 3000 printer Self-adhesive vinyl (SAV), otherwise known as pressure-sensitive adhesive (PSA) vinyl, or simply
Caring for Your PleurX Pleural Catheter
 Caring for Your PleurX Pleural Catheter A PleurX Pleural Catheter has been placed in your chest through a small incision in your skin into the pleural space (see picture below). This allows you to drain
IMAGINE trying to paint a picture without a canvas or a
 Identifying Floral Design Tools and Supplies IMAGINE trying to paint a picture without a canvas or a brush. Even with a wide variety of paints with which to work, you could not create the artwork without
INSTRUCTIONS FOR USE HUMIRA 40 MG/0.8 ML, 20 MG/0.4 ML AND 10 MG/0.2 ML SINGLE-USE PREFILLED SYRINGE
 INSTRUCTIONS FOR USE HUMIRA (Hu-MARE-ah) (adalimumab) 40 MG/0.8 ML, 20 MG/0.4 ML AND 10 MG/0.2 ML SINGLE-USE PREFILLED SYRINGE Do not try to inject HUMIRA yourself until you have been shown the right way
INSTRUCTION FOR ASSEMBLY. 150x180 v Traditional sauna cabin
 INSTRUCTION FOR ASSEMBLY 150x180 v Traditional sauna cabin 1. SAUNA PLAN 1800 LIGHT UNDER THE BENCH VENTILATION OUTLET UPPER BENCH 600 1500 LOWER BENCH 400 700 1656 956 HEATER 366 381 690 815 Light switch
WATERPROOFING OF REINFORCED CONCRETE FLAT ROOF 12
 WATERPROOFING OF REINFORCED CONCRETE FLAT ROOF 12 87 88 GOOD INDUSTRY PRACTICES 12 WATERPROOFING OF REINFORCED CONCRETE FLAT ROOF 12.1 BACKGROUND Most roofs in Singapore are constructed using reinforced
How to Install Hardwood Flooring Over a Sub Floor
 How to Install Hardwood Flooring Over a Sub Floor Installation Preparation Instructions Read the entire instructions before starting your project. 1) INSPECT EACH PLANK (see fig. a) Wood is a natural product
All About Clearstar Coatings
 All About Clearstar Coatings Liquid Laminates Clear Ultraviolet-Protective Coatings A Product Guide for our Customers Clearstar Coatings Corporation 811 Palm Blvd. Isle of Palms, SC 29451 1-888-253-2778
GARDEN WINDOW GLAZING AND DE-GLAZING INSTRUCTIONS
 GARDEN WINDOW GLAZING AND DE-GLAZING INSTRUCTIONS DE-GLAZING 1.) If there is any PVC cement covering the joints where external glazing bead strips meet, cut through the cement with a utility knife. 2.)
A. Work on this project shall consist of, but is not limited to, the following:
 PART 1 - GENERAL CLEANING AND RESTORATION OF SECTION 05900-1 1.1 SUMMARY A. Work on this project shall consist of, but is not limited to, the following: 1. Clean and treat all exposed anodized architectural
Adhesive Recommendation for Altro Flooring. Porous (absorbent) subfloors (most wood subfloors and some concrete)
 subfloors (most wood subfloors and some concrete)") Adhesive Recommendation for Altro Flooring Product Safety Sheet Flooring Smooth Sheet Flooring Porous (absorbent) subfloors (most wood subfloors and some concrete) Altrofix 30/31 (excessively heavy rolling
Adhesive Recommendation for Altro Flooring Product Safety Sheet Flooring Smooth Sheet Flooring Porous (absorbent) subfloors (most wood subfloors and some concrete) Altrofix 30/31 (excessively heavy rolling
NFLS-x Series Flexible LED Flexible Light Strip
 NFLS-x Series Flexible LED Flexible Strip Primary Features 12VDC operation. Applications Back ing Cove ing Task ing Simple Connection Steps Display Case ing Retail ing Sign Illumination Accent Decor ing
Hendricks 40m 15m SOTA EFHW Tuner
 Hendricks 40m 15m SOTA EFHW Tuner First, familiarize yourself with the parts and check for all the components. Parts Inventory 1 - Tayloe SWR Indicator kit 1 - T50-6 core (yellow), T94-2 (red) core not
Solids, Liquids, and Gases
 Solids, Liquids, and Gases nd Intended for Grade: 2 Grade Subject: Science Description: Activities to help students understand solids, liquids, gases, and the changes between these states. Objective: The
1300 West Bartlett Road Elgin, Illinois 60120-7529 Phone: (847) 741-5370 Fax: (847) 622-7077. SUBJECT: Pelican NP and NS Cab Glass Replacement
 741-5370 Fax: (847) 622-7077. SUBJECT: Pelican NP and NS Cab Glass Replacement") SERVICE BULLETIN Subsidiary of Federal Signal Corporation 1300 West Bartlett Road Elgin, Illinois 60120-7529 Phone: (847) 741-5370 Fax: (847) 622-7077 DATE: 08/07/2007 NUMBER: 0703146 SUBJECT: Pelican
SERVICE BULLETIN Subsidiary of Federal Signal Corporation 1300 West Bartlett Road Elgin, Illinois 60120-7529 Phone: (847) 741-5370 Fax: (847) 622-7077 DATE: 08/07/2007 NUMBER: 0703146 SUBJECT: Pelican
All seam allowances are 1/2 unless otherwise noted. All pattern pieces include the seam allowance. Please read all instructions before beginning.
 This structured bag has lots of pretty detailing. It s large enough to carry all of your essentials as well. Make it in a great patchwork, or stick to a single fabric! All seam allowances are 1/2 unless
How to Install UnderDeck The Original.
 How to Install UnderDeck The Original. TOOLS: Chalk Line Caulk Gun Garden hose or water bucket Gloves Hammer or Screw Gun Power Mitre Saw with OSB Blade Pencil Pliers Safety Glasses Straight Edge / Carpenter
Product Information. D8115 Matte and D8117 Semi-Gloss Clearcoat System
 Product Information D8115 Matte and D8117 Semi-Gloss Clearcoat System Product Description D8115 Matte and D8117 Semi-Gloss Clearcoats are designed for use over Envirobase High Performance Waterborne, Global
Operator Quick Guide EC SENSOR
 Operator Quick Guide EC SENSOR Revision G - 24/04/2008 General Information About This Guide The information in this guide has been carefully checked and is believed to be accurate. However, Hach Ultra
Technical Services. Product MM INCH Installation direction Seams treatment GTI CONNECT (interlocking)
") INSTALLATION INSTRUCTIONS FOR GTI CONNECT TILES This document refers to the following products: Product MM INCH Installation direction Seams treatment GTI CONNECT (interlocking) 635 X 635 mm 25.5 x 25.5
INSTALLATION INSTRUCTIONS FOR GTI CONNECT TILES This document refers to the following products: Product MM INCH Installation direction Seams treatment GTI CONNECT (interlocking) 635 X 635 mm 25.5 x 25.5
Important Information
 Single Door Quadrant Instruction Manual ESQ Important Information Toughened glass is completely safe for use in our shower enclosures and bath screens; providing our products are installed according to
GENERAL RUBBER LINING PRINCIPLES
 GENERAL RUBBER LINING PRINCIPLES I. METAL PREREQUISITES Metal to be lined should meet the requirements as stated in section 8 Metal Fabrication and section 12 Blasting and Cementing Procedures. The surface
How to Build a Cosmic-Ray Cloud Chamber
 How to Build a Cosmic-Ray Cloud Chamber October 2008, Version 1.4 QuarkNet version. Fermi National Accelerator Laboratory. Instructions written by Jeremy Paschke, York High School and Anne Mary Teichert,
Composite Stone Veneer
 Composite Stone Veneer Installation Guide Ver 1 Jun 2015 www.compstone.com Composite Stone Veneer Installation Guide Contents Introduction & Overview 3 Required Tools 4 Optional Tools 4 Attachment Guidelines:
3 Single-Coated Foam Tapes
 3 Single-Coated Foam Tapes Technical Data May, 2008 Product Description 3M Single-Coated Foam Tapes will adhere to a variety of substrates, including latex-painted wood, lacquered wood, enameled steel,
Floriani Embroidery Project PATCH PERFECTION
 Floriani Embroidery Project PATCH PERFECTION TRADITIONAL PATCH USING A BACKGROUND FABRIC This method of patch making requires a design that will stitch a straight stitch on the fabric first to hold the
Profiles for floors of same height Cerfix Projoint
 PROFILPAS S.P.A. VIA EINSTEIN, 38 35010 CADONEGHE (PADOVA) ITALY TEL. +39 (0)49 8878411 +39 (0)49 8878412 FAX. +39 (0)49-706692 EMAIL: INFO@PROFILPAS.COM s for floors of same height Cerfix Projoint Application
IMPORTANT! READ ALL INSTRUCTIONS BEFORE BEGINNING INSTALLATION. Step 1:
 IMPORTANT! READ ALL INSTRUCTIONS BEFORE BEGINNING INSTALLATION. Thank you for purchasing your new replacement windows from Great Lakes Window. The following instructions will help remove the old windows
COMPACT ELITE MAT CUTTER
 INSTRUCTION MANUAL MODEL 350-1 COMPACT ELITE MAT CUTTER INSTRUCTIONS AND OPERATION MANUAL 32in (81cm) mat cutting system with bevel & straight cutters, production stops and 20 in (51 cm) squaring bar.