XYZ Corporation. Project Waterproofing Handbook. 23 June Working Set Rev. 0. Project Address: 8888 Main Street York, PA 88888
|
|
|
- Barnaby Ward
- 7 years ago
- Views:
Transcription
1 Arch itectu ral Te sting Inc. XYZ Corporation 23 June 2008 Project Waterproofing Handbook Working Set Rev. 0 Project Address: 8888 Main Street York, PA Prepared By: Architectural Testing 4 Rancho Circle Lake Forest, CA 92630

2 Table of Contents Architectural Testing Inc. Revision Log 2 Mock-up Elevations 3 6 Waterproofing Systems Index 7 10 Reference Photos and Sketches _WORKING SET_REV.0 Page 1

3 Revision Log Architectural Testing Inc. Revision 0 No Revisions to Date _WORKING SET_REV.0 Page 2

4 Mock-up: South Elevation Architectural Testing Inc. Small Balcony Part 1 Large Balcony Part 1 Sliding Glass Doors Part 4 South Elevation _WORKING SET_REV.0 Page 3

5 Mock-up: East Elevation Architectural Testing Inc. Roof Part 6 Windows Part 4 Façade Part 5 Small Balcony Part 1 1st Floor Patio Part 2 East Elevation _WORKING SET_REV.0 Page 4

6 Mock-up: North Elevation Architectural Testing Inc. Façade Part 5 Small Balcony Part 1 North Elevation _WORKING SET_REV.0 Page 5

7 Mock-up: West Elevation Architectural Testing Inc. Windows Part 3 Façade Part 5 West Elevation _WORKING SET_REV.0 Page 6

8 Index: Waterproofing Systems Architectural Testing Inc. 1. Balconies A. Flexible Flashing 1. Guardrail Penetrations a. Vertical to Deck 13 b. Vertical to Balcony Exterior Wall 13 c. Horizontal to Wall 13 d. Exterior Edge 13 B. Sheet Metal Flashing 1. Sheet Metal L Metal Field Laps Sheet Metal L Metal Inside Corners Sheet Metal L Metal Outside Corners Scupper Flanges Exterior Edge Metal Exterior Edge Metal Corners 17 C. Balcony Deck Fluid-Applied Waterproofing 1. Detail Work a. Sheet Metal L Metal 1. Field Laps Inside Corners Outside Corners Balcony Scuppers 21 b. Balcony Door Threshold Pans 22 c. Decking Substrate Field Joints 22 d. Decking Knot Holes 22 e. Balcony Deck Guardrail Post General Application a. Decking Substrate Field 23 b. Inside Corners 23 c. Scuppers 23 d. Balcony Deck Guardrail Post _WORKING SET_REV.0 Page 7

9 Index: Waterproofing Systems Architectural Testing Inc. 2. 1st Floor Patio A. Sheet Metal Flashing 1. Inside Corners Door Jamb Corner Scuppers Vinyl Flanged Windows A. Flexible Flashing 1. Exterior Head/Jamb Exterior Jamb/Sill Jamb/Sill Corner Piece Flashing Window Over Jamb/Sill Corner Piece Flashing Sliding Glass Doors A. Flexible Flashing 1. Head /Jamb Jamb/Threshold Concrete Slab Jamb/Threshold Wood Decking 12 B. Sheet Metal Flashing 1. Finished Corner Wooden Door Jambs Vinyl Sliding Glass Door Façade A. Flexible Flashing 1. Plumbing Electrical Boxes Grouped Penetrations Anchors Storefront Sheet Metal Flashing Head/Jamb Storefront Sheet Metal Flashing Jamb/Sill Roof Corner to Wall _WORKING SET_REV.0 Page 8

10 Index: Waterproofing Systems Architectural Testing Inc. B. Sheet Metal Flashing 1. Balcony Scupper Flanges Exhaust Louver Flanges Plumbing/Electrical Box 20 C. Portland Cement Plaster 1. Weather Resistant Barrier Installation a. Inside Corners 24 b. Outside Corners 24 c. Vinyl Flanged Windows/Doors 24 d. Flashed Penetrations 24 e. Balcony Deck Outer Edge Metal 25 f. Horizontal To Vertical Transitions Sealant Repairs a. Balcony Scupper J-mold 26 b. Flashed Electrical Box 26 c. Scaffold Tie Wires 26 d. Balcony Guardrail Flanges Lath a. Fasteners 27 b. Vertical Corner Aids 27 c. Horizontal Corner Aids 27 d. Arches 27 e. Misc. Transitions Trim/Accessories a. Weep Screeds 1. Inside Corners Outside Corners Vinyl Flanged Door Jamb Terminations Hollow Metal Door Jamb Terminations Balcony Scupper Transitions Control Joints _WORKING SET_REV.0 Page 9

11 Index: Waterproofing Systems Architectural Testing Inc. 6. Roof A. Valleys 31 B. Sheet Metal Flashing 31 C. Vent Hood Penetration 31 D. Pipe Penetration 31 E. Roof Underlayment 32 F. Roof Eave 32 G. Roof Tiles _WORKING SET_REV.0 Page 10

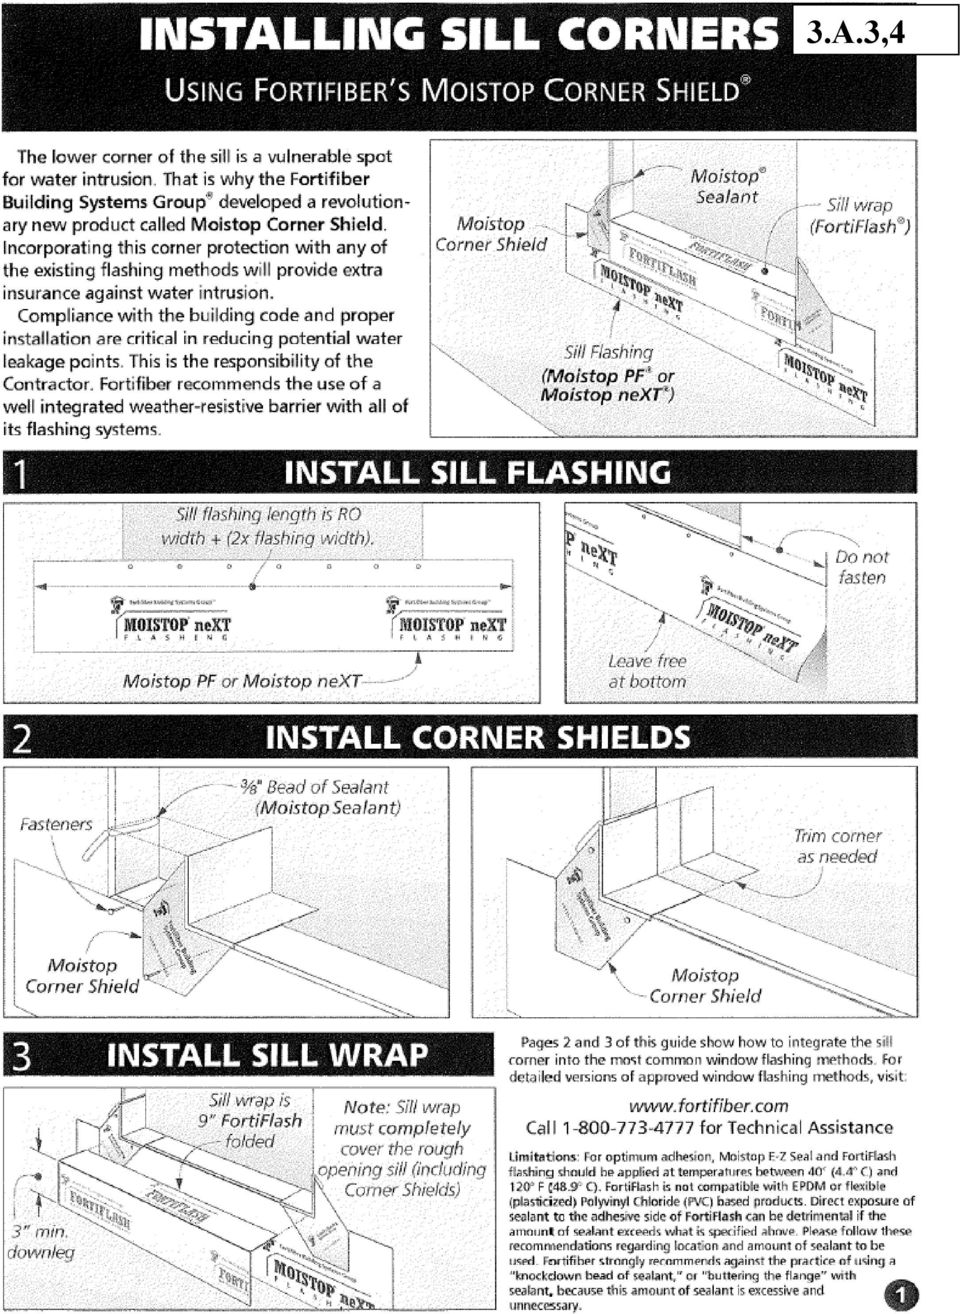
12 Vinyl Flanged Windows Architectural Testing Inc. 3.A.1 Exterior Head/Jamb Lap window head flexible flashing over jamb flexible flashing. Set interior side of window flange in full bed of sealant. 3.A.2 Exterior Jamb/Sill Lap window jamb flexible flashing over sill flashing. Set interior side of window flange in full bed of sealant. 3.A.3 Jamb/Sill Corner Piece Flashing Install vinyl jamb/sill corner piece flashing into window rough opening. Lap jamb flexible flashing over corner piece. 3.A.4 Window Over Jamb/Sill Corner Piece Flashing Install window over vinyl jamb/sill corner piece flashing _WORKING SET_REV.0 Page 11

13 3.A.1,2

14 3.A.3,4
15 3.A.1,2

16 3.A.3,4

17 Sliding Glass Doors Architectural Testing Inc. 4.A.1 Head/Jamb Lap sliding glass door head flexible flashing over jamb flexible flashing. Set interior side of window flange in full bed of sealant. 4.A.2 Jamb/Threshold Concrete Slab Install sliding glass door jamb flexible flashing over rough opening. Set jamb flange over jamb flexible flashing in a full bed of sealant. 4.A.3 Jamb/Threshold Wood Decking Install sliding glass door jamb flexible flashing over rough opening. Set jamb flange over jamb flexible flashing in a full bed of sealant. Lap jamb flexible flashing over balcony deck sheet metal L metal _WORKING SET_REV.0 Page 12

18 1.B.1 1.B.2 1.C.1.a.2 4.A.3 5.C.4.a.2

19 Balcony Decks Architectural Testing Inc. 1.A.1.a Vertical to Deck Install balcony guardrail post over a strip of selfadhered sheet flashing. Set guardrail post flange in a full bed of sealant. 1.A.1.b Vertical to Balcony Exterior Wall Install balcony guardrail post over a strip of selfadhered sheet flashing. Set guardrail post flange in a full bed of sealant. 1.A.1.c Horizontal to Wall Install balcony guardrail flanges over a strip of selfadhered sheet flashing. Set guardrail flange in a full bed of sealant. 1.A.1.d Exterior Edge Install a strip of flexible sheet flashing at the balcony deck exterior edge _WORKING SET_REV.0 Page 13

20 BALCONY HANDRAIL POST-TO-DECK 1.A.1.a 1.C.2.d

21 Wall Penetrations Architectural Testing Inc. 5.A.1 Plumbing Install Quickflash flashing over wall plumbing penetrations. 5.A.2 Electrical Boxes Install Quickflash flashing over wall electrical box penetrations. 5.A.3 Grouped Penetrations Install Quickflash flashing over grouped wall penetrations. Lap flashings to shed water and seal penetrations to the flashing with sealant. 5.A.4 Anchors Fasten wall anchors over a strip of self-adhered sheet flashing. Remove release paper and press the remaining strip firmly against the weather resistive barrier _WORKING SET_REV.0 Page 14
22
23 5.A.2 (SIM.) Apply sealant to building paper Quickflash. Building Paper Field Verify 5.A.2 (SIM.)
24 Building Paper o/ Quickflash 5.A.2 (SIM.) Apply sealant to building paper penetration. 5.A.2 (SIM.)
25 5.A.2 Apply sealant to building paper Quickflash. Building Paper Field Verify 5.A.2
26
27 Wall Penetrations Architectural Testing Inc. 5.A.5 Storefront Sheet Metal Flashing Head/Jamb Apply self-adhered sheet membrane over sheet metal head and jamb flashing flanges. Apply sheet membrane such that laps shed water. 5.A.7 Storefront Sheet Metal Flashing Head/Jamb Apply self-adhered sheet membrane over sheet metal jamb and sill flashing flanges. Apply sheet membrane such that laps shed water. 5.A.8 Roof Corner to Wall Apply a strip of self-adhered sheet membrane at roof edges to wall intersections. 5.A.9 Flashing Sequence to Weather Barrier Flash Quickflash flashing over weather resistive barrier such that laps shed water _WORKING SET_REV.0 Page 15
28 5.A.5 5.A.7
29
30 Balcony Decks Architectural Testing Inc. 1.B.1 Sheet Metal L Metal Field Laps Set all sheet metal laps in a full bed of sealant extending the width of the lap. 1.B.2 Sheet Metal L Metal Inside Corners Mechanically fasten and fully solder watertight the inside corners of the balcony deck sheet metal L metal. 1.B.3 Sheet Metal L Metal Outside Corners Mechanically fasten and fully solder watertight the outside corners of the balcony deck sheet metal L metal. 1.B.4 Balcony Scuppers Mechanically fasten and fully solder watertight scupper flanges to the deck sheet metal L metal _WORKING SET_REV.0 Page 16
31 1.B.1 1.B.2 1.C.1.a.2 4.A.3 5.C.4.a.2
32 Balcony Decks Architectural Testing Inc. 1.B.5 Exterior Edge Metal Install balcony deck edge sheet metal flashing. Ensure that the edge metal flashes over a strip of sheet flashing as shown in photo 1.A.1.d. 1.B.6 Exterior Edge Metal Corners Mechanically fasten and fully solder watertight the deck edge sheet metal to the corner sheet edge metal. Ensure that the corner edge sheet metal is installed over a strip of self-adhered sheet flashing. Seal balcony guardrail flanges to edge sheet metal corner in a full bed of sealant _WORKING SET_REV.0 Page 17
33 1st Floor Patios Sheet Metal Flashing Architectural Testing Inc. 2.A.1 Inside Corners Install sheet metal flashing over stud framing such that flashing extends down to ground level. Ensure that the sheet metal is continuous around inside corners. 2.A.2 Door Jamb Corner Bring sheet metal flashing around door jamb corners to extend across the full width of the jamb framing. Ensure that the sheet metal is continuous around jamb corners. 2.A.3 Scuppers Install sheet metal scupper flashing over formed concrete scupper. Mechanically fasten and fully solder watertight scupper flanges _WORKING SET_REV.0 Page 18
34 2.A.1, 2
35
36 Balcony Door Threshold Pans Architectural Testing Inc. 4.B.1 Finished Corner Mechanically fasten and fully solder watertight door threshold flashing ends to the balcony deck sheet metal L metal. 4.B.2 Wooden Door Jambs Notch wooden door jambs such that there is no interference with the threshold flashing back dams. 4.B.3 1st Floor Patio Vinyl Sliding Glass Door Install sliding glass door over concrete floor. Set the door threshold in a full bed of sealant _WORKING SET_REV.0 Page 19
37 1.C.1.b 4.B.1
38 Wall Penetrations Architectural Testing Inc. 5.B.1 Balcony Scupper Flanges Set scupper flanges in a bed of sealant over the scupper body. Install scupper assembly such that lower flange is flashed over a target patch of weather resistive barrier. 5.B.2 Exhaust Louver Flanges Spot weld the louver flanges to the sheet metal louver backing. 5.B.3 Plumbing Flashing Install collared flashing to wall plumbing penetrations _WORKING SET_REV.0 Page 20
39
40 Detail Work Sheet Metal L Metal Architectural Testing Inc. 1.C.1.a.1 Field Laps Apply a detail coat of the balcony deck waterproofing with reinforcement tape over all horizontal sheet metal L metal field laps. 1.C.1.a.2 Inside Corners Apply a detail coat of the balcony deck waterproofing with reinforcement tape over all horizontal sheet metal L metal inside corners. 1.C.1.a.3 Outside Corners Apply a detail coat of the balcony deck waterproofing with reinforcement tape over all horizontal sheet metal L metal outside corners. 1.C.1.a.4 Balcony Scuppers Apply a detail coat of the balcony deck waterproofing with reinforcement tape over all horizontal sheet metal L metal and scupper laps _WORKING SET_REV.0 Page 21
41 1.C.1.a.4 1.C.2.c 5.C.4.a.5
42 1.B.1 1.B.2 1.C.1.a.2 4.A.3 5.C.4.a.2
43 Detail Work, contd. Architectural Testing Inc. 1.C.1.b Balcony Door Threshold Pans Apply a detail coat of the balcony deck waterproofing with reinforcement tape over horizontal door threshold sheet metal in contact with the balcony decking. 1.C.1.c Decking Substrate Field Joints Apply a detail coat of the balcony deck waterproofing with reinforcement tape over all balcony decking field joints. 1.C.1.d Decking Knot Holes Apply additional coats of balcony deck waterproofing over decking knot holes such that manufacturer s minimum coating thickness is achieved. Photo Pending 1.C.2.d Balcony Deck Guardrail Post Apply a detail coat of the balcony deck waterproofing with reinforcement tape over all guardrail post flanges in contact with the decking _WORKING SET_REV.0 Page 22
44 1.C.1.c
45 1.C.1.b 4.B.1
46 General Application Architectural Testing Inc. 1.C.2.a Decking Substrate Field Apply a uniform coating of balcony deck waterproofing. Ensure that the manufacturer s minimum coating thickness is achieved. 1.C.2.b Inside Corners Apply a uniform coating of balcony deck waterproofing over the sheet metal L metal including the full height of the vertical leg. Ensure that the manufacturer s minimum coating thickness is achieved. 1.C.2.c Scuppers Apply a uniform coating of balcony deck waterproofing over the sheet metal L metal and scupper flanges including the full height of the vertical leg. Ensure that the manufacturer s minimum coating thickness is achieved. Photo Pending 1.C.2.d Balcony Deck Guardrail Post Apply additional coats of balcony deck waterproofing over guardrail post flanges such that manufacturer s minimum coating thickness is achieved _WORKING SET_REV.0 Page 23
47 BALCONY HANDRAIL POST-TO-DECK 1.A.1.a 1.C.2.d
48 1.C.1.a.4 1.C.2.c 5.C.4.a.5
49 1.C.2.a
50 Weather Resistant Barrier Installation Architectural Testing Inc. 5.C.1.a Inside Corners Install wall weather resistive barrier continuously around inside corners and to the next wall stud. Do not terminate weather resistive barrier at inside corners. 5.C.1.b Outside Corners Install wall weather resistive barrier continuously around outside corners and to the next wall stud. Do not terminate weather resistive barrier at outside corners. 5.C.1.c Vinyl Flanged Windows/Doors Install weather resistive barrier such that it overlaps the full flange width with no gaps. 5.C.1.d Flashed Penetrations Install weather resistive barrier such that it overlaps the full flange width of wall penetration flashings and sheds water _WORKING SET_REV.0 Page 24
51 5.C.1.a-c Upper layer building paper building paper under of building paper first crosses the path of paper building building paper under the sill building paper building paper and
52 5.C.1.a-c BUILDING PAPER Provides this guide to assist installers by demonstrating an efficient and effective method for installing in common residential and light commercial settings. The back of this document has details regarding integrating with window flashing. Compliance with the building code and proper installation are critical in reducing potential water leakage points. It is the responsibility of the architect, or builder to ensure that these standards are met. There are six grades available: 60 minute 40 x 240 and 324 sq. ft. rolls Two-Ply Super 60 minute 40 x 162 sq. ft. rolls 30 minute 40 x 324 and 500 sq. ft. rolls Two-Ply 30 minute 40 x 162 sq. ft. rolls 40 x 324 and 500 sq. ft. rolls Two-Ply 40 x 162 and 250 sq. ft. rolls Install directly to studs or over an approved exterior sheathing. Starting at the bottom of one end of the wall, place the roll horizontally (overlapping the corner by a minimum of 6 ) and roll out the first course evenly, covering rough window and door openings. Attach the membrane so that it is tight and flat and then place enough fasteners to hold in place until the final wall cladding is installed. Fasten securely to the exterior wall with appropriate fasteners (Step 2). The size of fasteners used and the spacing required is determined on the job site. Apply enough fasteners to hold in place until final cladding is applied. A higher grade of galvanized fastener, or large headed galvanized nail may be required in certain settings or weather conditions. Apply enough fasteners to hold into place until final cladding is applied. It is the responsibility of the architect, builder, or foreman to decide the type of exterior grade fastener that will best suit the job at hand. And how many of these fasteners are required.
53 Weather Resistant Barrier Installation, contd. Architectural Testing Inc. 5.C.1.e Balcony Deck Outer Edge Metal Install weather resistive barrier such that deck edge flexible sheet flashing in photo 1.A.1.d full overlaps below the deck outer edge metal. 5.C.1.f Horizontal to Vertical Transitions Apply self-adhered sheet flashing at horizontal wall feature areas and lap with vertical weather resistive to shed water. Do not use fasteners to secure horizontal lath _WORKING SET_REV.0 Page 25
54 Sealant Repairs Architectural Testing Inc. 5.C.2.a Balcony Scupper J-mold Install J-mold around scupper. If applying self-adhered flashing over J-mold flange, then seal the gap between the scupper body and J-mold. 5.C.2.b Flashed Electrical Box Seal weather resistive barrier to Quickflash flanges with sealant on all sides but the bottom. 5.C.2.c Scaffold Tie Wires Seal scaffold tie wires with sealant. 5.C.2.d Balcony Guardrail Flanges Seal weather resistive barrier to balcony guardrail flanges with sealant on all sides but the bottom _WORKING SET_REV.0 Page 26
55
56
57 Lath Architectural Testing Inc. 5.C.3.a Fasteners Install lath fasteners with cardboard washers such that a continuous 1/4 in. space is achieved between the metal lath and weather resistive barrier. 5.C.3.b Vertical Corner Aids Install metal lath corner aids at outside vertical wall corners. 5.C.3.c Horizontal Corner Aids Install metal lath corner aids at outside horizontal wall corners. Use tie wire in lieu of fasteners to fasten the corner aids to the metal lath. 5.C.3.d Arches Install expanded metal lath around wall arches _WORKING SET_REV.0 Page 27
58 Lath Architectural Testing Inc. 5.C.3.e Misc. Transitions Install metal lath around all wall transitions and use metal corner aids where appropriate. Ensure that a 1/4 in spacing is maintained around all wall transitions _WORKING SET_REV.0 Page 28
59 Trim/Accessories Weep Screeds Architectural Testing Inc. 5.C.4.a.1 Inside Corners Install cement plaster weep screeds at inside wall corners. Ensure that the weep screed flanges are continuous around inside corners and that the weather resistive barrier laps over the entire height of the weep screed flange. 5.C.4.a.2 Outside Corners Install cement plaster weep screeds at outside wall corners. Ensure that the weep screed flanges are continuous around outside corners and that the weather resistive barrier laps over the entire height of the weep screed flange. 5.C.4.a.3 Vinyl Flanged Door Jamb Terminations Bring cement plaster weep screed such that it terminates against the door jamb. Lap weather resistive barrier over weep screed flange. Photo Pending 5.C.4.a.4 Hollow Metal Door Jamb Terminations Bring cement plaster weep screed such that wall flange terminates behind the hollow metal door jamb _WORKING SET_REV.0 Page 29
60
61 1.B.1 1.B.2 1.C.1.a.2 4.A.3 5.C.4.a.2
62 Trim/Accessories Weep Screeds Architectural Testing Inc. 5.C.4.a.5 Balcony Scupper Transitions Install cement plaster J-molds around the balcony scuppers and integrate with the cement plaster weep screeds. 5.C.5 Control Joints Install cement plaster control joints such that they do not terminate at horizontal surfaces _WORKING SET_REV.0 Page 30
63 1.C.1.a.4 1.C.2.c 5.C.4.a.5
64 Roofing Architectural Testing Inc. 6.A Valleys Install sheet metal valley flashing over roofing underlayment and valley centerline. 6.B Sheet Metal Flashing 6.C Vent Hood Penetration Install sheet metal roof vent hood over roofing underlayment. 6.D Pipe Penetration Install additional underlayment over pipe flashing metal flange and integrate into roof underlayment _WORKING SET_REV.0 Page 31
65 Roofing Architectural Testing Inc. 6.E Roof Underlayment 6.F Roof Eave Install flexible flashing at roof eave. Counter-flash with edge sheet metal flashing. Install roof underlayment over edge sheet metal flashing flange. 6.G Roof Tiles _WORKING SET_REV.0 Page 32
66 6.B
67 1 6.B
68 2 6.B
69 3 6.B
70 4 6.B
71 6.B
72 6.B
73 6.C (SIM.)
74 6.D
75 6.F (SIM.)
76 Architectural Testing 4 Rancho Circle Lake Forest, CA YES WE CAN! Main Fax _WORKING SET_REV.0
Clad Direct Glaze Window Installation Instructions
 Clad Direct Glaze Window Installation Instructions Sill flashing and sealing: 2. An overview of the proper flashing sequence is shown in figure 1. Please read entire installation instructions carefully
How To Repair A Boat Landing Deck With A Boat Bed
 RESIDENTIAL INSULATED SHEATHING INSTALLATION GUIDE Residential Insulated Sheathing Installation Guide ROXUL COMFORTBOARD IS Table of Contents Slab-on-grade-to Above Grade Wall...1 Foundation Wall at Footing
Mark Cramer Inspection Services, Inc.
 Mark Cramer Inspection Services, Inc. 492 Twentieth Avenue, Indian Rocks Beach, FL 34635-2970 (727) 595-4211 Fax (727) 596-7583 Certified Member #12085 American Society of Home Inspectors Construction
Installation Instructions Double-Hung, Single-Hung, Casement, Awning, Sliding, Picture & Shapes Non-Impact & Impact Resistant Nailing Fin Windows
 Installation Instructions Double-Hung, Single-Hung, Casement, Awning, Sliding, Picture & Shapes Non-Impact & Impact Resistant Nailing Fin Windows americancraftsmanwindows.com Project Requirements: Read
Window Installation Instructions
 Caution The correct installation methods of windows in full frame or insert applications is critical towards achieving the tested performance of the window and longterm enjoyment and energy savings for
Asphalt Shingle Application Requirements
 Alberta Allied Roofing Association Asphalt Shingle Application Requirements Section 1 Roof Decks 1.1 General Asphalt Shingles are not permitted to be installed directly over rigid insulation. When Asphalt
 LINE OF EXISTING ADJACENT STRUCTURE 6" MIN. PROTECTION COURSE (NOT REQUIRED WHERE THERE IS NO ADJACENT BLDG. MOISTURE RESISTIVE MEMBRANE AT EXIST. AND NEW BLDG. AS OCCURS WATER STOP SLAB-ON-GRADE TERMINATION
University of California - Santa Barbara West Campus Point Faculty Housing
 University of California - Santa Barbara West Campus Point Faculty Housing Reconstruction Guidelines and Considerations to Correct Exterior Building Envelope Weatherproofing Defects and Recommended Upgrades
Ver. 2. Guide to. Inspecting Residential Brick Veneer
 Ver. 2 Guide to Inspecting Residential Brick Veneer 1. A guide created by industry professionals. The knowledgeable staff at MASONPRO together with technical support from the Masonry Institute of Michigan
CITY OF WHITE BEAR LAKE BUILDING INSPECTION DEPARTMENT 4701 Highway 61 White Bear Lake, MN 55110 Fax: 651-429-8503. Re-Roofing: Asphalt Shingles
 CITY OF WHITE BEAR LAKE BUILDING INSPECTION DEPARTMENT 4701 Highway 61 White Bear Lake, MN 55110 Fax: 651-429-8503 Re-Roofing: Asphalt Shingles This is a summary of the standard requirements based on the
GreenGuard Housewrap Installation Guide
 000768PACBPHW_Flashing Bro 5/23/03 2:52 PM Page 1 For the most current product information, go to www.green-guard.com. Pactiv Building Products believes the information and recommendations herein to be
300mm. 2mm MIN GAP. PLACE 100mm X 100mm. SO THAT IT IS 38mm INTO
 INSTALL PEEL & STICK (P&S) GUSSETS WITH PRIMER AS PER MANUFACTURERS INSTRUCTIONS 2mm MIN GAP IN SHEATHING STEP 1 PLACE 100mm X 100mm PIECE OF P&S IN CORNER SO THAT IT IS 38mm INTO THE OPENING EACH WAY
Sun Windows General Information Sun New Construction Window Installation Instructions
 Sun Windows General Information Section 1 G F H H H A. Apply Weather Resistive Barrier B. Apply Sill Flashing Tape C. Place Waterproof Sill Shims D. Caulk Back of Nail Fin Sides & Top, Set Window, Fasten
INSTALLATION INSTRUCTIONS for Vinyl Windows with Integral Nailing Fin (JII001)
") Thank you for selecting JELD-WEN products. Attached are JELD-WEN s recommended installation instructions for Vinyl windows with an integral nailing fin. While the use of these installation instructions
Thank you for selecting JELD-WEN products. Attached are JELD-WEN s recommended installation instructions for Vinyl windows with an integral nailing fin. While the use of these installation instructions
Final inspections are completed by site visit only. Access to fenced yards shall be planned.
 ROOFING RESIDENTIAL BUILDING INSPECTIONS DEPARTMENT www.ci.blaine.mn.us This handout is intended only as a guide and is based in part on the 2015 Minnesota State Building Code, Blaine City ordinances,
Superform Products Ltd.
 TYPICAL CORNER REINFORCING NOTE : SEE ENGINEERED REBAR SCHEDULES SUPPLIED BY THE MANUFACTURER STEEL REINFORCEMENT WALL CORNER 90 Copyright 2012 Sept. 2012 5.1.1 Rebar Spacing 6" 12" Max. Load LB./FT. 2000
Replacement Window Installation Guide Non-Impact & Impact Resistant Windows without Nailing Fin
 Replacement Window Installation Guide Non-Impact & Impact Resistant Windows without Nailing Fin americancraftsmanwindows.com Project Requirements: Failure to follow these instructions may void product
City of Tucson and Pima County Arizona Building Code Appendix Chapter 72 Straw-Bale Structures
 City of Tucson and Pima County Arizona Building Code Appendix Chapter 72 Straw-Bale Structures SECTION 7201 - PURPOSE The purpose of this appendix chapter is to establish minimum prescriptive standards
Chapter 36 - STRAW BALE CONSTRUCTION SECTION 3601 - PURPOSE. SECTION 3602 - SCOPE. SECTION 3603 - DEFINITIONS.
 Austin City Code - Volume II TITLE 25 LAND DEVELOPMENT\CHAPTER 25-12 TECHNICAL CODES\ARTICLE 1: UNIFORM BUILDING CODE\25-12-3 LOCAL AMENDMENTS TO THE BUILDING CODE Chapter 36 - STRAW BALE CONSTRUCTION
Basement Window Installation Guide Hopper and Sliding
 Basement Window Installation Guide Hopper and Sliding americancraftsmanwindows.com Project Requirements: Installation must comply with all applicable building codes. Existing window frame, wall and weatherresistant
Tundra Series Windows January 2016
 Tundra Series Windows January 2016 New Construction Installation Instructions Nail Fin, J-Fin and Brickmold Aplications product. ATTENTION! Read and understand all installation instructions before installing
March 14, 2007. Installation of Bay, Bow and Garden Windows
 March 14, 2007 Re: Installation of Bay, Bow and Garden Windows Attached are the Atrium Companies, Inc recommendation for the installation of bay, bow and garden windows. These instructions were developed
INSTALLATION INSPECTION GUIDE FOR 3RD PARTY INSPECTORS FOR PAREX USA EXTERIOR INSULATION AND FINISH SYSTEMS
 INSTALLATION INSPECTION GUIDE FOR 3RD PARTY INSPECTORS FOR PAREX USA EXTERIOR INSULATION AND FINISH SYSTEMS Introduction This inspection guide is organized to follow the EIF System's Installation Guide.
RESIDENTIAL ROOFING & RE-ROOFING, ROOF VENTILATION AND ROOF SHEATHING REQUIREMENTS MICHIGAN RESIDENTIAL CODE 2000
 RESIDENTIAL ROOFING & RE-ROOFING, ROOF VENTILATION AND ROOF SHEATHING REQUIREMENTS MICHIGAN RESIDENTIAL CODE 2000 SECTION R905 REQUIREMENTS FOR ROOF COVERINGS R905.1 Roof covering application. Roof coverings
The WANZ Guide to Window Installation
 The WANZ Guide to Window Installation as described in E2/AS1 Amendment 5 Ver. 1.1 Page 2 of 74 Contents Overview Page 5 Objective Page 5 Scope Page 5 Opening Preparation Page 7 Step P1 Preliminary Check
Leaky Homes Financial Assistance Package (FAP) Repair plan example
 Repair plan example") LEAKY HOMES FINANCIAL ASSISTANCE PACKAGE FACT SHEET Repair Plan Example - June 2014 Page 1 Leaky Homes Financial Assistance Package (FAP) Repair plan example Introduction This repair plan example is intended
LEAKY HOMES FINANCIAL ASSISTANCE PACKAGE FACT SHEET Repair Plan Example - June 2014 Page 1 Leaky Homes Financial Assistance Package (FAP) Repair plan example Introduction This repair plan example is intended
Residential Roofing Guide
 Residential Roofing Guide TABLE OF CONTENTS Building Detail and Accessories...... 1 Panel Introduction and Handling...... 2 Cutting and Trimming.... 3 Roof Preparation..... 3 Roof Slope..... 3 Re-roofing...
RODENT PROOFING CHECKLIST
 RODENT PROOFING CHECKLIST The most important part of a rodent control job is a thorough inspection of the problem areas/building. Since we warranty the control of rodents with our standard pest control
ENERGY STAR Qualified New Homes Thermal Enclosure Checklist. Water Management Checklist. Eli Caudill
 ENERGY STAR Qualified New Homes Thermal Enclosure Checklist & Water Management Checklist Eli Caudill ENERGY STAR Version 3 Tighter Standards Whole Home Approach Better, More Sustainable Construction Surpasses
Detached accessory structures that contain no conditioned floor area are exempt.
 RESIDENTIAL ROOFING PERMITS: A roofing permit is required for roofing of residential dwellings and garages in accordance with Section R105 of the International Residential Code. Updated 11/2013 City of
VA25014B0516 VA CINCINNATI PROJECT NO. 539-328 INPATIENT BED TOWER ADDITION (4 TH AND 5 TH FLOORS) SECTION 09 29 00 GYPSUM BOARD
 SECTION 09 29 00 GYPSUM BOARD") SECTION 09 29 00 GYPSUM BOARD PART 1 - GENERAL 1.1 DESCRIPTION This section specifies installation and finishing of gypsum board, vapor retarder and air and moisture barrrier. 1.2 RELATED WORK A. Installation
SECTION 09 29 00 GYPSUM BOARD PART 1 - GENERAL 1.1 DESCRIPTION This section specifies installation and finishing of gypsum board, vapor retarder and air and moisture barrrier. 1.2 RELATED WORK A. Installation
STANDARD PROCEDURES FOR INSTALLATION OF METAL ROOF SYSTEMS
 ROOFING APPLICATION STANDARD (RAS) No. 133 STANDARD PROCEDURES FOR INSTALLATION OF METAL ROOF SYSTEMS 1. Scope 1.1 This application standard has been developed to provide consistent information for the
Free 12 x 8 Shed Plan With Illustrations, Blueprints & Step By Step Details
 Free 12 x 8 Shed Plan With Illustrations, Blueprints & Step By Step Details Brought To You By: MyShedPlans Click Here To Download 12,000 Shed Plans >> 12 x 8 Basic Shed This 8 12-ft. shed features a simple
G VYCOR DECK PROTECTOR
 G VYCOR DECK PROTECTOR Self-Adhered Flashing Contractor s Guide DECKS AND DETAIL AREAS For longer lasting decks, install Grace Vycor Deck Protector. FROM THE MAKERS OF G Ice & Water Shield What Self-Adhered
We urge you to read and follow the attached installation instructions. Failure to do so may void the warranty of this garden window unit.
 Important Information for New Construction Installations Attention Installer! We urge you to read and follow the attached installation instructions. Failure to do so may void the warranty of this garden
DE Frame with C Series Sidelight
 TOOLS REQUIRED Tape measure 6' magnetic level 3' magnetic level Screw gun with clutch adjusted #2 phillips tip #3 phillips tip Screwdriver (used to adjust frame on will using oval slots) Pry Bar Powder
INSTALLATION INSTRUCTIONS for Vinyl Windows without Nailing Fin (JII011) ImPOrTANT INFOrmATION & GlOssAry. rough OPeNINGs
 ImPOrTANT INFOrmATION & GlOssAry. rough OPeNINGs") Thank you for selecting JELD-WEN products. Attached are JELD-WEN s recommended installation instructions for vinyl windows without a nailing fin (including finless, flush fin and flange). Read these instructions
Thank you for selecting JELD-WEN products. Attached are JELD-WEN s recommended installation instructions for vinyl windows without a nailing fin (including finless, flush fin and flange). Read these instructions
PART 1 GENERAL 1.1 SECTION INCLUDES
 J-1 Section 09110 Long Form Specification INTERIOR METAL STUD FRAMING This section includes lightweight, usually 0.036 inch (0.9 mm) thick or lighter, non-axial load bearing metal stud framing including
Vinyl Greenhouse Window Page 2 of 6 New Contruction Installation Instructions
 New Construction Installation Instructions EPLACEMENT Installation Instructions Page 2 of 6 New Contruction Installation Instructions 1. Frame rough opening equal to window call out size. ough opening
PETERSONS WATERFRONT CONDOMINIUMS
 CONSULT DESIGN CONSTRUCT PETERSONS WATERFRONT CONDOMINIUMS 103 Park Street Chelan, Washington Findings Summary Report Prepared for: Petersons Waterfront Condominium Association March 21, 2014 J2 Project
Exterior Elevated Elements Inspection Guidelines
 Exterior Elevated Elements Inspection Guidelines Planning and Development 1. Guideline Purpose These guidelines are intended to assist practicing professionals in complying with Berkeley Municipal Code
HURRICANE MITIGATION RETROFITS FOR EXISTING SITE-BUILT SINGLE FAMILY RESIDENTIAL STRUCTURES
 HURRICANE MITIGATION RETROFITS FOR EXISTING SITE-BUILT SINGLE FAMILY RESIDENTIAL STRUCTURES 101 Retrofits Required. Pursuant to Section 553.844 553.884, Florida Statutes, strengthening of existing site-built,
Residential Deck Safety, Construction, and Repair
 Juneau Permit Center, 4 th Floor Marine View Center, (907)586-0770 This handout is designed to help you build your deck to comply with the 2006 International Residential Building code as modified by the
Chapter 9: INSTALLING ROOFING
 9.1 LEAK BARRIER (ICE AND WATER SHIELD) 9.2 SHINGLE UNDERLAYMENT 9.3 INSTALLING GUTTER APRON AND GABLE D-EDGE 9.4 INSTALLING SHINGLES 9.5 RIDGE VENT AND CAP Tools needed by each volunteer: Hammer (16 oz.
Weather Resistive Barriers: Building Science Makes a Case for Two Layers by Dave Olson Technical Services Manager, Fortifiber Building Systems Group
 Weather Resistive Barriers: Building Science Makes a Case for Two Layers by Dave Olson Technical Services Manager, Fortifiber Building Systems Group Since water intrusion is among the most damaging problems
COMMONLY USED RESIDENTIAL BUILDING CODES
 COMMONLY USED RESIDENTIAL BUILDING CODES INTERNATIONAL RESIDENTIAL CODE (2009) form revised 5/10 FOUNDATION 1. DESIGN OF FORMWORK. Section 1906.1 IBC 2009, Section R404.1.2.3.6 IRC 2009, ACI 318 Section
ROOF CONSTRUCTION Roof Styles Gable Roof Hip Roof Gambrel Roof
 ROOF CONSTRUCTION The overall appearance of a building is greatly affected by the roof lines and the roofing materials. The designer has many standard designs to choose from and should be able to find
Barewood Octagon and Elongated Windows Installation Instructions
 Step-by-step instructions to a beautiful window. Measuring and Installation of your new window from Century Specialty Windows couldn't be easier with our step-by-step instructions. Quality, function and
Stormproof Your Roof. I ve done enough roof repairs to know that storm water that gets past the shingles
 Stormproof Your Roof Self-adhering underlayment provides critical protection in vulnerable locations BY MIKE GUERTIN I ve done enough roof repairs to know that storm water that gets past the shingles and
Air-Conditioning, Heating, and Refrigeration Institute. Sheet Metal and Air-Conditioning Contractors National Association
 Air-Conditioning, Heating, and Refrigeration Institute Sheet Metal and Air-Conditioning Contractors National Association GUIDELINE B-1997 ACKNOWLEDGEMENT These guidelines for Roof Mounted Outdoor Air-
TEST REPORT. Report No.: A9814.01 109 44. Rendered to: BAMCO INC. Middlesex, New Jersey. PRODUCT TYPE: Wall Cladding System SERIES/MODEL: Dry Concept
 Architectural Testing TEST REPORT Report No.: A9814.01 109 44 Rendered to: BAMCO INC. Middlesex, New Jersey PRODUCT TYPE: Wall Cladding System SERIES/MODEL: Dry Concept AAMA 508 07, Voluntary Test Method
PREMIUM LAMINATED ASPHALT SHINGLES Dallas, TX Tuscaloosa, AL Phillipsburg, KS
 Application Instructions for THESE ARE THE MANUFACTURER S APPLICATION INSTRUCTIONS FOR THE ROOFING CONDITIONS DESCRIBED. TAMKO BUILDING PRODUCTS, INC. ASSUMES NO RESPONSIBILITY FOR LEAKS OR OTHER ROOFING
Installer Training and Certification Overview
 Installer Training and Certification Overview Outline of This Presentation The Need for a Training Program The History of the Program Details of the Training Program The Certification Process The Need
HomeSpec REPORT SUMMARY
 HomeSpec 04/25/2007 Ms. Rachel Trujeque Re: 13038 West Plum Road Lot #1225 - Peoria, AZ. 85383 - Pre Drywall Inspection Dear Ms. Trujeque, At your request, a visual pre drywall inspection of the above
NCMA TEK CONCRETE MASONRY FOUNDATION WALL DETAILS. TEK 5-3A Details (2003)
") NCMA TEK National Concrete Masonry Association an information series from the national authority on concrete masonry technology CONCRETE MASONRY FOUNDATION WALL DETAILS TEK 5-3A Details (2003) Keywords:
NCMA TEK National Concrete Masonry Association an information series from the national authority on concrete masonry technology CONCRETE MASONRY FOUNDATION WALL DETAILS TEK 5-3A Details (2003) Keywords:
Excerpts from the Canadian National Building Code (NBC)
") Excerpts from the Canadian National Building Code (NBC) Reproduced here with Permission of the Copyright Owner, the National Research Council of Canada, Institute for Research in Construction. For more
Excerpts from the Canadian National Building Code (NBC) Reproduced here with Permission of the Copyright Owner, the National Research Council of Canada, Institute for Research in Construction. For more
LEGACY REPORT. www.icc-es.org (800) 423-6587 (562) 699-0543 A Subsidiary of the International Code Council RETAINED ON U.S.
 423-6587 (562) 699-0543 A Subsidiary of the International Code Council RETAINED ON U.S.") ICC-ES Legacy Report ER-5043* Reissued March 2004 www.icc-es.org (800) 423-6587 (562) 699-0543 A Subsidiary of the International Code Council Legacy report on the 1997 Uniform Building Code DIVISION: 09
ICC-ES Legacy Report ER-5043* Reissued March 2004 www.icc-es.org (800) 423-6587 (562) 699-0543 A Subsidiary of the International Code Council Legacy report on the 1997 Uniform Building Code DIVISION: 09
How To Make A House Safe
 1 RESIDENTIAL Screen Enclosures Orange County Residential Code Compliance Alternative design method for screen enclosures R301.2.1.1.3 PLAN REVIEW Engineered plans must state that the Alternative Design
Residential Building Inspection Policies
 CONCRETE 1. A footing inspection has been called in, but a monolithic slab shows on the plans. Cancel the footing and create a slab inspection, as long as there is a Passed Plumbing Rough (05). 2. A stemwall
INSTALLATION OF A BAY WINDOW
 INSTALLATION OF A BAY WINDOW Installation of a Bay Window These instructions relate to the replacement of an existing bay window or replacement of a straight window with a new bay window, in an opening
RESIDENTIAL MASONRY A BEST PRACTICES GUIDE
 RESIDENTIAL MASONRY A BEST PRACTICES GUIDE Build With Brick Build With Boral CONTENTS BRICK :01 MASONRY CEMENT :03 MASONRY SAND :04 WALL TIES :05 STEEL LINTELS :07 DRAINAGE WALL SYSTEM :09 FLASHING :11
Linea Weatherboard DIRECT FIX CONCRETE SLAB AND SOFFIT FIGURE 1
 Top plate Stud Soffit lining 45mm min nog Fix scotia bead Building underlay/james Hardie rigid air barrier Soffit Detail Building underlay/james Hardie rigid air barrier Bottom plate 25mm wide cant strip.
STRUCTURAL CONCEPT FOR LIGHT GAUGE STEEL FRAME SYSTEM
 Chapter 9 STRUCTURAL CONCEPT FOR LIGHT GAUGE STEEL FRAME SYSTEM 9.1 BACKGROUND Steel is widely used in the construction of multi-storey buildings. However, steel construction is seldom used and is traditionally
SECTION 08 41 1 ALUMINUM FRAMED ENTRANCES and STOREFRONTS. System 402 Flush-Glazed Screw Spline Storefront
 PART 1 GENERAL 1.01 Work Included SECTION 08 41 1 ALUMINUM FRAMED ENTRANCES and STOREFRONTS System 402 Flush-Glazed Screw Spline Storefront A. Furnish and install aluminum architectural storefront system
INSTALLATION INSTRUCTIONS for Vinyl Patio Doors with Integral Nailing Fin (JII006)
") Thank you for selecting JELD-WEN products. Attached are JELD-WEN s recommended installation instructions for Vinyl Patio Doors with nailing fin. Any local building code requirements supersede the recommended
Thank you for selecting JELD-WEN products. Attached are JELD-WEN s recommended installation instructions for Vinyl Patio Doors with nailing fin. Any local building code requirements supersede the recommended
Comment Form on Proposed Gut Rehabilitation Alternatives
 Comment Form on Gut Rehabilitation Alternatives Name: Organization: Email: Instructions Submission: Please submit this form to energystarhomes@energystar.gov by October 10 th, 2012 with the subject line
Block Lofts Condominiums
 Block Lofts Condominiums Building Envelope Condition Assessment 747 Ralph McGill Boulevard Atlanta, Georgia Presented to: Block Lofts Condominium Home Owners Association C/o Heritage Property Management
Natural Thin Stone Veneer
 Natural Thin Stone Veneer Until recently, if a project called for the natural look of stone but could not support its weight or thickness, the options were limited to manufactured imitation stone. More
PANELIZED HOME INSTALLATION GUIDELINE
 PANELIZED HOME INSTALLATION GUIDELINE A typical home package will be constructed of Snap-N-Lock Insulated Panels clad with steel skins. 4" panels will be used for the walls, and 6" panels for the roof.
Window Sill Details for Effective Drainage of Water
 Construction Technology Update No. 76 Window Sill Details for Effective Drainage of Water By M.A. Lacasse and M.M. Armstrong Satisfactory window performance demands a good product and proper installation.
CERTIFICATE NAME OF PRODUCT MANUFACTURER PRODUCT DESCRIPTION CERTIFICATION PROCEDURE. No VTT C-6044-10 Date of issue 11.10.2010, Updated July 1, 2011
 CERTIFICATE NAME OF PRODUCT No VTT C-6044-10 Date of issue 11.10.2010, Updated July 1, 2011 H-CONTROL REFLEX+ reflective insulating vapour control layer for roof and wall applications MANUFACTURER ACTIS
Common Callbacks. Designers love intersecting roof. ~ CoastalContractor
 Common Callbacks In the face of wind-blown rain and short drying cycles, coastal exteriors are shown no mercy by Steve Easley Callbacks typically result from three things: poor design, faulty construction,
Introduction...COMB-2 Design Considerations and Examples...COMB-3
 SECTION DIRECTORY General Information Introduction...COMB-2 Design Considerations and Examples...COMB-3 Combination Assembly Recommendations and Limitations Composite Configurations...COMB-4 Typical Sealant
We urge you to read and follow the attached installation instructions. Failure to do so may void the warranty of this garden window unit.
 Important Information for New Construction Installations Attention Installer! We urge you to read and follow the attached installation instructions. Failure to do so may void the warranty of this garden
Fig. 2 WALL-TO-WALL PANEL CONNECTIONS CORNER WALL CONNECTION
 SIPS SCREWS WITH MINIMUM 1" PENETRATION IN WOOD MEMBER IN SIP WALL PANEL CONNECTED TO @ 24" O.C. MAXIMUM OUTSIDE SKIN EACH SIDE OF FRAMING TYP. AS RECOMMENDED BY FOAM CORE AS EACH SIDE OF FRAMING TYP.
City of San Diego, CWP Guidelines
 PART 1 -- GENERAL SECTION 08520-1.1 WORK OF THIS SECTION City of San Diego, CWP Guidelines A. The WORK of this Section includes providing aluminum windows with frames, bracing, glazing attachments, screens,
SUPER SHED. Indoor shelter for your outdoor tools.
 SUPER SHED Indoor shelter for your outdoor tools. Not everyone needs a garden shed. But, if you've no more space on your garage wall for that new leaf rake, if you can't find your potting trowel because
Envelope INSULATION BATT (2) Avoid Using Batt Insulation With Metal Framing. Pressure or Friction Fit
 Avoid Using Batt Insulation With Metal Framing. Pressure or Friction Fit") R-H-DI1 INSULATION BATT NR-E-IB1 Avoid Using Batt Insulation With Metal Framing Batt insulation should not be used with metal framing systems. Although it is common to see fiberglass batt insulation installed
R-H-DI1 INSULATION BATT NR-E-IB1 Avoid Using Batt Insulation With Metal Framing Batt insulation should not be used with metal framing systems. Although it is common to see fiberglass batt insulation installed
RDH Building Sciences Inc.
 MAK LTR 2007 03 26 Proposal for Building Enclosure Consulting Services RDH Building Sciences Inc. 509 FAIRVIEW AVENUE N SEATTLE WA 98109-5507 TEL 206 324 2272 FAX 206 324 6339 SEA@RDHBE.COM WWW.RDHBE.COM
K2 STONE NATURAL VENEER
 INTRODUCTION WHAT IS K2 NATURAL THINSTONE VENEER? Natural K2 Stone veneer is real stone, cut 1 inch thick, making it light enough to be installed as a veneer. Sometimes referred to as thin veneer, thin
New Construction Stud Frame Vinyl Window Installation Guide
 New Construction Stud Frame Vinyl Window Installation Guide This manual contains procedures based on ASTM E2112 and Installation Masters Installer Training & Certification Program Manual RLC-1 The procedures
The WANZ Guide to Window Installation
 The WANZ Guide to Window Installation as described in E2/AS1 Amendment 5 2 of 60 Contents Overview 5 Objective 5 Scope 5 Opening Preparation 7 Step P1 Preliminary Check 8 Step P2 Cut the Underlay 9 Step
SECTION 07320 ROOFING TILE
 SECTION 07320 ROOFING TILE PART 1 - GENERAL 1.1 SUMMARY: A. Section Includes: 1. Vitrified clay roofing tiles. 2. Tile accessories. 3. Felt underlayment. 4. Self-adhering sheet underlayment. 5. Snow guards.
WINDOW INSTALLATION GUIDE FOR NEW CONSTRUCTION - WOOD FRAMING
 WINDOW INSTALLATION GUIDE FOR NEW CONSTRUCTION - WOOD FRAMING IMPORTANT NOTICES AND INFORMATION Read these instructions in their entirety prior to installing windows. Any local building code requirements
ROOF CONSTRUCTION Roof Styles Gable Roof Hip Roof Gambrel Roof
 ROOF CONSTRUCTION The overall appearance of a building is greatly affected by the roof lines and the roofing materials. The designer has many standard designs to choose from and should be able to find
K. D. FRAME ASSEMBLY FOR CLOSED STEEL STUD WALLS...Ins 10. FRAME INSTALLATION DETAILS FOR CLOSED STEEL STUD WALLS...Ins 11
 K. D. FRAME ASSEMBLY FOR MASONRY WALLS...........................Ins 2 FRAME INSTALLATION DETAILS FOR MASONRY WALLS......................Ins 3 INSTALLING EXISTING MASONRY WALL ANCHORS IN FRAME..................Ins
SINGLE FAMILY RESIDENCE HURRICANE MITIGATION APPLICATION
 SINGLE FAMILY RESIDENCE HURRICANE MITIGATION APPLICATION As of October 1, 2007, this mitigation form must be submitted as part of the roofing permit application package. Secondary water barrier (if applicable)
After reading this lesson you will be able to: 12.3 IMPORTANCE OF ROOF 12.4 TYPES OF ROOF IN A HOUSE
 86 :: Certificate in Construction Supervision (CIVIL) 12 ROOF 12.1 INTRODUCTION The structure provided to cover the house surface (floor) is known as roof. For different situation and requirement, it is
The better way to build TM. Installation Manual. FOUNDATION SIPs & FROST WALLS SIPs
 The better way to build TM Installation Manual FOUNDATION SIPs & FROST WALLS SIPs February 2016 PWF FOUNDATION & FROST WALL SIPs Installation Manual Table of Contents Topics General Requirements...................................
application instructions
 application instructions ARCHITECTURAL COLLECTION PRIMED BOLD PROFILE 120 SERIES LAP SIDING (D5, T4, D8, T5, Q4) General At the time of manufacture, siding meets or exceeds the performance standards set
How to Install GoBoard:
 How to Install GoBoard: A Step-by-Step Guide Durable, Ultra-Lightweight, Waterproof Tile Backer Board Introducing GoBoard Every tiling project requires a durable, waterproof surface under the tile, called
Storage Store the siding in a dry and ventilated area. Do not place it directly on the ground. Always cover the siding after a day s work.
 Installation Guide Before you begin, take the time to read this entire guide to clearly understand the requirements and steps to follow for proper installation. Warning Do not install defective material.
3.1 Water Intrusion Problems Related to Unsealed Stucco Penetrations
 3.1 Water Intrusion Problems Related to Unsealed Stucco Penetrations Any penetration through the stucco that is left unsealed will allow entry of moisture. Even an average size home can have an extreme
Directions For Applying Malarkey Laminate Shingles
 S Laminate Shingle Instructions 1 Directions For Applying Malarkey Laminate Shingles GENERAL INSTRUCTIONS Install Malarkey laminate shingles according to building code and local amendments. To qualify
Classic Products, Inc. ClickLock Standing Seam Installation Manual
 Classic Products, Inc. ClickLock Standing Seam Installation Manual Classic Products, Inc. 8510 Industry Park Drive Piqua, OH 45356 800.543.8938 Table of Contents page Introduction 1. 1 Starter. 2. 1 Panels.
AMERICAN GOTHIC PLAYHOUSE
 AMERICAN GOTHIC PLAYHOUSE Project Plan #856 Sheet 1 of 5 Pick a spot and get started with the beautiful that your kids will love. The design of the playhouse includes 35 square feet of interior space plus
GYPSUM BOARD, GYPSUM PANEL PRODUCTS AND PLASTER
 CHAPTER 25 GYPSUM BOARD, GYPSUM PANEL PRODUCTS AND PLASTER User note: Code change proposals to this chapter will be considered by the IBC Structural Code Development Committee during the 2016 (Group B)
Sample Drawing Package for One and Two Family Dwelling Applications
 Sample Drawing Package for One and Two Family Dwelling Applications For a full list of submission requirements, refer to the relevant checklist for your application found on our website: http://vancouver.ca/home-property-development/application-forms-and-checklists.aspx
DESIGN AND CONSTRUCTION GUIDELINES AND STANDARDS DIVISION 8 DOORS AND WINDOWS 08 50 00 WINDOWS
 SECTION INCLUDES Metal Windows Vinyl/Aluminum Clad Wood Windows Solid Fiberglass and Vinyl Windows Wood Windows (Historic Preservation only) RELATED SECTIONS 02 83 00 Lead Paint Remediation 06 10 00 Rough
Chapter 10 - Scaffolding Systems
 Chapter 10 - Scaffolding Systems Contents Chapter 10 - Scaffolding Systems... 10-1 Check and Oil the Pump Jacks... 10-4 Set Pump Jack Brackets... Error! Bookmark not defined. Set Pump Jack Poles... 10-5