Small Flat Panel Lift Arm FSA-1004 and KSA-1004
|
|
|
- Tamsin Anderson
- 9 years ago
- Views:
Transcription
1 I N S T A L L A T I O N I N S T R U C T I O N S Small Flat Panel Lift Arm FSA-1004 and KSA-1004 The Lift Arm is an accessory that can be used with a broad range of Small Flat Panel Displays. The allows the user to move a display vertically up or down in a 13 inch radius. The lift arm can be moved vertically 6-1/2 up from center and 6-1/2 down from center. Lift Arm The is designed to safely hold a display weighing up to 25 lbs. (11.3kg). The display can be up to 30 inches wide. The accommodates all VESA 75mm/100mm compliant displays. BEFORE YOU BEGIN CAUTION: To prevent damage to the mount, which could affect or void the Factory warranty, thoroughly study all instructions and illustrations before you begin to install the mount brackets. Pay particular attention to the Important Precautions on Page 2. If you have any questions about this installation, contact Chief Manufacturing at or CHIEF MANUFACTURING INC Rev. F FAX Chief Manufacturing 8401 EAGLE CREEK PARKWAY, STE. 0 SAVAGE, MINNESOTA USA 03/07

2 IMPORTANT WARNINGS and CAUTIONS! WARNING A WARNING alerts you to the possibility of serious injury or death if you do not follow the instructions. CAUTION A CAUTION alerts you to the possibility of damage or destruction of equipment if you do not follow the corresponding instructions. WARNING Improper installation can result in serious personal injury! Make sure that the mounting surface can support a redundant weight factor five times the total weight of the equipment: if not, reinforce the mounting surface structural members before installing the. WARNING Be aware of the potential for personal injury or damage to the unit if it is not adequately mounted. WARNING The installer is responsible for verifying that the mounting surface to which the is anchored will safely support the combined load of all attached components or other equipment. WARNING The combined weight of the display placed on the must not exceed 25 lbs. (11.3kg), the maximum load capacity of the mount. WARNING Watch for pinch points. Do not put your fingers between movable parts. WARNING Make sure the mount is correctly oriented. WARNING When using an OFB and adding an additional arm to an existing mount, the total number of arms on the mount cannot exceed two arms. CAUTION Check the unit for shipping damage before you begin the installation. CAUTION Over-tightening mounting screws may damage your display. CONTENTS TOOLS REQUIRED FOR INSTALLATION PARTS...3 PARTS LIST...3 INSTALLATION...4 Removing the Display from the Mount...4 Installing the Lift Arm...5 Installing base end of lift arm...5 Installing display end of lift arm...5 Adjusting Lateral Movement...6 Adjusting Lift Arm Tension...6 Cable Management...Error! Bookmark not defined. 5/32 Hex key wrench (provided) 3/16 Hex Key wrench (provided) NOTE: Other tools may be required depending on the method of installation. 2

3 PARTS Tension adjustment bolt Figure 1. Lift Arm Installation Drawing PARTS LIST Table 1. Lift Arm Parts PART DESCRIPTION QTY 10 LIFT ARM 1 20 WASHER, UHMW,.640 ID X.845 OD 2 30 WASHER, UHMWPE,.318 ID X.031 OD 2 40 PIVOT PIN, SPF 1 CAPSCREW, BUTTON HEAD 2 60 LOCK NUT, NYLOCK 1 SPACER, STAINLESS STEEL,.320 X LARGE LOCK NUT, NYLOCK 1 3

4 INSTALLATION Adding a lift arm modifies your mount configuration. This procedure applies to most small flat panel displays, particularly those with a pivot or swing arm, whether wall mount or desk mount. Removing the Display from the Mount To remove the display from its mount, perform the following steps: NOTE: Do not remove the four screws (not shown) that attach the display to the interface bracket. 1. Disconnect the power/audio/video cables from the display (not shown). 2. Remove the cap screw, washers, pivot pin, and retaining nut from the display end of the mount. Refer to Figure 2. Separate the display from the mount. 3. To remove the pivot pin (see Figure 2) from the other end, do the following: a. If the mount is a pivot/pitch wall mount, remove the attaching hardware from the display. b. If the mount is wall mounted, desk mounted, or has more than one swing arm, remove the attaching hardware from the arm closest to the display. NOTE: The two button head cap screws removed from the mount will be replaced with longer screws when the lift arm is installed. NOTE: Keep the pivot pin removed in step 2. This part will be used again when the lift arm is installed. Cap screw Small Washer Pivot Pin Large Washer Flat Washers Display Mount Parts Typical PART NAME QTY SCREW, CAP 2 WASHER, FLAT 4 SMALL WASHER, NYLON 2 LARGE WASHER, NYLON 2 NUT, NYLOCK 2 Nut Figure 2. Single Swing Arm (FWS-110) Example 4
. 2. Remove the cap screw, washers, pivot pin, and retaining nut from the display end of the mount. Refer to Figure 2.")
5 Installing the Lift Arm To install the lift arm, perform the following procedures: Installing base end of lift arm 1. Locate the tension adjustment bolt on the lift arm (see Figure 3). Install the pivot pin (40) and a washer (20) onto the base of the mount. 2. Assemble a button head cap screw (), one stainless steel washer (), washer (30), and a second stainless steel washer () onto button head cap screw () as shown in Figure Insert the screw assembly (step 2) into the pivot hole on the lift arm (10) and the base end of the mount. 4. Thread the lock nut (60) to the screw assembly (step 2) at the bottom of the mount. CAUTION: Over-tightening a tension screw () will cause excessive wear and may distort adjustment components. 5. Using the 3/16 hex key (provided), tighten the button head cap screw () into the nut (60) several turns, leaving flexibility in the hinged joint. Do not over-tighten the cap screw (). Installing display end of lift arm 1. Install the original pivot pin (see Figure 3) that was retained when the display was removed and a washer (20) onto the base of the mount. 2. Assemble a button head cap screw (), one stainless steel washer (), washer (30), and a second stainless steel washer () onto button head cap screw () as shown in Figure Insert the screw assembly (step 2) into the pivot hole on the lift arm (10) and the display end of the mount. 4. Thread the lock nut (80) to the screw assembly (step 2) at the bottom of the mount. CAUTION: Over-tightening a tension screw () will cause excessive wear and may distort adjustment components. 5. Using the 3/16 hex key (provided), tighten the button head cap screw () into the nut (80) several turns, leaving flexibility in the hinged joint. Do not over-tighten the cap screw (). Lift Arm Parts ITEM PART NAME QTY 10 LIFT ARM LARGE WASHER, NYLON 2 30 SMALL WASHER, NYLON 2 20 Original Pivot Pin 40 PIVOT PIN, SPF 1 CAP SCREW, BUTTON HEAD 2 60 LOCK NUT, NYLOCK 1 SPACER, STAINLESS STEEL 4 80 LARGE LOCK NUT, NYLOCK Figure 3. Installing Lift Arm 5
 into the pivot hole on the lift arm (10) and the base end of the mount. 4. Thread the lock nut (60) to the screw assembly (step 2) at the bottom of the mount.")
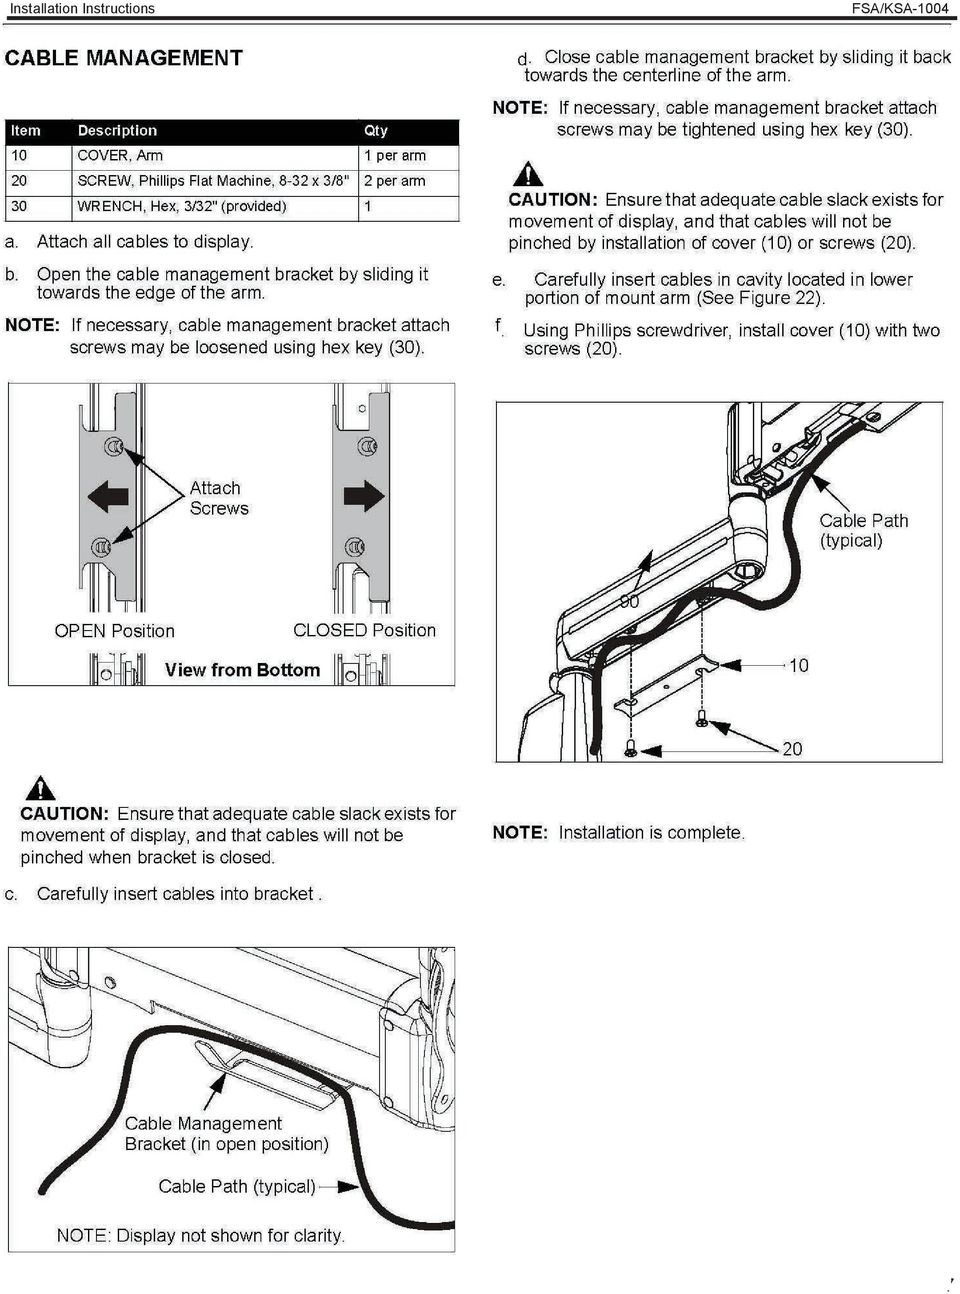
6 Adjusting Lateral Movement CAUTION: Over-tightening tension bolt will cause excessive wear and may distort adjustment components. Lateral Tension Adjustment Bolts (Typical) To adjust the lateral movement tension, perform the following procedures: 1. Slightly tighten or loosen the tension adjustment bolt. 2. Check for desired tension. Repeat as necessary. Adjusting Lift Arm Tension CAUTION: Over-tightening tension bolt will cause excessive wear and may distort adjustment components. Adjusting Lateral Movement To adjust the tension of the lift arm: 1. Raise or lower the lift arm until tension adjustment bolt appears in the opening. 2. Using the 5/32 hex key (provided), adjust the tension adjustment bolt, as follows: Lift Arm Tension Adjustment Bolt NOTE: There is no fixed number of revolutions to turn the tension adjustment bolt. Tighten or loosen the bolt, as needed. When the bolt is adjusted correctly, the display can be easily raised or lowered at any time, and stay in place without sagging. a. To increase lift arm tension, turn the tension adjustment bolt counterclockwise. b. To decrease lift arm tension, turn the tension adjustment bolt clockwise. 3. Raise or lower the lift arm to check for desired tension. Repeat step 2 as needed. Adjusting Lift Arm Tension 6

7 7
MEDIUM FLAT PANEL DISPLAY STATIC MOUNT MSR Series
 INSTALLATION INSTRUCTIONS MEDIUM FLAT PANEL DISPLAY STATIC MOUNT The static mount accommodates medium flat panel displays weighing up to 125 lbs (57 kgs). The teardrop holes in the mount allow for quick
ECM-D70T / ECM-D70T1.5
 Elliptical Ceiling Dual Mount for 37 to 50 Flat Panels INSTALLATION INSTRUCTIONS CREATING POSITIVE CUSTOMER EXPERIENCES 9531-041-001-01 Contents ECM-D70T / ECM-D70T1.5 Installation Tools... 3 Parts List...
Elo Touch Solutions Wall-mounting Kit for the 5501L IDS Touchmonitors
 Installation Manual Elo Touch Solutions Wall-mounting Kit for the 5501L IDS Touchmonitors SW602206 Rev B Table of Contents Chapter 1: Safety Warning... 3 Chapter 2: Kit Contents... 4 Included in Kit...
OWNER S MANUAL Table Tennis Table Patent Pending
 OWNER S MANUAL Table Tennis Table Patent Pending Be sure to write your model number and serial number here for future reference. You can find these numbers printed on the bottom of the table. MODEL # T8179
GEH6290. Mechanism Circuit Breaker. Handle Operating Mechanism Cat. No. Type NEMA 1, 3R, 12, 13 NEMA 4/4X Cat. No. Cat. No. Series Instruction
 GEH6290 g Cable Operator Mechanisms for E150, SE150, SF250, and SG600 Spectra RMS Circuit Breakers Type SCH1/1X, SCH2/2X Flange-Mounted Handle Assemblies, Cable Series SC3L SC10L and Type SC0M1A, SCOM1EF,
KEEP FOR FUTURE REFERENCE MRTALP VERTICAL LIFT BAR READ ALL INSTRUCTIONS AND WARNINGS BEFORE USING THIS PRODUCT
 KEEP FOR FUTURE REFERENCE INSTRUCTIONS P.O. Box 368 908 West Main Laurel, MT USA 59044 phone 800-548-7341 phone 406-628-8231 fax 406-628-8354 International Version MODEL NUMBER: LB10VLB MRTALP VERTICAL
Owner s Manual Gantry Cranes
 Owner s Manual Gantry Cranes Fixed Height Gantry Crane MODEL NUMBER: SERIAL NUMBER: CAPACITY IN TONS: Telescoping Gantry Crane Bushman AvonTec 262-790-4200, 800338-7810, Fax 262-790-4200 www.bushmanavontec.com
In-Ground Basketball System Owners Manual
 In-Ground Basketball System Owners Manual Customer Service Center N53 W4700 South Corporate Circle Sussex, WI 53089 U.S.A. Write Model Number From Box Here: WARNING! 3 Capable Adults REQUIRED TOOLS AND
HYDRAULIC TABLE CART 500-LB.
 HYDRAULIC TABLE CART 500-LB. OWNER S MANUAL WARNING: Read carefully and understand all MACHINE ADJUSTMENT AND OPERATION INSTRUCTIONS before operating. Failure to follow the safety rules and other basic
AMF112 (6904-002010 <00>) 13mm (1/2 in.)
 13mm (1/2 in.)") AMF112 () Concrete Wood 13mm (1/2 in.) 5.5mm (7/32 in.) 10mm (3/8 in.) Sanus Systems 2221 Hwy 36 West Saint Paul, MN 55113 USA Customer Service Americas: 800-359-5520 651-484-7988 [email protected] Europe,
AMF112 () Concrete Wood 13mm (1/2 in.) 5.5mm (7/32 in.) 10mm (3/8 in.) Sanus Systems 2221 Hwy 36 West Saint Paul, MN 55113 USA Customer Service Americas: 800-359-5520 651-484-7988 [email protected] Europe,
DB 18 & DB 18E Options
 DB 8 & DB 8E Options Assembly Manual Boom Truss Element Truss 6m Passive Inventory check DB 8 & DB 8 E Boom Truss Kit 7-004-0 QTY Part # Description 6 60-0045 /6 wire clips 4 60-0048 /6 Thimble 4 60-0044
AMF112 Instruction Manual
 AMF112 Instruction Manual Scan here to view product demo and install videos or visit san.us/103 Milestone AV Technologies 6436 City West Parkway Eden Prairie, MN 55344 USA Customer Service Americas: 800-359-5520
INSTALLATION INSTRUCTIONS
 INSTALLATION INSTRUCTIONS PARTS REQUIRED Single QuickStand Parts A (1) QuickStand Unit B (1) Base Plate C (1) Platform D (1) Palm Support E (1) VESA Plate F (6) M8 x 18 mm Flat Head Machine Screws G (4)
Roll-Up Door Maintenance Guide
 R Roll-Up Door Maintenance Guide Cable Replacement on Two Spring Type Balancer Page 1 Panel Replacement - Removable Roller Cover Type Bottom Panel Page 1 Panel Replacement - Removable Roller Cover Type
ATS Overhead Table Shelf System INSTRUCTION MANUAL
 ATS Overhead Table Shelf System INSTRUCTION MANUAL ATS Overhead Table Shelf System Instruction Manual Warranty Newport Corporation warrants this product to be free of defects in material and workmanship
CETAC Z-Drive Assembly
 CETAC Z-Drive Assembly Replacement Guide Manual Part Number 610144 Rev 1, 2012 CETAC Technologies, Printed in USA Overview This guide describes the necessary steps to replace the Z-drive assembly on your
Express5800/120Ed. Rack Mount Kit Installation Procedures PN: 455-01607-001
 Express5800/120Ed Rack Mount Kit Installation Procedures PN: 455-01607-001 Proprietary Notice and Liability Disclaimer The information disclosed in this document, including all designs and related materials,
Rollator Cane and Brake Replacement SAFETY SUMMARY (CONTINUED)
") Rollator Cane and Replacement Assembly, Installation and Operating Instructions SAVE THESE INSTRUCTIONS NOTE: Check ALL parts for shipping damage. If shipping damage is noted, DO NOT use. Contact Carrier/Dealer
Rollator Cane and Replacement Assembly, Installation and Operating Instructions SAVE THESE INSTRUCTIONS NOTE: Check ALL parts for shipping damage. If shipping damage is noted, DO NOT use. Contact Carrier/Dealer
Hinge Replacement & Hinge and Hardware Adjustment Guide for Andersen Frenchwood Hinged Patio Doors Manufactured Before November 2005
 Hinge Replacement & Hinge and Hardware Adjustment Guide for Andersen Frenchwood Hinged Patio Doors Manufactured Before November 2005 For ease of installation and continued enjoyment of your Andersen product,
Micro Cart User's Guide
 Micro Cart User's Guide To take full advantage of the ergonomic features of your new Sun Mountain Micro Cart, please read the following information. SUN MOUNTAIN 1 Your Micro Cart has several innovative
HYDRAULIC LIFT TABLE CART 2200-LB.
 HYDRAULIC LIFT TABLE CART 2200-LB. OWNER S MANUAL WARNING: Read carefully and understand all MACHINE ADJUSTMENT AND OPERATION INSTRUCTIONS before operating. Failure to follow the safety rules and other
OPERATIONS AND MAINTENANCE MANUAL ** UNCLASSIFIED ** PROPRIETARY & BUSINESS SENSITIVE INFORMATION
 INTRODUCTION 1 OPERATIONS AND MAINTENANCE MANUAL SERIES 500V5-RBM GENERAL INFORMATION 2 INSTALLATION SEAT ADJUSTMENT 3 4 Description, Operation, Maintenance and Illustrated System Breakdown SHOCK ABSORBER
SAN25 (6904-002001 <00>)
") SAN25 () Wood 002752.eps Concrete 13mm (1/2 in.) 5mm (3/16 in.) Sanus Systems 2221 Hwy 36 West Saint Paul, MN 55113 USA Customer Service Americas: 800-359-5520 651-484-7988 [email protected] Europe, Middle
SAN25 () Wood 002752.eps Concrete 13mm (1/2 in.) 5mm (3/16 in.) Sanus Systems 2221 Hwy 36 West Saint Paul, MN 55113 USA Customer Service Americas: 800-359-5520 651-484-7988 [email protected] Europe, Middle
6 inch A-Arm Lift Kit WARNING: 16-018/16-019. installation instructions. will fit CLUB CAR DS. included:
 Revised May 205 6-08/6-09 6 inch A-Arm Lift Kit will fit CLUB CAR DS installation instructions included: Rear Lift Blocks Main Suspension Assembly Spindles A-Arms Rear Shock Mounting Plates U-Bolts WARNING:
Wiper Motor Marinco 2.5. Installation Instructions
 Wiper Motor Marinco 2.5 Installation Instructions Wiper Motor Marinco-2.5 The Marinco 2.5 Wiper Motor Offers the Following Features: Fully sealed base and housing which allows installation in outdoor wet
NBA Arena Portable System
 REQUIRED TOOLS AND MATERIALS: Two (2) Capable Adults Tape Measure Wood Board 6 x 6 (scrap) N53 W24700 South Corporate Circle Sussex, WI 53089 U.S.A. NBA Arena Portable System Sawhorse or Support Table
DYNA RIDER FOOTBOARD KIT
 -J0 REV. 0-0-0 DYNA RIDER FOOTBOARD KIT GENERAL Kit Number 000 Models For model fitment information, see the P&A Retail Catalog or the Parts and Accessories section of www.harley-davidson.com (English
READ CAREFULLY - FAILURE TO FOLLOW INSTRUCTIONS AND SAFETY RULES MAY RESULT IN SERIOUS INJURY
 Owner s Manual LSP16H LS3001 LS3002H LS3003 LSP21H LS3101 LS3102H LS3103 LSP24H LS3201 LS3102H LS3103 LSP28H LS3301 LS3302H LS3303 mainframe bundle H-unit bundle accessory box mainframe bundle H-unit bundle
Operator s Manual. Pressure Injection Cell Model PC8500. Congratulations! Contents
 Operator s Manual Pressure Injection Cell Model PC8500 Congratulations! Congratulations on your purchase of a Next Advance Pressure Injection Cell. Please read this operator s manual which explains proper
LIFT-505. BMF Lift Kit. Yamaha Drive Gas or Electric. Installation Instructions
 LIFT-505 BMF Lift Kit Yamaha Drive Gas or Electric Installation Instructions Contents of LIFT-505 Yamaha Drive BMF Lift Kit: a (1 ea.) BMF A-Arm Assembly b (1 ea.) Driver Side Shock Tower c (1 ea.) Passenger
Strut Spring Compressor
 Strut Spring Compressor Item 43753 Read this material before using this product. Failure to do so can result in serious injury. SAVE THIS MANUAL. When unpacking, make sure that the product is intact and
SECTION G2: CABLE PROCESSOR MODULE MAINTENANCE
 SECTION G2: CABLE PROCESSOR MODULE MAINTENANCE Cable Processor Module overview WARNING! When tipping the Cable Processor Module back, (after removing the toggle arm pin), use extreme caution not to drop
SWIM N DUNK CHALLENGE RESIDENTIAL BASKETBALL GAMES And COMMERCIAL ASSEMBLY AND INSTALLATION INSTRUCTIONS
 SWIM N DUNK CHALLENGE RESIDENTIAL BASKETBALL GAMES And COMMERCIAL BASKETBALL GAMES ASSEMBLY AND INSTALLATION INSTRUCTIONS CORPORATE HEADQUARTERS WESTERN SALES AND MANUFACTURING PLANT P.O. Box 400 Canby,
F-Series Camera Mounting Accessories
 F-Series Camera Mounting Accessories Document Number: 427-0462-00-12 Version: 100 Issue Date: September 2010 2010. All rights reserved worldwide. FLIR Commercial Systems, Inc. 70 Castilian Drive Goleta,
CP2 Buried Cable Pedestal Initial & Rehab Installation Instructions
 Printing 3 March 2008 CP2 Buried Cable Pedestal Initial & Rehab Installation Instructions This instruction is intended for CP2 cable pedestal installations and replacements. The following tools will be
Slim Desk Mount Articulating Monitor Arm with Cable Management
 Slim Desk Mount Articulating Monitor Arm with Cable Management ARMSLIM *actual product may vary from photos DE: Bedienungsanleitung - de.startech.com FR: Guide de l'utilisateur - fr.startech.com ES: Guía
EZ-48-3AB-125-35 Weather Station Mounting Tripod and Mast
 EZ-48-3AB-125-35 Weather Station Mounting Tripod and Mast EZ-125-35M 35 Mast Extension (Optional) EZ-125-SK Stake Kit (Optional) EZ-46-3 Tar Pad Kit (Optional) EZ-GWA Guy Wire Kit (Optional) Ambient Weather
Overview PARTS LIST. B. Lever mounting base C. Flush handle assembly D. Grey/Blue float stop E. Grey float (Full Flush) F. Flush valve washer
 F. Flush valve washer") Overview READ ENTIRE INSTRUCTIONS BEFORE STARTING INSTALLATION PARTS LIST A. Flush valve B. Lever mounting base C. Flush handle assembly D. Grey/Blue float stop E. Grey float (Full Flush) F. Flush valve
Overview READ ENTIRE INSTRUCTIONS BEFORE STARTING INSTALLATION PARTS LIST A. Flush valve B. Lever mounting base C. Flush handle assembly D. Grey/Blue float stop E. Grey float (Full Flush) F. Flush valve
INSTALLATION AND OPERATING INSTRUCTIONS For Model GL1 Gate Locks
 Securitron Magnalock Corp. www.securitron.com ASSA ABLOY, the global leader Tel 800.624.5625 [email protected] in door opening solutions INSTALLATION AND OPERATING INSTRUCTIONS For Model GL1 Gate
FRONT BUMPER INSTALLATION INSTRUCTIONS 2007-2011 DODGE / MERCEDES SPRINTER
 Aluminess Products Inc 9402 Wheatlands Ct. #A Santee, CA 92071 619-449-9930 FRONT BUMPER INSTALLATION INSTRUCTIONS 2007-2011 DODGE / MERCEDES SPRINTER Please read before beginning Stainless steel hardware
Trillium 40 Axis Spring Tensioner Wire Replacement Instructions
 Trillium 40 Axis Spring Tensioner Wire Replacement Instructions 1 Overview The objective is to replace the broken axis spring tensioner wire. This requires the following tasks: 1. Remove the seismometer
Installation Manual. SKU# 21000 series (Base Rails) SKU# 22000 series (Overhead Racks)
 SKU# 22000 series (Overhead Racks)") Installation Manual SKU# 21000 series (Base Rails) SKU# 22000 series (Overhead Racks) Welcome to the world of TracRac! We re delighted that you have chosen TracRac, the ultimate sliding truck rack system.
Installation Manual SKU# 21000 series (Base Rails) SKU# 22000 series (Overhead Racks) Welcome to the world of TracRac! We re delighted that you have chosen TracRac, the ultimate sliding truck rack system.
Dell E Series Monitor VESA Mounting Bracket Installation Instructions
 Dell E Series Monitor VESA Mounting Bracket Installation Instructions The VESA mounting bracket enables a Wyse cloud client to be mounted to the Dell E Series Monitor. The bracket attaches to the monitor
1000-LB. TRAILER JACK OWNER S MANUAL
 1000-LB. TRAILER JACK OWNER S MANUAL WARNING: Read carefully and understand all INSTRUCTIONS before operating. Failure to follow the safety rules and other basic safety precautions may result in serious
Seismic Installation for Attic Storage System
 Your Performance Partner Seismic Installation for Storage System CONTENTS SSafety Precautions................................. 2 Required Tools..................................... 2 Parts and Fastener
758 Heavy-duty Ratchet Guy Wire Cutter
 INSTRUCTION MANUAL 758 Heavy-duty Ratchet Guy Wire Cutter Read and understand all of the instructions and safety information in this manual before operating or servicing this tool. Register this product
POD Visor Instructions
 POD Visor Instructions Please read fully before beginning assembly and mounting the Visor Parts List - Visor Left Part (LV), Visor Right Part (RV) Qty 2, Aluminum Crossbars Hardware - Qty 17, 1/4" X 3/4"
Mini Pallet Jack OWNER S MANUAL
 Mini Pallet Jack OWNER S MANUAL WARNING: Read carefully and understand all ASSEMBLY AND OPERATION INSTRUCTIONS before operating. Failure to follow the safety rules and other basic safety precautions may
Auto-belay Cable Replacement Process
 Auto-belay Cable Replacement Process Version 2.00 WARNING: The air pressure in the auto-belay system is what causes the cable to be retracted when releasing the cable or climbing the wall with the cable
Pallet Jack. OWNER S MANUAL Model MH1230. Important Safety Instructions Assembly Instructions Parts and Hardware Identification
 OWNER S MANUAL Model MH1230 Important Safety Instructions Assembly Instructions Parts and Hardware Identification Pallet Jack CAUTION: Read, understand and follow ALL instructions before using this product
CR25 Cable Roller Guide
 INSTRUCTION MANUAL CR25 Cable Roller Guide Read and understand all of the instructions and safety information in this manual before operating or servicing this tool. 52022071 2005 Greenlee Textron Inc.
Pulleys and Belt. Install the Major Accessory and Pulley. Install the Motor Pulley NOTE. Align the Motor Pulley and the Tool Pulley NOTE
 Pulleys and Belt Pulley Guard - 505862 Install the Major Accessory and Pulley 1. Place the short end of the mounting base holes, and insert - but don t tighten - the setscrews. If the Major Accessory has
RAIN COLLECTOR S HELF MANUAL
 RAIN COLLECTOR S HELF MANUAL The Rain Collector Shelf provides a good mounting support for your Rain Collector II. The Rain Collector Shelf is designed to be attached to Davis Sensor Mounting Arm, and
SCION tc 2005-2008 COIL OVER SUSPENSION Preparation
 SCION tc 2005-2008 COIL OVER SUSPENSION Preparation Part Number: PTR11-21070 NOTE: Part number of this accessory may not be the same as the part number shown. Kit Contents: Item # Quantity Reqd. Description
Installation Instructions: (Part # SB76880) XRC Armor Front Fender Kit
 XRC Armor Front Fender Kit") WARNING: Check with Local and State laws before installing this accessory! NOTE: Carefully read entire instructions thoroughly before attempting to install this part. Parts Included: Qty Parts Included:
WARNING: Check with Local and State laws before installing this accessory! NOTE: Carefully read entire instructions thoroughly before attempting to install this part. Parts Included: Qty Parts Included:
BUILT-IN DISHWASHER INSTALLATION INSTRUCTIONS
 BUILT-IN DISHWASHER INSTALLATION INSTRUCTIONS PLEASE READ COMPLETE INSTRUCTIONS BEFORE YOU BEGIN LEAVE INSTALLATION INSTRUCTIONS AND USER'S GUIDE WITH OWNER ALL ELECTRIC WIRING AND PLUMBING MUST BE DONE
INSTRUCTIONS: LocknCharge Laptop Carts
 INSTRUCTIONS: LocknCharge Laptop Carts www.lockncharge.com Extra Tools required: Hammer, Philips head screwdriver, medium adjustable spanner. (Allen key supplied) (Panel colours for illustration purposes
DANGER DANGER. General Information. Safety Is Your Responsibility. Ordering Parts. Contact Information
 Safety Safety Is Your Responsibility DANGER To avoid personal injury or death, carefully read and understand all instructions pertaining to the Anthony Liftgates product. Do not attempt to install, operate,
Owner s Manual & Safety Instructions
 Owner s Manual & Safety Instructions Save This Manual Keep this manual for the safety warnings and precautions, assembly, operating, inspection, maintenance and cleaning procedures. Write the product s
AstroSystems Digital Setting Circles for Zhumell, GSO, Apertura and Astro-Tech
 AstroSystems Digital Setting Circles for Zhumell, GSO, Apertura and Astro-Tech Components 1 Sky Commander Digital Setting Circle Computer 2 Encoders 10,000 step 1 Sky Commander Digital Setting Circle Manual
Wall-Mounting your HP computer. User Guide
 Wall-Mounting your HP computer User Guide The only warranties for Hewlett-Packard products and services are set forth in the express statements accompanying such products and services. Nothing herein should
Installation Instructions K900 series Door Closer
 Installation Instructions series Non-Hold Open Models Adjustable size : 1(BF) thru 6 Optional Feature : Delayed Action An Incorrectly installed or improperly adjusted door closer can cause property damage
149mm. Walk-Thru Assembly Gate. MODEL NO: 1161, 1167 Owner s Manual. www.regalo-baby.com
 149mm 210mm Walk-Thru Assembly Gate MODEL NO: 1161, 1167 Owner s Manual READ ALL INSTRUCTIONS BEFORE ASSEMBLY AND USE OF GATE. KEEP INSTRUCTIONS FOR FUTURE USE. www.regalo-baby.com... Regalo International,
VersaRack Installation Instructions. masterack. Tools Required:
 masterack Versaack Installation Instructions ll of us at asterack wish to thank you for your purchase of the Versaack. We are proud of this product and hope that you fi nd it a functional as well as a
POWER LOCK KIT GENERAL INSTALLATION -J04427 REV. 2007-12-04. Kit Number. Models. Additional Parts Required. Kit Contents
 -J0 REV. 00--0 POWER LOCK KIT GENERAL Kit Number -0, 0-0 Models For model fitment information, please see the P&A Retail Catalog or the Parts and Accessories section of www.harleydavidson.com (English
I BEAM TRACK INSTALLATION
 PDQ 0/700 FESTOON SYSTEM INSTALLATION AND MAINTENANCE INSTRUCTIONS INTRODUCTION The PDQ Festoon System was designed to run on one of three sizes of I-beams: S x., S8 x 8. and S x.. System trolleys must
Dell P Series Monitor VESA Mounting Bracket Installation Instructions
 Dell P Series Monitor VESA Mounting Bracket Installation Instructions The VESA mounting bracket enables a Wyse cloud client to be mounted to the Dell P Series Monitor and the Dell E24 Monitor. The cloud
Unpacking, Installation, and Customization
 Unpacking, Installation, and Customization NetShelter WX Enclosure AR100 AR100HD Contents Unpacking... 1 How to Unpack the Enclosure............................... 1 Please Recycle..........................................
4 in 1 Strength Station
 Revision 0 September 2010 4 in 1 Strength Station Owner s Manual Record Serial Number Here Platinum by Tunturi www.tunturi.com Date www.tunturi.com of Purchase 4 in 1 Strength Station Owner s Manual Instructions
Multi-Pitch Pitching Machine USER MANUAL
 Multi-Pitch Pitching Machine USER MANUAL TABLE OF CONTENTS Thank you for purchasing the Cimarron Multi-Pitch Pitching Machine. The Cimarron Multi-Pitch Pitching Machine is a high performance pitching machine
Triple Threat 3-in-1 Game Table 3 IN 1 GAME TABLE
 NG0M Triple Threat 3-in- Game Table 3 IN GAME TABLE Thank 3 in Y Game Table Thank you for your purchase of our product. We work around the clock and around the globe to ensure that our products maintain
TS93 EMR T/PT/TDE. Surface applied door closer
 TS EMR T/PT/TDE Surface applied door closer Installation instructions: Pull side track mount door closer with smoke detector (EMR T) Push side track mount door closer with smoke detector (EMR PT) Double
INSTALLATION INSTRUCTIONS MULTI-MOUNT KIT Part Number: 75330 Application: Warn HP PowerPlant P/N 71800
 INSTALLATION INSTRUCTIONS MULTI-MOUNT KIT Part Number: 75330 Application: Warn HP PowerPlant P/N 71800 Your safety, and the safety of others, is very important. To help you make informed decisions about
1 Ton Telescoping Gantry Crane
 1 Ton Telescoping Gantry Crane 41188 Gantry Crane Read this material before using this product. Failure to do so can result in serious injury. SAVE THIS MANUAL. When unpacking, make sure that the product
FUTURE MOBILITY HEALTHCARE APPRECIATES YOUR BUSINESS. OUR CUSTOMER SERVICE REPRESENTATIVES CAN BE CONTACTED AT: TO PLACE ORDERS: (905) 671-1661
 671-1661") PARTS MANUAL FUTURE MOBILITY HEALTHCARE APPRECIATES YOUR BUSINESS. OUR CUSTOMER SERVICE REPRESENTATIVES CAN BE CONTACTED AT: TO PLACE ORDERS: (905) 671-1661 FOR YOUR CONVENIENCE YOU MAY ALSO PLACE ORDERS
PARTS MANUAL FUTURE MOBILITY HEALTHCARE APPRECIATES YOUR BUSINESS. OUR CUSTOMER SERVICE REPRESENTATIVES CAN BE CONTACTED AT: TO PLACE ORDERS: (905) 671-1661 FOR YOUR CONVENIENCE YOU MAY ALSO PLACE ORDERS
Structural Holding System
 Structural Holding System Users Manual November 2013 by Vehicle Service Group. All rights reserved. CO8812.1 502071 Rev. - 11/21/2013 CHIEF'S LIMITED ONE-YEAR WARRANTY & LIABILITY Chief Automotive Technologies
M113 VEHICLE FAMILY RUBBER TRACK INSTALLATION INSTRUCTIONS SOUCY TRACK SYSTEM 04-M113-1ENS (SPLIT IDLER) Litho d in Canada 1 04-M113-1ENS
 Litho d in Canada 1 04-M113-1ENS") M113 VEHICLE FAMILY RUBBER TRACK INSTALLATION INSTRUCTIONS (SPLIT IDLER) 1 # TABLE OF CONTENTS List of parts and tools................................................3 Installation of complete kit...................................................5
M113 VEHICLE FAMILY RUBBER TRACK INSTALLATION INSTRUCTIONS (SPLIT IDLER) 1 # TABLE OF CONTENTS List of parts and tools................................................3 Installation of complete kit...................................................5
Rack Installation Instructions
 Rack Installation Instructions Guidelines This publication provides information about how to install your server into a standard rack cabinet using the rail kit shipped with your server. If you no longer
Table of Contents WARNING SYMBOLS AND DEFINITIONS
 Table of Contents SAFETY INSTALLATION OPERATION MAINTENANCE Safety... 2 Specifications... 4 Installation... 5 Operation... 8 WARNING SYMBOLS AND DEFINITIONS Maintenance... 9 Parts List and Assembly Diagram...
Series 30000 Hose Reels
 Operating Instructions and Parts List for Series 30000 Hose Reels - MANUAL DRIVEN - - POWER DRIVEN - SAFETY PRECAUTIONS Personal injury and/or equipment damage may result if proper safety precautions are
Assembly and Usage Instructions
 Assembly and Usage Instructions A Product 5885 West Van Horn Tavern Road Columbia, MO 65203 www.caldwellshooting.com Instruction #1001667 Limited Warranty Every Caldwell product is warrantied to be free
FOR ANY QUESTIONS, PLEASE CALL US @ 727.347.9915 M-F 8:00a.m.-8:00p.m. EST. REAR BRAKES 1 AEROSPACE COMPONENTS 727.347.9915
 REAR BRAKES 1 AEROSPACE COMPONENTS 727.347.9915 REAR BRAKES Before getting started, remove all stock braking components. Pre-assembly of parts: Clean the bolts and the threads in the hat with acetone.
12U Adjustable 4 Post Open Frame Server Rack
 12U Adjustable 4 Post Open Frame Server Rack 4POSTRACK12U *actual product may vary from photos DE: Bedienungsanleitung - de.startech.com FR: Guide de l'utilisateur - fr.startech.com ES: Guía del usuario
Kiosk Group, Inc. ASSEMBLY INSTRUCTIONS FOR THE STANDALONE. EXQUISITE ipad KIOSK. For ipad 2-3-4-5 Version Tablets.
 Kiosk Group, Inc. ASSEMBLY INSTRUCTIONS FOR THE STANDALONE EXQUISITE ipad KIOSK For ipad 2-3-4-5 Version Tablets ipad 2-3-4-5 Version Tablet Items Required: ipad data/power cable that came with your ipad.
Resharpening Companion
 Resharpening Companion 10950 Correct Angles, Pictures, and Step-By-Step Instructions The Resharpening Companion is meant to be a guide and quick reference to help you resharpen. It is not meant to replace
EXPLORE 4-Leg Teaming Table with Screen Share Assembly Instructions
 EXPLORE 4-Leg Teaming Table with Screen Share Monitor Display Requirements: your flat panel display must confirm to the following requirements. y With the stand removed, the monitor must not exceed 40
Installation Guide 2010 BMW S1000RR Full Exhaust System
 Installation Guide 2010 BMW S1000RR Full Exhaust System!! THIS PRODUCT IS DESIGNED FOR USE IN CLOSED COURSE RACING AND IS NOT INTENDED FOR HIGHWAY USE!! Congratulations on the purchase of your new TaylorMade
HEART Product Description Assembly Manual
 HEART Product Description Assembly Manual Part No. 620293B Revised February 25, 2009 2525 2525 Stemmons Stemmons Freeway Freeway Dallas, Dallas, Texas Texas 75207 75207 IMPORTANT: These These instructions
Installation Instructions 6028.801
 DAZZLE Installation Instructions 08.80 Spread Lavatory Faucet with Speed Connect Drain* Congratulations on purchasing your American Standard faucet with Speed Connect drain, a feature found only on American
Uninterruptible Power Supply. 500 kva - 750 kva
 9 315 Uninterruptible Power Supply 500 kva - 750 kva T1 and T3 Installation Addendum 164201244-001 Rev. A ------------------------------------------------------------------------ ------------------------------------------------------------------------
Invacare Mobile Recliners
 Owner s Operation and Maintenance Manual Invacare Mobile Recliners Three-Position Recliner Model IH6074A Deluxe Three-Position Recliner Model IH6065 series Clinical Recliner Model IH6077A DEALER: This
Cantina Wood Arc Hammock with Striped Polyspun Bed Set
 Cantina Wood Arc Hammock with Striped Polyspun Bed Set Model #: OP-WH01-RH02-CAN-K Assembly Instructions Please do not return this product to the store. Most likely, they do not stock parts and cannot
C O N V E Y O R C O M P O N E N T S C H A I N S B E L T S B E A R I N G S
 C O N V E Y O R C O M P O N E N T S C H A I N S B E L T S B E A R I N G S January 2009 Issue 6 Valu Guide Brackets The Ultimate in Adjustability and Cost Savings Valu Guide brackets are part of a family
JANUS INTERNATIONAL CORPORATION INSTALLATION INSTRUCTIONS Pantheon Mini Operator
 JANUS INTERNATIONAL CORPORATION INSTALLATION INSTRUCTIONS Pantheon Mini Operator The Janus Pantheon mini operator does not typically require the provision of any additional site requirements other than
PRS X-axis E-chain installation: For tools with a 12 Z-Axis
 PRS X-axis Energy Chain (Echain) Installation Page -1- PRS X-axis E-chain installation: For tools with a 12 Z-Axis This kit is compatible with PRS Shopbots that have an X-axis cutting area of 96 to 144.
SAFETY & OPERATING INSTRUCTIONS
 SAFETY & OPERATING INSTRUCTIONS EDLUND TOMATO LASER, Models ETL -316, -140 & -380 READ AND UNDERSTAND THIS MANUAL AND ALL INSTRUCTIONS BEFORE OPERATING THIS SLICER. 159 Industrial Parkway, Burlington,
Original Assembly Guide
 TCT Multipurpose Single Bevel Sliding Compound Mitre Saw Original Assembly Guide Read instructions before assembling this tool. Table of Contents GB Assembly Guide Read instructions before assembling this
2740 Whitten Rd Bldg 103 Memphis, TN 38133 Telephone 901-380-9290 Email [email protected]
 Fuel Injection Pump Replacement REMOVAL Diesel Care & Performance Inc 1. Disconnect negative battery terminal. 2. Remove throttle linkage. Fuel Injection Pump Bracket 3. Remove injection pump bracket.
SELF-STEERING AXLE TABLE OF CONTENTS
 SELF-STEERING AXLE TABLE OF CONTENTS Section 1 - Introduction Section 2 - Pre-Installation Check List Section 3 - Ride Height Adjustments Section 4 - Suspension Mount Section 5 - Axle Mount Section 6 -