CONCRETE FLOOR REPAIR/REMODEL SAMPLE SPECIFICATION LIGHT TRAFFIC RETAIL/COMMERCIAL APPLICATION
|
|
|
- Ambrose McDowell
- 7 years ago
- Views:
Transcription
1 CONCRETE FLOOR REPAIR/REMODEL SAMPLE SPECIFICATION LIGHT TRAFFIC RETAIL/COMMERCIAL APPLICATION Industry Standard Floor Joint Fillers and Concrete Repair Products P.O. Box 2217 Concord, NH

2 JOINT FILLING AND CONCRETE SLAB REPAIR PART 1 - GENERAL 1.1 DESCRIPTION OF WORK Provide all labor, products and equipment required to properly install semi-rigid filler in joints in the interior concrete floor slabs and low viscosity structural polymer required for narrow crack, surface spall, bolt hole, or defect repair. Scope of Work Fill all contraction and construction joints in the interior concrete floor slab where joints have been previously left unfilled. Joint filler removal and replacement where existing joints have been previously filled and show signs of deficiency. Repair of all non-moving narrow cracks with low viscosity structural repair polymer, 1/32 ¼. Repair of cracks greater than ¼ with rapid setting polyurea joint filler compound. Repair of surface defects including pop-outs, chips, spalls, and surface pitting. 1.2 SUBMITTALS Section Submittal Procedures: Procedures for Submittals. Contractor Qualifications Installer shall have been trained by Metzger/McGuire in performing the types of work covered by this Section and shall have Certified Repair and Remodel certification from Metzger/McGuire. Use only Metzger/McGuire Approved Applicators for work covered by this section. Applicator shall use tools and equipment specifically designed for the preparation and placement of industrial joint fillers. Product data for: Submit Manufacturer s data describing joint filler proposed for use on the project. Submit Manufacturer s Approved Applicator Certificate. All products and primary equipment used for repair of existing concrete slab defects. 1.3 ENVIRONMENTAL REQUIREMENTS Limit and control damage from excessive dust caused by demolition, preparation, and installation of all Work. Limit and control damage from moisture. All replaced concrete shall be cured a minimum of 28 days prior to joint filler installation. Concrete repair area shall be closed to traffic during preparation and repair for a time as recommended by manufacturer. PART 2 - PRODUCTS 2.1 MATERIALS Subject to compliance with project requirements, provide products as manufactured by the following: Metzger/McGuire (800) Polyurea Joint Filler: Rapid setting, two-component polyurea polymer liquid of 100% solids content, Shore hardness 85-92, compatible with construction materials in contact. Spal-Pro RS 88, by Metzger/McGuire. Match color of adjacent exposed concrete slab surface. Joint Filler Stain Preventing Film: (Where pre-installation test proves necessary) SPF by Metzger/McGuire. Low Viscosity Rigid Structural Polyurea/Urethane: Rapid Refloor, by Metzger/McGuire Rapid Refloor XP, by Metzger/McGuire. Match color of adjacent exposed concrete slab surface. Structural Epoxy Mortar Armor-Hard Extreme, by Metzger/McGuire

3 2.2 EQUIPMENT Subject to compliance with project requirements, provide equipment manufactured by the following: U.S. Saws, Santa Ana, CA (866) PerfectTrac, Haverill, MA (978) Joe Due Blades & Equipment, Mauston, WI (877) Joint Filler Removal and Preparation Dust Buggy, by U.S. Saws. PerfectTrac by PerfecTrac. Approved equal. Crack Repair: 5 Dustmizer 007, by Joe Due. 5 Crack Attacker, by Joe Due. 7 Handheld Crack Chaser, by Joe Due. SawTec 5 Tile Vac, by U.S. Saws. SawTec 7 Crac-Vac, by U.S.Saws. Approved equal. Surface Grinder: Handheld 5-7 electric surface grinder with dustless shroud/housing. SASE SC 50 with appropriate grinding/polishing pads from #50 metals to #800 resins Dust Avenger 5, by Joe Due. Dust Avenger 7, by Joe Due. SawTec 5 Grinder Vac, by U.S. Saws. SawTec 7 Grinder Vac, by U.S. Saws. Approved equal. PART 3 - EXECUTION 3.1 EXAMINATION An evaluation of the existing floor slab shall be conducted, identifying all defects. Scope of repairs shall be confirmed by the Owner and Architect of Record prior to commencement of work. Repairs are not acceptable unless specifically approved on a case-by-case basis by the Owner and/or Architect of Record. 3.2 PREPARATION Protect surface of slab immediately adjacent to defect under repair. 3.3 JOINT FILLER REPLACEMENT If joints have been previously filled and existing filler is loose, easily removed, or able to be forced downward with a hand tool, remove all filler material from joint. Where potential staining from new joint filler application may be objectionable, utilize Metzger/McGuire SPF-P (Stain Preventing Film) following manufacturer installation instructions. Place SPF prior to joint cleanout process commences. An acceptable alternative method is to tape both sides of the joint with painter s tape, etc. Clean existing joints full depth with a dry-cut, vacuum-equipped saw using a slightly oversized concrete diamond blade. The blade width should be sufficient to encapsulate the widest spall along a given contraction joint segment to produce a sharp corner on each side of the joint with a minimum of two passes through the joint. Remove all existing filler material where present. Clean joint of all debris and laitance. Refill with Spal-Pro RS88 polyurea joint filler per manufacturer s installation guidelines. Fill joints from the bottom up taking care not to entrap large air bubbles. Slightly overfill and shave flush to the slab surface after cure, approximately 1hr 4hrs after placement

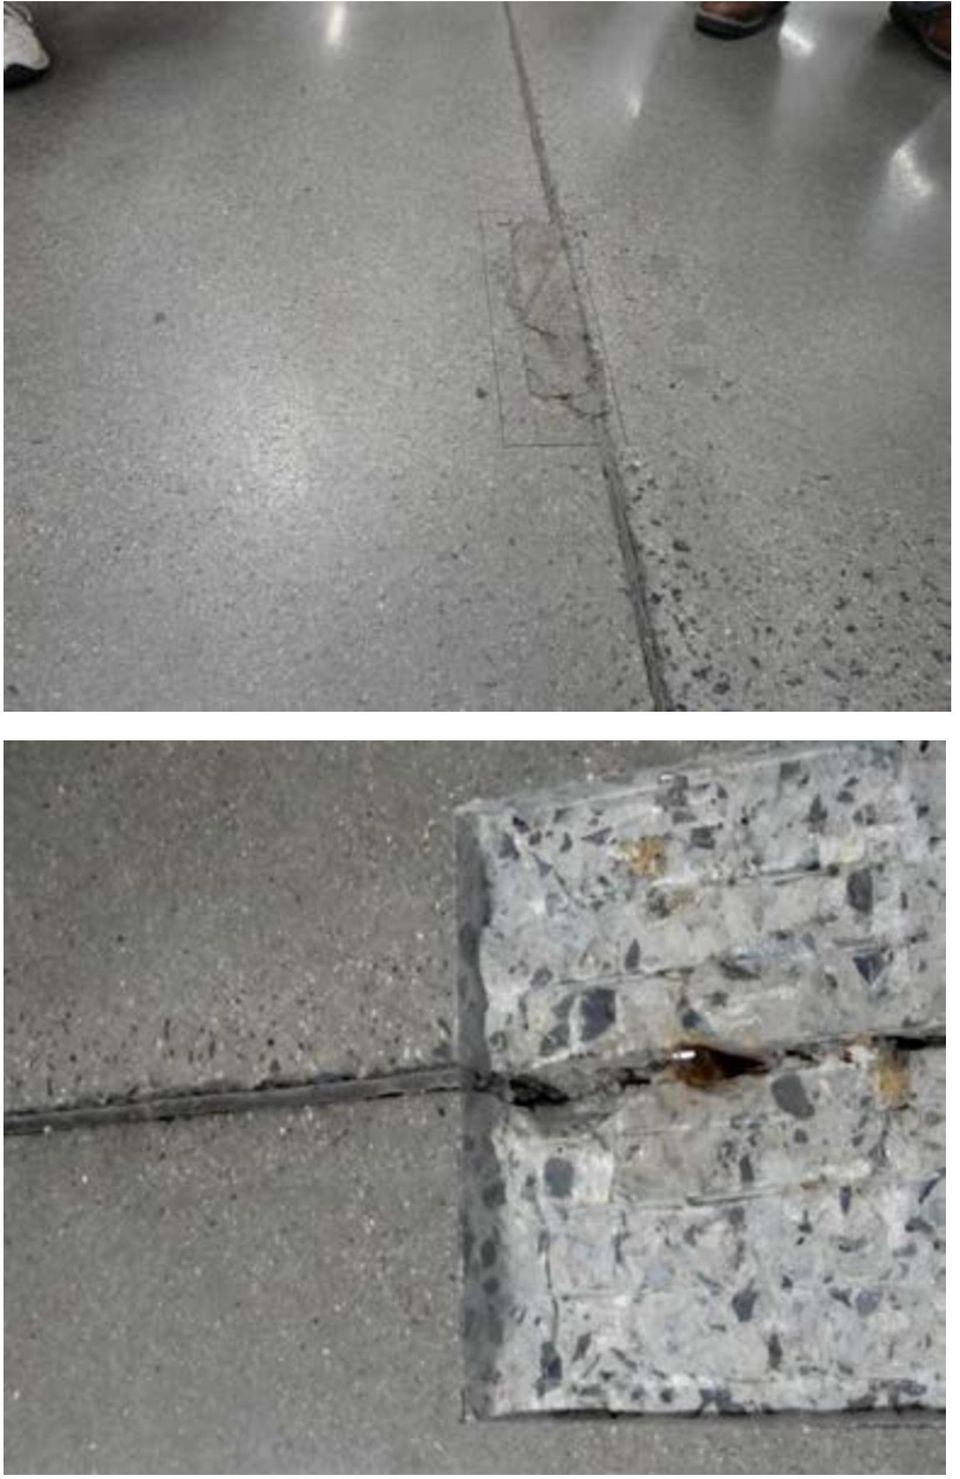
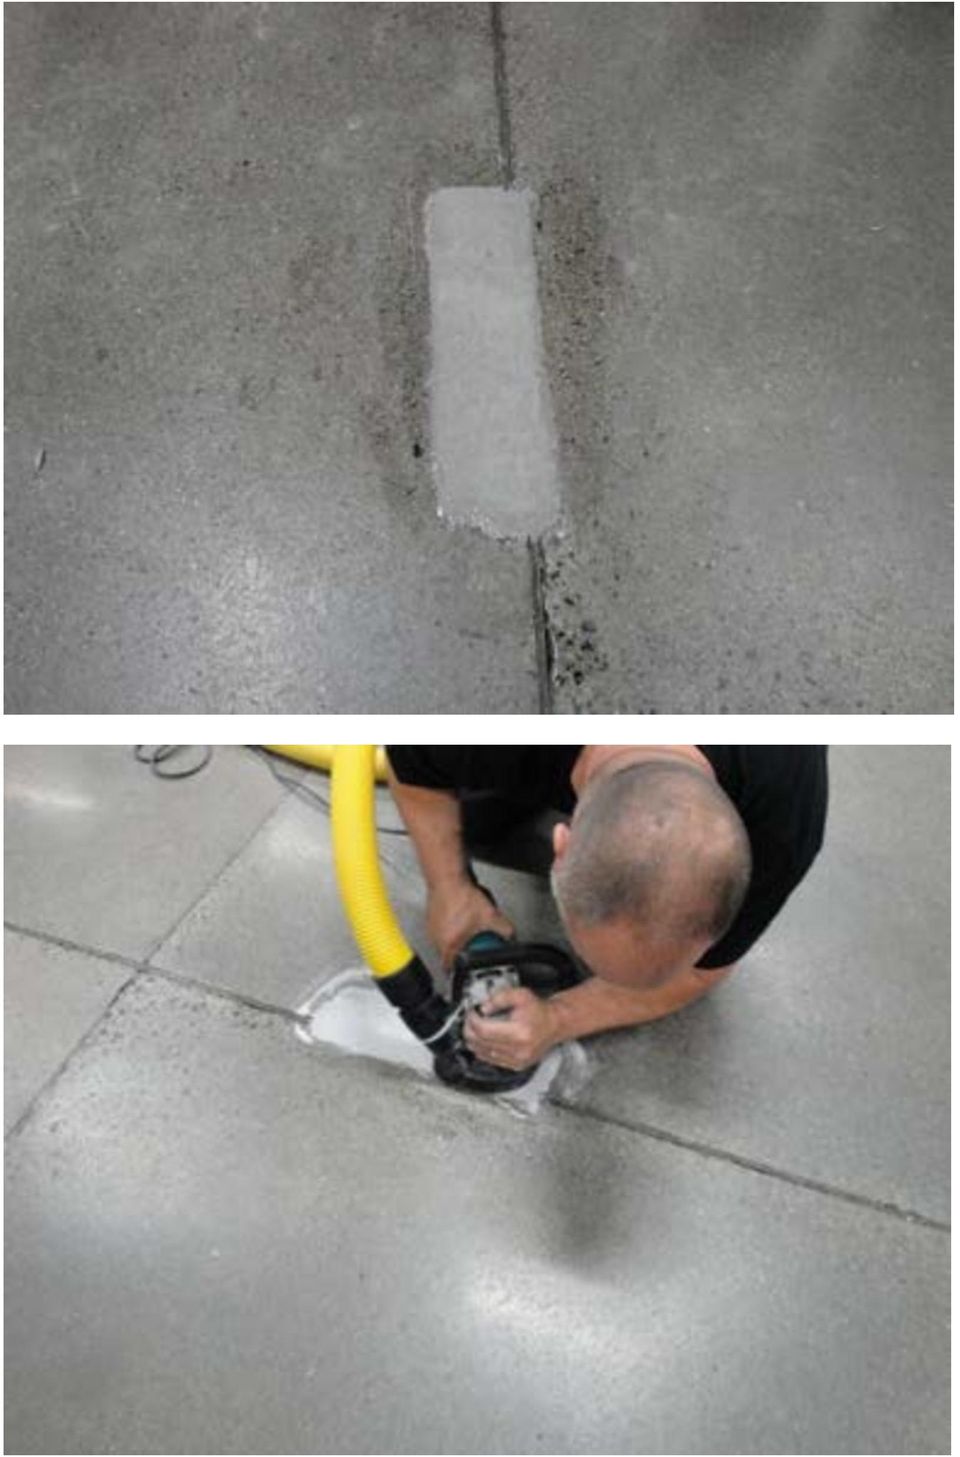
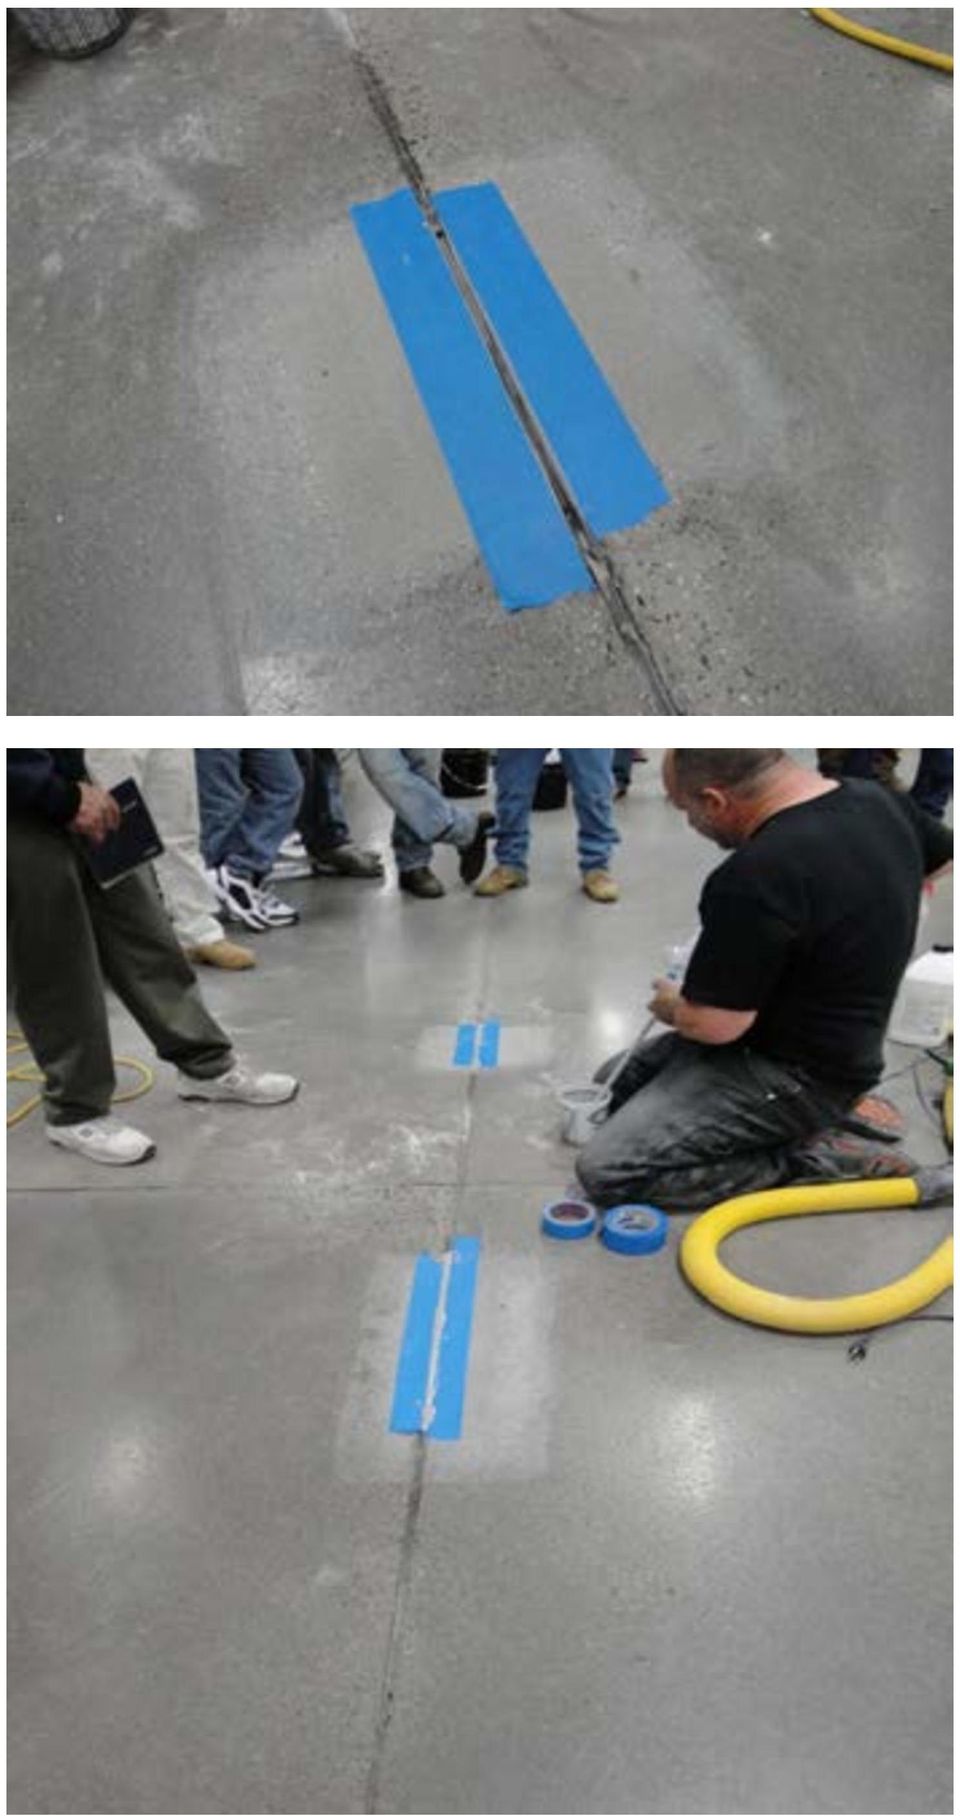
4 Step 1: Saw out all existing filler to full depth of original joint. Ensure that no residual filler remains on sides of joint walls or base of joint. Example of properly cleaned/prepared joint. All edges should be sharp and clean and joint base should be visible. Joint must be dry.

5 Step 2: Protect slab surface along joints using removable tape or Metzger/McGuire s SPF-P (stain prevention film). Slightly overfill joint with Spal-Pro RS 88 (color to match adjacent surface). Monitor regularly for seepage and re-apply if needed. Step 3: After cure razor off excess using razor scraper equipped with disposable blades. Monitor curing to test for optimal shave timing that yields flush material profile-typically between 35 mins. 2 hours. Blades should be changed often to ensure smooth cutting/profile.

6 3.4 SPALLED JOINT REPAIR (LESS THAN 1 ) For joints that are spalled or have radius tooled edges not exceeding 1 in width at slab surface. Where potential staining from new joint filler application may be objectionable, utilize Metzger/McGuire SPF-P (Stain Preventing Film) following manufacturer installation instructions. Re-saw the joint edge to a minimum depth of 3/4 with a dry-cut, vacuum-equipped saw allowing removal of the widest spall along a given joint segment to produce a sharp corner on each side of the joint with a minimum of two passes through joint. Clean joint of loose concrete, joint filler, laitance, dirt, debris, backer rod, etc. Joints must be free of all moisture. Fill joint cavity per manufacturer s instructions, taking care not to entrap large air bubbles. Overfill joint slightly and shave flush to slab surface prior to grinding process. It may be necessary to place a trace layer (1/8-1/4 ) of clean dry silica sand at the joint base to prevent material seepage down through the shrinkage crack. Step 1: Saw cut behind outside of any joint edge spalling to a minimum depth of ¾. Example of properly cleaned joint. Edges should be clean and crisp.

7 Step 2: Slightly overfill joint with Spal-Pro RS 88. Monitor joint for seepage/material loss and re-apply as needed. Step 3: After cure razor off excess using razor scraper equipped with disposable blades. Monitor curing to test for optimpal shave timing that yields flush material profile-typically between 35 mins. 2 hours. Blades should be changed often to ensure smooth cutting/profile. 3.5 SPALLED JOINT REPAIR (GREATER THAN 1 ) OR LARGE SURFACE REPAIR For joints that are spalled or have radius tooled edges exceeding 1 in width at slab surface. Where potential staining from new joint filler application may be objectionable, utilize Metzger/McGuire SPF (Stain Preventing Film) following manufacturer installation instructions.
 OR LARGE SURFACE REPAIR For joints that are spalled or have radius tooled edges exceeding 1 in width at slab surface.")
8 Saw lines behind the joint edge or surface spall to a minimum depth of 3/4 with a dry-cut, vacuum-equipped saw allowing removal of the widest spall along a given joint segment to produce a sharp corner on each side of the joint repair. Vacuum newly formed channel clean. If repairing joint, place backer rod or sand in original joint below the newly formed shelf to prevent Armor-Hard from running into existing joint. Mix and place Armor-Hard Extreme mortar into repair cavity Trowel Armor-Hard Extreme mortar flush with floor surface. If repairing joint only: Snap a chalk line over existing joint Re-saw cut completely through Armor-Hard Extreme repair to the depth of original joint. Fill newly created joint with Spal-Pro RS 88 After Spal-Pro RS 88 cures razor off overfill flush with floor surface. If large surface repair or joint repair, for best match to surrounding polished concrete surface: For initial grind, use #50 metals After #50 metals, polish repair using the following resin steps: 100, 200, 400 Apply thin coat of lithium densifier (Consolideck LS or Ameripolish 3DHSL), then do final polish with 800 resin disc Step 1: Saw cut lines behind outside of joint spalling to a nominal depth of ¾

9 Step 2: Prime newly cut repair channel with neat liquid Armor Hard Extreme Step 3: Fill channel with Armor Hard Extreme mortar, trowel flush with floor surface

10 Step 4. Allow mortar to cure into solid (2 hrs plus) and grind flush with floor surface. Step 5: Snap chalk line over existing joint.

11 Step 6: Saw cut along chalk line over existing joint. Cut should go completely into original joint. Step 8: Mask joint edge with tape of SPF-P. Slightly overfill joint with Spal-Pro RS 88.

12 Step 9: Razor off Spal-Pro RS 88 overfill flush with repair/floor surface. Example sequence of photos showing additional required steps to best blend repair area to surrounding concrete

13
14
15

16
17 3.6 CRACK REPAIR Cracks from 1/32 to 1/4 in width. a. Clean crack cavity b. Remove loose concrete, dirt and debris from crack with a wire brush or hand grinder with wire or Nylalox wheel. c. Remove any loose segments, including islands formed by crack, with sharp tool. d. Use methods that will not widen existing crack if possible. e. Vacuum crack to remove all dirt, debris and other laitance. f. Mask slab surface along crack as necessary to minimize overfill. g. Choose material color that closely matches the adjacent floor. h. Install Rapid Refloor in accordance with manufacturer s instructions. i. Repeat until all voids are filled and material crowns slab surface. j. Watch for bubble formation and off gassing as that would indicate that moisture is present in crack cavity and steps will need to be taken to dry area prior to further repairs. k. Do not allow material to gel before adding additional material. l. Grind material flush to surface upon full cure, approximately 30 minutes 1 hour. Step 1: Chase crack using small grinder equipped with Nyalox or soft wire wheel brush.

18 Step 2: Vacuum clean, ensuring crack is free of all loose debris and dust. Step 3: Gradually overfill crack with Rapid Refloor. Monitor crack for seepage and refill as needed prior to material cure.

19 Step 4: After material cure (approximately 30 mins. or more) grind overfill flush with floor surface using specified finishing pads. Cracks from ¼ ¾ in width Saw along crack to provide square edge, minimum ½ in depth Use small hand grinder with maximum 5 diameter blade with dust attachment. Take care to minimize overall crack width. Clean crack cavity. Vacuum crack to remove all dirt, debris and other laitance. Remove all visible moisture. Mask slab surface along crack as necessary to minimize overfill or utilize Metzger/McGuire SPF-P (Stain Preventing Film) to prevent residual staining from overfill. Install Spal-Pro RS 88 rapid set polyurea joint filler per installation instructions. a. Wait approximately 35 mins-1 hour, periodically checking for material cure. b. Check condition of material by shaving with razor scraper. c. Check condition of material by shaving with razor scraper. d. Material will shave smooth when cured. Proper timing is crucial, typically 1hr to 4hrs after placement 1) Too long and material will be difficult to shave 2) Too soon and material will ravel. Shave material flush to slab surface per manufacturer s instructions.
 to prevent residual staining from overfill.")
20 Step 1: Chase cracks using vacuum equipped angle grinder with diamond blade to a nominal depth of ½. Example of properly prepared crack. Edges should be neat and crisp; nominal depth of repair ½ deep.

21 Step 2: Gradually overfill crack with Spal-Pro RS 88.Monitor for seepage and refill as needed prior to material cure. Step 3: After Spal-Pro RS 88 cures (approximately 45 minutes minimum) razor off overfill leaving flush filler profile. Monitor various razoring times to find best finished profile. 3.7 SURFACE SPALLING/BOLT HOLE REPAIR Less than 6 Diamater a. Use wire or Nyalox brush to remove all dirt and laitance from spalled surface. b. If bolt is present, cut off or pound down at least ½ below floor surface. c. Mask slab at perimeter of spall with tape or SPF-P if needed.
22 d. Fill spalled cavity and finish flush with floor surface. e. Slightly overfill defect with Rapid Refloor f. Allow to material to cure into a hard solid (30 mins. or more) g. Grind Rapid Refloor flush with floor surface using specified finishing pads. NOTE: Where isolated or localized surface spalling has occurred adjacent to joints, a form material may be needed to temporarily support vertical face of spalled joint edge. Ensure that the repair material will not adhere to the form. Step 1: Clean defect of all dirt and debris using soft wire or Nyalox wheel. Step 2: Slightly overfill defect with Rapid Refloor, allow to cure 30 mins or more.
23 Step 3: Grind off cured material flush with floor surface. Edge spall repair Step 1: Dam off area around edge spall. Slightly overfill with Rapid Refloor
24 Step 2: Grind off Rapid Refloor overfill flush with floor surface. Step 3: Re-saw cut through repair along edge of joint spall repair.
25 Finished example of joint edge spall repair. 3.8 MULTIPLE SMALL SURFACE PITTING/PIN HOLES For surfaces consisting of micro-deficiencies, pin holes, hairline cracks and other surface clutter that impedes the achievement of the specified overall gloss values 1. Clean pitted sections with 90-degree angle grinder equipped with wire wheel to remove all dirt/laitance. Wheel should be run over defect in multiple directions to ensure proper cleaning. 2. Vacuum prepared pitted sections and entire floor surface per installation instructions. 3. Install and disperse Rapid Refloor Pit Grout over entire floor surface area and work into the surface using a metal smoother or rigid edged trowel or screeding device. 4. Ensure a thin, uniform layer of repair material covers the pitted areas. Monitor surface for air holes resulting from entrapped air and re-apply as needed. In some cases more than one coat will be required for best results. If two coatsare desired, first coat should be ground off prior to installing 5. Grind or polish flush with metal or resin-bond diamonds, ensuring repair material is flush with slab surface. 6. Repeat repairs in areas as required if repair material pulls out of defects. 7. Per manufacturer s directions, apply required applications of densifier, specified dye and polish smooth to meet specified overall gloss values.
26 Existing Condition Cleaning Defects
27 Spreading and Troweling Down Pit Grout Fully coated area
28 Condition After Initial Metal Grind Finishing with Resin Pad
29 Condition After Resin Finishing Finished Condition After Densification 3.9 PROTECTION Protect surfaces of finished floor. Prohibit traffic until floor repairs have received final approval by Owner. END OF SECTION
SECTION 03 35 43 POLISHED CONCRETE FINISHING
 SECTION 03 35 43 POLISHED CONCRETE FINISHING PART 1 - GENERAL 1.01 SUMMARY A. Provide polished concrete finishing system where indicated on drawings, complete. This section includes the following: 1. Concrete
Sample Specification Guideline for Installing a Polished Overlay Using Rapid Set TRU Self-Leveling SECTION 03 35 53 POLISHED CONCRETE TOPPING
 Sample Specification Guideline for Installing a Polished Overlay Using Rapid Set TRU Self-Leveling SECTION 03 35 53 POLISHED CONCRETE TOPPING PART 1 - GENERAL 1.1 RELATED DOCUMENTS A. Drawings and general
SECTION 03 35 43 - POLISHED CONCRETE FINISHING. InovaCrete Polished Concrete Floor Finish (GUIDE SPEC)
") SECTION 03 35 43 - POLISHED CONCRETE FINISHING InovaCrete Polished Concrete Floor Finish (GUIDE SPEC) PART 1 GENERAL 1.01 SUMMARY This Section includes information about: A. Polished concrete finish in
SECTION 03 35 43 - POLISHED CONCRETE FINISHING InovaCrete Polished Concrete Floor Finish (GUIDE SPEC) PART 1 GENERAL 1.01 SUMMARY This Section includes information about: A. Polished concrete finish in
ARDEX GUIDE SPECIFICATION
 ARDEX GUIDE SPECIFICATION ARDEX ULTRAFLOR POLISHED CONCRETE Part of the ULTRAFLOR ARDEX DIAMATIC Polished Concrete System SECTION 03 35 53 POLISHED CONCRETE PART 1 - GENERAL 1.1 RELATED DOCUMENTS A. Drawings,
SECTION 03 35 43. Formatted Specification for the ULTRAFLOR DIAMATIC Topical Polished Concrete System DRAFT
 SECTION 03 35 43 Formatted Specification for the ULTRAFLOR DIAMATIC Topical Polished Concrete System PART I GENERAL 1.01 SUMMARY A. This is the recommended specification for ULTRAFLOR DIAMATIC Topical
Section 03 35 43 Polished Concrete Finishing. Vexcon
 SS 120 1-13 Section 03 35 43 Polished Concrete Finishing Specifier Note: This product guide specification is written according to the Construction Specifications Institute (CSI) 3-part format. This section
SECTION 623 CONCRETE BONDING COMPOUND, EPOXY MORTAR AND EPOXY POLYMER CONCRETE OVERLAY SECTION 623.10 CONCRETE BONDING COMPOUND.
 SECTION 623 CONCRETE BONDING COMPOUND, EPOXY MORTAR AND EPOXY POLYMER CONCRETE OVERLAY SECTION 623.10 CONCRETE BONDING COMPOUND. 623.10.1 Description. This work shall consist of preparing the surface,
CORROSION ENGINEERING RESIN-BASED POLYMER CONCRETES AND GROUTS
 AN ERGONARMOR COMPANY TECHNICAL INFORMATION SPECIFICATION FOR INSTALLATION 07/11 SUPERSEDES 04/00 PAGE 1 OF 6 CORROSION ENGINEERING RESIN-BASED POLYMER CONCRETES AND GROUTS 1. SCOPE 1.1 This specification
MASONRY RESTORATION Lime Putty Mortar Repointing Guide
 1.0 Preparation for Lime Putty Mortar Pointing 1.1 Tools & Approach A. Grinding - When used in a controlled way, angle grinders with diamond-impregnated metal blades with a maximum 1/8-inch-thickness and
738-B-297 POLYMERIC CONCRETE BRIDGE DECK OVERLAY. (Adopted 02-20-14)
") POLYMERIC CONCRETE BRIDGE DECK OVERLAY (Adopted 02-20-14) Description The polymeric concrete bridge deck overlay shall consist of an epoxy polymer that acts together with special aggregate to form an overlay
POLYMERIC CONCRETE BRIDGE DECK OVERLAY (Adopted 02-20-14) Description The polymeric concrete bridge deck overlay shall consist of an epoxy polymer that acts together with special aggregate to form an overlay
ARDEX GUIDE SPECIFICATION ARDEX Exterior Concrete Repair & Resurfacing Polymer-Modified, Cement-Based, Patch & Horizontal Overlay Materials
 ARDEX GUIDE SPECIFICATION ARDEX Exterior Concrete Repair & Resurfacing Polymer-Modified, Cement-Based, Patch & Horizontal Overlay Materials SECTION 03 92 50 PART 1 - GENERAL 1.1 RELATED DOCUMENTS A. Drawings,
Minor Cracks in Horizontal Surfaces
 Cracks, chips and broken or flaking areas in concrete are not only unsightly, they can lead to further deterioration of the surface. The result is a costly replacement project as opposed to a simple repair.
1.1 This section is to be utilized for polishing both integral colored or natural gray concrete floors.
 SECTION 03 35 43 - CONCRETE POLISHING - NEW STORES PART 1 - GENERAL 1.1 This section is to be utilized for polishing both integral colored or natural gray concrete floors. A. Refer to concrete polishing
INDUSTRIAL FLOORING INSTALLATION CHALLENGES. James C. Ziegler, ArmorSeal Product Manager Sherwin Williams Cincinnati, Ohio, USA
 INDUSTRIAL FLOORING INSTALLATION CHALLENGES James C. Ziegler, ArmorSeal Product Manager Sherwin Williams Cincinnati, Ohio, USA Abstract: Specifier's and contractors not only need to properly evaluate the
BENTLEY ELEMENTS COLLECTION LVT
 This document refers to the following products: Product Size Installation direction Seams treatment Elements Tiles See specifications 90 None Elements Planks See specifications Stair Step None Note: This
Metropolitan Builders Association Masonry & Concrete Standard
 Metropolitan Builders Association Masonry & Concrete Standard Background Masonry and concrete work in residential construction often provides the base structure upon which the house is built or as a veneer.
GUIDELINES FOR POLISHED CONCRETE FLOORS A Guide for Integrally Colored, Dyed and Stained Polished Floors
 GUIDELINES FOR POLISHED CONCRETE FLOORS A Guide for Integrally Colored, Dyed and Stained Polished Floors 8 3 2 9 Mo n ti c el l o Roa d, S ha w n e e, K S 6 6 2 2 7 T e l: (9 1 3 ) 4 2 2-4 4 4 3 Fa x :
SCENIC VIEW SV 10 SECTION 08 87 13 SOLAR CONTROL FILMS
 PART 1 GENERAL SCENIC VIEW SV 10 SECTION 08 87 13 SOLAR CONTROL FILMS 1.1 SUMMARY A. Optically clear dual reflective, neutral sputtered and aluminum metallized polyester film for solar control. 1.2 RELATED
INSTALLATION RECOMMENDATIONS. Outdoor Rubber Tiles
 INSTALLATION RECOMMENDATIONS Outdoor Rubber Tiles Prior to Installation: The Outdoor Rubber Tiles and accessory transition pieces intended for this installation have been shipped to you via a freight carrier
Natural Thin Stone Veneer
 Natural Thin Stone Veneer Until recently, if a project called for the natural look of stone but could not support its weight or thickness, the options were limited to manufactured imitation stone. More
Sikaflex Sealant Installation. Sika Corporation
 Sikaflex Sealant Installation 1 Critical Success Factors Substrate preparation If done properly would probably eliminate 95% of all call backs Most common mode of sealant failure Must remove all weak material
Division 9. SignaFlor Pad and Pour Flooring System
 Division 9 SignaFlor Pad and Pour Flooring System SPECIFICATIONS Page 1. General... 2 1.1 Description 2 1.2 Quality Assurance 2 1.3 Submittals 2 1.4 Delivery and Storage 3 1.5 Warranty 3 1.6 Working Conditions
Wecryl Waterproofing System under surfacing supplied by others
 Brief description The Wecryl waterproofing system allows a high-quality, seamless and crack-bridging waterproofing layer to be installed under loose-laid or bonded surfacing supplied by others (stone slabs,
CRACK and JOINT REPAIRS on INDUSTRIAL CONCRETE FLOORS, PAVEMENTS and SECONDARY CONTAINMENT AREAS
 CRACK and JOINT REPAIRS on INDUSTRIAL CONCRETE FLOORS, PAVEMENTS and SECONDARY CONTAINMENT AREAS Introduction Defects that affect the structural integrity, water and chemical proofing, ride and walking
INSTALLATION INSTRUCTION - INSTRUCCIONES DE INSTALACION FOR DOUBLE-HUNG VENT REPLACEMENT WINDOW
 Vinyl Windows and Doors Manufactured by Pella Corporation INSTALLATION INSTRUCTION - INSTRUCCIONES DE INSTALACION FOR DOUBLE-HUNG VENT REPLACEMENT WINDOW Lea las instrucciones en español en el reverso.
NEW ELECTRICAL SUBSTATION Building 300 SECTION 07 53 23 ETHYLENE-PROPYLENE-DIENE-MONOMER ROOFING WORK
 ETHYLENE-PROPYLENE-DIENE-MONOMER ROOFING WORK PART 1 GENERAL 1.1 REFERENCES The publications listed below form a part of this specification to the extent referenced. The publications are referred to within
SECTION 1 GENERAL REQUIREMENTS
 Page 1 of 6 SECTION 1 GENERAL REQUIREMENTS 1. SCOPE OF WORK: The work to be performed under the provisions of these documents and the contract based thereon includes furnishing all labor, equipment, materials,
Shower Walls and Tub Surrounds
 Reverso en español TEC Skill Set How-To Project Guide Shower Walls and Tub Surrounds 3 Steps to a Beautiful Tile Surface! 1. Prepare the surface 2. Set the tile 3. Grout and caulk H.B. Fuller Construction
PERFORMANCE GUIDELINES
 1. Foundation/Basement 17 PERFORMANCE GUIDELINES 1. FOUNDATION/BASEMENT 1.1 Efflorescence on concrete or masonry surfaces Efflorescence is the formation of a white crystalline or powdery deposit on the
STANDARD SPECIFICATIONS SECTION 03461 PRECAST REINFORCED CONCRETE MANHOLES AND MANHOLE BASES. 1. Structure Earthwork: 02200
 STANDARD SPECIFICATIONS SECTION 03461 PRECAST REINFORCED CONCRETE MANHOLES AND MANHOLE BASES PART 1 - GENERAL A. Description This section includes materials, testing, and installation of precast concrete
SECTION 033543 - POLISHED CONCRETE FLOOR FINISHING
 SECTION 033543 - PART 1 - GENERAL 1.01 SUMMARY A. Section Includes: Products and procedures for placement, finishing, and polishing new cast-inplace concrete floors. 1.02 RELATED REQUIREMENTS A. Section
METHOD STATEMENT 006 TORCH APPLIED MEMBRANE TO BASEMENT WALLS
 This Document is designed to cover best practice installation procedures for a one layer torch applied sheet membrane system to basement walls. PRELIMINARY WORK Ensure that all surface preparation work,
1.02 DESCRIPTION A. This Section specifies furnishing and installing Cast in Place Detectable/Tactile Warning Surface tiles where indicated.
 CAST IN PLACE DETECTABLE/TACTILE WARNING SURFACE TILE PART 1 GENERAL 1.01 RELATED DOCUMENTS A. Drawings and general provisions of Contract, including General and Special Conditions and Division 1 Specifications
UNIVERSITY OF CHICAGO ELEVATOR PIT LEAK REPAIR
 ITEM: UNIVERSITY OF CHICAGO ELEVATOR PIT LEAK REPAIR DESCRIPTION: General Furnish all labor, equipment, and materials necessary and incidental thereto to perform all required operations to eliminate the
September 1, 2003 CONCRETE MANUAL 5-694.900 CONCRETE PAVEMENT REHABILITATION 5-694.900
 September 1, 2003 CONCRETE MANUAL 5-694.900 5-694.901 GENERAL CONCRETE PAVEMENT REHABILITATION 5-694.900 Concrete Pavement Rehabilitation is an extremely valuable tool of the Minnesota Department of Transportation
GRINDING GUIDE CONCRETE POLISHING SOFT CONCRETE EXPOSED AGGREGATE HEAVIER MACHINES (650/680/800/820/950)
") GRINDING GUIDE CONCRETE POLISHING SOFT CONCRETE EXPOSED AGGREGATE HEAVIER MACHINES (650/680/800/820/950) 1 POLISHING CONCRETE SOFT CONCRETE STEP 12 STEP 13 STEP 1 STEP 11 STEP 2 STEP 10 3500 STEP 3 1800
GRINDING GUIDE CONCRETE POLISHING SOFT CONCRETE EXPOSED AGGREGATE HEAVIER MACHINES (650/680/800/820/950) 1 POLISHING CONCRETE SOFT CONCRETE STEP 12 STEP 13 STEP 1 STEP 11 STEP 2 STEP 10 3500 STEP 3 1800
Installation PowerPoint for Grasscrete Formers
 Installation PowerPoint for Grasscrete Formers 1 This document describes the two single-use tools utilized to create the Grasscrete product. The original Former is a vacuum formed light gauge plastic mold
K2 STONE NATURAL VENEER
 INTRODUCTION WHAT IS K2 NATURAL THINSTONE VENEER? Natural K2 Stone veneer is real stone, cut 1 inch thick, making it light enough to be installed as a veneer. Sometimes referred to as thin veneer, thin
LOWELL REGIONAL WASTEWATER UTILITY SPECIFICATIONS FOR THE LOWELL MA CONCRETE FLOODWALL REPAIRS
 Concrete Repairs LOWELL REGIONAL WASTEWATER UTILITY SPECIFICATIONS FOR THE LOWELL MA CONCRETE FLOODWALL REPAIRS PART 1 - GENERAL 1.01 DESCRIPTION OF WORK A. The work will occur within the City of Lowell
Rehabilitation Strategies for Bonded Concrete Overlays of Asphalt Pavements
 University of Pittsburgh Rehabilitation Strategies for Bonded Concrete Overlays of Asphalt Pavements Authors: J. M Vandenbossche S. Sachs August 2013 1. Introduction Bonded concrete overlays of asphalt
Joint Rehabilitation. Driving Forces for Concrete Pavement Joint Repairs
 Long Life Concrete Pavement Joint Performance Joint Rehabilitation Gary Fick, Trinity Construction Management Services, Inc. Representing the National CP Tech Center Driving Forces for Concrete Pavement
Construction. 3-part thixotropic epoxy patching mortar. Product Description. Tests
 Product Data Sheet Edition 05/12/2014 Identification no: 020204030010000044 Sikadur -41 CF Rapid 3-part thixotropic epoxy patching mortar Construction Product Description Uses Characteristics / Advantages
Tecnoepo Flooring System 185
 Certificate ICMQ 1305-CPD-0808 Approved Standard EN 1504-2 prospect ZA.1f Direttive 89/106/CEE TECNOCHEM E LEED LEED Leadership Energy Environmental Design THE PRODUCTS: Primer TECNOFIX EP 110 Primer two-component
INSTALLATION INSTRUCTIONS for Bifold Doors (JII103)
") Thank you for selecting JELD-WEN products. Attached are JELD-WEN s recommended installation instructions for premium composite, hollow and solid core molded Bifold Doors. Bifolds are designed for fast
Thank you for selecting JELD-WEN products. Attached are JELD-WEN s recommended installation instructions for premium composite, hollow and solid core molded Bifold Doors. Bifolds are designed for fast
7. Installation. installation 7.1.1. CAST-IN WINDOW SYSTEM 7.1. INSTALLATION OF WINDOW MAIN FRAME
 7. Installation Window involves the fixing of window frame at an earlier construction stage and subsequent of the window sashes. This is a highly workmanship dependent process. Only trained and approved
Technical Services. Product MM INCH Installation direction Seams treatment GTI CONNECT (interlocking)
") INSTALLATION INSTRUCTIONS FOR GTI CONNECT TILES This document refers to the following products: Product MM INCH Installation direction Seams treatment GTI CONNECT (interlocking) 635 X 635 mm 25.5 x 25.5
INSTALLATION INSTRUCTIONS FOR GTI CONNECT TILES This document refers to the following products: Product MM INCH Installation direction Seams treatment GTI CONNECT (interlocking) 635 X 635 mm 25.5 x 25.5
SECTION 36 - CAST-IN-PLACE CONCRETE PIPE (CIPCP) TABLE OF CONTENTS
 TABLE OF CONTENTS") SECTION 36 - CAST-IN-PLACE CONCRETE PIPE (CIPCP) TABLE OF CONTENTS Section Page 36-1 GENERAL... 36.1 36-2 PIPEMAKING EQUIPMENT... 36.1 36-3 TRENCH EXCAVATION... 36.1 36-4 SPECIAL FOUNDATION TREATMENT...
SECTION 36 - CAST-IN-PLACE CONCRETE PIPE (CIPCP) TABLE OF CONTENTS Section Page 36-1 GENERAL... 36.1 36-2 PIPEMAKING EQUIPMENT... 36.1 36-3 TRENCH EXCAVATION... 36.1 36-4 SPECIAL FOUNDATION TREATMENT...
Guide for SOLID CONCRETE BLOCK SEALS
 Guide for SOLID CONCRETE BLOCK SEALS July, 2006 Mine Safety and Health Administration SOLID CONCRETE BLOCK SEAL Formersection 30 CFR 75.335(a)(1) specifies requirements for seals constructed using solid
Armstrong Do-It-Yourself Tile Installation System
 Armstrong Do-It-Yourself Tile Installation System What tools will I need to install my tile floor? You'll need just the basics: - floor tile (make sure you have enough tile to finish the job) - adhesive
How to Install Hardwood Flooring Over a Sub Floor
 How to Install Hardwood Flooring Over a Sub Floor Installation Preparation Instructions Read the entire instructions before starting your project. 1) INSPECT EACH PLANK (see fig. a) Wood is a natural product
STANDARD SPECIFICATIONS SECTION 02512 CLEANING AND LINING WATER MAINS
 STANDARD SPECIFICATIONS SECTION 02512 CLEANING AND LINING WATER MAINS PART 1 GENERAL 1.1 DESCRIPTION A. Section includes requirements for cleaning and lining existing cast iron and ductile iron water mains
Waterproofing System for Wastewater Tanks in Petrochemical Industries and Refineries
 Waterproofing System for Wastewater Tanks in Petrochemical Industries and Refineries Introduction Wastewater of petrochemical industries and refineries contains high amounts of emulsified aliphatic or
SECTION 03 54 00 RESURFACING CAST IN PLACE CONCRETE
 Page 1 SECTION 03 54 00 RESURFACING CAST IN PLACE CONCRETE Specifier Notes: This guide specification is written according to the Construction Specifications Institute (CSI) format. The section must be
Repairing Drywall Techniques for fixing everything from popped screws to big holes
 Repairing Drywall Techniques for fixing everything from popped screws to big holes BY MYRON R. FERGUSON C racks or holes in drywall, wet or stained drywall, peeling joint tape, popped nails or screws.
BLACK JACK ALL WEATHER ROOF COATING
 PAGE: 1 of 6 PRINT DATE: 16/09/2004 BLACK JACK ALL WEATHER ROOF COATING DESCRIPTION BLACK JACK ALL WEATHER ROOF COATING is a solvent based, full bodied black brushable compound with added fibres for reinforcement.
ARDEX GUIDE SPECIFICATION
 ARDEX GUIDE SPECIFICATION ARDEX PC-TTM POLISHED CONCRETE TOPPING Part of the ULTRAFLOR ARDEX DIAMATIC Polished Concrete System SECTION 03 35 53 POLISHED CONCRETE TOPPING PART 1 - GENERAL 1.1 RELA TED DOCUMENTS
Concrete Resurfacing. System Guide. by Parchem Construction Supplies
 Concrete Resurfacing System Guide by Parchem Construction Supplies Resurfacing Spray-on resurfacing is a 2-3mm topping applied to structurally sound concrete surfaces that are at least 28 days old. Resurfacing
Architectural Concrete Masonry
 1. Adams Profile Split Face Units (PSF). 2. Adams Profile Split Face Single Score Units (PSF-1). 3. Adams Profile Split Face Double Score Units (PSF-2) 4. Adams Profile Wide Split Rib Four Units (PWSR-4).
OLD BRICK ORIGINALS KILN-FIRED THIN BRICK VENEER Installation Guide. GeneralShale.com
 OLD BRICK ORIGINALS KILN-FIRED THIN BRICK VENEER Installation Guide GeneralShale.com OLD BRICK ORIGINALS THIN BRICK VENEER Page 2 INTRODUCTION Check local building codes for proper installation guidelines
Vinyl Composition Tile Installation System
 Vinyl Composition Tile Installation System Product Gauge Size Vinyl No-Wax (Dry Back) Urethane No-Wax (Dry Back) 0.045" (1.1 mm) 0.080" (2.0 mm) IMPERIAL TEXTURE 0.094" (2.4 mm) STONETEX ChromaSpin COMPANION
DIY CABINET REFACING INSTALLATION GUIDE
 DIY CABINET REFACING INSTALLATION GUIDE CABINET REFACING INSTALLATION Are you ready to reface your outdated cabinets? This guide will show you how to install your new Facelifters Cabinet Refacing Products
COLLISION REPAIR TECHNOLOGY CONTEST DESCRIPTION
 COLLISION REPAIR TECHNOLOGY CONTEST DESCRIPTION PURPOSE To evaluate each contestant s preparation for employment and to recognize outstanding students for excellence and professionalism in the field of
PART E SPECIFICATIONS
 PART E SPECIFICATIONS Page 1 of 5 PART E - SPECIFICATIONS GENERAL E1. APPLICABLE SPECIFICATIONS, STANDARD DETAILS AND DRAWINGS E1.1 The City of Winnipeg Works and Operations Division Standard Construction
How to build a Pizza Oven in 4 days
 How to build a Pizza Oven in 4 days Preparation day (slab) 1. Foundation 1500 deep x 1300 wide x 75mm deep Required 20 bags cement pre mix. If you already have a concrete base, you save this prep day DAY
See photo below showing this product being applied to a badly corroded floor.
 SPECIALTY COATINGS, INC 805 Lehigh Ave. Union, NJ 07083 TEL 888-755-7361 FAX 888-755-6231 www.armorpoxy.com info@armorpoxy.com FLOOR REPAIR, LEVELING & PREP BULLETIN This bulletin has been prepared by
Installation System. Existing Resilient Sheet Floors
 Vinyl Composition Tile Installation System Product Adhesive/Full Spread Adhesive/Tile-On Comment Imperial Texture MultiColor RAVE Stonetex Companion Square Feature Tile/Strips ARTEFFECTS SAFETY ZONE Vinyl
Seven. Easy Steps. Your Own Walkway, Without Mortar. or Concrete. to Installing. Driveway and Patio
 Seven Easy Steps to Installing Your Own Walkway, Driveway and Patio Without Mortar or Concrete Brick is one of the world s oldest and most enduring building materials. Those same qualities also make it
SCHWARTZ WATER-BASE WOOD FLOOR SEALER AND WATER-BASE PREMIIUM WOOD FLOOR FINISH
 !! SCHWARTZ WATER-BASE WOOD FLOOR SEALER AND WATER-BASE PREMIIUM WOOD FLOOR FINISH A Complete Guide for Preparation, Application, Curing and Maintenance for use with Schwartz H 2 O Water-base Floor Finish
STONE PANELS, INC. 100 South Royal Lane Coppell, TX 75019 Phone: (469) 635-5000 * Toll Free: (800) 328-6275 Fax: (469) 635-5555
 635-5000 * Toll Free: (800) 328-6275 Fax: (469) 635-5555") STONE PANELS, INC. 100 South Royal Lane Coppell, TX 75019 Phone: (469) 635-5000 * Toll Free: (800) 328-6275 Fax: (469) 635-5555 INTERLOCKING CHANNEL ATTACHMENT STEEL STUD FRAMING OR FURRING CONSTRUCTION
STONE PANELS, INC. 100 South Royal Lane Coppell, TX 75019 Phone: (469) 635-5000 * Toll Free: (800) 328-6275 Fax: (469) 635-5555 INTERLOCKING CHANNEL ATTACHMENT STEEL STUD FRAMING OR FURRING CONSTRUCTION
A. This Section includes rubberized asphalt sheet membrane waterproofing systems.
 SECTION 07110 SHEET MEMBRANE WATERPROOFING PART 1 - GENERAL 1.01 RELATED DOCUMENTS A. Drawings and general provisions of the Contract, including General and Supplementary Conditions and Division 1 Specification
Installation for Wood Flooring
 Installation for Wood Flooring Tarkett wood flooring offers a beautiful variety of options from species and colour, to plank widths and finishes. We developed enhanced locking system, T-lock, and the best
Chrome Finishing For 3d Powder Prints
 Chrome Finishing For 3d Powder Prints Powder Printing is definitely a very good technology for producing complex parts, but it can only generate the shape and that is not all about the appearance. Post
Standard details forming part of this Specification include the following drawings:
 Page 1 of 16 1.0 GENERAL This specification covers all concreting operations related to: a) construction of new cast-in-place traffic signal and controller concrete foundations; b) construction of concrete
Pink & White Gel Tip Overlay Rules, Judges Instructions & Criteria Student Division Competition Rules
 Competition Rules 1. Total time allowed 3 hours (180 minutes) 2. These are traditional square style competition nails. 3. The nails must be applied with Tips and Gel overlay 4. The competitor must apply
Improving the flood resistance of your home. Advice sheet 6: Flood-resilient floors
 Improving the flood resistance of your home Advice sheet 6: Flood-resilient This sheet provides guidance on identifying different types of floor, assessing the routes floodwater may enter, and describes
Concrete Repair. Applications and Procedures
 Concrete Repair Applications and Procedures Objectives Identify what surface preparation is needed Identify typical modes of failure and testing methods How to choose the correct material for the repair
1300 West Bartlett Road Elgin, Illinois 60120-7529 Phone: (847) 741-5370 Fax: (847) 622-7077. SUBJECT: Pelican NP and NS Cab Glass Replacement
 741-5370 Fax: (847) 622-7077. SUBJECT: Pelican NP and NS Cab Glass Replacement") SERVICE BULLETIN Subsidiary of Federal Signal Corporation 1300 West Bartlett Road Elgin, Illinois 60120-7529 Phone: (847) 741-5370 Fax: (847) 622-7077 DATE: 08/07/2007 NUMBER: 0703146 SUBJECT: Pelican
SERVICE BULLETIN Subsidiary of Federal Signal Corporation 1300 West Bartlett Road Elgin, Illinois 60120-7529 Phone: (847) 741-5370 Fax: (847) 622-7077 DATE: 08/07/2007 NUMBER: 0703146 SUBJECT: Pelican
ARDEX GUIDE SPECIFICATION ARDEX PC-T POLISHED CONCRETE TOPPING Part of the ARDEX Polished Concrete System (APCS)
") ARDEX GUIDE SPECIFICATION ARDEX PC-T Part of the ARDEX Polished Concrete System (APCS) SECTION 03 35 53 PART 1 - GENERAL 1.1 RELATED DOCUMENTS A. Drawings, general provisions of the Contract, and other
ARDEX GUIDE SPECIFICATION ARDEX PC-T Part of the ARDEX Polished Concrete System (APCS) SECTION 03 35 53 PART 1 - GENERAL 1.1 RELATED DOCUMENTS A. Drawings, general provisions of the Contract, and other
Laying the First Course. 1. Excavate the site and construct the footing.
 Use QUIKRETE Mortar Mix or Mason Mix lay up a concrete block wall as shown. QUIKRETE Mortar Mix or Mason Mix Concrete block Mason's line Line blocks 4' level brick trowel Jointer Mason's hammer Stiff brush
Chapter. Restoration of Damaged Structures
 5 Chapter Restoration of Damaged Structures Bringing back a damaged structure to its pre-earthquake state and original strength is called restoration. This is the first step of building rehabilitation.
EAST LYME HIGH SCHOOL
 Overview: 1971 N 1966 GYM 1966 CLASSROOM WING 1966 AUD. 1971 GYM 1998 1998 POOL EAST LYME HIGH SCHOOL Original 1966 Building: The original East Lyme High School was constructed in 1966 and was composed
Construction Specification for Concrete Curb and Concrete Curb and Gutter
 Engineering & Construction Services Division Standard Specifications for Road Works TS 3.50 April 2015 for Concrete Curb and Table of Contents TS 3.50.01 SCOPE... 3 TS 3.50.02 REFERENCES... 3 TS 3.50.03
Section 04810 EXTERIOR STONE VENEER Full Mortar
 Full Mortar PART 1 GENERAL 1.1 SUMMARY A. Section includes: 1. Portland cement mortar bed 2. Stone Veneer 3. Expansion and control joints. 4. Portland cement and hydraulic mortar and grout. 5. Sealer and
INSTRUCTIONS FOR COORDINATION SECTION 06651 SOLID SURFACE FABRICATIONS
 INSTRUCTIONS FOR COORDINATION SECTION 06651 SOLID SURFACE FABRICATIONS 1. Paragraph 1.02 Provide solid surface countertops at sinks locations. Provide solid surface window sills at drywall framing walls.
SPECIFICATIONS FOR SEWER PIPE AND LINING INSERTION - TRENCHLESS; GENERAL GUIDELINES (As Provided by NASSCO)
") SPECIFICATIONS FOR SEWER PIPE AND LINING INSERTION - TRENCHLESS; GENERAL GUIDELINES (As Provided by NASSCO) 1 Intent: The intent of trenchless sewer pipe Insertion is to rehabilitate the existing sewer
SPECIFICATIONS FOR SEWER PIPE AND LINING INSERTION - TRENCHLESS; GENERAL GUIDELINES (As Provided by NASSCO) 1 Intent: The intent of trenchless sewer pipe Insertion is to rehabilitate the existing sewer
The Art of Concrete 9/17/2012. ACI Spring 2012 Convention March 18 21, Dallas, TX. Amerete, Inc. started in 2004 as American Concrete Technologies
 The Art of Concrete Tim Taylor, President of Amerete, Inc., is one of the foremost experts on concrete polishing. He is a business professional with a degree in Industrial Engineering from North Carolina
Installation Guidelines for Modular Carpet
 Installation Guidelines for Modular Carpet Ecoflex Urethane Cushion Backed Carpet Tiles PVC Backed Carpet Tiles Thermoplastic Backed Carpet Tiles Self Lock Carpet Tiles 1975 West Oak Circle Field Services
QWALL 4 ACRYLIC SHOWER WALL INSTALLATION INSTRUCTIONS
 QWALL 4 ACRYLIC SHOWER WALL INSTALLATION INSTRUCTIONS IMPORTANT DreamLine TM reserves the right to alter, modify or redesign products at any time without prior notice. For the latest up-to-date technical
Technical Data Sheet Art. No. 1810. Kiesol. applications. Shelf-life. rate depending on application. Characteristic data of the product
 Page 1 of 5 Technical Data Sheet Art. No. 1810 Kiesol Deep protection silicification for waterproofing and refurbishing old and new buildings in the Kiesol System according to WTA Code of Practice 4-4-04/D
RECOATING AND RENEWING SPF ROOFING SYSTEMS
 RECOATING AND RENEWING SPF ROOFING SYSTEMS Procedures, Regional Differences and type of coating systems Bruce Schenke Premium Spray Products REASONS TO RECOAT/RENEW Add a new coating layer to renew the
Aspect Metal Peel & Stick Tile Installation Guide
 Aspect Metal Peel & Stick Tile Installation Guide Proper surface preparation is essential for a successful project Failure to follow recommended surface preparation instructions may void the warranty Read
Herringbone Pattern Flooring
 Herringbone Pattern Flooring If it s not marked NOFMA, it s not certified. Handling, Storage, Installation and Tips Herringbone is generally manufactured from 3/4 x 2 ¼ or ¾ x 1-1/2 standard tongue & groove
Asbestos Work Permit Procedures
 These procedures are to be followed by all persons required to perform the following work: Handling, installation or removal of non-friable manufactured products known to contain asbestos provided no sanding,
Grinding equipment that causes raveling, aggregate fractures or disturbance to the joints shall not be permitted.
 Guide Specification: Diamond Grinding for City Streets Publication Date: May 24, 2010 SCOPE City streets are defined as roadways with a closed drainage system along with numerous structures such as manholes,
Guide Specifications for Maple Flooring Systems
 Guide Specifications for Maple Flooring Systems MFMA Guide Specification for Resilient Pre-Engineered Fixed Panel System Purpose This Guide Specification is designed to assist in the production of actual
FIRESTOPPING & SMOKE SEALS
 SPECIFICATION SECTION 07 84 00 FIRESTOPPING & SMOKE SEALS 1 GENERAL 1.1 SECTION INCLUDES 1.1.1 Comply with Division 1, General Requirements and Documents referred to therein. 1.1.2 It is the intent of
APPENDIX B. I. Background Information
 APPENDIX B GUIDELINES FOR IDENTIFYING AND REPAIRING LOCALIZED AREAS OF DISTRESS IN AC PAVEMENTS PRIOR TO CAPITAL PREVENTIVE MAINTENANCE OR REHABILITATION REPAIRS I. Background Information A. AC Pavement
SECTION 03300 CAST-IN-PLACE CONCRETE
 SECTION 03300 PART 1 GENERAL 1.01 DESCRIPTION This section describes materials and methods for formwork, reinforcement, mixing, placement, curing and repairs of concrete, and the use of cementations materials
San Antonio Water System Standard Specifications for Construction ITEM NO. 1100 SLIP-LINING SANITARY SEWERS
 ITEM NO. 1100 SLIP-LINING SANITARY SEWERS 1100.1 DESCRIPTION: This item shall consist of slip-lining sanitary sewer pipe, which is accomplished by pulling or pushing liner pipe into existing sewers by