Adafruit's Raspberry Pi Lesson 11. DS18B20 Temperature Sensing
|
|
|
- Catherine Riley
- 9 years ago
- Views:
Transcription
1 Adafruit's Raspberry Pi Lesson 11. DS18B20 Temperature Sensing Created by Simon Monk Last updated on :47:48 PM EDT

2 Guide Contents Guide Contents Overview Other Code Libraries Parts Hardware DS18B20 Add OneWire support Software Configure and Test Adding more sensors Page 2 of 17

3 Overview The Occidentalis Linux distribution for Raspberry Pi (and Raspbian as of Dec 2012) includes support for the DS18B20 1-wire temperature sensor. These sensors come in a small three pin package like a transistor and are accurate digital devices. In this lesson, you will learn how to use a DS18B20 with the Raspberry Pi to take temperature readings. Since the Raspberry Pi has no ADC (Analog to Digital Converter), it cannot directly use an analog temperature sensor like the TMP36, making the DS18B20 a good choice for temperature sensing. Page 3 of 17
, it cannot directly use an analog temperature sensor like the TMP36, making")
4 Other Code Libraries If you are a python-fancier, there's also a nice DS18B20 library that works with raspberry pi over at ( (written by Timo!) Page 4 of 17

5 Parts To build the project described in this lesson, you will need the following parts. Raspberry Pi Page 5 of 17

6 DS18B20 Digital temperature sensor + extras, or waterproof or high temperature versions (see products sidebar) You'll also need a 4.7K or 10K ohm resistor, it comes with the sensor when purchased from Adafruit Half-sized breadboard Page 6 of 17

7 Jumper wire pack Pi Cobbler Page 7 of 17

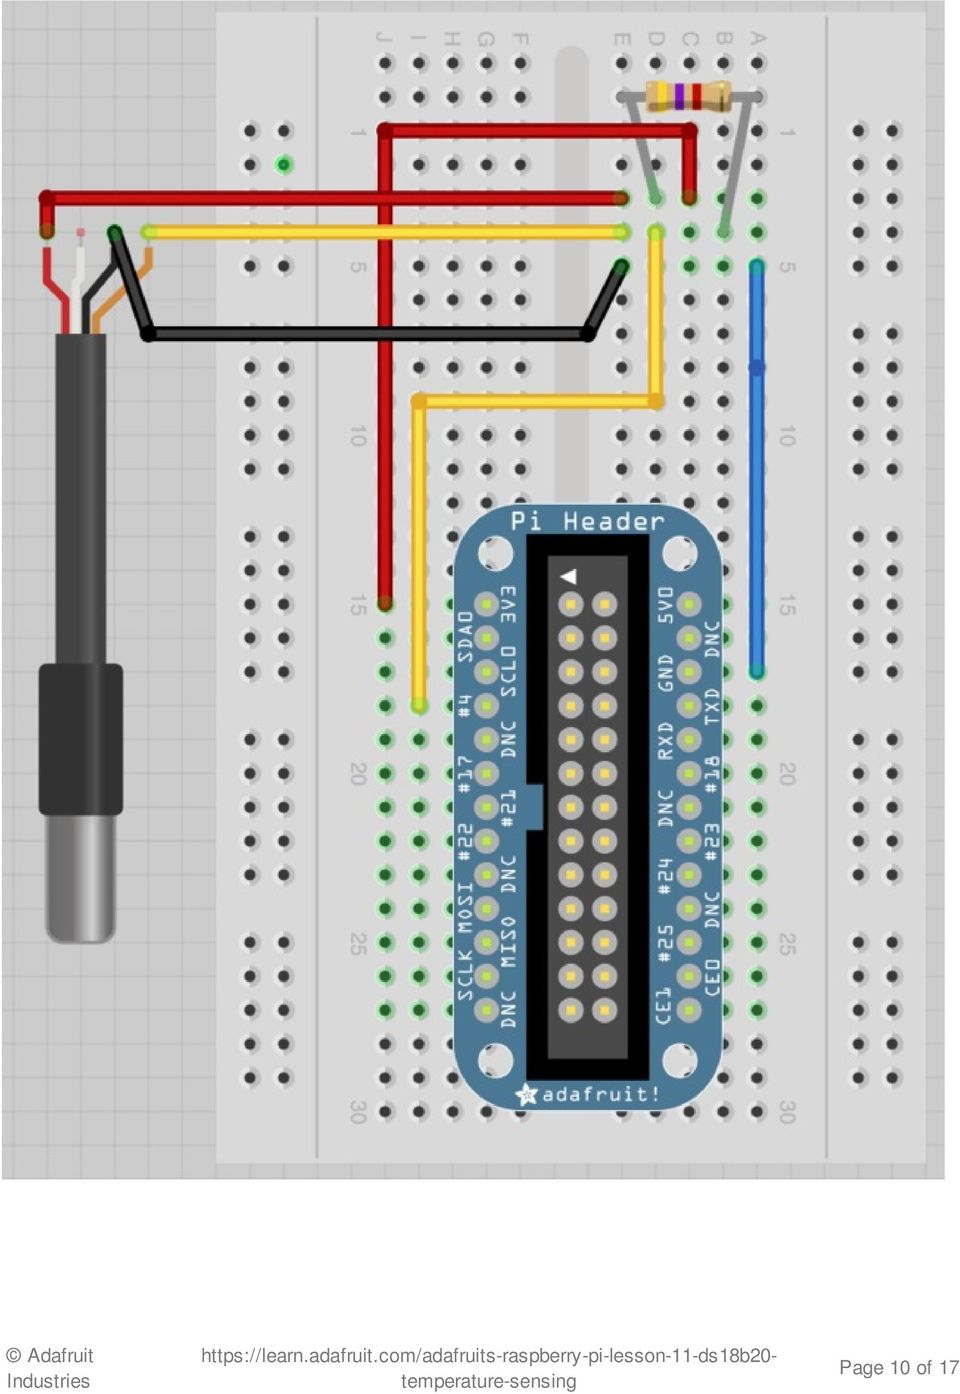
8 Hardware The breadboard layout for just the basic DS18B20 is shown below. The DS18B20 "1-wire" sensors can be connected in parallel - unlike nearly any other sensor sold! All sensors should share the same pins, but you only need one 4.7K resistor for all of them The resistor is used as a 'pullup' for the data-line, and is required to keep the data transfer stable and happy Be careful to get the DS18B20 the right way around. The curved edge should be to the left as shown in the figure below. If you put it the wrong way around, it will get hot and then break. Despite both being temperature sensors, the DS18B20+ is totally different than the TMP36. You cannot use a TMP36 for this tutorial! Page 8 of 17


9 If you are using the waterproof version of the DS18B20 then the device has three leads, red, black and yellow. The bare copper screening lead that does not need to be connected. If you are using the "high temperature" version of the DS18B20 we sell, connect Orange Stripe to 3.3V, White connects to ground and Blue Stripe is data, pin #4. You still need a ~4.7K-10K resistor from data to 3.3V Page 9 of 17

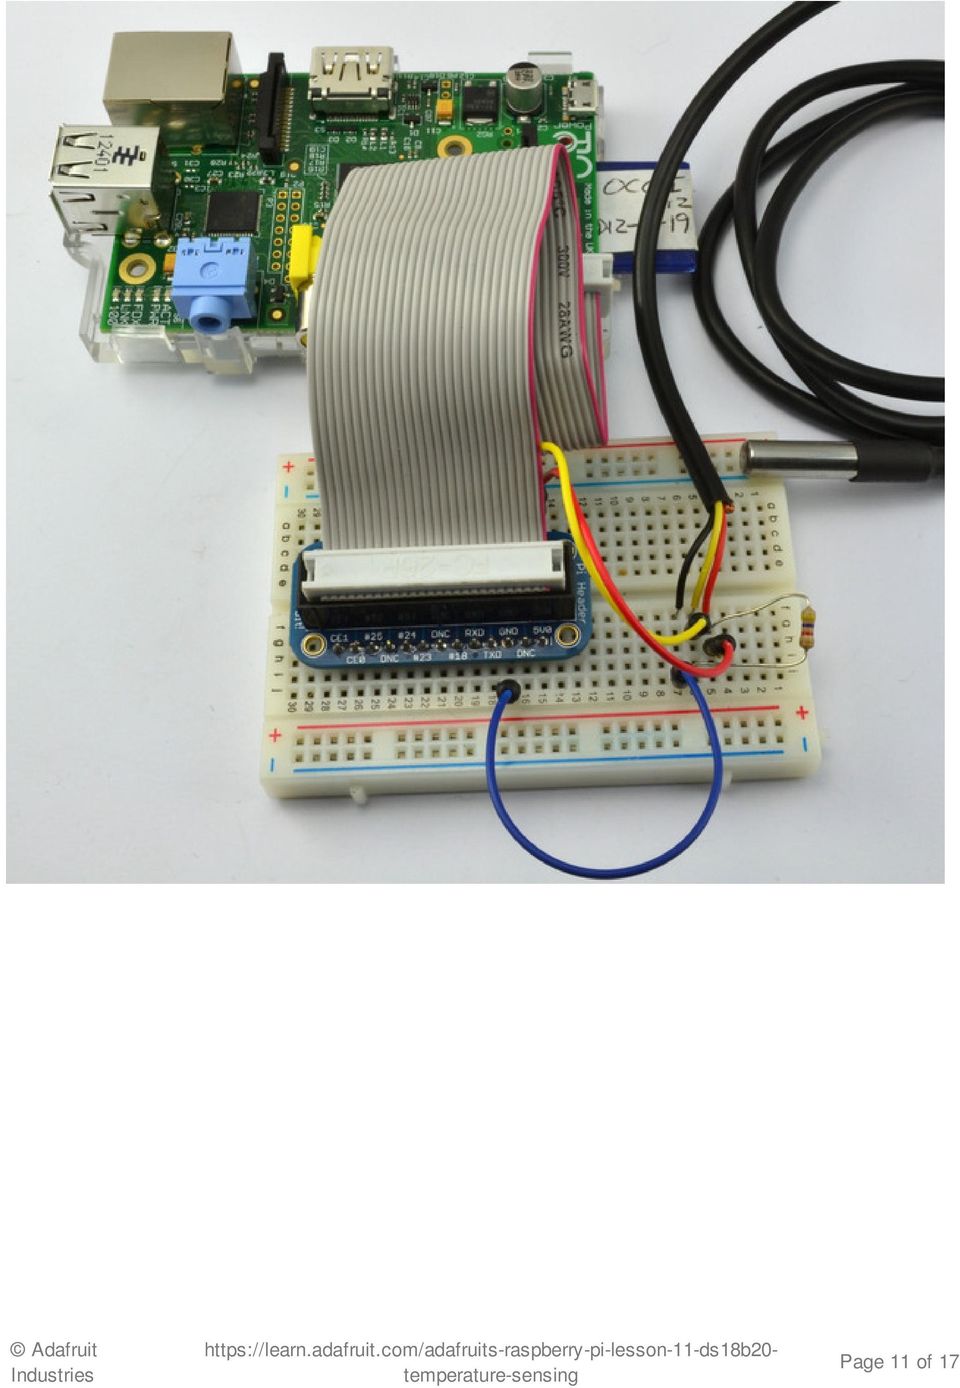
10 Page 10 of 17
11 Page 11 of 17
12 DS18B20 Although the DS18B20 just looks like a regular transistor, there is actually quite a lot going on inside. The chip includes the special 1-wire serial interface as well as control logic and the temperature sensor itself. Its output pin sends digital messages and Raspbian/Occidentalis includes an interface to read those messages. You can experiment with the device from the command line or over SSH (see Lesson 6 ( before we run the full program. Add OneWire support Start by adding the following line to /boot/config.txt You can edit that file with nano by running sudo nano /boot/config.txt and then scrolling to the bottom and typing it there dtoverlay=w1-gpio Then reboot with sudo reboot. When the Pi is back up and you're logged in again, type the commands you see below into a terminal window. When you are in the 'devices' directory, the directory starting '28-' may have a different name, so cd to the name of whatever directory is there. sudo modprobe w1-gpio sudo modprobe w1-therm cd /sys/bus/w1/devices ls cd 28-xxxx (change this to match what serial number pops up) cat w1_slave Page 12 of 17
), before we run the full program.")
13 The interface is a little unreliable, but fortunately it tells us if there is a valid temperature to read. It's like a file, so all we have to do is read The response will either have YES or NO at the end of the first line. If it is yes, then the temperature will be at the end of the second line, in 1/000 degrees C. So, in the example above, the temperature is actually read as and then degrees C. If you have more than one Sensor connected, you'll see multiple 28-xxx files. Each one will have the unique serial number so you may want to plug one in at a time, look at what file is created, and label the sensor! Page 13 of 17

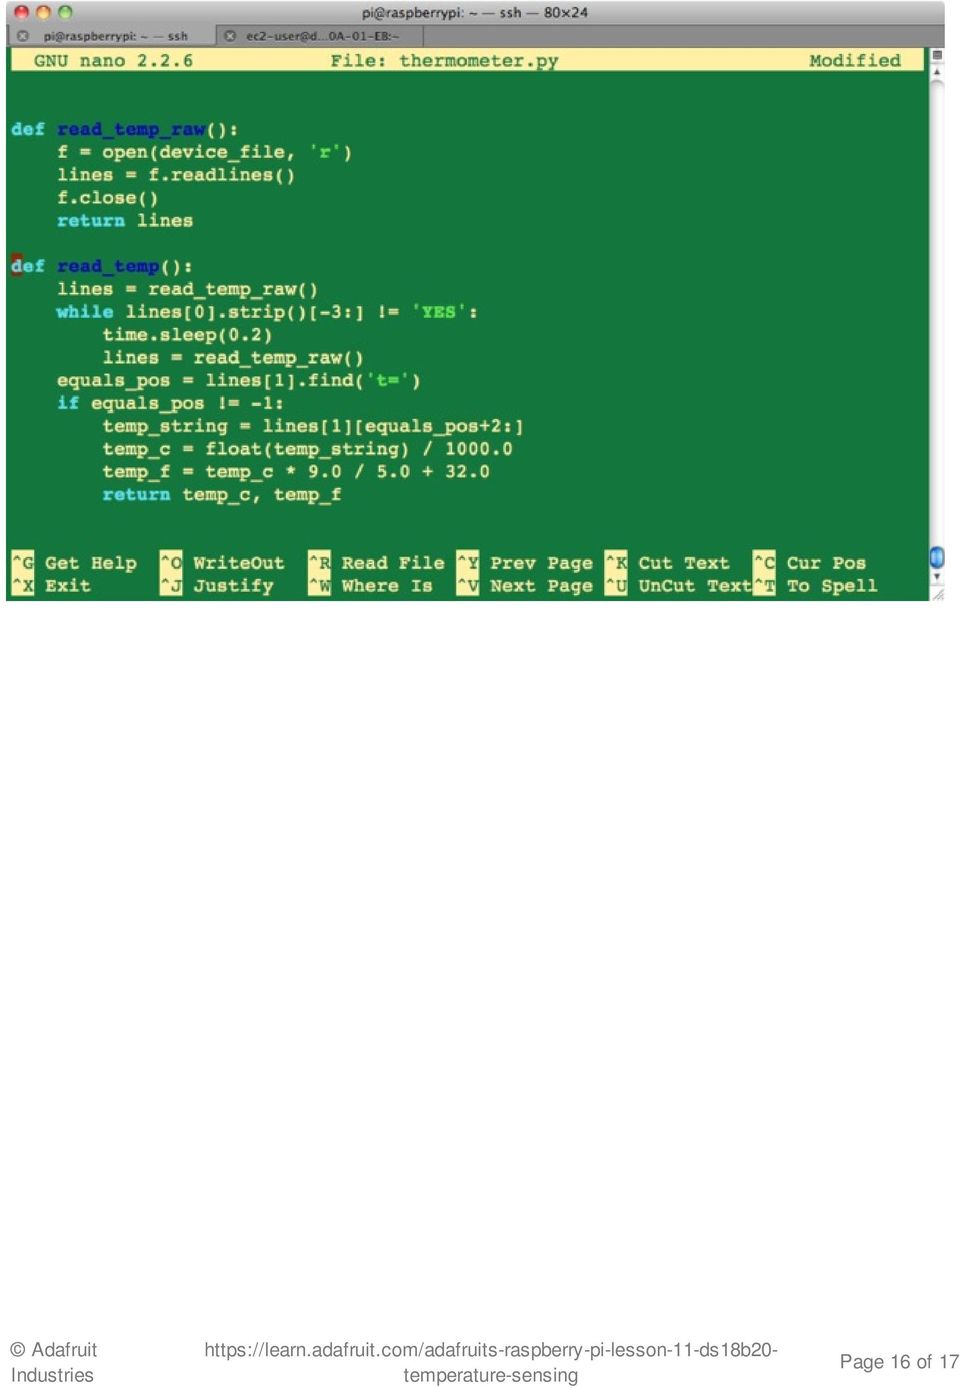
14 Software The Python program deals with any failed messages and reports the temperature in degrees C and F every second. import os import glob import time os.system('modprobe w1-gpio') os.system('modprobe w1-therm') base_dir = '/sys/bus/w1/devices/' device_folder = glob.glob(base_dir + '28*')[0] device_file = device_folder + '/w1_slave' def read_temp_raw(): f = open(device_file, 'r') lines = f.readlines() f.close() return lines def read_temp(): lines = read_temp_raw() while lines[0].strip()[-3:]!= 'YES': time.sleep(0.2) lines = read_temp_raw() equals_pos = lines[1].find('t=') if equals_pos!= -1: temp_string = lines[1][equals_pos+2:] temp_c = float(temp_string) / temp_f = temp_c * 9.0 / return temp_c, temp_f while True: print(read_temp()) time.sleep(1) The program starts by issuing the 'modprobe' commands that are needed to start the interface running. The next three lines, find the file from which the messages can be read. A problem has been reported with occasional hangs when reading the temperature file when using Raspbian. If you find you have the same problem, try replacing the function read_temp_raw with the Page 14 of 17
![glob(base_dir + '28*')[0] device_file = device_folder + '/w1_slave' def read_temp_raw(): f = open(device_file, 'r') lines = f.readlines() f.](/docs-images/46/21569235/images/page_14.jpg "close() return lines def read_temp(): lines = read_temp_raw() while lines[0].strip()[-3:]!= 'YES': time.sleep(0.2) lines = read_temp_raw() equals_pos = lines[1].find('t=') if equals_pos!")
15 code below. You will also need to add a line at the top of the file 'import subprocess'. def read_temp_raw(): catdata = subprocess.popen(['cat',device_file], stdout=subprocess.pipe, stderr=subprocess.pipe) out,err = catdata.communicate() out_decode = out.decode('utf-8') lines = out_decode.split('\n') return lines Reading the temperature takes place in two functions, read_temp_raw just fetches the two lines of the message from the interface. The read_temp function wraps this up checking for bad messages and retrying until it gets a message with 'YES' on end of the first line. The function returns two values, the first being the temperature in degrees C and the second in degree F. You could if you wished separate these two as shown in the example below: deg_c, deg_f = read_temp() The main loop of the program simply loops, reading the temperature and printing it, before sleeping for a second. To upload the program onto your Raspberry Pi, you can use SSH to connect to the Pi, start an editor window using the line: nano thermometer.py and then paste the code above, before saving the file with CTRL-x and Y. Page 15 of 17

16 Page 16 of 17
17 Configure and Test The program must be run as super user, so type the following command into the terminal to start it: sudo python thermometer.py If all is well, you will see a series of readings like this: Try putting your finger over the sensor to warm it up. Adding more sensors You can add additional DS18B20 sensors in parallel - connect all the sensors' VCC, data and ground pins together. Use a single 4.7K resistor. You will see multiple /sys/bus/w1/devices/28- nnnnn directories, each one having the unique serial number as the directory name. The python example code only works for one sensor right now so you will have to adapt it if you want it to read from different sensors at once Last Updated: :47:49 PM EDT Page 17 of 17

Adafruit's Raspberry Pi Lesson 9. Controlling a DC Motor
 Adafruit's Raspberry Pi Lesson 9. Controlling a DC Motor Created by Simon Monk Last updated on 2014-04-17 09:00:29 PM EDT Guide Contents Guide Contents Overview Parts Part Qty PWM The PWM Kernel Module
Arduino Lesson 13. DC Motors. Created by Simon Monk
 Arduino Lesson 13. DC Motors Created by Simon Monk Guide Contents Guide Contents Overview Parts Part Qty Breadboard Layout Arduino Code Transistors Other Things to Do 2 3 4 4 4 6 7 9 11 Adafruit Industries
Playing sounds and using buttons with Raspberry Pi
 Playing sounds and using buttons with Raspberry Pi Created by Mikey Sklar Last updated on 2015-04-15 01:30:08 PM EDT Guide Contents Guide Contents Overview Install Audio Install Python Module RPi.GPIO
Arduino Lesson 14. Servo Motors
 Arduino Lesson 14. Servo Motors Created by Simon Monk Last updated on 2013-06-11 08:16:06 PM EDT Guide Contents Guide Contents Overview Parts Part Qty The Breadboard Layout for 'Sweep' If the Servo Misbehaves
Arduino Lesson 9. Sensing Light
 Arduino Lesson 9. Sensing Light Created by Simon Monk Last updated on 2014-04-17 09:46:11 PM EDT Guide Contents Guide Contents Overview Parts Part Qty Breadboard Layout Photocells Arduino Code Other Things
Adafruit's Raspberry Pi Lesson 5. Using a Console Cable
 Adafruit's Raspberry Pi Lesson 5. Using a Console Cable Created by Simon Monk Last updated on 2014-09-15 12:00:13 PM EDT Guide Contents Guide Contents Overview You Will Need Part Software Installation
Arduino Lesson 0. Getting Started
 Arduino Lesson 0. Getting Started Created by Simon Monk Last updated on 204-05-22 2:5:0 PM EDT Guide Contents Guide Contents Overview Parts Part Qty Breadboard Installing Arduino (Windows) Installing Arduino
Adafruit's Raspberry Pi Lesson 5. Using a Console Cable
 Adafruit's Raspberry Pi Lesson 5. Using a Console Cable Created by Simon Monk Last updated on 2016-04-12 08:03:49 PM EDT Guide Contents Guide Contents Overview You Will Need Part Software Installation
Adafruit's Raspberry Pi Lesson 5. Using a Console Cable. Created by Simon Monk
 Adafruit's Raspberry Pi Lesson 5. Using a Console Cable Created by Simon Monk Guide Contents Guide Contents Overview You Will Need Part Software Installation (Mac) Software Installation (Windows) Connect
Arduino Lesson 17. Email Sending Movement Detector
 Arduino Lesson 17. Email Sending Movement Detector Created by Simon Monk Last updated on 2014-04-17 09:30:23 PM EDT Guide Contents Guide Contents Overview Parts Part Qty Breadboard Layout Arduino Code
Arduino Lesson 16. Stepper Motors
 Arduino Lesson 16. Stepper Motors Created by Simon Monk Last updated on 2013-11-22 07:45:14 AM EST Guide Contents Guide Contents Overview Parts Part Qty Breadboard Layout Arduino Code Stepper Motors Other
Adafruit's Raspberry Pi Lesson 6. Using SSH
 Adafruit's Raspberry Pi Lesson 6. Using SSH Created by Simon Monk Last updated on 2015-04-09 03:47:50 PM EDT Guide Contents Guide Contents Overview Enabling SSH Using SSH on a Mac or Linux SSH under Windows
Adafruit's Raspberry Pi Lesson 7. Remote Control with VNC
 Adafruit's Raspberry Pi Lesson 7. Remote Control with VNC Created by Simon Monk Last updated on 2013-06-17 07:15:23 PM EDT Guide Contents Guide Contents Overview Installing VNC Using a VNC Client Built
SSH to BeagleBone Black over USB
 SSH to BeagleBone Black over USB Created by Simon Monk Last updated on 2015-06-01 12:50:09 PM EDT Guide Contents Guide Contents Overview You Will Need Preparation Installing Drivers (Windows) Installing
Adafruit MCP9808 Precision I2C Temperature Sensor Guide
 Adafruit MCP9808 Precision I2C Temperature Sensor Guide Created by lady ada Last updated on 2014-04-22 03:01:18 PM EDT Guide Contents Guide Contents Overview Pinouts Power Pins I2C Data Pins Optional Pins
Adafruit's Raspberry Pi Lesson 1. Preparing an SD Card for your Raspberry Pi
 Adafruit's Raspberry Pi Lesson 1. Preparing an SD Card for your Raspberry Pi Created by Simon Monk Last updated on 2015-11-25 11:50:13 PM EST Guide Contents Guide Contents Overview You Will Need Downloading
Adding a Real Time Clock to Raspberry Pi
 Adding a Real Time Clock to Raspberry Pi Created by lady ada Last updated on 2016-04-29 11:45:10 PM EDT Guide Contents Guide Contents Overview Wiring the RTC Set up I2C on your Pi Verify Wiring (I2C scan)
Setting up a Raspberry Pi as a WiFi access point
 Setting up a Raspberry Pi as a WiFi access point Created by lady ada Last updated on 2015-03-10 04:30:11 PM EDT Guide Contents Guide Contents Overview What you'll need Preparation Check Ethernet & Wifi
Monitor Your Home With the Raspberry Pi B+
 Monitor Your Home With the Raspberry Pi B+ Created by Marc-Olivier Schwartz Last updated on 2015-02-12 03:30:13 PM EST Guide Contents Guide Contents Introduction Hardware & Software Requirements Hardware
Arduino Lesson 1. Blink
 Arduino Lesson 1. Blink Created by Simon Monk Last updated on 2015-01-15 09:45:38 PM EST Guide Contents Guide Contents Overview Parts Part Qty The 'L' LED Loading the 'Blink' Example Saving a Copy of 'Blink'
Adafruit NFC/RFID on Raspberry Pi
 Adafruit NFC/RFID on Raspberry Pi Created by Kevin Townsend Last updated on 2016-07-18 05:29:08 PM EDT Guide Contents Guide Contents Overview Freeing UART on the Pi Step One: Run raspi-conf Step Two: Disable
Adafruit's Raspberry Pi Lesson 3. Network Setup
 Adafruit's Raspberry Pi Lesson 3. Network Setup Created by Simon Monk Last updated on 2016-01-04 12:07:57 PM EST Guide Contents Guide Contents Overview Using a Wired Network Buying a USB WiFi Adapter Setting
Character LCDs. Created by Ladyada. Last updated on 2013-07-26 02:45:29 PM EDT
 Character LCDs Created by Ladyada Last updated on 2013-07-26 02:45:29 PM EDT Guide Contents Guide Contents Overview Character vs. Graphical LCDs LCD Varieties Wiring a Character LCD Installing the Header
Thermistor. Created by Ladyada. Last updated on 2013-07-26 02:30:46 PM EDT
 Thermistor Created by Ladyada Last updated on 2013-07-26 02:30:46 PM EDT Guide Contents Guide Contents Overview Some Stats Testing a Thermistor Using a Thermistor Connecting to a Thermistor Analog Voltage
Arduino Lesson 4. Eight LEDs and a Shift Register
 Arduino Lesson 4. Eight LEDs and a Shift Register Created by Simon Monk Last updated on 2014-09-01 11:30:10 AM EDT Guide Contents Guide Contents Overview Parts Part Qty Breadboard Layout The 74HC595 Shift
Using an IR Remote with a Raspberry Pi Media Center
 Using an IR Remote with a Raspberry Pi Media Center Created by Simon Monk Last updated on 2013-05-03 08:00:31 PM EDT Guide Contents Guide Contents Overview Parts Part Qty Hardware LIRC Configure and Test
Matrix and 7-Segment LED Backpack with the Raspberry Pi
 Matrix and 7-Segment LED Backpack with the Raspberry Pi Created by Kevin Townsend Last updated on 2014-07-09 02:30:10 PM EDT Guide Contents Guide Contents Overview What You'll Need Related Information
Drive a 16x2 LCD with the Raspberry Pi
 Drive a 16x2 LCD with the Raspberry Pi Created by Mikey Sklar Last updated on 2015-04-17 05:50:06 PM EDT Guide Contents Guide Contents Overview To Follow This Tutorial You Will Need Wiring the Cobbler
Raspberry Pi Setup Tutorial
 Raspberry Pi Setup Tutorial The Raspberry Pi is basically a miniature linux- based computer. It has an ARM processor on it, specifically the ARM1176JZF- S 700 MHz processor. This is the main reason why
Raspberry Pi Adding a Real Time Clock (RTC)
") Raspberry Pi Adding a Real Time Clock (RTC) Level of difficulty: Beginner Hardware: Raspberry Pi Model B, RTC Module, wires, optional connectors Tools required: Wire cutters, soldering iron Project cost:
Raspberry Pi Adding a Real Time Clock (RTC) Level of difficulty: Beginner Hardware: Raspberry Pi Model B, RTC Module, wires, optional connectors Tools required: Wire cutters, soldering iron Project cost:
How To Connect A Raspberry Pi To The Internet On A Microsoft Moonstone 2 (Microsoft) Microsoft Powerbook 2 (Powerbook 2) (Powerboard 2) And Powerbook 3 (Powerstation 2)
 Microsoft Powerbook 2 (Powerbook 2) (Powerboard 2) And Powerbook 3 (Powerstation 2)") Adafruit's Raspberry Pi Lesson 3. Network Setup Created by Simon Monk Last updated on 2013-11-06 11:45:18 AM EST Guide Contents Guide Contents Overview Using a Wired Network Buying a USB WiFi Adapter Setting
Adafruit's Raspberry Pi Lesson 3. Network Setup Created by Simon Monk Last updated on 2013-11-06 11:45:18 AM EST Guide Contents Guide Contents Overview Using a Wired Network Buying a USB WiFi Adapter Setting
PiFace Control & Display
 PiFace Control & Display A Plug and Play Device to control Raspberry Pi Exclusively From Quick Start Guide Version 1.0 Dated: 30 th Oct 2013 Table Of Contents Page No 1. Overview 2 2. Fitting the PiFace
5inch HDMI LCD User Manual
 5inch HDMI LCD User Manual Features 800 480 high resolution Directly-pluggable into any revision of Raspberry Pi (only except the first generation Pi model B which requires an HDMI cable) Driver is provided
7/Basic Input and Output
 7/Basic Input and Output While the Raspberry Pi is, in essence, a very inexpensive Linux computer, there are a few things that distinguish it from laptop and desktop machines that we usually use for writing
Arduino Lesson 5. The Serial Monitor
 Arduino Lesson 5. The Serial Monitor Created by Simon Monk Last updated on 2013-06-22 08:00:27 PM EDT Guide Contents Guide Contents Overview The Serial Monitor Arduino Code Other Things to Do 2 3 4 7 10
CPSC 226 Lab Nine Fall 2015
 CPSC 226 Lab Nine Fall 2015 Directions. Our overall lab goal is to learn how to use BBB/Debian as a typical Linux/ARM embedded environment, program in a traditional Linux C programming environment, and
Adafruit SHT31-D Temperature & Humidity Sensor Breakout
 Adafruit SHT31-D Temperature & Humidity Sensor Breakout Created by lady ada Last updated on 2016-06-23 10:13:40 PM EDT Guide Contents Guide Contents Overview Pinouts Power Pins: I2C Logic pins: Other Pins:
Adafruit BME280 Humidity + Barometric Pressure + Temperature Sensor Breakout
 Adafruit BME280 Humidity + Barometric Pressure + Temperature Sensor Breakout Created by lady ada Last updated on 2016-04-26 12:01:06 PM EDT Guide Contents Guide Contents Overview Pinouts Power Pins: SPI
MCP4725 Digital to Analog Converter Hookup Guide
 Page 1 of 9 MCP4725 Digital to Analog Converter Hookup Guide CONTRIBUTORS: JOELEB To DAC, or Not to DAC... When learning about the world of microcontrollers, you will come across analog-to-digital converters
TSL2561 Luminosity Sensor
 TSL2561 Luminosity Sensor Created by lady ada Last updated on 2015-06-12 12:10:28 PM EDT Guide Contents Guide Contents Overview Wiring the TSL2561 Sensor Using the TSL2561 Sensor Downloads Buy a TSL2561
UniPi technical documentation REV 1.1
 technical documentation REV 1.1 Contents Overview... 2 Description... 3 GPIO port map... 4 Power Requirements... 5 Connecting Raspberry Pi to UniPi... 5 Building blocks... 5 Relays... 5 Digital Inputs...
Bluefruit LE Python Library
 Bluefruit LE Python Library Created by Tony DiCola Last updated on 2015-08-18 07:40:09 PM EDT Guide Contents Guide Contents Overview Hardware Installation Mac OSX Linux & Raspberry Pi Library Installation
Your Multimeter. The Arduino Uno 10/1/2012. Using Your Arduino, Breadboard and Multimeter. EAS 199A Fall 2012. Work in teams of two!
 Using Your Arduino, Breadboard and Multimeter Work in teams of two! EAS 199A Fall 2012 pincer clips good for working with breadboard wiring (push these onto probes) Your Multimeter probes leads Turn knob
USER MANUAL V5.0 ST100
 GPS Vehicle Tracker USER MANUAL V5.0 ST100 Updated on 15 September 2009-1 - Contents 1 Product Overview 3 2 For Your Safety 3 3 ST100 Parameters 3 4 Getting Started 4 4.1 Hardware and Accessories 4 4.2
Capacitive Touch Sensor Project:
 NOTE: This project does not include a complete parts list. In particular, the IC described here does not come in a dual-inline-package (DIP), and so a gull-wing package has to be soldered to an adaptor
Raspberry Pi radio player with touchscreen
 Raspberry Pi radio player with touchscreen Created by Spencer Organ Last updated on 2014-08-27 12:45:09 PM EDT Guide Contents Guide Contents Overview Project steps Preparing the Raspberry Pi Installing
For Raspberry Pi - Getting started Connect to the real world in minutes, with the most popular interface board for Raspberry Pi.
 For Raspberry Pi - Getting started Connect to the real world in minutes, with the most popular interface board for Raspberry Pi. PiFace Digital 2 For step by step help and ideas for projects visit: http://www.piface.org.uk/guides/
Beginner s Guide to the PI MATRIX. by Bruce E. Hall, W8BH 1) INTRODUCTION
 INTRODUCTION") Beginner s Guide to the PI MATRIX - Part 1- by Bruce E. Hall, W8BH 1) INTRODUCTION The Pi Matrix is a fantastic tool for learning GPIO programming on the raspberry pi. Sure, you could hook up a few LEDs
Beginner s Guide to the PI MATRIX - Part 1- by Bruce E. Hall, W8BH 1) INTRODUCTION The Pi Matrix is a fantastic tool for learning GPIO programming on the raspberry pi. Sure, you could hook up a few LEDs
Setting up IO Python Library on BeagleBone Black
 Setting up IO Python Library on BeagleBone Black Created by Justin Cooper Last updated on 2015-01-16 11:15:19 AM EST Guide Contents Guide Contents Overview Installation on Angstrom Commands to setup and
A REST API for Arduino & the CC3000 WiFi Chip
 A REST API for Arduino & the CC3000 WiFi Chip Created by Marc-Olivier Schwartz Last updated on 2014-04-22 03:01:12 PM EDT Guide Contents Guide Contents Overview Hardware configuration Installing the library
TEECES DOME LIGHTING SYSTEMS
 This lighting system was designed by John V (Teeces) to be a simple, customizable, expandable and affordable solution for dome lighting. An Arduino micro-controller is used to tell LED driver chips which
Microstack Accelerometer Getting started
 Product Highlights Microstack Accelerometer Getting started Find out which way is up! Detect taps, flicks, swishes and shakes, make a 3D motion controller or discover how much force has been applied. http://www.microstack.org.uk
RGB LED Strips. Created by lady ada. Last updated on 2015-12-07 12:00:18 PM EST
 RGB LED Strips Created by lady ada Last updated on 2015-12-07 12:00:18 PM EST Guide Contents Guide Contents Overview Schematic Current Draw Wiring Usage Example Code Support Forums 2 3 5 6 7 10 12 13 Adafruit
Install bluez on the Raspberry Pi
 Install bluez on the Raspberry Pi Created by Tony DiCola Last updated on 2016-03-11 08:03:30 PM EST Guide Contents Guide Contents Overview Installation Download Source Install Dependencies Compile & Install
Bob Rathbone Computer Consultancy
 Raspberry PI Stepper Motor Constructors Manual Bob Rathbone Computer Consultancy www.bobrathbone.com 20 th of December 2013 Bob Rathbone Raspberry PI Robotic Arm 1 Contents Introduction... 3 Raspberry
Adafruit NFC/RFID on Raspberry Pi. Created by Kevin Townsend
 Adafruit NFC/RFID on Raspberry Pi Created by Kevin Townsend Guide Contents Guide Contents Overview Freeing UART on the Pi Step One: Edit /boot/cmdline.txt Step Two: Edit /etc/inittab Step Three: Reboot
PHYS 2P32 Project: MIDI for Arduino/ 8 Note Keyboard
 PHYS 2P32 Project: MIDI for Arduino/ 8 Note Keyboard University April 13, 2016 About Arduino: The Board Variety of models of Arduino Board (I am using Arduino Uno) Microcontroller constructd similarly
Digital Raspberry Pi temperature and humidity (& pressure) logger/webserver
 logger/webserver") Digital Raspberry Pi temperature and humidity (& pressure) logger/webserver Figure 1- Raspberry Pi logger - interim build using Sparkfun serial LCD, 2xDS18B20s and an LED Background The Raspberry Pi is
Digital Raspberry Pi temperature and humidity (& pressure) logger/webserver Figure 1- Raspberry Pi logger - interim build using Sparkfun serial LCD, 2xDS18B20s and an LED Background The Raspberry Pi is
cs281: Introduction to Computer Systems Lab08 Interrupt Handling and Stepper Motor Controller
 cs281: Introduction to Computer Systems Lab08 Interrupt Handling and Stepper Motor Controller Overview The objective of this lab is to introduce ourselves to the Arduino interrupt capabilities and to use
Animated Lighting Software Overview
 Animated Lighting Software Revision 1.0 August 29, 2003 Table of Contents SOFTWARE OVERVIEW 1) Dasher Pro and Animation Director overviews 2) Installing the software 3) Help 4) Configuring the software
UPS PIco. to be used with. Raspberry Pi B+, A+, B, and A. HAT Compliant. Raspberry Pi is a trademark of the Raspberry Pi Foundation
 UPS PIco Uninterruptible Power Supply with Peripherals and I 2 C control Interface to be used with Raspberry Pi B+, A+, B, and A HAT Compliant Raspberry Pi is a trademark of the Raspberry Pi Foundation
How to connect to a Class II router using a mobile-phone data cable specifically for Solwise & Safecom routers
 USB to router s serial port How to connect to a Class II router using a mobile-phone data cable specifically for Solwise & Safecom routers by Neo at RouterTech.Org Introduction Routers based on the AR7RD/AR7WRD
Eric Mitchell April 2, 2012 Application Note: Control of a 180 Servo Motor with Arduino UNO Development Board
 Eric Mitchell April 2, 2012 Application Note: Control of a 180 Servo Motor with Arduino UNO Development Board Abstract This application note is a tutorial of how to use an Arduino UNO microcontroller to
Preparing Raspberry Pi
 Preparing Raspberry Pi Install Raspbian Jessie on the Raspberry Pi Click HERE to download Raspbian Jessie. Raspberry Pi sample code Expand file system Run the following command line within the Raspberry
WebIOPi. Installation Walk-through Macros
 WebIOPi Installation Walk-through Macros Installation Install WebIOPi on your Raspberry Pi Download the tar archive file: wget www.cs.unca.edu/~bruce/fall14/webiopi-0.7.0.tar.gz Uncompress: tar xvfz WebIOPi-0.7.0.tar.gz
PhidgetInterfaceKit 8/8/8
 PhidgetInterfaceKit 8/8/8 Operating Systems: Windows 2000/XP/Vista, Windows CE, Linux, and Mac OS X Application Programming Interfaces (APIs): Visual Basic, VB.NET, C, C++, C#, Flash 9, Flex, Java, LabVIEW,
2.2" TFT Display. Created by Ladyada. Last updated on 2014-03-31 12:15:09 PM EDT
 2.2" TFT Display Created by Ladyada Last updated on 2014-03-31 12:15:09 PM EDT Guide Contents Guide Contents Overview Connecting the Display Test the Display Graphics Library Bitmaps Alternative Wiring
Using pcduino's WiFi Dongle With the Pi a
 Using pcduino's WiFi Dongle With the Pi a learn.sparkfun.com tutorial Available online at: http://sfe.io/t173 Contents Introduction Hardware Setup Edit interfaces Edit wpa_supplicant.conf ifdown and ifup
RGB for ZX Spectrum 128, +2, +2A, +3
 RGB for ZX Spectrum 128, +2, +2A, +3 Introduction... 2 Video Circuitry... 3 Audio Circuitry... 8 Lead Wiring... 9 Testing The Lead... 11 Spectrum +2A/+3 RGB Differences... 12 Circuitry Calculations...
Surveillance System Using Wireless Sensor Networks
 Surveillance System Using Wireless Sensor Networks Dan Nguyen, Leo Chang Computer Engineering, Santa Clara University Santa Clara, California, USA [email protected] [email protected] Abstract The
DS1307 Real Time Clock Breakout Board Kit
 DS1307 Real Time Clock Breakout Board Kit Created by Tyler Cooper Last updated on 2015-10-15 11:00:14 AM EDT Guide Contents Guide Contents Overview What is an RTC? Parts List Assembly Arduino Library Wiring
Intro to Intel Galileo - IoT Apps GERARDO CARMONA
 Intro to Intel Galileo - IoT Apps GERARDO CARMONA IRVING LLAMAS Welcome! Campus Party Guadalajara 2015 Introduction In this course we will focus on how to get started with the Intel Galileo Gen 2 development
Making a DB to RJ45 adapter.
 Making a DB to RJ45 adapter. DB9 to RJ45 adapters are often used in combination with a RS232 repeater for extending the distance of a serial RS232 link, but can be used for any adapter or converter purposes.
Raspberry Pi Kernel-o-Matic
 Raspberry Pi Kernel-o-Matic Created by Todd Treece Last updated on 2015-05-08 08:00:14 AM EDT Guide Contents Guide Contents Overview Installing Dependencies Starting the VM Build the Kernel Custom PiTFT
ABB Drives. User s Manual HTL Encoder Interface FEN-31
 ABB Drives User s Manual HTL Encoder Interface FEN-31 HTL Encoder Interface FEN-31 User s Manual 3AUA0000031044 Rev B EN EFFECTIVE: 2010-04-06 2010 ABB Oy. All Rights Reserved. 5 Safety instructions
LOCKSS on LINUX. Installation Manual and the OpenBSD Transition 02/17/2011
 LOCKSS on LINUX Installation Manual and the OpenBSD Transition 02/17/2011 1 Table of Contents Overview... 3 LOCKSS Hardware... 5 Installation Checklist... 7 BIOS Settings... 10 Installation... 11 Firewall
How to read Temperature and Humidity from Am2302 sensor using Thingworx Edge java SKD for Raspberry Pi
 How to read Temperature and Humidity from Am2302 sensor using Thingworx Edge java SKD for Raspberry Pi Revison History Revision # Date ThingWorx Revision Changes Owner 1.0 2.0 21-11-14 3.0 17-12-14 4.0
In-System Programmer USER MANUAL RN-ISP-UM RN-WIFLYCR-UM-.01. www.rovingnetworks.com 1
 RN-WIFLYCR-UM-.01 RN-ISP-UM In-System Programmer 2012 Roving Networks. All rights reserved. Version 1.1 1/19/2012 USER MANUAL www.rovingnetworks.com 1 OVERVIEW You use Roving Networks In-System-Programmer
Microcontroller to Sensor Interfacing Techniques
 to Sensor Interfacing Techniques Document Revision: 1.01 Date: 3rd February, 2006 16301 Blue Ridge Road, Missouri City, Texas 77489 Telephone: 1-713-283-9970 Fax: 1-281-416-2806 E-mail: [email protected]
AXE114S BINARY CLOCK. revolution Revolution Education Ltd. Email: [email protected] Web: www.rev-ed.co.uk Version 1.1 12/09/08 AXE114.PMD.
 AXE114S BINARY CLOCK Features: The PICAXE binary clock kit tells the time by lighting up blue LEDs in a binary pattern. This is a useful tool for teaching students binary code or simply just confusing/
Mobile Device Power Monitor Battery Connection Quick Start Guide
 Mobile Device Power Monitor Battery Connection Quick Start Guide Distributed By: Monsoon Solutions, Inc. www.msoon.com Introduction The Power Tool software and the Mobile Device Power Monitor hardware
How To Use An Ams 5812 Pressure Sensor With A Usb Starter Kit
 User Guide USB Starter Kit AMS 5812 Phone:+49 (0)6131/91 0730-0 Fax: +49 (0)6131/91 073-30 Internet: E Mail: [email protected] Analog Microelectronics GmbH An der Fahrt 13, D 55124 Mainz May 2012 - Rev.
Color Mark Sensor with Red or Green LED E3S-VS
 Color Mark Sensor with Red or Green LED Rugged IP67 Color Mark Sensor 1 ms response time Detects a wide variety of color marks PNP or NPN output ls Light-on/ Dark-on operation, wire selectable Vertical
Tiny Arduino Music Visualizer
 Tiny Arduino Music Visualizer Created by Phillip Burgess Last updated on 2014-04-17 09:30:35 PM EDT Guide Contents Guide Contents Overview Wiring Code Troubleshooting Principle of Operation Ideas 2 3 4
Yun Shield User Manual VERSION: 1.0. Yun Shield User Manual 1 / 22. www.dragino.com
 Yun Shield User Manual VERSION: 1.0 Version Description Date 0.1 Initiate 2014-Jun-21 1.0 Release 2014-Jul-08 Yun Shield User Manual 1 / 22 Index: 1 Introduction... 3 1.1 What is Yun Shield... 3 1.2 Specifications...
IMMS-CCC. IMMS-CCC Hardwire Central Interface. Installation Instructions
 IMMS-CCC IMMS-CCC Hardwire Central Interface Installation Instructions TABLE OF CONTENTS... Choose a Location... 1 Connections... 2 Operations... 3 Software Configuration... 4 Troubleshooting... 5 Loopback
Designing a Schematic and Layout in PCB Artist
 Designing a Schematic and Layout in PCB Artist Application Note Max Cooper March 28 th, 2014 ECE 480 Abstract PCB Artist is a free software package that allows users to design and layout a printed circuit
Building a Basic Communication Network using XBee DigiMesh. Keywords: XBee, Networking, Zigbee, Digimesh, Mesh, Python, Smart Home
 Building a Basic Communication Network using XBee DigiMesh Jennifer Byford April 5, 2013 Keywords: XBee, Networking, Zigbee, Digimesh, Mesh, Python, Smart Home Abstract: Using Digi International s in-house
ECEN 1400, Introduction to Analog and Digital Electronics
 ECEN 1400, Introduction to Analog and Digital Electronics Lab 4: Power supply 1 INTRODUCTION This lab will span two lab periods. In this lab, you will create the power supply that transforms the AC wall
* DISCLAIMER: Contents. How to Use This Guide: COMMERCIAL INSTALL GUIDE 2
 COMMERCIAL INSTALL GUIDE 2 Contents How to Use This Guide: The first section of this guide is designed to assist you with the installation of your DECK Monitoring hardware. The revenue grade meter and
Cornerstone Electronics Technology and Robotics I Week 15 Voltage Comparators Tutorial
 Cornerstone Electronics Technology and Robotics I Week 15 Voltage Comparators Tutorial Administration: o Prayer Robot Building for Beginners, Chapter 15, Voltage Comparators: o Review of Sandwich s Circuit:
WxGoos-1 Climate Monitor Installation Instructions Page 1. Connections. Setting an IP Address
 Instructions Page 1 Connections The WxGoos-1 is a self-contained web server and requires 6vdc of power at 300ma. A center-positive 2.1 mm plug is used. There are five ports: 1. 10/100 Ethernet RJ-45 receptacle
Network Interface Failover using FONA
 Network Interface Failover using FONA Created by Adam Kohring Last updated on 2014-10-20 12:30:12 PM EDT Guide Contents Guide Contents Overview Prerequisites Wiring Raspberry Pi to Fona ifacefailover Service
Intel Do-It-Yourself Challenge Lab 2: Intel Galileo s Linux side Nicolas Vailliet
 Intel Do-It-Yourself Challenge Lab 2: Intel Galileo s Linux side Nicolas Vailliet www.intel-software-academic-program.com [email protected] Intel Software 2014-02-01 Prerequisites and objectives
SYSTEM 4C. C R H Electronics Design
 SYSTEM 4C C R H Electronics Design SYSTEM 4C All in one modular 4 axis CNC drive board By C R Harding Specifications Main PCB & Input PCB Available with up to 4 Axis X, Y, Z, A outputs. Independent 25
LMU-5000. Hardware and Installation Guide
 LMU-5000 Hardware and Installation Guide Plan The Installation Verify Power, Ground and Ignition. Be sure to check each source (power, ground and ignition) to ensure that the proper signaling exists. This
AR1100 Resistive Touch Screen Controller Guide
 AR1100 Resistive Touch Screen Controller Guide Created by lady ada Last updated on 2015-06-30 01:40:06 PM EDT Guide Contents Guide Contents Overview Calibrating the AR1100 Download and Install AR1100 Configuration
Introduction to Arduino
 Introduction to Arduino With ArduBlock & LilyPad Dev Brian Huang Education Engineer [email protected] Pre-Class Survey http://bit.ly/14xk3ek Resources This PPT ArduBlock Download & Installation
Touch Screen for Pictiva OLED display. Application Note. Introduction
 Touch Screen for Pictiva OLED display Application Note AN0 Introduction A touch screen interface can be added to Pictiva.7 inch or similar OLED displays to enhance its operation. This application note
Copyright 2012 by Fen Logic Ltd. All rights reserved.
 Copyright 2012 by Fen Logic Ltd. All rights reserved. Gertboard Overview... 5 Labels and Diagrams... 7 Power on the Gertboard... 9 GPIO Pins... 10 Schematics... 11 Test Programs Overview... 11 C Code Overview...