Real Time Rendering. Preface What's New Getting Started Basic Tasks Advanced Tasks Workbench Description Index
|
|
|
- Brice Dennis
- 7 years ago
- Views:
Transcription
1 Real Time Rendering Preface What's New Getting Started Basic Tasks Advanced Tasks Workbench Description Index Dassault Systèmes All rights reserved.

2 Preface CATIA Version 5 Real Time Rendering is a next generation CATIA Solutions product that allows you to define material specifications that will be shared across your entire product development process as well as map materials onto parts to produce photo-realistic images. Material specifications define the characteristics of materials: Physical and mechanical properties (Youngs modulus, density, thermal expansion, and so forth.) 3D representation: textures on geometry 2D representation: patterns for drafting purposes. Other CATIA Version 5 products such as Analysis, Generative Drafting and Knowledge Advisor share the material specifications defined using Real Time Rendering. Materials are organized and managed in libraries. A default material library is provided with Real Time Rendering. When mapping materials, Real Time Rendering is available only in conjunction with a.catpart document type. Users can apply materials in Part Design, Shape Design, FreeStyle Shaper and FreeStyle Optimizer workbenches.
 3D representation: textures on geometry 2D representation: patterns for drafting purposes.")
3 Using This Guide This guide is intended for administrators who need to create and manage families of materials, as well as to any users wishing to apply materials to parts. All users should be familiar with basic Infrastructure concepts such as document windows, standard and view toolbars as well as the 3D compass. To get the most out of Real Time Rendering, check in the table below where to find information for your selected profile. I am a first time user I have used Real Time Rendering before I am an administrator Go to: The getting started tutorial. Once you have finished, you should move on to the user task section of this guide. This steps you through basic procedures. If you need some help in understanding tools and commands, use the on-line help. You can also take a look at the basic user task section of this guide to locate information with which you are not already familiar. The advanced task section of this guide. This steps you through how to organize and manage your own collections of materials.

4 Where to Find More Information Prior to reading this book, we recommend that you read the CATIA.Infrastructure User's Guide.

5 What's New? New: you can now use the Interoperability with V4 textures New: "Shading with Texture" option has changed to "Customized View Mode" when applying materials

6 Getting Started This task will guide you step-by-step through your first rendering session. You are going to apply pre-defined materials (brass then blue onyx) to a part (that is your.catpart document) and then edit the last material mapped. Open the gettingstarted.catpart document from the online/samples/realtimerendering directory. You should be familiar with basic concepts such as document windows, standard and view toolbars as well as the 3D compass. You should be able to complete this task in about 10 minutes. Task

7 Applying Materials This task shows you how to apply pre-defined materials. In this example, you will map brass and then blue onyx onto your part (that is your.catpart document). 1. Select any element of the part on which the material should be applied. 2. Click the Apply Material icon The Library dialog box opens, containing sample materials from which to choose. 3. Click the Metal tab 4. Select Brass 5. Click Apply to map the material onto the part

8 6. Select the Apply Customized View icon in the View ->Render Style command. 7. Make sure that the Shading and Materials options are checked in the Custom View Modes dialog box. 8. Click OK. The material is mapped onto the selected part and is identified in the specification tree. 9. Click the Stone tab and change the material to Blue Onyx. 10. Click OK in the Library dialog box. 11. Click in the free space. Blue Onyx is now mapped and the specification tree is updated to include the material you just applied.

9

10 Modifying the Mapped Material This task shows you how to edit materials. You will change the color and density as well as re-position the material mapped onto the part. 1. Right-click the mapped material (Blue Onyx) in the specification tree and select the Properties item from the contextual menu The Properties dialog box is displayed. Note: The mapping support (in this case a box support) appears in the geometry area. This will assist you later when you interactively position the material. 2. Click the Rendering tab if not already active
 appears in the geometry area.")
11 3. Change the color of the material to green: Click [...] opposite Color under the Lighting tab The Color dialog box is displayed Click in the preview area to select the green you want Click OK in the Color dialog box The selected color is displayed in the Color field. 4. Change the material density: Click the Analysis tab in the Properties dialog box Key in a new density, 2000 kg/m3 for example Click Apply Appropriate licenses are required to use these products. 5. Click OK in the Properties dialog box

12 6. Change the mapped material to Wall of Bricks using the Apply Material icon. 7. Right-click the mapped material in the specification tree and select the Properties item from the contextual menu. 8. Change the material size (in the Rendering tab of the Properties dialog box) so that the texture shrinks in size relative to the part. In our example, a material size of 100mm was used. 9. Position the material interactively using the 3D compass: Drag and drop the 3D compass onto the part Select the material in the specification tree: The box support appears in the geometry area.

13 Rotate the 3D compass and see how the material is rotated around one of the compass axes For more information on manipulating objects using the compass, see the Infrastructure User's Guide.

14 Basic Tasks The Basic Tasks section shows how to use Real Time Rendering and is intended for the end-user. Task Purpose Apply a pre-defined material to a part (that is a.catpart document) Edit material specifications Search for materials in large assemblies Copy and paste materials as linked objects Change materials in Knowledge Advisor and use material as a parameter in a rule

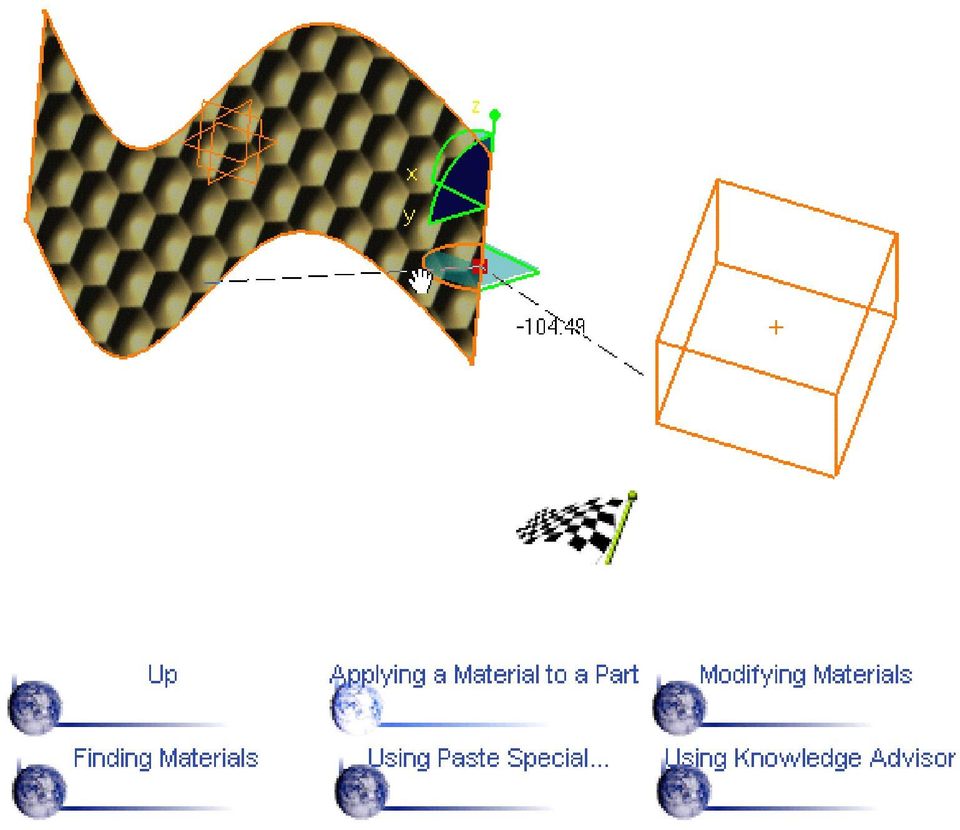
15 Applying a Material to a Part This tasks explains how to apply a pre-defined material to a part (.CATPart document) as well as interactively re-position the mapped material. 1. Select the part on which the material should be applied. 2. Click the Apply Material icon. The Library dialog box opens. It contains several pages of sample materials from which to choose. Each page is identified by a material family name on its tab. 3. Select a material from any family, by a simple click. Double-click on a material to display its properties for analysis purposes.

16 4. Click the Link to file checkbox if you want to map the selected material as a linked object and have it automatically updated to reflect any changes to the original material in the library. Two different icons (one with and one without a link) identify linked and unlinked materials respectively in the specification tree. Note: You can edit linked materials. Doing so will modify the original material in the library. If you want to save changes made to the original material, use the File->Save All command. Select the Edit->Links... command to identify the library containing the original material. You can then open this library in the Material Library workbench if desired. You can also use the Paste Special... command to paste material as a linked object. You can copy both unlinked and linked materials. You can, for example, paste a linked material on a different part in the same document as well as on a part in a different document. For more information, see Copying & Pasting Using Paste Special Click Apply to map the material onto the part The selected material is mapped onto the part and the specification tree is updated. In our example, the material was not mapped as a linked object.

17 Material specifications are managed in the specification tree: all mapped materials are identified. To edit materials (for more information, see Modifying Materials), simply right-click the material and select Properties from the contextual menu or double-click the material. You can also run searches to find a specific material in a large assembly (for more information, see Finding Materials) as well as use copy & paste or drag & drop capabilities. 6. Select the Apply Customized View icon in the View ->Render Style command. 7. Make sure that the Shading and Materials options are checked in the Custom View Modes dialog box. 8. Click OK. 9. Click OK in the Library dialog box. Applying materials to parts affect the physical and mechanical properties, for example the density, of elements. 10. Right-click the material just mapped in the specification tree and choose the Properties item. The Properties

18 dialog box is displayed. 11. Choose the Rendering tab to edit the rendering properties you applied on the part. From this dialog box you can adjust and reset position of the material. You can also modify all material definition parameters as described in Modifying Materials. 12. If necessary; change the material size to adjust the scale of the material relative to the part. 13. Click OK in the Properties dialog box, when you are satisfied with the material mapping on the part

19 14. Use the 3D compass to interactively position the material: Drag and drop the compass onto the part: The compass snaps to the part Select the material in the specification tree: The mapping support (in this case, a box) appears. If necessary, zoom in and out to visualize the mapping support which reflects the material size. Pan and rotate the material until satisfied with the result. You can: Pan along the direction of any axis (x, y or z) of the compass (drag any compass axis) Rotate in a plane (drag an arc on the compass) Pan in a plane (drag a plane on the compass) Rotate freely about a point on the compass (drag the free rotation handle at the top of the compass) Note that material positioning with the 3D compass is only available with P2 solutions. For more information on manipulating objects using the 3D compass, see the CATIA.Infrastructure User's Guide.
 Note that material positioning with the 3D compass is only available with P2 solutions.")
20
21 Modifying Materials You can change the material size and mapping type as well as edit material specifications (lighting and texture parameters) of both linked and unlinked materials. Notes: Editing materials linked to libraries will modify the original material in the library. If you want to save changes made to the original material, use the File ->Save All command. Editing linked materials on parts in the same document or on parts in different documents will change all linked materials. This tasks explains how to edit a material 1. Select the Mirror material in the specification tree 2. Click the Edit Properties icon, select the Edit -> Properties command or right-click and select Properties from the contextual menu The Properties dialog box is displayed. Double-click a material to edit its properties. 3. Make sure the Rendering tab is active. Using this dialog box, you can edit the lighting and texture parameters of the material you are currently editing. A preview area, in which different mapping types can be visualized, is also available: Different mapping types are proposed to let you select the most appropriate mapping for the shape of the geometry, for example a cylinder support to map a label onto a can of food. Manipulations are available within the preview area: zooming in and out, rotating the support, translating it. Use the icon to reframe the support within the preview area.
22 Note: Material specifications defined using Real Time Rendering are shared with other CATIA V5 products. For information on Drafting and Analysis tabs, see CATIA.Generative Drafting and CATIA.Generative Part Stress Analysis guides respectively. Appropriate licenses are required to use these products. 4. If necessary, change the material size to adjust the scale of the material relative to the part 5. Modify the Lighting parameters: color, luminosity, contrast, shininess, transparency, and reflectivity. 6. Click [...] opposite Color and choose the color to be used for the material texture The Color dialog box is displayed allowing you to choose the exact color you wish to define as a material texture. You can click in the preview area to choose the color, or even key in the exact value of the desired color. When satisfied, simply click OK, and the color is applied to the shape in the Properties preview. 7. Set the other material parameters: Parameter set to 0 Parameter set to 1 Luminosity: the intensity of light diffused in any direction by the object, even if not lit by any light source. This parameter affects the whole object, including the shadowed area.
23 Contrast: the intensity of light diffused by the object when lit by light sources. Typically, a shiny metal surface would have a diffuse reflectance value close to 0, while a piece of cardboard would have a value probably above 0.9. Shininess: dullness of an object Set the value to a minimum to generate very sharp highlights on very shiny surfaces. Set the shininess to a higher value to generate large specular spots creating a duller effect. Transparency: the degree of transparency of an object. The higher the value, the more transparent the object (in the example the value is 0.75), the lower the value, the more opaque the object. Reflectivity: the degree of reflectivity of an object. Set to a high value, the object reflects its environment. 8. Click Apply to validate the material lighting definition. The material icon reflects the material as defined. All lighting parameter values range from 0 to 1. Any amount of reflectivity, however small, means that you will no longer visualize the mapped texture simultaneously with the reflected scene. If you want to see the texture, make sure you set the Reflectivity parameter to 0 in the Lighting tab. 9. Click the Texture tab in the Properties dialog box. 10. In the Image Name field, navigate to locate the desired image, and click OK to map it onto the preview element as the texture. In the example, we choose the sky.rgb image available with the default catalog. The following image formats can be used: TIFF, JPEG, RGB, BMP. 11. Define the image repetition along U and V, as well as its scale, its position and its orientation: U and V correspond to parameters of the local parametric surface.
24 Repeat U, V: lets you specify whether or not you want the texture repeated ad infinitum along u- and v-axes. Scale U, V: determines how the texture is stretched along u- and v-axes. Position U, V: determines the position of the texture along u- and v-axes. By default, the image is centered. Orientation: defines the rotation of the texture on surfaces. 12. Click Apply to validate the material texture definition. The material icon reflects the material as defined. There is no specific order when defining parameters.
25 Finding Materials This tasks explains how to use the search for materials in documents. This is useful in large assemblies where you will be able to rapidly identify materials of interest. You can then, if desired, individually edit selected materials. For more information on the Search command, see the Infrastructure User's Guide. 1. Select the Edit -> Search... command The Search dialog box appears. 2. Set the Type field to Material 3. Ensure the Look in box is set to Everywhere to search the whole product structure 4. Click Search to start the search The search results are listed in the area in the lower half of the Search dialog box.
26 5. Click Select to select found items and then OK to exit the dialog box 6. Expand all entries in the specification tree to see that all mapped materials have been selected
27 7. Select the Edit -> Properties command: The Properties dialog box appears letting you edit the properties of selected materials. Click the Current selection drop-down list box and select the materials in turn to edit them. For more information on editing materials, see Modifying Materials. To edit other materials in your document, de-select the first material in the specification tree then select the Edit - Properties command again.
28 Copying & Pasting Using Paste Special... When you use the Paste Special... command, material is pasted as a linked object. You can copy a: Material from a library: The part will be automatically updated to reflect any changes to the original material in the library. This is also useful in large assemblies if you have material specifications that may change and that you use in more than one place. Materials can also be mapped as linked objects from libraries using the Link to file checkbox in the Library dialog box. Paste the material on a different part in the same document: The link is made from the second part to the first part. Editing the material on either part will automatically update the material on the other part Paste the material on parts in different documents: Editing the material on any part will automatically update all linked materials on all parts in all documents. You can in this way change the material specifications in all places where they appear without having to edit each individual occurrence. This tasks explains how to copy and paste materials using the Paste Special... command. 1. Select the material you want to copy 2. To copy, you can either: Click the Copy icon Select the Edit -> Copy command or Select the Copy command in the contextual menu 3. Select the part onto which you want to map the material 4. To paste, you can either: Select the Edit -> Paste Special... command or Select the Paste Special... command in the contextual menu
29 The Source Definition dialog box appears. 5. Click AsMaterialLink in the dialog box, then click OK The material is mapped onto the selected part and the specification tree updated. A linked material icon identifies the material in the specification tree. Note: You cannot change the material name in the Feature Properties tab of the Properties dialog box. Simple copy and paste as well as drag and drop operations can also be performed. In both cases, the mapped material is not linked.
30 Using Knowledge Advisor Capabilities Material specifications defined using Real Time Rendering are shared with Knowledge Advisor. This is illustrated in the two tasks below. In our examples, you will change the material mapped onto a part directly in the knowledgeware Formulas dialog box as well as write a rule using material as a parameter to, for example, change the mapped material as a function of hole diameter. For more information on Knowledge Advisor, see the CATIA.Knowledge Advisor User's Guide. Note that to use this product you need the appropriate license. Changing the Material Mapped onto a Part Directly in the Formulas Dialog Box This tasks explains how to change the material mapped onto a part directly in the knowledgeware Formulas dialog box. 1. Click the Formula icon in the Standard toolbar The Formulas dialog box appears listing all the part parameters. 2. Select the Material parameter The Edit name, value or formula fields are updated. 3. Enter another material, Gold for example, directly in the value field The dialog box, part itself and specification tree are all updated. You have changed the material mapped onto the part directly in the dialog box.
31 You can only change materials mapped in the Formulas dialog box to those available in the default material library. Any material changed in this way will be mapped as linked objects and will be automatically updated to reflect any changes to the original material in the library. Note: The material icon in the specification tree appears with a link to indicate that the material gold is mapped as a linked object. Writing a Rule This task explains how to write a rule using material as a parameter to, for example, change the mapped material as a function of hole diameter. 1. Select Tools -> Options... and click the Relations checkbox in the Display tab (under Part) to display relations in the specification tree 2. Select the part 3. Select Knowledge Advisor from the Start -> Infrastructure menu 4. Click the Rule icon: The Rule Editor dialog box appears. 5. Click OK to identify your rule in the Rule Editor dialog box The Rule Editor : Rule 1 dialog box is displayed. You can now write your rule. 6. Write the following rule: if (PartBody\Hole.1\Diameter > 60mm) Material = "Gold" else Material = "Aluminium"
32 7. Click OK when done: The system checks that your syntax is valid. If it is not, you are prompted to correct it. You cannot edit or apply materials that have been incorporated as parameters into rules. You can now check your rule. 8. Select Part Design from the Start -> Mechanical Design menu 9. Right-click the hole and select Hole1.Object -> Edit Parameters from the contextual menu 10. Double-click the hole diameter and enter a new value in the Constraint Edition dialog box, for example 70, then press Enter The material changes from aluminium to gold. Before: After: Note: Materials incorporated as parameters into rules are mapped as linked objects. Linked materials are identified in the specification tree by a material icon with link.
33
34 Advanced Tasks The Advanced Tasks section shows you how to organize and manage materials in libraries. It is intended for the administrator. CATIA Version 5 Real Time Rendering lets you define materials specifications that will be shared across your entire development process. Material specifications define the characteristics of materials: Physical and mechanical properties (Youngs modulus, density, thermal expansion, and so forth.) 3D representation: textures on geometry 2D representation: patterns for drafting purposes. Task
35 What You Should Know Before You Start A default material library file is provided with Real Time Rendering. By default, this file is located: under Windows NT: $CATStartupPath\startup\materials\Catalog.CATMaterial under UNIX: $CATStartupPath/startup/materials/Catalog.CATMaterial Note: For languages other than English, a folder identified by the appropriate language contains the Catalog.CATMaterial. This is where you should store any new library so that it is taken into account when users want to apply a material to a part (that is a.catpart document) in the Part Design, Shape Design, FreeStyle Shaper or FreeStyle Optimizer workbenches. The environment variable CATStartupPath concatenates start-up directories. When applying a material, the first occurrence of the Catalog.CATMaterial found in the directories listed in the variable is loaded. If you wish to assign different Catalog.CATMaterial files to different users, you need to modify their environment so that their respective CATStartupPath variable references the adequate catalogs.
36 Opening the Material Workbench This tasks explains how to load the Material Workbench and open a CATMaterial document. 1. Select the Start-> Infrastructure-> Material Library menu item. The Material Workbench is loaded, and a CATMaterial document is created. By default a family and a material are in the document, ready to be renamed and edited.
37 Creating a Material Library This tasks shows you how to add materials to a family, and create more families for your material libraries Click the Rename Family icon tab. The New Name dialog box is displayed. Key in the new name for the family, and press OK. Here we called it Wood. to give an explicit name to the default
38 3. Click on the New Family icon to create a new family. A New Family tab is displayed in the document. 4. Repeat step 2 and 3 to create more families such as Metal, Stone, Cloth and so forth. You can copy and paste families. None of the new families contain any material yet. 5. Click the Wood tab to activate the wood family. There is only the default material in this family so far.
39 6. 7. Select the material. Click the Rename Material Name dialog box. Let's call it Bark. icon to rename the material via the New 8. Click the New Material icon to add material to this family. You can add, and rename the Beech, Cork, Teak, Wild Cherry types of wood for example, and many more.
40 Now that your library is defined, you will need to modify each material to give it specific material properties. For more information on how to do so, see Modifying a Material. You can also remove a family or a material, simply by selecting the object then clicking on the Remove Family or Remove Material(s) icon respectively.
41 Interoperability with V4 Textures This tasks shows you how to apply a V4 2D texture to a V5 material. 1. Open the V4 template 2. Double-click on MASTER to display the tree 3. Click on the plus sign beside IMDE1 4. Click on the name of the texture you want to copy
42 5. 6. Copy the texture by selecting Edit -> Copy in the menu bar or by right-clicking and selecting Copy in the contextual menu Paste the new texture in the family on which you want to create a material based on it You can paste the texture in a part.
43 When you double-click on the applied texture, you can display properties: If you are working with UNIX, the right path is immediately displayed. The texture is displayed in the dialog box. If you are working with Windows NT, a UNIX path is displayed and you must change it into a NT path. A V4I licence is necessary to copy a V4 texture.
44 Sorting Materials Within a Family This tasks explains how to arrange materials alphabetically within a family in ascending and descending order. Open the editmaterial.catmaterial document from the online/samples/realtimerendering directory. 1. Click on the Sort Material (A->Z) icon The materials are automatically arranged in ascending alphabetical order, from left to right and top to bottom.
45 2. Click on the Sort Material (Z->A) icon to reverse the sort order of materials. You are not obliged to sort materials alphabetically. Simply click on one or more materials and drag them to their new location if you wish to set them in a specific order. You can do this material by material, or use the multi-selection capabilities (Shift and Ctrl keys).
46 Workbench Description The CATIA - Material Library Version 5 application window looks like this: Click the hotspots to see related documentation Material Library Menu Bar Material Library Toolbar
47 Menu Bar This section presents the menu bar tools and commands dedicated to the Material Library workbench. Start File Edit View Insert Tools Windows Help Edit For... See... Paste Special... Copying & Pasting Using Paste Special... Search... Finding Materials Links... Modifying Materials Properties Modifying Materials Insert For... See... New Family New Material Creating a Material Library Creating a Material Library
48 Material Library Toolbar See Creating a Material Library See Creating a Material Library See Creating a Material Library See Creating a Material Library See Creating a Material Library See Creating a Material Library See Modifying a Material See Sorting Materials Within a Family
49 C Index color D commands Apply Material Links New Family New Material Paste Special... Remove Family Remove Material Rename Family Rename Material Search Shading with Texture Sort Material compass contrast copying materials creating material families material library materials materials from V4 materials default family library material
50 E F L K M editing materials properties finding materials library creating lighting parameters link to file luminosity Knowledge Advisor material size materials color contrast copying creating editing finding linked to library luminosity material size
51 O P R S orientation positioning using 3D compass position u,v reflectivity repeat u,v scale u,v shininess sorting specifications transparency opening material workbench orientation parameters lighting texture Paste Special... command positioning materials using 3D compass position u,v reflectivity repeat u,v scale u,v shininess
52 T sorting materials specifications texture parameters transparency
CATIA Basic Concepts TABLE OF CONTENTS
 TABLE OF CONTENTS Introduction...1 Manual Format...2 Log on/off procedures for Windows...3 To log on...3 To logoff...7 Assembly Design Screen...8 Part Design Screen...9 Pull-down Menus...10 Start...10
Structure Design. Preface What's New? Getting Started Basic Tasks Advanced Tasks Workbench Description Customizing Glossary Index
 Structure Design Preface What's New? Getting Started Basic Tasks Advanced Tasks Workbench Description Customizing Glossary Index Dassault Systèmes 1994-2000. All rights reserved. Preface CATIA Version
Generative Drafting. Page 1 1997 2001 DASSAULT SYSTEMES. IBM Product Lifecycle Management Solutions / Dassault Systemes
 Generative Drafting Page 1 Tutorial Objectives Description This Tutorial is an introduction to Generative Drafting. Message To show how CATIA V5 allows the user to automatically generate associative drafting
Sheet Metal Design. Preface What's New? Getting Started Basic Tasks Workbench Description Customizing Glossary Index
 Sheet Metal Design Preface What's New? Getting Started Basic Tasks Workbench Description Customizing Glossary Index Dassault Systèmes 1994-99. All rights reserved. Preface The V5 CATIA - Sheet Metal Design
Understand the Sketcher workbench of CATIA V5.
 Chapter 1 Drawing Sketches in Learning Objectives the Sketcher Workbench-I After completing this chapter you will be able to: Understand the Sketcher workbench of CATIA V5. Start a new file in the Part
Photo Studio. Site Map Preface What`s New? Getting Started Basic Tasks Advanced Tasks Workbench Description Customizing Glossary Index
 Photo Studio Site Map Preface What`s New? Getting Started Basic Tasks Advanced Tasks Workbench Description Customizing Glossary Index Dassault Systèmes 1994-2001. All rights reserved. Preface Welcome to
CATIA: Navigating the CATIA V5 environment. D. CHABLAT / S. CARO Damien.Chablat@irccyn.ec-nantes.fr
 CATIA: Navigating the CATIA V5 environment D. CHABLAT / S. CARO Damien.Chablat@irccyn.ec-nantes.fr Standard Screen Layout 5 4 6 7 1 2 3 8 9 10 11 12 13 14 15 D. Chablat / S. Caro -- Institut de Recherche
Wireframe and Surface
 Wireframe and Surface Preface What's New Getting Started Basic Tasks Workbench Description Glossary Index Dassault Systèmes 1994-99. All rights reserved. Preface CATIA Version 5 Wireframe and Surface allows
Part Design. Page 1 1997 2001 DASSAULT SYSTEMES. IBM Product Lifecycle Management Solutions / Dassault Systemes
 Part Design Page 1 Tutorial Objectives Description This tutorial is an introduction to Part Design. Message This tutorial illustrates how CATIA can Design precise 3D mechanical parts with an intuitive
Sketcher. Preface What's New? Getting Started Basic Tasks Customizing Workbench Description Glossary Index
 Sketcher Preface What's New? Getting Started Basic Tasks Customizing Workbench Description Glossary Index Dassault Systèmes 1994-99. All rights reserved. Preface CATIA Version 5 Sketcher application makes
Introduction to CATIA V5
 Introduction to CATIA V5 Release 16 (A Hands-On Tutorial Approach) Kirstie Plantenberg University of Detroit Mercy SDC PUBLICATIONS Schroff Development Corporation www.schroff.com www.schroff-europe.com
Creating Custom Crystal Reports Tutorial
 Creating Custom Crystal Reports Tutorial 020812 2012 Blackbaud, Inc. This publication, or any part thereof, may not be reproduced or transmitted in any form or by any means, electronic, or mechanical,
Steady Flow: Laminar and Turbulent in an S-Bend
 STAR-CCM+ User Guide 6663 Steady Flow: Laminar and Turbulent in an S-Bend This tutorial demonstrates the flow of an incompressible gas through an s-bend of constant diameter (2 cm), for both laminar and
Interactive Drafting
 Interactive Drafting Preface What's New Getting Started Basic Tasks Advanced Tasks Workbench Description Customizing Glossary Index Dassault Systèmes 1994-99. All rights reserved. Preface CATIA Version
Autodesk Fusion 360 Badge Guide: Design an F1 in Schools Trophy
 Autodesk Fusion 360 Badge Guide: Design an F1 in Schools Trophy Abstract: Gain basic understanding of creating 3D models in Fusion 360 by designing an F1 in Schools trophy. This badge may be claimed by
Pro/ENGINEER Wildfire 4.0 Basic Design
 Introduction Datum features are non-solid features used during the construction of other features. The most common datum features include planes, axes, coordinate systems, and curves. Datum features do
Getting Started with CATIA Version 5
 WB Getting Started with CATIA Version 5 Page 1 CATIA User Interface Let s review the following key features: Multi-document support Standard and specific menus & toolbars (File, Edit, Insert, ) Standard
Product Structure Preface What's New? User Tasks
 Product Structure Preface Conventions What's New? User Tasks Entering the Product Structure Workbench Selecting Products only Selecting Modes Inserting a New Component Inserting a New Part Inserting a
Introduction to Autodesk Inventor for F1 in Schools
 F1 in Schools race car Introduction to Autodesk Inventor for F1 in Schools In this course you will be introduced to Autodesk Inventor, which is the centerpiece of Autodesk s Digital Prototyping strategy
Introduction to Autodesk Inventor for F1 in Schools
 Introduction to Autodesk Inventor for F1 in Schools F1 in Schools Race Car In this course you will be introduced to Autodesk Inventor, which is the centerpiece of Autodesk s digital prototyping strategy
Speaker Drafting. Page 1 1997 2001 DASSAULT SYSTEMES
 Speaker Drafting Page 1 Tutorial Objectives Description This Tutorial is an introduction to Assembly Drafting. Message To show how CATIA V5 allows the user to automatically generate associative drafting
Part Design. Preface What's New? Getting Started Basic Tasks Advanced Tasks Workbench Description Customizing Glossary Index
 Part Design Preface What's New? Getting Started Basic Tasks Advanced Tasks Workbench Description Customizing Glossary Index Dassault Systèmes 1994-99. All rights reserved. Preface The CATIA Version 5 Part
USING STUFFIT DELUXE THE STUFFIT START PAGE CREATING ARCHIVES (COMPRESSED FILES)
") USING STUFFIT DELUXE StuffIt Deluxe provides many ways for you to create zipped file or archives. The benefit of using the New Archive Wizard is that it provides a way to access some of the more powerful
USING STUFFIT DELUXE StuffIt Deluxe provides many ways for you to create zipped file or archives. The benefit of using the New Archive Wizard is that it provides a way to access some of the more powerful
Microsoft Excel 2010 Part 3: Advanced Excel
 CALIFORNIA STATE UNIVERSITY, LOS ANGELES INFORMATION TECHNOLOGY SERVICES Microsoft Excel 2010 Part 3: Advanced Excel Winter 2015, Version 1.0 Table of Contents Introduction...2 Sorting Data...2 Sorting
The following is an overview of lessons included in the tutorial.
 Chapter 2 Tutorial Tutorial Introduction This tutorial is designed to introduce you to some of Surfer's basic features. After you have completed the tutorial, you should be able to begin creating your
Getting Started with ANSYS ANSYS Workbench Environment
 Getting Started with ANSYS ANSYS Workbench Environment Overview The purpose of this tutorial is to get you started with the ANSYS Workbench environment. We will use a simple, static analysis of a single
CATIA Team PDM. Preface Getting Started Basic Tasks Advanced Tasks Index. Dassault Systèmes 1994-99. All rights reserved.
 CATIA Team PDM Preface Getting Started Basic Tasks Advanced Tasks Index Dassault Systèmes 1994-99. All rights reserved. Preface Overview of PDM The Need Next to people, information is your company's most
Chapter 23: Drafting in Worksheet View
 Chapter 23: Drafting in Worksheet View Worksheet View is a powerful, 2D production drafting module. Here you can find all of the drawing and editing tools needed to create fast, accurate, detailed working
TABLE OF CONTENTS. INTRODUCTION... 5 Advance Concrete... 5 Where to find information?... 6 INSTALLATION... 7 STARTING ADVANCE CONCRETE...
 Starting Guide TABLE OF CONTENTS INTRODUCTION... 5 Advance Concrete... 5 Where to find information?... 6 INSTALLATION... 7 STARTING ADVANCE CONCRETE... 7 ADVANCE CONCRETE USER INTERFACE... 7 Other important
WHAT S NEW IN WORD 2010 & HOW TO CUSTOMIZE IT
 WHAT S NEW IN WORD 2010 & HOW TO CUSTOMIZE IT The Ribbon... 2 Default Tabs... 2 Contextual Tabs... 2 Minimizing and Restoring the Ribbon... 3 Customizing the Ribbon... 3 A New Graphic Interface... 5 Live
Excel 2007 Basic knowledge
 Ribbon menu The Ribbon menu system with tabs for various Excel commands. This Ribbon system replaces the traditional menus used with Excel 2003. Above the Ribbon in the upper-left corner is the Microsoft
Generative Shape Design
 Generative Shape Design Preface What's New Getting Started Basic Tasks Advanced Tasks Workbench Description Glossary Index Dassault Systèmes 1994-99. All rights reserved. Preface CATIA Version 5 Generative
ArcGIS. Tips and Shortcuts. for Desktop
 ArcGIS Tips and Shortcuts for Desktop Map Navigation Refresh and redraw the display. F5 Suspend the map s drawing. F9 Zoom in and out. Center map. Roll the mouse wheel backward and forward. Hold down Ctrl
Outlook. Getting Started Outlook vs. Outlook Express Setting up a profile Outlook Today screen Navigation Pane
 Outlook Getting Started Outlook vs. Outlook Express Setting up a profile Outlook Today screen Navigation Pane Composing & Sending Email Reading & Sending Mail Messages Set message options Organizing Items
Creating Reports with Smart View s Ad Hoc Analysis
 with Smart View s Ad Hoc Analysis Dartmouth College February 10, 2009 Table of Contents Overview... 3 Connecting to the Reporting Cube... 3 Setting Ad Hoc Options... 3 The Ad Hoc Grid... 4 Selecting Members
Chapter 4: Website Basics
 1 Chapter 4: In its most basic form, a website is a group of files stored in folders on a hard drive that is connected directly to the internet. These files include all of the items that you see on your
FastTrack Schedule 10. Tutorials Manual. Copyright 2010, AEC Software, Inc. All rights reserved.
 FastTrack Schedule 10 Tutorials Manual FastTrack Schedule Documentation Version 10.0.0 by Carol S. Williamson AEC Software, Inc. With FastTrack Schedule 10, the new version of the award-winning project
Intro to 3D Animation Using Blender
 Intro to 3D Animation Using Blender Class Instructor: Anthony Weathersby Class Objectives A primer in the areas of 3D modeling and materials An introduction to Blender and Blender s toolset Course Introduction
SpaceClaim Introduction Training Session. A SpaceClaim Support Document
 SpaceClaim Introduction Training Session A SpaceClaim Support Document In this class we will walk through the basic tools used to create and modify models in SpaceClaim. Introduction We will focus on:
Excel -- Creating Charts
 Excel -- Creating Charts The saying goes, A picture is worth a thousand words, and so true. Professional looking charts give visual enhancement to your statistics, fiscal reports or presentation. Excel
Microsoft PowerPoint 2010
 Microsoft PowerPoint 2010 Starting PowerPoint... 2 PowerPoint Window Properties... 2 The Ribbon... 3 Default Tabs... 3 Contextual Tabs... 3 Minimizing and Restoring the Ribbon... 4 The Backstage View...
BIGPOND ONLINE STORAGE USER GUIDE Issue 1.1.0-18 August 2005
 BIGPOND ONLINE STORAGE USER GUIDE Issue 1.1.0-18 August 2005 PLEASE NOTE: The contents of this publication, and any associated documentation provided to you, must not be disclosed to any third party without
Introduction to Word 2007
 Introduction to Word 2007 You will notice some obvious changes immediately after starting Word 2007. For starters, the top bar has a completely new look, consisting of new features, buttons and naming
Quick Tutorial. Overview. The NVIDIA Software Improvement Program. Creating an Effect
 Quick Tutorial Overview This chapter presents a very short FX Composer 2.5 tutorial to quickly introduce you to several convenient and powerful new features. We highly recommend this tutorial, particularly
CATIA Electrical Harness Design TABLE OF CONTENTS
 TABLE OF CONTENTS Introduction...1 Electrical Harness Design...2 Electrical Harness Assembly Workbench...4 Bottom Toolbar...5 Measure...5 Electrical Harness Design...7 Defining Geometric Bundles...7 Installing
Content Author's Reference and Cookbook
 Sitecore CMS 6.5 Content Author's Reference and Cookbook Rev. 110621 Sitecore CMS 6.5 Content Author's Reference and Cookbook A Conceptual Overview and Practical Guide to Using Sitecore Table of Contents
TimeValue Software Due Date Tracking and Task Management Software
 User s Guide TM TimeValue Software Due Date Tracking and Task Management Software File In Time Software User s Guide Copyright TimeValue Software, Inc. (a California Corporation) 1992-2010. All rights
Embroidery Fonts Plus ( EFP ) Tutorial Guide Version 1.0505
 Tutorial Guide Version 1.0505") Embroidery Fonts Plus ( EFP ) Tutorial Guide Version 1.0505 1 Contents Chapter 1 System Requirements.................. 3 Chapter 2 Quick Start Installation.................. 4 System Requirements................
Embroidery Fonts Plus ( EFP ) Tutorial Guide Version 1.0505 1 Contents Chapter 1 System Requirements.................. 3 Chapter 2 Quick Start Installation.................. 4 System Requirements................
Chapter 1. Creating Sketches in. the Sketch Mode-I. Evaluation chapter. Logon to www.cadcim.com for more details. Learning Objectives
 Chapter 1 Creating Sketches in Learning Objectives the Sketch Mode-I After completing this chapter you will be able to: Use various tools to create a geometry. Dimension a sketch. Apply constraints to
Produced by Flinders University Centre for Educational ICT. PivotTables Excel 2010
 Produced by Flinders University Centre for Educational ICT PivotTables Excel 2010 CONTENTS Layout... 1 The Ribbon Bar... 2 Minimising the Ribbon Bar... 2 The File Tab... 3 What the Commands and Buttons
Migrating to Excel 2010 from Excel 2003 - Excel - Microsoft Office 1 of 1
 Migrating to Excel 2010 - Excel - Microsoft Office 1 of 1 In This Guide Microsoft Excel 2010 looks very different, so we created this guide to help you minimize the learning curve. Read on to learn key
Software for Producing Rack Layouts and Purchase Orders
 1 Software for Producing Rack Layouts and Purchase Orders Welcome to RackTools: software that makes it simple and quick to specify Middle Atlantic Products. RackTools has been designed with one purpose
Handout: Word 2010 Tips and Shortcuts
 Word 2010: Tips and Shortcuts Table of Contents EXPORT A CUSTOMIZED QUICK ACCESS TOOLBAR... 2 IMPORT A CUSTOMIZED QUICK ACCESS TOOLBAR... 2 USE THE FORMAT PAINTER... 3 REPEAT THE LAST ACTION... 3 SHOW
Manual English KOI Desktop App 2.0.x
 Manual English KOI Desktop App 2.0.x KOI Kommunikation, Organisation, Information Comm-Unity EDV GmbH 2010 Contents Introduction... 3 Information on how to use the documentation... 3 System requirements:...
Data Visualization. Brief Overview of ArcMap
 Data Visualization Prepared by Francisco Olivera, Ph.D., P.E., Srikanth Koka and Lauren Walker Department of Civil Engineering September 13, 2006 Contents: Brief Overview of ArcMap Goals of the Exercise
ME 24-688 Week 11 Introduction to Dynamic Simulation
 The purpose of this introduction to dynamic simulation project is to explorer the dynamic simulation environment of Autodesk Inventor Professional. This environment allows you to perform rigid body dynamic
Introduction to Measurement Tools
 Introduction to Measurement Tools Revu's built-in measurement tools make it easy to take length, area, perimeter, diameter, volume and radius measurements, count from PDFs and perform area cutouts. Compatibility
Quick Start Tutorial Metric version
 Quick Start Tutorial Metric version 1996-2009 Cadsoft Corporation. No part of this guide or the accompanying software may be reproduced or transmitted, electronically or mechanically, without written permission
Windows 8.1 Update 1 Supplement
 Illustrated Series Guide to Windows 8.1 Update 1 Changes June 2014 Table of Contents (CTRL+Click a link to navigate directly to Part 1, 2, 3, or 4.) Part 1: What Version of Windows Am I Using? Part 2:
Avaya Network Configuration Manager User Guide
 Avaya Network Configuration Manager User Guide May 2004 Avaya Network Configuration Manager User Guide Copyright Avaya Inc. 2004 ALL RIGHTS RESERVED The products, specifications, and other technical information
CATIA Functional Tolerancing & Annotation TABLE OF CONTENTS
 TABLE OF CONTENTS Introduction...1 Functional Tolerancing and Annotation...2 Pull-down Menus...3 Insert...3 Functional Tolerancing and Annotation Workbench...4 Bottom Toolbar Changes...5 3D Grid Toolbar...5
Sample Table. Columns. Column 1 Column 2 Column 3 Row 1 Cell 1 Cell 2 Cell 3 Row 2 Cell 4 Cell 5 Cell 6 Row 3 Cell 7 Cell 8 Cell 9.
 Working with Tables in Microsoft Word The purpose of this document is to lead you through the steps of creating, editing and deleting tables and parts of tables. This document follows a tutorial format
Piston Ring. Problem:
 Problem: A cast-iron piston ring has a mean diameter of 81 mm, a radial height of h 6 mm, and a thickness b 4 mm. The ring is assembled using an expansion tool which separates the split ends a distance
Adding Animation With Cinema 4D XL
 Step-by-Step Adding Animation With Cinema 4D XL This Step-by-Step Card covers the basics of using the animation features of Cinema 4D XL. Note: Before you start this Step-by-Step Card, you need to have
Sweet Home 3D user's guide
 1 de 14 08/01/2013 13:08 Features Download Online Gallery Blog Documentation FAQ User's guide Video tutorial Developer's guides History Reviews Support 3D models Textures Translations Forum Report a bug
511 - Creating Structural Frame Designs
 4 th Generation VLC courtesy of Edison2 511 - Creating Structural Frame Designs Rahul Kulkarni, Manager, Product Design, Pune Center, Siemens PLM Software #SEU13 Agenda: 511 - Creating Structural Frame
Chapter 9. Editing Features. Learning Objectives
 Chapter 9 Editing Features Learning Objectives After completing this chapter, you will be able to: Edit features. Edit sketches of the sketch based features. Edit the sketch plane of the sketch based features.
Word 2010: Mail Merge to Email with Attachments
 Word 2010: Mail Merge to Email with Attachments Table of Contents TO SEE THE SECTION FOR MACROS, YOU MUST TURN ON THE DEVELOPER TAB:... 2 SET REFERENCE IN VISUAL BASIC:... 2 CREATE THE MACRO TO USE WITHIN
5. Tutorial. Starting FlashCut CNC
 FlashCut CNC Section 5 Tutorial 259 5. Tutorial Starting FlashCut CNC To start FlashCut CNC, click on the Start button, select Programs, select FlashCut CNC 4, then select the FlashCut CNC 4 icon. A dialog
SnagIt Add-Ins User Guide
 Version 8.1 User Guide By TechSmith Corp. User Guide User Guide Contents User s Guide 1 Overview...1 Word, PowerPoint, and Excel Add-Ins...2 Outlook Add-In...2 Internet Explorer / Windows Explorer Add-In...2
Generative Part Stress Analysis
 Generative Part Stress Analysis Preface What's new? Getting Started Basic Tasks Workbench Description Glossary Index Dassault Systèmes 1994-99. All rights reserved. Preface CATIA - Generative Part Structural
Introduction to Visio 2003 By Kristin Davis Information Technology Lab School of Information The University of Texas at Austin Summer 2005
 Introduction to Visio 2003 By Kristin Davis Information Technology Lab School of Information The University of Texas at Austin Summer 2005 Introduction This tutorial is designed for people who are new
LogMeIn Network Console Version 8 Getting Started Guide
 LogMeIn Network Console Version 8 Getting Started Guide April 2007 1. About the Network Console... 2 2. User Interface...2 3. Quick Start... 2 4. Network & Subnet Scans...3 5. Quick Connect...3 6. Operations...
TRIAL SOFTWARE GUIDE 1. PURPOSE OF THIS GUIDE 2. DOWNLOAD THE TRIALSOFTWARE 3. START WIDS 4. OPEN A SAMPLE COURSE, PROGRAM
 TRIAL SOFTWARE GUIDE Thank you for trying the WIDS software! We appreciate your interest and look forward to hearing from you. Please contact us at (800) 677-9437 if you have any questions about your trial
Microsoft Access 2010 Part 1: Introduction to Access
 CALIFORNIA STATE UNIVERSITY, LOS ANGELES INFORMATION TECHNOLOGY SERVICES Microsoft Access 2010 Part 1: Introduction to Access Fall 2014, Version 1.2 Table of Contents Introduction...3 Starting Access...3
Turbo Lister Listing Activity Quick Start Guide
 Turbo Lister Listing Activity Quick Start Guide ebay Inc. Date: April, 2007 Version: 1.1 2 ebay File Exchange Catalog Listing Template Instructions Document History Version Date 1.0 January, 2007 1.1 April,
TheFinancialEdge. Crystal Reports Tutorial
 TheFinancialEdge Crystal Reports Tutorial 101911 2011 Blackbaud, Inc. This publication, or any part thereof, may not be reproduced or transmitted in any form or by any means, electronic, or mechanical,
National RTAP Marketing Transit Toolkit Customizing Templates in Microsoft Publisher
 National RTAP Marketing Transit Toolkit Customizing Templates in Microsoft Publisher Customizing the Templates in Microsoft Publisher Microsoft Publisher is part of the Microsoft Office Suite, so most
Copyright 2006 TechSmith Corporation. All Rights Reserved.
 TechSmith Corporation provides this manual as is, makes no representations or warranties with respect to its contents or use, and specifically disclaims any expressed or implied warranties or merchantability
Cognos Introduction to Cognos
 Cognos Introduction to Cognos Administration and Finance Information Systems Management TTAT Table of Contents What is Cognos?...1 Report Access..3 Accessing Cognos..6 Welcome Page.7 Access Reports...8
Menus and Toolbars: Using and customizing those common to all OpenOffice.org components
 Menus and Toolbars: Using and customizing those common to all OpenOffice.org components Title: Menus and Toolbars: Using and customizing those common to all OpenOffice.org components Version: 1.0 First
PowerPoint 2007: Basics Learning Guide
 PowerPoint 2007: Basics Learning Guide What s a PowerPoint Slide? PowerPoint presentations are composed of slides, just like conventional presentations. Like a 35mm film-based slide, each PowerPoint slide
Microsoft Word 2010 Prepared by Computing Services at the Eastman School of Music July 2010
 Microsoft Word 2010 Prepared by Computing Services at the Eastman School of Music July 2010 Contents Microsoft Office Interface... 4 File Ribbon Tab... 5 Microsoft Office Quick Access Toolbar... 6 Appearance
UF Health SharePoint 2010 Document Libraries
 UF Health SharePoint 2010 Document Libraries Email: training@health.ufl.edu Web Page: http://training.health.ufl.edu Last Updated 2/7/2014 SharePoint 2010 Document Libraries 1.5 Hours 1.0 Shared Network
SQL Server 2005: Report Builder
 SQL Server 2005: Report Builder Table of Contents SQL Server 2005: Report Builder...3 Lab Setup...4 Exercise 1 Report Model Projects...5 Exercise 2 Create a Report using Report Builder...9 SQL Server 2005:
Step One. Step Two. Step Three USING EXPORTED DATA IN MICROSOFT ACCESS (LAST REVISED: 12/10/2013)
") USING EXPORTED DATA IN MICROSOFT ACCESS (LAST REVISED: 12/10/2013) This guide was created to allow agencies to set up the e-data Tech Support project s Microsoft Access template. The steps below have been
USING EXPORTED DATA IN MICROSOFT ACCESS (LAST REVISED: 12/10/2013) This guide was created to allow agencies to set up the e-data Tech Support project s Microsoft Access template. The steps below have been
PLAY VIDEO. Close- Closes the file you are working on and takes you back to MicroStation V8i Open File dialog.
 Chapter Five Menus PLAY VIDEO INTRODUCTION To be able to utilize the many different menus and tools MicroStation V8i offers throughout the program and this guide, you must first be able to locate and understand
Using Spreadsheets, Selection Sets, and COGO Controls
 Using Spreadsheets, Selection Sets, and COGO Controls Contents About this tutorial... 3 Step 1. Open the project... 3 Step 2. View spreadsheets... 4 Step 3. Create a selection set... 10 Step 4. Work with
Using Microsoft Office XP Advanced Word Handout INFORMATION TECHNOLOGY SERVICES California State University, Los Angeles Version 1.
 Using Microsoft Office XP Advanced Word Handout INFORMATION TECHNOLOGY SERVICES California State University, Los Angeles Version 1.0 Spring 2004 Contents Advanced Microsoft Word XP... 3 Customizing Word
SellerDeck 2013 Reviewer's Guide
 SellerDeck 2013 Reviewer's Guide Help and Support Support resources, email support and live chat: http://www.sellerdeck.co.uk/support/ 2012 SellerDeck Ltd 1 Contents Introduction... 3 Automatic Pagination...
Excel Database Management Microsoft Excel 2003
 Excel Database Management Microsoft Reference Guide University Technology Services Computer Training Copyright Notice Copyright 2003 EBook Publishing. All rights reserved. No part of this publication may
Microsoft Office Excel 2007 Key Features. Office of Enterprise Development and Support Applications Support Group
 Microsoft Office Excel 2007 Key Features Office of Enterprise Development and Support Applications Support Group 2011 TABLE OF CONTENTS Office of Enterprise Development & Support Acknowledgment. 3 Introduction.
SolidWorks Implementation Guides. Sketching Concepts
 SolidWorks Implementation Guides Sketching Concepts Sketching in SolidWorks is the basis for creating features. Features are the basis for creating parts, which can be put together into assemblies. Sketch
Table of Contents. Part I Welcome. Part II Introduction. Part III Getting Started. Part IV The User Interface. Part V Quick Start Tutorials
 Contents I Table of Contents Part I Welcome 5 Part II Introduction 5 1 Overview... 5 2 Product... Levels 5 3 Technical... Support 6 4 Copyright... 7 Part III Getting Started 7 1 Installation... 7 2 Register...
View Your Photos. What you ll need: A folder of digital photos Jasc Paint Shop Photo Album 5
 View Your Photos With Photo Album you can choose the way you view photos, easily switching back and forth between four useful options: Favorite Folders, Calendar, Keywords, or All Folders. You can even
Practical Work DELMIA V5 R20 Lecture 1. D. Chablat / S. Caro Damien.Chablat@irccyn.ec-nantes.fr Stephane.Caro@irccyn.ec-nantes.fr
 Practical Work DELMIA V5 R20 Lecture 1 D. Chablat / S. Caro Damien.Chablat@irccyn.ec-nantes.fr Stephane.Caro@irccyn.ec-nantes.fr Native languages Definition of the language for the user interface English,
IT 386: 3D Modeling and Animation. Review Sheet. Notes from Professor Nersesian s IT 386: 3D Modeling and Animation course
 IT 386: 3D Modeling and Animation Review Sheet Sources: Notes from Professor Nersesian s IT 386: 3D Modeling and Animation course Notes from CannedMushrooms on YouTube Notes from Digital Tutors tutorial
6. If you want to enter specific formats, click the Format Tab to auto format the information that is entered into the field.
 Adobe Acrobat Professional X Part 3 - Creating Fillable Forms Preparing the Form Create the form in Word, including underlines, images and any other text you would like showing on the form. Convert the
Ohio University Computer Services Center August, 2002 Crystal Reports Introduction Quick Reference Guide
 Open Crystal Reports From the Windows Start menu choose Programs and then Crystal Reports. Creating a Blank Report Ohio University Computer Services Center August, 2002 Crystal Reports Introduction Quick
Project Management WalkThrough
 PRACTICE CS Project Management WalkThrough version 2009.x.x TL 21455 10/25/09 Copyright Information Text copyright 2004-2009 by Thomson Reuters/Tax & Accounting. All rights reserved. Video display images