OCFS Data Warehouse Reporting: Impromptu Table of Contents
|
|
|
- Damian Whitehead
- 9 years ago
- Views:
Transcription
1
2 OCFS Data Warehouse Reporting: Impromptu Table of Contents Module 1: Introduction... 1 Participant Information... 1 What is Cognos?... 2 What is the OCFS data warehouse?... 2 The Content of This Guide... 3 The OCFS Training Database... 3 Logging into Citrix... 3 Cognos Common Logon... 6 Module 2: Getting Started in Impromptu... 8 What is Cognos Impromptu?... 8 Accessing Impromptu... 8 Module 3: Using Predefined Impromptu Reports Opening Predefined Reports Completing Prompts The Impromptu Report Screen Menu Bar Toolbar Standard Toolbar Format Toolbar Status Bar Getting Around in Impromptu Reports Scrolling Layout Views Drilling Through to Other Reports Closing Reports and Exiting Impromptu To Close an Impromptu Catalog To Close Impromptu Module 4: Modifying Impromptu Predefined Reports Opening Impromptu Predefined Reports Adding and Deleting Data To add data to a predefined report: To delete data from a predefined report: To remove data from a query: Sorting Data To sort data in the report To quickly sort the report on a data item using the toolbar To quickly remove the sorts on a report Grouping Data To change grouping To quickly group the report using the toolbar To quickly remove grouping from a report Associating Data To associate data Changing Report Filters To filter data in the report using the toolbar button To quickly filter using the drop-down filter menu Changing Report and Column Titles Saving Modified Reports i

3 Module 5: Using the Impromptu Report Wizard Impromptu Catalogs Opening Catalogs To open a shared catalog To open a distributed catalog and make a personal copy Creating a New Report Module 6: Using the Impromptu Report Query The Impromptu Screen Impromptu Catalogs Opening Catalogs To open report catalogs To open a distributed catalog and make a personal copy Starting a New Report Turning off the Report Wizard Selecting Data Query Data Order Running Your Query Report Views Status Check Organizing Data Ordering columns Setting column widths Sorting data Remove a sort by using the Sort tab of the Query dialog box To remove all sorts using the Sort button on the toolbar Grouping Data Grouping data using the Group button Grouping data using the Group tab of the Query dialog box Remove groupings from your report using the Query dialog box Remove all groupings from your report using the Group button Headers Associating Data Filtering Reports Filtering a report using the Filter button Filtering reports using the Filter tab in the Query dialog box Complex Filters Adding Calculations to Your Report Totals and Counts Summaries Column Calculations Functions Using a function to build a calculation Using a Function in a Filter Formatting Your Report Changing column titles Changing fonts, font styles, and font sizes Changing data formats Page setup Multi-line with word wrap Data alignment and sizing Inserting Titles Module 7: Managing Impromptu Reports Saving Impromptu Reports ii

4 Saving Impromptu Reports as Other File Types To save Impromptu reports as Excel files To save Impromptu reports as ASCII files To save Impromptu reports as PDF files Saving Impromptu reports as text files Sending Impromptu Reports via Publishing Impromptu Reports to HTML Format Printing Impromptu Reports Module 8: Advanced Impromptu Features Crosstabs Building crosstabs using the Report Wizard: Building crosstabs using the Query dialog box: Prompts Type-in prompts: Catalog Picklist Prompts: Report Picklist Prompts: If/Then/Else Conditional Statements Summary Filters Appendix A: Impromptu Catalogs Appendix A1: Allegations Catalog Appendix A2: Foster Home Catalog Appendix A3: Investigations Catalog Appendix A4: CCRS Related Catalogs Admissions and Discharges Summary Catalog In Care and Legal Detail Catalog In Care and Legal Summary Catalog CCRS Services Report Catalog Agency Folder CCRS Child Folder CCRS Case Folder In Care Detail Fact Folder Case Individual Folder Movement Folder Legal Dimension Legal Modifier A Folder Legal Modifier B Folder Legal Modifier C Folder Legal Modifier D Folder In Care Summary Fact Facility Folder Geography Folder Allegation Facts Folder Race & Ethnicity Folder Allegation Role Folder Allegation Subject Folder Allegation Child Folder Allegation Folder Reporter Relationship Folder Data As Of Date Folder Foster Home Member Ethnicity Folder Foster Home Facts Folder Foster Home Member Folder CPS Investigations Approval Folder CPS Investigations Fact Folder iii

5 CPS Investigations Stage Person Folder CPS Investigations Detail Folder CPS Investigations Reporter Relationship Folder CPS Worker Folder CPS Unit Folder CPS Individual Role Folder Worker Agency Folder Appendix B: Predefined Impromptu Reports FAD Impromptu Reports Appendix B1: Foster Home Reauthorization Coming Due Appendix B2: Foster Home Detail Report Appendix B3: Foster Home Summary List Report Appendix B4: Closed Home Report CCRS Impromptu Reports Appendix B5: Admission to Foster Care Summary Report Appendix B6: Discharge from Foster Care Summary Report Appendix B7: Legal Detail Report Appendix B8: Legal Summary Report Appendix B9: In Care Detail Report Appendix B10: In Care Summary Report CFSR Program Improvement Plan Reports Appendix B10: AFCARS First-Time-Entry Summary Data Appendix B11: AFCARS Point-In-Time Summary Data Appendix B12: Discharge to Adoption Summary Appendix B13: Maltreatment in Foster Care Summary Appendix B14: Recurrence by District Appendix B15: Re-Entry to Foster Care Summary Appendix B16: Reunify with Parent or Caretaker Summary Appendix B17: Six National Indicators Appendix B18: Two or Fewer Placement Settings Summary Security Reports Appendix B19: Assignee/Designee Report Appendix B20: Business Function Report Appendix B21: Staff Security Report Appendix B22: Unit Approver Report Appendix C: OCFS Data Warehouse Reporting Glossary iv

6 Module 1: Introduction Participant Information As a user of the OCFS data warehouse, you will be responsible for interacting with various program and system staff to implement and support desktop ad hoc reporting for your local district or agency. Your responsibilities may include the following: Working with agency or district staff to define data needs for ad hoc reporting; Initiating and coordinating local efforts regarding data quality and data validation; Implementing and utilizing the Cognos reporting tools Impromptu and PowerPlay; Generating predefined reports, modifying existing reports, and generating new reports from the OCFS data warehouse; Coordinating local efforts to schedule report generation; Coordinating local efforts to distribute reports, including identifying appropriate personnel to receive reports and physical distribution logistics; Coordinating orientation and training of appropriate staff to generate reports and access the OCFS data warehouse, where necessary; Sharing results and issues with other report specialists across jurisdictions as part of a users group. This guide provides basic step-by-step instructions for generating, modifying and creating reports from the OCFS data warehouse. OCFS Data Warehouse Reporting Page 1 Step-by-Step Guide: Impromptu Rev 11/10/2003

7 What is Cognos? Cognos is the name of a software development company based in Canada. It is widely acknowledged to be the leading provider of business intelligence applications. Business intelligence is the term given to a category of applications and technologies for gathering, storing, sharing, analyzing, reporting and providing access to data to help users make better decisions. The Cognos suite of data query and analysis tools was selected to meet the specific reporting needs of the local districts and voluntary agencies of the Office of Children and Family Services (OCFS). Cognos was chosen because it provides flexibility and ease of use for non-technical users to generate, modify, and create reports to support planning and operational needs. Cognos offers the same, or similar, functions as the Microsoft Office suite of products, and so offers familiarity to computer users. It also allows multiple users to access the same data source simultaneously. This allows flexibility for the local districts and agencies to retrieve data when they need it. These user-friendly, flexible tools allow report specialists to easily develop customized reports to meet the specific needs of their end users. Cognos software runs on Citrix servers, requiring an extra login procedure and some preparation prior to accessing the Data Warehouse. What is the OCFS data warehouse? The OCFS data warehouse is a collection of data retrieved from the Connections and CCRS systems that users can access independently of those production systems. The data from these two diverse databases is organized and stored in the data warehouse. Data in the OCFS Data Warehouse is available in a current point-in-time snapshot. Trend or historical views are also available. The OCFS data warehouse is refreshed, or updated, on a weekly basis. Thus, every Monday the data reflects the state of the Connections and CCRS systems as of the previous week. Any changes made in either production system during the week will not be reflected in the data warehouse until the following week, after the regularly scheduled update. A Connections Data As Of Date and a CCRS Data As Of Date have been made available in the data warehouse that reflect the dates of the last update so that users can readily see the age of the data. The OCFS data warehouse is a read-only file, which means that users who access the data cannot change the data. The data can only be read. Users can query and analyze the data using the Cognos tools, but they cannot change the data in any way. Page 2 Rev 11/10/2003 OCFS Data Warehouse Reporting Step-by-Step Guide: Impromptu
.")
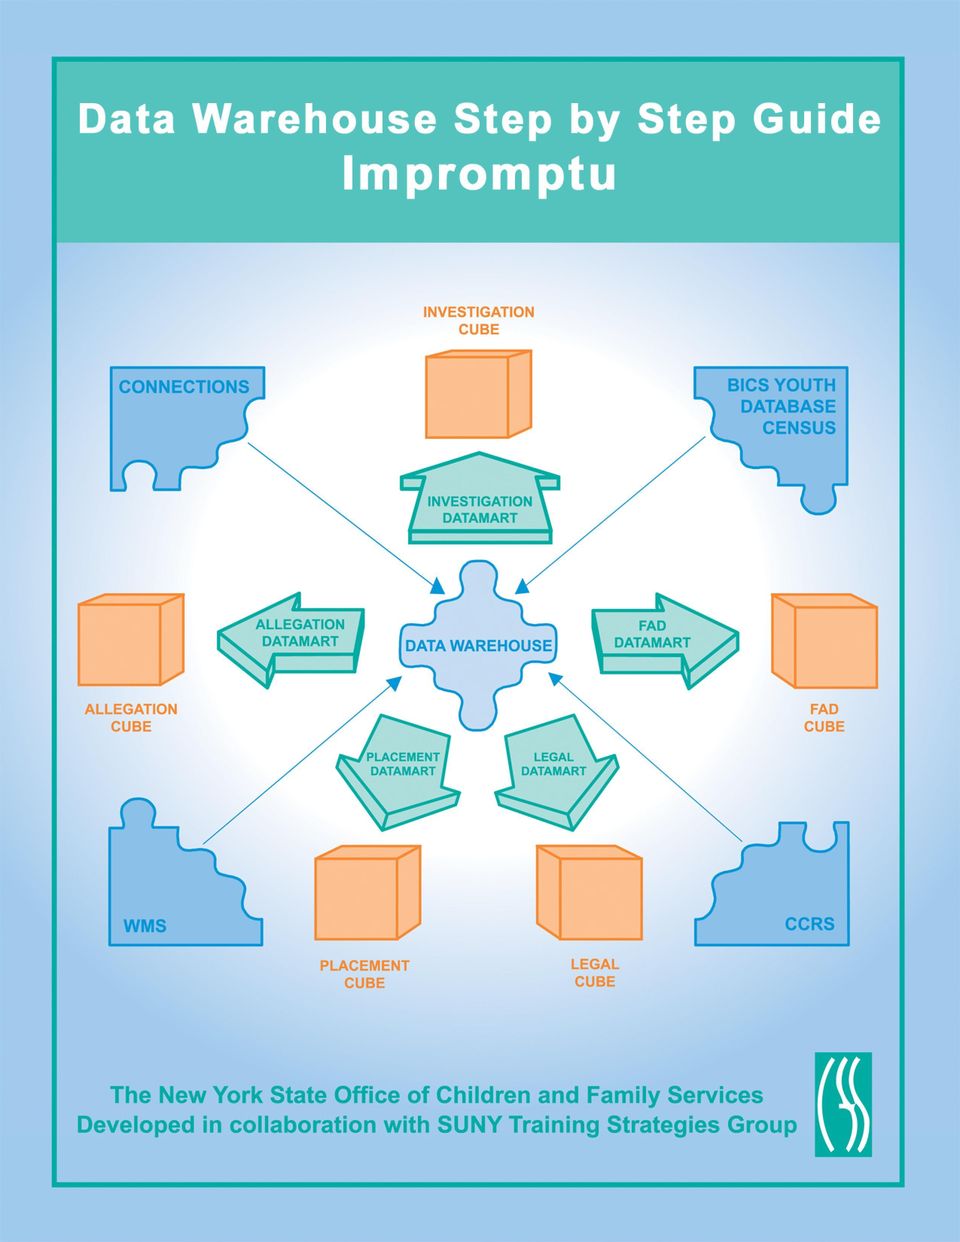
8 The OCFS data warehouse has been organized into five separate data marts. These data marts are subsets of the larger data warehouse. The data marts are focused on a particular subject, as shown below: The Investigations and Allegations data marts contain information on Child Protective Services; The Foster and Adoptive Home (FAD) data mart contains information pertinent to certification dates and demographics of the individuals in the homes; The In Care data mart contains foster care and adoption data on children who are in foster care, or have been admitted or discharged from foster care; and The Legal data mart has all legal information associated with each child in foster care. More information on the data warehouse can be found in the manuals located in the Public Folders in Microsoft Outlook. Instructions for accessing the Public Folders relating to the data warehouse can be found in this guide. The purpose of the data marts is to continue the structuring and organization of the data in ways that are meaningful to users and to extract more efficiently data for analysis. The data marts are the data sources for all catalogs that, in turn, are used for all cubes and predefined report creation. The Content of This Guide This step-by-step guide covers ad hoc reporting from the OCFS data warehouse using Cognos Impromptu. A separate step-by-step guide covers ad hoc reporting from the OCFS data warehouse using Cognos PowerPlay. It is expected that users will have basic computer skills, including Windows pointand-click, navigation, scrolling, etc. Major objectives addressed include accessing, modifying, and managing predefined PowerPlay and Impromptu reports, as well as creating new reports in Impromptu. The material presented in the step-by-step guide reflects data in the OCFS data warehouse. Overviews of the OCFS data warehouse and Cognos, as well as a discussion of where to go for additional help, are also presented. There are three appendices (Appendix A, B, and C) to this guide that contain more detailed information about the various reports, cubes and catalogs that have been made available to you. These appendices describe in more detail the New York State data you will be using. References to these appendices will be made in the appropriate modules of the guide. A glossary of OCFS data warehouse and Cognos terms is also a feature of this guide and can be found in Appendix C. Please refer to this glossary when you need a more complete definition of any terms used in this guide. The OCFS Training Database It is not feasible to use the real OCFS Data Warehouse for training purposes, since that would breach confidentiality standards. However, it is very beneficial for potential users to learn the Cognos tools using data that is familiar to them. For this purpose, the OCFS Data Warehouse Team has designed a training data warehouse that represents the same kind of data you will see in the real OCFS data warehouse. The training database is available on a Citrix network server on the Z: Drive for you to practice your skills and to try out new reporting techniques. You must login to Citrix to access the Training Database, just as you would access the production Data Warehouse database. The Training Database can be accessed with the Cognos User ID train01 and the Password train01. The material presented in the OCFS Class Manual is based on data in the OCFS Training Database. Logging into Citrix Instructions for logging in to Citrix to access the Cognos tools are as follows: OCFS Data Warehouse Reporting Page 3 Step-by-Step Guide: Impromptu Rev 11/10/2003

9 1 Double click the Internet Explorer icon on your desktop. 2 Click the Favorites button on the Internet Explorer menu bar. 3 Select Data Warehouse Login from the drop down-list and continue to step If Data Warehouse Login is not listed on the drop-down list, continue with step 5. 5 In the Address line at the top of the Internet Explorer screen, type 6 Click the Go button to the right of the Address box and wait for the page to load. 7 Click the Favorites button on the Internet Explorer menu bar and select Add to favorites from the drop-down list. 8 In the Add Favorite dialog box, type Data Warehouse Login in the Name field. 9 Click OK on the Add Favorite dialog box. 10 Enter your NT Username, Password, and Domain in the OCFS Data Warehouse login dialog box. 11 Click the Logon button at the bottom of the dialog box. 12 Click OK on the Confidential Warning screen. Page 4 Rev 11/10/2003 OCFS Data Warehouse Reporting Step-by-Step Guide: Impromptu

10 13 The OCFS Data Warehouse welcome screen is displayed. To the left of the screen are icons for PowerPlay, Impromptu, Cognos Cubes, and Training Database. 14 Double click either the PowerPlay or the Impromptu icon to launch the application. If you wish to save any reports or files generated in the Citrix environment, you must save to the T: Drive. In Citrix, the T: Drive is automatically mapped for you. In order to access the T: Drive from your local Desktop, you must manually map to it. Since the location of the T: Drive can vary for different users, you will be provided with the location of the T: Drive in Citrix (where it has already been mapped) that corresponds to the login you are using. You must then map your PC to this location. This process must be done once on each computer you will use to access Citrix. Instructions for mapping your PC to the T: Drive are as follows: OCFS Data Warehouse Reporting Page 5 Step-by-Step Guide: Impromptu Rev 11/10/2003
 that corresponds to the login you")
11 15 In Citrix, hold down the Ctrl and Esc keys on your keyboard simultaneously to display the local desktop Start bar. 16 Click the Show Desktop button at the bottom of your PC to display your local desktop. 17 Right click the My Computer icon on your desktop. 18 Select Map Network Drive from the drop-down list. 19 In the Map Network Drive box, select the T: drive by clicking the drop-down arrow to the right of the Drive box. If the T: drive is already mapped elsewhere, leave the default selection in the Drive: selection box. 20 In the Path or Folder field, enter the path to your T: Drive that has been provided for you (e.g., \\fnpcfs0a1aav\share XX\userid) 21 Ensure that the Reconnect at Logon option in the middle of the Map Network Drive box is selected. 22 Click Finish at the bottom of the Map Network Drive box. 23 Close the path directory widow by clicking the x in the upper right corner of the box. 24 Close the My Computer window by clicking the x in the upper right corner of the box. Again, you only have to complete the above task one time. Once your PC is mapped to the T: Drive, you will not have to map it again. If you move to another PC, you will have to repeat this process. Cognos Common Logon The Cognos Common Logon dialog box appears the first time you open any Cognos application (Impromptu or PowerPlay). It requires you to enter a Cognos User ID and Password. When working in the OCFS data warehouse, you will use the Cognos User ID and Password assigned to you by the OCFS Data Warehouse Team. When working in the training database, you will use train01 for both the User ID and Password. After inserting the appropriate User ID and Password and clicking the Log On button, a key will be displayed in the lower right corner of your PC screen, signifying that you are logged into Cognos. It is not necessary to log off the Cognos Common Logon when you exit a Cognos application. You will be automatically logged off when you exit the Citrix session. However, if you log on to the Training Database using the train01 User ID and Password, you will remain logged on as such until you exit from Cognos Page 6 Rev 11/10/2003 OCFS Data Warehouse Reporting Step-by-Step Guide: Impromptu

12 Common Logon and will only have access to training data. If you want to access your own live data, you will need to exit Cognos Common Logon as train01 and log in with your own Cognos User ID and Password. 1 Exit from any Cognos application that you may have open (Impromptu or PowerPlay). 2 Right click on the key in the lower right corner of your PC. 3 Select Log-Off from the drop-down list. The next time you open a Cognos application (either Impromptu or PowerPlay), you will be prompted to log into Cognos Common Logon. You can now enter your regular Cognos User ID and Password to access your own live data. OCFS Data Warehouse Reporting Page 7 Step-by-Step Guide: Impromptu Rev 11/10/2003
, you will be prompted to log into Cognos Common Logon.")
13 Module 2: Getting Started in Impromptu What is Cognos Impromptu? Impromptu is a user-friendly data query tool that allows the user easy access to a database while shielding him/her from technical database terminology, connections, and structures. The user has the ability to retrieve data directly from the database without needing to know how to program. The Microsoft point-and-click methodology is the primary utility for creating Impromptu reports. Impromptu also offers Microsoft-style formatting capabilities that enable the user to create presentation-style reports. Access to data through Impromptu is achieved by the creation of catalogs. The catalog also presents data to the user in language he/she can easily understand, instead of the technical terms used by the technical database creators. Catalogs provide access to data rather than to a selection of the data in summary form, such as in PowerPlay cubes. Impromptu catalogs are comprised of folders, which relate to tables in a subject-specific data mart. The brief descriptions to the right of each folder give an indication as to what kind of data each folder contains. To view the contents of a folder, click the + to the left of it. Generally speaking, you will see FACT folders and DIMENSION folders in each catalog. The FACT folders will contain actual facts or occurrences CPS reports, allegations, resources, etc. The DIMENSION folders contain descriptive data about the facts. For example, the Foster Home Fact folder contains many codes and ID numbers, such as Worker ID, County Code, Agency ID, and Race Code. The DIMENSION folders contain descriptive data that describe the codes (e.g., Worker ID from the Fact folder, plus Worker Name from the Worker Dimension folder, provide the Worker s Name). So, you will always want to start from the FACT folder and retrieve descriptive data from the DIMENSION folders. Each folder will contain data items that have been arranged in a logical order for your reporting needs. For example, the Allegation catalog contains a folder entitled Victim Dimension. This folder contains all the data fields related to alleged victims of child abuse, such as, Victim Person ID, Victim Age in Years, Gender Code, Birth Date, First Name, etc. There are also folders containing information on actual allegation facts, subjects, workers and geography, all of which relate to Allegations. Impromptu and PowerPlay differ in several respects. Impromptu is a query tool that retrieves data directly from a catalog based on the user s specific requests. PowerPlay is a data analysis tool that allows the user to explore data that has already been predefined and summarized in a cube. Impromptu catalogs allow access to all of the data while PowerPlay cubes present specific data in a summarized format. The OCFS Data Warehouse Team has created several catalogs for your use. These catalogs are described and more specifically defined in Appendix C. Accessing Impromptu Impromptu software runs on a Citrix server, so it must be accessed with an additional login process. 1 Double click the Internet Explorer icon on your desktop. 2 Click the Favorites button on the Internet Browser toolbar. 3 Select Data Warehouse Login from the drop-down listing. Note: If Data Warehouse Login does not appear on the Favorites listing, perform the following steps: Page 8 Rev 11/10/2003 OCFS Data Warehouse Reporting Step-by-Step Guide: Impromptu

14 Type the following in the Address line: Click the Go button and wait for the Login page to load. Click the Favorites button on the toolbar. Select Add to Favorites from the drop-down menu. Type Data Warehouse Login in the Name: field of the Add to Favorites dialog box. Click OK. 4 Enter your NT User ID, Password and Domain in the OCFS Data Warehouse login dialog box. 5 Click Logon. 6 Click OK on the Confidential Warning Screen. OCFS Data Warehouse Reporting Page 9 Step-by-Step Guide: Impromptu Rev 11/10/2003

15 7 Double click the Impromptu Icon to launch the application. Page 10 Rev 11/10/2003 OCFS Data Warehouse Reporting Step-by-Step Guide: Impromptu

16 Module 3: Using Predefined Impromptu Reports While the Impromptu tool offers you the ability to create presentation-quality ad hoc reports, several standard reports have already been created for your use. The Management Reporting Workgroup defined these reports as reports that would be helpful at both a management and supervisor/worker level. As noted previously, these reports will display only the data that is applicable to you; i.e., for your local district or agency. These reports are available to you in the Data Warehouse folders on the Data Warehouse Network Server, as illustrated below: + Desktop + OCFS Datawarehouse + DataWarehouse + Pre-defined User Reports Each of these reports is described in detail in Appendix B at the end of this manual. Opening Predefined Reports Login to Impromptu 1 Login to Citrix. 2 Double click the Impromptu icon on the left-hand side of the Citrix screen. 3 Click File Open on the menu bar OR click the Open button on the toolbar. 4 In the Open dialog box, open the file directory listing by clicking the arrow to the right of the Look in box. 5 Navigate to the Pre-defined User Reports folder as follows: Desktop OCFS Datawarehouse DataWarehouse Pre-defined User Reports The predefined Impromptu reports are in two folders: FAD contains reports on Foster and Adoptive Homes CCRS Reports contains reports on admissions, discharges, placements and legal status. 6 Open one of the above folders by double clicking on it. 7 Select a report from the listing and double click on it to open it. OCFS Data Warehouse Reporting Page 11 Step-by-Step Guide: Impromptu Rev 11/10/2003

17 8 A message screen will pop up notifying you that this report is read-only and that a copy will be made. This is a security measure to prevent users from changing the user reports. Click OK. 9 The Cognos Common Logon box will appear if you have not previously logged into a Cognos application. Enter your Cognos User ID and Password in the boxes provided. Click the Log On button. In most cases, the requested report will not display immediately on your screen. Depending on the complexity of the report (for example, the In Care-Legal summary reports), it can take several minutes to run. You will see, at the bottom of the report screen in the status bar, a fish that appears to be swimming back and forth. This indicates that Impromptu is working on your report and is retrieving the data you requested. Completing Prompts Some Impromptu reports have been designed to run based on user-specific parameters. In other words, you decide what information you want to see in the report. Most of the prompted reports ask for date ranges within which to select information. For example, the Closed Foster Home report asks for today s date. When you enter the date, the report retrieves data on Foster Homes that are closed by that date. Prompts have the effect of customizing the report to user specifications. 1 Login to Impromptu if you have not already done so. 2 Open a predefined Impromptu report with prompts (Closed Foster Home Report, Foster Home Reauthorization Coming Due). 3 Click OK on the This report is read-only message. Page 12 Rev 11/10/2003 OCFS Data Warehouse Reporting Step-by-Step Guide: Impromptu
, it can take several minutes to run.")
18 4 If the Cognos Common Logon dialog box displays, enter your Cognos User ID and Password in the Cognos Common Logon dialog box. 5 A Prompt dialog box is displayed. The dialog box contains requests for information and text boxes for you to enter the information. In most cases, these requests are for dates in a specific format. Your cursor is placed inside the first text box. Enter the information in the same format as displayed in the entry window (e.g., m/dd/yy, yyyy-mm-dd), and then click OK. 6 The report, filtered according to the date(s) you entered, is displayed on the screen. The prompt information that you entered should appear in the title of the report. 7 If you wish to see the report run based on another date, run the prompt again by selecting the button from the Impromptu toolbar. The Prompt dialog box will appear again. You can enter new dates, click OK, and run the report on different parameters. The Impromptu Report Screen Menu Bar As you familiarize yourself with the Impromptu environment, it is important to note the basic components of the interface screen. The Cognos Impromptu menu bar is located near the top of the screen, and contains the familiar options of a Windows application (File, Edit, etc.). Additionally, there are other menu options unique to Impromptu, such as Report and Catalog, which we will explain in more depth as we explore modifying and creating reports in later modules. OCFS Data Warehouse Reporting Page 13 Step-by-Step Guide: Impromptu Rev 11/10/2003
 you entered, is displayed on the screen. The prompt information that you entered should appear in the title of the report.")
19 Toolbar Immediately beneath the menu bar is a toolbar that provides quicker access to the available options. These toolbar buttons are briefly explained below: Standard Toolbar New Creates a new report. Open Opens an existing report. Close Closes the active report. Save Saves the active report. Print Will print the displayed report. It is not recommended that reports be printed directly from Impromptu. Print Preview Displays the current report as it will appear on the printed page. It is not recommended that reports be printed directly from Impromptu. Cut Cuts the current selection and saves it to the clipboard for pasting. Copy Copies the current selection to the clipboard for pasting. Paste Pastes the selection from the clipboard to the position of the cursor. Undo Clears the most recent action. Data Inserts a data field into the report by bringing up the Query Dialog box. Query Data Brings up the Query Dialog box. Sort Ascending Sorts the selected column in ascending order. Total Applies a total to the selected column. Count Applies a count summary on selected data elements, excluding null values. Rank Ranks the selected column and assigns a rank order number. Prompt Calls the prompt, if available, on the report. Header Inserts a header in the selected Group. Footer Inserts a footer in the selected Group. Thumbnail Creates a thumbnail, or a temporary copy of a limited number of rows from the report. Snapshot Creates a snapshot, or a permanent copy of the data stored as a part of the report. Screen Help Special point-and-click help feature. Filter Filters the report based on the chosen criteria, or if nothing is selected, will remove all filters from the report. Drill-Through Where applicable, drills through to another Impromptu report. Create PowerPlay PowerCube Opens PowerPlay Transformer for PowerCube Creation (PowerPlay functionality). Group Groups the selected column by its unique values, or if nothing is selected, will remove all grouping from the report. Page 14 Rev 11/10/2003 OCFS Data Warehouse Reporting Step-by-Step Guide: Impromptu

20 Format Toolbar Font Drop-down box for font style on the selected values in the report. Font Size Drop-down box for font size on the selected values in the report. Font Color Drop-down box for font color on the selected values in the report. Bold, Italic and Underline Formatting options for the selected values in the report. Left, Center and Right Justification Formatting options for the selected values in the report. Currency Formats the selected numerical values to standard currency format. Borders Adds a single-line border around the selected report objects, or if nothing is selected, removes the border from the report. Pattern Applies a pattern to the selected reports objects, or if nothing is selected, removes the pattern from the report. Zoom In and Out On-screen viewing options for the report, zooming in and out in 25% increments. Whole Page and Page Width - Enlarges or reduces the view of the report in the report window. Status Bar The status bar appears at the bottom of the Impromptu interface screen and delivers information about the catalog the report is attached to. The status bar also displays information about a command or toolbar button. In the case below, the catalog is the In Care Detail Catalog. This is also where the fish will swim as he retrieves your report, to let you know that the report is running. Getting Around in Impromptu Reports Scrolling Some predefined Impromptu reports cannot be fully displayed on a single screen. To view the report in its entirety, you will need to scroll up, down, left and right. The vertical scrollbar is located at the far right of the screen. The horizontal scrollbar is located at the bottom of the screen. There is also a set of Next Page buttons at the top and/or bottom of the vertical scrollbar and at the far right and/or left of the horizontal scrollbar. Clicking these will advance you to the next page of the report. Layout Views Two different views are available in an Impromptu report. Screen Layout view should be used when you are inserting graphics or comments, or for viewing screen-only reports. Page Layout view will reduce the display of the report so that you will see the edges of the report, page numbers, and page headers and footers. Page Layout will display the report, as it will look when printed. You can toggle between these views by selecting View Page Layout, or View Screen Layout on the menu bar. OCFS Data Warehouse Reporting Page 15 Step-by-Step Guide: Impromptu Rev 11/10/2003

21 Drilling Through to Other Reports Some Impromptu reports have a feature called Drill-Through that allows you to drill through to another Impromptu report to retrieve different information. For instance, the Foster Home Detail Report drills through to the Foster Home Summary List Report, which provides summarized information on home members and relationships. Drill through reports are linked to their parent report through one of the data items on the parent report. These linking data items are highlighted in color on the parent report. The Foster Home Detail Report is linked to the Foster Home Summary List Report on the Agency Code. Agency Code is highlighted in blue on the Foster Home Detail Report. When you drill through to another report, you will see information for only the specific data item that you drilled-through on (e.g., if you drill through on Agency Code 700, you will see details on only Agency 700). To quickly see if the current report has a drill-through report linked to it, follow these steps: 1 Press Esc to clear any selections in the report. 2 Click and hold the Drill-Through button on the toolbar. If there are drill-through links in the report, the linking data item will be highlighted. After you release the Drill-Through button, the highlights will disappear. 3 If there are no drill-throughs on the report, a Drill-Through Properties dialog box will appear. Click Cancel at the bottom of the box. To Drill-Through in the report 1 Select a value that was highlighted in Step 2 above or select a value that is already highlighted on the report (e.g.,, Agency Code on the Foster Home Detail Report). You must select the specific item that you want to see. In other words, if you select Agency Code 700, you will drill through to the details for Agency 700. You will get details for no other Agency Code. 2 Click the Drill-Through button on the toolbar OR double click on the selected data item. The Drill-Through report will appear, with its information filtered based on the selection in the parent report. Closing Reports and Exiting Impromptu 1 On the menu bar at the top of the screen, click File Close. 2 A dialog box appears asking if you want to save changes to the report. Click No. 3 The report closes. Page 16 Rev 11/10/2003 OCFS Data Warehouse Reporting Step-by-Step Guide: Impromptu
22 Note: If you are intending to open other predefined Impromptu reports, you must also close the catalog that was opened with your original predefined report. Otherwise, Impromptu will try to run the second requested report against the catalog opened for the first requested report. You will get query execution errors if you attempt to run a report against the wrong catalog. To Close an Impromptu Catalog 1 On the menu bar, click Catalog. 2 Select Close from the drop-down list. Now you can open other predefined Impromptu reports. Impromptu will automatically open the catalog to which the report is linked. To Close Impromptu 1 Click the x in the upper right corner of the screen. OCFS Data Warehouse Reporting Page 17 Step-by-Step Guide: Impromptu Rev 11/10/2003
23 Module 4: Modifying Impromptu Predefined Reports Within predefined reports, you may want to make certain modifications to customize the report to fit your needs. Although the official predefined reports cannot be changed in any way, the same reports exist in the Predefined User Reports folder. The predefined reports are built against shared catalogs, which allow users to make modifications to them. Some of the modifications that can be achieved are sorting and grouping data differently, filtering out unnecessary information, or changing titles. We will be using buttons on the toolbar as well as the Report Query dialog box to modify the predefined reports. The Report Query contains all of the information used to retrieve, sort, group, calculate, and filter data for a report. Opening Impromptu Predefined Reports 1 Login to Citrix and open the Impromptu application. 2 Click the Open button on the toolbar OR select File Open on the menu bar. 3 In the Open dialog box, click the arrow to the right of the Look in window 4 Select Desktop from the drop-down listing. 5 Double click OCFS Datawarehouse in the directory window. 6 Double click DataWarehouse in the directory window. 7 Open the Pre-defined User Reports folder. 8 Select and open one of the following folders: CFSR Project Improvement Plan FAD In Care Legal 9 Open a report from the report listing by selecting it and clicking the Open button. Adding and Deleting Data Additional data items can be inserted to a predefined report and irrelevant data can be removed. To add data to a predefined report: 1 Select Insert Data on the menu bar. 2 Your cursor now appears as. Place your cursor on the report where you want the new data item to appear. If you want the new data item to appear as a column, place it in between two existing columns. When a double dotted vertical line (::) appears between the two columns, click your mouse button. If you want the new data item to appear in a title or header frame, place your cursor inside the frame. When a small quote mark ( ) appears in the frame where you want the data item placed, click your mouse button. 3 The Query Data dialog box appears. You can select any data item in any of the folders appearing in the Catalog listing on the left-hand side of the screen. Page 18 Rev 11/10/2003 OCFS Data Warehouse Reporting Step-by-Step Guide: Impromptu
24 Open a folder by clicking the + to the left of the folder. Add the data item by double clicking on it, selecting it and clicking the button in the center of the dialog box, OR clicking and dragging it to the Query data listing on the right-hand side of the box. 4 Click OK at the bottom of the Query dialog box. To delete data from a predefined report: 1 Select any value on the report you wish to delete. 2 Press the Delete key on your keyboard. Deleting an item from a report does not delete it from the query. The data item remains in the Query dialog box until you remove it. Thus, the data item will be retrieved every time the query is run (or the report is executed), it just won t be reported. This could extend your processing time, so to be more efficient, the data item should be removed from the query. To remove data from a query: 1 Retrieve the Query dialog box by selecting Report Query on the menu bar OR clicking the Query Data button on the toolbar. 2 Highlight the data item you wish to remove in the Query data listing on the right side of the dialog box. 3 Press the Delete key on your keyboard. 4 Click the OK button at the bottom of the Query dialog box. Note: If at any time a command does not appear to have executed (adding/deleting data, grouping/ungrouping data, sorting/unsorting data, filters, etc.), select Report Retrieve on the menu bar. Sorting Data Data in Impromptu is organized into folders. The brief descriptions to the right of each folder give an indication as to what kind of data each folder contains. To view the contents of a folder, click the + to the left of it. Generally speaking, you will see FACT folders and DIMENSION folders in each catalog. The FACT folders will contain actual facts or occurrences CPS reports, allegations, resources, etc. The DIMENSION folders contain descriptive data about the facts. For example, the Foster Home Fact folder contains many codes and ID numbers, such as Worker ID, County Code, Agency ID, and Race Code. The DIMENSION folders contain descriptive data that describe the codes (e.g.,, Worker ID from the Fact folder, plus Worker Name from the Worker Dimension folder, provide the Worker s Name). Sorting data in the report is limited to either an ascending or descending display of numeric or text data in the report. Most predefined Impromptu reports have already been sorted based on the most logical data items. You may wish to change the sort order in some reports to better suit your needs. There is a Sort button on the toolbar and a Sort tab in the Query dialog box to facilitate this process. To sort data in the report 1 Open an Impromptu predefined report. 2 From the Report menu, click Query. The Query Dialog box will appear opened to the Data tab. Click the Sort tab. OCFS Data Warehouse Reporting Page 19 Step-by-Step Guide: Impromptu Rev 11/10/2003
25 3 The Sort Order box displays all the data items in the report in their sort order. The first item on the list will have the highest sort priority; the second item will have the next highest priority, and so on. Select one or more data items. 4 Click the Ascending or Descending buttons to specify the sort order. A small ascending or descending icon appears inside the data icon of the item you have sorted. 5 Click the Don t Sort button to remove the sort from a data item. Note: Impromptu sorts grouped data by default (see Grouping Data). You must remove grouping before you can remove sorting. 6 You can change the sort order of the data items in the Sort Order box by selecting an item, and dragging it above where you wish it to reside in the sort order. 7 Click OK to close the Query Dialog box and resort the report. To quickly sort the report on a data item using the toolbar 1 In the report, select an item in the column you wish to sort. Page 20 Rev 11/10/2003 OCFS Data Warehouse Reporting Step-by-Step Guide: Impromptu
26 2 Click the Sort button from the toolbar. 3 The report will add an ascending sort on the column you selected. To quickly remove the sorts on a report 1 In the report, press the Esc key on your keyboard to clear any selections. 2 Click the Sort button from the toolbar. 3 A message box displays warning that All sort items will be deleted. Click Yes, and the sorts will be removed. Note: Impromptu sorts grouped data by default (see Grouping Data). You must remove grouping before you can remove sorting. Grouping Data Grouping data in Impromptu serves to bring all like data together on the report. You can choose to group your data on any data item in your report. For example, if you have a list of CPS reports and want to see them by worker, you can group them by Worker ID. The report will then be reformatted where the Worker ID would be displayed only once, with all the CPS report records related to it displayed next to the Worker ID. A line, or break, would appear before the next Worker ID and his/her CPS report records. There is a Group button on the toolbar and a Group tab in the Query dialog box to facilitate this process. Most predefined Impromptu reports have been grouped based on the most logical data items. However, you can change the grouping if you think it necessary. To change grouping 1 Open the report (follow the steps in Module 3 for Opening a Report). 2 From the Report menu, click Query. The Query Dialog box will appear. Select the Group tab. 3 The Group Order box displays all the data items in the report in their group order. The first data item on the list will be the one with the highest group priority; the second item will have the next highest priority, and so on. Select one or more data items you want to group. 4 Click the Group button. A black bar will appear at the top of the data icon indicating those data elements that are grouped. 5 Click the Ungroup button to remove the grouping on a data item. 6 You can change the group order of the data items in the Group Order box by selecting an item, and dragging it above where you wish it to reside in the group order. 7 Click OK to close the Query Dialog box and display the report. OCFS Data Warehouse Reporting Page 21 Step-by-Step Guide: Impromptu Rev 11/10/2003
27 To quickly group the report using the toolbar 1 Select a data item from one or more columns (it is not necessary to select more than one data item from a single column). The order in which you select the data item will determine the group order. 2 Click the Group button on the toolbar. 3 The report will display the selected column(s) grouped in the order you selected them. To quickly remove grouping from a report 1 In the report, press the Esc key on your keyboard to clear any selections. 2 Click the Group button from the toolbar. 3 A message box will display the words All grouped data will be ungrouped. Click Yes, and all grouping will be removed. Associating Data You can associate a data item to a grouped data item to eliminate duplicate information in the report as long as it has a one-to-one relationship with the grouped data item. Associating data means linking it to a grouped data item. When you group data, the values for the grouped item are displayed only once. The records associated to the grouped item follow. Other data items, however, may repeat in the listing because they are related one-to-one to the grouped item. As in the above example, if you have Worker ID and Worker Name in your report and you grouped by Worker ID, Worker Name would be repeated for every CPS report record. To eliminate this repetition, you can associate Worker Name with Worker ID. To associate data 1 From the Report menu, click Query. The Query dialog box appears. 2 Click the Group tab. 3 Select the data element you want to associate to a grouped data element. 4 Click the Associate button. A black-and-white bar appears inside the data icon of the selected data element. 5 Click OK to close the Query dialog box and associate data in the report. Note: It should be noted that Impromptu issues no warning if the data item and the grouped item to which it is associated do not share a true one-to-one relationship. In the event that a one-to-one relationship does not exist, data will be missing from the report. Page 22 Rev 11/10/2003 OCFS Data Warehouse Reporting Step-by-Step Guide: Impromptu
28 Changing Report Filters A filter is a method of narrowing the results of a report to only that information that is relevant to you. Filter is Impromptu s term for the parameter or scope of your report. A filter specifies the conditions that must be met for data to be included in the report. By limiting information to a subset of the available data, a filter emphasizes the information that is important to you. Filters serve to focus a report and to minimize processing time by excluding any data that is irrelevant to the report. For example, you can filter a report on Foster Homes to show only those that have been accepted and are active. Filters can be done directly on the report workspace by using the Filter button on the toolbar. There is also a Filter tab on the Query dialog box that can be used to build more complex filters. All predefined Impromptu reports have been filtered, but you can filter, or focus, them further if required. To filter data in the report using the toolbar button 1 Select one or more values in the report you wish to filter on. 2 Click the Filter button on the toolbar. 3 The report displays filtered data, based on the values you selected. To quickly filter using the drop-down filter menu 1 Select one or more values in a column. 2 Click the Filter drop-down button. A drop-down menu appears. 3 Select an operator from the drop-down menu. The operators available are as follows: In Retrieves records with values equal to any value in an entered list of values. Not In Retrieves records with values not included in an entered list of values. Between Retrieves records with values inside a range of entered values. Not Between Retrieves records with values outside a range of entered values. = (Equals) Retrieves records with the same value as the entered value. <> (Not Equal to) Retrieves records with any value except the entered value. < (Less than) Retrieves records with values less than the entered value. <= (Less than or equal to) Retrieves records with values less than or equal to the entered value. > (Greater than) Retrieves records with values greater than the entered value. >= (Greater than or equal to) - Retrieves records with values greater than or equal to the entered value. 4 Point to the arrow that appears to the right of the operator (see Step 3) to display a fly-out menu. From this fly-out menu, select one of the following based on your filter preferences: OCFS Data Warehouse Reporting Page 23 Step-by-Step Guide: Impromptu Rev 11/10/2003
29 Selection To filter on the value or values you have selected in the report. The report will automatically be displayed. Number To enter one or more numbers on which to filter. The Enter Values dialog box will appear. String To enter a text string on which to filter. The Enter Values dialog box will appear. Date To enter a date expression on which to filter. The Enter Values dialog box will appear. Time To enter a time expression on which to filter. The Enter Values dialog box will appear. Date-Time To enter a date-time expression on which to filter. The Enter Values dialog box will appear. Interval To enter an interval on which to filter. The Enter Values dialog box will appear. To complete the Enter Values dialog box, enter the value or values you wish to use as your filter in the exact format as they appear in the database (e.g.,, if a value is in all caps in the database, it must be entered here in all caps). Click OK when you have completed entering values. Select Values To filter on your choice of a list of values that appear in the selected column in the report. A Select Values dialog box appears. To complete the Select Values dialog, select the value or values you wish to use as your filter in the Select one or more values listing. The value(s) selected will appear in the Values selected window. Click OK when you have completed making your selections. Page 24 Rev 11/10/2003 OCFS Data Warehouse Reporting Step-by-Step Guide: Impromptu
30 Other methods of filtering are available from the Report Query Filter tab. These methods are covered in Module 6: Using the Impromptu Report Query of this guide. Changing Report and Column Titles To change the titles that appear in the report: 1 Right-click on the column or report title. 2 Select Edit from the pop-up menu that appears. 3 Delete the existing title. 4 Type in the new title you wish to appear. 5 When you are finished, press the Esc key on your keyboard to take the focus off the title. Saving Modified Reports 1 On the menu bar at the top of the screen, click File Save As. 2 The Save As dialog box appears. Since you cannot save your modified report over the original predefined report, you will need to save the report using a different report name and save it to your T: Drive (My Home Drive (T:)). Open the directory listing by clicking the arrow to the right of the Save in window. 3 Select Desktop from the directory listing. 4 Select My Home Drive (T:) from the directory listing and open an appropriate folder. 5 Click the Save button. You are returned to the report. 6 Select File Close on the menu bar. 7 Select Catalog Close on the menu bar. OCFS Data Warehouse Reporting Page 25 Step-by-Step Guide: Impromptu Rev 11/10/2003
31 Module 5: Using the Impromptu Report Wizard The Impromptu Report Wizard is a tool that facilitates the creation of simple list reports. It walks you through each step of creating reports, from entering a title to filtering the data. There are some limitations in using the Report Wizard; for example, you cannot filter the report using any other data than what you have selected for your report. This module provides step-by-step instructions for creating a report using the Report Wizard. Module 6 provides detailed instructions for creating reports using the Report Query dialog box, which provides more flexibility and allows users to generate more complex reports. Impromptu Catalogs Before creating a new report or ad hoc query in Impromptu, you must first determine which catalog you will need to access. As discussed previously, a catalog represents your gateway to the database in Impromptu. Please refer to Module 2: Getting Started in Impromptu for more discussion on catalogs. Impromptu offers several different types of catalogs, each of which offers a different degree of security. For security reasons, OCFS has chosen to use the shared and distributed catalog types. Shared catalogs allow users to create new reports and modify existing reports. Users are not able to modify the catalog itself. Shared OCFS Catalogs are found in the Report Catalogs folder in the Data Warehouse. Distributed catalogs cannot be accessed or altered by anyone except the Administrator; however, personal copies can be made and these copies can be modified to suit the specific needs of the user. Personal copies of distributed catalogs are linked to the main distributed catalog. Each time a user accesses his/her personal copy, the main distributed catalog is checked and the copy is updated with any changes made to the main catalog. Users will have access to a number of distributed catalogs in the near future. But, before you can use them to create reports, you must copy the distributed catalogs to your home or local directory. Please adhere to local practices and guidelines in determining where to save your personal copies of distributed catalogs. You can save them to your local T: Drive. One advantage to saving to a network directory is that these are generally backed up on a regular basis, while local drives are not. Also, since limited changes can be made to distributed catalog copies, other local users can take advantages of any improvements made. Opening Catalogs To open a shared catalog 1 Login to Impromptu 2 Select Catalog Open on the menu bar. 3 In the Open Catalog dialog box, click on the down arrow to the right of the Look in box to open the directory selection list. 4 Select Desktop from the directory listing. 5 Double click the OCFS Datawarehouse directory. 6 Open the DataWarehouse folder by double clicking it. 7 Open the Report Catalogs folder. 8 Select a catalog in the selection pane. 9 Click the Open button in the lower right corner of the Open Catalog dialog box. Page 26 Rev 11/10/2003 OCFS Data Warehouse Reporting Step-by-Step Guide: Impromptu
32 10 If the Cognos Common Logon entry window appears, enter your Cognos User ID and Password. 11 Click the Log On button. To open a distributed catalog and make a personal copy 1 Login to Impromptu 2 Select Catalog Open on the menu bar. 3 In the Open Catalog dialog box, click on the down arrow to the right of the Look in box to open the directory selection list. 4 Select Desktop from the directory listing. 5 Double click the OCFS Datawarehouse directory. 6 Open the DataWarehouse folder. 7 Open the Distributed Catalogs folder. 8 Select a catalog in the selection pane. 9 Click the Open button in the lower right corner of the Open Catalog window. 10 If the Cognos Common Logon entry window appears, enter your Cognos User ID and Password. Click the Log On button. 11 An Impromptu message displays stating that the catalog you tried to open is a distributed catalog. It asks that you indicate a name and location for your personal copy. In other words, you cannot open this catalog, but you can open a copy of it. Please provide the file name and location under which you want to save your copy. You will want to save your copy of the distributed catalog to an appropriate folder on your T: Drive. Click OK. OCFS Data Warehouse Reporting Page 27 Step-by-Step Guide: Impromptu Rev 11/10/2003
33 12 A Name Your Copy of the Catalog dialog box appears. Type in the location on your T: Drive where you want to file your catalog copy, or click the Browse button. In the Browse box, open the directory list by clicking the down arrow to the right of the Save in box. Navigate to your T: Drive. Select an appropriate folder in the selection pane. If you need to create a new folder to hold your catalog copies (recommended), click the New Folder button. Enter a name for your new folder (e.g., Data Warehouse Reports). Press the Enter key on your keyboard. 13 Type a catalog name in the File Name box (e.g., Allegations, Investigations). The file will be saved with the.cat extension. 14 Click Save. 15 The location and name of your catalog copy appear in the File Name box of the Name Your Copy of the Catalog box. 16 Click OK. Creating a New Report Once you ve indicated that you want to create a new report and have opened a catalog, the Report Wizard dialog box opens on your computer. If Impromptu has already been opened without the Report Wizard, you can open it by clicking the New button on the toolbar or selecting File New on the menu bar, then selecting Simple List in the New dialog box, then clicking the Wizard button. Page 28 Rev 11/10/2003 OCFS Data Warehouse Reporting Step-by-Step Guide: Impromptu
34 1 The Impromptu Report Wizard dialog box appears. The first task is to enter a title for your report. This report title will appear in bold letters in a title text box at the top of your report. Enter a brief but descriptive report title, e.g., FAD Test Report. Click the Next button at the bottom right hand side of the dialog box. 2 The second Report Wizard screen asks what kind of report you want to create. The default is a List report, which means that a simple report format, with columns across the top and rows along the sides, will be used. We will be confining our instructions in this guide to the simple list style reports. Click the Next button at the bottom of the dialog box. OCFS Data Warehouse Reporting Page 29 Step-by-Step Guide: Impromptu Rev 11/10/2003
35 3 The next Report Wizard screen is used to select the data for your report. There are brief instructions at the top of the dialog box. On the left side of the box is a listing of all the folders in the catalog headed Catalog. On the right side of the box is a blank pane headed Report columns. In the middle of the screen are two buttons Add and Remove. To select data for your report: Double click any catalog folder to open it or click the plus sign ( + ) next to any folder to expand its contents. Select a data item from the folder listing. Click the Add button or double-click the data item. 4 The selected data item now appears in the Report columns listing. Repeat the above process until you have completed your data selection. When you have finished selecting data, click the Next button. Page 30 Rev 11/10/2003 OCFS Data Warehouse Reporting Step-by-Step Guide: Impromptu
36 5 The fourth Report Wizard screen is the Group selection screen. Grouping data in an Impromptu report serves to bring all like data together on the report. You can choose to group your data on any data item in your report. For example, if you have a list of CPS reports and want to see them by worker, you can group them by Worker ID. The report will then be reformatted where the Worker ID would be displayed only once, with all the CPS report records related to it displayed next to the Worker ID. A line, or break, would appear before the next Worker ID and his/her CPS report records. To select a column for grouping: Click in the box to the left of the column. A check mark appears in the box. Click the Next button. Note: Beneath the Report columns window of the group selection Wizard screen is an option to automatically generate totals. The default for this option is On (i.e., the box is checked). If this option is left on, Impromptu will automatically total all numeric columns, including ID columns (e.g., Resource ID, Worker ID). It is recommended that this option be turned off. 6 The filter Report Wizard screen appears. Filter is Impromptu s term for the parameter or scope of your report. By limiting information to a subset of the available data, a filter emphasizes the information that is important to you. When constructed correctly, filters serve to focus a report and to minimize processing time by excluding any data that are irrelevant to the report. For example, you can filter a report based on specific Worker ID s to show only those records related to those workers. The purpose of the filter screen in the Report Wizard is to build a filter statement (or definition) that specifies the conditions that must be met before data is included in your report. The example above states that the Worker ID must be either 1137 or 1709 in order for any data to be included in the report. To build your filter definition: OCFS Data Warehouse Reporting Page 31 Step-by-Step Guide: Impromptu Rev 11/10/2003
37 7 Select one of the Report Columns appearing on the left side of the screen (under Available components) that you want to use to filter your report. For example, if you only wanted to see records related to specific workers, you would be using the data item Worker ID in your filter. 8 Click the button in the center of the screen to move the selected data item to the Filter definition box. You can also double click the item to move it to the Filter definition box. 9 Now you need to select an appropriate operator for your filter. A filter operator specifies what happens to the values on either side of the operator. In other words, how do you want to compare values for the data item? In include records where this data item has any value in a given list of values (e.g., Worker ID in (1234, 6789) would retrieve records associated to both Worker 1234 and Worker 6789). Between include records where this data item has a value in a given range (e.g., Cert To Date between and would retrieve records were the Certification To Date was between September 1 and September 30, 2001). Contains include records where this data item has a value containing specific data (e.g.,, Last Name contains SMI would retrieve all records where the data item Last Name contained the letters SMI, such as SMITH). = Equals - include records that have the same value as the given value (e.g., Case ID = SD123456Z would retrieve just that one case record). <> Not equal to - include all records except those with the given value (e.g., Region <> 6 would retrieve records for all regions except New York City). < Less than include all records where the data item has a value that is less than the given value (e.g., Intake Start Date < 1/01/2001 would retrieve all records that occurred prior to January 1, 2001). <= Less than or equal to include all records where the data item has a value that is less than or equal to the given value (e.g., Min Female Yr Number <= 6 would retrieve records of Foster Care facilities that would accept a female age 6 or younger). Page 32 Rev 11/10/2003 OCFS Data Warehouse Reporting Step-by-Step Guide: Impromptu
38 > Greater than include all records where the data item has a value that is greater than the given value (e.g., Investigation Close Date > 8/31/01 would retrieve CPS Reports with close dates later than August 31, 2001). >= Greater than or equal to include all records where the data item has a value that is greater than or equal to the given value (e.g., Max Male Yr Number >= 16 would retrieve records of Foster Care facilities that would accept a male age 16 or older). 10 Select an appropriate filter operator from the list of Available components and click the button in the middle of the Report Wizard screen. It now appears next to your data item in the Filter definition box. 11 After you have selected your filter data item and filter operator, you can enter the value(s) for your filter data item or select from a list of available values. Warning: The Select Values list will contain a maximum of 100 values, which in most cases will not be all the values. We will confine our discussion here to entering values. To enter the value, click number, string, date, or value in the Available components listing. The purpose of selecting number, string, etc., is to properly format the values you enter. String data items will be enclosed in quotes (e.g., Smith ), number data items will be in numeric format; date data items will be formatted in yyyy-mm-dd format. Note: Only the data format appropriate for the data item you selected will appear in blue in the Available components listing. In other words, if you have selected a numeric data item, the word number will be listed. If you have selected an alphanumeric data item, the word string will be listed. If you have selected a date item, the word date will be listed. An Enter Value dialog box appears. Enter the exact value(s) you want to use as a filter in the space provided. Values must be entered in the exact format as they are found in the database (e.g., all caps, mm/dd/yy). Click the OK button on the Enter Value dialog box. 12 You can enter more than one condition or filter to your report by using the and or or connections. Be careful with these because there is a big difference. And will simply add another condition to our filter. All conditions joined by and must be met in order for data to be returned on our report. Or adds another condition to our filter, but either condition must be met before data is returned. For example: a filter which states Sex Cd = M and Birth Dt > 01/01/60 will result in records for all male individuals born after January 1, 1960 returned on the report. Change that filter to read Sex Cd = M or Birth Dt > 01/01/60 and you will get records for all male individuals, regardless of their birth dates, plus all male and female individuals born after January 1, If you want to add another statement to your filter definition, you can do so by clicking and in the Available components listing and adding it to the existing filter. Then repeat the above steps to complete another filter statement. 13 When you have finished your complete filter definition, click Finish at the bottom of the Report Wizard screen. OCFS Data Warehouse Reporting Page 33 Step-by-Step Guide: Impromptu Rev 11/10/2003
39 The report appears on your screen. The title you entered in the first Report Wizard screen is at the top of the report. The current date appears in the upper right corner. The data items you selected for your report appear as columns in the report. The records relating to the filter definition you entered appear as rows in the report. Scroll down to the bottom of the page. The page number is in the center of the page. Page 34 Rev 11/10/2003 OCFS Data Warehouse Reporting Step-by-Step Guide: Impromptu
40 Blank page Module 6: Using the Impromptu Report Query Now that you have accessed the predefined user reports in Impromptu, you may have realized a need to design your own queries and reports to meet the specialized needs of your users. This module will guide you through opening catalogs, and creating, saving and managing your own ad hoc Impromptu reports. The Impromptu Screen The menu bar at the top of the Impromptu screen has many of the same functions you are used to seeing in MS Windows applications File, View, Tools, Help, etc. A new option is Catalog, which allows you to open and close catalogs. As discussed previously, a catalog is your gateway to the database. There are currently a number of OCFS Data Warehouse catalogs available for your use, each of which connects you to the appropriate data mart. Descriptions of these catalogs can be found in Appendix C of this guide. The toolbar directly beneath the menu bar offers shortcuts to many of the Impromptu functions. The functions of these buttons will be discussed in more detail throughout this guide. The format toolbar, beneath the Impromptu toolbar, allows you to change fonts, font styles and sizes, colors, and justification. There are additional options for currency formatting and borders. At the bottom of the screen is a status bar, which provides information on the catalog and database you are connected to, as well as the number of records recovered in your current query. When you first open Impromptu, there will be a red X through the database symbols, indicating that you are not connected to a database. Impromptu Catalogs Before creating a new report or ad hoc query in Impromptu, you must first determine which catalog you will need to access. As discussed previously, a catalog represents your gateway to the database in Impromptu. Please refer to Module 2 Getting Started in Impromptu for more discussion on catalogs. The following needs to be reviewed in relation to the new security attributes of the Impromptu catalogs. Impromptu offers several different types of catalogs. For security reasons, OCFS has chosen to use the shared and distributed catalog types. Shared catalogs allow users to create new reports and modify existing reports. Users are not able to modify the catalog itself. Shared OCFS catalogs are found in the Report Catalogs folder in the Data Warehouse. Distributed catalogs cannot be accessed or altered by anyone except the Administrator; however, personal copies can be made and these copies can be modified to suit the specific needs of the users. Personal copies of distributed catalogs are linked to the main distributed catalog. Each time a user OCFS Data Warehouse Reporting Page 35 Step-by-Step Guide: Impromptu Rev 11/10/2003
41 accesses his/her personal copy, the main distributed catalog is checked and the copy is updated with any changes made to the main catalog. Users will have access to a number of distributed catalogs in the near future. But, before you use them to create reports, you must copy the distributed catalogs to your home or local directory. Please adhere to local practices and guidelines in determining where to save your personal copies of distributed catalogs. You can save it on your local hard drive (or C:\ directory) or your home drive (a network directory). The advantage to saving to a network directory is that these are generally backed up on a regular basis, while local drives are not. Also, since limited changes can be made to distributed catalog copies, other users can benefit from any improvements made. Opening Catalogs To open report catalogs 1 Login to Impromptu. 2 On the menu bar at the top of the Impromptu screen, select Catalog and Open from the dropdown list. 3 In the Open Catalog dialog box, open the directory selection list by clicking the down arrow to the right of the Look in box. 4 Select Desktop from the directory listing. 5 Open the OCFS Datawarehouse directory. 6 Open the DataWarehouse folder. 7 Open the Report Catalogs folder. 8 Select a catalog in the selection pane. 9 Click the Open button in the lower right corner of the Open Catalog window. 10 If the Cognos Common Logon entry window appears, enter your Cognos User ID and Password. Click the Log On button. If you have successfully attached to the catalog, the red x that displayed at the bottom of the screen will be replaced with a disk icon and the name of the catalog. To open a distributed catalog and make a personal copy 1 Login to Impromptu. 2 On the menu bar at the top of the Impromptu screen, select Catalog and Open from the dropdown list. 3 In the Open Catalog dialog box, open the directory selection list by clicking the down arrow to the right of the Look in box. 4 Select Desktop from the directory listing. 5 Open the Cognos Cubes directory. 6 Open the Data Warehouse folder. 7 Open the Catalog folder. 8 Open the Distributed folder by double clicking on the folder. Page 36 Rev 11/10/2003 OCFS Data Warehouse Reporting Step-by-Step Guide: Impromptu
42 9 Select a catalog in the selection pane. 10 Click the Open button in the lower right corner of the Open Catalog window. 11 If the Cognos Common Logon entry window appears, enter your Cognos User ID and Password. Click the Log On button. 12 An Impromptu message displays stating that the catalog you tried to open is a distributed catalog. It asks that you indicate a name and location for your personal copy. In other words, you cannot open this catalog, but you can open a copy of it. Please provide the file name and location under which you want to save your copy. Click OK. 13 A Name Your Copy of the Catalog dialog box appears. Type in the location on your local or home drive where you want to file your catalog copy, or click the Browse button: In the Browse box, open the directory list by clicking the down arrow to the right of the Save in box. Navigate to your T: Drive. Select the appropriate folder in the selection pane. If you need to create a new folder to hold your catalog copies (recommended), click the New Folder button. Enter a name for your new folder (e.g., Cognos) Press the Enter key on your keyboard. Type a catalog name in the File Name box (e.g., Allegations, Investigations). The file is saved with the.cat extension. Click Save 14 The location and name of your catalog copy appear in the File Name box of the Name Your Copy of the Catalog box. 15 Click OK Starting a New Report Once you ve opened a catalog and are connected to a database, you can start a new Impromptu report by clicking the New button on the toolbar. This brings up the Impromptu Report Wizard, which is a guide that walks you through each step of creating a report, starting with the title of the report. The Report Wizard has been covered in Module 5 of this guide. We will cover changing the file options to turn the wizard off. Turning off the Report Wizard This process must be repeated for each session, as changes are not saved to the server. 1 Login to Impromptu and open a catalog. 2 Click the New button on the toolbar. 3 The Impromptu Report Wizard box displays. Click the Cancel button at the bottom of the Wizard screen. 4 On the menu bar, click Tools. OCFS Data Warehouse Reporting Page 37 Step-by-Step Guide: Impromptu Rev 11/10/2003
43 5 Select Options from the drop-down list. 6 In the General tab of the Options box, click off the Use the Report Wizard to create standard reports option. 7 Click OK. Now we can create an Impromptu report the old-fashioned way: Selecting Data Data in Impromptu is organized into folders. The brief descriptions to the right of each folder give an indication as to what kind of data each folder contains. To view the contents of a folder, click the + to the left of it. Generally speaking, you will see FACT folders and DIMENSION folders in each catalog. The FACT folders will contain actual facts or occurrences CPS reports, allegations, resources, etc. The DIMENSION folders contain descriptive data about the facts. For example, the Foster Home Fact folder contains many codes and ID numbers, such as Worker ID, County Code, Agency ID, and Race Code. The DIMENSION folders contain descriptive data that describe the codes (e.g., Worker ID from the Fact folder, plus Worker Name from the Worker Dimension folder, provide the Worker s Name). So, you will always want to start from the FACT folder and retrieve descriptive data from the DIMENSION folders. When you start a new report in Impromptu, you will be working with the Query dialog box. You will note that the left pane of the box is headed Catalog and the right pane is headed Query data. The right pane, or Query data side, is empty when we first open the dialog box, indicating that there is no data in the query a blank report. Data needs to be selected from the Catalog, or left, side of the box and placed on the Query, or right, side of the box. Impromptu provides three distinct methods for selecting data, all of which will be discussed. 1 Login to Impromptu and open a catalog. 2 Click the New button on the toolbar. OR; click File New from the menu bar. If you choose File New, the New dialog box will display, requesting you to select a report template style. The template defaults to Simple List, which is the only template style we will cover in this guide. Click the OK button at the bottom of the New dialog box. 3 The Query dialog box will display. Page 38 Rev 11/10/2003 OCFS Data Warehouse Reporting Step-by-Step Guide: Impromptu
44 4 In the Query Data dialog box, open a FACT folder in the left (Catalog) pane by clicking on the + to the left of it. 5 Select a data item from the folder contents by clicking on it once to highlight it. 6 Add it to the Query data pane by one of the following methods: Click the button in the center of the window (between the Catalog and Query data panes); OR Double click on the data item and it is automatically added to the Query data side; OR Place your cursor on the data item, hold your mouse button down, drag it to the Query data pane, and release your mouse button. 7 Repeat Steps 5 and 6 for all data items you need to see in your report. OCFS Data Warehouse Reporting Page 39 Step-by-Step Guide: Impromptu Rev 11/10/2003
45 Query Data Order The order in which the data items appear in the Query data box is not necessarily the order in which you will see them on your report, horizontally from left to right. You should take a moment to review the order and make any changes before you run the report. The order of your query data can be rearranged by clicking and dragging the items up and down in the Query data pane. 1 Click on a data item in the Query data pane. 2 Hold your mouse button down and drag the data item up or down the pane. 3 Release your mouse button when your data item is in the new location. 4 Repeat the process until you are satisfied with the order of the data items. Note: Data items can also be moved on the report workspace. The Query data order dictates the order in which the data is retrieved from the database. Running Your Query Once you have all of the data items you want to see, in the order in which you want to see them; you can run your query. Note: Impromptu will run a query with a minimum of one data item selected. However, it is recommended that any required sorts, groupings, or filters be added to the query before it is run to minimize processing time. 1 Click the button in the lower right side of the Query Data box. Report Views The default view in Impromptu is the Page Layout format. So, when your report first appears, you will see it as it will look on the printed page. Unfortunately, you won t be able to see all of your data in most cases, and will need to use the Next Page buttons on the scrollbars to view all of the data. It is recommended that, while you continue to develop your report, you use the Screen Layout view. Use the Page Layout view when you have finished developing and are ready to format your report. 1 On the menu bar, click View. 2 Click Screen Layout on the drop-down list. Status Check Notice in the right corner of your screen (status bar) the number This section of the status bar indicates the number of records that have been retrieved. Since Impromptu retrieves only 100 records from the database at a time, the 100+ indicates that there are more than 100 records for this query. To see how many total records there are in your query: 1 Use the vertical scrollbar and scroll all the way down to the end of the report; OR 2 Press the End key on your keyboard; OR 3 Press the Page Down key repeatedly until you reach the end of the report. The number in the lower right corner of the status bar now indicates the total number of records in your query. To return to the top of your report, press the Home key on your keyboard. Page 40 Rev 11/10/2003 OCFS Data Warehouse Reporting Step-by-Step Guide: Impromptu
46 Organizing Data You have created a basic report and are now ready to organize your data to fit your requirements. There are a number of different things you can do to rearrange and organize the report, including: Ordering columns Setting column widths Sorting data Grouping data Associating data Creating headers and footers Ordering columns Once you ve seen your executed query, you may wish to move columns around on the report so that it makes more sense. You can change the order in which your columns appear on the report in the following manner: Note: 1 Click on any value in a column to highlight it. 2 Holding your mouse button down, drag the column to another location on the report. Make sure you keep your cursor just below the Column Header line of your report. 3 When you see two vertical dotted lines appear to the right of the column next to which you want to insert the moved column, release your mouse button. Reposition lines for Home Name field Setting column widths Impromptu defaults the width of a column to the greater of the data item name or the longest data item in the first 20 records retrieved. Since later records may have data items longer than the default, you may have to widen some columns. 1 Click on the header record of the column you want to widen to highlight it. 2 Move your cursor to the right until it is on the line between this column and the next. Your cursor will turn into two arrows facing left and right ( ). 3 Click on the line and, holding your mouse button down, drag the line to the right until the column is the desired width. You can shorten column widths by using the same method, dragging the line to the left instead of to the right. There is another technique that can be used to shorten column widths when the data is wider than OCFS Data Warehouse Reporting Page 41 Step-by-Step Guide: Impromptu Rev 11/10/2003
47 the columns. It is called Multi-line with word wrap and is covered in the Formatting section at the end of this module. Sorting data Impromptu retrieves data as it finds it in the database. So, it may appear on your report in no particular order. This will necessitate sorting the records in some fashion to make your report user-friendlier. Impromptu provides a Sort button on the toolbar and a Sort tab in the Query dialog box. The Sort button provides only an ascending sort, while the Sort tab of the Query dialog box allows you to un-sort, sort ascending, and sort descending. To sort in ascending order using the Sort button: 1 On your report, select any value in the column you want to sort. 2 Click the Sort button on your toolbar. This button sorts in Ascending order only, so your data will be sorted from lowest to highest value. Sort in descending order using the Sort tab of the Query dialog box: 1 Click the Data Query button on your toolbar OR click Report Query on the menu bar to bring up the Query dialog box again. 2 Click the Sort tab on the Query dialog box. All data items in the report are displayed in the Sort order listing. Those Items being sorted are indicated by the symbols (sorted in ascending order) or (sorted in descending order). 3 Select another data item to sort by clicking on it once in the Sort order list. 4 Click the Descending button on the bottom of the Sort order box. 5 Click OK at the bottom of the Query dialog box. Page 42 Rev 11/10/2003 OCFS Data Warehouse Reporting Step-by-Step Guide: Impromptu
48 Remove a sort by using the Sort tab of the Query dialog box 1 Click the Query Data button on your toolbar OR click Report Query on the menu bar to bring up the Query dialog box again. 2 In the Query dialog box, click the Sort tab. Note that the column you had previously sorted is at the top of the list of data items and the icon to the left of it holds a carat (^) to indicate that it is being sorted in ascending order. 3 Select the same data item by clicking once on it in the Sort order list. 4 Click the Don t Sort button at the bottom of the box. 5 Click the OK button at the bottom of the Query dialog box. To remove all sorts using the Sort button on the toolbar. 1 On the report workspace, press the Escape key on your keyboard to clear any selections. 2 Click the Sort button on the toolbar. 3 A message box will display notifying you that all sort items will be deleted. Click Yes. Grouping Data Grouping data in an Impromptu report serves to bring all like data together on the report. You can choose to group your data on any data item in your report. For example, if you have a list of CPS reports and want to see them by worker, you can group them by Worker ID. The report will then be reformatted where the Worker ID would be displayed only once, with all the CPS report records related to it displayed next to the Worker ID. A line, or break, would appear before the next Worker ID and his/her CPS report records. There is a Group button on the toolbar and a Group tab in the Query dialog box to facilitate this process. OCFS Data Warehouse Reporting Page 43 Step-by-Step Guide: Impromptu Rev 11/10/2003
49 Grouping data using the Group button 1 Select a data item on which to group the data in your report. Click on any value in that column or click on the column header. Note: You can select multiple items to group by holding down the Ctrl key on your keyboard and clicking on each item in succession. The items will be grouped in the order in which you selected them. 2 Click the Group button on the toolbar. There is also a Group tab on the Query dialog box that can be used to group data. This feature is especially helpful if you need to do multiple grouping on your report. Groupings are executed in the same order that you invoke them. A second grouping will be within the first grouping, a third within the second within the first, etc. Grouping can be undone using the Group tab. Grouping data using the Group tab of the Query dialog box 1 Click the Data Query button on the toolbar to bring up the Query dialog box. 2 Click the Group tab. 3 Select a data item on which to group the data in your report from the data listing. 4 Click the Group button at the bottom of the Group box. 5 Click OK on the Query dialog box to run the report. Remove groupings from your report using the Query dialog box 1 Click the Data Query button on the toolbar to bring up the Query dialog box. 2 Click the Group tab. 3 Select the grouped data item in the Group order listing. 4 Click the Ungroup button at the bottom of the box. Remove all groupings from your report using the Group button 1 Press the Escape key on your keyboard to clear any selections you may have on your report. 2 Click the Group button on the toolbar. Page 44 Rev 11/10/2003 OCFS Data Warehouse Reporting Step-by-Step Guide: Impromptu
50 3 A message box will display stating, All grouped items will be removed. Click OK. Headers Another way of grouping in Impromptu is to create a Header. The Header function creates a header frame in the report, places the grouped data item in the header, and places all of the records applicable to that data item beneath the header record. There is a Header button on the toolbar to facilitate this process. 1 Click View Screen Layout on the menu bar. 2 Select a data item on which to group your data. Click on any value in that column or click on the column header. 3 Click the Header button on the toolbar. Notice how the report has changed. The grouped item now appears above a listing of the records associated with it. Associating Data Associating data means linking it to a grouped data item. When you group data, the values for the grouped item are displayed only once. The records associated to the grouped item follow. Other data items, however, may repeat in the listing because they are related one-to-one to the grouped item. As in the above example, if you have Worker ID and Worker Name in your report and you grouped by Worker ID, Worker Name would be repeated for every CPS report record. To eliminate this repetition, you can associate Worker Name with Worker ID. Associating data using the Group tab of the Query dialog box 1 Click View Screen Layout on the menu bar. 2 Open the Query dialog box by clicking the Query Data button on the toolbar. 3 Click the Group tab. 4 Select a data item by which to group your report data in the data listing and click the Group button at the bottom of the screen. Note that the item you grouped by is highlighted in the group order list the top of the box to the left of it is shaded in. 5 Select the data item you want to associate to the grouped item by clicking on it in the group order list. 6 Click the Associate button at the bottom of the box. 7 Click the OK button at the bottom of the Query dialog box. Note that the item you associated is highlighted in the Group order listing with black-and-white shading in the box to the left of it. When the report runs, you will note that the item you associated to your grouped item now appears only once on the report. Associating data when you are using a Header is a little different. You will need to use the click-and-drag method in this instance. Note: It should be noted that Impromptu issues no warning if the data item and the grouped item to which it is associated do not share a true one-toone relationship. In the event that a one-to-one relationship does not exist, data will be missing from the report. OCFS Data Warehouse Reporting Page 45 Step-by-Step Guide: Impromptu Rev 11/10/2003
51 Associating data when using Headers 1 Select a data item on which to group your data. Click on any value in that column or click on the column header. 2 Click the Header button on the toolbar. 3 On the report workspace, select the data item that is to be associated to the Header item. Hold your mouse button down and drag it up to the Header frame. Drop the associated item next to the grouped item. Clearing or dissociating data associations 1 Click the Query Data button on the toolbar to bring up the Query dialog box. 2 Click the Group tab. 3 The associated items appear on the listing underneath the grouped items to which they have been associated. The top of the box next to the associated item is only shaded in halfway. 4 Select the item you want to dissociate. 5 Click the Dissociate button at the bottom of the dialog box. Filtering Reports Filter is Impromptu s term for the parameter or scope of your report. A filter specifies the conditions that must be met for data to be included in the report. By limiting information to a subset of the available data, a filter emphasizes the information that is important to you. Filters serve to focus a report and to minimize processing time by excluding any data that are irrelevant to the report. For example, you can filter a report on Foster Homes to show only those that have been accepted and are active. Filters can be done directly on the report workspace by using the Filter button on the toolbar. There is also a Filter tab on the Query dialog box that can be used to build more complex filters. A simple filter consists of three components: A data item, a filter operator, and a value. A data item would be any column of your report or any data item in the Catalog. For example, if you want a report listing all CPS Reports assigned to a given worker, the data item of your filter would be Worker ID. A filter operator specifies what happens to the values on either side of the operator. For example, if you want a report listing all CPS reports assigned to a single worker, your filter would read Worker ID =., meaning that the Worker ID on the record must equal a certain number before it is to be included in the report. The third part of the filter is the value. Again, following the same example as above, your filter would read Worker ID = to produce a report for a single worker. Values must be entered in the exact format as they are found in the database. You will have several choices for entering the actual value or values by which you want to filter. Values are entered by a direct selection on the report workspace. In other words, find the value of the data item you want to use as a filter and highlight it on the report. Values can also be selected from a list of all the values available for the selected data item. You can also enter the value into a number or text pop-up box. Filtering a report using the Filter button 1 On the report workspace, select a data item to use as a filter. Click on any value in the column or on the column header. 2 Click the arrow to the right of the Filter button on the toolbar. This brings up a listing of operators from which to choose. Page 46 Rev 11/10/2003 OCFS Data Warehouse Reporting Step-by-Step Guide: Impromptu
52 3 Select one of the operators from the drop-down list: In include records where this data item has any value in a given list of values Not In excludes records where this data item has any value in a given list of values Between include records where this data item has a value in a given range Not Between excludes records where this data item has a value in a given range = Equals - include records that have the same value as the given value <> Not equal to - include all records except those with the given value < Less than include all records where the data item has a value that is less than the given value <= Less than or equal to include all records where the data item has a value that is less than or equal to the given value > Greater than include all records where the data item has a value that is greater than the given value >= Greater than or equal to include all records where the data item has a value that is greater than or equal to the given value 4 Select the method by which you will choose the value you will use as a filter: Selection your filter value will be the value you have highlighted on the report. Number/String - a number or text entry box will pop-up and you will enter the exact value in the space provided. Note: Values must be entered in the same format as they appear in the database. Select values a list of all the values for your filter data item will be displayed and you will make your selection from that list. Note: Please be aware that there is a limit to the number of values that will be shown in this list. In most cases, only the first 100 values will be shown, so you will not be seeing the entire list of available values. 5 Enter or select the value you want to use as a filter. If you choose Select Values, a Select Values dialog box will display, listing all of the available values for the data item selected. Select each value you wish to use in the Select one or more values: listing box and it will then be listed in the Values selected box. When you have finished making your selections, click the OK button at the bottom of the dialog box. OCFS Data Warehouse Reporting Page 47 Step-by-Step Guide: Impromptu Rev 11/10/2003
53 If you choose Number/String, an Enter Values dialog box is displayed. Enter the values you want to use as a filter. The values must be entered in the exact format as they are found in the database. When you have finished, click the OK button at the bottom of the box. 6 Your report will be returned with the filter applied. There is a Filter tab on the Query dialog box that can also be used to construct filter expressions. The method is much the same as selecting data you select data items and operators from the Available components listing on the left side of the screen and place them in the Filter definition box on the right side of the screen. All of the data items in your report are available for your use in a folder called Report Columns. In addition, all the items in the catalog are available in a folder called Catalog Columns. So, you can use a data item that isn t even in your report to build a filter. Filtering reports using the Filter tab in the Query dialog box 1 Click the Data Query button on the tool bar to bring up the Query dialog box. 2 Click the Filter tab. 3 Open the Report Columns folder (or the Catalog Columns folder) in the Available components listing by double clicking it. 4 Select a data item to use in your filter expression by clicking on it once to highlight it. Move it to the Filter definition box by clicking the button in between the Available components window and the Filter definition window. You can also double click it to move it, or click and drag it over to the Filter definition box. Page 48 Rev 11/10/2003 OCFS Data Warehouse Reporting Step-by-Step Guide: Impromptu
54 5 Now the appropriate operators appear in the Available components window of the Query box. Select an operator and move it to the Filter definition window by double clicking it, clicking the button, or clicking and dragging it over. 6 Now you have to indicate what kind of value you will be entering. The blue text in the Available components listing indicates the type of value that is appropriate for the data item you ve chosen. It will be a number, string, or date value. Double click on the blue value-type item to move it to the Filter definition box. The purpose of selecting a value type is to format the value correctly in the Filter definition box. 7 Now you can enter the value you want to use as your filter. If the data item is an alphanumeric field, you will have chosen the value type of string and two quote marks will appear in the Filter definition box. Your cursor will be flashing between the two quote marks, so just type your value in there. If the data item is a date field, today s date will automatically appear in the Filter definition box in yyyy-mm-dd format. Type over that date field. If the data item is a number field, a zero will appear in the Filter definition box. Just type the numeric value you want over the zero. OCFS Data Warehouse Reporting Page 49 Step-by-Step Guide: Impromptu Rev 11/10/2003
55 string number date 8 When you have completed your filter expression, click the OK button at the bottom of the Query dialog box. Your report will now re-run with the filter applied. Complex Filters Complex filters consist of more than one simple expression; e.g., Worker ID = XXXXX and Intake Start Date between yyyy-mm-dd and yyyy-mm-dd. Complex filters are built in the same way as simple filters with the addition of and or or between the filter expressions. Complex filters can be built on the report workspace, using the Filter button and drop-down box, or they can be built manually in the Filter tab of the Query dialog box. Again you are cautioned to note the difference between the and and or connectors. And will simply add another condition to your filter. All conditions joined by and must be met in order for data to be returned on our report. Or adds another condition to our filter, but either condition must be met before data is returned. For example: a filter which states Sex Cd = M and Birth Dt > 01/01/60 will result in records for all male individuals born after January 1, 1960 returned on the report. Change that filter to read Sex Cd = M or Birth Dt > 01/01/60 and you will get records for all male individuals, regardless of their birth dates, plus all male and female individuals born after January 1, Building a complex filter using the Filter button 1 Select the data column you want to use to build the first part of your filter by clicking on any data item in the column or by clicking the column header on the report. 2 Click the drop-down box to the right of the Filter button on the toolbar. 3 Select a filter operator from the drop-down list. 4 Select the method by which you will choose a value for your filter expression from the drop-down list. 5 Select or enter the value you will use to filter your report. 6 To build the second part of your expression, select the data column you want to use by clicking on any data item in the column or by clicking the column header on the report. 7 Click the drop-down box to the right of the Filter button on the toolbar. 8 Select a filter operator from the drop-down list. 9 Select the method by which you will choose a value for the second filter expression. 10 Select or enter the value you will use in the second filter expression. Building a complex filter using the Filter tab of the Query dialog box 1 Click the Data Query button on the toolbar to bring up the Query dialog box. 2 Click the Filter tab. 3 In the Available components listing (left side of the Filter box), open Report Folders or Catalog Folders by double clicking it. 4 Select the data item you will use for the first part of your filter expression and move it to the Filter definition box by double clicking on it, or by using the arrow in the center of the box. Page 50 Rev 11/10/2003 OCFS Data Warehouse Reporting Step-by-Step Guide: Impromptu
56 5 Select a filter operator from the Available components listing and add it to your expression (double-click, click and drag, or ). 6 Select the data type (string, number, date) in blue text from the Available components listing and add it to your filter expression. 7 Enter the value(s) you will use in your filter in the Filter definition box. 8 In the Available components listing, select and and add it to your Filter expression. 9 Open the Report Folders or Catalog Folders in the Available components listing and select the data item you will use in the second part of your filter expression. 10 Add the data item to your filter expression by double-clicking, using the button, or clicking and dragging it to the Filter definition box. 11 Select a filter operator from the Available components listing and add it to your filter expression. 12 Select the data type from the Available components listing and add it to your filter expression (e.g., string, date, number). 13 Enter the value you will use in the second part of your filter expression. 14 Click OK at the bottom of the Filter dialog box to run the report. Adding Calculations to Your Report Totals and Counts Totals and counts can be added to your report directly on the report workspace. There are Total and Count buttons on the toolbar to facilitate this process. The Total button provides a sum of a selected column. If the report data has been grouped, subtotals will be provided automatically. The Count button will provide a count of the number of items in a selected column. This feature is useful if you need the number of CPS reports or the number of allegations per report. Totaling a column 1 Select a column for which you need a total by placing your cursor above the column header. When your cursor turns into an arrow, click once to highlight the entire column. 2 Click the Total button on the toolbar. Footer records have been placed in the report with subtotals for each grouping. At the bottom of the report is a footer record with the grand total for the report. Adding counts to your report When performing a count calculation on your report, remember to select a unique identifier to count. For example, when performing a count on children, you should select the unique CIN ID rather than Child Name, since two children could have the same name, but would not have the same CIN ID. 1 Select any value in the column for which you need a count (i.e., the number of items in the column) by placing your cursor above the column header. When your cursor turns into an arrow click once to highlight the entire column. 2 Click the Count button the toolbar. Footer records have been placed in the report containing subtotals of the count for each group. There is a footer record at the bottom of the report with the total count for the report. OCFS Data Warehouse Reporting Page 51 Step-by-Step Guide: Impromptu Rev 11/10/2003
57 Summaries There is a Summary icon in the center of the Query Data dialog box that can be used to add various summary calculations to your report in the data selection stage. You must first select the data item for which you require a summary in the Catalog data box, and then click the Summary button. A summary dialog box is displayed and you can select from six different types of summaries, as described below: Total will sum up all of the data items and return a total for all of them. Minimum will return the minimum value of the selected data items. Maximum will return the maximum value of the selected data items. Average will return the average number value of all the data records selected by totaling the values and dividing by the number of records. Count will return the total number of items selected, disregarding the number values. Percentage will return the percentage of the total value for each of the selected data items. The difference between the Summary dialog box and the Total and Count buttons is that the Summary option adds an entirely new column to your report, with the requested summary calculation for each record in your report. This may not make sense for total calculations, but is logical for percentage calculations. 1 In the Query dialog box, select a data item for which you want to provide a Summary calculation in the Catalog data listing by clicking on it once to highlight it. 2 Click the Summary button in the center of the Query dialog box. 3 The Summary dialog box appears. Type a title for your summary calculation in the Label box. This will be the column header for your new column. It defaults to the data item name, but you can delete that and add your own title. 4 Select from Total, Minimum, Maximum, Minimum, Average, Count and Percentage by clicking on the appropriate button. 5 Click the OK button in the upper right hand corner of the dialog box. 6 Group your report by a specific data item using the Group tab. 7 Place a filter on your report, if required, using the Filter tab. Page 52 Rev 11/10/2003 OCFS Data Warehouse Reporting Step-by-Step Guide: Impromptu
58 8 Click the OK button in the Query dialog box to run the report. A separate column containing the summary calculation you requested has been added to the report. Column Calculations You can create new columns by performing calculations on the columns of your report. A Calculation Definition dialog box is provided for your use in creating calculations. The box can be called up from the Query dialog box using the Calculate button in the center of the box, or from the report workspace using the Insert Calculation command on the menu bar. The Calculation Definition box is virtually the same as the Filter definition box in that components are provided on the left side and a definition box is provided on the right side. You move components from the left to the right by double-clicking them, or by using the button in the middle. Add, subtract, multiply, and divide are the operators you will be using most. Both Report Folders and Catalog Folders are available for your use in selecting data items for your calculation. Creating a calculated column using the Insert command 1 On the menu bar, click Insert Calculation on the menu bar. 2 Your cursor turns into an arrow. Place the arrow in between the two columns where you want your calculated column to appear and click your mouse button. 3 The Calculation Definition dialog box is displayed. Enter a name for your calculation in the Name box. If you do not enter a name, the title will default to the calculation expression itself. 4 Open the Report Folders or Catalog Folders in the Available components listing by double clicking on it. 5 Select a data item to start your calculation expression. Double click on it to add it to the Expression window or use the button in the center of the window. OCFS Data Warehouse Reporting Page 53 Step-by-Step Guide: Impromptu Rev 11/10/2003
59 6 The Available components window now displays operators (+, -, *, /) for adding, subtracting, multiplying, and dividing. Select one of these and add it to the Expression window by double clicking on it or by using the button in the center. 7 If you are using another data item to complete your expression (i.e., adding one column to another, subtracting one column from another column, multiplying one column by another column, or dividing one column by another column), then open the Report Folders or Catalog Folders by double-clicking on it. Then select the data item you need from the listing and add it to the Expression window by double-clicking it or by using the arrow in the center. Note: The Tips box beneath the Expression window gives a brief description of what the operator selected will do. Just click on any operator and read the description of it in the Tips box. 8 You can also use a static number to complete your expression; e.g., to develop an average monthly CPS reports processed number, take the total number of CPS reports processed and divide by 12. In this instance, select Value in the Available components listing, and then add number to the Expression box. 9 When you have completed your expression, click OK at the bottom of the Calculation Definition dialog box. Another method of adding calculations to your report is from the Query dialog box. There is a Calculate button in the center of the dialog box, between the Catalog data listing and the Query data listing. While selecting data for your report, you can click the Calculate button. The Calculation Definition dialog box will appear. You can build your calculation expression using the steps described above. Functions Functions are predefined formulas that you can use to reformat or manipulate data items. Functions are considered calculations in Impromptu; in other words, you will use them in building expressions in the Calculation Definition dialog box. There is a folder called Functions in the Available components window of the Calculation Definition dialog box. To open the folder, you double click on it. A listing of available functions is displayed. In order to learn what a function does, click on it and a brief description will appear in the Tips box in the lower right corner of the window. Some examples of functions are: Page 54 Rev 11/10/2003 OCFS Data Warehouse Reporting Step-by-Step Guide: Impromptu
60 Age Calculates an age by subtracting a specified date from today s date (i.e., today date of birth = age of child) Datetime-to-Date Returns the system datetime (in yyyymmdd format) in more legible date format (yyyy-mm-dd) Today Returns the current date according to the date set on your computer The Tips box also provides the syntax, or format, that the calculation must take to work properly. For example, the age function syntax is age (date_exp), which means it should read age (Date of Birth) if you are calculating the age of a child. Functions are also available to you in the Filter dialog box and you can use them in building filter definitions. For example, if you want to get a listing of foster homes whose certifications will expire within the next 90 days, you could insert a filter that read Cert Date >= Today Using a function to build a calculation 1 Click the Calculate button in the center of the window. 2 In the Calculate Definition dialog box, type a Name for your calculation in the Name box (e.g., Age). 3 Open the Functions folder in the Available components listing by double-clicking it. 4 Select a function from the listing. Place your cursor on the function in the listing and look at the Tips box in the lower right section of the box. The Tips box gives a brief description of what the function does and also provides the syntax, or format, that the expression must take. If you are using the age function, you will need to add age to your Expression window, then add the date on which you want to calculate an age, such as the Date of Birth. 5 Add the function to the Expression box by double clicking it or by using the button in the center. 6 Complete the expression following the syntax outlined in the Tips section. If you are calculating age, you must now add the date to your expression by double clicking on it from the Reports Folders listing of your Available components box. 7 When you have finished your calculation expression, click the OK button at the bottom of the Calculation Definition window. 8 Click OK on the Query dialog box to run the report. Using a Function in a Filter 1 Click the Filter tab. 2 In the Available components listing, select the data item you will use in your filter by opening the Report Columns or Catalog Columns folder and adding the data item to the Filter definition box. OCFS Data Warehouse Reporting Page 55 Step-by-Step Guide: Impromptu Rev 11/10/2003
61 3 Select an operator from the Available components listing (i.e., =, >, <, >=, <=, <>) and add it to your Filter definition. 4 Open the Function folder in the Available components listing and select a function from the list. Add it to your Filter definition. For example, Cert Date <= (Today + 90). 5 Click OK at the bottom of the Filter definition box to run the report. Formatting Your Report Impromptu offers many options for formatting your report. You must be in Page Layout view to effect any formatting changes that you make. Some of the features available are: Changing column titles Changing fonts, font styles, and font sizes Changing data formats Using multi-line with word wrap Data alignment and sizing Inserting Titles, Page numbers, etc. Using page setup to change margins, page size, etc. Changing column titles If the column header (or data item name) is not user-friendly or is too long, you can change it by using one of the following methods: 1 Click View Page Layout on the menu bar. Please remember that report titles, column titles, and data items must be formatted separately. 2 Click into the column header and delete the existing column title. Enter the column name of your choice; OR 3 Right click on the column header. Select Edit from the drop-down menu. Delete the existing column title and enter a new one. Page 56 Rev 11/10/2003 OCFS Data Warehouse Reporting Step-by-Step Guide: Impromptu
62 Changing fonts, font styles, and font sizes 1 Click View Page Layout on the menu bar. 2 Highlight the column that you want to change. Changes made to any item in a column will be carried over to all items in the column. If you want to change fonts on all columns, use your Shift or Ctrl keys to highlight all the columns. 3 Using the format toolbar, select a font, font style and font size. Changing data formats The default data format in Impromptu is General. You may want to format numeric data with commas and decimal points, or even as currency. Remember that you only need to reformat one data item in a column and the change is carried forward to all items in the column. 1 Click View Page Layout on the menu bar. 2 Click on a data item that you want to reformat. 3 Right click and select Format from the drop-down menu. 4 In the Data tab, open the selection listing by clicking the arrow to the right of the Positive window. 5 Select a format from the listing and click OK in the upper right corner of the dialog box. Page setup As with any Microsoft-style product, you can change your page size and margins in the Page Setup option from the File menu. 1 Select File Page Setup on the menu bar. 2 Change margins using the Left, Right, Top, and Bottom windows. 3 Change the page layout from Portrait to Landscape in the Page orientation section. 4 There is a Fit to Page option at the bottom of the window that can be very useful. However, be careful with this because Impromptu will attempt to fit all records on one page and you could end up with some very small print. 5 When you have finished making your changes, click the OK button at the top of the dialog box. Multi-line with word wrap Sometimes you may have some very long text items that take a lot of space on your report. You can set this item to wrap around to a second line, and thus save space horizontally across your page. This option is found in the Text Properties box. Multi-line with word wrap can also be used in column and report titles. 1 Click View Page Layout on the menu bar. 2 Select the data item you want to word-wrap. 3 Right click and select Properties from the drop-down list. 4 Select the Layout tab. 6 Select the Multi-line with word wrap option. 7 Click OK. Column headers must be formatted separately from report data. OCFS Data Warehouse Reporting Page 61 Step-by-Step Guide: Impromptu Rev 11/10/2002
63 Data alignment and sizing You can align data items vertically and horizontally in a header or title. You can also specify a size for a column or set it to be dynamic (it changes to fit the data). These options are also found in the Text Properties box. 1 Click View Page Layout on the menu bar. 2 Select the data item you want to align. 3 Right click and select Properties from the drop-down list. 4 Select the Align tab. 5 Use the arrows on the horizontal placement boxes to align your data to the left, at center, or to the right of any column in the report. 6 Use the arrows on the vertical placement boxes to align your data to the top, bottom or center of the selected data box. Inserting Titles Impromptu reports have a default title bar at the top of each report in Page Layout: 1 Place your cursor on the default title and right click. 2 Select Edit from the droop-down menu. 3 Your cursor is now placed inside the title bar. You can delete the default title and enter in your own title text. Page 62 Rev 11/10/2003 OCFS Data Warehouse Reporting Step-by-Step Guide: Impromptu
64 Module 7: Managing Impromptu Reports This module will cover all the skills you will need to print, distribute and save your Impromptu reports. There are a number of options in Impromptu for saving your reports in other file formats such as Excel files, ASCII files, text files, and PDF files (viewable in Adobe Acrobat). You can also reports you have saved to your T: Drive from your local desktop. There are some things to consider when printing reports, too, since you will not in most cases want to print an entire report and should not print reports directory from Impromptu in Citrix. All of these options are discussed below. Saving Impromptu Reports As has been noted previously, you cannot save modified predefined reports over the original reports in the Data Warehouse folder. If you make modifications to a report and want to save the modified version, you can save it to your T: Drive to prevent corrupting the original report. Of course, you will need to save reports that you create with unique names. Follow the steps below to save modified and new reports. 1 Login to Impromptu and open a catalog. 2 Create a new report or make modifications to a predefined user report. 3 Select File Save As on the menu bar. 4 A Save As dialog box is displayed on your screen. 5 Open the list of file directories by clicking the arrow to the right of the Save in window. 6 Select My Home Drive (T:) and an appropriate folder from the directory selection list. 7 Type a report title in the File name box. 8 Click the Save button in the lower right hand corner. Saving Impromptu Reports as Other File Types Impromptu offers a variety of file types for your use in managing and distributing reports. If you need to further manipulate the data, or add more data to it, you can save the report as an Excel file. You can choose to save as an Excel file with or without format. If you save with format, you retain all fonts, borders, patterns, and styles that you used in your Impromptu report. You can save reports as ASCII files if you need to import it to another application (Excel, Access) or if you need to send it to a colleague who does not have the Impromptu or Excel applications. If you need to import the report data into a word document, you can also save it as a text file. You can also Impromptu reports from Microsoft Outlook after you have saved them to your T: Drive. Another means of distributing reports to colleagues who do not have access to Citrix is to publish them to HTML so that others can view them in Internet Explorer. There is another option available for saving your report in PDF (Adobe Acrobat) format, which is excellent for saving reports in presentation format and printing reports, but does not allow for much manipulation. Since it is not recommended that reports be printed in Citrix, you will need to save your reports to your T: Drive in PDF format, then print them from Acrobat Reader on your desktop. OCFS Data Warehouse Reporting Page 63 Step-by-Step Guide: Impromptu Rev 11/10/2002
65 All of these options are discussed below: To save Impromptu reports as Excel files 1 Click File Save As on the menu bar. 2 In the Save As dialog box, open the directory listing by clicking the arrow to the right of the Save in box. 3 Select My Home Drive (T:) 4 Open an appropriate folder. It is a good idea to filter your report to retrieve the minimum amount of data needed to fit your requirements. Saving large amounts of unnecessary data in Excel format drains system resources and is much harder to manipulate. 5 Enter a name for your file in the File name box. 6 Open the file type listing by clicking the arrow to the right of the Save as type box. It is always helpful to assign names to files that are easily recognizable to you. Remember that file names can be as long or as short as you like. 7 Select Excel file [*.XLS] or Excel with Format [*.XLS] from the listing. Again, Excel with Format retains the same fonts, borders, patterns and styles that you used in your Impromptu report. 8 Click the Save button in the lower right corner of the box. You can now login to Excel and open the file you just created. 1 Press the Windows key on your keyboard. 2 Select Programs Microsoft Excel from the Start menu. 3 In Excel, select File Open on the menu bar. 4 In the Open dialog box, open the directory listing by clicking the arrow to the right of the Look in window. 5 Navigate to your T: Drive and open the appropriate folder. 6 Select the Excel file you saved and click the Open button. Page 64 Rev 11/10/2003 OCFS Data Warehouse Reporting Step-by-Step Guide: Impromptu
66 To save Impromptu reports as ASCII files ASCII stands for American Standard Code for Information Interchange. This is the code that makes it possible for just about every computer to understand the letter A (and all the other letters) as a letter A. The ASCII text file, although simple and limited, is understood by virtually all computers. 1 Select File Save As on the menu bar. 2 In the Save As dialog box, open the directory listing by clicking the arrow to the right of the Save in window. 3 Select My Home Drive (T:) from the directory listing. 4 Open an appropriate folder. 5 Type a name for your file in the File Name box. 6 Open the file type listing by clicking the arrow to the right of the Save as type box. 7 Select Delimited ASCII [*.CSV] from the listing. 8 Click the Save button in the upper right corner of the Save As dialog box. To save Impromptu reports as PDF files PDF stands for Portable Document Format, which means that all formatting made to your document will travel with the document. Remember, all Connections computers have the Adobe Acrobat Reader software required to view and print the PDF files. 1 Select File Save As from the menu bar. 2 In the Save As dialog box, open the directory listing by clicking the arrow to the right of the Save in box. 3 Select My Home Drive (T:) from the drop-down listing. 4 Open an appropriate folder. 5 Enter a name for your file in the File name box. 6 Open the file type listing by clicking the arrow to the right of the Save as type box. 7 Select PDF Format [*.PDF] from the listing. 8 Click the Save button in the upper right corner of the Save As dialog box. You can now login to Acrobat Reader and open the PDF file you just created: 1 Press the Windows key on your keyboard to return to your desktop. 2 Select Programs Acrobat Reader from the Start menu. 3 In Acrobat Reader, select File Open on the menu bar. 4 In the Open dialog box, open the directory listing by clicking the arrow to the right of the Look in window. 5 Navigate to your T: Drive and open the appropriate folder. OCFS Data Warehouse Reporting Page 65 Step-by-Step Guide: Impromptu Rev 11/10/2002
67 6 Select the PDF file you just saved and click the Open button. Saving Impromptu reports as text files Text files can be opened in Microsoft Word or any other word-processing application. Thus, you can use the text file for any word-processing operation, such as mail merges. 1 Select File Save As from the menu bar. 2 In the Save As dialog box, open the directory listing by clicking the arrow to the right of the Save in box. 3 Navigate to My Home Drive (T:). 4 Open an appropriate folder. 5 Enter a name for your file in the File name box. 6 Open the file type listing by clicking the arrow to the right of the Save as type box. 7 Select Text file [*.TXT] from the listing. 8 Click the Save button in the upper right corner of the Save As dialog box. Sending Impromptu Reports via You can send an Impromptu report to a colleague using Microsoft Outlook from your local desktop. Remember that a file saved as an *.imr file type will require your colleague to access the Impromptu application to open it. Reports must be ed from the local desktop, so must first be saved to the T: Drive before leaving your Citrix session. In order to an Impromptu report, you must be on your local desktop. Your local desktop can be accessed with a Citrix session open, or after completing a session working with Impromptu. Both *.imr (Impromptu reports) and other file types can be saved and ed to other users. If you are unsure whether your intended recipient can access Citrix, the file type recommended is *.PDF (Portable Document Format). Every Connections computer has Adobe software installed and can open and print this file type. Having completed formatting of your report: 1 Select File Save as. 2 In the Save As dialog box, open the directory listing by clicking the down arrow to the right of the Save in window. 3 Navigate to My Home Drive (T:). 4 Open an appropriate folder. 5 Open the file types listing by clicking the down arrow to the right of the Save as Type window. 6 Select PDF Format [*.PDF]. Page 66 Rev 11/10/2003 OCFS Data Warehouse Reporting Step-by-Step Guide: Impromptu
68 7 Type a name in the Name field. 8 Click the Save button. 9 Press the Windows key on your keyboard in order to return to NT. 10 Click Start Programs Microsoft Outlook. 11 In Outlook, select File New Mail Message. 12 Enter the recipient s address in the To: field. 13 Type an appropriate subject in the Subject field. 14 Enter a message (e.g., Here is the report I promised you. Open it with Adobe Acrobat Reader. ). 15 Click Insert File. 16 In the Insert File dialog box, navigate to your T: Drive. 17 Open an appropriate folder. 18 Select the report you wish to Click Insert. (More than one report can be sent at one time by repeating the Insert command.) 20 Click the Send button on the Outlook toolbar to send your message and attached report. Publishing Impromptu Reports to HTML Format You can save Impromptu reports in HTML Format for viewing inside a web browser, like Internet Explorer. This format can be used in a local intranet, so that specified users can access the report through typical browser commands, like links. Presently, OCFS does not support a local intranet for publishing reports, however this functionality should be noted. 1 Select File Publish as HTML on the menu bar. 2 In the Publish As HTML dialog box, open the directory listing by clicking the drop-down arrow to the right of the Save in: box. OCFS Data Warehouse Reporting Page 67 Step-by-Step Guide: Impromptu Rev 11/10/2002
69 3 Navigate to My Home Drive (T:) and open an appropriate folder. 4 Enter a name for your report in the File Prefix box. 5 Click Publish. The status bar at the bottom of the screen will indicate the report is being published. 6 To view your report in Internet Explorer. Press the Windows key on your keyboard to return to your desktop. Select Programs Internet Explorer from the Start menu. In the Address line, type in the name of your report, including the directory path OR find the file in Windows Explorer (choose the Main File only), and double-click. Page 68 Rev 11/10/2003 OCFS Data Warehouse Reporting Step-by-Step Guide: Impromptu
70 Printing Impromptu Reports Due to the limitations of the Citrix environment, reports should not be printed directly from Impromptu. Printing may not work correctly from the Citrix window, so reports should be saved as a file type that can be opened and printed on the local desktop. PDF format (Portable Document Format) is recommended for this purpose. Because an Impromptu report is often larger than what appears on your PC screen, it is important that you specify exactly what you want to print. It is recommended that you save a copy of a report you have modified or created, as *.IMR (Impromptu report format) prior to saving as any other file type, so that you do not lose your original report. After completing the formatting of your report in Impromptu: 1 Select File Save As on the menu bar. 2 In the Save As dialog box, open the directory listing by clicking the arrow to the right of the Save in window. 3 Navigate to your T: Drive. 4 Open the file types listing by clicking the arrow to the right of the Save As Type window. 5 Select PDF Format [*.PDF] from the file types listing. 6 Type a name in the Name field. 7 Click the Save button. 8 Press the Ctrl and Esc keys on your keyboard simultaneously to return to NT. 9 Click Start Programs Adobe Acrobat Reader. 10 In Adobe Acrobat Reader, select File Open. 11 In the Open dialog box, open the directory listing by clicking the arrow to the right of the Look in window. 12 Navigate to your T:Drive and select the PDFcopy of your report. 13 When the report is open in Acrobat Reader, select File Print on the menu bar. 14 Enter the page numbers of the report you wish to print in the Print dialog box. 15 Verify your printer selection. OCFS Data Warehouse Reporting Page 69 Step-by-Step Guide: Impromptu Rev 11/10/2002
71 16 Click Print. Page 70 Rev 11/10/2003 OCFS Data Warehouse Reporting Step-by-Step Guide: Impromptu
72 Module 8: Advanced Impromptu Features Crosstabs Impromptu crosstab reports display summary information from a list report in a compact table of columns and rows. A crosstab shows the value for the combination of each row and column, enabling you to gain a different perspective of the data and view more information without the need to scroll. For example, if you needed to track the number of overdue CPS reports by worker by month, a crosstab report can be easily designed to extract the information. The sample report below displays the months as columns, the workers as rows, and the number of overdue CPS reports in each cell. Cell is the intersection of a column and a row that contains a single value. Crosstab reports can be built using the Report Wizard or the Query dialog box. Both procedures will be reviewed in this guide so that users can determine which method is more convenient for them. Building crosstabs using the Report Wizard: 1 Login to Citrix and open the Cognos Impromptu application. 2 Click the New button on the toolbar. 3 In the Open Catalog dialog box, navigate to the OCFS Datawarehouse/DataWarehouse/Report Catalogs directory. 4 Select a catalog in the selection window. 5 Click the Open button. OCFS Data Warehouse Reporting Page 71 Step-by-Step Guide: Impromptu Rev 11/10/2002
73 6 Enter your Cognos User ID and Password into the appropriate windows of the Cognos Common Logon dialog box. 7 Click the Log On button. 8 The first Report Wizard screen appears. Enter a title for your crosstab report in the Type the title of the report window. 9 Click the Next button. 10 Click the Crosstab report option on the second Report Wizard screen. Page 72 Rev 11/10/2003 OCFS Data Warehouse Reporting Step-by-Step Guide: Impromptu
74 11 Click the Next button. 12 The third Wizard screen asks you to place the available data (i.e., all of the data items in the catalog) where you want to see it on the crosstab (i.e., columns, rows, cells). Open an appropriate folder in the Available data window by clicking the + to the left of the folder. Select the data item you want to see as columns on your report by clicking on it once to highlight it. Click the Column button in the center of the screen. Select the data item you want to see as rows in your report by clicking on it once to highlight it. Click the Row button in the center of the screen. Select the data item you want to see as cells in your report by clicking on it once to highlight. Click the Cell button in the center of the screen. Click the Next button at the bottom of the screen. OCFS Data Warehouse Reporting Page 73 Step-by-Step Guide: Impromptu Rev 11/10/2002
75 Note: Impromptu automatically summarizes the data item you select as your cell value. In most cases, Report Wizard will total the data item. Totals are not appropriate for most OCFS Data Warehouse data, where unique ID codes should be counted rather than totaled. Unfortunately, the Report Wizard does not provide an opportunity to change the summarization method. You can, however, run the report and then change the total to a count. 13 The fourth Wizard screen asks you to define a filter. One of the limitations of the Report Wizard is that it offers only the Report Columns on which to build a filter. You do not have Catalog Columns, Functions, or any of the other components normally available in the Query dialog box. If the Report Columns contain data items that can be used to define a filter, build a filter for your report (refer to Module 6 of this guide for detailed instructions). If the Report Columns do not contain the data items you need to build a filter, run the report without a filter. You can then invoke the Query dialog box and add a filter later. 14 Click the Finish button at the bottom of the Wizard screen. 15 If the cell figures do not represent the values you wanted to see (e.g., totals of ID numbers rather than counts), they can be changed. Page 74 Rev 11/10/2003 OCFS Data Warehouse Reporting Step-by-Step Guide: Impromptu
76 Right click on any cell value on the report. Select Data Definition from the drop-down list. In the Expression window of the Data Definition dialog box, click on the summarization method (i.e., total) at the beginning of the expression. Press the Delete key on your keyboard. Open the Summaries folder in the Available components listing. Double click the summarization method you need in the report (e.g., count). Delete the [<column or calculation>] by placing your cursor over each piece of the Expression and pressing the Delete key on your keyboard. Click the OK button at the bottom of the Query dialog box. 16 If you were not able to filter your report in the Report Wizard, you can do so now in the Query dialog box Click the Query Data button on the toolbar. OCFS Data Warehouse Reporting Page 75 Step-by-Step Guide: Impromptu Rev 11/10/2002
77 Click the Filter tab. You now have all of the components to build a filter, including Catalog Columns. Refer to Module 6 of this guide for detailed instructions on building a filter. Click the OK button at the bottom of the Query dialog box. Your crosstab report should now contain the data you originally wanted. Even though the Report Wizard does not provide the ideal opportunities for structuring a crosstab, you can always correct the report using the Query dialog box. Building crosstabs using the Query dialog box: 1 Login to Citrix and open the Impromptu application. 2 Select Tools Options on the menu bar. 3 Deselect the Use the Report Wizard to create standard reports option. 4 Click OK on the Options dialog box. 5 Click the New button on the toolbar. 6 In the Open Catalog dialog box, navigate to the OCFS Datawarehouse/DataWarehouse/Report Catalogs directory. Page 76 Rev 11/10/2003 OCFS Data Warehouse Reporting Step-by-Step Guide: Impromptu
78 7 Select an appropriate catalog in the selection window. 8 Click the Open button. 9 Enter your Cognos User ID and Password in the appropriate windows of the Cognos Common Logon dialog box. 10 Click the Log On button. 11 Select the data items you want to see in your crosstab: Select the data item you want to see as rows first and add it to your Query data. Select the data item you want to see as columns second and add it to your Query data. Select the data item you want to see as values by clicking on it once. Click the Sum button in the center of the Query dialog box. In the Summary dialog box, click the summarization method you want to use (e.g., count). Click the OK button on the Summary dialog box. OCFS Data Warehouse Reporting Page 77 Step-by-Step Guide: Impromptu Rev 11/10/2002
79 12 Click the Build Crosstab button in the lower center of the Query dialog box. 13 If necessary, move data items from columns to rows or vice versa by clicking on the item, holding your mouse button down and dragging them from the columns window to the rows window, or vice versa. 14 If you want to see a summary row and/or column on your crosstab: Click on the data item in the Cell window. Click the Summarize button beneath the cell window, In the Summarization dialog box, a. Click the arrow to the right of the Summary type window. Page 78 Rev 11/10/2003 OCFS Data Warehouse Reporting Step-by-Step Guide: Impromptu
80 b. Select the appropriate summary type from the drop-down list. c. Click the box to the left of Overall in the Column total window to get a summary column. d. Click the box to the left of Overall in the Footer total window to get a summary row. 15. Click the Filter tab. Note that you have all of the components normally available to build a filter, including Catalog Columns. Refer to Module 6 of this guide for detailed instructions on building filters. 16. Click the OK button on the Query dialog box to run the report. OCFS Data Warehouse Reporting Page 79 Step-by-Step Guide: Impromptu Rev 11/10/2002
81 Prompts A prompt is a dialog box that asks the user to enter information when a report is opened. A report can contain several prompts, which it uses to filter the report to retrieve only the data you want. To create prompts, we will be using the Prompt Manager, which is a dialog box used to create, edit, and store prompts for the currently active report. The Prompt Definition dialog box is what we will use to actually name and define the prompt. The Prompt Manager is not available in the Impromptu Report Wizard, so you will be building your report using the Query dialog box. There are several types of prompts. A Type-in prompt requires the user to type in information. A Picklist prompt requires the user to select items from a list. A picklist can include data items from the catalog, from another report, or from a file in delimited ASCII format. The prompt data are generally used in filters, so we will review how to add a prompt into a report filter. Type-in prompts: Type-in Prompts are the easiest prompts to set up. You need only enter a name and a message on the Prompt Definition dialog box. You may also need to change the data type that is to be entered. However, the user is required to enter the data, which must be entered in the exact same format as it is found in the database. If your users are not familiar with the data, type-in prompts may not be the most effective prompt type to be using. Type-in prompts are generally used for date prompts, where the user is required to add a date or a range of dates. 1 Login to Citrix and open the Cognos Impromptu application. 2 Select Tools Options on the menu bar. 3 In the General tab of the Options dialog box, deselect the Use the Report Wizard to create standard reports option. 4 Click OK on the Options dialog box. 5 Click the New button on the toolbar. 6 In the Open Catalog dialog box, navigate to the OCFS Datawarehouse/DataWarehouse/Report Catalogs directory. Page 80 Rev 11/10/2003 OCFS Data Warehouse Reporting Step-by-Step Guide: Impromptu
82 7 Select an appropriate catalog in the selection window. Refer to Appendix A for complete descriptions of the OCFS DataWarehouse catalogs. 8 Click the Open button on the Open Catalog dialog box. 9 Enter your Cognos User ID and Password in the appropriate windows of the Cognos Common Logon dialog box. 10 Click Log On. 11 Select the data items you want to see on the report. Refer to Module 6 of this guide for detailed instructions on Selecting Data. 12 Click the Group tab and group those data items you want to see grouped in your report. Refer to Module 6 of this guide for detailed instructions on Grouping Data. 13 Click the Sort tab and sort those data items you want sorted in your report. Refer to Module 6 of this guide for detailed instructions on Sorting Data. 14 Click the Filter tab and enter a filter for your report. Refer to Module 6 for detailed instructions on Filtering Data. 15 To insert prompts into your filter: Start out with the data item you want to use as the basis for your prompt (e.g., Home Authorized To Date). Double click the data item to add it to the Filter definition. Select an operator from the Available components listing (e.g., between). Click Prompt Manager in the Available components listing. Type a name for your prompt in the Name window (e.g., Date From ) of the Prompt Definition dialog box. Type a message for the user in the Message box (e.g., Please enter a start date ). Check the Data type to make sure it s appropriate for the prompt (e.g., date). To change the data type, click the arrow to the right of the Data type window and select the appropriate type from the drop-down listing. Click OK on the Prompt Definition box. OCFS Data Warehouse Reporting Page 81 Step-by-Step Guide: Impromptu Rev 11/10/2002
83 Select the correct prompt in the Available prompts window of the Prompt Manager dialog box. Click OK on the Prompt Manager dialog box. If the filter is complete, click OK on the Query dialog box. If the filter is not complete, follow the steps above to complete it. You can enter any number of prompts in a single report, as in the example below, which uses two prompts to define a date range for the Home Authorized To Date to determine the homes whose certification will be expiring within a specified range of time. Click OK on the Query dialog box. Page 82 Rev 11/10/2003 OCFS Data Warehouse Reporting Step-by-Step Guide: Impromptu
84 16 Complete the Prompt dialog box. Note: Date prompts should be completed using the same format as the default dates which appear in the dialog window. In other words, if the default date is in m/d/yy format, then the user s entry should be in m/d/yy format. Catalog Picklist Prompts: Picklist prompts require a more involved set-up, but are the easiest for users to complete. The user is presented with a list from which to select data items on which to run the report. Catalog picklists display all the values for a selected data item from which the user selects one or more values. 1 Login to Citrix and open the Cognos Impromptu application. 2 Select Tools Options on the menu bar. 3 In the General tab of the Options dialog box, deselect the Use the Report Wizard to create standard reports option. 4 Click OK on the Options dialog box. 5 Click the New button on the toolbar. 6 In the Open Catalog dialog box, navigate to the OCFS Datawarehouse/DataWarehouse/Report Catalogs directory. 7 Select an appropriate catalog. Refer to Appendix A for detailed descriptions of the OCFS Data Warehouse catalogs. 8 Click the Open button on the Open Catalog dialog box. 9 If the Cognos Common Logon dialog box appears, enter your Cognos User ID and Password in the appropriate windows. 10 Click the Log On button. 11 Select the data items you want to see on your report. Refer to Module 6 for more detailed instructions on selecting data. 12 Click the Group tab. Refer to Module 6 for more detailed instructions on grouping data. 13 Click the Sort tab. Refer to Module 6 for more detailed instructions on sorting data. 14 Click the Filter tab and insert prompts into your filter. Select the data item you want to use as the basis for your filter. For example, if you want to develop a report on children in care, but you want to allow the user to run the report based on the Goal, you would select Goal to start your filter. OCFS Data Warehouse Reporting Page 83 Step-by-Step Guide: Impromptu Rev 11/10/2002
85 Select an operator for your filter. As in the above example, if you want to run the report on only one specific goal, you would add the equal sign (=) to your filter. If you want the user to be able to run the report on several goals, you would add in to the filter. Double click Prompt Manager in the Available components listing. Type a name for your prompt in the Name window (e.g., Goal ). Click the arrow to the right of the Type window. Select Catalog picklist from the drop-down list. Enter a message for the user in the Message box (e.g., Please select Goal(s): ). Open an appropriate folder in the Catalog columns window by double clicking it. Select a data item from the folder listing. i. If this data item is the one to be used to compare values in the database, click the Use button beneath the Catalog columns window. The item is displayed in the Currently using window. ii. If you want to use one data item, but display another data item to the user, select the display item in the folder listing and click the Display button. The item is displayed in the Currently displaying window. The Use/Display feature in picklist prompts is especially useful when using code data items. Users may not know the definitions of the codes. You can use the Code item to retrieve the data, but display the Description item to the user. Numerical data items are better choices for use, since numerical searches require less processing time. For example, racial codes are found in Fact folders, but their descriptions are found in the Ethnicity Dimension folder. You can use the Ethnicity Cd in your prompt, but display Ethnicity Desc Txt to the user. iii. If the same data item is to be used and displayed, select the data item in the Catalog columns window and click the Use button beneath the window. The data item will appear in both the Currently using and Currently displaying windows. Page 84 Rev 11/10/2003 OCFS Data Warehouse Reporting Step-by-Step Guide: Impromptu
86 Click OK on the Prompt Definition dialog box. Click OK on the Prompt Manager dialog box. 15 Click OK on the Query dialog box. 16 To open the catalog picklist in the Prompt dialog box, click the arrow to the right of the prompt window. To select more than one value on the picklist, hold your Ctrl key down and click on each value. 17 Click OK on the Prompt dialog box to execute the query. Report Picklist Prompts: Report picklist prompts require a separate Impromptu report to be created first. It is important that the picklist report be saved in the same directory or folder as the report using the picklist. Report picklists are especially useful when you need to manipulate the data in some way. For example, if you want to present the user with a list of Child CIN s with the child s name from which to select, you could develop an Impromptu report with that information and use it as a prompt for a more detailed report. OCFS Data Warehouse Reporting Page 85 Step-by-Step Guide: Impromptu Rev 11/10/2002
87 1 Login to Citrix and open the Cognos Impromptu application. 2 Select Tools Options on the menu bar. 3 On the General tab of the Options dialog box, deselect the Use the Report Wizard to create standard reports option. 4 Click OK on the Options dialog box. 5 Click the New button on the toolbar. 6 In the Open Catalog dialog box, navigate to the OCFS Datawarehouse/DataWarehouse/Report Catalogs directory. 7 Select an appropriate catalog in the selection window. Refer to Appendix C of this guide for detailed descriptions of the OCFS Data Warehouse catalogs. 8 Click the Open button. 9 Select the data items for your report. 10 Define calculated columns for your report: Click the Calculate button in the center of the Query dialog box. Type a name for your calculation in the Name window of the Calculation Definition dialog box. Build your calculation. For example, if you wanted to present users with a list of Child CIN s and Child Names, you would select Child CIN and Child Name as data items on your report. The calculation (Child CIN + Child Name would be built as follows: Double click Report Columns. Double click Child CIN. Double click string. Enter space dash space between the two quote marks in the Expression window. Press the Enter key on your keyboard. Double click the plus sign (+). Double click Report Columns. Double click Child Name. Click OK in the Calculation Definition dialog box. 11 If you want a specific sort in your report, click the Sort tab and select the data item you want to sort by, and then click Ascending or Descending. Generally speaking, prompt reports provide lists from which users select values for use in filtering reports. Such lists can be sorted to make it easier for users, but they should not be grouped. For example, on the Child CIN-Child Name example, we could sort numerically by Child CIN. Select Child CIN in the Sort order window. Page 86 Rev 11/10/2003 OCFS Data Warehouse Reporting Step-by-Step Guide: Impromptu
88 Click the Ascending button beneath the Sort order window. 12 Click the Filter tab of the Query dialog box and build a filter for your report, if necessary. Refer to Module 6 for detailed instructions on building filters. 13 Click OK on the Query dialog box. 14 Click File Save As on the menu bar. 15 In the Save As dialog box, navigate to an appropriate folder on your T: Drive. You will have to save the report using this report picklist in the same folder. 16 Type a name for your report in the File name window. Make it easily recognizable as a Report Picklist report (e.g., Prompt Report ). 17 Click the Save button. 18 Select File Close on the menu bar. 19 Click the New button on the toolbar. 20 Select data for your report. Refer to Module 6 of this guide for detailed instructions on selecting data. 21 Click the Sort tab. Refer to Module 6 of this guide for detailed instructions on sorting data. 22 Click the Group tab. Refer to Module 6 of this guide for detailed instructions on grouping data. 23 Click the Filter tab. 24 Build a filter using a report picklist prompt. For example, using the Child CIN-Child Name report picklist: Open the Report Columns folder in the Available components listing. Select Child CIN and add it to your filter. Note: You can use Catalog Columns to retrieve data items not appearing on your report. Double click the equal sign (=) in the Available components listing. Double click Prompt Manager in the Available components listing. Type a name for your prompt in the Name window of the Prompt Definition dialog box (e.g., CIN/Name ). Click the arrow to the right of the Type window. Select Report picklist from the drop-down list. Enter a message for the user in the Message window (e.g., Please select a child ). Click the Browse button to the right of the Report window. In the Open dialog box, navigate to the folder on your T: Drive where you saved your picklist report. Select the picklist report in the selection window. Click the Open button. OCFS Data Warehouse Reporting Page 87 Step-by-Step Guide: Impromptu Rev 11/10/2002
89 Select Child CIN in the Report data window. Click the Use button beneath the Report data window. Select Child CIN/Name in the Report data window. Click the Display button beneath the Report data window. Click OK on the Prompt Definition box. Click OK on the Query dialog box. 25 Click OK on the Query dialog box. 26 To open the report picklist, click the arrow to the right of the prompt window. 27 Select an item from the list (use your Ctrl key to select more than one item, providing in was used in the filter). 28 Click OK on the Prompt dialog box. Page 88 Rev 11/10/2003 OCFS Data Warehouse Reporting Step-by-Step Guide: Impromptu
90 If/Then/Else Conditional Statements If/Then/Else refers to a conditional statement used to manipulate data. In other words, data is not in the format you want to see it in on the report. For example, the OCFS Data Warehouse is full of codes. Instead of displaying codes on the report, perhaps you d rather display the descriptions of the codes. You can manipulate that data using the If/Then/Else conditional statement. If/Then/Else statements are formatted by stating a condition, what happens if the condition is met, and what happens if the condition is not met. If the condition is true, then one operation is performed; if the condition is false, then another operation is performed. For example, if the Activity Cd in the Admissions and Discharges Catalog is M910, then that denotes an admission. Any other Activity Cd is considered a discharge. We can convert the Activity Cd to read Admission or Discharge with the statement: if (Activity Cd = M910 ) then ( Admission ) else ( Discharge ) In other words, if the Activity Code on the record is M910, then print the word Admission in the column. If the Activity Code is anything other than M910, then print the word Discharge in the column. If/Then/Else conditional statements are considered calculations in Impromptu, so you must use the Calculate feature to build the statement. Also, If/Then/Else statements are not available in the Report Wizard. Assuming you have started a new report in Impromptu and now want to add the If/Then/Else referenced above: 1 Click the Calculate button in the center of the Query dialog box. 2 Type a name for your calculated column in the Name window of the Calculation Definition dialog box. 3 Double click if in the Available components listing. 4 Now build the true statement inside the parentheses. Using the above example: a. Double click Report Columns (Catalog Columns if the data item needed is not on your report) in the Available components listing. b. Double click Activity Cd to add it to the Expression. c. Double click the equal sign (=). d. Double click string. e. Type M910 between the two quote marks in the Expression window. f. Press the Enter key on your keyboard. g. Double click the closing parenthesis ) in the Available components listing. 5 Now enter what you want to have happen if the preceding statement is true. As in the above example, if the Activity Code on a record is M910, we want the word Admission to appear in the column: a. Open the Value folder in the Available components listing. b. Double click string to add it to the Expression. c. Type Admission between the two quote marks in the Expression window. d. Press the Enter key on your keyboard. OCFS Data Warehouse Reporting Page 89 Step-by-Step Guide: Impromptu Rev 11/10/2002
91 e. Double click the closing parenthesis ) in the Available components listing. 6 Now enter what is to happen if the preceding statement is not true. As in the example, if the Activity Code is anything but M910, we want the word Discharge to appear in the column: a. Double click the opening parenthesis (in the Available components listing). b. Double click string. c. Type Discharge between the two quote marks in the Expression window. d. Press the Enter key on your keyboard. e. Double click the closing parenthesis ) in the Available components listing. 7 Click OK on the Calculation Definition dialog box. 8 Click OK on the Query dialog box to execute the query. You can now use this calculated column like any other column in the report. You can group, sort, or use it as a header. Summary Filters Filters can be applied to summary data items using the Summary filter function in Impromptu. We have been using detail filters, which apply one or more conditions to each row of data. If the conditions are true for a row, that row is retrieved for the report; if the conditions are not true, the row is not retrieved. Summary filters are applied to summary data items only. For example, if you develop a summary calculation that counts the number of CPS reports per unique Case ID, you could then apply a summary filter against that count to retrieve only those counts that are 3 or higher per Case ID. Summary data items (such as counts, totals, etc.) are not available for use in detail filters. Using the above example, the following instructions should be followed to apply a summary filter in a report: Page 90 Rev 11/10/2003 OCFS Data Warehouse Reporting Step-by-Step Guide: Impromptu
92 1 Login to Citrix and open the Cognos Impromptu application. 2 Select Tools Options on the menu bar. 3 On the General tab of the Options dialog box, deselect the Use the Report Wizard to create standard reports option. 4 Click OK on the Options dialog box. 5 Click the New button on the toolbar. 6 In the Open Catalog dialog box, navigate to the OCFS Datawarehouse/DataWarehouse/Report Catalogs directory. 7 Select an appropriate catalog in the selection window (e.g., Investigations Catalog). 8 Click the Open button. 9 Select the data items for your report (i.e., from the Investigation Fact folder Case ID). 10 Add a summary data item to your report. For example, in the example above: a. Select Report ID in the Catalog window by clicking on it once. b. Click the Sum button in the center of the dialog box. c. In the Summary of Report ID dialog box, click Count. d. Click OK on the Summary dialog box. 11 Click the Filter tab. 12 In the Filter options section of the dialog box, click the arrow to the right of the Filter Type window. 13 Select Summary from the drop-down list. OCFS Data Warehouse Reporting Page 91 Step-by-Step Guide: Impromptu Rev 11/10/2002
93 14 Double click Report Columns in the Available components listing. 15 Select the summary data item you created in step 10 (i.e., Count Report ID) and add it to your filter definition. 16 Select an appropriate operator (=, <>, <, <=, >, >=) and add it to your filter. 17 Double click number in the Available components listing. 18 Type a number over the default zero in the filter definition. 19 Press the Enter key on your keyboard. 20 Click OK on the Query dialog box to run the report. Page 92 Rev 11/10/2003 OCFS Data Warehouse Reporting Step-by-Step Guide: Impromptu
94 Appendix A: Impromptu Catalogs Appendix A1: Allegations Catalog This catalog contains all CPS investigation information with allegation details. This shared catalog contains the following folders. Geography Folder Describes the counties associated to investigations and allegations. See Geography Folder, page 118 for details. Allegation Facts Contains detailed data of actual allegations. All Races & Ethnicity Folder Role Folder Contains details of the race and ethnicity codes and their descriptions Contains descriptions of all roles played by victims, subjects, reporters, and workers Subject Folder Unit Folder Contains demographic information for the perpetrator [subject] assigned to investigations and allegations Contains demographic details about the units associated to investigations and allegations Victim Folder Contains demographic information on the victim in allegations and investigations Worker Folder Describes the individual workers assigned to investigations and allegations Allegation Folder Contains descriptions of specific allegations of child abuse/neglect Reporter Relationship Folder Describes the role of the reporter of the alleged child abuse/maltreatment Data As of Date Folder Provides the dates on which the Allegations data mart was updated with data from the CONNECTIONS and CCRS systems. See Data As Of Folder, page 128 for detailed information. OCFS Data Warehouse Reporting Page 93 Step-by-Step Guide: Impromptu Rev 11/10/2002
95 Appendix A2: Foster Home Catalog Agency Folder Provides descriptive details for the agency with which the resource is associated Geography Folder Provides descriptive details of the counties associated to foster and adoptive care. See Geography Folder, page 118 for details. Foster Home Fact Worker Folder Ethnicity Folder Contains detailed data for all resources designated as foster home care facilities Provides descriptive details for the workers associated with Foster and Adoptive Homes Provides descriptive details on the race or ethnicity of the Resource Member Ethnicity Folder Provides descriptive details on the race or ethnicity of the members of the Resource Home Member Folder Provides descriptive details about the members of foster homes Worker Agency Folder Provides descriptive details of the agency to which the worker belongs Data As Of Date Folder (Provides the latest dates on which the data warehouse was updated with CONNECTIONS and CCRS data) See Data As Of Folder, page 128 for detailed information. Page 94 Rev 11/10/2003 OCFS Data Warehouse Reporting Step-by-Step Guide: Impromptu
96 Appendix A3: Investigations Catalog Geography Folder Worker Folder Role Folder Provides descriptive details of the counties associated to foster and adoptive care. See Geography Folder, page 118 for details. Describes the individual worker associated with investigations (Contains descriptions of all roles played by victims, subjects, reporters and workers) Unit Folder (Contains demographic details about the units associated to investigations and allegations) Investigation Detail Folder (Contains detailed data for actual CPS Reports) Approval Folder (Contains the details of approvals made on CPS Reports and Stages) Stage Person Folder (Contains descriptive details of the various individuals in each Stage of a case) Investigation Fact Folder (Contains detailed data for actual CPS Reports) Reporter Relation Folder (contains descriptive details of the individual who reported the case) Data As Of Date Folder (Provides the latest dates on which the OCFS Data Warehouse was updated with data from operational systems) See Data As Of Folder, page 128 for detailed information. OCFS Data Warehouse Reporting Page 95 Step-by-Step Guide: Impromptu Rev 11/10/2002
97 Appendix A4: CCRS Related Catalogs Admissions and Discharges Summary Catalog This catalog can be used to obtain aggregate and child specific information on children in the custody of the local Commissioner of Social Services admitted or discharged from foster care during a user-defined time period. This catalog contains the last five full years of data plus the current year to date. The Agency or District Admissions and Discharge catalog contains the following folders: Summary Case Child Movement Total number of children whose records include an M910 for admissions (or M990, M999 for discharges) movement code. Contains current CCRS case-level information, including WMS Case address Contains current information for all children Contains all movement activity (M910, M990 or M999) codes for a child Activity Detail Fact Geography Contains detailed data for admissions and discharges. Provides descriptive details of the counties associated to foster care cases. See Geography Folder, page 118 for details. Race & Ethnicity Folder Facility Agency Folder Provides descriptive details of racial origin and ethnicity. Contains detailed information on facilities from CAPS RESOURCE. Provides descriptive details of agencies associated with admissions and discharges within the Child welfare and foster care systems. See Agency Folder, page 102 for detailed information. In Care Detail Fact Data As Of Contains detailed information about placements. Provides the latest date on which the OCFS data warehouse was updated. See Data As Of Folder, page 128 for detailed information. Page 96 Rev 11/10/2003 OCFS Data Warehouse Reporting Step-by-Step Guide: Impromptu
98 In Care and Legal Detail Catalog This catalog can be used to obtain aggregate and child specific information on children currently in the custody of the local Commissioner of Social Services. A shared catalog containing the following folders: Agency Folder Detail Folder Case Folder Child Folder Provides descriptive details of agencies associated to admissions and discharges. See Agency Folder, page 102 for detailed information. Contains detailed information about placements and legal activities. Contains current CCRS case-level information, including address. Contains one record for each child who is currently in placement. Facility Folder Contains detailed information on facilities from CAPS RESOURCE. Case Individual Folder Contains current detailed information for individuals associated to a case. Movement Folder Contains detailed information on movement activities. In Care Detail Folder Contains detailed information on the placements of children. Geography Folder Legal Folder Provides descriptive details of the counties associated to placement cases. See Geography Folder, page 118 for details. Contains legal activity details for children. Legal Modifier A Folder These variables contain specific information associated with each activity code. Consult your CCRS Coding Guide. Legal Modifier B Folder These variables contain specific information associated with each activity code. Consult your CCRS Coding Guide. Legal Modifier C Folder These variables contain specific information associated with each activity code. Consult your CCRS Coding Guide. Legal Modifier D Folder OCFS Data Warehouse Reporting Page 97 Step-by-Step Guide: Impromptu Rev 11/10/2002
99 These variables contain specific information associated with each activity code. Consult your CCRS Coding Guide. Race and Ethnicity Folder Provides descriptive details of racial origin and ethnicity. Data As Of Folder Provides the latest date on which the OCFS data warehouse was updated. See Data As Of Folder, page 128 for detailed information. Page 98 Rev 11/10/2003 OCFS Data Warehouse Reporting Step-by-Step Guide: Impromptu
100 In Care and Legal Summary Catalog This catalog can be used to obtain legal and placement aggregate and child specific information on children in the custody of the local Commissioner of Social Services during a user-defined time period. This catalog contains the last five full years of data plus the current year to date. A shared catalog containing the following folders Detail Folder Total number of children whose records include a movement code of the most recent M910. In Care Summary Fact Folder Contains child-level information on placements. Geography Folder Provides descriptive details of the counties associated to foster care cases.) See Geography Folder, page 118 for details. Disposition Lookup Folder Please consult your CCRS Coding Guide for specific information concerning these variables. Agency Folder Facility Folder Provides descriptive details of agencies associated to admissions and discharges. See Agency Folder, page 102 for detailed information. Contains detailed information on facilities from CAPS RESOURCE. Race and Ethnicity Folder Provides descriptive details of racial origin and ethnicity. In Care Detail Fact Folder Case Folder Child Folder Contains detailed information about placements. Contains current CCRS case-level information, including address. Contains current information for all children. Data As Of Folder Provides the latest date on which the OCFS data warehouse was updated. See Data As Of Folder, page 128 for detailed information. OCFS Data Warehouse Reporting Page 99 Step-by-Step Guide: Impromptu Rev 11/10/2002
101 CCRS Services Report Catalog This catalog is used to obtain all service case information concerning children who have been in placement or are currently in placement. The Catalog contains the following folders: Data As Of Folder Provides the latest date on which the OCFS data warehouse was updated. Key Dates & Derivations This folder contains Key dates for the children in placement. These dates include Time in Care at Discharge, Most Recent Admission, Most Recent Discharge, ASFA Time in Care etc. Child Folder Contains current information for all children. Case Individual Folder Contains current detailed information for individuals associated to a case Case Folder Each item in this folder contains either CCRS or WMS Case Data. This is one record per case in this folder. Race and Ethnicity of Case Individual Folder Provides descriptive details of racial origin and ethnicity of the child. Service Assessment Folder Contains all service assessment information for the child Child s Current Agency Information Folder Contains detailed information on the Agency associated with the child s current placement. Agency data is from Connections. In Connections Agencies are coded 05 in the CD_RSRC_TYPE column on the CAPS Resource table. Child s Current Facility Folder Contains detailed information on the child s current facility from CAPS RESOURCE. Current Facility s Owner Agency Information Folder Contains detailed information on the owner Agency of the Facility associated with the child s current placement. Agency data is from Connections. In Connections Agencies are coded 05 in the CD_RSRC_TYPE column on the CAPS Resource table. Race and Ethnicity of Child Folder Provides descriptive details of racial origin and ethnicity of the child. Movement Folder Contains all movement activity ( M910, M990 or M999) codes for a child Movement Facility Information Folder Contains detailed information on facility associated with the Movement Code from CAPS RESOURCE. Page 100 Rev 11/10/2003 OCFS Data Warehouse Reporting Step-by-Step Guide: Impromptu
102 Movement Facility s Owner Agency Information Folder Contains detailed information on the owner Agency of the Facility associated with the movement code. Agency data is from Connections. In Connections Agencies are coded 05 in the CD_RSRC_TYPE column on the CAPS Resource table. Legal Folder Contains legal activity details for children. Legal Modifier A Folder These variables contain specific information associated with each activity code. Consult your CCRS Coding Guide. Legal Modifier B Folder These variables contain specific information associated with each activity code. Consult your CCRS Coding Guide. Legal Modifier C Folder These variables contain specific information associated with each activity code. Consult your CCRS Coding Guide. Legal Modifier D Folder These variables contain specific information associated with each activity code. Consult your CCRS Coding Guide. Adoption Folder Contains all adoption activities. Goal Folder Contains all goal (G000, G100, G200, G250, G400, G600, G700, G800, G850, G900, G903, G912, G918, G920 & G999) activities. Geography Folder Provides descriptive details of the counties associated to a case. Activity Detail Contains all activity details for the child In Care Detail Folder This folder contains child specific information on children currently in the custody of the local Commissioner of Social Services. In Care Summary Folder This folder contains child specific information on children in the custody of the local Commissioner of Social Services during the last five full years plus the current year. OCFS Data Warehouse Reporting Page 101 Step-by-Step Guide: Impromptu Rev 11/10/2002
103 Folder Definitions Agency Folder Contains detailed information on all Agencies in Connections. In Connections Agencies are coded 05 in the CD_RSRC_TYPE column on the CAPS Resource table. This folder is included in all CCRS related and Out of Home settings catalogs Agency ID Unique identification number assigned to the agency by New York State. This data element from NBR_RSRC_AGENCY_ID Agency Contact Name Name of the agency contact person. This data element from NM_RSRC_CONTACT Agency Certification Date The date on which the agency was certified (licensed). This data element from DT_RSRC_CERT Agency Authorization To Date The date on which the agency s authorization expires. The only time an agency s authorization will expire is when the agency is new and on probation. After the first reauthorization then the agency remains open until closed. This data element from CD_RSRC_CERT_BY Agency Close Date The date on which the agency was closed. This data element from Agency Type Code This code indicates whether the Agency is a District (D) or Voluntary Agency (V). This data element from CD_RSRC_AGENCY_TYPE Agency Status Code The operational status of the agency (active or Inactive). This data element from CD_RSRC_STATUS Agency Name Name of the agency. This data element from NM_RESOURCE Agency Address Line 1 first line of the agency's address. This data element from ADDR_RSRC_ST_LN_1 Agency Address Line 2 Second line of the agency s address. This data element from ADDR_RSRC_ST_LN_2 Agency City Address city in which the agency is located. This data element is from ADDR_RSRC_CITY Agency NYC Community District Code community board district code that is generated by the geocoding interface on the FAD and Resource director address windows. Community district is calculated for new York city addresses only. This data element is from ADDR_RSRC_CMNTY_DIST Agency State Code abbreviated code for the state in which the agency is located. This data element is from CD_RSRC_STATE Agency Zip Code numeric ZIP code for the agency. This data element is from ADDR_RSRC_ZIP Agency Address County Code County in which the Agency is physically located. This data element is from CD_RSRC_CNTY Page 102 Rev 11/10/2003 OCFS Data Warehouse Reporting Step-by-Step Guide: Impromptu
104 Agency Phone Number phone number for the agency. This data element is from NBR_RSRC_PHONE OCFS Data Warehouse Reporting Page 103 Step-by-Step Guide: Impromptu Rev 11/10/2002
105 CCRS Child Folder This folder contains one record for each child who has ever been in placement. This folder is included in all CCRS related catalogs. Child CIN ID System-generated number that uniquely identifies an individual child in CCRS Child Name The name of the child. Child Sex Code Sex of the child. Child Charge Indicator Indicates the government (state or federal) assuming fiscal responsibility for the child and why. Child JD/PINS Indicator Indicates a child adjudicated as a JD (Juvenile Delinquent) or PINS (Person In Need of Supervision). The code is necessary for post-authorization claiming purposes. Child Location Code Indicates physical location of the child. Child District Agency Plan ID The district or agency with planning responsibility for the child. Child Individual Status Code Indicates the status of each individual who has significance to the case (not limited to the applicant and recipients). Child Status Code Indicates the current status of the child. Child Original School District ID Identifies the school district in which the child resided at the time of first placement. Child Current School District ID Identifies the child's current school district while in placement or receiving preventive services. Child Auth Agency 1 ID Identifies the controlling corporate unit or entity of one or more child-care facilities. Unit 1 ID Identifies the unit within the agency to which the child's case belongs. Worker 1 ID Identifies the worker assigned to the child's case. Worker Function 1 Code Identifies the casework function associated with each district or agency worker with responsibility for the child's case. Auth Agency 2 ID Identifies the controlling corporate unit or entity of one or more child-care facilities. Unit 2 ID Identifies the unit within the agency to which the child's case belongs. Worker 2 ID Identifies the worker assigned to the child's case. Worker Function 2 Code Identifies the casework function associated with each district or agency worker with responsibility for the child's case. Auth Agcy 3 ID Identifies the controlling corporate unit or entity of one or more child-care facilities. Unit 3 ID Identifies the unit within the agency to which the child's case belongs. Worker 3 ID Identifies the worker assigned to the child's case. Worker Function 3 Code Identifies the casework function associated with each district or agency worker with responsibility for the child's case. Auth Agcy 4 ID Identifies the controlling corporate unit or entity of one or more child-care facilities. Unit 4 ID Identifies the unit within the agency to which the child's case belongs. Page 104 Rev 11/10/2003 OCFS Data Warehouse Reporting Step-by-Step Guide: Impromptu
106 Worker 4 ID Identifies the worker assigned to the child's case. Worker Function 4 Code Identifies the casework function associated with each district or agency worker with responsibility for the child's case. Auth Agency 5 ID Identifies the controlling corporate unit or entity of one or more child-care facilities. Unit 5 ID Identifies the unit within the agency to which the child's case belongs. Worker 5 ID Identifies the worker assigned to the child's case. Worker Function 5 Code Identifies the casework function associated with each district or agency worker with responsibility for the child's case. Plan Type Code Identifies the plan type for the latest service assessment done for the child. It expresses the relationship of a specific plan to the mandatory plan submittal sequence. Child Facility ID Identifies the facility where the child is currently placed. Child Facility Type Code Identifies the type of facility where the child is currently placed. Child Claiming Category Code Identifies the appropriate federal or state category denoting the federal title or state allocation from which the cost of services is reimbursed. Service Recipient Eligibility Category Code Identifies the categorical relationship, income eligibility, or financial ineligibility of an individual member of a services family unit or case designated for purposes of services financial eligibility. Child s CCRS Case Status Code Status of the CCRS case. Service Type Code Identifies the type of service as defined in Title XX and annual CASSP available to eligible individuals displaying a need. Child s CCRS Case District ID The state-assigned code identifying the local social services district currently controlling the child's case. Acct Number The child's social security number. Birth Date The child's date of birth. Plan Date Date on which the latest service assessment plan for the child was completed, as indicated by the current planning worker. Individual Next Plan Date Date on which the next service plan for the child is due. Facility Date Date on which the child was admitted to the facility. Transaction Date (TID) Date on which a specific record was entered. Track Start Date The date on which the child, or someone acting on his/her behalf, requested adoptive, foster care, and/or preventive services. Track Close Date Date on which adoptive, foster care, and/or preventive services for the child were closed. Child s Case Initiation Date (CID) Date on which the child's case was first initiated. Child s Case Authorization Period Start Date The period-from date for which the child's case has been authorized. Child s Case Authorization Period End Date The period-to date for which the child's case has been authorized. Agency ID Identifies the agency with primary responsibility for the child's case. OCFS Data Warehouse Reporting Page 105 Step-by-Step Guide: Impromptu Rev 11/10/2002
107 Child Goal Code The current permanency-planning goal from the child's current service assessment. Child Race Code Identifies the racial origin of the child. Child Ethnicity Indicator Identifies whether the child is of Hispanic origin. Child Current Legal Status Code Current legal status of the child, based on legal activity. Child Current Age Number Child's current age in years, based on the date of birth. Child s Sibling Count Number of the child's siblings in the CCRS case. Child Siblings in Placement Number of the child's sibling currently placed in foster care. Child Line Number The line number of the CCRS application on which the child is listed. Child CCRS Case ID The district-assigned number that uniquely identifies the child's case within the district or responsible state agency. Case Name The name by which the child's case is currently identified (usually Line 1 of the CCRS application). Page 106 Rev 11/10/2003 OCFS Data Warehouse Reporting Step-by-Step Guide: Impromptu
108 CCRS Case Folder Each column can contain either CCRS or WMS Case Data. There is one record per case in this folder. This folder is included in all CCRS related catalogs Case ID The district - assigned 10 digit case number that uniquely identifies the case within the district, or responsible state agency. Can contain Alpha Characters; in counties where a case number for one case type may be duplicated for another case type, the inclusion of an A for ADC, or H for HR, or M for MA etc may have been used to make the number unique within the district. This data element is taken from 01_050_CASE_NO. Case District ID The state - assigned district code that identifies the local social services district currently controlling the input transactions for the case. This data element is taken from 01_010_JUR_TRNSCTNL_RESP. Case Office ID Identifies the office within a district that has responsibility for the case, often referred to as satellite offices, district offices, IM centers, etc. This data element take from 01_020_local_office Case Unit ID Used within a district to identify the unit currently responsible for the case. This data element taken from 01_030_resp_unit Case Worker ID Used within a district to identify the worker currently responsible for the case. From 01_040_resp_worker Case CCRS Status Code Indicates the status of the case. This data element is from 36_003_CCRS_CASE_STATUS calculation if 36_003_ccrs_case_status = 01 then Y else if 02 then N Case CCRS Indicator Indicates the presence of CCRS information. This data element is from 023_490_ccrs_ind Codes C CCRS Involvement in Case N Delinquent (JD) Remand D Day Treatment Services O Neglect Remand (non CPS) E Direct Intensive Preventive Service Program (PEG) P PINS Remand; Q= Delinquent (JD) Commitment/Placement F Home Aide From Emergency Children's Services (ECS) Q Delinquent (JD) Commitment/Placement G Home Aide From Emergency Children's Services (ECS) R PINS Commitment/Placement H Purchased Preventive Services S Delinquent (JD) Placement NYS/DFY for Replacement with SSC I Family Services (Direct) T Court-Ordered Evaluation (docket code other than N neglect) J Foster care Services U Court-Ordered Investigation K Maternity Shelter V Court-Ordered Supervision L Foster care-emergency Children s Services W Closed Case Service M PINS Warrant X Home Evaluation Y Referral for Services to Other Community or OCFS Data Warehouse Reporting Page 107 Step-by-Step Guide: Impromptu Rev 11/10/2002
109 Social Service Agency Case Initiation Date (CID) The date on which the case was first initiated. This data element from 36_183_CID Case Transaction Date(TID The date on which a particular entry was made. From 36_001_TRANSACTION_DATE Case Original WMS Application Date Date on which application was received for assistance and/or care, as defined by the program for which application is made. This data element is from 36_090_applctn_date Case Name The name by which the child's case is currently identified (usually Line 1 of the WMS application) from 01_070_case_name Case Street Address Street of the residential address from the WMS case Case City Address City of the residential address from the WMS case Case State Code State of the residential address from the WMS case Case Zip Code Postal ZIP code of the residential address from the WMS case Page 108 Rev 11/10/2003 OCFS Data Warehouse Reporting Step-by-Step Guide: Impromptu
110 In Care Detail Fact Folder Contains detailed information about placements. This folder is included in the In Care/Legal Summary and Detail Catalogs CIN ID Child Name Case ID District ID Current Facility ID Worker ID Unit ID Office ID Agency ID Sex Code Race Code Ethnicity Ind Goal Code Goal Text Child Status Code Current Legal Status Code Current Facility Type Code Current Age Number Current Age Group Text Sibling Count Sibling Placed Count ASFA Time In Care Number Foster Care Admission Date Facility Admission Date System-generated number that uniquely identifies an individual child in CCRS Name of the child. The district-assigned number that uniquely identifies the case within the district, or responsible state agency, associated with the child State-assigned code identifying the local social services district currently controlling the case. Identifies the facility in which the child is currently placed. Identifies the worker currently responsible for the child s case. Identifies the unit currently responsible for the child s case. Identifies the office currently responsible for the child s case. Identifies the agency from the most recent placement of the child. Sex of the child. Racial origin of the child. Indicates whether the child is of Hispanic origin. Code for permanency-planning goal from the child s latest service assessment. Text description of the permanency-planning goal from the child s latest service assessment. Child s current status in CCRS. Identifies the child s current legal status. Type of facility in which the child is currently placed. Child s current age in years. Age range in which the child belongs. Number of siblings in the child s case. Number of the child s siblings who are currently in foster care. Current length of time in months that the child has spent in care, based on ASFA guidelines. Date of the most recent placement for the child. Date on which the child entered care at the current facility. OCFS Data Warehouse Reporting Page 109 Step-by-Step Guide: Impromptu Rev 11/10/2002
111 Agency Admission Date Birth Date Next Hearing Date Date on which the child entered care at the current agency. Child s date of birth. Date scheduled for the child s next court hearing. Page 110 Rev 11/10/2003 OCFS Data Warehouse Reporting Step-by-Step Guide: Impromptu
112 Case Individual Folder Contains current detailed information for all individuals associated to the Services case of a child in placement. This folder is included in the In Care/Legal detail and CCRS Services Report Catalogs. District ID Zip Code Middle Initial Name Line Number Sex Code WMS Individual Status Code CCRS Individual Status Code Location Code Race Code Religion Code Prim Lang Code Track Indicator Relationship Line 1 No Text Relationship Qualifier 1 Code Relationship Line 2 No Text Relationship Qualifier 2 Code Relationship Line 3 No Text Relationship Qualifier 3 Code Birth Date Transaction Date First Name Last Name Facility Case Name Facility Type Code State-assigned code identifying the local social services district currently controlling the case. Zip code of the individual Middle initial of the individual s name. The line number of the CCRS application on which the individual appears. Sex of the individual. Current status of the individual in WMS. Current status of the individual in CCRS. Code indicating physical location of the individual. Racial code for the individual. Code for the religion of the individual. The primary language, if other than English, of the individual. Indicates that the individual is being tracked in CCRS. Line number of each child s mother, father, or significant other person. The relationship of the associated line number to the child on whose line it appears. Line number of each child s mother, father, or significant other person. The relationship of the associated line number to the child on whose line it appears. Line number of each child s mother, father, or significant other person. The relationship of the associated line number to the child on whose line it appears. Date of birth of the individual. Date on which a record was entered. First name of the individual. Last name of the individual. If the child s status is 04 or 06, then this field contains the name of the facility in which the child has been placed; otherwise it contains the name of the case. If the child s status is 04 or 06, this field contains the type of facility in which OCFS Data Warehouse Reporting Page 111 Step-by-Step Guide: Impromptu Rev 11/10/2002
113 the child has been placed; otherwise, it is blank. Line 1 Address Line 2 Address City Address State Code Address line 1 for the individual. Address line 2 for the individual. City in which the individual resides. State in which the individual resides. Movement Folder Contains detailed information on movement activities. This folder is included in the In Care/Legal Detail, Agency or District Admissions/Discharge Summary, CCRS Services Ad Hoc Catalogs. CIN ID Transaction Date Activity Number Location Code Case ID District ID Activity Modifier A Code Activity Modifier B Code Activity Modifier C Code Activity Modifier D Code Agency ID Unit ID Worker ID Child Status Code Effective Date System-generated number that uniquely identifies an individual child in CCRS Date on which a movement activity took place. A unique sequence number assigned to each movement activity in a child s case. The oldest activity is assigned the value 1. This guarantees uniqueness for similar movement activities being entered on the same day. Indicates the physical location of the child associated with an activity. The district-assigned case number that uniquely identifies the case within the district, or responsible state agency, associated with an activity. The state-assigned code identifying the local social services district currently controlling the case. These variables contain specific information associated with each activity code. Consult your CCRS Coding Guide. These variables contain specific information associated with each activity code. Consult your CCRS Coding Guide. These variables contain specific information associated with each activity code. Consult your CCRS Coding Guide. These variables contain specific information associated with each activity code. Consult your CCRS Coding Guide. Identifies the agency that entered the activity. Identifies the unit within the agency that entered the activity. Identifies the worker that entered the activity. A derived status associated with each type of movement activity. The date on which a movement activity became effective. Page 112 Rev 11/10/2003 OCFS Data Warehouse Reporting Step-by-Step Guide: Impromptu
114 Legal Dimension Contains legal activity details for children. This folder is included in the In Care/Legal Detail and CCRS Services Report Catalogs CIN ID Worker ID Activity Date Activity Code Activity Number Update Date Location Code Case ID District ID Activity Modifier A Code Activity Modifier B Code Activity Modifier C Code Activity Modifier D Code Agency ID Unit ID System-generated number that uniquely identifies a child in CCRS. Identifies the caseworker that entered the activity. Date on which the legal activity occurred. The four-character CCRS activity code. A sequence number that uniquely identifies the separate activities within a child s case. The oldest activity is assigned the value 1. This guarantees uniqueness for similar legal activities occurring on the same day. The date on which a record is updated. Code identifying the physical location of the child associated with this activity. The district-assigned number that identifies the case within the district, or responsible state agency, associated with this activity. The state-assigned code that identifies the local social services district currently controlling the case. These variables contain specific information associated with each activity code. Consult your CCRS Coding Guide. These variables contain specific information associated with each activity code. Consult your CCRS Coding Guide. These variables contain specific information associated with each activity code. Consult your CCRS Coding Guide. These variables contain specific information associated with each activity code. Consult your CCRS Coding Guide. Code identifying the agency that entered the activity. Code identifying the unit within the agency that entered the activity. Legal Modifier A Folder (These variables contain specific information associated with each activity code. Consult your CCRS Coding Guide.) Activity Code Desc Text Activity Modifier Code Activity Modifier Text These variables contain specific information associated with each activity code. Consult your CCRS Coding Guide. These variables contain specific information associated with each activity code. Consult your CCRS Coding Guide. These variables contain specific information associated with each activity code. Consult your CCRS Coding Guide. These variables contain specific information associated with each activity code. Consult your CCRS Coding Guide. OCFS Data Warehouse Reporting Page 113 Step-by-Step Guide: Impromptu Rev 11/10/2002
115 Legal Modifier B Folder (These variables contain specific information associated with each activity code. Consult your CCRS Coding Guide.) Activity Code Desc Text Activity Modifier Code Activity Modifier Text These variables contain specific information associated with each activity code. Consult your CCRS Coding Guide. These variables contain specific information associated with each activity code. Consult your CCRS Coding Guide. These variables contain specific information associated with each activity code. Consult your CCRS Coding Guide. These variables contain specific information associated with each activity code. Consult your CCRS Coding Guide. Legal Modifier C Folder (These variables contain specific information associated with each activity code. Consult your CCRS Coding Guide.) Activity Code Desc Text Activity Modifier Code Activity Modifier Text These variables contain specific information associated with each activity code. Consult your CCRS Coding Guide. These variables contain specific information associated with each activity code. Consult your CCRS Coding Guide. These variables contain specific information associated with each activity code. Consult your CCRS Coding Guide. These variables contain specific information associated with each activity code. Consult your CCRS Coding Guide. Legal Modifier D Folder (These variables contain specific information associated with each activity code. Consult your CCRS Coding Guide.) Activity Code Desc Text Activity Modifier Code Activity Modifier Text These variables contain specific information associated with each activity code. Consult your CCRS Coding Guide. These variables contain specific information associated with each activity code. Consult your CCRS Coding Guide. These variables contain specific information associated with each activity code. Consult your CCRS Coding Guide. These variables contain specific information associated with each activity code. Consult your CCRS Coding Guide. Page 114 Rev 11/10/2003 OCFS Data Warehouse Reporting Step-by-Step Guide: Impromptu
116 In Care Summary Fact Contains child-level information on placements. This folder is included in the In Care/Legal Summary Catalog CIN ID Legal Disposition Code Office ID Unit ID Worker ID Report Date Case ID District ID Facility ID Sex Code Race Code Ethnicity Indicator Goal Code Child Status Code Facility Type Code Age Number Age Group Text Time In Care Number Goal Text Goal Ethnicity Race Facility Type ASFA Time In Care Number ASFA Group Text Legal Status Code System-generated number that uniquely identifies an individual in CCRS. Legal disposition for a child as of the latest update. Identifies the office currently responsible for the child s case. Identifies the unit currently responsible for the child s case. Identifies the caseworker currently responsible for the child s case. Month-end date for which the child s information is current. The district-assigned number that uniquely identifies the case within the district, or responsible state agency, associated with the child. State-assigned code that identifies the district currently controlling the child s case. Identifies the facility in which the child resided as of the Report Date. Sex of the child. Identifies the racial origin of the child. Indicates whether the child is of Hispanic origin. Permanency-planning goal from the child s latest service assessment as of the Report Date. Child s status in CCRS as of the Report Date. Identifies the type of facility in which the child resided as of Report Date. Child s age in years as of the Report Date. Text grouping based on age as of the Report Date. Length of time the child has spent in care as of the Report Date, expressed in months. Text description of the permanency-planning goal. Identifies the permanency-planning goal from the child s most recent service assessment as of the Report Date. Identifies whether the child is of Hispanic origin. Identifies the racial origin of the child. Text description of the type of facility in which the child resided as of the Report Date. Length of time in months the child has spent in care based on ASFA guidelines Text grouping based on ASFA Time In Care Number. Legal status of the child as of the Report Date. OCFS Data Warehouse Reporting Page 115 Step-by-Step Guide: Impromptu Rev 11/10/2002
117 Facility Folder Contains detailed information on all Facilities in Connections. In Connections all facilities are coded 06 in the CD_RSRC_TYPE column on the CAPS Resource table. This folder is included in all CCRS related catalogs. Facility/Vendor ID Identification number assigned to each facility by New York State. This data element is from NBR_RSRC_VID. Vendor ID is 8 characters in length and the values may contain both alpha and numeric characters. Many of these numbers were converted from CCRS. Facility Contact Name Name of the contact person for the facility This data element is from NM_RSRC_CONTACT Facility Certification Date The date on which the facility was certified or licensed for the current certification period. This data element is from DT_RSRC_CERT Facility Authorization To Date The date on which the facility s certification expires. This data element is from DT_RSRC_AUTH_TO Facility Close date on which the FAD home or facility was closed (license cancelled). This data element is from DT_RSRC_CLOSE_EFFECTIVE Facility Type This is the Level of Care (LOC) provided by the facility. The LOC is defined by who licensed the facility, the number of clients it can accommodate, and the type of service it provides. The type/loc of a facility is also used to calculate the commodity codes sent to BICS. This data element is from CD_RSRC_FACIL_TYPE Facility Status Code The operational or license status of the facility; active or inactive. This data element is from CD_RSRC_STATUS and a calculation is done which changes "01" to "Y" (active), and "02" to "N" (inactive). Facility Owner Agency Code Identifies the agency that owns or operates the facility. This data element is from NBR_RSRC_AGENCY_ID Facility Capacity Number The maximum number of children to whom the facility will be able to provide care. This data element is from NBR_RSRC_FACIL_CAPACITY Facility Name Name of the facility. This data element is from NM_RESOURCE Facility Address Line Line 1 of the primary address (physical location) of the facility This data element is from ADDR_RSRC_st_ln_1 Facility Address Line Line 2 of the primary address (physical location) of the facility This data element is from ADDR_RSRC_st_ln_2 Facility Address City City of the primary address (physical location) of the facility This data element is from ADDR_RSRC_CITY Facility Address State State of the primary address (physical location) of the facility. This data element is from CD_RSRC_STATE Facility Address Zip Code Postal zip code of the primary address (physical location) of the facility. This data element is from ADDR_RSRC_ZIP Facility Address County Code The county of the primary address (physical location) in which the facility is located. This data element is from CD_RSRC_CNTY Facility Phone Number Telephone number of the facility This data element is from NBR_RSRC_PHN Page 116 Rev 11/10/2003 OCFS Data Warehouse Reporting Step-by-Step Guide: Impromptu
118 Facility NYC Community District Code Community district is calculated for New York City addresses only. This data element is from ADDR_RSRC_CMNTY_DIST Elements available but not currently used in any catalog. Facility Resource ID A unique 8-digit number that identifies a Resource. This data element is from ID_RESOURCE Facility Sub Agency Code This data element is from CD_RSRC_SUB_AGENCY. Sub Agency primarily applies to NYC (A66) created Foster or Adoptive Homes. The sub agency code is populated with the NYC 800 level decode appropriate to the home when it is created. Sub agency allows users to search and sort Foster or Adoptive homes by the 800 code. OCFS Data Warehouse Reporting Page 117 Step-by-Step Guide: Impromptu Rev 11/10/2002
119 Geography Folder (Describes the counties associated to case information. This folder is included in all CCRS, Allegation, Investigation and Out of Home Settings Catalogs. Upstate Downstate Text FIPS Code County Code County Name Region Code Region Name Descriptive text assigned to each county indicating whether it is part of New York City ( Downstate ) or part of the rest of New York State ( Upstate ). Long Island, even though it is across the river from New York City, is considered Upstate. Federal Information Processing Standards code assigned to the county. Unique three-digit code assigned to each county in the Connections system. Full name of the county (e.g., Albany, Montgomery, etc.) Unique code identifying the New York State region to which the county belongs (one of six in the state). Full name of the region: 1 Buffalo Region 5 Yonkers Region 2 Rochester Region 6 New York City Region 3 Syracuse Region 7 Statewide Agencies 4 Albany Region 8 Regional Offices State Text Other State Agency IAB Indicator Comparable Group Code Name of the state to which the county belongs (New York). Indicates whether the agency is other than an OCFS agency. Indicates whether the county is considered a Regional Office for the purposes of investigating IAB cases. Indicates which of three groups of comparable counties to which this county belongs. Counties are grouped based on how closely they relate to each other with respect to the following variables: Children less than 22 years old Urbanicity (all non-rural housing units divided by all housing units) Families with children with income less than 125% of the poverty level. Page 118 Rev 11/10/2003 OCFS Data Warehouse Reporting Step-by-Step Guide: Impromptu
120 Allegation Facts Folder Contains detailed data of actual allegations. This folder in included in the Allegation Catalog. Case ID Reporter Relationship Code Report ID Intake Stage ID Investigative Stage ID County Code Unit ID Unit Code Worker ID Worker s Role Intake Code Intake Type Code Intake Start Date Investigation Close Date Report Last Update Date Last Updated Date Report Status Text Investigative Code Invest Type Code The unique number assigned to each case by the district that identifies the case within the district or responsible state agency. Identifies the role played by the individual reporting the allegation (see Reporter Relationship Folder for codes). Unique identification number assigned to each CPS Report in the CONNECTIONS system. Unique identification number assigned to the Intake stage of each CPS Report in the CONNECTIONS system. Unique identification number assigned to the investigative stage of each CPS Report in the CONNECTIONS system. Unique three-digit code assigned to each county in the CONNECTIONS system. Unique identification number of the unit to which the report has been assigned. Unique code assigned to the unit to which the report has been assigned. Unique identification number of the worker to whom the report has been assigned. Code identifying the role the assigned worker is to play on this report (i.e., PR = Primary, SE = Secondary). Code identifying the intake stage of the report (i.e., INT ). Code identifying the type of report (i.e., INI Initial, SUB Subsequent, ADD Additional Information). The report start date. The date on which the investigation was closed. The date on which the report was updated last. The date on which the Allegation Fact table was last updated. Indicates the status of the report (i.e., Open, Closed ). Code identifying the investigative stage of the report (i.e., INV ). Code identifying the type of report (i.e., INI Initial, SUB Subsequent, ADD Additional Information). OCFS Data Warehouse Reporting Page 119 Step-by-Step Guide: Impromptu Rev 11/10/2002
121 Reason Investigation Closed Code Code identifying the reason for closing the investigation. 5 Allegation(s) already investigated 10 Law Enforcement agreed to investigate 15 Preliminary investigation of an anonymous report 23 Assessment only 25 Other 30 Close No credible evidence 35 Close Unable to contact 40 Close Service completed 45 Withdrawal 55 Subcare Protective Placement 60 Close 64 Open Court ordered services 65 Open Court ordered services 66 Open Court ordered supervision 67 Open Court ordered supervision 68 Open Voluntary services 69 Open Voluntary services 70 Open Voluntary Placement 71 Open Voluntary Placement 72 Open Court ordered placement 73 Open Court ordered placement 80 Close Refuse service/unable to take legal action 81 Close No services required 83 Close Lost contact 84 Workload constraints Close 85 Close 86 Non-family Investigation 88 Close Only child died 97 Closed to Merge 99 Reclassification Page 120 Rev 11/10/2003 OCFS Data Warehouse Reporting Step-by-Step Guide: Impromptu
122 Investigation Classification Code Indicates the type of investigation conducted: CPD CPS Report investigation involving Foster Care/Day Care providers CPF CPS Report investigation involving Family members CPI CPS Report investigation involving Institutional abuse I & R Information and Referral NCP Non-CPS Report investigation NON Non-Report SPC Special Request Approved Determination Code Allegation Code Disposition Code Victim Person ID Victim Gender Code Victim Race/Ethnicity Code Victim's Age at Intake Subject Person ID Subject Gender Code Subject Ethnicity/Race Code Subject Age at Intake Age of Report Number Indicates the determination made and approved on the CPS Report (IND = Indicated, UNF = Unfounded) Identifies the specific abuse/maltreatment being alleged (see Allegation Folder for codes). Indicates what determination has been made concerning the allegation of abuse (SUB = Substantiated, UNS = Unsubstantiated). Unique identification number assigned to all children in the CONNECTIONS system. Identifies the sex of the child or victim (F = Female, M = Male, U = Unknown). Identifies the race or ethnicity of the child (see All Races & Ethnicity Folder for codes). Age in months of the victim on the Intake Start Date. Unique identification code assigned to every subject (alleged perpetrator) in the CONNECTIONS system. Identifies the sex of the subject (F = Female, M = Male, U = Unknown). Identifies the race or ethnicity of the subject (see Ethnicity Folder for codes). Age in years of the subject on the Intake Start Date. Number of days between the Intake Start Date and the Close Date of the CPS Report. If the report is not closed, it is the number of days between the current date and the Intake Start Date. OCFS Data Warehouse Reporting Page 121 Step-by-Step Guide: Impromptu Rev 11/10/2002
123 Race & Ethnicity Folder (Contains details of the race and ethnicity codes and their descriptions. This folder is included in all CCRS, Allegation, and Out of Home Settings Catalogs. Race Code Race Descriptive Text Code assigned to specific races. Description of the race or ethnicity. AA AC AH AN AP AS BO CW HC HL HO NA OB UN XX African-American African-American-Caucasian African-American-Hispanic Native American/Alaskan Native Asian/Pacific Is-Caucasian Asian/Pacific Islander/Oriental Black (Other) Caucasian (White/Non-Hisp) Hispanic-Caucasian Hispanic/Latino/Puerto Rican Hispanic/Oriental Native African Oriental/Black Unable to Determine Other Race Type Ethnicity Indicator Broad groupings of racial codes (American Indian or Alaska Native, Asian, Black or African American, Other, Unknown, White). Indicates whether the race is considered to be of Hispanic or Latino origin (Y = Yes, N = No) Page 122 Rev 11/10/2003 OCFS Data Warehouse Reporting Step-by-Step Guide: Impromptu
124 Allegation Role Folder (Contains descriptions of all roles played by victims, subjects, reporters, and workers. This folder is included in the Allegation Catalog. Role Code Code identifying the role. AB AS CA CM CS HM HP MA MG NA NM NO NS PC PR RP SE SR SS SU UK VI Abused Child Alleged Subject Confirmed Abused Confirmed Maltreated Confirmed Subject Historical Manager Historical Primary Worker Maltreated Child Case Manager Non-confirmed Abused Non-confirmed Maltreated No Role Non-Confirmed Subject Primary Child Primary Reporter Secondary Source Sustained Subject Suspect Unknown Victim Role Description Text All Roles Text Description of the role. ALL Roles OCFS Data Warehouse Reporting Page 123 Step-by-Step Guide: Impromptu Rev 11/10/2002
125 Allegation Subject Folder (Contains demographic information for the perpetrator [subject] assigned to investigations and allegations. This folder is included in the Allegation Catalog. Subject Person ID Approximate DOB Indicator Gender Code Status Code Religion Code Unique identification number assigned to every subject in the CONNECTIONS system. Indicates whether the subject s date of birth has been estimated in the report due to lack of information (Y = Yes, N = No). Indicates the sex of the subject (F = Female, M = Male, U = Unknown). Not being used at this time. Code indicating the religion practiced by the subject (if any). BP Protestant CJ Jewish DE Eastern Religion EN None FP No Preference IS Islam RC Catholic UN Unknown XX Other Birth Date Date on which the subject was born. Note: If Approximate DOB Indicator is Y, this date is an estimate. First Name Middle Name Last Name City Street Zip Code First name of the subject. Middle name or initial of the subject. Last name of the subject. City in which the subject resides. Street address of the subject. Postal ZIP code of the subject s address. Page 124 Rev 11/10/2003 OCFS Data Warehouse Reporting Step-by-Step Guide: Impromptu
126 Allegation Child Folder Contains demographic information on the victim in allegations and investigation. This folder is in the Allegation Catalog Child Person ID Child Age In Years Approx. DOB Indicator Gender Code Unique identification number assigned to all children in the CONNECTIONS system. Calculation of child s age based on his/her date of birth. Indicates whether the date of birth for this victim is estimated due to lack of information. Indicates the sex of the victim (F = Female, M = Male, U = Unknown). Status Code Current status of the victim in the CONNECTIONS system (A = Active, I = Inactive, M = Merged). Religion Code Code indicating the religion practiced by the victim (if any). BP CJ DE EN FP IS RC UN XX Protestant Jewish Eastern Religion None No Preference Islam Catholic Unknown Other Birth Date First Name Middle Name Last Name Street City Zip Code Date on which the victim was born. Note: If the Approximate DOB Indicator is Y, then this is an estimated date. First name of the victim. Middle name or initial of the victim. Last name of the victim. Street address of the victim. City in which the victim resides. Postal ZIP code of the victim s address. OCFS Data Warehouse Reporting Page 125 Step-by-Step Guide: Impromptu Rev 11/10/2002
127 Allegation Folder Contains descriptions of specific allegations of child abuse/neglect. This folder is included in the Allegations Catalog. Allegation Code Allegation Text Allegation Group Text Code assigned to a specific allegation of child abuse/maltreatment. Description of specific allegations of child abuse/maltreatment. Groupings of specific allegations used for reporting purposes as defined by NCANDS (National Child Abuse and Neglect Data System). Allegation Group Text Allegation Code Allegation Text Medical Neglect LMED Lack of Medical Care Neglect or deprivation of EDNG Educational Neglect necessities IFCS Inadequate Food, Clothing, Shelter INGD Inadequate Guardianship LSUP Lack of Supervision Other Physical Abuse Psychological or emotional maltreatment MITT ABAN CDRG INCC PDRG XOTH BURN CHTS EXCP FATL FRAC IINJ LABW PONX SWDS EMOT ISOL Malnutrition, Failure to Thrive Abandonment Child s Drug/Alcohol Use Inappropriate Custodial Conduct Parent s Drug/Alcohol Misuse Other Burns, Scalding Choking/Twisting/Shaking Excessive Corporal Punishment DOA/Fatality Fractures Internal Injuries Lacerations, Bruises, Welts Poisoning, Noxious Substances Swelling/Dislocation/Sprains Emotional Neglect Sexual Abuse SXAB Sexual Abuse Inappropriate Isolation/Restraint Page 126 Rev 11/10/2003 OCFS Data Warehouse Reporting Step-by-Step Guide: Impromptu
128 Reporter Relationship Folder Describes the role of the reporter of the alleged child abuse/maltreatment. This folder is included in the Allegation and Investigation Catalogs. Reporter Relationship Code Reporter Description Text CONNECTIONS code for the role of the incident reporter. Text describing the CONNECTIONS Reporter Relationship Code: AA Substance Abuse Counselors AD Attend Teacher AG Community Agency AN Anonymous AS Physician's Asst. AT Attorney AU Aunt/Uncle BF Biological Father CC Concerned Citizen CO Cousin CR Clergy CS Christian Science Practitioner CT Court CW Child Care Worker DA Daughter/Son DC Day Care Fac./Prov. DH Dental Hygienist DI Director DS DSS Worker DT District Attorney NCANDS Reporter Code DV Detective EM EMS/EMT FM Other Family member FP Foster Parent FR Friend FV Family Viol. Shelter GC Grandchild GN Guidance Counselor GP Grandparent GU Guardian IS Institutional Staff LA Law Enforcement MC ME/Coroner MF Medical Fac. Staff MH Mental Health Prof. MO Mother NE Neighbor NN Niece/Nephew NR Nurse OS Other Shelter PA Parent PB Probation Officer PH Public Health PN Principal PO Police Officer PS Parent Substitute PY Psychologist/ Psychiatrist PZ Physician SA Other St. Agency SB Sibling SC School Personnel SW Social Worker TC Teacher TP Therapist UH Unrelated Home member UK Unknown XX Other Code used by the National Child Abuse and Neglect Data System for incident reporter roles. NCANDS Reporter Type Mandated Indicator Description of the NCANDS Reporter Code. Indicates whether this type of reporter is required by law to report incidents of child abuse/maltreatment (Y = Yes, N = No). OCFS Data Warehouse Reporting Page 127 Step-by-Step Guide: Impromptu Rev 11/10/2002
129 Data As Of Date Folder Provides the dates on which the Allegations data mart was updated with data from the CONNECTIONS and CCRS systems This folder is included in all OCFS Data Warehouse catalogs CONNECTIONS Data As Of Date CCRS/WMS Data As Of Date Date on which the data mart was updated with CONNECTIONS data. Date on which the data mart was updated with CCRS and/or WMS data. Page 128 Rev 11/10/2003 OCFS Data Warehouse Reporting Step-by-Step Guide: Impromptu
130 Foster Home Member Ethnicity Folder Provides descriptive details on the race or ethnicity of the members of the Resource. This folder is included in the Out of Home Settings Catalog Ethnicity Code Ethnicity Desc Txt Ethnicity Type Hispanic Latino Ind Two-letter code identifying the ethnicity of the home member (refer to Ethnicity Dim for codes). Text describing the ethnicity of the home member. Broad groupings of ethnicity codes (American Indian or Alaska Native, Asian, Black or African American, Other, Unknown, White). Indicates whether the race is considered to be of Hispanic or Latino origin (Y=Yes, N=No). OCFS Data Warehouse Reporting Page 129 Step-by-Step Guide: Impromptu Rev 11/10/2002
131 Foster Home Facts Folder (Contains detailed data for all resources designated as foster home care facilities. This folder is included in the Out of Home Settings Catalog. Foster Home Resource ID Foster Home Vendor ID Foster Home Name Foster Home Worker ID Foster Home Stage ID Foster Home Setting Foster Home Level Of Care Foster Home Status Foster Home Authorized To Date Foster Home Certification Date Foster Home Close Date Foster Home Original Certification Date Foster Home Agency Code Foster Home Original Agency Code Foster Home Inquiry Source Code Foster Home Close Reason Code Foster Home Language Foster Home Religion Foster Home Ethnicity Foster Home Emergency Program Type Indicator Unique identification number assigned to every resource in the CONNECTIONS system. Unique identification number of the facility associated to the resource. This is the CCRS Facility ID Full name by which the resource is known. Unique identification number of the worker with whom the foster home is associated. A unique integer that identifies the resource as the stage. Describes the type of resource (i.e., Foster Home or Congregate). Describes the level of care provided by the resource, including Agency Boarding Home, Approved Relative Foster Home, Certified Foster Home, Group Home, Group Residence, Institution Status of the home. Date to which the resource is authorized. Date on which the resource was certified. Date on which the resource was closed. Date on which the resource was originally certified. Three-digit identification code for the agency with which the home is associated. The original agency code for the home. Code which captures how the inquirer learned about the F/A Home program. Code identifying the reason for closing the home. Language spoken in the home. Religion practiced in the home. Code indicating the ethnicity of the home (please refer to Ethnicity Dim for codes). Indicates whether a resource provides emergency program services. Page 130 Rev 11/10/2003 OCFS Data Warehouse Reporting Step-by-Step Guide: Impromptu
132 Foster Home Hard To Place Program Type Indicator Foster Home HIV AIDS Program Type Indicator Foster Home Maternity Program Type Indicator Foster Home Mother and Child Program Type Indicator Foster Home Refugee Assistance Program Type Indicator Foster Home Regular Program Type Indicator Foster Home Sex Offender Program Type Indicator Foster Home SILP Program Type Indicator Foster Home Special Needs Behavioral Program Type Indicator Foster Home Special Needs Medical Program Type Indicator Foster Home Therapeutic Program Type Indicator Foster Home Diagnostic Reception Center Program Type Indicator Foster Home RTC Program Type Indicator Foster Home Capacity Number Indicates whether a resource provides hard to place program services. Indicates whether a resource provides HIV+/AIDS program services. Indicates whether a resource provides maternity program services. Indicates whether a resource provides Mother/Child program services. Indicates whether a resource provides Refugee Assistance program services. Indicates whether a resource provides regular program services. Indicates whether a resource provides sex offender program services Indicates whether a resource provides Supervised Independent Living Program services. Indicates whether a resource provides Special Needs Behavioral program services Indicates whether a resource provides Special Needs Medical program services. Indicates whether a resource provides therapeutic program services. Indicates whether a resource provides Diagnostic Reception Center program services. Indicates whether a resource provides Residential Treatment Center program services. Maximum licensed capacity of the resource. OCFS Data Warehouse Reporting Page 131 Step-by-Step Guide: Impromptu Rev 11/10/2002
133 Foster Home Unavailable Number Foster Home Maximum Female Month Number Foster Home Maximum Female Year Number Foster Home Minimum Female Month Number Foster Home Minimum Female Year Number Foster Home Maximum Male Month Number Foster Home Maximum Male Year Number Foster Home Minimum Male Year Number Foster Home Minimum Male Month Number Foster Home Address Line 1 Foster Home Address Line 2 Foster Home Address City Foster Home Address Zip Code Foster Home Address State Foster Home Address County Foster Home NYC Community District Foster Home Phone Number Foster Home Phone Extension Foster Home Sub Agency Code The number of places currently unavailable in the resource. The maximum age in months at which the resource will accept female children. The maximum age in years at which the resource will accept female children. The minimum age in months at which the resource will accept female children. The minimum age in years at which the resource will accept female children. The maximum age in months at which the resource will accept male children. The maximum age in years at which the resource will accept male children. The minimum age in years at which the resource will accept male children. The minimum age in months at which the resource will accept male children. First line of the home s street address. Second line of the home s street address. City in which the home is located. Postal ZIP code for the home. Two letter code for the state in which the resource is located. Three-digit code for the county in which the home is located. Community district code of the resource (New York City only). Phone number for the home. Phone extension number for the home. This data element is from CD_RSRC_SUB_AGENCY. Sub Agency primarily applies to NYC (A66) created Foster or Adoptive Homes. The sub agency code is populated with the NYC 800 level decode appropriate to the home when it is created. Sub agency allows users to search and sort Foster or Adoptive homes by the 800 code. Page 132 Rev 11/10/2003 OCFS Data Warehouse Reporting Step-by-Step Guide: Impromptu
134 Foster Home Member Folder (Provides descriptive details about the members of foster homes. This folder is included in the Out of Home Settings Catalog. Member ID Member Name Resource ID Facility ID Approx Dob Ind Sex Code Ethnicity Code State Code County Code Agency Code Birth Date Card Sent Date Card Recvd Date Zip Code Phone Number City Address Language Txt Unique CONNECTIONS identification number assigned to an individual who is a member of a foster home. Full name of an individual who is a member of a foster home. Unique CONNECTIONS resource identification number of the foster home. Unique Connections facility identification number of the foster home. Indicates whether a foster home member s date of birth has been estimated. Identifies the gender of a foster home member. Identifies the ethnicity of a foster home member (refer to Ethnicity Folder for codes). Identifies the state in which a foster home is located Identifies the county in which a foster home is located. Code assigned to that agency that owns a foster home. Date on which a foster home member was born. Note: If the Approx Dob Ind is Y, then this date is estimated. The date on which fingerprint cards of a foster home member were sent to the Department of Criminal Justice Services (DCJS) for a criminal background check. The date on which a response is received from the DCJS. Postal ZIP code of a foster home address. Telephone number of a foster home. City in which a foster home is located. Language spoken at a foster home. Amer Sign Hindi Other Chinese Italian Polish Creole Japanese Portuguese English Korean Portuguese French Multiple Spanish German Nat Am Lan Vietnamese Hebrew Marital Status Txt Indicates the marital status of a foster home: Child, not applicable Separated Single, never MA Widowed Unknown Divorced OCFS Data Warehouse Reporting Page 133 Step-by-Step Guide: Impromptu Rev 11/10/2002
135 Unmarried Couple Legally Separated Married Relation Txt Identifies the relationship of individuals living in a foster home: Absent Parent Foster Child Administrator Foster Parent Attorney Friend Aunt/Uncle Godparent Child Grandchild Child Care Worker Grandparent Clergy Guardian Community Agency Institutional Non- Prof. Mother Court Concerned Citizen Cousin Niece/Nephew Neighbor Daughter/Son Non-custodial Parent Other Family member Day Care Fac./Prov. Other Non-relative Parent Parent Substitute Other Shelter School Personnel Sibling Psychiatric Staff Spouse Step-Parent Son Step Sibling Teacher Unknown Unrel. Home mem Religion Txt Religion primarily practiced by a foster home member: Catholic Jewish Other Eastern Religion None Protestant Islam No Preference Unknown Role Txt Street1 Address First Name Last Name Middle Name Street2 Address Identifies the principal and collateral relationships in a foster home (Collateral, Principal). The first line of the street address of a foster home. First name of an individual who is a member of a foster home. Last name of an individual who is a member of a foster home. Middle name of an individual who is a member of a foster home. Second line of the foster home s street address. Page 134 Rev 11/10/2003 OCFS Data Warehouse Reporting Step-by-Step Guide: Impromptu
136 CPS Investigations Approval Folder (Contains the details of approvals made on CPS Reports and Stages. This folder is included in the Investigation Catalog. Report ID Approval Description Text Approval ID Case ID Person ID Approval Status Code Unique identification number assigned to all CPS Reports in the CONNECTIONS system. Text description of the approval made to a CPS Report or Stage. Unique identification number assigned to the individual with approval responsibility for a case. Unique identification number assigned to all CPS Reports in the CONNECTIONS system. Unique identification number assigned to the primary worker on a CPS Report. Status of the approval on a CPS Report. OCFS Data Warehouse Reporting Page 135 Step-by-Step Guide: Impromptu Rev 11/10/2002
137 CPS Investigations Fact Folder (Contains detailed data for actual CPS Reports. This folder is included in the Investigation catalog. Report ID Report Relation Code Unit ID Case ID Worker ID Worker Role Code County Code Intake ID Intake Code Intake Type Code Intake Start Date Investigation ID Investigation Code Investigation Type Code Investigation Close Date Investigation Reason Closed Code Unique identification number assigned to all CPS Reports in the CONNECTIONS system. Code identifying the relationship of the individual who reported the case. Unique identification number of the unit to which the primary worker on the case is in assigned. Unique identification number assigned to all cases in the CONNECTIONS system. Unique identification number assigned to the primary worker on a case. Code identifying the role played by the primary worker on a case. Code identifying the county to which the primary worker on a case belongs. Unique identification number assigned to the Intake Stage of a case. Code identifying the Intake Stage of a case (i.e., INT ). Code identifying the type of intake for a case. The date on which the case is opened as an Intake on the CONNECTIONS system. Unique identification number assigned to the Investigation Stage of a case. Code identifying the Investigation Stage of a case (i.e., INV ). Code identifying the type of investigation for a case. Date on which the Investigation Stage of a case is closed. Code identifying the reason an Investigation Stage is closed. 5 Allegation(s) already 68 Open Voluntary services investigated 10 Law Enforcement agreed to 69 Open Voluntary services investigate 15 Preliminary investigation of an 70 Open Voluntary Placement anonymous report 23 Assessment only 71 Open Voluntary Placement 25 Other 72 Open Court ordered placement 30 Close No credible evidence 73 Open Court ordered placement 35 Close Unable to contact 80 Close Refuse service/unable to take legal action Page 136 Rev 11/10/2003 OCFS Data Warehouse Reporting Step-by-Step Guide: Impromptu
138 40 Close Service completed 81 Close No services required 45 Withdrawal 83 Close Lost contact 55 Subcare Protective Placement 85 Close 60 Close 86 Non-family Investigation 64 Open Court ordered services 88 Close Only child died 65 Open Court ordered services 97 Closed to Merge 66 Open Court ordered 99 Reclassification supervision 67 Open Court ordered supervision Investigation Classification Code Code identifying the type of investigation conducted: CPD CPS Report investigation involving Foster Care/Day Care providers CPF CPS Report investigation involving Family members CPI CPS Report investigation involving Institutional abuse I & R Information and Referral NCP Non-CPS Report investigation NON Non-Report SPC Special Request Approved Determination Code Last Updated Date Report Name Case Open Indicator Code identifying the determination made on a case ( IND =Indicated, UNF =Unfounded). Date on which the CPS Report was last updated. Name of the CPS Report or case. Indicates whether the CPS Report or case is open. OCFS Data Warehouse Reporting Page 137 Step-by-Step Guide: Impromptu Rev 11/10/2002
139 CPS Investigations Stage Person Folder (Contains descriptive details of the various individuals in each Stage of a case. This folder is included in the Investigation Catalog. Report ID Stage Person Link Date Case ID Person ID Person Role Code Person Relation Code Unique identification number assigned to each CPS Report in the CONNECTIONS system. Latest date on which the CPS Report was updated. Unique identification number assigned to each case in the Connections system. Unique identification number assigned to the individual associated to the CPS Report. Code identifying the role played by the individual in the CPS report. Code identifying the relationship of the individual in the CPS report. Page 138 Rev 11/10/2003 OCFS Data Warehouse Reporting Step-by-Step Guide: Impromptu
140 CPS Investigations Detail Folder (Contains detailed data for actual CPS Reports. This folder is included in the Investigation Catalog. Report ID Report Date Rep Tot Open Count Rep Beg Open Count Rep End Open Count Rep Last day Overdue Count Rep Tot Open Days Unique identification number assigned to all CPS Reports in the CONNECTIONS system. The Intake Start Date for a specific CPS Report. Total number of CPS Reports currently open in the CONNECTIONS system (i.e., INV-stage reports with no Close Dates). The total number of CPS Reports active as of midnight on the first day of the period covered. The total number of CPS reports that were active as of midnight on the last day of the period covered. The total number of CPS reports that were still active at the end of period where the number of days between the Intake Start Date and the Period End Date is greater than 60 days. Total number of days a CPS Reports was open at any time during the period covered. OCFS Data Warehouse Reporting Page 139 Step-by-Step Guide: Impromptu Rev 11/10/2002
141 CPS Investigations Reporter Relationship Folder (Contains descriptive details of the individual who reported the CPS case. This folder is included in the Allegation and Investigation Catalogs. Reporter Relation Code Code identifying the relationship of the reporter in the case: AA Substance Abuse Counselors DT District Attorney NR Nurse AD Attend Teacher DV Detective OS Other Shelter AG Community Agency EM EMS/EMT PA Parent AN Anonymous FM Other Family member PB Probation Officer AS Physician's Asst. FP Foster Parent PH Public Health AT Attorney FR Friend PN Principal AU Aunt/Uncle FV Family Viol. Shelter PO Police Officer BF Biological Father GC Grandchild PS Parent Substitute CC Concerned Citizen GN Guidance Counselor PY Psychologist/ Psychiatrist CO Cousin GP Grandparent PZ Physician CR Clergy GU Guardian SA Other St. Agency CS Christian Science Practitioner IS Institutional Staff SB Sibling CT Court LA Law Enforcement SC School Personnel CW Child Care Worker MC Medical Examiner/Coron er SW Social Worker DA Daughter/Son MF Medical Fac. Staff TC Teacher DC Day Care Fac./Prov. MH Mental Health Prof. TP Therapist DH Dental Hygienist MO Mother UH Unrelated. Home Member DI Director NE Neighbor UK Unknown DS DSS Worker NN Niece/ Nephew XX Other Page 140 Rev 11/10/2003 OCFS Data Warehouse Reporting Step-by-Step Guide: Impromptu
142 Mandated Indicator Description Text NCANDS Reporter Code NCANDS Reporter Description Indicates whether the reporter was required by law to report a case of child abuse and/or maltreatment. Text description of the relationship of the reporter in the case. Category of reporter type according to the National Child Abuse and Neglect Data System guidelines. Text description of NCANDS Reporter Code. CPS Worker Folder (Describes the individual workers associated with investigations. This folder is included in the Allegation and Investigation Catalogs. Worker ID Worker Name Unit ID Unit Code County Code Agency Code Site Code First Name Middle Name Last Name Office Name Unique identification number assigned to the primary worker in the CONNECTIONS system. Full name of the primary worker associated to a case. Unique identification number assigned to the unit to which the primary worker is in assigned. Code assigned to the unit to which the primary worker is in assigned. Unique three-digit code assigned to the county to which the primary worker belongs. Code assigned to the agency with primary responsibility for a case. Code assigned to the site to which the unit is associated. First name of the primary worker assigned to a case. Middle name of the primary worker assigned to a case. Last name of the primary worker assigned to a case. Name of the office to which the primary worker reports. OCFS Data Warehouse Reporting Page 141 Step-by-Step Guide: Impromptu Rev 11/10/2002
143 CPS Unit Folder (Contains demographic details about the units associated to investigations and allegations. This folder is included in the Allegation and Investigation Catalogs. Unit ID Agency Name Agency Code Site Code Unit Code Approver ID Approver Name Unique identification number of the unit within the district or agency to which a case belongs. Name of the agency to which the unit belongs. Code assigned to the agency with primary responsibility for a case. Code assigned to the site to which the unit is associated. Code assigned to the unit with primary responsibility for a case. Unique identification number assigned to the individual responsible for approving a case. Full name of the individual with approval responsibility for a case. Page 142 Rev 11/10/2003 OCFS Data Warehouse Reporting Step-by-Step Guide: Impromptu
144 CPS Individual Role Folder (Contains descriptions of all roles played by victims, subjects, reporters and workers. This folder is included in the Allegation and Investigation Catalogs. Role Code Role Description Text Code identifying the role. Text description of the role: AB Abused Child AS Alleged Subject CA Confirmed Abused CM Confirmed Maltreated CS Confirmed Subject HM Historical Manager HP Historical Primary Worker MA Maltreated Child MG Case Manager NA Non-confirmed Abused NM Non-confirmed Maltreated NO No Role NS Non-Confirmed Subject PC Primary Child PR Primary RP Reporter SE Secondary SR Source SS Sustained Subject SU Suspect UK Unknown VI Victim All Roles Text ALL Roles OCFS Data Warehouse Reporting Page 143 Step-by-Step Guide: Impromptu Rev 11/10/2002
145 Worker Agency Folder Contains detailed information on the Agency to which the worker belongs. In Connections Agencies are coded 05 in the CD_RSRC_TYPE column on the CAPS Resource table. This folder is included in all CCRS related and Out of Home settings catalogs Worker Agency ID Unique identification number assigned to the agency by New York State. This data element from NBR_RSRC_AGENCY_ID Worker Agency Contact Name Name of the agency contact person. This data element from NM_RSRC_CONTACT Worker Agency Certification Date The date on which the agency was certified (licensed). This data element from DT_RSRC_CERT Worker Agency Authorization To Date The date on which the agency s authorization expires. The only time an agency s authorization will expire is when the agency is new and on probation. After the first re-authorization then the agency remains open until closed. This data element from CD_RSRC_CERT_BY Worker Agency Close Date The date on which the agency was closed. This data element from Worker Agency Type Code This code indicates whether the Agency is a District (D) or Voluntary Agency (V). This data element from CD_RSRC_AGENCY_TYPE Worker Agency Status Code The operational status of the agency (active or Inactive). This data element from CD_RSRC_STATUS Worker Agency Name Name of the agency. This data element from NM_RESOURCE Worker Agency Address Line first line of the agency's address. This data element from ADDR_RSRC_ST_LN_1 Worker Agency Address Line --- Second line of the agency s address. This data element from ADDR_RSRC_ST_LN_2 Worker Agency City Address --- city in which the agency is located. This data element is from ADDR_RSRC_CITY Worker Agency NYC Community District Code community board district code that is generated by the geo-coding interface on the FAD and Resource director address windows. Community district is calculated for new York city addresses only. This data element is from ADDR_RSRC_CMNTY_DIST Worker Agency State abbreviated code for the state in which the agency is located. This data element is from CD_RSRC_STATE Worker Agency Zip Code numeric ZIP code for the agency. This data element is from ADDR_RSRC_ZIP Worker Agency Address County Code County in which the Agency is physically located. This data element is from CD_RSRC_CNTY Page 144 Rev 11/10/2003 OCFS Data Warehouse Reporting Step-by-Step Guide: Impromptu
146 Worker Agency Phone Number phone number for the agency. This data element is from NBR_RSRC_PHONE OCFS Data Warehouse Reporting Page 145 Step-by-Step Guide: Impromptu Rev 11/10/2002
147 Appendix B: Predefined Impromptu Reports FAD Impromptu Reports Appendix B1: Foster Home Reauthorization Coming Due Report Title: Report Purpose: Report Prompts: Totals: Foster Home Reauthorization Coming Due Lists foster homes that require reauthorization for a time period specified by the user. Today s Date (start of time period) End Date (end of time period) Total Homes Coming Due for Period by Worker Agency ID Data: Data Field Data Definition Sample Values Home Authorization Will Expire Start and End dates entered by user Date of Report Date on which the report is run Office Name of the Office to which an agency is assigned New Alternatives for Children Unit Worker Name Three-digit identification number for the unit to which an employee is currently assigned First and last names of the worker assigned to the Foster Home 013 Doe, John Resource ID Connections Vendor ID for the Resource Home Name Name of the Resource Knox, Diane Setting Describes the type of home Foster Home Congregate Home Home Status Cert from Date Cert to Date Status of the Resource Note: All current reports are formatted to include Accepted Active and Emergency status only. Date of the original authorization or last reauthorization/approval date of a Foster or Congregate Care Home Date the resource is due to be closed if the worker takes no action Accepted Active Emergency 10/8/00 10/8/01 Page 146 Rev 11/10/2003 OCFS Data Warehouse Reporting Step-by-Step Guide: Impromptu
148 Appendix B2: Foster Home Detail Report Report Title: Report Purpose: Report Prompts: Totals: Foster Home Detail Provides information for Congregate and Foster Home resources in Accepted Active and Emergency statuses. None None Data: Data Field Data Definition Sample Values Agency Name of the agency that owns the resource 700 Worker Name Office Name Worker Unit First and last names of the worker assigned to this resource. The name of the office to which the worker is currently in assigned. NOTE: In some cases, this will be different from the Worker Agency field. Identification number of the unit to which the worker assigned to the resource is in assigned in Connections. Smith, Carol New Alternatives for Children 013 Home Name Name of the Foster or Congregate Home resource. Smith, Marian Resource ID Facility ID Home Status The Connections identification number for this resource. The Connections Vendor identification number for this resource. Status of the resource. NOTE: All current reports are formatted to include Accepted Active and Emergency status only Accepted Active Emergency Setting Indicates the setting of the resource Foster Care Congregate Care Level of Care The level of care provided by the resource. Agency Boarding Home Approved Relative Foster Home Certified Foster Home Group Home Group Residence Institution Cert From The date on which the resource was last authorized 6/25/01 OCFS Data Warehouse Reporting Page 147 Step-by-Step Guide: Impromptu Rev 11/10/2002
149 Data Field Data Definition Sample Values Cert To The date on which authorization for the resource 6/25/02 expires Capacity The maximum number of children for which the resource is licensed 6 # Unavailable Number of unavailable spaces in this resource 2 Male Min Yrs & Mos Male Max Yrs & Mos Female Min Yrs & Mos Female Max Yrs & Mos Program Types The minimum age, in years and months, of male children that the resource is licensed to accept. The maximum age, in years and months, of male children that the resource is licensed to accept. The minimum age, in years and months, of female children that the resource is licensed to accept. The maximum age, in years and months, of female children that the resource is licensed to accept. Describes the types of programs offered by the resource. Values include: RG Regular EM Emergency TH Therapeutic HP Hard to Place MC Mother/Child HIV HIV+/AIDS MT Maternity SO Sexual Offenders RTC Residential Treatment Center DRC Diagnostic Reception Center RA Refugee Assistance Program SILP Supervised Independent Living Program SNM Special Needs Medical SNB Special Needs Behavioral Home Location Street Ln 1 The first line of the street address of the resource Linden Blvd Street Ln 2 The second line of the resource s street address. City City in which the resource is located Brooklyn County County in which the resource is located. Manhattan CD Community district in which the resource is located. NOTE: This field will be completed for New York City resources. All others will be blank. 05 State State in which the resource is located. NY Page 148 Rev 11/10/2003 OCFS Data Warehouse Reporting Step-by-Step Guide: Impromptu
150 Data Field Data Definition Sample Values Zip Zip code of the resource s street address Phone Phone number for the resource Ext Phone extension number for the resource. 123 Race Race of the resource. African American Language Language(s) spoken at the resource. English Religion Predominant religion practiced at the resource. Protestant Member Name Name of each member living in the resource Jones, Carmen Person ID Relationship Role DOB The Connections identification number of the individuals living in the resource Relationship of the individuals living in the resource. Identifies the principal and collateral relationships of the persons living in the resource. Date of birth of the individuals living in the resource Foster Parent Principal 10/13/48 Sex The gender of the individuals living in the resource. F Race Race of the individual living in the resource. African American Connections As Of Date Date of the latest update of the OCFS Data Warehouse 10/05/2001 Date of This Report Fingerprint Card Sent Fingerprint Card Returned Medical Exam Date CCRS Child CIN Child Name ASFA Time in Care Total Siblings Siblings Placed Date on which the report was requested. 9/14/01 Date on which fingerprint cards for this home member were sent. Date on which fingerprint cards for this home member were returned. Date on which this home member received a medical examination. The CIN identification number for the child. Name of the child. Number of months the child has been in care, based on ASFA guidelines. Number of siblings of this child. Number of this child s siblings who have been placed in care. OCFS Data Warehouse Reporting Page 149 Step-by-Step Guide: Impromptu Rev 11/10/2002
151 Appendix B3: Foster Home Summary List Report Report Title: Report Purpose: Report Prompts: Totals: Foster Home Summary List Report To provide workers and supervisors with a listing of all foster care facilities by agency/district. None Total number of foster care facilities by agency/district Data: Data Field Data Definition Sample Values Agency/District The name of the agency to which the workers is New Alternatives for Children Name currently in assigned. Agency/District Code Total Number of Foster Homes Worker Officer Name Unit Code Code assigned to the agency by New York State Total number of foster homes within the responsibility of the agency Name of the office to which the worker is assigned. Unique identification number for the unit within a district that is responsible for the foster homes 700` Worker Name Name of the worker responsible for the foster home SMITH JOHN E Resource ID Unique identification number assigned to the foster home in the Connections system Home Name Name by which the foster home is known Smith, Clara Home Member Name Role Name of individual who is a member of the home Identifies the principal and collateral relationships in the foster home Smith, Jill Principal Collateral Relationship Describe the relationship of the home member Foster Parent Daughter/Son Grandchild Status Status of the Foster Home Accepted-Active Emergency Fingerprint Card Sent Fingerprint Card Received Original Certification Medical Exam Date on which a fingerprint card for the home member was sent for a criminal background check Date on which the results of the criminal background check were received Date on which the foster home was originally certified Date on which the home member received a 1/01/2001 3/31/2001 2/28/1996 Page 150 Rev 11/10/2003 OCFS Data Warehouse Reporting Step-by-Step Guide: Impromptu
152 Data Field Data Definition Sample Values Date medical examination. Authorized to Date Date on which the foster home s certification will expire. OCFS Data Warehouse Reporting Page 151 Step-by-Step Guide: Impromptu Rev 11/10/2002
153 Appendix B4: Closed Home Report Report Title: Report Purpose: Report Prompts: Totals: Closed Home Report Provides information on foster homes whose authorizations have expired or are about to expire prior to the date entered by the user. Date for which the user wishes the report to run (yyyy-mm-dd format). Total number of homes whose certifications will become overdue by the date entered by the user. Data: Data Field Data Definition Sample Values Home Closed The date entered by the user in the prompt screen. 9/30/01 Prior To Worker Agency ID The agency of the office to which the worker is in assigned. A03 Agency Name Name of the agency that owns the resource. Chautaugua County DSS Total Closed Homes Total number of homes whose certifications will become overdue by the date entered by the user 6 Office Name of the office to which the agency is assigned. Chautauqua Office Bldg Unit Worker Name Resource ID Code identifying the unit in which the worker is currently active. First and last names of the worker assigned to the resource. The Connections identification number for the foster home. 013 Smith, John Home Name Name of the foster home. Davis, Lynn Setting Describes the type of setting for the foster home (i.e., relative, resource, congregate) Foster Home Congregate Home Home Status Current status of the foster home Accepted-Active Emergency Cert From Date Cert To Date Recert Date Closure Reason The date on which the foster home was last authorized The date on which the resource authorization expires. Date on which the home needs to be recertified. Reason the home was closed. 8/6/00 8/6/01 Page 152 Rev 11/10/2003 OCFS Data Warehouse Reporting Step-by-Step Guide: Impromptu
154 CCRS Impromptu Reports Appendix B5: Admission to Foster Care Summary Report Report Title: Report Purpose: Report Prompts: Totals: Admission to Foster Care Summary Report To provide a summary of the number of admissions to foster care (movement code = M910) by voluntary agency. Start Date and End Date for user to specify the time period for which to run the report. Total admissions by ethnicity, Hispanic origin, facility type, sex, age range at admission, goal, and previous care. Data: Data Field Data Definition Sample Values Agency/County Name of the agency or district Albany Report Period Admissions to Foster Care during Period Race Hispanic Origin Facility Type The period for which the report is run, specified by the user in prompt response Total number of children who have a movement code of the most recent M910 with a corresponding activity date that falls within the request report time period. Count of the number of children admitted to foster care by racial origin, based on present AFCARS definitions Count of the number of children admitted to foster care by whether or not they are of Hispanic origin Count of the number of children admitted to foster care by the type of facility to which they were admitted 9/1/01 9/30/ White African-American Asian American Indian or Alaskan Native Native Hawaiian or Other Pacific Islander Other Unknown Yes No Foster Boarding Home Approved Relative Home Congregate Care Institution Group Residence Group Home Supervised Independent Living Agency Operated Boarding Home Other OCFS Data Warehouse Reporting Page 153 Step-by-Step Guide: Impromptu Rev 11/10/2002
155 Data Field Data Definition Sample Values Sex Count of the number of children admitted to foster care by sex Male Female Age Range at Admission Goal Admissions Count of the number of children admitted to foster care by age in years at the date of admission Count of the number of children admitted to foster care by their CPS permanency planning goal Count of the number of children admitted to foster care by previous admission history Over 18 Discharge to Parent/Legal Guardian Discharge to Independent Living Discharge to Adoption Discharge to Adult Residential Care Other Goal No Goal Not previously in care Readmitted within 3 months Readmitted within 4-12 months Readmitted within months Readmitted within 25 or more months Page 154 Rev 11/10/2003 OCFS Data Warehouse Reporting Step-by-Step Guide: Impromptu
156 Appendix B6: Discharge from Foster Care Summary Report Report Title: Report Purpose: Report Prompts: Totals: Discharge from Foster Care Summary Report To provide a summary of the number of children discharged from foster care (movement code = M990, M999, or M970) by agency Start Date and End Date for user to specify the time period for which to run the report Total discharges by ethnicity, Hispanic origin, facility type, sex, age range at discharge, goal, final discharge reason, and time in care at discharge Data: Data Field Data Definition Sample Values Agency/District Name of the Agency/District Albany Report Period Discharges from Foster Care during Period Race Hispanic Origin Facility Type Period of time for which the report is run, specified by the user in response to prompts Total number of children who have been discharged from foster care during the specified time period. Note: If a child has more than one discharge during the period, the child is only counted once, based on the most recent discharge. Count of the number of children discharged from foster care by racial origin, based on present AFCARS definitions Count of the number of children discharged from foster care by whether or not they are of Hispanic origin Count of the number of children discharged from foster care by the type of facility to which they were admitted 9/1/01 9/30/ White African-American Asian American Indian or Alaskan Native Native Hawaiian or Other Pacific Islander Other Unknown Yes No Foster Boarding Home Approved Relative Home Congregate Care Institution Group Residence Group Home Supervised Independent Living Agency Operated Boarding Home Other OCFS Data Warehouse Reporting Page 155 Step-by-Step Guide: Impromptu Rev 11/10/2002
157 Data Field Data Definition Sample Values Sex Count of the number of children discharged from foster care by sex Male Female Age Range at Admission Goal Final Discharge Reason Time in Care at Discharge Count of the number of children discharged from foster care by age in years at the date of discharge Count of the number of children discharged from foster care by their CPS permanency planning goal Count of the number of children discharged from foster care by the final discharge reason Count of the number of children discharged from foster care by the average number of months they were in care at the time they were discharged Over 18 Discharge to Parent/Legal Guardian Discharge to Independent Living Discharge to Adoption Discharge to Adult Residential Care Other Goal No Goal Return to Parent Release to Relative Release to Own Responsibility Release to Primary Resource Person Adoption subsidized Adoption not subsidized Order of Court Other Average Number of Months Page 156 Rev 11/10/2003 OCFS Data Warehouse Reporting Step-by-Step Guide: Impromptu
158 Appendix B7: Legal Detail Report Report Title: Report Purpose: Report Prompts: Totals: Legal Status Detail Report To provide agency workers and managers with details of the legal activities in a child s case CIN None Data: Data Field Data Definition Sample Values District The state assigned district code which identifies the local social services district currently controlling input transactions to the child s case 66 Office Unit Worker Identifies within a district, the office that has responsibility for the case Used within a district to identify the unit currently responsible for the case Used within a district to identify the worker currently responsible for the case Child Name The name of the child SMITH JOHN e Agency Where Placed In Care 12 of 22 Months Unique agency identification number assigned by New York State to the agency responsible for placing the child Current time in care based on ASFA guidelines, expressed in months A ASFA In Care Date Date on which the child was admitted to foster care 9/15/01 CIN Case Name Case Number Current Legal Status Next Hearing Unique identifying number for an individual in the CCRS system The name by which the child s case is currently identified (usually line 1 name in the CCRS application) The district-assigned case number that uniquely identifies the child s case within the district, or responsible state agency Current legal status of the child based on legal activity Date on which the next hearing on the case is to be held BX44990J SMITH DAINA S Abuse/Neglect Proceeding (Table continued on next page) OCFS Data Warehouse Reporting Page 157 Step-by-Step Guide: Impromptu Rev 11/10/2002
159 Data Field Data Definition Sample Values (Table continued from previous page) Legal Activity History: Date Date on which the activity took place 8/15/01 Legal Activity The description of the legal event based on Reportable Events in the CCRS system. Petition Filed Anticipated Discharge Hearing Additional Dispositions Revocation Appeal Agreement Signed Unknown Type of Legal Activity or Reason Type of legal event as recorded in the CCRS system Transfer of Care & Custody Court Action Court Review Article 10 Abuse/Neglect 1055 Court Review Article 7 PINS 756 Court Review (PINS) Article 3 JD 384 Voluntary surrender for adoption 384b Commitment of guardianship and custody 651b Refugee Assistance Program Violation of Disposition Other Family Court Other Court (non-family) Court Review (JD) 1055A (Court Review) Court or Disposition Docket # or Anticipated Discharge Date or Disposition or Court Hearing Date or Next Hearing Date or Source Describes whether the case has been assigned to the court or for disposition Docket number assigned to the case by the court or the anticipated discharge date of the case The date of the hearing or source of appeal. Court Disposition Page 158 Rev 11/10/2003 OCFS Data Warehouse Reporting Step-by-Step Guide: Impromptu
160 Appendix B8: Legal Summary Report Report Title: Report Purpose: Report Prompts: Totals: Legal Summary Report To provide a summary of the number of children in 24-hour care or absent by the various most recent legal dispositions Year and Month for which the report is required Total number of children by the following: In Care (local district or agency) Period of time in care (ASFA) Legal Status Most Recent Legal Disposition Data: Data Field Data Definition Sample Values Year-Month The year and month for which the report is requested (prompt) CountyAgency CCRS/WMS Data As Of Identifies the county or agency that has responsibility for the cases The date of the latest OCFS Data Warehouse update Albany 8/13/01 Date of This Report Current date 10/9/01 Total Number of Children in Care ASFA Time in Care Total number of children with a status of 04 (In 24- Hour Care) or 06 (Absent) Total number of children by the number of months during which the child has been in care, according to ASFA guidelines, as of the report date, expressed in months. Placed in local district Placed in voluntary agency In care 0-6 months In care 7-9 months In care months In care 12+ months (Table continued on next page) OCFS Data Warehouse Reporting Page 159 Step-by-Step Guide: Impromptu Rev 11/10/2002
161 Data Field Data Definition Sample Values (Table continued from previous page) Legal Status Total number of children by legal status Note: If multiple legal codes occur on the same day, only one will be displayed, prioritized in the following order: Abuse/Neglect Pins/JD Adoption Legal 358A/392 Court Action Other Unknown Petition Filed Hearing Additional Disposition Revocation Appeal Agreement Signed Most Recent Legal Disposition Total number of children by legal disposition. Uses the legal event, which determines the legal status 14 Withdrawn 15 Adjournment in Contemplation of Dismissal, etc. Page 160 Rev 11/10/2003 OCFS Data Warehouse Reporting Step-by-Step Guide: Impromptu
162 Appendix B9: In Care Detail Report Report Title: Report Purpose: Report Prompts: Totals: In Care Detail Report To provide agency workers and managers with details of a child s movements to and from foster care facilities CIN None Data: Data Field Data Definition Sample Values Child Name The name of the child SNYDER CALVIN J In Care 12 of 22 Months CID District Case Name CIN Case Number Length of time child has been in care, according to ASFA regulations, expressed in months The state-assigned district code which identifies the local social services district currently controlling the case The name by which the child s case is currently identified (usually Line 1 of the CCRS application) Unique identification number assigned to the child in the CCRS system The district-assigned case number which uniquely identifies the child s case within the district SNYDER DAINA BX44990J S Agency Code for the agency responsible for the case A43 Case Address The street, city, state and zip code of the residential address for the WMS case 41 DELAWARE ST WATKINS GLEN NY Race Code identifying the ethnicity of the child White African American Asian American Indian or Alaskan Native Native Hawaiian or Other Pacific Islander Other Unknown Office Unique identification number of the office within a district that has responsibility for the case 070 Sex Code identifying the sex of the child M, F (Table continued on next page) OCFS Data Warehouse Reporting Page 161 Step-by-Step Guide: Impromptu Rev 11/10/2002
163 Data Field Data Definition Sample Values (Table continued from previous page) Unit Legal Status Unique identification number of the unit within a district currently responsible for the case Current legal status of child based on legal activity. Note: If there are multiple legal codes on the same day, only one will be displayed, prioritized in the order shown. 006 Abuse/Neglect Proceeding PINS/JD Proceeding Adoption Proceeding Foster Care Review Proceeding Other Unknown DOB Date on which the child was born 12/19/83 Current Age Child s current age based on the date of birth 17 Number of Siblings In Case In Placement Worker Current Goal Number of child s siblings in the CCRS case Number of the child s siblings in the CCRS case who are currently placed in foster care Unique identification number of the worker currently responsible for the case Permanency planning goal from the latest service assessment Discharge to Parent/Legal Guardian Discharge to Independent Living Discharge to Adoption Discharge to Adult Residential Care Other Goal No Goal Case Manager Foster Care Admission Date Agency Admission Date Facility Admission Date This field is populated with the known worker since CCRS does not collect Case Manager information. Date of the most recent activity that qualifies the child for inclusion in this report Date on which the agency accepted the child s case Date of the child s admission to the facility (Table continued on next page) Page 162 Rev 11/10/2003 OCFS Data Warehouse Reporting Step-by-Step Guide: Impromptu
164 Data Field Data Definition Sample Values (Table continued from previous page) Child s Placements: Movement Code Effective Date Transaction Date Facility Type Facility Name/ Address Family Contact/ Phone The 4-character CDRS activity code The date the movement took place The date on which the movement was entered The type of facility as defined by who licensed the facility the number of clients it can accommodate, and the type of service it provides. The name and address of the facility in which the child was placed. Name of the individual acting as contact for the facility. Telephone number of the facility M910 1/1/2001 1/1/2001 Institution, Group Residence, Group Home, SILP, Agency Operated Boarding Home, etc. Four Winds 30 Crescent Ave Saratoga Springs, NY Nancy Smith Child s Family/Case Members: Name CIN Line Number Relationship Current Address Current Location/ Name Contains details of the child s family members. Full name of family member CCRS identification number of the family member CCRS application line number of family member Relationship of family member to the child Address for the family member If the family member is a child also placed in foster care, the facility type where he/she is placed JAMES PATTERSON SO1345X 1 Biological Father 13 Elm Street, Amstead, NY Institution, Group Residence, Group Home, SILP, etc. CCRS Data As Last date on which CCRS data was updated 9/31/01 Date of This Report Current date 10/13/01 OCFS Data Warehouse Reporting Page 163 Step-by-Step Guide: Impromptu Rev 11/10/2002
165 Appendix B10: In Care Summary Report Report Title: Report Purpose: Report Prompts: Totals: In Care Summary Report To provide agency workers and managers with a summary of all placements for a specified month and year. Month/Year Total number of children placed by Ethnicity, Hispanic Origin, Status, Facility Type, Sex, Age Range, Goal, Time in Care, and ASFA Time in Care Data: Data Field Data Definition Sample Values Year-Month Year and month for which the report was requested (Prompt) County/Agency Name of the county/agency Albany Total Number of Children in Foster Care Race Total number of children whose status is 04 ( in 4- hour care ) or 06 ( absent ) for the period of time requested Total number of children in foster care by racial origin 80 White African American Asian American Indian or Alaskan Native Native Hawaiian or Other Pacific Islander Other Unknown Hispanic Origin Status Facility Type Total number of children in foster care by whether or not they are of Hispanic Origin Total number of children in foster care by their status Total number of children in foster care by the type of facility in which they are placed Yes No In 4-Hour Care In Absence Status Foster Boarding Home Approved Relative Home Congregate Care Institution Group Residence Group Home Supervised Independent Living Agency Operated Boarding Other Sex Total number of children in foster care by their sex Male Female Page 164 Rev 11/10/2003 OCFS Data Warehouse Reporting Step-by-Step Guide: Impromptu
166 Data Field Data Definition Sample Values (Table continued from previous page) Age Range Goal Total number of children in foster care by their age in years Total number of children in foster care by their permanency planning goal Discharge to Parents/Legal Guardians Discharge to Independent Living Discharge to Adoption Discharge to Adult Residential Care Other Goal No Goal Time in Care ASFA Time in Care Average number of months the children reported on have been in care Total number of children in foster care by the time they have been in care according to ASFA guidelines 40 Children in Care at Least 12 of 22 months Children in Care Less Than 12 of 22 months CCRS Data As Of Date of This Report The latest date on which CCRS data was updated 9/15/01 Current Date 10/13/01 OCFS Data Warehouse Reporting Page 165 Step-by-Step Guide: Impromptu Rev 11/10/2002
167 CFSR Program Improvement Plan Reports Appendix B10: AFCARS First-Time-Entry Summary Data Report Title: Report Purpose: Report Prompts: Totals: Additional Info: AFCARS First-Time-Entry Summary Data Provides districts with the capacity to review the cases that are part of the AFCARS data submission, individually and from a systemic viewpoint. The data items are pieces of information that link directly to the CFSR as well as to issues that impact child welfare policy and practice. None None From any text with Aqua colored shading, you may Drill Through to a corresponding child specific list by selecting the desired prompt values for the Report Year and the related category such as placement type, permanency goals, etc. The detailed report will contain key information for each child including Office, Unit, Worker, Case Name, CIN, Child Name, and Agency Where Placed. Data Item Data Definition Sample Values Number of children entering care for the first time in cohort group (%= 1st time entry of all entering within first 6 months) # of children and % of children for Federal fiscal years 1999, 2000, 2001 Most Recent Placement Types Most Recent Permanency Goals Number of Placement Settings in Current Episode Reason for Discharge Median Length of Stay in Foster Care # of children and % of children for Federal fiscal years 1999, 2000, 2001 # of children and % of children for Federal fiscal years 1999, 2000, 2001 # of children and % of children for Federal fiscal years 1999, 2000, 2001 # of children and % of children for Federal fiscal years 1999, 2000, 2001 Represented in median months for Federal fiscal years 1999, 2000, 2001 Page 166 Rev 11/10/2003 OCFS Data Warehouse Reporting Step-by-Step Guide: Impromptu
168 Appendix B11: AFCARS Point-In-Time Summary Data Report Title: Report Purpose: Report Prompts: Totals: Additional Info: AFCARS Point-In-Time Summary Data Provides districts with the capacity to review the cases that are part of the AFCARS data submission, individually and from a systemic viewpoint. The data items are pieces of information that link directly to the CFSR as well as to issues that impact child welfare policy and practice. None None From any text with Aqua colored shading, you may Drill Through to a corresponding child specific list by selecting the desired prompt values for the Report Year and the related category such as placement type, permanency goals, etc. The detailed report will contain key information for each child including Office, Unit, Worker, Case Name, CIN, Child Name, and Agency Where Placed. Data Item Data Definition Sample Values Foster Care Population Flow Children in foster care on first day of year (10/1/YY): # of children for Federal fiscal years 1999, 2000, 2001 Admissions During Year: # of children for Federal fiscal years 1999, 2000, 2001 Discharges During Year: # of children for Federal fiscal years 1999, 2000, 2001 Children in care on last of year (9/30/YY): # of children for Federal fiscal years 1999, 2000, 2001 Placement Types for Children in Care Permanency Goals for Children in Care Number of Placement Settings in Current Placement Number of Removal Episodes for Children in Care # of children and % of children for Federal fiscal years 1999, 2000, 2001 # of children and % of children for Federal fiscal years 1999, 2000, 2001 # of children and % of children for Federal fiscal years 1999, 2000, 2001 # of children and % of children for Federal fiscal years 1999, 2000, 2001 OCFS Data Warehouse Reporting Page 167 Step-by-Step Guide: Impromptu Rev 11/10/2002
169 Data Item Data Definition Sample Values Number of Children in care 17 of the most recent 22 months # of children and % of children for Federal fiscal years 1999, 2000, 2001 Median Length of Stay in Foster Care Length of Time to Achieve Perm. Goal Represented in median months for Federal fiscal years 1999, 2000, 2001 # of children and % of children for Federal fiscal years 1999, 2000, 2001 Page 168 Rev 11/10/2003 OCFS Data Warehouse Reporting Step-by-Step Guide: Impromptu
170 Appendix B12: Discharge to Adoption Summary Report Title: Report Purpose: Report Prompts: Totals: Additional Info: Discharge to Adoption Summary This report identifies the Length of Time to Adoption indicator defined by ACF s Children s Bureau. This report is intended to help identify potential systemic factors contributing to failure in providing safety and permanency to children in care. None None Information is available by year in separate cubes. You may Drill Through to a corresponding child specific list(s). Data Item Data Definition Sample Values Date Date of Report 04/09/2003 District Code District Name Children Discharged to Adoption more than 2 Yrs after Removal Children Discharged to Adoption within 2 Yrs of Removal Children Discharged to Adoption The state assigned district code which identifies the local social services district currently controlling input transactions to the child s case. The local social services district currently controlling input transactions to the child s case. This population is a unique count of children whose adoption occurred more than two years after removal. This population is a unique count of children whose adoption occurred within two years of removal. The universe (or base population) is a count of unique (distinct) children who were adopted during a federal fiscal year: Children Discharged to Adoption more than 2 Yrs After Removal Plus Children Discharged to Adoption within 2 Yrs of Removal 099 Hudson OCFS Data Warehouse Reporting Page 169 Step-by-Step Guide: Impromptu Rev 11/10/2002
171 Data Item Data Definition Sample Values Rate % value of 23.1 Children Discharged to Adoption within 2 Yrs Of Removal Divided by Children Discharged to Adoption Page 170 Rev 11/10/2003 OCFS Data Warehouse Reporting Step-by-Step Guide: Impromptu
172 Appendix B13: Maltreatment in Foster Care Summary Report Title: Report Purpose: Report Prompts: Totals: Additional Info: Maltreatment in Foster Care Summary This series of Incidence of Child Abuse and/or Neglect in Foster Care reports is intended to help identify potential systemic factors contributing to the maltreatment of these children by looking at the children and perpetrators in these reports. None None Information is available by year in separate cubes. You may Drill Through to a corresponding child specific list(s). Data Item Data Definition Sample Values Date Date of Report 04/09/2003 District Code District Name No. Children with incident No. Children in Foster Care Rate The state assigned district code which identifies the local social services district currently controlling input transactions to the child s case. The local social services district currently controlling input transactions to the child s case. A unique count of children with substantiated allegations in an indicated report for the year with an intake start date between January and September whose perpetrator was a foster parent or residential facility staff. The universe (or base population) is a count of unique (distinct) children in foster care from January to September taken from the Adoption and Foster Care Analysis and Reporting System (AFCARS) FFY submission. % value of No. Children with incident Divided by No. Children in Foster Care 099 Hudson OCFS Data Warehouse Reporting Page 171 Step-by-Step Guide: Impromptu Rev 11/10/2002
173 Appendix B14: Recurrence by District Report Title: Report Purpose: Report Prompts: Totals: Additional Info: Recurrence by District This series of Recurrence Reports is intended to help identify potential systemic factors contributing to the recurrence of these children by looking at the allegations in the multiple reports. Because child level information is also provided, reviewing other dynamics on a case-by-case basis is possible. None None Information is available by year in separate cubes. You may Drill Through to a corresponding child specific list(s). Data Item Data Definition Sample Values Date Date of Report 04/09/2003 District Code District Name Children with Recurrence Children with Indicated Reports Rate The state assigned district code which identifies the local social services district currently controlling input transactions to the child s case. The local social services district currently controlling input transactions to the child s case. A child is counted as an instance of recurrence if the child has another substantiated allegation in an indicated report and the date of the second oral report is within 2 to 183 days of the oral report of the first report. The universe (or base population) is a count of unique (distinct) children with a substantiated allegation in an indicated report that was reported in the first six months of the year. % value of Children with Recurrence Divided by Children with Indicated Reports 099 Hudson Page 172 Rev 11/10/2003 OCFS Data Warehouse Reporting Step-by-Step Guide: Impromptu
174 Appendix B15: Re-Entry to Foster Care Summary Report Title: Report Purpose: Report Prompts: Totals: Additional Info: Re-Entry to Foster Care Summary This report identifies the Re-entry to Foster Care indicator defined by ACF s Children s Bureau. This report is intended to help identify potential systemic factors contributing to failure in providing safety and permanency to children in care. None None Information is available by year in separate cubes. You may Drill Through to a corresponding child specific list(s). Data Item Data Definition Sample Values Date Date of Report 04/09/2003 District Code District Name Children reentering Foster Care with no Previous Placement or more than 1 Yr after Previous Placement Children Reentering Foster Care within 1 Yr of Discharge from Previous Placement Children Admitted during the Year The state assigned district code which identifies the local social services district currently controlling input transactions to the child s case. The local social services district currently controlling input transactions to the child s case. This population is a unique count of children who at the time of admission had no previous placement or more than one year of discharge from a preceding placement. This population is a unique count of children who at the time of admission were within one year of discharge from a preceding placement. The universe (or base population) is a count of unique (distinct) children admitted during a federal fiscal year: Children Re-entering Foster Care with no Previous Placement or more than 1 Yr after Previous Placement Plus Children Re-entering Foster Care within 1 Yr of Discharge from Previous Placement 099 Hudson OCFS Data Warehouse Reporting Page 173 Step-by-Step Guide: Impromptu Rev 11/10/2002
175 Data Item Data Definition Sample Values Rate % value of 9.5 Children Re-entering Foster Care within 1 Yr of Discharge from Previous Placement Divided by Children Admitted during the Year Page 174 Rev 11/10/2003 OCFS Data Warehouse Reporting Step-by-Step Guide: Impromptu
176 Appendix B16: Reunify with Parent or Caretaker Summary Report Title: Report Purpose: Report Prompts: Totals: Additional Info: Reunify with Parent or Caretaker Summary This report identifies the Length of Time to Reunification indicator defined by ACF s Children s Bureau. This report is intended to help identify potential systemic factors contributing to failure in providing safety and permanency to children in care. None None Information is available by year in separate cubes. You may Drill Through to a corresponding child specific list(s). Data Item Data Definition Sample Values Date Date of Report 04/09/2003 District Id District Name Children Reunified more than 1 Yr after Removal Children Reunified within 1 Yr of Removal Children Reunified Rate The state assigned district code which identifies the local social services district currently controlling input transactions to the child s case. The local social services district currently controlling input transactions to the child s case. This population is a unique count of children whose reunification occurred more than one year after removal. This population is a unique count of children whose reunification occurred within one year of removal. The universe (or base population) is a count of unique (distinct) children who left foster care during a federal fiscal year because they were reunified with their parents: Children Reunified more than 1 Yr. After Removal Plus Children Reunified within 1 Yr of Removal % value of Children Reunified within 1 Yr. Of Removal Divided by Children Reunified 099 Hudson OCFS Data Warehouse Reporting Page 175 Step-by-Step Guide: Impromptu Rev 11/10/2002
177 Appendix B17: Six National Indicators Report Title: Report Purpose: Report Prompts: Totals: Additional Info: Six National Indicators This report identifies the national indicators defined by ACF s Children s Bureau. This report is intended to help identify potential systemic factors contributing to failure in providing safety and permanency to children in care. None None Information is available by year in separate cubes. From the main report, you may Drill Through to a report detailing the numbers from each District. You may Drill Through to a corresponding child specific list(s). Data Item Data Definition Sample Values Safety Indicators The recurrence of maltreatment data rate is derived from our NCANDS submission. The following definition is used by the Children s Bureau for recurrence. The universe (or base population) is a count of unique (distinct) children with a substantiated allegation in an indicated report that was reported in the first six months of the year. From that population a child is counted as an instance of recurrence if the child has another substantiated allegation in an indicated report and the date of the second oral report is within 2 to 183 days of the oral report of the first report. Success is considered any rate below the National Standard of 6.1%. The incidence of child abuse and/or neglect in foster care rate is derived from our NCANDS submission. The following definition is used by the Children s Bureau for incidence of child abuse and/or neglect in foster care. The universe (or base population) is a count of unique (distinct) children in foster care from January to September taken from the Adoption and Foster Care Analysis and Reporting System (AFCARS) FFY submission. The numerator for this population is a unique count of children with substantiated allegations in an indicated report for the year with an intake start date between January and September whose perpetrator was a foster parent or residential facility staff. Success is considered any rate below the National Standard of 0.57%. Page 176 Rev 11/10/2003 OCFS Data Warehouse Reporting Step-by-Step Guide: Impromptu
178 Data Item Data Definition Sample Values Permanency Indicators The Length of time to reunification with parents rate is derived from our AFCARS submission. The following definition is used by the Children s Bureau for length of time to reunification with parents. The universe (or base population) is a count of unique (distinct) children who left foster care during a federal fiscal year because they were reunified with their parents. The numerator for this population is a unique count of children whose reunification occurred within one year of removal. Success is considered any rate above the National Standard of 76.2%. The Length of time to adoption rate is derived from our AFCARS submission. The following definition is used by the Children s Bureau for length of time to adoption: The universe (or base population) is a count of unique (distinct) children who were adopted during a federal fiscal year. The numerator for this population is a unique count of children whose adoption occurred within two years of removal. Success is considered any rate above the National Standard of 32%. The Stability of Placement rate is derived from our AFCARS submission. The following definition is used by the Children s Bureau for stability of placement: The universe (or base population) is a count of unique (distinct) children served during the period and who on the last day had been in care less than one year. The numerator for this population is a unique count of children who had two or fewer placements during that period. Success is considered any rate above the National Standard of 86.7%. The Re-entry to Foster Care rate is derived from our AFCARS submission. The following definition is used by the Children s Bureau for re-entry to foster care: The universe (or base population) is a count of unique (distinct) children admitted during a federal fiscal year. The numerator for this population is a unique count of children who at the time of admission were within one year of discharge from a preceding placement. Success is considered any rate below the National Standard of 8.6%. OCFS Data Warehouse Reporting Page 177 Step-by-Step Guide: Impromptu Rev 11/10/2002
179 Appendix B18: Two or Fewer Placement Settings Summary Report Title: Report Purpose: Report Prompts: Totals: Additional Info: Two or Fewer Placement Settings Summary This report identifies the Stability of Placement indicator defined by ACF s Children s Bureau. This report is intended to help identify potential systemic factors contributing to failure in providing safety and permanency to children in care. None None Information is available by year in separate cubes. You may Drill Through to a corresponding child specific list(s). Data Item Data Definition Sample Values Date Date of Report 04/09/2003 District Code District Name Children with More Than 2 Placement Settings and In Care Less Than 1 Yr Children with 2 or Fewer Placement Settings and In Care Less Than 1 Yr Children in Foster Care Less Than 1 Yr The state assigned district code which identifies the local social services district currently controlling input transactions to the child s case. The local social services district currently controlling input transactions to the child s case. This population is a unique count of children who had more than two placements settings during the period. This population is a unique count of children who had two or fewer placements during the period. The universe (or base population) is a count of unique (distinct) children served during the period and who on the last day had been in care less than one year: Children with More Than 2 Placement Settings and In care Less Than 1 Yr Plus Children with 2 or Fewer Placement Settings and In Care Less Than 1 Year 099 Hudson Page 178 Rev 11/10/2003 OCFS Data Warehouse Reporting Step-by-Step Guide: Impromptu
180 Data Item Data Definition Sample Values Rate % value of 97.3 Children with 2 or Fewer Placement Settings and In Care Less Than 1 Yr Divided by Children in Foster Care Less Than 1 Yr OCFS Data Warehouse Reporting Page 179 Step-by-Step Guide: Impromptu Rev 11/10/2002
181 Security Reports Appendix B19: Assignee/Designee Report Report Title: Report Purpose: Report Prompts: Totals: Assignee/Designee Report Allows a security coordinator to be able to track which agency workers are assignees or designees of another worker. Agency Code None Data Item Data Definition Sample Values Date of this Report Current Date 04/09/2003 Data As Of Date of Latest OCFS Data Warehouse Update 04/02/2003 Agency Name Name of Agency reporting Hudson County DSS Agency Code Code of Agency reporting A90 Staff Name Workers names as they appear in CONNECTIONS Doe, John Unit The unit code to which the worker is in assigned 063 Assignee of The names of the worker s designees Fuss, Katie Unit The unit code of the worker s designees 008 Date Expires The date that each assignment expires 03/15/2011 Designee for The names of the worker s assignees McCord, Murphy Unit The unit code of the worker s assignees 009 Date Expires The date that each designee s assignment expires 10/09/2004 Page 180 Rev 11/10/2003 OCFS Data Warehouse Reporting Step-by-Step Guide: Impromptu
182 Appendix B20: Business Function Report Report Title: Report Purpose: Report Prompts: Totals: Business Function Report Allows a security coordinator to track which agency staff have a particular business function. Agency Code Business Function None Data Item Data Definition Sample Values Date of this Report Current Date 04/09/2003 Data As Of Date of Latest OCFS Data Warehouse Update 04/02/2003 Agency Name Name of Agency reporting Hudson County DSS Agency Code Code of Agency reporting A90 Office Type Type of office of report District Business Function The business function in question ACCESS ALL DIST Site Specific Site for report 3H0 Staff Name Workers names as they appear in CONNECTIONS Doe, John Unit The unit code to which the worker is in assigned 063 Assignee of The names of the worker s designees Fuss, Katie Designee s Unit The unit code for the worker s designees 009 OCFS Data Warehouse Reporting Page 181 Step-by-Step Guide: Impromptu Rev 11/10/2002
183 Appendix B21: Staff Security Report Report Title: Report Purpose: Report Prompts: Totals: Staff Security Report Allows a security coordinator to track which agency staff is in CONNECTIONS, what business functions each staff member has, which staff is a Unit Approver, whether a staff person is an Assignee or Designee, and whether cases may be assigned to a staff member. Agency Code None Data Item Data Definition Sample Values Date of this Report Current Date 04/08/2003 Data As Of Date of Latest OCFS Data Warehouse Update 04/02/2003 Agency Name Name and code of Agency reporting Hudson County DSS A90 Site Specific Site for report 3H0 Unit The unit code to which the worker is in assigned 063 Name Workers names as they appear in CONNECTIONS Doe, John NT Logon Worker s logon ID assigned through WEBSTAR XX2222 Unit Approver Business Functions Assignee or Designee Yes or No Is the worker a Unit Approver for any unit? All business functions assigned to the worker Yes or No Is the worker an assignee or designee for anyone else No CASE/PERS SRCH No Case Assignable Yes or No Can cases be assigned to the worker? Yes Page 182 Rev 11/10/2003 OCFS Data Warehouse Reporting Step-by-Step Guide: Impromptu
184 Appendix B22: Unit Approver Report Report Title: Report Purpose: Report Prompts: Totals: Unit Approver Report Allows a security coordinator to be able to easily see who is the Unit Approver for any unit in his or her agency. Agency Code None Data Item Data Definition Sample Values Date of this Report Current Date 04/09/2003 Data As Of Date of Latest OCFS Data Warehouse Update 04/02/2003 Agency Name Name of Agency reporting Hudson County DSS Agency Code Code of Agency reporting A90 Staff Name Worker s name as it appears in CONNECTIONS Doe, John Approver of Unit The unit codes of units for which the worker is the Unit Approver SD In/Out Assigned The type of assignment to the unit (In/Out) Out OCFS Data Warehouse Reporting Page 183 Step-by-Step Guide: Impromptu Rev 11/10/2002
185 Appendix C: OCFS Data Warehouse Reporting Glossary 3-D Bar Display A graph that shows relationships between two or more variables. Use to analyze large quantities of data that are difficult to interpret otherwise. ASCII ASCII stands for American Standard Code for Information Interchange. This is the code that makes it possible for just about every computer to understand the letter A (and all the other letters) as a letter A. The ASCII text file, although simple and limited, is understood by virtually all computers. Additional Information Information that does not constitute a report of abuse/maltreatment but contains information pertinent to an open/active SCR case. Associating Linking a data item to a grouped data item to suppress duplicate data values. There should be a one-to-one relationship between the grouped item and the item being associated to it. Calculated Column A column whose values are calculated from other columns, calculated columns, functions, and constants to derive new data for a model. Calculation A category created by applying an operator to one or more categories. See also calculated category. Catalog A file that contains all of the information necessary for Impromptu to retrieve data from a database. The catalog does not contain all of the data, but only a user view of the database. Category Items that match a specific description or classification. Categories can be different levels of information within a dimension. Any categories can be grouped into more general categories. For example, a set of dates could be grouped into a month, and months into quarter, and quarters into years. CCRS Child Care Review Service Clustered Bar Display A graph that groups related information, compares summaries, and compares categories. Cognos Cognos is a software development company based in Canada. It is widely acknowledged to be the leading provider of business intelligence applications. Business intelligence is the term given to a category of applications and technologies for gathering, storing, sharing, analyzing, reporting and providing access to data to help users make better decisions. Page 184 Rev 11/10/2003 OCFS Data Warehouse Reporting Step-by-Step Guide: Impromptu
186 Cognos Common Logon Cognos Common Logon maintains authentication data so you can open multiple secure data sources using different Cognos products. This means that you only have to provide a user ID and password once, even when you navigate from one Cognos application to another. Column In reports, a category that shows related information in a vertical list. Connections New York State s child welfare information system. Correlation Display A graph that shows the values of two measure that are being compared. Bars represent one measure and a line represents the other. You must have at least two measures to use a correlation display. Crosstab Display A chart that shows data in tabular format. Cubes A multidimensional representation of data. Cubes contain information organized into dimensions to provide faster retrieval and drill down to lowerlevel categories in reports. Data Mart Data marts are subsets of the larger data warehouse. They are smaller and focused on a particular subject. Data Warehouse A data warehouse is a collection of data retrieved from production systems. The data from diverse databases is combined and stored separately. The data warehouse organizes and stores the data needed for informational and analytical processing over a historical time perspective. Delimited-Field Text File A file containing text data, where the fields in each record are separated (delimited) by a character, such as a comma or a tab. Dimension A broad grouping of descriptive data about a major aspect of an organization, such as dates, geography, ethnicity, etc. Each dimension includes different levels of categories in one or more drill-down paths, and an optional set of special categories. Dimension Line In PowerPlay for Windows, shows the categories from each dimension used to filter on data for the current report. Dimension Menu In PowerPlay for Windows, a menu that appears when you select a dimension folder. You use a dimension menu to filter on specific information. When you select a category from the menu, the level of the dimension changes and so do the values in the report. Dimension Viewer An organized view of all dimensions, levels and categories in the selected cube. Use the dimension viewer to add categories as rows, columns, or layers, create subset definitions, format measures, filter, and define sets of categories. OCFS Data Warehouse Reporting Page 185 Step-by-Step Guide: Impromptu Rev 11/10/2002
187 Display In PowerPlay for Windows, the type of chart or graph. You can change the display or add another display to the same report. Drill See Drill Down/Up or Drill-Through Drill Down/Up Focusing a report on a lower level of detail in a particular dimension; i.e., looking at child categories. Drill-Through Accessing more detailed information in another PowerPlay report, PowerCube, or Impromptu report. Drill-through access is set up to match on some combination of dimensions, measures, or data items. Filter Focus a report on a specific value of a data item or dimension. Fixed-Field Text File A file that contains text data aligned in fixed-length columns. Functions A predefined formula that takes one or more values, performs an operation, and returns a value. Grouping Grouping data in an Impromptu serves to bring all like data together on the report. Horizontal Axis The X-axis on a display. Impromptu Impromptu is a user-friendly data query tool that allows the user easy access to a database while shielding him/her from technical database terminology, connections, and structures. IAB Institutional Abuse cases which are investigated by IAB investigative agencies (Regional Offices, Office of Mental Health, Office of Mental Retardation (OMR), or Developmental Delays (OMRDD). Indicated A determination made by local CPS that some credible evidence exists to support an incident of child abuse and/or maltreatment. Initial Report Information that contains a reasonable cause to suspect child abuse and/or maltreatment that has no open or active case in the SCR. Join Defines the relational links between tables in a database so that you can retrieve information from more than one table at a time. Key Fields The data items used to join tables. Label The name of a row, column, or layer. Page 186 Rev 11/10/2003 OCFS Data Warehouse Reporting Step-by-Step Guide: Impromptu
188 Layers Another dimension, in addition to rows and columns, added to a report. Reports can contain several layers, but you can look at only one at a time. MDC File A Cognos file that represents a cube. The file may contain the data, or be a pointer file to a database cube or third-party OLAP source. Measures Numeric data used as performance indicators. For example, measures can be number of allegations, number of CPS Reports Indicated, number of children admitted to foster care, etc. Missing Value A value that is not available for a category because of the context, or because there is no data. Missing values appear in a report as zero, NA (not available), a blank (nothing in the cell), or missing, depending on how the measure sin the cube were designed to handle missing values. Multidimensional Cube File (.mdc) See cube or.mdc file. Multiline Display A graph that reveals and compares trends and cycles that show relationships between variables. It also shows time series analysis and relationships between variables. NCANDS National Child Abuse and Neglect Data System. Nesting Adding another dimension or dimension level to an existing row or column on a report to provide a more detailed perspective of the data. OCFS Office of Children and Family Services PDF Portable Document Format. A file format developed by Adobe Systems that captures formatting information from a variety of desktop publishing applications, making it possible to send formatted documents and have them appear on the recipient s monitor or printer as they were intended. To view a file in PDF format, you need Adobe Acrobat Reader. Pie Display A graph that shows the relationship between the whole and the parts. For example, a pie display can show how much of a department s budget goes to paper supplies. PowerPlay PowerPlay is a data analysis tool that utilizes OLAP (On Line Analytical Processing) technology. It allows users to easily explore data across the organization. Prompts Request for information when a report is opened that determines the focus or scope of the report. OCFS Data Warehouse Reporting Page 187 Step-by-Step Guide: Impromptu Rev 11/10/2002
189 Query A question to a database that defines what information you want from the data source. Ranking Assigning ordinals to values in a selected row or column of a report, to be used to sort the values in ascending or descending order. Row A category that shows related information in a horizontal list. Scatter Display A graph that compares two different measures. You must have at least two measures to use the scatter display effectively. Simple Bar Display A graph that shows change over a specific time period, contrasts two or more variables, and reveals trends and irregularities in a bar format. Single Line Display A graph that shows change over a specific time period, contrasts two or more variables, and reveals trends and irregularities in a line format. Slice and Dice To change and arrange data when you: Choose different categories for your report Drill down or drill up Drag dimensions from the dimension line Swap rows, columns, or layers Filter information For example, you have a report that shows the number of CPS Reports by each district at the end of the last quarter. You can slice and dice information to show CPS Report Determinations over the last two months for each worker. Sort To arrange values in numerical order, or labels in alphabetical order. You can sort in ascending or descending order. Stacked Bar Display A graph or chart that shows relative proportions of parts to the whole and the relationship between the parts. For example, the days to determination data can be segmented into indicated and unfounded determinations as stacked bars. Subsequent Report A report involving either new allegations or a new incident of the same allegations occurring under an open SCR case number. Substantiated A finding by local CPS that credible evidence exists to support an allegation of child abuse and/or maltreatment. Page 188 Rev 11/10/2003 OCFS Data Warehouse Reporting Step-by-Step Guide: Impromptu
190 Swapping To exchange the position of categories in a report. You can swap rows and columns, columns and layers, or rows and layers. The terms rows and columns change depending on the current display. For a pie display, rows and columns are called displays and slices. Unfounded A determination made by local CPS that no credible evidence has been found to substantiate the report of child abuse and/or maltreatment. Unsubstantiated A finding by local CPS that no credible evidence exists to support an allegation of child abuse and/or maltreatment. Variable A symbol representing a value supplied by your computer or by PowerPlay for Windows. For example, the variable Date represents today s date. You can add a report variable such as Date to a report title, header, or footer. Vertical Axis The Y-axis on a display. View In PowerPlay for Windows, a way of presenting a report: normal, page layout, and page width. You can use a combination of views. For example, you can use normal view for working with the report, and page layout view or page width view to organize parts of the report. There are two types of views: dimension views and user class views. See also Display. OCFS Data Warehouse Reporting Page 189 Step-by-Step Guide: Impromptu Rev 11/10/2002
OCFS Data Warehouse Reporting: PowerPlay Table of Contents
 OCFS Data Warehouse Reporting: PowerPlay Table of Contents Module 1: Introduction... 1 Participant Information... 1 What is Cognos?... 2 What is the OCFS data warehouse?... 2 The Content of This Guide...
Decision Support AITS University Administration. Web Intelligence Rich Client 4.1 User Guide
 Decision Support AITS University Administration Web Intelligence Rich Client 4.1 User Guide 2 P age Web Intelligence 4.1 User Guide Web Intelligence 4.1 User Guide Contents Getting Started in Web Intelligence
Business Objects Version 5 : Introduction
 Business Objects Version 5 : Introduction Page 1 TABLE OF CONTENTS Introduction About Business Objects Changing Your Password Retrieving Pre-Defined Reports Formatting Your Report Using the Slice and Dice
WHAT S NEW IN WORD 2010 & HOW TO CUSTOMIZE IT
 WHAT S NEW IN WORD 2010 & HOW TO CUSTOMIZE IT The Ribbon... 2 Default Tabs... 2 Contextual Tabs... 2 Minimizing and Restoring the Ribbon... 3 Customizing the Ribbon... 3 A New Graphic Interface... 5 Live
BUSINESS OBJECTS XI WEB INTELLIGENCE
 BUSINESS OBJECTS XI WEB INTELLIGENCE SKW USER GUIDE (Skilled Knowledge Worker) North Carolina Community College Data Warehouse Last Saved: 3/31/10 9:40 AM Page 1 of 78 Contact Information Helpdesk If you
Microsoft Access 2010 handout
 Microsoft Access 2010 handout Access 2010 is a relational database program you can use to create and manage large quantities of data. You can use Access to manage anything from a home inventory to a giant
Merging Labels, Letters, and Envelopes Word 2013
 Merging Labels, Letters, and Envelopes Word 2013 Merging... 1 Types of Merges... 1 The Merging Process... 2 Labels - A Page of the Same... 2 Labels - A Blank Page... 3 Creating Custom Labels... 3 Merged
Ohio University Computer Services Center August, 2002 Crystal Reports Introduction Quick Reference Guide
 Open Crystal Reports From the Windows Start menu choose Programs and then Crystal Reports. Creating a Blank Report Ohio University Computer Services Center August, 2002 Crystal Reports Introduction Quick
Introduction to Word 2007
 Introduction to Word 2007 You will notice some obvious changes immediately after starting Word 2007. For starters, the top bar has a completely new look, consisting of new features, buttons and naming
Elisabetta Zodeiko 2/25/2012
 PRINCETON UNIVERSITY Report Studio Introduction Elisabetta Zodeiko 2/25/2012 Report Studio Introduction pg. 1 Table of Contents 1. Report Studio Overview... 6 Course Overview... 7 Princeton Information
Windows XP Pro: Basics 1
 NORTHWEST MISSOURI STATE UNIVERSITY ONLINE USER S GUIDE 2004 Windows XP Pro: Basics 1 Getting on the Northwest Network Getting on the Northwest network is easy with a university-provided PC, which has
Internet Explorer 7. Getting Started The Internet Explorer Window. Tabs NEW! Working with the Tab Row. Microsoft QUICK Source
 Microsoft QUICK Source Internet Explorer 7 Getting Started The Internet Explorer Window u v w x y { Using the Command Bar The Command Bar contains shortcut buttons for Internet Explorer tools. To expand
Handout: Word 2010 Tips and Shortcuts
 Word 2010: Tips and Shortcuts Table of Contents EXPORT A CUSTOMIZED QUICK ACCESS TOOLBAR... 2 IMPORT A CUSTOMIZED QUICK ACCESS TOOLBAR... 2 USE THE FORMAT PAINTER... 3 REPEAT THE LAST ACTION... 3 SHOW
Creating Custom Crystal Reports Tutorial
 Creating Custom Crystal Reports Tutorial 020812 2012 Blackbaud, Inc. This publication, or any part thereof, may not be reproduced or transmitted in any form or by any means, electronic, or mechanical,
Microsoft Word 2010 Prepared by Computing Services at the Eastman School of Music July 2010
 Microsoft Word 2010 Prepared by Computing Services at the Eastman School of Music July 2010 Contents Microsoft Office Interface... 4 File Ribbon Tab... 5 Microsoft Office Quick Access Toolbar... 6 Appearance
Business Portal for Microsoft Dynamics GP 2010. User s Guide Release 5.1
 Business Portal for Microsoft Dynamics GP 2010 User s Guide Release 5.1 Copyright Copyright 2011 Microsoft. All rights reserved. Limitation of liability This document is provided as-is. Information and
Web Intelligence User Guide
 Web Intelligence User Guide Office of Financial Management - Enterprise Reporting Services 4/11/2011 Table of Contents Chapter 1 - Overview... 1 Purpose... 1 Chapter 2 Logon Procedure... 3 Web Intelligence
In this session, we will explain some of the basics of word processing. 1. Start Microsoft Word 11. Edit the Document cut & move
 WORD PROCESSING In this session, we will explain some of the basics of word processing. The following are the outlines: 1. Start Microsoft Word 11. Edit the Document cut & move 2. Describe the Word Screen
BIGPOND ONLINE STORAGE USER GUIDE Issue 1.1.0-18 August 2005
 BIGPOND ONLINE STORAGE USER GUIDE Issue 1.1.0-18 August 2005 PLEASE NOTE: The contents of this publication, and any associated documentation provided to you, must not be disclosed to any third party without
Business Objects 4.1 Quick User Guide
 Business Objects 4.1 Quick User Guide Log into SCEIS Business Objects (BOBJ) 1. https://sceisreporting.sc.gov 2. Choose Windows AD for Authentication. 3. Enter your SCEIS User Name and Password: Home Screen
COGNOS Query Studio Ad Hoc Reporting
 COGNOS Query Studio Ad Hoc Reporting Copyright 2008, the California Institute of Technology. All rights reserved. This documentation contains proprietary information of the California Institute of Technology
Training Manual. Version 6
 Training Manual TABLE OF CONTENTS A. E-MAIL... 4 A.1 INBOX... 8 A.1.1 Create New Message... 8 A.1.1.1 Add Attachments to an E-mail Message... 11 A.1.1.2 Insert Picture into an E-mail Message... 12 A.1.1.3
Sage Abra SQL HRMS Reports. User Guide
 Sage Abra SQL HRMS Reports User Guide 2010 Sage Software, Inc. All rights reserved. Sage, the Sage logos, and the Sage product and service names mentioned herein are registered trademarks or trademarks
Sample Table. Columns. Column 1 Column 2 Column 3 Row 1 Cell 1 Cell 2 Cell 3 Row 2 Cell 4 Cell 5 Cell 6 Row 3 Cell 7 Cell 8 Cell 9.
 Working with Tables in Microsoft Word The purpose of this document is to lead you through the steps of creating, editing and deleting tables and parts of tables. This document follows a tutorial format
Business Objects 4.1 Web Intelligence introduction
 Computing Services IT Literacy Business Objects 4.1 Web Intelligence introduction Document Information Author Revised By Lydia Maskell Lydia Maskell with input from Steve Wyatt Date 05/07/2016 Version
Microsoft Word 2013 Tutorial
 Microsoft Word 2013 Tutorial GETTING STARTED Microsoft Word is one of the most popular word processing programs supported by both Mac and PC platforms. Microsoft Word can be used to create documents, brochures,
TxDMV RTS Training Guide for Working with Cognos Reports
 TxDMV RTS Training Guide for Working with Cognos Reports April, 2015 About This Guide This Training Guide introduces the implementation of the Cognos enterprise reporting tool for the TxDMV Registration
Excel 2007: Basics Learning Guide
 Excel 2007: Basics Learning Guide Exploring Excel At first glance, the new Excel 2007 interface may seem a bit unsettling, with fat bands called Ribbons replacing cascading text menus and task bars. This
Excel 2003 Tutorial I
 This tutorial was adapted from a tutorial by see its complete version at http://www.fgcu.edu/support/office2000/excel/index.html Excel 2003 Tutorial I Spreadsheet Basics Screen Layout Title bar Menu bar
REUTERS/TIM WIMBORNE SCHOLARONE MANUSCRIPTS COGNOS REPORTS
 REUTERS/TIM WIMBORNE SCHOLARONE MANUSCRIPTS COGNOS REPORTS 28-APRIL-2015 TABLE OF CONTENTS Select an item in the table of contents to go to that topic in the document. USE GET HELP NOW & FAQS... 1 SYSTEM
Custom Reporting System User Guide
 Citibank Custom Reporting System User Guide April 2012 Version 8.1.1 Transaction Services Citibank Custom Reporting System User Guide Table of Contents Table of Contents User Guide Overview...2 Subscribe
Content Author's Reference and Cookbook
 Sitecore CMS 6.5 Content Author's Reference and Cookbook Rev. 110621 Sitecore CMS 6.5 Content Author's Reference and Cookbook A Conceptual Overview and Practical Guide to Using Sitecore Table of Contents
Crystal Reports Payroll Exercise
 Crystal Reports Payroll Exercise Objective This document provides step-by-step instructions on how to build a basic report on Crystal Reports XI on the MUNIS System supported by MAISD. The exercise will
Ingeniux 8 CMS Web Management System ICIT Technology Training and Advancement ([email protected])
") Ingeniux 8 CMS Web Management System ICIT Technology Training and Advancement ([email protected]) Updated on 10/17/2014 Table of Contents About... 4 Who Can Use It... 4 Log into Ingeniux... 4 Using Ingeniux
Ingeniux 8 CMS Web Management System ICIT Technology Training and Advancement ([email protected]) Updated on 10/17/2014 Table of Contents About... 4 Who Can Use It... 4 Log into Ingeniux... 4 Using Ingeniux
University of Rochester
 University of Rochester User s Guide to URGEMS Ad Hoc Reporting Guide Using IBM Cognos Workspace Advanced, Version 10.2.1 Version 1.0 April, 2016 1 P age Table of Contents Table of Contents... Error! Bookmark
Basic Excel Handbook
 2 5 2 7 1 1 0 4 3 9 8 1 Basic Excel Handbook Version 3.6 May 6, 2008 Contents Contents... 1 Part I: Background Information...3 About This Handbook... 4 Excel Terminology... 5 Excel Terminology (cont.)...
Microsoft Access 2010 Part 1: Introduction to Access
 CALIFORNIA STATE UNIVERSITY, LOS ANGELES INFORMATION TECHNOLOGY SERVICES Microsoft Access 2010 Part 1: Introduction to Access Fall 2014, Version 1.2 Table of Contents Introduction...3 Starting Access...3
MS Word 2007 practical notes
 MS Word 2007 practical notes Contents Opening Microsoft Word 2007 in the practical room... 4 Screen Layout... 4 The Microsoft Office Button... 4 The Ribbon... 5 Quick Access Toolbar... 5 Moving in the
Microsoft Word 2010 Tutorial
 Microsoft Word 2010 Tutorial GETTING STARTED Microsoft Word is one of the most popular word processing programs supported by both Mac and PC platforms. Microsoft Word can be used to create documents, brochures,
Microsoft Access 2010 Overview of Basics
 Opening Screen Access 2010 launches with a window allowing you to: create a new database from a template; create a new template from scratch; or open an existing database. Open existing Templates Create
Copyright 2006 TechSmith Corporation. All Rights Reserved.
 TechSmith Corporation provides this manual as is, makes no representations or warranties with respect to its contents or use, and specifically disclaims any expressed or implied warranties or merchantability
DOING MORE WITH WORD: MICROSOFT OFFICE 2010
 University of North Carolina at Chapel Hill Libraries Carrboro Cybrary Chapel Hill Public Library Durham County Public Library DOING MORE WITH WORD: MICROSOFT OFFICE 2010 GETTING STARTED PAGE 02 Prerequisites
ADMINISTRATORS GUIDE EPISUITE 6
 ADMINISTRATORS GUIDE EPISUITE 6 A quick tutorial on how to set up and implement Episuite Software created by IDentiphoto Specialists in IDentification 1810 Joseph Lloyd Pkwy. Willoughby, OH 44094 Phone:
BID2WIN Workshop. Advanced Report Writing
 BID2WIN Workshop Advanced Report Writing Please Note: Please feel free to take this workbook home with you! Electronic copies of all lab documentation are available for download at http://www.bid2win.com/userconf/2011/labs/
AFN-FixedAssets-062502
 062502 2002 Blackbaud, Inc. This publication, or any part thereof, may not be reproduced or transmitted in any form or by any means, electronic, or mechanical, including photocopying, recording, storage
Project Management WalkThrough
 PRACTICE CS Project Management WalkThrough version 2009.x.x TL 21455 10/25/09 Copyright Information Text copyright 2004-2009 by Thomson Reuters/Tax & Accounting. All rights reserved. Video display images
Decision Support AITS University Administration. Web Intelligence 4.1 Reporting Basics
 Decision Support AITS University Administration Web Intelligence 4.1 Reporting Basics 2 Web Intelligence 4.1: Reporting Basics Appropriate Use and Security of Confidential and Sensitive Information Due
MICROSOFT WORD TUTORIAL
 MICROSOFT WORD TUTORIAL G E T T I N G S T A R T E D Microsoft Word is one of the most popular word processing programs supported by both Mac and PC platforms. Microsoft Word can be used to create documents,
DESIGN A WEB SITE USING PUBLISHER Before you begin, plan your Web site
 Page 1 of 22 DESIGN A WEB SITE USING PUBLISHER Before you begin, plan your Web site Before you create your Web site, ask yourself these questions: What do I want the site to do? Whom do I want to visit
Introduction to Microsoft Word 2003
 Introduction to Microsoft Word 2003 Sabeera Kulkarni Information Technology Lab School of Information University of Texas at Austin Fall 2004 1. Objective This tutorial is designed for users who are new
Introduction to Business Reporting Using IBM Cognos
 Introduction to Business Reporting Using IBM Cognos Table of Contents Introducing Reporting... 1 Objectives... 1 Terminology... 2 Cognos Users... 2 Frequently Used Terms... 3 Getting Started... 4 Gaining
Basic Microsoft Excel 2007
 Basic Microsoft Excel 2007 The biggest difference between Excel 2007 and its predecessors is the new layout. All of the old functions are still there (with some new additions), but they are now located
Microsoft PowerPoint 2010
 Microsoft PowerPoint 2010 Starting PowerPoint... 2 PowerPoint Window Properties... 2 The Ribbon... 3 Default Tabs... 3 Contextual Tabs... 3 Minimizing and Restoring the Ribbon... 4 The Backstage View...
NJCU WEBSITE TRAINING MANUAL
 NJCU WEBSITE TRAINING MANUAL Submit Support Requests to: http://web.njcu.edu/its/websupport/ (Login with your GothicNet Username and Password.) Table of Contents NJCU WEBSITE TRAINING: Content Contributors...
Manual English KOI Desktop App 2.0.x
 Manual English KOI Desktop App 2.0.x KOI Kommunikation, Organisation, Information Comm-Unity EDV GmbH 2010 Contents Introduction... 3 Information on how to use the documentation... 3 System requirements:...
Business Objects. Report Writing - CMS Net and CCS Claims
 Business Objects Report Writing - CMS Net and CCS Claims Updated 11/28/2012 1 Introduction/Background... 4 Report Writing (Ad-Hoc)... 4 Requesting Report Writing Access... 4 Java Version... 4 Create A
ACCESS 2007 BASICS. Best Practices in MS Access. Information Technology. MS Access 2007 Users Guide. IT Training & Development (818) 677-1700
 677-1700") Information Technology MS Access 2007 Users Guide ACCESS 2007 BASICS Best Practices in MS Access IT Training & Development (818) 677-1700 Email: [email protected] Website: www.csun.edu/it/training Access
Information Technology MS Access 2007 Users Guide ACCESS 2007 BASICS Best Practices in MS Access IT Training & Development (818) 677-1700 Email: [email protected] Website: www.csun.edu/it/training Access
Baylor Secure Messaging. For Non-Baylor Users
 Baylor Secure Messaging For Non-Baylor Users TABLE OF CONTENTS SECTION ONE: GETTING STARTED...4 Receiving a Secure Message for the First Time...4 Password Configuration...5 Logging into Baylor Secure Messaging...7
MICROSOFT ACCESS 2003 TUTORIAL
 MICROSOFT ACCESS 2003 TUTORIAL M I C R O S O F T A C C E S S 2 0 0 3 Microsoft Access is powerful software designed for PC. It allows you to create and manage databases. A database is an organized body
Microsoft Access Basics
 Microsoft Access Basics 2006 ipic Development Group, LLC Authored by James D Ballotti Microsoft, Access, Excel, Word, and Office are registered trademarks of the Microsoft Corporation Version 1 - Revision
Umbraco v4 Editors Manual
 Umbraco v4 Editors Manual Produced by the Umbraco Community Umbraco // The Friendly CMS Contents 1 Introduction... 3 2 Getting Started with Umbraco... 4 2.1 Logging On... 4 2.2 The Edit Mode Interface...
Module One: Getting Started... 6. Opening Outlook... 6. Setting Up Outlook for the First Time... 7. Understanding the Interface...
 2 CONTENTS Module One: Getting Started... 6 Opening Outlook... 6 Setting Up Outlook for the First Time... 7 Understanding the Interface...12 Using Backstage View...14 Viewing Your Inbox...15 Closing Outlook...17
Formatting & Styles Word 2010
 Formatting & Styles Word 2010 Produced by Flinders University Centre for Educational ICT CONTENTS Layout... 1 Using the Ribbon Bar... 2 Minimising the Ribbon Bar... 2 The File Tab... 3 What the Commands
Password Memory 6 User s Guide
 C O D E : A E R O T E C H N O L O G I E S Password Memory 6 User s Guide 2007-2015 by code:aero technologies Phone: +1 (321) 285.7447 E-mail: [email protected] Table of Contents Password Memory 6... 1
Participant Guide RP301: Ad Hoc Business Intelligence Reporting
 RP301: Ad Hoc Business Intelligence Reporting State of Kansas As of April 28, 2010 Final TABLE OF CONTENTS Course Overview... 4 Course Objectives... 4 Agenda... 4 Lesson 1: Reviewing the Data Warehouse...
Education Solutions Development, Inc. APECS Navigation: Business Systems Getting Started Reference Guide
 Education Solutions Development, Inc. APECS Navigation: Business Systems Getting Started Reference Guide March 2013 Education Solutions Development, Inc. What s Inside The information in this reference
Business Warehouse Reporting Manual
 Business Warehouse Reporting Manual This page is intentionally left blank. Table of Contents The Reporting System -----------------------------------------------------------------------------------------------------------------------------
BusinessObjects Enterprise InfoView User's Guide
 BusinessObjects Enterprise InfoView User's Guide BusinessObjects Enterprise XI 3.1 Copyright 2009 SAP BusinessObjects. All rights reserved. SAP BusinessObjects and its logos, BusinessObjects, Crystal Reports,
Migrating to Excel 2010 from Excel 2003 - Excel - Microsoft Office 1 of 1
 Migrating to Excel 2010 - Excel - Microsoft Office 1 of 1 In This Guide Microsoft Excel 2010 looks very different, so we created this guide to help you minimize the learning curve. Read on to learn key
Lotus Notes Client Version 8.5 Reference Guide
 Lotus Notes Client Version 8.5 Reference Guide rev. 11/19/2009 1 Lotus Notes Client Version 8.5 Reference Guide Accessing the Lotus Notes Client From your desktop, double click the Lotus Notes icon. Logging
Hamline University Administrative Computing Page 1
 User Guide Banner Handout: BUSINESS OBJECTS ENTERPRISE (InfoView) Document: boxi31sp3-infoview.docx Created: 5/11/2011 1:24 PM by Chris Berry; Last Modified: 8/31/2011 1:53 PM Purpose:... 2 Introduction:...
SQL Server 2005: Report Builder
 SQL Server 2005: Report Builder Table of Contents SQL Server 2005: Report Builder...3 Lab Setup...4 Exercise 1 Report Model Projects...5 Exercise 2 Create a Report using Report Builder...9 SQL Server 2005:
Introduction to Microsoft Access 2013
 Introduction to Microsoft Access 2013 A database is a collection of information that is related. Access allows you to manage your information in one database file. Within Access there are four major objects:
Basic Web Development @ Fullerton College
 Basic Web Development @ Fullerton College Introduction FC Net Accounts Obtaining Web Space Accessing your web space using MS FrontPage Accessing your web space using Macromedia Dreamweaver Accessing your
Creating Personal Web Sites Using SharePoint Designer 2007
 Creating Personal Web Sites Using SharePoint Designer 2007 Faculty Workshop May 12 th & 13 th, 2009 Overview Create Pictures Home Page: INDEX.htm Other Pages Links from Home Page to Other Pages Prepare
FaxFinder Fax Servers
 FaxFinder Fax Servers Models: FF130 FF230 FF430 FF830 Client User Guide FaxFinder Client User Guide Fax Client Software for FaxFinder Series PN S000460B, Version B Copyright This publication may not be
9 CREATING REPORTS WITH REPORT WIZARD AND REPORT DESIGNER
 9 CREATING REPORTS WITH REPORT WIZARD AND REPORT DESIGNER 9.1 INTRODUCTION Till now you have learned about creating Table, Query and Form using the respective Wizard and Designer mode. Every application
Word Processing. with. OpenOffice Writer
 Word Processing with OpenOffice Writer W o r d P r o c e s s i n g w i t h O p e n O f f i c e W r i t e r P a r t 1 Part I: Introduction to OpenOffice Writer OpenOffice Writer is an open-source free software
Novell ZENworks Asset Management 7.5
 Novell ZENworks Asset Management 7.5 w w w. n o v e l l. c o m October 2006 USING THE WEB CONSOLE Table Of Contents Getting Started with ZENworks Asset Management Web Console... 1 How to Get Started...
FastTrack Schedule 10. Tutorials Manual. Copyright 2010, AEC Software, Inc. All rights reserved.
 FastTrack Schedule 10 Tutorials Manual FastTrack Schedule Documentation Version 10.0.0 by Carol S. Williamson AEC Software, Inc. With FastTrack Schedule 10, the new version of the award-winning project
PowerPoint 2007 Basics Website: http://etc.usf.edu/te/
 Website: http://etc.usf.edu/te/ PowerPoint is the presentation program included in the Microsoft Office suite. With PowerPoint, you can create engaging presentations that can be presented in person, online,
Word 2010: The Basics Table of Contents THE WORD 2010 WINDOW... 2 SET UP A DOCUMENT... 3 INTRODUCING BACKSTAGE... 3 CREATE A NEW DOCUMENT...
 Word 2010: The Basics Table of Contents THE WORD 2010 WINDOW... 2 SET UP A DOCUMENT... 3 INTRODUCING BACKSTAGE... 3 CREATE A NEW DOCUMENT... 4 Open a blank document... 4 Start a document from a template...
Microsoft Excel 2013 Tutorial
 Microsoft Excel 2013 Tutorial TABLE OF CONTENTS 1. Getting Started Pg. 3 2. Creating A New Document Pg. 3 3. Saving Your Document Pg. 4 4. Toolbars Pg. 4 5. Formatting Pg. 6 Working With Cells Pg. 6 Changing
Introduction to Microsoft Excel 2010
 Introduction to Microsoft Excel 2010 Screen Elements Quick Access Toolbar The Ribbon Formula Bar Expand Formula Bar Button File Menu Vertical Scroll Worksheet Navigation Tabs Horizontal Scroll Bar Zoom
WINDOWS 7 EXPLORE INTERNET EXPLORER 8
 WINDOWS 7 EXPLORE INTERNET EXPLORER 8 Windows 7 Explore Internet Explorer 8 Last Edited: 2012-07-10 1 Explore changes in the UI... 3 Enhance with built-in Search engine... 3 Manage and Organize IE with
BusinessObjects: General Report Writing for Version 5
 BusinessObjects: General Report Writing for Version 5 Contents 1 INTRODUCTION...3 1.1 PURPOSE OF COURSE...3 1.2 LEVEL OF EXPERIENCE REQUIRED...3 1.3 TERMINOLOGY...3 1.3.1 Universes...3 1.3.2 Objects...4
MICROSOFT OFFICE ACCESS 2007 - NEW FEATURES
 MICROSOFT OFFICE 2007 MICROSOFT OFFICE ACCESS 2007 - NEW FEATURES Exploring Access Creating and Working with Tables Finding and Filtering Data Working with Queries and Recordsets Working with Forms Working
Introduction to Microsoft Access 2010
 Introduction to Microsoft Access 2010 A database is a collection of information that is related. Access allows you to manage your information in one database file. Within Access there are four major objects:
Joomla! 2.5.x Training Manual
 Joomla! 2.5.x Training Manual Joomla is an online content management system that keeps track of all content on your website including text, images, links, and documents. This manual includes several tutorials
Macros in Word & Excel
 Macros in Word & Excel Description: If you perform a task repeatedly in Word or Excel, you can automate the task by using a macro. A macro is a series of steps that is grouped together as a single step
Appendix A How to create a data-sharing lab
 Appendix A How to create a data-sharing lab Creating a lab involves completing five major steps: creating lists, then graphs, then the page for lab instructions, then adding forms to the lab instructions,
State of Ohio DMS Solution for Personnel Records Training
 State of Ohio DMS Solution for Personnel Records Training 1 Contents LOGGING IN AND THE BASICS... 3 LOGGING INTO THE DMS... 3 NAVIGATING THE UNITY CLIENT... 4 CREATING PERSONAL PAGES... 6 ADDING WEB LINKS
PowerPoint 2013: Basic Skills
 PowerPoint 2013: Basic Skills Information Technology September 1, 2014 1 P a g e Getting Started There are a variety of ways to start using PowerPoint software. You can click on a shortcut on your desktop
Create a GAME PERFORMANCE Portfolio with Microsoft Word
 Create a GAME PERFORMANCE Portfolio with Microsoft Word Planning A good place to start is on paper. Get a sheet of blank paper and just use a pencil to indicate where the content is going to be positioned
Asset Track Getting Started Guide. An Introduction to Asset Track
 Asset Track Getting Started Guide An Introduction to Asset Track Contents Introducing Asset Track... 3 Overview... 3 A Quick Start... 6 Quick Start Option 1... 6 Getting to Configuration... 7 Changing
SAP Business Intelligence (BI) Reporting Training for MM. General Navigation. Rick Heckman PASSHE 1/31/2012
 Reporting Training for MM. General Navigation. Rick Heckman PASSHE 1/31/2012") 2012 SAP Business Intelligence (BI) Reporting Training for MM General Navigation Rick Heckman PASSHE 1/31/2012 Page 1 Contents Types of MM BI Reports... 4 Portal Access... 5 Variable Entry Screen... 5
2012 SAP Business Intelligence (BI) Reporting Training for MM General Navigation Rick Heckman PASSHE 1/31/2012 Page 1 Contents Types of MM BI Reports... 4 Portal Access... 5 Variable Entry Screen... 5
Business Insight Report Authoring Getting Started Guide
 Business Insight Report Authoring Getting Started Guide Version: 6.6 Written by: Product Documentation, R&D Date: February 2011 ImageNow and CaptureNow are registered trademarks of Perceptive Software,
BIG LOTS VENDOR COMPLIANCE WEB PORTAL USER GUIDE - VENDOR 300 PHILLIPI RD. COLUMBUS, OH 43228
 BIG LOTS VENDOR COMPLIANCE WEB PORTAL USER GUIDE - VENDOR 300 PHILLIPI RD. COLUMBUS, OH 43228 Contents Getting Started...4 Tips for Using Actionable Intelligence... 4 Logging into Actionable Intelligence...