Covisint PQRS TM User Guide
|
|
|
- Audra Peters
- 9 years ago
- Views:
Transcription
1 Covisint PQRS TM User Guide 2014 This guide illustrates to Providers step-by-step instructions for using Covisint PQRS to enter and submit measures/measures groups patient data. Covisint Corporation One Campus Martius Suite 700 Detroit, MI p covisint.com

2 Table of Contents Section 1- Introduction 3 1. Covisint PQRS Overview 3 A. About the User Guide 3 B. About Covisint PQRS 3 C. About the PQRS Program 3 D. What s new for 2014? 3 E. Hardware/Software Requirements for Using Covisint PQRS 3 Section 2 Getting Started 4 1. Covisint PQRS Registration 4 2. Accessing Covisint PQRS and Logging In Navigating Covisint PQRS 15 A. Main Navigation Menu 15 B. Secondary Navigation Menu 16 Section 3 Using Covisint PQRS PQRS Data Collection Overview 18 A. PQRS Data Collection Forms 18 B. PQRS Data Collection Process 18 C. Accessing the PQRS Collection Forms Managing User and Provider Account Information 20 A. Editing User Account Information 20 B. Adding Providers 22 Page 1

3 3. Covisint PQRS Submission Process 27 A. Entering Patient Data for PQRS Submission Measure Groups Entering Patient Data For PQRS Submission Individual Measures PQRS Submission Summary Reports 46 A. Generating a Report Reporting a Submitted Data and CMS Incentive Payment Information Contact Covisint for additional PQRS questions or support 49 Page 2

4 Section 1- Introduction 1. Covisint PQRS Overview A. About the User Guide This guide is for providers participating in the PQRS program who use the Covisint web application to report their data to the Centers for Medicare and Medicaid Services (CMS). The guide provides step-by-step instructions for using Covisint PQRS to enter and submit measures/measures groups patient data. B. About Covisint PQRS Covisint PQRS offers a simple, effective, and affordable way for every provider to quickly meet the Medicare PQRS reporting requirements. Using Covisint, providers simply: Choose either the measures group or individual measures reporting option. For the measures group option select one measures group to report from the 25 CMS-approved groups offered by CMS and supported by Covisint. Collect the clinical data for 20 unique patients, 11 (50%) of which must be Medicare Part B Fee-For-Service (FFS) patients. For the individual measures reporting option, providers can select 3-9 individual measures across 1-3 NQS domains applicable to their specialty and report at 50%. Enter and submit the data using the HIPPA secure Covisint application. Eligible physicians can earn an additional 0.5% of total estimated Medicare Part B Physician Fee Schedule (PFS) allowed charges for the reporting year and avoid a -2.0% penalty using the Covisint application. C. About the PQRS Program IMPORTANT! According to the CMS rule regarding 0% performance rates that was implemented in 2011: An eligible professional reporting via registry for a measures group needs to report all of the measures in the group (where the patient is eligible for the measure) for 20 unique patients over 50% (11 patients) must be Medicare Part B FFS AND have a performance rate >0% for each applicable measure during a specified reporting period to successfully report. For example, an answer of "Not Done/Unknown" for all eligible patients for a given measure within the selected measures group will result in a performance rate of 0% for that measure and the provider WILL NOT be eligible for the PQRS incentive nor will they avoid the penalty. D. What s new for 2014? Read the 2014 CMS Incentives FAQ. E. Hardware/Software Requirements for Using Covisint PQRS Browser Software: Microsoft Internet Explorer Microsoft Internet Explorer 11.0 is not currently supported. Page 3


5 Browser Software: FireFox 3.X or above Browser Software: Chrome Monitor Settings: Set to 1024 x 768 Display or higher Adobe Acrobat Reader: Please go to and download the latest version of Acrobat Reader. You will need this application to view reports. Section 2 Getting Started 1. Covisint PQRS Registration IMPORTANT! If you have registered with Covisint previously, please DO NOT register again. If you cannot recall your username or password please contact a Covisint representative at for assistance. You must register to use Covisint PQRS. The following section explains the four-step registration process. Step 1: Enter practice and user information. Step 2: Accept agreement terms. Step 3: Enter provider information. Step 4: Confirm information. To access and register for Covisint PQRS: 1. Using your internet browser, navigate to the Covisint PQRS website at: 2. Click New User - Registration Figure 1.- Click: PQRS - Registration Page 4

6 Step 1: Complete the Practice and User Information NOTE: Field names in blue are required fields. 1. When the Registration screen displays, complete the Practice Information fields. a. Practice Name - Enter the name of the practice. b. Address - Enter the practice s business address. c. (Address) - Additional address line (e.g., suite number) if needed. d. City - Enter the city where the practice s business is located. e. State - Select the state where the practice s business is located from the drop-down list. f. Zip - Enter the zip code where the practice s business is located. g. Practice Phone - Enter the practice s main phone number. 2. Complete the User Information fields. a. First Name - Enter the first name of the person who will be the main contact for the data entry. b. Last Name - Enter the last name of the person who will be the main contact for the data entry. c. - Enter a valid address that is accessible by the user who is doing the data entry. NOTE: Covisint sends an automated password to this address. Covisint support sends new passwords when one is forgotten or when the account is locked due to too many inappropriate login attempts. Also, should Covisint have an update about the PQRS application or an issue in the PQRS data that requires notification, this address will be used. 3. Username - Create a user name for the user(s) who will login to the Covisint CMS Incentive Programs portal to enter data. Make a note of the username as you will need it to login later. 4. Click Next. Figure 2.- Complete the Registration Form Page 5


7 Step 2: Accept the Covisint Portal Services Agreement 1. Read the Covisint Portal Service Agreement. 2. Click the I have read and agree to the Covisint Portal Services Agreement checkbox indicating the agreement has been read. 3. Click the I hereby attest that I am an authorized signer for the providers registered checkboxes indicating the agreements have been read. NOTE: BOTH checkboxes must be checked to proceed to the next step. 4. The agreements can be printed and filed for later reference, if necessary. Click Printable Version at the top right corner of each agreement. 5. Click Next. Figure 3.- Accept the Portal Services Agreement Page 6

8 Step 3: Add Providers You may opt to enter only one provider and add the rest of the providers when you log into the Covisint PQRS application, or you may enter all providers during the registration process. You will need the following information to add a provider to Covisint PQRS: INDIVIDUAL National Provider Identifier number (NPI) for each provider Practice s Federal tax identification number (TIN) 1. In the Provider List section, click Add New. Figure 4.- Click: Add a New Provider 2. The screen refreshes and the NIP Search screen displays. Enter the provider s NPI number. To retrieve the provider s demographic data from the NPI registry click Get Provider Detail. If you are using Internet Explorer and have trouble with this step try using another browser. NOTE: Only providers with claims reported to CMS using their NPI are eligible for reporting for CMS incentive programs. Mid-levels reported under another provider s NPI should not report. Figure 5.- Enter the Provider NPI Number 3. The Provider Details screen displays the provider s demographic data from the NPI registry. a. Review the information on the screen and enter missing data and/or update incorrect data. NOTE: All fields labeled with blue titles are required fields, specifically the Specialty, , and Medicare Tax ID fields, which are not populated from the NPI registry and need to be completed. b. Click the I verify I have entered the provider's INDIVIDUAL NPI in combination with the TIN used to file this Provider's CMS claims. I also understand that Covisint cannot verify the TIN/NPI combination entered and that an incorrect TIN and/or NPI may result in no payment from CMS. checkbox. c. Click Save Provider. Page 7

9 Figure 6.- Edit Provider Demographics and Click Save Provider 4. The Provider List screen displays with the new provider s demographic data from the NPI registry added to Covisint PQRS. Use the page size feature if you want to display more than 5 providers per page. 5. Continue adding providers or click Next to proceed to the final step in registration. NOTE: Additional providers can also be added whenever you login to the Covisint PQRS application. NOTE: If the provider s individual NPI is unavailable, you can search for the provider s NPI on the Free National NPI Number Registry Lookup website. Figure 7.- Click: Click Here to Lookup NPI 6. Click the Click Here to Lookup NPI link. 7. A pop-up window opens in front of the Covisint registration screen. Enter the following in the appropriate fields: a. Provider s Last Name or Entity b. Provider s First Name c. State in which the provider practices 8. Click Search For NPI. Page 8

10 Figure 8.- Enter Provider Information 9. The NPI Number Lookup results screen displays. Scroll to find your provider The NPI Number Lookup results screen is not an interactive screen. Highlight the desired NPI number and use CTRL+C to copy the number, or record the number for later use. 10. Exit the NPI Number Lookup results screen by clicking the X in the top right corner of the window to return to the Covisint PQRS registration screen. Figure 9.- Copy the Provider NPI Number 11. Click into the Enter Medicare Provider NPI field on the NPI Search screen and use CTRL+V to paste the NPI number into the field, or type the number into the field. 12. Click Get Provider Detail and the provider s demographic data as recorded in the NPI registry populates into the Covisint Provider Details screen. Page 9

11 Figure 10.- Click: Get Provider Detail 13. The Provider Details screen displays the provider s demographic data from the NPI registry. a. Enter missing data and update incorrect data. NOTE: All fields labeled in blue are required fields. The Specialty, , and Medicare Tax ID fields, which are not populated from the NPI registry and need to be completed. b. Click Save Provider. Figure 11.- Edit Provider Demographics and Click: Save 14. The Provider List screen displays with the new provider s demographic data from the NPI registry added to Covisint PQRS. Continue adding providers or click Next to proceed to the final step in registration. Page 10

12 Figure 12.- New Provider Added to Covisint PQRS Step 4: Confirm Information 1. The Provider Information screen displays with the information previously entered for the Practice Information, User Information, and Provider List sections. b. Review the data. c. If items need to be corrected, click the respective link for each section: Edit Practice Information or Edit User Information. 2. Click I would like to receive reminder s regarding PQRS deadlines if you would like to receive these types of reminders. 3. Click Finish when all entries are correct. Figure 13.- New Provider Added to Covisint PQRS 4. A confirmation message displays and a registration is auto-generated and sent to the address entered during Step 1 of registration, in the User Information section. Click OK. Page 11

13 NOTE: The with your password should arrive within five minutes of completing the registration. It will contain the username as set up during registration and the password as generated by a password generating program. It is a long and complex password, including upper- and lower-case letters as well as numbers and symbols. Use it exactly as it appears in the . NOTE: Sometimes the password arrives in the recipient s Spam, Junk, or Trash folder instead of the Inbox due to filters set on the recipient s server. If the user does not receive a password , please contact Covisint customer support at Figure 14.- New Provider Added to Covisint PQRS 5. After clicking OK on the confirmation screen, you will be redirected to the Covisint PQRS login screen. 2. Accessing Covisint PQRS and Logging In Covisint PQRS is a browser-based web application, meaning it runs completely in an internet browser requiring no additional hardware or software. You can access Covisint PQRS from virtually any computer as long as it is connected to the Internet. To Access and Log in to Covisint PQRS: 1. Using your internet browser, navigate to Covisint PQRS at: TIP: At the login screen, either click Favorites > Add to Favorites or right-click and click Create a Shortcut to save the login link for quick access in the future. Page 12

14 Figure 15.- Login to Covisint PQRS 2. On the Sign In area of the screen, enter your User Name and Password exactly as received in the registration from Covisint. 3. Click Sign In. NOTE: The system requires you to change your password every 90 days. After three unsuccessful login attempts, you will be locked out of the account, which will have to be reset by an administrator or Covisint Customer Support. TIP: If you forget your username or password, click Click here to Unlock account. If the message: "Patient Planner was unable to process your request. Please contact Covisint Support displays, contact Customer Support at or , or The FIRST time you log in to Covisint PQRS: The screen displays the My Account data-entry page of the Covisint PQRS application. Review the data, paying special attention to the fields labeled in blue. These are required fields. NOTE: It is RECOMMENDED that you enter your address and answer the security question. Should you forget your password, this will allow you to self-request your password, which will be sent to the address you provide. 1. Complete the following fields. b. Address Line 1 - Enter your street address. c. Address Line 2 - Additional street address line if needed. d. City - Enter the city where you reside. e. Phone - Enter a phone number. f. State - Enter the state where you reside. g. Postal Code - Enter your zip code. h. - Enter or change your address. i. Security Question - Select a security question from the drop-down list. j. Answer - Enter the answer to the security question you selected. 2. Click Save. Page 13

15 Figure 16.- Change Your Password The screen refreshes to display the same My Account screen, but in a read-only mode rather than a data-entry mode. To change your temporary password (using the following password rules): Passwords must include the following: o upper case character or lower case character o numeric character or special character o must be 6-12 characters in length 1. Click Change Password at the top of the screen. The Manage Password screen displays. 2. Complete the following fields on the Manage Password screen. b. Current Password - Enter your temporary password received from your Covisint administrator. c. New Password - Enter a password that conforms to the password rules. Page 14

16 d. Confirm New Password - Enter the newly created password again to confirm that it was entered correctly. 3. Click Save. Figure 17.- Change Your Password The new password has been created. Use the new password the next time you login to the Covisint PQRS application. 3. Navigating Covisint PQRS Covisint PQRS functions and features are accessible via two menus that display on all screens within the application. The main menu includes links to the Covisint PQRS functions and Home page. The secondary menu (located at the top right of the screen) includes links to user features for accessing data collection forms, managing your account, changing your password, logging off, etc. Since Covisint PQRS is a web-based application, everywhere blue text appears is a link. Each link is a shortcut, and clicking on a link will take you to another page or section. A. Main Navigation Menu The functions that appear on the main menu are described below. Home - Displays a list of the Data Collection Forms and reference documents. PQRS Submission - This function is used to select the PQRS Submission method: Measure Groups or Individual Measures. Admin - This function is used to add new providers or edit existing provider information. PQRS Submission Summary Report - This function is used to generate and view the following reports: o o PQRS 2013 Feedback Report PQRS 2014 Submission Summary Report Page 15

17 Figure 18.- Main Navigation Menu B. Secondary Navigation Menu The following functions are accessible via the secondary menu by clicking on the function name. This menu is located at the top right of the screen. Help - Link to the Covisint PQRS Support website. Change Password - Navigates to the Manage Password screen, which you may use to change your current password. My Account - Displays a read-only screen with specific information about your account, including username, name, address, phone, , and security question. The screen includes a link to edit your account information. Logoff - Click to log out. Page 16

 minutes of inactivity will log you out of the Covisint PQRS application.")
18 Support Navigates to the Contact Covisint PQRS Support screen, which you may use to report an issue or problem. NOTE: The Covisint PQRS support team is also available to answer questions. Call or There is a timer in the top right corner, which after fifteen (15) minutes of inactivity will log you out of the Covisint PQRS application. You must log back into Covisint PQRS application to continue entering PQRS data. Unsaved data entered prior to the time out will be lost. A popup window will display with 2 minutes left giving the user the opportunity to reset the timer to 15 minutes. Figure 19.- Secondary Navigation Menu Page 17

19 Section 3 Using Covisint PQRS 1. PQRS Data Collection Overview A. PQRS Data Collection Forms Covisint has created collection forms specific to the CMS-approved measure groups to help users accurately collect qualifying patients clinical data for reporting to CMS. The collection forms display each individual measure specific to the chosen measure group written in a question format, with all possible answers allowed by CMS indicated. Brief directions for the measure group as well as for each individual measure associated with a measure group are provided on the collection forms. Detailed directions for each measure group, as well as for each individual measure are included in the CMS Specification Manuals. Individual collection forms for each of the CMS-approved measure groups are provided at the bottom of the Home screen. CMS Specification Manuals are also provided at the bottom of the Home screen. B. PQRS Data Collection Process Print the desired collection form(s). Then complete the form as patients visit the practice, recording measure responses while reviewing the patient s (paper or electronic) chart at the time of the visit. Keep a completed copy of the collection form for each of the 20 patients who are reported by a provider. Use the completed collection forms as resource when entering the responses into the Covisint PQRS application. The order of the individual measures on the collection form should directly correspond to the order of the individual measures in the application. Copy the answers from the collection form into the appropriate data entry screen of the PQRS application at a later time that may be more convenient than when sitting with a patient. Data entry can occur directly into the Covisint PQRS application, also, instead of using the collection forms. Review the CMS Measure Groups Specifications Manual for requirements and directions associated with reporting clinical data correctly for a chosen measure group. Finally, data can be entered into the application retroactively, as long as reported patient visits are for the appropriate reporting year. A user can report data from the medical records of patients with scheduled visits starting January 1 of the reporting year through the end of the reporting year. To report retroactively, choose a patient s date of service and search the patient s medical records prior to that specific date of service according to the measure specifications, recording the measure responses on the collection form and then entering them into the application, or recording them directly into the PQRS application. This method of reporting is more time consuming, but still just as appropriate as proactively reporting the clinical data at the time of the patient visit. C. Accessing the PQRS Collection Forms At the bottom of the Home screen review the lists of data collection forms for the CMS-approved PQRS measure groups for the submission year. Additionally, refer to the CMS Measure Group Specifications Manual, if necessary. To access Covisint s PQRS application, the collection forms, and CMS Measure Groups Specifications Manual: 1. Login to the Covisint PQRS application or, if you have not completed your registration, go to to access the PQRS Collection Forms, under the tab labeled Forms. Page 18

20 2. Within the Covisint PQRS application, click a title under the Collection Forms or Other Documents column headers. A secondary pop-up window appears, displaying a PDF of the selected document. The PDF does not allow for on-screen entry. Figure 20.- PQRS Data Collection Forms and Other Documents 3. This file can be viewed, downloaded and saved to your computer, or printed from this pop-up window. When the desired function (view, save or print) is completed, click the X in the top right corner of the pop-up window. 4. The window closes and the PQRS screen refreshes to the forefront, ready for use again. 5. When all desired collection forms are accessed, saved, and/or printed the user may exit the PQRS application by clicking Logoff in the top right corner of the screen. Page 19
 is completed, click the X in the top right corner of the pop-up window. 4.")

21 2. Managing User and Provider Account Information A. Editing User Account Information Users have the ability to edit and/or update their account information, which was created during the registration process. This includes the user s name, address, phone, , and security question. To edit your user account information: 1. Click My Account in the top right corner of the screen. Figure 21.- Click My Account 2. Click Edit Account at the bottom of the My Account screen. Page 20
22 Figure 22.- Click Edit Account 3. Edit existing data or enter additional data at any field showing on the screen. Items labeled in bright blue are required fields (Username, First Name, Last Name, Security Question, and Answer). These fields cannot be left blank; the screen will not save if a required field is blank. When a Save is attempted while required fields are blank a message will appear advising what field(s) should be completed. 4. When all edits and additions are completed, click Save at the bottom of the Edit My Account screen. Page 21

23 Figure 23.- Click Save The changes to your account have been saved and the screen refreshes displaying the My Account screen. You may logoff or proceed to another area in the PQRS application. B. Adding Providers Providers that were not added to the PQRS application during the registration process may be added afterwards at any time. You will need the following information to add a provider: Individual National Provider Identifier number (NPI) for each provider Practice s tax identification number (TIN) Page 22


24 To add a provider: 1. On the main menu bar, click place the cursor on Admin and select Edit Providers. Figure 24.- Click: Admin 2. When the screen refreshes the Provider List will display. To edit a provider click on the provider s NPI. To add a new provider click on Add New. Page 23


25 Figure 25.- Provider List 3. After clicking the Add New button, the provider search screen displays, and in the Enter Medicare Provider NPI field, enter the provider s individual NPI. Or, if you do not have the provider s NPI available, search the NPI registry by clicking the Click Here to Lookup NPI link. Figure 26.- Click: Click Here to Lookup NPI 4. A pop-up window opens in front of the Covisint registration screen. Enter the following in the appropriate fields: a. Provider s Last Name or Entity b. Provider s First Name c. State in which the provider practices 5. Click Search For NPI. Page 24
26 Figure 27.- Enter Provider Information 6. The NPI Number Lookup results screen displays. Scroll to find your provider The NPI Number Lookup results screen is not an interactive screen. Highlight the desired NPI number and use CTRL+C to copy the number, or record the number for later use. 7. Exit the NPI Number Lookup results screen by clicking the X in the top right corner of the window to return to the Covisint PQRS registration screen. Figure 28.- Copy the Provider NPI Number 8. Click into the Enter Medicare Provider NPI field on the NPI Search screen and use CTRL+V to paste the NPI number into the field, or type the number into the field. 9. Click Get Provider Detail and the provider s demographic data as recorded in the NPI registry populates into the Covisint Provider Details screen. Page 25

27 Figure 29.- Enter NPI and Click: Get Provider Detail 10. The Provider Details screen displays the provider s demographic data from the NPI registry. a. Enter missing data and update incorrect data. NOTE: All fields labeled in blue are required fields. The Specialty, , and Medicare Tax ID fields, which are not populated from the NPI registry and need to be completed. Changing data in the fields on this screen that originally populated from the NPI registry does not affect the data in the NPI registry. You are only changing the data within the Provider Details screen. The provider information should reflect the address and number that is best to reach the provider should there ever be a question about the data that is entered and the main contact at the site is not available. It is appropriate to enter the address of the practice. b. Click Save Provider. Figure 30.- Edit Provider Demographics and Click: Save 11. The Provider List screen displays with the new provider s demographic data from the NPI registry added to Covisint. NOTE: To sort the Provider List, click on a category name (e.g., NPI, First Name, etc.). Page 26

28 Figure 31.- New Provider Added to Covisint PQRS The new provider has been added. Continue adding new providers using these same steps until all providers to be reported for PQRS are entered. 3. Covisint PQRS Submission Process Using Covisint PQRS, physicians simply select a measures group to report from the 25 CMS-approved groups, collect the clinical data for 20 patients - with at least 50% being - Medicare Part B Fee-For-Service patients, enter, and submit the data using the Covisint PQRS application. In addition to Measure Group reporting providers can also report using Individual Measures. A. Entering Patient Data for PQRS Submission Measure Groups For PQRS data entry, over 50% of the 20 (or a minimum of 11) patients entered must be Medicare Part B Fee-For- Service patients. The PQRS application will calculate and identify when a CMS minimum number of patients is met. At that time, in addition to the Add New button the Submit button will be made available. The Covisint system will give you the option to add up to a total of 35 patients (Note: this is not a requirement). All data entered will be submitted to CMS. TIP: For a specific measure, you may not answer Not done/unknown or equivalent across all eligible patients. This will result in zero performance for that measure which does not meet the CMS reporting requirements (See section 5 on the Covisint PQRS Submission Summary report to ensure you do not have any 0% performance issues). IMPORTANT! There is a HIPAA privacy feature at the top, right corner of the data entry page denoted as HIPAA privacy timeout in: 15:00. It is an automatic lock out feature to protect patient data remaining on an unattended computer screen and counts down from 15 minutes to zero. At the time of automatic lock out the text changes to HIPAA privacy timeout. When this happens, click Logoff in the top, right corner. The user will need to log back into the service and continue entering data. Patient data not saved prior to the lock out will be lost and will need to be re-entered. A popup will display with 2 minutes remaining giving the user the opportunity to reset the timer to 15 minutes. 1. On the main menu bar, click PQRS Submission. When the user hovers over the PQRS Submission tab, two choices are displayed; Measure Groups and Individual Measures. Select Measure Groups to display the next screen. Page 27
29 Figure 32.- Click: PQRS Submission Measure Groups 2. Click the down arrow in the Providers field. b. The drop-down list expands to display all providers currently entered for the site in the PQRS application. c. Click the appropriate provider s name. The selected provider s name populates the Provider field and the drop-down list closes. 3. Click the down arrow in the Conditions field. a. The drop-down list expands to display all measure groups approved for the appropriate PQRS submission year. b. Click the appropriate measure group name. Page 28

30 Figure 33.- Select a Provider and Condition After selecting the provider and the measure group for reporting for the selected provider, the screen refreshes to display the entry fields for the selected condition criteria. If this is the first patient for this provider and this measure group, the fields will be blank. 1. Enter data for the first patient. Complete all required fields labeled in blue. NOTE: An error message will display if a required field is not completed. All required fields must be completed to save the patient data. a. Enter the patient s last name. b. Enter the patient s first name. c. Enter the patient s middle name, if needed. d. Enter the patient s date of birth using the format of mm/dd/yyyy. e. Select the patient s gender from the drop-down list. f. Enter the patient s medical record number (MRN), if needed. g. Enter the appointment date using the format of mm/dd/yyyy, or click the calendar icon and choose the date. h. Enter the ICD-9 code, if available. i. Enter the Encounter code, if available. j. Enter Procedure Code if applicable. k. Click the appropriate insurance checkbox IMPORTANT! PQRS requires 20 unique patients the majority (>50%; 11 patients) of which must be insured under Medicare Part B to qualify for the PQRS incentive. Page 29

31 Figure 34.- Enter the Patient Demographics 5. In the Measure Entry section of the screen, enter the measure data. a. Enter data for each field, using the drop-downs, radio buttons, or check boxes to select or enter data specific to that measure. 6. After entering data from the data collection form, click Save at the bottom of the screen. Figure 35.- Enter the Measure Date for the Selected Condition 7. A patient list is automatically generated on the left hand side of the screen in alphabetical order by patient last name. a. Patients identified in red have incomplete data and will need to be completed prior to submission. b. To revise saved data, click on the name of the patient in the patient list. The patient s data will appear on the screen. c. Make changes then click Save. Page 30


32 8. Click Add New to continue with data entry for another patient. 9. Review all data entered for accuracy. Figure 36.- Enter the Measure Date for the Selected Condition 10. When at least 20 patients are entered, a message displays letting you know that you may enter up to 35 total patients or proceed to submit your data. Click OK. 11. The screen refreshes and the patient list now includes a Submit link in addition to the Add New link. a. If you are ready to submit the patient data, click Submit to begin the submission process. b. Or you may enter a total of 35 patients. Figure 37.- Patient List Now Displays the Submit Link 12. When 35 patients are entered, a message displays letting you know that you have entered the maximum patients allowed. Click OK. 13. The screen refreshes and the patient list now includes only a Submit link. 14. If you are ready to submit the patient data, click Submit to begin the submission process. 15. A Submit Confirmation message displays. Read the message and click OK to acknowledge that the Individual NPI and Federal Tax ID numbers entered are correct and that you accept sole responsibility for any inaccuracies which may prevent you from receiving your CMS incentives. Page 31

33 Figure 38.- Submit Confirmation Message 16. A second Submit Confirmation message displays. Read the message and click OK to acknowledge that you are aware that each measure group has ICD-9 and Encounter code requirements as defined by CMS. Figure 39.- Submit Confirmation Message 17. The screen refreshes to an attestation screen where you must attest to the correctness and completeness of all data being submitted for this provider. Read the attestation statement. 18. Click I Accept to continue the submission process. Page 32

34 Figure 40.- Click: I Accept to Continue the Submission Process 19. The screen refreshes to the payment screen. Select one of the methods below to complete the payment process. VERY IMPORTANT! If you have a coupon, enter the coupon code and select Apply Coupon BEFORE completing your submission. There will be NO option to resubmit using another coupon. a. Paying by Credit Card: i. To submit the payment via credit card, enter your billing and credit card information in the provided fields ii. Click Next. iii. A pop up window will appear with a Confirmation Code indicating successful submission of data to Covisint. A receipt will be sent to the address entered during the registration process. b. Paying by Coupon: i. Enter your issued coupon code in the provided Coupon Code field. ii. Click Apply Coupon. This will process the amount of your coupon, refresh the payment screen, and indicate any remaining charges. iii. If you have a partial payment Coupon: Page 33
35 1. After clicking Apply Coupon, the screen will refresh, indicating your balance. To pay the balance, you enter your billing and credit card information in the provided fields 2. Click Next. c. If you have a Coupon for the Full Amount: i. After clicking Apply Coupon, the screen will refresh leaving a balance of $0.00. ii. DO NOT complete the billing and credit card fields. iii. A pop up window will appear with a Confirmation Code indicating successful submission of data to Covisint. A receipt will be sent to the address entered during the registration process. Click Next to proceed to the next screen. Figure 41.- Coupon Code Page 34
36 20. The screen refreshes to the submission screen. Click Next to go to the next screen in the process. The sales tax screen will display. Click Submit to complete the process. Figure 42.- Click: Next Page 35

37 21. You should receive a confirmation message indicating the process is completed successfully and an automated confirmation will be sent to the address entered for the main contact at User Information in registration. Click OK. Figure 43.- Click: OK Page 36
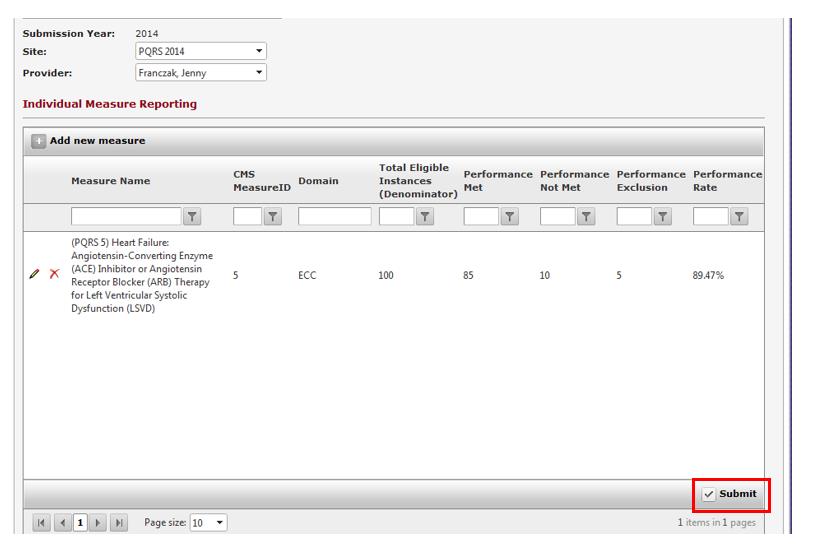
38 Figure 44.- Confirmation Measure data has been entered for a minimum of 20 unique patients the majority of which must be Medicare Part B feefor-service patients for a specified provider. You may either log out of the PQRS application, or start the data entry process for another provider. 4. Entering Patient Data For PQRS Submission Individual Measures Eligible Professionals (EP) must report on at least 9 measures covering at least 3 of the National Quality Strategy (NQS) domains for at least 50 percent of the EP Medicare Part B FFS patients seen during the reporting period to which the measure applies. If less than 9 measures covering at least 3 NQS apply to the EP, report 1-8 measures covering 1-3 NQS domains as applicable. EP that report 1-8 measures across one or more domains or report 9 measures across less than 3 domains will be subject to the Measure Applicability Validation (MAV) process. The MAV Process allows CMS to determine whether additional measures or domains should have been reported. To report an individual measure, you first identify the denominator which is the Total Eligible Instances to which the measure applies. The Total Eligible Instances can be determined from your Practice Management or billing system based on the denominator requirements (including age, gender, encounter and disease) as found in the CMS 2014 PQRS Measure Specifications Manual. Then you determine the numerator - of the patients in the denominator, identify the total number of patients that met the performance of the measure, didn t meet the performance of the measure or were excluded from the measure as per the numerator requirements. (Definitions are included below.) These are the values that you enter into the Covisint PQRS web application. Page 37

39 Encounters versus patients Some measures specify that the measure is to be reported at each visit while others state unique patients or once per reporting period. Be sure to read the measure instructions to ensure you understand what the measure is asking you to report. 1. On the main menu bar place the cursor over PQRS Submission and select Individual Measures. 2. Review the information page and click Accept. 3. The Select Provider screen displays. Click the down arrow in the Providers field. The drop-down list expands to display all providers currently entered for the site in the PQRS application. 4. Click the appropriate provider s name. The selected provider s name populates the Provider field and the drop-down list closes. Figure 45.- Click: PQRS Submission After selecting the provider, the Individual Measure Reporting screen displays where the user will select the individual measures being reported by this provider. 5. Select Add new measure. Page 38
.")
40 6. The 2014 Individual Measures Selection screen displays. Click the icon to display the CMS 2014 PQRS Measure Specifications Manual where eligibility and performance information is detailed. A table displaying all measures begins on page 6 of the Manual. 7. Use either the filter option or page forward to locate the measures. Check the box beside the appropriate measure(s). Once selected click Add & Close. Note: You can choose more than nine if you are unsure about which measures to submit. You can delete any measure you do not wish to submit prior to submission. Page 39

41 8. For each measure displayed on the Individual Measure Reporting screen, click the icon and enter values for Total Eligible Instances, Performance Met, Performance Not Met, and Performance Exclusion. 9. When complete, click the icon to save the measure. To close the edit window without saving any data, click on the icon. 10. Identify the Total Eligible Instances (denominator) from your Practice Management or billing system based on the denominator requirements (including age, gender, and disease) as found in the CMS 2014 PQRS Measure Specifications Manual (use the measure. icon). Enter the quantity in the Total Eligible Instances column for each Note about the denominator: The denominator must be a minimum of 50% of the provider s Total Eligible Instances for which this measure applies during the reporting year. The denominator can be unique patients or each visit unless otherwise indicated by the measure definition. Exceptions include procedure-based or episodic measures. Be sure to read the measure specification instructions to ensure you are reporting this correctly. Visits are ambulatory unless otherwise indicated by the measure. All patients reported must be Medicare Part B FFS. 11. Of the Total Eligible Instances for each measure, determine how many met performance for the measure, how many did not meet performance and if there were any excluded from the measure. Enter these numbers for each measure. Page 40

42 Note: Performance Met + Performance Not Met + Performance Exclusions must equal the Denominator (Total Eligible Instances) or the measure will not save. Zero Percent Performance Violation: if a measure has a zero in Performance Met, the measure will not save as CMS will not accept a zero performance for most measures Performance Rate and Reporting Rate are automatically calculated. o o The performance rate is the total number of patients who meet the performance for the measure divided by the total number of patients seen who are eligible for the measure. The performance rate must be greater than 0% with the exception of inverse measures (see inverse measure exception below). The reporting rate (not displayed) is the number of patients (or encounters) who are eligible for the measure that you report on divided by the total number of patients seen who are eligible for the measure. The Reporting Rate must be at least 50%* of total eligible instances for the measure being reported. *Note: the reporting rate calculated in the Covisint web application will always be 100% and assumes that EP s are always reporting all eligible instances. If you decide not to submit data for a measure you selected, from the Individual Measure Reporting screen, click on the icon next to the measure. Once data entry is completed for the measures you plan to submit, click Submit to proceed to the attestation screen. Once you have attested you will be directed to the payment screen. Page 41

43 Page 42
44 If fewer than nine measures are being submitted, a warning box displays. Submit displays the attestation page followed by payment. The individual measures being reported are displayed on both pages. Page 43

45 Figure 46.- Attestation Statement Acceptance Page 44
; and a numerator")
46 Individual Measure Definitions: Measures - the sets of established clinical elements or processes that define how a managed condition is tracked. Measures consist of two major components: a denominator that describes the eligible patients for a measure (the eligible patient population associated with a measure s numerator); and a numerator that describes the Quality Service / Clinical Action required by the measure for reporting and performance. Total Eligible Instances (Denominator) the number of patients who are eligible for the measure. Example: Patients aged 18 years and older with a diagnosis of heart failure (HF) with a current or prior left ventricular ejection fraction (LVEF) < 40% seen during the reporting period. Measure Numerator = Performance Met + Performance Not Met + Performance Exclusions. Performance Met the number of Total eligible patients upon whom the quality service / clinical action was performed. Example: Patients who were prescribed ACE inhibitor or ARB therapy either within a 12 month period when seen in the outpatient setting or who were already taking ACE inhibitor or ARB therapy as documented in the current medication list. [A clinical action to be counted as meeting a measure s requirements = Performance Met.] Page 45
47 Performance Not Met the number of Total eligible patients who do not meet the performance criteria (the quality service / clinical action was not performed). Example: The number of Eligible Patients for whom ACE inhibitor or ARB therapy was not prescribed, with appropriate code indicating reason not otherwise specified. Performance Exclusion the number of Total eligible patients who are excluded from the clinical action. Example: The number of Eligible Patients who were not prescribed ACE or ARB therapy along with the appropriate codes indicating the clinical action was not performed for Medical Reasons, Patient Reasons, or System Reasons. 5. PQRS Submission Summary Reports A. Generating a Report Users have the ability to generate and view the following Covisint PQRS Submission Summary reports: PQRS 2013 Submission Summary Report Performance summary for 2013 submissions. This report is only available if your practice submitted PQRS data via Covisint in The report is organized by provider and condition. It includes total patients submitted per measure within a condition, and the number of met, not met, and exclusion performances. PQRS 2014 Submission Summary Report Performance summary for 2014 submissions. The report is organized by Provider and condition. It includes total patients submitted per measure within a condition, and the number of met, not met, and exclusion performances. Page 46
48 To generate and view a report: 1. Click PQRS Submission Summary Report on the main menu bar. Figure 47.- Click PQRS Submission Summary Report 2. On the Report screen: a. In the Report field, click on the report name you want to view. For this example, the PQRS 2014 Submission Summary Report" was selected. Figure 48.- Select the Provider and Click on the Name of a Report Page 47

49 3. A new window displays. a. In the Select Providers field, select the providers from the drop down list to include in the report. b. Click View Report. Figure 49.- Select the Provider and Click View Report 4. The screen refreshes displaying additional fields. a. Reports can be exported in multiple formats by selecting Select a format field and clicking on Export. Report displays in the selected format. 5. A new window opens displaying the report, which you may save to your computer or print. 6. Items highlighted in red need to be addressed. Note: Reports need to update overnight so any data entered today will not be reflected in the report until it updates. Figure PQRS Submission Summary Report Page 48
50 6. Reporting a Submitted Data and CMS Incentive Payment Information Covisint processes all submitted data from the PQRS application at one time, at the end of the reporting year. If a practice did not complete the entire process, submitting data for each provider by the designated close date posted at our website, the data will not be included in the information sent to CMS. CMS has a designated window of time when the data can be submitted by vendors, usually mid-march of the year following the reporting year. Covisint will post a close date on the website that allows us time to process the data and prepare it for submission to CMS. Upon receipt of the data CMS will process data and determine eligible professionals who satisfactorily reported clinical data in a selected measure group. CMS will provide an incentive payment equal to a percentage of the eligible provider s estimated total allowed charges under the TIN/NPI combination reported for covered Medicare Part B PFS services provided during the reporting year. For the 2014 reporting year, the incentive is 0.5% of the provider s 2014 allowed charges for covered Medicare Part B PFS services. CMS does not notify Covisint when they start making payments of the incentives. Covisint receives no information indicating which providers were incentive eligible and which were not, nor does Covisint know what a specific provider s actual incentive total is or should be. CMS decides when they will distribute the incentive payments. Precedence has the payments being distributed anywhere between late summer and early fall, after the completion of the reporting year. CMS will make a lump-sum incentive payment to a practice or provider in the normal manner of Medicare Part B reimbursement. If a practice normally receives a direct deposit, that is how the incentive payment will be received. If the practice normally receives a paper check in the mail, then that is how the incentive payment will be received. Typically, there is no message prior to receipt of the incentive payment. It arrives, and you are expected to review the CMS feedback report for details related to the incentive payment. CMS provides multiple methods for practices and providers to receive feedback reports. A user can contact CMS QualityNet Help Desk Support at for assistance, or a user can contact the practice s Medicare carrier for a feedback report. Or you can go to the PQRS home page at: 7. Contact Covisint for additional PQRS questions or support You can reach Covisint PQRS Sales at or [email protected]. For assistance with a password reset only call Covisint PQRS support at Covisint provides the leading cloud engagement platform for creating and enabling new mission critical external business processes. Our solutions enable organizations to connect, engage, and collaborate with the critical external audiences that define their success -- including customers, business partners, and suppliers. Learn more at covisint.com. Covisint Corporation One Campus Martius Suite 700 Detroit, Michigan United States of America p covisint.com All Covisint products and services listed within are trademarks of Covisint Corporation. All other company or product names are trademarks of their respective owners Covisint Corporation. Page 49
DIRECT MESSAGING END USER GUIDE ALABAMA ONE HEALTH RECORD. Unify Data Management Platform 2012/2013 Software Build 5.15
 DIRECT MESSAGING END USER GUIDE ALABAMA ONE HEALTH RECORD Unify Data Management Platform 2012/2013 Software Build 5.15 April 2015 Proprietary and Confidential Property of Truven Health Analytics Inc.
EXPRESSPATH PROVIDER PORTAL USER GUIDE AUGUST 2013
 EXPRESSPATH PROVIDER PORTAL USER GUIDE AUGUST 2013 2013-2020 Express Scripts, Inc. All rights reserved. No part of this publication may be reproduced or transmitted in any form or by any means, electronic
PQRS Quality Reporting System www.mshregistry.com
 PQRS Quality Reporting System www.mshregistry.com This Guide is intended for US Oncology Network Members Sections I. How to Access the PQRS Quality Reporting System II. How to Log into the PQRS Quality
Wisconsin Medicaid Electronic Health Record Incentive Program for Eligible Hospitals
 P-00358D Wisconsin Medicaid Electronic Health Record Incentive Program for Eligible Hospitals User Guide i Table of Contents 1 Introduction... 1 2 Before You Begin... 2 2.1 Register with Centers for Medicare
Secure Provider Website. Instructional Guide
 Secure Provider Website Instructional Guide Operational Training 2 12/12/2012 Table of Contents Introduction... 4 How to Use the Manual... 4 Registration... 5 Update Account... 8 User Management... 10
Center for Educational Performance and Information (CEPI) Student Data System (SDS)
 Student Data System (SDS)") Center for Educational Performance and Information (CEPI) Student Data System (SDS) Training Manual Questions? Contact: 517.335.0505 E-mail: [email protected] Table of Contents MODULE 1 STUDENT DATA SYSTEM
Center for Educational Performance and Information (CEPI) Student Data System (SDS) Training Manual Questions? Contact: 517.335.0505 E-mail: [email protected] Table of Contents MODULE 1 STUDENT DATA SYSTEM
UCB erequest IIS Requestor - Quick Reference Guide
 UCB erequest - CONTENTS 1 INTRODUCTION... 3 2 HOW TO REGISTER AND LOG-IN... 3 2.1 REGISTER TO RECEIVE AN EXTERNAL REQUESTOR USER ID AND PASSWORD... 3 2.2 LOGIN WITH USER ID AND PASSWORD... 5 3 HOW TO SUBMIT
Optum Patient Portal. 70 Royal Little Drive. Providence, RI 02904. Copyright 2002-2013 Optum. All rights reserved. Updated: 3/7/13
 Optum Patient Portal 70 Royal Little Drive Providence, RI 02904 Copyright 2002-2013 Optum. All rights reserved. Updated: 3/7/13 Table of Contents 1 Patient Portal Activation...1 1.1 Pre-register a Patient...1
Wisconsin Medicaid Electronic Health Record Incentive Program for Eligible Professionals
 P- Wisconsin Medicaid Electronic Health Record Incentive Program for Eligible Professionals June 15,2015 User Guide i Table of Contents 1 Introduction... 1 2 Before You Begin... 2 2.1 Register
Campus Solutions Self Service: Student Quick Reference Guide
 Campus Solutions Self Service: Student Table of Contents Introduction to Step Sheets... 4 Getting Started in CUNYfirst... 5 Activate My CUNYfirst Account... 6 Log into My CUNYfirst Account... 10 Sign Out
NYS OCFS CMS Contractor Manual
 NYS OCFS CMS Contractor Manual C O N T E N T S CHAPTER 1... 1-1 Chapter 1: Introduction to the Contract Management System... 1-2 CHAPTER 2... 2-1 Accessing the Contract Management System... 2-2 Shortcuts
NextGen Patient Portal User Guide. Version 2.0
 NextGen Patient Portal User Guide Version 2.0 Copyright 2014 NextGen Healthcare Information Systems, LLC. All Rights Reserved. NextGen and the registered trademarks listed at http://www.nextgen.com/about-nextgen/legalnotices.aspx
Resource Online User Guide JUNE 2013
 Resource Online User Guide JUNE 2013 CHASE PAYMENTECH SOLUTIONS MAKES NO WARRANTY OF ANY KIND, EITHER EXPRESSED OR IMPLIED, WITH REGARD TO THIS MATERIAL, INCLUDING, BUT NOT LIMITED TO, THE IMPLIED WARRANTIES
Maryland Electronic Health Records (EHR) Incentive Program Registration and Attestation System. Provider User Guide. Version 2
 Incentive Program Registration and Attestation System. Provider User Guide. Version 2") Maryland Electronic Health Records (EHR) Incentive Program Registration and Attestation System Provider User Guide Version 2 December 2012 Table of Contents Table of Figures... 3 Introduction... 4 Getting
Maryland Electronic Health Records (EHR) Incentive Program Registration and Attestation System Provider User Guide Version 2 December 2012 Table of Contents Table of Figures... 3 Introduction... 4 Getting
NEW USER REGISTRATION AND EMAIL VERIFICATION
 NEW USER REGISTRATION AND EMAIL VERIFICATION The Children s Treatment (CT) or Residential Treatment (RT) organization must have an assigned Departmental Vendor Number (DVN), a PIN number issued to the
DHS Medicaid Online (DMO) Web-Based Eligibility/Enrollment Verification. Application Walk-Through
 Web-Based Eligibility/Enrollment Verification. Application Walk-Through") DHS Medicaid Online (DMO) Web-Based Eligibility/Enrollment Verification Application Walk-Through Contents Overview...3 Browser Requirement...3 DHS/MQD Online Overview...4 Contact Us...5 Security...7 Login...7
DHS Medicaid Online (DMO) Web-Based Eligibility/Enrollment Verification Application Walk-Through Contents Overview...3 Browser Requirement...3 DHS/MQD Online Overview...4 Contact Us...5 Security...7 Login...7
BEST / Act 230 Funding
 BEST / Act 230 Funding GRANTIUM APPLICATION INSTRUCTIONS FOR FY 16 (2015 2016 Academic Year) Table of Contents Logging into Grantium and Changing Your Password... 3 Forgot Your Password?... 4 How to Get
Maryland Electronic Health Records (EHR) Incentive Program Registration and Attestation System. Provider User Guide. Version 3
 Incentive Program Registration and Attestation System. Provider User Guide. Version 3") Maryland Electronic Health Records (EHR) Incentive Program Registration and Attestation System Provider User Guide Version 3 January 2014 Table of Contents Table of Figures... 3 Introduction... 4 Getting
Maryland Electronic Health Records (EHR) Incentive Program Registration and Attestation System Provider User Guide Version 3 January 2014 Table of Contents Table of Figures... 3 Introduction... 4 Getting
TPA-Trading Partner Account User Guide. for. State of Idaho MMIS
 TPA-Trading Partner Account User Guide for State of Idaho MMIS Date of Publication: 4/8/2016 Document Number: RF019 Version: 11.0 This document and information contains proprietary information and copyrighted
DarwiNet Client Level
 DarwiNet Client Level Table Of Contents Welcome to the Help area for your online payroll system.... 1 Getting Started... 3 Welcome to the Help area for your online payroll system.... 3 Logging In... 4
Patient Portal Users Guide
 e-mds Solution Series Patient Portal Users Guide Version 7.0 How to Use the Patient Portal CHARTING THE FUTURE OF HEALTHCARE e-mds 9900 Spectrum Drive. Austin, TX 78717 Phone 512.257.5200 Fax 512.335.4375
INVESTOR360º CLIENT USER GUIDE
 INVESTOR360º CLIENT USER GUIDE TABLE OF CONTENTS 1. About Investor360 3 1.1 What does Investor360 provide? 3 1.2 Security 3 2. Logging in to Investor360 4 3. Welcome to Investor360 7 4. Navigating in Investor360
DI SHAREPOINT PORTAL. User Guide
 DI SHAREPOINT PORTAL User Guide -1- TABLE OF CONTENTS PREFACE... 3 SECTION 1: DI PORTAL ACCESS... 4 REQUEST USER ACCESS... 4 To register... 4 SIGNING IN TO THE PORTAL... 8 To sign in to the DI Portal...
NextGen Patient Portal User Guide. Version 2.0
 NextGen Patient Portal User Guide Version 2.0 Copyright 2014 NextGen Healthcare Information Systems, LLC. All Rights Reserved. NextGen and the registered trademarks listed at http://www.nextgen.com/about-nextgen/legalnotices.aspx
NYS OCFS CMS Manual CHAPTER 1...1-1 CHAPTER 2...2-1 CHAPTER 3...3-1 CHAPTER 4...4-1. Contract Management System
 NYS OCFS CMS Manual C O N T E N T S CHAPTER 1...1-1 Chapter 1: Introduction to the Contract Management System...1-2 Using the Contract Management System... 1-2 Accessing the Contract Management System...
efiletexas.gov Court Administrator User Guide
 efiletexas.gov Court Administrator User Guide EFS-TX-200-3191 v.4 February 2014 Copyright and Confidentiality Copyright 2014 Tyler Technologies, Inc. All rights reserved. All documentation, source programs,
Physician Quality Reporting System (PQRS) Physician Portal
 Physician Portal") The American College of Radiology Physician Quality Reporting System (PQRS) Physician Portal User Guide January 29, 2016 American College of Radiology 1891 Preston White Drive Reston, VA 20191-4397 Copyright
The American College of Radiology Physician Quality Reporting System (PQRS) Physician Portal User Guide January 29, 2016 American College of Radiology 1891 Preston White Drive Reston, VA 20191-4397 Copyright
Secure Messaging Quick Reference Guide
 Secure Messaging Quick Reference Guide Overview The SHARE Secure Messaging feature allows a SHARE registered user to securely send health information to another SHARE registered user. The Secure Messaging
eopf Release E Administrator Training Manual
 eopf Release E Administrator Training Manual i The United States Office Of Personnel Management eopf Administrator Training Manual for eopf v5 eopf Version 4.1, July 2007, March 2008, March 2009; eopf
Chapter 15: Forms. User Guide. 1 P a g e
 User Guide Chapter 15 Forms Engine 1 P a g e Table of Contents Introduction... 3 Form Building Basics... 4 1) About Form Templates... 4 2) About Form Instances... 4 Key Information... 4 Accessing the Form
Stewart Secure Email User Guide. March 13, 2015
 Stewart Secure Email User Guide March 13, 2015 Table of Contents Introduction... 1 What is secure email?... 1 Why secure email?... 1 What is personal, non-public information?... 1 How is my data protected?...
How To Use Thecontinuus Provider Portal
 PROVIDER PORTAL USER GUIDE OCTOBER 13, 2014 TOGETHER ADMINISTRATION OFFICE phone: 608-647-4729 toll free: 1-877-376-6113 fax: 608-647-4754 web: www.continuus.org email: [email protected] CONTENTS System
Getting Started. Getting Started with Time Warner Cable Business Class. Voice Manager. A Guide for Administrators and Users
 Getting Started Getting Started with Time Warner Cable Business Class Voice Manager A Guide for Administrators and Users Table of Contents Table of Contents... 2 How to Use This Guide... 3 Administrators...
User Manual for Web. Help Desk Authority 9.0
 User Manual for Web Help Desk Authority 9.0 2011ScriptLogic Corporation ALL RIGHTS RESERVED. ScriptLogic, the ScriptLogic logo and Point,Click,Done! are trademarks and registered trademarks of ScriptLogic
Student ANGEL FAQs. General Issues: System Requirements:
 Student ANGEL FAQs General Issues: What is ANGEL? How do I log in? What is my username and password? How do I activate my account? I forgot my C number/password, what do I do? I registered after the first
Secure Message Center User Guide
 Secure Message Center User Guide Using the Department of Banking Secure Email Message Center 2 Receiving and Replying to Messages 3 Initiating New Messages 7 Using the Address Book 9 Managing Your Account
Using Webmail. Document Updated: 11/10. Technical Manual: User Guide. The Webmail Window. Logging In to Webmail. Displaying and Hiding the Full Header
 Using Webmail Technical Manual: User Guide Webmail is supported in the following browsers: Windows Internet Explorer 6, Internet Explorer 7, Firefox 2, and Firefox 3 Mac OSX Safari 2, Safari 3, Firefox
OSP User Guide. 1 P a g e
 Online School Payments (OSP) User Guide February, 2014 OSP User Guide Table of Contents Overview...3 Site Information...3 Login to Portal...4 Activity Setup...6 OSP Activity Setup Form...6 Add Activity...7
Document Services Online Customer Guide
 Document Services Online Customer Guide Logging in... 3 Registering an Account... 3 Navigating DSO... 4 Basic Orders... 5 Getting Started... 5 Attaching Files & Print Options... 7 Advanced Print Options
North Carolina Medicaid Electronic Health Record Incentive Program
 North Carolina Medicaid Electronic Health Record Incentive Program Eligible Professional Stage 1 (2014) Meaningful Use Attestation Guide NC MIPS 2.0 Issue Number 1.8 November 19, 2014 The North Carolina
DEPARTMENT OF VETERANS AFFAIRS Financial Services Center Dialysis Provider Portal User Guide. Version 3.0 May 2015
 DEPARTMENT OF VETERANS AFFAIRS Financial Services Center Dialysis Provider Portal User Guide Version 3.0 May 2015 1. Provider Portal for Dialysis Overview The VA Financial Services Center (FSC) Dialysis
How To Use Senior Systems Cloud Services
 Senior Systems Cloud Services In this guide... Senior Systems Cloud Services 1 Cloud Services User Guide 2 Working In Your Cloud Environment 3 Cloud Profile Management Tool 6 How To Save Files 8 How To
VALUE LINE INVESTMENT SURVEY ONLINE USER S GUIDE VALUE LINE INVESTMENT SURVEY ONLINE. User s Guide
 VALUE LINE INVESTMENT SURVEY ONLINE User s Guide Welcome to Value Line Investment Survey Online. This user guide will show you everything you need to know to access and utilize the wealth of information
CAQH ProView. Practice Manager Module User Guide
 CAQH ProView Practice Manager Module User Guide Table of Contents Chapter 1: Introduction... 1 CAQH ProView Overview... 1 System Security... 2 Chapter 2: Registration... 3 Existing Practice Managers...
RSCCD REMOTE PORTAL TABLE OF CONTENTS: Technology Requirements NOTE
 RSCCD REMOTE PORTAL The RSCCD Remote Portal allows employees to access their RSCCD Email (via Outlook Web Access), Department (Public) Folders, Personal (H Drive) Folder, and the District Intranet from
PDMP User s Guide. Oregon Health Authority Prescription Drug Monitoring Program
 Oregon Health Authority Prescription Drug Monitoring Program December 2015 Contents Contents 1 Document Overview... 1 Purpose and Contents... 1 RxSentry Update... 1 2 System Overview... 3 About the RxSentry
efiletexas.gov Review Queue User Guide
 efiletexas.gov Review Queue User Guide EFS-TF-200-3194 v.4 February 2014 Copyright and Confidentiality Copyright 2014 Tyler Technologies, Inc. All rights reserved. All documentation, source programs, object
Customer Management Services (CMS)
") Customer Management Services (CMS) Customer User Manual Version 1.2 April 2009 Page 1 of 23 Table of Contents 1 AN INTRODUCTION TO CMS... 3 2 GETTING STARTED WITH CMS... 4 ONLINE HELP... 4 ACCESSING CMS...
Customer Management Services (CMS) Customer User Manual Version 1.2 April 2009 Page 1 of 23 Table of Contents 1 AN INTRODUCTION TO CMS... 3 2 GETTING STARTED WITH CMS... 4 ONLINE HELP... 4 ACCESSING CMS...
NextGen Patient Portal User Guide. Version 5.8
 NextGen Patient Portal User Guide Version 5.8 Copyright 1994-2013 NextGen Healthcare Information Systems, LLC. All Rights Reserved. NextGen and NextPen are registered trademarks of QSI Management, LLC,
Outlook Web App User Guide
 Outlook Web App Table of Contents QUICK REFERENCE... 2 OUTLOOK WEB APP URL... 2 Imagine! Help Desk...... 2 OUTLOOK WEB APP MAIN WINDOW... 2 KEY NEW FEATURES... 3 GETTING STARTED WITH OUTLOOK... 4 LOGGING
Online School Payments (OSP) User Guide
 User Guide") Online School Payments (OSP) User Guide November, 2013 OSP User Guide Table of Contents Overview...3 Site Information...3 Login to Portal...4 Activity Setup...6 OSP Activity Setup Form...6 Add Activity...7
Online School Payments (OSP) User Guide November, 2013 OSP User Guide Table of Contents Overview...3 Site Information...3 Login to Portal...4 Activity Setup...6 OSP Activity Setup Form...6 Add Activity...7
Secure Messaging (Direct) Training Manual
 Training Manual") Secure Messaging (Direct) Training Manual 9D Revised 4.1.14 HealtheConnections Secure Messaging (Direct Mail) HealtheConnections Secure Messaging is a solution based on the Nationwide Health Information
Secure Messaging (Direct) Training Manual 9D Revised 4.1.14 HealtheConnections Secure Messaging (Direct Mail) HealtheConnections Secure Messaging is a solution based on the Nationwide Health Information
TrueFiling. User Guide. Release 1.0.36. www.imagesoftinc.com 25900 W. 11 Mile Rd., Suite 100 Southfield, MI 48034 phone: (855) 959-8868
 959-8868") TrueFiling User Guide Release 1.0.36 www.imagesoftinc.com 25900 W. 11 Mile Rd., Suite 100 Southfield, MI 48034 phone: (855) 959-8868 Copyright 2015 ImageSoft, Inc. All rights reserved If this guide is
TrueFiling User Guide Release 1.0.36 www.imagesoftinc.com 25900 W. 11 Mile Rd., Suite 100 Southfield, MI 48034 phone: (855) 959-8868 Copyright 2015 ImageSoft, Inc. All rights reserved If this guide is
PowerSchool Parent Portal User Guide. PowerSchool 7.x Student Information System
 PowerSchool 7.x Student Information System Released December 2011 Document Owner: Documentation Services This edition applies to Release 7.1 of the [product name] software and to all subsequent releases
Cypress Connexion HELP Guide www.cypressconnexion.com
 Welcome to Cypress Connexion your one-stop-shop for accessing and managing your Cypress Communications account online, at your convenience. The following guide will provide you with helpful information
Health Indicators Advancing Healthy Aging in Your Community. Database Instructions for Managers
 Health Indicators Advancing Healthy Aging in Your Community Database Instructions for Managers Getting to the Database Website You can access the Health Indicators online database in two different ways.
What s Inside. Welcome to Busey ebank
 What s Inside Security............................ Getting Started...................... 5 Account Access...................... 6 Account Detail...................... 7 Transfer Funds......................
User Guide. A guide to online services available through Sircon for Education Providers. DOC CX 08/13/10 02/02 v5
 User Guide A guide to online services available through Sircon for Education Providers DOC CX 08/13/10 02/02 v5 Contents Contents Contents... 2 Introduction... 4 About this Guide... 4 Getting Started...
Using Webmail. Technical Manual: User Guide. Document Updated: 1/07. The Webmail Window. Displaying and Hiding the Full Header.
 Using Webmail Technical Manual: User Guide The Webmail Window To save an attachment: 1. Click once on the attachment name. Or, if there are multiple attachments, click the Save icon to save all attachments
Outlook Web App McKinney ISD 5/27/2011
 Outlook Web App McKinney ISD 5/27/2011 Outlook Web App Tutorial Outlook Web Access allows you to gain access to your messages, calendars, contacts, tasks and public folders from any computer with internet
Employee Quick Reference Guide
 Employee Quick Reference Guide Thank you for using ADP's ipaystatements to view your payroll information. Use this Quick Reference Guide to learn how to view your pay statements, W-2s, 1099s, and adjustments.
RescueNet 12-Lead User Guide. Software version 2.4 Issue 1
 RescueNet 12-Lead User Guide Software version 2.4 Issue 1 2013 by ZOLL. All rights reserved. RescueNet is a registered trademark of ZOLL. RescueNet CommCAD, RescueNet Dispatch, RescueNet DispatchPro, RescueNet
CITY OF BURLINGTON PUBLIC SCHOOLS MICROSOFT EXCHANGE 2010 OUTLOOK WEB APP USERS GUIDE
 CITY OF BURLINGTON PUBLIC SCHOOLS MICROSOFT EXCHANGE 2010 OUTLOOK WEB APP USERS GUIDE INTRODUCTION You can access your email account from any workstation at your school using Outlook Web Access (OWA),
Does the GC have an online document management solution?
 This FAQ contains: Web File Services definition Access web file services Create a WFS folder Upload a document Email a link to a document folder Create WFS subscription Cancel existing subscription Create
WebGrants for Students User Guide
 Updated: December 7, 2005 Overview of is the California Student Aid Commission s (Commission) website that allows students to check the status of their Cal Grant and Chafee Grant applications and, in the
Recognition Program Online Application Step-by-step Instructions Guide for Single Site Submission
 Recognition Program Online Application Step-by-step Instructions Guide for Single Site Submission No part of this publication may be reproduced or transmitted in any form or by any means, electronic or
End User Training Guide
 End User Training Guide October 2013 2005-2013 ExpenseWire LLC. All rights reserved. 1 expensewire.com Use of this user documentation is subject to the terms and conditions of the applicable End- User
User guide. Tax & Accounting. Version 4.1. Last updated April 16, 2010. Copyright 2010 Thomson Reuters/ONESOURCE. All Rights Reserved
 Onesource Fileroom User guide Version 4.1 Last updated April 16, 2010 Tax & Accounting Copyright 2010 Thomson Reuters/ONESOURCE. Proprietary Materials No use of these Proprietary materials is permitted
HertSFX. User Guide V2.04. Hertfordshire s Secure File Exchange Portal. (Jan 2014) HertSFX User Guide V2.04 Jan 2014 Page 1 of 17
 HertSFX User Guide V2.04 Jan 2014 Page 1 of 17") Hertfordshire s Secure File Exchange Portal User Guide V2.04 (Jan 2014) HertSFX User Guide V2.04 Jan 2014 Page 1 of 17 CONTENTS 1. About HertSFX... 3 2. HertSFX Limitations... 3 3. Getting Started... 3
Hertfordshire s Secure File Exchange Portal User Guide V2.04 (Jan 2014) HertSFX User Guide V2.04 Jan 2014 Page 1 of 17 CONTENTS 1. About HertSFX... 3 2. HertSFX Limitations... 3 3. Getting Started... 3
National Government Services Connex Quick Steps
 National Government Services Connex Quick Steps Table of Contents Table of Contents... 1 Detailed Setup Instructions... 3 Detailed setup instructions for new Connex users are available by going to http://www.ngsmedicare.com
e@syfile TM Employer USER GUIDE
 e e@syfile Employer User Guide e@syfile Employer User Guide e@syfile Employer User Guide e@syfile Employer User Guide 2012 e@syfi e@syfile TM Employer USER GUIDE MAY 2012 I r User Guide e@syfile Employer
Document Management Portal User Guide
 NetClient CS Document Management Portal User Guide Version 8.x Copyright Information Text copyright 2001-2009 by Thomson Reuters/Tax & Accounting. All rights reserved. Video display images copyright 2001-2009
Webmail User Guide. The Webmail Window. Logging In to Webmail. Displaying and Hiding the Full Header. Printing an Email. Composing a New Email
 Webmail User Guide Rev: November, 2012 Webmail is supported in the following browsers: Windows Internet Explorer 6, Internet Explorer 7, Firefox 2, and Firefox 3 Mac OSX Safari 2, Safari 3, Firefox 2,
Forefront Online Protection for Exchange (FOPE) User documentation
 User documentation") Forefront Online Protection for Exchange (FOPE) User documentation About Your FOPE Quarantine Mailbox Applies To: Forefront Online Protection for Exchange This document will help you get started with the
Forefront Online Protection for Exchange (FOPE) User documentation About Your FOPE Quarantine Mailbox Applies To: Forefront Online Protection for Exchange This document will help you get started with the
Outlook Web Access (OWA) User Guide
 User Guide") Outlook Web Access (OWA) User Guide September 2010 TABLE OF CONTENTS TABLE OF CONTENTS... 2 1.0 INTRODUCTION... 4 1.1 OUTLOOK WEB ACCESS SECURITY CONSIDERATIONS... 4 2.0 GETTING STARTED... 5 2.1 LOGGING
Outlook Web Access (OWA) User Guide September 2010 TABLE OF CONTENTS TABLE OF CONTENTS... 2 1.0 INTRODUCTION... 4 1.1 OUTLOOK WEB ACCESS SECURITY CONSIDERATIONS... 4 2.0 GETTING STARTED... 5 2.1 LOGGING
Getting Started with Mamut Online Desktop
 // Mamut Business Software Getting Started with Mamut Online Desktop Getting Started with Mamut Online Desktop Contents Welcome to Mamut Online Desktop... 3 Getting Started... 6 Status... 23 Contact...
Coast Guard Pay & Personnel Center Topeka, KS
 Coast Guard Pay & Personnel Center Topeka, KS Setting Up and Using the Self-Service Password Reset Features in Direct Access and T-PAX Contents: Direct Access (DA) Account Setup... 2 Add Your E-Mail Address
CONTRACT MANAGEMENT SYSTEM USER S GUIDE VERSION 2.7 (REVISED JULY 2012)
") CONTRACT MANAGEMENT SYSTEM USER S GUIDE VERSION 2.7 (REVISED JULY 2012) VERSION 2.6 (REVISED APRIL 2012)... I INTRODUCTION... 5 Helpful Hints... 5 Pop-Up Blockers... 5 Users... 6 CPUC Staff Administrator...
CONTRACT MANAGEMENT SYSTEM USER S GUIDE VERSION 2.7 (REVISED JULY 2012) VERSION 2.6 (REVISED APRIL 2012)... I INTRODUCTION... 5 Helpful Hints... 5 Pop-Up Blockers... 5 Users... 6 CPUC Staff Administrator...
Netmail Search for Outlook 2010
 Netmail Search for Outlook 2010 Quick Reference Guide Netmail Search is an easy-to-use web-based electronic discovery tool that allows you to easily search, sort, retrieve, view, and manage your archived
TriCore Secure Web Email Gateway User Guide 1
 TriCore Secure Web Email Gateway User Guide This document provides information about TriCore Secure Web Email Gateway. This document is for users who are authorized to send and receive encrypted email
Instructions for using Eastpointe s Electronic Systems (Waiver Version)
") Instructions for using Eastpointe s Electronic Systems (Waiver Version) Updated 11/05/2012 Instruction Manual on the MCO and Service Provider Electronic System Processes Eastpointe - 1 - Contents ProviderConnect
Instructions for using Eastpointe s Electronic Systems (Waiver Version) Updated 11/05/2012 Instruction Manual on the MCO and Service Provider Electronic System Processes Eastpointe - 1 - Contents ProviderConnect
Cre-X-Mice Database. User guide
 Cre-X-Mice Database User guide Table of Contents Table of Figure... ii Introduction... 1 Searching the Database... 1 Quick Search Mode... 1 Advanced Search... 1 Viewing Search Results... 2 Registration...
NetClient CS Document Management Portal User Guide. version 9.x
 NetClient CS Document Management Portal User Guide version 9.x TL 23560 (6/9/11) Copyright Information Text copyright 2001-2011 by Thomson Reuters/Tax & Accounting. All rights reserved. Video display images
rbweb RB Web 8 online office for attorneys, paralegals and secretaries User Guide
 rbweb RB Web 8 online office for attorneys, paralegals and secretaries User Guide Table of Contents Program Basics Logging in.... 1 Resetting password for security reasons.... 1 Navigating the site...
Ohio Electronic Child Care Provider Website (PWeb) User Guide
 User Guide") Ohio Electronic Child Care Provider Website (PWeb) User Guide Table of Contents 1.0 Introduction... 5 1.1 About This Guide... 5 1.2 About the Ohio Electronic Child Care Provider Website... 5 2.0 Provider
Ohio Electronic Child Care Provider Website (PWeb) User Guide Table of Contents 1.0 Introduction... 5 1.1 About This Guide... 5 1.2 About the Ohio Electronic Child Care Provider Website... 5 2.0 Provider
Electronic Payments & Statements User Guide
 Electronic Payments & Statements User Guide Contents Welcome to Electronic Payments & Statements (EPS) This guide will show you how to: 4 Get More Information about EPS on the Welcome Page The EPS Welcome
Webmail Instruction Guide
 Webmail Instruction Guide This document is setup to guide your through the use of the many features of our Webmail system. You may either visit www.safeaccess.com or webmail.safeaccess.com to login with
mywcb Online User Guide
 WCB REV NOVEMBER, 2014 mywcb Online User Guide for Employers ebusiness Support Team Phone: 780-498-7688 Fax: 780-498-7866 Email: [email protected] Hours: 8:00 a.m. to 4:30 p.m., Monday through
Document Management Portal User Guide
 NetClient CS Document Management Portal User Guide Version 8.x TL22805 07/26/10 Copyright Information Text copyright 2001-2010 by Thomson Reuters/Tax & Accounting. All rights reserved. Video display images
Vodafone Email Plus. User Guide for Windows Mobile
 Vodafone Email Plus User Guide for Windows Mobile 1 Table of Contents 1 INTRODUCTION... 4 2 INSTALLING VODAFONE EMAIL PLUS... 4 2.1 SETUP BY USING THE VODAFONE EMAIL PLUS ICON...5 2.2 SETUP BY DOWNLOADING
Directory and Messaging Services Enterprise Secure Mail Services
 Title: Directory and Messaging Services Enterprise Secure Mail Services Enterprise Secure Mail Services for End Users Attention: Receivers of Secure Mail Retrieval of Secure Mail by the Recipient Once
Document Management Portal User Guide
 Client Portal Document Management Portal User Guide Version 8.x TL22805 07/26/10 Copyright Information Text copyright 2001-2010 by Thomson Reuters/Tax & Accounting. All rights reserved. Video display images
Outlook Web Access 2003 New Features Guide
 Global Information Services Outlook Web Access 2003 New Features Guide Table of Contents After following a link, click on the toolbar to return to the Table of Contents. OWA 2003 2 Log in Screen 2 OWA
Vendor User Accounts managing your NAP User Account
 This guide explains how to request and manage your NAP User Account so that you may access Web Status. Topics include: Reactivating an existing NAP User Account Requesting a NAP User Account Managing your