Sk Series Using the USB Port
|
|
|
- Marybeth Polly Russell
- 10 years ago
- Views:
Transcription

1 Sk Series Using the USB Port

2 Using the USB Port 1 USING THE USB PORT Your Hammond Sk-series instrument is equipped with a USB Port. USB is an acronym for Universal Serial Bus), which is a method developed in the mid-1990s for allowing connection, communication and power supply between computers and electronic devices. There have been several revisions to the USB protocol since it was first introduced which are distinguished from one another by version numbers. As with software version numbers, the higher the number the more recent the revision. The most common is USB 2.0, which is the version supported by the Sk-series instruments. Many different USB-compatible electronic devices - digital cameras, GPS navigation systems, etc. - are now available; however, the USB Port on the Sk-series is designed for use with a USB Flash Drive (example pictured below): A USB Flash Drive is so-called because it includes what is called flash memory with an integrated Universal Serial Bus (USB) interface. USB Flash Drives are available in many different memory capacities; however, 1 or 2 Gigabytes (Gb) will be enough for the applications unique to the Sk-series instruments. The term, drive is not technically accurate since no moving parts are involved; however, since the same types of operations are used with a USB Flash Drive as for an old-style floppy disk drive, the drive terminology is still used - much in the same manner as the term Patch is used even though modern-day synthesizer- type instruments do not utilize patch cords. On the Sk-series instruments, a USB Flash Drive allows you to: 1. Play MP3-format files, 2. Play.WAV-format files, 3. Save Setups, 4. Load previously stored Setups from a USB Flash Drive into the Sk-series keyboard, 5. Install software upgrades into the Sk s operating system, 6. Load new Extra Voices into the Sk-series Voice Library. The following pages will explain how to do each operation. IMPORTANT NOTE: Due to the great variety of USB Flash Drives available, be sure to select one which is compatible with the Sk-series instruments. The following have been tested and confirmed to be compatible: Kingston Lexar PNY SanDiSk Emtek

3 2 Using the USB Port Preparing a USB Flash Drive for use with the Sk In order to use a USB Flash Drive with the Sk-series instrument, several special directories or Folders have to be created on the Flash Drive itself. All Sk-series instruments have a facility that Formats the drive and automatically creates these directories for you. This is the recommended way to prepare a Flash Drive so that you can use t with your instrument. The following paragraphs will explain this in detail. Formatting a USB Flash Drive using the Sk USB Port To format a USB Flash Drive for the Sk, do the following: 1. Locate a USB Flash Drive which either is empty or which does not have data you want to save. The Formatting procedure will erase any data which may already be on the drive. 2. When you have located a suitable Flash Drive, insert it into the USB port. The bottom line of the Information Center Display will scroll the following: Confirming USB. Please wait After the above message stops scrolling, the Information Center Display should now look like this: 4. Now touch the ENTER Touch Button once. The Information Center Display should now look like this: If there is any data on the USB Flash Drive, formatting the drive will erase it. Therefore if you DO NOT wish to format the USB Flash Drive, simply touch either the MENU/EXIT or PLAY Touch Buttons.

4 Using the USB Port 3 If you wish to proceed with the formatting operation, from the above screen touch the ENTER Touch Button once. The Information Center Display should now look like this: The bottom line of the Information Center Display will scroll the following: Formatting USB. Please wait... After approximately 3 seconds, the USB Flash Drive will be formatted and ready for use. Upgrading the Sk-series software using a USB Flash Drive The different components of the software of your Sk-series instrument can be upgraded to new versions. To do this, you must first download the software update from the Hammond website and install it to your USB Flash Drive. Installing a software upgrade to a USB Flash Drive 1. Go to the Hammond website ( and left-click on Support 2. When the Support page finishes loading, left-click on Downloads from either of the two links on the page. 3. When the Downloads page finishes loading, left-click on System Downloads from either of the two links on the page. 4. On the left side of the System Downloads page you will see information about the latest system software upgrade and a link to a file named Sk12Release?.zip. The number of the release will be the latest software available. 5. Right-click on the link and select Save Link As... A dialog box will appear asking to what location you want to save the.zip file. It is recommended that you save the.zip file to your hard drive. What Is A ZIP File? When working with computer operations which involve several files, such as software installations or upgrades, it is frequently necessary to combine the individual files into one file, called an archive, and to compress the files so that the resulting archive file is smaller in size. Originally this was done so that all the necessary data would fit onto a storage medium such as a floppy disk or installation CD; in recent years it is done so that if it is necessary to download data from the Internet, the download will take a shorter amount of time. There are several methods of compressing files; however, the most common is the.zip format, support for which is built into both PC and Mac operating systems. On a PC, the name "compressed folders is given to.zip files, while Mac OS X 10.3 includes.zip file support under the name Archive Utility. 6. After the.zip file has finished downloading, go to the directory on your hard drive which contains the.zip file and extract the contents of the file. It is recommended that you allow the extraction utility to determine the folder which will contain the extracted files.

5 4 Using the USB Port 7. After the.zip file is finished extracting, open the folder which contains the extracted files. You should see a number of files with the extension,.sys. 8. Insert a USB Flash Drive that has been formatted for use with the Sk instrument into an open USB port on your computer. 9. Open the hammond directory on the USB Drive, then the Sk sub-directory. You will see five (5) folders - audio lib, patch, setup and system. The system folder is the one to which you will copy the system software files. 10. From the folder on your hard drive containing the extracted files select the files with a.sys extension and copy them to the system folder on your USB Drive. You have now prepared the USB Flash Drive with all the necessary information for upgrading your Skseries instrument with the latest system software. The following pages will explain in detail how to upgrade the Sk with the new software. Installing a software upgrade to the Sk: 1. Make sure the power to the Sk instrument is OFF. 2. Turn the instrument ON while pressing and holding the three Touch Buttons shown: The Information Center Display will show the following:

6 Using the USB Port 5 3. Insert the USB Flash Drive containing the system upgrade software into the USB Port of the Sk instrument. The bottom line of the Information Center Display will scroll the following: Confirming USB. Please wait... After approximately 3 seconds, the Information Center Display will show the following: The amount of time necessary to upgrade the system software will depend upon the software modules to be updated. The range is from 15 to as much as 45 minutes. When the system software has finished upgrading, the Information Center Display will show the following: 4. Turn the power to the Sk OFF, but DO NOT remove the USB Flash Drive from the USB Port yet. Installing the sload Boot Program to the Sk (if needed): After the system software is updated, there may be an additional boot program called sload that must be loaded and installed. To find out if this is the case: 1. Make sure the USB Flash Drive is still in the USB Port. 2. After you have performed the previous procedure to update the system software, turn the power to the Sk instrument ON. The bottom line of the Information Center Display will scroll the following: Confirming USB. Please wait... Wait approximately 3 seconds. If an additional boot program needs to be loaded, the Information Center Display will show the following: If you see this screen, the sload boot program is being installed. It will take about 1 ~ 2 minutes for this procedure to complete.

7 6 Using the USB Port 3. When this procedure is completed, the Information Center Display will show the following: 4. Now remove the USB Flash Drive from the USB Port. 5. Turn the power to the Sk OFF, then ON. Your Sk instrument is now updated and ready to play. IMPORTANT NOTE: If there is no additional boot program, the Information Center Display will show a normal PLAY screen after performing steps 1 and 2 on the preceding page. In this case, the software update is completed and the USB Flash Drive may safely be removed from the USB Port.

8 Using the USB Port 7 Voice Libraries The EXTRA VOICE Section has six (6) categories of voices, one of which is called Library. This category has several pre-loaded sounds; however you can add more voices using the USB Flash Drive. The following pages will explain this in detail. What Is A Voice Library? A Voice Library is a collection of sounds grouped together by type (Strings, Vocal, Jazz Guitar, etc). The number of voices in each group will vary - some will have only three or four while others may contain many more. These Voice Libraries, can be downloaded from the Hammond website and made a part of your Sk s Extra Voice complement. Loading a Voice Library to the Sk-series instrument The Hammond Sk-series instruments can be enhanced with additional sounds and voices. To do this, you must first download the Voice Libraries from the Hammond website and install them to your USB Flash Drive. This is described starting on the next page.

9 8 Using the USB Port Downloading and Extracting Voice Libraries If you want to add additional sounds to your Sk instrument, the first step will be to select the Voice Libraries you want from the Hammond website. TRY THIS: 1. Go to the page on the Hammond website which contains the Voice Library downloads: The page will look similar to this: On this page you will see names of different Voice Libraries. The links to each library appear as long gray boxes below the titles. If you move your screen pointer over a title, a popup box will appear describing that particular Voice Library. In this way you can decide which Voice Libraries you want to download.

10 Using the USB Port 9 2. After you have selected a Voice Library, move your screen pointer over the link to the library file and click. When a dialog box appears, select Save File As Select the location where you want to save the file and select Save. It is recommended that you save the file to the hard drive on your computer. 4. Because the saved file is in.zip format, you will need to extract its contents before the file is usable. Therefore, after the file is saved, open the folder contained the downloaded file, and right-click. When a dialog box appears, select Extract. 5. After the.zip file has finished downloading, go to the directory on your hard drive which contains the.zip file and extract the contents of the file. It is recommended that you allow the extraction utility to determine the folder which will contain the extracted files. Do this same procedure for each Voice Library file you want to extract. 6. After you are finished extracting.zip files, open the folder which contains the extracted file. The file name(s) will be similar to this: LibVLxxx.sys. The numbers in the file name will be the same for the extracted.sys file as for the host.zip file. NOTE: The x s indicate numbers. These will vary with each file name ( LibVL-Sk001, LibVL-Sk0051, etc.). 7. Insert a USB Flash Drive that has been formatted for use with the Sk instrument into an open USB port on your computer. NOTE: If the USB Drive is not yet formatted for use with the Sk, follow the instructions starting on page 162 for preparing the USB Drive for use with your instrument. 8. Open the hammond directory on the USB Drive, then the Sk sub-directory. You will see a number of folders, one of will be lib. This folder is the one which will contain extracted Voice Library files. 9. From the folder on your hard drive containing the extracted Voice Library file(s), files select the file or files you want to copy, then copy them to the lib folder on your USB Drive. You have now prepared the USB Flash Drive with all the necessary information for upgrading your Skseries instrument with new voices. The following pages will explain in detail how to add these voices to your Sk instrument.

11
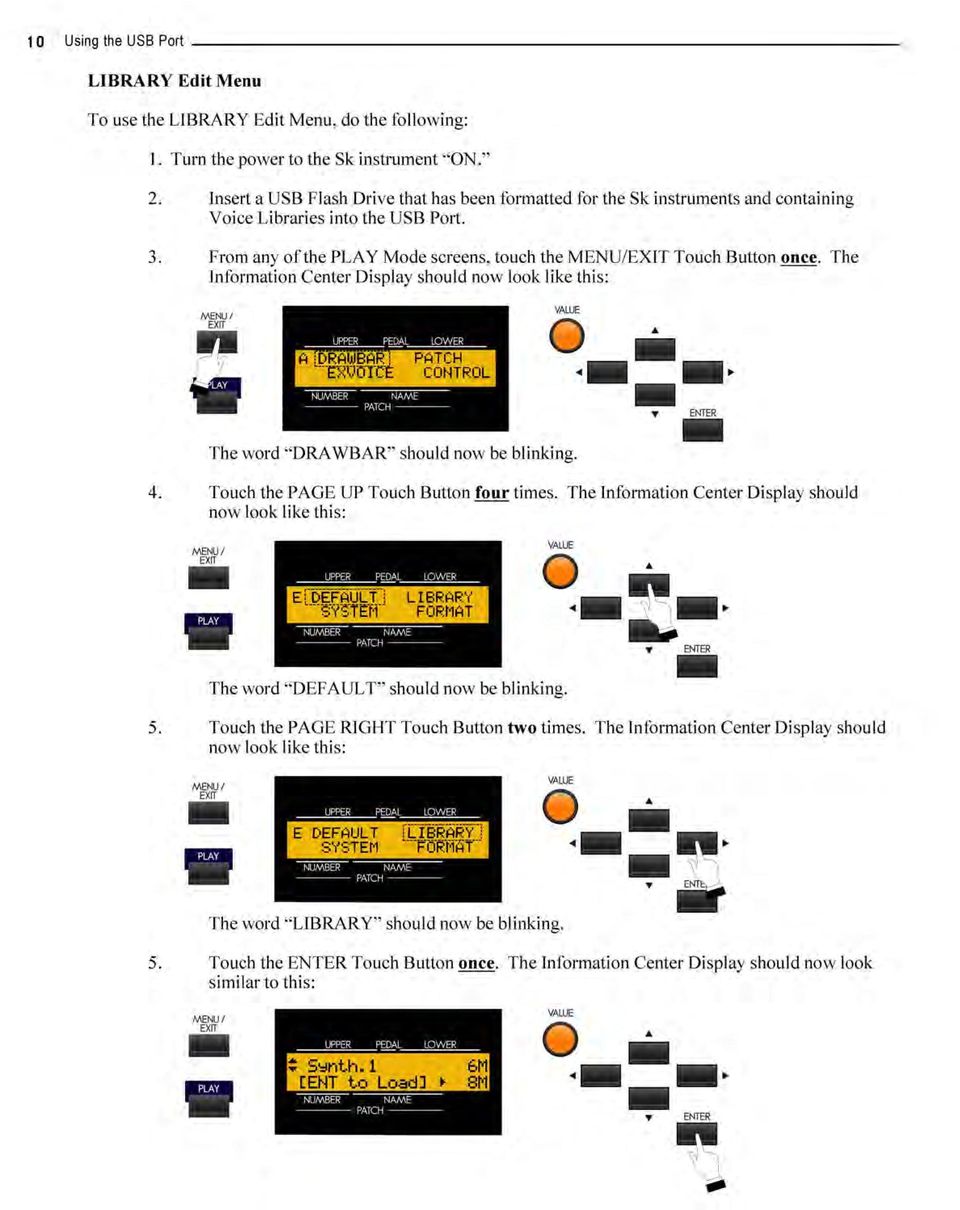
12 Using the USB Port 11 You are now in the LIBRARY Edit Menu. You may now use the PAGE NAVIGATION Touch Buttons in conjunction with the VALUE Rotary Control to Load, Save or Delete Sound Libraries. These changes are explained starting below. NOTE: If the Flash Drive is not formatted, or if there is no Flash Drive inserted, the Information Center Display will read: USB is not ready. If you see this message, you will be prompted to touch the ENTER Touch Button to return to the previous screen. Installing a Voice Library from a USB Flash Drive to the Sk 1. If you are not in the LIBRARY Edit Menu, follow the instructions on the previous page to display it. Otherwise, go to the next step. The Information Center Display should look similar to this: If more than one Voice Library is loaded on the USB Drive, the Information Center Display will show an arrow symbol. Use the PAGE UP and PAGE DOWN Touch Buttons to select the Voice Library you want to load. You will also see numbers on the right side of the display followed by the letter M. The number on the top line shows the amount of memory the selected Voice Library will require. The number on the bottom line shows the amount of available memory in the Sk s hardware. In this way, you can determine whether you have enough memory to load each Library. 2. When you have selected the Voice Library you want to download, touch the ENTER Touch Button.. The bottom line of the Information Center Display will scroll the following: Loading LIBRARY. Please wait... After the library has finished loading, the opening screen shown at the bottom of the preceding page will again display. Notice that the number on the bottom line has now changed to reflect the amount of available memory. You can use this number to keep track of how much memory each Library uses.

13

14 Using the USB Port Touch the PAGE RIGHT Touch Button two times. The word, SETUP in the upper right corner of the display will now blink. 5. Touch the ENTER Touch Button. You are now in the SETUP Edit Menu. You may now use the PAGE NAVIGATION Touch Buttons in conjunction with the VALUE Rotary Control to change the MIDI performance of your Sk-series instrument. This is explained starting below. Saving a Setup After you have customized your Sk instrument, you can save your settings as a Setup. To do this: 1. If you are not in the SETUP Edit Menu, follow the instructions starting on the previous page to display it. Otherwise go to the next step. NOTE: If you enter the SETUP Edit Menu with no USB Flash Drive inserted, the Information Center Display will show: USB is not ready. If you see this message, you will be prompted to touch the ENTER Touch Button to return to the previous screen. 2. At this point it is assumed that the USB Flash Drive contains no previous Setup information. If this is the case, the Information Center Display will look like this:

15 14 Using the USB Port If there are Setups already stored on the USB Flash Drive, the Information Center Display will look similar to this: If more than one Setup is loaded on the USB Drive, the Information Center Display will show an arrow symbol. Turn the VALUE Rotary Control to the right until the Information Center Display looks like this: When you see New File, you can now save a new Setup to the USB Flash Drive. You will also see a down arrow on the left side of the display which also indicates you have reached the end of previously stored Setups. 3. At this point you should decide whether you want to save your settings as a Setup or as a Whole. If any of your Patches are using Voice Libraries you have installed, you will need to save your settings as a Whole - otherwise some of your Patches will not have the correct sound. To select either Setup or Whole, touch the PAGE RIGHT Touch Button once. The Information Center Display should now look like this: Turn the VALUE Rotary Control to make your selection. 4. After you have made your selection, touch the PAGE LEFT Touch But PAGE RIGHT Touch Button once. The Information Center Display should now look similar to this: NOTE: If you have selected WHOLE, the two letters on the extreme right of the upper line of the display will show W H. SPECIAL NOTE: If you are merely updating Setup registrations or if all your Setups contain the same Voice Library data, you DO NOT need to save each Setup as a WHOLE. In this case saving one W hole will be sufficient.

16 Using the USB Port Touch the ENTER Touch Button once. The bottom line of the Information Center Display will scroll the following: Naming a Setup Saving SETUP. Please wait... When the above message stops scrolling, your Setup has been saved. Each time you save a new Setup or Whole, it will automatically be assigned a name (SETUP01, WHOLE01), etc) However, it is recommended that you give each of your Setups a name which helps you to remember what each Setup consists of. This is particularly important if you have a number of different Setups with different settings. You can name your Setup at any time after you have saved it, but it is strongly recommended that you name it immediately after the Save procedure is complete. To do this: 1. Wait until the Setup has finished saving to the USB Flash Drive. The Information Center Display should show a screen similar to this: NOTE: The last two digits will vary with each file name ( SETUP02, SETUP03, etc., through to SETUP99, which is the upper limit). If you have saved a WHOLE, the screen will show WHOLExx and WH will display in the upper right corner of the screen. 2. Touch the PAGE RIGHT Touch Button once. The Information Center Display should now look similar to this: 3. Touch the ENTER Touch Button. The Information Center Display should now look similar to this:

17 16 Using the USB Port 4. Now name your Setup or Whole by doing the following: Use the PAGE LEFT and PAGE RIGHT Select Touch Buttons to select the character to be edited. Turn the VALUE Rotary Control to the right to scroll forward through the characters. Turn the VALUE Rotary Control to the left to scroll backward through the characters. The available characters include: Punctuation Marks (space -. &), Numeric Characters (0 ~ 9), Upper-case Letters ( A ~ Z ), and Lower-case Letters ( a ~ z ). 5. After you have finished editing, Touch and Release the ENTER Touch Button. The bottom line of the Information Center Display will show the following: Saving Name. Please wait... When the above message stops displaying, your Setup has been has been renamed and your new name will appear on the top line of the display. Loading a Setup 1. Insert a USB Flash Drive containing Setups into the USB Port of the Sk instrument. The bottom line of the Information Center Display will scroll the following: Confirming USB. Please wait... After approximately 3 seconds, the Information Center Display will show the normal PLAY screen.

18 Using the USB Port Follow the instructions starting on page 12 to enter the SETUP Edit Menu until the Information Center Display shows a screen similar to this: If more than one Setup is loaded on the USB Drive, the Information Center Display will show an arrow symbol. Use either the PAGE UP and PAGE DOWN Touch Buttons or the VALUE Rotary Control to select the Setup you want to load. NOTE: The two letters on the extreme right of the upper line of the display will show SU or WH depending on whether you select a SETUP or a WHOLE 3. When you have selected the Setup or Whole you want to Load, touch the ENTER Touch Button.. The bottom line of the Information Center Display will scroll the following: Deleting a Setup Loading SETUP. Please wait... After the Setup has finished loading, the opening screen shown above will again display. NOTE: The Information Center Display will show, Loading Setup for either a Setup or a Whole. 1. With the USB Flash Drive inserted into the USB Port of the Sk, follow the instructions starting on page 245 to enter the SETUP Edit Menu until the Information Center Display shows a screen similar to this: 2. If more than one Setup is loaded on the USB Drive, the Information Center Display will show an arrow symbol. Use the VALUE Rotary Control or the PAGE UP and PAGE DOWN Touch Buttons to scroll through the Setups contained on the USB Flash Drive until you find the one you want to delete.

19 18 Using the USB Port 3. Now touch the Touch the PAGE RIGHT Touch Button two times. The Information Center Display should now look similar to this: 4. Touch the ENTER Touch Button. The Information Center Display should now look similar to this: 5. If you DO NOT wish to Delete the selected Setup, touch either the MENU/EXIT or PLAY Touch Button to exit the SETUP Edit Menu. If you want to Delete the Setup, touch the ENTER Touch Button.. The bottom line of the Information Center Display will scroll the following: Deleting SETUP. Please wait... After the Setup has been deleted, the opening screen of the Setup menu will again display:

20 Using the MUSIC PLAYER 19 MUSIC PLAYER Your Hammond Sk-series instrument has the ability to play Music Files in one of two formats: 1..WAV 44.1kHz 16-bit 2..MP3 44.1kHz 64 ~ 192kbps You can listen to the Music Files (or Songs ) as they play, add vocals or other instruments to them live ( karaoke ), or play the Sk along with them. NOTE: If you wish simply to play a Song, the.mp3 format will be adequate; however, if you wish to play along on the Sk with the Song, the.wav format is recommended, as.mp3 files may stutter or play intermittently if keys or Touch Tabs are pressed during playback. MUSIC PLAYER Controls The controls for the Music Player are located on the left side of the Control Panel next to the MASTER VOLUME Rotary Control. VOLUME Rotary Control This Rotary Control allows you to control the volume of the Song being played by the Music Player. Use this control in conjunction with the MASTER VOLUME Rotary Control, particularly if you wish to play the Sk along with the sound file. SONG Touch Tab This Touch Tab allows you to select the Song you wish to play if multiple song files are stored on your USB Flash Drive. PLAY/PAUSE Touch Tab This Touch Tab allows you to start playback of a Song as well as to pause the Song in the midst of playback.

21 20 Using the MUSIC PLAYER Using the Music Player In order to play Song files using the Music Player, a USB Flash Drive containing compatible Song data must be inserted into the USB Port on your Sk-series instrument. The next few pages will explain more about this. Copying a Music File to a USB drive 1. Insert a USB Flash Drive that has been previously formatted for use with the Sk-series instruments into an open USB Port on your computer. 2. Find any audio files with either the.wav or.mp3" extension you wish to copy. 3. Copy the files from your source location (usually a hard drive) to the following folder on the USB Flash Drive: \hammond\sk\audio\ NOTE: The number of files may vary according to the size of the files. Numerically, up to 99 files can be stored. Playing a Music File 1. Insert a USB Flash Drive to which you have copied audio files using the procedure described above into the USB Port. The bottom line of the Information Center Display will scroll the following: Confirming USB. Please wait After the above message stops scrolling, touch the SONG Touch Button in the MUSIC PLAYER Section of the Control Panel. The Information Center Display should now look similar to this: A Song Name will now display.
22 Using the MUSIC PLAYER If you wish to play the Song whose name is currently displaying, touch the PLAY Touch Button. The currently selected Song will start playing. As the song plays, the bottom line OF THE DISPLAY WILL FUNCTION AS A Time Counter displaying hours, minutes ands seconds. 4. To pause the Song during playback, touch the PLAY Touch Button while the Song is playing. The Time Counter on the bottom line of the display will stop its count and the Song will be paused. 5. To start the song playing from the currently selected time, touch the PLAY Touch button again. To start the Song playing from the beginning, touch the SONG Touch Button, then touch the PLAY Touch Button. The Song will start playing again from the beginning.
23 22 Using the MUSIC PLAYER Playing Multiple Songs When the Information Center Display is showing Song names, you may see an UP arrow ( ) on the extreme left of the upper line of the display. This indicates multiple songs on the USB Flash Drive (see the figure above). NOTE: If no arrow appears, only one Song is available for playback on the MUSIC PLAYER. To scroll up through the Song names, touch the PAGE UP Touch Button to display each Song. The symbol displayed in the upper left corner will depend on the number of songs available. If only two Song files are available, a DOWN arrow ( ) will show. If there are three or more Songs, you will see an UP/DOWN arrow (~) in the upper left corner of the display. When you have reached the end of the Song list, a DOWN arrow will display. To scroll down through the song names, touch the PAGE DOWN Touch Button to display each Song. The UP arrow will show in the upper left corner when you have reached the start of the Song list.
24
25 24 Using the MUSIC PLAYER Determining Song Order On the Sk-series MUSIC PLAYER, the order in which the Songs play is determined by the first character of the File name. Numbers have priority over letters - for example, if a file is named 2002" and another file is named A TiSket A TaSket, the file 2002" will be listed ahead of the other file and will play first if the Songs are played in order (if the CHAIN Advanced Feature is set to ALL. ) If you have a selection of Songs that you want to play in a particular order, it is recommended that you manually rename the files using the File Rename feature of your computer. It is further recommended that you use numbers in front of the Song name so that the Songs will play in the order you want if the titles are not in alphabetical order. Here is an example: 00-Them Changes.mp3 01-Keep Rockin.mp3 02-Bein Green.mp3 03-In the Heat of the Night.mp3 04-Chicago.mp3 05-September Moan.mp3 In the above example, the numbers are separated from the song names by a hyphen (-); but this is not necessary - an underscore space can also be used, or you may prefer not to separate the numbers and names at all. It is recommended, however, that you preface each number with 0" as shown above so that songs with two numbers in the file name ( 12, 32, etc.) will play in the correct order.
PA-80 USB Interface. Installation and Operating Manual. 1. Installation Manual 2. Driver Software installation 3. Operating Manual 4.
 PA-80 USB Interface Installation and Operating Manual 1. Installation Manual 2. Driver Software installation 3. Operating Manual 4. Applications Important Notice: Only a qualified service technician should
Practical Application How to Use a Flash Drive
 Practical Application How to Use a Flash Drive Practical application How to Use a Flash Drive Page 1 of 6 About this Practical Application Prerequisite Skills To use this Application you will need be comfortable
PART 1. Using USB Mixer with a Computer
 PART 1. Using USB Mixer with a Computer Universal Serial Bus Mixers The USB mixer is equipped with either one or two USB ports that allow you to play and record audio directly from your computer! Just
Iridium Extreme TM Satellite Phone. Data Services Manual
 Iridium Extreme TM Satellite Phone Data Services Manual Table of Contents 1 OVERVIEW... 1 2 HOW IT WORKS... 1 3 BEFORE INSTALLING... 2 4 USB DRIVER INSTALLATION... 3 5 MODEM INSTALLATION AND CONFIGURATION...
Contents. Hardware Configuration... 27 Uninstalling Shortcuts Black...29
 Contents Getting Started...1 Check your Computer meets the Minimum Requirements... 1 Ensure your Computer is Running in Normal Sized Fonts... 7 Ensure your Regional Settings are Correct... 9 Reboot your
How do I Check if My Computer is Compatible with Windows 7
 How do I Check if My Computer is Compatible with Windows 7 Enterprise Computing & Service Management 1 Follow this link to download the Windows 7 Upgrade Advisor http://www.microsoft.com/windows/windows-7/get/upgrade-advisor.aspx
Shearwater Research Dive Computer Software Manual
 Shearwater Research Dive Computer Software Manual Revision 1.3 Table of Contents 1. Basic overview of components 2. O/S IrDA driver installation 2.1 USB IrDA installation for Windows XP Home/Pro editions
Be sure to connect the USB cable from TonePort into your computer s USB port, and then proceed with the following steps
 GearBox/TonePort setup for Line 6 Monkey Compatibility Check Mac OS X This document is designed to provide information for using the Line 6 Monkey compatibility utility. One of the very useful functions
Online Backup Client User Manual
 Online Backup Client User Manual Software version 3.21 For Linux distributions January 2011 Version 2.0 Disclaimer This document is compiled with the greatest possible care. However, errors might have
Wrist Audio Player Link Soft for Macintosh. User s Guide
 Wrist Audio Player Link Soft for Macintosh User s Guide Trademarks Macintosh and Mac OS are registered trademarks of Apple Computer Inc. All other product, service and company names mentioned herein may
itunes Basics Website: http://etc.usf.edu/te/
 Website: http://etc.usf.edu/te/ itunes is the digital media management program included in ilife. With itunes you can easily import songs from your favorite CDs or purchase them from the itunes Store.
XConsole GUI setup communication manual September 2010.
 XConsole GUI setup communication manual September 2010. XConsole is compatible with Microsoft XP, Vista and Windows 7. The software will also work if using Boot camp on a Mac. IMPORTANT NOTES: - Do NOT
Using These Manuals. How to Use the. Software User Guide. Display examples: 1. Understanding How to Use Your Camera.
 Software User Guide For the safe use of your camera, be sure to read the Safety Precautions thoroughly before use. Types of software installed on your computer varies depending on the method of installation
CONTENTS PAGE. c) Our Recommended Settings... 14. d) Overview...7. i. Check Out and Download a book... 27
 Our Recommended Settings... 14. d) Overview...7. i. Check Out and Download a book... 27") USER GUIDE CONTENTS PAGE Top Tip: Hold down the Ctrl key on your keyboard and using your mouse click on the heading below to be taken to the page Introduction... 3 1. How to create a new account... 3 2.
USER GUIDE CONTENTS PAGE Top Tip: Hold down the Ctrl key on your keyboard and using your mouse click on the heading below to be taken to the page Introduction... 3 1. How to create a new account... 3 2.
User Manual. 2 Bay Docking Station
 FANTEC MR-CopyDU3 User Manual 2 Bay Docking Station With One Touch Backup (OTB) and Copy Function Hardware: PC and Notebooks, Macintosh USB 1.1, USB 2.0 or USB 3.0 interface Features: 2,5 or 3,5 SATA I,II,III
TBS Help Index / On Board Software User Manual
 TBS Help Index / On Board Software User Manual The TBS 2000 Functional Testing Systems Software has a convenient, quick and easy access on board software help manual. While a hard copy of on board TBS
Call Recorder Oygo Manual. Version 1.001.11
 Call Recorder Oygo Manual Version 1.001.11 Contents 1 Introduction...4 2 Getting started...5 2.1 Hardware installation...5 2.2 Software installation...6 2.2.1 Software configuration... 7 3 Options menu...8
Chapter 1 Downloading Images to Your Computer (Windows)
") Software User Guide For the safe use of your camera, be sure to read the Safety Precautions thoroughly before use. Types of software installed on your computer varies depending on the method of installation
Software User Guide For the safe use of your camera, be sure to read the Safety Precautions thoroughly before use. Types of software installed on your computer varies depending on the method of installation
RecoveryVault Express Client User Manual
 For Linux distributions Software version 4.1.7 Version 2.0 Disclaimer This document is compiled with the greatest possible care. However, errors might have been introduced caused by human mistakes or by
Tutorial How to upgrade firmware on Phison S8 controller MyDigitalSSD using a Windows PE environment
 Tutorial How to upgrade firmware on Phison S8 controller MyDigitalSSD using a Windows PE environment Version 2.0 This tutorial will walk you through how to create a bootable USB drive to enter into a WINPE
Basic Hardware Skills:
 Level 1: Basic Coverage: Basic hardware and common peripheral components of a computer. Connections for all components. Start-up, power-down, and reboot procedures for public and staff computers. Options
1. Product Information
 ORIXCLOUD BACKUP CLIENT USER MANUAL LINUX 1. Product Information Product: Orixcloud Backup Client for Linux Version: 4.1.7 1.1 System Requirements Linux (RedHat, SuSE, Debian and Debian based systems such
Online Backup Client User Manual Linux
 Online Backup Client User Manual Linux 1. Product Information Product: Online Backup Client for Linux Version: 4.1.7 1.1 System Requirements Operating System Linux (RedHat, SuSE, Debian and Debian based
Online Backup Client User Manual
 For Linux distributions Software version 4.1.7 Version 2.0 Disclaimer This document is compiled with the greatest possible care. However, errors might have been introduced caused by human mistakes or by
An Informational User Guide for: Web Conferencing
 Allows You to: Manage your audio conference online using easy point and click conference commands Show slide presentations and graphics to meeting participants Show your desktop to meeting participants
Adding Audio to a Presenter File
 Adding Audio to a Presenter File Presenter lets you record your own audio files or impor t existing files. Rec orded files are saved in mp3 format. Imported files can be in WAV or mp3 format. Stereo files
HOW TO BURN A CD/DVD IN WINDOWS XP. Data Projects
 Page 1 HOW TO BURN A CD/DVD IN WINDOWS XP There are two ways to burn files to a CD or DVD using Windows XP: 1. Using Sonic RecordNow! Plus or 2. Using the Windows Explorer CD Burning with Sonic Recordnow!
System update procedure for Kurio 7 (For build number above 110)
") System update procedure for Kurio 7 (For build number above 110) IMPORTANT NOTE: Before starting the procedure, please check your current Android build number, that can be found as follows: exit the Kurio
System update procedure for Kurio 7 (For build number above 110) IMPORTANT NOTE: Before starting the procedure, please check your current Android build number, that can be found as follows: exit the Kurio
Instructions for downloading and installing the GPS Map update
 Instructions for downloading and installing the GPS Map update Before starting the process, you will need a USB flash drive with 2 GB or more free space. On your computer: 1. Complete the map update purchase
WA1826 Designing Cloud Computing Solutions. Classroom Setup Guide. Web Age Solutions Inc. Copyright Web Age Solutions Inc. 1
 WA1826 Designing Cloud Computing Solutions Classroom Setup Guide Web Age Solutions Inc. Copyright Web Age Solutions Inc. 1 Table of Contents Part 1 - Minimum Hardware Requirements...3 Part 2 - Minimum
MXL 990 Virtual Preamp Installation
 MXL 990 Virtual Preamp Installation The MXL 990 USB will operate without MXL s Virtual Preamp software using the standard drivers included in your computer's operating system. However, the MXL 990 USB
Printer Support Guide. FedEx Ship Manager Software
 Printer Support Guide FedEx Ship Manager Software Printer FAQs Installing Printer Drivers How do I download and install the Zebra printer drivers? To download and install the current Zebra printer drivers
User Manual. Thermo Scientific Orion
 User Manual Thermo Scientific Orion Orion Star Com Software Program 68X637901 Revision A April 2013 Contents Chapter 1... 4 Introduction... 4 Star Com Functions... 5 Chapter 2... 6 Software Installation
OFFICE KEYBOARD (MT1210 & MT1405) OFFICE FEATURES
 OFFICE FEATURES") OFFICE KEYBOARD (MT1210 & MT1405) OFFICE FEATURES Thank you for purchasing OFFICE KEYBOARD. This User s manual contains all information that helps you to operate your keyboard. Please keep the software
OFFICE KEYBOARD (MT1210 & MT1405) OFFICE FEATURES Thank you for purchasing OFFICE KEYBOARD. This User s manual contains all information that helps you to operate your keyboard. Please keep the software
V.I.P. Kit. Video Insight Pilot Kit. (Video Insight Pilot Kit).
.") V.I.P. Kit (Video Insight Pilot Kit). Video Insight Pilot Kit Please follow these instructions and everything should go very smoothly. Before you begin, you will need to establish (or obtain from your
V.I.P. Kit (Video Insight Pilot Kit). Video Insight Pilot Kit Please follow these instructions and everything should go very smoothly. Before you begin, you will need to establish (or obtain from your
NovaBACKUP. User Manual. NovaStor / November 2011
 NovaBACKUP User Manual NovaStor / November 2011 2011 NovaStor, all rights reserved. All trademarks are the property of their respective owners. Features and specifications are subject to change without
C6 Easy Imaging Total Computer Backup. User Guide
 C6 Easy Imaging Total Computer Backup User Guide Clickfree and the Clickfree logo are trademarks or registered trademarks of Storage Appliance Corporation. Other product names used in this guide are recognized
Playing Audio through the Zodiac DAC using S/PDIF (electrical or optical input cable) Source. Playing Audio through the Zodiac DAC using USB Sources
 Source. Playing Audio through the Zodiac DAC using USB Sources") Using the Zodiac DAC with Mac OS X (Screenshots taken using OS X Version 10.6.6) Playing Audio through the Zodiac DAC using S/PDIF (electrical or optical input cable) Source Playing Audio through the Zodiac
Using the Zodiac DAC with Mac OS X (Screenshots taken using OS X Version 10.6.6) Playing Audio through the Zodiac DAC using S/PDIF (electrical or optical input cable) Source Playing Audio through the Zodiac
File Management and File Storage
 File Management and File Storage http://training.usask.ca Information Technology Services Division Table of Contents File Management at the University of Saskatchewan...3 Introduction...3 Creating Files
FX-BTCVT Bluetooth Commissioning Converter Commissioning Guide
 FX-BTCVT Bluetooth Commissioning Converter Commissioning Guide FX-BTCVT-1 (Bluetooth Commissioning Converter) Code No. LIT-12011665 Issued December 5, 2014 Refer to the QuickLIT website for the most up-to-date
Version 1.0. PNY DUO-LINK 4 User Manual
 Version 1.0 PNY DUO-LINK 4 User Manual Table of Contents 1. PRODUCT DESCRIPTION 3 2. SYSTEM REQUIREMENTS 4 3. DUO-LINK APP INSTALLATION 4 4. DUO-LINK APP DESCRIPTION 6 5. FILE MANAGEMENT 7 5.1 Types of
Recording Supervisor Manual Presence Software
 Presence Software Version 9.2 Date: 09/2014 2 Contents... 3 1. Introduction... 4 2. Installation and configuration... 5 3. Presence Recording architectures Operating modes... 5 Integrated... with Presence
Online Backup Linux Client User Manual
 Online Backup Linux Client User Manual Software version 4.0.x For Linux distributions August 2011 Version 1.0 Disclaimer This document is compiled with the greatest possible care. However, errors might
Allworx OfficeSafe Operations Guide Release 6.0
 Allworx OfficeSafe Operations Guide Release 6.0 No part of this publication may be reproduced, stored in a retrieval system, or transmitted, in any form or by any means, electronic, mechanical, photocopy,
Getting Started. rp5800, rp5700 and rp3000 Models
 Getting Started rp5800, rp5700 and rp3000 Models Copyright 2011 Hewlett-Packard Development Company, L.P. The information contained herein is subject to change without notice. Microsoft, Windows, and Windows
Online Backup Client User Manual Mac OS
 Online Backup Client User Manual Mac OS 1. Product Information Product: Online Backup Client for Mac OS X Version: 4.1.7 1.1 System Requirements Operating System Mac OS X Leopard (10.5.0 and higher) (PPC
Online Backup Client User Manual Mac OS
 Online Backup Client User Manual Mac OS 1. Product Information Product: Online Backup Client for Mac OS X Version: 4.1.7 1.1 System Requirements Operating System Mac OS X Leopard (10.5.0 and higher) (PPC
ALON MP3 Dictaphone. User's manual. 1. Introduction 2. Audio Player 3. Voice Dictaphone 4. Phone calls recorder 5. Customer support.
 ALON MP3 Dictaphone User's manual Thanks for choosing ALON MP3 Dictaphone! We hope you will like our product and it will be useful for you. We ll be happy to receive any feedback from you for improving
MusiConnect Patented AlwaysPlay Technology
 MusiConnect Patented AlwaysPlay Technology PianoDisc has expanded its MusiConnect technology with its newest version MusiConnect 2.2 which allows the PianoDisc system to play more music than ever before.
To prevent possible hearing damage, do not listen to high volume levels for long periods.
 To prevent possible hearing damage, do not listen to high volume levels for long periods. Fully understand user manual before use. Ensure your player is at low volume levels or power off when not in use.
MP3/WMA Player + Digital Voice Recorder + USB Flash Drive
 Kanguru Micro MP3 PRO USB2.0 User s Manual MP3/WMA Player + Digital Voice Recorder + USB Flash Drive Copyright 2004, All Rights Reserved. This manual applies to 1.1 or later versions of the Kanguru Micro
Installing ABACUS ELECTRICS USB Optical Probes under Windows 7
 Installing ABACUS ELECTRICS USB Optical Probes under Windows 7 AN17a This note assumes that you are installing the drivers on to a clean system, i.e. one on which ABACUS ELECTRICS Optical Probe drivers
1.0. User s Guide & Manual USB 2.0 FLASH DRIVE
 1.0 USB 2.0 FLASH DRIVE User s Guide & Manual Index Introduction 1 CHAPTER1 Features & Specifications 2 CHAPTER2 System Requirements 4 CHAPTER3 Getting Started Installation of the Windows 98SE Driver 5
IT Quick Reference Guides Using Windows 7
 IT Quick Reference Guides Using Windows 7 Windows Guides This sheet covers many of the basic commands for using the Windows 7 operating system. WELCOME TO WINDOWS 7 After you log into your machine, the
History of Revisions. Ordering Information
 No part of this document may be reproduced in any form or by any means without the express written consent of II Morrow Inc. II Morrow, Apollo, and Precedus are trademarks of II Morrow Inc. Windows is
Installing the Android SDK
 Installing the Android SDK To get started with development, we first need to set up and configure our PCs for working with Java, and the Android SDK. We ll be installing and configuring four packages today
Lab Activity File Management with Windows Explorer Windows XP, Vista, Windows 7 and Windows 8 Brought to you by RMRoberts.com
 Lab Activity File Management with Windows Explorer Windows XP, Vista, Windows 7 and Windows 8 Brought to you by RMRoberts.com After completing this laboratory activity, you will be able to: o Open and
Vess A2000 Series. NVR Storage Appliance. Windows Recovery Instructions. Version 1.0. 2014 PROMISE Technology, Inc. All Rights Reserved.
 Vess A2000 Series NVR Storage Appliance Windows Recovery Instructions Version 1.0 2014 PROMISE Technology, Inc. All Rights Reserved. Contents Introduction 1 Different ways to backup the system disk 2 Before
MOTO. Quick Start Guide
 MOTO 9h Quick Start Guide welcome Technology promised to make things easier... but then it gave you more to do phone calls, e-mails, music, photos, videos, the Internet, and more. It s time to take back
1. System Requirements
 BounceBack Ultimate 14.2 User Guide This guide presents you with information on how to use BounceBack Ultimate 14.2. Contents 1. System Requirements 2. BounceBack Pre-Installation 3. How To Install The
www.devicemanuals.eu
 AMD RAID Introduction The integrate one SATA host controller separately, and support RAID function for performance and reliability. SB950 SATA RAID provides support for RAID 0 (Striping), RAID 1 (Mirroring),
Table of Contents. System Requirement of MP3 Player:... 4. Connection and Downloading... 7. Downloading DRM10 Files... 8.
 Table of Contents Instructions... 1 Precautions... 2 System requirements... 4 System Requirement of MP3 Player:... 4 Introduction... 5 Features... 5 Charging the Battery... 6 Connection and Downloading...
Updating the KLN 94 Database Card using the GPS Database Loader and a SanDisk ImageMate SDDR-31 that is attached to the PC's USB port
 Updating the KLN 94 Database Card using the GPS Database Loader and a SanDisk ImageMate SDDR-31 that is attached to the PC's USB port Most computers that are relatively new have USB ports. Users who wish
Introweb Remote Backup Client for Mac OS X User Manual. Version 3.20
 Introweb Remote Backup Client for Mac OS X User Manual Version 3.20 1. Contents 1. Contents...2 2. Product Information...4 3. Benefits...4 4. Features...5 5. System Requirements...6 6. Setup...7 6.1. Setup
USB Flash Memory TransMemory-EX II TM
 USB Flash Memory TransMemory-EX II TM Security Software User Manual TOSHIBA Corporation Semiconductor & Storage Products Company Contents Chapter 1: Introduction... 2 Chapter 2: System Requirements...
Tech Times. Back-up and Storage
 Tech Times Back-up and Storage Back-up and Storage Why? Avoid loss of personal information, settings and software. Save time, resources and sanity by storing data so it is easily retrievable. Be proactive.
Format the USB Thumb Drive for Ghost
 First, download the 3 files found on this FTP site: ftp://ftp.meta.moleculardevices.com/outgoing/kudoh/ Also, download the files found here: ftp://ftp.meta.moleculardevices.com/support/wavetracer/ You
DVR4C Remote Viewer Operation Manual Table of Contents EN 3 1. OVERVIEW...5 1.1 MINIMUM PC REQUIREMENTS...5 2. INSTALLING THE PROGRAM...
 DVR4x4RemoteViewer.book Page 3 Tuesday, February 15, 2005 9:19 AM DVR4C Remote Viewer Operation Manual Table of Contents EN 3 1. OVERVIEW...5 1.1 MINIMUM PC REQUIREMENTS...5 2. INSTALLING THE PROGRAM...5
Firmware Update Instruction Manual
 Firmware Update Instruction Manual This manual explains the procedures for downloading the CX2 firmware from the Ricoh website and updating the camera s firmware. Perform the following operations to update
Wireless Network Adapter Installation
 Belkin 54 Mbps Wireless Network Adapter Installation Version 1.0 Copyright Copyright 2013 Watthour Engineering Co., Inc.. All rights reserved. Information in this document is subject to change without
FAQ for USB Flash Drive
 FAQ for USB Flash Drive 1. What is a USB Flash Drive? A USB Flash Drive consists of a flash memory data storage device integrated with a USB interface. USB Flash Drives are typically removable and rewritable.
Email Archiving. Follow these steps to archive your email:
 Email Archiving Archiving is a process by which your email messages and attached files are moved from the database on our email server to a location on your computer. This document contains step-by-step
Instrument Software Update Instructions. Keysight X-Series Signal Analyzers (PXA/MXA/EXA/CXA) Upgrading an older version to A.12.
 Upgrading an older version to A.12.") Instrument Software Update Instructions Keysight X-Series Signal Analyzers (PXA/MXA/EXA/CXA) Purpose Upgrading an older version to A.12.09 and above The purpose of this document is to outline the instrument
Instrument Software Update Instructions Keysight X-Series Signal Analyzers (PXA/MXA/EXA/CXA) Purpose Upgrading an older version to A.12.09 and above The purpose of this document is to outline the instrument
Clickfree Software User Guide
 Clickfree Software User Guide Last Revised: Nov 2, 2011 Clickfree_backup_software_user_guide_v1.0 Clickfree and the Clickfree logo are trademarks or registered trademarks of Storage Appliance Corporation.
Setting up for Adobe Connect meetings
 Setting up for Adobe Connect meetings When preparing to lead a live lecture or meeting, you probably ensure that your meeting room and materials are ready before your participants arrive. You run through
Florence School District #1
 Florence School District #1 Training Module 2 Designing Lessons Designing Interactive SMART Board Lessons- Revised June 2009 1 Designing Interactive SMART Board Lessons Lesson activities need to be designed
Boot Camp Installation & Setup Guide
 Boot Camp Installation & Setup Guide Contents 3 Introduction 4 Installation overview 4 Step 1: Check for updates 4 Step 2: Prepare your Mac for Windows 4 Step 3: Install Windows on your Mac 4 Step 4: Install
Corsair Flash Voyager USB 2.0 Flash Drive UFD Utility User s Manual
 Corsair Flash Voyager USB 2.0 Flash Drive UFD Utility User s Manual Contents For AP v2.10.0.0 Release For Windows 98/ME/2000/XP Version 1.1B (08/27/2004) Contents...1 Introduction...1 Features & Specifications...2
Hi-Speed USB Flash Disk User s Manual Guide
 Hi-Speed USB Flash Disk User s Manual Guide System Requirements Windows 98, ME, 2000, XP, Mac OS 10.1, Linux 2.4 or above AMD or Intel Pentium 133MHz or better based computer USB 1.1, USB 2.0 or higher
USB Driver Installation for Windows XP
 USB Driver Installation for Windows XP USB Serial Converter Driver Installation for Windows XP CAUTION: You must use the drivers on the CD-ROM supplied with your USB Device. DO NOT download drivers from
Boot Camp Installation & Setup Guide
 Boot Camp Installation & Setup Guide Contents 3 Introduction 3 What You Need 4 Installation Overview 4 Step 1: Check for updates 4 Step 2: Prepare your Mac for Windows 4 Step 3: Install Windows 4 Step
Operating System Installation Guide
 Operating System Installation Guide This guide provides instructions on the following: Installing the Windows Server 2008 operating systems on page 1 Installing the Windows Small Business Server 2011 operating
Additional Requirements for ARES-G2 / RSA-G2. One Ethernet 10 Base T/100 Base TX network card required for communication with the instrument.
 TA Instruments TRIOS Software Installation Instructions Installation Requirements Your TRIOS Instrument Control software includes all the components necessary to install or update the TRIOS software, as
Colorfly Tablet Upgrade Guide
 Colorfly Tablet Upgrade Guide (PhoenixSuit) 1. Downloading the Firmware and Upgrade Tool 1. Visit the official website http://www.colorful.cn/, choose 产 品 > 数 码 类 > 平 板 电 脑, and click the product to be
Digital Photo Bank / Portable HDD Pan Ocean E350 User Manual
 Digital Photo Bank / Portable HDD Pan Ocean E350 User Manual Installing a hard disk 1. Power off the unit. 2. Remove the bottom cover from the unit by removing four screws. 3. Insert the 2.5 HDD to the
Online Backup Client User Manual
 For Mac OS X Software version 4.1.7 Version 2.2 Disclaimer This document is compiled with the greatest possible care. However, errors might have been introduced caused by human mistakes or by other means.
Concert Hall Sound You Can Hold In Your. Hand. Users Manual 0.9
 Concert Hall Sound You Can Hold In Your Hand Users Manual 0.9 1 Greetings Thank you for purchasing Calyx M. Calyx M is a product made for people who love music and want to listen no matter when or where
C-more Remote Access, Data Log, FTP File Transfer, and Email Tutorial
 C-more Remote Access, Data Log, FTP File Transfer, and Email Tutorial P a g e 2 Introduction: This script will walk you through the basic process of setting up the remote access, data logging, FTP file
Scanning. WorkCentre C2424 Copier-Printer
 Scanning This chapter includes: "Basic Scanning" on page 4-2 "Installing the Scan Driver" on page 4-4 "Adjusting Scanning Options" on page 4-5 "Retrieving Images" on page 4-11 "Managing Files and Controlling
RDC-7 Windows XP Installation Guide
 RDC-7 Windows XP Installation Guide CONTENTS 1. End User License Agreement...3 2. Important notes...4 3. Customer support...4 4. Installing the USB driver...4 I. Prior to installation...4 II. Installation
Backup and Restore User manual For version 5.0.0.8
 Backup and Restore User manual For version 5.0.0.8 All rights reserved 1989 2008 Microware Software - Rev. 1.0.5 October 2, 2008 Page 1 Table of Contents Backup and Restore 1.0 Overview... 3 1.1 Main features...4
EnVivo 4 GB Aluminum MP3 Player
 User Manual EnVivo 4 GB Aluminum MP3 Player With Clipper, Display & Voice Recording Electrical and electronic equipment (EEE) contains materials, parts and substances, which can be dangerous to the environment
Administrator Manual Across Personal Edition v6 (Revision: February 4, 2015)
") Administrator Manual Across Personal Edition v6 (Revision: February 4, 2015) Copyright 2004-2015 Across Systems GmbH The contents of this document may not be copied or made available to third parties in
Administrator Manual Across Personal Edition v6 (Revision: February 4, 2015) Copyright 2004-2015 Across Systems GmbH The contents of this document may not be copied or made available to third parties in
`````````````````SIRE USER GUIDE
 `````````````````SIRE USER GUIDE Table of Contents INTRODUCTION 3 SYSTEM REQUIREMENTS 4 RUNNING SANDISK BACKUP 5 Setup Your First Backup 6 Create Your Backup 7 Custom Backup 8 Dmailer Online 10 Launch
S PT-E550W ELECTRONIC E C LABELING L SYSTEM
 ELECTRONIC E C LABELING L SYSTEM S PT-E0W In order to use your P-touch labeling system safely, read the included Quick Setup Guide first. Read this guide before you start using your P-touch labeling system.
Kanguru Micro MP3 PRO USB2.0 User s Manual
 Kanguru Micro MP3 PRO USB2.0 User s Manual MP3/WMA Player + Digital Voice Recorder FM Tuner + USB Flash Drive Copyright 2005, All Rights Reserved. This manual applies to 1.1 or later versions of the Kanguru
Intel System Event Log (SEL) Viewer Utility. User Guide SELViewer Version 10.0 /11.0 December 2012 Document number: G88216-001
 Viewer Utility. User Guide SELViewer Version 10.0 /11.0 December 2012 Document number: G88216-001") Intel System Event Log (SEL) Viewer Utility User Guide SELViewer Version 10.0 /11.0 December 2012 Document number: G88216-001 Legal Statements INFORMATION IN THIS DOCUMENT IS PROVIDED IN CONNECTION WITH
Intel System Event Log (SEL) Viewer Utility User Guide SELViewer Version 10.0 /11.0 December 2012 Document number: G88216-001 Legal Statements INFORMATION IN THIS DOCUMENT IS PROVIDED IN CONNECTION WITH