Disk-to-Disk-to-Tape Backups with Retrospect 7.5 for Windows
|
|
|
- Sandra Bradford
- 10 years ago
- Views:
Transcription
1 EMC White Paper Disk-to-Disk-to-Tape Backups with Retrospect 7.5 for Windows Abstract: EMC Retrospect 7.5 for Windows backup and recovery software can be used with disk storage to provide a fast, highly reliable, easy-to-manage disk-based backup solution. The speed of disk and the convenience of Retrospect is an ideal combination for small and medium businesses (SMBs) and distributed enterprises protecting networked desktops, notebooks, and servers as well as for larger corporations seeking reliable backups of networked desktops and notebooks. This paper describes how to configure EMC Retrospect backup and recovery software to deliver optimum performance with disk. It recommends best practices for using Retrospect to stream backups to disk and then copy data to tape at a later time for secure offsite storage and archiving. 1

2 Copyright 2006 EMC Corporation. All rights reserved. EMC believes the information in this publication is accurate as of its publication date. The information is subject to change without notice. THE INFORMATION IN THIS PUBLICATION IS PROVIDED AS IS. EMC CORPORATION MAKES NO REPRESENTATIONS OR WARRANTIES OF ANY KIND WITH RESPECT TO THE INFORMATION IN THIS PUBLICATION, AND SPECIFICALLY DISCLAIMS IMPLIED WARRANTIES OF MERCHANTABILITY OR FITNESS FOR A PARTICULAR PURPOSE. Use, copying, and distribution of any EMC software described in this publication requires an applicable software license. EMC 2 and Retrospect are trademarks of EMC Corporation. All other trademarks used herein are the property of their respective owners. All other brand names are trademarks or registered trademarks of their respective owners. [S V1] 2

3 Table of Contents Disk-to-Disk-to-Tape Backups...1 Introduction...4 Requirements and Considerations...5 Sizing the Backup Server... 5 Estimating Disk Space Requirements... 5 Performance... 5 Setting Up the Disk...6 Setting Up Retrospect...6 Overview of Steps... 6 Ongoing Maintenance of Backup Operations... 6 Installing Retrospect on the Backup Server... 7 Installing Retrospect Clients on Networked Computers... 7 Assigning Computers to Source Groups... 7 Creating Disk Backup Sets... 8 Creating Proactive Backup Scripts... 9 Copying Backups to Tape for Secure Offsite Storage...10 Creating Tape Backup Sets...10 Transferring Snapshots from Disk to Tapes Alternative Backup Strategies...12 Scheduling Tape Drive Cleanings Setting up notification Appendices: Step-by-Step Procedures...14 Appendix A: Installing Retrospect on the Backup Server Appendix B: Installing the Retrospect Client on Networked Computers Appendix C: Assigning Computers to Source Groups Appendix D: Creating Disk Backup Sets Appendix E: Creating Proactive Backup Scripts Appendix E: Creating Proactive Backup Scripts Appendix F: Creating Tape Backup Sets Appendix G: Transferring Snapshots from Disk to Tape Appendix H: Scheduling Disk Backup Set Grooming Appendix H: Scheduling Tape Drive Cleanings Appendix I: Enabling Notification

4 Introduction This data protection solution is comprised of a dedicated backup server, EMC Retrospect 7.5 for Windows backup and recovery software, disk storage, and a tape device for creating tapes for long-term offsite storage. This paper provides an overview of the process of setting up the solution and discusses the advantages using Retrospect with disk storage. The detailed, step-by-step directions in the appendices enable backup administrators and technical consultants to set up and configure Retrospect to ensure optimum performance and minimum ongoing maintenance of disk-to-disk-to-tape (D2D2T) backups. Retrospect protects networked desktops, notebooks, and file servers running Windows, Macintosh, Linux, Solaris and NetWare operating systems, as well as business-critical applications. Disk delivers costeffective, high-capacity storage. By using Retrospect to manage backups on disk, backup administrators can realize three key advantages: Easy administration Fast backups Rapid restores This solution has been designed to be easy to set up and manage on an ongoing basis. Retrospect s patented technology automates many common backup tasks. After Retrospect has been set up, it performs backups and adjusts ongoing operations to react to changing network situations without the need for manual intervention. Retrospect s backup-to-disk features protect the maximum amount of data in the shortest amount of time by utilizing the speed and efficiency of disk. Backups can be stored internally on hard disk within the backup server or externally on a disk storage device. Disk provides an easy-to-use, cost-effective destination for backups. Rapid restores are achieved by storing the most recent data, for example files and folders that are less than 30 days old, on disk. This option delivers a powerful solution for rapid recovery of missioncritical data. For archival and disaster recovery purposes, Retrospect transfers data from disk to tapes at a later time for long-term offsite storage and archiving. Figure 1 Network topology of the Retrospect disk-to-disk-to-tape solution. 4

5 Requirements and Considerations This solution has the following software and hardware requirements: Retrospect 7.5 for Windows, Multi Server edition Windows-based backup server running one of the following operating systems: Windows 2000 Server, Windows 2000 Advanced Server, Windows Server 2003 (32-bit or x64), Windows NT 4.0 Server, Microsoft Small Business Server 2000 or 2003, Windows XP Professional (32-bit or x64), or Windows Storage Server 2003 A minimum of 6 disk drives Retrospect-supported tape library or autoloader for creating tapes for offsite storage Tape media to accommodate the amount of data being protected LAN infrastructure (10, 100, or 1000 Mbps) Sizing the Backup Server An important step in creating a solid backup environment is to select appropriate backup server hardware that can handle the load of moving and managing the data being protected. Additionally, Retrospect will collect the file information and store them for future restores. When considering the backup server hardware, there are a few items you should take into consideration, for example: Select a computer with acceptable CPU performance (greater than 2GHz is recommended, as well as multiple CPUs) Select a computer with at least 1GB of RAM; for larger environments, 2GB of RAM is better For optimal tape performance, do not put more than 2 tape drives on each SCSI bus To optimize client performance, we recommend network clients be connected to at least a 100Base-T or 1000Base-T Ethernet network. Estimating Disk Space Requirements The first step in establishing a backup solution is determining the disk space required to hold daily backups of the networked computers being protected by the Retrospect server. Add the amount of disk spaced used on all networked computers and multiply the total by two. The resulting number gives an estimate of the amount of disk space needed. This approximation permits the storage of a reasonable number of restore points for each computer. For example, with four servers each containing 250 GB of data, the total disk space to be protected is 4 x 250 GB, or 1 TB. To account for additional incremental backups, double this number to get a final figure of 2 TB of disk space required for backups. Performance There are a number of factors that can effect overall system backup and restore performance when using Retrospect to back up to disk. Backup server performance A number of factors can affect the servers ability to process backup data and move it to the target device. Processor speeds, total available system memory, multiuse vs. dedicated server. Network bandwidth - Performing backups when the network is not in heavy use for other production operations will provide more available bandwidth for backup operations. Consider performing scheduled backups of servers at off-peak times. Additionally, faster networks can dramatically improve performance i.e. 1000Mbps vs. 100Mbps or 10 Mbps. File sizes and data type - Larger files typically back up faster than smaller files. Disk storage Most disk storage can be configured to meet specific needs, and can be upgraded as needs grow. The following observations should be taken into account to optimize backup to disk performance with 5
, or Windows Storage Server 2003 A minimum of 6 disk drives Retrospect-supported tape library or")
6 Retrospect: Retrospect allows one concurrent backup to each Backup Set. By creating multiple Disk Backup Sets, up to 8 simultaneous backups can be supported. Configure the disk with multiple volumes, and distribute the Disk Backup Sets across them. When Retrospect is utilizing Disk Backup Sets in parallel the overall I/O performance will be higher because the write operations will be distributed across separate volumes. Setting Up the Disk For instructions on installing and configuring the disk to receive backups, see the disk manufacturer s documentation. For the examples in this documents, configure your disk as four NTFS volumes: G:\, H:\, I:\, and J:\. Setting Up Retrospect Retrospect is built on patented, automated technology that simplifies common tasks associated with setting up and maintaining backups. It includes built-in backup-to-disk capability that allows fast backups and rapid restores, and it simplifies the process of transferring backups from the backup disks to tapes for offsite archival storage and disaster recovery protection. Retrospect s backup to disk capability allows data to be streamed to disk to deliver the fastest possible backup times. Retrospect enables rapid restores by retaining recent backup data on disk for quick, easy random-access recovery. Retrospect s automated data grooming feature can delete older, unnecessary files and folders from the backup disk to ensure that there is always plenty of available disk space for newer backups to be stored, allowing the disk to be self-maintaining. Overview of Steps Setting up Retrospect to back up a network of desktops, notebooks, file servers, and application servers involves the follow nine straightforward steps: 1. Installing Retrospect on the backup server 2. Installing Retrospect Clients on networked computers 3. Assigning computers to source groups 4. Creating Disk Backup Sets 5. Creating Proactive Backup scripts 6. Creating Tape Backup Sets 7. Transferring Snapshots from disk to tape 8. Scheduling Tape Drive cleanings 9. Enable notification for problem reporting The body of this document describes each of these steps and the appendices give detailed, step-by-step procedures for completing each step. Ongoing Maintenance of Backup Operations Once the steps to set up the backups have been performed, maintaining the ongoing backup operations is easy. If computers do not get backed up during a particular backup session because they were inaccessible or there was not sufficient time, there is no need to write a custom backup script to protect them. Retrospect s patented Proactive Backup technology automatically adjusts the backup operations to ensure the computers are protected during subsequent backup sessions. As more computers are added to your network, simply assign them to the appropriate group as described in Assigning Computers to Source Groups later in this document. They will be protected along with the other computers in the group. Manual effort is required to rotate the Tape Backup Sets between onsite and offsite locations each week. In the recommended backup strategy two sets of tapes are used, A and B. Transfers of data from disk to tape take place each week. The first week Tape Backup Set A is used, then Tape Backup Set B. Although both 6

7 Tape Backup Sets can be left in the tape library permanently, it is safer to move the tape that is not being used for a given week and store it offsite. This protects against catastrophic loss of critical data due to disk failure, fire, or theft. Tapes should be moved offsite to long term storage at the end of each quarter, and new tapes need to be placed into the tape library. Installing Retrospect on the Backup Server The backup server is typically a dedicated computer that hosts the Retrospect backup and recovery application. The disk is accessed from this server, as is the tape library or tape autoloader. Installation of Retrospect is fast and easy. All valid backup devices such as a disk array, supported tape libraries or autoloaders are automatically recognized and configured without the need to install special device drivers. For step-by-step instructions on installing the Retrospect application, see Appendix A in this document. Installing Retrospect Clients on Networked Computers Retrospect recognizes computers when they connect to the network and prioritizes them for backup, which is particularly useful for backing up notebook and desktop computers because notebooks are not connected to the network during predictable periods of time, and desktops might be turned off or located on a portion of the LAN that is temporarily inaccessible during the backup window. The Retrospect client software is installed onto each networked computer. It communicates with the backup server when a computer becomes available for backup, and manages the data transfer of files, folders, and system state information which is required to recover a computer if it becomes corrupted. For step-by-step instructions on the available options for deploying the Retrospect client onto the networked computers, see Appendix B in this document. Assigning Computers to Source Groups After the Retrospect client has been installed onto each networked computer the computers can be logged in to the Retrospect application using the password that was assigned to each client when it was installed. The client can only be controlled by the Retrospect server that knows this password. Retrospect remembers the password for each client for subsequent interactions with the client such as backups, restores, renaming the client, or updating client software centrally from within Retrospect.. If a private and public key have been generated within Retrospect and the public key has been deployed with the Retrospect Client for Windows installer, the clients can be logged in automatically, while providing a high level of security. After they are logged in, client computers are typically placed into source groups so they can be protected as a group. For example, executive notebooks might be placed into one group and scheduled for immediate backup when they connect to the network. An Exchange Server might be placed in another group and backed up each evening. Financial data might be placed in yet another group to facilitate compliance with government regulatory guidelines regarding frequency of backups or data retention. Figure 2 Organizing computers into groups 7

8 For step-by-step instructions on assigning computers to source groups, see Appendix C in this document. Creating Disk Backup Sets Each source group is backed up to a Disk Backup Set residing on disk. This allows Retrospect to back up as many as eight source groups concurrently, each to its corresponding Disk Backup Set. A Disk Backup Set resides in any folder on an existing volume. It is recommended to distribute the Disk Backup Sets across the disk volumes created earlier. In this example the Disk Backup Sets is distributed across the four volumes shown in Figure 3. Each Backup Set also has an associated catalog file, which Retrospect uses to track the contents of the Backup Set. It is convenient to place these Catalog Files in the same folders as their corresponding Disk Backup Set. Figure 3 Directory structure for Disk Backup Sets and their associated Catalog Files. The first backup into a Disk Backup Set is a full backup of everything from the computers in the source group. Thereafter only new or changed files, folders, and system state information needs to be added to the Disk Backup Set during each backup session. This is typically referred to as an incremental backup. The amount of backup data gradually increases over time until it fills the disk space allotted for backups. That s why EMC designed a built-in data grooming capability for Retrospect. Retrospect s data grooming function deletes unneeded older backups in order to make room on the disk for newer backups. Because disk space never has to be adjusted or reallocated on the backup server, incremental backups can be performed forever without manual intervention. Typically the backup administrator never has to allocate additional disk space. However, in most cases additional disk space can be added, or a disk storage device can also be included in the existing configuration. Regardless of the disk configuration, after the maximum size has been established for a Disk Backup Set, Retrospect can be set up to groom out older backups automatically. Retrospect can be configured to perform data grooming in three ways: Grooming can be triggered automatically when the allotted disk space is full. Grooming can be set to occur according to a predetermined schedule. Grooming can be initiated manually. Figure 4 Data grooming. 8

9 Because data grooming deletes older files, a reliable offsite archiving policy utilizing tapes or remote disk is essential to prevent the loss of potentially valuable older data. Onsite disk provides fast operational recovery of time-sensitive data, while offsite archiving prevents the permanent loss of data that has been groomed from the onsite disk. Figure 5 shows the advantage of overlapping offsite backups with onsite disk backups that employ data grooming. Figure 5 Combining data grooming and archived backups. The recommended D2D2T strategy is to back up to a Disk Backup Set which is set to retain only the last 30 backups for each source. Snapshot Transfers are performed to tapes each week to ensure that data is safely stored for long term archives well before it is groomed out of the Disk Backup Set to make room for newer backups. Snapshot Transfers are discussed later in this document. For step-by-step instructions on creating Disk Backup Sets, see Appendix D in this document. Creating Proactive Backup Scripts Each group of computers will be backed up into its corresponding Disk Backup Set with a Proactive Backup Script. Proactive Backup scripts have significant advantages over fixed schedule backup scripts because they minimize the manual efforts required to keep backup operations running smoothly. Fixed scheduled scripts run at a specific time. If a computer is unavailable or there is not enough time to complete the backups, an error is logged. In the case of notebook computers, trying to catch them for backup when they are available on the network can be especially frustrating. A manual effort is required to read the backup logs each day and create custom backup scripts to protect computers not protected when the backup script ran. This is a tedious, time consuming, and difficult task. Retrospect provides fixed scheduled scripts because they are commonly used by people familiar with other backup applications. In contrast, Proactive Backup Scripts adjust themselves to keep backup operations running smoothly without the need for manual intervention. A backup window is established for the script to identify when the first backup can begin, and when the last backup must be stopped. Computers are automatically recognized when they appear because the Retrospect Client that is installed on them communicates to the Retrospect backup server so they can be prioritized for backup. Computers within the group that have not been backed up recently are raised to a higher priority to ensure they are not starved from being backed up. If all backups for the group cannot be completed during the backup window, they will be captured during the next backup. Lastly, if a computer is only partially backed up during a session, its backup will resume from where it left off when backups are again possible. In Retrospect 7.5, a media-only verification option has been added to increase backup windows when comparing data backed up to the original source is not a requirement. The Media Verification option uses accurate MD5 digests created when the data is copied to ensure accuracy. For step-by-step instructions on creating Proactive Backup Scripts, see Appendix E in this document. 9

10 Copying Backups to Tape for Secure Offsite Storage For archiving and disaster recovery purposes, data that is stored on disk needs to be copied to tapes and stored in a secure offsite location for long-term storage in case the data ever needs to be restored. Use Snapshot Transfers to automatically schedule the copying of data from disk to tapes for long-term offsite storage. Creating Tape Backup Sets Estimate the amounts of data that will be backed up and procure the appropriate number of tapes. A tape device should be selected which has enough capacity to hold all of the data that is stored on disk, for example, a tape library. EMC maintains an extensive list of supported devices for this purpose. For the complete list, see the EMC Retrospect Storage Device Support web page at Two separate Tape Backup Sets are recommended to store backups to ensure that if a tape in one set fails, the other set will be able to be used. For step-by-step instructions on creating Tape Backup Sets, see Appendix F in this document. Transferring Snapshots from Disk to Tapes The term Snapshot is most often used in describing the process of creating an instantaneous non-changing image of a disk that is in use. In backups we take a Snapshot of the hard drive so that after we back it up we can verify our backups against the source. This provides a highly reliable and consistent recovery point. Retrospect uses Microsoft VSS to Snapshot volumes on Windows Server 2003 and Windows XP computers, and it installs its own optional snapshot service to protect Windows computers running Windows NT/2000. However, prior to the current common use of the term Snapshot, Retrospect used the term to designate a list of all files, folders, and settings on a computer at a point in time when a backup occurred. Each time a backup is performed, another Snapshot is added to the Backup Set. Each Snapshot represents a point in time to which a restore can be performed for each source. This is the definition of the term Snapshot that is used when performing transfers of backup data from one Backup Set to another. Backup data from the Disk Backup Sets is copied to either of two Tape Backup Sets, which are rotated offsite on alternating weeks for disaster recovery and archive purposes. The data is moved using Snapshot Transfers, which copy selected data from the Disk Backup Set to a new or existing Tape Backup Set. After the first Snapshot Transfer to a Tape Backup Set, the tapes contain exactly one Snapshot (restore point) for each source that is being backed up. If one were to examine the tapes, it would be impossible to determine if the backup data on them was not collected from the source computers at that point in time. However, because the data was placed onto the tapes with a Snapshot Transfer operation, it was collected from the Disk Backup Set without having to burden the original source computers and the network infrastructure. This is especially useful for copying data from notebook computers onto tapes. When notebook computers are present, they are automatically backed up to the Disk Backup Set. Then the last backup performed for each notebook is placed onto tapes each week. Each subsequent Snapshot Transfers to an existing Tape Backup Set adds an additional restore point onto the tapes for each source. Each of these restore points is also indiscernible from a full backup of each source performed at that point in time. However, these subsequent Snapshot Transfer operations need to copy only the files and folders that are new or changed since the last Snapshot Transfer operation. The result is a collection of restore points that make extremely efficient use of the tape media. Hence, Retrospect s Snapshot Transfers to tape go well beyond the Synthetic Full Transfers provided by other high-end backup applications. The recommended tape usage schedule shown in Figure 6 provides good protection, uses far fewer tapes than other backup software would use, and makes offsite media administration easy. Snapshot Transfers from the groomed Disk Backup Sets are sent to two Tape Backup Sets, A and B, which are used 10

11 alternately. At the end of each quarter, Tape Backup Set A is retired to offsite storage, and new tapes are moved into the rotation to take its place. Figure 6 Recommended schedule for tape usage After a Tape Backup Set (in this example, Backup Set A) has been moved offsite, select the New Backup Set media action option for the Backup Set. The new Backup Set A will be named A with a number 11

12 appended to its name, indicating that it is a replacement for the original Backup Set A, which has been retired. This enables the Retrospect Snapshot Transfer scripts, which are expecting Tape Backup Set A, to copy data from Disk Backup Set A to the new tapes. On week 14, the quarterly cycle begins again with a Snapshot Transfer to the new Tape Backup Set A. On the following week, Tape Backup Set B is then recycled in order to keep the amount of tapes required by the Backup Set to a minimum. At the end of the year both Tape Backup Set A and Tape Backup Set B are retired as yearly archives. Having two sets of archives protects against a potential media failure in either set. Storing them in separate locations provides additional safety. Store the Tape Backup Sets offsite in a secure location when they are not being used. The Tape Backup Sets should be created as AES-256 encrypted Backup Sets to prevent access to the data if the tapes are lost or stolen. Passwords should be stored in an encrypted or physically secured location with access by a few trusted employees to ensure continued password availability, despite employee turnover. Creating a password management process is critical because if you loose and forget the password, the data will not be restorable. NOTE: We recommend AES-256 encryption for off-site backups when possible. However, encryption will have a major impact on the throughput to high performance tape drives and will reduce storage capacity on each tape. This is because of the adverse mathematical relationship between compression algorithms and encryption algorithms. If the capacity and speed concerns outweigh your encryption needs, we recommend password protection in that case to provide at least minimal offsite security needs. For step-by-step instructions on transferring Snapshots from disk to tapes, see Appendix G in this document. Alternative Backup Strategies Other patterns can be easily constructed based on the recommended strategy, ranging from maximum protection, which requires additional tapes and additional human action, to minimal protection, which requires fewer tapes and less human interaction. Table 1 illustrates a variety of different strategies. Table 1 Backup strategies Minimum Basic Recommended Very Strong Computers Servers protected Desktops/notebooks Days of restore data on disk Frequency of transfers to tape 2 weeks 1 week 1 week daily Servers, desktops, and notebooks Filter data no filters for transfer Servers to tape no filters Desktops/notebooks selected folders Number of tape sets Archived tape sets per quarter Tape storage offsite onsite offsite offsite 2 locations AES-256 tape encryption no - no password only yes yes 12

13 Scheduling Tape Drive Cleanings Regular cleaning of your tape drive is essential for reliable performance. Dirty drive heads are a major cause of tape drive problems and media failure. Cleaning most tape drives is as simple as inserting a tape cleaning cartridge and letting the drive clean itself. Refer to the manufacturer's cleaning recommendations in the tape drive s documentation. Retrospect offers a few cleaning options, depending on the capabilities of the tape drive. Tape Libraries If a cleaning tape with a cleaning-specific barcode label is loaded in a tape library that supports barcode reading, Retrospect can automatically clean the drive at specified intervals. If the tape library does not support barcode reading, Retrospect will still automatically clean the drive, as long as the storage slot has been designated as a cleaning slot, and contains the cleaning tape. The Clean option is available only with a tape library. After a drive is selected, right click it and select Clean. The library moves the cleaning tape from its storage slot to the drive and begins cleaning. When it's done, the tape is moved backed to its storage slot. Cleaning can be set up to occur after a certain number of drive usage hours. Barcoded Cleaning Tapes You can use Retrospect to specify a maximum number of times to use a bar-coded cleaning tape. Retrospect tracks the number of times the tape has been used. It stops using the tape after it reaches the specified number. This feature assists in managing cleaning tapes that have a set number of usages. For step-by-step instructions about scheduling tape cleanings, see Appendix H in this document. Setting up notification Retrospect can multiple users when errors occur allowing quick turnaround time to resolve major problems without requiring manual daily oversight to check for problems. For step-by-step instructions about notification, see Appendix I in this document. About EMC EMC Corporation (NYSE: EMC) is the world leader in products, services and solutions for information storage and management that help organizations extract the maximum value from their information, at the lowest total cost, across every point in the information lifecycle. Information about EMC's products and services can be found at About EMC Retrospect EMC Retrospect is part of the EMC Insignia line of software and hardware products, which enables small and medium businesses (SMBs) to store, protect, manage, and share vital business information. To learn more about EMC Insignia, contact your authorized EMC Velocity SMB channel partner or visit 13

14 Appendices: Step-by-Step Procedures The guidelines in the following appendices describe best practices for setting up Retrospect to perform fast, easy-to-maintain backups to disk and to copy data from disk to tape for secure offsite storage. Appendix A: Installing Retrospect on the Backup Server Complete the following steps to install Retrospect on a backup server. Step 1 Install Retrospect and enter the license code. Step 2 Enter any additional license codes for optional add-ons such as the Open File, Exchange Agent, or SQL Server Agent add-ons. 14

15 Step 3 Personalize your copy of Retrospect. Step 4 Select Register Now to register your Retrospect software. Step 5 Fill out the registration form or opt to register later. 15

16 Step 6 Trials of Retrospect add-ons are available on request. Step 7 To back up databases to the backup server, set up Retrospect to run under an account that is powerful enough to perform the backup. For example, the backup user must be in the Administrators group at a minimum. If on a domain, the account must a Domain Admin as well as a SQL or Exchange administrator if required. NOTE: If you are NOT on a domain, enter the computer name into the Log on to field. Step 8 Uncheck the Perform a backup checkbox and select Finish. 16

17 Appendix B: Installing the Retrospect Client on Networked Computers Retrospect 7.5 for Windows supports Windows, Macintosh, Red Hat Linux, SUSE Linux, Solaris and NetWare clients. Retrospect Single Server edition backs up networked desktop and notebook computers. Retrospect Multi Server edition backs up networked desktops, notebooks, and servers. The Retrospect clients for each type of computer can be found on the Retrospect installation CD or at If you would like Retrospect to automatically log in Windows clients in a secure manner, a private key/public key relationship can be created between the backup server and the client. If you would like to manually assign individual passwords to each client, or are installing non-windows clients, proceed to Step 4. Create the private key and public key files in Retrospect. The private key will be assigned to the backup server and the public key will get distributed with the Windows client software. Step 1 In the Retrospect preferences, click the Create keys button in the Clients>Adding section. Step 2 Create a password. 17

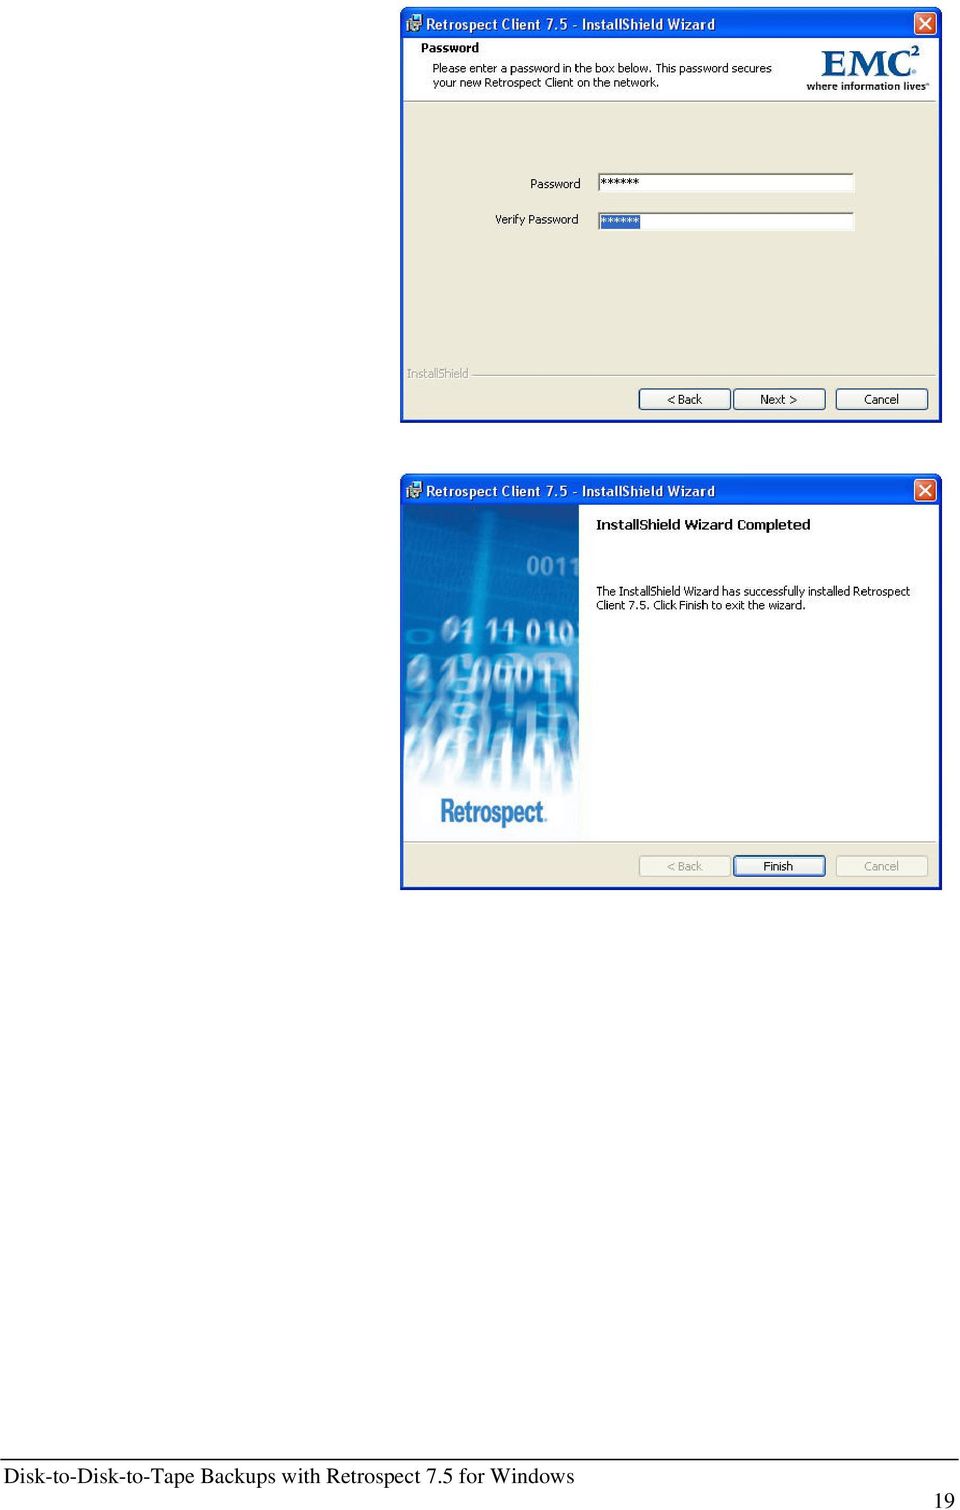
18 Step 3 Copy the pubkey.dat file from C:\Documents and Settings\All Users\Application Data\Retrospect to the public_key folder in the Retrospect Client for Windows Installer directory. When the Retrospect client is installed, the public key will be installed with it. When the backup server discovers the Windows client, it can be logged in without having to provide a password. NOTE: If the client installer is located on the Retrospect Install CD, first copy the Windows client installation directory to your computer so you can add files to it. Step 4 Copy the client installation directories to a network server for convenience when installing clients on each networked computer. Windows client installers can also be automatically deployed to computers on the network using tools such as Microsoft Systems Management Server or using the Group Policy feature in Windows Server

19 19
20 Appendix C: Assigning Computers to Source Groups Step 1 Invoke Retrospect on the backup server and select Configure Clients from the left navigation panel. Step 2 Initially, the Retrospect backup server has no networked client computers entered into its database. Click Add. Step 3 Retrospect automatically discovers all client computers on the subnet that the backup server is on. Choose a client computer from the list and click Add. 20

21 If using the private/public key feature for client security, Retrospect can be setup to automatically log in discovered clients. If you would like to manually add clients, proceed to Step 5. Step 4 Select Clients>Adding, select the Automatically add clients check box, and enter the interval at which you would like to add clients. Click OK. Clients automatically added to the Client Database will be placed in a folder called Automatically Added. To automatically protect clients that are discovered by the backup server, a Proactive Backup script can be created with the Automatically Added folder as the source. This will give you time to organize your new clients without them being left unprotected. Step 5 Enter the client password that was provided during installation of the Retrospect client software. Click OK. Repeat this process to check in each networked client. Checking in clients is a one-time event. Thereafter, Retrospect remembers each client and its password. If the client has a public key that matches up with the private key located on the backup server, you will not be prompted for a password when the client is logged in. If multiple clients contain a public key, you can select more than one of them and log them in at the same time. 21
22 Step 6 After networked clients are checked in, they appear in the Retrospect backup server database of clients. Close the Backup Clients Database window. Step 7 To create the Source Groups into which the clients will be placed, click Configure Volumes and click the New Group toolbar button. Step 8 To place a client in a Source Group, click the icon for the client and then drag and drop it into a Source Group. A reference to the client appears in the Source Group. A client can be placed into multiple Source Groups. Close the Volumes Database window. In this example, we created six groups and name them: AppServer, Desktops, Exchange, FinancialData, Notebooks, and Servers. 22
23 Appendix D: Creating Disk Backup Sets Step 1 To create a Disk Backup Set to hold the contents of the backups for each Source Group, click Configure Backup Sets. Initially there will be no known Backup Sets. Click Create New. Step 2 When the Welcome screen opens, click Next. Step 3 Select Disk. Click Next. 23
24 Step 4 Assign the Disk Backup Set the same name as its corresponding Source Groups, for example Notebooks. Place the Disk Backup Set on any of the disk volumes defined previously. Try to distribute the six Source Groups fairly evenly across the available volumes. In this dialog 99% of the disk is available to the Disk Backup Set. Using only 90% would ensure that the Catalog File which is associated with the Disk Backup Set does not get crowded out as the Disk Backup Set grows. Click Next. Step 5 AES encryption is not required here, because the disk is physically secured on the site. Establish a security password for the Disk Backup Set to ensure that no rogue copies of Retrospect can be used to access it. Allow Retrospect to remember the password for scripted access. Store the password in a physically secured location with access by a few trusted employees to ensure continued password available despite employee turnover. Click Next. Step 6 Allow Retrospect to groom any data that is not needed to perform restores to the last 30 backups of the Source Group. This allows Retrospect to perform incremental backups forever without the need for manual intervention to assign or reallocate disk space. Click Next. 24
25 NOTE: If you would like to have Retrospect groom the Disk Backup Sets on a defined schedule, see Appendix H. Step 7 Place the Catalog File for this Disk Backup Set on the same volume as the Disk Backup Set itself. In this case the same folder, G:\Notebooks, is specified. This keeps the Backup Set and its associated catalog file together in one folder. Click Next Step 8 Click Finish. Step 9 Repeat steps 1-8 for each of the five other Disk Backup Sets.. 25
26 Appendix E: Creating Proactive Backup Scripts Step 1 Go to Automate Proactive Backup and create a new script called Notebooks. Select the Notebooks group for the script source and select the Notebooks Disk Backup Set as the destination. Unlike regular backup scripts, which have a scheduled start time and run until complete, Proactive Backup scripts have active times, during which Retrospect searches for computers in need of a backup. Use the default Schedule option of Always Active for this script. When Notebooks appear on the network, night or day, the Retrospect Client installed on them will communicate with the Retrospect backup ser to announce their presence. Retrospect will then prioritize them for backup. Click on Selecting and choose All Files Except Cache Files. This will filter out the Cache files from being backed up, saving valuable time. Click OK. Step 2 Now, add a script to back up the Servers group. Create a new Proactive Backup script and name it Servers. Select the Servers group as the source, select the Servers Disk Backup Set as the destination, and choose a Selector to filter out cache files from being backed up. Click OK 26
27 Step 3 This script is currently active at all times. To set it to run on nights and weekends, click the Schedule button, click Custom Schedule, and click the Custom button to bring up the Weekly Schedule window. To modify the schedule for weekdays, click on Mon and drag through Fri, highlighting those days. Enter a Start time of 7:00 PM and a Stop time of 7:00 AM. The window now shows a graphic representation for all-day weekend and nightly weekday operations. Click OK to close the Weekly Schedule window and then click OK to close the Schedule window. The final Proactive Backup script looks like this. Select OK. 27
28 Step 4 Create Proactive Backup Scripts for the other four Source Groups as well. The Desktops and FinancialData groups of computers should have a backup window of always active. The AppServer and Exchange Server groups of computers should be backed up at night like the Servers group. To add a new computer to the backup system, simply add the client to the appropriate group. Retrospect automatically includes that computer in the backups. This basic strategy protects all business-critical data on the network with minimal intervention from IT staff and without requiring backups on a fixed or user-initiated schedule. After the initial backup, Retrospect backs up only new and changed files daily, greatly reducing the amount of time needed to perform backups. Computers that are most in need are prioritized for backup, so that no data remains unprotected. Because Proactive Backup scripts run concurrently, as many groups and schedules as necessary can be created. For example, one script might look for notebooks 24 hours a day and back them up every 8 hours. Another might back up the engineering team s workstations nightly to an encrypted Backup Set. A third might back up documents only from the marketing department. The flexibility of Retrospect s Proactive Backup can meet the demands of almost any backup strategy. 28
29 Appendix F: Creating Tape Backup Sets Use the following procedure to create Tape Backup Sets for transferring data to tape for offsite storage. Step 1 From the left navigation pane click Configure>Backup Sets. Step 2 The previously created Disk Backup Sets appear. Click Create New. Step 3 The Create New Backup Set wizard is invoked. Click Next. 29
30 Step 4 Select Tape. Click Next. Step 5 Accept the default name Backup Set A and select the checkbox to enable hardware data compression. Click Next. Step 6 Select AES 128 or AES-256 encryption. Allow Retrospect to remember the password for scripted access. Click Next. 30
31 Step 7 Because encryption has been selected for the Tape Backup Set, Retrospect displays this dialog on top of the Security dialog as notification that only software compression is available. Click OK. Step 8 Store the Catalog File for the Tape Backup Set in a folder dedicated to storing tape Catalog Files. In this example they will reside on G:\Tape Catalog Files. Step 9 Unselect the checkbox offering to add a tape member to the newly created Tape Backup Set. There is no need to manually add tapes because Retrospect s Proactive Backup script automatically adds unused tapes in the tape library to the Tape Backup Set as needed. Click Finish. Step 10 Repeat steps 2 through 8 to create a second Tape Backup Set (Backup Set B). After the second Tape Backup Set is created, the Configure>Backup Sets window should display the following entries. 31
32 Appendix G: Transferring Snapshots from Disk to Tape Snapshot Transfers can be set up to move weekly Snapshots (restore points) from the Disk Backup Sets to the two Tape Backup Sets, alternating each week. In the first week transfers are placed into Tape Backup Set A, the next week they are placed into Backup Set B, etc. Step 1 From the left navigation pane, click Automate>Manage Scripts. Step 2 There are no fixed scheduled scripts defined yet. To define one, click New. 32
33 Step 3 Select Transfer Snapshots and click OK. Step 4 Name the script Transfer Snapshots to A. Then click OK. Step 5 Click Source. 33
34 Step 6 Select one of the Disk Backup Sets. Select the most recent Snapshot for each source radio button. This checkbox modifies the Snapshot selection so that only the latest Snapshots are transferred, rather than all of the Snapshots. Click OK. Step 7 The first Disk Backup Set appears, along with a notice that all current Snapshots will be transferred from it. Click Add to include the other five Disk Backup Sets as sources in this Snapshot Transfer script. Click OK. Step 8 Click Destination and choose Backup Set A as the destination of the Snapshot transfer operations. Do not define a selector to filter certain kinds of files from being transferred. Ensure verification is on. Click OK. 34
35 Step 9 Establish a schedule for the Snapshot transfers. The recommended policy is to perform Snapshot transfers weekly. To establish a schedule click Add. Step 10 Select Repeating interval. Click OK. Step 11 Select the first date, time, and repeating interval for Snapshot transfers to occur. Select Normal in the Action dropdown box to transfer only files that are new or changed since the last backup. Click OK. 35
36 Step 12 The schedule transfers for Backup Set A appear in the Transfer Snapshots window. Click OK. Step 13 Repeat steps 1 through 12 to establish the scheduled transfer of Snapshots to Tape Backup Set B every other week. The Manage Scripts dialog should display the following entries. Step 14 Ensure that the tape library is stocked with enough tapes to perform the Snapshot transfer scripts that run each Saturday. Each Monday, remove either Tape Backup Set A or Tape Backup Set B from the library and send it offsite or place it in a fireproof safe. Each Friday, load the appropriate Tape Backup Set into the library and check to make sure that a sufficient number of blank tapes remain in the library. 36
37 Appendix H: Scheduling Disk Backup Set Grooming Using the Groom Script to Schedule Disk Backup Set Maintenance If a Disk Backup Set is configured to groom back to a defined number of backups, the groom operation will take place whenever the disk fills. More often than not, this groom operation will take place during your defined backup window, because a backup operation is what will usually fill the backup disk. This groom operation can take a few hours to complete if you are protecting many client computers. The Groom Script allows this maintenance operation to be scheduled, forcing it to occur when the backup server is usually idle or minimally tasked. Creating a Groom Script does not prevent the Disk Backup Set from automatically maintaining itself, but if a scheduled groom occurs every other week, in most cases the disk will not become completely full. Step 1 Repeat steps 1 and 2 from Appendix G. When you are prompted to select a script, select Groom. Click OK. Step 2 Enter a name for the script. Click OK. Step 3 Select one or more Backup Sets to groom. Click Add. Then click OK. 37
38 Step 4 Select the Day of the week radio button. Then click OK. Step 5 Enter a start date and time. Select a day of the week for the script to run. Enter the number of weeks to transpire between script executions. Then click OK. Step 6 Review the source and schedule information for your script. If the information is correct, click OK. 38
39 Appendix H: Scheduling Tape Drive Cleanings Using the Cleaning Interval Option If a cleaning tape with a cleaning-specific barcode label is loaded in a tape library that supports barcode reading, Retrospect can automatically clean the drive at specified intervals. If the tape library does not support barcode reading, Retrospect will still automatically clean the drive, as long as a storage slot has been designated as a cleaning slot, and contains the cleaning tape. The Clean option is available only with a tape library. After a drive is selected, right click it and select Clean. The library moves the cleaning tape from its storage slot to the drive and begins cleaning. When it's done, the tape is moved backed to its storage slot. Cleaning can be set up to occur after a certain number of drive usage hours. Step 1 Click Configure>Devices, select the tape drive in the Status tab, and then click the Properties button in the toolbar. Step 2 Click the Cleaning Interval button on the Properties window's toolbar. Step 3 By default, Retrospect enters 20 hours for the number of hours of drive use between cleanings. Enter the drive vendor's recommended cleaning interval and click OK. 39
40 Specifying the Cleaning Count The Cleaning Count option tracks the number of times a cleaning tape has been used and stops using the tape after a specified number of cleanings have been performed. This option works only if a cleaning tape with a barcode has been inserted in a tape library that supports barcodes. Step 1 Click Configure>Devices, select the cleaning tape, and then click the Properties button in the toolbar. Step 2 After the Properties window opens, click the Cleaning Count button. Step 3 Enter the number of cleanings the manufacturer recommends for the cleaning tape and click OK. 40
41 Appendix I: Enabling Notification Use the following procedures to enable notifications of backup failures and media requests. Step 1 Go to Configure>Preferences and select under Notification. Step 2 Enable Send for failure and media request and enter one or more addresses and the outgoing mail server information. Separate multiple addresses with semicolons. Multiple addresses are particularly useful for notifying an offsite backup consultant or value added reseller. Use the Send Test button to check the settings you have entered. Click OK. 41
Disk-to-Disk-to-Offsite Backups for SMBs with Retrospect
 Disk-to-Disk-to-Offsite Backups for SMBs with Retrospect Abstract Retrospect backup and recovery software provides a quick, reliable, easy-to-manage disk-to-disk-to-offsite backup solution for SMBs. Use
EMC Retrospect 7.5 for Windows. Backup and Recovery Software
 EMC Retrospect 7.5 for Windows Backup and Recovery Software Data Protection for Small and Medium Business EMC Retrospect backup and recovery software delivers automated, reliable data protection for small
EMC Retrospect 7.5 for Windows. Backup and Recovery Software
 EMC Retrospect 7.5 for Windows Backup and Recovery Software Data Protection for Small and Medium Business EMC Retrospect backup and recovery software delivers automated, reliable data protection for small
How To Protect Your Data With Ecm Retrospect
 EMC Retrospect 7.5 for Windows Backup and Recovery Software Data Protection for Small and Medium Business EMC Retrospect backup and recovery software delivers automated, reliable data protection for small
Continuous Data Protection. PowerVault DL Backup to Disk Appliance
 Continuous Data Protection PowerVault DL Backup to Disk Appliance Continuous Data Protection Current Situation The PowerVault DL Backup to Disk Appliance Powered by Symantec Backup Exec offers the industry
InventoryControl for use with QuoteWerks Quick Start Guide
 InventoryControl for use with QuoteWerks Quick Start Guide Copyright 2013 Wasp Barcode Technologies 1400 10 th St. Plano, TX 75074 All Rights Reserved STATEMENTS IN THIS DOCUMENT REGARDING THIRD PARTY
EMC Backup and Recovery for Microsoft SQL Server 2008 Enabled by EMC Celerra Unified Storage
 EMC Backup and Recovery for Microsoft SQL Server 2008 Enabled by EMC Celerra Unified Storage Applied Technology Abstract This white paper describes various backup and recovery solutions available for SQL
Symantec Backup ExecTM11d
 Symantec Backup ExecTM11d RM Administration Guide For Community Connect 3 and RM Smart-Tools 3 networks Symantec Backup Exec 11d RM Administration Guide PN 1B0-364 Copyright RM 2007 All rights reserved.
VERITAS Backup Exec 9.1 for Windows Servers Quick Installation Guide
 VERITAS Backup Exec 9.1 for Windows Servers Quick Installation Guide N109548 Disclaimer The information contained in this publication is subject to change without notice. VERITAS Software Corporation makes
7.x Upgrade Instructions. 2015 Software Pursuits, Inc.
 7.x Upgrade Instructions 2015 Table of Contents INTRODUCTION...2 SYSTEM REQUIREMENTS FOR SURESYNC 7...2 CONSIDERATIONS BEFORE UPGRADING...3 TERMINOLOGY CHANGES... 4 Relation Renamed to Job... 4 SPIAgent
How To Backup An Exchange Server With 25Gb And More On A Microsoft Smartfiler With A Backup From A Backup To A Backup Point Set On A Flash Drive On A Pc Or Macbook Or Ipad On A Cheap Computer (For A
 Using SmartFiler for Microsoft Exchange Server Backup Introduction The SmartFiler Backup Appliance Exchange Server backup solution is integrated with the Symantec Backup Exec System Recovery 2010. Using
Administration GUIDE. Exchange Database idataagent. Published On: 11/19/2013 V10 Service Pack 4A Page 1 of 233
 Administration GUIDE Exchange Database idataagent Published On: 11/19/2013 V10 Service Pack 4A Page 1 of 233 User Guide - Exchange Database idataagent Table of Contents Overview Introduction Key Features
Using Backup Exec System Recovery's Offsite Copy for disaster recovery
 Using Backup Exec System Recovery's Offsite Copy for disaster recovery The software described in this book is furnished under a license agreement and may be used only in accordance with the terms of the
VERITAS Backup Exec TM 10.0 for Windows Servers
 VERITAS Backup Exec TM 10.0 for Windows Servers Quick Installation Guide N134418 July 2004 Disclaimer The information contained in this publication is subject to change without notice. VERITAS Software
BackupAssist v6 quickstart guide
 New features in BackupAssist v6... 2 VSS application backup (Exchange, SQL, SharePoint)... 3 System State backup... 3 Restore files, applications, System State and mailboxes... 4 Fully cloud ready Internet
Symantec Backup Exec 11d for Windows Servers New Encryption Capabilities
 WHITE PAPER: ENTERPRISE SECURITY Symantec Backup Exec 11d for Windows Servers New Encryption Capabilities White Paper: Enterprise Security Symantec Backup Exec 11d for Windows Servers Contents Executive
Symantec Backup Exec TM 11d for Windows Servers. Quick Installation Guide
 Symantec Backup Exec TM 11d for Windows Servers Quick Installation Guide September 2006 Symantec Legal Notice Copyright 2006 Symantec Corporation. All rights reserved. Symantec, Backup Exec, and the Symantec
Administration GUIDE. SharePoint Server idataagent. Published On: 11/19/2013 V10 Service Pack 4A Page 1 of 201
 Administration GUIDE SharePoint Server idataagent Published On: 11/19/2013 V10 Service Pack 4A Page 1 of 201 Getting Started - SharePoint Server idataagent Overview Deployment Configuration Decision Table
1 of 10 1/31/2014 4:08 PM
 1 of 10 1/31/2014 4:08 PM copyright 2014 How to backup Microsoft SQL Server with Nordic Backup Pro Before creating a SQL backup set within Nordic Backup Pro it is first necessary to verify that the settings
BrightStor ARCserve Backup for Windows
 BrightStor ARCserve Backup for Windows Tape RAID Option Guide r11.5 D01183-1E This documentation and related computer software program (hereinafter referred to as the "Documentation") is for the end user's
NovaBACKUP. User Manual. NovaStor / November 2011
 NovaBACKUP User Manual NovaStor / November 2011 2011 NovaStor, all rights reserved. All trademarks are the property of their respective owners. Features and specifications are subject to change without
with the ArchiveSync Add-On Evaluator s Guide 2015 Software Pursuits, Inc.
 with the ArchiveSync Add-On Evaluator s Guide 2015 Table of Contents Introduction... 2 System Requirements... 2 Contact Information... 3 Required Add-Ons for ArchiveSync in Real-Time... 3 Communications
SmartFiler Backup Appliance User Guide 2.0
 SmartFiler Backup Appliance User Guide 2.0 SmartFiler Backup Appliance User Guide 1 Table of Contents Overview... 5 Solution Overview... 5 SmartFiler Backup Appliance Overview... 5 Getting Started... 7
Online Backup Client User Manual Linux
 Online Backup Client User Manual Linux 1. Product Information Product: Online Backup Client for Linux Version: 4.1.7 1.1 System Requirements Operating System Linux (RedHat, SuSE, Debian and Debian based
Retrospect User s Guide
 Retrospect User s Guide 8 2010 Sonic Solutions. Portions 1989-2010 EMC Corporation. All rights reserved. Roxio Retrospect 8 Users Guide, first edition. Use of this product (the Software ) is subject to
How to Test Out Backup & Replication 6.5 for Hyper-V
 How to Test Out Backup & Replication 6.5 for Hyper-V Mike Resseler May, 2013 2013 Veeam Software. All rights reserved. All trademarks are the property of their respective owners. No part of this publication
BackupAssist v6 quickstart guide
 Using the new features in BackupAssist v6... 2 VSS application backup (Exchange, SQL, SharePoint)... 2 Backing up VSS applications... 2 Restoring VSS applications... 3 System State backup and restore...
Cloud Services for Backup Exec. Planning and Deployment Guide
 Cloud Services for Backup Exec Planning and Deployment Guide Chapter 1 Introducing Cloud Services for Backup Exec This chapter includes the following topics: About Cloud Services for Backup Exec Security
Kaseya 2. User Guide. Version 7.0. English
 Kaseya 2 Backup User Guide Version 7.0 English September 3, 2014 Agreement The purchase and use of all Software and Services is subject to the Agreement as defined in Kaseya s Click-Accept EULATOS as updated
Pro Bundle Evaluator s Guide. 2015 Software Pursuits, Inc.
 Pro Bundle Evaluator s Guide 2015 Table of Contents Introduction... 2 System Requirements... 2 Contact Information... 3 About the Communications Agent Add-On... 3 Other SureSync Add-Ons... 4 File Locking
1. Product Information
 ORIXCLOUD BACKUP CLIENT USER MANUAL LINUX 1. Product Information Product: Orixcloud Backup Client for Linux Version: 4.1.7 1.1 System Requirements Linux (RedHat, SuSE, Debian and Debian based systems such
HP Data Protector Express Single Server Edition technical white paper
 HP Data Protector Express Single Server Edition technical white paper Backup and recovery software exclusively for StorageWorks tape drives and tape autoloaders Table of contents Introduction... 2 Why
Using HP StoreOnce Backup Systems for NDMP backups with Symantec NetBackup
 Technical white paper Using HP StoreOnce Backup Systems for NDMP backups with Symantec NetBackup Table of contents Executive summary... 2 Introduction... 2 What is NDMP?... 2 Technology overview... 3 HP
Installation Guide. Version 1.5. May 2015 Edition 2002-2015 ICS Learning Group
 Installation Guide Version 1.5 May 2015 Edition 2002-2015 ICS Learning Group 1 Disclaimer ICS Learning Group makes no representations or warranties with respect to the contents or use of this manual, and
Symantec System Recovery 2013 Management Solution Administrator's Guide
 Symantec System Recovery 2013 Management Solution Administrator's Guide Symantec System Recovery 2013 Management Solution Administrator's Guide The software described in this book is furnished under a
Protect Microsoft Exchange databases, achieve long-term data retention
 Technical white paper Protect Microsoft Exchange databases, achieve long-term data retention HP StoreOnce Backup systems, HP StoreOnce Catalyst, and Symantec NetBackup OpenStorage Table of contents Introduction...
Version: 1.5 2014 Page 1 of 5
 Version: 1.5 2014 Page 1 of 5 1.0 Overview A backup policy is similar to an insurance policy it provides the last line of defense against data loss and is sometimes the only way to recover from a hardware
Every organization has critical data that it can t live without. When a disaster strikes, how long can your business survive without access to its
 DISASTER RECOVERY STRATEGIES: BUSINESS CONTINUITY THROUGH REMOTE BACKUP REPLICATION Every organization has critical data that it can t live without. When a disaster strikes, how long can your business
WHITE PAPER THE BENEFITS OF CONTINUOUS DATA PROTECTION. SYMANTEC Backup Exec 10d Continuous Protection Server
 WHITE PAPER THE BENEFITS OF CONTINUOUS DATA PROTECTION SYMANTEC Backup Exec 10d Continuous Protection Server 1 TABLE OF CONTENTS EXECUTIVE SUMMARY...3 Current Situation...3 The New Opportunity...3 The
Windows Domain Network Configuration Guide
 Windows Domain Network Configuration Guide Windows Domain Network Configuration Guide for CCC Pathways Copyright 2008 by CCC Information Services Inc. All rights reserved. No part of this publication may
User Guide. Laplink Software, Inc. Laplink DiskImage 7 Professional. User Guide. UG-DiskImagePro-EN-7 (REV. 5/2013)
") 1 Laplink DiskImage 7 Professional Laplink Software, Inc. Customer Service/Technical Support: Web: http://www.laplink.com/contact E-mail: [email protected] Laplink Software, Inc. 600 108th Ave.
1 Laplink DiskImage 7 Professional Laplink Software, Inc. Customer Service/Technical Support: Web: http://www.laplink.com/contact E-mail: [email protected] Laplink Software, Inc. 600 108th Ave.
Exchange Mailbox Protection Whitepaper
 Exchange Mailbox Protection Contents 1. Introduction... 2 Documentation... 2 Licensing... 2 Exchange add-on comparison... 2 Advantages and disadvantages of the different PST formats... 3 2. How Exchange
AVG 8.5 Anti-Virus Network Edition
 AVG 8.5 Anti-Virus Network Edition User Manual Document revision 85.2 (23. 4. 2009) Copyright AVG Technologies CZ, s.r.o. All rights reserved. All other trademarks are the property of their respective
VMware/Hyper-V Backup Plug-in User Guide
 VMware/Hyper-V Backup Plug-in User Guide COPYRIGHT No part of this publication may be reproduced, stored in a retrieval system, or transmitted in any form or by any means, electronic, mechanical, photocopying,
Backup Exec Private Cloud Services. Planning and Deployment Guide
 Backup Exec Private Cloud Services Planning and Deployment Guide Chapter 1 Introducing Backup Exec Private Cloud Services This chapter includes the following topics: About Backup Exec Private Cloud Services
Acronis Backup & Recovery for Mac. Acronis Backup & Recovery & Acronis ExtremeZ-IP REFERENCE ARCHITECTURE
 Acronis Backup & Recovery for Mac Acronis Backup & Recovery & Acronis ExtremeZ-IP This document describes the technical requirements and best practices for implementation of a disaster recovery solution
EMC Replication Manager and Kroll Ontrack PowerControls for Granular Recovery of SharePoint Items
 EMC Replication Manager and Kroll Ontrack PowerControls for Granular Recovery of SharePoint Items Applied Technology Abstract This white paper discusses how Kroll Ontrack PowerControls integrates with
Managing Remote Access
 VMWARE TECHNICAL NOTE VMware ACE Managing Remote Access This technical note explains how to use VMware ACE to manage remote access through VPN to a corporate network. This document contains the following
Symantec Backup Exec 12.5 for Windows Servers. Quick Installation Guide
 Symantec Backup Exec 12.5 for Windows Servers Quick Installation Guide 13897290 Installing Backup Exec This document includes the following topics: System requirements Before you install About the Backup
HP StorageWorks Data Protector Express versus Symantec Backup Exec white paper
 HP StorageWorks Data Protector Express versus Symantec Backup Exec white paper A high-level comparison of features and functionality Introduction... 2 Overview... 3 Installation... 4 What is installed?...
Installation and Setup: Setup Wizard Account Information
 Installation and Setup: Setup Wizard Account Information Once the My Secure Backup software has been installed on the end-user machine, the first step in the installation wizard is to configure their account
Updated: April 2010. Copyright 2005-2010 DBA Software Inc. All rights reserved. 2 Getting Started Guide
 Updated: April 2010 Copyright 2005-2010 DBA Software Inc. All rights reserved. 2 Getting Started Guide Table of Contents Welcome 4 Support Center Subscription 5 1. System Requirements 8 2. Installing the
Metalogix SharePoint Backup. Advanced Installation Guide. Publication Date: August 24, 2015
 Metalogix SharePoint Backup Publication Date: August 24, 2015 All Rights Reserved. This software is protected by copyright law and international treaties. Unauthorized reproduction or distribution of this
Symantec Backup Exec 11d for Windows Small Business Server
 Symantec Backup Exec 11d for Windows Small Business Server End-User Call Script for Sales This document is intended as a simple call structure to help get you started when selling Backup Exec 11d for Windows
ReadyNAS Replicate. Software Reference Manual. 350 East Plumeria Drive San Jose, CA 95134 USA. November 2010 202-10727-01 v1.0
 ReadyNAS Replicate Software Reference Manual 350 East Plumeria Drive San Jose, CA 95134 USA November 2010 202-10727-01 v1.0 2010 NETGEAR, Inc. All rights reserved. No part of this publication may be reproduced,
Using HP StoreOnce Backup systems for Oracle database backups
 Technical white paper Using HP StoreOnce Backup systems for Oracle database backups Table of contents Introduction 2 Technology overview 2 HP StoreOnce Backup systems key features and benefits 2 HP StoreOnce
User Manual. Onsight Management Suite Version 5.1. Another Innovation by Librestream
 User Manual Onsight Management Suite Version 5.1 Another Innovation by Librestream Doc #: 400075-06 May 2012 Information in this document is subject to change without notice. Reproduction in any manner
1. Overview... 2 Documentation... 2 Licensing... 2 Operating system considerations... 2
 User Guide BackupAssist User Guides explain how to create and modify backup jobs, create backups and perform restores. These steps are explained in more detail in a guide s respective whitepaper. Whitepapers
Networking Best Practices Guide. Version 6.5
 Networking Best Practices Guide Version 6.5 Summer 2010 Copyright: 2010, CCH, a Wolters Kluwer business. All rights reserved. Material in this publication may not be reproduced or transmitted in any form
NovaBACKUP. Storage Server. NovaStor / May 2011
 NovaBACKUP Storage Server NovaStor / May 2011 2011 NovaStor, all rights reserved. All trademarks are the property of their respective owners. Features and specifications are subject to change without notice.
SonicWALL CDP Local Archiving
 This document describes how to configure, implement, and manage a local archive for your SonicWALL CDP appliance. It contains the following sections: Feature Overview section on page 1 Using Local Archiving
REMOTE BACKUP-WHY SO VITAL?
 REMOTE BACKUP-WHY SO VITAL? Any time your company s data or applications become unavailable due to system failure or other disaster, this can quickly translate into lost revenue for your business. Remote
BillQuick Agent 2010 Getting Started Guide
 Time Billing and Project Management Software Built With Your Industry Knowledge BillQuick Agent 2010 Getting Started Guide BQE Software, Inc. 2601 Airport Drive Suite 380 Torrance CA 90505 Support: (310)
RecoveryVault Express Client User Manual
 For Linux distributions Software version 4.1.7 Version 2.0 Disclaimer This document is compiled with the greatest possible care. However, errors might have been introduced caused by human mistakes or by
Attix5 Pro Server Edition
 Attix5 Pro Server Edition V7.0.3 User Manual for Linux and Unix operating systems Your guide to protecting data with Attix5 Pro Server Edition. Copyright notice and proprietary information All rights reserved.
Acronis Backup & Recovery Online Stand-alone. User Guide
 Acronis Backup & Recovery Online Stand-alone User Guide Table of contents 1 Introduction to Acronis Backup & Recovery Online... 4 1.1 What is Acronis Backup & Recovery Online?... 4 1.2 What data can I
System Protection for Hyper-V Whitepaper
 Whitepaper Contents 1. Introduction... 2 Documentation... 2 Licensing... 2 Hyper-V requirements... 2 Definitions... 3 Considerations... 3 2. About the BackupAssist Hyper-V solution... 4 Advantages... 4
Flexible backups to disk using HP StorageWorks Data Protector Express white paper
 Flexible backups to disk using HP StorageWorks Data Protector Express white paper A powerful and simple way to combine the advantages of disk and tape backups to improve backup efficiency, reduce data
SOS SO S O n O lin n e lin e Bac Ba kup cku ck p u USER MANUAL
 SOS Online Backup USER MANUAL HOW TO INSTALL THE SOFTWARE 1. Download the software from the website: http://www.sosonlinebackup.com/download_the_software.htm 2. Click Run to install when promoted, or alternatively,
Symantec System Recovery 2011 Management Solution Administrator's Guide
 Symantec System Recovery 2011 Management Solution Administrator's Guide Symantec System Recovery 2011 Management Solution Administrator's Guide The software described in this book is furnished under a
Spector 360 Deployment Guide. Version 7.3 January 3, 2012
 Spector 360 Deployment Guide Version 7.3 January 3, 2012 Table of Contents Deploy to All Computers... 48 Step 1: Deploy the Servers... 5 Recorder Requirements... 52 Requirements... 5 Control Center Server
How To Install The Exchange Idataagent On A Windows 7.5.1 (Windows 7) (Windows 8) (Powerpoint) (For Windows 7) And Windows 7 (Windows) (Netware) (Operations) (X
 (Windows 8) (Powerpoint) (For Windows 7) And Windows 7 (Windows) (Netware) (Operations) (X") Page 1 of 208 User Guide - Exchange Database idataagent TABLE OF CONTENTS OVERVIEW Introduction Key Features Add-On Components Customized Features for Your Exchange Version Terminology SYSTEM REQUIREMENTS
Page 1 of 208 User Guide - Exchange Database idataagent TABLE OF CONTENTS OVERVIEW Introduction Key Features Add-On Components Customized Features for Your Exchange Version Terminology SYSTEM REQUIREMENTS
BACKUP SOLUTIONS FOR SCHOOLS. Advice and Guidance. ICT Services 42 New Union Street Coventry CV1 2HN
 BACKUP SOLUTIONS FOR SCHOOLS Advice and Guidance ICT Services 42 New Union Street Coventry CV1 2HN Revision History and Approval Date Author Version Comments Approval 26/02/2014 Alison York 1.00 Initial
Use QNAP NAS for Backup
 Use QNAP NAS for Backup BACKUP EXEC 12.5 WITH QNAP NAS Copyright 2010. QNAP Systems, Inc. All Rights Reserved. V1.0 Document revision history: Date Version Changes Apr 2010 1.0 Initial release Note: Information
In the same spirit, our QuickBooks 2008 Software Installation Guide has been completely revised as well.
 QuickBooks 2008 Software Installation Guide Welcome 3/25/09; Ver. IMD-2.1 This guide is designed to support users installing QuickBooks: Pro or Premier 2008 financial accounting software, especially in
Retrospect. for Windows. www.retrospect.com
 Retrospect Backup & Recovery Software provides medical offices, law firms, banks, auto repair shops, restaurants, departments in large corporations, universities, government offices and many others with
Dr.Backup Remote Backup Service. Quick Start User Guide
 Dr.Backup Remote Backup Service Quick Start User Guide Version 8.5.0-1 Copyright 2003-2004 Doctor Backup, LLC. All Rights Reserved. No part of this publication may be reproduced, transmitted, transcribed,
NETWRIX FILE SERVER CHANGE REPORTER
 NETWRIX FILE SERVER CHANGE REPORTER ADMINISTRATOR S GUIDE Product Version: 3.3 April/2012. Legal Notice The information in this publication is furnished for information use only, and does not constitute
AccuGuard Desktop and AccuGuard Server User Guide
 AccuGuard Desktop and AccuGuard Server User Guide 1 2 Table of Contents Welcome 4 Backup Simplified 5 Features 6 Protection Plans 7 Archived Data Viewing 8 Archived Data Restoring 9 Best Practices 11 Getting
NTP Software File Auditor for Windows Edition
 NTP Software File Auditor for Windows Edition An NTP Software Installation Guide Abstract This guide provides a short introduction to installation and initial configuration of NTP Software File Auditor
How do you test to determine which backup and restore technology best suits your business needs?
 KEY CRITERIA WHEN SELECTING BACKUP AND RESTORE TECHNOLOGY FOR WINDOWS SYSTEMS How do you test to determine which backup and restore technology best suits your business needs? Real-Time Recovery delivers
Online Backup Client User Manual
 For Linux distributions Software version 4.1.7 Version 2.0 Disclaimer This document is compiled with the greatest possible care. However, errors might have been introduced caused by human mistakes or by
ACS Backup and Restore
 Table of Contents Implementing a Backup Plan 3 What Should I Back Up? 4 Storing Data Backups 5 Backup Media 5 Off-Site Storage 5 Strategies for Successful Backups 7 Daily Backup Set A and Daily Backup
efolder BDR for Veeam Cloud Connection Guide
 efolder BDR for Veeam Cloud Connection Guide Setup Connect Preload Data uh6 efolder BDR Guide for Veeam Page 1 of 36 INTRODUCTION Thank you for choosing the efolder Cloud for Veeam. Using the efolder Cloud
Protecting SQL Server Databases. 1997-2008 Software Pursuits, Inc.
 Protecting SQL Server Databases 1997-2008 Table of Contents Introduction... 2 Overview of the Backup Process... 2 Configuring SQL Server to Perform Scheduled Backups... 3 Configuring SureSync Relation
VERITAS NetBackup BusinesServer
 VERITAS NetBackup BusinesServer A Scalable Backup Solution for UNIX or Heterogeneous Workgroups V E R I T A S W H I T E P A P E R Table of Contents Overview...................................................................................1
Bitrix Site Manager ASP.NET. Installation Guide
 Bitrix Site Manager ASP.NET Installation Guide Contents Introduction... 4 Chapter 1. Checking for IIS Installation... 5 Chapter 2. Using An Archive File to Install Bitrix Site Manager ASP.NET... 7 Preliminary
VMware vsphere Data Protection 6.0
 VMware vsphere Data Protection 6.0 TECHNICAL OVERVIEW REVISED FEBRUARY 2015 Table of Contents Introduction.... 3 Architectural Overview... 4 Deployment and Configuration.... 5 Backup.... 6 Application
Quick Start - Virtual Server idataagent (Microsoft/Hyper-V)
") Page 1 of 31 Quick Start - Virtual Server idataagent (Microsoft/Hyper-V) TABLE OF CONTENTS OVERVIEW Introduction Key Features Complete Virtual Machine Protection Granular Recovery of Virtual Machine Data
Page 1 of 31 Quick Start - Virtual Server idataagent (Microsoft/Hyper-V) TABLE OF CONTENTS OVERVIEW Introduction Key Features Complete Virtual Machine Protection Granular Recovery of Virtual Machine Data
User Guide - Exchange Public Folder idataagent
 Page 1 of 191 User Guide - Exchange Public Folder idataagent TABLE OF CONTENTS OVERVIEW Introduction Key Features Add-On Components Terminology SYSTEM REQUIREMENTS - EXCHANGE PUBLIC FOLDER IDATAAGENT DEPLOYMENT
BSDI Advanced Fitness & Wellness Software
 BSDI Advanced Fitness & Wellness Software 6 Kellie Ct. Califon, NJ 07830 http://www.bsdi.cc SOFTWARE BACKUP/RESTORE INSTRUCTION SHEET This document will outline the steps necessary to take configure the
VirtualCenter Database Maintenance VirtualCenter 2.0.x and Microsoft SQL Server
 Technical Note VirtualCenter Database Maintenance VirtualCenter 2.0.x and Microsoft SQL Server This document discusses ways to maintain the VirtualCenter database for increased performance and manageability.
Trend ScanMail. for Microsoft Exchange. Quick Start Guide
 Trend ScanMail for Microsoft Exchange Quick Start Guide Trend ScanMail for Microsoft Exchange ScanMail for Exchange This Quick Start Guide provides a step-by-step guide to installing ScanMail for Exchange,
Introweb Remote Backup Client for Mac OS X User Manual. Version 3.20
 Introweb Remote Backup Client for Mac OS X User Manual Version 3.20 1. Contents 1. Contents...2 2. Product Information...4 3. Benefits...4 4. Features...5 5. System Requirements...6 6. Setup...7 6.1. Setup