Quick Start Program Advanced Manual ContactWise 9.0
|
|
|
- Cuthbert Mosley
- 10 years ago
- Views:
Transcription

1 Quick Start Program Advanced Manual ContactWise 9.0

2 Copyright 2010 GroupLink Corporation. All Rights Reserved. ContactWise is a registered trademark of GroupLink Corporation. All other trademarks are the property of their respective owners. Released May, 2010 for ContactWise (versions 9.0) by GroupLink Corporation. This material may not, in whole or in part, be copied, photocopied, reproduced, translated, or reduced to any electronic medium or machine readable form without prior consent in writing from GroupLink Corporation 563 W 500 S Suite 400, Bountiful, UT ALL EXAMPLES WITH NAMES, COMPANY NAMES, OR COMPANIES THAT APPEAR IN THIS MANUAL ARE FICTION- AL AND DO NOT REFER TO OR PORTRAY IN NAME OR SUBSTANCE ANY ACTUAL NAMES, COMPANIES, ENTITIES, OR INSTITUTIONS. ANY RESEMBLANCE TO ANY REAL PERSON, COMPANY, ENTITY, OR INSTITUTION IS PURELY COINCIDENTAL. Every effort has been made to ensure the accuracy of this material. However, GroupLink Corporation makes no warranties with respect to this documentation and disclaims any implied warranties of merchantability and fitness for a particular purpose. GroupLink Corporation shall not be liable for any errors or for incidental or consequential damages in connection with the furnishing, performance, or use of this material or the examples herein. The information in this material is subject to change without notice. Produced by GroupLink Corporation 563 West 500 South, Suite 400 Bountiful, Utah (801)

3 Table of Contents Chapter 1 - Overview Chapter 2 Opportunities Opportunities Overview Opportunity Types and Templates Opportunity Tracking Viewing and Accessing Opportunities Opportunity Tab Contact or Organization Opportunity Opportunity Creation Opportunity Filter Templates Opportunity Extended View Opportunity Property Fields Deleting an Opportunity Chapter 3 Advanced Filter Phone and Address Filter Advanced Database Filtering Boolean Search Logic Understanding Filter Results Chapter 4 Extended View Setup & View Options Accessing & Understanding Extended View Options Contact Options Opportunity Options Chapter GroupWise Attaching Links to an Message ing Messages to Multiple Contacts to Multiple Contact Addresses Opening the ContactWise Address Book Adding Multiple Addresses Mass er Outlook Import ContactWise Collaboration Options Add Selected to ContactWise Add Selected to Opportunity Chapter 6 Document Merge Utility Creating a Merge Document Editing a Merge Document Launching a Merge Document Using a Merge Document with Multiple Databases ContactWise Fields Included in a Merge Document Basic Information Telephone Information Address Information

4 6.5 Document Merge Utility Labels Creating History Notes using the Document Merge Utility Blank Fields in the Document Merge Utility Chapter 7 Calendar Integration Calendar Integration Options Create Sub-Menu Events Menu Calendar Icon Schedule a Task in ContactWise Schedule a Call Back Schedule an Appointment Assign a Task Assign a Call Back Create a Note/Reminder Link Contact Information with an Event Complete Calls Outlook Integration Chapter 8 Generating Reports Opening the Report Writer From the Main Screen of ContactWise From a Group or Filter Report Explorer Create a Report from Report Explorer Modify an Existing Report APPENDIX

5 Chapter 1: Overview This is the ContactWise QuickStart Program Advanced Manual. As was discussed in the Basic Manual, Contact- Wise is a Customer Relationship Management (CRM) application. The ultimate purpose of ContactWise CRM is to help you save time, stay organized, and effectively help you manage business-critical information. The Basic Manual covered aspects such as: contact management (contact creation, contact edit, contact history summary, etc.), group management (public and private groups of database contacts), and event management (scheduling phone calls and appointments). The following subjects will be discussed throughout the course of this Advanced Manual. Opportunity Management o o Schedule action items for your sales pipeline Keep track of any process or instance with a customer and/or organization Marketing o o Create and send mass s to a group of contacts Perform mail merges with Microsoft Word or WordPerfect Call Lists o Create call lists of your contacts Report Generation o Generate a report based on group, filter, or opportunity criteria 5
, group management (public and private groups of database contacts), and event management (scheduling phone calls and appointments).")
6 Chapter 2: Opportunities 2.1 Opportunities Overview The Opportunities feature provides users with the ability to track multiple opportunities (or instances/transactions) per person or organization contact. Opportunities are typically used in a sales organization and can be used to track: sales pipelines opportunity status sales forecasting account representative activities probabilities correspondence per deal amount closed Because of the flexibility ContactWise offers, opportunities have been used in various organizational applications, from bill tracking for Legislative organizations to project management and campaigns. The information that can be tracked in an opportunity includes: Opportunity Status Products being sold Estimated completion date Associate assigned to the opportunity Custom property fields Opportunity history Opportunity events Opportunity Types and Templates All opportunities are associated with a type and a template. The best way to think of how types and templates relate is to consider a type to be a category and a template to be a category option. For example, you could consider the United States of America to be a type and each of the 50 states to be a template. One type can have many templates that can be chosen as its category option. The system administrator can create as many types and/or templates as it deems necessary for organizational needs Opportunity Tracking The opportunities feature provides users with the ability to track multiple opportunities per person or organization contact. Information that can be tracked includes: The source of an opportunity The value (dollar amount) of an opportunity Whether or not an opportunity status has matured to completion (ie: a sale) Opportunity history of correspondence by and phone with the contact or organization Opportunity History notes Appointments and tasks both scheduled and assigned Property fields (configured by the database administrator) 2.2 Viewing and Accessing Opportunities Accessing opportunities in ContactWise can be done in several different ways, including all opportunities in the database and opportunities for a specific contact or organization. 6


7 2.2.1 Opportunity Tab The primary opportunity tab is located between the Groups and Filters and Call Lists tabs. Once you have clicked on the Opportunity tab, you should see your opportunity filter template to the left, the main grid in the center, and the opportunity extended view to the right. If there are any existing opportunities that have been created by yourself or someone else in your organization, you will see them in the main grid. If you are new to opportunities and this is a first time use for you or your organization you will not see any opportunities listed in the main grid (Figure 2.1). Figure 2.1 Figure 2.2 illustrates an example of an opportunity tab that already has opportunities stored in the database. You will notice there is an icon on the far left of each listed opportunity. This icon indicates this is an opportunity. You will also notice the following fields displayed in the main grid of the opportunity tab: Display Name Organization Type Template (Opportunity) Status Figure 2.2 7
. Figure 2.1 Figure 2.")
8 Just as is the case on the Contacts tab, you can choose to filter and/or sort opportunities by selecting the sort box. Figure 2.3 shows the various options that can selected to narrow down the result list. Figure 2.3 You will also notice in Figure 2.2 that there is a box displayed as Show Completed Opportunities. Once an opportunity status has been selected as complete it will no longer display in the primary opportunity tab. However, if you do wish to view all completed opportunities you may select this box and they will be displayed. The opportunity filter functions the same as the filter in the main Contacts tab (Figure 2.4). Figure 2.4 These fields are configured by the database administrator, but you have the option to quickly narrow down the result list to the specific information you are looking for. This filter template does not correspond to the filter template in the primary Contacts tab Contact or Organization Opportunity To open an opportunity or view all opportunities associated with a specific contact or organization you can: 1. Double click on an opportunity from the opportunity tab (Figure 2.5). 8

9 Figure Open a contact record and select the Opportunity tab (Figure 2.6). Figure 2.6 After accessing the opportunity tab for an individual contact or organization, the screen in Figure 2.7 will appear. If you have not created an opportunity for this contact, everything will be blank. 9


10 Figure 2.7 The top of the opportunity tab displays the key to create a new opportunity key to delete a selected opportunity Date field range Option to show completed opportunities in the display Below the top part of the opportunity tab is the display field of all listed opportunities. This field shows: Opportunity Type Opportunity Template Opportunity Status Status Changed (Date) ID (gives a unique identifier to each opportunity; the system automatically generates this number) Amount Discussed (dollar amount) Amount Closed (dollar amount collected) Creation Date (creation date of the specified opportunity Modified Date (date the opportunity was last modified) Submitted By (internal user that submitted the opportunity or made the last modification) Account Number (number the system generates automatically for an invoice if an invoice system is used) Note that the top tab is used for display only. 10
 ID (gives a unique identifier to each opportunity; the system automatically generates this number)")
11 On the left, under Type-Status you will notice the following fields: Amount Discussed Amount Closed Status Est Completion Date (Estimated completion date of the sale or status) The system administrator may have also set up customer property tabs to allow you to have additional capabilities to record information about an opportunity (Figure 2.7). In the mid-right section of the Contact or Organization Opportunity screen is horizontal list of actions that can be taken for each opportunity (Figure 2.8). The icons for each action, in order, are: 1. Open Original This will link to the first associated with that opportunity. 2. Remove Selected Opportunity History: This action will delete any history made for a desired opportunity. 3. Refresh Opportunity History: This will refresh the history of a desired opportunity to see if any recent changes have been made. 4. Send Allows you to send an in relation to an opportunity. 5. Add History Note: Allows you to insert a note for an opportunity so that it may appear in its history. 6. The remaining actions create generic history notes and appointments. They are as follows: Receive a Phone Call, Placed a Phone Call, Schedule an Appointment, Schedule a Task, Assign an Appointment, and Assign a Task. Figure 2.8 You should see your opportunity filter template to the left, the main grid in the center, and the opportunity extended view to the right. If there are existing opportunities that have been created by yourself or someone else in your organization, you will see them in the main grid. 11


12 Figure 2.9 Once an opportunity has been entered, the bottom left portion of the screen will fill with Opportunity Properties that are set by the database administrator to further document the opportunity. You have already learned how to create an organization in the ContactWise QuickStart Program Basic Manual. Once you have created an organization, open that organization s contact record by double clicking on it. You will notice the primary tabs discussed previously (Name, Phone & Address, Properties, History, Events, Members, and Groups) (Figure 2.9). The status of an opportunity is displayed in the columns of both the main Opportunity Tab and the Contact or Organization Opportunity Tab. The status can be changed by clicking on it in the left side of the Contact or Organization page. Using the Database Administrator Tool, a status field can be selected and assigned a certain number of days that may pass before the opportunity will appear on the grid, highlighted in a color selected by the user (Figure 2.10). 12


13 Figure Opportunity Creation When creating an opportunity, it is important to consider your workflows and how you are using opportunities. For example, a sales organization may create opportunities under the organization they are working with as opposed to a person at that company. The reason is one or more sales representatives may have multiple opportunities with a single organization. Using an example in the state or local government sector, a senator may want to track constituent stances on a particular piece of legislation. The senator in this instance would create an opportunity for the person since the constituent is not tied to any particular organization. Remember that opportunities can only be created when you are in a Contact s page in the Opportunity Tab Opportunity Filter Templates The quick filter in the opportunity tab works much like the Quick Filter in the Contact tab. There are only two differences: 1. It finds opportunities instead of Contacts 2. The filter templates are independent of those in the Contact tab Filter Templates are created in the ContactWise Database Administrator. To use the Quick Filter, first select the desired template. Fill out some or all of the fields in the template and click the Search button. The filter will find opportunities that meet all the criteria you ask for. An asterisk can be used as a wild card in searches. The asterisk is used to represent any one or more characters. For example, if the names Mike and Michael exist in the database in a particular field then Mi* would find both of them. 13

.")
14 2.3.2 Opportunity Extended View When an opportunity is selected in the main grid, information pertaining to that opportunity is displayed in the extended view. There are five sections of information that can be displayed in the extended view. Three are displayed by default: Opportunity Details, Opportunity Properties, and Opportunity History (Figure 2.11). The other two, Opportunity Owner Phone and Opportunity Owner Address, can be turned on in ContactWise Options under Tools in the tool bar. Figure Opportunity Property Fields Property information associated with the opportunity is set by the administrator and appears in the bottom left-hand corner of the Contact or Organization screen when an opportunity is selected (Figure 2.12). Figure

15 2.3.4 Deleting an Opportunity An opportunity is deleted by selecting an opportunity and then clicking the icon. Opportunities may also be deleted from the main Opportunity Grid by right-clicking on the opportunity and selecting Delete Selected Opportunities. 15

16 Chapter 3: Advanced Filter In this chapter, you will learn the advantages of using advanced filters as well as how to run them. The topics discussed include: The phone and address filter Advanced database filtering Boolean search logic Understanding filter results 3.1 Phone and Address Filter The phone and address filter allows you to create a comprehensive filter for the phone numbers and addresses of people and organizations. To perform a Phone/Address Filter in ContactWise: Open the Filters menu and select New Phone/Address Filter (Figure 3.1). Select what will be filtered Person, Organization, or All Apply desired operators to all search fields, including: Phone Description, Country Code, Area Code, Phone, Ext, Address Description, Address, City, State, Postal Code, Country, , and Website. Then enter text information that applies to your operators for each field you desire to search. Click Search to apply your filter and bring up the Filter Screen (Figure 3.3). Figure
.")
17 3.2 Advanced Database Filtering Advanced filtering is set up to allow just about everything in ContactWise to be compared. It can pull from property tabs, history, address, phone, and first/last/full/organization names, creation date, and brief notes. It also allows for grouping and one level of parentheses. To perform an advanced search in ContactWise: Select New Advanced Filter under the Filters menu (Figure 3.2). Select the Contact Filter All Contacts, Person, or Organization. Choosing Person or Organization will narrow the search to that type of contact. Select an output option: Contacts, Opportunities, or Members. Click on the adjacent menu drop down arrow to select the areas of ContactWise to search. Select an operator Select End to add more lines to the search, or expand the search criteria by using AND, OR, or END GROUP statements. Click on Search Important Notes: Figure 3.2 o Because of the flexibility of the advanced filter it is easy to create a search that does not have anything in it. For example: (Area Code=801 AND Area Code=802). Since nobody can have two area codes for the same phone number, an empty set is returned. o Searching for the subject or body of a history item is a case-sensitive search. The body of a history item is referred to as a note in Advanced Filters. As soon as the contents are submitted, the Advanced Filter s results will appear in a new screen. Figure 3.3 shows the results of a filter where the first name of John was filtered. 17

18 Figure Boolean Search Logic The ContactWise search filter can be effectively broadened to incorporate more desired results by using Boolean Logic. This includes options such as AND as well as OR. For example, if you wanted to create a filter that contained everyone whose first names started with J and everyone whose names started with L, you would: Select the First Name Search Option Select the Begins with Operator Put the letter J in the text field Change the Line Options from End to Or Use the same settings for the second line, using the letter L and End for the Line Option These settings are displayed in Figure 3.4 with the results in Figure 3.5. Figure


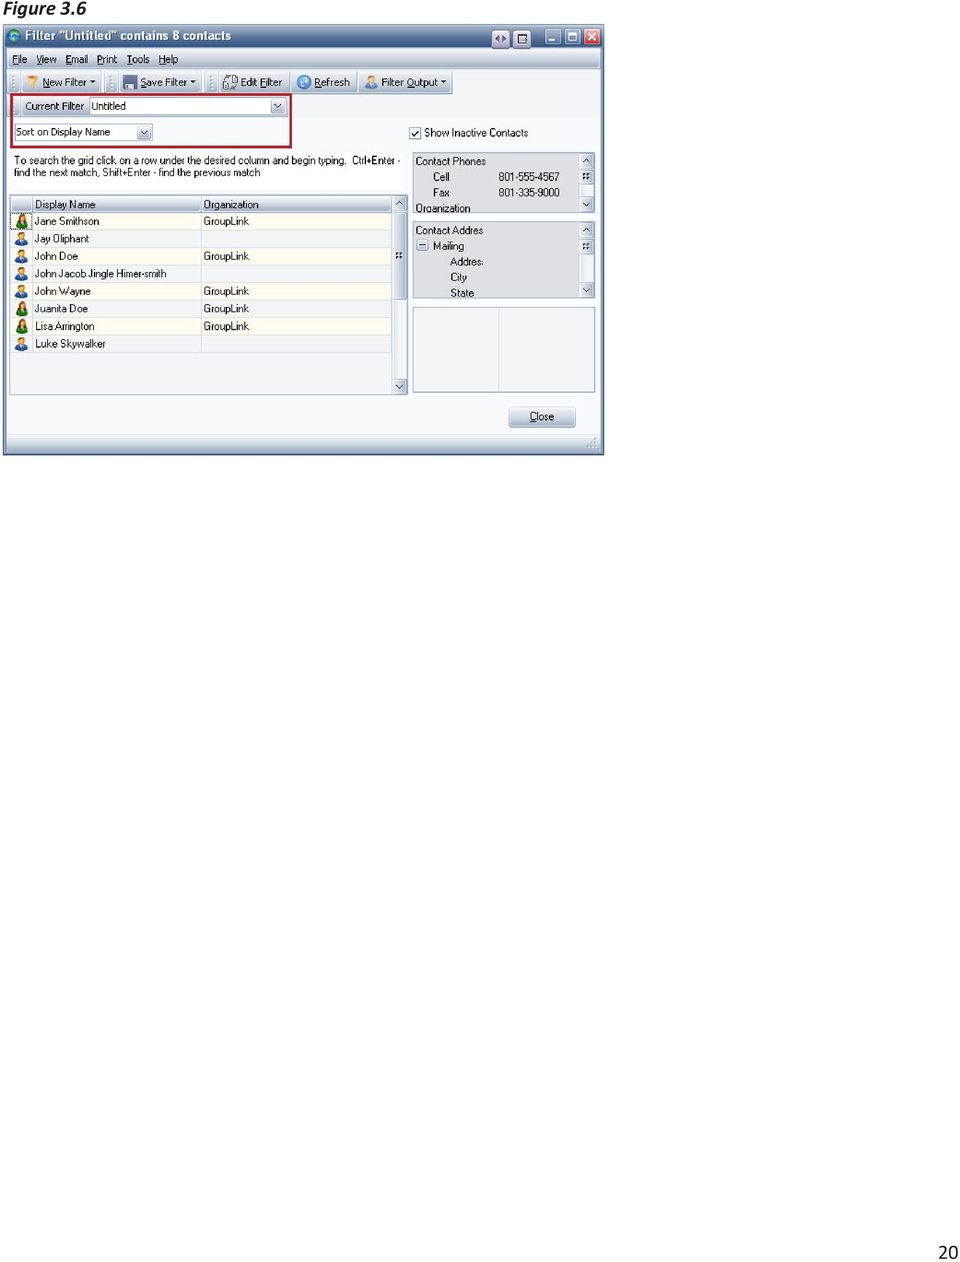
19 Figure Understanding Filter Results The information of each result is displayed at the right when it is clicked on. From this screen, you can use the menu bar for more options. Clicking on File will allow you to create another filter, edit your current filter, export it into another format, save it, mark it as private, or delete it. View will allow you to refresh your filter to see if any new results might be added into the list. gives you options for ing the filter. Print gives you options for printing the filter. Tools allows you to Copy Group to Group as well as Copy to a Call List. Help will bring up the help files to answer questions about the filter or its results. Many of these options also appear under the menu bar, including buttons for creating a New Filter, Saving your Filter, Editing your Filter, and Refreshing it. There is also a button that allows you to select the Filter s Output, which means it allows you to pick the Contacts, Opportunities, and Members that meet your search criteria. Next to Current Filter is a drop down bar that allows you to pick from saved filters, and below that is another drop down bar that allows you to sort your results (Figure 3.6). 19

20 Figure

21 Chapter 4: Extended View Setup & View Options This chapter will go into detail about the Extended View feature and the different options it provides in the following sections: Accessing & understanding Extended View options Contact options Opportunity options 4.1 Accessing & Understanding Extended View Options Extended view is a panel on the right side of the screen that shows a brief summary of a contact or opportunity when it is clicked on. The options for Extended View can be customized by clicking on the Tools menu then Options (Figure 4.1). Figure 4.1 As shown in Figure 4.1, Extended View must be clicked in the sidebar to access its options. Contact and Opportunities will expand from Extended View because both of those uses Extended View respectively. 4.2 Contact Options As seen in Figure 4.1, the information that Extended View presents can be edited. The options for the Contact page allow you to select which types of information will be presented and what order they come in. Below the ordering buttons is a Restore to Default button to set the types back into their original order. 21

22 You can also select which properties appear in Extended View by selecting Search for Properties by Property Name, or by Tabs, which can associate many properties with one tab. The checkboxes are used to indicate when a property has been selected; if the box is checked, it will appear in Extended View when saved. At the bottom of the screen there are options to Cancel your adjustments to Extended View, Save them, or restore them to Default. Click on Help to answer any questions you may have about Extended View adjustments. After you have saved your options, the Extended View for a contact in the Contacts Tab will appear when you click on that contact (Figure 4.2). Figure Opportunity Options The Opportunity Options page works the same as the Contact Options page. You can choose the types of information shown and the order in which they are shown. You can also select the Search for Properties by options. These options work with the checkbox and save system. One unique attribute found on the Opportunity Options page is the Opportunity Histories selection (Figure 4.3). Figure

23 The Opportunity Histories option allows you to select how many histories will appear in the Opportunity Extended View. After all the options have been saved, the Extended View for an opportunity in the Opportunity Tab will appear when you click on that opportunity (Figure 4.4). Figure

24 Chapter 5: This chapter discusses both GroupWise and Outlook clients, beginning with Groupwise. If you are using the Outlook client, go directly to section 5.5. In this chapter, you will learn how to do the following: Attach contact records to an message Send an message to multiple contacts Send an message to multiple addresses of a contact Change the primary address Insert multiple addresses into a contact or company record Mass 5.1 GROUPWISE - Attaching Links to an Message When an message is sent to another GroupWise user who has access to your ContactWise database, you can send a link from which the contact record can be opened. Contact links within an message are only saved with Intranet messages. If the is sent to an Internet address, the link to the record is lost. Below is a list of steps to link a contact to an message: Highlight a contact and click on the button at the top of the ContactWise screen (Figure 5.1). Figure 5.1 Select the Use the ContactWise Mail Dialog radio button in the ContactWise dialog and click OK. Select Add ContactWise Links from the Contact Links menu (Figure 5.2a). This will open the Select a Contact dialog (Figure 5.2b). 24

25 Figure 5.2a Figure 5.2b Select a contact and click OK. Click Send to send the message ing Messages to Multiple Contacts NOTE: This topic only applies when GroupWise is being used as the collaboration client. can be sent to multiple contacts through the ContactWise dialog by following these steps: Open a ContactWise dialog in one of the following ways: 1. In the ContactWise main screen, select a contact and click on the icon (Figure 5.1). 2. In the ContactWise main screen, right-click on the contact; in the context menu choose Create: Contact (Figure 5.3). 25

26 Figure 5.3 Figure From a Contact Display select Send Mail from the Mail menu (Figure 5.4). An Dialog will pop up asking if you want to use the ContactWise dialog or the GroupWise dialog. This dialog will not come up if you have previously checked the box which says, Please do not display this message again or if you have turned it off in Options. Click on the Address Book button to open the ContactWise Address Book (Figure 5.5). 26
.")
27 Figure 5.5 Select the contact or multi-select the contacts to which you want to send a copy of the message, then click the To, CC, or BCC button. Alternatively, you can right click on one of the selected Contacts and, in the context menu, choose To, CC, or BCC. Either of these will add the contact or contacts to the mailing list (Figure 5.6). Figure 5.6 Click OK when all of the recipient contacts have been selected. Enter the subject and body of your and click the Send button. 27
.")
28 to Multiple Contact Addresses NOTE: This topic only applies when GroupWise is being used as the collaboration client. Open up the ContactWise dialog to write an message to the respective contact. Open the Address Book by clicking on the button in the upper right corner (Figure 5.5). Click the To button at the top and double-click on the name of the contact that the message will be sent to (Figure 5.6). One by one, select each address you want the message to be sent to. When all of the addresses have been selected, click OK and return to the ContactWise window Opening the ContactWise Address Book NOTE: This topic only applies when GroupWise is being used as the collaboration client. 1. Follow the steps in section 5.1 to open the ContactWise dialog. 2. In the message window click the Address Book button (Figure 5.5). From here you can select the recipients for you message. 5.3 Adding Multiple Addresses To add a new address from within a contact record, do the following: Open the contact record (Figure 5.7). If the contact already has one or more addresses, select an address description from the pane on the left side of the contact display. If the contact does not have any addresses, an address can be added in the same way it is added during a Full Add. In the field, enter the address. Figure 5.7 There are several ways to add additional addresses for a contact or company: 1. Find and highlight the contact or organization in the ContactWise main screen. Right-click on the selected contact and select Add from the context menu Select New Address from the sub-menu (Figure 5.8) Type in the description and address Check Set to Primary Address to set this as the Primary Address if desired Click the Save button 28

29 Figure While in the ContactWise Address Book, find and highlight the contact/company to which you want to add an additional address. NOTE: the ContactWise Address Book is only available when Group- Wise is used as the collaboration client. Right-click on the contact and select Add New Address Type in the description and address Check Set to Primary Address if desired Click the Save button 5.4 Mass er The Mass er simplifies the process of sending a personalized to groups of contacts. The Mass er includes the following features: Allows data from contact records to be merged into the Allows attachments to be included with the Allows the to be sent as both plain text and as HTML Allows a history note to be created for each recipient Allows to be sent through GroupWise or thought an SMTP server The Mass er can be accessed in any of the following ways: Run a Quick Filter in the main screen of ContactWise and choose Mass result list from the action list found just above and to the right of the grid where the results are displayed (Figure 5.9). 29
. Figure 5.")
30 Figure 5.9 Using the control key, multi-select several contacts in the ContactWise main grid and choose Mass Selected Contact(s) from the Tools menu (Figure 5.10). Figure 5.10 When in the Groups and Filters tab of the main screen in ContactWise, select a group and choose Mass Group/Filter from the Tools menu (Figure 5.11). Figure

31 Once the Mass er has been accessed (Figure 5.12), an can be sent using the following steps: 1. Fill out the fields at the top of the Mass er. 2. If you have an attachment to include, click on the folder icon to the top right of the Attachments box, browse to the desired file, select it, and click the Open button. 3. Type the body of the message. Whenever you want to include a ContactWise field in the message, simply double-click on the desired field in the list on the left hand side of the Mass Mailer. This will allow data from the ContactWise contacts to be merged with the If you have an HTML Message to include, click on the folder icon to the right of the HTML Message box, browse to the HTML file, select the file and click the Open button. 5. If you wish to receive a return receipt from the recipients, click the box marked Request a return receipt. 6. If you wish to have a history note added to each of the recipients then check the box marked Create a History Note for the merged s. 7. You may send out test copies of your by clicking on the Test button. 8. Click the Send button. The will be sent through GroupWise or through SMTP server depending on your settings in ContactWise options. Figure Outlook Import ContactWise allows to be imported from Outlook into ContactWise. Importing results in a history item being created for that in the appropriate contact record. If the address does not exist in 31
. If exactly one contact in ContactWise has that email address, the email is imported.")
32 ContactWise then, depending on importing options chosen, a new record can be automatically created and the is imported to the new record. Attachments are not imported. Outgoing If the is outgoing, ContactWise looks at the address of the recipient(s). If exactly one contact in ContactWise has that address, the is imported. Incoming If the address is incoming, ContactWise uses the sender s address to determine which contact in ContactWise should have the history item ContactWise Collaboration Options Any item, whether they reside in the Inbox folder, Sent folder, or other personal folders, can be imported into ContactWise. You must make your selection of s that you would like imported from Outlook (usually the Inbox) prior to choosing an import option from the ContactWise button menu. The exception to this is to set up your collaboration options (Figure 5.13). Figure 5.13 The first set of choices asks you how an outgoing message should be handled by ContactWise (Figure 5.14). Figure 5.14 Clicking the Always add them to ContactWise radio button will automatically add all outgoing s to ContactWise, respecting the rule of the 2nd option set. The Prompt me each time BEFORE sending an option is used by default. When selecting and importing an , a dialog box will appear asking if you would like to save your sent message to ContactWise. There is also a checkbox option allowing you to NOT display the prompt message again. If this is checked, the Options menu will appear allowing you to change the way your outgoing will be imported in the future. When using the Never add them to ContactWise option, you may send outgoing messages without ContactWise intervention. Adding selected messages to ContactWise affects both outgoing and incoming messages (Figure 5.15). 32

33 Figure 5.15 Using the Automatically add selected messages to ContactWise option can automatically create a new contact depending on the option chosen (Figure 5.16). A new contact will be created with the sender s address allowing ContactWise to automatically import the into the contact s History tab. The option is only valid when you are automatically adding selected messages to ContactWise. It is disabled if you are manually choosing from a list of Contacts to add selected s. If the Manually choose from a list of Contacts to add selected s option is chosen, a dialog box will appear allowing you to perform a number of options to manually choose a contact to have an imported. Figure 5.16 When you select the Automatically create contacts radio button, a contact is created automatically without prompting. If you select the Prompt me before a new contact is created radio button, you will be prompted before any contact is created in ContactWise. With this option, you can decide whether to have the contact created or not. ContactWise will not import an addres if it already exists for multiple contacts. Instead, it will display a message indicating that the was not imported and create a log file Add Selected to ContactWise Imports selected Outlook into contacts either existing, or created depending on options, into the History tab of the contact. For further information, see the GroupWise import to contacts dialog box, which operates identical Add Selected to Opportunity This is always a manual function. A dialog box is displayed showing a list of Contacts or Companies linked with an Opportunity template. Selected Outlook s are loaded into the form after which they can be saved to the opportunities that you choose. As you save the imported s, contacts are created depending on the options you choose and stored to the the History Tab. Additionally, the s are also stored to the Opportunity History which by nature of ContactWise operation also automatically creates an history in the Opportunity s History tab. For further information, see the GroupWise import to opportunities dialog box, which operates almost identical. 33

34 Chapter 6: Document Merge Utility The Document Merge Utility allows reports to be saved in either Microsoft Word (97, 2000, 2003) or WordPerfect (8-2002) documents that update themselves every time they are opened. It is an effective tool for up-todate documentation as well as report production. 6.1 Creating a Merge Document 1. Open the Document Merge Utility dialog (Figure 6.1) in one of the following ways: Figure 6.1 a. After selecting a record from the main grid in ContactWise, go to the Tools menu and select Document Merge Utility. b. Right-click on a contact in the main grid and select Print-Document Merge Utility from the context menu. c. Open a group and select Document Merge Utility from the Print menu. d. Open a filter and select Document Merge Utility from the Print menu. 2. Once the Document Merge Utility dialog is open, click on File and New Document. This will bring up a dialog form which you can select a word processor (Figure 6.2). Figure Choose a word processor that you have installed on your computer and click OK. This will bring up a Save As dialog. 34

35 4. Name the document and click Save. This will open the document in the Word Processor you chose in step 2 as well as the List of Available Fields (DMU Field List) dialog (Figure 6.3). Figure 6.3 Now a document can be typed using your word processor, inserting ContactWise field IDs where necessary. When opened at a later time, the Merged Document will populate with the desired fields from the Contact- Wise database. Note that if a Merge Document includes property tab fields, a new Merge Document will have to be created in the other database for it to function correctly. If it does not inclue property tab fields, the Document can be opened with any database. 6.2 Editing a Merge Document 1. Open the Document Merge Utility dialog using the directions in Step 1 of the previous section. 2. Once the Document Merge Utility dialog is open, select the document you wish to edit, then click File and Edit Document (Figure 6.4). This will open the document in the appropriate word processor and the List of Available Fields dialog. Note that the document to be openend should not already be running in another program. If it is running, close it and allow the Document Mergy Utility to open it. 35
 Figure 6.")
36 Figure Make the necessary changes, inserting ContactWise field ID s where needed 6.3 Launching a Merge Document 1. Open the Document Merge Utility using the directions in Step 1 of Section Select the Document you wish to Launch and click the Launch button (Figure 6.5) Figure 6.5 If the selected document is already open when it is launched, the Document Merge Utility will open a Read-Only version of the document. If the document is not already open, it will not be Read-Only in the Document Merge Utility version. 3. If you want to keep the original Merge Document, use Save As when saving the new merged document. Note that if you use the same name as you listed in the Document Merge Utility, it will no longer be available for future document merges Using Merge Document with Multiple Databases Any Merge Document, which does not include property tab fields, can be used with any database. If a particular Merge Document does include property tab fields, a new Merge Document will have to be created in the other database for it to function correctly. 36
37 6.4 ContactWise Fields Included in a Merge Document Basic information from a Contact in ContactWise can be included in a Merge Document. When the document is opened, a DMU Field List will pop up with the Word Processor Screen (Figure 6.3). To insert a ContactWise field into a merge document, either select the desired field from the List of Available Fields (DMU Field List) and click Add Field or simply double-click the desired field from the list. Note that any property that is defined in your database can be used in a Merge Document. The following are examples of regularly used properties Basic Information The basic information that can be included in a Merge Document from a record includes: First Name Middle Name Last Name Salutation Gender Generational Qualifier Organization Name Telephone Information The telephone information that can be included is: The primary phone number for a record if there is not a primary phone number, the first non-primary phone number will be used in the merge. The primary fax number for a record if there is no primary fax number, no fax number will be used in the merge Address Information Any fields from the primary address can be included as well. If there is no primary address, the first address in the record will be used for the merge. The address fields are: Address City State Postal Code Country Web Site 6.5 Document Merge Utility Labels Labels can be created with the Document Merge Utility using the following steps: Create a Merge Document and insert the appropriate fields for the label If you are using WordPerfect, use the following steps: 1. While the Merge Document is still open, choose Labels from the Format menu and select the desired label settings. 2. Save the changes and close WordPerfect. 3. Launch the Merge Document from within ContactWise. 37
38 If you are using Microsoft Word, follow these steps: 1. If the Merge Document has not already been saved and closed, do so now. 2. Launch the merge document from within ContactWise. 3. After the Merge is complete, insert Merge Records* without the quotation marks, at the top of the document. 4. Select Replace from the Edit menu. 5. Click the More button to see additional options in the Find and Replace dialog. 6. Click the button labeled Special and select Paragraph Mark. Click the Special button again and select Manual Page Break. 7. Type * without the quotation marks, in the Replace with box. 8. Click Replace All. 9. Microsoft Word should give you a message indicating that it has made the replacements. Click OK. 10. Using the Save As option in the File menu, save this document with a different name than your original Merge Document. 11. Create a new document in Microsoft Word by selecting New from the File menu. In the dialog box that comes up, select Blank Document and click OK. 12. In this new document, select Mail Merge from the Tools menu. This will bring up the Mail Merge Helper dialog. There are three steps in this dialog: o Select Mailing Labels from the Create drop-down menu, then click the Active Window button in the dialog that comes up o Select Open Data Sources from the Get Data drop-down menu. This will open the Open Data Source dialog. Browse to the file that you saved in step 10, select it, and click Open. This will bring up the Header Record Delimiters dialog. Choose (none) for the Field Delimiter and the asterisk symbol (*) for the Record Delimiter and then click OK. In the dialog that comes up next, click Set Up Main Document. This will bring up the Label Options dialog. Select the appropriate label options and click OK. This will bring up the Create Labels dialog. Click Insert Merge Fields and select Merge Records. Click OK. o Click Merge, select New Document from the Merge to drop-down box, and click Merge again. 6.6 Creating History Notes using the Document Merge Utility The Document Merge Utility can create a history item in each record used in a merge. The history item will include the following information: Name of the Merge Document Date and time of the merge User entered Subject User entered Note To create a History Note, follow these steps: Open the Document Merge Utility dialog and check the box labeled, Create a History Note for Contact/ Group/Filter Launch a Merge Document When the merge is complete, a History Note dialog will appear. In this dialog, type the desired subject and note. The following information will be included in the body of the note automatically: o The date and time of the merge o The name of the Merge Document 38

39 6.7 Blank Fields in the Document Merge Utility Upon completing a merge, the Document Merge Utility will display a list of contacts whose records contain one or more blank merge fields (Figure 6.6). The records of these contacts can be opened directly from the list and corrected by clicking on the contact and clicking Open Record. Figure 6.6 The Save List button in the DMU Results dialog will save the list to a text file. 39
. Figure 7.")
40 Chapter 7: Calendar Integration ContactWise has the ability to integrate with both GroupWise and Outlook clients. This chapter will discuss both, beginning with GroupWise integration. 7.1 Calendar Integration Options Many of the calendar integration options can be accessed through one of three ways: Create sub-menu Events menu Calendar icon Create Sub-Menu To access the Create sub-menu, highlight your selected Contact, right-click on the name and select the Create option from the menu (Figure 7.1). Figure 7.1 The different options in this sub-menu will be discussed later in the chapter Events Menu The Events menu is located at the top of the ContactWise screen (Figure 7.2) and contains options similar to the Create sub-menu. 40

41 Figure 7.2 The options in the Events menu will be discussed later in the chapter Calendar Icon The Calendar icon options are the same as the options in the Events menu. To access the Calendar options, click on the Calendar icon at the top of the ContactWise screen. This icon with the same options can also be found in the Events tab of any Contact display (Figure 7.3). Figure
 Figure 7.")
42 7.2 Schedule a Task in ContactWise ContactWise allows users to post tasks to the collaboration calendar. Follow the steps below to schedule a task through ContactWise. Select Schedule a Task from any one of the menus mentioned in the previous section Fill out the information in the Schedule a Task dialog (Figure 7.4) Figure 7.4 After filling out the information, click the Post button at the bottom of the window to post the task in the selected Contact s GroupWise Tasklist 7.3 Schedule a Call Back To schedule a Call Back for a Contact, use the following steps: Select Schedule a Call Back from any one of the menus mentioned in section 7.1 or any of the following: o The menu that appears under the Phone icon in the ContactWise screen o The menu that appears under the Phone icon in the Phone & Address tab of a Contact display o The Phone menu at the top of a Contact display Fill out the information in the Schedule a Call Back dialog (Figure 7.5) 42
43 Figure 7.5 After filling out the information, click the Post button at the bottom of the window to post the call back in your GroupWise Calendar 7.4 Schedule an Appointment To schedule an appointment for a Contact, use the following steps: Select Schedule an Appointment from any one of the menus mentioned in section 7.1 Fill out the information in the Schedule an Appointment dialog (Figure 7.6) Figure 7.6 After filling out the information, click the Post button at the bottom of the window to post the appointment in the Contact s GroupWise Calendar 43

44 7.5 Assign a Task (GroupWise collaboration only) ContactWise alows users to assign tasks to other people. When a task is assigned, the task is sent to both the person who assigned it and to each of the recipients who are assigned and is automatically posted to the recipients tasklist. After a task is assigned, the recipients cannot modify the task. Follow these steps to assign a task: Select Assign a Task from any one of the menus mentioned in section 7.1 Fill out the information in the Assign a Task dialog (Figure 7.7) including choosing a Recipient (required) Figure 7.7 After filling out the information, click the Send button at the bottom of the window to send the task to the recipient(s) and post it in their GroupWise Tasklist 7.6 Assign a Call Back (GroupWise collaboration only) ContactWise allows the user to assign a call back to another GroupWise user so the assigned user can view the task in the GroupWise Calendar. To assign a call back, follow these steps: Select Assign a Call Back from any one of the menus mentioned in section 7.1 or any of the following: o The menu that appears under the Phone icon in the ContactWise screen o The menu that appears under the Phone icon in the Phone & Address tab of a Contact display o The Phone menu at the top of a Contact display Fill out the information in the Assign a Call Back dialog (Figure 7.8) including choosing a Recipient 44

45 Figure 7.8 After filling out the information, click the Send button at the bottom of the window to send the Call Back to the recipient(s) and post it in their GroupWise Tasklist 7.7 Create a Note/Reminder The following steps will allow you to create a Note/Reminder for yourself in ContactWise: Select Note/Reminder from Events menu mentioned in section 7.1, the Calendar icon on the Contact- Wise main screen, or from the Calendar icon under the Events tab of the Contact record Fill out the information in the Note/Reminder dialog (Figure 7.9) Figure 7.9 After filling out the information, click the Post button at the bottom of the window to post the note/reminder in your GroupWise Calendar 45
46 7.8 Link Contact Information with an Event (GroupWise collaboration only) Linking contact information to an event allows the contact record to be viewed when the event is reviewed or completed. To link Contact information with and event, create a new Calendar Event. The current Contact will be linked to that event and the event will appear in the Contact s Events tab. While an Event dialog box is open (Figure 7.10), the following three menu items are available from the Contact Info drop-down menu: Figure 7.10 View Selected Record shows the record of the linked Contact Select New Contact allows a different contact to be selected as the link with the event showing up in the Events tab of the new linked Contact Remove Contact Link removes the Contact Link from the event doing this before the event is initially posted or sent will post the event only on the GroupWise calendar and not on the Events tab of a contact 7.9 Complete Calls (GroupWise collaboration only) Completing a scheduled or assigned call can be done following these steps: Open the Call Back to be completed this can be done from within ContactWise or from within Group Wise o ContactWise: Open the contact with whom the Call Back is associated, click on the Events tab, and open the Call Back to be completed by double-clicking on it o GroupWise: Go to the calendar, find the Call Back, and open it by double-clicking on it when opening the Call Back from within GroupWise, ContactWise must be connected to the same database to which it was connected when the Call Back was originally created From the Phone menu in the bottom of the Call Back Dialog, select Place Call this will open the Place a Call dialog (Figure 7.11) 46
47 Figure 7.11 Take note of the Call Result drop-down box which allows you to track whether the call was a Success, you Left a Message, got a Busy Signal, or there was No Answer Outlook Integration ContactWise allows items to be placed on the Outlook calendar. To do this, open a contact to the Events tab, click on the calendar icon, and choose one of the following menu items: Schedule a Task Schedule a Call Back Schedule an Appointment Assign a Task Assign a Call Back Assign an Appointment Note/Reminder When any of these items are chosen then the appropriate outlook dialog comes up (Figure 7.12). Fill out the dialog as would normally be done if the dialog had been opened directly from outlook. By initiating one of the above items from ContactWise that item will not only appear on the Outlook calendar but on the contact s events tab as well. 47
48 Figure 7.12 The Outlook calendar can also be opened from the same menu mentioned above by choosing the Open Calendar item. 48

49 Chapter 8: Generating Reports In this chapter you will learn how to generate reports based on your ContactWise database, including creating Custom Reports. 8.1 Opening the Report Writer The reporting tool can be opened from either the ContactWise Main screen or from a Group or Filter From the Main Screen of ContactWise To generate a report from the main screen in ContactWise (Figure 8.1), follow these steps: Select or multi-select a group of contacts From the Reports menu select Generate Report For Selected Contacts/Opportunities Figure From a Group or a Filter To generate a report from a Group or a Filter, follow these steps: Go to the Groups and Filters tab on the main screen of ContactWise (Figure 8.2) Figure
 8.2 Report Explorer After you have made your selection, the Report Explorer dialog will appear (Figure 8.3) Figure 8.")
50 Double-click on a Group or a Filter to open it From within the Group or Filter do ONE of the following 1. From the Print menu select Entire Group or Entire Filter, depending on what you chose 2. Select one or more Contacts and choose Selected Contact(s) 8.2 Report Explorer After you have made your selection, the Report Explorer dialog will appear (Figure 8.3) Figure 8.3 From this screen, you can select the information you want printed in your report. In the above example, the Address field on the left side of the dialog is selected giving the option to print a report based on an Address List by Organization in the right side of the dialog. Simply double-click the desired report to view a printable version (Figure 8.4). Figure
. Figure 8.")
. Figure 8.")
51 8.3 Create a Report from Report Explorer To create a report, choose File, New, then Report (Figure 8.5). Figure 8.5 After you have given your Report a name you will be taken to the Report Builder (Figure 8.6). Figure 8.6 For additional instruction on using the Report Builder, contact GroupLink support at (801)

52 8.4 Modify an Existing Report To modify an existing Report, right-click on the desired report in the Report Explorer dialog and select Design from the menu (Figure 8.7). Figure 8.7 When modifying an existing Report, it is best to save it under a different name so you can refer back to the original Report as needed. For additional instruction on modifying an existing Report, contact GroupLink Support at (801)
53 Appendix General Short Cut Keys: (Select Contact) + Shift + Page Down: Select all contacts below highlighted contact on the same page. (Select Contact) + Shift + End: Select all contacts below highlighted contact Short Cut for the ContactWise Main Window: Ctrl + G: Open Groups Window Ctrl + Alt + G: Go Remote Ctrl + I: Current database information Ctrl + Alt + M: Document Merge Utility Ctrl + N: Edit Comments Ctrl + M: Contact Ctrl + O: Open Database Ctrl + P: Print Ctrl + Q: Create Advance Filter Ctrl + S: Opens the Options screen Ctrl + Y: Synchronize Go Remote F1: Help F4: Bookmarks F5: Refresh Window F9: GroupWise Address Book Add/Update Ctrl + Alt + P: Create Phone / Address Filter Ctrl + U: Saves the filter as a public filter Ctrl + R: Saves the filter as a private filter 53
Managing Contacts in Outlook
 Managing Contacts in Outlook This document provides instructions for creating contacts and distribution lists in Microsoft Outlook 2007. In addition, instructions for using contacts in a Microsoft Word
OWA - Outlook Web App
 OWA - Outlook Web App Olathe Public Schools 0 Page MS Outlook Web App OPS Technology Department Last Revised: May 1, 2011 Table of Contents MS Outlook Web App... 1 How to Access the MS Outlook Web App...
Sample- for evaluation purposes only! Advanced Outlook. TeachUcomp, Inc. A Presentation of TeachUcomp Incorporated. Copyright TeachUcomp, Inc.
 A Presentation of TeachUcomp Incorporated. Copyright TeachUcomp, Inc. 2012 Advanced Outlook TeachUcomp, Inc. it s all about you Copyright: TeachUcomp, Inc. Phone: (877) 925-8080 Web: http://www.teachucomp.com
Don't have Outlook? Download and configure the Microsoft Office Suite (which includes Outlook)!
!") UVa Exchange Service Outlook 2013 Quickstart Guide Don't have Outlook? Download and configure the Microsoft Office Suite (which includes Outlook)! In this Quickstart Guide, you will learn to: Send and
UVa Exchange Service Outlook 2013 Quickstart Guide Don't have Outlook? Download and configure the Microsoft Office Suite (which includes Outlook)! In this Quickstart Guide, you will learn to: Send and
Outlook Live Basics. for Students
 Outlook Live Basics for Students 2 Outlook Live for Support Staff Outlook Live for Support Staff 3 Getting Started... 6 Signing into your Outlook Account... 6 Migrating your Account... 8 Address Book...
What is a Mail Merge?
 NDUS Training and Documentation What is a Mail Merge? A mail merge is generally used to personalize form letters, to produce mailing labels and for mass mailings. A mail merge can be very helpful if you
FOR WINDOWS FILE SERVERS
 Quest ChangeAuditor FOR WINDOWS FILE SERVERS 5.1 User Guide Copyright Quest Software, Inc. 2010. All rights reserved. This guide contains proprietary information protected by copyright. The software described
Catholic Archdiocese of Atlanta Outlook 2003 Training
 Catholic Archdiocese of Atlanta Outlook 2003 Training Information Technology Department of the Archdiocese of Atlanta Table of Contents BARRACUDA SPAM FILTER... 3 WHAT IS THE SPAM FILTER MS OUTLOOK PLUG-IN?...
Email Basics. a. Click the arrow to the right of the Options button, and then click Bcc.
 Email Basics Add CC or BCC You can display the Bcc box in all new messages that you compose. In a new message, do one of the following: 1. If Microsoft Word is your e-mail editor a. Click the arrow to
email-lead Grabber Business 2010 User Guide
 email-lead Grabber Business 2010 User Guide Copyright and Trademark Information in this documentation is subject to change without notice. The software described in this manual is furnished under a license
Version 10.3. End User Help Files. GroupLink Corporation 2014 GroupLink Corporation. All rights reserved
 Version 10.3 End User Help Files GroupLink Corporation 2014 GroupLink Corporation. All rights reserved GroupLink and everything HelpDesk are registered trademarks of GroupLink Corporation. The information
Version 11.0.1. End User Help Files. GroupLink Corporation 2015 GroupLink Corporation. All rights reserved
 Version 11.0.1 End User Help Files GroupLink Corporation 2015 GroupLink Corporation. All rights reserved GroupLink and everything HelpDesk are registered trademarks of GroupLink Corporation. The information
Microsoft Outlook 2003 Basic Guide
 Microsoft Outlook 2003 Basic Guide Table of Contents Introduction... 2 Getting Help... 2 Exploring Outlook... 3 Drop-Down Menus... 3 Navigation Pane... 4 Folder Pane... 7 Reading Pane... 7 Toolbars...
Using Outlook WebAccess
 Using Outlook WebAccess Outlook Toolbars - Terminology Update all folders New Move/Copy Reply Forward Check for New Messages Help Show/Hide Folders Delete Reply to All Show/Hide Reading Pain Search Address
Microsoft Office 365 Outlook Web App (OWA)
") CALIFORNIA STATE UNIVERSITY, LOS ANGELES INFORMATION TECHNOLOGY SERVICES Microsoft Office 365 Outlook Web App (OWA) Winter 2015, Version 2.0 Table of Contents Introduction...3 Logging In...3 Navigation
CALIFORNIA STATE UNIVERSITY, LOS ANGELES INFORMATION TECHNOLOGY SERVICES Microsoft Office 365 Outlook Web App (OWA) Winter 2015, Version 2.0 Table of Contents Introduction...3 Logging In...3 Navigation
The LSUHSC N.O. Email Archive
 The LSUHSC N.O. Email Archive Introduction The LSUHSC N.O. email archive permanently retains a copy of all email items sent and received by LSUHSC N.O. Academic email users. Email items will be accessible
How to access your email via Outlook Web Access
 How to access your email via Outlook Web Access 1) Open your internet browser and type in the following address: www.law.miami.edu * Aol users must minimize their browser and use Internet Explorer 6.0+
Netmail Search for Outlook 2010
 Netmail Search for Outlook 2010 Quick Reference Guide Netmail Search is an easy-to-use web-based electronic discovery tool that allows you to easily search, sort, retrieve, view, and manage your archived
Module One: Getting Started... 6. Opening Outlook... 6. Setting Up Outlook for the First Time... 7. Understanding the Interface...
 2 CONTENTS Module One: Getting Started... 6 Opening Outlook... 6 Setting Up Outlook for the First Time... 7 Understanding the Interface...12 Using Backstage View...14 Viewing Your Inbox...15 Closing Outlook...17
Outlook Tips & Tricks. Training For Current & New Employees
 Outlook Tips & Tricks Training For Current & New Employees The workshop will help build the necessary skills needed to begin using Microsoft Outlook 2010. The participant will learn how to create e-mail
15R1 Enterprise Email Integration and Functionality
 Help Documents 15R1 Enterprise Email Integration and Functionality The integration of email within Enterprise allows Enterprise users to mirror their Microsoft Outlook. or other SMTP or IMAP email, including
Webmail Instruction Guide
 Webmail Instruction Guide This document is setup to guide your through the use of the many features of our Webmail system. You may either visit www.safeaccess.com or webmail.safeaccess.com to login with
MICROSOFT OUTLOOK 2010
 MICROSOFT OUTLOOK 2010 George W. Rumsey Computer Resource Center 1525 East 53rd, Suite 906 Chicago, IL 60615 (773) 955-4455 www.computer-resource.com [email protected] What Is Outlook?... 1 Folders... 2
Outlook Web Access (OWA) User Guide
 User Guide") Outlook Web Access (OWA) User Guide September 2010 TABLE OF CONTENTS TABLE OF CONTENTS... 2 1.0 INTRODUCTION... 4 1.1 OUTLOOK WEB ACCESS SECURITY CONSIDERATIONS... 4 2.0 GETTING STARTED... 5 2.1 LOGGING
Outlook Web Access (OWA) User Guide September 2010 TABLE OF CONTENTS TABLE OF CONTENTS... 2 1.0 INTRODUCTION... 4 1.1 OUTLOOK WEB ACCESS SECURITY CONSIDERATIONS... 4 2.0 GETTING STARTED... 5 2.1 LOGGING
Outlook. Getting Started Outlook vs. Outlook Express Setting up a profile Outlook Today screen Navigation Pane
 Outlook Getting Started Outlook vs. Outlook Express Setting up a profile Outlook Today screen Navigation Pane Composing & Sending Email Reading & Sending Mail Messages Set message options Organizing Items
Training Guide. Managing Your Reminders and Contact History in Contact Manager
 Training Guide Managing Your Reminders and Contact History in Contact Manager Managing Your Reminders and Contact History in Contact Manager Copyright 2014 TABLE OF CONTENTS Unit 1: Finding an Account
Outlook 2013 ~ Advanced
 Mail Using Categories 1. Select the message that for the category. 2. Select the appropriate category. 3. The category color displays next to the message. Renaming Categories 1. Select a message. 2. Select
Microsoft Office 365 Outlook Web App (OWA)
") CALIFORNIA STATE UNIVERSITY, LOS ANGELES INFORMATION TECHNOLOGY SERVICES Microsoft Office 365 Outlook Web App (OWA) Spring 2013, Version 1.0 Table of Contents Introduction...3 Signing In...3 Navigation
CALIFORNIA STATE UNIVERSITY, LOS ANGELES INFORMATION TECHNOLOGY SERVICES Microsoft Office 365 Outlook Web App (OWA) Spring 2013, Version 1.0 Table of Contents Introduction...3 Signing In...3 Navigation
WINDOWS LIVE MAIL FEATURES
 WINDOWS LIVE MAIL Windows Live Mail brings a free, full-featured email program to Windows XP, Windows Vista and Windows 7 users. It combines in one package the best that both Outlook Express and Windows
Using the GroupWise Client
 Spring 2006 (Our appreciation to Jennifer Sherouse for her assistance in editing and improving this document) Page 1 of 15 What is the GroupWise Client The GroupWise client is a program that installs on
Marketing and Query Guide
 Marketing and Query Guide 111011 2011 Blackbaud, Inc. This publication, or any part thereof, may not be reproduced or transmitted in any form or by any means, electronic, or mechanical, including photocopying,
A Presentation of TeachUcomp Incorporated. Copyright TeachUcomp, Inc. 2013. Mastering Outlook Made Easy for Lawyers CPE Edition v.2.
 A Presentation of TeachUcomp Incorporated. Copyright TeachUcomp, Inc. 2013 Mastering Outlook Made Easy for Lawyers CPE Edition v.2.0 TeachUcomp, Inc. it s all about you Copyright: Copyright 2013 by TeachUcomp,
Outlook Web Access. PRECEDED by v\
 Outlook Web Access Logging in to OWA (Outlook Web Access) from Home 1. Login page http://mail.vernonct.org/exchange 2. To avoid these steps each time you login, you can add the login page to your favorites.
For example, within General Settings, you can change the default language from English to Spanish and change the size of the text that is displayed.
 Atlantic Broadband s free Webmail service makes it easy to read and send email using just a web browser from any computer. This quick reference guide will help you get the most out of Webmail with useful
Basics of Microsoft Outlook/Email. Microsoft Outlook
 Basics of Microsoft Outlook/Email Microsoft Outlook Workshop Outline for Improve Your Outlook Microsoft Outlook Contents Starting the application... 3 The Outlook 2010 window... 3 Expanding and minimizing
Microsoft Outlook 2010
 Microsoft Outlook 2010 Prepared by Computing Services at the Eastman School of Music July 2010 Contents Microsoft Office Interface... 4 File Ribbon Tab... 5 Microsoft Office Quick Access Toolbar... 6 Appearance
Outlook 2011 Window. [Day], [Work Week], [Full [Home]. Schedule and plan: Click the [New
![Outlook 2011 Window. [Day], [Work Week], [Full [Home]. Schedule and plan: Click the [New](/thumbs/27/11891778.jpg "Outlook 2011 Window. [Day], [Work Week], [Full [Home]. Schedule and plan: Click the [New") MS Outlook 2011 Quick Reference for Macintosh The Ribbon consists a series of tabs giving access to buttons, menus, and dialog boxes in various groups to facilitate locating the tools required for a particular
MS Outlook 2011 Quick Reference for Macintosh The Ribbon consists a series of tabs giving access to buttons, menus, and dialog boxes in various groups to facilitate locating the tools required for a particular
Lotus Notes Client Version 8.5 Reference Guide
 Lotus Notes Client Version 8.5 Reference Guide rev. 11/19/2009 1 Lotus Notes Client Version 8.5 Reference Guide Accessing the Lotus Notes Client From your desktop, double click the Lotus Notes icon. Logging
Mail Chimp Basics. Glossary
 Mail Chimp Basics Mail Chimp is a web-based application that allows you to create newsletters and send them to others via email. While there are higher-level versions of Mail Chimp, the basic application
Microsoft Outlook 2010. Reference Guide for Lotus Notes Users
 Microsoft Outlook 2010 Reference Guide for Lotus Notes Users ContentsWelcome to Office Outlook 2010... 2 Mail... 3 Viewing Messages... 4 Working with Messages... 7 Responding to Messages... 11 Organizing
MICROSOFT OUTLOOK 2010 READ, ORGANIZE, SEND AND RESPONSE E-MAILS
 MICROSOFT OUTLOOK 2010 READ, ORGANIZE, SEND AND RESPONSE E-MAILS Last Edited: 2012-07-09 1 Read Emails... 4 Find the inbox... 4 Change new incoming e-mail notification options... 5 Read email... 6 Change
Outlook 2010 Essentials
 Outlook 2010 Essentials Training Manual SD35 Langley Page 1 TABLE OF CONTENTS Module One: Opening and Logging in to Outlook...1 Opening Outlook... 1 Understanding the Interface... 2 Using Backstage View...
USER MANUAL APPLICATION MONITOR. Version 1.5 - March 2015
 USER MANUAL APPLICATION MONITOR Version 1.5 - March 2015 USER MANUAL IP2Archive 1.5 Application Monitor Disclaimer This manual and the information contained herein are the sole property of EVS Broadcast
Outlook Web Access (OWA) 2010 Email Cheat Sheet
 2010 Email Cheat Sheet") June 9, 2014 Outlook Web Access (OWA) 2010 Email Cheat Sheet Outlook Web Access 2010 allows you to gain access to your messages, calendars, contacts, tasks and public folders from any computer with internet
June 9, 2014 Outlook Web Access (OWA) 2010 Email Cheat Sheet Outlook Web Access 2010 allows you to gain access to your messages, calendars, contacts, tasks and public folders from any computer with internet
BCSD WebMail Documentation
 BCSD WebMail Documentation Outlook Web Access is available to all BCSD account holders! Outlook Web Access provides Webbased access to your e-mail, your calendar, your contacts, and the global address
EMAIL QUICK START GUIDE
 IT Services Microsoft Outlook 2010 EMAIL QUICK START GUIDE Contents What is Outlook?...2 Quick Guide to Email...2 Create a new e-mail message...2 Forward or reply to an e-mail message...2 Creating new
A Presentation of TeachUcomp Incorporated. Copyright TeachUcomp, Inc. 2015. Mastering Outlook Made Easy for Lawyers CPE Edition v.3.
 A Presentation of TeachUcomp Incorporated. Copyright TeachUcomp, Inc. 2015 Mastering Outlook Made Easy for Lawyers CPE Edition v.3.0 TeachUcomp, Inc. it s all about you Copyright: Copyright 2015 by TeachUcomp,
Connecting to LUA s webmail
 Connecting to LUA s webmail Effective immediately, the Company has enhanced employee remote access to email (Outlook). By utilizing almost any browser you will have access to your Company e-mail as well
Outlook Web App McKinney ISD 5/27/2011
 Outlook Web App McKinney ISD 5/27/2011 Outlook Web App Tutorial Outlook Web Access allows you to gain access to your messages, calendars, contacts, tasks and public folders from any computer with internet
Context-sensitive Help Guide
 MadCap Software Context-sensitive Help Guide Flare 11 Copyright 2015 MadCap Software. All rights reserved. Information in this document is subject to change without notice. The software described in this
Installing Sage ACT! 2013 for New Users
 Installing Sage ACT! 2013 for New Users Installing Sage ACT! 2013 for New Users Copyright 2012 Sage Software, Inc. All Rights Reserved. Sage, the Sage logos, ACT!, and the Sage product and service names
Non-Profit Solution for Microsoft Dynamics CRM
 Non-Profit Solution for Microsoft Dynamics CRM 1 Non-Profit Solution for Microsoft Dynamics CRM Users Guide Table of Contents Introduction... 2 Overview... 2 Default Objects... 2 Screen Elements... 3 Required
Outlook Email. User Guide IS TRAINING CENTER. 833 Chestnut St, Suite 600. Philadelphia, PA 19107 215-503-7500
 Outlook Email User Guide IS TRAINING CENTER 833 Chestnut St, Suite 600 Philadelphia, PA 19107 215-503-7500 This page intentionally left blank. TABLE OF CONTENTS Getting Started... 3 Opening Outlook...
Microsoft Outlook Tips & Tricks
 Microsoft Outlook Tips & Tricks Columbia College Technology Services Table of Contents Creating an email signature Page 1 Handling attachments Page 1 Sending an attachment Opening an attachment Page 2
Microsoft Office Outlook 2013
 Microsoft Office Outlook 2013 Navigating the Outlook Interface The Components of the Outlook 2013 Interface Component Title bar Quick Access Toolbar The ribbon Ribbon tabs Folder pane Content pane Sort
XMailer Reference Guide
 XMailer Reference Guide Version 7.00 Wizcon Systems SAS Information in this document is subject to change without notice. SyTech assumes no responsibility for any errors or omissions that may be in this
Project Management WalkThrough
 PRACTICE CS Project Management WalkThrough version 2014.x.x TL 27715a (1/16/15) Copyright Information Text copyright 2004 2015 by Thomson Reuters. All rights reserved. Video display images copyright 2004
Outlook XP Email Only
 Outlook XP Email Only Table of Contents OUTLOOK XP EMAIL 5 HOW EMAIL WORKS: 5 POP AND SMTP: 5 TO SET UP THE POP AND SMTP ADDRESSES: 6 TO SET THE DELIVERY PROPERTY: 8 STARTING OUTLOOK: 10 THE OUTLOOK BAR:
CITY OF BURLINGTON PUBLIC SCHOOLS MICROSOFT EXCHANGE 2010 OUTLOOK WEB APP USERS GUIDE
 CITY OF BURLINGTON PUBLIC SCHOOLS MICROSOFT EXCHANGE 2010 OUTLOOK WEB APP USERS GUIDE INTRODUCTION You can access your email account from any workstation at your school using Outlook Web Access (OWA),
Outlook Web Access Tutorial
 1 Outlook Web Access Tutorial Outlook Web Access 2010 allows you to gain access to your messages, calendars, contacts, tasks and public folders from any computer with internet access. How to access your
Outlook Web Access E-mail
 Outlook Web Access E-mail A. Accessing the mailbox via the Internet 1. Open your browser Firebox or Internet Explorer 2. In the URL address location box, key mail.asbury.edu for students and mail2.asbury.edu
Installing Act! for New Users
 Installing Act! for New Users Installing Act! for New Users 2014 Swiftpage ACT! LLC. All Rights Reserved. Swiftpage, Act!, and the Swiftpage product and service names mentioned herein are registered trademarks
Using Webmail. Document Updated: 11/10. Technical Manual: User Guide. The Webmail Window. Logging In to Webmail. Displaying and Hiding the Full Header
 Using Webmail Technical Manual: User Guide Webmail is supported in the following browsers: Windows Internet Explorer 6, Internet Explorer 7, Firefox 2, and Firefox 3 Mac OSX Safari 2, Safari 3, Firefox
everything HelpDesk Help Files May 2009 GroupLink Corporation 2009 GroupLink Corporation. All rights reserved
 everything HelpDesk Help Files May 2009 everything HelpDesk Help Files GroupLink Corporation 2009 GroupLink Corporation. All rights reserved GroupLink, everything HelpDesk, GroupLink ereferrals and ContactWise
- Training. Getting Started with Outlook 2003. Information Technology Services - Training The University of Texas at Austin
 - Training Getting Started with Outlook 2003 Information Technology Services - Training The University of Texas at Austin http://www.utexas.edu/its/training 2007 Information Technology Services The University
Scribe Online Integration Services (IS) Tutorial
 Tutorial") Scribe Online Integration Services (IS) Tutorial 7/6/2015 Important Notice No part of this publication may be reproduced, stored in a retrieval system, or transmitted in any form or by any means, photocopying,
Scribe Online Integration Services (IS) Tutorial 7/6/2015 Important Notice No part of this publication may be reproduced, stored in a retrieval system, or transmitted in any form or by any means, photocopying,
Contact Manager and Document Tracking. CampusVue Student User Guide
 Contact Manager and Document Tracking CampusVue Student User Guide Campus Management Corporation Web Site http://www.campusmanagement.com/ E-mail Information: Support: E-mail form on Web site [email protected]
Using Outlook Web App
 Using Outlook Web App About Outlook Web App Using a web browser and the Internet, Outlook Web App (OWA) provides access to your Exchange mailbox from anywhere in the world at any time. Outlook Web App
emarketing Manual- Creating a New Email
 emarketing Manual- Creating a New Email Create a new email: You can create a new email by clicking the button labeled Create New Email located at the top of the main page. Once you click this button, a
You can also get to OWA by typing https://mymail.saisd.net. You have now entered the new and improved Web Outlook.
 Access E-Mail from Anywhere through the Internet Start your Internet Browser i.e. Internet Explorer Go to www.saisd.net Refer to Quick Links on the right side of the page Click on Web Outlook Were it shows
Microsoft Outlook. KNOW HOW: Outlook. Using. Guide for using E-mail, Contacts, Personal Distribution Lists, Signatures and Archives
 Trust Library Services http://www.mtwlibrary.nhs.uk http://mtwweb/cgt/library/default.htm http://mtwlibrary.blogspot.com KNOW HOW: Outlook Using Microsoft Outlook Guide for using E-mail, Contacts, Personal
Changes to Skillnet Group Emails. Outlook and Outlook Express Users
 Changes to Skillnet Group Emails Skillnet Group emails are moving from the current provider to our own exchange mail server. This will mean that you will have a much improved web-mail system and almost
Resource Online User Guide JUNE 2013
 Resource Online User Guide JUNE 2013 CHASE PAYMENTECH SOLUTIONS MAKES NO WARRANTY OF ANY KIND, EITHER EXPRESSED OR IMPLIED, WITH REGARD TO THIS MATERIAL, INCLUDING, BUT NOT LIMITED TO, THE IMPLIED WARRANTIES
Results CRM 2012 User Manual
 Results CRM 2012 User Manual A Guide to Using Results CRM Standard, Results CRM Plus, & Results CRM Business Suite Table of Contents Installation Instructions... 1 Single User & Evaluation Installation
ACT! by Sage. Premium for Workgroups 2007 (9.0) Administrator s Guide to the ACT! Reader Utility
 Administrator s Guide to the ACT! Reader Utility") ACT! by Sage Premium for Workgroups 2007 (9.0) Administrator s Guide to the ACT! Reader Utility ACT! by Sage Premium for Workgroups 2007 (9.0) Administrator s Guide to the ACT! Reader Utility Copyright
ACT! by Sage Premium for Workgroups 2007 (9.0) Administrator s Guide to the ACT! Reader Utility ACT! by Sage Premium for Workgroups 2007 (9.0) Administrator s Guide to the ACT! Reader Utility Copyright
Microsoft Outlook 2013 Part 1: Introduction to Outlook
 CALIFORNIA STATE UNIVERSITY, LOS ANGELES INFORMATION TECHNOLOGY SERVICES Microsoft Outlook 2013 Part 1: Introduction to Outlook Fall 2014, Version 1.0 Table of Contents Introduction...3 Starting Outlook...3
Email -- Reading and Printing Email
 Email -- Reading and Printing Email Checking for New Email By default, webmail checks for new email automatically. If you want to manually check for new email, click the Check Email button. Or, click the
WHAT S NEW IN OUTLOOK 2010 & HOW TO CUSTOMIZE IT
 WHAT S NEW IN OUTLOOK 2010 & HOW TO CUSTOMIZE IT THE RIBBON... 2 CONTEXTUAL TABS... 4 THE FILE TAB... 4 DIALOG BOXES... 5 MINIMIZING THE RIBBON... 5 CUSTOMIZING THE RIBBON... 6 CUSTOMIZING THE QUICK ACCESS
Overview... 2 How to Add New Documents... 3 Adding a Note / SMS or Phone Message... 3 Adding a New Letter... 4. How to Create Letter Templates...
 THE DOCUMENT MANAGER Chapter 14 THE DOCUMENT MANAGER CONTENTS Overview... 2 How to Add New Documents... 3 Adding a Note / SMS or Phone Message... 3 Adding a New Letter... 4 How to Create Letter Templates...
384 PastPerfect Museum Software User s Guide THE CONTACTS SCREEN
 20 CONTACTS In this chapter, we will show you how PastPerfect can help you manage your patrons and memberships. PastPerfect s contact management features automate tracking donors, potential donors, current
Produced by: Flinders University Centre for Educational ICT
 Produced by: Flinders University Centre for Educational ICT Introduction to Outlook 2010 Contents Microsoft Online Services Sign-in to Outlook/Exchange... 2 Key Features... 3 Outlook Screen... 4 To-Do
Using Webmail. Technical Manual: User Guide. Document Updated: 1/07. The Webmail Window. Displaying and Hiding the Full Header.
 Using Webmail Technical Manual: User Guide The Webmail Window To save an attachment: 1. Click once on the attachment name. Or, if there are multiple attachments, click the Save icon to save all attachments
E-mailing a large amount of recipients
 E-mailing a large amount of recipients DO NOT use the TO or CC field! If you have a large list of recipients you need to send an email you, you should never try sending one large email with all of the
CRM Quick Reference Guide
 CRM Quick Reference Guide AMS Distributor Customers 2013 Internet Pipeline, Inc. All rights reserved. Information in this document is subject to change without notice. The software described in this document
Microsoft Outlook 2013 Part 2: Intermediate Outlook
 CALIFORNIA STATE UNIVERSITY, LOS ANGELES INFORMATION TECHNOLOGY SERVICES Microsoft Outlook 2013 Part 2: Intermediate Outlook Spring 2015, Version 1.0 Table of Contents Introduction...2 Calendar...2 Scheduling
Pipeliner CRM Phaenomena Guide Add-In for MS Outlook. 2015 Pipelinersales Inc. www.pipelinersales.com
 Add-In for MS Outlook 205 Pipelinersales Inc. www.pipelinersales.com Add-In for MS Outlook Learn how to use sales lead management with Pipeliner MS Outlook Add-In. CONTENT. Setting up Pipeliner Add-In
Create a New Database in Access 2010
 Create a New Database in Access 2010 Table of Contents OVERVIEW... 1 CREATING A DATABASE... 1 ADDING TO A DATABASE... 2 CREATE A DATABASE BY USING A TEMPLATE... 2 CREATE A DATABASE WITHOUT USING A TEMPLATE...
Outlook 2013 ~ e Mail Quick Tips
 The Ribbon: Home tab New Email to send a new mail New Items to send a new mail, a new appointment, a new meeting, a new contact, a new task, a new Lync Meeting Ignore to ignore a request Clean Up to clean
Microsoft Access to Microsoft Word Performing a Mail Merge from an Access Query
 Microsoft Access to Microsoft Word Performing a Mail Merge from an Access Query Performing a Query in Access Before performing a mail merge, we need to set up a query with the necessary fields. Opening
Microsoft Outlook 2010 Part 1: Introduction to Outlook
 CALIFORNIA STATE UNIVERSITY, LOS ANGELES INFORMATION TECHNOLOGY SERVICES Microsoft Outlook 2010 Part 1: Introduction to Outlook Spring 2015, Version 1.4 Table of Contents Introduction...3 Starting Outlook...3
www.novell.com/documentation Client User Guide GroupWise 2014 April 2014
 www.novell.com/documentation Client User Guide GroupWise 2014 April 2014 Legal Notices Novell, Inc., makes no representations or warranties with respect to the contents or use of this documentation, and
5.7. Quick Guide to Fusion Pro Schedule
 5.7 Quick Guide to Fusion Pro Schedule Quick Guide to Fusion Pro Schedule Fusion 5.7 This publication may not be reproduced, in whole or in part, in any form or by any electronic, manual, or other method
Microsoft Exchange Hosted Archive (MEHA)
") Microsoft Exchange Hosted Archive (MEHA) All the Features of NYSeMAIL Archiving including Using for Business Continuity Using MEHA Using MEHA The Microsoft Exchange Hosted Archive (MEHA) can be accessed
Microsoft Exchange Hosted Archive (MEHA) All the Features of NYSeMAIL Archiving including Using for Business Continuity Using MEHA Using MEHA The Microsoft Exchange Hosted Archive (MEHA) can be accessed
Getting Started Guide
 Getting Started Guide Mulberry IMAP Internet Mail Client Versions 3.0 & 3.1 Cyrusoft International, Inc. Suite 780 The Design Center 5001 Baum Blvd. Pittsburgh PA 15213 USA Tel: +1 412 605 0499 Fax: +1
2012 Teklynx Newco SAS, All rights reserved.
 D A T A B A S E M A N A G E R DMAN-US- 01/01/12 The information in this manual is not binding and may be modified without prior notice. Supply of the software described in this manual is subject to a user
Microsoft Outlook 2010 Part 1: Introduction to Outlook
 CALIFORNIA STATE UNIVERSITY, LOS ANGELES INFORMATION TECHNOLOGY SERVICES Microsoft Outlook 2010 Part 1: Introduction to Outlook Spring 2012, Version 1.0 Table of Contents Introduction...3 Starting the
Microsoft Outlook 2013 -And- Outlook Web App (OWA) Using Office 365
 Using Office 365") 1 C H A P T E R Microsoft Outlook 2013 -And- Outlook Web App (OWA) Using Office 365 1 MICROSOFT OUTLOOK 2013 AND OUTLOOK WEB ACCESS (OWA) Table of Contents Chapter 1: Signing Into the Microsoft Email System...
1 C H A P T E R Microsoft Outlook 2013 -And- Outlook Web App (OWA) Using Office 365 1 MICROSOFT OUTLOOK 2013 AND OUTLOOK WEB ACCESS (OWA) Table of Contents Chapter 1: Signing Into the Microsoft Email System...
How To Use Outlook On A Pc Or Macbook With A Pc (For A Pc) Or Macintosh (For An Ipo) With A Macbook Or Ipo With A Ipo (For Pc) With An Outlook (For Macbook
 Or Macintosh (For An Ipo) With A Macbook Or Ipo With A Ipo (For Pc) With An Outlook (For Macbook") Outlook for Mac Getting started, reading and sending emails When you use Outlook for the first time, we suggest starting with a few minor adjustments to make the interface more familiar. From the View
Outlook for Mac Getting started, reading and sending emails When you use Outlook for the first time, we suggest starting with a few minor adjustments to make the interface more familiar. From the View