Recommended Settings for PACS HRS-d/eJacket via Remote Access
|
|
|
- Clement Morgan
- 9 years ago
- Views:
Transcription
1 The Main Line Health (MLH) system can be accessed through the Internet using the MLH Extranet Portal. The Extranet Portal gives users access to the MLH Intranet, PACS Horizon RadStation Distributed (HRS-d), PACS ejacket, and Physicians Workstation. Users must have an assigned SecurID fob to pass the security measures in place. Please contact the Information Services Help Desk for assistance at or internally at McKesson s PACS HRS-d and ejacket products can be accessed by using the MLH Extranet Portal to the MLH Network. This software is intended for image viewing capabilities only and is not to be used in any diagnostic format. The quality of your PC monitor will directly affect the quality of the images displayed via the Web. Recommended Settings for PACS HRS-d/eJacket via Remote Access Display settings: x x 1200 pixels screen resolution - 24-bit screen bit depth (To determine if your monitor supports 24-bit color click on Start Settings Control panel Display Settings tab and see if one of the options for number of colors to display either says True Color, 24-bit or 32-bit.) Hardware: Required software: - Pentium III 500 MHZ - Microsoft Internet Explorer version MB RAM (for viewing reports and images) - Adobe Reader v 6 or later (for viewing reports) MB free disk space (more space may be necessary) - Single color monitor - Mouse with scroll wheel Internet Connection: Operating system: - Cable Modem or DSL - Windows 2000 or Windows XP - Main Line Health SecurID (for Remote Access) To Login 1. Enter (Note: notice the letter S after http) 2. Enter your six-character username in lowercase. Press <Tab> The username is usually the first five characters of your last name and the first character of your first name. 3. Enter your four-digit PIN, followed by the SecurID number on the display 4. Click the Sign In button 1

2 Note: If you have requested access to HRS-d (i.e., the version currently used within the MLH hospitals), then you will see the following set of WSAM screens. If you have not requested this access, please skip to the Extranet Portal Menu on page 6 and follow the instructions for the Main Line Health Enterprise PACS link. WSAM Client To use HRS-d, you must first install a WSAM client (a small application that allows you to connect to MLH) on to your PC. When you sign on to the extranet portal, you will see the following screen. In order to complete the kick-off you will need to allow the ActiveX object installation. The following dialog will appear: Notice the security bar across the top of the Internet Explorer window in the graphic below. You ll need to click on this bar and select Install ActiveX Control. This security bar is a function of Internet Explorer Service Pack 2 and was designed by Microsoft to help prevent the automated installation of unwanted spyware and malware by third parties. Unfortunately that design now requires that you explicitly allow the installation, requiring you to click and select Install ActiveX Control. 2

3 The ActiveX object is designed to help facilitate the installation of the WSAM client. As depicted below you ll be prompted to install the actual WSAM client (NeoterisSetup.cab). You should select Install in order to continue Please Note: If you are running Additional Virus Protection or Personal Firewall you may receive an additional message box. The verbiage of this dialog will differ depending on software. Please permit this action by selecting Install, Allow or Run to ensure the ActiveX Control is downloaded. After selecting Install you will see the client get downloaded from the Juniper appliance. The download dialog will disappear when the download is complete. The following Setup Dialog presents while the application is loading. 3

4 You have now completed the installation of the Juniper Windows Secure Application Manager (WSAM) Client. If you have run into unexpected problems while following the steps above please refer to the Firewall/Antivirus section located on page 18 near the end of this document. The WSAM manager can be located by an Icon the lower right hand corner of your desktop) in windows task tray (the group of icons in Once the initial download and installation are complete the WSAM Client will automatically launch itself and bring you to the Extranet portal at login. You do not need to go through the download process each time you use PACS. You should see a page similar to the graphic attached below. 4

5 When finished it is very important to Log Out of PACS and most importantly Sign Out the WSAM session. There are two ways to Sign Out 1) Click the Button in the upper Right portion of the portal screen. 2) Right click on and choose End Session. This icon will be located in task tray on the bottom left portion of the screen. Bank of icons should look like this... MLH cannot support the installation of this application beyond the instructions provided in this document because of the considerable variations of hardware and software that exist on home/office PCs. If you are not successful following the instructions in this document for installing the Windows Secure Application Manager (WSAM) client, please contact MLH Help Desk ( ). If your issue can not be resolved by the MLH Help Desk, you have two options: 1) Use ejacket as your remote PACS solution 1 or 2) Contact a third-party vendor to assist you with the installation If you choose option 2) you will be responsible for any costs associated with using the third-party. 1 This option requires Main Line Health Information Services to remove you from the WSAM User Group. Please contact the MLH Help Desk at or inside tie line to have yourself removed from this group. 5

6 Extranet Portal Menu After you have successfully logged into MLH, you will see the portal page as seen below. You have several choices one of them is Main Line Health Enterprise PACS (HRS-d) and another is Main Line Health Enterprise PACS (ejacket). If you select the Main Line Health Enterprise PACS (ejacket) link, you will be able to use a feature limited PACS Web application. While this version lacks many features, it does provide basic image review capabilities and more importantly is designed to run in the IE browser without any downloads as a standard Web page. If you have difficulties installing and/or using the more advanced HRS-d application, you can always use this version. If you select the Main Line Health Enterprise PACS (HRS-d) link, you will be able to use the latest version of HRS-d, the more advanced PACS viewer. This is the version that is currently available from any MLH PC within the MLH hospitals. Please note that this version requires an application installation on your PC unlike the ejacket application. If you need instructions on using or installing this version of the Web application, follow the Main Line Health Enterprise PACS (HRS-d) instructions that begin on page 13 of this document. MLH cannot support the installation of this application beyond the instructions provided in this document because of the considerable variations of hardware and software that exist on personal PCs. If you cannot install this version of the Web application based on the instructions provided in this document, you have two options: 1) Use the ejacket application or 2) use a third-party to assist you with the installation. If you choose option 2) you will be responsible for any costs associated with using the third-party. 6

7 Main Line Health Enterprise PACS (ejacket) Below are instructions on using the ejacket application. Enter your PACS User ID and Password Enter your PACS user name and password. Locating a patient or study Enter Patient Name, CID, Accession Number, or Exam Date and hit Enter or click on Search to locate a study. A list of studies will be returned that match the selection criteria. Once you locate the study you want to view, double click on the study in the list using the left mouse button to view the images. 7

8 Viewing Images The first image in the study will display automatically. To view the next image in the study click on Next. To view the next series, click on Next Series. To go back, click on Previous or Previous Series. You can click on the Other Studies for This Patient drop down box in the upper right corner of the screen to view other studies for the particular patient for whom the current study is open. Studies with a significant number of images (e.g., CT, MR, US) will display four images per screen. If you would like to make any of these images larger, click on the image with the mouse and this will launch High Resolution Mode, which displays the images across the entire screen. Click on the Exit High Resolution Mode link at the top of the screen to return to the normal display. The icons in the upper right corner of the screen have the following functions: Search for another patient Help Exit the application 8
 will display four images per screen.")
9 Main Line Health Enterprise PACS (HRS-d) Note: If you are running HRS-d for the first time on a particular PC, you will need to install the software on your PC prior to using the application. This will only need to be run one time per PC. See instructions on page 13 of this document for the setup process. From the main extranet portal page show below click on the HRS-d link as shown below (Note: if you are not running the WSAM client this will not run). If you have already installed the HRS-d client you will see the following screen. Enter your PACS username and password here. 9

10 1. Click on the arrow next to the Study List icon and then click on Find Studies to search for a patient study. 2. Enter the patient name then click Find. 3. Double click on the study you wish to open on the list. Images automatically load. To view other images/series, click on the thumbnail for that image/series and drag it to the active window while holding down the mouse button or double click on the thumbnail. If images are compressed, it will be indicated on the image. To remove or change compression, click on the compression icon. 10

11 Prior studies will automatically load along top toolbar. To compare studies, drag series thumbnails from different studies into active parts of the screen. Clicking on the documents icon (shown at left) in the toolbar will display any results available for the study in a separate window (shown below). To review reports for older studies, click on the study details in the list at the left of the window. 11
.")
12 Below is a list of all icons available in HRS-d and their functions. Items are also available via a right mouse click on an image. Click on the Preferences icon in the toolbar to change the items that appear in the toolbar. You can also change the items that appear in your Right-Click Menu. Click Apply to save changes. 12

13 Installing HRS-d MLH provides the following instructions as a guide to help you with installation of HRS-d, but MLH makes no guarantees that you will be able to successfully install this on your PC. Furthermore, MLH takes no responsibility for any damage you or any third-party does to your PC or any application or data on your PC as a result of trying to install this application. There are a number of steps involved to successfully install HRS-d on your PC. In addition, depending on the OS (e.g., Windows XP, Windows 2003) and third-party applications (e.g., antivirus, firewalls, pop-up blockers), some or all of the following steps may be blocked by your PC. Because of the considerable variations of hardware and software that exist on personal PCs MLH cannot support the installation of this application beyond the instructions provided in this document. If you contact the MLH Help Desk for assistance with installing HRS-d, they will refer you to this document or to a third-party. If you are unable to install this application on your PC, you have the option to use ejacket (see page 6 for more details) or you can use a third-party to assist you with the installation of the application. If you choose to use a third-party you will be responsible for any costs associated with using the third-party. To begin the installation, click on the Main Line Health Enterprise PACS (HRS-d Software Download) link as shown below. Please note that firewalls, antivirus applications, and pop-up blockers may prevent the successful installation of HRS-d. For more information on configuring to your firewall or antivirus application see page 18. For more information on configuring your pop-up blocker see page
 and third-party applications (e.g., antivirus, firewalls, pop-up blockers), some or all of the following steps may be blocked by your PC.")
14 When the following pop up window appears, click on the Run button. (Note: Depending on your system, you may need to click on Open instead of Run.) You will see the following window appear. The percentage at the top of the window will count up to 100% as the application downloads to your PC. You will then see the following window click on Run. 14

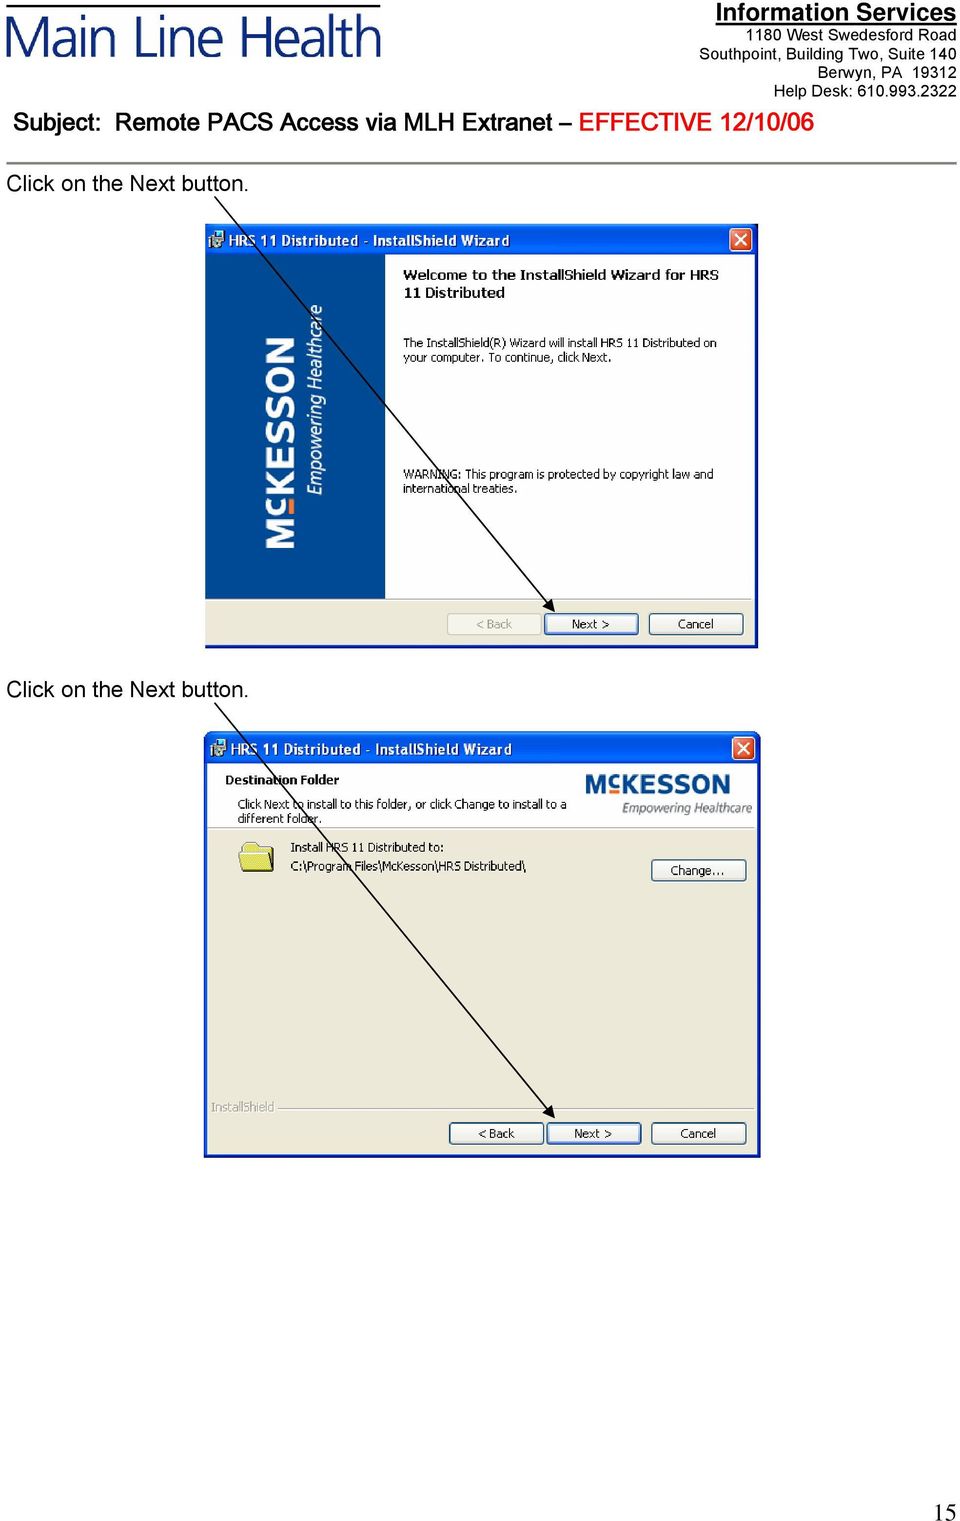
15 Click on the Next button. Click on the Next button. 15
16 Click on the Install button. The software will install automatically (If you have a firewall or antivirus application installed on your PC, this may block the installation. See the note on page 18 if this occurs.). Please note that this step may take several minutes as indicated on the screen and even if nothing appears to be happening the application is still installing in the background. 16

17 After the PACS installation completes you will see the following window. Click on Finish. After the PACS installation completes go back to the Main Line Health extranet menu to launch the application (see page 6 for more details). 17

18 Firewall/Antivirus Issues If you have a Person Firewall (e.g., Windows Firewall, Windows Defender, McAfee Personal Firewall Plus, Symantec Norton Personal Firewall) or Anti Virus application (e.g., McAfee VirusScan, Symantec Norton AnitVirus) installed on your PC, it may block the installation of the WSAM and HRS-d clients. If you receive an alert from your firewall or Anti Virus package (typically identified by an additional dialog on the windows tool bar) during the installation of the WSAM or HRS-d client you will need to select this dialog and MANULLY choose to Allow or Unblock or Permit these clients to install. Below are some sample dialog windows for common firewall and Anti Virus applications. (Note: the names of the blocked applications may differ from those shown below as these are just representative examples) Click on Allow entire script this time. Click on Unblock. 18
 Click on Allow entire script this time. Click on Unblock. 18")
19 Pop-Up Blockers With virtually hundreds of pop-up blockers on the market today it is impossible to provide an allinclusive manual. Below are some configurations for common pop-up blockers. For instructions on other pop-up blockers, refer to your pop-up blocker manufacturer's manual. Configuring the Windows XP Service Pack 2 Pop-up Blocker Open an Internet Explorer window 1. Click Tools (on the upper menu) 2. Choose Internet Options 3. Select the Privacy tab 4. Click the Settings button (see the picture below) 5. In the box for Address for Web Site to Allow type 6. Click the Add button (see the picture below) 7. Click Apply and OK 19
 5. In the box for Address for Web Site to Allow type https://www2.mlhs.org 6.")
20 You can also Go to Tools>Pop-Up Blocker>Pop-Up Blocker Settings. Type in Address of Web Site to allow and click Add. As Illustrated below... Type web address and click Add to allow Pop-Ups for Secure Session. 20

21 Configuring the Google toolbar Pop-up Blocker If you are using Internet Explorer with the Google toolbar, ensure that the Google Toolbar says "Site pop-ups allowed" when you are on the Main Line Health SSL ( To accomplish this, go to the and click the button on the Google Toolbar that says " # blocked" (e.g., 377 blocked in the picture below). The button will turn into Site pop-ups allowed". Click to allow Pop-Ups for session. Find more information about Google's Pop-up Blocker look at Configuring the Yahoo toolbar Pop-up Blocker Turn Pop-Up Blocker off using the Pop-Up Blocker menu Add the source of the pop-up window to your Allowed List by clicking the Pop-Up Blocker menu and selecting Always Allow Pop-Ups From... button. Then select from the Sources of Recently Blocked Pop-Ups list and click Allow. Find more information about Yahoo's Pop-up Blocker look at Configuring the MSN toolbar Pop-up Blocker Click the down arrow next to Pop-ups Blocked Choose Allow Pop-ups from this Site from the drop down menu. Add to the list of sites to allow pop-ups. Click Add>OK. 21
22 Configuring the AOL toolbar Pop-up Blocker AOL Toolbar appears in the browser as follows... The following icon is the Pop-Up Blocker: Click on this icon. The icon should now look like this: Configuring Pop-up Stopper Professional Pop-Up Blocker One of the more popular Pop-Up Blockers available, this software is designed solely for preventing Pop-Ups. It will install an icon in the lower right corner of your Start Menu Toolbar This Icon will look like this: To disable Pop-Up Blocking, right-click on the icon and a Pop- Up menu will appear with a list of options: Uncheck the option Block pop-up ad windows. 22
23 Configuring the Pop-Up Cop Pop-up Blocker Another popular Pop-Up Blocker, this software is also designed solely for preventing Pop-Ups. It installs the following toolbar within the browser: Click on the down arrow next to the shield to display options... Click on Allow popups from... type the address Click OK 23
24 Configuring the Norton Internet Security/Firewall Pop-up Blocker 1. Open Norton Internet Security's/Firewall s main window (you may click the firewall icon on the system tray or use Start->Programs->Norton Firewall( 2. Click the Ad Blocking line 3. Click the Turn Off button 24
How to Disable Common Pop-Up Blockers
 How to Disable Common Pop-Up Blockers Listed below are some of the most popular pop-up blocking software packages, and instructions to enable pop-up windows with them. Pop-up windows must be enabled to
How to Disable Common Pop-Up Blockers
 How to Disable Common Pop-Up Blockers Internet Explorer AOL Toolbar Google Toolbar Microsoft Windows XP Service Pack 2 (SP2) MSN Toolbar Pop-Up Stopper PopUpCop Yahoo! Toolbar Firefox Norton Internet Security/Firewall
ATTENTION: End users should take note that Main Line Health has not verified within a Citrix
 Subject: Citrix Remote Access using PhoneFactor Authentication ATTENTION: End users should take note that Main Line Health has not verified within a Citrix environment the image quality of clinical cal
Remote Access to Niagara Wheatfield s Computer Network
 Remote Access to Niagara Wheatfield s Computer Network Niagara Wheatfield Central School District Office of Instructional Technology Revised: June 24, 2010 Page 1 of 15 To gain access to Niagara Wheatfield
McAfee Enterprise Edition v 7.1.0 Installation & Configuration For Windows NT, 2000, and XP
 McAfee Enterprise Edition v 7.1.0 Installation & Configuration For Windows NT, 2000, and XP McAfee Enterprise Edition v 7.1.0: Installation & Configuration 1 McAfee Enterprise Edition v 7.1.0: Installation
Kodak Learning Management System (LMS)
") Kodak Learning Management System (LMS) Accessing the System...2 Using the LMS in Learner Mode...3 The Home Page...3 Locating Assigned Training...4 Registering for a Learning Activity...5 Launching Learning
Kodak Learning Management System (LMS) Accessing the System...2 Using the LMS in Learner Mode...3 The Home Page...3 Locating Assigned Training...4 Registering for a Learning Activity...5 Launching Learning
How to Temporarily Allow Popups for the Current Session
 How to Temporarily Allow Popups for the Current Session NOTE: The following procedure works on most browsers, but there may be some that don t. Try it anyway. Press the ctrl key while clicking on the Go
How to Disable Common Pop-Up Blockers
 How to Disable Common Pop-Up Blockers Listed below are some of the more popular Pop-up Blocking software packages and the workarounds that should be followed in order to disable the Pop-Up blocking feature
Installation and Troubleshooting Guide for SSL-VPN CONNECTIONS Access
 Installation and Troubleshooting Guide for SSL-VPN CONNECTIONS Access Version 1 Revised 11/29/2007 Table of Contents Java Installation:...4 Browser Configuration:...4 Citrix Client Installation:...8 Attempting
Instructions for using evitran / Budget Allocation Software
 Instructions for using evitran / Budget Allocation Software General requirements for running running evitran / Budget Allocation software The application is best viewed In IE Explorer 5.0+ and 1024 X 768
Microsoft Windows Installation and Troubleshooting Guide
 Remote Access Services Microsoft Windows - Installation and Troubleshooting Guide Version 2.1 February 19, 2013 1 P age TABLE OF CONTENTS 1 MICROSOFT WINDOWS XP INSTALLATION PROCEDURES... 3 2 MICROSOFT
extranet.airproducts.com Windows XP Client Configuration
 extranet.airproducts.com Windows XP Client Configuration To successfully connect to the Air Products extranet.airproducts.com website and have full functionality, the client computer needs to have the
MySabre with Sabre VPN
 MySabre with Sabre VPN MIGRATION / INSTALLATION GUIDE T a b l e o f C o n t e n t s Table of Contents... ii Introduction... 3 Before Installing... 3 New MySabre User Installation... 4 Appendix A ActiveX
Windows and MAC User Handbook Remote and Secure Connection Version 1.01 09/19/2013. User Handbook
 Windows and MAC User Handbook How to Connect Your PC or MAC Remotely and Securely to Your U.S. Department of Commerce Account Developed for You by the Office of IT Services (OITS)/IT Service Desk *** For
Cognos 10 Getting Started with Internet Explorer and Windows 7
 Browser/Windows Settings There are several Internet Explorer browser settings required for running reports in Cognos. This document will describe specifically how to set those in Internet Explorer 9 and
Passport Installation. Windows XP + Internet Explorer 8
 Passport Installation Windows XP + Internet Explorer 8 OS Version Windows XP System Type 32bit or 64bit Browser & version Internet Explorer 8 Before you begin.. Make sure you have Anti Virus software installed
Passport Installation. Windows 8 + Internet Explorer 10
 Passport Installation Windows 8 + Internet Explorer 10 OS Version Windows 8 System Type 32bit and 64bit Browser Name & version Internet Explorer 10 Before you begin Make sure you have Anti Virus software
Network Connect Installation and Usage Guide
 Network Connect Installation and Usage Guide I. Installing the Network Connect Client..2 II. Launching Network Connect from the Desktop.. 9 III. Launching Network Connect Pre-Windows Login 11 IV. Installing
This guide provides all of the information necessary to connect to MoFo resources from outside of the office
 REMOTE ACCESS GUIDE INTRODUCTION This guide provides all of the information necessary to connect to MoFo resources from outside of the office Links to topics in this document Connect remotely from your
Using Access.Centegra.Com (Physician Access) Secure Remote Access from the Internet
 Secure Remote Access from the Internet") System Requirements These are the minimum requirements necessary to ensure the proper operation of Centegra Health System s Access.Centegra.Com. Administrative level access to the PC or other device used
System Requirements These are the minimum requirements necessary to ensure the proper operation of Centegra Health System s Access.Centegra.Com. Administrative level access to the PC or other device used
How to Disable Common Pop-Up Blockers
 Listed below are some of the most popular pop-up blocking software packages, and instructions to enable pop-up windows with them. Pop-up windows must be enabled to use the online course. There are dozens
How To Use Moodle Online Class On A Pc Or Mac Or Ipad (For Acedo) On A Computer Or Mac) On Your Computer Or Ipod Or Ipo (For An Ipo) For Acedor Or Mac (
 On A Computer Or Mac) On Your Computer Or Ipod Or Ipo (For An Ipo) For Acedor Or Mac (") Welcome to Stanly Online, This document has been sent to you to supply the information you need to: access our online learning system AND find help, should the need arise Accessing : Your online class
Welcome to Stanly Online, This document has been sent to you to supply the information you need to: access our online learning system AND find help, should the need arise Accessing : Your online class
WorldExtend IronDoor 3.5 Publishing a Terminal Services Application
 WorldExtend IronDoor 3.5 Publishing a Terminal Services Application WorldExtend, LLC. Published: September 2008 Abstract This guide will walk you through the steps required to publish a terminal services
Instructions for Connecting to PACS outside of a Regional Facility
 Instructions for Connecting to PACS outside of a Regional Facility For support, please contact the ehealth Saskatchewan Helpdesk at 1-888-316-7446 Recommended options provide optimal performance 1 The
Remote Desktop access via Faculty Terminal Server Using Internet Explorer (versions 5.x-7.x)
") Remote Desktop access via Faculty Terminal Server Using Internet Explorer (versions 5.x-7.x) Start your Internet Explorer browser and direct it to the faculty home page. Click on the link Remote Access,
Remote Desktop access via Faculty Terminal Server Using Internet Explorer (versions 5.x-7.x) Start your Internet Explorer browser and direct it to the faculty home page. Click on the link Remote Access,
MiraCosta College now offers two ways to access your student virtual desktop.
 MiraCosta College now offers two ways to access your student virtual desktop. We now feature the new VMware Horizon View HTML access option available from https://view.miracosta.edu. MiraCosta recommends
How to Disable Common Pop-Up Blockers
 How to Disable Common Pop-Up Blockers Listed below are some of the more popular Pop-up Blocking software packages and the workarounds that should be followed in order to disable the Pop-Up blocking feature
How to Disable Common Pop-Up Blockers
 How to Disable Common Pop-Up Blockers Listed below are some of the more popular Pop-up Blocking software Packages, and the workarounds in order to disable them to view our Programs. There are literally
Centricity PACS-IW 3.7.3
 GE Healthcare Integrated IT Solutions, Dynamic Imaging Solutions Centricity PACS-IW 3.7.3 Referring Physicians Quick Start Guide This guide includes all the information you need to begin using Centricity
Installing Remote Desktop Connection
 SETTING UP YOUR REMOTE DESKTOP This section will assist you in setting you Remote Desktop Connection. This will allow you to create an icon for easy access to your virtual desktop. DISCLAIMER: All images
Passport installation Windows 8 + Firefox
 Passport installation Windows 8 + Firefox OS Version Windows 8 System Type 32-bit and 64-bit Browser name & version Firefox 23 Before you begin Check you have Anti Virus software installed on your computer
Intelligent Office: Web Optimisation Guide. Published Date: 06/11/2015. Version: 3.3
 Intelligent Office: Web Optimisation Guide Published Date: 06/11/2015 Version: 3.3 Table of Contents System Requirements:... 3 Introduction... 3 Difficulties Logging on to Intelligent Office (io)... 3
vpn.airproducts.com Windows XP Client Configuration
 vpn.airproducts.com Windows XP Client Configuration To successfully connect to the Air Products vpn.airproducts.com website and have full functionality, the client computer needs to have the following
Victoria College Online Course Guide
 Victoria College Online Course Guide DO NOT LOSE THIS GUIDE!! IT CONTAINS IMPORTANT INFORMATION THAT YOU WILL NEED TO HELP YOU ACCESS YOUR COURSE!!! YOU HAVE ENROLLED IN THE FOLLOWING COURSE/COURSES: COURSE
PC Requirements and Technical Help. Q1. How do I clear the browser s cache?
 Q1. How do I clear the browser s cache? A1. Clear your browser's cache, and close all other applications that are running in your PC to free up memory space. For instructions on clearing cache (temporary
Using Remote Desktop to access your Office Computer or Faculty Remote Desktop Server August, 2005 This document consists of two main parts and an
 Using Remote Desktop to access your Office Computer or Faculty Remote Desktop Server August, 2005 This document consists of two main parts and an addendum. The first part will be the steps required to
Click on a link below to navigate this document, or use bookmarks in Adobe.
 Website Instructions Click on a link below to navigate this document, or use bookmarks in Adobe. Logging in and User Registration MyUSG Quoting Online with USLI Quoting Online with RAMP: Century Surety
Citrix Client Install Instructions
 Citrix Client Install Instructions If you are using Citrix remotely, Information Technology Services recommends updating Citrix client to the newest version available online. You must be an administrator
Allianz Global Investors Remote Access Guide
 Allianz Global Investors Remote Access Guide Web Address: http://remote.allianzgi-us.com/ Page 1 of 29 pages Table of Contents 1. Introduction to the Remote Access Page 3 2. Overview of Outlook Web Access
Remote Access Using The New York Eye & Ear Infirmary of Mount Sinai Secure Web VPN
 Remote Access Using The New York Eye & Ear Infirmary of Mount Sinai Secure Web VPN OVERVIEW The New York Eye & Ear Infirmary of Mount Sinai Remote Access (VPN) home page allows remote access to the Infirmary
Windows XP with Symantec AntiVirus 10 Corporate Edition
 NC State University 1 of 7 Windows XP with Symantec AntiVirus 10 Corporate Edition home download free antivirus now windows xp with symantec antivirus 10 corporate edition Install SAV10 on Windows XP only
How to Log in to LDRPS-Web v10 (L10) https://enterprise.strohlservices.com
 https://enterprise.strohlservices.com") How to Log in to LDRPS-Web v10 (L10) https://enterprise.strohlservices.com Contents First Time Login Instructions... 1 1) Use the Internet Explorer (IE) Web browser*... 1 2) Install the.net Framework...
How to Log in to LDRPS-Web v10 (L10) https://enterprise.strohlservices.com Contents First Time Login Instructions... 1 1) Use the Internet Explorer (IE) Web browser*... 1 2) Install the.net Framework...
my.airproducts.com Windows Vista Client Configuration
 my.airproducts.com Windows Vista Client Configuration To successfully connect to the Air Products my.airproducts.com website, the client computer needs to have the following three pieces of software installed
Setting up VPN and Remote Desktop for Home Use
 Setting up VPN and Remote Desktop for Home Use Contents I. Prepare Your Work Computer... 1 II. Prepare Your Home Computer... 2 III. Run the VPN Client... 3-4 IV. Remote Connect to Your Work Computer...
Section 1.0 Getting Started with the Vālant EMR. Contents
 Section 1.0 Getting Started with the Vālant EMR Contents Getting Started with the Valant EMR application:... 2 Hardware Requirements for the Vālant EMR:... 3 Software Requirements for the Vālant EMR:...
SSL VPN Service. Once you have installed the AnyConnect Secure Mobility Client, this document is available by clicking on the Help icon on the client.
 Contents Introduction... 2 Prepare Work PC for Remote Desktop... 4 Add VPN url as a Trusted Site in Internet Explorer... 5 VPN Client Installation... 5 Starting the VPN Application... 6 Connect to Work
Tufts VPN Client User Guide for Windows
 Tufts VPN Client User Guide for Windows Introduction The Tufts Virtual Private Network (VPN) implementation is a service that is provided to the faculty and staff of Tufts University to enable secure access
UMMS SSL VPN Instructions
 UMMS SSL VPN Instructions The document contains the following sections: 1. Introduction 2. Prerequisites 3. Supported software platforms 4. Browser configuration 5. Logon to the UMMS SSL VPN 6. Launching
Remote Terminal Service (RTS) User Guide (Version 2.1)
 User Guide (Version 2.1)") Remote Terminal Service (RTS) User Guide (Version 2.1) Page 1 Table of Content Content Page 1 Introduction 3 2 Prerequisite 3 3 Logon Corporate Network via Internet 4 4 Download and Install RTS Client
Remote Terminal Service (RTS) User Guide (Version 2.1) Page 1 Table of Content Content Page 1 Introduction 3 2 Prerequisite 3 3 Logon Corporate Network via Internet 4 4 Download and Install RTS Client
STEP 1: INSTALLING WINDOWS DEFENDER
 Office of Information Technology Secure your Windows XP Computer for Use on AU s Network Every member of the AU community has a shared responsibility for the safekeeping of our computer network. Since
FAQ. Safe Anywhere PC. Disclaimer:
 FAQ Safe Anywhere PC Version: 1.0 Disclaimer: You can freely use (copy and edit) the information in this document for your own purposes. You may want to replace all references to F-Secure, F-Secure launch
Getting Started with WebEx Access Anywhere
 Getting Started with WebEx Access Anywhere This guide provides basic instructions to help you start using WebEx Access Anywhere quickly. This guide assumes that you have a user account on your meeting
Resolving H202 Errors (INTERNAL)
") Resolving H202 Errors (INTERNAL) Contents Scope and audience.......3 General H202 Error Information...... 3 System Recommendations....4 QuickBooks Multi User Mode - QuickBooks Over a Network......4 QuickBooks
Resolving H202 Errors (INTERNAL) Contents Scope and audience.......3 General H202 Error Information...... 3 System Recommendations....4 QuickBooks Multi User Mode - QuickBooks Over a Network......4 QuickBooks
DUKANE Intelligent Assembly Solutions
 PC Configuration Requirements: Configuration Requirements for ipc Operation The hardware and operating system of the PC must comply with a list of minimum requirements for proper operation with the ipc
DOE VPN Client Installation and Setup Guide March 2011
 DOE VPN Client Installation and Setup Guide March 2011 Table of Contents Introduction... 3 System Requirements... 3 Microsoft Windows... 3 Mac OS X... 4 Windows... 4 Installation for the Cisco AnyConnect
Optimal Internet Explorer v6.0 Settings User Guide
 Optimal Internet Explorer v6.0 Settings User Guide Copyright 1998-2006, E-Z Data, Inc. All Rights Reserved. No part of this documentation may be copied, reproduced, or translated in any form without the
Citrix : Remediation - MAC
 Citrix : Remediation - MAC Key Points: 1. 2. 3. 4. 5. 6. 7. Understanding End Point Scan Analysis Supported anti-virus and firewall products Configuring AVAST/SOPHOS and the Mac OS X Firewall Installing
THE GOVERNMENT OF THE REPUBLIC OF SINGAPORE MINISTRY OF MANPOWER WP ONLINE. Technical Guidelines
 THE GOVERNMENT OF THE REPUBLIC OF SINGAPORE MINISTRY OF MANPOWER WP ONLINE Technical Guidelines Last Updated: 12-July-2013 Content 1. Technical Guidelines... 3 1.1 Minimum PC Configuration... 4 1.2 Internet
Mercy s Remote Access Instructions
 Mercy s Remote Access Instructions ~~~~~~~~~~~~~~ Section A Windows 2000 / XP ~~~~~~~~~~~~~~ I. Install Meditech............................... A1 II. Install VPN Client............................. A3
Getting Started with MozyPro Online Backup Online Software from Time Warner Cable Business Class
 Getting Started with MozyPro Online Backup Online Software from Time Warner Cable Business Class A Guide for Users MozyPro is an online backup service with an easy to use interface so you can start backing
Virtual Office Remote Installation Guide
 Virtual Office Remote Installation Guide Table of Contents VIRTUAL OFFICE REMOTE INSTALLATION GUIDE... 3 UNIVERSAL PRINTER CONFIGURATION INSTRUCTIONS... 12 CHANGING DEFAULT PRINTERS ON LOCAL SYSTEM...
Remote Access (VPN) User Instructions. 1 Printed: 10/10/11
 User Instructions. 1 Printed: 10/10/11") Remote Access (VPN) User Instructions 1 Printed: 10/10/11 2 Printed: 10/10/11 Contents: FIRST TIME REMOTE ACCESS (VPN) USERS... 4 KPASS AND REMOTE ACCESS (VPN)... 5 USING AND INSTALLING REMOTE ACCESS (VPN)...
Remote Access (VPN) User Instructions 1 Printed: 10/10/11 2 Printed: 10/10/11 Contents: FIRST TIME REMOTE ACCESS (VPN) USERS... 4 KPASS AND REMOTE ACCESS (VPN)... 5 USING AND INSTALLING REMOTE ACCESS (VPN)...
The UC Learning Center: Disabling Pop-Up Blockers
 The UC Learning Center: Disabling Pop-Up Blockers In order to launch online courses within the UC Learning Center all pop-up blockers must be turned off. This guide will walk you through disabling pop-up
Remote Access End User Reference Guide for Access to SJLinked Version 1.0 3/11/2014
 Remote Access End User Reference Guide for Access to SJLinked Version 1.0 3/11/2014 Contents Introduction... 2 Installing Citrix Receiver for Windows... 3 Before You Begin... 3 System Requirements... 3
Quick Start. Installing the software. for Webroot Internet Security Complete, Version 7.0
 Quick Start for Webroot Internet Security Complete, Version 7.0 This Quick Start describes how to install and begin using the Webroot Internet Security Complete 2011 software. This integrated suite delivers
Home Agent Installation Manual Windows 8 v1.0
 Home Agent Installation Manual Windows 8 v1.0 By: Leonard Poulin Page 1 Version History Version Date Changes 1 2/16/2014 First release for Windows 8 Page 2 Table of Contents Version History... 2 Installation
Verizon Remote Access User Guide
 Version 17.12 Last Updated: August 2012 2012 Verizon. All Rights Reserved. The Verizon names and logos and all other names, logos, and slogans identifying Verizon s products and services are trademarks
Fuji Synapse PACS Installation Instructions Radiology Specialists of Denver, P.C.
 Fuji Synapse PACS Installation Instructions Radiology Specialists of Denver, P.C. Disclaimer & Synapse Use Agreement... 2 Authenticated Users... 2 Secure Connection to Radiology Specialists of Denver,
How to Use Remote Access Using Internet Explorer
 Introduction Welcome to the Mount s Remote Access service. The following documentation is intended to assist first time or active users with connecting, authenticating and properly logging out of Remote
OfficeSuite CRM Connector Quick Start-Up Guide Version 1.0 May 2013
 OfficeSuite CRM Connector Quick Start-Up Guide Version 1.0 May 2013 i Table of Contents INTRODUCTION AND GETTING STARTED... 1 OPERATING SYSTEM, HARDWARE AND SOFTWARE REQUIREMENTS... 1 Hardware Requirements...
LRDC Computing Services
 LRDC Computing Services Remote Access to the LRDC Fileservers Windows XP* April 5, 2005 *While these instructions have been created for and tested on a Windows XP computer, they may also work for your
Microsoft Internet explorer 7.0 or higher (Except 10), Mozilla Firefox.
, Mozilla Firefox.") Dear Client, Welcome to www.canmoney.in, our portal for online trading. We thank you for choosing us as your trading partner. Our website provides host of services and we have taken adequate care to make
Dear Client, Welcome to www.canmoney.in, our portal for online trading. We thank you for choosing us as your trading partner. Our website provides host of services and we have taken adequate care to make
XStream Remote Control: Configuring DCOM Connectivity
 XStream Remote Control: Configuring DCOM Connectivity APPLICATION BRIEF March 2009 Summary The application running the graphical user interface of LeCroy Windows-based oscilloscopes is a COM Automation
TAMUS Terminal Server Setup BPP SQL/Alva
 We have a new method of connecting to the databases that does not involve using the Texas A&M campus VPN. The new way of gaining access is via Remote Desktop software to a terminal server running here
Windows Server 2003 x64 with Symantec AntiVirus 10 Corporate Edition
 NC State University 1 of 5 Windows Server 2003 x64 with Symantec AntiVirus 10 Corporate Edition home download free antivirus now windows server 2003 x64 with symantec antivirus 10 corporate edition CAUTION:
Welcome to Part 2 of the online course, Spyware and Adware What s in Your Computer?
 Welcome to Part 2 of the online course, Spyware and Adware What s in Your Computer? 1 2 This is the second part of a two-part course on spyware and adware. In this portion of the course we will: Review
Follow the instructions below for first-time users only
 Whittier Law School Law Library Cisco NAC Agent Wireless Installation Guide For Microsoft Windows In order to access the wireless network on campus, Microsoft Windows laptop users must go through the Cisco
Remote Access VPN SSL VPN Access via Internet Explorer
 The following instructions will allow you to access your company network remotely, via your Internet Explorer web browser. 1. Launch Internet Explorer and choose Internet Options from the Tools menu. 2.
Crystal Print Control Installation Instructions for PCs running Microsoft Windows XP and using the Internet Explorer browser
 Crystal Print Control Installation Instructions for PCs running Microsoft Windows XP and using the Internet Explorer browser Important Notice: You must have administrative rights to your PC to perform
User Tutorial on Changing Frame Size, Window Size, and Screen Resolution for The Original Version of The Cancer-Rates.Info/NJ Application
 User Tutorial on Changing Frame Size, Window Size, and Screen Resolution for The Original Version of The Cancer-Rates.Info/NJ Application Introduction The original version of Cancer-Rates.Info/NJ, like
Instructions for Connecting to PACS outside of a Regional Facility
 Instructions for Connecting to PACS outside of a Regional Facility For support, please contact the ehealth Saskatchewan Helpdesk at 1-888-316-7446 Recommended options provide optimal performance The following
How to remotely access your Virtual Desktop from outside the college using VMware View Client. How to guide
 How to remotely access your Virtual Desktop from outside the college using VMware View Client How to guide Author: ICT Services Version: 1.0 Date: November 2015 Contents What is the VMware View Client?...
PLATO Learning Environment System and Configuration Requirements. for workstations. April 14, 2008
 PLATO Learning Environment System and Configuration Requirements Version 1.1 (for use with Academic Systems Algebra only) for workstations April 14, 2008 Windows 2000 Professional with SP4 Windows XP Professional
PLATO Learning Environment System and Configuration Requirements for workstations. October 27th, 2008
 PLATO Learning Environment System and Configuration Requirements for workstations October 27th, 2008 Windows 2000 Professional with SP4 Windows XP Professional with SP2 Windows XP Home Edition with SP2
Information Technology
 Information Technology Symantec Endpoint Protection Download and Installation The packages on the web include virus and spyware protection for 32 and 64 bit Microsoft Windows systems. Minimum system requirements:
BROWSER AND SYSTEM REQUIREMENTS
 BROWSER AND SYSTEM REQUIREMENTS Minimum and Recommended System Requirements To ensure that CSIU Student Information System performs seamlessly, please adhere to the requirements listed in the chart below:
Setting up VPN and Remote Desktop for Home Use
 Setting up VPN and Remote Desktop for Home Use Contents I. Prepare Your Work Computer... 1 II. Prepare Your Home Computer... 2 III. Run the VPN Client... 3 IV. Remote Connect to Your Work Computer... 4
Reference Guide for WebCDM Application 2013 CEICData. All rights reserved.
 Reference Guide for WebCDM Application 2013 CEICData. All rights reserved. Version 1.2 Created On February 5, 2007 Last Modified August 27, 2013 Table of Contents 1 SUPPORTED BROWSERS... 3 1.1 INTERNET
Using the Online ebooks Library. Moray Council Libraries & Information Services. For more information log on to http://moray.libraryebooks.co.
 Using the Online ebooks Library Moray Council Libraries & Information Services For more information log on to http://moray.libraryebooks.co.uk How does the ebooks Service work? Log in to ebooks website
2. Manage the power of the target device
 Please have "MagicConnect user account list" that we sent you upon delivery time be ready at your hand Here, we take OS: Windows 7 Ultimate, Display method: category as a sample for describing this Quick
Login through Citrix
 Login through Citrix You can login to the Citrix Metaframe servers through the following url s: Internally (from Cebeo network): Externally (from f.i. home): Application Site http://cebeofarm/citrix/metaframe