Training Guide For 7960 & 7940 Series Cisco IP Phones
|
|
|
- Barrie Goodwin
- 9 years ago
- Views:
Transcription
1 Training Guide For 7960 & 7940 Series Cisco IP Phones Prepared by: Corporate Technologies, LLC th Street SW, Suite 100 Fargo, ND (701)
")
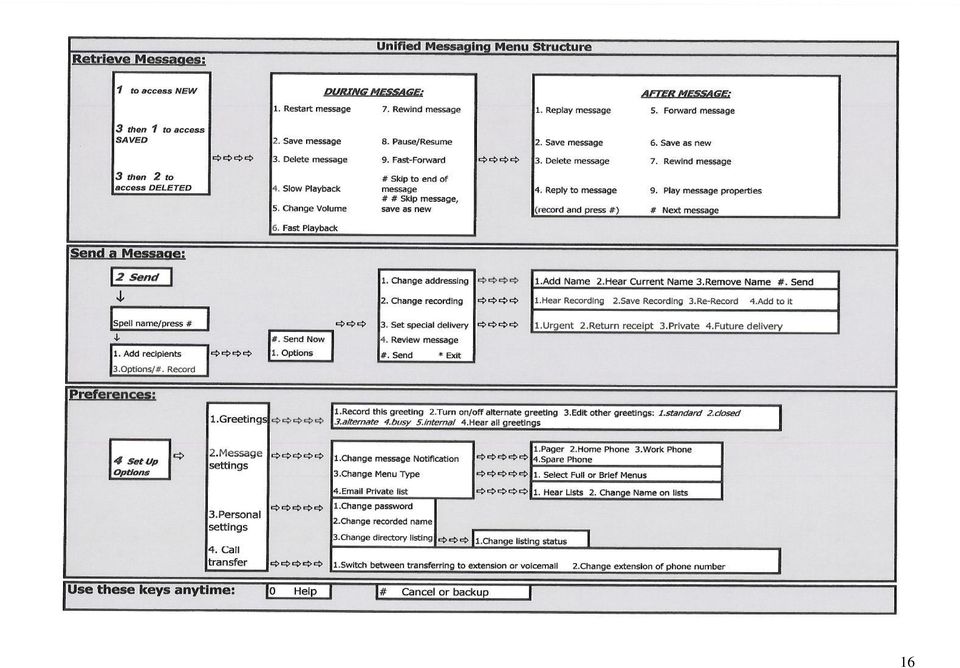
2 Table of Contents: Section I: GETTING STARTED Page 4 A. Connecting your IP phone Page 4 B. Buttons/Descriptions on your phone Page 5-6 C. Additional Information Page 7 Section II: PHONE USE Page 8 A. Placing a call Page 8 B. Answering a call Page 8 C. Ending a call Page 8 D. Transferring a call Page 9 E. Putting a call on hold Page 10 F. DND (do not disturb): Page 10 G. Parking a call Page 10 H. Forwarding your phone Page 11 I. Making Conference calls Page J. Redialing a number Page 12 K. Pick-up Groups Page 12 Section III: INFORMATION FEATURES Page 13 A. Accessing help Page 13 B. Using call Logs and Directories Page 13 C. Viewing/Editing missed, received, & placed calls Page 14 D. Using Corporate Directory Page 14 E. Setting up & Accessing Voic Page F. Telephone Menu Structure Chart Page 16 2

3 Section IV: BROWSER FEATURES Page 17 A. Configure Speed Dials that appear on phone display Page 17 Section V: AUDIO FEATURES Page 17 A. Changing the LCD Contrast Page 17 B. Changing Ring tones Page 18 C. Adjusting the Ring Volume Page 18 D. Adjusting the Handset, Speaker and Headset Volume Page 18 E. Muting a Call Page 18 3

4 Section I: GETTING STARTED A. Connecting your IP phone: 1. Your new Cisco IP Phone will be connected to the network through your computer. The existing network cable connected to your PC needs to be removed from the PC and connected to the middle port (10/100 SW) on your phone. (This cable will go to the network jack on the wall.) The 6 Cat5 cable provided to you will connect your PC and your phone (the outside port marked 10/100 PC). After you have connected your phone, it will go through a set up period. During this time you need to let it go through its boot up without disturbing it. Your phone will be ready to use when the date and time appear on your LCD screen. 4

5 B. Buttons/Description on your phone: 1 Handset with indicator light Functions like a traditional handset. The light strip at the top of the handset blinks when the phone rings and can be set to remain lit when you receive a voice mail message. 2 Phone Screen Displays feature such as the time, date, your phone number, caller ID, line/call status and soft key tabs. If you have programmed speed dial buttons, these will show up next to the button that was programmed. When you are on an active call this area will display current calls per line, including caller ID, call duration, and call state. 3 Model Type Model of your Cisco IP Phone. 4 Programmable buttons Depending on the configuration, programmable buttons provide access to: - Phone lines (Line buttons) - Speed dial numbers (Names show on display) The buttons illuminate to indicate status: Green, Steady---Active call on this line (off hook) Green, Blinking---Call on hold on this line Amber, Steady---Privacy feature enabled 5

6 5 Foot stand adjustment button 6 Directories button Amber, Blinking---Incoming call ringing on this line Red---Shared line, currently in use No Color---No call activity on this line (on hook) Allows you to adjust the angle of the phone base. Open/close the Directories menu. Use it to access call logs and corporate directories Help button Settings button Speaker button Mute button Headset button Volume button Activates the help menu. Displays helpful information about buttons and features. Provides access to phone settings such as contrast and ring sound, network configuration, and status information. Toggles the speaker on or off. Toggles the mute on or off. Toggles the headset on or off. Increases or decreases volume for the handset, headset, or speakerphone. Also controls the ringer volume and the LCD screen contrast. 13 Services button Provides access to any available phone services that have been set up by your system administrator. 14 Messages button Provides access to a message system Navigation button Dial pad Soft keys Enables you to scroll through text and select features displayed on the LCD screen. This button also allows you to toggle between multiple calls on your phone. Works exactly like the dial pad on a traditional telephone. Enable you to engage any of the functions displayed on the corresponding LCD screen tabs. Soft keys point to feature options displayed along the bottom of your LCD screen. 6

7 C. Additional Information: Dial 9 for outside calls. If you move your phone, your individual settings will stay with the phone. Dialing 911 and 9911 will both work. If called on accident remain on the phone and explain so they don t send help. If you move offices you MUST let IT Dept. know so they can make sure they have the correct information for you in case of an emergency so 911 will know the correct location if you called from your phone. To dial internally between two Cisco phones it will be 5-digit dialing. Reminder: Your existing voic s will be gone after your department cuts over to new system. If you want to save any of the numbers or messages please go through them prior to your scheduled cutover date. 7

8 Section II: PHONE USE A. Placing a call: 1. Lift the handset and dial the number; dial the number and lift the handset, OR 2. Press the Speaker button and dial the number; dial the number and press speaker button, OR 3. If using a headset press the Headset button and dial the number; dial the number and press headset button, OR 4. Press the NewCall soft key and dial the number; dial the number and press soft key Dial. **NOTES: Enter a phone number leaving your phone idle. (The auto dial feature might pop up to suggest matching phone numbers from your Placed Calls Log ). You can display phone numbers from your Placed Calls Log by pressing your navigation button. If you make a mistake while entering the phone number, press << to erase one or more digits. Press Cancel soft key to exit the dialing attempt. B. Answering a call: 1. Lift the handset and you are connected to the incoming caller, OR 2. Press the Answer soft key and you are connected to the incoming caller, OR 3. Press the Speaker button and you are connected to the incoming caller, OR 4. If using a headset press the Headset button and you are connected to the incoming caller. To send an incoming call directly to your voic , press the idivert soft key. The incoming call automatically transfers to your voic . When answering a second call, make sure the call you want to answer is highlighted and press Answer soft key. C. Ending a call: 1. Hang up the handset, OR 2. Press the EndCall soft key, OR 3. If using a headset, press the lit Speaker button. 8

9 D. Transferring a call: (Trnsfer/Number/Hang up handset) Transfer redirects a connected call. The target is the number to which you want to transfer the call. Three key steps to remember: 1. Transfer puts the original caller on hold. 2. Enter the number you want to transfer the caller to. 3. Hanging up the handset sends the original call to the number you dialed (transfer recipient). Blind Transfer is transferring a call without talking to the transfer recipient: 1. While on an active call, press the Trnsfer soft key. 2. Enter the number to which you want to transfer the call. 3. When you hear ringing, hang up the handset to complete your transfer. **NOTES: To end the call before the transfer is completed, press EndCall soft key, then Resume soft key to reconnect with the original call. You can transfer the caller to another recipient if the first one didn t answer or send them directly to transfer recipients voic (see below). You must resume the call before you can transfer again. Consult Transfer is announcing the call to the transfer recipient before transferring: 1. While on an active call, press the Trnsfer soft key. 2. Enter the number to which you want to transfer the call. 3. Wait for the transfer recipient to answer the call. Make the announcement of the call. 4. If the recipient accepts the transferred call, tell them to remain online and you ll send the call, hang up handset. 5. If the recipient refuses the call, or if you dialed the wrong number, or don t want to complete the transfer, press EndCall. Press the Resume soft key to return to the original call. To transfer a call directly to the transfer recipients voic 1. During an active call, press the Trnsfer soft key. 2. Press * followed by the extension number of the person you are transferring the call to. 3. Hang up the handset immediately and your call is directed into voic . This won t ring their phone; it goes directly to the greeting. If you don t hang up handset immediately, the beginning of the voic greeting will be cut off. **NOTES: You cannot use Trnsfer to redirect a call on hold. Press Resume, to remove the call from hold, before using the transfer soft key. 9

10 E. Putting a call on hold: When you put a caller on hold, you can only retrieve the call from the phone where it was placed on hold. 1. During the call, press the Hold soft key. 2. To return to the call, press the Resume soft key. **NOTES: You are also able to retrieve calls on hold by pressing the button next to the blinking line on your display. Putting a call on hold will generate hold music or a beeping tone. For this reason, you should not place a call on hold while you are on a conference call. The line button blinks (depending on your phone model), the HOLD icon is animated, and the caller ID text blinks. F. DND (do not disturb): (VCSU anticipates replacing the Mobility soft key with this DND soft key by January 2009) Do Not Disturb disengages the ringer but still passes the caller id so you can see who is calling. If you don t want to be interrupted during a meeting you can set your phone to DND and it will not ring but still flash as calls come in. 1. Leaving your handset down, press DND soft key once to activate (it will tell you it is activated on the bottom of phone screen) 2. Leaving your handset down, press DND soft key once to deactivate (it will tell you it s deactivated) G. Parking a call: Park is an extended hold and is the only way to pick up a call from another extension. You can Park a call and retrieve the call from any phone on your network. 1. During an active call, press the More soft key until you see the Park soft key. 2. Press the Park soft key to park the call. The LCD displays the number where the call has been parked. The phone system assigns the _4_-digit park number. Park range is Make a note of the number displayed and hang up. 4. To retrieve the parked call, go to any phone on your system and dial the number that displayed. You are connected to the party. If the parked call doesn t get picked up, it will ring back to the original phone it was parked at (call back time depends on your system admin setup). 5. If you have a Cisco phone and you want to retrieve a call that was parked on a Legacy phone, dial # (pound)-1-46 and the 4-digit park ext. they give you. 10
, the HOLD icon is animated, and the caller ID text blinks. F.")
11 H. Forwarding your phone: You can use Call Forward All soft key to redirect your incoming calls internally or externally. Enter the Call Forward All target number exactly as you would dial it from your phone if you were calling it. To forward all calls: 1. Press the CFwdALL soft key, and you will hear two beeps. 2. Enter the number to which you want to forward your calls. (Be sure to enter the number exactly as you would if you were placing a call to that number from your office.) Cancel forward all calls: 1. To cancel call forwarding, press the CFwdALL soft key once. **NOTE: To forward your calls directly to voic ; press CFwdALL soft key followed by the Messages button. I. Making conference calls: There are three kinds of conference calls you are able to make with your Cisco IP Phone. 1. Standard or Ad Hoc conference calls: 8 parties total 2. Join Conference calls: 8 parties total 3. Meet Me Conference calls: 8 parties total Standard or Ad Hoc Conference Call: 8 Parties total (yourself and 7 others) 1. During an active call, press the More soft key and then Confrn soft key. This will open a new line while placing the current party or party on hold. 2. Place the call to the next party. 3. When the call connects, press the Confrn soft key again to create a conference. 4. Repeat the first three steps to add additional parties to the conference call. 5. To view a list of the participants in the conference call; press More soft key and press ConfrnList soft key. This will show you all the participants in the conference. The one with the * next to it is the initiator of the conference. This person will also have a Remove soft key listed and is able to remove participants from the conference. Once participants are removed, press the Update soft key to refresh the list of participants. Only the initiator can add and remove participants. Join Conference Call: 8 Parties total (yourself and 7 others) If you have 2 calls on one line (the same extension), you are able to initiate a Join Conference call. 1. Place the first call on hold. (This will happen automatically when you press the soft key Answer ) 2. Answer the 2 nd call. 3. Use the Navigation button to move up to the first call. Make sure it s highlighted. 4. Press the More soft key. 5. Press the Join soft key. 11

12 6. You will now have a three way conference call. 7. If you want to add more participants to the conference call you will need to use the Confrn soft key with the directions above. You are able to use the Conference list with this conference call. Conference call options: To place the conference call on speaker, press the phones Speaker button. To mute a conference call, press the Mute button. We recommend that you don t place a conference call on hold. Initiator Notes: Only the conference initiator can add and remove parties in the conference. If the initiator leaves the conference, no other parties can be added to the conference, and if participants are still online, they can keep talking. For this reason the initiator might want to make sure that all participants are removed before hanging up. The initiator features cannot be forwarded to someone else once the initiator hangs up. J. Redialing a number: 1. Lift the handset and press the Redial soft key, OR 2. Press the Redial soft key without lifting the handset to place a call from the speakerphone. 3. If you press your Navigation key it will also give you a list of the most recent outgoing calls you have made. From this list, whichever number you have highlighted you can dial by lifting the handset or pressing speaker key or soft key Dial. **NOTE: To see a short cut of the last people you dialed, press the Navigation key (up or down) the list will appear. K. Pick-up Group: This doesn t apply to all dept. s but what it allows you to do is answer any phone within your pick-up group from your phone. 1. Lift up your handset, press More soft key 2. Press Pickup soft key (you will see the call on your phone display) 3. Press Answer soft key to answer the call. 12

13 Section III: INFORMATION FEATURES A. Accessing Help: 1. Press the Help button once to view the Main Help Menu 2. Press the Help button twice quickly to view Help Topics 3. Press the Help button followed by any key to display information for that key. Press more soft key & link soft key to get additional information for the button pressed. B. Using Call Logs and Directories: Your phone maintains logs of your missed, placed and received calls. You can use the Directories button to access these records. You can also access a corporate directory and a personal directory. 1. Press the Directories button to view: Missed Calls Received Calls Placed Calls Personal Directory Corporate Directory (entered by system administrator and can not be changed or edited by end users) 2. Use the Navigation button to highlight the item you want to look at. 3. Press the Select soft key OR press the number associated with the item you want to look at on your key pad. 4. To place a call from the directory, highlight the desired number and press the Dial soft key or lift the handset. To edit dial from your history log: 1. Highlight the call that you want to edit. 2. Press the EditDial soft key. 3. The cursor is at the beginning of the number. You can add a 9_ here, OR 4. To delete numbers press the More soft key then Delete. Delete out the numbers that aren t needed to make the call. Or use the << and >> soft keys to delete. To call a local number, you must delete the area code and add a _9_ for an outside line. To dial a long distance number you must add a _9_ followed by 1 for long distance. Press Exit soft key to exit the screen. 13

14 C. Viewing/Editing Missed, Received & Placed Calls: 1. Select either Missed, Received or Placed call logs, 2. Highlight a number, 3. You can do any of the soft key options, delete will delete just the call you have highlighted, clear will delete all the calls in that call log, more and details will give you the details of that call such as caller ID/date/time D. Using The Corporate Directory: 1. Press the Directories button. 2. Use the navigation button to select corporate directory, then press Select soft key or enter 5 on the key pad. 3. Position the cursor on the First Name, Last Name or Number by using the navigation button. 4. Enter the search information. Partial entries are acceptable. You can also search a portion of directory, by pressing the Search soft key and not entering anything above. To enter letters, press a corresponding number key. For example, press 2 key once for an a, twice for a b and three times for a c. The cursor automatically advances between letters. If a mistake is made, press the << key to erase. 5. Press the Search soft key. The LCD screen displays search results. 6. The name that is highlighted can be dialed by pressing the Dial soft key or lifting the handset. 7. You can access the directory list while you are on a live call. This comes in handy if you need to transfer someone and forgot their extension. You can put the caller on hold or keep talking while you find their ext. Write it down, exit to main screen, press Transfr, ext., Transfr. E. Setting up and Accessing Voic To set up your voic from your phone: 1. Press the Messages button. 2. You will be asked to enter your passcode. First time users use default passcode is Followed by #. 3. You are then asked to record your first name and last name, a personal greeting for your callers to hear and to change your passcode to another three up to six digits. If you are at another phone on the system and want to set up your voic 1. Press the Messages button followed by the * key. 2. Enter your extension number; this is your ID number. Your ID number is your 4-digit extension. 3. Enter the default passcode Followed by #. 4. Follow the prompts to record your name, a personal greeting for your callers to hear and then change your passcode to three up to six digits. 14

15 To access voic from your phone when you have a message: The light indicator on your handset will be a solid red when you have a message. The LCD also indicates you have a voic with an envelope icon in the upper right hand corner of the display. 1. Press the Messages button and follow the voice prompt instructions. To access your voic remotely: 1. If you have a DID (Direct Inward Dial), dial your DID number. 2. When you hear your personal greeting, press the * key. 3. Enter your 4-digit extension number when prompted for your ID followed by #. 4. Enter your passcode followed by #. Follow prompts for retrieving your messages. Primary Menu: This is what you will hear after you have entered your passcode. Press 1 to hear new messages. Press 2 to send new messages. (This is to send a message to another user on the voic system, not to change your greeting.) Press 3 to review old messages. Press 4 to access setup options. **Note: You will hear the message first and the time and date it was sent after. If you want to leave someone in the system a voic ; dial their extension and when their greeting starts, press # to skip over their greeting, you will hear the beep and you can record your message right away. *** To call someone s voic without ringing their phone; dial *, Ext., and leave the message this will not ring their phone at all it goes right into the voic greeting. You have Unified Messaging which means you will receive voic s in your Outlook box as well. It will be a wave file attachment. To open you can double click on the wave file and listen to the voic from your computer as long as you have working speakers. From here it is very easy to forward a message to someone else. If you delete your voic in your it will delete it off your phone and vice verse. If you accidentally opened the voic in your it will see it as being read and this will take the red light off of your handset, as it won t be considered new message anymore. If you want to turn the light back on your handset, right click on the message and select mark as unread. This will turn the new message light indicator on again. 15

16 16
17 Section IV: BROWSER FEATURES **NOTE: Browser features are optional features that may be configured by your system administrator. These features take place through Cisco CallManager and the user s PC. No interaction will occur with the IP phone. To log in to access the browser features: Login Name: first name and last name, e.g. John.Smith_ Password: A. Setting up speed dials that appear on your phone display: 1. Click User Options 2. Select Device 3. Click on Speed Dials 4. You will see the list is broken in two: The Speed Dial Settings are the speed dials that will appear on your phone display and The Abbreviated Dial Settings are the speed dials you will not see on your phone display or in the personal directory. You will have to print off the screen to remember the Abbreviated Speed Dial numbers. (If you choose to use these). 5. Under the Number box, enter the number you want assigned to that speed dial just as you would dial it from your phone. No spaces or dashes needed. 6. Under the Label type the name/title you want associated to it. 7. To dial a number in the Abbreviated Dial Settings group you would press the speed dial number on your phone, i.e. press 8 on your key pad and press AbbrDial soft key. 8. The numbers you entered under The Speed Dial Settings will appear on your phone display. To call them, press the round button to the right of the screen. Section V: AUDIO FEATURES A. Changing the LCD Contrast: 1. Press the Settings button. 2. Use the Navigation button to move down to the contrast option or press the corresponding number on the key pad. 3. Press the Select soft key. 4. Press the Up or Down soft key to adjust the contrast OR the Volume button will adjust the contrast too. 5. Press the Ok soft key to accept and save your changes. 17

18 B. Changing Ring Tones: 1. Press the Settings button. 2. Press the Navigate button to highlight USER PREFERENCES, then use the soft key to Select or press the corresponding number on the key pad. 3. Press the Navigation button to move down to RINGS, then use the soft key to Select or press the corresponding number on the key pad. 4. Press the Select soft key to display a list of ring types. 5. Press the Navigation button to scroll through the options. 6. Press the Play soft key to hear a sample of the ring type. 7. Press Select soft key and then press Ok to apply the ring type to your phone. 8. Press Exit to return to the main menu. C. Adjusting the Ring Volume: 1. While the phone is idle, press the Volume button once to hear a sample of the current volume level. 2. Continue to press the Volume button to adjust the level. The new ring volume level is saved until the next time you change it. D. Adjusting the Handset, Speaker and Headset Volume: 1. During an active call, press the Volume button to increase or decrease the volume. 2. Press the Save soft key to save your settings. **NOTE: If you need to lower the volume of the handset, you must be using the handset. If you need to lower the volume on the speaker, you must be using the speaker and so on. E. Muting a call: 1. Press the Mute button. When the Mute is lit red, they cannot hear you but you can hear them. 2. To turn off mute, press the Mute button again. **NOTE: If you are using mute along with the speakerphone, lifting the handset will disengage the mute. You are able to use the MUTE button with the handset, speaker or headset. 18

Quick Start Guide Cisco 7940/7960 IP Telephone
 Quick Start Guide Cisco 7940/7960 IP Telephone Contents: Cisco 7960/7940 IP Phone Feature and Key Overview...2 Basic Features...5 Installing the IP Phone and Connecting to the Network...5 Adjusting the
Quick Start Guide Cisco 7912 IP Telephone
 Quick Start Guide Cisco 7912 IP Telephone Contents: Cisco 7912 IP Phone Feature and Key Overview...3 Basic Features...5 Installing the IP Phone and Connecting to the Network...5 Placing a Call...5 Answering
Napa Valley College Cisco Telephone User Guide
 Napa Valley College Cisco Telephone User Guide Button Legend 1 Programmable buttons Depending on configuration, programmable buttons provide access to: Phone lines (line buttons) Speed-dial numbers (speed-dial
Cisco IP Phone 7960G and Cisco IP Phone 7940G for Cisco IOS Telephony Services
 CHAPTER 1 Cisco IP Phone 7960G and Cisco IP Phone 7940G for Cisco IOS Telephony Services Button Legend The Cisco IP Phone 7960G and the Cisco IP Phone 7940G differ only in the number of available line
End User Phone Training 7945/7965 Reference Guide
 End User Phone Training 7945/7965 Reference Guide Page 1 Navigation (Scroll) The user may display his/her last calls out using the blue navigation button. Please note that the phone handset will display
Welcome to Cisco s IP Telephony Phone and Voice Mail Training
 Welcome to Cisco s IP Telephony Phone and Voice Mail Training Last Updated: June 2010 Features and Benefits Full-feature Telephone Provides voice communication over your Data network Phone number moves
Training Guide for Cisco IP Phones 7940/7960
 Training Guide for Cisco IP Phones 7940/7960 LCD Display Indicator Light Foot Stand Adjustment Line Keys Soft Keys Navigation button 1 2 3 4 5 6 7 8 9 * 0 # i Menu buttons Volume Control Sound Control
Cisco IP Phone 7941 and 7961 User Guide
 Cisco IP Phone 7941 and 7961 User Guide Depending on configuration, programmable buttons provide access to: Phone lines (line buttons) Speed-dial numbers (speed-dial buttons) 1 The buttons illuminate to
Table Of Contents. Installation and Safety. Cisco IP Phone 7960 Features. Cisco IP Phone 7960 Operation. Conference Calls
 Table Of Contents Installation and Safety Installing the Cisco IP Phone 7960 Cisco IP Phone 7960 Features Accessing Online Help Cisco IP Phone 7960 Operation How to Use the Handset, Headset, and Speakerphone
If you are having a problem or technical issue regarding your IP Telephone, please call the UAA IT Call Center at 907.786.4646
 If you are having a problem or technical issue regarding your IP Telephone, please call the UAA IT Call Center at 907.786.4646 1 Physical Layout. 3-4 Connecting Your Phone. 5 Adjusting the Handset Rest
Cisco VoIP 79XX Phones Reference Guide ICIT Technology Training and Advancement [email protected]. Updated on 7/11/2014
 Cisco VoIP 79XX Phones Reference Guide ICIT Technology Training and Advancement [email protected] Updated on 7/11/2014 1 TABLE OF CONTENTS 2 Phone Overview... 4 2.1 Phone Terms... 5 3 Operating Your Phone...
Cisco IP Phone Models 7941 and 7945 Quick Reference Guide December 23, 2011
 Emergency Calls Dial 911 or 3 911 Cisco IP Phone Models 7941 and 7945 Quick Reference Guide December 23, 2011 Place a Call Lift handset (or press the Speaker button, the line button, or New Call soft key)
Setting up & using your IP Telephone
 Setting up & using your IP Telephone Version: 1.8 Last Edited: 09/02/15 Welcome to your new IP Telephone! In order to help you get acquainted with your new phone this helpsheet provides a basic description
Using the Cisco IP Phone System
 Using the Cisco IP Phone System Chapter 0 The Cisco IP Phones 7970 and 7960G are full-feature telephones that provide voice communication over the same data network that your computer uses, allowing you
IP Phone System: Cisco 7960G and 7940G
 IP Phone System: Cisco 7960G and 7940G Table of Contents: IP Phone System 7940G and 7960G CISCO IP PHONE ROAD MAP...1 NAVIGATE THE PHONE SYSTEM AND USE THE LCD SCREEN...2 SOFT KEYS... 2 USE THE NAVIGATION
Cisco IP Phone Training 8/26/15
 Cisco IP Phone Training 8/26/15 Using your Phone This document will provide information on the following: Introduce you to your phone Place, transfer, forward, park and pick up a call Set voice mail passwords
CISCO IP 7962 Series QUICK REFRENCE
 CISCO IP 7962 Series QUICK REFRENCE 1. Programmable Buttons 2. Phone Screen 3. Foot stand Button 4. Messages Button 5. Directies Button 6. Help Button 7. Settings Button 8. Services Button 9. Volume Button
1. Primary Phone Line 2. Programmable Button Indicators 3. Soft Key Labels 4. Status Line 5. Call Activity Area 6. Phone Tab 7.
 CISCO IP 7975 Series QUICK REFRENCE 1. Programmable Buttons 2. Foot stand Button 3. Display Button 4. Messages Button 5. Directies Button 6. Help Button 7. Settings Button 8. Services Button 9. Volume
Quick Start Guide. Cisco 7940/7960. IP Telephone
 Quick Start Guide Cisco 7940/7960 IP Telephone Quick Start Guide Cisco 7940/7960 IP Telephone CONTENTS CISCO 7960/7940 IP PHONE FEATURE AND KEY OVERVIEW... 3 BASIC FEATURES... 5 Installing the IP Phone
CISCO IP PHONE 6945 Series User Guide
 CISCO IP PHONE 6945 Series User Guide Notes Page 15 VOICE MAIL Setting up Voice Mail for the First Time: Press the messages key on your phone. Follow the recorded instruction to record your name, record
VoIP Phone System. South Central College VoIP User Guide
 VoIP Phone System South Central College installed a new high tech phone system in July of 2005. This system communicates across the network rather than using traditional phone wiring. The technology, known
User Guide for Cisco Unified IP Phones 7961G and 7941G
 User Guide for Cisco Unified IP Phones 7961G and 7941G Common Phone Tasks Softkey Definitions View online help on the phone Press. Place a call Redial a number Switch to the handset during a call Switch
Cisco IP Phone 7942 User Training Guide
 Cisco IP Phone 2 User Training Guide 1 1 Key to the Cisco 2: 1 2 = Line Buttons = Foot Adjust Button = Message Button = Mute Button = Headset Button = Volume Button = Directories Button = Help Button =
Information Systems Cisco 7945 IP Phone Quick Reference Guide
 Information Systems Cisco 7945 IP Phone Quick Reference Guide Contents Cisco 7945 IP Phone Quick Reference Guide Contents Page 2 Introduction 3 Overview of Phone 3 How Do I: 4 Place a Call? 4 Put a Call
Information Systems Cisco 7940/7942 IP Phone Quick Reference Guide
 Information Systems Cisco 7940/7942 IP Phone Quick Reference Guide Contents Page: Cisco 7940/7942 IP Phone Quick Reference Guide Contents 2 Introduction 3 Phone Overview 3 How Do I: 4 Place a Call? 4 Put
Information Systems Cisco 7965 IP Phone Quick Reference Guide
 Information Systems Cisco 7965 IP Phone Quick Reference Guide Contents Cisco 7965 IP Phone Quick Reference Guide Contents Page 2 Introduction 3 Overview of Phone 3 How Do I: 4 Place a Call? 4 Put a Call
CISCO IP PHONE MODEL 7960 & UNITY VOICEMAIL. Getting Started Manual
 CISCO IP PHONE MODEL 7960 & UNITY VOICEMAIL Getting Started Manual... 3 Getting Started... 3 Using LCD Icons... 3 Using the IP Phone Configuration Utility... 3 Tips... 3 How to Use the Handset, Speakerphone,
IP Phone Training. University Information Technology Services. uits.arizona.edu. Revised 05-26-2010
 IP Phone Training Revised 05-26-2010 Know Your IP Phone 1) Line/speed dial buttons 2) Foot stand adjustment 3) Display button 4) Voice Mail button 5) Directories button 6) Help button 7) Settings button
St. Paul Public Schools. IP Phone Quick Reference Guide
 St. Paul Public Schools IP Phone Quick Reference Guide Phone Operations Place a Call Internal call: dial the 5-digit extension number External call: dial 9 + the number Pick up the Handset, press the line
Cisco 7941 / 7961 IP Phone User Guide
 Cisco 7941 / 7961 IP Phone User Guide Emergency To dial 911 for emergency service, you must dial the Outside Access Digit first (usually 9) + 911. Customer Service / Technical Support (919) 459-2300, option
Cisco 7912 Users Guide
 Cisco 7912 Users Guide Cisco IP Phone 7912 Road Map to your Cisco IP Phone 1 2 LCD Screen Cisco IP Phone series type 3 Soft Keys 4 5 6 Navigation button Menu Button Hold Button 7 Dial Pad Volume 8 Button
How To Use A Cisco Phone On A Cell Phone On An Ipod Or Ipod (For A Cell) On A Pc Or Ipo (For An Ipo) On An Iphone Or Ipok (For Pc Or Mac)
 On A Pc Or Ipo (For An Ipo) On An Iphone Or Ipok (For Pc Or Mac)") Cisco IP Communications Solutions End User Training Course Outline Introducing your IP phone Using common telephone features Using telephone feature buttons Voicemail Cisco 7942 Model This full-featured
Cisco IP Communications Solutions End User Training Course Outline Introducing your IP phone Using common telephone features Using telephone feature buttons Voicemail Cisco 7942 Model This full-featured
IP Phone 7941/7961 User Manual
 IP Phone 7941/7961 User Manual IP Phone User Manual IP Phone User Manual...2 IP Phone Introduction...3 Setting Up Your IP Phone...3 Locating Buttons and Hardware...5 Using Help on Your Phone...7 Choosing
Quick Start Guide Cisco 7911 IP Telephone
 Quick Start Guide Cisco 7911 IP Telephone CONTENTS CISCO 7911 IP PHONE FEATURE AND KEY OVERVIEW... 3 BASIC FEATURES... 5 Installing the IP Phone and Connecting to the Network... 5 Placing a Call... 5 Answering
7971 Basic Phone Overview
 7971 Basic Phone Overview 1 Programmable buttons Configurable buttons that provide access to various phone features 2 Footstand button Allows you to adjust the angle of the phone base. Awakens the touchscreen
Cisco 7940/7960 IP Phone Quick Reference Guide
 Cisco 7940/7960 IP Phone Quick Reference Guide Phone Operations Place a Call Internal call: dial the extension number External call: dial 9 + the entire 7 or 10-digit phone number for a local call, or
PHONE & VOICEMAIL- REFERENCE GUIDE
 Information Technology PHONE & VOICEMAIL- REFERENCE GUIDE INTRODUCTION The following guide is designed as a reference guide for the Cisco Model 7960 phone system. Figure 1 Cisco Model 7960 Phone COMMON
Getting to Know Your Cisco VoIP Phone 303G, 504G, 508G and 514G
 Getting to Know Your Cisco VoIP Phone 303G, 504G, 508G and 514G Getting to know your new phone is easy. This guide will help you get started. You ll learn how to: Use the feature buttons Navigate your
CISCO IP Phone 7942-7962
 CISCO IP Phone 7942-7962 PHONE / EXTENSION NUMBERS - Internal 5-digit extension numbers - 13000 to 13199 (Non-DID) - 73000 to 73199 (DID s) - External 7-digit phone numbers (DID Direct Inward Dial) - 687-3000
2 Session buttons. 1 Phone Screen
 1 Phone Screen 2 Session buttons Shows information about your phone, including directory number (extension), call information (for example caller ID, icons for an active call or call on hold) and available
Cisco Unified Communications System End-User Guide
 Cisco Unified Communications System End-User Guide Version 1.0 Revised 11/19/2012 Customized for East Orange School District Note: Information in this document is drawn from Cisco documentation. These
Cisco IP Phone 7960 / 7940 Quick Reference Guide
 Cisco IP Phone 7960 / 7940 Quick Reference Guide CONTENTS CALLS... 5 Placing a Call... 5 Dialing... 5 Answering a Call... 5 Ending a Call... 5 Muting a Call... 5 Placing a Call on Hold... 5 TRANSFERS...
Cisco Unified Communications System End-User Guide
 Cisco Unified Communications System End-User Guide Version 1.0 Revised July 25, 2012 Customized for Neptune School District Note: Information in this document is drawn from Cisco documentation. These guides
Operating Your Cisco IP Phone Quick Reference Guide. Basic Operations: Answering, Ending and Placing a call
 Operating Your Cisco IP Phone Quick Reference Guide Basic Operations: Answering, Ending and Placing a call Answer a Call End a call Place a Call Using the handset Using the handset To get a dial tone:
Cloud Voice Service. Cisco Unified IP Phone 7942G User Guide. (Version 1.0)
") Cisco Unified IP Phone 7942G User Guide (Version 1.0) Table of Content 1. Phone Set Features and Functions... 2 1.1 Operation for IP Phone 7942G... 3 1.2 Adjusting the Height of the Footstand... 4 2. Preference
Cisco Unified IP Phone 7942G User Guide (Version 1.0) Table of Content 1. Phone Set Features and Functions... 2 1.1 Operation for IP Phone 7942G... 3 1.2 Adjusting the Height of the Footstand... 4 2. Preference
Cisco Unified IP Phone 6945 User Guide for Cisco Unified Communications Manager Express Version 8.8 (SCCP)
") Cisco Unified IP Phone 6945 User Guide for Cisco Unified Communications Manager Express Version 8.8 (SCCP) First Published: July 22, 2011 Last Modified: July 22, 2011 Americas Headquarters Cisco Systems,
Cisco Unified IP Phone 6945 User Guide for Cisco Unified Communications Manager Express Version 8.8 (SCCP) First Published: July 22, 2011 Last Modified: July 22, 2011 Americas Headquarters Cisco Systems,
CISCO IP PHONE MODEL 7960 & UNITY VOICEMAIL INCLUDES IPMA ASSISTANT CONSOLE & CONFERENCE CONNECTION. Getting Started Manual
 CISCO IP PHONE MODEL 7960 & UNITY VOICEMAIL INCLUDES IPMA ASSISTANT CONSOLE & CONFERENCE CONNECTION Getting Started Manual... 4 Getting Started... 4 Using LCD Icons... 4 Using the IP Phone Configuration
South College VOIP Phone Training
 South College VOIP Phone Training Some of the components of your new telephone system are Cisco IP phones (Series 7945/7962), Call Manager and Unity Express Voice Mail. Some employees will have 7945/7962
CISCO SMALL BUSINESS PRO IP PHONE
 CISCO SMALL BUSINESS PRO IP PHONE For Models: SPA501G, SPA502G, SPA504G, SPA508G, and SPA509G Business Communications Solutions 9910 Irvine Center Drive Irvine, CA 92618 www.bcsconsultants.com [ m ] 949.333.1000
Cisco 8851. Dial Plan. Feature and Session Buttons. Your Phone
 Cisco 8851 Dial Plan Internal Calls: Dial 5-digit extension External Calls: Domestic/Local: 9+1 Area Code + Number Int l: 9+011+Country Code + Number Emergency: 9+911 or 911 Your Phone 1. Incoming call
Cloud Voice Service Cisco Unified IP Phone 6921 User Guide. (Version 1.0)
") Cisco Unified IP Phone 6921 User Guide (Version 1.0) Table of Content 1 Phone Set Features and Functions... 3 1.1 Operation for IP Phone 6921... 3 2 Location of Control... 4 3 Preference Setup... 6 3.1
Cisco Unified IP Phone 6921 User Guide (Version 1.0) Table of Content 1 Phone Set Features and Functions... 3 1.1 Operation for IP Phone 6921... 3 2 Location of Control... 4 3 Preference Setup... 6 3.1
Cloud Voice Service Remote Extension for Cisco Unified IP Phone 7942G User Guide
 Cloud Voice Service Remote Extension for Cisco Unified IP Phone 7942G User Guide (Version 1.0) Table of Content 1. Phone Set Features and Functions... 2 1.1 Setup the IP Phone... 3 1.2 Adjusting the Height
Cisco VoIP 8961/9951/9971 Phones Reference Guide ICIT Technology Training and Advancement [email protected]
 Cisco VoIP 8961/9951/9971 Phones Reference Guide ICIT Technology Training and Advancement [email protected] Updated on 8/1/2014 TABLE OF CONTENTS Phone Overview... 4 Phone Terms... 5 Operating Your Phone...
Ipiphony Phone System. User Manual. 1 P a g e
 Ipiphony Phone System User Manual 1 P a g e About this Guide This guide explains how to use the basic features of your new Aastra phones. Not all features listed are available by default. Contact your
Cisco IP Phones 7942G and 7962G
 1 Cisco IP Phones 7942G and 7962G USER GUIDE The Cisco Telephone System- The Cisco Unified Communications System is widely known in the Information Technology (IT) industry as a Voice-over-IP (VoIP) Telephone
Cisco Phone Overview. Voicemail: Internal Hit messages (Envelope) button or dial 10000
 button or dial 10000") Cisco Phone Overview Providence School Department extensions are 5 digits. Dial 8 to place an outside call. Voicemail: Internal Hit messages (Envelope) button or dial 10000 To place a call, choose one
Cisco Phone Overview Providence School Department extensions are 5 digits. Dial 8 to place an outside call. Voicemail: Internal Hit messages (Envelope) button or dial 10000 To place a call, choose one
CISCO UNIFIED COMMUNICATIONS MANAGER EXPRESS 7.1 USER GUIDE
 CISCO UNIFIED COMMUNICATIONS MANAGER EXPRESS 7.1 USER GUIDE For Unified IP Phone 7931 Business Communications Solutions 9910 Irvine Center Drive Irvine, CA 92618 www.bcsconsultants.com [ m ] 949.333.1000
Place a call using the handset Pick up the handset and enter a number. An Overview of Your Phone, page 8 Place a call using the speakerphone
 Basic Call Handling You can perform basic call-handling tasks using a range of features and services. Feature availability can vary; see your system administrator for more information. Placing a Call Basic
7921G Wireless IP Telephone User Guide
 7921G Wireless IP Telephone User Guide Deerfield Public Schools District 109 Line Definitions: 1. Line 1 Personal Line 4. Press the EXIT soft key twice to exit the Directory menu. Placing a Call: 1. Dial
Overview of IP Phone. 1 Handset Pick up to place or answer a call. 2 Message Waiting Indicator
 Overview of IP Phone 1 Handset Pick up to place or answer a call. 2 Message Waiting Indicator Displays solid red when you have a new voice mail message. Flashes red during an incoming call. 3 LCD Screen
Using the Cisco IP Phone 7940/7960
 CHAPTER 3 Using the Cisco IP Phone 7940/7960 Your Cisco IP Phone 7940/7960 provides features you might not have had before on an office phone. You can learn how to use these features by exploring the available
CISCO IP PHONE MODEL 7960 & UNITY VOICEMAIL INCLUDES CISCO CALLMANAGER ATTENDANT CONSOLE. Getting Started Manual
 CISCO IP PHONE MODEL 7960 & UNITY VOICEMAIL INCLUDES CISCO CALLMANAGER ATTENDANT CONSOLE Getting Started Manual... 3 Getting Started... 3 Using LCD Icons... 3 Using the IP Phone Configuration Utility...
Basic Training Syllabus
 Mastering the ShoreTel IP Communication System Basic Training Syllabus Personal Call Manager - P a g e 1 Objectives of the class: Understanding new technology can at times appear challenging. However,
City University VoIP Quick Reference Cisco IP Phone 7945, 7971-7975
 For enquiries and service appointment, please call CSC Help Desk at 3442 7658 Warning: Do not unplug, remove or change the location of IP phone yourself. Otherwise, network interruption may be resulted.
For customers in AL, FL, GA, KS, SC, TN. wowforbusiness.com MATRIX USER GUIDE. For Cisco SPA504 & SPA509 IP Phones MGCP.U.1304.O
 wowforbusiness.com MATRIX USER GUIDE For Cisco SPA504 & SPA509 IP Phones MGCP.U.1304.O Matrix User Guide Table of Contents Getting Started...3 CommPortal...3 Support...3 Understanding Your Phone s Lines
Cisco VoIP 8941/8945 Phones Reference Guide ICIT Technology Training and Advancement [email protected]
 Cisco VoIP 8941/8945 Phones Reference Guide ICIT Technology Training and Advancement [email protected] Updated on 7/31/2014 TABLE OF CONTENTS Phone Overview... 4 Phone Terms... 5 Operating Your Phone...
Quick Reference Book. Cisco 7940 & 7960 Series IP Phones. Business Feature Set T6000 Release 6.0 SCCP Protocol
 Quick Reference Book Cisco 7940 & 7960 Series IP Phones Business Feature Set T6000 Release 6.0 SCCP Protocol 2007 Red Gap Communications, Inc. All rights reserved. Revision 20070309 Important Phone Numbers
Cisco 7900 Series IP Phone
 Main Menu 1. Phone Parts Stand Adjustment button Ring/Voicemail indicators Programmable buttons Soft Keys Navigation Wheel Volume Button Speaker Button Mute Button Headset Button 2. Line Appearance Colors
CISCO UNIFIED COMMUNICATIONS MANAGER EXPRESS 7.1 USER GUIDE
 CISCO UNIFIED COMMUNICATIONS MANAGER EXPRESS 7.1 USER GUIDE For Unified IP Phones 7905G, 7912G, 7906G, 7911G, 7940G, 7960G, 7941G, 7961G Business Communications Solutions 9910 Irvine Center Drive Irvine,
OneSolutions Hosted IP PBX Cisco IP Phone Training
 OneSolutions Hosted IP PBX Cisco IP Phone Training Download the Service User Guides at: http://www.onecommunications.com/knowledgecenter.aspx?id=4704 2009 One Communications. The One Communications logo
Basic Features. Placing a Call. Answering a Call. Ending a Call. Placing a Call on Hold. Redialing a Call. Press the Phone button. Dial the number.
 Basic Features Placing a Call Press the Phone button. Dial the number. Answering a Call Press the Phone button or the Answer softkey. The active call appears in the active call list in the LCD screen.
Guide to using your CISCO IP 6941 phone at Imperial College
 Cisco IP Phone 6941 Cisco IP 6941 Phone Screen 1. Header Displays date, time and extension number 2. Programmable feature button - Shows feature button programming depending on your confi guration 3. Primary
Cisco IP Phone Training
 Cisco IP Phone Training TRAINING OVERVIEW Cisco IP Phone & Agent Training Cisco IP Phone 7821, 8831, 8851 Call Control Features Button review User Options How is my phone connected? Voicemail Cisco IP
Phone System Guide Handout
 Phone System Guide Handout Union Institute & University September 2012 Rev 1 9/6/2012 1 Contents Union Institute & University... 1 Introduction... 4 Section 1 Phone System Voicemail:... 5 Section 2 Phone
Cisco IP 7961 Telephone & Unity Voicemail User s Guide
 Cisco IP 7961 Telephone & Unity Voicemail User s Guide Office of Information Technology Telecommunications and Network Operations Table of Contents General Information...1 Understanding Lines vs. Calls...2
Quick Reference Guide
 Dialing Plan Fill in these important numbers for your dialing plan. Cisco IP 8941/8945 Phone for ADP Network Phone Enterprise Quick Reference Guide Number Description My Direct Dial or Extension Operator/Attendant
Overview of IP Phone Notes:
 Overview of IP Phone 1 Handset Pick up to place or answer a call. 2 LCD Screen Displays date and time, phone station name, line extensions, and soft key options. 3 Line Keys/Additional Line Keys Indicates
Cisco IP Phone User Guide
 Cisco IP Phone User Guide CONTENTS DISPLAY CONTRAST SETTINGS... 4 CHOOSE RING TONE... 4 SET RING VOLUME... 5 SET RECEIVER VOLUME... 5 SET SPEAKER VOLUME... 6 SETUP VOICE MAIL... 6 MAKE CALLS... 6 CALLS
VoIP Handset User Manual. Digital Voice Quality Business Grade Handset Easy Plug & Play
 Digital Voice Quality Business Grade Handset Easy Plug & Play Table of Contents 1.0 Getting Started... 1 1.1 Unpacking the box... 1 1.2 Assembling the Phone... 2 2.0 Phone Button Features... 3 3.0 Phone
Quick Start Guide (79xx Series Offices)
") Quick Start Guide (79xx Series Offices) Congratulations on your new phone!! GCSD has upgraded the entire phone system to a modern VOIP (voice over Internet Protocol) system. The biggest things to be aware
Quick Start Guide (79xx Series Offices) Congratulations on your new phone!! GCSD has upgraded the entire phone system to a modern VOIP (voice over Internet Protocol) system. The biggest things to be aware
Avaya 9608 IP Phone Quick Reference User Guide
 Avaya 9608 IP Phone Quick Reference User Guide The phone supports 24 programmable call appearance/feature buttons. The labels for these are displayed in the main display and can be controlled by the adjacent
Quick start guide to your IP phone
 Quick start guide to your IP phone IP Phone Models SPA501G, SPA502G, SPA504G, SPA508G, and SPA509G Welcome Thank you for choosing the Cisco Small Business IP Phone. This guide describes how to install
CISCO 7912 TELEPONE USER GUIDE
 Release 5.6.2 CISCO 7912 TELEPONE USER GUIDE WWW www.tekelec.com Tekelec, Inc. 3605 E. Plano Parkway, Suite 100 Plano, TX 75074 2005 Tekelec, Inc. All rights reserved. T100, T300, T6000, T7000, T8000,
How To Use A Cell Phone On A Sim Sims 2.2 (Sprinting) And Sims 1 (Cell Phone) With A Sims 3.2.2 On A Iphone Or Ipod) With An Ipod
 And Sims 1 (Cell Phone) With A Sims 3.2.2 On A Iphone Or Ipod) With An Ipod") LINKSYS SPA941 / SPA942 User Guide Emergency To dial 911 for emergency service, you must dial the Outside Access Digit first (usually 9) + 911. Customer Service / Technical Support (919) 459-2300, option
LINKSYS SPA941 / SPA942 User Guide Emergency To dial 911 for emergency service, you must dial the Outside Access Digit first (usually 9) + 911. Customer Service / Technical Support (919) 459-2300, option
THE EWING PUBLIC SCHOOLS. CISCO VoIP TELEPHONY UNITY VOICE MAIL INSTRUCTIONS TIPS AND SHORTCUTS
 THE EWING PUBLIC SCHOOLS CISCO VoIP TELEPHONY UNITY VOICE MAIL INSTRUCTIONS TIPS AND SHORTCUTS Any questions or concerns, or if any part of your phone is broken and needs to be replaced, enter a ticket
How To Use A 9608 Phone On A Cell Phone On Sim Sims 2 (Satellite) On A Sims 3 (Cell Phone) On An Iphone Or Ipad Or Ipa 2 (Cellphone) On Sims 4
 On A Sims 3 (Cell Phone) On An Iphone Or Ipad Or Ipa 2 (Cellphone) On Sims 4") AVAYA 9608 SIP DESKPHONE INSTRUCTIONS MESSAGE WAITING INDICATOR YOUR PHONE 9608 PHONE INSTRUCTIONS If there are messages in your Avaya Voice Mailbox, the light on the top right corner of your telephone
AVAYA 9608 SIP DESKPHONE INSTRUCTIONS MESSAGE WAITING INDICATOR YOUR PHONE 9608 PHONE INSTRUCTIONS If there are messages in your Avaya Voice Mailbox, the light on the top right corner of your telephone
TABLE: The 2420 Telephone Components
 2420 Telephone TABLE: The 2420 Telephone Components 1. Display, Call Appearance and Feature buttons: Call Appearance Keys allow the user to handle multiple calls and the display shows call information.
State of Illinois Central Management Services. Training provided to you by Netech Corporation
 State of Illinois Central Management Services Training provided to you by Netech Corporation The phone Basic Calling Functions Making calls, transferring calls Features Call Logs, Corporate Directory Video
User Guide. IP Multimedia 1110, 1120, 1140 & 1150 phones
 User Guide IP Multimedia 1110, 1120, 1140 & 1150 phones Content 1. IP Phone buttons & usage 2. Logging on / off your IP Phone 3. Changing your password 4. Making a call 5. Receiving a call 6. Placing a
Instructions for using your Cisco IP phone
 Instructions for using your Cisco IP phone 877-PC MYCLOUD 7777 on your phone 2 CBV User Guide We are pleased to welcome you to the Chicago Business VOIP community. Everything you need to access your new
9608/9611 IP Phone User Guide
 CTI INSIGHT www.cons ol tech.com 9608/9611 IP Phone User Guide Answering and Making Calls Placing a call Lift the handset and dial the number. Answering a call Lift the handset If you are using a headset,
Polycom SoundPoint 650 Quick Guide
 Polycom SoundPoint 650 Quick Guide ISC Networking & Telecommunications University of Pennsylvania October 2009, v.2 Contents Icons and Indicator Lights Telephone Icons 4 Envelope/Message Waiting Icon.4
Cisco 7940/7960 User Guide. Cisco 7940/7960 User Guide
 Cisco 7940/7960 User Guide Table of Contents Table of Contents...2 Introduction...3 The Cisco 7940/7960 IP Phone... 3 Web Portal...3 Telephony Toolbar...3 Document Format...4 Feature Functionality...5
Cisco IP Phone 7912G in SR04 SR08
 There are two types of IP phone being used in the Student Residence, Jockey Club House and To Yuen Building: Cisco IP Phone 7910 in SR01 SR03, Jockey Club House and To Yuen Building Cisco IP Phone 7912G
Polycom 2-Line Desk Phone Quick Reference Guide
 Polycom 2-Line Desk Phone Quick Reference Guide ACC-1142 PUG Table of Contents INTRODUCTION TO YOUR POLYCOM 2-LINE DESK PHONE... 2 WELCOME... 2 DESK PHONE... 2 HOW TO USE YOUR POLYCOM 2-LINE DESK PHONE...
VoIP User Guide UCLA INFORMATION TECHNOLOGY SERVICES
 VoIP User Guide UCLA INFORMATION TECHNOLOGY SERVICES 1 Introduction This guide covers the features that are available with the VoIP telephone system. IT SERVICES 741 Charles E. Young Drive South (CSB 1,
" (877)MY T4 TEL " " " " " " " (877)698-4835
MY T4 TEL (877)698-4835") Display Features The display on your phone is interactive. As you use the phone the information will change and different features and functions will appear on the display. The 8 buttons above the display
Display Features The display on your phone is interactive. As you use the phone the information will change and different features and functions will appear on the display. The 8 buttons above the display