SurfCop for Microsoft ISA Server. System Administrator s Guide
|
|
|
- Gavin Butler
- 10 years ago
- Views:
Transcription

1 SurfCop for Microsoft ISA Server System Administrator s Guide

2 Contents INTRODUCTION 5 PROGRAM FEATURES 7 SYSTEM REQUIREMENTS 7 DEPLOYMENT PLANNING 8 AGENTS 10 How It Works 10 What is Important to Know about Agent? 11 ISA Server Enterprise Edition 12 Local IP addresses 12 Configuring Agent 14 Global Settings 14 Protocol Calibration 16 Migration Wizard 16 SurfCop Rules 18 Rules Evaluation Order 18 Quota Rules 18 How It Works 19 Traffic Counters 22 Time counters 23 Personal Web Statistics 24 Useful Information 25 Bandwidth Rules 26 How It Works 26 Speed Counters 29 Web Access Rules 31 Global Web Access Policy 32 Web Access Rules 36 How It Works 36 Useful Information 39 Advanced Rule Conditions 40 DATA CENTER 42 General settings 43 Active Directory 43 2

3 44 Data Storage 45 SQLite 49 Microsoft Access 50 Microsoft SQL Server 61 MySQL 75 PostgreSQL 85 Oracle 94 Alias Management 105 Converters 106 Value Lists 107 License Management 109 Licensing Schema 109 License Activation 111 Licensed Objects 114 Licensing Restrictions 114 Urls Database 115 MONITORING 116 Reports 117 Report Generation 117 Report Sections 126 Repository 128 Report Generator Task Bar 129 Task Manager 131 Summaries 142 Quota Monitor 146 Activity Monitor 151 How It Works 151 Configuring Activity Monitor Layout 155 Useful Information 158 Bandwidth Monitor 159 TROUBLESHOOTING 164 PRACTICAL RECOMMENDATIONS FOR SOFTWARE CONFIGURATION 166 Scenario Scenario Scenario

4 Scenario Scenario Scenario Scenario Scenario

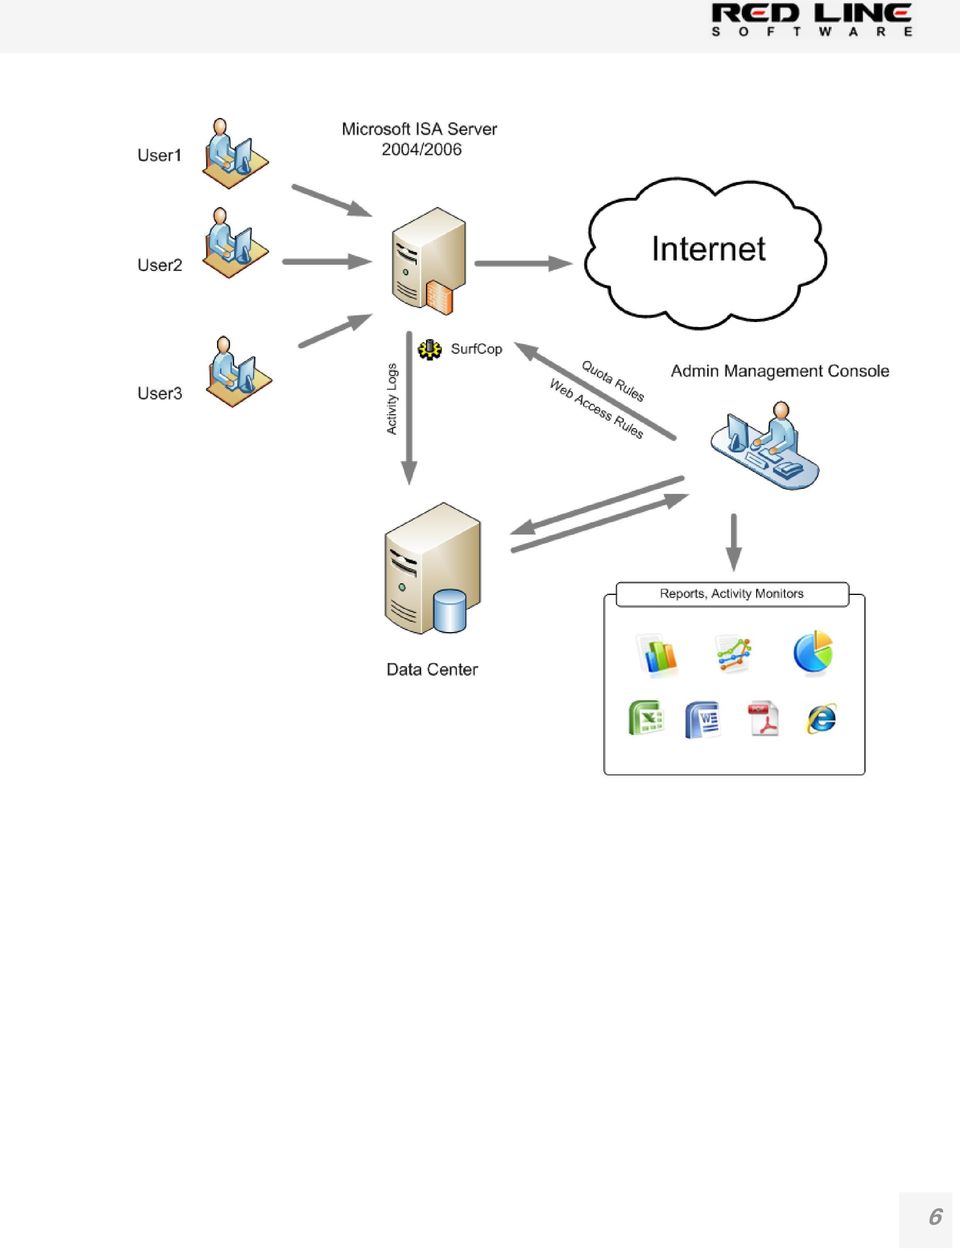
5 Introduction SurfCop is a software product designed to monitor and control traffic in an organization that uses Microsoft ISA Server 2004/2006. It implements the concept of integrated approach to monitoring and limiting traffic and also to controlling the efficiency of the company's employees. Program features: monitoring traffic; limiting traffic; bandwidth management; monitoring and limiting users' surfing time; generating reports about traffic consumption; monitoring user activity in real time; limiting access to sites depending on categories they belong to; limiting access to web pages containing forbidden words and much more; The program consists of three components: Agent - the filter permanently residing in memory and collecting information about user activity. In case the Enterprise version of Microsoft ISA Server is used, the filters must be installed on all servers in the array. Data Center - the system service receiving data from agents and gathering it in the database. SQLite, MS Access, MS SQL, MySQL, PostgreSQL, Oracle can be used as a data storage. It is possible to install the Data Center on any computer in the network. Management Console - the Microsoft Management Console snap-in designed for administering the software and controlling Internet activity. The console is delivered as a separate component and can be installed separately from all other system components (the Microsoft ISA Server console is required). 5

6 6
7 Program features Active Directory support; Microsoft ISA Server 2004/2006 support; close integration with the Microsoft ISA Server 2004/2006 console; compatibility with the Standard and Enterprise editions of Microsoft ISA Server 2004/2006; multi-tier architecture allowing all software components to be installed on different computers; remote administration from any network computer; administration and monitoring from several network workstations at once; support for SQLite, MS Access, MS SQL, MySQL, PostgreSQL, Oracle as a data storage; a lot of predefined reports allowing collected information to be analyzed from various angles; System Requirements Microsoft ISA Server 2004/ KB free disk space. 7


8 Deployment Planning SurfCop is a module-based system that consists of three components: the Agent, Data Center and Management Console. Each component is installed using a single installation wizard that allows you to choose one of the predefined scenarios: Install all components each component will be installed on one computer. This scenario is most suitable when ISA Server Standard Edition is used or you would like to install the agent on one of ISA Server Enterprise Edition array servers. In this case Data Center will also be installed on the computer. Install Data Center component only the Data Center component will be installed. This scenario should be used in case you have decided to dedicate a separate computer or a separate virtual machine (VM) for gathered data storage. Install server components only this scenario should be used if you have ISA Server Enterprise Edition installed and you need to install the agent on array servers. This scenario is also applicable when ISA Server Standard Edition is used and you only wish to install the agent component on the Microsoft ISA Server computer. In this case you should also have the Data Center component installed and configured on you network. Install Remote Management Console if your computer has the ISA Management Console installed on it for remote management of Microsoft ISA Server, you can use this scenario to install SurfCop management console. Thus you will be able to perform remote management and monitoring tasks. 8

9 While installing the program you should pay special attention to the Data Center component location. If the Internet activity of your company is rather high, you are highly recommended to allocate a separate computer or VM for the Data Center component. In this case the workload created by data processing and log generation will be taken from the computer running Microsoft ISA Server to that allocated machine. 9

10 Agents Agent installation is straightforward. In case you decide to use the «Install all components» scenario you don t have to make any special configuration tasks during the installation process. If you use the «Install server components only» scenario though, during the installation process wizard will ask you to specify computer address the Data Center component is installed on. You should use IP address or NetBIOS name of the computer as its address. During the Agent installation process you will have to stop Microsoft ISA Server for a short period of time. Reboot is not required. How It Works Agent is a collection of filters that register within the configuration and operate inside of Microsoft ISA Server. Major agent s tasks are as follows: Gather information about user activity Control user access to the Internet resources Count and control traffic and time quota exceeding Manage bandwidth During the operation agents generate detailed activity logs and pass them on to Data Center for further processing. 10

11 What is Important to Know about Agent? Agent does not monitor any local traffic. So no activity on the local network will be reflected in activity monitors, logs and will be counted by the traffic counters. Only external network traffic will be taken into account. Previous point leads to the following important condition: care should be taken when configuring range of local IP addresses in the Microsoft ISA Server (Internal Network). Otherwise you may end up with the situation, when SurfCop will treat entire traffic as local. For more details read below. Besides the filter that works together with Microsoft ISA Server a special «SurfCop Agent» service is also installed on the computer. This service is extremely important for agent functioning; therefore it must be constantly running. If you use Microsoft ISA Server Enterprise Edition, all array servers should be up and running. In case even one array server is down, all other array servers can experience latency. It has something to do with the frequency of data synchronization by the agents. All computers that have agents, Data Center and management console running on them (in case all components are installed on different computers) must be available over the network from standard Network Places applet. 11

12 ISA Server Enterprise Edition If you organization uses Microsoft ISA Server Enterprise Edition, the agents should be installed on all array servers. When installing all agents it is essential to specify the same settings. Local IP addresses Correctness of SurfCop functioning strongly depends on the correct local IP address configuration. Here is the example of the appropriate address list configuration for Internal network in Microsoft ISA Server: In this case Microsoft ISA Server will only perceive the addresses included into this range as local addresses. All other addresses will be treated as external. Here is the example of the inappropriate address list configuration for Internal network in Microsoft ISA Server: 12


13 Administrators often create IP address list using the «Add Adapter» option that makes it possible to select NIC and after that the address list is created automatically. In the above example program has created the address list that includes almost every IPv4 address of the Internet. Therefore SurfCop will perceive any traffic as local and will not count it. If SurfCop will find incorrect setting in the Internal network configuration, it will record corresponding alert to the Microsoft ISA Server log. 13


14 Configuring Agent The «SurfCop\Configuration\General» page contains several dialog boxes that allow you to configure agent operation. Global Settings Resolve MAC address and Computer name by Client IP allows displaying computer names and MAC addresses in logs and activity monitors. Besides if this option is enabled MAC address and computer name can be used to identify the user. Otherwise only IP address and username will be used. Disable activity logging all subsystems with the exclusion of log generation subsystem will continue to operate. Enable debug logging this option makes it possible to enable a detailed debug logging. It is used, when SurfCop performance issues occur. Treat VPN clients as external this option allows you to change program behavior in traffic counting for VPN users. Usually VPN users are the users that connect externally, log on to the company s local network, get local IP address from a special address pool and are further treated as regular internal users. Thus the rules of IGNORING local traffic apply to them. Thus if a VPN user will download 1 GB 14


15 file from the company s internal network to his/her local computer this traffic will not be counted, because SurfCop will perceive it as local traffic. It is quite logical but the thing is that this traffic actually goes through the secured VPN cconnection over the Internet so it must be counted. To avoid such situation you can use the checkbox mentioned earlier. When you check this checkbox all VPN clients will be treated as external during the process of traffic counting. But to count this traffic correctly just checking this checkbox is not enough. You will also have to modify SurfCop quota rules and web access rules so that they count VPN users. Data Center address IP address and the name of the computer running the Data Center component. This option is helpful in case you have decided to switch the agent to another Data Center. When you apply all changes, agent sends all its information to the new address. 15

16 Protocol Calibration The essential part of SurfCop performance is the configuration of Microsoft ISA Server protocols. During the installation process SurfCop connects to all types of protocols that are present in the ISA Server configuration. So when traffic that uses any type of the included protocols is generated, ISA Server is taken over by SurfCop, which in its turn becomes capable of counting and controlling traffic. But very often administrator decides to add new protocols, change configuration of existing protocols or even remove some protocols. As a result of such modifications there can occur a situation, when SurfCop is not connected to the protocol. In this case when traffic using new or modified protocol is generated, ISA Server will not be taken over by SurfCop and traffic will not be counted. That is why it is essential for the administrator to perform protocol calibration after any changes made to protocol configuration to avoid such situations (only protocol calibration is required. Changes made to other configuration settings in no way affect the program, and thus calibration for them is not required). To perform protocol calibration you should go to the «Calibrate Protocols» link on the «SurfCop\Configuration\General» tab. During the calibration process SurfCop will analyze all changes made to the protocols and will either tell you that the configuration is appropriate or will make all the necessary changes and connect to new protocols. In case SurfCop will find incorrect protocol configuration setting, it will generate corresponding message to the Microsoft ISA Server log. If you have some questions related to this issue, please, feel free to contact Help Desk of Red Line Software. Migration Wizard The program includes an integrated migration wizard that is designed to move configuration and statistics from one computer to another. This tool is very helpful in case you want to reinstall agent of the program to a new computer or implement configuration settings on other agent installed on your network. During the first step the migration wizard prompts you to pick up one of the following actions: Create a backup Restore from backup 16


17 Before you create a backup copy you are prompted to enter the file, to which the configuration will be saved, and select objects the backup copy will be created for. SurfCop configuration Quota counters Summaries URL database Firewall configuration After the migration wizard finishes its task, a «.bk» file is created that can be used later on to restore saved configuration settings. 17


18 SurfCop Rules The major configuration tools of the program are the rules. The rules offer flexible mechanism of controlling access to different Internet resources. Web sites, traffic, time spent on the Internet, network bandwidth, etc, all can be referred to as resources. Generally the mechanism of creating and configuring rules is identical to that of Microsoft ISA Server. If you have ever had a chance of creating rules in Microsoft ISA Server, creating rules in SurfCop will be an easy task for you. SurfCop has several rule types: Quota Rules, Web Access Rules, and Bandwidth Rules. SurfCop management console has a separate node for managing each rule type. Rules Evaluation Order Rules are evaluated from top to bottom. When the rule is checked all its conditions are evaluated and if the parameters of user request match rule conditions further evaluation is not performed. Thus the first rule to be applied is the rule with the conditions that first match user request parameters. Warning! The situation may occur, when no matching rule will be found. In this case traffic will not undergo any changes; it will not be controlled or restricted. To avoid such situations you are highly recommended to create an additional rule by default with such conditions that will be met by all requests from all users. This rule should be placed at the end of the list. Quota Rules An important part of SurfCop is the subsystem of quota allocation. Quota rule allows you to set up quantitative quotas for various Internet resources. 18


19 There are two types of quota rules: Traffic quota rules Time quota rules How It Works Quota rules define the conditions that if met cause the program to perform certain actions. The following user request parameters act as conditions: source, destination, protocol, list of users and groups, schedule that determines days and hours on which quota rule is working, and advanced conditions specific of SurfCop only. Besides quota rule determines the actions taken after the quota has been exceeded and the access is blocked. Following options are possible: Show blank denial page Show internal denial page Show custom denial text When a user initiates a request, SurfCop analyses quota rule list and tries to find the rule that is met by this request. If no such rule is found user request is processed without any changes. If the corresponding rule is found in the list SurfCop performs an action that is defined in the settings of the rule. 19

20 Quota rules can perform following actions: Create ONE quota counter for all objects that match rule conditions. This action creates shared counter for all users that match rule conditions. So, all these users will get a single quota. This option is useful when you want to give one quota for all users of a certain department in your organization, for example. Or you might want to set one quota for all IP addresses belonging to a certain subnet. Thus when quota is exceeded, access to the resource specified in the conditions of this quota rule will be blocked for all users of this counter. Create separate quota counter for each object that match rule conditions. This action creates an individual counter for every single user that matches rule conditions. If we look back at the department scenario above, in this case a separate counter and quota will be created for each user of the department. Thus if one user exceeds quota this will not affect other users in any way. The concept of object identification method is an essential part of the abovementioned action. The identification method determines object attribute that will be used for search among the existing counters list. The program supports following object identification methods: o Computer IP address o Computer MAC address o Username o Computer name You should clearly understand that if you use username option and several users will access the Internet from the same computer a separate counter will be created for each one of these users. In case you choose IP address option and you have DHCP server configured on your network, each time the user will start the computer and get a new IP address, new individual counter will be created for this user. If Microsoft ISA Server has no mandatory authentication configured on it and the DHCP server is running on your network, the only way to explicitly identify an object and set quota for it is to use computer name or MAC address of the computer. If users access the Internet from terminal server, then it s better to use username option for object identification. So what is counter? Counter is an object that is created by quota rule. Counter is created when a user tries to get access to a certain resource specified in rule settings. It can be a web site, subnet, individual host or a subnet of addresses that are defined in rule settings. Quota rule also determines counter type: shared or individual. Depending on rule that has created a counter there may be the following types of counters: Traffic counter Time counter Counters exist within certain time period after which they reset. The maximum time value before the counters reset is determined by quota rule. You can choose one of the following intervals of counter reset: 20

21 Daily. Counter resets every day at certain time explicitly specified in rule settings. Weekly. Counter resets every week on certain day and at certain time explicitly specified in rule settings. Monthly. Counter resets each certain day of month at certain time that is explicitly specified in rule settings. If counter data will reach threshold value before its reset time is reached the access to resource will be blocked and access will only be granted after the counter resets. If counter does not reach the threshold value, it will simply reset on a due date and time. 21

22 Traffic Counters Traffic quota rule defines threshold values of traffic counter as follows: Traffic to count this option defines as to what traffic type is to be counted and affected by quota rule. Following options are available here: o Incoming o Outgoing o Total total amount of incoming and outgoing traffic is to undergo quota rule. o Both separate quota for incoming and outgoing traffic. The advantage of this option is in that when, for example, the threshold value for incoming traffic is reached, the outgoing traffic will still be allowed. Incoming threshold threshold value for incoming traffic, exceeding of which will block incoming access. Outgoing threshold threshold value for outgoing traffic, exceeding of which will block outbound access. Do not count web traffic retrieved from cache if this checkbox is checked, all traffic retrieved from cache will not be counted and thus will not increase counter readings. Do not show counters of this rule in WebStat if this option is checked, counters created by this rule will not be presented to the user on his/her personal WebStat page. 22
 while client session is alive this option makes it possible for you to enable a special mechanism that helps enhance the accuracy of")
23 Time counters Time quota rule defines threshold values of time counter as follows: Threshold threshold value of time spent on the Internet, exceeding of which will block access. Poll proxy server (using asynchronous client side Java Script) while client session is alive this option makes it possible for you to enable a special mechanism that helps enhance the accuracy of time calculation spent by the user on the Internet. This parameter is optional but is highly recommended. Enable short domain names using this checkbox you can display short names of web sites the user visited. If this option is checked, the visited web site names will be cut up to the specified level. This option affects site names displayed in quota monitor and user s personal WebStat page. Do not show counters of this rule in WebStat if this checkbox is checked, then counters created by this quota rule will not be visible on the user s personal WebStat page. Warning! Time counters only count time that the user has spent on web site browsing. They do not count time spent on using IM applications, applications, etc. 23
24 Personal Web Statistics Each user that matches at least one quota rule conditions and that has at least one counter created for him/her respectively can view the counter data using a special web page. To view this personal web page user should visit one of the following URLs: for SecureNAT clients for WebProxy and Firewall clients As you can see, these are fake addresses and thus they will be intercepted by SurfCop to show user s quota counter state instead of real content. Personal WebStat page contains several tabs and allows you to view both traffic and time counters. This page was tested and optimized for the following web browsers: Internet Explorer 6.0 and higher Opera 8.0 and higher Chrome 2.0 and higher Mozilla Firefox 2.0 and higher If you do not want some counters to be displayed in the WebStat window (for instance, if you do not want the user to be able to see browsed web sites statistics), you can make them invisible for the user by checking the «Do not show counters of this rule in WebStat» checkbox in the settings of the corresponding quota rule. 24
25 Useful Information You can set several quotas separated by different protocols for one user. For example you can allow a user to generate 500 MB of HTTP traffic per day and 100 MB of POP3 and SMTP traffic per day. If web traffic will be blocked due to exceeding of the limit, user will still be able to use . Current traffic counter value for any user can be either increased or decreased using management console. The text on the standard blocking page can be changed by editing corresponding pages located in HTML folder under the directory where you have your agent installed. If the user visits secured SSL site, the changes to the traffic counter data will only be visible after user session is finished. It is due to the nature of SSL traffic and the peculiarities of Microsoft ISA Server implementation. If time quota rule does not have the «Poll proxy server.» checked, the changes to the traffic counter data will only be visible after user session is finished. Rule list can be exported to an XML file so that you could be able to load it back from that file later. To import/export rule list you simply use the following commands: Import Configuration and Export Configuration. 25

26 Bandwidth Rules An important part of SurfCop is the subsystem of controlling bandwidth. Bandwidth rules allow you to limit access rate in accordance with certain conditions. How It Works Bandwidth rules define threshold value of access rate to different resources and when this threshold value is reached bandwidth is restricted. The following user request parameters act as conditions: source, destination, protocol, list of users and groups, schedule that determines days and hours on which bandwidth rule is working, and advanced conditions specific of SurfCop only. When user initiates a request, SurfCop analyses bandwidth rule list and tries to find the rule that is met by this request. If no such rule is found user request is processed without any changes. If the corresponding bandwidth rule is found in the list SurfCop limits access speed based on the rule settings. 26

27 Bandwidth rules can perform following actions: Create ONE speed counter for all objects that match rule conditions. This action creates a shared speed counter for all objects that match rule conditions. Thus you can specify single speed limit for all objects. For example, you can create a rule that will limit access rate to the sites of certain category up to the specified threshold for all users of the enterprise. In this case the program will only set general speed limit for the entire user group and will not control speed rate of a specific member of the group that matches rule conditions. All users will compete for the bandwidth in natural way. Create separate speed counter for each object that match rule conditions. This action creates personal counter for each object that matches rule conditions. The specified speed limit will be equally distributed among each member of the object group. Thus you can set an individual quota on a per-object basis. For example, you can create a rule that will set individual speed limit to the site of certain category for each user in your organization. The concept of object identification method is the essential part of this action. The identification method determines object attribute that will be used for search among the existing counters list. The program supports following object identification methods: o Computer IP address o Computer MAC address o Username o Computer name 27
28 You should clearly understand that if you use username option and several users will access the Internet from the same computer a separate counter will be created for each one of these users. In case you choose IP address option and you have DHCP server configured on your network, each time the user will start the computer and get a new IP address, new individual counter will be created for this user. If Microsoft ISA Server has no mandatory authentication configured on it and the DHCP server is running on your network, the only way to explicitly identify an object and set quota for it is to use computer name or MAC address of the computer. If users access the Internet from terminal server, then it s better to use username option for object identification. So what is speed counter? Speed counter is an object that is created by bandwidth rule. Speed counter is created when a user tries to get access to a certain resource specified in rule settings. It can be a web site, subnet, individual host or a subnet of addresses that are defined in rule settings. Bandwidth rule also determines counter type: shared or individual. In case speed counter data will reach threshold value access speed to the resource will be limited. 28

29 Speed Counters Bandwidth rule defines threshold values of speed counter as follows: Speed to count this option specifies traffic type that is to be counted. Following options are available here: o Incoming o Outgoing o Both in this case separate speed counters will be created for incoming and outgoing traffic respectively Incoming threshold threshold value for incoming traffic speed. Outgoing threshold threshold value for outgoing traffic speed. Do not count web traffic retrieved from cache if you have this option checked, the entire traffic volume retrieved from cache will not be counted and as a result transfer speed of such traffic will in no way affect the counter readings. Reserve bandwidth even if no active speed counters exist if you check this checkbox, each user that matches rule conditions will have constant bandwidth reserved for him/her. In this case the bandwidth reserved for the user cannot be used by other users even if such user is offline. This parameter is very important and it s necessary to clearly understand how it works. If this option is checked, the user will have bandwidth reserved solely for him/her. It is very useful for allocating bandwidth for VIP users. Therefore when such user goes online he/she will get necessary bandwidth and will not have to «compete» for it with other users. But care should be taken when using this option, because if this option is enabled, but the user is offline or does not fully consume the bandwidth, all other users will still be «locked» within limited bandwidth. 29
30 If this option is disabled, the rest bandwidth that is not in use will be evenly distributed among other users. You are not recommended to use this option unless necessary. 30

31 Web Access Rules One more important part of SurfCop is the subsystem of access restriction to web resources. Web access rules allow you to set strict limits for various web resources on the basis of certain conditions. Access to web resources in SurfCop can be limited in three ways: Using Quota Rules and quota exceeding Using Global Web Access Policy Using Web Access Rules First variant was covered in details in previous section. Let s take a look at two other options. 31

32 Global Web Access Policy Global web access policy allows you to simplify management tasks for functions in SurfCop related to web page content analysis and web access restriction. These settings are global and used in case no corresponding Deny or Allow rule has been found for the user s request. Optionally web access rule can override global policy settings. You can access dialog box for editing global policy from the «SurfCop\Configuration\Web Access Rules» tab using the «Configure Global Web Access Policy» link. Deny Web pages containing forbidden words if this option is enabled, SurfCop will analyze content of all visited web pages and count the number of forbidden words. Each forbidden word has its own weight. If the total weight of all forbidden words on the page exceeds allowed value, the page will be blocked. 32

33 Enable modifying Web pages contents using Search/Replace Rules if you have this option enabled, SurfCop will analyze web page content trying to find certain substrings and replace them with other values. Source and replace substrings are defined by the «Search/Replace Rules». 33

34 When SurfCop decides to block web access under global policy, it performs one of the following actions: 34

35 Show blank denial page Show internal denial page Show custom denial text Redirect to denial URL in this case you should make sure the denial page is not blocked by other SurfCop or Microsoft ISA Server rules. 35
36 Web Access Rules Web access rules in SurfCop are very similar to that of Microsoft ISA Server access rules. But here are some important things: SurfCop web access rules start working and apply ONLY when access to the requested resource is allowed by some Microsoft ISA Server rule. Otherwise SurfCop web access rule will not even have a chance to analyze requests. Besides usual conditions (source, destination, protocol, user, etc.), the SurfCop web access rules can also use advanced conditions that are specific of SurfCop only. How It Works Web access rules define the conditions that if met cause the program to perform certain actions. The following user request parameters act as conditions: source, destination, protocol, list of users and groups, schedule that determines days and hours on which web access rule is working, and advanced conditions specific of SurfCop only. Besides web access rule determines the actions taken, when web access is blocked. Following options are possible: Show blank denial page Show internal denial page Show custom denial text Redirect to denial URL in this case you should make sure the denial page is not blocked by other SurfCop or Microsoft ISA Server rules. When user initiates a request, SurfCop analyzes web access rule list and tries to find a rule that is met by the request. If no such rule is found user request is processed without any changes. If the corresponding rule is found in the list SurfCop performs an action that is defined in the settings of this rule. 36

37 Web access rule can perform the following actions: Allow. Access to the requested resource is allowed. If you enable this option you will have additional tab named «Content Scanning» that allows you to specify the rules of allowed content category. By default, the program uses the rules defined in global web access policy. But you can redefine global settings of a certain web access rule in its settings if necessary. Deny. Access to the requested resource is denied. The only reason for SurfCop to include web access rules is the necessity to be able to specify additional optional conditions in rule settings: 37

38 These optional conditions have equal power with all other conditions and are useful when main conditions are not sufficient. Additional conditions can be specified based on the following request parameters: Application user s application name. Application name can be specified for web traffic only. Array Server name of certain array server (applicable for Microsoft ISA Server Enterprise Edition only) Client Host Name name of certain client computer Client IP client computer IP address Client MAC MAC address of a certain client computer Client type client type. Following options are possible: Web Proxy, SecureNat, Firewall Client username domain user name Content File Extension extension of the file requested by the user Content File Name name of the file requested by the user Web Listener web listener name responsible for inbound request Web Site Category one or more categories the requested site belongs to Web Site Name name of the web site requested by the user Web Site Referrer referrer of the requested web site Web Site Request user request (requested object address without site name) 38
39 Useful Information Web access rules are optional. If you are satisfied with the capabilities Microsoft ISA Server offers you, you can disable web access rules and global web access policy. When you add advanced filters using the conditions «Equals», «Does not Equal» you can use masks. For example: o «Web Site Name» equals «*.google.*» o «Client HostName» equals «Computer10?» Each web site in the Urls Database can be associated with one, two or three categories. That is why care should be taken when creating filters that use the Web Site Category field. For example, if SomeSite.com web site belongs to the «Adult» category, the condition: «Web Site Category» equals «Adult» will be true. In case this site belongs to some other category alongside with the «Adult» category, the condition above will be false and the rule that defines this condition will not be performed. In this case you should use the following condition: «Web Site Category» contains «Adult» Rule list can be exported to an XML file, so that you can load it back later. To perform import/export tasks for the rule list you can use following commands: Import Configuration and Export Configuration. 39
: These optional conditions have equal power with all other conditions and are useful")
40 Advanced Rule Conditions Besides the fields that are common for all rule types, such as source, destination, protocols, users, etc., SurfCop allows you to specify optional filtering conditions. For this purpose you can make use of the special tab on the rule type list page (applicable for all rule types): These optional conditions have equal power with all other conditions and are useful when general conditions are not sufficient. Additional conditions can be specified based on the following request parameters: Application user s application name. Application name can be specified for web traffic only. Array Server name of certain array server (applicable for Microsoft ISA Server Enterprise Edition only) Client Host Name name of certain client computer Client IP client computer IP address Client MAC MAC address of a certain client computer Client type client type. Following options are possible: Web Proxy, SecureNat, Firewall Client username domain user name Content File Extension extension of the file requested by the user Content File Name name of the file requested by the user Web Listener web listener name responsible for inbound request Web Site Category one or more categories the requested site belongs to Web Site Name name of the web site requested by the user Web Site Referrer referrer of the requested site 40
41 Web Site Request user request (requested object address without site name) 41

42 Data Center Data Center is a special service designed to process the information about users activity on the Internet and to save this information to special storage. Since part of functionality is performed on the computer running Data Center, the program includes certain tools that allow you to configure its settings. 42
43 General settings This dialog box allows you to specify various settings that are necessary for the data center to run normally. Active Directory The program is closely integrated with Active Directory and allows you to automatically convert user logins into their full names. This process is performed, when activity monitors are used and during report generation process. To enable this feature, you should specify the account that will be used to connect to Active Directory. It is important to specify the correct account data because no conversion will be done otherwise. Warning! If you specify incorrect data or the account does not have enough permissions to access Active Directory, an error will occur during the conversion process and it will considerably slow down the performance of the program. 43

44 The application modules use these settings to send reports. 44

45 Data Storage These settings allow you to specify the type and parameters of the database, which will be used to store the collected data. SurfCop allows you to store user activity information in the following database formats: SQLite MS Access MySQL Oracle PostgreSQL MS SQL By default, the data is stored in SQLite format but the database format can be changed to any other. You should specify the data storage name, the database type and its optional description in the dialog, specially designed for this purpose. Warning! Before adjusting the connection settings you should create and configure the database BY YOURSELF using DBMS tools as it is shown in one of the chapters of this help section. 45
46 After you have chosen the data storage name and the database format you should specify the database connection settings, the program uses to gain access to the database. The content of the «Connection Settings» tab may change depending on the selected database format. As you click on «Test Connection» button the program tests connection with database and if all settings are adjusted correctly it informs you about it in a message. If it is impossible to connect to the database the program displays an error report on invalid input data. 46
47 The «Statistics» tab shows information about the data storage. This tab shows such information as: the storage size on the disk the names and versions of all data schemas present in the storage the number of records in each data schema the date of the earliest record in the data schema the date of the most recent record in the data schema 47
 - this setting allows you to specify the number of days after which a record will be considered outdated and deleted from the data storage.")
48 The Maintenance tab allows you to limit the storage size and the time to store information for. Delete records older than (days) - this setting allows you to specify the number of days after which a record will be considered outdated and deleted from the data storage. Limit data storage size (GB) - this setting allows you to limit the data storage size. In case the data storage size limit is exceeded, the program can do the following: Deleting older records as necessary Discarding new entries The program allows you to delete records from the data storage for a certain time period manually. To delete records for a certain time period, click the «Delete old records...» button, specify the time period and click «OK». All records for the specified time period will be deleted from all data schemas after that. The Drop all tables... button allows you to instantly delete all tables in the data storage and thus completely clear it. 48
49 SQLite Setup features No particular operations needed. Creating database The database is created automatically on the first access. Connection string You should specify a full path to the DB file. If the file does not exist it will be created automatically. You may use macros when specifying a file path: %INSTALLFOLDER% - path to a folder, to which the Data Center is installed By default, the value %INSTALLFOLDER%\DB\Activity.dat is used 49
50 Microsoft Access Microsoft Access is an RDBMS by the Microsoft Corporation. It has a wide range of functions, including related searches, sorting by multiple fields, and links to external tables and databases. Thanks to the built-in VBA language, it allows you to create applications to work with your databases. Versions of Microsoft Access: Access 2.0 for Windows (Office 4.3) Access 7 for Windows 95 (Office 95) Access 97 (Office 97) Access 2000 (Office 2000) Access 2002 (Office XP) Access 2003 (Microsoft Office 2003) Microsoft Office Access 2007 (Microsoft Office 2007) Microsoft Office Access 2010 (Microsoft Office 2010 TP) Microsoft Access Setup Microsoft Office Access 2007 part of the Microsoft Office 2007 package, is used as a DBMS. The first step is to create the database. The database must be created on the computer where the Data Center component is set up and used. Accordingly, Microsoft Access must also be set up on this computer. To create a new database, open the «File» menu (in Microsoft Office Access 2007 and later a round icon with an image of the Microsoft Office symbol is used instead of the «File» menu) and select «New». The main program window is shown in Figure 1. 50

51 Figure 1. On the right-hand side of the program window, the database create window will appear (Figure 2). You must choose a path for the new database, enter a name, then click «Create». It is recommended that you choose something simple and intuitive as the database name, for example, «Activity». 51

52 Figure 2. Once the new database is created, a table edit menu will appear, as shown in Figure 3. 52

53 Figure 3. You can close this menu, since Data Center creates all necessary tables itself on first access of the database. After this, Microsoft Access setup is complete. Data Center Configuration Once the new database is created, Data Center should be set up in order to work with it. For this, you must open the program s management console, go to the «Configuration» page shown in Figure 4, and select «Data Storage Settings». 53
54 Figure 4. In the dialog that opens, choose the database type (in this case, Microsoft Access). 54
55 Figure 5. On the second tab, specify the parameters for connecting to the database (Figure 6). To avoid the need to enter the connection string manually, the program has a special tool, to use which you simply click the button by the connection string field. 55
56 Figure 6. The dialog that opens, shown in Figure 7, allows you to choose the type of OLE DB provider, through which the connection should be set up. Choose Microsoft Office 12.0 Access Database Engine OLE DB Provider and click «Next». If another version of Microsoft Access is being used, then the name of the OLE DB provider may differ. 56

57 Figure 7. On the second tab, enter the connection parameters, as shown in Figure 8, where, C:\Users\Admnistrator\Documents\Activity.accdb name of database file created earlier. Warning! It is important to understand that since the connection parameters will be used in Data Center, all paths are displayed in relation to the computer on which Data Center is being used. This is especially important if Data Center and the management console are set up and used on different computers on the network. User name the user whose name will be used to connect to the database. Warning! In Microsoft Office Access 2007, protection for new file formats is not supported at user level, therefore «Admin» should be entered as the username. Password password of the user whose name will be used to access the database. Blank password means that a blank password is used to access the database (if you wish, you can protect the database with a password; in this case you should disable this option). 57

58 Figure 8. Click «OK» to continue. Once you have entered all the necessary connection parameters, a connection string will be generated automatically, as shown in Figure 9. The contents of the string may change depending on the information entered earlier. To test the connection string, click «Test Connection». 58
59 Figure 9. Once you have pressed «Test Connection» the program will attempt to connect to the database, and if the connection settings have been specified correctly, the message shown in Figure 10 will appear. Figure 10. When the connection testing is complete, click «OK». A message will appear notifying you that Data Center must be restarted for the new parameters to be applied (Figure 11). 59
60 Figure 11. Click «Yes», and Data Center will restart automatically. Once Data Center is restarted, all changes will take effect and the program will begin using the new database to store information. The status of the database can be viewed on the «Statistics» tab of the data storage management dialog (Figure 12). Figure 12. Conclusion: On the one hand, Microsoft Access DBMS is the simplest system in terms of setup, whereas on the other, it is not recommended for use by medium and large-sized companies, since it is a desktop product and is unable to store and process data satisfactorily once the database reaches a certain size (comparatively small). 60
61 Microsoft SQL Server Microsoft SQL Server is a system for managing relational databases (DBMS), developed by the Microsoft Corporation. The main query language used is Transact-SQL, created by Microsoft and Sybase together. Transact-SQL is an ANSI/ISO-standard realization of a Structured Query Language (SQL), with some expansions. It is used for small and medium-sized databases, and in the last five years has started to be used for large databases on an enterprise scale, competing with other DBMS in this segment of the market. Microsoft SQL Server Express is a freely distributed version of SQL Server. This version has several technical limitations, making it unsuitable for building large databases. However, it is perfectly suited for running software on a small-company scale. Microsoft SQL Desktop Edition is another freely distributed version of SQL Server. This version is designed for small user databases. This DBMS is not recommended for storing large volumes of data. Configuring Microsoft SQL Server Installation and customization of the Microsoft SQL Server must be carried out by the administrator themselves. All the operations described in this article were carried out under Microsoft SQL Server 2005 with the help of the freely distributed application for database management Microsoft SQL Server Management Studio Express. Settings for other versions of DBMS (SQL Server 2000, SQL Server 2008) are analogous to those presented here and do not differ significantly. Microsoft SQL Server Management Studio Express can be downloaded from the official Microsoft website: Before you start, you should enable the remote connection to the database server. For this, you will need to use the SQL Server Configuration Manager application. You can find SQL Server Configuration Manager here: Start->Programs->Microsoft SQL Server 2005->Configuration Tools-> SQL Server Configuration Manager In the open window, go to the Protocols for MSSQLSERVER tab (Figure 1). By default, the Named Pipes and TCP/IP protocols are disabled; therefore you will need to enable them by right-clicking and selecting Enable from the menu that appears. 61

62 Figure 1. Next, start «Microsoft SQL Server Management Studio Express» and connect to the database server, using the special icon in the top left corner. In the window that appears, select the database server you need to connect to, and choose the type of authorization. It is recommended that you use Windows authentication, as this method of authentication is more reliable than the built-in Microsoft SQL Server. (Figure 2) 62

63 Figure 2. Figure 3 shows the main program window. In the left-hand part of the window there is an object browser, in which a list is displayed of all the servers the program is connected to at that moment. The Databases container shows a list of databases located on the server. To create a new database, right click the Databases container and select «New Database». Figure 3. In the window that appears, you will need to set the name of the database being created, as shown in Figure 4. In this window you can also set the name of the database owner and the path of the database files, and configure the function to automatically increase the size of the database file. 63

64 Figure 4. On the «Options» tab, you will need to select the sort parameters. It is recommended that you use as a sort parameter SQL_Latin1_General_CP1_CL_AS, as shown in Figure 5. 64

65 Figure 5. Once you have set all the required parameters, click OK to start creating the database. If errors arise during the process of creating the database, the program will bring up a message with a detailed description. To fix any errors that arise, you must follow the directions given in these messages. If the database is created successfully, a new database icon will appear in the Databases container, as shown in Figure 6. The actions described above are completely sufficient for the SurfCop to operate normally with the new database, although you may set additional parameters if you wish. 65
66 Figure 6. The procedure for creating a new Microsoft SQL Server database is now complete. In case you cannot use Windows Authentication for some reason, you can enable integrated authorization of Microsoft SQL Server. To use integrated authorization of Microsoft SQL Server you simply enable the «SQL Server and Windows Authentication mode» option, as depicted in Figure 7. 66

67 Figure 7. Data Center Configuration Once the new database is created, Data Center should be set up in order to work with it. For this, you must open the program s management console, go to the «Configuration» page shown in Figure 8, and select «Data Storage Settings». 67
68 Figure 8. In the open window, select the database type (in this case, MS SQL). 68
69 Figure 9. On the second tab, specify the parameters for connecting to the database (Figure 10). To avoid the need to enter the connection string manually, the program has a special tool, to use which you simply click the button by the connection string field. 69

70 Figure 10. The dialog that opens, shown in Figure 11, allows you to select the type of OLE DB provider, through which the connection should be set up. Select Microsoft OLE DB Provider for SQL Server and click «Next». 70

71 Figure 11. On the second tab, you will need to enter the connection parameters, as shown in Figure 12, where, WIN2003 name of MS SQL server Activity name of database created earlier, to which the connection will be made Warning! To link to the database server, it is recommended that you use the Windows tools for authorization. If MS SQL tools are used for authorization, the login and password of a user with the necessary privileges to work with the database must be entered in the Username and Password fields, and the «Allow saving password» option must be enabled. Blank password means that a blank password is used to access the database (you can protect the database with a password if you wish; in this case, this option should be disabled). 71

72 Figure 12. To test whether the connection parameters are correct, click «Test Connection». Once you have pressed «Test Connection», the program will attempt to connect to the database, and if the connection settings have been specified correctly, the message shown in Figure 13 will appear. Next, click «OK». Figure 13. Once you have entered all the required parameters, a connection string will be generated automatically, as shown in Figure 14. The contents of the string may change, depending upon the information entered earlier. To test the connection string, click «Test Connection». 72
73 Figure 14. After you click «Test Connection», the program will attempt to connect to the database, and if the connection settings have been specified correctly, the message shown in Figure 15 will appear. Figure 15. When the connection testing is complete, click «OK». A message will appear notifying you that Data Center must be restarted for the new parameters to be applied (Figure 16). 73
74 Figure 16. Click «Yes», and Data Center will restart automatically. Once Data Center is restarted, all changes will take effect and the program will begin using the new database to store information. The status of the database can be viewed on the «Statistics» tab of the data storage management dialog (Figure 17). Figure 17. Conclusion: Microsoft SQL Server is a reliable and relatively straightforward DBMS. Microsoft SQL Server DBMS is recommended for use in medium and large-sized companies. 74
75 MySQL MySQL is a free database management system. It is characterized by high speed, stability, and ease of use. It is the ideal solution for small and medium-sized companies. Configuring MySQL Installation and configuration of the MySQL server should be carried out by the administrator themselves. All the operations described in this article to set up MySQL were carried out with the help of free web application phpmyadmin. Official phpmyadmin website: Detailed instructions on how to install and configure this application can be found on the website. To start phpmyadmin, open your browser and enter the following address in the address bar: where, computer_name is the name of the computer on which phpmyadmin is installed. In the browser window, the main page will load, shown in Figure 1. 75

76 Figure 1. First of all, you need to create a database. For this, you must choose a name for the database and enter it on the main page, select a method for the lines to be sorted and click Create. The database creation form is shown in Figure 2. Activity - name of database being created utf8_unicode_ci - method for sorting lines It is recommended that you choose a simple and intuitive name for the database, for example, «Activity». 76

77 Figure 2. On selecting Create a message will appear, notifying you that the database was created successfully. Figure 3. The next step is to create a database user and assign them the privilege to manage the database. To go to the edit users and privileges pages, you will need to return to the main page and select «Privileges». 77

78 Figure 4. On the page that opens, a list of existing users will appear (Figure 5). The properties of any of these users can be edited as you like, but we recommend you create a new user to manage the database you have just created. Creating a new user may increase the security of the database significantly, and also make accessing it simpler. On the page that is open, select the «Add a new user» link. Figure 5. On the form that follows, you must choose and enter a username, the IP address of the computer from which you will be connecting, and a password. 78

79 Figure 6. The following should be taken into account: Data Center and the MySQL server may be installed on different computers. In the Host field you must specify the IP address of the computer on which Data Center is installed. It is from this computer that connections to the MySQL server will be initialized. If the connection to the database will be made from a local computer, you may enter «localhost» in the Host field. If you need to allow access to the database to all users from a given computer, simply specify «Any user» as the «Username» value and give the IP address of the computer in the «Host» field. The user password may be left blank, but we strongly recommend for security reasons NOT to use a blank password. Besides completing the fields mentioned above, on this page you must select the privileges to be assigned to the user you are creating. We recommend you select all privileges by clicking «Check All». Once you have completed the form, click GO. 79
80 A message will appear, notifying you that the SQL request to create a user was completed successfully. Figure 7. Data Center Configuration Once the new database is created, Data Center should be set up in order to work with it. For this, you must open the program s management console, go to the «Configuration» page shown in Figure 8, and select «Data Storage Settings». Figure 8. In the window that opens, you will need to select a database type (in our case, MySQL). 80
81 Figure 9. On the second tab, you must specify the parameters for connecting to the database (Figure 10). 81
82 Figure 10. Here: IP address of MySQL server 3306 port through which the connection will be made (3306 used by default) User1 name of the user created earlier with the help of phpmyadmin Password password of the user created earlier with the help of phpmyadmin Activity name of the database created earlier, to which the connection will be made To test that the parameters are correct, click «Test Connection». Once you click «Test Connection», the program will attempt to connect to the database, and if the connection settings have been specified correctly, the message shown in Figure 11 will appear. Figure
83 Next, click «OK». A message will appear notifying you that Data Center must be restarted for the new parameters to be applied (Figure 12). Figure 12. Click «Yes», and Data Center will restart automatically. Once Data Center is restarted, all changes will take effect and the program will begin using the new database to store information. The status of the database can be viewed on the «Statistics» tab of the data storage management dialog (Figure 13). Conclusion: Figure 13. MySQL is the optimal solution for the majority of companies for a whole list of reasons: 83
84 it is free of charge. the server is very simple to set up. setting up the program to store information in the MySQL DBMS may significantly speed up the process of writing and accessing data, and also increase reliability. 84
85 PostgreSQL PostgreSQL is a free alternative to commercial DBMS (such as Oracle, MsSQL Server, IBM DB2, Informix and DBMS manufactured by Sybase), like other free DBMS (such as MySQL and Firebird). PostgreSQL is based on the SQL language and supports many of the capabilities of the SQL:2003 standard (ISO/IEC 9075). At this moment in time, PostgreSQL (version 8.4.0) has the following limitations: A maximum database size A maximum table size A maximum entry size A maximum field size A maximum number of entries in a table A maximum number of fields in a table A maximum number of indexes in a table no limitations 32 Tb 1,6 Tb 1 Gb no limitations , relating to field types no limitations The strong points of PostgreSQL are considered to be: support for databases of practically unlimited size; powerful and reliable transaction and replication mechanisms; inheritance; simple expandability. Configuring PostgreSQL Installation of PostgreSQL is relatively straightforward simply download the distribution kit from the official website: and launch the installation process. During the installation process, you will be required to enter the password of the database administrator (the user with login «postgres»). In cases where the database will be accessed from a remote machine, you will need to enable the remote connections in the DBMS settings. Step-by-step instructions are presented below: you will need to edit the file C:\Program Files\PostgreSQL\8.3\data\postgresql.conf, as shown in Figure 1, specifying as the value for the listen_addresses parameter the IP address from which the DBMS will listen and expect an incoming connection (By default, «*» is entered, meaning «All addresses». You may leave this value and not change anything if you wish). 85

86 Figure 1. Once you have edited the postgresql.conf file, save it under the same name. You will need to configure access permission from specific remote computers. For this, you will need to open the file C:\Program Files\PGSQL\8.3\data\pg_hba.conf in any text editor and find in it the following line: # Ipv4 local connections: In the list located below this line, add an entry corresponding with the range of IP addresses of the computers from which connections will be initialized. For example: host all all /32 md5 where, host signifies authorization at host level all signifies that access will be enabled to all databases for all users /32 range of IP addresses, from which a connection will be made (in the format IP/Mask) md5 defines the type of encryption for the information being transmitted An example of the contents of file pg_hba.confis shown in Figure 2. 86

87 Figure 2. Once you have edited and saved files postgresql.conf and pg_hba.conf you will need to restart the database server. To do this, simply restart the PostgreSQL Server service. Changes will be applied only once PostgreSQL is restarted. The next step is creating the database. To create a database, launch the PostgreSQL console (script C:\Program Files\PostgreSQL\8.3\scripts\runpsql.bat) and run the following command: CREATE DATABASE "Activity" WITH OWNER = postgres ENCODING = 'UTF8'; where, Activity - name of database being created postgres - name of database manager utf8 text encoding used to store data in the database. The result of the executed command is shown in Figure 3. 87

88 Figure 3. Data Center Configuration Once the new database is created, Data Center should be set up in order to work with it. For this, you must open the program s management console, go to the «Configuration» page shown in Figure 4, and select «Data Storage Settings». 88
89 Figure 4. In the dialog that opens, select a database type (in our case, PostgreSQL). 89
90 Figure 5. On the second tab, enter the connection parameters as shown in Figure 6, where, IP address of PostgreSQL port through which the connection will be made (5432 used by default) User name - name of user with privileges to connect to the database (all necessary privileges assigned to user «postgres» earlier) Password - password for user «postgres», chosen on installation of PostgreSQL 90
91 Figure 6. To test whether the connection parameters have been entered correctly, click «Test Connection». After you press «Test Connection», the program will attempt to connect to the database, and if the connection settings were specified correctly, the message shown in Figure 7 will appear. Next, click «OK». Figure 7. A message will appear notifying you that Data Center must be restarted for the new parameters to be applied (Figure 8). 91
92 Figure 8. Click «Yes», and Data Center will restart automatically. Once Data Center is restarted, all changes will take effect and the program will begin using the new database to store information. The status of the database can be viewed on the «Statistics» tab of the data storage management dialog (Figure 9). Figure 9. Conclusion: PostgreSQL - is a freely-distributed object-relational database management system (ORDBMS), the most developed open-source DBMS in the world, and is a real alternative to commercial databases. PostgreSQL is considered the best for a number of reasons: 92
93 support for databases of practically unlimited size; powerful and reliable transaction and replication mechanisms; inheritance; simple expandability. 93
94 Oracle Oracle is a DBMS designed to be incorporated into corporate distributed data processing networks (Enterprise Grid). It allows you to reduce IT expenses thanks to automated management, the use of inexpensive modular components and clustered servers, with the aim of using resources as efficiently as possible. The Oracle architecture is designed to work with large volumes of data and huge teams of users; it demonstrates unrivalled capabilities to provide high reliability, efficiency, scalability, security and self-management. This DBMS can be implemented effectively on any platform, from small blade servers to large symmetrical multiprocessor servers and multisite clusters of any size. The Oracle DBMS is supplied in four different versions, designed for different working scenarios and deployment of applications (and also differing in price). Edition Rastriction OS Enterprise Edition Standard Edition Standard Edition One Personal Edition Lite Express Edition cannot be installed on systems with more than four processor sockets cannot be installed on systems with more than two processor sockets one user for mobile and built-in devices free version; physical working memory 1 Gb, maximum volume of user data 4 Gb Windows 32-bit Linux x86 Configuring Oracle Installation and configuration of the Oracle server should be carried out by the administrator themselves. All described operations were carried out in Oracle Database 10g Express Edition. Oracle Database 10g Express Edition can be downloaded from the official Oracle site: During installation, you must enter the system administrator password (the user with login «system»). Immediately after installation, the program will launch the database homepage. On the authorization page, you must enter login «system» and the password chosen during installation, as shown in Figure 1. 94

95 On the page that is open, select «Administration» Figure 1. 95

96 On the page that is open, select «Database Users» Figure 2. 96

97 Figure 3. On the «Database Users» page, shown in Figure 4, a list of all existing users is displayed. To find a user by name, simply enter the name in the «Search Username» field and click «Go». You can adjust the view of the user list by using the View, Show and Display settings. View users displayed in icon or list view Show show all users, only database users, only external users Display maximum number of users displayed in the list To create a new user, click «Create>». 97

98 Figure 4. On the create new user page that opens, you must complete all fields, as specified in Figure 5. You will need to enter a name for the new user, a password, and confirm the password. Besides this, you will need to assign the user all the required privileges. To assign the user the required privileges, simply click «Check All» in the select privileges section. If the «Expire Password» option is set up, this user s password will have a time limit. Once the time limit has expired, the user will need to change their password. The «Account Status» option allows you to set the status of an account (blocked/unblocked). By using this option, you can temporarily disable unused accounts. Once you have entered all the required information, click «Create» to begin the user creation procedure. 98

99 Figure 5. On completion of the user creation procedure, the page shown in Figure 6 will open. If everything has been done correctly, and the user was created successfully, their name will appear in the list. 99
100 Figure 6. On the computer with Data Center, you will need to set up Oracle Database Instant Client. Oracle Database Instant Client can be downloaded here: To provide access to the database, simply download the Instant Client Package - Basic Lite package. Once it has downloaded, unzip the contents of the package to any folder, for example C:\Oracle\InstantClient. Next, copy the file tnsnames.ora from the c:\oraclexe\app\oracle\product\10.2.0\server\network\admin\ folder of the computer where the Oracle database server is installed to the C:\Oracle\InstantClient folder of the client s computer. 100
101 Data Center Configuration Once the new database is created, Data Center should be set up in order to work with it. For this, you must open the program s management console, go to the «Configuration» page shown in Figure 7, and select «Data Storage Settings». Figure 7. In the window that opens, you will need to select a database type (in our case, Oracle). 101
102 Figure 8. On the second tab, you must specify the parameters for connecting to the database (Figure 9), where, IP address of Oracle server User name - name of user with privileges to connect to the database (all necessary privileges assigned to user «Activity» earlier) Password - password for user «Activity» C:\Oracle\InstantClient\ - Oracle Instant Client install directory 102
103 Figure 9. Once you have pressed «Test Connection» the program will attempt to connect to the database, and if the connection settings have been specified correctly, the message shown in Figure 10. Next, click «OK». Figure 10. A message will appear notifying you that Data Center must be restarted for the new parameters to be applied (Figure 11). 103
104 Figure 11. Click «Yes», and Data Center will restart automatically. Once Data Center is restarted, all changes will take effect and the program will begin using the new database to store information. The status of the database can be viewed on the «Statistics» tab of the data storage management dialog (Figure 12). Figure 12. Conclusion: Oracle is the largest professional DBMS with a multitude of options and settings. This DBMS is designed to be incorporated into corporate distributed data processing networks. The Oracle architecture is designed to work with large volumes of data. Due to its complex setup and high price, this DBMS is not recommended for use on smaller networks. 104

105 Alias Management Another new interesting feature in the program is the support of aliases. Aliases are used to convert information from one view to another. For example, the login of a user is converted into its full name with the help of the alias. The program is distributed with a ready set of aliases: There are two types of aliases: Converters Value lists 105
106 Converters Converters allow you to use small subroutines in the Pascal language to convert the source value into the one you need. To make sure your converter operates properly you should implement the feature called «Convert» that will get a source string on its input and should generate an output string converted in accordance with your idea. For example, figure above shows how you can get a group name the user belongs to from that user s login. 106
107 Value Lists Value lists are used in case you need to convert some values known beforehand into other values known beforehand. As can be seen from the example with the HTTP Status field, alias converts source value of 100 into 100 Continue, and value of 404 into 404 Not Found. The list of values allows you to combine several source values into one group. It is convenient if you have several different values meaning the same. In order to correctly interpret the source data, the value list has the Values type property that can take the following values: string the source data are interpreted as is wildcard the source value is interpreted as a string that may contain wildcards. It is possible to use the special characters * and? regular expression the source value is interpreted as a string that may contain Perl-style regular expressions 107
108 custom function the source value is interpreted as an expression in the Pascal language that should return True. This expression may contain the predefined variable Source initialized by the source value that is converted by this alias. Also, any functions that you define in the global module can be used in this expression. Example: Alias implementation area is determined by the field it is used for. For example, the «Categories» alias is used for all values of the «Web Site Category» field. It means that this parameter is used to specify the values that will be passed on to the alias input. Every alias can be linked to its parent alias that can be linked to another alias in its turn. In case there is a link to the parent alias, the source value will be passed to the parent alias first and the result of this conversion will be passed to the initial alias as the input value. 108

109 License Management Any actions regarding license management of the program such as activation or management of licensed object list are performed with the use of the license management wizard that can be accessed in the «Data Center/Configuration» section. Licensing Schema Network sessions are subjects to licensing. Network session is a set of connections established from one client computer. And it does not matter how many applications establish Internet connections - all of them will be considered as one network session. Thus, a license is required for every network session. If the maximum number of licensed objects is exceeded, a new session will be blocked and the user will see the corresponding error message. It is possible to select the identification method for licensed objects. The following methods are supported: Client Username + Client Host Name Client Username + Client MAC Address Client Username + Client IP Address Depending on the company's policy, it is possible to select any of the above identification methods. 109

110 Licenses are assigned on the Data Center level. The number of agents sending information to the Data Center is not limited. If there is an additional Data Center installed in the network, it requires a separate license. 110

111 License Activation To activate the software you need the internet connection on the computer, on which the management console runs. Activation is a simple process during which the program connects to the activation server with the activation key and registers the program copy. In return, the activation server sends the registration key, which is stored on the local disk as a file. 111

112 Please specify valid address. This address will be used for important notifications only: free updates period completion, new product releases, etc. Generally, the activation is performed automatically without crashes. However, if connection fails during the activation, the program suggests manual activation. Click on the special «Activation» link to activate manually. 112

113 After that the program starts your Web browser and redirects it to the special page of the activation server. Finally, you will see the registration key in the browser window. Copy this key to the clipboard, go back to the program, paste it to the proper field of the dialog window and click Next. 113

114 Licensed Objects The list of licensed objects is filled automatically during the working process. The size of the list is regulated by the license capacity. When this capacity is exceeded, the objects are placed into the list of non-licensed objects. Attention! If you have made changes in the objects list and the license capacity is still not exceeded, then the new objects will be automatically added to the list on the next report building. Licensing Restrictions If the user is not on the list of licensed objects, the user s session will be blocked Unregistered version does not allow to export reports Unregistered version does not allow to print reports Unregistered version does not allow to send reports with task scheduler 114
115 Urls Database SurfCop features the in-built database containing multiple URLs for different sites. Each site in the database belongs to one or several categories. The program allows you to create rules and generate reports based on the categories a certain site belongs to. For instance, the program makes it possible for you to deny or restrict user access to all dating websites or social networking sites. Besides, you can create the report about all users that have recently visited job opening sites. Due to the large number of predefined categories and the possibility to create custom categories the program provides you with almost unlimited capabilities for controlling and monitoring content that your users browse. In the "Urls Database" page you can perform the following tasks with the URLs database: Define Categories - edit the list of predefined categories or create a custom category list. Resolve Web Site Category - specify the categories a certain site will belong to. Modify Urls Database - set categories for sites. 115
116 Monitoring SurfCop offers great capabilities for activity monitoring and statistics: Summaries allow you to view summaries in regards to different aspects. Activity Monitor makes it possible to view active and recently finished user sessions in real time. It also lets you display a detailed history of the last 2000 requests. Quota Monitor shows quota rule list and counter list created by these rules. Reports gives you unlimited capabilities for analyzing network activity of you company s employees. Allows generation of lots of predefined reports as well as creation of custom reports with any degree of complexity. 116

117 Reports Reports are the distinctive characteristic of the Red Line Software products. All company s products are supplied with powerful report generators that allow to analyze the activity in one or another cut set. Report Generation Report generation has three steps: Preparing a report generation request (Console) Report generation (Data Center) Report viewing (Console) The report preparation step includes specifying report options, making up filtering rules for elements that are to be included into the set, selecting the range of report dates, etc.. To start preparing a new report select «Generate a New Report». 117

118 Welcome page. Selecting the data storage and schema. 118
 displays information grouped in columns.")
119 Selecting the report type: Comparison reports (Vertical, Sections) displays information grouped in different sections. Report can be one-level or multilevel. Comparison reports (Horizontal, Columns) displays information grouped in columns. Allows you to create plane reports that present information in the form of columns. 119
120 Optional filter of entries which should be included into the final set. Report options: Report Style single-level or multi-level Percentage Column the column used for percentage calculation 120

121 Sort column the column used for data sorting Report section options. A report consists of one or more sections. Each section can be configured individually. If it hasn't been configured, the above-stated options will be used. Show in section what to show in section: elements, charts or both. Apply aliases to section items Apply or not apply aliases to items in the specified section. Maximum items number the maximum number of items to be shown in section. Filter1, Filter2 optional filters which can be used to exclude the elements, meeting certain conditions, from the generated report. Unlike the page with optional filters (see above), here the final and already grouped data is analyzed and filtered. 121

122 Report sections. Here you can make a list of sections, which should be included in the report, their order and optional settings for each section. You can override the default values for each section: the chart properties, aliases etc. 122

123 Columns included in the report. Here you can adjust width, positions and visibility of columns. To make it easier you may use a special visual editor which allows to adjust the columns using the mouse: Simply adjust width, positions and visibility and click OK. Report building dates range. 123

124 Report name and optional description. These settings are important if you plan to add the created report to the report repository for further use. 124
125 Final step. After clicking on Finish button the console sends a request to generate a report for the Data Center. 125
126 Report Sections When the process of report generation is performed SurfCop allows you to add different types of sections. The list given below describes each section: Application displays application name that is used for access. Application Protocol displays application protocol name that is used for access (e.g. HTTP, HTTPS, FTP, etc.). Array Server displays array server through which access is gained. Client Auth Schema displays the name of client authentication scheme. Client Host Name displays host name used for access. For the clients connecting from the external network this field will contain IP address. Client IP displays IP address of the computer used for access. Client MAC displays MAC address of the computer used for access. For the clients connecting from the external network this field will contain IP address. Client Network displays network name from which connection was made (internal, external, local host, etc.). Client Operating System displays operating system name used for access. Available for web traffic only. Client Port displays port used for access. Client Type displays client type name (Web Proxy, Firewall or SecureNAT). Client Username displays client user name that tried to get access. Client Workgroups displays name of workgroup accessing user belongs to. Data Source display source name that provides the information for report generation. Data Storage displays data storage name. Date displays date of access. Day of Week displays day of the week on which access was gained. Destination IP displays destination server IP address to which the connection was made. Destination Network displays destination network name to which the connection was made. Destination Port displays the port on which the connection was made. Direction displays traffic direction (inbound or outbound). Error Code displays error code. If connection was established without errors this field contains «OK». Hour displays time of the connection (hour). HTTP Status displays status value returned by a remote host. Available for web traffic only. MIME Type displays content data type (text, image, application, etc.). Available for web traffic only. Month displays month when connection was made. Object Source displays object source name. Object can be retrieved from internal cache of ISA Server or from Internet for example. Policy Check Result displays policy check results. If access was granted this field will contain «Access Allowed», otherwise it will contain «Access Denied». Policy Rule displays name of policy rule that allowed or denied the access. Service displays ISA Server service used for access (Firewall or Web Proxy). Transport Protocol displays transport protocol name used for access (for instance, TCP or UDP). Web Listener displays web listener name used to access published site. Web Site Category displays category name visited site belongs to. Web Site Country displays country name visited site located in. 126
127 Web Site Keywords displays phrases list used for search through the search engine (Google, Yahoo, Yandex, etc.) Web Site Name displays browsed web site name. Web Site Referrer displays reference to the web page from which browsed web page was visited. Web Site Request displays request for web site. Usually this request includes page name of the site that was visited. Web Site Title displays web site title, which is presented at the top of web browser. Year displays year of access. 127

128 Repository Repository is designed to store frequently used reports. Repository is a common folder with free structure of subfolders, which contain files with reports settings. The report can be relocated, renamed, edited or generated any time. To make file and folder migration easier, Drug'n'Drop feature is suported. 128

129 Report Generator Task Bar Generate a New Report activates a new report wizard Generate a Predefined Report activates the report repository. After one or more reports have been selected they are sent to generation. Print Report activates a report print preparation dialog. This feature is available only in the registered version. Report activates a report preparation dialog. This feature is available only in the registered version. Export Report activates a dialog of saving the report on the disk. This feature is available only in the registered version. Edit Report Settings activates a report settings editing dialog. After clicking OK the report with edited settings is sent to generation again Save Report Settings activates a dialog of selecting the existing report the settings of which are to be replaced with the settings of the current report. Save Report Settings As activates a dialog of selecting a new report name and its location in the report repository. After that the report is saved to the repository. Toggle Report Style toggles the report style from Single Level to Multi Level. When clicking on the button the program sends a request to the Data Center to generate one more report with edited settings. 129
130 Find Text activates a dialog of searching the substring in the report text. Show/Hide Charts shows/hides the charts. Configure Settings activates a report generator appearance configuring dialog. Manage Scheduled Tasks activates a scheduled tasks list managing dialog. 130
131 Task Manager Any report stored in the report repository may be used for automatic scheduled generation. Each scheduled task can build reports with unlimited number of templates. Each report can be sent by , printed or saved into a folder on the disk or in LAN (e. g. on SharePoint server). 131

132 To start creating a scheduled task click on Add button. The reports are selected from the report repository which will be used as generation templates. Multiselect is supported. 132

133 Specify delivery ways. Three ways are currently supported: Send by Save into a folder Save into a folder The delivery ways can be combined. If you select «Send by » you can also configure message settings: message subject and body. In both fields you can use different macro objects which are replaced with real values on execution of the scheduled task. 133

134 Configure delivery settings. You can configure the identical settings for several simultaneously selected reports at a time. Each delivery way has its individual settings. Moreover, these settings are individual for every report template. 134

135 Report file name template a template used to form a report file name when saving it on the disk. It can be either a common string, e. g. «somefile.doc», or a combination of one or more macro objects which will be replaced with real values during the report generation. Possible values: o %REPORTNAME% - report name o %TASKNAME% - scheduled task name o %DATE% - report generation date o %UNIQUEID% - unique number o %DATEFROM% - beginning of the report generation dates range o %DATEFROM(mm/dd/yyyy hh/mm)% - beginning of the report generation dates range adjusted to the specified format o %DATETO% - end of the report generation dates range o %DATETO(mm/dd/yyyy hh/mm)% - end of the report generation dates range adjusted to the specified format Report format the format in which the report will be built Pack report into a zip archive the indicator showing that the report should be packed into the zip archive before sending. 135

136 If «Send by » is selected as the delivery way you should specify message recipients. Warning! The message will be sent from the computer where the Data Center is installed. Correspondingly, you should properly configure the settings of SMTP server which will be used for message delivery, so that the message could be delivered successfully. 136

137 If «Save into a Folder» is selected as the delivery way you should specify the name of existing folder into which the file will be saved. If the specified folder is networked you should specify the properties of the user account which will be used for access to the network resource. If you specify incorrect properties, saving to the network folder will finish with an error. Saving is made from computer on which the Data Center is installed. 137
138 If «Send to a Printer» is selected as the delivery way you should specify the printer name (on computer where the Data Center is installed) and paper layout. If the specified printer is a network accessible one, you should specify the properties of the user account which will be used for access to the network printer. If you specify incorrect properties, printing to the network printer will finish with an error. Printing is made from computer on which the Data Center is installed. 138
 and are calculated upon executing the scheduled task.")
139 Specify the dates range for scheduled reports. The ranges are relative (to the task execution date) and are calculated upon executing the scheduled task. You can also specify the fixed absolute dates range. Configure task schedule. 139

140 Configure task repetition. Specify name and optional description of scheduled task. 140

141 The final step of creating the scheduled task. After the task has been created, it will start executing in the scheduled time. During task execution the reports will be built by the specified templates within the specified dates range, and the result will be delivered in the specified way to the specified addresses. 141

142 Summaries Summaries represent a set of simple graphical reports that make it possible to get general statistic picture of your organization in matter of seconds. The current version of SurfCop offers the following Summaries: Users traffic distribution on a per-user basis. Computers traffic distribution on a per-computer basis. IP Addresses traffic distribution on a per-ip address basis. Protocols traffic distribution on a per-protocol basis. Sites traffic distribution per visited web sites. Browsers traffic distribution per web browsers used in organization. OSs traffic distribution per OSs used in organization. Agents traffic distribution per applications used in organization for the Internet access. HTTP Responses traffic distribution per HTTP codes, returned by web servers. Cache Performance shows traffic ratio retrieved from cache and the Internet. Daily Traffic traffic distribution on a per-time-of-day basis. Connections distribution of the number of simultaneous connections to Microsoft ISA Server based on time of day. Processing Time distribution of average request processing time based on time of day. Summaries have the following settings: 142

143 Traffic Type allows you to specify traffic type presented in summary. Here you have the following options: o Web Traffic only web traffic will be displayed in summaries. o non-web summaries will present not only web traffic. o Both both traffic types will be presented in summaries. Traffic Direction enables specifying traffic direction that will be presented in the summary. Here you have the following options: o Incoming inbound traffic only. This is the traffic generated by the external users who visit resources internally published in the office (corporate web sites, internal mail servers, OWA sites, etc.). o Outgoing outbound traffic only. This is the traffic generated by the internal users who visit any external resources (different web sites, external mail servers, etc.). o Both both directions of traffic. Interval time interval the statistic data should be taken from. Here you have the following options: o One day o One week o One month Summaries have the following appearance settings: Size Units this group of settings defines the way traffic information will be presented. Summaries Size number of items presented in summary table. 143

144 Summaries list of summaries that will be displayed on the page. At list one summary should be selected from the list. Each summary has its own chart display settings. To configure these settings you simply double-click the chart. The following dialog box will open: 144

145 Chart type allows selecting chart type Max items number allows specifying maximum number of items presented in the chart Palette allows you to select color palette for the chart 3-D chart if you have this option enabled, 3D charts will be displayed Show legend box if this option is checked, you will see legend box next to the chart For the «Vertical Bar Chart» and «Horizontal Bar Chart» types you have following options at the bottom of the «Chart Customization» window: Multi color chart chart colors will depend on the color palette you ve chosen Single color chart you can select chart color Use semi-transparent colors For the «Pie Chart» type you have the following options at the bottom of the «Chart Customization» window: Radius pie chart radius Labels layout allows you to place labels around the chart or next to it Show labels join line if this option is checked, labels will be joined to the corresponding parts of the chart by lines 145

146 Quota Monitor Quota monitor is designed to view, analyze and edit current quota counter readings. Quota monitor is a table with two tabs: Traffic Counters and Time Counters. Each tab displays currently existing counters grouped by quota rules that created them. The table contains user names that have counters created for them, current counter data, percent of quota used, and the amount of quota left. For time counters besides the time spent by the user on the Internet the table displays web sites that the user has visited within this time. If the number of users in your organization is large the table will show great number of counters as well. To decrease this number you can use the feature of counter filtering. For this purpose you should use the «Edit Filter» option. 146
147 Basic SurfCop dialog box makes it possible to create counter list filtering conditions. To disable filter you simply press «Clear», and then OK. Quota monitor has following appearance settings: 147
148 Size Units set of parameters that define the way traffic information will be presented. Expand nodes after refresh if this checkbox is checked, counter tree will expand all of its nodes each time it is refreshed. 148
149 Client Details list of attributes that will be displayed in the counter list within the «User» column. Besides the abovementioned appearance settings you can configure visibility of columns in the counter list. To do so you just need to right-click anywhere in the list title area and choose the «Add/Remove Columns» command from the context menu. 149

150 Quota monitor allows you to perform following operations with counters: Clear All Counters all current counters will be reset. All blocked users will immediately get access to the resources that have previously been blocked. Clear Selected Counter resets a selected counter only. If a user has been blocked due to exceeding of quota he or she will immediately get access. Edit Selected Counter allows editing the data of the selected counter. Depending on counter type this dialog box can differ, but its major function remains the same increase or decrease counter data. Export Counters exporting of counter list to an XML file 150
151 Activity Monitor Activity monitor is used to perform monitoring over the users Internet activity. By now activity monitor contains three tabs: Active Sessions. This tab shows all sessions that are active at present time. Recently Finished Sessions. This tab contains the list of sessions that have finished within the previous minute. History. This tab contains a detailed log about last 2000 requests. How It Works When a user generates new request it is immediately recorded into the Active Sessions list. When the request is over it is moved to the Recently Finished Sessions list. The session is retained in this list for one minute, and right after that is moved to History. History stores last 2000 sessions. All the entries above that limit are deleted from the activity monitor. When it happens, the only available option for data analysis you have is reports. If the number of employees in your organization is huge, the table will display great number of sessions respectively. To decrease this number, you might want to use session filtering feature. To do so you just need to use «Edit Filter». 151
152 Basic SurfCop dialog box makes it possible to create session list filtering conditions. To disable filter you simply press «Clear», and then OK. Warning! Filters of these three monitors are independent so you will have to create separate filter list for each monitor. Activity monitors have the following appearance settings: 152
153 Size Units set of parameters that define the way traffic information will be presented. Expand nodes after refresh if this checkbox is checked, session tree will expand all of its nodes each time it is refreshed. 153

154 Show icons this checkbox is responsible for enabling and disabling icon display feature in the session list. Enable coloring this checkbox is responsible for enabling and disabling the feature that highlights allowed and denied sessions with different colors. Besides the abovementioned appearance settings you can configure visibility of columns in the session list. To do so you just need to right-click anywhere in the list title area and choose the «Add/Remove Columns» command from the context menu. 154

155 Warning! Filters of these three monitors are independent so you will have to create separate filter list for each monitor. Configuring Activity Monitor Layout Activity monitor is a tree that can contain several nesting levels and several columns, which show different parameters of sessions. Each level can contain a group of unlimited number of parameters. Number of monitor levels is also unlimited. Each session is characterized by a large number of parameters. And here one administrator may be interested in one type of parameters, while the other is interested in the other parameters. This is why the mechanism of activity monitor layout configuration was added to the program that allows configuring monitor in accordance with the administrator s needs. Layout configuration wizard is a dialog box that allows you to configure the number of levels and select those session parameters, which will be shown on each level. 155

156 To add a new level you simply click the «Add Level» button. Doing so will open a dialog box, where the entire set of existing session parameters will be shown. You can check one or more parameters, and change the order, in which they will be displayed, using Up and Down buttons. When you click ОК the new level is created. The levels can be moved up or down against each other, edited or deleted. To clear the configuration completely, you simply use the «Delete All» button. Some examples of layouts are given below: This layout allows you to perform monitoring in regards to protocols, site names and users. 156

157 This layout lets you monitor site titles users are currently browsing. This layout should be used with session filtering feature. 157
158 Useful Information Each activity monitor highlights the entries with different colors. Requests that were successfully processed are displayed in green. Requests that were finished with some errors are displayed in red. Active Sessions monitor has an additional option Kill session. This option lets you immediately finish user session. This command can be applied to several sessions simultaneously. Each monitor has its own settings for filtering, appearance and layout configuration. To export session list to an XML file you can use «Export Sessions» option. 158

159 Bandwidth Monitor Bandwidth monitor is used for analysis and current speed counter data. Bandwidth monitor is a table that contains currently existing counters grouped by bandwidth rules that created them. The table contains user names that have counters created for them, as well as charts depicting inbound and outbound bandwidth consumption. If the number of users in your organization is large the table will show great number of counters as well. To decrease this number you can use the feature of counter filtering. For this purpose you should use the «Edit Filter» option. 159
160 Basic SurfCop dialog box makes it possible to create counter list filtering conditions. To disable filter you simply press «Clear», and then OK. Bandwidth monitor has the following appearance settings: 160
161 Size Units set of parameters that define the way speed information will be displayed. Expand nodes after refresh if this checkbox is enabled, counter tree will expand all of its nodes each time it is refreshed. 161
162 Client Details list of attributes that will be displayed in the counter list within the «User» column. Besides the abovementioned appearance settings you can configure visibility of columns in the counter list. To do so you just need to right-click anywhere in the list title area and choose the «Add/Remove Columns» command from the context menu. 162

163 Bandwidth monitor allows you to perform following tasks with the counters: Clear All Counters all current counters will be reset. Delete Selected Counter this action deletes selected counter. Export Counters allows exporting counter list to an XML file. 163

164 Troubleshooting The program has a special built-in tool for detecting errors occurring in each of the application modules and also for all kinds of information messages Event Viewer. If an error occurs in the management console, you should check Event Viewer in the first place and find out the type of the occurred error, its code and message text. It allows you to quickly solve the problem in most cases. Actually, this tool similar to the standard Windows Event Viewer, except that all events shown here are related only to SurfCop. You can see the following information in the table: Event type, date and time (error, warning or information) Category 164

165 Event source: data center, agent or console The computer name where the event occurred Message text You can configure the way events are logged. Use the following dialog box for that: There are 4 logging modes available: Do not log anything Log all events immediately after they occur Log unique events only. An event is not considered unique if there is an event with the same properties, but it occurred at a different time. Therefore, if you delete all events, new events will start appearing as they occur. Log subsequent duplicate events only if number of minutes since last occurrence is more than the specified value. This mode is recommended and allows you to protect the event log against an overflow. After you select the logging mode, the changes will be applied to all application modules: agents, console and data center. 165
166 Practical Recommendations for Software Configuration Below you will see several typical cases of how the application may function and the optimal configuration variants from our point of view. Scenario 1 Reference conditions: All computers and devices are connected to a single network The Internet access is provided through Microsoft ISA Server/Forefront TMG Task: Implement traffic controlling system Solution: This task can be solved in several ways. We offer a variant, where all system components will be deployed on the Microsoft ISA Server/Forefront TMG computer. In this case the data will be logged to the database located on the same machine the Microsoft ISA Server/Forefront TMG installed on. To manage the program and view stats data you simply establish remote connection to the server from any computer on the network using the Remote Desktop feature or any other remote management capabilities. This scenario is the most simple to realize, but it is also the least convenient to use. The thing is that if the physical access to the server with the program installed is hampered, and the third party products for remote desktop management are unavailable, it is impossible to manage this program. Besides managing the program can also be complicated due to the limitation of the remote desktop management features. In case you have constant physical access to the computer with Microsoft ISA Server/Forefront TMG installed this scenario is the most effective. 166
167 167
168 Scenario 2 Reference conditions: Dedicated database server All computers and devices are connected to a single network The Internet access is provided through Microsoft ISA Server/Forefront TMG Task: Implement traffic controlling system Solution: To implement this task we offer a variant with the installation of Data Center on a dedicated machine. In this case you only need to install the Agent and management console on the Microsoft ISA Server/Forefront TMG computer. Data Center should be installed on the dedicated database server machine. As a result program management and statistic viewing tasks will be performed the same way that was described in previous scenario, but all information about traffic will be stored on the dedicated server. With the help of this scenario you can spare disk space of the Microsoft ISA Server/Forefront TMG computer significantly due to the fact that database will now be stored on the remote computer. Besides the workload produced by log generation process will not affect the performance of Microsoft ISA Server/Forefront TMG. 168
169 Scenario 3 Reference conditions: Dedicated database server All computers and devices are connected to a single network The Internet access is provided through Microsoft ISA Server/Forefront TMG Task: Implement traffic controlling system Solution: The most interesting is the scenario, where all system components run on separate machines. In the case you will only need to install the program Agent on the Microsoft ISA Server/Forefront TMG computer. Data Center can be installed on the remote computer. Management console can be installed on the administrator s desktop. To successfully install Management Console of the program on the admin s computer it should have Microsoft ISA Server/Forefront TMG management console installed on it. Program management and log generation can be performed directly from the admin s computer using management console. You should specify Data Center address in the Agent settings that will be used for data storage (Refer the product documentation for more details). 169
170 Scenario 4 Reference Conditions: Dedicated database server All computers and devices are connected to a single network The Internet access is provided through Microsoft ISA Server/Forefront TMG Two or more Microsoft ISA Server/Forefront TMG servers are combined into the array Task: Implement traffic controlling system Solution: To implement traffic controlling system on the basis of several Microsoft ISA Server/Forefront TMG servers combined into an array you will have to install program Agents on all array member computers. Data Center can be installed on the dedicated database server. In this case the admin s computer should have Microsoft ISA Server/Forefront TMG management console and SurfCop management console installed on it. To manage the program and view statistics the administrator can connect to the configuration storage server of the Microsoft ISA Server/Forefront TMG array using management console. 170
171 171
172 Scenario 5 Reference Conditions: Two or more dedicated database servers All machines and devices are connected to a single network The Internet access is provided through Microsoft ISA Server/Forefront TMG Four or more Microsoft ISA Server/Forefront TMG servers are combined into two or more arrays Task: Implement traffic controlling system Solution: In case you organization has several Microsoft ISA Server/Forefront TMG arrays one of the possible solutions is to use two or more Data Centers. In this case each array will be connected to its own Data Center. Admin s computer should have Microsoft ISA Server/Forefront TMG management console and SurfCop management console installed on it. To manage the program and view statistics the administrator can connect to the configuration storage server of Microsoft ISA Server/Forefront TMG array using management console. In the program settings you will have to specify the address of Data Centers, where the gathered data will be stored for each array. It is recommended to use a separate Data Center for each Microsoft ISA Server/Forefront TMG array. This will allow you to evenly distribute the load among Data Centers as well as separate the statistics within the context of each array. 172
173 173
174 Scenario 6 Reference Conditions: Dedicated database server All machines and devices are connected to a single network The Internet access is provided through Microsoft ISA Server/Forefront TMG Four or more Microsoft ISA Server/Forefront TMG servers are combined into two or more arrays Task: Implement traffic controlling system Solution: To implement this scenario you can use one Data Center. In this case admin s computer should have the Microsoft ISA Server/Forefront TMG management console and SurfCop management console installed on it. To manage the program and view statistics the administrator can connect to the configuration storage server of Microsoft ISA Server/Forefront TMG array using management console. You should specify the address of the same Data Center for both arrays in the program settings (Refer the product documentation for more details). 174
175 175
176 Scenario 7 Reference conditions: All machines and devices are connected to a single network The Internet access is provided through Microsoft ISA Server/Forefront TMG Task: Implement traffic monitoring system Solution: SurfCop can be configured to work in monitoring mode and traffic counting (without control). If you plan to use the program only for monitoring purposes you should disable or remove all web access and quota rules in SurfCop. Moreover you should disable global web access policies. In this case the Data Center component can be installed either on a local computer or on a remote machine. For more convenient log generation and statistics viewing you can install the program management console on the administrator s desktop. If you plan to use the program for tracing the large volumes of traffic you are recommended to use enterprise database as the storage for data (for instance MS SQL or Oracle). 176
177 Scenario 8 Reference conditions: All machines and devices are connected to a single network The Internet access is provided through Microsoft ISA Server/Forefront TMG Task: Implement traffic quota system Solution: SurfCop can be configured to work in the traffic quota mode. To use SurfCop only as a traffic quota mechanism you should create respective quota rules in the Quota Rules section. Rules can be configured either for allocating quota for traffic or time spent by the users on the Internet. If nothing but quota functionalities is required web access rules can be disabled or removed. You can also disable global web access policies. To save the resources of quota server the stats collecting module can also be disabled. To do this you simply need to check the «Disable activity logging» checkbox located in the global settings of the program. Once you have done it the logs will become unavailable (Refer the product documentation for more details). 177
Printer Activity Monitor. System Administrator s Guide
 Printer Activity Monitor System Administrator s Guide Contents INTRODUCTION... 5 PROGRAM FEATURES... 7 SYSTEM REQUIREMENTS... 7 MANAGEMENT CONSOLE... 8 DATA CENTER... 9 AGENTS...12 Collecting Data on Workstations
Desktop Surveillance Help
 Desktop Surveillance Help Table of Contents About... 9 What s New... 10 System Requirements... 11 Updating from Desktop Surveillance 2.6 to Desktop Surveillance 3.2... 13 Program Structure... 14 Getting
User Manual. Onsight Management Suite Version 5.1. Another Innovation by Librestream
 User Manual Onsight Management Suite Version 5.1 Another Innovation by Librestream Doc #: 400075-06 May 2012 Information in this document is subject to change without notice. Reproduction in any manner
WhatsUp Gold v16.3 Installation and Configuration Guide
 WhatsUp Gold v16.3 Installation and Configuration Guide Contents Installing and Configuring WhatsUp Gold using WhatsUp Setup Installation Overview... 1 Overview... 1 Security considerations... 2 Standard
Charter Business Desktop Security Administrator's Guide
 Charter Business Desktop Security Administrator's Guide Table of Contents Chapter 1: Introduction... 4 Chapter 2: Getting Started... 5 Creating a new user... 6 Recovering and changing your password...
TSM Studio Server User Guide 2.9.0.0
 TSM Studio Server User Guide 2.9.0.0 1 Table of Contents Disclaimer... 4 What is TSM Studio Server?... 5 System Requirements... 6 Database Requirements... 6 Installing TSM Studio Server... 7 TSM Studio
How To Create An Easybelle History Database On A Microsoft Powerbook 2.5.2 (Windows)
") Introduction EASYLABEL 6 has several new features for saving the history of label formats. This history can include information about when label formats were edited and printed. In order to save this history,
Introduction EASYLABEL 6 has several new features for saving the history of label formats. This history can include information about when label formats were edited and printed. In order to save this history,
Installing GFI MailSecurity
 Installing GFI MailSecurity Introduction This chapter explains how to install and configure GFI MailSecurity. You can install GFI MailSecurity directly on your mail server or you can choose to install
Step-by-Step Configuration
 Step-by-Step Configuration Kerio Technologies Kerio Technologies. All Rights Reserved. Printing Date: August 15, 2007 This guide provides detailed description on configuration of the local network which
SecuraLive ULTIMATE SECURITY
 SecuraLive ULTIMATE SECURITY Home Edition for Windows USER GUIDE SecuraLive ULTIMATE SECURITY USER MANUAL Introduction: Welcome to SecuraLive Ultimate Security Home Edition. SecuraLive Ultimate Security
Ekran System Help File
 Ekran System Help File Table of Contents About... 9 What s New... 10 System Requirements... 11 Updating Ekran to version 4.1... 13 Program Structure... 14 Getting Started... 15 Deployment Process... 15
Synchronizer Installation
 Synchronizer Installation Synchronizer Installation Synchronizer Installation This document provides instructions for installing Synchronizer. Synchronizer performs all the administrative tasks for XenClient
System Administration Training Guide. S100 Installation and Site Management
 System Administration Training Guide S100 Installation and Site Management Table of contents System Requirements for Acumatica ERP 4.2... 5 Learning Objects:... 5 Web Browser... 5 Server Software... 5
Kaseya Server Instal ation User Guide June 6, 2008
 Kaseya Server Installation User Guide June 6, 2008 About Kaseya Kaseya is a global provider of IT automation software for IT Solution Providers and Public and Private Sector IT organizations. Kaseya's
Table of Contents. Introduction...9. Installation...17. Program Tour...31. The Program Components...10 Main Program Features...11
 2011 AdRem Software, Inc. This document is written by AdRem Software and represents the views and opinions of AdRem Software regarding its content, as of the date the document was issued. The information
Sophos Mobile Control Installation guide. Product version: 3.5
 Sophos Mobile Control Installation guide Product version: 3.5 Document date: July 2013 Contents 1 Introduction...3 2 The Sophos Mobile Control server...4 3 Set up Sophos Mobile Control...10 4 External
NovaBACKUP. Storage Server. NovaStor / May 2011
 NovaBACKUP Storage Server NovaStor / May 2011 2011 NovaStor, all rights reserved. All trademarks are the property of their respective owners. Features and specifications are subject to change without notice.
NovaBACKUP Storage Server User Manual NovaStor / April 2013
 NovaBACKUP Storage Server User Manual NovaStor / April 2013 2013 NovaStor, all rights reserved. All trademarks are the property of their respective owners. Features and specifications are subject to change
GFI Product Manual. ReportPack Manual
 GFI Product Manual ReportPack Manual http://www.gfi.com [email protected] The information and content in this document is provided for informational purposes only and is provided "as is" with no warranty of
DiskPulse DISK CHANGE MONITOR
 DiskPulse DISK CHANGE MONITOR User Manual Version 7.9 Oct 2015 www.diskpulse.com [email protected] 1 1 DiskPulse Overview...3 2 DiskPulse Product Versions...5 3 Using Desktop Product Version...6 3.1 Product
How To Manage Storage With Novell Storage Manager 3.X For Active Directory
 www.novell.com/documentation Installation Guide Novell Storage Manager 4.1 for Active Directory September 10, 2015 Legal Notices Condrey Corporation makes no representations or warranties with respect
QUANTIFY INSTALLATION GUIDE
 QUANTIFY INSTALLATION GUIDE Thank you for putting your trust in Avontus! This guide reviews the process of installing Quantify software. For Quantify system requirement information, please refer to the
HP Device Manager 4.6
 Technical white paper HP Device Manager 4.6 Installation and Update Guide Table of contents Overview... 3 HPDM Server preparation... 3 FTP server configuration... 3 Windows Firewall settings... 3 Firewall
There are numerous ways to access monitors:
 Remote Monitors REMOTE MONITORS... 1 Overview... 1 Accessing Monitors... 1 Creating Monitors... 2 Monitor Wizard Options... 11 Editing the Monitor Configuration... 14 Status... 15 Location... 17 Alerting...
WebSpy Vantage Ultimate 2.2 Web Module Administrators Guide
 WebSpy Vantage Ultimate 2.2 Web Module Administrators Guide This document is intended to help you get started using WebSpy Vantage Ultimate and the Web Module. For more detailed information, please see
Installation Guide for Pulse on Windows Server 2012
 MadCap Software Installation Guide for Pulse on Windows Server 2012 Pulse Copyright 2014 MadCap Software. All rights reserved. Information in this document is subject to change without notice. The software
USER GUIDE WEB-BASED SYSTEM CONTROL APPLICATION. www.pesa.com August 2014 Phone: 256.726.9200. Publication: 81-9059-0703-0, Rev. C
 USER GUIDE WEB-BASED SYSTEM CONTROL APPLICATION Publication: 81-9059-0703-0, Rev. C www.pesa.com Phone: 256.726.9200 Thank You for Choosing PESA!! We appreciate your confidence in our products. PESA produces
IceWarp to IceWarp Server Migration
 IceWarp to IceWarp Server Migration Registered Trademarks iphone, ipad, Mac, OS X are trademarks of Apple Inc., registered in the U.S. and other countries. Microsoft, Windows, Outlook and Windows Phone
Installation Guide for Pulse on Windows Server 2008R2
 MadCap Software Installation Guide for Pulse on Windows Server 2008R2 Pulse Copyright 2014 MadCap Software. All rights reserved. Information in this document is subject to change without notice. The software
BlackBerry Enterprise Service 10. Version: 10.2. Configuration Guide
 BlackBerry Enterprise Service 10 Version: 10.2 Configuration Guide Published: 2015-02-27 SWD-20150227164548686 Contents 1 Introduction...7 About this guide...8 What is BlackBerry Enterprise Service 10?...9
Installing and Configuring vcloud Connector
 Installing and Configuring vcloud Connector vcloud Connector 2.7.0 This document supports the version of each product listed and supports all subsequent versions until the document is replaced by a new
Installation & Configuration Guide
 Installation & Configuration Guide Bluebeam Studio Enterprise ( Software ) 2014 Bluebeam Software, Inc. All Rights Reserved. Patents Pending in the U.S. and/or other countries. Bluebeam and Revu are trademarks
Plesk 11 Manual. Fasthosts Customer Support
 Fasthosts Customer Support Plesk 11 Manual This guide covers everything you need to know in order to get started with the Parallels Plesk 11 control panel. Contents Introduction... 3 Before you begin...
Dell SupportAssist Version 2.0 for Dell OpenManage Essentials Quick Start Guide
 Dell SupportAssist Version 2.0 for Dell OpenManage Essentials Quick Start Guide Notes, Cautions, and Warnings NOTE: A NOTE indicates important information that helps you make better use of your computer.
WhatsUp Gold v16.1 Installation and Configuration Guide
 WhatsUp Gold v16.1 Installation and Configuration Guide Contents Installing and Configuring Ipswitch WhatsUp Gold v16.1 using WhatsUp Setup Installing WhatsUp Gold using WhatsUp Setup... 1 Security guidelines
AVG 9.0 Internet Security Business Edition
 AVG 9.0 Internet Security Business Edition User Manual Document revision 90.5 (16. 4. 2010) C opyright AVG Technologies C Z, s.r.o. All rights reserved. All other trademarks are the property of their respective
http://docs.trendmicro.com
 Trend Micro Incorporated reserves the right to make changes to this document and to the products described herein without notice. Before installing and using the product, please review the readme files,
Jetico Central Manager. Administrator Guide
 Jetico Central Manager Administrator Guide Introduction Deployment, updating and control of client software can be a time consuming and expensive task for companies and organizations because of the number
Migrating helpdesk to a new server
 Migrating helpdesk to a new server Table of Contents 1. Helpdesk Migration... 2 Configure Virtual Web on IIS 6 Windows 2003 Server:... 2 Role Services required on IIS 7 Windows 2008 / 2012 Server:... 2
XenClient Enterprise Synchronizer Installation Guide
 XenClient Enterprise Synchronizer Installation Guide Version 5.1.0 March 26, 2014 Table of Contents About this Guide...3 Hardware, Software and Browser Requirements...3 BIOS Settings...4 Adding Hyper-V
If you have questions or find errors in the guide, please, contact us under the following e-mail address:
 1. Introduction... 2 2. Remote Access via PPTP... 2 2.1. Configuration of the Astaro Security Gateway... 3 2.2. Configuration of the Remote Client...10 2.2.1. Astaro User Portal: Getting Configuration
safend a w a v e s y s t e m s c o m p a n y
 safend a w a v e s y s t e m s c o m p a n y SAFEND Data Protection Suite Installation Guide Version 3.4.5 Important Notice This guide is delivered subject to the following conditions and restrictions:
Getting Started. Symantec Client Security. About Symantec Client Security. How to get started
 Getting Started Symantec Client Security About Security Security provides scalable, cross-platform firewall, intrusion prevention, and antivirus protection for workstations and antivirus protection for
GUARD1 PLUS SE Administrator's Manual
 GUARD1 PLUS SE Administrator's Manual Version 4.4 30700 Bainbridge Road Solon, Ohio 44139 Phone 216-595-0890 Fax 216-595-0991 [email protected] www.guard1.com i 2010 TimeKeeping Systems, Inc. GUARD1 PLUS
KASPERSKY LAB. Kaspersky Administration Kit version 6.0. Administrator s manual
 KASPERSKY LAB Kaspersky Administration Kit version 6.0 Administrator s manual KASPERSKY ADMINISTRATION KIT VERSION 6.0 Administrator s manual Kaspersky Lab Visit our website: http://www.kaspersky.com/
Configuring, Customizing, and Troubleshooting Outlook Express
 3 Configuring, Customizing, and Troubleshooting Outlook Express............................................... Terms you ll need to understand: Outlook Express Newsgroups Address book Email Preview pane
1. Set Daylight Savings Time... 3. 2. Create Migrator Account... 3. 3. Assign Migrator Account to Administrator group... 4
 1. Set Daylight Savings Time... 3 a. Have client log into Novell/Local Machine with Administrator Account...3 b. Access Adjust Date/Time...3 c. Make sure the time zone is set to Central Time...3 2. Create
Step-by-Step Configuration
 Step-by-Step Configuration Kerio Technologies C 2001-2003 Kerio Technologies. All Rights Reserved. Printing Date: December 17, 2003 This guide provides detailed description on configuration of the local
WhatsUp Gold v16.2 Installation and Configuration Guide
 WhatsUp Gold v16.2 Installation and Configuration Guide Contents Installing and Configuring Ipswitch WhatsUp Gold v16.2 using WhatsUp Setup Installing WhatsUp Gold using WhatsUp Setup... 1 Security guidelines
Astaro Security Gateway V8. Remote Access via L2TP over IPSec Configuring ASG and Client
 Astaro Security Gateway V8 Remote Access via L2TP over IPSec Configuring ASG and Client 1. Introduction This guide contains complementary information on the Administration Guide and the Online Help. If
1. PRODUCT OVERVIEW... 3 2. PRODUCT COMPONENTS... 3
 Contents 1. PRODUCT OVERVIEW... 3 2. PRODUCT COMPONENTS... 3 2.1. SERVER-BASED COMPONENTS:... 3 2.1.1. Interception Server... 3 2.1.2. Database server... 3 2.1.3. Data processing server... 3 2.1.3.1. Search
Enterprise Manager. Version 6.2. Installation Guide
 Enterprise Manager Version 6.2 Installation Guide Enterprise Manager 6.2 Installation Guide Document Number 680-028-014 Revision Date Description A August 2012 Initial release to support version 6.2.1
Xythos on Demand Quick Start Guide For Xythos Drive
 Xythos on Demand Quick Start Guide For Xythos Drive What is Xythos on Demand? Xythos on Demand is not your ordinary online storage or file sharing web site. Instead, it is an enterprise-class document
Vector Asset Management User Manual
 Vector Asset Management User Manual This manual describes how to set up Vector Asset Management 6.0. It describes how to use the: Vector AM Console Vector AM Client Hardware Inventory Software Inventory
Migrating TimeForce To A New Server
 Rev. 4/28/14 Migrating TimeForce To A New Server Table of Contents 1. Installation Prerequisites... 2 Required... 2 Recommended... 3 2. Update to a Migration Compatible Version... 3 Determine the Database
Sophos for Microsoft SharePoint startup guide
 Sophos for Microsoft SharePoint startup guide Product version: 2.0 Document date: March 2011 Contents 1 About this guide...3 2 About Sophos for Microsoft SharePoint...3 3 System requirements...3 4 Planning
User Guide. Version 3.2. Copyright 2002-2009 Snow Software AB. All rights reserved.
 Version 3.2 User Guide Copyright 2002-2009 Snow Software AB. All rights reserved. This manual and computer program is protected by copyright law and international treaties. Unauthorized reproduction or
National Fire Incident Reporting System (NFIRS 5.0) Configuration Tool User's Guide
 Configuration Tool User's Guide") National Fire Incident Reporting System (NFIRS 5.0) Configuration Tool User's Guide NFIRS 5.0 Software Version 5.6 1/7/2009 Department of Homeland Security Federal Emergency Management Agency United States
National Fire Incident Reporting System (NFIRS 5.0) Configuration Tool User's Guide NFIRS 5.0 Software Version 5.6 1/7/2009 Department of Homeland Security Federal Emergency Management Agency United States
Snow Inventory. Installing and Evaluating
 Snow Inventory Installing and Evaluating Snow Software AB 2002 Table of Contents Introduction...3 1. Evaluate Requirements...3 2. Download Software...3 3. Obtain License Key...4 4. Install Snow Inventory
Installing and Configuring WhatsUp Gold
 Installing and Configuring WhatsUp Gold This guide provides information about installing and configuring WhatsUp Gold v14.2, including instructions on how to run the WhatsUp web interface through an Internet
Installation Instruction STATISTICA Enterprise Server
 Installation Instruction STATISTICA Enterprise Server Notes: ❶ The installation of STATISTICA Enterprise Server entails two parts: a) a server installation, and b) workstation installations on each of
AVG 8.5 Anti-Virus Network Edition
 AVG 8.5 Anti-Virus Network Edition User Manual Document revision 85.2 (23. 4. 2009) Copyright AVG Technologies CZ, s.r.o. All rights reserved. All other trademarks are the property of their respective
SonicWALL SSL VPN 3.5: Virtual Assist
 SonicWALL SSL VPN 3.5: Virtual Assist Document Scope This document describes how to use the SonicWALL Virtual Assist add-on for SonicWALL SSL VPN security appliances. This document contains the following
NovaBACKUP xsp Version 15.0 Upgrade Guide
 NovaBACKUP xsp Version 15.0 Upgrade Guide NovaStor / November 2013 2013 NovaStor, all rights reserved. All trademarks are the property of their respective owners. Features and specifications are subject
Database Administration
 Unified CCE, page 1 Historical Data, page 2 Tool, page 3 Database Sizing Estimator Tool, page 11 Administration & Data Server with Historical Data Server Setup, page 14 Database Size Monitoring, page 15
Installation Guide For ChoiceMail Enterprise Edition
 Installation Guide For ChoiceMail Enterprise Edition How to Install ChoiceMail Enterprise On A Server In Front Of Your Company Mail Server August, 2004 Version 2.6x Copyright DigiPortal Software, 2002-2004
Sophos Mobile Control Installation guide. Product version: 3
 Sophos Mobile Control Installation guide Product version: 3 Document date: January 2013 Contents 1 Introduction...3 2 The Sophos Mobile Control server...4 3 Set up Sophos Mobile Control...16 4 External
Networking Best Practices Guide. Version 6.5
 Networking Best Practices Guide Version 6.5 Summer 2010 Copyright: 2010, CCH, a Wolters Kluwer business. All rights reserved. Material in this publication may not be reproduced or transmitted in any form
Kaseya 2. Installation guide. Version 7.0. English
 Kaseya 2 Kaseya Server Setup Installation guide Version 7.0 English September 4, 2014 Agreement The purchase and use of all Software and Services is subject to the Agreement as defined in Kaseya s Click-Accept
TANDBERG MANAGEMENT SUITE 10.0
 TANDBERG MANAGEMENT SUITE 10.0 Installation Manual Getting Started D12786 Rev.16 This document is not to be reproduced in whole or in part without permission in writing from: Contents INTRODUCTION 3 REQUIREMENTS
SHAREPOINT 2013 IN INFRASTRUCTURE AS A SERVICE
 SHAREPOINT 2013 IN INFRASTRUCTURE AS A SERVICE Contents Introduction... 3 Step 1 Create Azure Components... 5 Step 1.1 Virtual Network... 5 Step 1.1.1 Virtual Network Details... 6 Step 1.1.2 DNS Servers
WEBCONNECT INSTALLATION GUIDE. Version 1.96
 WEBCONNECT INSTALLATION GUIDE Version 1.96 Copyright 1981-2015 Netop Business Solutions A/S. All Rights Reserved. Portions used under license from third parties. Please send any comments to: Netop Business
Deploying Windows Streaming Media Servers NLB Cluster and metasan
 Deploying Windows Streaming Media Servers NLB Cluster and metasan Introduction...................................................... 2 Objectives.......................................................
Manual POLICY PATROL SECURE FILE TRANSFER
 Manual POLICY PATROL SECURE FILE TRANSFER MANUAL Policy Patrol Secure File Transfer This manual, and the software described in this manual, are copyrighted. No part of this manual or the described software
Using DC Agent for Transparent User Identification
 Using DC Agent for Transparent User Identification Using DC Agent Web Security Solutions v7.7, 7.8 If your organization uses Microsoft Windows Active Directory, you can use Websense DC Agent to identify
How To Set Up Safetica Insight 9 (Safetica) For A Safetrica Management Service (Sms) For An Ipad Or Ipad (Smb) (Sbc) (For A Safetaica) (
 For A Safetrica Management Service (Sms) For An Ipad Or Ipad (Smb) (Sbc) (For A Safetaica) (") SAFETICA INSIGHT INSTALLATION MANUAL SAFETICA INSIGHT INSTALLATION MANUAL for Safetica Insight version 6.1.2 Author: Safetica Technologies s.r.o. Safetica Insight was developed by Safetica Technologies
SAFETICA INSIGHT INSTALLATION MANUAL SAFETICA INSIGHT INSTALLATION MANUAL for Safetica Insight version 6.1.2 Author: Safetica Technologies s.r.o. Safetica Insight was developed by Safetica Technologies
2X ApplicationServer & LoadBalancer Manual
 2X ApplicationServer & LoadBalancer Manual 2X ApplicationServer & LoadBalancer Contents 1 URL: www.2x.com E-mail: [email protected] Information in this document is subject to change without notice. Companies,
LifeSize Control TM Deployment Guide
 LifeSize Control TM Deployment Guide July 2011 LifeSize Control Deployment Guide 2 LifeSize Control This guide is for network administrators who use LifeSize Control to manage video and voice communications
3 Setting up Databases on a Microsoft SQL 7.0 Server
 3 Setting up Databases on a Microsoft SQL 7.0 Server Overview of the Installation Process To set up GoldMine properly, you must follow a sequence of steps to install GoldMine s program files, and the other
Remote Application Server Version 14. Last updated: 06-02-15
 Remote Application Server Version 14 Last updated: 06-02-15 Information in this document is subject to change without notice. Companies, names, and data used in examples herein are fictitious unless otherwise
Backup & Disaster Recovery Appliance User Guide
 Built on the Intel Hybrid Cloud Platform Backup & Disaster Recovery Appliance User Guide Order Number: G68664-001 Rev 1.0 June 22, 2012 Contents Registering the BDR Appliance... 4 Step 1: Register the
Virtual Web Appliance Setup Guide
 Virtual Web Appliance Setup Guide 2 Sophos Installing a Virtual Appliance Installing a Virtual Appliance This guide describes the procedures for installing a Virtual Web Appliance. If you are installing
FileMaker Server 11. FileMaker Server Help
 FileMaker Server 11 FileMaker Server Help 2010 FileMaker, Inc. All Rights Reserved. FileMaker, Inc. 5201 Patrick Henry Drive Santa Clara, California 95054 FileMaker is a trademark of FileMaker, Inc. registered
ez Agent Administrator s Guide
 ez Agent Administrator s Guide Copyright This document is protected by the United States copyright laws, and is proprietary to Zscaler Inc. Copying, reproducing, integrating, translating, modifying, enhancing,
Legal Notes. Regarding Trademarks. 2012 KYOCERA Document Solutions Inc.
 Legal Notes Unauthorized reproduction of all or part of this guide is prohibited. The information in this guide is subject to change without notice. We cannot be held liable for any problems arising from
Lepide Software. LepideAuditor for File Server [CONFIGURATION GUIDE] This guide informs How to configure settings for first time usage of the software
![Lepide Software. LepideAuditor for File Server [CONFIGURATION GUIDE] This guide informs How to configure settings for first time usage of the software](/thumbs/33/16328811.jpg "Lepide Software. LepideAuditor for File Server [CONFIGURATION GUIDE] This guide informs How to configure settings for first time usage of the software") Lepide Software LepideAuditor for File Server [CONFIGURATION GUIDE] This guide informs How to configure settings for first time usage of the software Lepide Software Private Limited, All Rights Reserved
Lepide Software LepideAuditor for File Server [CONFIGURATION GUIDE] This guide informs How to configure settings for first time usage of the software Lepide Software Private Limited, All Rights Reserved
Click Studios. Passwordstate. Installation Instructions
 Passwordstate Installation Instructions This document and the information controlled therein is the property of Click Studios. It must not be reproduced in whole/part, or otherwise disclosed, without prior
Gigabyte Management Console User s Guide (For ASPEED AST 2400 Chipset)
") Gigabyte Management Console User s Guide (For ASPEED AST 2400 Chipset) Version: 1.4 Table of Contents Using Your Gigabyte Management Console... 3 Gigabyte Management Console Key Features and Functions...
Gigabyte Management Console User s Guide (For ASPEED AST 2400 Chipset) Version: 1.4 Table of Contents Using Your Gigabyte Management Console... 3 Gigabyte Management Console Key Features and Functions...
Installation Guide. Novell Storage Manager 3.1.1 for Active Directory. Novell Storage Manager 3.1.1 for Active Directory Installation Guide
 Novell Storage Manager 3.1.1 for Active Directory Installation Guide www.novell.com/documentation Installation Guide Novell Storage Manager 3.1.1 for Active Directory October 17, 2013 Legal Notices Condrey
FortKnox Personal Firewall
 FortKnox Personal Firewall User Manual Document version 1.4 EN ( 15. 9. 2009 ) Copyright (c) 2007-2009 NETGATE Technologies s.r.o. All rights reserved. This product uses compression library zlib Copyright
NetWrix SQL Server Change Reporter
 NetWrix SQL Server Change Reporter Version 2.2 Administrator Guide Contents NetWrix SQL Server Change Reporter Administrator Guide 1. INTRODUCTION... 3 1.1 KEY FEATURES... 3 1.2 LICENSING... 4 1.3 HOW
Outpost Network Security
 Administrator Guide Reference Outpost Network Security Office Firewall Software from Agnitum Abstract This document provides information on deploying Outpost Network Security in a corporate network. It
NSi Mobile Installation Guide. Version 6.2
 NSi Mobile Installation Guide Version 6.2 Revision History Version Date 1.0 October 2, 2012 2.0 September 18, 2013 2 CONTENTS TABLE OF CONTENTS PREFACE... 5 Purpose of this Document... 5 Version Compatibility...
Eucalyptus 3.4.2 User Console Guide
 Eucalyptus 3.4.2 User Console Guide 2014-02-23 Eucalyptus Systems Eucalyptus Contents 2 Contents User Console Overview...4 Install the Eucalyptus User Console...5 Install on Centos / RHEL 6.3...5 Configure
Exchange 2010. Outlook Profile/POP/IMAP/SMTP Setup Guide
 Exchange 2010 Outlook Profile/POP/IMAP/SMTP Setup Guide September, 2013 Exchange 2010 Outlook Profile/POP/IMAP/SMTP Setup Guide i Contents Exchange 2010 Outlook Profile Configuration... 1 Outlook Profile
RBackup Server Installation and Setup Instructions and Worksheet. Read and comply with Installation Prerequisites (In this document)
") RBackup Server Installation and Setup Instructions and Worksheet Fill out the Installation Worksheet. (In this document) Read and comply with Installation Prerequisites (In this document) Review the Partner
RBackup Server Installation and Setup Instructions and Worksheet Fill out the Installation Worksheet. (In this document) Read and comply with Installation Prerequisites (In this document) Review the Partner
Setting Up a Unisphere Management Station for the VNX Series P/N 300-011-796 Revision A01 January 5, 2010
 Setting Up a Unisphere Management Station for the VNX Series P/N 300-011-796 Revision A01 January 5, 2010 This document describes the different types of Unisphere management stations and tells how to install
Troubleshooting File and Printer Sharing in Microsoft Windows XP
 Operating System Troubleshooting File and Printer Sharing in Microsoft Windows XP Microsoft Corporation Published: November 2003 Updated: August 2004 Abstract File and printer sharing for Microsoft Windows
Barracuda Link Balancer Administrator s Guide
 Barracuda Link Balancer Administrator s Guide Version 1.0 Barracuda Networks Inc. 3175 S. Winchester Blvd. Campbell, CA 95008 http://www.barracuda.com Copyright Notice Copyright 2008, Barracuda Networks
Installing Oracle 12c Enterprise on Windows 7 64-Bit
 JTHOMAS ENTERPRISES LLC Installing Oracle 12c Enterprise on Windows 7 64-Bit DOLOR SET AMET Overview This guide will step you through the process on installing a desktop-class Oracle Database Enterprises