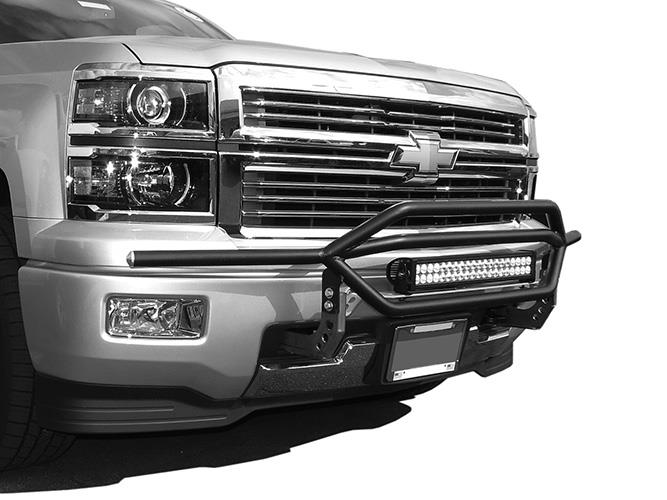
(2) Universal Light Brackets. Passenger/Right Mounting Bracket. Driver/Left Mounting Bracket
|
|
|
- Oscar Stevenson
- 7 years ago
- Views:
Transcription

1 PARTS LIST: 1 EVO3 Light Bar mm x 35mm Single Bolt Plate 1 Cross Bar Light Mounting Bracket 3 12mm x 24mm OD x 2.5mm Flat Washers 2 Universal Light Tabs 3 12mm Nylon Lock Nuts 1 Driver/left Frame Mounting Bracket mm x 30mm Hex Bolts 1 Passenger/right Frame Mounting Bracket 12 8mm x 22mm OD x 2mm Flat Washer mm x 30mm Double Bolt Plate 8 8mm Lock Washers mm Nylon Lock Nut (2) Universal Light Brackets EVO3 Light Bar Light Mount Cross Bar Passenger/Right Mounting Bracket Driver/Left Mounting Bracket PROCEDURE: REMOVE CONTENTS FROM BOX AND VERIFY ALL PARTS ARE PRESENT. READ INSTRUCTIONS CAREFULLY. CUTTING MAY BE REQUIRED. INSTALLATION MAY INTERFERE WITH FRONT MOUNTED SENSORS. DO NOT USE LIGHT BAR AND/OR BRACKETS FOR TOWING/PULLING. NOTE: It may be necessary to remove/relocate front license plate and license plate bracket. It is not required, but strongly recommended. If local/state law requires a front license plate, license plate relocation kit is available. 1. Start installation from under the passenger side, front of the vehicle. Determine if the vehicle is equipped with tow hooks. Vehicles without tow hooks: It will be necessary to cut out the indented area in both sides of the plastic bumper insert to clear the Brackets as pictured, (Figures 1 & 2). IMPORTANT: Make several small cuts for best fit. Do not cut through the top edge of the panel. Once both openings have been cut, continue on to Step 2. Tow Hook equipped vehicles: a. Remove the factory hardware attaching the tow hook to the end of each frame channel, (Figure 3A & 3B). It is not necessary to remove the tow hook, only remove the hardware. NOTE: On 2014 and newer models, the hardware on the driver side may be difficult to
2 remove and assistance is highly recommended on these models. The following info only applies to the 2014-on GM models. Tow hook hardware removal: Remove the hex bolts securing the driver side of the bumper to the bracket. Use a short pry bar or large screwdriver to move the tab on the bumper bracket up and away to clear the hex bolt and slide it out past the bumper bracket, (Figures 3A & 3B). b. Remove the trim and seal around both tow hooks if equipped, (Figures 3B & 4). c. Check for Bracket clearance and cut opening if necessary, (Figure 4). 2. Line up the (2) slots in the passenger side Mounting Bracket with the (2) holes in the outer side of the frame channel for the tow hook, (Figure 5). a. Models without tow hooks: Select (1) 12mm Double Bolt Plate, (Figure 6A). Insert the Bolt Plate into the open end of the frame, through the (2) holes in the side of the frame and out through the Bracket, (Figure 6B). Secure the Bracket to the Bolt Plate with (2) 12mm Flat Washers and (2) 12mm Nylon Lock Nuts. Snug but do not fully tighten hardware at this time. b. Models with tow hooks: Use the tow hook hardware to attach the Bracket to the frame. Do not tighten hardware at this time, (Figures 5 & 6B). 3. Repeat Steps 1 & 2 to install the driver side Mounting Bracket, (Figure 7). IMPORTANT: The driver side Bracket has (2) mounting slots. Attach the Bracket to the frame using the forward mounting slot, (Figure 8B). a. Models without tow hooks: Insert (1) 12mm x 35mm Single Bolt Plate into the open end of the frame as described in Step 2, (Figure 8A). Attach the driver side Bracket to the outside of the frame with (1) 12mm Flat Washer and (1) 12mm Nylon Lock Nut, (Figure 8B). Snug but do not fully tighten hardware at this time. b. Models with tow hooks: Use the tow hook hardware, (long cross bolt), to attach the driver side Bracket to the outside of the frame, (Figure 8B & 9). Snug but do not fully tighten hardware at this time. 4. With assistance, hold the EVO3 Light Bar up in position on the outside of the Mounting Brackets, (Figure 10). Bolt the mounting tabs on the Light Bar to the Brackets with (4) 8mm x 30mm Hex Bolts, (4) 8mm Lock Washers and (4) 8mm Flat Washers, (Figure 11). Do not tighten hardware at this time. 5. Select the Light Mount Cross Bar, (Figure 12). Attach the Cross Bar to the top of the tabs on the Mounting Brackets with (4) 8mm Hex Bolts, (4) 8mm Lock Washers and (4) 8mm Flat Washers, (Figure 13). Do not tighten hardware at this time. 6. Check the EVO3 Light Bar alignment with the vehicle and the bumper. Adjust as required then starting with the frame Bracket hardware, fully tighten all hardware at this time. Tighten the supplied 8mm hardware to 18-20ft-lbs, the 12mm hardware to 35-40ft-lbs and tow hook hardware to 45-50ft-lbs. 7. If installing an accessory light at this time, select the (2) L Universal Light Brackets, (Figure 14). Replace the brackets included with the light with the (2) Universal Brackets. Attach the Brackets to the long slot in either side of the Light Mount Cross Bar Bracket with the included (2) 8mm Hex Bolts, (4) 8mm Flat Washers and (2) 8mm Nylon Lock Nuts. 8. Follow the instructions provided by the light manufacturer to attach the light to the (2) Brackets and to install the electrical wiring. 9. Do periodic inspections to the installation to make sure that all hardware is secure and tight.


3 To protect your investment, wax this product after installing. Regular waxing is recommended to add a protective layer over the finish. Do not use any type of polish or wax that may contain abrasives that could damage the finish. Mild soap may be used to clean the EVO3 Light Bar. (Fig 1) Example of "no tow hook" model (Fig 2) Driver side cut out illustrated for reference only (Fig 3A) 2014 Silverado driver side illustrated from behind bumper to show bumper bolt locations. Remove the bolts securing the driver side of the bumper to the bumper bracket. Use a large screwdriver or pry bar to move the mounting tab (large arrow) up enough to get the long tow hook bolt out of the end of the frame
 to remove long bolt through tow hook On models")
 Driver side pictured from behind bumper Fig 4")
 12mm")

 12mm Nylon Lock Nuts (Fig 6B) Passenger side Bracket")
4 On 2014-on models with tow hooks, remove bumper bolt and carefully pry up tab (arrow) to remove long bolt through tow hook On models with tow hooks, remove trim and seal surrounding tow hook if equipped (Fig 3B) Driver side pictured from behind bumper Fig 4 Trim opening for bracket clearance if necessary (Fig 5) Passenger side with tow hook pictured from behind bumper (Fig 6A) 12mm Double Bolt Plate On models without tow hooks, insert 12mm Double Bolt Plate into open end of frame on passenger side. Attach Bracket to Bolt Plate with the included: (2) 12mm Flat Washers (2) 12mm Nylon Lock Nuts (Fig 6B) Passenger side Bracket installed with tow hook hardware
 Driver side pictured")

")

 Line up Light")
5 Outer mounting hole in end of frame for tow hook (Fig 7) Driver side pictured without plastic panel for instruction purposes only Fig 8A Models without tow hook use: 12mm Single Bolt Plate 12mm Flat Washer 12mm Nylon Lock Nut (Fig 8B) Attach driver side Bracket to outside of frame with Single Bolt Plate or reuse tow hook hardware (Fig 9) Driver side Mounting Bracket (Fig 10) Line up Light Bar with outside of Brackets


6 (2) 8mm Hex Bolts (2) 8mm Lock Washers (2) 8mm Hex Bolts (2) 8mm Lock Washers Fig 11 Fig 12 (2) 8mm Hex Bolts (2) 8mm Lock Washers Fig 13 Fig 14 8mm Hex Bolt 8mm Nylon Lock Nut Complete Installation (Light not included)
FRONT BUMPER INSTALLATION INSTRUCTIONS 2007-2011 DODGE / MERCEDES SPRINTER
 Aluminess Products Inc 9402 Wheatlands Ct. #A Santee, CA 92071 619-449-9930 FRONT BUMPER INSTALLATION INSTRUCTIONS 2007-2011 DODGE / MERCEDES SPRINTER Please read before beginning Stainless steel hardware
R O A D M A S T E R, I N C.
 R O A D M A S T E R, I N C. ROADMASTER, Inc. 6110 NE 127th Ave. Vancouver, WA 98682 12 10 3 11 4 5 13 7 8 360-896-0407 fax 360-735-9300 www.roadmasterinc.com ITEM QTY NAME MATERIAL 1... 4...1/2 x 1 1/2
R O A D M A S T E R, I N C.
 R O A D M A S T E R, I N C. ROADMASTER, Inc. 6110 NE 127th Ave. Vancouver, WA 98682 6 13 11 MOUNTING BRACKET KIT Cable Tab 14 12 7 15 9 Cable Tab 360-896-0407 fax 360-735-9300 www.roadmasterinc.com ITEM
R O A D M A S T E R, I N C.
 R O A D M A S T E R, I N C. 11 10 20 12 4 18 19 1 2 13 16 ITEM QTY NAME MATERIAL 1...2... 1/2" x 3 1/2" BOLT... 350103-00 2...2... 1/2" x 2" BOLT... 350097-00 3...6... 1/2" x 1 1/2" BOLT... 350095-00 4...2...
Installation instruction do88 Intercooler for Volvo S40 / V50 / C30
 Installation instruction do88 Intercooler for Volvo S40 / V50 / C30 This instruction shows how to replace the OEM intercooler with our performance intercooler. 2. 3. 1. 4. 5. Part number: ICM-170 6. At
R O A D M A S T E R, I N C.
 R O A D M A S T E R, I N C. 11 7 6 1 2 10 13 8 ITEM QTY NAME PART # 1...2...1/2 x 5 1/2 BOLT...350108-00 2...4...1/2 x 1 3/4 BOLT...350096-00 3...6...1/2 LOCK WASHER...350309-00 4...6...1/2 HEX NUT...350258-00
1999-2010 GENERAL MOTORS 3/4 &1 TON RT3 UNDERCARRIAGE MOUNTING INSTRUCTIONS (PART NO. LTA04767B)
") 1999-010 GENERAL MOTORS 3/4 &1 TON MOUNTING INSTRUCTIONS (PART NO. LTA04767B) MSC04380-8 WARNING Many newer trucks are now equipped with air bags. DO NOT under any circumstances disable, remove or relocate
1999-010 GENERAL MOTORS 3/4 &1 TON MOUNTING INSTRUCTIONS (PART NO. LTA04767B) MSC04380-8 WARNING Many newer trucks are now equipped with air bags. DO NOT under any circumstances disable, remove or relocate
R O A D M A S T E R, I N C.
 R O A D M A S T E R, I N C. 6 28 1 2 "ā 1 2 " 4 8 ITEM QTY NAME PART # 1...4...1/2 x 1 1/4 BOLTS... 350094-00 2...4...1/2 LOCK WASHER... 350309-00 3...4...1/2 HEX NUT... 350258-00 4...2...SPACER PLATE...
R O A D M A S T E R, I N C.
 R O A D M A S T E R, I N C. MOUNTING BRACKET KIT 12 3 6 9 5 11 ITEM QTY NAME MATERIAL 1...4...1/2" x 1 1/2" BOLT... 350095-00 2...4...1/2" x 1 1/2" CARRIAGE BOLT... 350362-00 3...8...1/2" NUT... 350258-00
R O A D M A S T E R, I N C.
 R O A D M A S T E R, I N C. ROADMASTER, Inc. 6110 NE 127th Ave. Vancouver, WA 98682 4 MOUNTING BRACKET KIT 1 2 3 360-896-0407 fax 360-735-9300 www.roadmasterinc.com ITEM QTY NAME PART # 1...2... #10 x
LIFT-505. BMF Lift Kit. Yamaha Drive Gas or Electric. Installation Instructions
 LIFT-505 BMF Lift Kit Yamaha Drive Gas or Electric Installation Instructions Contents of LIFT-505 Yamaha Drive BMF Lift Kit: a (1 ea.) BMF A-Arm Assembly b (1 ea.) Driver Side Shock Tower c (1 ea.) Passenger
R O A D M A S T E R, I N C.
 R O A D M A S T E R, I N C. MOUNTING BRACKET KIT 14 8 7 4 13 5 6 ITEM QTY NAME MATERIAL 1...6...1/2" x 2 1/2" BOLT... 350099-00 2...2...1/2" x 1 1/2" BOLT... 350095-00 3...8...1/2" LOCK WASHER... 350309-00
R O A D M A S T E R, I N C.
 R O A D M A S T E R, I N C. 8 4 7 6 9 ITEM QTY NAME MATERIAL 1...2...1/2 x 4 1/2 BOLT...350106-00 2...2...1/2 HEX NUT...350258-00 3...2...1/2 LOCK WASHER...350309-00 4...2...#10 x 3/4 SELF TAPPING SCREW...350247-35
LG G5 Chassis Brace Gen 5 Camaro THE MOST POWERFUL HEADERS ON THE PLANET Brought to you by LG Motorsports 972-429-1963
 LG G5 Chassis Brace Gen 5 Camaro THE MOST POWERFUL HEADERS ON THE PLANET Brought to you by LG Motorsports 972-429-1963 Thank you for purchasing LG Motorsports products for your Gen 5 Camaro. Parts Inventory:
R O A D M A S T E R, I N C.
 R O A D M A S T E R, I N C. ROADMASTER, Inc. 6110 NE 127th Ave. Vancouver, WA 98682 8 7 1 6 15 28 1 2 "± 1 2 " MOUNTING BRACKET KIT 3 2 10 14 4 5 9 360-896-0407 fax 360-735-9300 www.roadmasterinc.com Item
PRS X-axis E-chain installation: For tools with a 12 Z-Axis
 PRS X-axis Energy Chain (Echain) Installation Page -1- PRS X-axis E-chain installation: For tools with a 12 Z-Axis This kit is compatible with PRS Shopbots that have an X-axis cutting area of 96 to 144.
R O A D M A S T E R, I N C.
 R O A D M A S T E R, I N C. ROADMASTER, Inc. 6110 NE 127th Ave. Vancouver, WA 98682 16 6 18 Cable Tab 13 15 8 10 2 Cable Tab 1 11 9 17 14 360-896-0407 fax 360-735-9300 www.roadmasterinc.com ITEM QTY NAME
TITAN Fuel Tanks. INSTALLATION INSTRUCTIONS G e n e r a t i o n V
 TITAN pt. no.: 02 0000 0143 Important: Please read these instructions carefully and completely before starting the installation. TITAN Fuel Tanks INSTALLATION INSTRUCTIONS G e n e r a t i o n V Extended
BILLET HEADLAMP SHELL
 -J008 REV. 007-07- BILLET HEADLAMP SHELL GENERAL Kit Number 770-0 Models For model fitment information, please see the P&A Retail Catalog or the Parts and Accessories section of www.harleydavidson.com
R O A D M A S T E R, I N C.
 R O A D M A S T E R, I N C. 22 9 8 7 10 17 26 20 15 Cable Tab 21 1 16 Cable Tab 6 5 25 ITEM QTY NAME PART # 1...2...#10 x 3/4 SELF DRILLING SCREW...350247-35 2...6...1/2 FLAT WASHER...350308-00 3...6...1/2
R O A D M A S T E R, I N C.
 R O A D M A S T E R, I N C. ROADMASTER, Inc. 6110 NE 127th Ave. Vancouver, WA 98682 15 ITEMS 18,19,20,21,& 22 REQUIRED FOR VEHICLES WITHOUT TOW HOO 19 18 MOUNTING BRACKET KIT 20 22 4 21 14 5 11 360-896-0407
R O A D M A S T E R, I N C.
 R O A D M A S T E R, I N C. 11 4 9 28 1 2 "ā 1 2 " 10 7 13 Special tools needed: plastic pop rivet gun ITEM QTY NAME PART # 1...4... 1/2 x 1 1/4 BOLT... 350094-00 2...8... 1/2 LOCK WASHER... 350309-00
Equipped with AEM Dryflow Filter No Oil Required! INSTALLATION INSTRUCTIONS PART NUMBER 21-754DS. 2012-2015 BMW 335i 3.0L
 Equipped with AEM Dryflow Filter No Oil Required! INSTALLATION INSTRUCTIONS PART NUMBER 21-754DS 2012-2015 BMW 335i 3.0L 1 ITEM NO. PART NUMBER DESCRIPTION QTY. 1 21-2057DK AIR FILTER 1 2 9-0442 TUBE;
16 April 2012 1032011-F 1994-2002 Dodge Adjustable Track bar with Relocation Bracket 1
 16 April 2012 1032011-F 1994-2002 Dodge Adjustable Track bar with Relocation Bracket 1 BD Adjustable Track Bar w/bracket Dodge 2500-3500 4WD Models 1994-2002 Dodge 1500 4WD Model 1994-2001 P/N# 1032011-F
Important: Please read these instructions carefully and completely before starting the installation. TITAN Fuel Tanks
 TITAN pt. no.: 03 0000 0120 Important: Please read these instructions carefully and completely before starting the installation. TITAN Fuel Tanks INSTALLATION INSTRUCTIONS G e n e r a t i o n V Extended
GENUINE PARTS INSTALLATION INSTRUCTIONS
 GENUINE PARTS INSTALLATION INSTRUCTIONS DESCRIPTION: Illuminated Kick Plate APPLICATION: Rogue (2011) PART NUMBER: 999G6 GX010 KIT CONTENTS: Item A B C G H QTY 1 1 1 D 1 E 1 F 3 15 6 Description Kick Plate,
Installation Guide for the TJ LCG PRO Suspension System (Low Center of Gravity) Available 4 or 5
 Available 4 or 5") INSTALLATION GUIDE Installation Guide for the TJ LCG PRO Suspension System (Low Center of Gravity) Available 4 or 5 Take every precaution to make this installation a safe procedure. Make safety the number
INSTALLATION GUIDE Installation Guide for the TJ LCG PRO Suspension System (Low Center of Gravity) Available 4 or 5 Take every precaution to make this installation a safe procedure. Make safety the number
Installation Instructions: (Part # SB76880) XRC Armor Front Fender Kit
 XRC Armor Front Fender Kit") WARNING: Check with Local and State laws before installing this accessory! NOTE: Carefully read entire instructions thoroughly before attempting to install this part. Parts Included: Qty Parts Included:
WARNING: Check with Local and State laws before installing this accessory! NOTE: Carefully read entire instructions thoroughly before attempting to install this part. Parts Included: Qty Parts Included:
Installation Instructions HighRock 4x4 TM
 Installation Instructions HighRock 4x4 TM Slider Step Vehicle Application: Jeep YJ and TJ Wrangler 1986 2006 Part Number: 49312 www.bestop.com - We re here to help! Visit our web site and click on Ask
RAIN COLLECTOR S HELF MANUAL
 RAIN COLLECTOR S HELF MANUAL The Rain Collector Shelf provides a good mounting support for your Rain Collector II. The Rain Collector Shelf is designed to be attached to Davis Sensor Mounting Arm, and
INSTALLATION INSTRUCTIONS. 6111 Air Spring Kit 2011+ Ford F250/F-350 Single Wheel 2WD 2011+ Ford F350 Dually 2WD IMPORTANT NOTES
 INSTALLATION INSTRUCTIONS 6111 Air Spring Kit 2011+ Ford F250/F-350 Single Wheel 2WD 2011+ Ford F350 Dually 2WD Thank you for purchasing a quality Hellwig Product. PLEASE READ THIS INSTRUCTION SHEET COMPLETELY
Volkswagen Jetta, Golf, GTI 1999, 2000 Brake System 46 Brakes - Mechanical Components (Page GR-46)
") 46 Brakes - Mechanical Components (Page GR-46) Front brakes Brake pads, removing and installing Brake pads, removing and installing FN 3 brake caliper, servicing FS III brake caliper, servicing Rear wheel
46 Brakes - Mechanical Components (Page GR-46) Front brakes Brake pads, removing and installing Brake pads, removing and installing FN 3 brake caliper, servicing FS III brake caliper, servicing Rear wheel
92-00 Civic/ 94-01 Integra/ 93-97 Del Sol/ 92-95 CRX Rear Kit Part No. 75540
 92-00 Civic/ 94-01 Integra/ 93-97 Del Sol/ 92-95 CRX Rear Kit Part No. 75540 www.airliftperformance.com MN-514 (06409) NPR 4762 Please read these instructions completely before proceeding with installation
VW GOLF Mk4 TDI FRONT MOUNTING INTERCOOLER INSTALLATION INSTRUCTIONS
 VW GOLF Mk4 TDI FRONT MOUNTING INTERCOOLER INSTALLATION INSTRUCTIONS Tools required: 10mm/13mm socket and 3/8 drive ratchet with extension Torx T20/25/30 screwdrivers or bits Phillips head screwdriver,
Installation Instructions for Wamilton s Steering Cable Modification. Remove the cables from the white retaining clip
 Installation Instructions for Wamilton s Steering Cable Modification The steering cable on the 08 and later superjets is too short and limits the throw of the nozzle. By changing to an older style steering
INSTALLATION INSTRUCTIONS
 Turbo Tube Slide INSTALLATION INSTRUCTIONS C A U T I O N Do not climb on the outside of the slide This slide is designed for home use only, not for Public Playgrounds PlayCore, Inc. 2004 Copyrighted Material.
Rating when used as a weight carrying hitch without spring bars:
 BOLT-TOGETHER WEIGHT DISTRIBUTING HITCH SYSTEM Rating when used as a weight distributing hitch with spring bars: Part Number 48051 4805 48053 48054 Max Tongue Weight 550 Ibs. 750 Ibs. 1000 Ibs. 1400 lbs.
Installation Instructions
 Installation Instructions Page 1 of 16 January 2008 Equipment Parts, Trailer Hitch Ver 3.0 Accessory Development SUBJECT TRAILER HITCH KIT (US Only) - P/N 71 60 0 413 359 MODEL X5 (E70): Select Vehicle
CorkSport Mazdaspeed 6 Rear Sway Bar 2006-2007 Mazdaspeed 6
 CorkSport Mazdaspeed 6 Rear Sway Bar 2006-2007 Mazdaspeed 6 Pre-Installation Notes: The CorkSport Rear Sway Bar is a great addition to improving the handling performance to the Mazdaspeed 6. It will minimize
P7100 PUMP INSTALLATION INSTRUCTIONS Diesel Care & Performance Inc
 P7100 PUMP INSTALLATION INSTRUCTIONS Diesel Care & Performance Inc Installation Timing Pin Location CAUTION: Before installing the injection pump, be sure that number 1 cylinder is at the Top Dead Center
INSTRUCTIONS THOROUGHLY BEFORE BEGINNING***************
 Bill of Materials: RAC0012 Green Wing Aerodynamic Skirt Kit Item Part Number Description Quantity 1 RMC0218 Gen 2 Trailer Skirt Roadside 1 2 RMC0219 Gen 2 Trailer Skirt Curbside 1 3 RMC0041 Trailer Skirt
AM/FM ANTENNA RELOCATION KIT
 -J0 REV. 008-09-0 AM/FM ANTENNA RELOCATION KIT GENERAL Kit Number 766-09 Models This kit is used to relocate a fender-mounted AM/FM antenna to a Detachable Tour-Pak on specific model motorcycles. For model
Installation instructions, accessories - Alarm siren
 XC90 Section Group Weight(Kg/Pounds) Year Month 3 36 2003 04 XC90 2003, XC90 2004, XC90 2005, XC90 2006, XC90 2007, XC90 2008, XC90 2009, XC90 2010 R3904364 Page 1 of 6 Required tools A0000162 A0000161
INSTALLATION INSTRUCTIONS
 INSTALLATION INSTRUCTIONS Accessory Application Publications No. AII23628 2003 PILOT Issue Date MAY 2002 PARTS LIST Security System Kit (sold separately): P/N 08E51-S84-100 2 Remote controls Attachment
ELECTRONICS G H I J K L M
 ELECTRONICS TM LASER INSTALLATION INSTRUCTIONS PARTS KIT Parts Kit includes the following: A- (1) Universal Mounting Bracket A B- (1) Red L.E.D. Laser Alert Light C- (1) Piezo Beeper w/ O Ring Tape D-
INSTALLATION INSTRUCTIONS FOR 2006-2009 VW MK5
 CI100018 INSTALLATION INSTRUCTIONS FOR 2006-2009 VW MK5 Rabbit, Jetta 2.5L These instructions are applicable to vehicles equipped with either manual or automatic transmissions Thank you for choosing to
Installation Instructions GOOSENECK MOUNTING KIT Chevrolet/GMC 1500/2500/3500 All except 4-door Crew-Cab
 GOOSENECK MOUNTING KIT Equipment Required: Fastener Kit: F Wrenches: 3/4, 7/8, 15/16 Drill Bits: 1/4 Other Tools: Drill WARNING: Under no circumstances do we recommend exceeding the towing vehicle manufacturers
TOYOTA TUNDRA 2015 Billet Grille w/led DRL
 TOYOTA TUNDRA 2015 Billet Grille w/led DRL Part Number: 00016-34088 Accessory Code: BG3000 Conflicts Models 1794 and Platinum Kit Contents Item # Quantity Reqd. Description 1 2 LED DRL 2 1 Driver Box 3
PowerFlex 700S and 700H Frame 12 DC Bus Connector Kit
 PowerFlex 700S and 700H Frame 12 DC Bus Connector Kit Installation Instructions This document provides instructions for the installation of a DC bus connector kit for PowerFlex 700S and 700H frame 12 drives
SWIM N DUNK CHALLENGE RESIDENTIAL BASKETBALL GAMES And COMMERCIAL ASSEMBLY AND INSTALLATION INSTRUCTIONS
 SWIM N DUNK CHALLENGE RESIDENTIAL BASKETBALL GAMES And COMMERCIAL BASKETBALL GAMES ASSEMBLY AND INSTALLATION INSTRUCTIONS CORPORATE HEADQUARTERS WESTERN SALES AND MANUFACTURING PLANT P.O. Box 400 Canby,
Firewall Cover Installation Instruction Sheet
 Firewall Cover Installation Instruction Sheet Please Read Carefully Our Firewall cover is designed to fit on the stock strut brace. If you have an aftermarket strut brace than it is you re responsibility
M-2004-MBA Brake Duct Kit 2013 BOSS 302, Mustang GT and California Special INSTALLATION INSTRUCTIONS
 Please visit www.fordracingparts.com for the most current instruction information.!!! PLEASE READ ALL OF THE FOLLOWING INSTRUCTIONS CAREFULLY PRIOR TO INSTALLATION. AT ANY TIME YOU DO NOT UNDERSTAND THE
MUSTANG II IFS COMPLETE PARTS PACKAGE
 MUSTANG II IFS COMPLETE PARTS PACKAGE Your Southern Rods & Parts Mustang II IFS Parts Package contains the following items: 1 pr) Upper Control Arms (2023) 1) Upper Arm Bolt Kit (MP-001-A) 1 pr) Lower
TITAN Fuel Tanks. Extended Capacity Replacement Tank for Diesel Chevrolet / GMC Trucks
 Important: Please read these instructions carefully and completely before starting the installation. TITAN Fuel Tanks INSTALLATION INSTRUCTIONS G e n e r a t i o n V Extended Capacity Replacement Tank
CETAC Z-Drive Assembly
 CETAC Z-Drive Assembly Replacement Guide Manual Part Number 610144 Rev 1, 2012 CETAC Technologies, Printed in USA Overview This guide describes the necessary steps to replace the Z-drive assembly on your
Figure 2 The fan and shroud also needs to be removed for access to the four a/c compressor bolts and removal of the compressor from the top.
 Here are some pictures to show what s required when replacing the A/C compressor, expansion valve and receiver/drier on a 2001 Volvo V70. Even if you don t replace these A/C parts these pictures can help
Slide the new steering column shaft through the steering column from the driver compartment.
 Slide the new steering column shaft through the steering column from the driver compartment. Push the column shaft through the steering column until the machined end is out past the column lower bushing.
Installation Instructions for Cessna Single Engine Aircraft (Except 177)
") Installation Instructions for Cessna Single Engine Aircraft (Except 177) Kit RCS-300-1, -2 (R1180001, R1180002) This is an FAA STC d installation requiring a logbook entry in the aircraft maintenance manual
Installation Instructions for Cessna Single Engine Aircraft (Except 177) Kit RCS-300-1, -2 (R1180001, R1180002) This is an FAA STC d installation requiring a logbook entry in the aircraft maintenance manual
MGB Chrome Bumper Conversion
 MGB Chrome Bumper Conversion Installation Instructions For 1974 1/2-1980 MGB This kit requires cutting, welding, and painting. Professional installation recommended. Note: Every MGB body is slightly different
PRODUCT: WASHER / WASHER-DRYER COMBO MODEL: AW 120 / AW 122 / AW 125 AWD 120 / AWD 121 / AWD 129
 PRODUCT: WASHER / WASHER-DRYER COMBO MODEL: The information included in this Splendide Repair Manual may change without notice. Please see our web site www.splendide.com/service/docs.html for updates,
Installation Instructions
 READ BEFORE INSTALLING UNIT For Slider Casement Air Conditioners To avoid risk of personal injury, property damage, or product damage due to the weight of this device and sharp edges that may be exposed:
Body Parts. Aftermarket parts for VOLVO. Mod Type L/R Year Oe Ref Art No
 240 Front bumper moulding Center -1993 1372328 83432328 EU, mat black (1312364) 240 Front bumper moulding Outer -1993 1372330 83432330 EU, mat black Left (1372090) 240 Front bumper moulding Outer -1993
CONTENTS TOOLS REQUIRED: Ratchet 13mm Socket 10mm Socket Phillips Screwdriver Pliers Panel Removal Tool. Amp Installation
 CONTENTS 1EA. SUBWOOFER ASSEMBLY P/N RUWRANGLER 1EA. 200 WATT AMP/BRACKET ASSEMBLY P/N RM11JKBTL - Bracket P/N RE08BTL200R - Amp 1EA. POWER HARNESS P/N RHWRANGLERPWR 1EA. OVERLAY HARNESS P/N RHWRANGLER
INSTALLATION INSTRUCTIONS. 6108 Air Spring Kit 2011+ Ford F250 Single Wheel 4WD 2011+ Ford F350 Dually 4WD (2011 F350 Single Wheel 4WD use p/n 6113)
") INSTALLATION INSTRUCTIONS 6108 Air Spring Kit 2011+ Ford F250 Single Wheel 4WD 2011+ Ford F350 Dually 4WD (2011 F350 Single Wheel 4WD use p/n 6113) Thank you for purchasing a quality Hellwig Product. PLEASE
INSTALLATION INSTRUCTIONS 6108 Air Spring Kit 2011+ Ford F250 Single Wheel 4WD 2011+ Ford F350 Dually 4WD (2011 F350 Single Wheel 4WD use p/n 6113) Thank you for purchasing a quality Hellwig Product. PLEASE
Installation Manual. SKU# 21000 series (Base Rails) SKU# 22000 series (Overhead Racks)
 SKU# 22000 series (Overhead Racks)") Installation Manual SKU# 21000 series (Base Rails) SKU# 22000 series (Overhead Racks) Welcome to the world of TracRac! We re delighted that you have chosen TracRac, the ultimate sliding truck rack system.
Installation Manual SKU# 21000 series (Base Rails) SKU# 22000 series (Overhead Racks) Welcome to the world of TracRac! We re delighted that you have chosen TracRac, the ultimate sliding truck rack system.
BODY-12, Door Handle - Removal, Installation, and Adjustment
 Introduction BODY-12, Door Handle - Removal, Installation, and Adjustment There are many different procedures floating around describing how to replace the door handles on a 944 and every one of them will
Dell P Series Monitor VESA Mounting Bracket Installation Instructions
 Dell P Series Monitor VESA Mounting Bracket Installation Instructions The VESA mounting bracket enables a Wyse cloud client to be mounted to the Dell P Series Monitor and the Dell E24 Monitor. The cloud
88-98 Chevy / GMC Fullsize 4WD 6-Lug 2"- 2 1/2" Suspension Lift Installation Instructions
 88-98 Chevy / GMC Fullsize 4WD 6-Lug 2"- 2 1/2" Suspension Lift Installation Instructions Safety Glasses Metric / Standard Wrenches & Sockets Floor Jack Jack Stands Hack Saw Ball Joint Seperator Measuring
Triple Threat 3-in-1 Game Table 3 IN 1 GAME TABLE
 NG0M Triple Threat 3-in- Game Table 3 IN GAME TABLE Thank 3 in Y Game Table Thank you for your purchase of our product. We work around the clock and around the globe to ensure that our products maintain
All-Season Sunroom Sliding Glass Door Installation Instructions
 ASRESGD-08 All-Season Sunroom Sliding Glass Door Installation Instructions Panel Frame Door Frame Left Side Foam Insulator IE241 H Bar Assembly Door Frame Top Track Panel Frame Door Frame Right Side Stationary
AM/FM ANTENNA KIT (TOUR-PAK MOUNT)
") -J077 REV. 008-0-0 AM/FM ANTENNA KIT (TOUR-PAK MOUNT) GENERAL Kit Number 7-98A Models For model fitment information, see the P&A Retail Catalog or the Parts and Accessories section of www.harley-davidson.com
-J077 REV. 008-0-0 AM/FM ANTENNA KIT (TOUR-PAK MOUNT) GENERAL Kit Number 7-98A Models For model fitment information, see the P&A Retail Catalog or the Parts and Accessories section of www.harley-davidson.com
Solstice/Sky Water Pump Replacement
 Solstice/Sky Water Pump Replacement The water pump on the Solstice/Sky is starting to need replacement on some vehicles. This guide will help in replacing the water pump while the engine is still in the
PRS Y-axis EChain Installation
 PRS Y-axis Energy Chain Installation Page -1- PRS Y-axis EChain Installation This document shows how to install the Energy chain (Echain) on the Y-axis on ShopBot PRS and PRS BT models. Note that the dust
HOME GYM. Model. Retain This Manual for Reference OWNER'S MANUAL. www.hyper-extension.com
 NOTE: Please read all instructions carefully before using this product Table of Contents Safety Notice www.hyper-extension.com HOME GYM 50036 Hardware Identifier Assembly Instruction Parts List Warranty
ReadyLift (Part# 66-5075) Strut Extension, Installation Instructions Toyota Tundra New Body Style 2WD & 4WD
 Strut Extension, Installation Instructions Toyota Tundra New Body Style 2WD & 4WD") SAFETY WARNING: recommends this system be installed by a professional technician. In addition to these instructions, professional knowledge of disassembly/ reassembly procedures and post installation checks
SAFETY WARNING: recommends this system be installed by a professional technician. In addition to these instructions, professional knowledge of disassembly/ reassembly procedures and post installation checks
TS93 EMR T/PT/TDE. Surface applied door closer
 TS EMR T/PT/TDE Surface applied door closer Installation instructions: Pull side track mount door closer with smoke detector (EMR T) Push side track mount door closer with smoke detector (EMR PT) Double
INSTRUCTION BOOK FOR. Single Monitor Video Conference Cart
 INSTRUCTION BOOK FOR Single Monitor Video Conference Cart Procedure 1. Remove contents from cartons and examine for damaged or missing parts. The keys for the cabinet doors are tied to the outside of the
TONNEAU INSTALLATION GUIDE
 TONNEAU INSTALLATION GUIDE Warranty, Care & Maintenance Model 4056 Toyota Tacoma Double Cab 5' Short Bed 2005-Current (With Multi-Track System) EASY AS 1-2-3! NORMAL INSTALLATION TIME 30 MINUTES For Warranty
Installation Instructions Avalanche XUV Cap IMPORTANT! IMPORTANT!
 Installation Instructions Avalanche XUV Cap IMPORTANT! Read all instructions carefully before commencing any work. Always wear safety equipment. Some installation steps will require two or more installers.
Mazda CX7 2010-up 99-7520B
 INSTALLATION INSTRUCTIONS FOR PART 99-7520B APPLICATIONS Mazda CX7 2010-up 99-7520B KIT FEATURES DIN radio provision with pocket ISO radio provision with pocket Double DIN radio provision Painted matte
Installation Instructions
 Installation Instructions READ BEFORE INSTALLING UNIT For Low Profile Window Air Conditioner INSTALLATION WARNINGS AND CAUTION Carefully read the installation manual before beginning. Follow each step
CHARISMA SHOWER/TUB DOOR INSTALLATION INSTRUCTIONS
 CHARISMA SHOWER/TUB DOOR INSTALLATION INSTRUCTIONS IMPORTANT DreamLine reserves the right to alter, modify or redesign products at any time without prior notice. For the latest up-to-date technical drawings,
STEEL-RITE II or III COMMERCIAL SECTIONAL DOOR Owner s Manual Supplement Model 52242 NOTICE TO USER
 STEEL-RITE II or III COMMERCIAL SECTIONAL DOOR Owner s Manual Supplement Model 52242 NOTICE TO USER Thank you for purchasing the Steel-Rite II or III, model 52242 commercial sectional door from RITE-HITE
READ AND UNDERSTAND ALL INSTRUCTIONS AND WARNINGS PRIOR TO INSTALLATION OF SYSTEM AND OPERATION OF VEHICLE.
 491 W. Garfield Ave., Coldwater, MI 49036 Phone: 517-279-2135 Web/live chat: www.bds-suspension.com E-mail: tech-bds@sporttruckusainc.com Product: GM Leaf Spring READ AND UNDERSTAND ALL INSTRUCTIONS AND
INSTALLATION AND OPERATING INSTRUCTIONS For Model GL1 Gate Locks
 Securitron Magnalock Corp. www.securitron.com ASSA ABLOY, the global leader Tel 800.624.5625 techsupport@securitron.com in door opening solutions INSTALLATION AND OPERATING INSTRUCTIONS For Model GL1 Gate
Installation Instructions
 READ BEFORE INSTALLING UNIT For Through-the-Wall Air Conditioners To avoid risk of personal injury, property damage, or product damage due to the weight of this device and sharp edges that may be exposed:
SCION tc 2005-2008 COIL OVER SUSPENSION Preparation
 SCION tc 2005-2008 COIL OVER SUSPENSION Preparation Part Number: PTR11-21070 NOTE: Part number of this accessory may not be the same as the part number shown. Kit Contents: Item # Quantity Reqd. Description
2011-14 F250 6 RADIUS ARM KIT
 92154000 Thank you for choosing Rough Country for your suspension needs. 2011-14 F250 6 RADIUS ARM KIT Rough Country recommends a certified technician installs this system. In addition to these instructions,
SB-C-CTS/10TW3 SKU# 94552 2008 & Up Cadillac CTS/CTS-V
 INSTALLATION GUIDE for the SB-C-CTS/10TW3 SKU# 94552 2008 & Up Cadillac CTS/CTS-V If you choose to perform the installation yourself, it is absolutely vital that the Stealthbox be properly mounted to the
MODEL# SLA001-3 "SLIDE & LOCK" A-FRAME POOL LADDER
 MODEL# SLA001-3 "SLIDE & LOCK" A-FRAME POOL LADDER IMPORTANT INSTRUCTIONS: : Read all instructions carefully & completely to become familiar with parts, assembly, safety and proper use of this product.
GEH6290. Mechanism Circuit Breaker. Handle Operating Mechanism Cat. No. Type NEMA 1, 3R, 12, 13 NEMA 4/4X Cat. No. Cat. No. Series Instruction
 GEH6290 g Cable Operator Mechanisms for E150, SE150, SF250, and SG600 Spectra RMS Circuit Breakers Type SCH1/1X, SCH2/2X Flange-Mounted Handle Assemblies, Cable Series SC3L SC10L and Type SC0M1A, SCOM1EF,
AIR-SUSPENSION. Art. nr.: L.L200.07.C.M. Auxiliary Air Suspension. Designed for: Mitsubishi L200. From: 2007& UP RDW 71/320-0569
 AIR-SUSPENSION Dunlop Systems and Components Het Wegdam 22 7496 CA Hengevelde The Netherlands Tel.: +31-547-333065 Fax: +31-547-333068 Website: www.dunlopsystems.com Art. nr.: L.L200.07.C.M Designed for:
Pulleys and Belt. Install the Major Accessory and Pulley. Install the Motor Pulley NOTE. Align the Motor Pulley and the Tool Pulley NOTE
 Pulleys and Belt Pulley Guard - 505862 Install the Major Accessory and Pulley 1. Place the short end of the mounting base holes, and insert - but don t tighten - the setscrews. If the Major Accessory has
Mazda CX7 2007-09 99-7508
 INSTALLATION INSTRUCTIONS FOR PART 99-7508 APPLICATIONS Mazda CX7 2007-09 99-7508 KIT FEATURES DIN Radio Provision with Pocket ISO Mount Radio Provision with Pocket Double DIN Mount Radio Provision Stacked
2003/2004/2005 TOYOTA COROLLA
 2003/2004/2005 TOYOTA COROLLA KEYLESS ENTRY UPGRADE SECURITY SYSTEM INSTALLATION INSTRUCTIONS KIT NO. 00016-30120 SPECIAL NOTE: Installation Sequences After TMS and Safety mandated preparatory steps have
Post Mount Light Installation*
 Post Mount Light Installation* *For the general installation of most Post Mount Spotlights, many vehicles may need slight modifications to these instructions. You will need the following tools: High torque
Front brakes (FN- 3), servicing
, servicing") j a t Front brakes (FN- 3), servicing 46-1 Front brakes, servicing Note: Install complete repair kit. After replacing brake pads and before moving vehicle, depress brake pedal several times firmly to properly
j a t Front brakes (FN- 3), servicing 46-1 Front brakes, servicing Note: Install complete repair kit. After replacing brake pads and before moving vehicle, depress brake pedal several times firmly to properly
Double Glider Assembly Instructions.
 Double Glider Assembly Instructions. Thank you for purchasing your new Torrans Manufacturing Company s Lawn Glider. Assembly of the Glider can be accomplished by one person however, it is advised that
WARNING TO END USER, INSTALLER AND SELLER OF THIS PART!
 WARNING TO END USER, INSTALLER AND SELLER OF THIS PART! By installing this part you are accepting full responsibility and liability for proper wheel and tire fitment after installation. It is the installer
Rack Installation Instructions
 Rack Installation Instructions Second Edition (June 2014) 2014 Contents Chapter 1. Safety information..... 1 Chapter 2. Rack kit parts inentory... 3 Chapter 3. Rack installation...... 5 Identifying the