North Texas Soccer Association Registration Setup Manual Contents
|
|
|
- Jessica Benson
- 7 years ago
- Views:
Transcription
1 North Texas Soccer Association Registration Setup Manual Contents Introduction... 2 Log into your Account... 2 Creating Player, Coach and Team Accounts Creating Teams... 3 Creating Players... 7 Preparing an Excel Spreadsheet to Import Players and Create Teams Placing Players on a Team Creating a Coach or Team Official Account Risk Management (KidSafe) Discussion Placing a Coach or Manager on a Team Setting up the Registrar Account and Opening Registration Events Setting up your Registrar Account Setting up a Registration Event / League Creating a Registration Link for Club Teams Moving Teams into the Registrar Area, Generating Rosters and ID Cards Submitting Teams to the Registrar for Official Rostering and Carding Freezing Rosters Player ID Cards Coach, Assistant Coach, and Team Manager Cards Finding Roster and ID Cards in the Club, Association or Team Account Adding, Releasing and Transfering Players Modifying Rosters (Add, Release, and Transfer) Releasing Players Transferring Players Secondary Players... 67
2 Introduction North Texas Youth Soccer (NTSSA) has selected GotSoccer as the state online registration program. The following manual will outline steps NTSSA Home Associations will need to take to properly create teams, set up a registration event, generate rosters, ID cards and help teams find them in the team or club area of the program. Please check our ( ) North Texas Youth Soccer Documentation site for additional instruction sets. Log into your Account 1) Go to 2) Click on the Login Link 3) Click on the Club & Home Association login link
3 4) Enter your username and password. If you do not know your login information, please contact Sanette Owen-Thomas or the NTX Soccer state office. Creating Teams In order to properly register player we must begin by creating teams. 1) Click on the Club tab above the dark blue menu bar.


4 2) Click on the Teams link on the dark blue menu bar. Then the Add Team link 3) Let s start with the Basic Team Information

5 a. Team ID If you are the individual that creates team ID numbers you can enter it or create all IDs at once using out ID generator. If you do not create team numbers just leave this blank. b. The Club Name should be prefilled c. Level This is very important as this will ultimately determine the billing rate for any players entered on the team. Select the appropriate team level from the dropdown menu. MYSA has defined the following team categories: i. Academy ii. Top Soccer iii. Recreational iv. Competitive d. Position This is optional and related to competitive teams with very similar names. It helps understand the difference between the top (1) team or the second team (2). e. Age Group It is very important to understand how the GotSoccer system works. We increment team and player ages on August 1 st of each year. Therefore you will need to consider the team as if it were playing today. If, for example the team will be a U12 team in September 2009, buy you are creating the team before August 1, 2009, you will need to make it a U11 team as we increment it to U12 on August 1 st. f. State This will be Missouri g. Prevent Team, Group or State change by Manager- This is a lock that prohibits a team manager or coach from modifying team information. This can be locked or unlocked for all teams at once from the main Teams screen. h. Prevent Add/release of players by manager. This will prohibit a team manager or coach from adding or deleting players from the team player list.
 Scroll down the screen and look to the right side for the College Coach, Team Notes and Team Login area. a. If your team is u15 or older and you want college coaches to be able to view player information check the box b.")
6 4) Team Officials will be added using these dropdown menus. You will only be able to place coaches, managers or trainers on teams and generate ID cards, if they have completed the MYSA KidSafe review. This will be described in the Creating Coaches and Team Officials section. 5) Scroll down the screen and look to the right side for the College Coach, Team Notes and Team Login area. a. If your team is u15 or older and you want college coaches to be able to view player information check the box b. You can enter notes if you wish.
 Finally, press Save. The team has now been created.")
7 c. The system will automatically generate a username and password. This can be modified at a later date, but is usually a good idea to create one that will be easy to remember now. Team usernames must be unique to our system. We have over 120,000 teams registered. Therefore, your username may already be taken. 6) Finally, press Save. The team has now been created. Creating Players If you are a new club, league or association, there may not be any existing players in the account. There are three ways to get players into the gotsoccer system 1) Import teams with players already on them. 2) Upload a spreadsheet 3) Type in each player s name. To import a team, an independent team or one that wishes to be a direct member of the league: 1) Make sure you have the team s username and password 2) Click on Club tab 3) Then the Teams link on the dark blue menu bar. 4) Next, the Import Team link on the gray menu bar. 5) Enter the username and password 6) Click Import

 Type in their last name in the")
8 7) The team and its roster will now appear in your account and any coach or manager listed in the team account will appear in the Coach or Team Official area of the account. If players are already in the system: 1) Type in their last name in the Player name box 2) Click on the Apply Filters button
9 3) If the player appears in the table, click on their ID number, most likely an NA at this point. 5) This will open the player information screen. You can modify any information and you can assign them to a previously created team using the Assigned team dropdown. If the Player is not found, you will need to create a new player account. To create a new player account: 1) Click on the Players link on the dark blue menu bar. 2) Click on the Create Player Profile link just below the gray menu bar

10 3) Fill out as much of the Player Info screen as possible and press Save. It is very important to enter the player or parent address as this will allow for full communication options using our software. 4) If you want to add the player to a team at this point you can click on the Assigned Team drop down link at the top of the Player Info screen. There are other ways to assign teams and we will describe them later. 5) Once the screen is saved, you will see additional tabs appear that will allow of additional information input. These include Parent Info, Emergency Info, and more. Not all tabs will be
11 available to all players. The college recruiting tab will only be available to the player once they reach the U15 age group. Just click on any tab to access that screen. Preparing an Excel Spreadsheet to Import Players and Create Teams Before we begin to import a player list, we must discuss the requirements of the actual player file. The Excel file must be converted to CSV format. CSV stands for Comma Separated Values. Each field, column if you re used to Excel, starts with a comma and ends with a comma. There are other types of delimited files including Tab, I-Beam and Quote. The good news is Excel does it all for you. Just: a) Open an Excel File b) Click Save As c) You see a drop down or list of formats d) Select CSV (Comma Delimited) e) Press Save f) That s it! Before you upload you will probably want to clean up the data in the spreadsheet. We suggest: Player a) Sort the data by last name, first name, and birthday. Look for duplicate players. Delete as many as you can. b) Make sure the columns are formatted for our database i. Birth date should be in mm/dd/yy (m/d/yy) format
12 ii. The player name is in two fields; first and last name. iii. The parent(s) name must be in one field. If your data has 2 fields, use the concatenate function assuming the parent s first and last names are in cells B6 and B7, insert a column and use the formula =Concatenate(B6,,B7) the new cell would return the full name with a space between the first and last name. iv. The player gender cannot be Coed. It must be boy, girl, male, female, m, f, or b, g. c) Save the file as a CSV file. d) We strongly suggest you create another CSV test file with just a few player records (rows). This will allow you to check the imported players and teams to insure they were imported as desired without creating a significant number of duplicate player records. Team Our system can also place the players on a team. The process requires that both the player and team be imported at the same time. You cannot upload players and then upload teams. The player s team information must be in the same row as the player information. The process requires the following: i. Team Name ii. Team Gender; it may be coed or c. This cannot be combined with the team age. iii. Team Age Group (U10 not U10B) iv. You may designate the team as recreational or competitive by creating a column with Comp or Rec as the designation. This is not required. The GotSoccer database is organized in a precise fashion. Each player has their own record. Events, team, and program history are attached to the player profile. If an address or phone number changes for the player, it will change for all programs, including those that have expired. The past programs can be used for marketing purposes. 1. Log in to your club account, (see above) 2. Click on Club (Home Association in Texas) 3. Click on Players on the dark blue menu bar.

13 Screen Shot 1 4. This will bring you to the manage players screen. 5. Click Upload Players, circled in red below, on the Gray menu bar. Also notice that you can export player lists to a CSV file and to an Excel file, the blue circle, from this page. The links are circled in blue below. (Note: For those of you in states that use Logical Solutions, the CSV file can be uploaded directly into that software.) 6. We strongly suggest you create a small CSV test file with just a few player records (rows). This will allow you to check the players and teams to insure they were imported as desired. Screen Shot 2 7. You will now be at our Import page. Before being the upload please review Preparing an Excel Spreadsheet to Import. The file must be a CSV file and must be formatted as described above. Click on the Browse button. This will take you to the directory of your computer. Again, we strongly suggest you create a small CSV test file with just a few player records (rows). This will allow you to check the players and teams to insure they were imported as desired.

14 Screen Shot 3 8. Find the CSV file, in this example NCA upload click it and press Open at the bottom of the screen Screen Shot 4 9. The system will return you to the Import page.
15 a. There are a few Format Options. If you are using Excel and saved the file as a CSV file, you won t need to use these options. b. If you file is formatted with quote marks or other delimiters, choose the appropriate options. c. You can omit the header row. This will eliminate the first row of your file. Sometime it is better to leave this row in the file, as matching your file column headings with ours is easier. The only drawback to leaving your column headings is our system will create a player using the header rows. It is easy to find this player, search for your column heading that marks the player s last name, and delete the account. d. Click on Upload at the bottom left of the screen. Screen Shot The system will load the file in preparation for importation. You will see three options above the player list. They are circled in red below. a. Teams; creates teams and places players on the assigned team. The CSV file must contain columns for Team Name, Team Gender (B,G, Boy, Girl, M, F, Coed) and Team Age (U8, U10, ). Don t include your club name in the team name as the system will use the name of the club you created for the account. b. Families; creates family accounts by grouping players with the same last name plus home phone or address or zip code. Players with different last names can be added to the family account after this process is complete, see or Family Account help section. c. Notification; s players their username and password. If you have the club extended version of our software (all Arkansas clubs and any account that has Messaging on the gray menu bar in the Club area) you can user names and passwords at any time. If you have the free account (you will not find Programs or Messaging on the Club menu bar), this is the only opportunity to send an using our mailer.

16 Screen Shot Select the options you want use for the upload. 12. At the top of each column on your file will be a dropdown menu of our matching fields. In databases each record must have the same exact name. Simply match your column heading to ours. In the example below. We have matched the first few columns. If you have a column that you don t want imported or there in no corresponding field on our drop down list, select Do not Import Screen Shot 7 a. The column for last Name in the uploaded CSV file is called PlayerLastName, the matching name from our dropdown list is Last Name. b. Notice we decided not to import the column called PlayerMiddleName. c. Certain of our fields are marked with a * this designates a required field. For players, we require a Last Name, First Name and Gender. Be aware, if you upload just the minimum information we will not be able to assign an age to the player and will not be able to contact them via or provide other contact options. 13. If you want to our system to create teams and place the player on the team you must include the team name, age group and team gender in each player row. If the information is not there for all players those without teams will still be imported, but will not be assigned to a team.

17 Screen Shot Click Import Data at the bottom left side of the screen Screen Shot The next screen reports the action of the import. Screen Shot In this example we imported 17 players and placed them on a Boys U11 team called United. The file also contained players for a Girl s U11 team call the Power. Remember the header row, we actually only imported 16 players. We also created one false team called Team Name from the file s header row. To see this click to the Teams link on the dark blue menu bar, circled in green above.
 from this page.")
18 Screen Shot The system place 10 players on the United and 6 players on the Power. Click on a Team Name and scroll to the bottom of the screen to delete a team. 18. To see a list of players and the teams there re on, Click Players on the dark blue menu bar. 19. You can sort and (if you have the Club Extended Account) from this page. The sort features are highlighted in red below. We have a much more powerful sort area in Player Registrations. Screen Shot 12

19 Placing Players on a Team As described above, you can place a player on a team from the player info screen, by using the Assigned Team drop down. If you have entered players or they already exist you can add multiple player s to a team at once. This is done using the Search Filter area on the Players screen. To do this: 1) Make sure you are in the Club and Players area 2) Click on the Click to Show teams link on the right side of the player table. This will display all teams.
 The system will return all players that match the settings and reduce the team list to the appropriate gender, age plus one age group higher.")
20 3) Select a Gender, Age and Competition Level (optional) and press Apply Filters. 4) The system will return all players that match the settings and reduce the team list to the appropriate gender, age plus one age group higher. Our system assumes the most likely place for a player is on a team that matches the player s age group, or one up. You can still place the player on a team two or more years higher. But this is done using the Assigned Team dropdown in the Player Info area described above. 5) You can then select individual players by check the box at the far left of each player 6) Then selecting the team from the Assign Team dropdown box
 Placing your cursor over the player s name 2) Press and hold the left mouse button 3) Drag the icon to the team box on the right side of the")
21 7) And finally, clicking the Assign button. You can also drag and drop individual players by: 1) Placing your cursor over the player s name 2) Press and hold the left mouse button 3) Drag the icon to the team box on the right side of the page. The team box border will turn red. Let go of the mouse button. The page will refresh and show the team name in the Team column of the player table.


22 Creating a Coach or Team Official Account The process of creating a coach or team official account is identical. The only difference is which link you select. Select the Coach link to create a coach account or the Team Official link to create a team official account. MYSA states all individuals that come in contact with children should have a background check. If you have board members, trainers, or any other club official that need to have a background check, create their account as a Team Official. 1 In this example, we will create a coach account. 1) Click on the Coach link on the dark blue menu bar. 2) Click on the Create Coach Profile link 3) You will have to type in the following information: a. The coaches (team officials) name
23 b. address c. Username (recommended but not required) d. Password (recommended but not required) 4) Press Save. At this point the GotSoccer system will automatically send an to the coach using the address listed. If you do not know the coach s address, please enter a club address and contact the coach in another manner to give instructions on how to log into their account to submit a background check. We have created a short instruction document (pdf file) that you can place on your website giving detailed instructions to coaches and team official on how to complete the risk management process. The will look something like this:

24 Notice it has the coach s username and password attached and the link for them to sign in and complete their risk management form. 5) This can be customized by your club or league, just a. Click on the Club or Home Association tab b. Then Customization c. Look for the User Notification tab d. Type in the message to be included in the automatic in the New Coach or Team Official box and press Save.

25 6) If you click back to the Coach link on the gray menu bar and type in the name of the coach, you will see a column giving it s Risk Management status. The initial status is N/A for Not Applied.
26 7) As soon as the coach submits his/her risk management form to MYSA, the status will change from N/A to Pending. Once the account has been approved, the status will change to Approved. 8) You can follow the progress of your coaches risk management status by using the Search Filters area on the Coah or team Official screen. Just select the R/M Status level you want to see (N/A, Pending, Approved or denied) and press Apply Filters. Risk Management (KidSafe) Discussion Coaches and managers cannot be placed on a team, cannot be listed on an official roster and cannot receive an ID card until they have a MYSA approved background check (KidSafe). Risk management also known as background checks or KidSafe, is an integrated element in the GotSoccer system. Our system automatically hooks up to an outside background check vendor. When a person submits a background check request, our system will: 1) Look at the answers to the Volunteer Disclosure questions. 2) Look at the response from the background check vendor. If the answers to the volunteer disclosure questions are No and there are no hits from the outside check, the system will automatically approve the person. Our system runs every 30 minutes. The result is that the majority of individuals will be approved in less than an hour. If the individual answers Yes to the volunteer disclosure questions or the outside check comes back with hits the application will have to be reviewed by MYSA. The amount of time to approve this

27 application is a function of MYSA s review process. Please remember that many common names like John Smith or Juan Gonzales will likely come back with hits. It is therefore prudent to submit an application as soon as possible. Placing a Coach or Manager on a Team Once the coach or manager s risk management status has changed to Approved, they will be able to be placed on a team. To do this: 1) Click on the Club tab 2) Then the Teams link on the dark blue menu bar 3) Click on the name of the team you want to work with. Remember you can filter by teams type (Recreation, Academy, Competitive, ) 4) Look for the Coach drop down list. The list is sorted by first name not last.
 Press Save 7) You can add additional coaches, assistant coaches, managers, using the other drop downs and + buttons Setting up your Registrar Account You can upload a signature, a second signature")
28 5) Click on the desired coach s name (Remember if the name does not appear it means the person does not have their KidSafe approval from MYSA. 6) Press Save 7) You can add additional coaches, assistant coaches, managers, using the other drop downs and + buttons Setting up your Registrar Account You can upload a signature, a second signature 9if desired0 for rosters, change the way we print the year from 2009/10 to 09/10 or and event the display of the state. We default to the two letter code MO. You can display it as Missouri or MYSA, To upload your signature 1) Write it on a piece of paper, if you want a stamp to apprea make sure you stamp the piece of paper. 2) Scan the file as a jpeg file and upload it to your computer. 3) Click on the Registrar tab 4) Click on Signature on the gray menu bar. 5) The Browse
 Press the Open button 9) The signature will now be in the")

29 6) Find the file on your computer 7) Click on the file name, it will appear in the File Name box at the bottom of the screen 8) Press the Open button 9) The signature will now be in the system and automatically placed on ID cards and official rosters. If you want a different signature to appear on official rosters, click the roster Signature button and follow the same instructions
 Make the changes you desire 4) Press Save 5) Click on Options on the gray menu bar The ID cards will now print MYSA instead of")
30 To modify the way the seasonal year or state appears on ID cards: 1) Click on the registrar tab 2) Click on Options on the gray menu bar 3) Make the changes you desire 4) Press Save 5) Click on Options on the gray menu bar The ID cards will now print MYSA instead of MO

 YOURASSOCIATION Competitive Team Registration 2009/2010 [ Where YOURCLUB is something like BAYFA, CFBSA, ] 2) YOURCLUB Recreational Team Registration 2009/2010 3) YOURCLUB Academy Registration")
31 Setting up a Registration Event / League The registration organization must create a registration event or program in order to create official rosters and ID cards. Events are most often used when a club or association is entering its own teams into the registration vehicle. We recommend naming the events descriptively. This will help if you allow club teams to register through your home Association. 1) YOURASSOCIATION Competitive Team Registration 2009/2010 [ Where YOURCLUB is something like BAYFA, CFBSA, ] 2) YOURCLUB Recreational Team Registration 2009/2010 3) YOURCLUB Academy Registration 2009/2010 If the League tab is not active it will have to be turned on by GotSoccer. If the League function is active, the tab will be green. In the example below, the League function is off. Screen Shot 13 The registration league is designed only to create official rosters and cards. It can be used to schedule league games, but that is not required. Click on the League tab and then the Add Leagues link.
32 Screen Shot 14 Enter the league name, please be descriptive as described above. Enter the location and state and press Save. In this example we ll call it Sample Registration League. Screen Shot 15 Once the league is saved, additional tabs will appear. You may want to upload your logo from the Appearance tab

33 Screen Shot 16 What is critical is that you open the application for this league. If the application is not open, clubs will not be able to search for or find the league. To open the application, click on Application on the gray menu bar. Remember to click Save at the bottom of the screen Screen Shot 17 That s it. A registration league has been created. You may want to create multiple registration leagues for different types of teams, recreational and competitive, for example. Creating a Registration Link for Club Teams

34 If your association allows individual club teams to registrar through the association you will have to create a registration link. The link is available once the registration event is created, see Setting up a registration Event above. Just: 1) Click on the League tab 2) Click on the name of the registration event, here Zoccer Summer league 09 3) Click on the Application link on the gray menu bar. 4) You ll need to decide on a payment method even if there is no charge. If you do not want to bill during the registration process, just fill out the Payment Address and select pay by check. We will enter a $0 dollar fee in the next step and the team will not see a payment option when they register.
 Next we will add a fee. Click on the fees tab near the top of the screen. 7) Input your fee.")
35 5) If you look at the bottom left of this screen you will see the Individual Team Registration link. This is what you will place on your association website when we finish creating the application. 6) Next we will add a fee. Click on the fees tab near the top of the screen. 7) Input your fee. If there are different fees for different age groups, you can create a range of ages and associate one fee. Here we have created two fee structure; $0 for U5 to U9 and $300 for U9 to U18. You can create as many levels as necessary. Teams will only see fees that apply to their specific age group. If you do not want to charge a fee, just stop here and post the Individual Team Registration link shown above. 8) If you would like to upload a logo click on Appearance and follow the directions. This is very similar to uploading a registrar s signature above. 9) If you also want to collect a player fee; Click on the Application link on the gray menu bar 10) Then Sale Items 11) Next the Add Item button

36 12) Next fill out the Item Information and Units/ Pricing area. a. Item Name should be descriptive b. Enter a Description if you want c. List Priority is the order the item will appear if you have more than one item for sale. The lowest number will appear first. d. The Unit Type in this example is Per Player e. The Unit Price is $20 13) Click Save 14) We also have the ability to add Form Fields that might include a. Liability waiver (Checkbox) b. Parent code of conduct (checkbox) c. Competition level question and more (Dropdown or radio Button) 15) Click on the Form Field tab

37 16) Select the type of form from the Data Field Mapping dropdown 17) Enter the information 18) Decide if you want it to be a required field and press Save 19) Post the Individual Team Registration link on your website and notify your club teams.. Submitting Teams to the Registrar for Official Rostering and Carding In the GotSoccer world the word registrar means the person responsible for creating the official roster and or generation ID cards. There are several ways to submit teams to a Registrar. This manual assumes you are a direct member club with no other affiliated clubs or independent teams registering through you. If are a league with non-member clubs registering through you then you will need to see the MYSA League Instruction set. Once the registration event is created: 1) Click back to the Club account by pressing the Club tab 2) Next click on the Teams link
 Click Apply Filters 5) This will sort the list to just your competitive teams.")
38 3) If, when you created your teams you, you gave them a Level (Competitive, Recreation, Academy, Top Soccer, ) you will be able to filter the team list by these levels. If you have more than 20 teams in a level make sure the Page Size is set to Infinite. 4) Click Apply Filters 5) This will sort the list to just your competitive teams. 6) Next, we will select the registration event we created earlier in the League module (See Setting up a registration Event / League above) from the drop down list in the Enter teams in an inhouse league, Training Program, or other associated event. In this example the event is called Lake Country Competitive Registration 09/10. The name in your list will most likely be different. 7) Press Select
 Click on the Select link at the top left of the team table. This will select all teams on the current screen.")
39 8) The system will refresh and show team NOT in the registration event. This keeps you from duplication team entries. 9) Click on the Select link at the top left of the team table. This will select all teams on the current screen. You can deselect any individual team, for example a team not forming this season, by clicking their Select box individually.
 When the screen refreshes it will again show the teams not entered in the league.")
40 10) Then click the Enter Selected Teams button. (A common mistake is to press the Selected teams.) A box will appear asking you to confirm the action. Click OK 11) When the screen refreshes it will again show the teams not entered in the league. That s it the teams are now available in the registrar area and you can create official rosters and ID cards. Freezing Rosters There are two distinct areas the registrar may have to work in: a) The Registration Event area. This is where clubs can enter teams in bulk. b) The Registration Program area. This is where individual teams can apply. The Registration Event / League

41 Once teams have been entered into a registration league, they will show up in the Registrar module home page. The registrar has the option of opening each team individually and reviewing the player list before freezing the roster, or to freeze all or most of the rosters in a batch manner. To Review teams individually: Click on the Registrar tab and you will see the associated events / leagues. Click on the league you want to work with, here Sample State Registration 2008 / 2009 The screen will refresh and you will see the teams associated with this registration event. You can sort the teams by age group and gender. You can search by club or team name and you can sort the table by clicking on the underlined column headings.

42 Make sure the Select event box is set to the registration event you want to work with. If you come to the Roster & ID Card screen and you do not see add/release or the Freeze roster buttons, it is because you have not selected an event. When the screen refreshes, you may be able to customize the roster.

43 For example, if we want the Association or Club name to appear at the top of the roster, type in the name in the Association text box. If you want the roster to display a particular name for the season or event type it in the Playing League text box. Next, select a team by clicking on the team s name, here the Zephyr. This is a large screen so let s break it down. Scroll down to the Event Player List area. You see the list of players associated with the team. You will see: a) A photo if one has been uploaded, b) The player name, c) ID number, the small x next to the id number allows you to modify it. d) The jersey number e) Gender f) Date of birth Notice the Add and Transfer buttons, they are live but are usually not used at this point as the roster has yet to be frozen. Also notice player 3, Lindsey Caldwell, the system shows a Matching Player Alert. There is another Lindsay Caldwell born on the same date on another team in our system. This could be just coincidence or it could be a dually registered player. You may also come across a player highlighted in orange.

44 This means that the club (Association) or team manger has specifically determined that this player should be excluded from rosters relative to the registration event. If they want this play included, they will have to log into the team account, directly or from the club/association account, click on Roster, click on the player name, then the Event Attendance tab and Add the event back into the player s account. Once you have reviewed and approved the player list it s time to generate to official roster. Take a look at the area just above player 1.

45 Notice there are no Generated Documents and no links above the player list table. Click on the Freeze Roster link and the screen will refresh displaying a series of links and a Reset Roster button. Also notice that the Add button to the right of each player name has changed to a Release button. If we click the word Download just to the right of Official Roster, we will be prompted to open a PDF file.

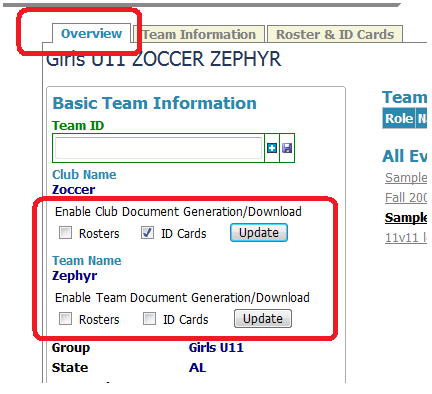
46 Click on the Open button and the official roster will open. At the bottom of the Official Roster you ll find the signature. This is the format for the Arkansas State Soccer Association. We do create different roster formats to conform to state needs. Now that the roster is frozen, we can generate official time stamped documents. Look toward the top of the screen for the Document Generation area, click on the Generate Official Roster button and the system will generated a time stamped Official Roster. This roster will not change even if you add, release or transfer players. To modify it, you have to delete it and regenerate it. This allows the registrar to make changes without them going live to the team immediately. This document is available in the registrar account but cannot be downloaded by teams, clubs or associations.

47 To allow direct access to the official roster: Click on the Overview tab at the top of the screen Click the check boxes to give permission to download the roster to the club and or team and click Update. To Freeze several or all rosters at once: 1) Click on The Registrar tab 2) Click on the event / league you want to work with
 5) Click Apply Filters after you input the search parameters 6) The system will refresh displaying those teams that meet the requirement.")
48 3) The system will refresh and show all teams in the event. 4) Use the Search for Teams area to refine a team search. You can sort by: a. Gender b. Age c. Club d. Schedule Status (Accepted or Unaccepted) 5) Click Apply Filters after you input the search parameters 6) The system will refresh displaying those teams that meet the requirement. Remember, if you want to freeze all rosters regardless of gender, age, status, You can skip the Search for Teams area. 7) Click on the Select link, the fist column heading in the team table. You can deselect a particular team by unclick its elect box, here the Pony Express. 8) The Click the Freeze Rosters Button, on the far right side of the screen above the table. Note: You can reset frozen roster in the same way.

49 Player ID Cards When Rosters are frozen the system also creates pdf files that generate USYSA player passes. As a quick review to get to the ID card screen, you clicked on the Registrar tab, selected the event you want to work in then clicked on the team name. The team page will open to the roster & ID Card tab. Scroll down a bit and you will see PDF links for roster and ID cards. (This assumes you ve already frozen the roster. If these links do not appear, it is because the roster has not been frozen. If there is no Freeze roster button it is because you have not Selected a League Event.
![There are two sets of ID card links: Full [Front] and Full [Back] these](/docs-images/49/25295180/images/50-0.png "links are used with plain card stock and will print the USYSA ID card")
50 There are two sets of ID card links: Full [Front] and Full [Back] these links are used with plain card stock and will print the USYSA ID card background.
51 Plain [Front] Plain [Back], these links are meant to be used with the preprinted USYSA card stock

52 To make these cards available for printing by the club, association or team: 1) Generate the documents by clicking the appropriate Generate ID Card button 2) To allow clubs, associations or teams to download and print the cards, click on the Overview tab at the top of the screen and check the appropriate permission boxes. In this example, we ve only allowed the club to download ID Cards. If neither box is checked, only the registrar has the ability to print cards.
53

54 Coach, Assistant Coach, and Team Manager Cards These cards are generated at the same time player cards are generated. In our example we have one coach, one assistant coach and one manager. Our system has room for twelve coaches and other team officials per team. To view these cards: 1) Click on the Overview tab from the team area 2) Scroll down and look for the Coach, Manager and Trainer ID Card area. 3) Click on the Front or Back link to generate a PFD with all coaches, managers or trainers. 4) Print the cards or send the PDF file to the club.
 Logging into the Club or Association account 2) Clicking on the Club or Association tab 3) Clicking on the Teams link")
55 Finding Roster and ID Cards in the Club, Association or Team Account Once the registrar has generated the roster and ID cards and given permission for a club, association or team to download and print the documents the documents can be accessed from: The club account by: 1) Logging into the Club or Association account 2) Clicking on the Club or Association tab 3) Clicking on the Teams link 4) Clicking on the team name 5) Click on the Documents tab 6) Click on the document they want to print. Printer setup instructions for printing ID cards are also listed here.

56 Teams can access the documents, if the registrar has given permission, by; 1) Logging into their team account 1. This is what the home page of a team account looks like. 2. Click on the Team Profile link on the gray menu bar. 3. Click on the Documents tab. If the league has created a roster and id cards, and allows teams to download them from the team account, you will find the documents on the right hand side of the opening screen. They are pdf files. You will need Adobe Acrobat Reader to view and print the files. This is a free download, just search Google for adobe acrobat reader.

57 4. If you cannot see these documents, it may be because the league does not allow teams to download official rosters or id cards. Check with your club or league administrator for the specific rules.

58 Modifying Rosters (Add, Release, and Transfer) Once rosters are frozen the may need to be modified. The most common of these is adding an additional player. This process starts when a club official or team manager adds a player to the team player list. In this example the Zoccer club has requested to add Amanda Strack to the Zephyr for the Sample State Registration 2008/ ) Click on the Registrar tab 2) Click on the registration event, here Sample State Registration 2008/ ) Then click on the team name. 4) Scroll down below the frozen roster and look at the team player list. Thos players already in the official event roster will not have an Add button, those not on the official Roster will have an add button
 will look like this; If you click on the Official Roster Download link And open the PDF file, you will see that the")
59 5) Click on the Add button the Add button will disappear and if you look above to the official roster area you will see the player, here Amanda Stack. Player list view will look like this; Official Roster view (above the player list) will look like this; If you click on the Official Roster Download link And open the PDF file, you will see that the player has been added, and in this Arkansas roster shows as an Add.
 Click the Generate Official Roster button and click")
60 To make the new roster available to the club, association or team,: 1) Delete the old Official roster 2) Click the Generate Official Roster button and click OK.

61 If you have previously allowed the club, association or team access to the document they can now download it. Note: Sometimes an Add might actually be a transfer. A player may have come from an out of state team and is not in our system. In this case the player will show as an add, but after you add the player you can change the designation from Add to Transfer by clicking on the exchange icon toggling the player from an add to a transfer. The roster will now show the player as a Transfer and not an Add The roster will also reflect the change.

62 Releasing Players Releasing players can only be done after rosters are frozen. Go to the Registrar tab, click on the event you want to work in and click on the team name, see above. Let s assume we want to release Grace Ann Albright, click on the release button to the right of the players name Scroll down and look below the official roster and you will see an area the details the released players.
63 If you go back up to the Official Roster Download link and open the PDF file you ll see Albright listed as a release. If you want to update the documents in the club, association or team accounts, delete the old official roster

64 And generate a new official roster. Transferring Players Transfers are usually done to and from teams within the registration league. Sometimes you ll need to Add a player that is really a transfer. We can handle this by toggling the Add to Transfer, see the Add player area above for details. If the player is moving from team to team: 1) Click on the Transfer button to the right of the player s name and click OK

65 2) Open the New Team drop down list and select the new team 3) Click Transfer and OK the screen will refresh and you can view either team

66 4) The player will show as a release on the old team 5) And a Transfer on the new team 6) Remember to deleted the old official roster and regenerate the newofficial rosters if you want the club, association or team to be able to download the revised roster
 In the Registrar area click on a league 2) This will take you to the Teams page. Here you can search for teams by name, or sort age and gender.")
67 Secondary Players The GotSoccer registration software allows you to place the same player on more than one team. 1) In the Registrar area click on a league 2) This will take you to the Teams page. Here you can search for teams by name, or sort age and gender. 3) Click on a team name and the team page will open. Click on the Search for Secondary Player link.
 If we want to play Chris Armas onto a roster, just click the add button. The system will add him to the roster and automatically designate him as a secondary player.")
68 4) Once open a sort box will appear. You can search for players by name, id number, team, level and more. Once the player is found, they can be added onto the new team. 5) If we want to play Chris Armas onto a roster, just click the add button. The system will add him to the roster and automatically designate him as a secondary player.
69 6) The roster will list the player as a secondary player. 7) The list of players includes every player in any club in the state.
Creating Coach and Team Official Accounts
 Creating Coach and Team Official Accounts The Arkansas and Oklahoma State Soccer Associations will be using our software to process Volunteer Disclosure Forms (VDF) and background checks. Your state organization
MYSA Team Handbook. Contents
 1 MYSA Team Handbook Contents Introduction to our Team Account... 3 How Teams Accounts are Created... 4 Logging into your Team Account... 5 The Overview Screen... 7 Updating Team Contact, Coach and Record
Logging into your Account... 4 The Confidentiality Agreement... 5. Home Tab: Account Settings... 6 Creating Sub-Users... 9 Activity Logs...
 Logging into your Account... 4 The Confidentiality Agreement... 5 Home Tab: Account Settings... 6 Creating Sub-Users... 9 Activity Logs... 15 Events Entering Teams into a League or Registration Event...
Merging Duplicate Referee Accounts... 68 Clubs... 70 Logging into a Club Account from the State... 71 Locating Username and Passwords for Clubs...
 Table of Contents Logging into your Account... 1 Home Tab: Account Settings and Billing... 2 My Account... 2 Account Info... 3 Contact info... 3 Billing Contact... 4 Change Master password... 4 User Accounts...
Council of Ontario Universities. COFO Online Reporting System. User Manual
 Council of Ontario Universities COFO Online Reporting System User Manual Updated September 2014 Page 1 Updated September 2014 Page 2 Table of Contents 1. Security... 5 Security Roles Defined in the Application...
GotSoccer Tournament Module Table of Contents
 1 GotSoccer Tournament Module Table of Contents What s New in this Version?... 5 Logging into your Account... 6 Creating a New Event... 9 Uploading Permission to Host... 12 Creating an Application Mandatory
Player & Parent Handbook
 Player & Parent Handbook Your GotSoccer player account has many features. This handbook is designed to help you understand the capabilities of our system. Contents Creating a Player Account... 2 Login
DarwiNet Client Level
 DarwiNet Client Level Table Of Contents Welcome to the Help area for your online payroll system.... 1 Getting Started... 3 Welcome to the Help area for your online payroll system.... 3 Logging In... 4
Logging into your Account The Confidentiality Agreement Home Tab: Account Settings and Billing Club/Home Association Tab
 Logging into your Account... 5 The Confidentiality Agreement... 6 Home Tab: Account Settings and Billing... 7 Creating Sub-Users... 11 Payment Setup/Merchant Account Setup... 17 Creating multiple merchant
Education Solutions Development, Inc. APECS Navigation: Business Systems Getting Started Reference Guide
 Education Solutions Development, Inc. APECS Navigation: Business Systems Getting Started Reference Guide March 2013 Education Solutions Development, Inc. What s Inside The information in this reference
ithenticate User Manual
 ithenticate User Manual Updated November 20, 2009 Contents Introduction 4 New Users 4 Logging In 4 Resetting Your Password 5 Changing Your Password or Username 6 The ithenticate Account Homepage 7 Main
ithenticate User Manual
 ithenticate User Manual Version: 2.0.2 Updated March 16, 2012 Contents Introduction 4 New Users 4 Logging In 4 Resetting Your Password 5 Changing Your Password or Username 6 The ithenticate Account Homepage
eschoolplus Users Guide Teacher Access Center 2.1
 eschoolplus Users Guide Teacher Access Center 2.1. i Table of Contents Introduction to Teacher Access Center... 1 Logging in to Teacher Access Center (TAC)...1 Your My Home Page... 2 My Classes...3 News...4
JROTC Unit Management System (JUMS) User s Guide
 User s Guide") JROTC Unit Management System (JUMS) User s Guide 1 March 2016 Summary of Changes JUMS User Guide This revision, dated 1 March 2016 o Updates Chapter 3, paragraph 3-2, Import New Cadets from a File into
JROTC Unit Management System (JUMS) User s Guide 1 March 2016 Summary of Changes JUMS User Guide This revision, dated 1 March 2016 o Updates Chapter 3, paragraph 3-2, Import New Cadets from a File into
Document Manager 2.0. Corporate Administrator Guide
 Document Manager 2.0 Corporate Administrator Guide Introduction to the Corporate Administrator Guide Document Manager 2.0 is the Web to Print ordering application for OfficeMax ImPress. Many features and
Amerigroup Website User Guide for Providers: Provider Updates page 1
 Amerigroup Website User Guide for Providers: Provider Updates page 1 The tools for provider updates allow you to: Change and update o Basic information o Registration information o Practice information
Job Streaming User Guide
 Job Streaming User Guide By TOPS Software, LLC Clearwater, Florida Document History Version Edition Date Document Software Trademark Copyright First Edition 08 2006 TOPS JS AA 3.2.1 The names of actual
Client Marketing: Sets
 Client Marketing Client Marketing: Sets Purpose Client Marketing Sets are used for selecting clients from the client records based on certain criteria you designate. Once the clients are selected, you
SAP Business Intelligence (BI) Reporting Training for MM. General Navigation. Rick Heckman PASSHE 1/31/2012
 Reporting Training for MM. General Navigation. Rick Heckman PASSHE 1/31/2012") 2012 SAP Business Intelligence (BI) Reporting Training for MM General Navigation Rick Heckman PASSHE 1/31/2012 Page 1 Contents Types of MM BI Reports... 4 Portal Access... 5 Variable Entry Screen... 5
2012 SAP Business Intelligence (BI) Reporting Training for MM General Navigation Rick Heckman PASSHE 1/31/2012 Page 1 Contents Types of MM BI Reports... 4 Portal Access... 5 Variable Entry Screen... 5
Adobe Acrobat 6.0 Professional
 Adobe Acrobat 6.0 Professional Manual Adobe Acrobat 6.0 Professional Manual Purpose The will teach you to create, edit, save, and print PDF files. You will also learn some of Adobe s collaborative functions,
User s Guide for the Texas Assessment Management System
 User s Guide for the Texas Assessment Management System Version 8.3 Have a question? Contact Pearson s Austin Operations Center. Call 800-627-0225 for technical support Monday Friday, 7:30 am 5:30 pm (CT),
Microsoft Office Word 2013
 Microsoft Office Word 2013 Mail Merge and Creating Forms University Information Technology Services Training, Outreach & Learning Technologies Copyright 2014 KSU Department of University Information Technology
Employer Portal User Guide Last Updated: October 2015
 Employer Portal User Guide Last Updated: October 2015 San Francisco City Option PO Box 194367 San Francisco, CA 94119-4367 Phone: 1(415) 615-4492 Fax: 1(415) 615-4392 Email: employerservices@sfcityoption.org
What Do You Think? for Instructors
 Accessing course reports and analysis views What Do You Think? for Instructors Introduction As an instructor, you can use the What Do You Think? Course Evaluation System to see student course evaluation
School account creation guide
 School account creation guide Contents Your welcome email Page 2 The CSV file Page 3 Uploading the CSV and creating the accounts Page 5 Retrieving staff usernames and passwords Page 8 Retrieving student
HEALTH SAVINGS ACCOUNT EMPLOYER WEBSITE GUIDE
 REGISTERING YOUR ACCOUNT FOR ONLINE ACCESS HEALTH SAVINGS ACCOUNT EMPLOYER WEBSITE GUIDE A note to accountholders with multiple account types with Sterling HSA: We now support a single login for all of
Administrator Quick Start Guide
 This guide is designed to provide Administrators with a quick overview of the features and functionalities provided to them in LEARN360 s Administration section. Login Figures 1-4 feature different components
Strategic Asset Tracking System User Guide
 Strategic Asset Tracking System User Guide Contents 1 Overview 2 Web Application 2.1 Logging In 2.2 Navigation 2.3 Assets 2.3.1 Favorites 2.3.3 Purchasing 2.3.4 User Fields 2.3.5 History 2.3.6 Import Data
City of De Pere. Halogen How To Guide
 City of De Pere Halogen How To Guide Page1 (revised 12/14/2015) Halogen Performance Management website address: https://global.hgncloud.com/cityofdepere/welcome.jsp The following steps take place to complete
CoventryOne Agent Portal User Guide
 CoventryOne Agent Portal User Guide CoventryOne is an Individual Product underwritten by PersonalCare Insurance of Illinois, Inc. Welcome to the CoventryOne Agent Portal bringing the convenience of the
February 2013 Copyright 2013 by CTB McGraw-Hill Education. 1
 February 2013 Copyright 2013 by CTB McGraw-Hill Education. 1 OCCT & OMAAP Welcome to the Record Editing System (RES) Utility... 3 About Your Task... 3 Security Concerns... 3 Before You Begin... 3 Contacting
UF Health SharePoint 2010 Introduction to Content Administration
 UF Health SharePoint 2010 Introduction to Content Administration Email: training@health.ufl.edu Web Page: http://training.health.ufl.edu Last Updated 2/7/2014 Introduction to SharePoint 2010 2.0 Hours
The Lynx A Step by Step guide
 The Lynx A Step by Step guide Section 1: Updating your organization and recruiting tips (pg.1) Section 2: For page managers (pg. 5) Section 3: Club Sports specific tasks (pg. 12) Section 4: New Users and
FedEx Billing Online PDF Help Guide Invoiced Customers
 FedEx Billing Online PDF Help Guide Invoiced Customers Table of Contents Introduction... 2 Logging In/Your Account Summary... 3 Viewing... 5 Approving and Notifying... 9 Canceling Approvals... 14 Paying...
As your financial institution completes its system conversion, you
 QuickBooks Business Accounting Software 2007 2009 for Windows Account Conversion Instructions Converting from Direct Connect to Web Connect As your financial institution completes its system conversion,
Using VLOOKUP to Combine Data in Microsoft Excel
 Using VLOOKUP to Combine Data in Microsoft Excel Microsoft Excel includes a very powerful function that helps users combine data from multiple sources into one table in a spreadsheet. For example, if you
e-invoicing Online Billing
 e-invoicing Online Billing For any assistance please contact Email: Tel: Contents Welcome to Online Billing 3 Registering for Online Billing 4 einvoicing and epayment 10 Logging in 11 Accessing your new
E-FILE. Universal Service Administrative Company (USAC) Last Updated: September 2015
 Last Updated: September 2015") E-FILE USER GUIDE This document providers E-File users with an overview of E-File account management, managing entitlements, and instructions on how to submit forms, such as the FCC Form 498, FCC Form
E-FILE USER GUIDE This document providers E-File users with an overview of E-File account management, managing entitlements, and instructions on how to submit forms, such as the FCC Form 498, FCC Form
Verified Volunteers. System User Guide 10/2014. For assistance while navigating through the system, please contact Client Services at:
 Verified Volunteers System User Guide 10/2014 For assistance while navigating through the system, please contact Client Services at: RCAN@verifiedvolunteers.com - (855) 326-1860 - Option 1 Welcome to Verified
User Manual - Sales Lead Tracking Software
 User Manual - Overview The Leads module of MVI SLM allows you to import, create, assign and manage their leads. Leads are early contacts in the sales process. Once they have been evaluated and assessed,
Government of Saskatchewan Executive Council. Oracle Sourcing isupplier User Guide
 Executive Council Oracle Sourcing isupplier User Guide Contents 1 Introduction to Oracle Sourcing and isupplier...6 1.0 Oracle isupplier...6 1.1 Oracle Sourcing...6 2 Customer Support...8 2.0 Communications
Table of Contents. Manual for Core Staff - Equipment/Scheduling Core Facilities
 Table of Contents 1. Overview 2. How do I manage my account? 3. Equipment Scheduling Workflow Overview 4. Equipment Scheduling Walk Through a. How do I access the list of calendars available for scheduling?
MyMaths. User Guide for Teachers. Secondary Level
 MyMaths User Guide for Teachers Secondary Level Edition 1.5 February 2015 Table of Contents Welcome to the MyMaths user guide What is MyMaths?.............................. 5 Who is this user guide for?.......................
AgencyDash Data Management Solution Version 2.0 Help Guide. Release Date: July 1, 2008 Last Updated: August 17, 2010 Simtech Solutions Inc.
 AgencyDash Data Management Solution Version 2.0 Help Guide Release Date: July 1, 2008 Last Updated: August 17, 2010 Simtech Solutions Inc. Revision History: Area Changed Revised by Revision Date Description
Virtual Communities Operations Manual
 Virtual Communities Operations Manual The Chapter Virtual Communities (VC) have been developed to improve communication among chapter leaders and members, to facilitate networking and communication among
****Also, if you have done previous promotions and have multiple mailing lists, make sure you select the most recent one.
 Instructions for Using the Integrated Direct Mail (IDM) System for BERNINA Direct Mail Pieces Getting Started Creating Your Mailer Checking Out Uploading Your Customer Lists Updating your Customer Lists
ithenticate User Manual
 ithenticate User Manual Version: 2.0.8 Updated February 4, 2014 Contents Introduction 4 New Users 4 Logging In 4 Resetting Your Password 5 Changing Your Password or Username 6 The ithenticate Account Homepage
How to Add Users 1. 2.
 Administrator Guide Contents How to Add Users... 2 How to Delete a User... 9 How to Create Sub-groups... 12 How to Edit the Email Sent Out to New Users... 14 How to Edit and Add a Logo to Your Group's
CentreSuite Expense Routing Cardholder USER GUIDE
 CentreSuite Expense Routing Cardholder USER GUIDE CentreSuite Expense Routing Cardholder User Guide Table of Contents 3 First Time Users 6 Quick Links from your Home Screen 7 Statements 9 Creating and
Results CRM 2012 User Manual
 Results CRM 2012 User Manual A Guide to Using Results CRM Standard, Results CRM Plus, & Results CRM Business Suite Table of Contents Installation Instructions... 1 Single User & Evaluation Installation
Managing Submissions via ExpressO: A Guide for Law Review Editors
 : A Guide for Law Review Editors Table of Contents List of Figures... 3 Welcome to ExpressO... 4 Contacting bepress Consulting Services... 4 Accessing ExpressO... 5 Editorial Privileges... 5 Editor Tools:
Certification Quality Initiative User s Guide
 Certification Quality Initiative User s Guide IPC, inc. 3000 Lakeside Drive, Suite 309S Bannockburn, IL 60015 847.615.7100 Certification Quality Initiative User s Guide Copyright 2014 IPC, Inc Bannockburn,
Certification Quality Initiative User s Guide v.2
 Certification Quality Initiative User s Guide v.2 IPC, i n c. 3000 L a k e s i d e D r i v e, S u i t e 309S B a n n o c k b u r n, I L 6 0 015 847.6 1 5.710 0 Certification Quality Initiative User s Guide
Reading Wonders Training Resource Guide
 Reading Wonders Training Resource Guide Table of Contents Page Register for Your Teacher Access 2 Redeem Master Codes 4 Enroll Students Teacher / District Import (Single or Multiple Students) 7 Individual
Creating Interactive PDF Forms
 Creating Interactive PDF Forms Using Adobe Acrobat X Pro Information Technology Services Outreach and Distance Learning Technologies Copyright 2012 KSU Department of Information Technology Services This
CONTRACT MANAGEMENT SYSTEM USER S GUIDE VERSION 2.7 (REVISED JULY 2012)
") CONTRACT MANAGEMENT SYSTEM USER S GUIDE VERSION 2.7 (REVISED JULY 2012) VERSION 2.6 (REVISED APRIL 2012)... I INTRODUCTION... 5 Helpful Hints... 5 Pop-Up Blockers... 5 Users... 6 CPUC Staff Administrator...
CONTRACT MANAGEMENT SYSTEM USER S GUIDE VERSION 2.7 (REVISED JULY 2012) VERSION 2.6 (REVISED APRIL 2012)... I INTRODUCTION... 5 Helpful Hints... 5 Pop-Up Blockers... 5 Users... 6 CPUC Staff Administrator...
Offline Remittance Processing Standalone, Service-Based, Multi-Client, Attorney Options
 Offline Remittance Processing Standalone, Service-Based, Multi-Client, Attorney Options User Manual 911 Central Parkway North, Suite 200 San Antonio, Texas 78232 (210) 403-8670 www.acttax.com Contents
emarketing Manual- Creating a New Email
 emarketing Manual- Creating a New Email Create a new email: You can create a new email by clicking the button labeled Create New Email located at the top of the main page. Once you click this button, a
PaymentNet Federal Card Solutions Cardholder FAQs
 PaymentNet Federal Card Solutions It s easy to find the answers to your questions about PaymentNet! June 2014 Frequently Asked Questions First Time Login How do I obtain my login information?... 2 How
How To Use Thecontinuus Provider Portal
 PROVIDER PORTAL USER GUIDE OCTOBER 13, 2014 TOGETHER ADMINISTRATION OFFICE phone: 608-647-4729 toll free: 1-877-376-6113 fax: 608-647-4754 web: www.continuus.org email: info@continuus.org CONTENTS System
VALUE LINE INVESTMENT SURVEY ONLINE USER S GUIDE VALUE LINE INVESTMENT SURVEY ONLINE. User s Guide
 VALUE LINE INVESTMENT SURVEY ONLINE User s Guide Welcome to Value Line Investment Survey Online. This user guide will show you everything you need to know to access and utilize the wealth of information
Custom Reporting System User Guide
 Citibank Custom Reporting System User Guide April 2012 Version 8.1.1 Transaction Services Citibank Custom Reporting System User Guide Table of Contents Table of Contents User Guide Overview...2 Subscribe
SLA Online User Guide
 SLA Online User Guide Contents SLA Online User Guide 2 Logging in 2 Home 2 Things to do 2 Upcoming events/calendar 3 News features 3 Services 3 Shopping Basket 3 Appointment/Visit Bookings 4 Quote Requests
USING DOCUWARE TO MANAGE WORKFORCE SOLUTIONS FILES CAREER OFFICE
 USING DOCUWARE TO MANAGE WORKFORCE SOLUTIONS FILES CAREER OFFICE Using DocuWare to Manage Workforce Solutions Files Workforce Solutions 2015 Version 1.1, 3/17/15 Workforce Solutions is an equal opportunity
Solutions e Selection wledg Kno.com ficedepot bsd.of
 bsd.officedepot.com Knowledge Selection Solutions HOURS OF OPERATION E-COMMERCE TECHNICAL SUPPORT DESK OPERATIONAL HOURS DAYS OF WEEK Monday-Friday: HOURS (EASTERN TIME) 7:00 A.M. 8:30 P.M. (800) 269-6888
Customer admin guide. UC Management Centre
 Customer admin guide UC Management Centre June 2013 Contents 1. Introduction 1.1 Logging into the UC Management Centre 1.2 Language Options 1.3 Navigating Around the UC Management Centre 4 4 5 5 2. Customers
Getting Started Guide Administrators Vol. 1
 Getting Started Guide Administrators Vol. 1 Username: Password: Mission Our business model is to NEVER stop developing our software, NEVER stop listening to suggestions, NEVER stop working with new ideas,
ARIBA Contract Management System. User Guide to Accompany Training
 ARIBA Contract Management System User Guide to Accompany Training Technical Training Team 6/29/2010 Table of Contents How to use this Guide... 4 Contract Management Process... 5 ARIBA- Getting Started...
Learning Management System (LMS) Guide for Administrators
 Guide for Administrators") Learning Management System (LMS) Guide for Administrators www.corelearningonline.com Contents Core Learning Online LMS Guide for Administrators Overview...2 Section 1: Administrator Permissions...3 Assigning
Learning Management System (LMS) Guide for Administrators www.corelearningonline.com Contents Core Learning Online LMS Guide for Administrators Overview...2 Section 1: Administrator Permissions...3 Assigning
2) Log in using the Email Address and Password provided in your confirmation email
 Log in using the Email Address and Password provided in your confirmation email") Welcome to HR Classroom! The following will show you how to use your HR Classroom admin account, including setting up Training Groups, inserting Policies, and generating Trainee Reports. 1) Logging into
Welcome to HR Classroom! The following will show you how to use your HR Classroom admin account, including setting up Training Groups, inserting Policies, and generating Trainee Reports. 1) Logging into
I. Definitions of Membership Categories... p.2. II. Society Dues Structure p.4. III. Chapter Rosters p.5. IV. Membership Reports p.
 Congratulations on accepting the position of Membership Director for your local chapter. This is an important role, as you are representing RIMS and your local chapter to both current members and prospective
Adobe Digital Signatures in Adobe Acrobat X Pro
 Adobe Digital Signatures in Adobe Acrobat X Pro Setting up a digital signature with Adobe Acrobat X Pro: 1. Open the PDF file you wish to sign digitally. 2. Click on the Tools menu in the upper right corner.
NYS OCFS CMS Contractor Manual
 NYS OCFS CMS Contractor Manual C O N T E N T S CHAPTER 1... 1-1 Chapter 1: Introduction to the Contract Management System... 1-2 CHAPTER 2... 2-1 Accessing the Contract Management System... 2-2 Shortcuts
About mysi-net. A note on privacy. Always Sign Out. mysi-net STAFF FACT SHEET April 20, 2012
 About mysi-net mysi-net is effectively a 'cut-down' version of SI-net, UQ s Student Administration system. It is available for self-service access by students, and allows staff members to search for and
TRUST Online u s e r g u i d e v e r s i o n 8. 4 O c t o b e r 2 0 1 3
 TRUSTOnline u s e r g u i d e version 8.4 October 2013 TABLE of CONTENTS Access Trust Online... 1 Login to Trust Online... 1 Enhanced Authentication Login... 3 Select an Account... 5 Locate an Account...
Jefferson County Public Schools. FRYSC Tips and Tricks
 FRYSC Tips and Tricks Table of Contents FRYSC Information Tracked in Infinite Campus... 4 Student Records... 4 Group Operations... 4 Individual Interventions... 5 Group Program Interventions... 9 Creating
Smart Web. User Guide. Amcom Software, Inc.
 Smart Web User Guide Amcom Software, Inc. Copyright Version 4.0 Copyright 2003-2005 Amcom Software, Inc. All Rights Reserved. Information in this document is subject to change without notice. The software
Billing Dashboard Review
 Billing Dashboard Review 70 Royal Little Drive Providence, RI 02904 Copyright 2002-2013 Optum. All rights reserved. Updated: 3/13/13 Table of Contents 1 Open Batches...1 1.1 Posting a Batch...1 2 Unbilled
CMS Training Manual. A brief overview of your website s content management system (CMS) with screenshots. CMS Manual
 with screenshots. CMS Manual") Training A brief overview of your website s content management system () with screenshots. 1 Contents Logging In:...3 Dashboard:...4 Page List / Search Filter:...5 Common Icons:...6 Adding a New Page:...7
Training A brief overview of your website s content management system () with screenshots. 1 Contents Logging In:...3 Dashboard:...4 Page List / Search Filter:...5 Common Icons:...6 Adding a New Page:...7
Creating and Using Links and Bookmarks in PDF Documents
 Creating and Using Links and Bookmarks in PDF Documents After making a document into a PDF, there may be times when you will need to make links or bookmarks within that PDF to aid navigation through the
MYEDUCATION BC MIDDLE SCHOOL TEACHER GUIDE BOOK
 MYEDUCATION BC MIDDLE SCHOOL TEACHER GUIDE BOOK Janzen, Barry GREATER VICTORIA SCHOOL DISTRICT 61 [Company address] Middle School Teacher MyEducation BC Basics Guide Book Contents: 1. Logging On and Change
Washington Access to Instruction and Measurement (WA-AIM) Engrade Users Guide
 Engrade Users Guide") Washington Access to Instruction and Measurement (WA-AIM) Engrade Users Guide Copyright 2015 by OSPI, Data Recognition Corporation, and McGraw-Hill LLC. All rights reserved. Developed and published under
Washington Access to Instruction and Measurement (WA-AIM) Engrade Users Guide Copyright 2015 by OSPI, Data Recognition Corporation, and McGraw-Hill LLC. All rights reserved. Developed and published under
Contents 1 Overview 2 Steps to run an Excel Add-In Setup: 3 Add-Ins 4 LOGIN 5 SEND SMS 5.1 Send Text or Flash Sms 5.2 Select Range 5.
 Contents 1 Overview 2 Steps to run an Excel Add-In Setup: 3 Add-Ins 4 LOGIN 5 SEND SMS 5.1 Send Text or Flash Sms 5.2 Select Range 5.3 Selected Range Preview List 5.4 Scheduling of Messages 5.5 Scheduled
Microsoft Office. Mail Merge in Microsoft Word
 Microsoft Office Mail Merge in Microsoft Word TABLE OF CONTENTS Microsoft Office... 1 Mail Merge in Microsoft Word... 1 CREATE THE SMS DATAFILE FOR EXPORT... 3 Add A Label Row To The Excel File... 3 Backup
BUSINESS ONLINE BANKING CASH MANAGEMENT USER GUIDE
 BUSINESS ONLINE BANKING CASH MANAGEMENT USER GUIDE TABLE OF CONTENTS LogIn Process...1 Company Login... 1 Cash User Login... 3 Cash Management User Single Sign On... 4 Navigation...5 Account Listing Page...6
Cox Business Premium Online Backup USER'S GUIDE. Cox Business VERSION 1.0
 Cox Business Premium Online Backup USER'S GUIDE Cox Business VERSION 1.0 Table of Contents ABOUT THIS GUIDE... 4 DOWNLOADING COX BUSINESS PREMIUM ONLINE BACKUP... 5 INSTALLING COX BUSINESS PREMIUM ONLINE
Express Reports. HealthStream Express TM
 HealthStream Express TM Administrator access to features and functions described in the HLC Help documentation is dependent upon the administrator s role and affiliation. Administrators may or may not
BUSINESS NETTELLER ONLINE BANKING USER GUIDE
 BUSINESS NETTELLER ONLINE BANKING USER GUIDE Revised 6.5.2013 TABLE OF CONTENTS Login Process...1 Cash Management User Login...2 Cash Management User Single Sign-on...3 Multi-Factor Authentication...4
BulkSMS Text Messenger Product Manual
 BulkSMS Text Messenger Product Manual 1. Installing the software 1.1. Download the BulkSMS Text Messenger Go to www.bulksms.com and choose your country. process. Click on products on the top menu and select
MANAGER SELF SERVICE USER GUIDE
 MANAGER SELF SERVICE USER GUIDE FEBRUARY 2016 Contents Note: If using this guide electronically the contents are hyperlinked to each section. Introduction... 2 Using This Manual... 2 Signing in to Workday...
Novell ZENworks Asset Management 7.5
 Novell ZENworks Asset Management 7.5 w w w. n o v e l l. c o m October 2006 USING THE WEB CONSOLE Table Of Contents Getting Started with ZENworks Asset Management Web Console... 1 How to Get Started...
paragraph(s). The bottom mark is for all following lines in that paragraph. The rectangle below the marks moves both marks at the same time.
. The bottom mark is for all following lines in that paragraph. The rectangle below the marks moves both marks at the same time.") MS Word, Part 3 & 4 Office 2007 Line Numbering Sometimes it can be helpful to have every line numbered. That way, if someone else is reviewing your document they can tell you exactly which lines they have
MS Word, Part 3 & 4 Office 2007 Line Numbering Sometimes it can be helpful to have every line numbered. That way, if someone else is reviewing your document they can tell you exactly which lines they have
Table of Contents. Page 1 MLS PIN Customer Support 800 695 3000 Monday Friday 8 am to 7:30 pm, Saturday 9 am to 5 pm, Sunday 9 am to 1 pm
 Table of Contents Activity... 4 Chart Time Frame... 4 Listing Activity Chart... 4 View Price Activity Chart... 4 Archive... 4 Archive Contacts... 4 Unarchiving Contacts... 5 Assign Contacts... 5 Assigned
Using the SimNet Course Manager
 Using the SimNet Course Manager Using the SimNet Course Manager Contents Overview...3 Requirements...3 Navigation...3 Action Menus...3 Sorting Lists...4 Expanding and Collapsing Sections...4 Instructor
Supply Chain Finance WinFinance
 Supply Chain Finance WinFinance Customer User Guide Westpac Banking Corporation 2009 This document is copyright protected. Apart from any fair dealing for the purpose of private study, research criticism
B2W Maintain. Setup and Preventive Maintenance
 B2W Maintain Setup and Preventive Maintenance Session Contents B2W Maintain - Setup and Preventive Maintenance... 2 1: Learning About Maintenance Categories... 3 2: Learning About Equipment Level Enhancements...
NJCU WEBSITE TRAINING MANUAL
 NJCU WEBSITE TRAINING MANUAL Submit Support Requests to: http://web.njcu.edu/its/websupport/ (Login with your GothicNet Username and Password.) Table of Contents NJCU WEBSITE TRAINING: Content Contributors...
Note: With v3.2, the DocuSign Fetch application was renamed DocuSign Retrieve.
 Quick Start Guide DocuSign Retrieve 3.2.2 Published April 2015 Overview DocuSign Retrieve is a windows-based tool that "retrieves" envelopes, documents, and data from DocuSign for use in external systems.
Teaching Strategies GOLD Online Guide for Administrators
 Assessment Teaching Strategies GOLD Online Guide for Administrators June 2013 Welcome to Teaching Strategies GOLD online! Welcome to Teaching Strategies GOLD online! It s easy to start using the system.
Last Updated on 11/06/2008. www.jobprotech.com
 Last Updated on 11/06/2008 www.jobprotech.com Copyright JobPro Technology, 2008 How to Use this Guide This manual is designed as a reference for JobPro customers. It is not intended to be a replacement