Repairing a Day/Night Shade made by Specialty Window Coverings. Introduction
|
|
|
- Elfrieda Evans
- 8 years ago
- Views:
Transcription
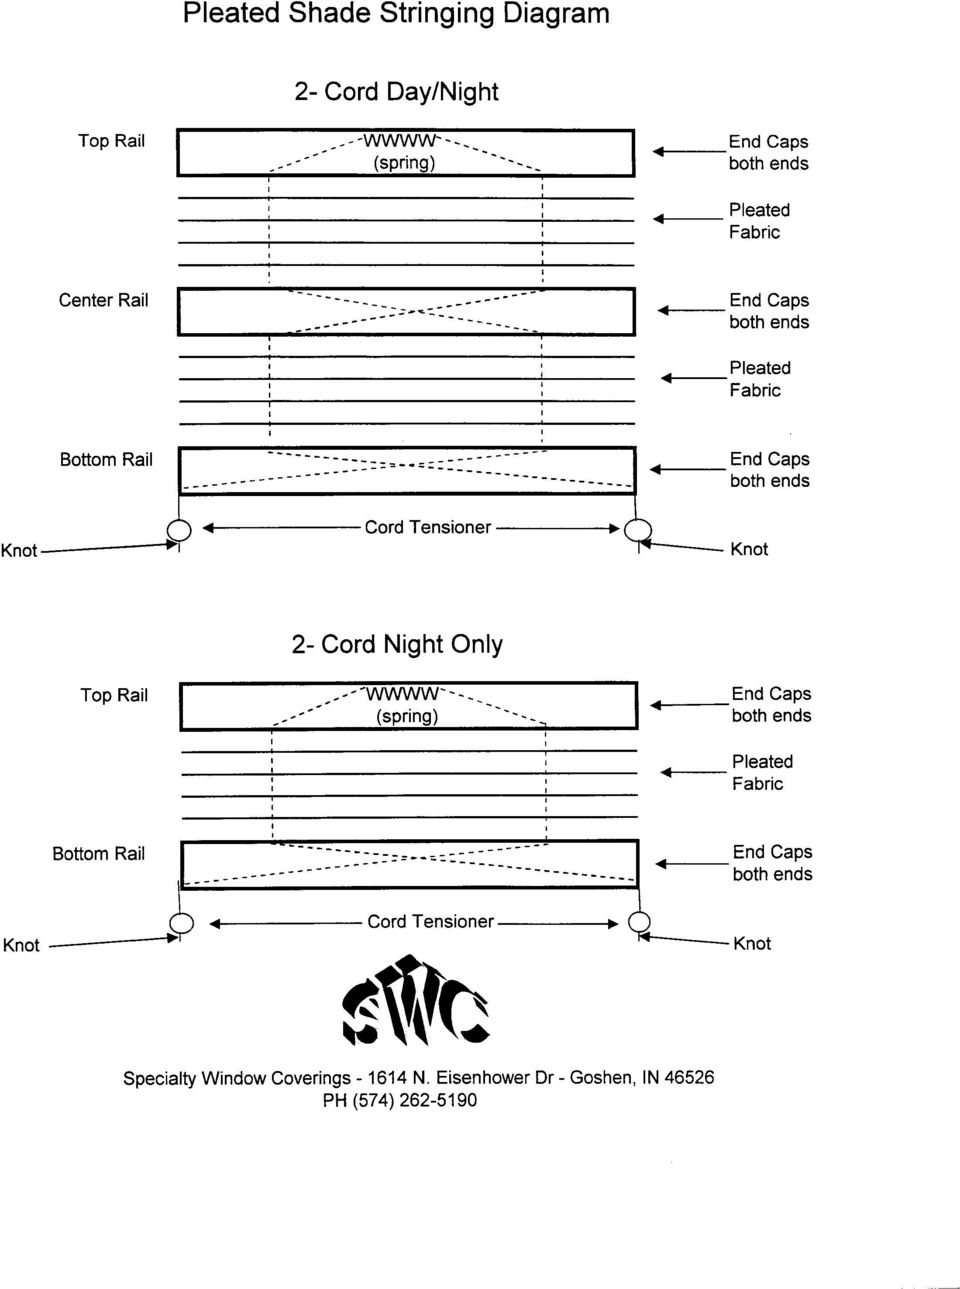
1 Repairing a Day/Night Shade made by Specialty Window Coverings Introduction Restringing a pleated shade can be exasperating hopefully the changes I made to the manufacturer s instructions will make the process a bit easier. The manufacturer assumes that the shade has been installed with some thought as to how it will be removed when it breaks. The problem is you will probably find as I did that the RV manufacturer did not take this into consideration when they were originally installed. I have wondered how some of mine could have even been installed the way they were but then maybe cabinets and similar items had not been installed previous to hanging the shades. Before attempting the repair or buying replacement cord it is necessary to see whether the top rail can be seen (without cutting the remaining cords and dropping the shade) and specifically can the screws holding the shade up be accessed. If they cannot then you need to scrap the manufacturer s instructions and use mine. If you purchase precut cord from a supplier and you cannot access the screws holding the shade up you may have just wasted your money so make sure of this very first step before doing anything. The second consideration is the shade itself. All of the shades in my coach had the eyelets installed upside down even the replacement shades purchased. Although the manufacturer says that this is all right I disagree and have never had a problem after I changed the eyelets. I can only assume that this is the reason that we all have so many problems with these shades and repair centers call them an issue. I also decided to use another material for the cords and this made them glide up and down with ease a significant difference from the originals. The first 4 sheets of this instruction were supplied to me by the manufacturer. The stringing procedure is the same with either their instructions or mine. The balance of the instructions by Dennis include replacing grommets, how to size the string if you can t see the top rail and some pictures of the problems. Good luck I hope this helps!

2
3

4

5

6 Repairing a Day/Night Shade by Dennis The following repair guide is for the two and four cord assemblies manufactured by Specialty Window Coverings of Indiana. Blinds are assembled using clear 50# test fishing line and the eyelets are replaced using a two piece eyelet in the correct direction which is the cause for the continual breakage of these blinds. The results of the repair are a blind that glides up and down with ease and no further breakage. An added benefit is almost invisible cords. Required tools and materials: You will need to go to a store like Michael s Crafts and purchase 3/16 two-sided eyelets; 6 required for the 2 cord and 12 for the 4 cord blind. Also they have a small eyelet die set for a couple of dollars. Spool of clear 50# test. Awl to open to punch holes in fabric if required. Drill motor and drill bit to open the holes for the new eyelets or a Dremel tool. The Dremel will allow you to grind which will be required also. Darning needle 1) The first step assumes that at least one of the cords is still holding the blind assembly together, meaning the shade assembly still is partially compressed together and NOT TOTALLY STRETCHED OUT. Attempt to look up at the top rail and see if you can see the screws. If you can easily you are ready to cut the remaining cords and remove the assembly. If you cannot you need to check two things: a) If the screw holes are not easily accessible because they are on the window side but would be visible from the interior side then go to step 2 after removing the blind. b) If it is still difficult to see either side of the top rail because the folded blind takes up most of the area of the valance then cutting the remaining strings will allow visibility of the top rail after pulling the blind out to stretch it flat. Cutting and lengthening to remove the blind though causes a major problem if you have purchased a set of cords from a supplier the correct length for the blind. Understand that if the blind needs to be extended to see the top rail it will also need to be extended to replace the blind. If you have installed the precut new cords and now have a finished blind that is compressed and will not lay flat it wiil not be possible to see the screws to remount. If this is the situation go to step two (2) and then step four (4) skip step three (3). 2) Using the awl, punch a hole through the first fold of the Night shade closest to the top rail so the screw will be accessible from the interior side. Go to step 3. 3) Measure the length and width of the blind. This will be the length required for each individual cord. For ease of installation add an additional foot to the cord. Example: 5 foot wide by 4 foot in length equals 9 foot plus add additional 1 foot for installation ease or 10 feet. OR 4) Lay out the blind on a flat surface and pull out flat. Now measure the blind length and width. Example: The blind you have is 5 foot wide and 8 foot extended plus 1 foot for installation ease or 14 feet in cord length (5+8+1=14.) This step will allow you to assemble the blind and pull out flat when installing allowing visual access to the top rail. If as in the example you have a two cord blind you would have 2-14 foot lengths of cord. If you are repairing a 4 string unit then it

7 is necessary to double the final length of both sides. The 4 cord blind will rethreaded with two 28 foot cords. Each separate length will when tied at the middle to the end of the spring will result in 4 cords 14 foot in length. 5) Disassemble the blind. Mark your rails so you know top, bottom, window side etc. 6) Tie your new cords to the ends of the springs. If a 2 string unit install one length of cord to each end of the spring. If a 4 string unit tie a double length piece on each end of the spring so you now have 2 cords on each end. See Illustration 5 & 6 respectively. 7) When tying the fishing line double tie the knot so it does not unravel. See Illustration 4. 8) Note the direction of the eyelets now installed in the two lower plastic strips and the metal center divider. The manufacturer s eyelet is installed with the crimped end on the bottom. See picture 1. The original cord passes over this sharp crimped portion and frays the cord. When installing your new eyelets install the peened over side of the eyelet on the top. The cord passes through this part first and straight so will not catch on the peened over part of the eyelet. The new cord will pass and bend over the smooth side of the eyelet effortlessly without catching on anything. Remove each eyelet and replace with a new one in the correct direction. There is no need to change the eyelets in the top rail even though they are backwards. The cord does not bend here but drops straight down into the Night shade. It will probably be necessary to grind off or remove the ridges next to the holes on the underside of each plastic rail so the base of the die will lay flat when installing the new eyelet, this depends on the size of the die and you will have to judge for yourself if this will be necessary. 9) Fold up the night and day shades of the blind and rubber band together. 10) Using you darning needle feed the cord through the Night shade of the blind see manufacturer s diagram. 11) String the cords using the darning needle through the Day shade of the blinds see manufacturer s diagram. 12) Carefully slide the upper plastic strip into the bottom of the rail. Note the direction of the folds on the rails. Illustration 12 shows a blind with the Day shade installed backwards. Illustration 13 shows the same blind with the direction of the first fold correctly installed on the bottom of the metal rail. Slowly feed the plastic strip through while constantly pulling the cords tight. Go slowly so the cords do not tangle. Finish by placing the end caps on the metal rail. 13) Tie the two cords together on the right and left sides. 14) Cross the right cords to the left and the right cords to the left. Slide the bottom metal rail over the lower plastic strip keeping tension on each set of cords until the rail is in the final position. Pull each set of cords through the end caps and install the end caps on the rail see manufacturer s diagram.. 15) Take the completed assembly and re-install. 16) Pull each set of cords down and place a knot stop at the lowest position where the adjustment retainer will be installed. 17) Install the retainer at the bottom and turn to tighten each set of cords just enough to hold up both sets of shades.


8 Picture 1 The eyelet shown is the crimped over part of a 1-piece eyelet installed by the manufacturer. The cord after passing through the top has to pass over this rough part of the eyelet with considerable tension. In every set of blinds with frayed cords this will be found. Illustration 12 The eyelet shows because the Day Shade is installed backwards. See Illustration 13


9 Illustration 13 The eyelet is not seen through the first fold of the Day Shade.

TASK: Restring or Replace Cord Lock for Cellular, Pleated or Roman Shades
 If replacing the cord lock, skip steps 9-16. 1. Remove shade from installation brackets using a flathead screwdriver. Insert tip of screwdriver between the back of the headrail and the bracket. 2. Remove
1958-64 WINDOW CHANNEL, WEATHERSTRIP & WHISKER STRIP REPLACEMENT FOR 2-DOOR SEDANS
 By Denny Williams Photos by Denny Williams 1958-64 WINDOW CHANNEL, WEATHERSTRIP & WHISKER STRIP REPLACEMENT FOR 2-DOOR SEDANS Denny Williams - Technical Writer Denny is first and foremost a dyed-in-thewool
POD Visor Instructions
 POD Visor Instructions Please read fully before beginning assembly and mounting the Visor Parts List - Visor Left Part (LV), Visor Right Part (RV) Qty 2, Aluminum Crossbars Hardware - Qty 17, 1/4" X 3/4"
BUILD A TABLETOP LOOM
 BUILD A TABLETOP LOOM From 1" x 2" stock (actual 3/4" x 1"1/2) cut: 4 pieces 15" long 4 pieces 5"1/2 long Use the above to make 2 frames for the front and back of the loom. From 1" x 4" stock (actual 3/4"
http://waterheatertimer.org/troubleshoot-rheem-tankless-water-heater.html
 http://waterheatertimer.org/troubleshoot-rheem-tankless-water-heater.html TECHNICAL SERVICE DEPARTMENT Removal, Cleaning, & Reinstallation of the Burner Assembly For models 74 & GT199 Required tools -
MGB Chrome Bumper Conversion
 MGB Chrome Bumper Conversion Installation Instructions For 1974 1/2-1980 MGB This kit requires cutting, welding, and painting. Professional installation recommended. Note: Every MGB body is slightly different
TABLE OF CONTENTS. I. TROUBLESHOOTING... 2 - Section 1.01: Common Problems/Solutions... 2
 BAL Accu-Slide System I. Table of Contents TABLE OF CONTENTS I. TROUBLESHOOTING... 2 - Section 1.01: Common Problems/Solutions... 2 II. GETTING STARTED... 5 - Section 2.01: Tools You Will Need... 5 - Section
Ceiling Mounted Folding Attic Ladders Installation Instructions
 Ceiling Mounted Folding Attic Ladders Installation Instructions WARNING Before you start installing your new Louisville Ceiling Mounted Folding Attic Ladder, you must read and understand the following:
TENSION ISSUES? ROLLER SEE PAGE 7
 ROLLER TENSION ISSUES? SEE PAGE 7 Roller Shade Installation Guide Important: If you have ordered a valance for your shade, you must first read the Valance Installation Guide found in your box. We make
UPLIFT Height Adjustable Standing Desk (T-Frame) DIRECTIONS FOR ASSEMBLY AND USE - - ALSO - - Watch our assembly video
 DIRECTIONS FOR ASSEMBLY AND USE - - ALSO - - Watch our assembly video") UPLIFT Height Adjustable Standing Desk (T-Frame) DIRECTIONS FOR ASSEMBLY AND USE - - ALSO - - Watch our assembly video http://bit.ly/9ywwh! CAUTION MAKE SURE NO OBSTACLES ARE IN THE DESK S PATH AND ALL
UPLIFT Height Adjustable Standing Desk (T-Frame) DIRECTIONS FOR ASSEMBLY AND USE - - ALSO - - Watch our assembly video http://bit.ly/9ywwh! CAUTION MAKE SURE NO OBSTACLES ARE IN THE DESK S PATH AND ALL
Thread Tensions All Machines
 Below are items related to thread tensions and tension problems as found on Brother embroidery equipment. They are listed in the order that they most often occur. Use this form only as a guide. Following
Air Conditioner Duct Construction & Repair
 PROPER ROOF AIR CONDITIONER MOUNTING At Newmar, there are two different models of air conditioners available on all towable and motorized units. The different models are the Dometic Brisk and Penguin models,
Basic Spring Motor Roller Shades
 Comprehensive Roller Shade Installation Guide Basic Spring Motor Roller Shades ATTENTION!!! READ CAREFULLY! This shade has a reliable long-lasting Spring Motor. The Spring Motor must have proper tension
THE TRIMLINE 10' x 20' CANOPY
 THE TRIMLINE 10' x 20' CANOPY Instructions for Assembly Please, assemble the TrimLine at home the first time, not at an event. Before beginning assembly of your TrimLine, please take time to review the
Building The Modular Moveable Greenhouse described in The Four Season Farm Gardener s Cookbook By Barbara Damrosch and Eliot Coleman
 1 Building The Modular Moveable Greenhouse described in The Four Season Farm Gardener s Cookbook By Barbara Damrosch and Eliot Coleman This modular greenhouse is designed so home gardeners can easily build
UNPACKING AND ASSEMBLY
 UNPACKING AND ASSEMBLY Assembly Instructions Step 1. Open the two boxes and remove all the parts. Lay out the parts as shown below and read through the assembly instructions before beginning assembly.
1998-2002 Suzuki Katana Fender Eliminator
 1998-2002 Suzuki Katana Fender Eliminator The following are instructions and illustrations on the installation of the custom fender elimination. 1 Begin by removing seat, both rear fairings, and tail light
Pole Lathe and Shave Horse Design
 Pole Lathe and Shave Horse Design These pictures and accompanying words are Copyright Michael Hughes February 2002. They are not to be re-produced, in part or whole, without permission from the author.
DIY CABINET REFACING INSTALLATION GUIDE
 DIY CABINET REFACING INSTALLATION GUIDE CABINET REFACING INSTALLATION Are you ready to reface your outdated cabinets? This guide will show you how to install your new Facelifters Cabinet Refacing Products
Picnic Table Plans. Made out of a single sheet of plywood, it s also portable! By Kevin Ayer. This children's picnic table would
 Picnic Table Plans Made out of a single sheet of plywood, it s also portable! By Kevin Ayer Materials One 4- by 8-foot sheet of 3 4-inch AC plywood Twelve 11 4-inch wood screws Primer and exterior paint
Panel Track Installation Guide
 Panel Track Installation Guide We make it easy! BTG 493361 EN_0510 Before starting Your new Blinds To Go panel track is custom made to your specifications from the finest materials available. To ensure
How to Build Your Own CornHole Game
 How to Build Your Own CornHole Game DIMENSIONS Here is a diagram with the basic measurements for the Cornhole board game. SUPPLIES 1/2 thick sheet of plywood one 4 x4 or two 2 x4 s 8 long 2 4 s (4) 4 1/2
AZEK Rail Install Guide
 TRIM MOULDING DECK PORCH RAIL PAVERS AZEK Rail Install Guide Installing AZEK Rail with CableRail by Feeney... 1 Installing CableRail by Feeney for AZEK Rail... 7 Installing AZEK Rail Stairs with CableRail
Horizontal Mini Blinds Installation Guide
 Horizontal Mini Blinds Installation Guide We make it easy! BTG 468298 EN_ rev0614 For more safety information: 1-866-662-0666 or.www.healthcanada.gc.ca/blindcords Before starting Your new Blinds To Go
RadianceRail Installation Guide
 RadianceRail Installation Guide Installing RadianceRail with CableRail by Feeney... 2 Installing CableRail by Feeney for RadianceRail... 7 Installing RadianceRail Stairs with CableRail by Feeney... 10
SEWING MAINTENANCE CHECKLIST
 SEWING MAINTENANCE CHECKLIST Many Retail, Brand-name Marketing, Mail Order and Sourcing Companies are visiting existing and potential Contractor sewing facilities and evaluating their sewing capabilities
REPLACEMENT INSTRUCTIONS FOR AWNING
 REPLACEMENT INSTRUCTIONS FOR AWNING Fabric Roller Tube Torsion Assembly For Models 8500 & 9000 Tools Required: Vise Grips Socket Wrench Set 3/16" rill Bit 1/8" Pop Rivets End Cap Guide Screwdriver Electric
Rowley project list: Contemporary Layered Ripplefold Window Treatment
 Rowley project list: Contemporary Layered Ripplefold Window Treatment Ripplefold panels are gaining popularity in the residential market. This style of panel takes less fabric length than a traditional
Sewing Methods Chicago Style Stitch
 Chicago Style Stitch 1 2 3 4 TWO STRANDS OF CORD PULL ALL STITCHES TIGHT STARTING STITCH FIRST STITCH SECOND STITCH VERTICAL FLAT CABLES COMPLETED KNOT A B C D NOTE 6 NOTE 7 GROUPED OR SMALL CABLES 1.
UNIT 4: SHEATHING AND SHINGLING THE ROOF
 KEY CONCEPTS 1. Identify tools needed for roofing 2. Steps to finishing a roof 3. Maintenance of a roof 4. Safety while roofing INSTRUCTIONAL ACTIVITIES 1. Complete Follow Up Worksheet from Unit 3 2. Roof
Roll Up Banners. Display Banners. Pop-Up Counter. Display Wall. Flags. Free Hanging Banners
 Roll Up Banners Display Banners Pop-Up Counter Display Wall Flags Free Hanging Banners Roll Up Banner: Roll Up Regular A robust and professional looking free standing retractable display. The unit comes
Installation of Rear View Camera in a 1995 Roadtrek 190 Popular
 Installation Instructions: 1995 Roadtrek Rear View Camera Page 1 Installation of Rear View Camera in a 1995 Roadtrek 190 Popular Introduction. In the fall of 2010 we investigated rear view cameras for
Roll-Up Door Maintenance Guide
 R Roll-Up Door Maintenance Guide Cable Replacement on Two Spring Type Balancer Page 1 Panel Replacement - Removable Roller Cover Type Bottom Panel Page 1 Panel Replacement - Removable Roller Cover Type
Juice Box Stages 1&2 135&335 Installation Guide 5/10/08
 Tools Required: 8mm socket or nut driver Small flat head screwdriver Electrical tape, masking tape, or shrink tube Pep talk: Although the install looks daunting at first, once you get the learning curve
Black Wolf POCKET BILLIARD TABLE INSTALLATION MANUAL. SERVICE DEPARTMENT P.O. BOX 68 BRISTOL, WI 53104
 Black Wolf TM POCKET BILLIARD TABLE INSTALLATION MANUAL www.brunswickbilliards.com SERVICE DEPARTMENT P.O. BOX 68 BRISTOL, WI 53104 51-905710-000 SEPTEMBER 2010 NOTE: Please use the instructions in this
Expanding a 40-Type Cabinet
 Expanding a 40-Type Cabinet using the 3M Add-On Terminal 4220P 400-Pair and Jumper Trough Instructions January 2006 Table of Contents 1.0 General... 3 2.0 Cabinet Overall Descriptions... 3 3.0 Tools Required...
Quest for Speed. Discover Engineering. Youth Handouts
 Discover Engineering Youth Handouts Activity 1: Spooling Around Name: Date: Materials List Wooden spool Nail Flat washer Rubber bands Craft stick Nut Tape measure Calculator Masking tape Procedure 1. To
Ford F-Series Column Shift Repairs
 Ford F-Series Column Shift Repairs I ve had it on my list to tighten up the linkage on my 52 s column shift setup for a long time. I tried to get it apart when I had all the front end sheet metal off,
Mattress Warranty Claim Form
 Mattress Warranty Claim Form Dear valued customer, We take great pride in the quality of the products we sell and appreciate hearing from you. Please read the enclosed manufacturer s warranty process information
www.cornholesupplies.com
 www.cornholesupplies.com How To Build Regulation Cornhole Boards Home of the Original Cornhole Bags and Boards Supply List: 1-4' X 8' Piece of Plywood (pre sanded) 4-2" X 4" X 8' Studs (2 by 4s make sure
TECHNICAL INFORMATION
 TECHNICAL INFORMATION Models No. 2012NB Description 304mm (12") Automatic Thickness Planer CONCEPTION AND MAIN APPLICATIONS * Compact and light weight (27 Kg./59 lbs) automatic thickness planer for easier
Replacement Window Installation Guide Non-Impact & Impact Resistant Windows without Nailing Fin
 Replacement Window Installation Guide Non-Impact & Impact Resistant Windows without Nailing Fin americancraftsmanwindows.com Project Requirements: Failure to follow these instructions may void product
Coaxial Cable Installation Accessories
 Installation Instructions Bulletin 37608 Coaxial Cable Installation Accessories Hoisting Grips for Coaxial Cable and Elliptical Waveguide READ ALL WARNINGS AND INSTRUCTIONS BEFORE INSTALLATION Antenna
STEADYfast Stabilizer Installation Notes Fifth Wheel and Travel Trailers 11/23/13
 STEADYfast Stabilizer Installation Notes Fifth Wheel and Travel Trailers 11/23/13 (See Supplemental Instructions for trailers with heavy duty round footplates and/or Power Leveling Systems) PHONE SUPPORT
Table of Contents. www.hunterfan.com. What to Expect with. Preparation. Tools Needed. Wiring. Hanging the Fan. Blades. Motor Housing.
 www.hunterfan.com Table of Contents What to Expect with Your Installation 30 inches Hanging the Fan Wiring 8 Maintenance, Operation & Cleaning Light Kit 13??? 14 1 9 Troubleshooting 11 5 Blades Motor Housing
Mini multi-purpose sewing machine
 TROUBLESHOOTING Problem Problem cause Amendment No power or the machine runs slowly Batteries are installed incorrectly Batteries are low Reinstall the batteries making sure they are the correct way around
How to erect a Kelty Grand Mesa 4 tent
 How to erect a Kelty Grand Mesa 4 tent Introduction When selecting a tent, one must first choose what purpose the tent will serve. There are many types of tents which serve a variety of purposes. These
I BEAM TRACK INSTALLATION
 PDQ 0/700 FESTOON SYSTEM INSTALLATION AND MAINTENANCE INSTRUCTIONS INTRODUCTION The PDQ Festoon System was designed to run on one of three sizes of I-beams: S x., S8 x 8. and S x.. System trolleys must
Triple Threat 3-in-1 Game Table 3 IN 1 GAME TABLE
 NG0M Triple Threat 3-in- Game Table 3 IN GAME TABLE Thank 3 in Y Game Table Thank you for your purchase of our product. We work around the clock and around the globe to ensure that our products maintain
Hamilton Form Company, Ltd Custom Designs, Flexible Solutions
 Hamilton Form Company, Ltd Custom Designs, Flexible Solutions 1 IFC 2 CUSTOM DESIGNS, FLEXIBLE SOLUTIONS Hamilton Form has been designing and building custom steel forms for the precast industry since
5800 Temperature Sensor Cable Assembly
 5800 Temperature Sensor Cable Assembly Removal and Replacement Instruction Sheet #60-4702-070 Revision D, January 14, 2013 Overview The 5800 has two refrigeration temperature sensors, one attached to the
Installation Operation Care
 Installation Operation Care Duette and Applause Honeycomb Shades LiteRise Lifting System CONTENTS Getting Started: Product View... 1 Tools and Fasteners Needed... 2 Mounting Types and Window Terminology...
#12 Professional Meat Grinders
 #12 Professional Meat Grinders MG-203100 (52021040) Manual Instruction Thank you, and congratulations on purchasing the Non-corrosive electric meat grinder. Your grinder comes complete with everything
PRODUCT GUIDE Vinyl Single and Double-Hung Windows (JPG006) INTRODUCTION
 INTRODUCTION") This guide contains procedures for common user serviceable repair tasks found on vinyl single and double-hung windows. If a condition arises that is not covered in this guide, please contact us for professional
This guide contains procedures for common user serviceable repair tasks found on vinyl single and double-hung windows. If a condition arises that is not covered in this guide, please contact us for professional
Customer Service 800.780.8889 or visit us online at smithnoble.com. Wood Shutters. Step by Step Installation. Troubleshooting Tips
 reflect your style TM Customer Service 800.780.8889 or visit us online at smithnoble.com Wood Shutters Step by Step Installation Troubleshooting Tips Easy Care Instructions STEP 1 Your New Shutter Thank
QSI Auto-Focus Mounting Bracket
 QSI Auto-Focus Mounting Bracket The camera mounting bracket makes extensive use of sliding dovetails. The dovetail joint gets immense strength from a trapezoidal pin trapped in a slot. The internal flats
Go-kart for little race-drivers
 Go-kart for little race-drivers Drill and drive. Go-kart What it lacks in speed, it more than makes up for in fun: the go-kart will excite little race-drivers. 1 Introduction It s only a go-kart, but it
Layout of Hanging Light Strings for Morningside Gym
 Layout of Hanging Light Strings for Morningside Gym Loops on beams 1:00 2:00 3:00 Loop on window crank 4:00 5:00 Light String Labels STAGE 12:00 Junction Board (suspended) 6:00 11:00 7:00 10:00 9:00 8:00
Installation Instructions for Wamilton s Steering Cable Modification. Remove the cables from the white retaining clip
 Installation Instructions for Wamilton s Steering Cable Modification The steering cable on the 08 and later superjets is too short and limits the throw of the nozzle. By changing to an older style steering
WARNING! REQUIRED TOOLS & SUPPLIES: HIGH VOLTAGE
 INSTRUCTIONS Product: GEM Electric Motorcars Models: All Subject: Instructions for installing Stereo Accessory Estimated Completion Time:.75 Hours Parts: See Page # 7 REQUIRED TOOLS & SUPPLIES: (1) 3/8
FRONT WINDSHIELD SEAL INSTALLATION
 FRONT WINDSHIELD SEAL INSTALLATION Tech Article From Newsletter 16.1-1st Quarter of 2010 Replacing your Front Windshield Seal ISN T AS HARD AS YOU MAY THINK! Recently, we retooled our front window seal
1999.5-2001 Audi A4 (B5) HID conversion installation instructions
 HID conversion installation instructions") 1 of 5 10/26/2007 4:48 PM 1999.5-2001 Audi A4 (B5) HID conversion installation instructions Tools Needed: A drill 1" hole saw T27 Torx bit and driver with a 4" extension Extendable magnet Pliers or A drill
1 of 5 10/26/2007 4:48 PM 1999.5-2001 Audi A4 (B5) HID conversion installation instructions Tools Needed: A drill 1" hole saw T27 Torx bit and driver with a 4" extension Extendable magnet Pliers or A drill
Guidelines for Earthquake Bracing of Residential Water Heaters
 Guidelines for Earthquake Bracing of Residential Water Heaters Department of General Services Division of the State Architect 1102 Q Street, Suite 5100 Sacramento, CA 95814 Phone: (916) 324-7099 Fax: (916)
How To Stretch Your Body
 Exercise Module A New Leaf Choices for Healthy Living University of North Carolina at Chapel Hill 2007 Center for Health Promotion and Disease Prevention Physical Activity Exercises for Keeping Active
Arctic Leash Instruction Manual Alaskan Products Company LLC.
 Retractable Cord Reel for Engine Block Heaters Arctic Leash Instruction Manual Alaskan Products Company LLC. INSTALLATION INSTRUCTIONS This instruction manual is a reference guide for installing and operating
Technical data sheet PVC Bi-fold doors
 Standard Specifications White internally beaded, Deceuninck 3000 series profile 28mm Low-e toughened sealed units with argon gas Open in doors with white handles and hinges Tracks are fitted to the top
Standard Operating Procedures 4ft Muscle Wall
 Standard Operating Procedures 4ft Muscle Wall Secondary Containment Standard Operating Procedures Page 2 of 12 Table of Contents Page 4 Page 3 Page 7 Page 5 Page 10 Page 11 Page 9 Specifications Items
Brick Veneer Construction
 Brick Veneer Construction Check list of suggested tools & support items Claw hammer Tape measure 3/4" [19 or 20] Wood chisel Wood or plastic shims Pry bar Utility knife Caulking and caulking gun Power
Firewall Cover Installation Instruction Sheet
 Firewall Cover Installation Instruction Sheet Please Read Carefully Our Firewall cover is designed to fit on the stock strut brace. If you have an aftermarket strut brace than it is you re responsibility
A&A CORVETTE PERFORMANCE C6 BOOST & FUEL GAUGE INSTALLATION INSTRUCTIONS
 A&A CORVETTE PERFORMANCE C6 BOOST & FUEL GAUGE INSTALLATION INSTRUCTIONS 1. Check your gauges before you take them out of the packaging to make sure they are at 0 (zero) psi for both boost and fuel pressure.
ALUMINUM UNIVERSAL VAN / CAP RACK INSTRUCTIONS ROOF MOUNT APPLICATION P/N ULRHDGV-1 / ULRHDGC-1
 ALUMINUM UNIVERSAL VAN / CAP RACK INSTRUCTIONS ROOF MOUNT APPLICATION P/N ULRHDGV-1 / ULRHDGC-1 Package Contents: (8) Load Secure Posts (2) Cross Bars (4) Curved Arms (4) G Mount Hinges (4) G Mount Rubber
WINDOW REPAIR MANUAL & REFERENCE GUIDE
 WINDOW REPAIR MANUAL & REFERENCE GUIDE TABLE OF CONTENTS DOUBLE HUNG & SINGLE HUNG PARTS 4-5 CASEMENT PARTS 6 SCREEN PARTS 7-8 HOW TO REMOVE TILT-IN SASH 9 HOW TO REMOVE A BALANCE 10 HOW TO INSTALL BALANCE
with installation dynafact boost GAUGE this manual is for use with systems 64050-64054
 owners manual with installation instructions dynafact boost GAUGE this manual is for use with systems 64050-64054 GENERAL INSTALLATION PRACTICES This manual is an installation guide for all 1. Banks DynaFact
SIG 556 Match Sear/Hammer Installation
 SIG 556 Match Sear/Hammer Installation ShootingSight LLC 2012 Safety Warning Always verify your firearm is unloaded before working on it. These instructions are meant as a supplemental guide to an armorer
2006 JUDY SERVICE GUIDE
 2006 JUDY SERVICE GUIDE For exploded diagram and part number information, refer to the Spare Parts Catalog available on our website at www.rockshox.com. Information contained in this publication is subject
Navico-Northstar 2kW JRC Radar Package, Scanner Cable Removal and Replacement
 Navico-Northstar 2kW JRC Radar Package, Scanner Cable Removal and Replacement This work instruction describes the methods and means for which to remove and reinstall optional scanner cable configurations
Post Mount Light Installation*
 Post Mount Light Installation* *For the general installation of most Post Mount Spotlights, many vehicles may need slight modifications to these instructions. You will need the following tools: High torque
INSTALL INSTRUCTIONS KK-C-HVAC-1 HVAC UNIT 2003-2014 CHEVROLET/GMC VANS FOR
 INSTALL INSTRUCTIONS KK-C-HVAC-1 HVAC UNIT 2003-2014 CHEVROLET/GMC VANS FOR (For NEW 2007 ALL WHITE KWIK-KITS ONLY) Warning do not attempt to install A/C units unless you are experienced with servicing
How to Build a Poker Table
 How to Build a Poker Table www.pokertablematerials.com 10-Person Poker Table- 96 x 48 These are step by step instructions for building a poker table. The table will measure 48" x 96" and have a 4" wide
AM/FM ANTENNA KIT (TOUR-PAK MOUNT)
") -J077 REV. 008-0-0 AM/FM ANTENNA KIT (TOUR-PAK MOUNT) GENERAL Kit Number 7-98A Models For model fitment information, see the P&A Retail Catalog or the Parts and Accessories section of www.harley-davidson.com
-J077 REV. 008-0-0 AM/FM ANTENNA KIT (TOUR-PAK MOUNT) GENERAL Kit Number 7-98A Models For model fitment information, see the P&A Retail Catalog or the Parts and Accessories section of www.harley-davidson.com
MODEL 2400 RAISED BED PLASTIC MULCH LAYER OPERATING MANUAL
 MODEL 2400 RAISED BED PLASTIC MULCH LAYER OPERATING MANUAL Rain-Flo Irrigation 929 Reading Road East Earl, Pa 17519 PH: 717-445-3000 Table Of Contents Bed Height...............................7 Cover Disk...............................9
Fabricating a chassis from clad PCB board material
 Fabricating a chassis from clad PCB board material How many times have you started a project and the finished appearance is based on what box you had laying around, rather than what you would like to have?
Installation information. METTLER TOLEDO MultiRange Floor scales / Pit scales
 Installation information METTLER TOLEDO MultiRange Floor scales / Pit scales KC300/KCS300 KC600/KCS600 KD600/KD1500 KE1500/KE3000 KES1500/KES3000 KG3000/KG6000 KN1500 Floor scales / Pit scales Contents
Installing Window and Door Mouldings
 Installing Window and Door Mouldings About Window and Door Mouldings The trim around windows and doors greatly influences the look and style of your interior. They also bridge the gaps and cover spaces
ADDING AN ELECTRIC AUXILIARY FAN TO RADIATOR STACK ON 03 ALPINE COACH
 ADDING AN ELECTRIC AUXILIARY FAN TO RADIATOR STACK ON 03 ALPINE COACH The original design of the 03 Alpine Coaches (and perhaps other years as well) did not include any kind of engine fan engage mechanism
HOW TO MEASURE FOR DRAPERY & WINDOW
 HOW TO MEASURE FOR DRAPERY & WINDOW From the fabric you select to the hardware that you choose, window treatments are an opportunity to define a room s style. This guide outlines the various drapery styles
Installation instructions, accessories - Handsfree for cellular phone, system B, entry level
 XC90 Section Group Weight(Kg/Pounds) Year Month 3 39 0.5/1.1 2006 07 XC90 2003, XC90 2004 IMG-249663 Page 1 of 18 Required tools A0000162 A0000163 IMG-239664 M0000232 IMG-253123 IMG-252223 Page 2 of 18
Instructions for assembly of your Pop-Up Display
 Instructions for assembly of your Pop-Up Display I: Frame a) With the Pop-Up Frame still in the travel case, open the cloth bag. Make note of the ten black pegs on the top. These pegs represent the TOP
Sprinter Fuel Filter Installation
 This document is based on my experience with a 2002 Sprinter, and created because of the lack of manuals for the Sprinter in the US that reflects basic maintenance guidelines. The pros, no doubt, have
Awning Instructions. Standard Manual 1.5m to 4.5m
 Awning Instructions Standard Manual 1.5m to 4.5m English Standard Manual Instructions Contents Warning 1.5m 3.0m Awnings 4 x Expansion bolts (2 per bracket)** 2 x brackets 1 x Awning 1 x Winder handle
Responsibilities of a Volunteer Leader
 Responsibilities of a Volunteer Leader Inspecting tools for safe conditions. Removing unsafe tools from use and immediately notifying site supervisor. Teaching safe tool use to volunteers on your crew.
PRODUCT GUIDE Vinyl Single and Double-Hung Windows (JPG006)
") This guide contains procedures for common user serviceable repair tasks found on vinyl single and double-hung windows. If a condition arises that is not covered in this guide, please contact us for professional
This guide contains procedures for common user serviceable repair tasks found on vinyl single and double-hung windows. If a condition arises that is not covered in this guide, please contact us for professional
Installation Instructions
 READ BEFORE INSTALLING UNIT For Through-the-Wall Air Conditioners To avoid risk of personal injury, property damage, or product damage due to the weight of this device and sharp edges that may be exposed:
Middle School Electric Car Competition
 Middle School Electric Car Competition 1. Competition Structure 1-1. Speed Race The race will take place on a 20 meter track and will consist of three time trials. The top 16 teams from the time trials
SUPERCHIPPER CASTING MAINTENANCE
 INTRODUCTION By design, the Superchipper Rotor is clad in castings which wear during crushing. The castings wear at different rates depending on their location on the rotor, material feed rate, material
Installation Instructions 4508 4508S
 SYMPHONY Spread Lavatory Faucet with Speed Connect Drain Congratulations on purchasing your American Standard faucet with Speed Connect drain, a feature found only on American Standard faucets. Speed Connect
Standard Operating Procedures 4ft Muscle Wall
 Standard Operating Procedures 4ft Muscle Wall Primary Containment Standard Operating Procedures Page 2 of 11 Table of Contents Page 4 Page 3 Page 7 Page 5 Page 10 Specifications Items Needed Stage 1: Liner
Andersen Electric Window Opener for Andersen Awning and Roof Windows
 W A Electric Window Opener Electric Window Opener for Awning and Roof Windows Congratulations! You have just purchased one of the many fine products. For ease of installation and continued enjoyment of
IN00419 (rev A) Aqua 6 Glide Quadrant and Off-set Quadrant Enclosure
 Aqua 6 Glide Quadrant and Off-set Quadrant Enclosure") IN00419 (rev A) Aqua 6 Glide Quadrant and Off-set Quadrant Enclosure Instruction suitable for both Quadrant & Off-set Quadrant variations. Instruction suitable for both Right and Left Hand fixing variations
IN00419 (rev A) Aqua 6 Glide Quadrant and Off-set Quadrant Enclosure Instruction suitable for both Quadrant & Off-set Quadrant variations. Instruction suitable for both Right and Left Hand fixing variations
Installation Instructions
 Installation Instructions 1. Position the unit onto bridging packers. These keep the unit away from any water sitting inside the frame. 2. Centralise the unit within the frame and pack the edges with appropriate