FCC COMPLIANCE STATEMENT FOR AMERICAN USERS
|
|
|
- Marsha Shepherd
- 10 years ago
- Views:
Transcription
1
2 FCC COMPLIANCE STATEMENT FOR AMERICAN USERS This equipment has been tested and found to comply with the limits for a CLASS A digital device, pursuant to Part 15 of the FCC Rules. These limits are designed to provide reasonable protection against harmful interference when the equipment is operated in a commercial environment. This equipment generates, uses, and can radiate radio frequency energy and, if not installed and used in accordance with the instructions, may cause harmful interference to radio communications. Operation of this equipment in a residential area is likely to cause harmful interference in which case the user will be required to correct the interference at own expense. EMS AND EMI COMPLIANCE STATEMENT FOR EUROPEAN USERS This equipment has been tested and passed with the requirements relating to electromagnetic compatibility based on the standards EN 55022: 2010, CISPR 22, Class A EN 55024: 2010, IEC Series EN / 2006+A1:2009+A2:2009 & EN :2008. The equipment also tested and passed in accordance with the European Standard EN55022 for the both Radiated and Conducted emissions limits. CL-S300 TO WHICH THIS DECLARATION RELATES IS IN CONFORMITY WITH THE FOLLOWING STANDARDS EN55022 : 2010, Class A / EN55024 : 2010 / IEC Series / EN : 2006+A1:2009+A2:2009 / EN : 2008 / CFR 47, Part 15/CISPR 22, Class A / ANSI C63.4 : 2009 / IEC : 2005 (EN : 2006+A11 : 2009+A1:2010+A12:2011) / GB : 2011 / GB9254 : 2008 / GB : 2003

3 CAUTION Changes or modifications not expressly approved by the party responsible for compliance could void the user's authority to operate the equipment. 1

4 Safety instructions Please read the following instructions carefully. 1. Keep the equipment away from humidity. 2. Before you connect the equipment to the power outlet, please check the voltage of the power source. 3. Make sure the printer is off before plugging the power connector into the power jack. 4. It is recommended that you connect the printer to a surge protector to prevent possible transient overvoltage damage. 5. Be careful not to get liquid on the equipment to avoid electrical shock. 6. For safety and warranty reasons, ONLY qualified service personnel should open the equipment. 7. Do not repair or adjust energized equipment under any circumstances. 2

5 1. BARCODE PRINTER Box content Specifications Getting to know your printer PRINTER SETUP Loading the label roll Installing the label roll holder Connecting the printer to the host computer Installing the driver OPERATOR PANEL FEED button LED status Label size calibration Self test Error alerts ACCESSORIES Installing the label dispenser MAINTENANCE AND ADJUSTMENT Cleaning the print head Labels with black marks Troubleshooting APPENDIX A. Printer interfaces

6 1. Barcode printer 1-1. Box content Please check that all of the following items are included with your printer: Barcode printer Power cord Quick Start guide CD (with BarTender label software / User s manual) CL-S Specifications Model CL-S300 Print Method Direct Thermal Resolution 203 dpi (8 dot/mm) Print Speed 4 IPS (102 mm/s) Print Width 4.25 (108 mm) Print Length Min. 1.5 (38.1 mm)** Memory 64KB Flash (4MB for user storage) ; 16KB SDRAM (No user strage) Sensor Type Adjustable reflective sensor. Fixed transmissive sensor, central aligned Types: Continuous form, gap labels, black mark sensing, and punched hole; label length set by auto sensing or programming Width: 1 (25.4 mm) Min (118 mm) Max. Media Thickness: (0.06 mm) Min (0.20 mm) Max. Label roll diameter: Max. 5 (127 mm) Core diameter: 1, 1.5 (25.4 mm, 38.1 mm) Printer Language N/A (EPL specialized for graphic printing) 4
** Memory 64KB Flash (4MB for user storage) ; 16KB SDRAM (No user strage) Sensor Type Adjustable reflective sensor.")
7 Label design software: BarTender Software Driver: Windows 2000, XP, Vista, 7, 8, Windows Server 2003, 2008 & 2012 DLL: Windows 2000, XP and Vista Interfaces USB Device One Tri-color LED: Power (Green, Orange and Red) Control Panel Control key: FEED Power AC V 1.6A (Max) 50/60Hz Operation temperature: 41 F to 104 F (5 C to 40 C) Environment Storage temperature: -4 F to 122 F (-20 C to 50 C) Operation: 30-85%, non-condensing. Humidity Storage: 10-90%, non-condensing. Agency CE(EMC), FCC Class A, CB, UL, c-ul, CCC Approvals Length: 222 mm Dimension Height: 178 mm Width: 168 mm Weight 2.0Kg,excluding consumables Label Dispenser Options External label roll holder for 10 (250 mm) O.D. label rolls External label rewinder *Specifications are subject to change without notice. All company and/or product names are trademarks and/or registered trademarks of their respective owners. ** Minimum print height specification compliance can be dependent on non-standard material variables such as label type, thickness, spacing, liner construction, etc. Citizen is pleased to test non-standard materials for minimum height printing capability. 5
, FCC Class A, CB, UL, c-ul, CCC Approvals Length: 222 mm Dimension Height: 178 mm Width: 168 mm Weight 2.")
8 1-3. Getting to know your printer LED indicator 2. FEED function button 3. Printer cover 4. Release buttons Print head release lever 2. Label roll holder 3. Print mechanism 4. Label supply hub 5. Label guides 6. Front cover 6

9 Platen cover 2. Label sensor 3. Platen roller ON/OFF switch 2. Power jack 3. Feed slot for continuous labels 4. USB port 7

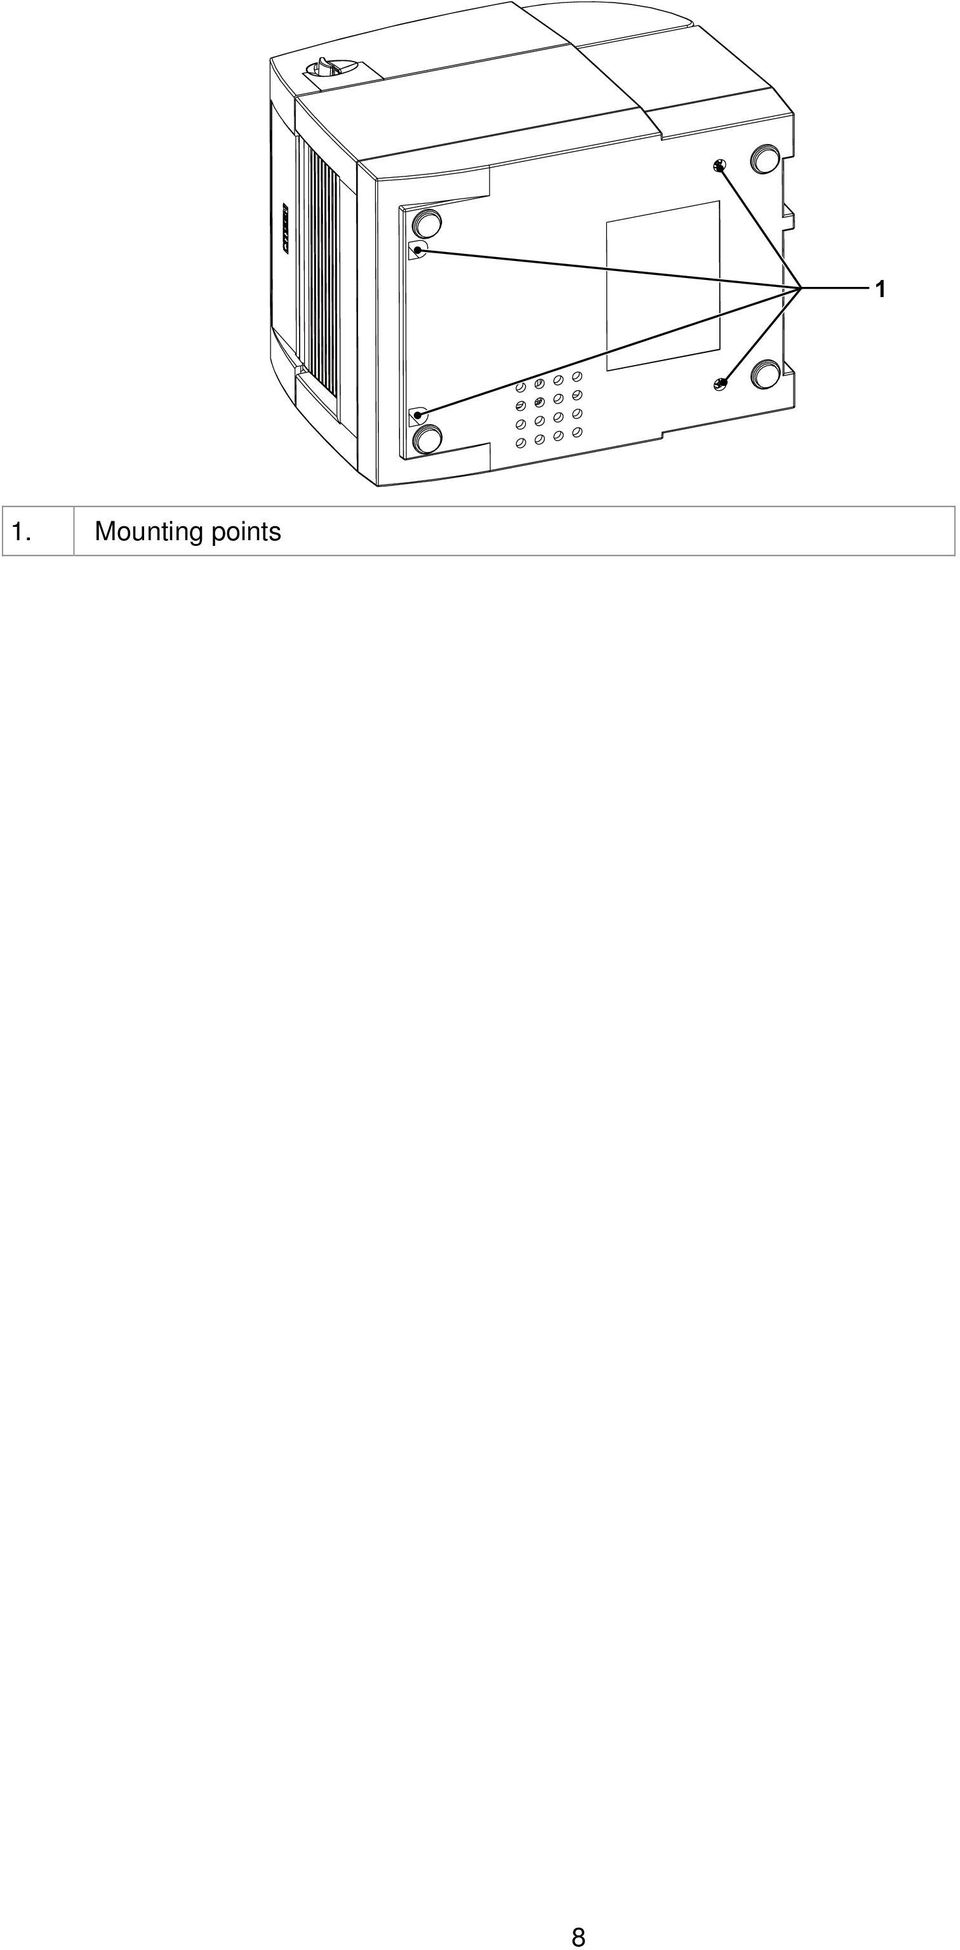
10 1 1. Mounting points 8
11 2. Printer setup 2-1. Loading the label roll 1. Place the printer on a flat surface and open the printer cover. 2. Lift the label roll holder and pull it out as far as possible. 3. Install the label roll on the label supply hub. 4. Now press the label roll holder down until it clicks into place. 5. Return the label roll holder to its original position. 9

12 6. Pass the label under the paper guides and pull it forward. 7. Adjust the paper guides to the width of the label liner. 8. Close the printer cover to finish loading the labels. 10

13 2-2. Installing the label roll holder 1. Pull the label roll holder out as far as it will go. 2. Fold out the label supply hub as shown in the illustration. 3. Now rotate the label roll holder to return the label supply hub to its original position. Press down the label supply hub until it clicks into place. A. To load label stock with a 1" core, the locking notch must be at the top of the label supply hub. 1" core B. To load label stock with a 1.5" core, the locking notch must be at the bottom of the label supply hub. 1.5" core Note The hub is also marked on both sides to indicate the core size, as shown in the illustration. 11

14 2-3. Connecting the printer to the host computer 1. Please make sure that the printer is switched off. 2. Connect the power code to the printer, then connect to the electrical outlet. 3. Connect the printer with the host computer via the USB port. 4. Switch on the printer. The LED indicator should light up

15 2-4. Installing the driver 1. Insert the product CD in the CD/DVD drive of the host computer and open the "Windows Drivers" folder on the CD. 2. Execute the file with the same icon as the file selected in the illustration on the right. 3. Follow the instructions in the installation wizard. 4. Select "Install printer drivers" to start with the driver installation. 5. Specify your printer model and continue with the installation. 13

16 6. Specify the port used to connect the printer to the host computer. 7. Enter a printer name. The printer will be listed under this name in the "Printers and Faxes" folder. 8. Specify whether or not you want to share the printer with other network users and assign the printer a share name. 9. When you have configured all the settings, a summary of the printer settings is displayed, which you should check. 10. If all settings are correct, click Finish to start copying the driver files. 14

17 11. Once copying is complete, the new printer should be visible in the "Printers and Faxes" folder. 15

18 3. Operator panel 3-1. FEED button When you press the FEED button, the printer moves the label to the defined stop position. If you are using continuous labels, pressing the FEED button will move label stock until you release the button again. If you are using individual labels, pressing the FEED button will move only one label. If the label does not stop at the correct position, you need to run the auto-detection function on the label stock (see Section 3-3) LED status Press the FEED button and keep it pressed, then switch on the printer. You will hear three beeps and the LED lights up red. Release the FEED button. The printer will now automatically measure the label size (see Section 3-3.) and then print a test page (see Section 3-4.) LED indicator Status Description Green Standby mode The printer is ready for operation. Red (flashing) Error mode The printer has detected an error. (see Section 3-5. Error alerts) 3-3. Label size calibration The printer can automatically detect and store label height. That means the host computer does not need to transmit the label height to the printer. 1. Check that the label sensor is positioned correctly. 2. Check that the label stock is loaded correctly. 3. Switch off the printer. 4. Switch on the printer, keeping the FEED button pressed. When the LED starts to flash red, release the FEED button. The printer will now measure the label stock and store the label height. 5. Once the printer has successfully measured the label stock, it will print a self-test label. 16
. 3-2.")
19 3-4. Self test The self-test function helps you find out whether the printer is functioning normally. The printer prints the following test page: 17

20 3-5. Error alerts LED indicator Beeps Description Solution Red 2 x 2 beeps Media error Possible reasons: the print medium has become trapped around the rubber roll; the sensor cannot detect a gap or black mark between the labels; there is no paper. Please reset the sensor. Red (flashing) None Print head overheat Wait for the print head to cool off 18

21 4. Accessories 4-1. Installing the label dispenser 1 Label dispenser 2 Screws (set of 2) Note1 Remember to switch off the printer before installing the label dispenser. Note 2 A label liner thickness of mm ± 10% and a weight of 65 g/m 2 ± 6% are recommended. Note3 The label dispenser will take labels up to a max. width of 110 mm. 1. Place the printer on a flat surface and open the printer cover Remove the front cover. Note You can use a coin or screwdriver to open the cover. 19
22 3. Pass the dispenser cable through the opening as shown in the illustration. 4. Fit the label dispenser in the recess provided. 5. Turn the printer upside down and take out the screws to open the cover. 6. Open the cover on the bottom of the printer to access the motherboard. 7. Tighten the screws to secure the label dispenser. 20
23 8. Connect the cable to the motherboard. 9. Close the cover and tighten the screws again. 10. Place the printer the right way up again. 11. Open the dispenser by folding it out. 12. Load the labels, following the instructions in Section
24 13. Remove the first label and pass the label liner over the roller and the tear-off plate. Note The label stock should be at least 25 mm high. Suggestion When using the label dispenser, set the stop position to 9 mm. 14. Pass the label liner through the printer and dispenser as shown in the illustration. 15. Fold up the dispenser cover to close it. 22
25 16. Switch on the printer and press the FEED button to measure the label stock. 23
26 5. Maintenance and adjustment 5-1. Cleaning the print head Dirt on the print head or glue residue from the label liner may result in inadequate print quality. The printer cover must therefore always be closed. Keeping dirt and dust away from the paper or labels ensures a good print quality and a longer lifespan of the print head. Here is how you clean the print head: 1. Switch off the printer. 2. Open the printer cover. 3. To remove any label residue or other dirt from the print head (see blue arrow), please use a soft lint-free cloth dipped in alcohol. Note 1 The print head should be cleaned once a week. Note 2 Please make sure that there are no metal fragments or other hard particles on the soft cloth used to clean the print head. 24
27 5-2. Labels with black marks If you are using black-mark label stock that has the printer's maximum feed width, the printer may not recognise the black marks because they are outside the sensor range. When using label stock with black marks, you should therefore observe the following restrictions: For 118 mm wide label stock, the black marks should have the following positions and sizes: A > mm high B < 1.95 mm high C > 8.1 mm high 25
28 5-3. Troubleshooting Problem Solution The printer is switched on but the LEDs do not light up. The LED lights up red (ERROR) and printing is interrupted. The label stock passes through the printer but no image is printed. Check the power supply. Check whether is an error in the software settings or the print commands. Replace the print medium with a suitable medium. Check whether there is a label jam. Check whether the label stock is finished. Check whether the print mechanism is closed (the print head is not positioned correctly). Check whether the print medium is covering the sensor. Please make sure that the label stock is loaded the right way up and that it is suitable material. Choose the correct printer driver. Choose the correct label stock and a suitable printing mode. The label stock jams during printing. Clear the paper jam. Remove any label material left on the thermal print head and clean the print head using a soft lint-free cloth dipped in alcohol. The label stock does not move correctly and there is no printed image on some parts of the label. Check whether any label material is stuck to the thermal print head. Check for errors in the application software. Check whether the starting position has been set incorrectly. Check the power supply. There is no printed image on part of the label. Check the thermal print head for dust or other dirt. Use the internal CZ SELFTEST command to check whether the thermal print head will carry out a complete print job. Check the quality of the print medium. The printed image is positioned incorrectly. Check whether there is paper or dust covering the sensor. Check whether the label liner is suitable. Please contact your dealer. Check the paper guide settings. A label is missed out during printing. Check the label height setting. Check whether there is dust covering the sensor. 26
29 The printed image is blurred. Check the darkness setting. Check the thermal print head for glue residue or other dirt. The stripper is not functioning correctly. Check whether there is dust on the label dispenser. Check whether the label stock is positioned correctly. Note If any problems occur that are not described here, please contact your dealer. 27
30 Appendix A. Printer interfaces USB port Connector type : Type B Pin No Function VBUS D- D+ GND 28
31 PXZ PMC-1301
USER MANUAL DT2 / DT4
 USER MANUAL DT2 / DT4 USER MANUAL VERSION ISSUE DATE P/N : DT2 / DT4 : Rev. B : 2012.11.07 : 920-014211-00 FCC COMPLIANCE STATEMENT FOR AMERICAN USERS This equipment has been tested and found to comply
EZ1000 PLUS BARCODE PRINTER USER MANUAL
 EZ1000 PLUS BARCODE PRINTER USER MANUAL USER MANUAL VERSION ISSUE DATE P/N : EZ1000 Plus : Rev. C : 2013.07.24 : 920-012411-04 FCC COMPLIANCE STATEMENT FOR AMERICAN USERS This equipment has been tested
USER MANUAL G500 SERIES. User Manual Version Issue Date P/N. : G500 series : Rev 1.3 : 2012.11.07 : 920-014011-00
 USER MANUAL G500 SERIES User Manual Version Issue Date P/N : G500 series : Rev 1.3 : 2012.11.07 : 920-014011-00 附 錄 產 品 規 格 機 種 G500 G530 列 印 模 式 熱 感 式 / 熱 轉 式 兩 用 解 析 度 203 dpi (8 dot/mm) 300 dpi (12
G300/G330 BARCODE PRINTER USER MANUAL
 G300/G330 BARCODE PRINTER USER MANUAL User Manual Version Issue Date P/N : G300 series : Rev. 1.3 : 2013.07.09 : 920-014111-00 1 G300/G330 USER MANUAL CONTENTS 1 Barcode Printer 001 1.1 Box Content 001
How To Use A Brother Ql700
 User's Guide QL-700 Be sure to read and understand this guide before using the machine. We recommend that you keep this guide nearby for future reference. www.brother.com US ENG ver.0 Thank you for purchasing
User's Manual. Metapace L-1. Label Printer Rev. 1.00
 User's Manual Label Printer Rev. 1.00 Table of Contents Manual Information & Usage Precautions 3 1. Content Confirmation 6 2. Product Part Names 7 3. Installation & Usage 9 3-1 Power Connection 9 3-2 Interface
MODEL : LK-P31 MOBILE PRINTER
 SEWOO TECH CO.,LTD. Doosung BD, 689-20, Geumjung-dong, Gunpo-si, Gyeonggi-do, 435-862 South Korea TEL : +82-31-459-8200 FAX : +82-31-459-8880 www.miniprinter.com MODEL : LK-P31 MOBILE PRINTER Rev. 1.0
500/600/1000. User Manual June 2011 Rev. 061311. 1 v061311
 500/600/1000 User Manual June 2011 Rev. 061311 1 v061311 http://shopping.netsuite.com/digitalcheck TABLE OF CONTENTS Contents Radio Frequency Interference... 3 About the SB Scanner... 3 SB Scanner Equipment...
reflecta Super 8 Scanner
 reflecta Super 8 Scanner User Manual 1 FEDERAL COMMUNICATIONS COMMISSION (FCC) STATEMENT This Equipment has been tested and found to comply with the limits for a class B digital device, pursuant to Part
110244-003. PrintPAD CN3/4/3e/4e. User Guide
 110244-003 PrintPAD CN3/4/3e/4e User Guide TABLE OF CONTENTS PrintPAD CN3/4 & PrintPAD CN3e/4e Printer Views...1 Open View...1 Closed View...1 Using Batteries: General Guidelines...1 Installing and/or
RT700i/RT730i BARCODE PRINTER USER MANUAL
 RT700i/RT730i BARCODE PRINTER USER MANUAL User Manual: RT700i series Version : Rev. 1.3 Issue Date : 2012.10.25 P/N : 920-014811-00 RT700i/RT730i USER MANUAL CONTENTS 1 Barcode Printer 001 1.1 Box Content
USER MANUAL USER MANUAL. : EZPi1000 series : Rev. E : 2013.07.22 : 920-013011-02 VERSION ISSUE DATE P/N
 EZPi1000 series BARCODE PRINTER USER MANUAL USER MANUAL VERSION ISSUE DATE P/N : EZPi1000 series : Rev. E : 2013.07.22 : 920-013011-02 FCC COMPLIANCE STATEMENT FOR AMERICAN USERS This equipment has been
User's Manual Label Printer. Rev. 1.01 SLP-DX220 / DX220E SLP-DX223 / DX223E. http://www.bixolon.com
 User's Manual Label Printer Rev. 1.01 SLP-DX220 / DX220E SLP-DX223 / DX223E http://www.bixolon.com Table of Contents Manual Information & Usage Precautions... 3 1. Content Confirmation... 7 2. Product
WARNING CANADIAN D.O.C. WARNING
 Each product and program carries a respective written warranty, the only warranty on which the customer can rely. Avery Dennison Corp. reserves the right to make changes in the product, the programs, and
Business Audio System: Music & Messaging MP3 Player. by Grace Digital Audio. User Guide. Model No. GDI-USBM10
 Business Audio System: Music & Messaging MP3 Player by Grace Digital Audio User Guide Model No. GDI-USBM10 User Guide Contents Introduction 2 Safety & General Use Information 2 Features 3 Set Up & Operation
USB Dual Handset Adapter for Nortel 1100-Series IP Phones
 1021 USB Dual Handset Adapter for Nortel 1100-Series IP Phones User Guide Document#: 90-00039 [email protected] [email protected] www.algosolutions.com Table of Contents Algo 1021 USB Dual
OPERATOR S Manual All specifications are subject to change without notice
 OPERATOR S Manual All specifications are subject to change without notice Warning - U.S. This equipment has been tested and founded to comply with the limits for a Class A digital device pursuant to Part
AXIS 291 1U Video Server Rack Installation Guide
 AXIS 291 1U Video Server Rack Installation Guide About This Document This document describes how to install Axis blade video servers in the AXIS 291 1U Video Server Rack. Updated versions of this document
Desktop Thermal Printer User s Manual
 Desktop Thermal Printer User s Manual 2722 2742 3742 User s Manual No. 980344-001 Rev. A 2001 Zebra Technologies Corporation COPYRIGHT NOTICE This document contains information proprietary to Zebra Technologies
Perle Protocol Transparent Media Converter Modules
 Perle Protocol Transparent Media Converter Modules Installation Guide C-4GPT-DSFP CM-4GPT-DSFP Part# 5500335-10 Overview This document contains instructions necessary for the installation and operation
User Guide TL-SG1016D 16-Port Gigabit Switch TL-SG1024D 24-Port Gigabit Switch
 User Guide TL-SG1016D 16-Port Gigabit Switch TL-SG1024D 24-Port Gigabit Switch Rev: 1.1.0 7106503251 COPYRIGHT & TRADEMARKS Specifications are subject to change without notice. is a registered trademark
OC-3 SERIES OF PRINTERS
 110204-003 OC-3 SERIES OF PRINTERS User Guide TABLE OF CONTENTS OC-3 Printer Views... 1 Front and back view... 1 Side views... 1 Setting up your printer... 2 Unpacking your printer... 2 Installing/removing
Zebra GC420t User Guide VIF-NA-BG-125, V3.0
 VIF - Maintenance of computer systems infrastructure Zebra GC420t User Guide VIF-NA-BG-125, V3.0 IZUM, 2016 COBISS, COMARC, COBIB, COLIB, IZUM are registered trademarks owned by IZUM. CONTENTS 1 Introduction...
Duplex ID Card & License Scanner. User Guide
 Duplex ID Card & License Scanner User Guide CE Conformity and FCC Statement This equipment has been tested and found to comply with the limits of the European Council Directive on the approximation of
Trademarks DYMO and LabelWriter are registered trademarks of Sanford, L.P. All other trademarks are the property of their respective holders.
 User Guide Copyright 2008 Sanford, L.P. All rights reserved. Version 1.0 Revised 7/08. No part of this document or the software may be reproduced or transmitted in any form or by any means or translated
WPL305 Thermal Label Printer User s Guide
 WPL305 Thermal Label Printer User s Guide For Wasp Technologies DT/TT Printer Copyright Wasp Bar Code Technologies 2004. All rights reserved. No part of this publication may be reproduced or transmitted
Square D Clipsal DIN-Rail Four-Channel Auxiliary Input Unit
 Square D Clipsal DIN-Rail Four-Channel Auxiliary Input Unit SLCLE5504AUX for Use with Wired C-Bus Networks Instruction Bulletin Retain for future use. Square D Clipsal DIN-Rail Four-Channel Auxiliary Input
How To Set Up An Ecm Display On A D210 (D210) (D2) (Ecm) (Emc) (Mcd) (Power Supply) (Mm) (Camellom) (Ios)
 (D2) (Ecm) (Emc) (Mcd) (Power Supply) (Mm) (Camellom) (Ios)") English Customer Display DM-D210 Installation Manual 401285101 CAUTIONS This document shall apply only to the product(s) identified herein. No part of this document may be reproduced, stored in a retrieval
English Customer Display DM-D210 Installation Manual 401285101 CAUTIONS This document shall apply only to the product(s) identified herein. No part of this document may be reproduced, stored in a retrieval
User's Manual Label Printer. Rev. 1.00 SLP-D220 / D220E SLP-D223 / D223E. http://www.bixolon.com
 User's Manual Label Printer Rev. 1.00 SLP-D220 / D220E SLP-D223 / D223E http://www.bixolon.com Table of Contents Manual Information & Usage Precautions...3 1. Content Confirmation...7 2. Product Part Names...8
4.3-inch Back-Up Camera
 TM 4.-inch Back-Up Camera Model No.: PKC0BU4 Owner s Manual and Warranty Information Read these instructions completely before using this product. Retain this Owner s Manual for future reference. INTRODUCTION
Daily use. Never use alcohol or other solvents to clean any part of the loudspeakers!
 BeoLab 6002 Guide WARNING: To reduce the risk of fire or electric shock, do not expose this appliance to rain or moisture. Do not expose this equip ment to dripping or splashing and ensure that no objects
TL-PS310U Single USB 2.0 Port MFP and Storage Server
 Single USB 2.0 Port MFP and Storage Server REV3.0.0 1910010947 COPYRIGHT & TRADEMARKS Specifications are subject to change without notice. is a registered trademark of TP-LINK TECHNOLOGIES CO., LTD. Other
Customer VFD pole display JP-8034 USB OPERATION MANUAL
 ISO 9001 Certified Lead with technology Win customers with service Customer VFD pole display JP-8034 USB OPERATION MANUAL Jarltech International Inc. 2007. All rights reserved. Under the copyright laws,
TL-PS310U Single USB 2.0 Port MFP and Storage Server
 TL-PS310U Single USB 2.0 Port MFP and Storage Server Rev: 2.0.0 1910010313 Contents Chapter 1 Introduction... 1 1.1 Product Overview...1 1.2 Network Management...1 1.3 Components and Features...1 1.4 Hardware
ADSL Modem Installation Guide. Model # 36R515 Part # 030-300108 Rev. D Revision Date 12/2000. ADSL Modem Installation Guide
 ADSL Modem Installation Guide Model # 36R515 Part # 030-300108 Rev. D Revision Date 12/2000 ADSL Modem Installation Guide Installation Instructions Westell ADSL Modem 1. Package Inspection and Contents...2
In-Site Motion Webcam
 In-Site Motion Webcam User s Manual Model IC825C FCC STATEMENT IC825C This device complies with part 15 of FCC Rules. Operation is subject to the following two conditions: (1) this device may not cause
Win 7 - STIMA CLS / CMP Driver Installation Quick Guide
 Win 7 - STIMA CLS / CMP Driver Installation Quick Guide This guide is intended to demonstrate a quick installation and setup of ticket alignment under Windows 7 for the Stima CLS and CMP printers using
Lexmark T64x Troubleshooting Guide
 Lexmark T64x Troubleshooting Guide Online technical support Technical support is available on our Lexmark Web site at www.lexmark.com. Checking an unresponsive printer If the printer is not responding,
User Manual. RK-2d / RK-2t. dedicated KVM switch and rackmount screen technology. Designed and manufactured by Austin Hughes
 dedicated KVM switch and rackmount screen technology User Manual RK-2d / RK-2t 1U Short Depth Keyboard Drawer Designed and manufactured by Austin Hughes 751 Legal Information First English printing, October
BeoLab 7-1 BeoLab 7-2. Guide
 BeoLab 7-1 BeoLab 7-2 Guide CAUTION: To reduce the risk of electric shock, do not remove cover (or back). No User-serviceable parts inside. Refer servicing to qualified service personnel. WARNING: To prevent
Mercury Helios 2 ASSEMBLY MANUAL & USER GUIDE
 Mercury Helios 2 ASSEMBLY MANUAL & USER GUIDE TABLE OF CONTENTS INTRODUCTION...1 1.1 MINIMUM SYSTEM REQUIREMENTS 1.1.1 Apple Mac Requirements 1.1.2 PC Requirements 1.1.3 Supported PCIe Cards 1.2 PACKAGE
user manual IH-W350DB IH-W351DW MyLife webcam pro 5.0 megapixel max resolution
 IH-W350DB IH-W351DW MyLife webcam pro 5.0 megapixel max resolution Congratulations on the purchase of your new MyLife webcam pro. This product comes with a limited lifetime warranty. Before using your
Basic Specifications. Electrical. EPSON Perfection 3170. Color EPSON MatrixCCD TM line sensor. device Effective pixels
 Scanner Parts Document table Power cord Document cover Transparency unit (TPU) under lid Web Transparency unit (TPU) connector TPU indicator light e-mail Carriage and lamp (in the home position) USB port
Thermal Printer User s Manual
 Thermal Printer User s Manual 2844 User s Manual No. 980348-001 Rev. A 2001 Zebra Technologies Corporation ii 980348-001 Rev. A FOREWORD This manual provides installation and operation information for
This equipment has been tested and found to comply with the limits for a Class B digital device, pursuant to part 15 of the FCC Rules.
 Power Max Level 2 Charging Station en Installation and Operating Instructions This equipment has been tested and found to comply with the limits for a Class B digital device, pursuant to part 15 of the
CAUTION RISK OF ELECTRIC SHOCK DO NOT OPEN
 BeoLab 7-6 Guide CAUTION RISK OF ELECTRIC SHOCK DO NOT OPEN CAUTION: To reduce the risk of electric shock, do not remove cover (or back). No User-serviceable parts inside. Refer servicing to qualified
Magic Wand Portable Scanner
 Magic Wand Portable Scanner PDS-ST470-VP User Manual Table of Contents 1. Key Features... 3 2. Functional Parts... 3 3. Explanation of the Status Icons... 5 4. Using the Scanner... 5 4.1. Charging up the
ALL8808POE. 8 Port Gigabit PoE+ Switch. Manual
 ALL8808POE 8 Port Gigabit PoE+ Switch Manual FCC Certifications This Equipment has been tested and found to comply with the limits for a Class B digital device, pursuant to part 15 of the FCC Rules. These
LT SERIES User s Manual
 LT SERIES User s Manual 1 - LT Series Operations Manual TABLE OF CONTENTS Specifications... 2 Introduction... 3 LT Series Models... 4 Optional Features... 4 Getting Started... 5 Installation... 5 Registration...
User s Manual Model KB990W
 Wireless Internet Keyboard & Optical Mouse User s Manual Model KB990W FCC Statement This device complies with part 15 of FCC Rules. Operation is subject to the following two conditions: (1) this device
BARCODE / LABEL PRINTER GUIDE
 BARCODE / LABEL PRINTER GUIDE 2010 BARCODE / LABEL PRINTER GUIDE Citizen barcode/label printers get the job done and more... BARCODE/LABEL PRINTER CLP-521 / 621 / 631 Desktop Printer - Industrial Performance
MAINTENANCE & TROUBLESHOOTING
 MAINTENANCE & TROUBLESHOOTING This section describes how to: clean the lens clean the fan intake filter replace the projection lamp replace the batteries in the remote control use the Kensington lock feature
Power Supply Guide Version 1.0 for D-Show
 Power Supply Guide Version 1.0 for D-Show Digidesign 2001 Junipero Serra Boulevard Daly City, CA 94014-3886 USA tel: 650 731 6300 fax: 650 731 6399 Technical Support (USA) tel: 650 731 6100 fax: 650 731
Owner s Manual. Not suitable for mobile applications. Important Safety Instructions 2. Quick Installation 3. Basic Operation 4. Storage & Service 7
 Register online today for a chance to win a FREE Tripp Lite product! www.tripplite.com/warranty Owner s Manual Internet Office & BC Personal UPS Systems Not suitable for mobile applications. Important
TG-3468 Gigabit PCI Express Network Adapter
 TG-3468 Rev:2.0.0 1910010580 COPYRIGHT & TRADEMARKS Specifications are subject to change without notice. is a registered trademark of TP-LINK TECHNOLOGIES CO., LTD. Other brands and product names are trademarks
Wireless Travel Mouse with 5-Buttons User Manual
 Wireless Travel Mouse with 5-Buttons User Manual Product Features 1. Radio frequency 27MHz wireless transmission 2. Use of 256 ID codes to prevent interference between several wireless mice being used
BroadBand PowerShield. User Manual
 BroadBand PowerShield User Manual 990-0375G 12/2006 Chapter 1 General Information The PowerShield provides a power source for broadband telephony and other DC applications. Safety This Safety Guide contains
Doc. No: 412-121033 Issue: 1 Date: Aug 2014. BTT-02 card printer manual THERMAL TRANSFER CARD PRINTER BTT-02
 Date: Aug 2014 THERMAL TRANSFER CARD PRINTER BTT-02 TABLE OF CONTENTS Introduction... 3 System Contents and Initial Checks... 3 Installation... 4 Preparation of Installation Site... 4 Printer Connections...
Royal Mail Despatch Manager Online Printer Installation Guide
 Royal Mail Despatch Manager Online Printer Installation Guide Getting you started Thank you for opting to use Royal Mail s Despatch Manager Online (DMO) system. To help get you started successfully please
7 High-Resolution Digital Photo Frame
 TM 16-1003 User s Guide 7 High-Resolution Digital Photo Frame One demo photo included, as illustrated Please read this user s guide before using your new photo frame. Package contents Photo Frame AC Adapter
ES-3305P V2 / ES-3308P V2. Quick Installation Guide. 09-2013 / v1.0
 ES-3305P V2 / ES-3308P V2 Quick Installation Guide 09-2013 / v1.0 1 COPYRIGHT Copyright Edimax Technology Co., Ltd. all rights reserved. No part of this publication may be reproduced, transmitted, transcribed,
USB 2.0 Peripheral Switch USER MANUAL US221A / US421A
 USB 2.0 Peripheral Switch USER MANUAL US221A / US421A FCC Information This equipment has been tested and found to comply with the limits for a Class B digital device, pursuant to Part 15 of the FCC Rules.
MCR1900 Media Converter 19-Slot Chassis
 MCR1900 Media Converter 19-Slot Chassis Installation Guide Part #5500304-11 Copyright Statement This document must not be reproduced in any way whatsoever, either printed or electronically, without the
RC8021 Indoor Camera Installation Guide
 RC8021 Indoor Camera Installation Guide P/N: 957YL502GJ Document Version: 1.0 Copyright 2011. All Rights Reserved. All trademarks and trade names are the properties of their respective owners i Package
MADRIX NEO Quick Start Guide & User Manual
 MADRIX NEO Quick Start Guide & User Manual 4 th Edition, Last Update: March 2011 Thank You for Purchasing MADRIX NEO Please read this manual carefully and thoroughly before using the MADRIX NEO. Make sure
Wireless Indoor/ Outdoor Thermometer
 Wireless Indoor/ Outdoor Thermometer Owner s Manual Please read before using this equipment. ˆ Contents FCC Information... 3 FCC Declaration of Conformity... 5 Preparation... 5 Installing Batteries...
2100 POS System. 2100 User Guide
 2100 POS System 2100 User Guide Thank you for selecting UTC RETAIL s innovative Model 2100 Point of Sale solution! This guide is designed to acquaint you with the features and functionality of the 2100
SAFETY WARNINGS. Important Safety Instructions. FCC Notice. Caution
 Table of Contents SAFETY WARNINGS...2 FCC Notice...2 Caution...2 Important Safety Instructions...2 Basic Instructions...3 Equipment checklist...3 Input Voltage...3 Power Indicator Light...3 Function Keys...3
Brady IP Printer Installation Instructions
 Brady IP Printer Installation Instructions Ensure the following are available before commencing installation: The IP Printer and accessories (Printer, power cable, Product CD including Windows printer
SmartCard On-Board Reader (# 8105) SmartCard Desktop Reader (# 8108) SmartCards, Pack of 10 (# 8112) Starter Interrupter Kit (# 8116)
 SmartCard Desktop Reader (# 8108) SmartCards, Pack of 10 (# 8112) Starter Interrupter Kit (# 8116)") athena Includes: SmartCard On-Board Reader (# 8105) SmartCard Desktop Reader (# 8108) SmartCards, Pack of 10 (# 8112) Starter Interrupter Kit (# 8116) Davis Instruments, 3465 Diablo Avenue, Hayward, CA
athena Includes: SmartCard On-Board Reader (# 8105) SmartCard Desktop Reader (# 8108) SmartCards, Pack of 10 (# 8112) Starter Interrupter Kit (# 8116) Davis Instruments, 3465 Diablo Avenue, Hayward, CA
OPTICAL HEADEND PLATFORM OTOHP-NMS NETWORK MONITORING MODULE INSTRUCTION MANUAL
 OPTICAL HEADEND PLATFORM OTOHP-NMS NETWORK MONITORING MODULE INSTRUCTION MANUAL Phone: (209) 586-1022 (800) 545-1022 Fax: (209) 586-1026 OTOHP-NMS Rev. X1 E-Mail: [email protected] www.olsontech.com
Taurus Super-S3 LCM. Dual-Bay RAID Storage Enclosure for two 3.5-inch Serial ATA Hard Drives. User Manual March 31, 2014 v1.2 www.akitio.
 Dual-Bay RAID Storage Enclosure for two 3.5-inch Serial ATA Hard Drives User Manual March 31, 2014 v1.2 www.akitio.com EN Table of Contents Table of Contents 1 Introduction... 1 1.1 Technical Specifications...
HP UPS R1500 Generation 3
 HP UPS R1500 Generation 3 Installation Instructions Part Number 650952-001 NOTE: The rating label on the device provides the class (A or B) of the equipment. Class B devices have a Federal Communications
LevelOne IFE-0500 4-Port PoE + 1-Port TP Industrial Fast Ethernet Switch User Manual
 LevelOne IFE-0500 4-Port PoE + 1-Port TP Industrial Fast Ethernet Switch User Manual Ver. 1.0.0-0711 1 FCC Warning This Equipment has been tested and found to comply with the limits for a Class-A digital
TUP500. Interface Type. Quick Setup Guide. Thank you for choosing Star Micronics as your provider for printing solutions. Unpacking the Unit
 TUP500 Thank you for choosing Star Micronics as your provider for printing solutions. Unpacking the Unit Contents a. Printer b. Paper Shaft c. 1 Paper Core Adapter d. 2 Paper Core Adapter e. Shaft Weight*
THERMAL PRINTER TSP650II SERIES
 THERMAL PRINTER TSP650II SERIES Hardware Manual Federal Communications Commission Radio Frequency Interference Statement This device complies with Part 15 of the FCC Rules. Operation is subject to the
esata External Storage
 esata External Storage Operation Manual DA-ES110 Before reading this manual This operation manual contains basic instruction on installing and using esata External Storage, an IDIS product. Users who are
Model: 308-1412 Manual DC: 080215 WIRELESS COLOR FORECAST STATION
 Model: 308-1412 Manual DC: 080215 WIRELESS COLOR FORECAST STATION FRONT VIEW SENSOR TX141TH-Bv2 LED TX Sensor Battery Cover Sensor Battery Compartment 2 AA Buttons Battery Compartment 3 AAA BACK VIEW Battery
FB-500A User s Manual
 Megapixel Day & Night Fixed Box Network Camera FB-500A User s Manual Quality Service Group Product name: Network Camera (FB-500A Series) Release Date: 2011/7 Manual Revision: V1.0 Web site: Email: www.brickcom.com
mysensors mysensors Wireless Sensors and Ethernet Gateway Quick Start Guide Information to Users Inside the Box mysensors Ethernet Gateway Quick Start
 mysensors Information to Users mysensors Wireless Sensors and Ethernet Gateway Quick Start Guide This equipment has been tested and found to comply with the limits for a Class B digital devices, pursuant
=============================== WARNING
 =============================== WARNING EXPLANATION OF GRAPHICAL SYMBOLS This symbol is intended to alert the user to the presence of unprotected dangerous voltage" within the product's enclosure that
Quick Start Turning on the Tablet PC for the First Time
 User s Manual DL46 Getting Started Congratulations on your purchase of a Tablet PC. The Tablet PC is a fully functional PC with built-in LAN, and wireless connectivity. With your Tablet PC you will be
Installation and Operation Manual Back-UPS BX800CI-AS/BX1100CI-AS
 + Installation and Operation Manual Back-UPS BX800CI-AS/BX1100CI-AS Inventory Safety and General Information bu001c This unit is intended for indoor use only. Do not operate this unit in direct sunlight,
First Data FD130 Terminal. Quick Set-up Guide
 First Data FD130 Terminal Quick Set-up Guide Thanks for choosing a First Data Terminal. First Data Terminals are some of the fastest, most secure point-of-sale terminals available. Installation is quick
Wireless Router Setup Manual
 Wireless Router Setup Manual NETGEAR, Inc. 4500 Great America Parkway Santa Clara, CA 95054 USA 208-10082-02 2006-04 2006 by NETGEAR, Inc. All rights reserved. Trademarks NETGEAR is a trademark of Netgear,
USB VoIP Phone Adapter. User s Manual
 USB VoIP Phone Adapter User s Manual FCC Certifications This Equipment has been tested and found to comply with the limits for a Class B digital device, pursuant to part 15 and part 68 of the FCC Rules.
2 Bay FireWire 800/400/USB RAID Solution RAID 0, RAID 1, & JBOD. User Manual
 2 Bay FireWire 800/400/USB RAID Solution RAID 0, RAID 1, & JBOD User Manual CalDigit, Inc. 1941 Miraloma Ave, Unit B Placentia, CA 92870 USA www.caldigit.com The information of the products in this manual
Printer Support Guide. FedEx Ship Manager Software
 Printer Support Guide FedEx Ship Manager Software Printer FAQs Installing Printer Drivers How do I download and install the Zebra printer drivers? To download and install the current Zebra printer drivers
I STAR COMPUTER CO., LTD
 I STAR COMPUTER CO., LTD Mini Redundant Power Supply 300W+300W for IPC-Computer Model No. TC-300R8 Table of content 1. Introduction...1 2. Specification 2.1 Input Voltage...1 2.2 DC Output...1 2.3 PS-ON
GV-Keyboard. User's Manual V2.0
 GV-Keyboard User's Manual V2.0 Before attempting to connect or operate this product, please read these instructions carefully and save this manual for future use. 2007 GeoVision, Inc. All rights reserved.
CAUTION RISK OF ELECTRIC SHOCK DO NOT OPEN
 BeoLab 4 Guide CAUTION RISK OF ELECTRIC SHOCK DO NOT OPEN CAUTION: To reduce the risk of electric shock, do not remove cover (or back). No User-serviceable parts inside. Refer servicing to qualified service
Dialog Telephone Interface Module Installation Sheet
 Dialog Telephone Interface Module Installation Sheet Description The Dialog Telephone Module (DTIM), model number 60-879- 95R, is a battery operated communication link between the security system control
User s Manual. Bluetooth Calculator Keypad. Page
 User s Manual Bluetooth Calculator Keypad Page Regulatory Compliance This device complies with Part 15 of the FCC Rules. Operation is subject to the following two conditions: (1) This device may not cause
Wireless Mouse USER GUIDE. for Mac. www.targus.com/us/formac ONE YEAR LIMITED WARRANTY N2953
 AMW43US / 410-1514-001C N2953 www.targus.com/us/formac 2008 Manufactured or imported by Targus Group International, Inc. (for U.S. sales: 1211 North Miller Street, Anaheim, CA 92806 USA, for Australia
InnoMedia ESBC 9380-4B. Quick Install Guide. www.innomedia.com 1
 InnoMedia ESBC 9380-4B Quick Install Guide www.innomedia.com 1 Table of Contents Introduction 2 Package Contents 2 CAUTION 2 Installation 3 Wall-Mounting Instructions 5 Troubleshooting 6 Appendix A. LED
Manual IB-3620 Series
 IB-RD3620SU3 1 IB-3620U3 CONTENT 1. Introduction... 3 1.1 General Information... 3 2. Hardware IB-3620 Series... 4 2.1 LED Indication / Button Front Panel... 4 2.2 Rear View... 5 3. HDD Installation...
dedicated KVM switch and rackmount screen technology User Manual IP-S101 Combo KVM Extender Designed and manufactured by Austin Hughes
 dedicated KVM switch and rackmount screen technology User Manual IP-S101 Combo KVM Extender Designed and manufactured by Austin Hughes 751 Legal Information First English printing, October 2002 Information
MAINTENANCE & TROUBLESHOOTING
 MAINTENANCE & TROUBLESHOOTING This section describes how to: clean the lens replace the projection lamp replace the batteries in the remote use the security lock feature troubleshoot the projector Cleaning
User Guide. Guide d utilisation Guida dell'utente Benutzerhandbuch Guía del usuario Guia do Usuário WNA-100. Wireless Network Adapter
 WNA-100 Wireless Network Adapter User Guide Guide d utilisation Guida dell'utente Benutzerhandbuch Guía del usuario Guia do Usuário www.xerox.com/office/wna Copyright 2007 Xerox Corporation. All Rights
Full_IG.book Page 1 Monday, January 9, 2012 6:11 PM. ProSafe 24 Port Gigabit Switch Installation Guide
 Full_IG.book Page 1 Monday, January 9, 2012 6:11 PM ProSafe 24 Port Gigabit Switch Installation Guide Full_IG.book Page 2 Monday, January 9, 2012 6:11 PM 2011 NETGEAR, Inc. All rights reserved. No part