USERS HANDBOOK THIS HANDBOOK REFERS TO S410 & S510 FAC SIDE LEVER MODELS
|
|
|
- Thomas Watson
- 9 years ago
- Views:
Transcription
1 MODEL S410 & S510-SL CARBINE, CLASSIC & XTRA FAC 5 & 10 SHOT USERS HANDBOOK THIS HANDBOOK REFERS TO S410 & S510 FAC SIDE LEVER MODELS PLEASE READ THIS MANUAL BEFORE USING YOUR NEW RIFLE, IT CONTAINS IMPORTANT SAFETY INFORMATION AND INSTRUCTION ON ADJUSTMENT AND MAINTENANCE. Illustrated with optional telescopic sight and mounts. HIGH POWER MODELS - OVER 20ft/lbs MUZZLE ENERGY ***** SAFETY CODE ***** 1 - TREAT THIS AIR RIFLE AS IF LOADED. 2 - NEVER POINT IT AT ANYONE, EVEN IF UNLOADED. 3 - NEVER LEAVE THIS RIFLE UNATTENDED WHEN COCKED OR LOADED. 4 - ALWAYS BE SURE OF WHAT LIES BEYOND YOUR TARGET. 5 - ALWAYS CONDUCT YOURSELF IN A SPORTSMAN-LIKE MANNER. ALWAYS BE AWARE THAT YOUR ACTIONS WILL BE UNDER THE SCRUTINY OF OTHER MEMBERS OF THE PUBLIC WHO MAY NOT SHARE YOUR ENTHUSIASM FOR AIR WEAPONS. BAD PRACTICES PROMOTE BAD PUBLICITY. DO NOT JEOPARDISE WARNING! - UNAUTHORIZED DISASSEMBLY OF THIS RIFLE WILL INVALIDATE THE MANUFACTURERS WARRANTY S510-SL-FAC US ISS1

2 THIS AIRGUN IS INTENDED FOR USE BY THOSE 18 YEARS OF AGE OR OLDER Not a toy. Adult supervision required. Misuse or careless use may cause serious injury or death. May be dangerous up to 1,000 yards. Do not inhale dust from lead pellets or put lead pellets in the mouth. Wash hands after handling lead. Lead pellets contain lead, a chemical known to the State of California to cause cancer and birth defects (or other reproductive harm). Keep the air rifle in the ON SAFE position until you re ready to shoot, then push the safety to the OFF SAFE position. Keep your fingers off the trigger while cocking the air rifle or with the barrel in the downwards position. Failure to do so may permanently damage your air rifle. Do not shoot without a pellet in the chamber (dry fire). This may permanently damage your air rifle. Use the correct pellet size according to your Air Arms model. Never reuse pellets. The use of any other kind of ammunition can cause injury to you or damage the air rifle. Do Not assume that the gun is unloaded if it fails to fire properly. Never leave your gun loaded. Do not store it loaded.

3 IMPORTANT INFORMATION, PLEASE READ Before leaving the factory this rifle was Q.A. inspected and test fired using Air Arms PELLETS to check operation and final adjustment. It was dispatched in a sealed purpose designed box with a contents label on the lid. Air Arms may not be responsible for any damage to the contents or missing items if the box is not original, if it is damaged or the seals are not intact. Air Arms cannot be held responsible for damage or missing items due to transit damage, mishandling or being tampered with after leaving the factory. If this rifle is not received in the original box with the seals intact, please examine carefully for any damage, missing tools or documentation. In the first instance any problems or complaints regarding this product should be referred to the supplier. The air cylinder is a highly pressurised unit that must not be modified in any way. Serious personal injury may result if this, and the advice below is not followed. Do not pressurize the cylinder if there are any surface abrasions or dents. Contact Air Arms for advice. Do not store the rifle in places with, or near sources of high temperature such as fires or boilers. Do not attempt to dismantle when pressurised. Do not pressurize beyond the stated filling pressure (see filling instruction section). Damage caused by such action is not covered by the manufacturers warranty. Only use clean, filtered and dry compressed air. Never use any other gas, particularly industrial or welding gases such as oxygen, carbon dioxide, acetylene, hydrogen, argon, etc. If compressed air is being used other than from a diving shop, the inside of the cylinder should be inspected for corrosion at least annually. If in doubt contact Air Arms for advice. In any event the cylinder should be inspected every two to three years depending upon usage. Air Arms can provide this service at a reasonable cost. To maintain this rifle in good working order it should be serviced annually by a competent gunsmith, your supplier may be able to provide this service or contact air arms. A reasonable amount of advice will be provided to enable the end user to service their own rifle, however this is at the discretion of Air Arms and may not be given in all cases. The velocity of this rifle has been set using Air Arms field pellets. If any other make or type of pellet is to be used the rifle must be re-tested with the pellet that is to be used, to ensure the muzzle energy is within the limits determined by current legislation. Due to the nature of hand pumps and their relative inefficiency in removing moisture from the compressed air, the chances of corrosion damage to the cylinder and other internal components are increased. Therefore the rifle should be regularly serviced and/or checked for any signs of damage by a competent gunsmith. Air Arms recommend using a dry pack filter kit on any hand pumps used to fill our air rifles. This model is a high power version that requires the user to hold a firearms certificate. If accessories not manufactured by Air Arms are used on this rifle, Air Arms can not be held responsible for any loss of performance. Contact your supplier or Air Arms for any advice on this matter.

4 GENERAL MAINTENANCE AND LUBRICATION MAINTENANCE Fixings Regularly check the tightness of all fixings. However do not be tempted to over tighten as some parts are made from aluminium and stripped threads may result. Stripped threads are not covered by the manufacturers warranty. Barrel For ultimate accuracy, clean and re-lube the barrel frequently. It is difficult to advise how often is best for every circumstance, but every 250 shots is not too often if the desire is to keep the barrel in the best possible condition. The correct materials are very important. Air arms only use products made by napier. Listed below are the napier products and a more generally available alternative. If possible use napier for the best results. CLEANER : OIL : PULL-THROUGH PAD : PULL-THROUGH LINE : NAPIER GUN CLEANER, ALTERNATIVELY WHITE SPIRIT. NAPIER GUN OIL, ALTERNATIVELY 3 IN 1 OIL. NAPIER RIFLE CLEAN, ALTERNATIVELY SOFT COTTON CLOTH. NAPIER PULL THROUGH KIT, ALTERNATIVELY 20lb FISHING LINE. As a rule cleaners and oils intended for shotguns and small/full bore weapons are not suitable. 1. Cut a piece of line three times the length of your barrel, fold in half and tie ends together. Remove silencer if fitted. Open loading bolt. 2. Feed un-knotted end down barrel from the muzzle end until folded end protrudes about 50mm. 3. Cut a 100mm length of rifle clean or 100 x 50mm piece of cloth and pass it between the protruding loop. Spray the pad with gun cleaner or white spirit, turn the rifle upside down and pull the line back through the barrel slowly. 4. Repeat steps 2&3 until the pad is clean. 5. Repeat steps 2&3 once more without any cleaner on the pad to dry the barrel. 6. Repeat steps 2&3 once more with the pad sprayed with gun oil or 3 in 1 oil. Important The reason for turning the rifle upside down is to prevent excess cleaner/oil from passing down the transfer port into the firing valve chamber. Lubrication Lubrication of the internal mechanism is not covered in this handbook. This is best performed by a competent gunsmith or the factory and in any case should not be required until the annual service. Apply a small dab of grease or oil, on the two pivot points shown in the diagram, and work -in by moving the bolt forwards and backwards. Wipe off excessive grease. Preferred grease is napier g95 gun grease. On return from every shooting session, wipe all over the exterior with an oily rag to preserve the surface finish during storage. A small drop of oil should be applied to the magazine O ring to keep it moist, and increase its life span.

5 OPERATING INSTRUCTIONS Cocking Hold securely in one hand and with the other pull the cocking lever out and to the rear. At the end of the stroke the magazine will index and present a new chamber, also the trigger mechanism will engage. This can be determined by the trigger blade kicking forward at the end of the cocking stroke. The effect required to cock the gun is quite low so minimal force should be used. Note! It is very important that the cocking lever is pulled back to the correct position. In one positive motion. The magazine indexes to the next pellet position as the bolt is retracted and it is possible for a partial index if the lever is not pulled back fully. If you find the mechanism has not cocked completely but the magazine has indexed, Re-cock but before closing the bolt, remove the magazine and manually index it back to the empty chamber. Replace the magazine and fire as normal. If this procedure is not followed it is likely that you will load a second pellet into the barrel. Push the lever back to the forward position. The rifle is now cocked and loaded, treat with caution.

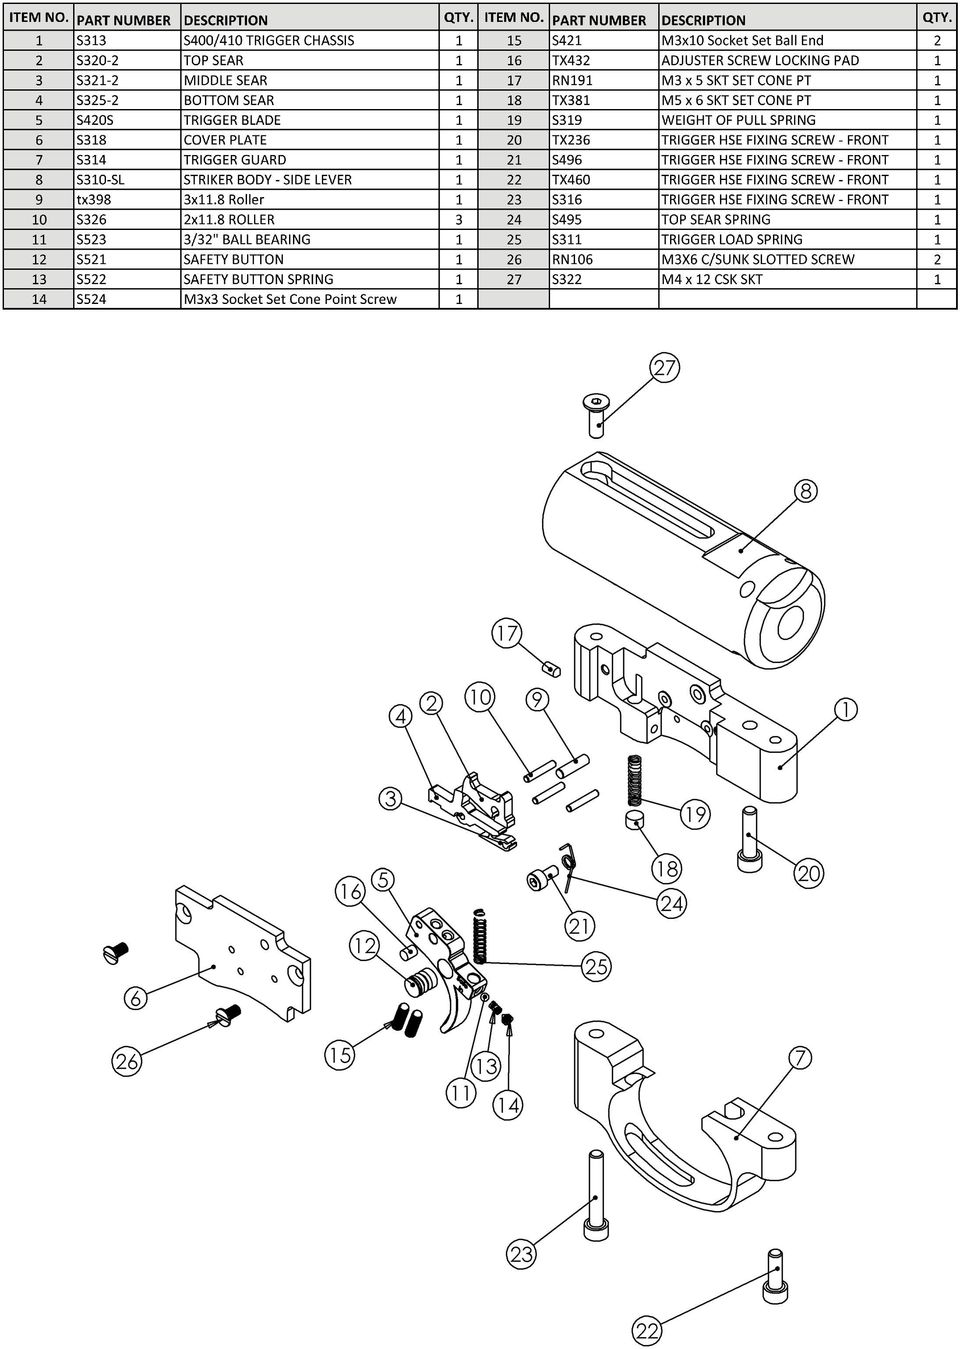
6 TRIGGER ADJUSTMENTS The S500 & S510 models all have the same trigger mechanism. It is a two stage unit with adjustment to both stages plus a weight of pull adjustment. It is easy to upset the balance between the two stages and make the trigger inoperable if incorrectly adjusted. If you have no experience of adjusting two stage triggers seek guidance or leave the trigger as set by the factory. Note! Incorrectly adjusted trigger mechanisms are not covered by the manufacturers warranty. It is not possible to test this rifle with an incorrectly adjusted trigger, therefore all triggers leave the factory with correct adjustment. Please note that it is possible to stop the safety button working with incorrect trigger adjustment. AN INCORRECTLY ADJUSTED TRIGGER CAN MAKE THE RIFLE UNSAFE TO HANDLE. DESCRIPTION OF OPERATION The S500 & S410 rifles have a true two stage trigger mechanism. This means that as the trigger is pulled the bottom sear gradually disengages with the top sear until the two disengage completely and the rifle goes off. If the pressure on the trigger is released at any point before full disengagement, the bottom sear will automatically return back to full engagement. This type of trigger allows very fine but safe operation because it is the release of the 2nd stage that actually makes the rifle fire. This arrangement is vastly superior to pseudo two stage triggers where the first stage is just a pivoting trigger blade that does not move sears. The down side is that they are more difficult to adjust correctly. Adjustment There are three adjuster screws, a-b-c. The weight of pull adjuster (a) is located in the front of the trigger guard. Clockwise rotation increases pull weight. If adjusted too far the spring will become coil-bound and prevent trigger operation. The second stage adjuster (b) is the rear screw located in the trigger blade. This screw determines the exact point that the 2nd stage starts. If the 1st stage screw is incorrectly adjusted this screw may not have any effect. The first stage adjuster (c) is the front screw located in the trigger blade. This screw determines the length of travel before the 2nd stage starts. Clockwise adjustment reduces the first stage travel.


7 This rifle is fitted with a manual safety button located in the trigger blade. To make the rifle safe the button must be pressed until it is flush with the side of the trigger blade. Please note that it is possible to stop the safety button working with incorrect trigger adjustment. With the button pressed in the rifle is safe. With the button out the rifle is now ready to fire.

8 Power adjuster The S510/500 extra is fitted with a power adjuster on the side of the rifle. This can be used to adjust the power at any time by just turning anti clockwise to increase and clockwise to decrease the power. Adjusting the power between shots will not harm the rifle. On the left hand side of the rifle is a indicator to help select your most common power settings + = High. - = Low. The marks do not indicate a particular power as this would change depending on the pellets used. The engraving maybe marked the other way round to the image below. This is normal and for manufacturing purposes.

9 FILLING INSTRUCTIONS NOTE! ONLY USE CLEAN, DRY AND FILTERED COMPRESSED AIR, PREFERABLY FROM A DIV- ING SHOP. OVER PRESSURIZATION MAY DAMAGE THE CYLINDER BEYOND REPAIR. First the female part of the filling kit (this was supplied with the rifle) must be fitted to your filling equipment. The female part (S475) has a 1/8th BSP male thread that screws directly into the hose of your pump or bottle. Next remove the dust cover from the end of your rifle. This is achieved by unscrewing the cover in an anti-clockwise direction. Once the connector is exposed the female part of the filling kit can be place on the male and press all the way on making sure that the O rings on the male part are covered. It is a wise precaution to hold the female part of the connector, during the filling procedure, as shown in the pictures below. This will ensure the female adaptor is located completely over the male part and prevent any accidental dislodging of the connector before you start to refill the cylinder. Using hand pumps The procedure for using hand pumps is the same as for bottle. It is more important to turn the female on the gun to lock it in place. When using the pump it must be remembered that the first few pump are filling the hose and NOT the gun. When the pressure in the hose equalizes to that in the gun, the gun will start to fill. It can take some effort to fill the gun using a pump and we recommend using the pump to top up instead of filling from empty.

10 With the female in place the gun can now be filled. If the rifle is empty the mechanism will need to be cocked to allow the firing valve to close. If the rifle is not cocked when the bottle is opened or the pump used, the air will past the valve and exhaust through the barrel. Check that the bleed valve on the filling equipment is closed (turn clockwise to close) then slowly open the main valve on bottle or start using the pump. The pressure in the hose will equalise and then the rifle will start to fill. If you are filling your rifle from empty there may be some air exhausted through the barrel until the air pressure is sufficient to over come the firing valve spring (S306) this will happen at approximately 50 bar (750psi). The filling pressure of the S500 is 200 bar (2900psi). Filling to a higher pressure will not increase either power or number of shots. Over filling will lower the power and may cause irreparable damage to the cylinder. Once the filling pressure has been reached, close the valve on the bottle or stop pumping, open the bleed valve on the filling kit (to vent the hose, if you do not vent the hose you will not be able to remove the female from the rifle). Now the female connector can be removed from the rifle and end cap (S483) can be replaced over the male connector ensuring not to over-tighten. The S500 range of rifles are fitted with a pressure indicator mounted on the underside of the rifle just in front of the stock screw. This provides the user with a visual check on the amount of air remaining in the cylinder this indicator should not be used during the filling process as the needle reaction speed has been slowed to prevent damage whilst filling. After filling the needle can take several seconds to synchronize with the air in the cylinder. The picture below shows a guns with just over 150 bar of pressure. Although every gun is slightly different the recommended refill pressure for the S500 is between 100 and 110 bar. NOTE: On the front end of the cylinder is an engraved warning reading... READ MANUAL. MFP 200bar. MSP 200bar. DOM **/**/** **. INSPECT ANNUALLY. MFP MSP DOM = Maximum Filling Pressure. The pressure is stated. = Maximum Safe Pressure. The pressure is stated. = Date of Manufacture. The date is stated. WARNING NOTE CONCERNING 300 BAR BOTTLES. WITH THE ADVENT OF THE 300 BAR BOTTLE IT SHOULD BE NOTED THAT CARE HAS TO BE TAKEN WHEN FILLING YOUR RIFLE. THE FILLING PROCEDURE DESCRIBED IN THIS MANU- AL MUST BE FOLLOWED TO AVOIDED DAMAGE TO THE RIFLE, PARTICULARLY THE SLOW OPENING OF THE VALVE ON THE BOTTLE. OPENING THE VALVE QUICKLY WILL ALLOW UP TO 300 BAR OF PRESSURE INTO THE CYLINDER AT ONCE, THIS COULD CAUSE SERIOUS PER- SONAL INJURY OR IRREPARABLE DAMAGE TO THE CYLINDER.

11
12 PLEASE NOTE THE THE CARBINE AND CLASSIC MODELS ARE ONLY AVAILABLE IN.22 (5.5MM) CALIBRE. AND THE.25 (6.35mm) CALIBRE IS ONLY AVAILABLE IN THE EXTRA LENGTH FORMAT. PLEASE STATE YOUR RIFLE NUMBER IN ANY CORRESPONDENCE

13

14 SAFETY You and others with you should always wear shooting glasses to protect your eyes. Always aim your air rifle in a SAFE DIRECTION. When you are sure of your target and backstop and the area around the target is clear, take the air rifle OFF SAFE and squeeze the trigger to fire. Do not shoot at hard surfaces or at the surface of water. The pellet may bounce off or ricochet and hit someone or something you had not intended to hit. Always choose your target carefully. It is best to shoot at paper bullseye targets attached to a safe backstop. Your backstop should be checked for wear before and after each use. Replace your backstop if the surface is worn or damaged or if a ricochet occurs. Your rifle is suited for indoor and outdoor use. Always remember to place your target carefully. THINK about what you will hit if you miss the target. Do not attempt to disassemble or tamper with your air rifle. Contact Air Venturi at for repair. Do not put the air rifle away while it is loaded or cocked. REPAIR SERVICE If your rifle needs to be repaired, contact Air Venturi at

15 WARRANTY Limited One-Year Warranty This product is warranted to the retail consumer for one year from date of retail purchase against defects in material and workmanship and is transferable. What is covered: Replacement parts and labor. Transportation charges to consumer for repaired product. What is NOT covered: Transportation charges to Air Venturi for defective products. Damages caused by abuse or failure to perform normal maintenance. Any other expense. CONSEQUENTIAL DAMAGES, INCIDENTAL DAMAGES OR INCIDENTAL EXPENSES INCLUDING DAMAGE TO PROPERTY. SOME STATES DO NOT ALLOW THE EXCLUSION OR LIMITATION OF INCIDENTAL OR CONSEQUENTIAL DAMAGES, SO THE ABOVE LIMITATION OR EXCLUSION MAY NOT APPLY TO YOU. Warranty claims: Warranty claims for U.S. and Canadian Customers: Please return product to Air Venturi. Call Air Venturi at before returning any product. Implied warranties: ANY IMPLIED WARRANTIES, INCLUDING THE IMPLIED WARRANTIES OF MERCHANTABIL- ITY AND FITNESS FOR A PARTICULAR PURPOSE, ARE LIMITED IN DURATION TO ONE YEAR FROM DATE OF RETAIL PURCHASE. SOME STATES DO NOT ALLOW LIMITATIONS ON HOW LONG AN IMPLIED WARRANTY LASTS, SO THE ABOVE LIMITATION MAY NOT APPLY TO YOU. To the extent any provision of this warranty is prohibited by federal, state or municipal law which cannot be preempted, it shall not be applicable. This warranty gives you specific legal rights, and you may also have other rights which vary from state to state and country to country. Air Venturi AirVenturi.com DO NOT TRY TO DISASSEMBLE THE GUN. Your rifle needs special tools and Air Arms parts in order to be repaired. If you disassemble it, you may not be able to properly reassemble it. Air Arms does not assume any warranty liability under such circumstances.

USERS HANDBOOK THIS HANDBOOK REFERS TO EV2 MODELS
 USERS HANDBOOK THIS HANDBOOK REFERS TO EV2 MODELS PLEASE READ THIS MANUAL BEFORE USING YOUR NEW RIFLE, IT CONTAINS IMPORTANT SAFETY INFORMATION AND INSTRUCTION ON ADJUSTMENT AND MAINTENANCE. Illustrated
FX TYPHOON 12. Table of Contents
 Owner s Manual FX TYPHOON 12 Table of Contents Table of Contents Warranty Specifications General Instructions Operating Instructions Loading the Magazine Trigger Adjustments Care & Maintenance Recommended
OWNER'S MANUAL. MODELS Beretta 92FS and 92FS Match Caliber.177 (4.5 mm) Pellet CO2 Air Pistol. Patent Pending
 Pellet CO2 Air Pistol. Patent Pending") OWNER'S MANUAL READ ALL INSTRUCTIONS AND WARNINGS IN THIS MANUAL BEFORE USING THIS AIR PISTOL. MODELS Beretta 92FS and 92FS Match Caliber.177 (4.5 mm) Pellet CO2 Air Pistol Patent Pending Not a toy. Adult
OWNER'S MANUAL READ ALL INSTRUCTIONS AND WARNINGS IN THIS MANUAL BEFORE USING THIS AIR PISTOL. MODELS Beretta 92FS and 92FS Match Caliber.177 (4.5 mm) Pellet CO2 Air Pistol Patent Pending Not a toy. Adult
Professional Precharged Hunting Rifle
 TRIGGER ADJUSTMENT. The trigger is set at the factory, but some aspects can be adjusted to suit individual preferences. 1. This screw adjusts the weight of second stage trigger pull, to increase the weight
MODELS 93/693 By CO2 SEMI-AUTOMATIC
 O p e r a t i o n M a n u a l MODELS 93/693 By CO2 SEMI-AUTOMATIC.177 cal BB (4.5 mm) STEEL AIRGUN SHOT 12gm CO2 cylinder only WARNING: NOT A TOY. ADULT SUPERVISION REQUIRED. MISUSE OR CARELESS USE MAY
CZ 200 INSTRUCTION MANUAL
 CZ 200 INSTRUCTION MANUAL PLEASE READ THIS MANUAL BEFORE USING YOUR NEW RIFLE, IT CONTAINS IMPORTANT SAFETY INFORMATION AND INSTRUCTION ON HANDLING, ADJUSTMENT AND MAINTENANCE. Improper and careless handling
HATSAN BREAK BARREL AIR RIFLES
 HATSAN ARMS COMPANY HATSAN BREAK BARREL AIR RIFLES Instruction Manual GB Bedienungsanleitung Manuel d instruction DE FR Manual de Instrucciones ESP PLEASE READ THIS MANUAL BEFORE USING YOUR AIR GUN Thank
Morini CM 162EI. Technical Data
 Morini CM 162EI Technical Data Caliber: Weight: Total Length: Total Height: Total Width: Length of Sight Line: Barrel Length: Type of Barrel: Number of Riflings: Functioning: Trigger: Path: Arrest Point:
INSTRUCTION MANUAL CZ 200
 INSTRUCTION MANUAL CZ 200 PLEASE READ THIS MANUAL BEFORE USING YOUR NEW RIFLE, IT CONTAINS IMPORTANT SAFETY INFORMATION AND INSTRUCTION ON HANDLING, ADJUSTMENT AND MAINTENANCE. Improper and careless handling
Morini CM 22M. Technical Data
 Morini CM 22M Technical Data Caliber: Weight: Total Length: Total Height: Total Width: Length of Sight Line: Barrel Length: Number of Riflings: Trigger: 1 st stage weight: 2 nd stage weight: Sight: Sight
http://guninfo.tnet.com
 Reconstructed Manual for a PA-63 Double Action Semi-Automatic Pistol 9x18mm Makarov More Gun Info can be found at: http://guninfo.tnet.com The contents of this manual were reconstructed from graphical
MODEL T200-F18 MODEL T125-F18 Finish Nailers
 P MODEL T200-F18 MODEL T125-F18 Finish Nailers IMPORTANT! DO NOT DESTROY It is the customer s responsibility to have all operators and service personnel read and understand this manual. OPERATING MANUAL
How To Shoot An Air Rifle
 HATSAN ARMS COMPANY AT44 & AT44-10 Series PCP Air Rifle INSTRUCTION MANUAL PLEASE READ THIS MANUAL BEFORE USING YOUR AIR GUN Thank you for choosing HATSAN AT44 / AT44-10 PCP air rifle. Always use caution
An Easy AR-15 Trigger Job by: Dave Kaiser
 An Easy AR-15 Trigger Job by: Dave Kaiser Factory Colt Fire Control Parts JP Enterprises, Inc., has been one of our leading suppliers of AR-15 rifle accessories and one of the first suppliers that made
P22 Cal..22L.R. Operating Instructions. Semi-Automatic pistol USA. anl_us~1.qxd 13.08.2002 07:52 Seite 1. extractor
 anl_us~1.qxd 13.08.2002 07:52 Seite 1 manual safety extractor stabilizer frontsight slide Loaded chamber indicator rear sight hammer barrel trigger lock muzzle trigger mounting rail manual safety slide
MOD 25 HATSAN ARMS COMPANY. Instruction manual. Bedienungsanleitung. Manuel d instruction. Manual de instrucciones. Break barrel air pistol
 HATSAN ARMS COMPANY MOD 25 Break barrel air pistol Luftpistole Pistolet à air canon basculant Pistola de aire comprimido con acción de quiebre Instruction manual Bedienungsanleitung Manuel d instruction
GALATIAN SERIES PCP AIR RIFLE
 HATSAN ARMS COMPANY Serious. Solid. Impact. GALATIAN SERIES PCP AIR RIFLE INSTRUCTION MANUAL PLEASE READ THIS MANUAL BEFORE USING YOUR AIR GUN Thank you for choosing Hatsan Galatian air rifle. Always
WARNING: This product contains chemicals known to the state of California to cause cancer, or birth defects or other reproductive harm.
 WARNING: This product contains chemicals known to the state of California to cause cancer, or birth defects or other reproductive harm. 9780 SW Freeman Drive Wilsonville, OR 97070 USA Tel: 800-442-2406
tire inflator with pressure gauge
 tire inflator with pressure gauge Model 95583 Assembly And Operation Instructions Due to continuing improvements, actual product may differ slightly from the product described herein. 3491 Mission Oaks
Table of Contents: Safety Rules... 1. Safety Selector... 1. Loading the Magazine... 2. Loading Magazine into Rifle... 2. Chambering a Round...
 OWNERS MANUAL Table of Contents: Safety Rules... 1 Safety Selector... 1 Loading the Magazine... 2 Loading Magazine into Rifle... 2 Chambering a Round... 3 Chambering a Round (with Carrier in Battery)...
Figure 2. 1. Place selector lever on SAFE. If rifle is not cocked, selector lever cannot be pointed toward safe.
 UNLOADING Figure 2 1. Place selector lever on SAFE. If rifle is not cocked, selector lever cannot be pointed toward safe. 2. Point rifle in a SAFE DIRECTION!! 3. Remove magazine by pressing magazine catch
FJ2. 2 Ton Trolley Floor Jack Assembly & Operating Instructions
 FJ2 2 Ton Trolley Floor Jack Assembly & Operating Instructions READ ALL INSTRUCTIONS AND WARNINGS BEFORE USING THIS PRODUCT. This manual provides important information on proper operation & maintenance.
HYDRAULIC LIFT TABLE CART 2200-LB.
 HYDRAULIC LIFT TABLE CART 2200-LB. OWNER S MANUAL WARNING: Read carefully and understand all MACHINE ADJUSTMENT AND OPERATION INSTRUCTIONS before operating. Failure to follow the safety rules and other
TIPPMANN. A-5 Owner s Manual CO2 POWERED PAINTBALL MARKER
 TIPPMANN PNEUMATICS, INC. Get Your ur Heart t Pound unding With h A Tippmann! WARNING: This paintball marker/gun is not a toy nor is it intended for unsupervised use by persons under the age of 18 years.
Failure to comply with the following cautions and warnings could cause equipment damage and personal injury.
 1.0 IMPORTANT RECEIVING INSTRUCTIONS Visually inspect all components for shipping damage. Shipping Damage is not covered by warranty. If shipping damage is found, notify carrier at once. The carrier is
MP-4V Heavy Duty Riveter / 39048
 MP-4V Heavy Duty Riveter / 39048 This newly designed heavy-duty air/hydraulic riveter is ergonomically designed with the professional in mind. The light weight 3.7 lbs. well balanced MP-4V includes a Vacuum
10 TON HYDRAULIC PRESS
 10 TON HYDRAULIC PRESS Model Nos. CSA10F and CSA10B OPERATING & MAINTENANCE INSTRUCTIONS 0200 SPARE PARTS and SERVICING Please contact your nearest dealer, or CLARKE International, on one of the following
MICRO DRACO SEMI-AUTO PISTOL
 Owner s Manual MICRO DRACO SEMI-AUTO PISTOL Cal. 7.62X39MM Congratulations on your purchase of the Micro Draco Semi-Auto Pistol. With proper care and handling, it will give you many years of long, reliable
PAINT SPRAY GUN WASHER
 PAINT SPRAY GUN WASHER 94996 ASSEMBLY AND OPERATING INSTRUCTIONS Visit our website at: http://www.harborfreight.com Read this material before using this product. Failure to do so can result in serious
GAS CYLINDER SAFETY. 2. GRADES OF GASES BOC have divided the gases that they supply into 3 grades.
 GAS CYLINDER SAFETY Contents 1. INTRODUCTION 2. GRADES OF GASES 3. PRESSURES 4. TYPES OF REGULATORS 5. CYLINDER TRANSPORT 6. STORAGE 7. KEEPING THE SYSTEM SAFE 8. PROBLEM REGULATORS OR ATTACHMENTS 9. FURTHER
model 12 Perfect Repeater"
 1P Instructions model 12 "The Perfect Repeater" Outstanding natural pointing qualities, effortless operation, trouble-free performance and time-proven durability have gained the WINCHESTER Model 12 a world-wide
Model 2128 AIR COMPRESSOR PUMP Operating Instructions
 Model 8 AIR COMPRESSOR PUMP Operating Instructions Assembly of pump Connection to cylinder and charging ) Connect the air hose to the air cylinder and tighten with spanner. Do not over tighten. Note; the
SIG 556 Match Sear/Hammer Installation
 SIG 556 Match Sear/Hammer Installation ShootingSight LLC 2012 Safety Warning Always verify your firearm is unloaded before working on it. These instructions are meant as a supplemental guide to an armorer
1000-LB. TRAILER JACK OWNER S MANUAL
 1000-LB. TRAILER JACK OWNER S MANUAL WARNING: Read carefully and understand all INSTRUCTIONS before operating. Failure to follow the safety rules and other basic safety precautions may result in serious
SPRINGFIELD ARMORY XD PISTOLS OPERATION AND SAFETY MANUAL Sub-Compact 3 Service Model 4 Tactical Model 5 Ported Models
 SPRINGFIELD ARMORY XD PISTOLS OPERATION AND SAFETY MANUAL Sub-Compact 3 Service Model 4 Tactical Model 5 Ported Models Important Safety Information Inside Read this manual before handling this firearm.
Failure to comply with the following cautions and warnings could cause equipment damage and personal injury.
 1.0 IMPPORTANT RECEIVING INSTRUCTIONS Visually inspect all components for shipping damage. Shipping Damage is not covered by warranty. If shipping damage is found, notify carrier at once. The carrier is
HYDRAULIC TABLE CART
 Owner s Manual & Safety Instructions Save This Manual Keep this manual for the safety warnings and precautions, assembly, operating, inspection, maintenance and cleaning procedures. Write the product s
HYDRAULIC TABLE CART 500-LB.
 HYDRAULIC TABLE CART 500-LB. OWNER S MANUAL WARNING: Read carefully and understand all MACHINE ADJUSTMENT AND OPERATION INSTRUCTIONS before operating. Failure to follow the safety rules and other basic
Failure to comply with the following cautions and warnings could cause equipment damage and personal injury.
 1.0 IMPORTANT RECEIVING INSTRUCTIONS Visually inspect all components for shipping damage. Shipping Damage is not covered by warranty. If shipping damage is found, notify carrier at once. The carrier is
Auxiliary Rams USERS MANUAL
 Auxiliary Rams 2007 Chief Automotive Technologies, Inc. Chief s Limited One-Year Warranty & Liability CHIEF'S LIMITED ONE-YEAR WARRANTY & LIABILITY Chief Automotive Technologies, Inc. warrants for one
Play Safe. Safety. Instruction Manual. Rebel Specifications
 Operation Guide Instruction Manual Congratulations on your purchase of the 32 Degrees Rebel Bottom Line semi-auto. Before you use this marker, please read this manual in its entirety. Please follow all
German Sport Guns Gmbh GSG-StG44. Handling and Safety Instructions USA
 German Sport Guns Gmbh GSG-StG44 Handling and Safety Instructions USA ATI Warranty Service Policy & Procedure ATI 2 year limited warranty on imported goods American Tactical Imports provides warranty services,
Pump Action.22. Instruction Manual. Made in America and Priced Right. Made in America
 Made in America and Priced Right Pump Action.22 Instruction Manual Important: Please make certain to immediately return your warranty registration card. For best performance we suggest that you use American
FASCINATION 700 HVLP TANNING PRO SYSTEM USER MANUAL
 FASCINATION 700 HVLP TANNING PRO SYSTEM USER MANUAL Congratulations on choosing the Fascination 700 HVLP Tanning Pro System! Your system includes the following items: 1 Fascination 700 HVLP Tanning Pro
Table of contents 1 US 06.01
 Please read and understand this owner s manual before taking your new SIGARMS pistol out of the box. It is vital to your safety and to the safety of others that you accurately follow the information contained
SAFETY WARNINGS AND INSTRUCTION HANDBOOK
 DOUBLE ACTION AUTOLOADING PISTOLS SAFETY WARNINGS AND INSTRUCTION HANDBOOK READ CAREFULLY BEFORE USING THIS FIREARM 1 INDEX Some basic rules of firearm safety... 3 How to use your firearm... 4 Model Thunder
GLOCK INSTRUCTION FOR USE
 GLOCK INSTRUCTION FOR USE for the Safe Action self-loading pistol TAKE NOTE: Always assume that the GLOCK pistol or any other firearm is loaded is capable of being discharged until you the user, have been
San josé OWNER S MANUAL
 San josé OWNER S MANUAL Assembling & operating manual San josé 30 mbar - PORTABLE GAS BARBECUE 1. 2. 3. Improper installation, adjustment, alteration, service or maintenance can injury or property damage.
SA vz. 61 SKORPION. pistol instruction manual
 SA vz. 61 SKORPION pistol instruction manual 1. Description of Sa vz. 61 pistol 1.1. General 1.1.1...Purpose and features of Sa vz. 61 pistol 1.1.2...Characteristics of Sa vz. 61 pistol 1.2 Description
If you do not understand any of the material in this manual or have any questions, contact a qualified gunsmith or Maverick directly.
 OWNER S MANUAL FOR 88 TM AND 91 TM MODEL PUMP ACTION SHOTGUNS IMPORTANT SAFETY WARNINGS - NOTE THE SYMBOL These safety warnings are for your protection as well as the safety of others. Disregarding information
Instructions and precautions. Fork Height. Visit our website at: http://www.harborfreight.com
 Pallet Jack Item 68760 / 68761 Instructions and precautions Specifications Capacity Control Lever Fork Height Fork Length Fork Width Maximum Minimum Width over Forks Steering Wheel Dia. 2-1/2 Ton (5,000
1 TON FOLDING CRANE CFC1000
 1 TON FOLDING CRANE CFC1000 OPERATION &MAINTENANCE INSTRUCTIONS 0401 SPECIFICATIONS MAXIMUM SAFE WORKING LOADS (kg) 1 2 3 4 1000 750 500 250 MAXIMUM LIFT HEIGHT - 1920mm HYDRAULIC RAM OIL CAPACITY - 450CC
IMPORTANT INFORMATION - PLEASE READ. Table of Contents. Introduction. General Information
 IMPORTANT INFORMATION - PLEASE READ Introduction Congratulations! Welcome to the world of the ELLIPTICAL CROSS TRAINER. The ELLIPTICAL CROSS TRAINER is one of the finest and most comprehensive pieces of
8 ton air/hydraulic long ram jack
 8 ton air/hydraulic long ram jack Model 94562 Set up and Operating Instructions Visit our website at: http://www.harborfreight.com Read this material before using this product. Failure to do so can result
Cylinder Leak- Down Tester
 Cylinder Leak- Down Tester Item 94190 INSTRUCTIONS AND PRECAUTIONS Visit our website at: http://www.harborfreight.com When unpacking, make sure that the product is intact and undamaged. If any parts are
Mini-led spotlight with magnetic base
 Mini-led spotlight with magnetic base Model 95799 Assembly And Operation Instructions Due to continuing improvements, actual product may differ slightly from the product described herein. 3491 Mission
Hydraulic Punch Driver Kit
 Hydraulic Punch Driver Kit Item 96718 Instructions and precautions Visit our website at: http://www.harborfreight.com Read this material before using this product. Failure to do so can result in serious
ClearView 100. Instruction Manual
 ClearView 100 Instruction Manual Important Safeguards This appliance is not intended for use by children or infirm persons without supervision. Young children should be supervised to ensure that they do
3 WATT LED SPOTLIGHT Model No. SLM - 3801
 3 WATT LED SPOTLIGHT Model No. SLM - 3801 OWNER'S MANUAL Customer Service Tel: 1-800-268-3319 Superex Canada Ltd, Toronto,M2H 3B8 Made in China Table of Contents A). Important Safety Instructions B). Charging
Rf)CK ISLAND ARMORY 1911A1/1911A2 PISTOL
CK ISLAND ARMORY 1911A1/1911A2 PISTOL") Rf)CK ISLAND ARMORY 1911A1/1911A2 PISTOL Owner'. Manual ROCK ISLAND ARMORY OWNER / USER'S MANUAL ROCK ISLAND ARMORY 1911Al / 1911A2 PISTOL SAFETY, INSTRUCTION AND PARTS MANUAL As a responsible owner of
Rf)CK ISLAND ARMORY 1911A1/1911A2 PISTOL Owner'. Manual ROCK ISLAND ARMORY OWNER / USER'S MANUAL ROCK ISLAND ARMORY 1911Al / 1911A2 PISTOL SAFETY, INSTRUCTION AND PARTS MANUAL As a responsible owner of
SE-100-1, SE-200-1, SE-500-1, and SE-1000-1 AIR CHAMP PRODUCTS. User Manual SE BRAKE MODELS: (i) MTY (81) 83 54 10 18 ventas@industrialmagza.
 MTY (81) 83 54 10 18 ventas@industrialmagza.") AIR CHAMP PRODUCTS User Manual SE BRAKE MODELS: SE-00-, SE-200-, SE-500-, and SE-000- (i) FORM NO. L-20084-E-040 In accordance with Nexen s established policy of constant product improvement, the specifications
AIR CHAMP PRODUCTS User Manual SE BRAKE MODELS: SE-00-, SE-200-, SE-500-, and SE-000- (i) FORM NO. L-20084-E-040 In accordance with Nexen s established policy of constant product improvement, the specifications
SALTER AIRE Plus COMPRESSOR Model 8350 / 8352 / 8353. Instruction Manual. Page 1 of 9
 SALTER AIRE Plus COMPRESSOR Model 8350 / 8352 / 8353 Instruction Manual Page 1 of 9 TABLE OF CONTENTS Introduction...3 Important Safeguards..3 System Components...5 Setup and Operation...5 Setup...5 Operation....6
POSEIDON 2-29, 2-25 & 2-22 POSEIDON 2-29, 2-25 & 2-22 XT
 POSEION 2-29, 2-25 & 2-22 POSEION 2-29, 2-25 & 2-22 XT Repair Manual Index A. Safety precautions 3 B. Technical data 4 C. Structure 5-6. Service / Repair 7-23 E. Tools 24 F. Function 25-26 G. Electric
15GAL STEEL OIL DRAIN WITH 110V PUMP
 15GAL STEEL OIL DRAIN WITH 110V PUMP OWNER S MANUAL WARNING: Read carefully and understand all ASSEMBLY AND OPERATION INSTRUCTIONS before operating. Failure to follow the safety rules and other basic safety
Hydraulic Air Riveter. Operation Manual RC197 RC198. Recommend for mass production line industrial area. Page 1
 Hydraulic Air Riveter Recommend for mass production line industrial area Operation Manual RC197 RC198 Page 1 CONTENTS 1 Important Safety Rules 2 Tool Specification 2.1 Nomenclature 2.2 Technical Data 3
NITROUS TRANSFER PUMP INSTRUCTIONS
 NITROUS TRANSFER PUMP INSTRUCTIONS SAFETY TIPS Never directly inhale nitrous oxide. When inhaled in large quantities, nitrous oxide can cause respiratory ailments or in extreme cases, death by suffocation.
AURORA OWNER S MANUAL. TR & TT Series LL Bean Series Over & Under Shotguns WARNING
 AURORA TR & TT Series LL Bean Series Over & Under Shotguns OWNER S MANUAL WARNING Please read and understand this owner s manual before taking your new Aurora shotgun out of the box. It is vital to your
BACKPACK SPRAYERS. MODEL NOS: KSP16 & KSP20 Part Nos: 3402270 & 3402275 OPERATING & MAINTENANCE INSTRUCTIONS GC04/12
 BACKPACK SPRAYERS MODEL NOS: KSP16 & KSP20 Part Nos: 3402270 & 3402275 OPERATING & MAINTENANCE INSTRUCTIONS GC04/12 INTRODUCTION Thank you for purchasing this CLARKE Sprayer, designed for use only with
Features: Mounting the Optic
 MICRO GREEN DOT with INTEGRATED RED LASER The Patented Micro Green Dot with Integrated Red Laser is a compact optical system packed with many features. The Green Dot is designed as the primary targeting
SBC90. Abrasive Blast Cabinet Assembly & Operating Instructions
 SBC90 Abrasive Blast Cabinet Assembly & Operating Instructions READ ALL INSTRUCTIONS AND WARNINGS BEFORE USING THIS PRODUCT. SAVE THESE INSTRUCTIONS FOR FUTURE REFERENCE. This manual provides important
ROTOR LOADER OWNER S MANUAL
 ROTOR LOADER OWNER S MANUAL ROTOR LOADER OWNER S MANUAL WARNING IMPORTANT SAFETY INSTRUCTIONS AND GUIDELINES. Misuse of paintball equipment may cause serious injury or death. QUICK SET-UP GUIDE BATTERY
Design Utility Lever Thermostatic Bath Shower Mixer
 Design Utility Lever Thermostatic Bath Shower Mixer Installation Instructions & User Guide Please keep these instructions for future reference and request of replacement parts General Information Thank
Triple Threat 3-in-1 Game Table 3 IN 1 GAME TABLE
 NG0M Triple Threat 3-in- Game Table 3 IN GAME TABLE Thank 3 in Y Game Table Thank you for your purchase of our product. We work around the clock and around the globe to ensure that our products maintain
USA WARNING: Colt 1911 Self loading pistol Cal..22 L.R. OPERATING INSTRUCTIONS MADE BY CARL WALTHER. Rear Sight. Front Sight. Ejection Port.
 Colt 1911 Self loading pistol Cal..22 L.R. USA Rear Sight Ejection Port Front Sight Muzzle Slide Slide Stop Safety Hammer Trigger Trigger Guard Grip Safety READ THE INSTRUCTIONS AND WARNINGS IN THIS MANUAL
VISM CQB Scope Series
 1 VISM CQB Scope Series Congratulations on the purchase of your new VISM CQB Scope! The CQB Series of Scopes give you many great options so you can choose the scope that best fits your needs. Backed by
Extrusion Flo-Valve INSTRUCTIONS-PARTS LIST. 3000 psi (210 bar) Maximum Working Pressure. Model 204 355, Series K. Rev.
 Maximum Working Pressure. Model 204 355, Series K. Rev.") INSTRUCTIONS-PARTS LIST INSTRUCTIONS This manual contains important warnings and information. READ AND KEEP FOR REFERENCE. 306 586 Rev. D Supercedes B Extrusion Flo-Valve Model 204 355, Series K 3000 psi
INSTRUCTIONS-PARTS LIST INSTRUCTIONS This manual contains important warnings and information. READ AND KEEP FOR REFERENCE. 306 586 Rev. D Supercedes B Extrusion Flo-Valve Model 204 355, Series K 3000 psi
SW380 PISTOL. Safety and Instruction Manual
 S I G M A S E R I E S SW380 PISTOL Safety and Instruction Manual S M I T H & W E S S O N WARNING UNLIKE SOME SMITH & WESSON SEMI-AUTOMATIC PISTOLS, THE SW380 SEMI-AUTOMATIC PISTOL CAN BE FIRED WHEN THE
Tech. Services: (800) 477-8326 Fax: (800) 765-8326 Order Entry: (800) 541-1418 Fax: (800) 288-7031 Internet Address: http://www.powerteam.
 477-8326 Fax: (800) 765-8326 Order Entry: (800) 541-1418 Fax: (800) 288-7031 Internet Address: http://www.powerteam.") ORIGINAL INSTRUCTIONS Form No.102842 5 SPX Hydraulic Technologies 5885 11th Street Rockford, IL 61109-3699 USA Tech. Services: (800) 477-8326 Fax: (800) 765-8326 Order Entry: (800) 541-1418 Fax: (800)
ORIGINAL INSTRUCTIONS Form No.102842 5 SPX Hydraulic Technologies 5885 11th Street Rockford, IL 61109-3699 USA Tech. Services: (800) 477-8326 Fax: (800) 765-8326 Order Entry: (800) 541-1418 Fax: (800)
INSTRUCTION MANUAL CZ 452 ZKM
 INSTRUCTION MANUAL CZ 452 ZKM Before handling the firearm read this manual carefully and observe the following safety instructions. Improper and careless handling of the firearm could result in unintentional
Assembly and Usage Instructions
 Assembly and Usage Instructions A Product 5885 West Van Horn Tavern Road Columbia, MO 65203 www.caldwellshooting.com Instruction #1001667 Limited Warranty Every Caldwell product is warrantied to be free
WHAT YOU DON T KNOW ABOUT ACCUMULATORS CAN KILL YOU!
 WHAT YOU DON T KNOW ABOUT ACCUMULATORS CAN KILL YOU! Atlanta (Monroe) GA 770-267-3787 [email protected] www.gpmhydraulic.com What You Don t Know About Hydraulic Accumulators Can Kill You TABLE OF CONTENTS
HAND CRIMP TOOL Specification Sheet Order No. 63819-0900
 HAND CRIMP TOOL Specification Sheet Order No. 63819-0900 FEATURES TYPE 4D ΠA full cycle ratcheting hand tool ensures complete crimps ΠErgonomic soft grip handles for comfortable crimping ΠA precision
staple gun with 5/16 Long staples
 staple gun with 5/16 Long staples Model 95718 Assembly And Operation Instructions Due to continuing improvements, actual product may differ slightly from the product described herein. 3491 Mission Oaks
Multi-Pump Pneumatic Air Rifles
 06/07 10 SHOOTING SAFETY RULES FAILURE TO FOLLOW WARNING: THESE RULES CAN RESULT IN SERIOUS INJURY OR DEATH. 1 Always keep the muzzle pointed in a safe direction. There are several safe carries depending
Table of Contents TO OPERATE THE 12.0 VOLT POWER PACK: THIS OPERATES ONLY OFF THE UNIT S RECHARGEABLE BATTERY, NOT OFF YOUR VEHICLE S BATTERY.
 TO OPERATE THE 12.0 VOLT POWER PACK: THIS OPERATES ONLY OFF THE UNIT S RECHARGEABLE BATTERY, NOT OFF YOUR VEHICLE S BATTERY. Table of Contents Page No. 1. Turn the main power switch located on the back-side
Weatherproof Tournament Table Tennis Table
 Weatherproof Tournament Table Tennis Table Owner s Manual Model Number 7035-590 Absolutely Weatherproof Printed on 100% recycled paper.! Made in Germany Thank you for purchasing our high quality KETTLER
Air Sleeve Maintenance
 Air Sleeve Maintenance and Stuck-Down Troubleshooting Tools required: Safety glasses, gloves, strap wrench, shop towel, 1/4 -diameter 6 breaker bar, FOX High Pressure Pump, dental pick, hex wrench(es)
National- Spencer Inc.
 9-27-2010 National- Spencer Inc. 19.2V HEAVY DUTY GREASE GUN PRODUCT SPECIFICATION Charger Input Power 110 VAC Battery Output Power 19.2V Battery Capacity 1500 MAH Battery Pack Charge Time 1 Hour Maximum
100 Series Maxi Internal Filters. Instruction Manual
 100 Series Maxi Internal Filters Instruction Manual Important Safeguards This appliance is not intended for use by children or infirm persons without supervision. Young children should be supervised to
Mini multi-purpose sewing machine
 TROUBLESHOOTING Problem Problem cause Amendment No power or the machine runs slowly Batteries are installed incorrectly Batteries are low Reinstall the batteries making sure they are the correct way around
Compressed Gas Cylinder Program
 Department of Environmental Health & Safety Procedures Compressed Gas Cylinder Program March 2010 Compressed Gas Cylinder Program Page 1 of 8 Table of Contents I. Introduction II. III. IV. Policy Scope
ARE YOU READY NOW? CHECK LIST Daisy Outdoor Products WARNING: Competition Rifles
 ARE YOU READY NOW? Now you have what it takes to be a responsible airgun shooter. Will you be one? See how well you ve learned your lessons. Ask Dad or Mom to test you on your knowledge and practice of
VERTICAL / FIXED BEAM CLAMP I-BEAM ANCHOR ADJUSTABLE FROM 4-14 Model # HD26249
 VERTICAL / FIXED BEAM CLAMP I-BEAM ANCHOR ADJUSTABLE FROM 4-14 Model # HD26249 IMPORTANT!!! ALL PERSONS USING THIS EQUIPMENT MUST READ AND UNDERSTAND ALL INSTRUCTIONS. FAILURE TO DO SO MAY RESULT IN SERIOUS
SLP 1.85 Ratio Offset Rocker Arms with Valve Springs, LS3
 PART #50190 SLP 1.85 Ratio Offset Rocker Arms with Valve Springs, LS3 PACKING LIST Before installation, use this check list to make sure all necessary parts have been included. ITEM QTY CHECK PART NUMBER
M1A/M14 5/8-24 thread adapter Installation Instructions
 - 1 - M1A/M14 5/8-24 thread adapter Installation Instructions Table of contents Table of contents... 1 About the operators manual... 2 Adapter description... 3 Kit contents... 3 Technical specifications...
Semi-automatic rifle Match Rifle MR223 A1 Calibre.223 Rem.
 EN Semi-automatic rifle Match Rifle MR223 A1 Calibre.223 Rem. Operator s Manual Semi-automatic rifle Match Rifle MR223 A1 Calibre.223 Rem. Risk of death from gunshot wounds! Accidental discharge of weapon
123 Industrial Loop Road Paynesville, MN 56362 Phone: 1-800-864-1649 www.master-mfg.com
 123 Industrial Loop Road Paynesville, MN 56362 Phone: 1-800-864-1649 www.master-mfg.com INTRODUCTION The purpose of this manual is to assist you in the assembly, operation and maintenance of your sprayer
MODEL T-4 TRENCHER. Operators Manual
 DO NOT THROW AWAY IMPORTANT MANUAL MODEL TRENCHER Operators Manual P.O.BOX 290 San Bernardino, CA. 92402 Phone (909) 478-5700 (800) 922-4680 Fax (909) 478-5710 E-mail: [email protected] www.groundhoginc.com