TIPPMANN. A-5 Owner s Manual CO2 POWERED PAINTBALL MARKER
|
|
|
- Christine Goodman
- 8 years ago
- Views:
Transcription
1 TIPPMANN PNEUMATICS, INC. Get Your ur Heart t Pound unding With h A Tippmann! WARNING: This paintball marker/gun is not a toy nor is it intended for unsupervised use by persons under the age of 18 years. Misuse may cause serious injury or death. Eye Protection designed for paintball use must be worn by the user and any person within range. Read operation manual before using. Do not field strip or remove any parts while marker is pressurized. A-5 Owner s Manual CO2 POWERED PAINTBALL MARKER Always keep in mind that the sport of Paintball will be viewed and judged upon your safe and sportsmanlike conduct.

2 TIPPMANN PNEUMATICS, INC Adams Center Road, Fort Wayne, IN P) F) CONGRATULATIONS on your purchase of a Tippmann A-5 paintball marker. We believe it to be the most accurate and durable paintball marker available. The Tippmann A-5 will give many years of dependable service if cared for properly. Please take time to read through this manual thoroughly and become familiar with the Tippmann A-5 parts, operation, and safety precautions before you attempt to load or fire this marker. INDEX Table of Contents Warning/Liability Statement...5 Safety is your Responsibility...5 Specifications...7 Getting Started Tank Installation Hopper & Ball Feeder Velocity Adjustment Rear Sight Adjustment...12 Schematic Unloading Your Marker Tank Removal...13 Cleaning & Maintenance...14 Field Stripping Receiver Disassembly...15 Repairing Tank Leaks...17 Storage Warranty and Repair Policy Warranty or Repair Procedure...18 Warranty Registration Card Warning/Liability Statement This marker is classified as a dangerous weapon and is surrendered by Tippmann Pneumatics, Inc. with the understanding that the purchaser assumes all liability resulting from unsafe handling or any action that constitutes a violation of any applicable laws or regulations. Tippmann Pneumatics, Inc. shall not be liable for personal injury, loss of property or life resulting from the use of this weapon under any circumstances, including the intentional, reckless, negligent or accidental discharges. All information contained in this manual is subject to change without notice. Tippmann Pneumatics, Inc. reserves the right to make changes and improvements to products without incurring any obligation to incorporate such improvements in products previously sold. Safety is Your Responsibility! The ownership of this weapon places upon you the total responsibility of its safe and lawful use. You must observe the same safety precautions as you would any firearm to assure the safety of not only yourself but everyone around you. The user should at all times use caution when using this marker. Always remember that the game of Paintball can only survive and grow if it remains SAFE! Do not load or fire this marker until you have completely read this manual and are familiar with its mechanical operation and handling characteristics. Handle this and any marker as if it were loaded at all times. 5

3 Never point a marker at anything you do not intend to shoot. Always keep the muzzle pointed down or in a safe direction, even if you stumble or fall. All persons within a 200 yard radius should always wear eye protection in the form of approved goggles or full face mask and never shoot at a person who is not similarly protected. Pressurize and load the marker only when the marker will be immediately used. Unload and remove the CO2 cylinder immediately after use for safe storage. Dress appropriately when playing the game of paintball. Avoid exposing any skin when playing the game of paintball. Even a light layer will absorb some of the impact and protect you from the paintballs. Keep exposed skin away from escaping CO2 gas when installing or removing cylinder. CO2 gas is very cold and can cause frostbite under certain conditions. Use only.68 caliber paintballs. Never load or fire any foreign objects. Do not field strip or otherwise disassemble this marker while it is pressurized with gas. Do not look directly into the barrel. Accidental discharge into the eyes may cause permanent injury or death. Avoid alcoholic beverages before and during the use of this marker. Handling markers while under the influence of drugs or alcohol is a criminal disregard for public safety. Avoid shooting an opponent at point blank (6 feet or less). If you purchased a 12 gram cartridge or any other form of adapter with this marker be sure to read and follow the instructions that came with the adapter. Never fire your marker at personal property of others, the paintball can stain the paint of automobiles and houses. Specifications Model...Tippmann A-5 Caliber Action... Semi-Automatic (Open bolt blow-back) Power... (Optional) CO2 cylinder Magazine Capacity Rd Hopper Cycle Rate RPS Standard Barrel Length Overall Length (with standard barrel & no tank)...20 Weight (without tank) lbs. Effective Range ft. 6 7

4 Getting Started Note: Eye protection designed for paintball use must be worn at all times when handling this marker by the user and any person within range. 1) Standard Tank Installation Into Pistol Grip Adapter. A) First, make sure that the marker is on SAFE mode. Press safety In on left receiver half to lock trigger & put marker in SAFE mode. (When safety button on left side of marker shows red, the marker is in FIRE mode and marker can fire.) B) Next, cock the marker by sliding the bolt cocking handle all the way back until you hear/feel the bolt lock into place, then release the cocking handle to its forward position. 2) Hopper and Ball Feeder Make sure that the hopper is clean and free of debris so it will feed the marker smoothly. Make sure that the ball feeder housing is clean and free of debris and the star feeders turn freely when the manual advance lever knob is pushed. Install the hopper neck into the ball feeder housing aligning the hopper neck tab to fit into the cutout in the ball feeder housing. Now you are ready to load your hopper with paintballs. After filling the hopper with paintballs the chamber will still be empty. You need to push the feeder manual advance lever to chamber a paintball. C) To install the tank, insert the tank valve end into the tank adapter at the back end of the pistol grip. Twist the tank clockwise into the marker, until it stops. Adjust the butt plate if necessary. Your marker is ready to fire once you switch to FIRE mode from SAFE mode. 8 9
 B) Next, cock the marker by sliding the bolt cocking handle all the way back until you hear/feel the bolt lock into place, then release the cocking handle to its forward position.")
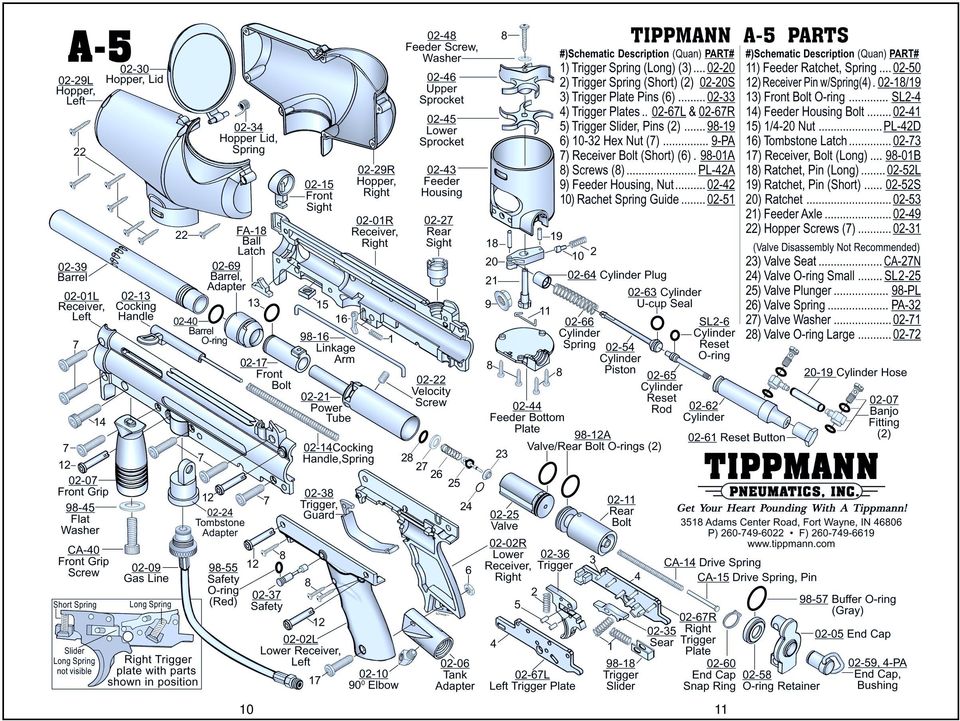
5 10 11
6 3) Velocity Adjustment Unloading Your Marker To unload your marker first remove the hopper. Then, point your marker in a safe direction and fire several times to be sure there are no balls left in the feeder or lodged in the chamber. 1) Tank Removal To adjust the velocity use the small allen wrench included with your marker. The velocity adjustment screw is located on the right side of the marker. To adjust the velocity down, turn the screw inward or clockwise. To turn the velocity up, turn the screw out or counterclockwise. Note: You must turn the velocity screw in past the receiver before doing any disassembly. The valve will not slide out of the marker if the velocity screw is adjusted out too far. 4) Rear Sight Adjustment Rotate the rear sight to preferred width to allow easy sighting. To remove a charged CO2 cylinder, turn the cylinder approximately 3/4 of a turn counterclockwise or out. This allows the tank pin valve to close so that no CO2 will enter the marker. Point the marker in a safe direction and fire the remaining CO2 in the marker by pulling the trigger until the marker stops firing. (This may take 4-5 shots) If your marker keeps firing after you have turned the tank 3/4 of a turn, the tank pin valve has not closed yet and you may have to turn the tank counterclockwise a little further. If you turn the tank 3/4 of a turn and it begins to leak before you pull the trigger you have turned it too far and may have damaged the tank o-ring. Because of the variances in tank valve parts, each tank varies slightly on exactly how far it should be turned. If this process does not work the tank pin valve could be too long

7 Cleaning & Maintenance To clean your paintball marker use a damp towel with water to wipe off paint, oil, and debris. We recommend using a premium gun oil (Hoppes #9 gun oil) to maintain your marker in good working condition. To oil all internal parts, put 2 or 3 drops of oil in the tank adapter, then install the CO2 tank and shoot the marker. We also recommend using white lithium grease on the barrel o- ring, safety o-ring and tank o-ring. Note: Before doing any marker disassembly when cleaning, remove the CO2 cylinder and unload your marker as outlined on page 13. Do not use any cleaning solvents. Field Stripping Before doing any marker disassembly remove the CO2 cylinder and unload your marker as outlined on page 13. Put the marker in the uncocked position before beginning to field strip it. If your marker is cocked, hold the bolt cocking handle back - then pull the trigger and release handle forward which will un-cock the marker. Front Grip Adjustment: Loosen Screw inside front grip to slide grip front or back, tighten to lock in place. Barrel Removal: Twist counterclockwise to remove. To remove front sight: Remove front sight screw just below front sight and slide sight upward. To remove rear sight: Pull up and out Receiver Disassembly FIRST: Remove CO2 source before any disassembly: Unload marker, remove the CO2 cylinder and put the gun in the uncocked position as outlined on page 13 before beginning to field strip it. To remove cylinder gas line from upper receiver: Remove push pin (#1) in front of gas line plug from upper receiver, release Tombstone Latch and gas line will pull out. To detach lower receiver (grip): Remove 2 lower receiver push pins (#2 & #3) to detach from upper receiver. To remove trigger assembly from grip: Push Safety out left side of lower receiver and pull up on trigger assembly. To access trigger parts: Pull left plate off trigger assembly. Do not remove 6 long pins from right plate Tombstone Latch 4 3

8 FIRST: Remove CO2 source before any disassembly: Unload marker, remove the CO2 cylinder and put the marker in the uncocked position as outlined on page 13 before beginning to field strip it. Remove Gas line and lower receiver (see page 15) To remove drive assembly (front bolt, power tube, valve, rear bolt, linkage arm, drive pin guide, drive spring and end cap assembly): 1) Screw velocity screw in past receiver. 2) Remove last push pin (#4) holding end cap in place. 3) Pull end cap out and tilt marker up, drive assembly parts should slide out the back. To reinstall drive assembly parts and lower receiver: 1) Clean inside upper receiver and removed parts. 2) Insert valve into power tube with receiver gas line plug cutout aligned down to match power tube cutout. Insert Tombstone adapter to check fit. 3) Insert reassembled parts (front bolt, power tube/ valve, rear bolt with linkage arm facing up) until Tombstone adapter can be inserted, push pin replaced and velocity screw can be accessed. (You may need to jiggle marker while sliding parts in). 4) Insert drive spring and drive pin, end cap unit and replace upper end cap pin. 5) Reinstall trigger group into grip; insert safety; reconnect lower to upper receiver; and install last 2 push pins. NOTE: It is only necessary to disassemble upper receiver halves to access six parts, ball latch, front grip nut, cocking handle, cocking handle spring, Tombstone latch and Tombstone latch spring. 16 Ball Feed System removal FIRST: Remove CO2 source before any disassembly: Unload marker, remove the CO2 cylinder and put the marker in the uncocked position as outlined on page 13 before beginning to field strip it. Remove banjo fitting bolt from upper receiver. Remove housing screw from left front side of upper receiver and remove feed system. Repairing Tank Leaks The most common leak occurs from a bad tank o-ring. To replace a tank o-ring you must first remove the bad o-ring and then install a new one. This o-ring is located on the tip of your tank valve. The best tank o-rings are made of urethane. The urethane o-rings are not affected by high CO2 pressures. These may be purchased from Tippmann Pneumatics or your local paintball dealer. Storage You should store your marker in a dry area. Before storing your marker make sure that marker is cleaned and oiled so it does not rust. Store your marker with the bolt in the forward position. Empty and remove the CO2 tank from the marker. When removing your marker from storage you should re-oil before use. 17
 Clean inside upper receiver and removed parts.")
9 Warranty - Repair Policy Tippmann Pneumatics, Inc. is dedicated to providing you with the ultimate paintball marker and the quality support necessary for the utmost satisfaction in its use. Tippmann Pneumatics, Inc. warrants that this product is found free from defects in materials and workmanship for a period of 1 year from the original date of purchase by the initial owner/ purchaser. On claims submitted as outlined, Tippmann Pneumatics, Inc. will repair or replace, without charge, any of its markers that have failed through defect in material or workmanship. Note: If you should encounter any problems with your marker and have aftermarket parts on it, please test the marker with the original stock parts before sending it in. Repair Procedure In the event warranty or other non-warranty related repairs are required, send the product(s) to Tippmann Pneumatics, Inc. with postage or delivery charges prepaid. Include a brief statement regarding the requested repair, your name, return address and telephone number where you can be reached during normal business hours, if possible. We strive to complete the necessary repair work within 24 hours and return it to you via regular ground UPS. If you wish to have it returned quicker, request for next day air or Second day air and include your credit card number with the expiration date. Your card will be charged the difference in additional cost of Next day air or Second day air over regular ground shipping cost. Call for assistance with warranty and repair. Ship to: Tippmann Pneumatics, Inc Adams Center Road Fort Wayne, IN Warranty Card Note: The Serial number is on the side of the marker below the cocking handle. (not Pat# or A-5 ) 18 Mail Completed Card to: Tippmann Pneumatics, Inc Adams Center Road Fort Wayne, IN TIPPMANN PNEUMATICS, INC. COMPLETE WARRANTY CARD, CAREFULLY TEAR OFF AT PERFORATION AND MAIL. WARRANTY REGISTRATION CARD MODEL Tippmann A-5 SERIAL # Find serial number on side of marker below cocking handle. (Not the Pat. #) PURCHASED FROM DATE CITY STATE ZIP YOUR NAME (Please print) STREET CITY STATE ZIP PHONE # TIPPMANN PNEUMATICS, INC ADAMS CENTER ROAD FT. WAYNE, IN P) F)

TIBERIUS ARMS TECHNICAL MANUAL
 MAGAZINE & HOPPER-FED PAINTBALL RIFLE TIBERIUS ARMS TECHNICAL MANUAL TECHNICAL MANUAL MAGAZINE & HOPPER-FED. CAL PAINTBALL RIFLE PATENTS PENDING TABLE OF CONTENTS Warnings... WARNING: This is not a toy.
http://guninfo.tnet.com
 Reconstructed Manual for a PA-63 Double Action Semi-Automatic Pistol 9x18mm Makarov More Gun Info can be found at: http://guninfo.tnet.com The contents of this manual were reconstructed from graphical
Play Safe. Safety. Instruction Manual. Rebel Specifications
 Operation Guide Instruction Manual Congratulations on your purchase of the 32 Degrees Rebel Bottom Line semi-auto. Before you use this marker, please read this manual in its entirety. Please follow all
P22 Cal..22L.R. Operating Instructions. Semi-Automatic pistol USA. anl_us~1.qxd 13.08.2002 07:52 Seite 1. extractor
 anl_us~1.qxd 13.08.2002 07:52 Seite 1 manual safety extractor stabilizer frontsight slide Loaded chamber indicator rear sight hammer barrel trigger lock muzzle trigger mounting rail manual safety slide
MODELS 93/693 By CO2 SEMI-AUTOMATIC
 O p e r a t i o n M a n u a l MODELS 93/693 By CO2 SEMI-AUTOMATIC.177 cal BB (4.5 mm) STEEL AIRGUN SHOT 12gm CO2 cylinder only WARNING: NOT A TOY. ADULT SUPERVISION REQUIRED. MISUSE OR CARELESS USE MAY
OWNER'S MANUAL. MODELS Beretta 92FS and 92FS Match Caliber.177 (4.5 mm) Pellet CO2 Air Pistol. Patent Pending
 Pellet CO2 Air Pistol. Patent Pending") OWNER'S MANUAL READ ALL INSTRUCTIONS AND WARNINGS IN THIS MANUAL BEFORE USING THIS AIR PISTOL. MODELS Beretta 92FS and 92FS Match Caliber.177 (4.5 mm) Pellet CO2 Air Pistol Patent Pending Not a toy. Adult
OWNER'S MANUAL READ ALL INSTRUCTIONS AND WARNINGS IN THIS MANUAL BEFORE USING THIS AIR PISTOL. MODELS Beretta 92FS and 92FS Match Caliber.177 (4.5 mm) Pellet CO2 Air Pistol Patent Pending Not a toy. Adult
How To Shoot An Air Rifle
 HATSAN ARMS COMPANY AT44 & AT44-10 Series PCP Air Rifle INSTRUCTION MANUAL PLEASE READ THIS MANUAL BEFORE USING YOUR AIR GUN Thank you for choosing HATSAN AT44 / AT44-10 PCP air rifle. Always use caution
FX TYPHOON 12. Table of Contents
 Owner s Manual FX TYPHOON 12 Table of Contents Table of Contents Warranty Specifications General Instructions Operating Instructions Loading the Magazine Trigger Adjustments Care & Maintenance Recommended
PALLET JACK - 2.5 TON
 PALLET JACK - 2.5 TON 39939 SET UP AND OPERATING INSTRUCTIONS Visit our website at: http://www.harborfreight.com Read this material before using this product. Failure to do so can result in serious injury.
ROTOR LOADER OWNER S MANUAL
 ROTOR LOADER OWNER S MANUAL ROTOR LOADER OWNER S MANUAL WARNING IMPORTANT SAFETY INSTRUCTIONS AND GUIDELINES. Misuse of paintball equipment may cause serious injury or death. QUICK SET-UP GUIDE BATTERY
GALATIAN SERIES PCP AIR RIFLE
 HATSAN ARMS COMPANY Serious. Solid. Impact. GALATIAN SERIES PCP AIR RIFLE INSTRUCTION MANUAL PLEASE READ THIS MANUAL BEFORE USING YOUR AIR GUN Thank you for choosing Hatsan Galatian air rifle. Always
Table of Contents: Safety Rules... 1. Safety Selector... 1. Loading the Magazine... 2. Loading Magazine into Rifle... 2. Chambering a Round...
 OWNERS MANUAL Table of Contents: Safety Rules... 1 Safety Selector... 1 Loading the Magazine... 2 Loading Magazine into Rifle... 2 Chambering a Round... 3 Chambering a Round (with Carrier in Battery)...
MOD 25 HATSAN ARMS COMPANY. Instruction manual. Bedienungsanleitung. Manuel d instruction. Manual de instrucciones. Break barrel air pistol
 HATSAN ARMS COMPANY MOD 25 Break barrel air pistol Luftpistole Pistolet à air canon basculant Pistola de aire comprimido con acción de quiebre Instruction manual Bedienungsanleitung Manuel d instruction
Table of contents 1 US 06.01
 Please read and understand this owner s manual before taking your new SIGARMS pistol out of the box. It is vital to your safety and to the safety of others that you accurately follow the information contained
100% Made in Taiwan www.guay2.com Manufactured by G&G ARMAMENT
 100% Made in Taiwan www.guay2.com Manufactured by G&G ARMAMENT Address Taipei / 11F-3,NO.27,Lane 169,Kangning St,Shijr City,Taipei County 22180,TAIWAN Changhua / 999, Zhonghua Rd., Shengang Township, Changhua
Morini CM 22M. Technical Data
 Morini CM 22M Technical Data Caliber: Weight: Total Length: Total Height: Total Width: Length of Sight Line: Barrel Length: Number of Riflings: Trigger: 1 st stage weight: 2 nd stage weight: Sight: Sight
Professional Precharged Hunting Rifle
 TRIGGER ADJUSTMENT. The trigger is set at the factory, but some aspects can be adjusted to suit individual preferences. 1. This screw adjusts the weight of second stage trigger pull, to increase the weight
USA WARNING: Colt 1911 Self loading pistol Cal..22 L.R. OPERATING INSTRUCTIONS MADE BY CARL WALTHER. Rear Sight. Front Sight. Ejection Port.
 Colt 1911 Self loading pistol Cal..22 L.R. USA Rear Sight Ejection Port Front Sight Muzzle Slide Slide Stop Safety Hammer Trigger Trigger Guard Grip Safety READ THE INSTRUCTIONS AND WARNINGS IN THIS MANUAL
Morini CM 162EI. Technical Data
 Morini CM 162EI Technical Data Caliber: Weight: Total Length: Total Height: Total Width: Length of Sight Line: Barrel Length: Type of Barrel: Number of Riflings: Functioning: Trigger: Path: Arrest Point:
Figure 2. 1. Place selector lever on SAFE. If rifle is not cocked, selector lever cannot be pointed toward safe.
 UNLOADING Figure 2 1. Place selector lever on SAFE. If rifle is not cocked, selector lever cannot be pointed toward safe. 2. Point rifle in a SAFE DIRECTION!! 3. Remove magazine by pressing magazine catch
HATSAN BREAK BARREL AIR RIFLES
 HATSAN ARMS COMPANY HATSAN BREAK BARREL AIR RIFLES Instruction Manual GB Bedienungsanleitung Manuel d instruction DE FR Manual de Instrucciones ESP PLEASE READ THIS MANUAL BEFORE USING YOUR AIR GUN Thank
uture innovation air price Xtreme 45 Full Metal CO2 Powered Airsoft Gas Blow Back Pistol TAIWAN
 TAIWAN uture innovation G&G always brings you the most innovative products. We not only replicate real steel firearms, but we also push our R&D to develop more features and ergonomic designs to meet the
GLOCK INSTRUCTION FOR USE
 GLOCK INSTRUCTION FOR USE for the Safe Action self-loading pistol TAKE NOTE: Always assume that the GLOCK pistol or any other firearm is loaded is capable of being discharged until you the user, have been
HYDRAULIC TABLE CART 500-LB.
 HYDRAULIC TABLE CART 500-LB. OWNER S MANUAL WARNING: Read carefully and understand all MACHINE ADJUSTMENT AND OPERATION INSTRUCTIONS before operating. Failure to follow the safety rules and other basic
PRODUCT: WASHER / WASHER-DRYER COMBO MODEL: AW 120 / AW 122 / AW 125 AWD 120 / AWD 121 / AWD 129
 PRODUCT: WASHER / WASHER-DRYER COMBO MODEL: The information included in this Splendide Repair Manual may change without notice. Please see our web site www.splendide.com/service/docs.html for updates,
AURORA OWNER S MANUAL. TR & TT Series LL Bean Series Over & Under Shotguns WARNING
 AURORA TR & TT Series LL Bean Series Over & Under Shotguns OWNER S MANUAL WARNING Please read and understand this owner s manual before taking your new Aurora shotgun out of the box. It is vital to your
CZ 200 INSTRUCTION MANUAL
 CZ 200 INSTRUCTION MANUAL PLEASE READ THIS MANUAL BEFORE USING YOUR NEW RIFLE, IT CONTAINS IMPORTANT SAFETY INFORMATION AND INSTRUCTION ON HANDLING, ADJUSTMENT AND MAINTENANCE. Improper and careless handling
model 12 Perfect Repeater"
 1P Instructions model 12 "The Perfect Repeater" Outstanding natural pointing qualities, effortless operation, trouble-free performance and time-proven durability have gained the WINCHESTER Model 12 a world-wide
SAFETY & OPERATING INSTRUCTIONS
 SAFETY & OPERATING INSTRUCTIONS EDLUND TOMATO LASER, Models ETL -316, -140 & -380 READ AND UNDERSTAND THIS MANUAL AND ALL INSTRUCTIONS BEFORE OPERATING THIS SLICER. 159 Industrial Parkway, Burlington,
Table of Contents WARNING SYMBOLS AND DEFINITIONS
 Table of Contents SAFETY INSTALLATION OPERATION MAINTENANCE Safety... 2 Specifications... 4 Installation... 5 Operation... 8 WARNING SYMBOLS AND DEFINITIONS Maintenance... 9 Parts List and Assembly Diagram...
Instructions and precautions. Fork Height. Visit our website at: http://www.harborfreight.com
 Pallet Jack Item 68760 / 68761 Instructions and precautions Specifications Capacity Control Lever Fork Height Fork Length Fork Width Maximum Minimum Width over Forks Steering Wheel Dia. 2-1/2 Ton (5,000
SA vz. 61 SKORPION. pistol instruction manual
 SA vz. 61 SKORPION pistol instruction manual 1. Description of Sa vz. 61 pistol 1.1. General 1.1.1...Purpose and features of Sa vz. 61 pistol 1.1.2...Characteristics of Sa vz. 61 pistol 1.2 Description
SIG 556 Match Sear/Hammer Installation
 SIG 556 Match Sear/Hammer Installation ShootingSight LLC 2012 Safety Warning Always verify your firearm is unloaded before working on it. These instructions are meant as a supplemental guide to an armorer
MODEL G300 BRAKE BLEEDER
 MODEL G300 BRAKE BLEEDER Installation, Operation & Repair Parts Information Branick Industries, Inc. 4245 Main Avenue P.O. Box 1937 Fargo, North Dakota 58103 REV060616 P/N: 81-0035G 1 THIS PAGE INTENTIONALLY
Pallet Jack. OWNER S MANUAL Model MH1230. Important Safety Instructions Assembly Instructions Parts and Hardware Identification
 OWNER S MANUAL Model MH1230 Important Safety Instructions Assembly Instructions Parts and Hardware Identification Pallet Jack CAUTION: Read, understand and follow ALL instructions before using this product
HYDRAULIC TABLE CART
 Owner s Manual & Safety Instructions Save This Manual Keep this manual for the safety warnings and precautions, assembly, operating, inspection, maintenance and cleaning procedures. Write the product s
Overview PARTS LIST. B. Lever mounting base C. Flush handle assembly D. Grey/Blue float stop E. Grey float (Full Flush) F. Flush valve washer
 F. Flush valve washer") Overview READ ENTIRE INSTRUCTIONS BEFORE STARTING INSTALLATION PARTS LIST A. Flush valve B. Lever mounting base C. Flush handle assembly D. Grey/Blue float stop E. Grey float (Full Flush) F. Flush valve
Overview READ ENTIRE INSTRUCTIONS BEFORE STARTING INSTALLATION PARTS LIST A. Flush valve B. Lever mounting base C. Flush handle assembly D. Grey/Blue float stop E. Grey float (Full Flush) F. Flush valve
Semi-automatic rifle Match Rifle MR223 A1 Calibre.223 Rem.
 EN Semi-automatic rifle Match Rifle MR223 A1 Calibre.223 Rem. Operator s Manual Semi-automatic rifle Match Rifle MR223 A1 Calibre.223 Rem. Risk of death from gunshot wounds! Accidental discharge of weapon
German Sport Guns Gmbh GSG-StG44. Handling and Safety Instructions USA
 German Sport Guns Gmbh GSG-StG44 Handling and Safety Instructions USA ATI Warranty Service Policy & Procedure ATI 2 year limited warranty on imported goods American Tactical Imports provides warranty services,
Micro Cart User's Guide
 Micro Cart User's Guide To take full advantage of the ergonomic features of your new Sun Mountain Micro Cart, please read the following information. SUN MOUNTAIN 1 Your Micro Cart has several innovative
If you do not understand any of the material in this manual or have any questions, contact a qualified gunsmith or Maverick directly.
 OWNER S MANUAL FOR 88 TM AND 91 TM MODEL PUMP ACTION SHOTGUNS IMPORTANT SAFETY WARNINGS - NOTE THE SYMBOL These safety warnings are for your protection as well as the safety of others. Disregarding information
MODEL T200-F18 MODEL T125-F18 Finish Nailers
 P MODEL T200-F18 MODEL T125-F18 Finish Nailers IMPORTANT! DO NOT DESTROY It is the customer s responsibility to have all operators and service personnel read and understand this manual. OPERATING MANUAL
2006 HEADSHOK Service Video #1
 LEFTY SPEED DLR DAMPING CARTRIDGE This document explains how to properly remove, disassemble, inspect, reassemble and reinstall the Lefty Speed DLR2 damping cartridge. It is a document to be used in conjunction
WARNING: HK 416 Self loading Rifle/Pistol Cal..22L.R. HV USA MADE BY CARL WALTHER. Magazine Release. Charging Handle. Cover. Magazine.
 HK 416 Self loading Rifle/Pistol Cal..22L.R. HV Charging Handle Magazine Release Ejection Port Cover Rail System USA Magazine Trigger Guard Front Sight Rail System Upper Receiver Rear Sight Rear Receiver
PAINT SPRAY GUN WASHER
 PAINT SPRAY GUN WASHER 94996 ASSEMBLY AND OPERATING INSTRUCTIONS Visit our website at: http://www.harborfreight.com Read this material before using this product. Failure to do so can result in serious
Operator s Manual. Pressure Injection Cell Model PC8500. Congratulations! Contents
 Operator s Manual Pressure Injection Cell Model PC8500 Congratulations! Congratulations on your purchase of a Next Advance Pressure Injection Cell. Please read this operator s manual which explains proper
Multi-Pitch Pitching Machine USER MANUAL
 Multi-Pitch Pitching Machine USER MANUAL TABLE OF CONTENTS Thank you for purchasing the Cimarron Multi-Pitch Pitching Machine. The Cimarron Multi-Pitch Pitching Machine is a high performance pitching machine
INSTRUCTION MANUAL CZ 200
 INSTRUCTION MANUAL CZ 200 PLEASE READ THIS MANUAL BEFORE USING YOUR NEW RIFLE, IT CONTAINS IMPORTANT SAFETY INFORMATION AND INSTRUCTION ON HANDLING, ADJUSTMENT AND MAINTENANCE. Improper and careless handling
MP-4V Heavy Duty Riveter / 39048
 MP-4V Heavy Duty Riveter / 39048 This newly designed heavy-duty air/hydraulic riveter is ergonomically designed with the professional in mind. The light weight 3.7 lbs. well balanced MP-4V includes a Vacuum
MICRO DRACO SEMI-AUTO PISTOL
 Owner s Manual MICRO DRACO SEMI-AUTO PISTOL Cal. 7.62X39MM Congratulations on your purchase of the Micro Draco Semi-Auto Pistol. With proper care and handling, it will give you many years of long, reliable
DSV-2 ALTITUDE-AZIMUTH TELESCOPE MOUNT User Manual
 DSV-2 ALTITUDE-AZIMUTH TELESCOPE MOUNT User Manual Your New Mount Thanks for choosing the Desert Sky Astro Products DSV-2 mount. Take some time to familiarize yourself with its features (Figure 1). Please
Table of Contents. Overview 1. Pump Disassembly 2. Control Disassembly / Reassembly 7. Pump Reassembly 13. Adjustment Procedures DR Control 19
 Table of Contents Overview 1 Pump Disassembly 2 Control Disassembly / Reassembly 7 Pump Reassembly 13 Adjustment Procedures DR Control 19 Adjustment Procedures DRG Control 20 Adjustment Procedures DFR
LIFT N RACK PRO OPERATING & INSTALLATION GUIDE 5500 Lb. LIFT CAPACITY
 LIFT N RACK PRO OPERATING & INSTALLATION GUIDE 5500 Lb. LIFT CAPACITY IMPORTANT: READ THIS MANUAL BEFORE IN-STALLING, OPERATING OR MAINTAINING YOUR LIFT. Chassis Liner Company Sales Office Toll Free: 800-242-2448
Failure to comply with the following cautions and warnings could cause equipment damage and personal injury.
 1.0 IMPORTANT RECEIVING INSTRUCTIONS Visually inspect all components for shipping damage. Shipping Damage is not covered by warranty. If shipping damage is found, notify carrier at once. The carrier is
SECTION G2: CABLE PROCESSOR MODULE MAINTENANCE
 SECTION G2: CABLE PROCESSOR MODULE MAINTENANCE Cable Processor Module overview WARNING! When tipping the Cable Processor Module back, (after removing the toggle arm pin), use extreme caution not to drop
SE-100-1, SE-200-1, SE-500-1, and SE-1000-1 AIR CHAMP PRODUCTS. User Manual SE BRAKE MODELS: (i) MTY (81) 83 54 10 18 ventas@industrialmagza.
 MTY (81) 83 54 10 18 ventas@industrialmagza.") AIR CHAMP PRODUCTS User Manual SE BRAKE MODELS: SE-00-, SE-200-, SE-500-, and SE-000- (i) FORM NO. L-20084-E-040 In accordance with Nexen s established policy of constant product improvement, the specifications
AIR CHAMP PRODUCTS User Manual SE BRAKE MODELS: SE-00-, SE-200-, SE-500-, and SE-000- (i) FORM NO. L-20084-E-040 In accordance with Nexen s established policy of constant product improvement, the specifications
15GAL STEEL OIL DRAIN WITH 110V PUMP
 15GAL STEEL OIL DRAIN WITH 110V PUMP OWNER S MANUAL WARNING: Read carefully and understand all ASSEMBLY AND OPERATION INSTRUCTIONS before operating. Failure to follow the safety rules and other basic safety
All in One Activity Walker Instruction Manual
 All in One Activity Walker Instruction Manual Read all instructions BEFORE assembly and USE of product. KEEP INSTRUCTIONS FOR FUTURE USE. Record the following information for quick reference. Note: Illustrations
TABLE OF CONTENTS. - 2015 DM Series Marker - 14 UL Barrel. - 1 4 oz. Slick Lube - Parts Kit - Barrel Sock - Owner s Manual - Warranty Card
 2015 DM SERIES OWNER s MANUAL TABLE OF CONTENTS Important safety instructions and guidelines... page 02 quick reference... page 04 board settings and functions... page 06 Reach Airport... page 12 Included
Fuel Injection Pump, Rotary (005-014)
") Fuel Injection Pump, Rotary View Related Topic Page 1 of 30 Fuel Injection Pump, Rotary (005-014) Table of Contents Summary General Information Preparatory Steps Remove Front Gear Train Rear Gear Train
Fuel Injection Pump, Rotary View Related Topic Page 1 of 30 Fuel Injection Pump, Rotary (005-014) Table of Contents Summary General Information Preparatory Steps Remove Front Gear Train Rear Gear Train
Foodservice Equipment Specialists P.O. Box 880 Saco, ME. / U.S.A. 04072 877-854-8006 * FAX (207) 283-8080
 283-8080") Foodservice Equipment Specialists P.O. Box 880 Saco, ME. / U.S.A. 04072 877-854-8006 * FAX (207) 283-8080 FOR SERVICE ASSISTANCE U.S. AND CANADA CALL: 1-877-854-8006 24 HOURS/DAY 7 DAYS/WEEK TABLE OF CONTENTS
Foodservice Equipment Specialists P.O. Box 880 Saco, ME. / U.S.A. 04072 877-854-8006 * FAX (207) 283-8080 FOR SERVICE ASSISTANCE U.S. AND CANADA CALL: 1-877-854-8006 24 HOURS/DAY 7 DAYS/WEEK TABLE OF CONTENTS
REPAIR INSTRUCTIONS UNDER BODY CYLINDER (UM, UL)
") Table of contents 1. Introduction... 3 1.1. Scope of use... 3 1.2. General remarks... 3 1.3. Contact Hyva... 3 1.4. Precautions... 4 1.5. Spare parts... 4 1.5.1. Prior to use... 4 1.6. Recycling and Reuse
Table of contents 1. Introduction... 3 1.1. Scope of use... 3 1.2. General remarks... 3 1.3. Contact Hyva... 3 1.4. Precautions... 4 1.5. Spare parts... 4 1.5.1. Prior to use... 4 1.6. Recycling and Reuse
SAFETY WARNINGS AND INSTRUCTION HANDBOOK
 DOUBLE ACTION AUTOLOADING PISTOLS SAFETY WARNINGS AND INSTRUCTION HANDBOOK READ CAREFULLY BEFORE USING THIS FIREARM 1 INDEX Some basic rules of firearm safety... 3 How to use your firearm... 4 Model Thunder
Hydraulic Transmission Jacks Operating Instructions & Parts Manual
 Blackhawk Automotive is a Licensed Trade Mark Made by SFA Companies, Kansas City, MO Hydraulic Transmission Jacks Operating Instructions & Parts Manual Model BH7011 BH7210 Capacity 1/2 Ton 1 Ton SFA Companies
Mini Pallet Jack OWNER S MANUAL
 Mini Pallet Jack OWNER S MANUAL WARNING: Read carefully and understand all ASSEMBLY AND OPERATION INSTRUCTIONS before operating. Failure to follow the safety rules and other basic safety precautions may
WARNING: This product contains chemicals known to the state of California to cause cancer, or birth defects or other reproductive harm.
 WARNING: This product contains chemicals known to the state of California to cause cancer, or birth defects or other reproductive harm. 9780 SW Freeman Drive Wilsonville, OR 97070 USA Tel: 800-442-2406
English. Symbols used to mark instructions...3. Congratulations...5 Getting the best results...5. Warnings...6 Operating Procedure...
 2 Contents Components Attachments Guidance Installation Operation Maintenance Service Technical Troubleshooting Symbols used to mark instructions...3 Included Attachments...4 Congratulations...5 Getting
IMPORTANT INFORMATION - PLEASE READ. Table of Contents. Introduction. General Information
 IMPORTANT INFORMATION - PLEASE READ Introduction Congratulations! Welcome to the world of the ELLIPTICAL CROSS TRAINER. The ELLIPTICAL CROSS TRAINER is one of the finest and most comprehensive pieces of
Assembling an AR-15 Parts CheckList:
 Assembling an AR-5 Parts CheckList: Table of Contents Upper Receiver Common Parts... A, A2 & A3 sights... 2-3 BARREL COMPONENTS... 4-5 BOLT & BOLT CARRIER COMPONENTS... 6 LOWER RECEIVER COMMON PARTS...
Failure to comply with the following cautions and warnings could cause equipment damage and personal injury.
 1.0 IMPORTANT RECEIVING INSTRUCTIONS Visually inspect all components for shipping damage. Shipping Damage is not covered by warranty. If shipping damage is found, notify carrier at once. The carrier is
FJ2. 2 Ton Trolley Floor Jack Assembly & Operating Instructions
 FJ2 2 Ton Trolley Floor Jack Assembly & Operating Instructions READ ALL INSTRUCTIONS AND WARNINGS BEFORE USING THIS PRODUCT. This manual provides important information on proper operation & maintenance.
SE-900-MP ECO -SERIES. Operation & Parts Manual
 SE-900-MP ECO -SERIES Operation & Parts Manual SE 900 MP ECO - SERIES OWNERS MANUAL Table of Contents 1. Installation guide 2. Set-up instructions 3. Operation instructions 4. Cleaning 5. Troubleshooting
National- Spencer Inc.
 9-27-2010 National- Spencer Inc. 19.2V HEAVY DUTY GREASE GUN PRODUCT SPECIFICATION Charger Input Power 110 VAC Battery Output Power 19.2V Battery Capacity 1500 MAH Battery Pack Charge Time 1 Hour Maximum
TABLE OF CONTENTS CABINET SAFETY
 CABINET SAFETY...2 ASSEMBLY INSTRUCTIONS...3 Tools and Parts...3 Cabinet Use Requirements...3 Unpack the Cabinet...3 TABLE OF CONTENTS CABINET SAFETY Install the Bumper...3 Install the Casters...4 Install
An Easy AR-15 Trigger Job by: Dave Kaiser
 An Easy AR-15 Trigger Job by: Dave Kaiser Factory Colt Fire Control Parts JP Enterprises, Inc., has been one of our leading suppliers of AR-15 rifle accessories and one of the first suppliers that made
PEDAL CAR - GO CART ASSEMBLY & OPERATING INSTRUCTIONS
 PEDAL CAR - GO CART 42822 ASSEMBLY & OPERATING INSTRUCTIONS 3491 Mission Oaks Blvd., Camarillo, CA 93011 Visit our Web site at: http://www.harborfreight.com Copyright 2000 by Harbor Freight Tools. All
PK380 W ALTHER A RMS, INC. Semi-Automatic Sport Pistol Cal..380 Auto
 SAFETY & INSTRUCTION MANUAL PK380 Semi-Automatic Sport Pistol Cal..380 Auto Read the instructions and warnings in this manual CAREFULLY BEFORE using this firearm. W ALTHER A RMS, INC. PK380! WARNING: READ
HYDRAULIC LIFT TABLE CART 2200-LB.
 HYDRAULIC LIFT TABLE CART 2200-LB. OWNER S MANUAL WARNING: Read carefully and understand all MACHINE ADJUSTMENT AND OPERATION INSTRUCTIONS before operating. Failure to follow the safety rules and other
758 Heavy-duty Ratchet Guy Wire Cutter
 INSTRUCTION MANUAL 758 Heavy-duty Ratchet Guy Wire Cutter Read and understand all of the instructions and safety information in this manual before operating or servicing this tool. Register this product
Owner s Manual & Safety Instructions
 Owner s Manual & Safety Instructions Save This Manual Keep this manual for the safety warnings and precautions, assembly, operating, inspection, maintenance and cleaning procedures. Write the product s
SW380 PISTOL. Safety and Instruction Manual
 S I G M A S E R I E S SW380 PISTOL Safety and Instruction Manual S M I T H & W E S S O N WARNING UNLIKE SOME SMITH & WESSON SEMI-AUTOMATIC PISTOLS, THE SW380 SEMI-AUTOMATIC PISTOL CAN BE FIRED WHEN THE
SPRINGFIELD ARMORY 1911-A1 PISTOLS OPERATION AND SAFETY MANUAL
 SPRINGFIELD ARMORY 1911-A1 PISTOLS OPERATION AND SAFETY MANUAL Important Safety Information Inside Read this manual before handling this firearm. Keep this manual with your firearm and review it before
Plus ESG50GL Battery-powered, High-speed Cable Cutter
 INSTRUCTION MANUAL Serialnummer GATOR Plus ESG50GL Battery-powered, High-speed Cable Cutter Read and understand all of the instructions and safety information in this manual before operating of servicing
MaxiMist Spraymate By Earlex
 MaxiMist Spraymate By Earlex Distributed exclusively by Spray Tan Direct www.spraytandirect.com PART # DESCRIPTION 1 Air cap ring L0215 2 Air cap L0205 3 Spray direction plate L0206 4 Solution nozzle/spray
LASER DIAGRAM TABLE OF CONTENTS. SKY Technologies Inc. www.skytechlasers.com. Laser Diagram. Technical Specifications. Laser Operation.
 TABLE OF CONTENTS LASER DIAGRAM Laser Diagram 1 Technical Specifications 2 Laser Operation 3 Laser Safety 5 Maintanence 6 Limitation of Liability 7 Warranty 8 Laser Pointer Series Operations Manual Page
Installation Guide 2010 BMW S1000RR Full Exhaust System
 Installation Guide 2010 BMW S1000RR Full Exhaust System!! THIS PRODUCT IS DESIGNED FOR USE IN CLOSED COURSE RACING AND IS NOT INTENDED FOR HIGHWAY USE!! Congratulations on the purchase of your new TaylorMade
DANGER DANGER. General Information. Safety Is Your Responsibility. Ordering Parts. Contact Information
 Safety Safety Is Your Responsibility DANGER To avoid personal injury or death, carefully read and understand all instructions pertaining to the Anthony Liftgates product. Do not attempt to install, operate,
Owner s Manual & Safety Instructions
 Owner s Manual & Safety Instructions Save This Manual Keep this manual for the safety warnings and precautions, assembly, operating, inspection, maintenance and cleaning procedures. Write the product s
SPRINGFIELD ARMORY XD PISTOLS OPERATION AND SAFETY MANUAL Sub-Compact 3 Service Model 4 Tactical Model 5 Ported Models
 SPRINGFIELD ARMORY XD PISTOLS OPERATION AND SAFETY MANUAL Sub-Compact 3 Service Model 4 Tactical Model 5 Ported Models Important Safety Information Inside Read this manual before handling this firearm.
1 Ton Telescoping Gantry Crane
 1 Ton Telescoping Gantry Crane 41188 Gantry Crane Read this material before using this product. Failure to do so can result in serious injury. SAVE THIS MANUAL. When unpacking, make sure that the product
#12 Professional Meat Grinders
 #12 Professional Meat Grinders MG-203100 (52021040) Manual Instruction Thank you, and congratulations on purchasing the Non-corrosive electric meat grinder. Your grinder comes complete with everything
1 / 4 IN. FFL x 4 FT. 9 IN. 1 / 2 IN. ACME x 4 FT. 9 IN. Gauge Accuracy +/-2% Set includes Quick Disconnect Valves
 Specifications Blue (Low) Gauge 0-120 PSI Blue Hose 1 / 4 IN. FFL x 4 FT. 9 IN. Red (High) Gauge 0-500 PSI Red Hose 1 / 4 IN. FFL x 4 FT. 9 IN. Yellow Hose 1 / 2 IN. ACME x 4 FT. 9 IN. Gauge Accuracy +/-2%
Operator Manual 100 Series Coffee Grinders
 Operator Manual 100 Series Coffee Grinders Models 100 and 190SS Model 100 Model 190SS Specifications...2 Safety Information...2 Installation...3 Operation...3 Table of Contents Cleaning & Maintenance...6
Trillium 40 Axis Spring Tensioner Wire Replacement Instructions
 Trillium 40 Axis Spring Tensioner Wire Replacement Instructions 1 Overview The objective is to replace the broken axis spring tensioner wire. This requires the following tasks: 1. Remove the seismometer
INSTALLATION INSTRUCTIONS MULTI-MOUNT KIT Part Number: 75330 Application: Warn HP PowerPlant P/N 71800
 INSTALLATION INSTRUCTIONS MULTI-MOUNT KIT Part Number: 75330 Application: Warn HP PowerPlant P/N 71800 Your safety, and the safety of others, is very important. To help you make informed decisions about
Instruction Manual. Image of SP-3015 & SP-3815. Important Safeguards. Automatic Dispensing Hot Water Pot with Reboil Function
 Important Safeguards READ ALL INSTRUCTIONS BEFORE USE. Instruction Manual Automatic Dispensing Hot Water Pot with Reboil Function Image of SP-3015 & SP-3815 SP-3015: 3.0L SP-3815: 3.8L SP-3017: 3.0L (Stainless
OPERATING INSTRUCTION MANUAL MODELS HP-22 & HP-22A HP-25 & HP-25A
 OPERATING INSTRUCTION MANUAL MODELS HP-22 & HP-22A HP-25 & HP-25A phoenix arms DeLuxe range kit at HoMe on the Range hp DeLuxe range kit includes HP22a sport/target Pistol - in satin nickle or PolisHed
FASCINATION 700 HVLP TANNING PRO SYSTEM USER MANUAL
 FASCINATION 700 HVLP TANNING PRO SYSTEM USER MANUAL Congratulations on choosing the Fascination 700 HVLP Tanning Pro System! Your system includes the following items: 1 Fascination 700 HVLP Tanning Pro