Storage Bins U-BILD. Plan No. 797 A MERICA' S FAVORITE WOODWORKING P LANS. Bill of Material. Cutting Schedule
|
|
|
- Cameron Pitts
- 9 years ago
- Views:
Transcription
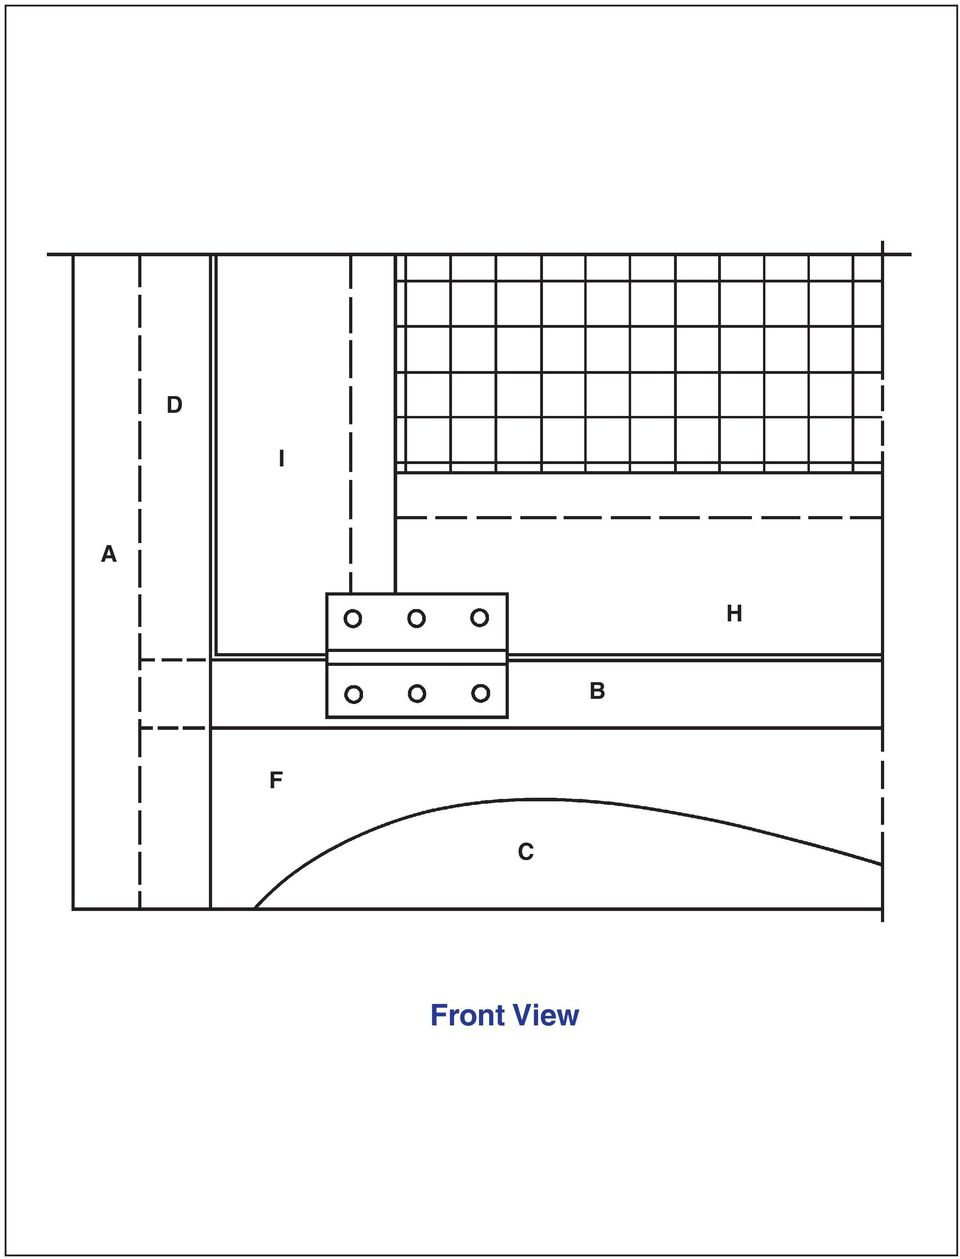
1 U-ILD A MERICA' S FAVORITE WOODWORKING P LANS Storage ins Plan No. 797 Copyright U-uild, Inc., All rights reserved. Printed in the U.S.A. A true country classic, this build-it-yourself storage bin unit is a practical, convenient and attractive way to keep apples, potatoes, onions and other fruits and vegetables fresh and dry. The secret is the wire mesh on the front of each of the three bins that allows air to circulate freely around the produce. The top shelf is flat for storing canned goods or dish towels. The two pull-out bins below, each measuring 10 inches deep by 15 inches wide, are sized to hold plenty of fruits and vegetables. The unit adds some old-fashioned charm to the kitchen, too. ecause the curved cuts for the lower bins and base are traced from full-size patterns, the project is easy enough for novices. The project measures 40 inches tall by 19 inches wide by 12 inches deep. ill of Material Quantity Size Material Item 1 1 x 2 x 83 pine D, N 1 1 x 3 x 171 pine E, F,, I, M 1 1 x 8 x 40 pine G 1 1 x 10 x 122 pine C, J, K 1 1 x 12 x 171 pine A,, L 3 7 3/4 x 11 3/4 1/2 x 1/2 wire mesh 3 pairs 1 3/8 x 2 butt hinges 3 1 porcelain knobs 1 friction lid support 1 magnetic catch 1 box 1 1/4 finish nails 1 bottle wood glue 1 can wood filler 1 quart finish of choice Cutting Schedule Item Qty T W L Material A 2 3/ /4 pine 3 3/ /2 pine C 1 3/4 16 1/2 * 39 1/4 pine D 2 3/4 1 1/2 39 1/4 pine E 1 3/ pine F 1 3/ pine G 1 3/4 12 1/4 * 19 pine 6 3/ /8 pine I 6 3/ /8 pine J 2 3/4 9 1/4 13 3/8 pine K 2 3/4 3 3/4 13 3/8 pine L 4 3/4 10 7/8 10 pine M 2 3/4 2 3 pine N 1 3/4 1 1/4 2 1/2 pine *Edge-gluing required to achieve width. NOTES 1. Read manufacturer s instructions before operating equipment. 2. Always wear safety glasses. 3. Edge-gluing may be required to achieve the necessary width of some pieces (see Cutting Schedule).

2 Isometric G M C E A D L F K J I

3 G M M E A C 11 TYP. L I K J F Side View

4 D I A F C Front View
5 Figure 1 Pattern 1 A 2 1 1/4 oard A Pattern 1 Position oard A Pattern 1

6 Figure 2 Pattern 2 (See Front View for Position) F oard F Pattern 2
 F oard")
7 1 Figure 3 Pattern /8 1 L 3 3/4 10 oard L Pattern 3 Position 2

8 Assembly Instructions Page One Read all instructions before beginning any work. Cut all material to sizes shown in cutting schedule. 1. Trace Pattern 1 onto the bottom end of boards (A), cut out curves and sand. Refer to Figure 1, Side View and Isometric. 2. Trace Pattern 2 onto the bottom edge of board (F), cut out curves and sand. Refer to Figure 2 and Isometric. 3. Trace Pattern 3 onto boards (L), cut out curves and sand. Refer to Figure 3, Side View and Isometric. 4. Cut a 3/4 by 3/4 notch on the front corners of shelf boards (). Refer to Figure 4. 3/4 3/4 Figure 4 oard 3/4 3/4 5. Attach shelf boards () to back board (C) using glue and 1 1/4 finish nails. Note: notched edges of boards () face the front of the project. Refer to Side View and Isometric. 6. Attach sides (A) to subassembly (, C) using glue and 1 1/4 finish nails. Refer to Front View, Side View and Isometric. 7. Assemble face frame (D, E, F) using glue. Refer to Front View and Isometric. 8. Attach face frame (D, E, F) to subassembly (A,, C) using glue and 1 1/4 finish nails. Refer to Front View, Side View and Isometric. 1/8 9. Cut a 1/8 wide by 1/2 deep dado on the center of the inside edges of door frame boards () and (I). Refer to Figures 5 and 6, Front View and Side View. 1/2, I Figure 5 oards, I LINE CENTER
. Refer to Figure 4. 3/4 3/4 Figure 4 oard 3/4 3/4 5. Attach shelf boards () to back board (C) using glue and 1 1/4 finish nails.")
9 Assembly Instructions Page Two Read all instructions before beginning any work. Cut all material to sizes shown in cutting schedule. 10. Apply finish of choice to door frame boards () and (I). 11. Insert 7 3/4 by 11 3/4 wire mesh panels into dados in door frame boards () and (I). With the wire mesh panels in place, assemble door frame (, I) using glue. Refer to Figure 6 and Isometric. 12. Once door frames (, I) are assembled, fill void space on the ends of boards (I) with wood filler. Refer to Figure 6. Figure 6 Door Detail I Fill w/ wood filler 1/8 wide by 1/2 deep dado 13. Attach bin back (K) to bin bottom (J) using glue and 1 1/4 finish nails. Refer to Side View and Isometric. 14. Attach bin sides (L) to subassemblies (J, K) using glue and 1 1/4 finish nails. Refer to Side View and Isometric. 15. Attach door frames (, I) to bin subassemblies (J, K, L) using glue and 1 1/4 finish nails. Refer to Side View and Isometric. 16. Attach cabinet top (G) to boards (A), (C) and (E) using glue and 1 1/4 finish nails. Refer to Side View and Isometric. 17. Glue boards (M) together to create a 3 wide by 2 tall by 1 1/2 thick block. Refer to Side View and Isometric. 18. Attach subassembly (M, M) to the center of and flush with the top with board of (E). Refer to Side View and Isometric. 19. Sand and apply finish to the project. 20. Attach bins (, I, J, K, L) and top door (, I) to boards of () using 2 butt hinges. Refer to Front and Side Views. 21. Attach knobs to upper boards (). Center knob on board. Refer to Side View. 22. Using lid support as a guide, install lid support mounting board (N) to inside of top cabinet. 23. Attach lid support to mounting board (N) and inside of top door frame (, I). Refer to manufacturer s instructions.
 to bin bottom (J) using glue and 1 1/4 finish nails. Refer to Side View and Isometric. 14. Attach bin sides (L) to subassemblies (J, K) using glue and 1 1/4 finish nails.")
Ladder Shelf Plans Final dimensions: 25 L x 21 W x 72 H
 Ladder Shelf Plans Final dimensions: 25 L x 21 W x 72 H Copyright 2011. MLCS Woodworking. Page 1 Router bits and supplies needed: 3/8 Rabbeting bit (#10691) 1 Bottom Cleaning bit (#7941) Top and Bottom
Cedar Cottage Doghouse Plans
 Overlapping cedar shingles add an element of charm to this medium size doghouse. The walls, floor, and trim are constructed of solid cedar, making it naturally weather resistant and provides excellent
Gate Leg Drop Leaf Table Plans
 Preparing the table top blanks: Cut and glue enough 3/4 stock to make three panels 40 long by 24 wide (they will be cut to final size at a later time). While the glue dries we will work on the legs. Preparing
DIY CABINET REFACING INSTALLATION GUIDE
 DIY CABINET REFACING INSTALLATION GUIDE CABINET REFACING INSTALLATION Are you ready to reface your outdated cabinets? This guide will show you how to install your new Facelifters Cabinet Refacing Products
Router Table Plans. www.bobsplans.com
 www.bobsplans.com Router Table Plans Increase the capabilities of your router with this weekend project. Features a sliding fence with EZ-Mount clamps. These clamps are simple to make and grip tightly
Wine Rack & Glass Storage Bench Chris Gardner
 Wine Rack & Glass Storage Bench Chris Gardner Quantity Length Width Material Part 2 48 16 3/4 birch plywood top, bottom 2 14 16 3/4 birch plywood sides 2 14 13 3/4 birch plywood support dividers 2 3 15
Best Barns USA Assembly Book
 Best Barns USA Assembly Book Revised November 27, 2013 the Easton - R 12'x 20' Manufactured by Reynolds Building Systems, Inc. 205 Arlington Drive Greenville, PA 16125 724-646-3775 This manual is copyrighted.
1 Door Tall Unit ASSEMBLY GUIDE. Page 1 of 9. WARNING: Contains small parts, keep out of reach of children.
 Page 1 of 9 ASSEMBLY GUIDE 1 Door Tall Unit IMPORTANT Before Commencing Assembly: Read all instructions COMPLETELY Ensure all listed parts are present If any parts are missing from Parts List 1, please
How to Build a Poker Table
 How to Build a Poker Table www.pokertablematerials.com 10-Person Poker Table- 96 x 48 These are step by step instructions for building a poker table. The table will measure 48" x 96" and have a 4" wide
SAMPLE INSTRUCTIONS. Best Barns USA Assembly Book. the Denver. 12'x 12' or 12'x16' Revised November 29, 2010
 Best Barns USA Assembly Book Revised November 29, 2010 SAMPLE INSTRUCTIONS the Denver 12'x 12' or 12'x16' Manufactured by Reynolds Building Systems, Inc. 205 Arlington Drive Greenville, PA 16125 724-646-3775
INSTALLATION INSTRUCTIONS for Bifold Doors (JII103)
") Thank you for selecting JELD-WEN products. Attached are JELD-WEN s recommended installation instructions for premium composite, hollow and solid core molded Bifold Doors. Bifolds are designed for fast
Thank you for selecting JELD-WEN products. Attached are JELD-WEN s recommended installation instructions for premium composite, hollow and solid core molded Bifold Doors. Bifolds are designed for fast
Garage Workbench Plans
 www.bobsplans.com Garage Workbench Plans Every home woodworker knows the importance of making efficient use of the available space in his or her shop. This workbench is designed to provide the maximum
Wren Kitchens Installation Tips... 3. Carefully check your kitchen delivery... 4. Measuring out and marking up... 5. Fitting the base cabinets...
 tra 1 Index Wren Kitchens Installation Tips... 3 Carefully check your kitchen delivery... 4 Measuring out and marking up... 5 Fitting the base cabinets... 6 Fitting the corner cabinets... 7 The 972mm or
Assembly GUIDE. display wine cellar kits. Required. Suggested. Questions? 888.373.6057. or visit wineracksamerica.com
 Page 1 Middle Ladder End Ladder Display Tray Screwless Connector Package Contents * All models follow the same assembly procedure varying only in the number of middle ladders your rack will require. Depending
Easy Six Cube Bookshelf. Copyrighted Material. Page 1
 Compare to: Land of Nod Cube Collection, 6 Cube Bookshelf Skill Level: Beginner Easy Six Cube Bookshelf I love the storage cubes in kids rooms because they give you an opportunity to have your children
Desk Cabinets & Bookshelves
 125 Desk Cabinets & Book Dimensions SKU Coding Width Height Depth 12 to 36 28 1 2 to 96 12 to 24 (Reduced Depth optional on select cabinets) DDO 18 21 Cabinet Type width depth (e.g., DDO= in inches in
Toy Box. Project Plan. Kreg Jig. www.kregjig.com
 Toy ox www.kregjig.com Kreg ig 32" What you ll What need You ll Need Toy ox TOOLS 25 Circular Saw Drill Kreg ace Clamp or C-Clmap Kreg ight ngle Clamp DWE & SUPPLIES 25 Materials PTS LIST SOPPIN LIST Quantity
A Screened Bottom Board
 A Screened Bottom Board As the name implies, a bottom board sits at the bottom of the hive; it is the floor of the hive (Figure 1). Basically, the bottom board is a platform connected to two side rails.
Here is your set of Detailed Plans from Copyright 2004 All Rights Reserved
 Here is your set of Detailed Plans from Copyright 2004 All Rights Reserved Materials for the House Here is the list of materials you will need to construct the basic house then to cover it with roofing
Chapter 3 Installing Over-the-Post Railing on an L-Shaped Stair
 49 Chapter 3 Installing Over-the-Post Railing on an L-Shaped Stair In this chapter: The Over-the-Post Balustrade System Determining the Rail Centerline Using Rail Bolts Making a Pitch Block Laying Out
Total Quantity: IMPORTANT: Plans are to be used with 3 x6 Plexiglass (SKU #298-017).
.") # Materials: Quantity Each: 4x4x8 3 2x4x8 2 2x8x8 1 4x8x3/4 plywood 1 3 x6 corkboard (can be 18 of the 1 x1 pieces) 1 3 x6 plexiglass 1 8 door casing 3 Primer 1 qt. Total Quantity: TIPS FOR SUCCESSFUL
# Materials: Quantity Each: 4x4x8 3 2x4x8 2 2x8x8 1 4x8x3/4 plywood 1 3 x6 corkboard (can be 18 of the 1 x1 pieces) 1 3 x6 plexiglass 1 8 door casing 3 Primer 1 qt. Total Quantity: TIPS FOR SUCCESSFUL
Children s Furniture Projects
 This is an excerpt from the book Children s Furniture Projects by Jeff Miller Copyright 2002 by The Taunton Press www.taunton.com CHILD S ROCKER KIDS ARE ALWAYS IN MOTION. It s not easy to get them even
SHELVES. www.tedswoodworking.com
 SHELVES It's rare that bookshelves look as interesting as the objects you display on them. After all, how much can you decorate the edges of your shelves and sides? This unit is unusual because the shelves
Hive Top Ventilation Shims
 Hive Top Ventilation Shims When preparing your bee hives for the winter, it is very important to provide for ventilation at the top of the hive. Through out the winter, the bees are expelling a lot of
Architectural Casework 06400-01. 1.01 Description of Work
 06400-01 1.01 Description of Work A. Extent of each type of architectural millwork and casework as indicated on drawings. Types of architectural casework shall include both stained and plastic laminated
DESK CABINETS & BOOKSHELVES
 142 : Desk Base Desk Base Cabinets File Drawer Base Cabinet Desk Base Cabinet 1 Factory Installed Wastebasket FDB1821 DWBT1821 Desk Base cabinets are 12 to 24 wide, 28 1 2 high and 20 3 4 or 24 deep. Cathedral
COMPLIMENTARY WOODWORKING PLAN
 COMPLIMENTARY WOODWORKING PLAN Adirondack Chair This downloadable plan is copyrighted. Please do not share or redistribute this plan in any way. It has been created for Wilton Tools, a division of WMH
INSTALLATION INSTRUCTIONS
 door frames Engineered product systems INSTALLATION INSTRUCTIONS door frames MINIMALIST DOOR FRAME Fry Reglet Flush Door frames are designed for use with 3 5/8 studs with ½ drywall both sides (4 5/8 throat
KITCHEN INSTALLATION GUIDE
 KITCHEN INSTALLATION GUIDE The step-by-step guide to installing your new kitchen right The materials and tools you ll need This brochure is your guide to preparing and installing your new kitchen. Inside
DIRECTIONS FOR ASSEMBLING BASE & WALL CABINETS
 DIRECTIONS FOR ASSEMBLING BASE & WALL CABINETS TheRTAStore.com STEP 1: CLEAR A WORK SPACE Place your RTA cabinet panels on a smooth, scratch resistant surface in a large, open area. (Some people like to
Installing Window and Door Mouldings
 Installing Window and Door Mouldings About Window and Door Mouldings The trim around windows and doors greatly influences the look and style of your interior. They also bridge the gaps and cover spaces
THE IDEAL SOLUTION SHELVING. Sales Telephone: 01553 765205 Sales Fax: 01553 768464 Email: [email protected]
 THE IDEAL SOLUTION Sales Telephone: 01553 765205 Sales Fax: 01553 768464 Email: [email protected] EZ STORE Bright Chrome Wire System g Bright Chrome wire shelves Heights 3 tier = 1650mm standard
Base Cabinet with Self-storing Folding Doors and Floor
 Usable Kitchens When designing a kitchen for use by persons with mobility impairments, especially those who use wheelchairs, careful layout of the kitchen is crucial to maintaining accessibility. People
Kitchen planning guide.
 Kitchen planning guide. Your kitchen plan. This guide is meant to help you start planning your new kitchen. Once completed, you can save, print or email the document to your designer or dealer as the first
HOW AND WHERE DO I USE IKEA
 HOW AND WHERE DO I USE IKEA KITCHEN PANNELS? PANELS? A Publication of Inspired Kitchen Design IKEA sells only three panel types which are designed to be cut for many distinct uses. These panel configurations
How you select and where to install me! Kitchen BE CAREFUL OF FOLLOWING PARAMETERS : A- Plumbing space needed (specifically the height).
.") Environment, recycling, selective collect Today, to convert a house to recycling, a house should have necessary methods and tools. Richelieu, always ahead of practical solutions, offers management and
Environment, recycling, selective collect Today, to convert a house to recycling, a house should have necessary methods and tools. Richelieu, always ahead of practical solutions, offers management and
How to Build Your Own CornHole Game
 How to Build Your Own CornHole Game DIMENSIONS Here is a diagram with the basic measurements for the Cornhole board game. SUPPLIES 1/2 thick sheet of plywood one 4 x4 or two 2 x4 s 8 long 2 4 s (4) 4 1/2
www.cornholesupplies.com
 www.cornholesupplies.com How To Build Regulation Cornhole Boards Home of the Original Cornhole Bags and Boards Supply List: 1-4' X 8' Piece of Plywood (pre sanded) 4-2" X 4" X 8' Studs (2 by 4s make sure
TopSky DLG Installation Manual
 TopSky DLG Installation Manual Attention: Because after the compound materials solidify, there will be ammonia iris on the surface, which affect the bonding strength afterwards. Please polish with sandpaper
KITCHENS. Tip PAGE 1 FITTING YOUR KITCHEN GUIDE. How to mark out a kitchen. Tools required for installing a kitchen STEP ONE STEP TWO STEP THREE
 FITTING YOUR KITCHEN GUIDE How to mark out a kitchen PAGE 1 Before starting on the installation, measure 870mm from the lowest point of the floor and mark a datum line around the room to indicate where
HOW TO INSTALL A BEAUTIFUL NEW KITCHEN
 HOW TO INSTALL A BEAUTIFUL NEW KITCHEN Easy to follow step-by-step kitchen cabinet installation TOOL AND MATERIAL LIST Hammer Pry bar Screwdriver Phillips Flathead Level Tape measure Pencil Straight edge
Luxor 3 & 4. Luxor 4. Luxor 3. Model no. 718 Pyrmont cherry repro. Model no. 721 Pyrmont cherry repro. Model no. 722 Golden maple repro.
 Luxor & 4 Luxor Luxor 4 Model no. 718 Pyrmont cherry repro. Model no. 721 Pyrmont cherry repro. Model no. 719 Golden maple repro. Model no. 722 Golden maple repro. Model no. 720 Light ash repro. Model
Wooden perpetual calendar plan
 Project: Wooden perpetual calendar plan Page 1 of 14 Wooden perpetual calendar plan Perpetual calendar consists of movable parts, and the combinations of these parts can display any date of the year. Movable
Taking Wainscot Up Stairs
 Taking Wainscot Up Stairs raised MDF panels and stock moldings bring this elegant trim detail to the rest of the house BY GARY STRIEGLER I credit a lot of the success of my business to the trimwork we
Heavy Glass Frameless Shower Door With Return Panel
 202 Anderson Ave., elvue, KS 66407 Phone: 800-669-9867 Fax: 800-393-6699 www.onyxcollection.com Heavy Glass Frameless Shower Door With Return Panel Full Showers with Return ench Seat with Return FRLSDRPL-0116
Barewood Octagon and Elongated Windows Installation Instructions
 Step-by-step instructions to a beautiful window. Measuring and Installation of your new window from Century Specialty Windows couldn't be easier with our step-by-step instructions. Quality, function and
Raised Panel Doors Made Simple With Freud s 2+2 Raised Panel Bit Set
 Raised Panel Doors Made Simple With Freud s 2+2 Raised Panel Bit Set Congratulations on your purchase of Freud s world class 2 + 2 Raised Panel Bit Set. This revolutionary design combines two small wings
Picnic Table Plans. Made out of a single sheet of plywood, it s also portable! By Kevin Ayer. This children's picnic table would
 Picnic Table Plans Made out of a single sheet of plywood, it s also portable! By Kevin Ayer Materials One 4- by 8-foot sheet of 3 4-inch AC plywood Twelve 11 4-inch wood screws Primer and exterior paint
Assembly Instructions Model 1544 Heart-Of-The-Kitchen Island
 Assembly Instructions Model 1544 Heart-Of-The-Kitchen Island A. These units are Ready-to-Assemble. Catskill uses positive fastening methods such as wood screws and in some places hidden Bastion fasteners.
Vanity Cabinets. Width Height Depth. 12 to 60 31 1 8 to 84 18 to 20 3 4 (Reduced Depth optional on select cabinets)
") 147 Dimensions Width Height Depth 12 to 60 31 1 8 to 84 18 to 20 3 4 (Reduced Depth optional on select cabinets) SKU Coding VSB 36 BUTT Cabinet Type width in inches Door Type (e.g., VSB=) Construction
147 Dimensions Width Height Depth 12 to 60 31 1 8 to 84 18 to 20 3 4 (Reduced Depth optional on select cabinets) SKU Coding VSB 36 BUTT Cabinet Type width in inches Door Type (e.g., VSB=) Construction
BUILD A TABLETOP LOOM
 BUILD A TABLETOP LOOM From 1" x 2" stock (actual 3/4" x 1"1/2) cut: 4 pieces 15" long 4 pieces 5"1/2 long Use the above to make 2 frames for the front and back of the loom. From 1" x 4" stock (actual 3/4"
Building an Off-Center Fixture for Turning Pendants
 Building an Off-Center Fixture for Turning Pendants Turning a pendant off-center with most available metal pendant chucks means that you will have a significant amount of mass off center, which will limit
Premier & Deluxe 3-Season Room Sliding Glass Door
 DTSSGD-11 Premier & Deluxe 3-Season Room Sliding Glass Door Installation Instructions Screen Door Seal Left Side Track Top Track Assembly Right Side Track Right Side Trim Sliding Glass Door Sliding Screen
Full extension drawer glides: This feature is particularly important for allowing accessibility to the back of shallow drawers.
 7/30/2006 KITCHEN DESIGN CHECKLIST Help your kitchen designer create an organized, efficient kitchen to meet all your storage needs. Check off the items that are important to you, then take this list to
Eggers meticulously-crafted door frames are rivaled only by their beauty, quality and lasting performance. Turning nature s beauty into works of art
 D O O R F R A M E S Eggers meticulously-crafted door frames are rivaled only by their beauty, quality and lasting performance. Turning nature s beauty into works of art D O O R F R A M E S Eggers Industries
Vinyl Brick Mould Field Installation Instructions All Vinyl and Vinyl Clad Windows
 Vinyl Brick Mould Field Installation Instructions All Vinyl and Vinyl Clad Windows Viewed from the exterior. IMPORTANT: Please read before you begin installation. TABLE OF CONTENTS AND TOOL / MATERIAL
HOW TO MAKE CUSTOM-SIZED IKEA KITCHEN CABINETS
 HOW TO MAKE CUSTOM-SIZED IKEA KITCHEN CABINETS A Publication of Inspired Kitchen Design IKEA has limited cabinet widths as well as corner cabinet options. There are also limited cabinet choices for appliances
PRO PANELS. 1-800-525-4159 www.propanels.com. the artist s choice in display designed by artists, for artists. voice: 214-350-5765 fax: 214-350-7372
 PRO PANELS by MD Enterprises the artist s choice in display designed by artists, for artists 1-800-525-4159 www.propanels.com voice: 214-350-5765 fax: 214-350-7372 MD Enterprises 1-800-525-4159 voice:
PUBLIC RESTROOMS, DESIGN INTENT
 PUBLIC RESTROOMS, DESIGN INTENT 1.01 STRUCTURAL A. Where feasible, metal stud partitions will be constructed on a 6 high concrete curb. 1.02 MECHANICAL A. Restrooms will have a minimum of 15 air changes
STORAGE & CONVENIENCE
 Wood Bottle Rack Sold by the pair (front & back pcs) BTLRK-24MAPLE Bottle Rack 3/4 T X 24 W X 2 H 1 Wood Wine Bottle Lattice Sold by the pair (front & back pcs) WR17X36-PRMAPLE Wine Lattice 7/8 T X 17
ARTS AND CRAFTS 10.1.0. 5410 (open) 5412 (doors) H : 84" Tote Tray Storage. Damp Storage. Tote Tray Storage. Notebook Board Storage, Doors
 5412 (doors) H : 84 Tote Tray Storage. Damp Storage. Tote Tray Storage. Notebook Board Storage, Doors") Drawing Board Storage, Open Drawing Board Storage, Doors Drawing Board Storage Notebook Storage, Open 1670 D : 23.25" holds 32 drawing boards 1 shelf, adjustable on 1¼" increments maximum board height
Drawing Board Storage, Open Drawing Board Storage, Doors Drawing Board Storage Notebook Storage, Open 1670 D : 23.25" holds 32 drawing boards 1 shelf, adjustable on 1¼" increments maximum board height
Great Beginnings. Merillat Essentials
 Great Beginnings. Merillat Essentials Sensibility+you. Where it all begins. The start of a meal. The core of the home. The center of life. The kitchen brings together all of the elements of life, and Merillat
FF+E Package 1: Casegoods Specifications UCSD NORTH CAMPUS HOUSING, PHASE 1
 FF+E Package 1: Casegoods Specifications UCSD NORTH CAMPUS HOUSING, PHASE 1 Issue Date: 3/3/2009 Each furniture item scheduled in this specification manual is assigned a "key" code; each key code is crossreferenced
1958-64 WINDOW CHANNEL, WEATHERSTRIP & WHISKER STRIP REPLACEMENT FOR 2-DOOR SEDANS
 By Denny Williams Photos by Denny Williams 1958-64 WINDOW CHANNEL, WEATHERSTRIP & WHISKER STRIP REPLACEMENT FOR 2-DOOR SEDANS Denny Williams - Technical Writer Denny is first and foremost a dyed-in-thewool
Build Your Own Weather Station
 Build Your Own Weather Station Every year, thousands of lives and millions of dollars are saved by severe weather warnings from the National Weather Service. From its earliest beginnings (on February 9th,
Modular Locomotive System Instruction Manual for HBK8 George Body Kit
 Modular Locomotive System Instruction Manual for HBK8 George Body Kit Roundhouse Engineering Co. Ltd. Units 6-10 Churchill Business Park. Churchill Road, Wheatley. Doncaster. DN1 2TF. England. Tel. 01302
Cabinetry Installation
 Cabinetry Installation INTALLATION EQUIPMENT #8 x 2 1 2 screws #8 x 2 1 2 washer head screws Variable speed drill, electric or cordless Extension cord Countersink drill bit Drill bits, 3/16 and 1/4 Assorted
The tablesaw may be your shop s most valuable cutting. Crosscut Sleds. Foolproof. Innovative approach guarantees perfect results
 Foolproof Crosscut Sleds Innovative approach guarantees perfect results B Y A L A N T U R N E R The tablesaw may be your shop s most valuable cutting tool, but for precise, repeatable crosscuts it needs
How to become an Operation Christmas Child Shoe Box Character
 How to become an Operation Christmas Child Shoe Box Character SUPPLIES A large rectangular box (to look like a shoe box) Cardboard or foam strips, 2 wide, for the lid Large printed Boy or Girl shoe box
ECLIPSE THE ULTIMATE MULTI-PURPOSE SHELVING SYSTEM. UP TO 360kg SHELF CAPACITY QUICK & EASY BOLT-FREE ASSEMBLY STRONG, ROBUST & MODERN DESIGN DESIGN
 ECLIPSE CHROME WIRE SHELVING ECLIPSE THE ULTIMATE MULTI-PURPOSE SHELVING SYSTEM UP TO 360kg SHELF CAPACITY QUICK & EASY BOLT-FREE ASSEMBLY STRONG, ROBUST & MODERN DESIGN A S S E M B LY Fully Adjustable
REDI-EXIT COMMERCIAL FIRE DOOR AND EXTERIOR DOOR KITS INSTALLATION GUIDELINES
 REDI-EXIT COMMERCIAL FIRE DOOR AND EXTERIOR DOOR KITS INSTALLATION GUIDELINES Tools Required Tape Measure Hammer Slotted Screw Driver #2 & #3 Philips Screw Driver 3-4 Foot Level 12 Pry Bar Cold Chisel
The Hive Bodies. In the Beekeeper s Work Shop. Building a Bee Hive: The Hive Bodies. by Stephen E. Tilmann
 The Hive Bodies In the Beekeeper s Work Shop The hive body is the heart of a managed bee hive colony (Figure 1). It is where the queen lays her eggs, the house bees raise the brood and the workers store
Stair Parts Installation. Tricks
 Stair Parts Installation Tips & Tricks Introduction Your DIY staircase guide Welcome to the Stairpart home installation guide. Your stairway is both a functional and focal point in your home, so keeping
DE Frame with C Series Sidelight
 TOOLS REQUIRED Tape measure 6' magnetic level 3' magnetic level Screw gun with clutch adjusted #2 phillips tip #3 phillips tip Screwdriver (used to adjust frame on will using oval slots) Pry Bar Powder
SUPER SHED. Indoor shelter for your outdoor tools.
 SUPER SHED Indoor shelter for your outdoor tools. Not everyone needs a garden shed. But, if you've no more space on your garage wall for that new leaf rake, if you can't find your potting trowel because
These instructions will show you how to install an internal door into a non-loadbearing partition wall. The instructions are split into three parts.
 No 8 in the series of 'How to' brochures produced by PlaceMakers, New Zealand How to Frame and Hang a Door These instructions will show you how to install an internal door into a non-loadbearing partition
WAECO COOLMATIC 2.8 CUBIC FEET 12/24 VOLTS DC & 110 / 220 VOLTS AC BUILT-IN REFRIGERATOR-FREEZER WITH FLUSH MOUNT FRAME
 Well after screwing around with the old Norcold refrigerator for the past 2 years I finally decided to search for a replacement. I looked at the Wal-Mart offerings but just did not like the look and feel
Overnight Sensations Speaker Kit
 Overnight Sensations Speaker Kit Thank you for purchasing the Overnight Sensation cabinet kit. This speaker kit was precision cut using CNC machinery for the best possible fit and finish. With a little
Vauth-Sagel Kitchen Storage systems. Kitchen Storage Systems. > Innovative and Functional Storage Systems
 Vauth-Sagel Kitchen Storage systems Kitchen Storage Systems > Innovative and Functional Storage Systems VAUTH-SAGEL engineered quality & innovations Vauth-Sagel is a valued development partner within the
Composite Stone Veneer
 Composite Stone Veneer Installation Guide Ver 1 Jun 2015 www.compstone.com Composite Stone Veneer Installation Guide Contents Introduction & Overview 3 Required Tools 4 Optional Tools 4 Attachment Guidelines:
Written By: Walter Galan
 ipad 2 GSM Front Panel Replacement Replace the front panel in your ipad 2 GSM. Written By: Walter Galan INTRODUCTION Note: this is a complete guide for replacing a plain front panel. If you have a Front
Patrol Box Parts Dimensions
 Bottom: 31½ x 13⅜ x ½ Top: 32 x 14¼ x ½ Back: 32 x 20½ x ¼ Ends (2) 20½ x 13 x ¼ V Divider 14¼ x 13 x ¼ L. Shelf 31½ x 13 x ¼ U Shelf 16¾ x 13 x ¼ L Glue Block 13 x 5½ x 1½ Patrol Box Parts Dimensions
BUILDINGA 1/10 SCALE FLATBED TRAILER
 VOLUME 1, ISSUE 1 BUILDINGA 1/10 SCALE FLATBED TRAILER BUILT, DESIGNED & WRITTEN BY NATHAN MYERS MATERIALS: FEATURES: While the design was kept simple to allow anyone to be able to build their own trailer,
How to Install UnderDeck The Original.
 How to Install UnderDeck The Original. TOOLS: Chalk Line Caulk Gun Garden hose or water bucket Gloves Hammer or Screw Gun Power Mitre Saw with OSB Blade Pencil Pliers Safety Glasses Straight Edge / Carpenter
CHAPTER 5 PARTS. This chapter describes assemblies / subassemblies / parts considered replaceable at on-site field installation.
 CHAPTER 5 PARTS PARTS BY PICTORIAL This chapter describes assemblies / subassemblies / parts considered replaceable at on-site field installation. NOTE: The following is a breakdown description of the
AstroSystems Digital Setting Circles for Zhumell, GSO, Apertura and Astro-Tech
 AstroSystems Digital Setting Circles for Zhumell, GSO, Apertura and Astro-Tech Components 1 Sky Commander Digital Setting Circle Computer 2 Encoders 10,000 step 1 Sky Commander Digital Setting Circle Manual
HOW-TO LAY HARDBOARD OR PLYWOOD FLOOR OVERLAY
 HOW-TO HOW-TO LAY HARDBOARD OR PLYWOOD FLOOR OVERLAY Most floor coverings, if laid over uneven wooden floors, will wear unevenly and look unsightly. The answer is to cover the old boards with hardboard
EXCEPTIONAL FURNITURE FOR CHILDREN
 PLUS EXCEPTIONAL FURNITURE FOR CHILDREN INGENUITY A BOLD NEW LOOK Introducing new Whitney Plus children s furniture. A super premium line that incorporates custom designer styling with unsurpassed strength
Reduced depth High Density Cabinet HDC with 19 swing frame 36, 40 and 45 U
 Reduced depth High Density Cabinet HDC with 19 swing frame 36, 40 and 45 U Applications The High Density Cabinets are suitable for Central Offices and can be used as fiber nodes and termination points
Installation Instructions
 READ BEFORE INSTALLING UNIT For Through-the-Wall Air Conditioners To avoid risk of personal injury, property damage, or product damage due to the weight of this device and sharp edges that may be exposed:
Manual for GlobePharma Mini-Press II Rotary Tablet Press
 1 of 13 Preparing the Rotary Press 1. Make sure the rotary press is unplugged. 2. Open the bottom cabinet of the rotary press and take out the grey tool kit, and the beige box of punches and dies. 3. Take
MGB Chrome Bumper Conversion
 MGB Chrome Bumper Conversion Installation Instructions For 1974 1/2-1980 MGB This kit requires cutting, welding, and painting. Professional installation recommended. Note: Every MGB body is slightly different
Brick Veneer Construction
 Brick Veneer Construction Check list of suggested tools & support items Claw hammer Tape measure 3/4" [19 or 20] Wood chisel Wood or plastic shims Pry bar Utility knife Caulking and caulking gun Power
Oh-Oh the Owl Cushion. Oh-Oh the Owl Cushion Softie. Page 1 2009 One Red Robin/Jhoanna Monte Aranez. All rights reserved.
 Oh-Oh the Owl Cushion Softie Page 1 By Jhoanna Monte Aranez Finished Size Approximately 37cm/14.6 tall Oh-Oh the Owl Cushion Materials Plain or printed cotton or linen blend fabric measuring 48cm/19 wide
FTC 2015-2016 DIY Mountain Build Guide
 FTC 2015-2016 DIY Mountain Build Guide Assembly Instructions Check out the DIY2015-2016 Prints and BoM for individual part details. Release 1.0 9/10/15 Page 1 This guide and Bill of Materials are for constructing
Installation Instructions
 Installation Instructions READ BEFORE INSTALLING UNIT For Low Profile Window Air Conditioner INSTALLATION WARNINGS AND CAUTION Carefully read the installation manual before beginning. Follow each step
INSTRUCTION MANUAL TOOLS NEEDED FOR ASSEMBLY: OPTIONAL FINISHING MATERIALS: Champaign, Illinois (217) 398-8970 E-mail: partssupport@hobbico.
 398-8970 E-mail: partssupport@hobbico.") INSTRUCTION MANUAL Thank you for purchasing the Hobbico Ultra-Tote! You have purchased one of the finest values available in field support equipment. We think you will be impressed with the design and
INSTRUCTION MANUAL Thank you for purchasing the Hobbico Ultra-Tote! You have purchased one of the finest values available in field support equipment. We think you will be impressed with the design and
GLASTAR SERVICE BULLETIN 36, SUPPLEMENT A
 MANDATORY Note This publication supplements GlaStar Service Bulletin 36, which remains in effect; it does not supersede it. Subject: Auxiliary fuel tank sump drains Applicability: Auxiliary fuel tank installations
Home Storage Projects
 This is an excerpt from the book Home Storage Projects by Paul Anthony Copyright 2001 by The Taunton Press www.taunton.com KITCHEN WORK STATION IN MANY KITCHENS, counter space is at a premium. There just