MODEL T600 40LB CAPACITY COMPUTER CONTROL COIN WASHER
|
|
|
- Natalie Bradley
- 9 years ago
- Views:
Transcription
1 P/N B MODEL T600 40LB CAPACITY COMPUTER CONTROL COIN WASHER DEXTER LAUNDRY, INC. OWNER'S BOOKLET INSTALLATION & OPERATION INSTRUCTIONS Please read this information and retain for reference. WARNING - THIS WASHER IS EQUIPPED WITH DEVICES AND FEATURES RELATING TO ITS SAFE OPERATION. TO AVOID INJURY OR ELECTRICAL SHOCK, DO NOT PERFORM ANY SERVICING UNLESS QUALIFIED TO DO SO. IT IS THE RESPONSIBILITY OF THE OWNER TO CHECK THIS EQUIPMENT ON A FREQUENT BASIS TO ASSURE ITS SAFE OPERATION. A machine should not be allowed to operate if any of the following occur: - Excessively high water level. - If machine is not connected to a properly grounded circuit. - If the door does not remain securely locked during the entire cycle. - Vibration or shaking from an inadequate mounting or foundation. WARNING - FOR SAFETY 1. Always shut off power and water supply before servicing. 2. Do not overload the washer. 3. Do not open door when cylinder is in motion or it contains water. 4. Do not bypass any safety devices of this washer. 5. Do not use volatile or flammable substances in or near this washer. 6. Keep all panels in place. They protect against shock and injury and add rigidity to the washer. PREVENTIVE MAINTENANCE REQUIREMENTS DAILY - Check that the loading door remains securely locked and cannot be opened during the entire cycle. - Check the water connections for leaks. - Clean the top and sides of the cabinet to remove residue. - Clean the soap dispenser and lid and check that all dispenser mounting screws are in-place and tight. - Check the drain valve for leaking and that it opens properly. - Check the loading door for leaks. Clean the door seal of all foreign matter. - Leave the loading door open to aerate the washer when not in use. QUARTERLY - Make sure the washer is inoperative by switching off the main power supply. - Check the V-belts for wear and proper tension. - Clean lint and other foreign matter from around motor. - Check all water connections for leaks. - Wipe and clean the inside of the washer and check that all electrical components are free of moisture and dust. - Remove and clean water inlet hose filters. Replace if necessary. - Check anchor bolts - retighten if necessary IMPORTANT: Replace any and all panels that were removed to perform daily and/or quarterly maintenance.

2 1 Load laundry, close and latch door. 2 Add detergent and fabric softener 5 Press START button. (Optional) 6 Add bleach when light comes on. remains locked until cycle is completed. Door Locks when machine starts, and Fabric softener Add Bleach Detergent ON COM ME R WASH RINSE FINAL RINSE SPIN CI A L W A S HE R Quarters Only for 3 seconds. Push and Hold into dispenser on top of machine. 3 Select wash temperature. 4 Insert coins/card.

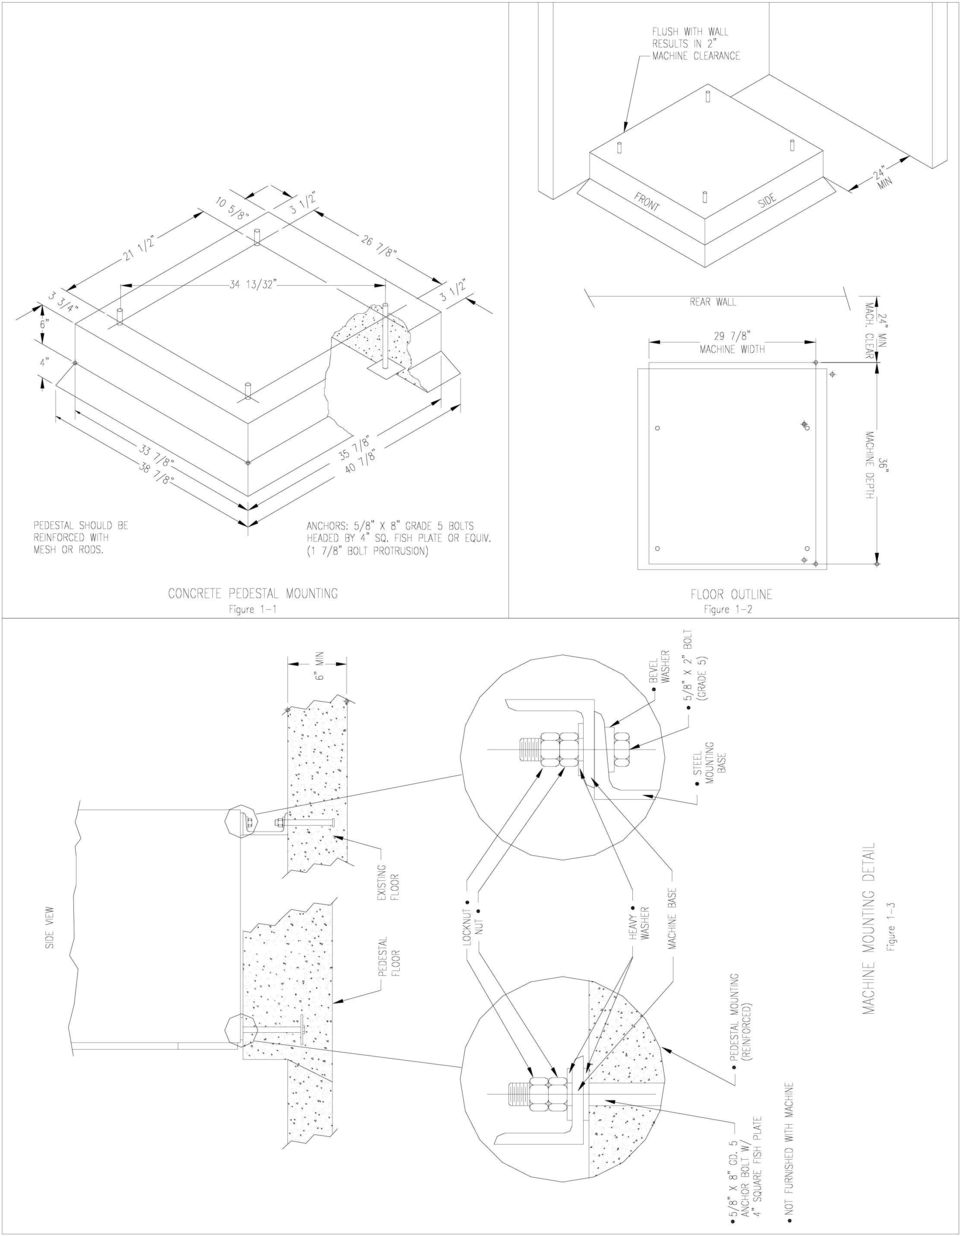
3 MODEL T600 DEXTER LAUNDRY, INC. INSTALLATION INSTRUCTIONS All washers must be installed in accordance with all local, state and national building, electrical, plumbing and other codes in effect in the area. WARNING - THESE INSTALLATION AND SERVICING INSTRUCTIONS ARE FOR USE BY QUALIFIED PERSONNEL ONLY. TO AVOID INJURY AND ELECTRICAL SHOCK DO NOT PERFORM ANY SERVICING OTHER THAN THAT CONTAINED IN THE OPERATING INSTRUCTIONS, UNLESS QUALIFIED. FOUNDATION REQUIREMENTS This machine is designed for use on or over bare concrete floor - not to be used above combustible flooring. The washer must be securely bolted and grouted to a substantial concrete floor, or mounted and grouted upon a suitable base that is securely bolted and grouted to a substantial concrete floor. CARE MUST BE STRESSED WITH ALL FOUNDATION WORK TO INSURE A STABLE UNIT INSTALLATION, ELIMINATING POSSIBILITIES OF EXCESSIVE VIBRATION. All installations must be made on sound concrete floors, 6 inches (150mm) or thicker. Anchor bolts or expansion anchors must be of a quality grade and a minimum of 5/8-inch (19 mm) diameter. MOUNTING A concrete pedestal or steel-mounting base that elevates the machine approximately 6 inches (150 mm) above the floor level is recommended to provide easy access to the loading door. Allow a minimum of 24 inches (600mm) of clearance behind the rear of the machine, to provide access for motor removal. Refer to Fig. 1-1 and 1-2 for machine bolt-down dimensions. If an elevated concrete pedestal is desired, it should be embedded into the existing floor. Anchor bolts should be 5/8" x 8" (12 mm x 200 mm), grade 5 or better, headed by a 4 inch (10 cm) square fish plate and should protrude 1 7/8 (48 mm) above the finished surface of the pedestal. EXPANSION ANCHORS ARE NOT RECOMMENDED FOR USE IN CONCRETE PEDESTALS, BECAUSE THE ANCHORS ARE TOO CLOSE TO AN EDGE, CAUSING IT TO BREAK OUT. (See Fig. 1-1 and 1-3.)

4
5 PLUMBING Water supply hoses are furnished with each machine. The threaded connections on the hoses are ¾- 11 ½ NHT. Separate hot and cold water lines must be provided, maintaining 30 psi to 120 psi (207 kpa to 827kPa) water flow pressure. A 140F (60C) degree hot water supply is recommended for best washing results. DRAIN The drain outlet tube at the rear of the machine is 3 inches (76 mm) in diameter. Any drain hose used must be lower than the drain valve to assure proper draining. ELECTRICAL WARNING SHUT OFF POWER AND WATER BEFORE OPENING ANY SERVICE PANELS. Dexter single/three-phase VAC 60 Hz washing machines are intended to be permanently installed appliances. No power cord is provided. The machine should be connected to an individual branch circuit not shared by lighting or other equipment. The connection should be sheathed in liquid tight flexible conduit, or equivalent, with conductors of the proper size and insulation. A qualified technician should make such connections in accordance with the wiring diagram. (Suggest a minimum wire size of 12 ga.) TO MAKE ELECTRICAL CONNECTIONS: Disconnect all power to the washer. Remove screw and lift out the cover located in the upper left corner of the machine (as viewed from the back). If power is PH-60Hz, connect L1, L2, L3 and ground. If there is a high leg it must be connected to L3. If power is PH-60Hz, connect L1, L2 and Ground. NOTE: It is important that the grounding screw next to the power terminal block TB-1 be connected to a good external ground. FUSING REQUIREMENTS: SINGLE- or THREE -PHASE POWER - 15 AMP TIME-DELAY (DUAL ELEMENT) FUSE (or equivalent circuit breaker) CONTROLS TRANSFORMER: The controls transformer is located inside the control trough and steps a range of 208 to 240 volts down to 115 volts. There are two terminals on the controls transformer for the primary (incoming) power. Use the terminal marked 208V for power supplies between 208 and 215 volts. Use the terminal marked 230V for power supplies between 216 and 240 volts.

6 CHECKOUT After all mounting, plumbing and electrical work is completed, the washer should be run through a cycle and checked for water leaks and proper functioning. STARTING THE WASHER A. Load the clothes into the cylinder and latch the door securely. Be sure clothing does not get caught between the door gasket and tub front when closing the door. Maximum load is 40 pounds clothes, dry weight. Do not load the washer with more than 40 lbs. B. Select the appropriate cycle temperatures for the load being washed. C. Add low sudsing powdered detergent into the detergent compartment of the automatic dispenser on the top of the washer. If desired add fabric softener to the fabric softener compartment. Use the amount of fabric softener as recommended by the manufacturer. If liquid wash products are used in the detergent compartment, they must be added at the beginning of the wash cycle. If the machine is set for pre-wash, washing products can be added to the round opening of the dispenser or put in with the clothes when loading the washing machine. D. Insert coins, tokens or debit card to meet the displayed vend price. Once the vend price is met, the display will read PUSH and the start button LED will blink. If the door is not closed and latched, the display will read DOOR and the control will wait until the door is latched to continue. Pressing the start button will begin the cycle and activate the ON light. The display will go blank for a moment and then display the cycle time in minutes. The clothes door will lock and remain locked until the end of the cycle. END OF CYCLE When the cycle is complete the time will display 00 until the door is opened and a 5-second tone will sound. The door can now be opened. Leave the clothes door open when the machine is not in use.

7 EMERGENCY STOP / SAFETY DOOR LOCK This machine is equipped with a Safety Door Lock that locks the door closed from when the cycle is started until the cycle is complete. The door lock prevents opening the door for up to 3 minutes if the power is interrupted during the cycle. The Emergency Stop button pauses the washer and allows the door to be opened during the cycle after the Safety Door Lock releases. When the Emergency Stop button is pressed an alarm will sound and the display will begin counting down from 3. If the button is released before 3 seconds elapse, the alarm will stop and the cycle will continue normally. If the Emergency Stop is held down for 3 seconds, the display will count down to 0 and the washer will begin stopping movement and water flow and begin draining water from inside the washer. Though the machine may stop wash movement quickly, it may take up to 3 minutes for the door to unlock. During that time the alarm will continue to sound. When the alarm stops, the door may be opened. The washer may be restarted by closing and latching the door, and pressing the Start button. If the washer was stopped more than once before the final extract, the cycle will be cancelled. If the washer was stopped during final extract, the cycle will be ended. If the washer is stopped for more than 1 hour, the cycle will be terminated. SPECIFICATIONS MODEL CAPACITY CYLINDER SIZE ELECTRICAL DRIVE SYSTEM WASH SPEED INTERMEDIATE EXTRACT FINAL EXTRACT MACHINE CONTROL WATER INLET DRAIN VALVE 40LB WASHER 40LBS/6 CUBIC FT. (18.2 kg/170 L) 25 DIA X 21 1/8 DEEP (63.5cm X 53.7cm) VAC, 60 HZ, 1 OR 3 PHASE SOFT START REVERSING INVERTER DRIVE, 2 HP MOTOR 50 RPM 412 RPM (60 G S) 532 RPM (100 G S) PROGRAMMABLE COMPUTER 2 SOLENOID OPERATED VALVES FLOW RATE: 9 GAL/MIN EACH, PSI 3 DIAMETER

8 PROGRAMMING INSTRUCTIONS: Programming can be accomplished manually using the machine controls or by connecting to the machine control using a PDA (personal digital assistant). For instructions on using a PDA with this washer control, please contact your local Dexter distributor. Please read below for manual programming instructions. The washer has two levels of programming. The Coin/Price Programming allows the owner to set the price for the washer features and the values of the coins. The Washer Cycle Programming allows the owner complete access to the wash cycle parameters add/remove a bath, bath times, spin times, water temperatures, etc. To enter the programming modes, the top of the washer must be unlocked and slid toward the back of the washer a few inches. COIN PRICE PROGRAMMING While the washer is in the Idle mode, push the Programming pushbutton on the controller. The Idle mode is when the washer is not running a cycle and the price of the bath is displayed. The Programming pushbutton is a very small button located on the upper center of the controller directly behind the display. There are seven stages in the Coin/Price Programming mode. To step through to the desired stage, repeatedly push the START button until the desired stage is blinking on the display. To exit the Coin/Price programming mode, push and hold the Cold temperature button for 5 seconds. Stage 1: Right Coin The display will blink first a r indicating right coin and then a coin value ($1.00 default). The display will blink back and forth between the r and the value. To change the value, use the Hot temperature button to decrease and the Warm temperature button to increase. The value will change in 1 steps. The range of values is from $00.00 to $ When the desired right coin value is displayed, push the Start button once to store the new value and a second time to move to the next Coin/Price programming step. To exit the Coin/Price programming mode, push the Cold temperature button for 5 seconds. Stage 2: Left Coin The display will blink first a L indicating left coin and then a coin value ($0.25 default). The display will blink back and forth between the L and the value. To change the value, use the Hot temperature button to decrease and the Warm temperature button to increase. The value will change in 1 steps. The range of values is from $00.00 to $ When the desired left coin value is displayed, push the Start temperature button once to store the new value and a second time to move to the next Coin/Price programming step. To exit the Coin/Price programming mode, push the Cold temperature button for 5 seconds. Stage 3: Wash Price The display will blink first a P indicating wash price and then present wash price. The display will blink back and forth between the P and the price. To change the value, use the Hot temperature button to decrease and the Warm temperature button to increase. The value will change in 1 steps. The range of values is from $00.00 to $ If the wash price is set to $00.00, the display will show FREE after exiting the programming mode. When the desired price is displayed, push the Start button once to store the new value and a second time to move to the next Coin/Price programming step. To exit the Coin/Price programming mode, push the Cold temperature button for 5 seconds.

9 WATER TEMPERATURE PRICING The washer can be set for different levels of pricing for Cold, Warm and Hot water. The Cold water setting is considered as the base price, which is the normal washer cycle price. Stage 4: Warm Water Price The next step in the pricing program is to set the additional price for Warm water usage. The additional price is the amount added to the price of a cold wash. The display will blink first CH P indicating cold/hot water mix price and then To change the value, use the Hot temperature button to decrease and the Warm temperature button to increase. The value will change in 1 steps. The range of values is from $00.00 to $ Note: To not use this feature, set the price to When the desired price is displayed, push the Start button once to store the new value and a second time to move to the next Coin/Price programming step. To exit the Coin/Price programming mode, push the Cold temperature button for 5 seconds. Stage 5: Hot Water Price The next step in the pricing program is to set the additional price for Hot water usage. The additional price is the amount added to the price of a cold wash. The display will blink first H P indicating hot water price and then To change the value, use the Hot temperature button to decrease and the Warm temperature button to increase. The value will change in 1 steps. The range of values is from $00.00 to $ Note: To not use this feature, set the price to When the desired price is displayed, push the Start button once to store the new value and a second time to move to the next Coin/Price programming step. To exit the Coin/Price programming mode, push the Cold temperature button for 5 seconds. The Coin/Price programming mode will automatically exit and return to the Idle mode if no buttons are pushed for one minute. Stage 6: Plus Cycle Price -- The next step in the programming sequence is the Plus Cycle feature. The Plus Cycle adds three (3) minutes of wash time to the wash bath only. The controller can be programmed to charge a fee for this or the feature can be turned off. The default setting is off. To turn the Plus Cycle feature off, set the Plus Cycle price to zero. The display will blink first a PC P indicating Plus Cycle price and then price (back and forth). To change the value, use the Hot temperature button to decrease and the Warm temperature button to increase. The value will change in 1 steps. The range of values is from $00.00 to $ When the desired price is displayed, push the Start temperature button once to store the new value and a second time to move to the next Coin/Price programming step. To exit the Coin/Price programming mode, push the Cold temperature button for 5 seconds. Stage 7: Decimal Point -- The next step in the programming sequence is the decimal point display. The display will start blinking back and forth first dp (Decimal Point) and then either on (default) or off. Press the Hot or Warm temperature buttons to select the decimal point display as on or off. When the desired setting is displayed, push the Start button to store it and a second time to move to the next programming step.

10 WASH CYCLE PROGRAMMING To change a feature of the wash cycle, push and hold the Hot temperature button and then push the programming pushbutton on the controller. The Washer must be in the Idle mode to enter the Wash Cycle Programming mode. When entering the cycle programming mode, the Bleach LED will start to blink and continue to blink as long as you are in the Cycle Programming mode. The display will show C 0. This is the default cycle number. Note: The washer can be returned to the factory default settings by holding the Start button and then pressing the Warm button. The display must show C 0 to do this. When the cycle default values are loaded, the washer will automatically exit the programming mode. Note: The Wash Cycle programming mode will automatically exit and return to the Idle mode if no buttons are pushed for one minute. End of Cycle Alarm: The end of cycle alarm can be turned on or off by pushing the Hot or Warm temperature buttons until AL is displayed and pressing the Start button. The display will now read on or off and can be changed by pressing the Hot or Warm temperature buttons. When the desired setting is displayed, press Start again to save. Modifying the Wash Cycle: To change the wash cycle, push the Hot or Warm temperature buttons until the display changes to C 1, indicating cycle one is selected. The temperature buttons are used to make changes to the program. In the program mode, the buttons will do the following: When the display shows C 1, push Enter. The display will show b and the PreWash mode light will blink. Use the Up/Down buttons to move to the bath that will be changed. As Up/Down buttons are pushed, the next bath mode light turns on.

11 When the Up button is pushed, the bath mode light changes from Prewash to Wash. With each additional push of the Up button, the lit bath mode changes from left to right: Prewash, Wash, Rinse and Final Rinse. As there are two possible Rinse bathes, for Rinse1 the Rinse LED and the display changes to b in the left digit and r1" in the two right hand digits. For Rinse2, the display changes to b in the left digit and r2" in the two right hand digits. Note that the Spin light is not used. When the Down button is pushed, the bath mode light changes from Prewash to Final Rinse, etc. There is a wrap around feature in both directions. When the desired bath mode light is on, push Enter. The selected bath LED begins to blink. The display shows the letters ct in the left two digits and the bath cycle time in the right two digits. Again the up/down buttons change this value. The range is shown below. If zero time is entered, then the bath will be skipped and the program will return to the bath selection. When the desired cycle time is selected, push enter. The display shows the letter t in the left digit and the letters CC appear in the right two digits. This is the bath water temperature. The selection choices are shown below but for the coin washer the value is defaulted to CC. When the desired temperature is selected, press enter. The display shows the letter L in the left digit and the letters LO appear in the right two digits. This is the bath water level. The selection choices are shown below but for the coin washer the value is defaulted to LO. As it is not selectable with a coin washer, the owner pushes enter to continue. The display shows the letters df in the left two digits and the letter t appears in the right digit. This is the bath delay fill. The selections are t for counting down bath time during the fill or d for delay the bath time until water level is reached. When the desired selection is made, push enter. The display shows the letter S in the left digit and the bath spin time in the right two digits. Again the up/down buttons change this value. The range is shown below. When the desired spin time is selected, push enter. The display shows the letters IS in the left two digits and the injection selection appear in the right digit. For the coin washer the default value is 0" and cannot be changed. Push enter twice. At this point the bath LED stops blinking. The display will show b and the next bath LED lights. Again use the up/down buttons to change the bath selection. To exit the programming mode, push and hold exit for 5 seconds. The cycle will be stored when exiting the programming mode.

12 COIN WASHER CYCLE PARAMETER RANGES The range of each cycle parameter is shown below: Cycle Time ct Water Temperature t Water Level L Delay Fill df Spin Time S IS 0 to 15 minutes for Prewash, Rinse1 and Rinse2 3 to 15 minutes for Wash and Final Rinse For the bathes that can, if the time is set to zero, then the bath will be eliminated from the cycle. HH hot, CH warm, CC cold The owner can set the bath default. For the wash bath, the customer overrides the default for that cycle when the temperature is selected. LO low The owner can change the displayed value, but for a coin washer only LO will be put into the cycle. The selections are d for delay the bath time until water level is reached or t to countdown bath time during the fill. 0 to 10 minutes for Prewash, Wash, Rinse1 and Rinse2 1 to 10 minutes for Final Spin. The owner can change the displayed value, but for a coin washer only 0 will be put into the cycle. COIN WASHER DEFAULT CYCLE The following table shows the complete details for the coin washer default cycle. Bath Bath Cycle Time (min.) Water Temp. Water Level * Delay Fill Spin Time (min.) IS * Prewash 0 CC LO t 0 0 Wash 9 CH LO t 0 0 Rinse 1 4 CC LO t 1 0 Rinse 2 0 CC LO t 0 0 Final Rinse Note * 5 CC LO t 4 0 These default values are preset and cannot be changed.

13 RAPID ADVANCE MODE To enter the Rapid Advance mode, push and hold the Cold water temperature button and then push the programming button on the controller. There will be no observed change to the washer or the display. The Rapid Advance mode can be entered from either the Idle mode or during the cycle. To rapid advance to the next step in the wash cycle, push the Start and Warm temperature buttons at the same time. The display will show an Ad (advance) in the display. The washer will advance to the next bath segment. The water will drain before the advance will occur. The Rapid Advance mode will not end until the final bath segment is completed. The final segment cannot be skipped in Rapid Advance mode. Notes: 1. When the Rapid Advance mode is used, the cycle time will no longer be correct. 2. By skipping steps with rapid advance, the door may not open immediately at the end of the cycle. EASY CARD MODELS Some Dexter washers are factory equipped with a card reader that is used with Dexter s Easy Card debit card system. The card reader signals the washer control when money is debited from the user s card account to satisfy the price of the wash cycle. The washer s pricing and the Easy Card system pricing are completely independent of each other and must be programmed separately and coordinated. Refer to the instructions that came with the Easy Card system for complete information.

14 SETTING THE ELECTRONIC COIN ACCEPTOR SWITCHES Some washer models come equipped with an electronic coin acceptor. Follow the instructions below for setting the switches for the desired country and currencies. 1) The electronic coin acceptor has switch settings depending on the coins and country. See the table below for available values of the left and right coin inputs for the available countries. WARNING: TURN POWER OFF BEFORE AND LEAVE POWER OFF WHEN CHANGING THE SWITCHES OF THE ELECTRONIC COIN ACCEPTOR. 2) Turn power back on and test coins to ensure proper operation. Acceptor P/N Country Left Coin Right SWs 1-8 SWs 9-16 Coin Canada 25 Canada $1 Canada $2 Japan 100 Japan Taiwan 10NT Taiwan 50NT Korea 500W Greenwald Token Greenwald Token U.S.A. 25 U.S.A. $1 Australia 10 Australia 20 Australia $1 Australia $2 New Zealand New Zealand 20 New Zealand $1 New Zealand $2 Hong Kong $5 Hong Kong $10 Greenwald Token Greenwald Token Switches =up/on, =down/off Note: Coins and tokens in the left coin column will result in one pulse to the left coin input. Note: The $1, 500, 50NT, and $10 coins in the right coin column will result in one pulse to the right coin input, while the $2 coins will result in two pulses to the right coin input. Note: Acceptance of multiple coins per country and multiple tokens is allowed. Only the down/off setting for each coin and token is required to accept that coin or token.
 Turn power back on and test coins to ensure proper operation.")
15 WASHER ERROR CODES Fault# (F #) Description The door failed to close and lock or the door failed to remain locked after three tries of latching the door and starting during the cycle. The washer tub does not fill with water within 7 minutes. The wash cycle will continue. The F 2 will flash three times, then wait for 30 seconds. The error will clear at the end of the cycle. Memory error in controller. Washer controller communication error Pressure Switch error ( only OPL )- when the high level sensor indicates full but the lower one indicates empty. The wash cycle will continue. The F 5 will flash three times, then wait for 30 seconds. The error will clear at the end of the cycle. Wrong washer size for drive type. Wrong size drive installed The washer tub does not empty within 7 minutes. The wash cycle will continue. The F 8 will flash three times, then wait for 30 seconds. The error will clear at the end of the cycle. The washer tub does not reach the spin target frequency within 200 seconds. The wash cycle will continue. The F 9 will flash three times, then wait for 30 seconds. The error will clear at the end of the cycle. After a spin the washer tub does not stop within 150 seconds. Customer Action Turn off the power to the washer. Check wire connections to door /lock switches. Check wire connections from switches to controller. If necessary door lock mechanism should be adjusted by a qualified person. Turn on the power to the washer. (See Note) Turn of the power to the washer. Check the operation of the water valves. Check the incoming water pressure. Check for blocked or restricted water flow. Check to ensure the drain valve is functioning properly. Turn on the power to the washer. (See Note) Turn off the power to the washer. Wait one minute. Turn power back on to the washer. If the problem returns, clear the fault with the Palm. If the problem returns again, replace the washer controller. Turn off the power to the washer. Wait one minute. Turn power back on to the washer. If the problem returns, replace the washer controller. Turn off the power to the washer. Replace the pressure switch. Turn on power to the washer. (See Note) Turn off the power to the washer. Check to ensure all the harnesses are properly connected to the controller. Check to ensure the drive horsepower is proper for this size of washer. Turn on power to the washer. (See Note) If problem reappears, contact your Dexter representative. Turn off the power to the washer. Check to ensure all the harnesses are properly connected to the controller. Check to ensure the drive horsepower is proper for this size of washer. Contact your Dexter representative. Turn off the power to the washer. Check to ensure the drain valve is operating properly. Check to ensure the pressure switch tube is clear of blockage. Check to ensure the pressure switch is operating proper. Correct any located problems. Turn on power to the washer. (See Note) Turn off the power to the washer. Inspect the washer to ensure the tub spins freely. If restricted, then clear the blockage. Test washer. If tub spins freely, the drive needs to be replaced. Turn off the power to the washer. Inspect the braking resistors and the connecting wiring to the drive braking resistors mounted in the top of the washer. If the resistors and wiring is correct, then replace the drive.

16 The drive size setting has changed. Washer controller internal error The control can not communicate with the drive Over-current on the drive or motor. Over-voltage on the drive or motor. Overheating of the drive Overload of the drive or motor Ground Fault to the drive Low Voltage to the drive Internal drive error Data error on communications between the controller and drive Turn off the power to the washer. Check to ensure all the harnesses are properly connected to the controller. Check to ensure the drive horsepower is proper for this size of washer. Turn on power to the washer. (See Note) If problem reappears, contact your Dexter representative. Turn off the power to the washer. Wait one minute. Turn on the power to the washer. (See Note) If problem reappears, contact your Dexter representative. Turn the power off to the washer. Check the data cable between the controller and the drive. If no problem is observed, turn on power to the washer and test. (See Note) If problem reappears, contact your Dexter representative. Turn the power off to the washer. Check the washer motor to ensure it turns freely. Check the wiring connections to the drive and motor. If no problem is observed, turn on power to the washer and test. (See Note) If problem reappears, contact your Dexter representative. Turn the power off to the washer. Check the washer motor to ensure it turns freely. Check the wiring connections to the drive, braking resistors and motor. Measure incoming line voltage. If no problem is observed, turn on power to the washer and test. (See Note) If problem reappears, contact your Dexter representative. Turn the power off to the washer. Allow the drive to cool. Check the cooling fins of the drive to ensure proper airflow. Check the wiring to the drive including the fan wiring. If no problem is observed, turn on power to the washer and test. (See Note) If problem reappears, contact your Dexter representative. Turn the power off to the washer. Check the washer motor to ensure it turns freely. Check the wiring connections to the drive and motor. If no problem is observed, turn on power to the washer and test. (See Note) If problem reappears, contact your Dexter representative. Turn the power off to the washer. Check the wiring connections to the drive and motor. Check the ground wiring of the drive, motor and incoming connection to ensure a proper ground is present. If no problem is found, contact your Dexter representative. Turn the power off to the washer. Check the wiring connections to the drive and motor. If no problem is observed, turn on power to the washer and test. (See Note) Measure the incoming line voltage. If problem reappears, contact your Dexter representative. Turn the power off to the washer. Wait one minute. Turn the power on to the washer. (See Note) If problem reappears, contact your Dexter representative. Turn the power off to the washer. Check the data cable between the controller and the drive. If no problem is observed, turn on power to the washer and test. (See Note) If problem reappears, contact your Dexter representative. Note: Whenever power is turned off to the washer, it must remain off for one minute. The washer will not operate properly if this is not done.

17 ACCESSORIES INSTALLATION: (Furnished) QTY Hose, Water Supply Washer, Inlet Hose Strainer, Inlet Hose 4 Contact your distributor or Dexter Laundry, Inc. if a steel-mounting base is required.

COIN V-SERIES AND EXPRESS- SERIES PROGRAMMING INSTRUCTIONS
 COIN V-SERIES AND EXPRESS- SERIES PROGRAMMING INSTRUCTIONS Programming can be accomplished manually using the machine controls or by connecting to the machine control using a PDA (personal digital assistant),
MODELS T900/T950 60LB CAPACITY COMPUTER CONTROL OPL WASHER
 P/N 8514-186-001B MODELS T900/T950 60LB CAPACITY COMPUTER CONTROL OPL WASHER DEXTER LAUNDRY, INC. OWNER'S BOOKLET INSTALLATION & OPERATION INSTRUCTIONS TABLE OF CONTENTS Page # Safety Warnings 2 Maintenance
Portable Air Conditioner
 Portable Air Conditioner Owner's Manual Model:3 in 1 12,000 Btu/h Series 3 Please read this owner s manual carefully before operation and retain it for future reference. CONTENTS 1. SUMMARY...1 2. PORTABLE
BUILT-IN DISHWASHER INSTALLATION INSTRUCTIONS
 BUILT-IN DISHWASHER INSTALLATION INSTRUCTIONS PLEASE READ COMPLETE INSTRUCTIONS BEFORE YOU BEGIN LEAVE INSTALLATION INSTRUCTIONS AND USER'S GUIDE WITH OWNER ALL ELECTRIC WIRING AND PLUMBING MUST BE DONE
Dehumidifier Users manual. For Models: DH45S DH65S
 Dehumidifier Users manual For Models: DH45S DH65S 950-0062-revD Jan. 9 2007 FORWARD The appearance of the units that you purchase might be slightly different from the ones described in the Manual, but
Fully Automatic Washing Machine User manual
 Fully Automatic Washing Machine User manual This manual is for HWMP55-918 Please read this manual carefully before using. Retain it for future reference. CONTENTS CONTENTS Inside cover Parts 1 Safety precautions
OPL BASIC. Dosing System for Professional Laundry machines. Contents
 OPL BASIC Dosing System for Professional Laundry machines Contents 1 Getting Started. Page 2 2 Installation. Page 4 3 Set Up & Operation. Page 8 4 Maintenance & Accessories. Page 10 5 Troubleshooting Page
CARING FOR YOUR WATER HEATER
 http://waterheatertimer.org/troubleshoot-rheem-tankless-water-heater.html Water Heater Inspections CARING FOR YOUR WATER HEATER Venting System (Direct Vent Only) The venting system should be inspected
USER INSTRUCTIONS FOR 10 LITRE PORTABLE DEHUMIDIFIER MODEL NO. DHMD102
 USER INSTRUCTIONS FOR 10 LITRE PORTABLE DEHUMIDIFIER MODEL NO. DHMD102 THANK YOU FOR CHOOSING YOUR NEW DEHUMIDIFIER. BEFORE USING THE UNIT READ THESE INSTRUCTIONS FULLY AND RETAIN THEM FOR FUTURE REFERENCE
IMPORTANT SAFETY INSTRUCTIONS WARNING READ AND SAVE THESE OPERATING AND SAFETY INSTRUCTIONS BEFORE USING THIS HEATER.
 THERMAWAVE CERAMIC HEATER Model HZ-850 Series Model HZ-860 Series IMPORTANT SAFETY INSTRUCTIONS WARNING READ AND SAVE THESE OPERATING AND SAFETY INSTRUCTIONS BEFORE USING THIS HEATER. Warning Failure to
WASHING MACHINE READ THIS MANUAL CAREFULLY TO DIAGNOSE TROUBLE CORRECTLY BEFORE OFFERING SERVICE.
 website : http://www.lgeservice.com e-mail : http://lgeservice.com/techsup.html WASHING MACHINE SERVICE MANUAL CAUTION READ THIS MANUAL CAREFULLY TO DIAGSE TROUBLE CORRECTLY BEFORE OFFERING SERVICE. MODEL
COMMERCIAL TOP LOAD WASHER INSTALLATION, USER & SET-UP INSTRUCTIONS
 COMMERCIAL TOP LOAD WASHER INSTALLATION, USER & SET-UP INSTRUCTIONS MODELS: MAT12CS, MAT12PD, MAT13MN, MAT13PN LEAVE THESE INSTRUCTIONS WITH THE OWNER MAYTAG COMPANY, NEWTON, IOWA 50208 2207647 IMPORTANT
Portable Evaporative Air Cooler. OWNER S MANUAL Read and save these instructions before use. Model: CL30XC
 Portable Evaporative Air Cooler OWNER S MANUAL Read and save these instructions before use Model: CL30XC Power rating: 250 Watts Voltage rating: 230 Volt, 50Hz Made in P.R.C. QUICK START GUIDE Fill with
Instruction manual for Firstline FCS12000CH
 Instruction manual for Firstline FCS12000CH Contents Introduction... 2 Safety Awareness... 3 Safety Awareness... 4 Name of Parts... 5 Name of Parts... 6 Remote Controller Preparation... 7 Operation of
H I G H S P I N W A S H E R E X T R A C T O R S H C 6 0 H C 6 5 H C 7 5 H C 1 0 0 H C 1 3 5 H C 1 6 5
 H I G H S P I N W A S H E R E X T R A C T O R S H C 6 0 H C 6 5 H C 7 5 H C 1 0 0 H C 1 3 5 H C 1 6 5 HC 60 - HC 65 - HC 75 - HC 100 - HC 135 - HC 165 New look Matt door: uniform look of the front Ergonomic
Error Codes: 02F. Model: 110.44832 200 (110. = Whirlpool) S/N: CSP 1903874 Type: 199-AKP 705/WT. Sears Kenmore/Whirlpool Front Load Washer
 S/N: CSP 1903874 Type: 199-AKP 705/WT. Sears Kenmore/Whirlpool Front Load Washer") Sears Kenmore/Whirlpool Front Load Washer Error Codes: 02F dlf Model: 110.44832 200 (110. = Whirlpool) S/N: CSP 1903874 Type: 199-AKP 705/WT SOURCE: www.applicancepartspros.com WHIRLPOOL FAULT CODES Whirlpool
Sears Kenmore/Whirlpool Front Load Washer Error Codes: 02F dlf Model: 110.44832 200 (110. = Whirlpool) S/N: CSP 1903874 Type: 199-AKP 705/WT SOURCE: www.applicancepartspros.com WHIRLPOOL FAULT CODES Whirlpool
ELECTRONIC THERMOSTAT AND THERMOMETER With SPEED CONTROL
 148 OLD CONCORD TURNPIKE, BARRINGTON NH 03825 USA TEL (603) 868-5720 FAX (603) 868-1040 1-800-435-6708 E-Mail:[email protected] www.seafrost.com ELECTRONIC THERMOSTAT AND THERMOMETER With SPEED CONTROL
Convection Ovens. BX Classic. Models BX4 / FG 189C, BX4-6040 / FG 158C, BX10 / FG 180C. Operator's Manual
 Convection Ovens BX Classic Models BX4 / FG 189C, BX4-6040 / FG 158C, BX10 / FG 180C Operator's Manual Belshaw Bros., Inc. 814 44 th Street NW, Suite 103 Auburn, WA 98001 USA Phone: 206-322-5474 Fax: 206-322-5425
Please read this manual carefully before using. Retain for future reference. Automatic Washing Machine User manual
 Automatic Washing Machine User manual This manual is for HWMP55-918 HWMP65-918 Please read this manual carefully before using. Retain for future reference. CONTENTS Product Overview 1 Safety Precautions
NewAir AC-10000E, AC-10000H Portable Air Conditioner Owner s Manual PLEASE READ AND SAVE THESE INSTRUCTIONS
 NewAir AC-10000E, AC-10000H Portable Air Conditioner Owner s Manual PLEASE READ AND SAVE THESE INSTRUCTIONS BEFORE USE GENERAL SAFETY INSTRUCTIONS: ALWAYS OPERATE THE UNIT IN AN UPRIGHT POSITION AND PLACE
DIAMOND Retractable Rodding Robot Model SPRAYROD-R
 2004-12-21 2 1 (23) DIAMOND Retractable Rodding Robot Model SPRAYROD-R 2004-12-21 2 2 (23) Table of contents 1 TECHNICAL DESCRIPTION...4 1.1 MAIN DETAILS...5 1.2 COMPONENTS DESCRIPTION...5 1.2.1 Pneumatic
UHIR Series. Horizontal or Vertical Mounting Industrial / Commercial Electric Unit Heater. Owner s Manual
 UHIR Series Horizontal or Vertical Mounting Industrial / Commercial Electric Unit Heater Owner s Manual This manual covers installation, maintenance and repair parts. Read carefully before attempting to
NITROUS TRANSFER PUMP INSTRUCTIONS
 NITROUS TRANSFER PUMP INSTRUCTIONS SAFETY TIPS Never directly inhale nitrous oxide. When inhaled in large quantities, nitrous oxide can cause respiratory ailments or in extreme cases, death by suffocation.
USER S MANUAL HSC-24A
 AIRREX AIR CONDITIONER USER S MANUAL HSC-24A Thank you for purchasing an AIRREX AIR CONDITIONER. BEFORE operation please read this user s manual carefully. Keep this manual readily available. It is ESSENTIAL
AMFA-27 AMFA-29. Operator s Manual & Installation Instructions. Rev. 2.5
 AMFA-27 AMFA-29 Operator s Manual & Installation Instructions Rev. 2.5 Date: 17 July, 2010 Permanently-connected, utility Interactive, single-phase, inverters Model AMFA-27 WIND TURBINE INVERTER (240 VAC
PORTABLE AIR CONDITIONER
 VERY IMPORTANT! MODEL: GDC-AC9RW / GDC-AC9RCS GDC-AC9RCW / GDC-AC12RW GDC-AC12RB / GDC-AC12RCB GDC-AC12RCW INSTRUCTIONS FOR USE PORTABLE AIR CONDITIONER Do not install and use your portable air conditioner
Split-type Air-Conditioner INSTALLATION MANUAL CONTENTS FOR INSTALLER MXZ-3A30NA MXZ-4A36NA ATTENTION. English. Français. Español
 Split-type Air-Conditioner MXZ-3A30NA MXZ-4A36NA INSTALLATION MANUAL Refer to the installation manual of each indoor unit for indoor unit installation. English Français Español ATTENTION This manual mentions
Bench Autoclave. Standard Operating Procedure. For Installation, Use and Maintenance
 Bench Autoclave Standard Operating Procedure For Installation, Use and Maintenance 1. Introduction This SOP is intended for use with the following model, in a laboratory context: Type: Nuve Bench Top Steam
MBSAW. Meat Cutting Band Saw With Meat Grinder Assembly & Operating Instructions
 06/2011 MBSAW Meat Cutting Band Saw With Meat Grinder Assembly & Operating Instructions READ ALL INSTRUCTIONS AND WARNINGS BEFORE USING THIS PRODUCT. This manual provides important information on proper
36G22, 36G23, 36G24 & 36G52 36J22, 36J23, 36J24 & 36J52 DSI and HSI Single Stage Combination Gas Valve
 Operator: Save these instructions for future use! FAILURE TO READ AND FOLLOW ALL INSTRUCTIONS CAREFULLY BEFORE INSTALLING OR OPERATING THIS CONTROL COULD CAUSE PERSONAL INJURY AND/OR PROPERTY DAMAGE. DESCRIPTION
Name of Equipment Silver King Model SKMCD1P/C1. This equipment chapter is to be inserted in the appropriate section of the Equipment Manual.
 Name of Equipment Silver King Model SKMCD1P/C1 This equipment chapter is to be inserted in the appropriate section of the Equipment Manual. Manufactured exclusively for McDonald s By Silver King Refrigeration,
DC REFRIGERATORS 12/24 VOLTS INSTALLATION AND OWNER S MANUAL
 DC REFRIGERATORS 12/24 VOLTS INSTALLATION AND OWNER S MANUAL Service Information If service or parts are required, contact the nearest Norcold Service Center. To find an authorized Norcold Service Center
Safety, Operation and Maintenance Manual with Parts List
 Safety, Operation and Maintenance Manual with Parts List 20-Gallon Wet/Dry Vac Important Information and Safety Instructions PLEASE READ BEFORE USE! # 961130020 9/10-Rev 1 20-Gallon Wet/Dray Vac TABLE
USER S, MAINTENANCE and SERVICE INFORMATION MANUAL
 CONTENTS SAFETY INFORMATION................ 2 FOR YOUR SAFETY....................... 2 SYSTEM OPERATION.................. 2 THERMOSTATS........................... 2 INTERMITTENT IGNITION DEVICE...........
CDS TROUBLESHOOTING SECTION I. VACUUM. 1.0. Weak vacuum at wand. Gauge reads normal (10hg to 14hg)
") CDS TROUBLESHOOTING SECTION I. VACUUM 1.0. Weak vacuum at wand. Gauge reads normal (10hg to 14hg) 1.1. Clogged hoses or wand tube. Disconnect hoses and carefully check for an obstruction. 1.2. Excessive
CDS TROUBLESHOOTING SECTION I. VACUUM 1.0. Weak vacuum at wand. Gauge reads normal (10hg to 14hg) 1.1. Clogged hoses or wand tube. Disconnect hoses and carefully check for an obstruction. 1.2. Excessive
Bubble King. User Manual
 Bubble King User Manual TABLE OF CONTENTS 1. Before You Begin... 3 What Is Included... 3 Unpacking Instructions... 3 Claims... 3 Text Conventions... 3 Icons... 3 Document Information... 3 Product at a
SERVICE MANUAL WASHING MACHINE
 Website:http://www.LGEservice.com E-mail:http://www.LGEservice.com/techsup.html WASHING MACHINE SERVICE MANUAL! CAUTION READ THIS MANUAL CAREFULLY TO DIAGSE PROBLEMS CORRECTLY BEFORE SERVICING THE UNIT.
Oil and Coolant Circulating Heating System. Model - OCSM
 Oil and Coolant Circulating Heating System Model - OCSM Installation & Operation Manual 216280-000 REV 2 Identifying Your System The HOTSTART heating system is designed to heat fluids for use in marine
SunMaxx Solar Filling Station Operating Instructions
 SunMaxx Solar Filling Operating Instructions Content 1. Declaration of conformity... 2 2. Introduction... 2 3. Transportation and unpacking... 4 4. Mounting and commissioning... 5 5. End of operation...
SWIMMING POOL HEAT PUMP
 SWIMMING POOL HEAT PUMP Installation & User Manual Model HP40B HP50B HP65B Hayward Pool Products Canada, Inc. T: 1-888-238-7665 www.haywardpool.ca CONTENT I. Application 4 II. Features 4 III. Technical
Installation Instructions
 Installation Instructions Built-In Dishwasher If you have questions, call 1-800-4-MY-HOME (1-800-469-4663) or visit our website at: www.sears.com BEFORE YOU BEGIN Read these instructions completely and
Maxi Pressurisation Units (Maxi, Maxi Plus & HP)
") Maxi Pressurisation Units (Maxi, Maxi Plus & HP) Installation and Maintenance Instructions Contents 1 Dimensions 3 1.1 Installation 4 1.1 Mains/boosted cold water inlet 4 1.2 Connection to the system 5
Maxi Pressurisation Units (Maxi, Maxi Plus & HP) Installation and Maintenance Instructions Contents 1 Dimensions 3 1.1 Installation 4 1.1 Mains/boosted cold water inlet 4 1.2 Connection to the system 5
San josé OWNER S MANUAL
 San josé OWNER S MANUAL Assembling & operating manual San josé 30 mbar - PORTABLE GAS BARBECUE 1. 2. 3. Improper installation, adjustment, alteration, service or maintenance can injury or property damage.
SWIMMING POOL HEAT PUMP Owners Manual
 SWIMMING POOL HEAT PUMP Owners Manual This manual refers to the 17.0kw and 21.0kw models only. The heat pump unit is sold with a 1 year warranty. In addition there is a 2 year parts warranty on the compressor
Use and Care Manual. Model CPA12KH AIR CONDITIONER
 Use and Care Manual Model CPA12KH AIR CONDITIONER Introduction Thank you for choosing this air conditioner to provide you and your family with all of the "Home Comfort" requirements for your home, cottage
COMPRESSED AIR DRYER
 COMPRESSED AIR DRYER Model 40211 ASSEMBLY and OPERATING INSTRUCTIONS 3491 Mission Oaks Blvd., Camarillo, CA 93011 Visit our Web site at http://www.harborfreight.com Copyright 2002 by Harbor Freight Tools.
All About. Servicing. Service Tech Hand Book. 2010 Electrolux Home Products Inc. 10200 David Taylor Drive Charlotte, NC 28262
 All About Servicing Service Tech Hand Book 2010 Electrolux Home Products Inc. 10200 David Taylor Drive Charlotte, NC 28262 Publication #5995588729 February 2011 Section 1 Basic Information Safe Servicing
IMPORTANT SAFETY RULES TO FOLLOW
 WARNING FLOOR & CARPET CLEANER Any piece of equipment can be dangerous if not operated properly. YOU are responsible for the safe operation of this equipment. The operator must carefully read and follow
PC1131 Electric Air Compressor
 Senco Products Inc. 8485 Broadwell Road Cincinnati, Ohio 45244 PC1131 Electric Air Compressor Operating Instructions 2006 by Senco Products, Inc. Warnings for the safe use of this tool are included in
FASCINATION 700 HVLP TANNING PRO SYSTEM USER MANUAL
 FASCINATION 700 HVLP TANNING PRO SYSTEM USER MANUAL Congratulations on choosing the Fascination 700 HVLP Tanning Pro System! Your system includes the following items: 1 Fascination 700 HVLP Tanning Pro
NewAir AC-10100E / AC-10100H Portable Air Conditioner Owner s Manual PLEASE READ AND SAVE THESE INSTRUCTIONS
 NewAir AC-10100E / AC-10100H Portable Air Conditioner Owner s Manual PLEASE READ AND SAVE THESE INSTRUCTIONS ELECTRICAL SAFETY This appliance is for indoor use only. Always turn off the unit and unplug
User Guide. Bagless Cylinder White. Get Cleaning... vax.co.uk. Vax Careline: (UK) 0844 412 8455 (ROI) 1-800 928 308. White series
 0844 412 8455 (ROI) 1-800 928 308. White series") C88-VW-B UG [Update 10.05.12]_User guide 10/05/2012 09:40 Page 1 User Guide Vax Careline: (UK) 0844 412 8455 Bagless Cylinder White Get Cleaning... What s your Vax model number? (Located on the top flap
C88-VW-B UG [Update 10.05.12]_User guide 10/05/2012 09:40 Page 1 User Guide Vax Careline: (UK) 0844 412 8455 Bagless Cylinder White Get Cleaning... What s your Vax model number? (Located on the top flap
Drayton Digistat +2RF/+3RF
 /+3RF Programmable Room Thermostat Wireless Model: RF700/22090 Model: RF701/22092 Power Supply: Battery - Thermostat Mains - Digistat SCR Invensys Controls Europe Customer Service Tel: 0845 130 5522 Customer
Portable Air Conditioner. OWNER S MANUAL Read these instructions before use. Model: MM14CCS. Voltage rating: 115V~60Hz Power rating : 1400W
 Portable Air Conditioner OWNER S MANUAL Read these instructions before use Model: MM14CCS Customer Support : 1-800-474-2147 Voltage rating: 115V~60Hz Power rating : 1400W For product inquiries or support
15GAL STEEL OIL DRAIN WITH 110V PUMP
 15GAL STEEL OIL DRAIN WITH 110V PUMP OWNER S MANUAL WARNING: Read carefully and understand all ASSEMBLY AND OPERATION INSTRUCTIONS before operating. Failure to follow the safety rules and other basic safety
Roof Top Air Conditioner INSTALLATION AND OPERATING INSTRUCTIONS
 Roof Top Air Conditioner INSTALLATION AND OPERATING INSTRUCTIONS Ducted System RECORD THIS UNIT INFORMATION FOR FUTURE REFERENCE: Model Number: Serial Number: Date Purchased: This manual must be read and
INSTALLATION & SERVICE MANUAL. Display Panel
 INSTALLATION & SERVICE MANUAL Display Panel The PowerLine EMS TM is a specialized power distribution and energy management system intended to be used in recreational vehicles. The Control Module is housed
Carpet Washer. vax.co.uk VRS5W. Vax Careline: (UK) 0844 412 8455 (ROI) 1-800 928 308. Vax model number: Version 1.0
 0844 412 8455 (ROI) 1-800 928 308. Vax model number: Version 1.0") VRS5W Powermax User Guide V1.0.qxd:V1.0 23/7/10 15:35 Page 1 Vax Careline: (UK) 0844 412 8455 (ROI) 1-800 928 308 Carpet Washer Vax model number: VRS5W instruction manual Version 1.0 Please read carefully
VRS5W Powermax User Guide V1.0.qxd:V1.0 23/7/10 15:35 Page 1 Vax Careline: (UK) 0844 412 8455 (ROI) 1-800 928 308 Carpet Washer Vax model number: VRS5W instruction manual Version 1.0 Please read carefully
BLOOD COLLECTION MIXER
 USER S MANUAL BLOOD COLLECTION MIXER Model CM735 No. CAT.CM73522Ce Centron Technologies Corporation 319-25 Sadang-4-dong, Dongjak-ku Seoul, Korea 156-823 Tel. +82-2.522.7807 Fax +82-2.522.7806 Table of
Cooling system components, removing and installing
 Page 1 of 34 19-1 Cooling system components, removing and installing WARNING! The cooling system is pressurized when the engine is warm. When opening the expansion tank, wear gloves and other appropriate
REFRIGERATED TYPE COMPRESSED AIR DRYERS INSTRUCTION MANUAL. For Sales & Service please contact:
 7610.478.16 8/99 INSTRUCTION MANUAL Models 8005, 8010, 8015 For Sales & Service please contact: CENTRAIR Air Systems & Supplies Phone: 705-722-5747 Fax: 705-722-5458 Email: [email protected] Website: www.centrair.ca
UB1 AIR CONDITIONING UNIT INSTALLATION INSTRUCTIONS
 UB1 AIR CONDITIONING UNIT INSTALLATION INSTRUCTIONS INSTALLATION INSTRUCTIONS: Carefully read these instructions before installing your new air-conditioner. AUSTRALIAN AUTOMOTIVE AIR AL00500054E 1 Table
Portable Air Conditioner. OWNER S MANUAL Read these instructions before use. Model: MN12CES / MN10CESWW
 Portable Air Conditioner OWNER S MANUAL Read these instructions before use 8 Model: MN12CES / MN10CESWW Voltage rating: 120V~60Hz Power rating : 1100W (MN12CES) Power rating : 900W (MN10CESWW) Customer
EKOS Cart. Instructions for Use
 EKOS Cart Instructions for Use EKOS Corporation 11911 North Creek Parkway South Bothell, WA 98011 USA (425) 415-3100 (tel) (425) 415-3102 (fax) [email protected] (e-mail) - 1-4913-002 REV E Intended Use
Operating Manual. Los Angeles Abrasion Machine HM-70A & HM-70AF
 Operating Manual Los Angeles Abrasion Machine HM-70A & HM-70AF Rev: 07/19/2012 PHONE: 800-444-1508 P.O. Box 200, Lewis Center, Ohio 43035-0200 FAX: 800-255-5314 740-548-7298 E-mail: [email protected]
PC1130 Electric Air Compressor
 Senco Products Inc. 8485 Broadwell Road Cincinnati, Ohio 45244 PC1130 Electric Air Compressor Operating Instructions 2006 by Senco Products, Inc. Warnings for the safe use of this tool are included in
Line to Refrigerator Ice/Water Dispenser
 Standard 18 Line to Refrigerator Ice/Water Dispenser Pump Module Bottled Water How The System Works The FLOJET Bottled Water Dispensing System was designed to pump water from a commercially available 5-gallon
English. Symbols used to mark instructions...3. Congratulations...5 Getting the best results...5. Warnings...6 Operating Procedure...
 2 Contents Components Attachments Guidance Installation Operation Maintenance Service Technical Troubleshooting Symbols used to mark instructions...3 Included Attachments...4 Congratulations...5 Getting
Please read this owner s Manual carefully before operating the unit. - Cooling - Heating - Dehumidifying - Fan
 Please read this owner s Manual carefully before operating the unit. - Cooling - Heating - Dehumidifying - Fan TABLE OF CONTENTS INTRODUCTION 2 IMPORTANT SAFEGUARDS...2 PACKAGE CONTAINS..2 NAMES OF PARTS.3
STANDARD OPERATING PROCEDURES DIVISION OF COMPARATIVE MEDICINE UNIVERSITY OF SOUTH FLORIDA
 STANDARD OPERATING PROCEDURES DIVISION OF COMPARATIVE MEDICINE UNIVERSITY OF SOUTH FLORIDA SOP#: 1005.7 Date Issued: 10/98 Date Revised: 2/16 Page 1 of 7 TITLE: SCOPE: RESPONSIBILITY: PURPOSE: Animal Care
B150 Series Commercial Brewer. Direct Plumb Kit
 B150 Series Commercial Brewer Welcome Keurig Authorized Dealer! Direct Plumb Kit This manual provides: Installation of the Direct Plumb Kit (DPK) that allows you to connect your customer s B150 brewer
OASIS-PLUS 120V READ ALL INSTRUCTIONS BEFORE OPERATING READ ALL INSTRUCTIONS BEFORE OPERATING OZONE IS A POWERFUL OXIDIZER AND MUST BE USED WITH CARE
 OASIS-PLUS 120V INFORMATION & OPERATING INSTRUCTIONS READ ALL INSTRUCTIONS BEFORE OPERATING READ ALL INSTRUCTIONS BEFORE OPERATING OZONE IS A POWERFUL OXIDIZER AND MUST BE USED WITH CARE 56041852 WARNING:
Wireless 7 Day Programmable Room Thermostat
 Wireless 7 Day Programmable Room Thermostat Cat. No. TRT037 Transmitter Receiver Operating & Installation Instructions What is a programmable room thermostat? an explanation for householders A programmable
Heat Pump Water Heater IOM Manual
 Heat Pump Water Heater IOM Manual Installation Operation & Maintenance This manual is intended as an aid to qualified service personnel for proper installation, operation and maintenance of the heat pump
ACCUMULATOR INSTALLATION
 7001-7 ACCUMULATOR INSTALLATION BRAKE ACCUMULATORS I 308L93 Rae 7-59710 Issued 6-93 Printed in U.S.A 7001-8 Removal ACCUMULATOR VALVE 1. Park the machine on a level surface and lower the. loader bucket
Wilo SP Series Submersible Sump Pumps ECS. ECS19-15.25 ECS22-15.33 ECS24-15.50 Installation and operating instructions
 Wilo SP Series Submersible Sump Pumps ECS ECS19-15.25 ECS22-15.33 ECS24-15.50 Installation and operating instructions PREINSTALLATION CHECK Inspect this pump before it is used. Occasionally, pumps can
Operational Overview and Controls Guide. Two or Three Pump IronHeart Lite with Variable Frequency Drives
 DOCUMENT: ECSEQ6-0 EFFECTIVE: 09/23/10 SUPERSEDES: Operational Overview and Controls Guide Two or Three Pump IronHeart Lite with Variable Frequency Drives 6700 Best Friend Road. Norcross, GA 30071. (770)
AN500T, AN1000, AN1000T, AN1500, AN1500T AN2000, AN2000T
 Product Instruction Manual Accona AN500T, AN1000, AN1000T, AN1500, AN1500T AN2000, AN2000T Panel heater v16.5/5 Version 3.2 Jan 2015 Contents 1. Important safety points 2. Installation 2.1. Wall mounting
Please also see 10 golden rules for correct Saniflo installation on www.saniflo.co.uk
 1. Description Sanicom is a lifting pump for wastewater used in commercial applications (restaurants, hairdressing salons, the catering industry etc.). The unit operates automatically, has a high performance
Operator: Save these instructions for future use!
 WHITE-RODGERS 36C01 Combination Gas Valves (24 Volt and 120 Volt Models) INSTALLATI INSTRUCTIS FAILURE TO READ AND FOLLOW ALL INSTRUCTIS CAREFULLY BEFORE INSTALLING OR OPERATING THIS CTROL COULD CAUSE
OEM Manual MODEL 2350 ELECTRONIC DUAL CYLINDER SCALE
 OEM Manual MODEL 2350 ELECTRONIC DUAL CYLINDER SCALE Scaletron Industries, Ltd. Bedminster Industrial Park 53 Apple Tree Lane P.O. Box 365 Plumsteadville, PA 18949 USA Toll Free: 1-800-257-5911 (USA &
- Do not immerse cords, pump or any electrical wire or device in water or other liquid.
 TRANSFER PUMP INSTRUCTIONS FOR THE SUPER TRANSFER PUMP 1. Pump (water may be present in the pump and lines due to testing at factory) 2. Instructions. 3. Inlet thicker wall hose (1), outlet hose (1) 4.
Portable Evaporative Air Cooler with Heater for indoor use. OWNER S MANUAL Read and save these instructions before use.
 Portable Evaporative Air Cooler with Heater for indoor use OWNER S MANUAL Read and save these instructions before use Model: CHL30XC Power rating: 252W (Cooling) / 2000W (Heating) Voltage rating: 220-240V
accidents which arise due to nonobservance and the safety information herein.
 20 GALLON COMPRESSOR Model: 7342 CALIFORNIA PROPOSITION 65 WARNING: You can create dust when you cut, sand, drill or grind materials such as wood, paint, metal, concrete, cement, or other masonry. This
Portable Air Conditioner. OWNER S MANUAL Read these instructions before use. Model: MM14CHCSCS
 Portable Air Conditioner OWNER S MANUAL Read these instructions before use Model: MM14CHCSCS Voltage rating: 120V~60Hz Power rating : 1400W(Cooling) Power rating : 1350W(Heating) Customer Support : 1-800-474-21477
Volkswagen Jetta, Golf, GTI 1999, 2000 2.8 Liter VR6 2V Engine Mechanical, Engine Code(s): AFP 17 Engine-Lubrication (Page GR-17)
: AFP 17 Engine-Lubrication (Page GR-17)") 17 Engine-Lubrication (Page GR-17) Lubrication system components, removing and installing Oil filter housing, disassembling and assembling Oil pan, removing and installing Oil pressure and oil pressure
17 Engine-Lubrication (Page GR-17) Lubrication system components, removing and installing Oil filter housing, disassembling and assembling Oil pan, removing and installing Oil pressure and oil pressure
Compressor Service & Maintenance Manual
 Compressor Service & Maintenance Manual C Series COMPRESSOR (D)C1103 (D)C1203 (D)C2106 (D)C2206 (D)C3210 Copyright 2006 DCI. All Rights Reserved. 92311, Rev. C, 08/13 1 C1000 Series Service & Maintenance
Pre-installation Manual. CONCEPT Processor 305 DW / 405 DW / 505 DW 505 DW XP
 Pre-installation Manual CONCEPT Processor 305 DW / 405 DW / 505 DW 505 DW XP Pre-installation Manual CONCEPT Processor 305 DW / 405 DW / 505 DW / 505 DW XP T11336 Edition AA, April 2013 This book has
CTV-1500 Cooling Tower Vacuum Operating & Maintenance Manual
 CTV-1500 Cooling Tower Vacuum Operating & Maintenance Manual Goodway Technologies Corporation 420 West Avenue Stamford, CT 06902-6384 (203)359-4708 Sales: 1-800-333-7467 Customer Service: 1-800-370-2855
MAP COFFEE MIA CAPSULE COFFEE MACHINE INSTRUCTION MANUAL MODEL: CM4725. Read this manual thoroughly before using and save it for future reference
 MAP COFFEE MIA CAPSULE COFFEE MACHINE INSTRUCTION MANUAL MODEL: CM4725 Read this manual thoroughly before using and save it for future reference Purchase MAP capsules at Harvey Norman stores nationwide
- 2 - IMPORTANT SAFETY REMINDERS
 USER MANUAL IMPORTANT SAFETY REMINDERS This appliance should only be used for domestic cleaning, as described in this user guide. Please ensure that this guide is fully understood before operating the
Quartzone Infrared Quartz Tube & Metal Sheathed Electric Heaters
 Quartzone Owner s Manual File E97759 COMFORT S for INDOOR* and OUTDOOR** USE *Excluding Residences ** With Quartz Elements and when mounted Underneath an Overhang by means of brackets out of the reach
HYLA NST Cleaning System
 Owner s Manual HYLA NST Cleaning System The HYLA NST Cleaning System aspirates and cleans the air through a waterbased filtration process. The system is intended for household use only. Applications: Usual
Utility Distribution Systems
 Utility Distribution Systems 6/2012 A0011037 1 WARRANTY This equipment is warranted to be free from defects in materials and workmanship, under normal use and service, for a period of 12 months from date
SELECTION, APPLICATION AND MAINTENANCE
 DIESEL PROTECTION SYSTEMS Automatic Diesel Engine Shut Down System for Safe Area Applications SELECTION, APPLICATION AND MAINTENANCE Series 300 Series 310 SYSTEM DESCRIPTION Suitable for attended engine
MG1532 & MG2032 MIXER-GRINDERS
 MIXER-GRINDER MG1532 & MG2032 MIXER-GRINDERS MODEL MG1532 ML-134099 7.5 HP Grind Motor + 1 HP Mix Motor MG1532 ML-134103 5 HP Grind Motor + 1 HP Mix Motor MG1532 ML-134100 7.5 HP Grind Motor + 1 HP Mix
The Black Box Push Button Control Box
 Roll Rite, LLC and its entire staff would like to not only Thank You but congratulate you on your purchase of one of what we feel to be the finest line of tarping systems in the industry. The Black Box
USER MANUAL OPERATION AND USE OF CAR WITH. Diego G3 / NEVO SEQUENTIAL GAS INJECTION SYSTEM
 USER MANUAL OPERATION AND USE OF CAR WITH Diego G3 / NEVO SEQUENTIAL GAS INJECTION SYSTEM Page 2 z 7 Table of contents 1. STARTING THE ENGINE... 3 2. CONTROL PANEL... 3 2.1 Indication of the current level
Programmable Thermostat MODEL 3312026.XXX With Dehumidify 3312024.XXX With Out Dehumidify
 Comfort Control Center 2 Thermostat Operating Instructions Programmable Thermostat MODEL 3312026.XXX With Dehumidify 3312024.XXX With Out Dehumidify TABLE OF CONTENTS About your new thermostat Features...2
DIGITAL WARMING CABINETS
 DIGITAL WARMING CABINETS INSTALLATION-OPERATION-MAINTENANCE USER MANUAL Mac Medical 820 S Mulberry St. Millstadt, IL 62260 California OSHPD Pre-approved (618) 476-3550 phone (618) 476-3337 fax December