Herringbone Pattern Flooring
|
|
|
- Ralf Watts
- 9 years ago
- Views:
Transcription
1 Herringbone Pattern Flooring If it s not marked NOFMA, it s not certified. Handling, Storage, Installation and Tips Herringbone is generally manufactured from 3/4 x 2 ¼ or ¾ x 1-1/2 standard tongue & groove Strip Flooring. Usually, individual slats are cut to length in multiples of the face width of the Strip Flooring. i.e. 2-1/4 slats would be 6-3/4 ; 9 ; or 11-1/4 long, etc. However slats can be cut to length, or from any width flooring. All slats are cut the same length and width. Herringbone Flooring is a pattern produced by alternating rows of Strip Flooring. It is laid in mastic and is one of the most difficult patterns to lay out and install. This pattern is best left to a skilled craftsman. We recommend both nailing and gluing slats 18 or longer. HANDLING, STORAGE & JOBSITE CONDITIONS Do not handle flooring in a manner that would expose it to rain, snow or sleet. Flooring should be stored in a completely enclosed covered building that is well ventilated, and preferably has weather proof windows that admit sunshine. Leave adequate room around the stacks of flooring for good air circulation. An unheated warehouse is preferred. If the building is heated, the temperature should not exceed 72 degrees F. Upon delivery, break the flooring into small lots and store it in the rooms here it will he installed. Allow 2 to 3 days for the flooring to become acclimated before beginning the installation. INSTALLATION I. Prepare the subfloor CONCRETE SLAB Check the slab to see that it is properly constructed and thoroughly dry. Check for unevenness, Grind off high spots, and use filling compound for low places. PLYWOOD SUBFLOORS should be at least 3/4 thick and nailed down well. Touch sanding may be required at joints to even out surface. Where the subfloor is too uneven, apply 3/8 plywood underlayrnent. BOARD SUBFLOORS (up to 6 square edged) also require good nailing. If uneven, hoards may require sanding. Nail 3/8 plywood underlayment on boards. T: W:

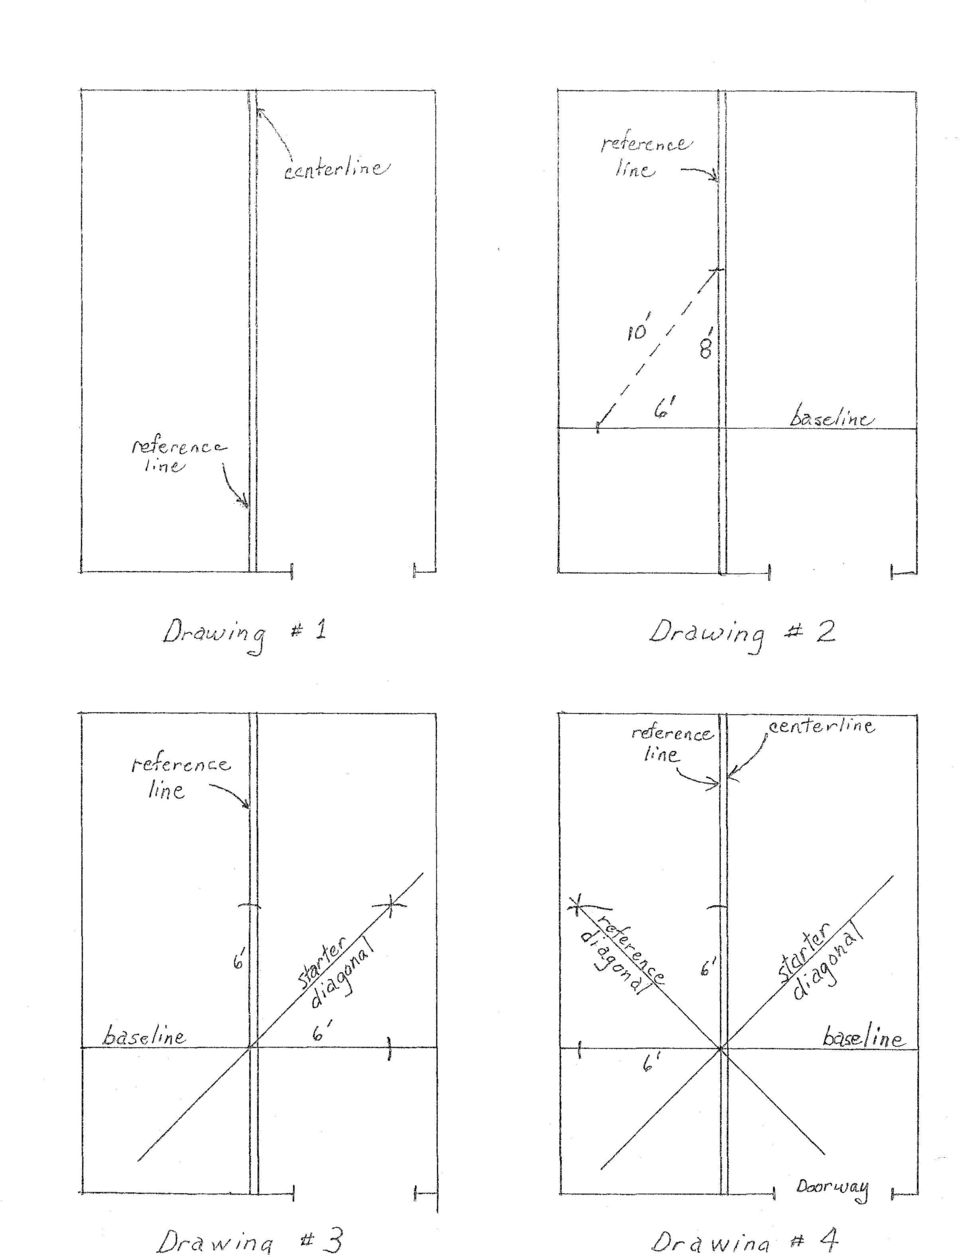
2 II. Lay out the Room 1. Check the room for squareness. Measure the diagonals of the room. If they are equal, the room is square. 2. Herringbone is, at best, a difficult pattern to put down. Two things must be considered when deciding on the orientation of the Herringbone pattern- A. The long dimension of the room. B. The pattern running to the major architectural interest point of the room. e.g. main entrance, window wall, or fireplace. 3. Pre-plan your working lines. It is usually best to center your first line along the orientation of the pattern (Drawing #1.) This line is called the centerline. Plan the layout, follow the example given in Drawing 4. III. Install vapor barrier (Concrete ONLY) Use either of the following methods: POLYETHYLENE A. Prime the slab with asphalt primer and allow to dry. B. Apply cold type cut-back asphalt mastic with a straight edge trowel over the entire surface. This is a skim-coat, thick enough to hold a 4 or 6-mu polyethylene film. Spread the mastic at a rate of 100 sq. ft. per gallon. C. Allow to dry for at least 30 minutes. D. Roll out 4 or 6-mu polyethylene film over the entire area, lapping edges 4 to 6 E. Walk in the polyethylene film, stepping on every inch of the surface to insure proper adhesion of the polyethylene. Small bubbles are of no concern. TWO MEMBRANE ASPHALT FELT OR BUILDING PAPER A. Prime the slab with asphalt primer and allow to dry. B. Apply cold type cut-back asphalt mastic with a notched trowel over the entire slab surface. C. Let the mastic set for two hours. D. Roll out 15 lb. asphalt felt or building paper. Lap edges 4, butt ends. E. Apply another coating of mastic with a notched trowel at a rate of 50 sq. ft. per gallon. Allow mastic to set. F. Roll out a second layer of 15 lb. asphalt felt or building paper. Lap edges 4. Butt ends. Lay both layers the same direction, but stagger the overlapping edges for a more even thickness. IV. Snap the chalk working lines. 1. Snap the centerline. NOFMA: The Wood Flooring Manufacturers Association T: W:
 This line is called the centerline. Plan the layout, follow the example given in Drawing 4. III.")
3 2. Establish the center focal point of the pattern desired for your layout. (A Herringbone pattern unit may have 3 center points,) 3. Chalk the reference line along the points of the pattern as shown in #5. & #5a. This line is parallel to the centerline and is the distance from the selected center point of the pattern to the far left point of the pattern. (This is the line to begin laying to.) 4. Snap the baseline perpendicular to the centerline about 3 or 4 from the near wall. Drawing #2 Check the angle, using the 6, 8 & 10 triangle. (Use 3, 4, 5 triangle for smaller areas.) Measure 6 along the baseline from the intersection of the baseline and the centerline. Then measure 8 from the same point along the centerline. The distance between these two points will be 10 IF the baseline is perpendicular to the centerline. IF THE LINES ARE NOT PERPENDICULAR, FIX THEM. (See Drawing #2.) 5. Chalk the Starter Diagonal Measure 6 along the baseline and the reference line. (See Drawing #3.) Scribe an arc from each point that intersects in the upper right quadrant. Chalk a line that passes through the intersection of the two arcs and the intersection of the baseline and reference line. 6. Chalk the Reference Diagonal -- as shown in Drawing #4. Use the same procedure as for the Starter Diagonal. V. Spread the mastic. 1. Be sure that the interior of the room in which you are working, and the mastic are in the proper temperature range recommended by the mastic manufacturer, Usually 60 to 72 F. If it is colder or warmer than recommended, there could be difficulty in spreading the mastic or getting it to set up as desired. Always follow the manufacturers directions. 2. Observe the manufacturers recommendation for open time (Setting up or hardening). This allows the mastic time to evaporate solvents and come to the proper consistency for sticking down the flooring. DO NOT COVER THE WORKING LINES WITH MASTIC. (Drawing #5. & #5a.) (Reference Line, Diagonal & Baseline.) NOFMA: The Wood Flooring Manufacturers Association T: W:

4 SPREAD MASTIC AS CLOSE AS POSSIBLE WITHOUT OBSCURING THE WORKING LINES. 3. Do no cover the area most convenient to the entrance and starting point with mastic so movement of materials can be accomplished without awkward motion or stepping in mastic. This area is covered with mastic toward the end of installation after all materials are in the room. VI. Start installing flooring at intersection of all working lines. (The selected center point of a Herringbone Unit will be along the centerline.) 1. Place the first piece of flooring as shown in Drawing #5 and #5a. The tongue edge of the piece should face the far wall, with the tongue edge along the Starter Diagonal. The left corner of piece #1 should be aligned with the intersection of the reference line and baseline. 2. Place the second piece as shown in Drawing #5. and #5a. This piece must be perpendicular to piece #1. Use a small carpenter s square to insure PRECISE ALIGNMENT, These two pieces determine the squareness of the entire installation. After a piece has been placed in the mastic, there can be minor adjustments in alignment by tapping the piece with a rubber mallet or similar non-marring instrument. 3. Continue placing the pieces in the order shown in Drawing #5 & #5a. Continue with the pattern until reaching the far wall. Then work the pattern to the right, one row at a time, alternating the direction of the flooring. (Always orient the tongue in the same direction.) Start each row carefully. Use the square to align the starting piece on each row and periodically check alignment. Leave pieces that fit along walls as the last step. 4. Upon completing the upper right quadrant, go back to the intersection of the working lines and complete the upper left quadrant one row at a time. Carefully align the first piece of each row and periodically check alignment with the carpenter s square. Alternate the direction of the flooring until upper quadrant is completed. THIS IS USUALLY THE BEST TIME TO FINISH BRINGING FLOORING INTO THE WORK AREA. STORE IT ON AREAS ALREADY COMPLETED. NOW SPREAD MASTIC OVER THE WALKWAY TO COMPLETE THE JOB. 5. Continue in the two remaining areas. Start at the centerline and continue working the pattern backwards. When installing the pattern backwards it is easiest to maintain alignment by coming back with double rows, as shown in Drawing #6. The first double row back into the lower left and right quadrant will be aligned with the reference line. After completing the first double row, continue installing two rows at a time until reaching the left wall. NOFMA: The Wood Flooring Manufacturers Association T: W:
 1. Place the first piece of flooring as shown in Drawing #5 and #5a.")
5 Finish lower right quadrant in the same manner, working from center to walls. 6. Cut pieces to within 3/4 of the walls. THIS 3/4 IS EXPANSION SPACE. Fit flooring into doorways where it is to butt against other flooring, or against a reducer strip. Leave 3/4 expansion space around masonry structures, such as a fireplace. (This void can be filled with a solid piece of cork and stained.) 7. Use spot cork blocking around the perimeter of the room between the flooring and the walls, (Drawing #6.) to allow the flooring to expand and contract. (Do not use flooring scraps.) GENERAL REMINDERS A. Upon opening flooring cartons, remove manufacturers recommendations, read and follow carefully. B. Most wood floor mastics will allow pieces to slip, when sideways pressure is applied, for some time after open time has elapsed. By working on knee boards or plywood panels laid on top of the installed area you avoid this sideways pressure. For the same reason, no heavy furniture or activity should be allowed on the finished parquet floor for at least 24 hours. C. For installation over suspended slabs which are thoroughly dry, no vapor barrier is necessary. However, test for moisture to be certain no excessive moisture condition is present. (See NOFMA Installation Manual.) A WORD ABOUT MASTICS CUT-BACK ASPHALT: (1.) It is spread at room temperature, has a long open time (takes a long time to set up before suitable for installing flooring), low coverage, low cost. (2.) Use with parquet that has interlocking tongues and grooves on all edges of all pieces. It has tendency to squirt up between edges of Square Edge Parquet. (3.) It is generally best to spread the mastic in the late afternoon and apply the flooring the next day. CHLORINATED SOLVENT: (1.) Most recently developed mastic that has tremendous holding power and will not burn. (2.) It has a smell of chlorine and should be used in a well ventilated area. NOFMA: The Wood Flooring Manufacturers Association T: W:
 to allow the flooring to expand and contract. (Do not use flooring scraps.) GENERAL REMINDERS A. Upon opening flooring cartons, remove manufacturers recommendations, read and follow carefully. B.")
6 (3.) Open time is short and coverage is about sq. ft. per gallon. (4.) Usually more expensive per square foot than asphalt mastics. PETROLEUM-BASED SOLVENT MASTICS: Open time is short. Can be highly flammable, so room must be well-ventilated. DO NOT ALLOW SMOKING --CHECK FOR PILOT LIGHTS LEFT ON NOTE: (ALWAYS FOLLOW MANUFACTURERS INSTRUCTION ON COVERAGE, DRYING TIME, AND VENTILATION.) NOFMA: The Wood Flooring Manufacturers Association T: W:

7
8

9

10

How to Install Hardwood Flooring Over a Sub Floor
 How to Install Hardwood Flooring Over a Sub Floor Installation Preparation Instructions Read the entire instructions before starting your project. 1) INSPECT EACH PLANK (see fig. a) Wood is a natural product
Guide Specifications for Maple Flooring Systems
 Guide Specifications for Maple Flooring Systems MFMA Guide Specification for Resilient Pre-Engineered Fixed Panel System Purpose This Guide Specification is designed to assist in the production of actual
Carpet Tile Installation Guidelines
 NOTICE FAILURE TO FOLLOW THESE GUIDELINES CAN RESULT IN VOIDING THE CARPET WARRANTY. Installation Guidelines The following instructions should be reviewed prior to installation. Shaw Industries will not
Bella Cera Engineered Hardwood Flooring Installation Instructions. Check for Proper Color Selection Prior to Installation
 Bella Cera Engineered Hardwood Flooring Installation Instructions Check for Proper Color Selection Prior to Installation 1 Important Information before You Begin 1.1 Installer/Owner Responsibility Carefully
INSTALLATION RECOMMENDATIONS. Outdoor Rubber Tiles
 INSTALLATION RECOMMENDATIONS Outdoor Rubber Tiles Prior to Installation: The Outdoor Rubber Tiles and accessory transition pieces intended for this installation have been shipped to you via a freight carrier
Vinyl Composition Tile Installation System
 Vinyl Composition Tile Installation System Product Gauge Size Vinyl No-Wax (Dry Back) Urethane No-Wax (Dry Back) 0.045" (1.1 mm) 0.080" (2.0 mm) IMPERIAL TEXTURE 0.094" (2.4 mm) STONETEX ChromaSpin COMPANION
Eucaboard / Eucaplac/ Eucatile paneling is intended for dry interior use only and requires care in handling.
 i This instruction sheet describes the proper methods for installing Eucatex decorative wall paneling. Eucaboard / Eucaplac/ Eucatile paneling is intended for dry interior use only and requires care in
Installation System. Existing Resilient Sheet Floors
 Vinyl Composition Tile Installation System Product Adhesive/Full Spread Adhesive/Tile-On Comment Imperial Texture MultiColor RAVE Stonetex Companion Square Feature Tile/Strips ARTEFFECTS SAFETY ZONE Vinyl
ENGINEERED FLOORING INSTALLATION
 ENGINEERED FLOORING INSTALLATION ATTENTION! INSTALLER/OWNER RESPONSIBILITIES Beautiful hardwood floors are a product of nature and, therefore, they will show variations in color, grain, texture, and appearance.
How To Level A Subfloor
 Skill Level: INTERMEDIATE Give these projects a try if you're a confident DIYer with a good working knowledge of a variety of tools. They can take a day or more to complete. If you can build a birdhouse
Laminate Flooring T-Lock Angle-Drop Installation Instructions
 TECHNICAL SERVICE Laminate Flooring T-Lock Angle-Drop Installation Instructions March 23, 2012 Read all instructions carefully before beginning installation. Make sure that the instructions are the most
BENTLEY ELEMENTS COLLECTION LVT
 This document refers to the following products: Product Size Installation direction Seams treatment Elements Tiles See specifications 90 None Elements Planks See specifications Stair Step None Note: This
Armstrong Do-It-Yourself Tile Installation System
 Armstrong Do-It-Yourself Tile Installation System What tools will I need to install my tile floor? You'll need just the basics: - floor tile (make sure you have enough tile to finish the job) - adhesive
Installation Instructions for staple/nail down applications
 Installation Instructions for staple/nail down applications General Notes Inspect all materials carefully before installation. Warranties do not cover materials with visible defects once they are installed.
Engineered Hardwood Flooring Installation Instructions
 Engineered Hardwood Flooring Installation Instructions Tip: Check for proper color selection and style prior to Installation. No claims will be accepted after installation Important Information before
Hardwood Flooring. Urbania Flooring
 Engineered Hardwood Flooring Installation Guide for Urbania Flooring BEFORE STARTING THE INSTALATION - Please take the time to read and ensure that you understand the information contained in this document.
How To Install Hardwood Flooring
 phone: 1.855.Ludaire e-mail: [email protected] Solid Flooring Installation Instructions These Instructions and Guidelines are for the typical installation of ¾ Pre-finished Solid Hardwood Flooring manufactured
LAYING BLOCK AND BRICK
 LAYING BLOCK AND BRICK Products highlighted in this section: SAKRETE Type N Mortar Mix SAKRETE Type S Mortar Mix Brick And Block Laying Basics The first step in building a brick or block wall is to construct
Installation Guidelines
 Installation Guidelines NWFA Information Available as of November 17, 2008 CONTENTS SECTION I GENERAL GUIDELINES CHAPTER 1 JOBSITE CONDITIONS CHAPTER 2 ACCLIMATION CHAPTER 3 MOISTURE REQUIREMENTS AND MOISTURE
Please calculate with around 5% more square meters than needed because you will have material loss due to cutting and sorting.
 1. TEKA Soft Loc Installation Guide Thank you for having chosen TEKA Parquet. To guarantee a constant quality product TEKA engineered hardwood flooring is made out of selected wood species and runs only
STANDARD REQUIREMENTS FOR BONDING OR MECHANICAL ATTACHMENT OF INSULATION PANELS AND MECHANICAL ATTACHMENT OF ANCHOR AND/OR BASE SHEETS TO SUBSTRATES
 ROOFING APPLICATION STANDARD (RAS) No. 117 STANDARD REQUIREMENTS FOR BONDING OR MECHANICAL ATTACHMENT OF INSULATION PANELS AND MECHANICAL ATTACHMENT OF ANCHOR AND/OR BASE SHEETS TO SUBSTRATES Scope 1.1.
installation Mannington Works. 800 241 2262 manningtoncommercial.com Mannington Commercial Luxury Vinyl Tile Installation Instructions GENERAL
 GENERAL These instructions cover all fully adhered s of Mannington Commercial LVT; Assurance Squared, Create, Nature s Paths, Nature s Paths Select and Walkway luxury vinyl flooring. Nature s Paths LockSolid
Directions For Applying Malarkey Laminate Shingles
 S Laminate Shingle Instructions 1 Directions For Applying Malarkey Laminate Shingles GENERAL INSTRUCTIONS Install Malarkey laminate shingles according to building code and local amendments. To qualify
SHINGLE APPLICATION GUIDE
 SHINGLE APPLICATION GUIDE CONTENTS 01. General conditions 01. Material requirements 02. Terms 07. Estimating shingle requirements 08. Roof preparation 10.Shingle application E version 2006 GENERAL CONDITIONS
INSTALLATION IMPORTANT INSTALLER/OWNER RESPONSIBILITY TOOLS & EQUIPMENT NEEDED FOR INSTALLATION PRE-INSTALLATION PROCEDURES & JOBSITE CONDITIONS
 IMPORTANT It is important that you read & understand the following information and instructions in their entirety before proceeding with installation. Please thoroughly inspect all Flooring products in
Read and understand all installation instructions and precautions before installing. GENERAL APPLICATION INSTRUCTIONS
 AC TOPSEAL SELF-ADHERED, GRANULAR SURFACED, SINGLE PLY, LOW SLOPE ROLLED ROOFING 3 X 33.3 = 100 SQ. FT. 10 YEAR MATERIAL LIMITED WARRANTY For Use on Porches / Sheds / Utility Buildings / Accessory Buildings
Technical Services. Product MM INCH Installation direction Seams treatment GTI CONNECT (interlocking)
") INSTALLATION INSTRUCTIONS FOR GTI CONNECT TILES This document refers to the following products: Product MM INCH Installation direction Seams treatment GTI CONNECT (interlocking) 635 X 635 mm 25.5 x 25.5
INSTALLATION INSTRUCTIONS FOR GTI CONNECT TILES This document refers to the following products: Product MM INCH Installation direction Seams treatment GTI CONNECT (interlocking) 635 X 635 mm 25.5 x 25.5
Fiberglass-Reinforced Sheet Flooring Installation System
 Fiberglass-Reinforced Sheet Flooring Installation System Product Adhesive Comments Residential Use Only CushionStep Value Good Better Best FlexStep Duality Premium Premium Plus Modified loose lay method
Asphalt Shingle Application Requirements
 Alberta Allied Roofing Association Asphalt Shingle Application Requirements Section 1 Roof Decks 1.1 General Asphalt Shingles are not permitted to be installed directly over rigid insulation. When Asphalt
CONTENTS. General conditions 2. Material requirements 3. Terms 4. Estimating shingle requirements 4. Roof preparation 6. Shingle application 9 - 1 -
 CONTENTS General conditions Material requirements 3 Terms 4 Estimating shingle requirements 4 Roof preparation 6 Shingle application 9 Shingle Shingle application application guide guide - - b a 3a 3b
Please read the entire document before purchasing and installing any of these products
 Please read the entire document before purchasing and installing any of these products USA SBS UNDERLAYMENT ROOFING UNDERLAYMENT SBS Mineral Surfaced MINERAL SURFACE CAP SHEET Ice and Water Protection
SC2000 CEMENT BONDING PROCEDURES
 Pg.1 SC2000 CEMENT BONDING PROCEDURES Widely recognized as the world s finest cold vulcanizing cement REMA SC2000 is the solution to your industrial bonding problems. By using REMA UTR20 hardener with
Shower Walls and Tub Surrounds
 Reverso en español TEC Skill Set How-To Project Guide Shower Walls and Tub Surrounds 3 Steps to a Beautiful Tile Surface! 1. Prepare the surface 2. Set the tile 3. Grout and caulk H.B. Fuller Construction
INSTALLATION INSTRUCTIONS FOR LAMINATE FLOORING
 INSTALLATION INSTRUCTIONS FOR LAMINATE FLOORING Introduction Laminate flooring is designed to be a floating floor that may be installed over virtually any type of sub floor. It is not nailed or glued to
THIRD PARTY INSPECTION GUIDELINES FOR OWNERS AND GENERAL CONTRACTORS/CONSTRUCTION MANAGERS DS150
 THIRD PARTY INSPECTION GUIDELINES FOR OWNERS AND GENERAL CONTRACTORS/CONSTRUCTION MANAGERS DS150 SECTION ONE A. Objective The objective of this guide is to provide Owners and General Contractors/Construction
Shingle Installation Guide
 Shingle Installation Guide Getting Started Dedicated to improving the environment, NewTech manufactures roofing tiles that are composed of up to 90% recycled post-industrial plastic. The manufacture of
Best Barns USA Assembly Book
 Best Barns USA Assembly Book Revised November 27, 2013 the Easton - R 12'x 20' Manufactured by Reynolds Building Systems, Inc. 205 Arlington Drive Greenville, PA 16125 724-646-3775 This manual is copyrighted.
INSTALLATION INSTRUCTIONS
 INSTALLER/OWNER RESPONSIBILITIES Hardwood flooring is a product of nature and its inherent beauty stems from the fact that each piece is unique with no two pieces the same. Due to the fact that this flooring
CHAPTER 3 MOISTURE TESTING
 CHAPTER 3 MOISTURE TESTING Part I - Moisture Testing for Wood Subfloors A. Testing Requirements 1. Test for moisture at several locations in the room a minimum of 20 per 1,000 square feet and average the
Fiberglass-Reinforced Sheet Flooring Installation System
 RESIDENTIAL USE ONLY Fiberglass-Reinforced Sheet Flooring Installation System Product Gauge Comments FlexStep Value FlexStep Good 0.055" (1.4 mm) 0.065" (1.65 mm) Modified loose lay method: Acrylic double-faced
Installation Guidelines for Modular Carpet
 Installation Guidelines for Modular Carpet Ecoflex Urethane Cushion Backed Carpet Tiles PVC Backed Carpet Tiles Thermoplastic Backed Carpet Tiles Self Lock Carpet Tiles 1975 West Oak Circle Field Services
FRAMED & MOUNTED TILE MURAL
 Page 1 of 5 There is no denying that tile murals have taken the sublimation industry by storm. The unique ability to take a customer s artwork or high resolution photograph, tile it using your software
Chapter 9: INSTALLING ROOFING
 9.1 LEAK BARRIER (ICE AND WATER SHIELD) 9.2 SHINGLE UNDERLAYMENT 9.3 INSTALLING GUTTER APRON AND GABLE D-EDGE 9.4 INSTALLING SHINGLES 9.5 RIDGE VENT AND CAP Tools needed by each volunteer: Hammer (16 oz.
Installation for Wood Flooring
 Installation for Wood Flooring Tarkett wood flooring offers a beautiful variety of options from species and colour, to plank widths and finishes. We developed enhanced locking system, T-lock, and the best
VINYL CLICK FLOORING INSTALLATION GUIDE
 VINYL CLICK FLOORING INSTALLATION GUIDE Owner/Installer Responsibility Prior to installing a single board, you or the installer must determine that the job-site environment and the sub-surfaces meet the
How to Install GoBoard:
 How to Install GoBoard: A Step-by-Step Guide Durable, Ultra-Lightweight, Waterproof Tile Backer Board Introducing GoBoard Every tiling project requires a durable, waterproof surface under the tile, called
Installing Window and Door Mouldings
 Installing Window and Door Mouldings About Window and Door Mouldings The trim around windows and doors greatly influences the look and style of your interior. They also bridge the gaps and cover spaces
PANELIZED HOME INSTALLATION GUIDELINE
 PANELIZED HOME INSTALLATION GUIDELINE A typical home package will be constructed of Snap-N-Lock Insulated Panels clad with steel skins. 4" panels will be used for the walls, and 6" panels for the roof.
installation Mannington Works. 800 241 2262 manningtoncommercial.com Mannington Commercial Hardwood
 General recommendations Product inspection All of the General Installation Guidelines regarding storage, job site conditions, including climatic and structural requirements found in Mannington s Professional
Commercial/Residential Linoleum Sheet Installation System
 Commercial/Residential Linoleum Sheet Installation System COMMERCIAL USE ONLY Product MARMORETTE GRANETTE COLORETTE UNI WALTON LINORETTE Gauge 0.080" (2.0 mm) 0.100" (2.5 mm) 0.125" (3.2 mm) 0.100" (2.5
HOW-TO LAY HARDBOARD OR PLYWOOD FLOOR OVERLAY
 HOW-TO HOW-TO LAY HARDBOARD OR PLYWOOD FLOOR OVERLAY Most floor coverings, if laid over uneven wooden floors, will wear unevenly and look unsightly. The answer is to cover the old boards with hardboard
Prefinished 3/4 Solid (including various widths such as 3 1/4, 3 5/8, 4 3/4, 5 ) Nail-Down Installation Instructions
 Nail-Down Installation Instructions") Prefinished 3/4 Solid (including various widths such as 3 1/4, 3 5/8, 4 3/4, 5 ) Nail-Down Installation Instructions Thank you for choosing ARK Floors Exotic Hardwood Flooring. In order to meet warranty
Prefinished 3/4 Solid (including various widths such as 3 1/4, 3 5/8, 4 3/4, 5 ) Nail-Down Installation Instructions Thank you for choosing ARK Floors Exotic Hardwood Flooring. In order to meet warranty
Installation & Technical Guide
 Of the very few negative responses that I have received regarding this product, the one that I find most humorous is this one: Contractors are too rough on the product. I don t think this can stand up
Final inspections are completed by site visit only. Access to fenced yards shall be planned.
 ROOFING RESIDENTIAL BUILDING INSPECTIONS DEPARTMENT www.ci.blaine.mn.us This handout is intended only as a guide and is based in part on the 2015 Minnesota State Building Code, Blaine City ordinances,
ROOFING APPLICATION STANDARD (RAS) No. 150 PRESCRIPTIVE BUR REQUIREMENTS
 No. 150 PRESCRIPTIVE BUR REQUIREMENTS") ROOFING APPLICATION STANDARD (RAS) No. 150 PRESCRIPTIVE BUR REQUIREMENTS 1. 2. 3. 3.0 Scope 1.1 This application standard shall be used where the authority having jurisdiction has adopted its use, and
ROOFING APPLICATION STANDARD (RAS) No. 150 PRESCRIPTIVE BUR REQUIREMENTS 1. 2. 3. 3.0 Scope 1.1 This application standard shall be used where the authority having jurisdiction has adopted its use, and
Mark Cramer Inspection Services, Inc.
 Mark Cramer Inspection Services, Inc. 492 Twentieth Avenue, Indian Rocks Beach, FL 34635-2970 (727) 595-4211 Fax (727) 596-7583 Certified Member #12085 American Society of Home Inspectors Construction
Installation guide. ENGINEERED and LOC. 1/2 in and 3/4 in (13 mm and 19 mm) INNOVATION TRADITION PERFECTION
 INNOVATION TRADITION PERFECTION") Installation guide ENGINEERED and LOC 1/2 in and 3/4 in (13 mm and 19 mm) INNOVATION TRADITION PERFECTION It is important to read the installation instructions, maintenance guide and warranty document
Installation guide ENGINEERED and LOC 1/2 in and 3/4 in (13 mm and 19 mm) INNOVATION TRADITION PERFECTION It is important to read the installation instructions, maintenance guide and warranty document
SOLID FLOORING 3/4 INSTALLATION GUIDELINES
 SOLID FLOORING 3/4 INSTALLATION GUIDELINES Thank you for choosing Cikel Exotic Hardwood Flooring, a responsible choice. Please thoroughly review and adhere to the following installation instructions to
GENERAL RUBBER LINING PRINCIPLES
 GENERAL RUBBER LINING PRINCIPLES I. METAL PREREQUISITES Metal to be lined should meet the requirements as stated in section 8 Metal Fabrication and section 12 Blasting and Cementing Procedures. The surface
How To Install Hardwood Flooring
 3/4" Solid Plank & Strip Products For Nail-Down Installation INSTALLER/OWNER RESPONSIBILITY Beautiful hardwood floors are a product of nature and therefore, not perfect. Our wood floors are manufactured
CITY OF WHITE BEAR LAKE BUILDING INSPECTION DEPARTMENT 4701 Highway 61 White Bear Lake, MN 55110 Fax: 651-429-8503. Re-Roofing: Asphalt Shingles
 CITY OF WHITE BEAR LAKE BUILDING INSPECTION DEPARTMENT 4701 Highway 61 White Bear Lake, MN 55110 Fax: 651-429-8503 Re-Roofing: Asphalt Shingles This is a summary of the standard requirements based on the
Residential Roofing Guide
 Residential Roofing Guide TABLE OF CONTENTS Building Detail and Accessories...... 1 Panel Introduction and Handling...... 2 Cutting and Trimming.... 3 Roof Preparation..... 3 Roof Slope..... 3 Re-roofing...
Daybreak Acacia. 25yr Residential Wear Warranty
 - Wide Leaf Acacia - Handsculpted - Tongue & Groove - Random Lengths - 8 Layer Urethane Finish - High Color Variation JANUARY 2013 HARDWOOD - WIDE LEAF SOLID Daybreak Acacia 3/4 Solid Handsculpted, Tongue
POST AND FRAME STRUCTURES (Pole Barns)
") POST AND FRAME STRUCTURES (Pole Barns) Post and frame structures. The following requirements serve as minimum standards for post and frame structures within all of the following structural limitations:
POST AND FRAME STRUCTURES (Pole Barns) Post and frame structures. The following requirements serve as minimum standards for post and frame structures within all of the following structural limitations:
Resurfacing Concrete. Page 1 of 5
 Resurfacing Concrete Materials List QUIKRETE Concrete Resurfacer (No. 1131) (see calculator on page 5 for quantity needed) QUIKRETE Concrete and Stucco Wash (No. 8601) QUIKRETE Concrete Sealer (No. 8800)
Composite Stone Veneer
 Composite Stone Veneer Installation Guide Ver 1 Jun 2015 www.compstone.com Composite Stone Veneer Installation Guide Contents Introduction & Overview 3 Required Tools 4 Optional Tools 4 Attachment Guidelines:
Technology at its best. Benefits
 Protecting what s under your roof from the elements is simplicity itself with Ruberoid Roofing Shingles. Roofing Shingles make ideal roofing; they are attractive, easy to install and are perfect for use
PREMIUM LAMINATED ASPHALT SHINGLES Dallas, TX Tuscaloosa, AL Phillipsburg, KS
 Application Instructions for THESE ARE THE MANUFACTURER S APPLICATION INSTRUCTIONS FOR THE ROOFING CONDITIONS DESCRIBED. TAMKO BUILDING PRODUCTS, INC. ASSUMES NO RESPONSIBILITY FOR LEAKS OR OTHER ROOFING
Cupped Floor STEP 1. Flooring absorbing excessive moisture on the underside causes expansion and cupping with the edges raised.
 BEHAVIOR OF FLOORING If it s not marked NOFMA, it s not certified. Cupping and Crowning Cupped Floor STEP 1. Flooring absorbing excessive moisture on the underside causes expansion and cupping with the
Here is your set of Detailed Plans from Copyright 2004 All Rights Reserved
 Here is your set of Detailed Plans from Copyright 2004 All Rights Reserved Materials for the House Here is the list of materials you will need to construct the basic house then to cover it with roofing
LIFE SCIENCE. Hoop House Construction for New Mexico: 12-ft. x 40-ft. Hoop House BRINGING TO YOUR HOME ECONOMICS COLLEGE OF AGRICULTURE AND
 Hoop House Construction for New Mexico: 12-ft. x 40-ft. Hoop House COLLEGE OF AGRICULTURE AND HOME ECONOMICS BRINGING SCIENCE TO YOUR LIFE Hoop House Construction for New Mexico: 12-ft. x 40-ft. Hoop House
SECTION 07550 - MODIFIED BITUMINOUS MEMBRANE ROOFING. A. Vapor barrier (base ply); cover board at existing roof deck.
; cover board at existing roof deck.") SECTION 07550 - PART I GENERAL 1.01 SECTION INCLUDES A. Vapor barrier (base ply); cover board at existing roof deck. B. Roof insulation at new roof deck. C. Modified bitumen membrane. D. Fluid applied
SECTION 07550 - PART I GENERAL 1.01 SECTION INCLUDES A. Vapor barrier (base ply); cover board at existing roof deck. B. Roof insulation at new roof deck. C. Modified bitumen membrane. D. Fluid applied
Installation Systems. Chapter V Installation Systems
 V Installation Systems Chapter V Installation Systems 81 ARSTRONG STRATEGIC ACCOUNTS RECOENDED SHEET FLOORING ADHESIVES AND INSTALLATION SYSTE Product Avantra Cambray Chelsea Corner Concerto Deco Collection
Construction of Quality Hot Mix Asphalt Pavements
 59 th Annual Asphalt Paving Conference Outline Best Practices for Pavement Construction Placement Best Practices Surface Prep Project planning Understanding the paver Factors affecting the screed Screed
Renovating Your Basement
 building science.com 2006 Building Science Press All rights of reproduction in any form reserved. Renovating Your Building America Report - 0309 2003 (revised 2007) Building Science Corporation Abstract:
The better way to build TM. Installation Manual. FOUNDATION SIPs & FROST WALLS SIPs
 The better way to build TM Installation Manual FOUNDATION SIPs & FROST WALLS SIPs February 2016 PWF FOUNDATION & FROST WALL SIPs Installation Manual Table of Contents Topics General Requirements...................................
Aspect Metal Peel & Stick Tile Installation Guide
 Aspect Metal Peel & Stick Tile Installation Guide Proper surface preparation is essential for a successful project Failure to follow recommended surface preparation instructions may void the warranty Read
Residential Foundations and Basements
 Residential Foundations and Basements Disclaimer All of the following information is based on the 2006 International Residential Code with Kentucky Amendments. As some information is paraphrased, article
WATERPROOFING OF REINFORCED CONCRETE FLAT ROOF 12
 WATERPROOFING OF REINFORCED CONCRETE FLAT ROOF 12 87 88 GOOD INDUSTRY PRACTICES 12 WATERPROOFING OF REINFORCED CONCRETE FLAT ROOF 12.1 BACKGROUND Most roofs in Singapore are constructed using reinforced
GigaCrete Specification PlasterMax
 GigaCrete Inc. 6775 Speedway Blvd. Suite M105 Las Vegas, NV 89115 Ph (702) 643-6363 Fax (702) 643 1453 www.gigacrete.com GigaCrete Specification PlasterMax PlasterMax : Fire Rated Plaster for Direct Application
Table of Contents. Western States Standing Seam SS675 Panel Installation, Flashings & Shop Drawing Detail Guide. Notes to Designer /Installers..
 Western States Standing Seam SS675 Panel Installation, Flashings & Shop Drawing Detail Guide Table of Contents Section Page Section Page Notes to Designer /Installers.. 1 Fastener Placement and Selection.2-3
Roof Deck Installation Guidelines
 Roof Deck Installation Guidelines June 2012 TABLE OF CONTENTS INTRODUCTION GENERAL INFORMATION BEFORE THE DECK ARRIVES WHEN THE DECK ARRIVES CARE OF MATERIALS CAUTIONS INSTALLATION GENERAL TECTUM I PLANK
Engineered Installation Instructions
 Engineered Installation Instructions Please read all instructions carefully before attempting installation. Improper installation may void the warranty. PRODUCT USE DIVINE Flooring Engineered products
12 POLYURETHANE ADHESIVE (PU 105)
") 12 POLYURETHANE ADHESIVE (PU 105) DISCLAIMER: Refer to page 5 of this document. 12.1 DESCRIPTION PU 105 is a high performance two-part polyurethane adhesive for both indoor installations of Mondo rubber
12 POLYURETHANE ADHESIVE (PU 105) DISCLAIMER: Refer to page 5 of this document. 12.1 DESCRIPTION PU 105 is a high performance two-part polyurethane adhesive for both indoor installations of Mondo rubber
The Mohawk Group Installation Guidelines for
 The Mohawk Group Installation Guidelines for Uniplus System II Double Stick Unibond RE Wet Set The Mohawk Group 1975 West Oak Circle Marietta, GA 30062 800-554-6637 www.themohawkgroup.com Field Services
Gate Leg Drop Leaf Table Plans
 Preparing the table top blanks: Cut and glue enough 3/4 stock to make three panels 40 long by 24 wide (they will be cut to final size at a later time). While the glue dries we will work on the legs. Preparing
Thin Veneer Stone Installation Guide
 Thin Veneer Stone Installation Guide Complete step by step How-to guide for installing Thin Veneer Stone. Important: From pallet to pallet of natural thin veneer stone, as with any natural stone product,
Adhesive Recommendation for Altro Flooring. Porous (absorbent) subfloors (most wood subfloors and some concrete)
 subfloors (most wood subfloors and some concrete)") Adhesive Recommendation for Altro Flooring Product Safety Sheet Flooring Smooth Sheet Flooring Porous (absorbent) subfloors (most wood subfloors and some concrete) Altrofix 30/31 (excessively heavy rolling
Adhesive Recommendation for Altro Flooring Product Safety Sheet Flooring Smooth Sheet Flooring Porous (absorbent) subfloors (most wood subfloors and some concrete) Altrofix 30/31 (excessively heavy rolling
RESIDENTIAL ROOFING & RE-ROOFING, ROOF VENTILATION AND ROOF SHEATHING REQUIREMENTS MICHIGAN RESIDENTIAL CODE 2000
 RESIDENTIAL ROOFING & RE-ROOFING, ROOF VENTILATION AND ROOF SHEATHING REQUIREMENTS MICHIGAN RESIDENTIAL CODE 2000 SECTION R905 REQUIREMENTS FOR ROOF COVERINGS R905.1 Roof covering application. Roof coverings
Solvent Cementing Instructions For Plastic Pipe & Fittings
 Solvent Cementing Instructions For Plastic Pipe & Fittings Description Solvent cementing is the process of fusing plastic pipe and fittings by the use of an adhesive containing a suitable active solvent
Staple-Down, Glue-Down and Floating Installation IndusParquet 1/2" Engineered
 Staple-Down, Glue-Down and Floating Installation IndusParquet 1/2" Engineered Thank you for choosing IndusParquet ½" Engineered Hardwood Flooring. Protect your investment; review and adhere to the flooring
We urge you to read and follow the attached installation instructions. Failure to do so may void the warranty of this garden window unit.
 Important Information for New Construction Installations Attention Installer! We urge you to read and follow the attached installation instructions. Failure to do so may void the warranty of this garden
DELTA Premium Moisture Management Systems for Foundations.
 DELTA protects property. Saves energy. Creates comfort. DELTA Premium Moisture Management Systems for Foundations. DELTA Premium Moisture Management Systems provide the best protection for foundations.
Pergo Installation Essentials Guide For Laminate Flooring
 Pergo Installation Essentials Guide For Laminate Flooring SECTION SECTION 1. Floating Floor Definition & Benefits 2. What You Need To Know Expansion/Contraction 3. Before Starting Estimates 4. A Basic
Chapter 3 Installing Over-the-Post Railing on an L-Shaped Stair
 49 Chapter 3 Installing Over-the-Post Railing on an L-Shaped Stair In this chapter: The Over-the-Post Balustrade System Determining the Rail Centerline Using Rail Bolts Making a Pitch Block Laying Out
Annapolis Valley - Engineered Floors - Installation Instructions
 Annapolis Valley - Engineered Floors - Installation Instructions OWNER/INSTALLATION TECHNICIAN RESPONSIBILITIES: Order Quantity: When the flooring is ordered, a minimum of 5% (recommended 7% - 10%) must
CERTIFICATE NAME OF PRODUCT MANUFACTURER PRODUCT DESCRIPTION CERTIFICATION PROCEDURE. No VTT C-6044-10 Date of issue 11.10.2010, Updated July 1, 2011
 CERTIFICATE NAME OF PRODUCT No VTT C-6044-10 Date of issue 11.10.2010, Updated July 1, 2011 H-CONTROL REFLEX+ reflective insulating vapour control layer for roof and wall applications MANUFACTURER ACTIS
2.18 INTERIOR & EXTERIOR FINISHES 2.18.1 VAPOR & AIR BARRIERS
 2.18 INTERIOR & EXTERIOR FINISHES 2.18.1 VAPOR & AIR BARRIERS The LOGIX wall assembly has no need for an additional vapor barrier, the solid concrete core covered with the low permeance EPS (Type II) foam