Dual HD Giganet NAS Enclosure User s Manual
|
|
|
- Allan Hunt
- 8 years ago
- Views:
Transcription
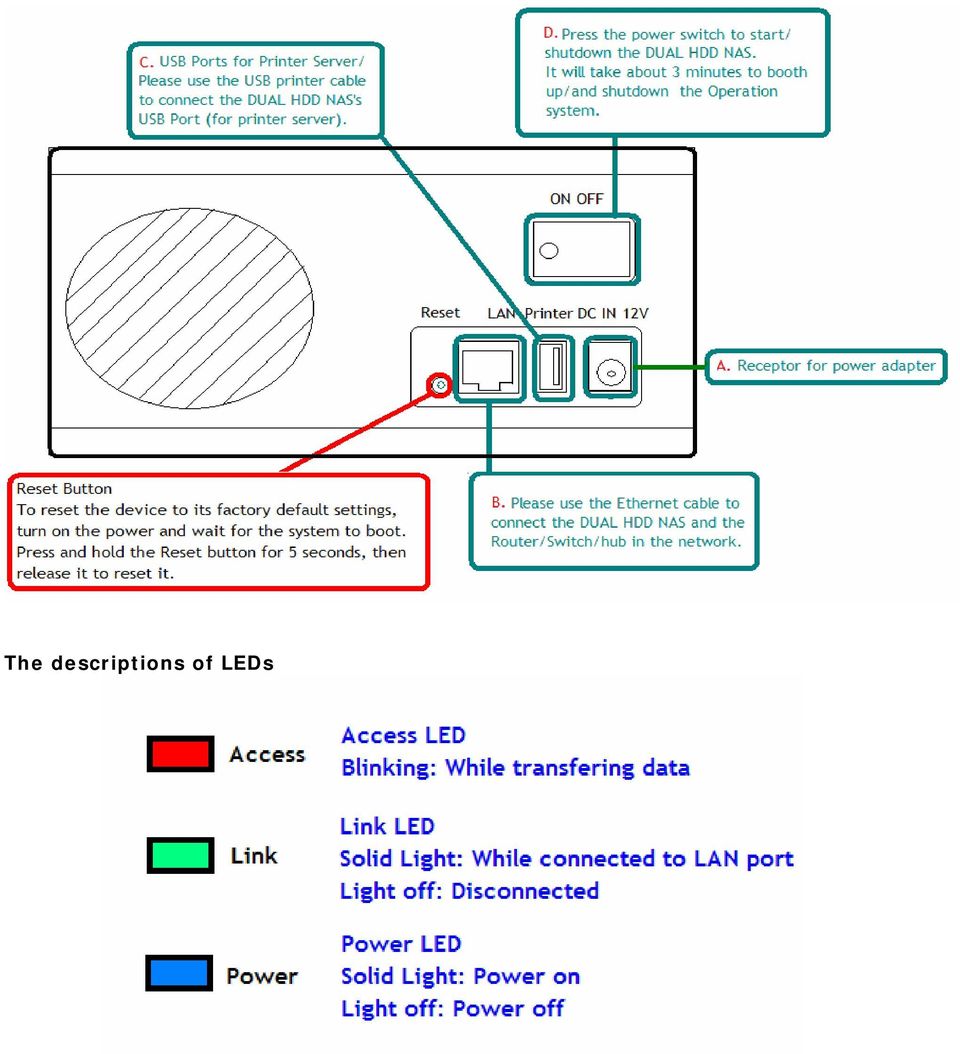
1 Before you begin Dual HD Giganet NAS Enclosure User s Manual 1. If you purchased the Dual HD Giganet NAS enclosure (indicated as The NAS hereafter) to share your file or media with other computers, you must use an Ethernet cable with a properly configured internet environment. 2. For optimal security and convenience, we recommend designating a single computer to handle all NAS configuration settings. Check your package content DUAL HD Giganet NAS (Network Attached Storage) CD-ROM (Containing Setup software & user s manual) Ethernet (CAT5 UTP/Straight Through) cable 12V/4A DC Power Adapter Connect the NAS to Network. 1. First, connect the power adapter to the receptor at the back panel of the NAS and then plug the other end of the power adapter to a wall outlet or power strip. Turn on the power switch; the Power LED will turn ON to indicate proper operation. 2. Insert an Ethernet cable to LAN port on the back of the NAS and an available Ethernet port on the network adapter in the router/switch/hub you will use to connect the NAS. The LED light for Link Port will illuminate to indicate proper connection. - Please use a straight-through cable to the LAN port. - Please make sure that your Local Area Network is already working properly. 3. USB ports can connect to USB printer, by connecting printer the NAS will become a printer server. Note: the NAS does not support GDI/Host-based printers 4. Press the power switch to start or shut down the NAS. It will take about 3 minutes to booth up/shutdown the operation system. 5. Before setting up the NAS, it s recommended to go through Q&A section on page 40 to avoid mistakes and confusion.
 CD-ROM (Containing Setup software & user s manual) Ethernet (CAT5 UTP/Straight Through) cable 12V/4A DC Power Adapter Connect")
2 The descriptions of LEDs
3 - When you have completed these steps, your connected network should look similar to this: Hardware Installation

4

5 Power ON/OFF Procedure Always connect the power adapter to your device before you plug it into the wall socket. To turn on the power, press the ON/OFF switch. The blue backlight LED will turn on and the unit will start to boot up. It will take about 1-2 minute for the drive to go online and be ready. During boot up, the Link LED will be blinking. To turn off the NAS, stop all current downloads, then turn off the power using the ON/OFF switch. It will take about 1 minute for the drive to park. Once the system has shut down, and if it will not be in use for a longer period of time, remember also to remove the power supply from the wall socket. Alternatively, the device can also be turned off using the admin interface via web browser. Login, go to the Turn Off Server menu in the System area and turn the server off. Quick Installation Guide Following is a quick installation guide and for further details on each of the settings, please refer to chapter below: 1. Install at least one hard drive. 2. Connect the Ethernet cable from your network router or switch to the NAS. 3. When everything is connected, turn the NAS on and give it about 2-3 minutes to boot up. 4. Access the web configuration interface via your web browser. See How to login in Chapter below. 5. Go to the Maintenance menu and use the disk utility to format the drive. If two identical drives are installed, you can also go to the RAID setting section and create your RAID array. 6. Once the drive has been formatted, go to the Basic menu and follow the quick setup wizard. This will help you to set up the IP configuration, add the first user and prepare file sharing. 7. You are now ready to start sharing or downloading files.

6 Note: Without installing and formatting a drive first, most functions will not be available (example: User&Group Management, BitTorrent download). How to login To configure your NAS, you will need to use the web browser, enter the IP address and then use the web configuration for further setup. To find out the IP address of your device once it is connected to the network, there are several different ways as described on the following pages. Use the Setup utility included on the CD. This will list the device automatically and allow you to access the web configuration interface with a simple click of your mouse. You may also use the same utility at a later point to map the network drive after you setup your shares. Step1. Turn on your NAS and make sure it is connected to the same network as your computer. Step2. Start the Setup utility by double clicking on the EXE file and then pressing the Setup button. Step3. Your NAS will automatically show up in the device list, but if not, make sure the Setup utility has access to the network and search again. You might have to configure your firewall or even temporarily turn it off. Step4. Select your device and click on OK to start the setup wizard. Step5. Before you can access the device, you will have to enter the admin password. The default login is admin/admin, so enter admin for the password and press OK to login.

7 Step6. You can define the name for your device and set up the IP configuration. We recommend using the Automatically obtain an IP address (DHCP). When set, press Next to continue. Step7. Set time zone, current Date and Time. Click Next. Step8. You can compare your new settings with the previous configuration. If you find a mistake, go back to make changes but if everything is OK, press Save.

8 Step9. Double click nas to Enter Web UI of NAS. Note: Alternatively, you could also simply write down the IP address in the first step of the setup wizard and then access the web configuration interface via your web browser. Input the IP address in the URL field of your web browser, hit the Enter key, enter admin for the username, once more admin for the password and then login. You can now use the setup wizard online or configure the individual settings yourself.

9 Web Configuration - Input the User s name and password in the login page, admin is default password; change security privilege is recommended. Basic The settings in this menu are aimed at the user who wants to quickly set up the NAS and share files on the local network. Only the most basic functions and settings are available but it is ideal for someone first using this device. For a more advanced set up, see Control Panel. Control Panel This menu includes all the settings and information the NAS offers. Sorted into individual categories, the user can access only particular settings or adjust and modify everything manually. Personal Info This menu is for the system administrator account. It includes the option to set the password and some other options related to the web interface. Logout This can be used to logout once all the settings have been configured. Note: Without installing and formatting a drive first, several functions will not be available (example: User&Group Management, BitTorrent download).

10 Quick Setup The settings in this menu are aimed at the user who wants to quickly set up the NAS and share files on the local network. Only the most basic functions and settings are available but it is ideal for someone first using this device. For a more advanced set up, see Control Panel. Wizard The setup wizard can be used to configure all the basic LAN settings for your NAS. For PC users, if you have followed the setup wizard previously, there is no need to go through this again unless you want to change some of the settings or have not yet completed the setup. Step 1: Select your preferred language for the web interface from the drop down list. Step 2: Set a new password for the web configuration interface. Not required but strongly recommended. Step 3: If you prefer a different hostname for your NAS, you can change the name here, otherwise simply use the default name. Step 4: We recommend setting both IP Address and DNS Server to obtain the IP automatically but if required, you can set it manually. If you need assistance in manually filling out these fields, please contact your network administrator for help. Step 5: Set the date and time manually or select your time zone from the drop down list and use a NTP server to synchronize the time via the internet. Step 6: Compare the new settings with the previous configuration and if OK, complete the setup wizard to save the new settings. Note: For a more detailed explanation of each of the settings, refer to System. Add User Use this setup wizard to quickly add and configure a new user account.

11 Step 1: Enter the user name and password for the new account. At the same time, you can also create a private folder for that user and set the quota limit. Step 2: If there are other users already set up, they can be added to the user account management. Step 3: In the last step you can configure the permissions to the shared folder and add or remove other users. Add Group Use this setup wizard to quickly add a new group. Step 1: Enter the group name. Step 2: Configure which members will be included in this group by adding and removing the members from the list. Step 3: Configure the share permissions by adding (read only or writable) and removing the shares from the list. Add Folder Use this setup wizard to quickly add a new share folder. Step 1: Enter the share folder name and an optional description for the share. Step 2: Configure the Windows/FTP access permissions by adding (read only or writable) and removing the members or group from the list. Step 3: Configure the NFS access permissions by adding unique IP addresses or a subnet. Note: For a more detailed explanation to each of the settings, refer to Users and Group Management or File and Print.

12 Users and Groups In this menu, the admin can manage the users and groups for the NAS. Start by adding your users first, then create the groups and assign the members to their groups. Note: If there is no hard drive installed or the HDD is not yet formatted, this menu is not available. User Management In this section you can see all existing users for the NAS and manage them by adding or removing them from the list. - Existing Users: Lists the current users of the NAS. - Adding Users: To add a new user, clear the form by pressing the Clear Form button, then fill out a user name and password. The description is optional but will help you to manage multiple users, so we recommend filling out a short description. If required, you can create a private folder for that user and set a limit for the capacity. Once done, press the Save button to create the new user. If you would like to add this user to an existing group, select the user from the existing users list and press the Groups button for further settings. - Modifying Users: Select the user from the existing users list and modify the settings. Once done, press the Save button to apply the new settings. - Removing Users: To remove a user, select it from the existing users list and then press the Delete User button.

13 Group Management In this section you can see all existing groups for the NAS and manage them by adding or removing them from the list. Groups are not required to grant access to the Dual Giga NAS but will help the admin to manage multiple users and easily share a folder among a group of people. - Existing Groups: Lists the current groups of the NAS. - Adding Groups: To add a new group, clear the form by pressing the Clear Form button, then enter a new group name. Once done, press the Save button to create the new group. If you would like to add some members to this group, select the group from the existing groups list and press the Members button for further settings. - Modifying Groups: Select the group from the existing groups list and modify the members by pressing the Members button for further settings. Once done, press the Save button to apply the new settings. - Removing Groups: To remove a group, select it from the existing groups list and then press the Delete Group button.

14 File and Print In this menu, you can configure all the settings related to the FTP, NFS and printer server. Use this to manage how your files and folders are shared. File Server In this section you can modify the server settings and also enable or disable a service. - Character set: By default, this is set to English (CP437). If your file names include characters from another language, change the encoding here and select your language from the drop down list. - Windows Setting: In this section, you can change the workgroup that the NAS belongs to and modify its description. The IP for the WINS Server (Windows Internet Name Server) can be left blank unless this is required for your network. - FTP Server: This service can be enabled or disabled. When enabled, the default FTP port number will be set to 21 but you can change that if required. - NFS Server: This service can either be enabled or disabled depending on your requirements. - Guest Access: To enable guest access (guest-share), enable it and if required, set a limit for the disk space. For security reasons, the guest access can also be disabled. Note: After changing any of the settings, press the Save button to apply the new configuration and save its settings. Share Management In this section you can manage the shares and access rights.

15 - Existing Shares: Lists the current shares on the NAS. - Adding Shares: To add a new share, clear the form by pressing the Clear Form button, then enter a new share name. Once done, press the Save button to create the new group. Select the new group from the existing shares list, then depending on how you share the files, click on Windows, FTP Access or NFS Access and add the users or groups that will have access to this share. You can allow access for all users or define each user and group separately. The names with for the first letter are groups. - Modifying Shares: Select the share from the existing shares list and modify the access rights by pressing the Windows, FTP Access or NFS Access button for further settings. Once done, press the Save button to apply the new settings. - Removing Shares: To remove a share, select it from the existing shares list and then press the Delete Share button. Printer Server setup page The NAS support most of major brand of printers, user can share printer resource form the network. Simply follow the steps below:

16 Step1. Power on and connect your USB printer in to your NAS. Step2. Browse the Web UI and see whether the printer has been detect the by the NAS. (for example Epson printer has been detected) Step3. Install your Printer driver in to your computer, (for example. if Epson PL-6200L Printer is connected to the NAS, you must install PL-6200L driver in to the computer which going to perform the print job. After driver installation please click Start Setting Printer and Faxes Add a printer Next.

17 Step4. Select A network printer or printer attached to another computer, and then click Next. Step5. Select Browse for a printer than Click Next.

18 Step6. Search the NAS and USB Printer attached, then click next to browse the printer driver. Step7. Go to Printer wizard and select the printer driver. Click OK to complete setup.

19 Notes: The NAS Printer server does not support GDI/Host-based printers. For some Multi Function Printers (MFP); scanning functions might not be functional probably. Please contact Printer Manufacture for detail Specifications.

20 System In this menu you can configure the basic network settings for the NAS, find some details related to the firmware, disk usage and set up the error notification. LAN Settings In this section you can define the hostname for your NAS and set up the IP configuration. We recommend using the Obtain IP/DNS address automatically. When selecting a hostname, make sure to use a unique name and not one that has already been used on the local network. If required, you can also set the individual addresses yourself. If you need assistance in manually filling out these fields, please contact your network administrator for help. Note: After changing any of the settings, press the Save button to apply the new configuration and save its settings. Time Settings In this section, you can set the date and time manually or select your time zone from the drop down list and use a NTP server to synchronize the time via the internet. When set manually, press the Save button to apply the new time and save the settings or when synchronized via the internet, select the NTP server and press the Update Time button.

21 Note: To use the NTP function, you need to enter a valid NTP server or select one from the drop down list. If the default address at time.windows.com does not work, find a new one and then try again or turn off the NTP server and set the time manually. Turn Off Server In this section, you can restart the server or turn off the NAS via the web browser. Make sure that nobody is accessing the device when you restart or turn it off. Press the Restart button to restart the server. The system will restart and automatically prompt you for the login when it s ready. Press the Turn Off button to shut down the system. The browser will prompt you to close it the window after about 90 seconds (Internet Explorer only, for other browser close it manually). Information In this section, you can find the product name, the current firmware and the current IP address.
22 Disk Usage In this section, you can find a summary of the hard disk status and disk usage. Press the Refresh button to update the information. Error Notification In this section, you can set up how the system should inform the admin of system errors. Define which services should be included in the report, select a time from the drop down list for the interval and set up how the errors should be sent.
23 - Pop-Up Notification: For the pop-up notification to work, the Messenger service has to be started. To test it, enter the computer name (see System Properties) of the PC that should receive the message and press the Send Test Pop-Up button (Windows only).
24 Network Service In this menu, you can enable or disable the network services like the DHCP server, Bonjour and the BitTorrent download service. DHCP Server In this section, you can enable and set up the DHCP server. In general, there is already a DHCP server on the local network, so you don t need to enable this but if required, enable it and configure the addresses. Once you have set everything up, press the Save button to start the DHCP server and save the settings. Bonjour In this section, you can enable or disable the Bonjour service. By default, this is enabled, offering easy access to the login page. In addition to that, you can also enable the itunes service. When the itunes option is enabled, you can store your MP3 music files in the /public/music folder and play them directly from itunes. The Dual Giga NAS will automatically appear in itunes under shared devices. BTorrent In this section, you can manage your torrents and add new downloads to the queue. Before you add the first job, set a limit for the download and upload speed according to your network s bandwidth. After changing the settings, press the Save button to apply the new configuration. To start downloading files, you will have to download a torrent file from the internet first
25 and then upload it to the NAS; using browser to select the torrent in your computer. Once the torrent file has been added, you can start downloading. The files will be stored in your /public/btdownload folder. To update downloaded percentage simply press Refresh button. Note: If there is no hard drive installed or the HDD is not yet formatted, this menu is not available. To add a new torrent file, use Internet Explorer!
26 Maintenance In this menu, you can format the hard drives, setup the RAID array, upgrade the firmware and manage the configuration settings. Disk Utility This utility can be used to format the individual hard drives and also to see all the information related to those disks. - Disk spin down time: To save power and reduce heat, you can let the hard disk spin down if not used for a certain amount of time. Enter a time in minutes and press the Save button to apply the new setting. - Encryption: The NAS supports 128bit loop-aes encryption for the EXT2 file system. When enabled, the drive has to be formatted again and you will be prompted for a password (has to be exactly 20 characters). - File System:.For drives that are not in a RAID array, there is a choice between EXT2, EXT3 and FAT32. For drives installed in the Dual Giga NAS, we recommend using EXT2 for optimum performance and functionality. - Scandisk: Press the Scan button to check the disk integrity. If possible, any errors found will automatically be fixed. This will take a while to finish depending on the capacity of the drive, and also the disk can not be used in that time. - Detail: Press the Detail button to see further disk information. If the HDD supports S.M.A.R.T, it will also report the disk s health status. RAID Setting In this section you can manage the RAID array and set up your drives. The Dual Giga NAS supports RAID 0 and RAID 1. Two hard drives of identical capacity and make are required. If only one drive is installed, the RAID configuration will not be available.
27 - RAID 0: Used where speed is the primary objective, RAID Level 0 (also called "striping") is not redundant. This form of array splits each piece of data across both of the drives in segments; since data is written without any form of parity data-checking, it allows for the fastest data transfer compared to the other setups. However, if one drive becomes damaged, the whole array can become corrupted. - RAID 1: This mode requires 2 identical drives to implement. A RAID 1 creates an exact copy (or mirror) of a set of data on the second drive. This is useful when reliability and backup are more important than data capacity. The available capacity to the user will only be as large as a single drive but when one of the hard drives fails, it can be replaced and the data rebuilt. - JBOD: Used to combine two hard drives of different capacity and create one single larger hard drive. If you are using two identical drives, we recommend using RAID 0 instead. Note: Creating the RAID system will take several hours, depending on HDD capacity. Do not turn off the power or interrupt the system in any other way during this process! We recommend using the EXT2 file system for optimum performance and functionality. Changing the RAID setup will require you to re-format the drives. Make sure you backup all data before doing so! - Rebuilding a RAID array When using RAID 1 and one of the drives has failed, the faulty HDD has to be replaced and the RAID 1 array rebuilt. 1. Login and go to the RAID Setting menu to check the disk status. If there is a problem, it will show which drive has to be replaced.
28 2. Turn off the power, remove the power supply from the wall socket and replace a new HDD. Please refer to the table below for the HDD allocations. 3. Turn on the power and go to the RAID setting menu. Add the new drive and the NAS will start to rebuild your RAID array.
29 4. Depending on the capacity, this will take several hours. Do not turn off the power or interrupt the system in any other way. The HDD LED will be ON while the RAID array is being rebuilt. Note: Rebuilding the RAID system will take several hours, depending on HDD capacity. Do not turn off the power or interrupt the system in any other way during this process! Firmware Upgrade In this section you can check the current firmware version and upgrade if a new one is available. Download the new firmware and store in on your computer, then browse for the *.gz file, select it and start the upgrade. The upgrade process will take minutes. Please contact your dealer for latest Firmware update.
30 Note: Never turn off your unit during the firmware upgrade procedure. This may damage your device! If for any reasons (e.g. power supply failure during firmware update) the procedure fails, you may not be able to operate your device any more. Save Configuration For backup and before every firmware upgrade, you can use this function to save your current configuration. Press the Save button and save the config.tar file on your computer. Restore Configuration To quickly restore previous settings or set up multiple units, you can save the configuration and then use this function to upload a previous backup. Browse for the config.tar file on your computer and press the Restore button to restore the previous settings.
31 Factory Reset Pressing the Factory Reset button will restore all settings to their default configuration. Before pressing this button, we recommend saving your current configuration in case you want to restore it again later. Note: When the Factory Reset button is pressed, all users, groups and other configurations will be lost!
32 Log File This menu includes all the log files of your NAS. You can find logs for the SAMBA, FTP and DHCP server as well as system and administration logs. Note: For the system log, you have the option to redirect the log to another Linux computer by entering its IP address in the redirect field. 32
33 Personal Information Account In this menu, you can change your admin password and the menu language for the configuration interface. There is also an overview of disk usage and share list available. 33
34 File Access on a PC To access the data on the NAS via the network connection, you may use either FTP or SMB. Before you can access the shared folders, you will have to set up your users, groups and shares. See chapter 3 for more details about user, group and share management. FTP Use your Windows Explorer and type ftp:// followed by the IP address of yournas. It will list the available folders and you can download or upload new files. As an example, your URL might look something like this: ftp:// Note: For FTP transfers, we recommend installing and using a dedicated FTP application, which can either be a free utility or professional shareware program. Windows Explorer Use Windows Explorer and type \\ followed by the IP address of your Dual Giga NAS. It will list all available folders and shares on your Dual Giga NAS, which you can then access directly. You can copy files to the network storage as if it were a folder on your local drive. Depending on the bandwidth, you can also directly play and open the files, although we recommend transferring the data to your local drive first. 34
35 Mapping a Network Drive For easy access, we recommend mapping the storage as network drive. Step1. Double click on My Computer, go to the Tools menu and select Map Network Drive Step2. Follow the setup wizard and fill in the path to your Dual Giga NAS. Alternatively, you can also browse for the shares by clicking on the Browse button and locating the folder that way. Step3. Once the drive has been mapped, you are able to find and access it under My Computer. This link will still be there even after rebooting your Operating System. 35
36 Note: For quick and temporary access, you can also simply go to My Network Places, view the workgroup computers and select your Dual Giga NAS. UPnP The NAS supports UPnP v1.0. To access the device on a PC, go to My Network Places and the NAS will be listed as an UPnP device. You can select it and access the configuration page. How to setup UPnP function in PC Step1. Go to control panel/ Adding new device/ Windows Components Wizard. Select Networking Service than click Next to continues. Step2. Select Universal Plug and Play than Click OK to start setup. 36
37 Step3. Go to My network place to search Dual Giga NAS. Bonjour & itunes For easy access to the web configuration interface on the Mac, a shortcut to the NAS will be available in the bookmarks collection under Bonjour. 37
38 itunes If the itunes support for Bonjour is enabled, the NAS will appear as a shared music folder in your itunes library. Store your MP3 files in the music folder of the NAS and play them over the network. Step1. Make sure the support for itunes in the Bojour menu is enabled. Step2. Store your MP3 files in the music folder of your NAS. The folder has already been created in /public/music. 38
39 Step3. Start itunes and the NAS will appear as shared device. 39
40 Q&A: Q: Why can t I access to the NAS setup page? A: Please connect the NAS directly to your computer via RJ45 port. Open your web browser and key in the default IP address Then type admin for both Account name and password to enter the NAS setup page. Q: Why Can t I perform RAID function under FAT32 format. A: FAT32 format doesn t support RAID functions, to perform RAID functions please use EXT2 or EXT3 format. Q: Some of the functions and menus are not available! A: Many of the functions require a hard drive to be installed. Make sure you have at least one HDD installed and formatted in EXT2 or EXT3. Q: I lost my password, what do I do? A: Press the reset button and hold it for 5 seconds to reset the device to its default settings. The default login is admin/admin. Be aware that resetting the device will erase all user and group accounts plus some other settings. Q: When install two HDD without performing RAID setting, and creating a Share- Folder, Why NAS can only to create Folder an the second Disk (/mnt/ide3/sharefolder) and not on the first Disk (/mnt/ide1/sharefolder) A: The NAS GUI Software is design to managing RAID 1 or 0 functions, if user wants to use two separate HDD in the NAS, share management will recognize only the first formatting disk. For example, if user format Ide1 HDD first than managing priority goes to Ide1. But still another HDD space can be recognize in the LAN development. User can browse it through My Network place Q: Why can t I create/share folders in SMB or FTP server with a non-english langauge? A: To avoid languages support issue, you are suggested to create/share folders with English characters only. Q: Why can t I upload the files via LAN connection or got disconnected A1: Please make sure the networking is connected properly and you have the access right (read & write) for the folders. A2: Please make sure you have enough bandwidth for uploading large files. A complicate network environment such as too many workgroups or too many layers of network can result in network disconnection. Q: How to reset the NAS A: Please press the reset button for 5 seconds and the NAS will start to reset to factory default setting. Q: How can I reduce the noise of the NAS?? A: Make sure the hard drive/case/fan are properly screwed without interference and put the foot stickers on the case. Q: Why WinXP can not enter SMB folder with password via the NAS? A: Please update WinXP to SP2 or above. After update, please make sure if you have installed Norton Internet Security. If you do, please check with Norton service center. Q: What is The NAS default login name and password? A: The default Login name: admin, default password: admin. Q: How do I access to my NAS via the Internet? 40
User s Manual. Copyright 2010 Vantec Thermal Technologies. All Rights Reserved.
 Copyright 2010 Vantec Thermal Technologies. All Rights Reserved. User s Manual Package Contents: 1 NexStar FX Gigabit NAS Enclosure x1 2 AC Adapter x1 3 Installation Guide x1 4 Rubber Feet x4 5 User s
Hydra LAN - User Guide
 Hydra LAN - Macpower & Tytech Technology Co., Ltd. Date: June 12, 2008 - v1.1 Firmware: v2.6.3-20080528 PCB: MP-LNU23JSL-3516-V1.0 Model: HY-LNU2SS The diagrams and images contained in this manual may
How To Use 1Bay 1Bay From Awn.Net On A Pc Or Mac Or Ipad (For Pc Or Ipa) With A Network Box (For Mac) With An Ipad Or Ipod (For Ipad) With The
 With A Network Box (For Mac) With An Ipad Or Ipod (For Ipad) With The") 1-bay NAS User Guide INDEX Index... 1 Log in... 2 Basic - Quick Setup... 3 Wizard... 3 Add User... 6 Add Group... 7 Add Share... 9 Control Panel... 11 Control Panel - User and groups... 12 Group Management...
1-bay NAS User Guide INDEX Index... 1 Log in... 2 Basic - Quick Setup... 3 Wizard... 3 Add User... 6 Add Group... 7 Add Share... 9 Control Panel... 11 Control Panel - User and groups... 12 Group Management...
User s Manual. Copyright 2010 Vantec Thermal Technologies. All Rights Reserved.
 Copyright 2010 Vantec Thermal Technologies. All Rights Reserved. User s Manual Package Contents: 1 NextStar FX Gigabit NAS Adapter x1 2 AC Adapter x1 3 Installation Guide x1 4 Rubber Feet x4 5 User s CD
Addonics T E C H N O L O G I E S. NAS Adapter. Model: NASU2. 1.0 Key Features
 1.0 Key Features Addonics T E C H N O L O G I E S NAS Adapter Model: NASU2 User Manual Convert any USB 2.0 / 1.1 mass storage device into a Network Attached Storage device Great for adding Addonics Storage
Dual Bay Home Media Store. User Manual
 Dual Bay Home Media Store User Manual CH3HNAS2 V1.0 CONTENTS Chapter 1: Home Page... 3 Setup Wizard... 3 Settings... 3 User Management... 3 Download Station... 3 Online User Manual... 3 Support... 3 Chapter
3.5 EXTERNAL NETWORK HDD. User s Manual
 3.5 EXTERNAL NETWORK HDD User s Manual Table of Content Before You Use Key Features H/W Installation Illustration of Product LED Definition NETWORK HDD Assembly Setup the Network HDD Home Disk Utility
DNS-312H Network Attached Storage
 This product can be set up using any current web browser, i.e., Internet Explorer 5x, and Netscape Navigator 4x or above. DNS-312H Network Attached Storage Before You Begin 1. If you purchased this storage
WHICH INTERFACE: USB OR ETHERNET?... 3 CONNECTING NAS DRIVE USING USB...
 Revision 1.2 INTRODUCTION... 1 CONTROLS, CONNECTORS AND INDICATORS... 1 Front Panel Area... 1 Rear Panel Area... 2 ABOUT THE HARD DISK... 2 LOCATING NAS DRIVE ON YOUR DESK... 3 WHICH INTERFACE: USB OR
MZK-NAS01SG User s Manual. Version. 1.0
 MZK-NAS01SG User s Manual Version. 1.0 Foreword Explanation of the Signals In order to let you set up and use this product correctly, please pay attention when reading or browsing the manual as you see
Network Storage Server. User s Manual
 Network Storage Server User s Manual Introduction... 3 Features... 3 Minimum Requirements... 3 Package Contents... 3 Understand your Storage Server... 5 Back Panel... 5 Front Panel... 6 Getting started...
Network Attached Storage User Manual
 http://www.icybox.de IB-NAS902 Network Attached Storage User Manual Content Content... 2 Introduction... 3 SMB... 3 FTP... 3 DHCP... 3 More than a NAS... 3 Package content... 4 Take a look at the IB-NAS902...
At the first glance -1-
 Overview The LAN Storage enclosure adds the convenience of network-attached storage to homes and in small businesses, providing you a central storage location for your data and letting you share data across
Introduction... 3 Features... 3 Minimum Requirements... 3 Package Contents... 3 Understand your storage server... 4 Back Panel... 4 Front Panel...
 Introduction... 3 Features... 3 Minimum Requirements... 3 Package Contents... 3 Understand your storage server... 4 Back Panel... 4 Front Panel... 5 Getting started... 7 Chapter 1... 14 Status... 14 Chapter
Single-bay NAS Server
 Single-bay NAS Server NAS-1100 User s Manual Copyright (C) 2004 PLANET Technology Corp. All rights reserved. The products and programs described in this User s Manual are licensed products of PLANET Technology,
Coolmax CN-590 Network Storage Solution
 Coolmax CN-590 Network Storage Solution Model Name Controller hip CPU OS Memory Interface CN-590 S2892 150MHz RTOS 8MB SDRAM / 1MB NOR Flash LAN Standard 10/100Base-TX Auto MDI/MDI-X Connector Type RJ-45
Network USB Storage Link
 Network USB Storage Link NUS1000 Users Manual V. 2.2 Table of Contents 1. Introduction... 2 2. Hardware & Installation... 3 3. Web Configuration... 6 4. Detailed Functions... 9 4.1. Status... 9 4.2. Setup...
NAS HARD DRIVE ENCLOSURE USER MANUAL. S T O R E n S H A R E MUSIC DATA PHOTO MOVIE
 NAS HARD DRIVE ENCLOSURE USER MANUAL S T O R E n S H A R E MUSIC DATA PHOTO MOVIE w w w. v a n t e c u s a. c o m Package Contents: NexStar LX External 3.5 HDD NAS Enclosure: User Manual NexStar LX External
Pleiades USB/LAN. User Manual. & Installation Guide. External Storage Enclosure for 3.5 Hard Drive. v1.1
 Pleiades USB/LAN External Storage Enclosure for 3.5 Hard Drive User Manual & Installation Guide v1.1 Table of Contents CHAPTER 1 - INTRODUCTION - 1 - CHAPTER 4 LAN DISK SETUP - 11 - ICON KEY - 1 - NETWORK
User s Manual Ver. 2.3
 Office NAS 3.5 IDE/SATA Network Attached Storage Model # ANAS350 User s Manual Ver. 2.3 Table of Contents 1. Introduction... 3 1.1 Package Contents... 3 1.2 Features... 3 1.3 NAS Diagram... 4 2. Hard Drive
Iomega Home Media Network Hard Drive
 Page 1 of 75 Iomega Home Media Network Hard Drive Iomega, the stylized "i" logo, and all Iomega brand blocks are either registered trademarks or trademarks of Iomega Corporation in the United States and/or
3.5 Mobile LAN Disk. User Guide
 3.5 Mobile LAN Disk User Guide Contents 1. Hardware...2 1.1 Power...2 1.2 Ports...2 1.3 Reset Button...2 1.4 LEDs...2 1.5 Front View...3 1.6 Rear View...3 2. Installation....... 4 2.1 Requirements 4 2.2
Document Created by Nick Schuster
 Document Created by Nick Schuster Table of Contents...2 Product Overview...4 Package Contents...4 System Requirements...4 Introduction...5 Features...6 Hardware Overview...7 Front View...7 Rear Panel (Connections)...8
Network Storage System with 2 Bays
 USER GUIDE Network Storage System with 2 Bays Model: NAS200 About This Guide About This Guide Icon Descriptions While reading through the User Guide you may see various icons that call attention to specific
3.5 Mobile LAN Disk User Guide
 3.5 Mobile LAN Disk User Guide A new, unformatted HDD must be initialized before LAN operation. Via LAN connection, format HDD under administrator s user interface before use Refer to Nettool Quick Installation
External Storage 200 Series. User s Manual
 External Storage 200 Series User s Manual Version 1.2 00P3DS200ZSEA2 Table of Contents User s Manual 1. Overview...3 2. Key Features...3 3. Rear Connectors...4 4. Setup the External Storage 200...4 5.
Open Source and License Source Information
 BlackArmor NAS 220 BlackArmor NAS 220 User Guide 2010 Seagate Technology LLC. All rights reserved. Seagate, Seagate Technology, the Wave logo, and FreeAgent are trademarks or registered trademarks of Seagate
Chapter 6 Using Network Monitoring Tools
 Chapter 6 Using Network Monitoring Tools This chapter describes how to use the maintenance features of your Wireless-G Router Model WGR614v9. You can access these features by selecting the items under
TRENDnet User s Guide. Cover Page
 Cover Page Contents Product Overview... 2 Package Contents... 2 Features... 2 Product Hardware Features... 3 Application Diagram... 5 Installing Hard Drive(s)... 5 Install NAS Setup Utility... 6 Configuring
3.5 LAN HDD Enclosure User s Manual
 3.5 LAN HDD Enclosure User s Manual NOTE: 1. USB and LAN can t be used at the same time. 2. HDD should be formatted as FAT32. Please check Disk utility section in this manual. 3. For internet FTP usage,
Gigabit Ethernet Hard Drive. User Guide
 Gigabit Ethernet Hard Drive User Guide Contents Introduction...2 Controls, Connectors and Indicators...2 Front Panel Area...2 Rear Panel Area...3 About the Hard Disk...4 Locating NAS Drive on Your Desk...5
NETWORK STORAGE CENTER NETWORK MEDIA CENTER
 USER MANUAL NETWORK STORAGE CTER NETWORK MEDIA CTER EXTERNAL NETWORK HARD DRIVE / 3.5" / LAN Rev. 924 Freecom Network Storage Center / Network Media Center Dear user, Thank you for selecting the Freecom
Thecus N2100 FAQ. 1. NAS Management
 Thecus N2100 FAQ Thecus N2100 FAQ...1 1. NAS Management...1 1-1. Map a network drive in Windows XP...1 1-2. Map a network drive in Mac OS X...2 1-3. Configure the firewall software such as Norton Internet
DI-634M. Check Your Package Contents. This product can be set up using any current web browser, i.e., Internet Explorer 6 or Netscape Navigator 7.
 This product can be set up using any current web browser, i.e., Internet Explorer 6 or Netscape Navigator 7. DI-634M 108G MIMO Wireless Router Before You Begin 1. If you purchased this router to share
ReadyNAS Duo Setup Manual
 ReadyNAS Duo Setup Manual NETGEAR, Inc. 4500 Great America Parkway Santa Clara, CA 95054 USA February 2008 208-10215-01 v1.0 2008 by NETGEAR, Inc. All rights reserved. Trademarks NETGEAR, the NETGEAR logo,
TL-PS310U Single USB 2.0 Port MFP and Storage Server
 TL-PS310U Single USB 2.0 Port MFP and Storage Server Rev: 2.0.0 1910010313 Contents Chapter 1 Introduction... 1 1.1 Product Overview...1 1.2 Network Management...1 1.3 Components and Features...1 1.4 Hardware
BlackArmor NAS 110 User Guide
 BlackArmor NAS 110 User Guide BlackArmor NAS 110 User Guide 2010 Seagate Technology LLC. All rights reserved. Seagate, Seagate Technology, the Wave logo, and FreeAgent are trademarks or registered trademarks
Chapter 6 Using Network Monitoring Tools
 Chapter 6 Using Network Monitoring Tools This chapter describes how to use the maintenance features of your RangeMax Wireless-N Gigabit Router WNR3500. You can access these features by selecting the items
Configure thin client settings locally
 This chapter contains information to help you set up your thin client hardware, look and feel, and system settings using the Control Center. Tip While it is not recommended to use dialog boxes for configuring
Software User Manual. Omnitech Innovation, Inc.
 Software User Manual Omnitech Innovation, Inc. MCS5 2 or 4 Bay MCS4 1 or 2 Bay My Cloud Storage Private Cloud Server Index: 1. Method of Search IP address... 2 2. Disk Setup Utility... 4 3. Explanation
READYNAS INSTANT STORAGE. Quick Installation Guide
 READYNAS INSTANT STORAGE Quick Installation Guide Table of Contents Step 1 Connect to FrontView Setup Wizard 3 Installing RAIDar on Windows 3 Installing RAIDar on Mac OS X 3 Installing RAIDar on Linux
User Manual OMNINAS KD20
 User Manual OMNINAS KD20 CHAPTER TITLE TABLE OF CONTENTS TABLE OF CONTENTS Product Overview Features................................. 1-2 Package Contents........................... 1-2 System Requirements........................
USER MANUAL ShareCenter Pulse DNS-320 VERSION 1.0
 USER MANUAL ShareCenter Pulse DNS-320 VERSION 1.0 Document Created by Nick Schuster Table of Contents...2 Product Overview...4 Package Contents...4 System Requirements...4 Introduction...5 Features...5
LinkStation Setup Manual www.buffalotech.com
 LinkStation Setup Manual www.buffalotech.com 35010969 ver.02 Contents Chapter 1 Setup...3 LinkNavigator Setup (LS-XHL, LS-CHL)... 3 LinkNavigator Setup (LS-WXL)... 5 LinkNavigator Setup (LS-WSXL)... 7
ReadyNAS Setup Manual
 ReadyNAS Setup Manual NETGEAR, Inc. 4500 Great America Parkway Santa Clara, CA 95054 USA October 2007 208-10163-01 v1.0 2007 by NETGEAR, Inc. All rights reserved. Trademarks NETGEAR, the NETGEAR logo,
Network Storage Link
 A Division of Cisco Systems, Inc. WIRED Network Storage Link for USB 2.0 Disk Drives User Guide Model No. NSLU2 Copyright and Trademarks Specifications are subject to change without notice. Linksys is
USB 2.0 Port USB Media Adapter. User Manual
 USB 2.0 Port USB Media Adapter User Manual Table of Contents Introduction... 4 Product Feature... 5 Specifications... 6 Package Content... 8 1 Installation... 10 1.1 Identifying hardware components...
User s Manual CONTENT. Nano NAS Server for USB storages. 1. Product Information...1. 2. Product Specifications.2. 3. System requirements..
 CONTENT Nano NAS Server for USB storages 1. Product Information...1 2. Product Specifications.2 3. System requirements..3 4. Product Connecting. 4 5. Configuring DN-7023....5 6. Setting... 9 7. Note..
is605 Dual-Bay Storage Enclosure for 3.5 Serial ATA Hard Drives FW400 + FW800 + USB2.0 Combo External RAID 0, 1 Subsystem User Manual
 is605 Dual-Bay Storage Enclosure for 3.5 Serial ATA Hard Drives FW400 + FW800 + USB2.0 Combo External RAID 0, 1 Subsystem User Manual (English/Deutsch/ 中 文 ) v1.0 August 23, 2007 Table of Contents CHAPTER
EM6230 e-camview HD outdoor IP camera
 EM6230 e-camview HD outdoor IP camera 2 ENGLISH EM6230 e-camview HD outdoor IP camera Table of contents 1.0 Introduction... 3 1.1 Packing contents... 3 1.2 Requirements to access the camera.... 3 1.3 Major
Quick Installation Guide
 V48.01 Model: FI8919W Quick Installation Guide Outdoor Pan/Tilt Wireless IP Camera For Windows OS ------- Page 1 For MAC OS ------- Page 15 ShenZhen Foscam Intelligent Technology Co., Ltd Quick Installation
How To Check If Your Router Is Working Properly
 Chapter 6 Using Network Monitoring Tools This chapter describes how to use the maintenance features of your RangeMax Dual Band Wireless-N Router WNDR3300. You can access these features by selecting the
Configuring NXT Hardware with Mercury Inside into Doors.NET TM Application Note
 1.0 Installing the Mercury SCP Gateway The MSC/SCP gateway must be installed to interface with Mercury hardware. This gateway must be chosen during the installation of the software, or it can be added
Taurus - RAID. Dual-Bay Storage Enclosure for 3.5 Serial ATA Hard Drives. User Manual
 Dual-Bay Storage Enclosure for 3.5 Serial ATA Hard Drives User Manual v1.0 August 23, 2007 EN Table of Contents CHAPTER 1 - INTRODUCTION 1 CHAPTER 3 - SYSTEM SET UP 9 ICON KEY 1 THE TAURUS RAID 1 AVAILABLE
BlackArmor NAS 440/420 User Guide
 BlackArmor NAS 440/420 User Guide BlackArmor NAS 440/420 User Guide 2010 Seagate Technology LLC. All rights reserved. Seagate, Seagate Technology, the Wave logo, and FreeAgent are trademarks or registered
Option nv, Gaston Geenslaan 14, B-3001 Leuven Tel +32 16 317 411 Fax +32 16 207 164 http://www.option.com Page 1 of 14
 Page 1 of 14 ! " #!"#$ % &&' Page 2 of 14 1 INTRODUCTION One of the highly desirable features of the GlobeSurfer III device is the ability to network together Printers and External Hard Disk drives (aka
DVG-2101SP VoIP Telephone Adapter
 This product can be set up using any current web browser, i.e., Internet Explorer 6 or Netscape Navigator 6.2.3. DVG-2101SP VoIP Telephone Adapter Before You Begin 1. If you purchased this VoIP Telephone
How To Set Up An Ipa Ez On A Pc Or Mac Or Macbook Or Ipa Or Ipamorade
 Iomega EZ Media and Backup Center User Guide Table of Contents Setting up Your Device... 1 Setup Overview... 1 Set up My Iomega StorCenter If It's Not Discovered... 2 Discovering with Iomega Storage Manager...
USER MANUAL. ShareCenter Pulse DNS-320 VERSION 2.0
 USER MANUAL ShareCenter Pulse DNS-320 VERSION 2.0 Table of Contents Product Overview... 1 Introduction... 1 Package Contents... 2 System Requirements... 2 Features... 3 Hardware Overview... 4 Front Panel...
How to setup EW-7438RPn with a Windows computer to extend an existing Wi-Fi network
 2 How to setup EW-7438RPn with a Windows computer to extend an existing Wi-Fi network Note: 1. This instruction use pictures from EW-7438RPn firmware v1.13. 2. If you need to restore to the default settings,
Table of Contents. Table of Contents
 Table of Contents Table of Contents Introduction...1 Product Overview...2 Package Contents...2 System Requirements... 2 Features... 3 Hardware Overview...4 Front Panel... 4 Rear Panel (Connections)...
Taurus Super-S3 LCM. Dual-Bay RAID Storage Enclosure for two 3.5-inch Serial ATA Hard Drives. User Manual March 31, 2014 v1.2 www.akitio.
 Dual-Bay RAID Storage Enclosure for two 3.5-inch Serial ATA Hard Drives User Manual March 31, 2014 v1.2 www.akitio.com EN Table of Contents Table of Contents 1 Introduction... 1 1.1 Technical Specifications...
Connecting the DG-102S VoIP Gateway to your network
 Contents of Package: DG-102S VoIP Station Gateway Power adapter CD-ROM, including User s Manual Quick Install Guide Requirements: RS-232 Console Cable Two RJ-45 CAT-5 Straight-Through Cables For more information
Quick Installation Guide
 V2.01 Model: FI9821W Quick Installation Guide Indoor HD Pan/Tilt Wireless IP Camera Black White For Windows OS ------- Page 1 For MAC OS ------- Page 16 ShenZhen Foscam Intelligent Technology Co., Ltd
How To Set Up A Computer With A Network Connection On A Cdrom 2.5 (For A Pc) Or Ipad (For Mac) On A Pc Or Mac Or Ipa (For Pc) On An Ipad Or Ipro (
 Or Ipad (For Mac) On A Pc Or Mac Or Ipa (For Pc) On An Ipad Or Ipro (") Connect the supplied power-adapter to the power inlet port and connect it to a wall outlet. Then, the router automatically enters the self-test phase. During self-test phase, RNX-EasyN400 s Power LED will
Connect the supplied power-adapter to the power inlet port and connect it to a wall outlet. Then, the router automatically enters the self-test phase. During self-test phase, RNX-EasyN400 s Power LED will
GIGA LAN USB2.0 USB MEDIA ADAPTER
 GIGA LAN USB2.0 USB MEDIA ADAPTER User Manual DN-70230 Table of Contents Introduction... 1 Product Feature... 2 Specifications... 3 Package Content... 5 1 Installation... 7 1.1 Identifying hardware components...
SMARTSTOR. NAS Product Manual. Version 1.0
 SMARTSTOR NAS Product Manual Version 1.0 Copyright 2010 Promise Technology, Inc. All Rights Reserved. Copyright by Promise Technology, Inc. (Promise Technology). No part of this manual may be reproduced
Quick Start Guide. NSS324 and NSS326 Smart Storage. Package Contents. Cisco Small Business
 Quick Start Guide Cisco Small Business NSS324 and NSS326 Smart Storage Package Contents Smart Storage Power Cord Quick Start Guide Ethernet Cable (2) Disk Tray Screws (2 Packs) Inline Switch Module HDD
2-Bay NAS Media Server Enclosure (1 x 1 TB) TN-200T1 (v1.0r)
 TN-200T1 (v1.0r)") 2-Bay NAS Media Server Enclosure (1 x 1 TB) TRENDnet s 2-Bay NAS Media Server Enclosure (1 x 1 TB), model, is the entertainment and storage hub of a digital network. DLNA certified Smart TVs, media players,
2-Bay NAS Media Server Enclosure (1 x 1 TB) TRENDnet s 2-Bay NAS Media Server Enclosure (1 x 1 TB), model, is the entertainment and storage hub of a digital network. DLNA certified Smart TVs, media players,
Table of Contents. D-Link DNS-346 USER S MANUAL
 Table of Contents Table of Contents... 2 Product Overview... 3 About this User s Guide... 3 Introduction... 3 Package Contents... 4 System Requirements... 4 Features... 5 Hardware Overview... 6 Front Panel...
Storage Device. User Manual. Wireless Network Attached. Solutions for the Digital Life
 Wireless Network Attached Storage Device Model #s: WNS100, WNS100-160, WNS100-200, WNS100-250, WNS100-300, WNS100-400 User Manual Ver. 0.3 Solutions for the Digital Life Table of Contents 1 Introduction
Multifunctional Broadband Router User Guide. Copyright Statement
 Copyright Statement is the registered trademark of Shenzhen Tenda Technology Co., Ltd. Other trademark or trade name mentioned herein are the trademark or registered trademark of above company. Copyright
Seagate Business Storage 1-Bay, 2-Bay, and 4-Bay NAS User Guide
 Seagate Business Storage 1-Bay, 2-Bay, and 4-Bay NAS User Guide Seagate Business Storage NAS User Guide 2013 Seagate Technology LLC. All rights reserved. Seagate, Seagate Technology, the Wave logo, and
WD My Cloud EX4 Personal Cloud Storage Release Notes for Firmware 1.03.39
 WD My Cloud EX4 Personal Cloud Storage Release Notes for Firmware 1.03.39 These release notes provide information on the WD My Cloud EX4 personal cloud storage. Information on the firmware is provided
Installation Guide Wireless 4-Port USB Sharing Station. GUWIP204 Part No. M1172-a
 Installation Guide Wireless 4-Port USB Sharing Station 1 GUWIP204 Part No. M1172-a 2011 IOGEAR. All Rights Reserved. PKG-M1172-a IOGEAR, the IOGEAR logo, MiniView, VSE are trademarks or registered trademarks
IP Power Stone 4000 User Manual
 IP Power Stone 4000 User Manual Two Outlet Remote AC Power Controller Multi Link, Inc. 122 Dewey Drive Nicholasville, KY 40356 USA Sales and Tech Support 800.535.4651 FAX 859.885.6619 techsupport@multi
You may refer the Quick Installation Guide in the package box for more information.
 Hardware Installation: 1. Turn off your modem. 2. Use one Ethernet cable to connect your modem to WAN port (Blue) port of BR-6228nC. 3. Use another Ethernet cable to connect your PC to one LAN Port (Yellow)
This section will focus on basic operation of the interface including pan/tilt, video, audio, etc.
 Catalogue Basic Operation... 2 For Internet Explorer... 2 For Other Non-IE Web Browsers... 5 Camera Settings... 6 System... 6 About... 6 PT Setting... 7 Backup and Restore Setup... 8 NTP Setting... 8 System
USER MANUAL NETWORK DRIVE XS EXTERNAL NETWORK HARD DRIVE / 3.5" / GIGABIT LAN / USB 2.0. Rev. 945
 USER MANUAL NETWORK DRIVE XS EXTERNAL NETWORK HARD DRIVE / 3.5" / GIGABIT LAN / USB 2.0 Rev. 945 Freecom Network Drive XS Dear user, Thank you for selecting the Freecom Network Drive XS. The Freecom Network
Quick Installation Guide
 Quick Installation Guide (For Windows & Mac OS) Outdoor Wireless IP Camera Package Contents V1.1 IP Camera Power Adapter Resource CD Ethernet Cable Mounting Bracket(except FI8919) Wi-Fi Antenna Quick Installation
Quick Start Guide. NSS322 Smart Storage. Package Contents. Cisco Small Business
 Quick Start Guide Cisco Small Business NSS322 Smart Storage Package Contents Smart Storage Power Adapter Quick Start Guide Ethernet Cable (2) Disk Tray Screws (2 Packs) Inline Switch Module HDD Sequence
USER GUIDE. Web Interface
 USER GUIDE Web Interface 1. Overview... 4 2. Install and Set Up... 4 2.1. Charge your Wi-Fi HDD... 4 2.2. For Mac users... 5 2.3. Connect your Wi-Fi HDD to your computer (no Internet connection required)...
How To Check If Your Router Is Working Properly On A Nr854T Router (Wnr854) On A Pc Or Mac) On Your Computer Or Ipad (Netbook) On An Ipad Or Ipa (Networking
 On A Pc Or Mac) On Your Computer Or Ipad (Netbook) On An Ipad Or Ipa (Networking") Chapter 7 Using Network Monitoring Tools This chapter describes how to use the maintenance features of your RangeMax NEXT Wireless Router WNR854T. These features can be found by clicking on the Maintenance
Chapter 7 Using Network Monitoring Tools This chapter describes how to use the maintenance features of your RangeMax NEXT Wireless Router WNR854T. These features can be found by clicking on the Maintenance
CMP-102U. Quick Installation Guide
 CMP-102U Quick Installation Guide V1.0 http://www.cnet.com.tw 1 CMP-102U Supports One High-speed USB2.0 Port MFP Server Supports 10/100Mbps Fast Ethernet Network Quick Installation Guide 1 Package Contents:
HW550-3G. 3G Mobile Broadband plus 4-Port Wireless-N Router
 HW550-3G 3G Mobile Broadband plus 4-Port Wireless-N Router Table of Contents About the Product...4 Features...5 Requirements...6 Package Content...7 Device Design...8 Getting Started...11 Plan Your Network...12
Allworx Installation Course
 VPN Hello and welcome. In the VPN section we will cover the steps for enabling the VPN feature on the Allworx server and how to set up a VPN connection to the Allworx System from your PC. Page 1 VPN The
Canvio Home FAQ. is designed to be very easy to install and use to back up, share, and remotely access the files from your computers.
 What is a Canvio Home device? Canvio Home is a Network-Attached Storage device that is designed to be very easy to install and use to back up, share, and remotely access the files from your computers.
User Manual Version 4.0.0.5. User Manual A20 / A50 / A100 / A250 / A500 / A1000 / A2000 / A4000
 User Manual Version 4.0.0.5 User Manual A20 / A50 / A100 / A250 / A500 / A1000 / A2000 / A4000 I Endpoint Protector Appliance User Manual Table of Contents 1. Endpoint Protector Appliance Setup... 1 1.1.
Wireless Presentation Adaptor User s Manual
 Wireless Presentation Adaptor User s Manual (Model Name: WPS-Dongle 2) Version: 2.0 Date: Apr. 28, 2011 1 Table of Contents 1. Overview... 4 2. Quick Start... 6 3. Windows Client Utility... 9 3.1 Starting
Table of Contents. Table of Contents
 Table of Contents Product Overview... 1 Introduction... 1 Package Contents... 2 System Requirements... 2 Features... 3 Hardware Overview... 4 Front Panel... 4 Rear Panel (Connections)... 5 Getting Started...
PD-SATA USB/GbE. Network Attached Storage Drive. User Manual January 13, 2009 - v1.0 Firmware: v1.42a
 PD-SATA USB/GbE Network Attached Storage Drive User Manual January 13, 2009 - v1.0 Firmware: v1.42a EN The diagrams and images contained in this document may not fully represent the actual product and
Instructions for Adding a MacOS 10.4.x Server to ASURITE for File Sharing. Installation Section
 Instructions for Adding a MacOS 10.4.x Server to ASURITE for File Sharing Installation Section Purpose: We are setting up a server in ASU s specific environment. Power on the Server Insert the CD Hold
Movie Cube. User s Guide to Wireless Function
 Movie Cube User s Guide to Wireless Function Table of Contents 1. WLAN USB Adapter Connection...3 2. Wireless Setup...4 2.1 Infrastructure (AP)...5 2.2 Peer to Peer (Ad Hoc)...7 2.3 Settings for PC...8
Print Server User s Manual Version: 2.0 (January, 2006)
") Print Server User s Manual Version: 2.0 (January, 2006) COPYRIGHT Copyright 2006/2007 by this company. All rights reserved. No part of this publication may be reproduced, transmitted, transcribed, stored
Print Server User s Manual Version: 2.0 (January, 2006) COPYRIGHT Copyright 2006/2007 by this company. All rights reserved. No part of this publication may be reproduced, transmitted, transcribed, stored
Table of Contents. Installation...8 Hardware Setup...8
 Table of Contents Table of Contents Product Overview...3 Package Contents...3 System Requirements...3 Introduction...4 Features...5 Hardware Overview...6 Front View...6 Rear Panel (Connections)...7 Installation...8
USB 2.0 Multifunction Network Server
 USB 2.0 Multifunction Network Server DN-13020 DN-13021 DN-13022 DN-13023 User Manual DN-13020 DN-13021 DN-13022 DN-13023 1 Table of Contents CHAPTER1 PRODUCT OVERVIEW... 4 1.1 Package Contents... 4 1.2
NAS SERVER FOR EXTERNAL HDD
 NAS SERVER FOR EXTERNAL HDD Quick Installation Guide DN-70230 System requirement Operating system and software: Windows 2000, XP, 2003, Vista, Mac OS X or above, Linux Required hardware resources: 10/100
Pharos Control User Guide
 Outdoor Wireless Solution Pharos Control User Guide REV1.0.0 1910011083 Contents Contents... I Chapter 1 Quick Start Guide... 1 1.1 Introduction... 1 1.2 Installation... 1 1.3 Before Login... 8 Chapter
GWA501 package contains: 1 Wireless-G Broadband Gateway 1 Power Adapter 1 Ethernet Cable 1 Manual CD 1 Quick Start Guide 1 Warranty/Registration Card
 Wireless-G Broadband Gateway GWA501 Quick Start Guide Read this guide thoroughly and follow the installation and operation procedures carefully to prevent any damage to the unit and/or any of the devices
USB Functions for Windows 7
 USB Functions for Windows 7 Getting Started Position the DSL-2750B in your desired location, and connect the power cable to the rear of the device. From the ADSL micro filter device that provides the separated