Configuring Secure Socket Layer (SSL) for use with BPM 7.5.x
|
|
|
- Mervyn Pierce
- 9 years ago
- Views:
Transcription
1 Configuring Secure Socket Layer (SSL) for use with BPM 7.5.x Configuring Secure Socket Layer (SSL) communication for a standalone environment... 2 Import the Process Server WAS root SSL certificate into Process Center... 2 Export the Process Center root signer certificate... 6 Import the Process Center root SSL certificate into Process Server... 7 Export the Process Server root signer certificate... 7 Edit 100Custom.xml on Process Center... 7 Edit 100Custom.xml on Process Server SSL communication between Process Server and Process Center Server Disable all unsecured ports on all Process Center and Process Server servers Verify the Process Server 100Custom.xml file changes in the server Verify the Process Center 100Custom.xml file changes in the server Restart the Process Server and Process Center servers Importing an SSL security certificate into Integration Designer Configuring Secure Socket Layer (SSL) communication for a Network Deployment environment Import the Process Server WAS root SSL certificate into Process Center Export the Process Center root signer certificate Import the Process Center WAS root SSL certificate into Process Server Export the Process Server root signer certificate Edit 100Custom.xml on Process Center Edit 100Custom.xml on Process Server SSL communication between Process Server and Process Center Server Disable all unsecured ports on all Process Center and Process Server servers Verify the Process Server 100Custom.xml file changes in the server Verify the Process Center 100Custom.xml file changes in the server Restart the Process Server and Process Center servers Importing an SSL security certificate into Integration Designer Configure Process Designer to access Process Center using SSL... 44

2 Configuring Secure Socket Layer (SSL) communication for a standalone environment The following steps are required to make the communication between the Process Center and the Process Server work with https in a standalone environment. Import the Process Server WAS root SSL certificate into Process Center 1. On the Process center WAS admin console, navigate to Security > SSL certificate and key management > Key stores and certificate.

3 2. Click NodeDefaultTrustStore. 3. Click Signer certificates.
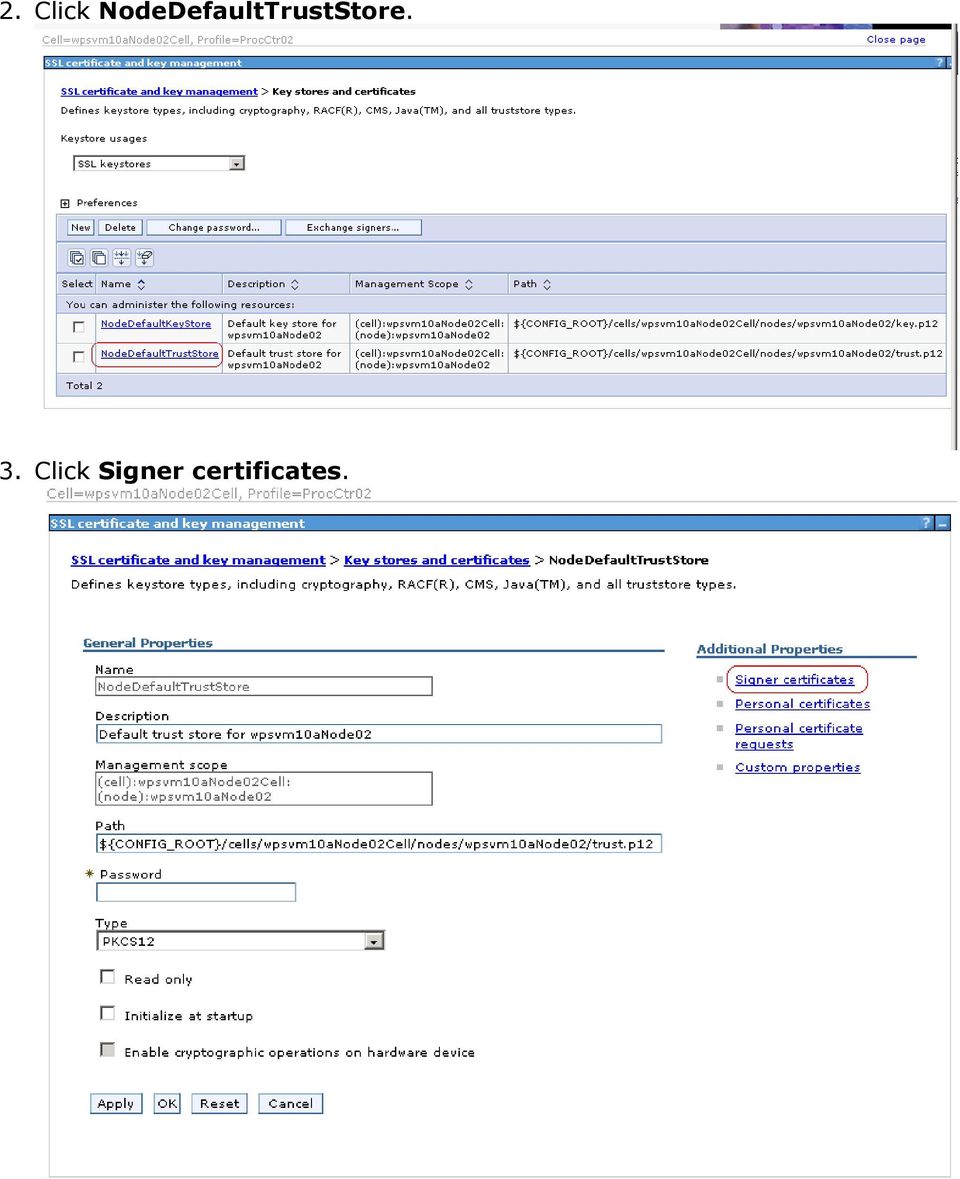
4 4. Click Retrieve from port. 5. Enter the Host name, secure Port of the Profile (WC_defaulthost_secure of Process Server profile), and Alias, and click Retrieve signer information. Note: The WC_defaulthost_secure is located in the WAS admin console. Navigate to Servers > Server Types > WebSphere Application Servers > SERVER_NAME > Ports.

5 6. Click Apply and save your changes.

6 Export the Process Center root signer certificate 1. On the Process center WAS admin console, navigate to Security > SSL certificate and key management > Key stores and certificate > NodeDefaultTrustStore > Signer certificates. 2. From the Signer certificates panel, click the root checkbox and select Extract. 3. Specify the File name path where you want to save the certificate and set the Data type to Binary DER data. Click OK. 4. Copy the extracted Process Center root certificate to the Process Server system.

7 Import the Process Center root SSL certificate into Process Server 1. On the Process Server WAS admin console, navigate to Security > SSL certificate and key management > Key stores and certificate > NodeDefaultTrustStore > Signer certificates > Retrieve from port. 2. Enter the Host name, secure Port of the Process Center Profile (WC_defaulthost_secure of Process Center profile), and Alias, and click Retrieve signer information. Note: The WC_defaulthost_secure is located in the WAS admin console. Navigate to Servers > Server Types > WebSphere Application Servers > SERVER_NAME > Ports. 3. Click Apply and save your changes. Export the Process Server root signer certificate 1. On the Process Server WAS admin console, navigate to Security > SSL certificate and key management > Key stores and certificate > NodeDefaultTrustStore > Signer certificates. 2. From the Signer certificates panel, click on the Root checkbox and select Extract. 3. Specify the File name path where you want to save the certificate and set the Data type to Binary DER data and click OK. 4. Copy the extracted Process Server root certificate to the Process Center system. Edit 100Custom.xml on Process Center 1. Edit WAS_HOME\profiles\profile name\config\cells\cell name\nodes\node name\servers\server name\processcenter\config\100custom.xml to overwrite values from 99Local.xml. For example: c:\bpm\profiles\procctr01\config\cells\gascogne01cell\nodes\gascogne Node01\servers\server1\process-center\config\100Custom.xml. 2. Open WAS_HOME\profiles\profile name\config\cells\cell name\nodes\node name\servers\server name\processcenter\config\system\99local.xml. For example:

8 c:\bpm\profiles\procctr01\config\cells\gascogne01cell\nodes\gascogne Node01\servers\server1\process-center\config\system\99local.xml. 3. Copy all occurrences of in the 99local.xml file, including the enclosing xml tags, and paste them in to the 100Custom.xml file. 4. Add merge="mergechildren" to the parent xml tags that contain the 5. Add merge="replace" to the xml tag that contains the

9 6. Change all occurances of to 7. Add the corresponding closing xml tags. 8. Copy the parent tags for the <client-link> that contains and paste them to the server tag.

10 9. Add the server section to the 100custom.xml file. Add merge="mergechildren" to the parent xml tags and add merge="replace" to the xml tag that contains the Then update to Add the following lines to the <server> section to enable https for deploying the snapshot and specify the correct Process Center secure port: <deploy-snapshot-using-https merge="replace">true</deploy-snapshot-usinghttps> <server-port merge="replace"><pc WC_defaulthost_secure port></serverport> (set value to WC_defaulthost_secure of Process Center profile) Note: The WC_defaulthost_secure is located in the WAS admin console. Navigate to Servers > Server Types > WebSphere Application Servers > SERVER_NAME > Ports. 11. Open WAS_HOME\profiles\profile name\config\cells\cell name\nodes\node name\servers\server name>\processcenter\config\system\99sharepoint.xml. For example: profiles\procctr01\config\cells\gascogne01cell\nodes\gascognenode01\ servers\server1\process-center\config\system\99sharepoint.xml). 12. Copy all occurrences of from the 99Sharepoint.xml, including its parent xml tags, and paste them to the 100Custom.xml file. 13. Change all occurances of to Save and close the 100Custom.xml file. Here is an example of the Process Center 100Custom.xml file: <properties>
 Note: The")
11 <!--Properties file for customer cluster scoped properties. --> <!-- set unversioned-po-caching-enable to false for clustering <common merge="mergechildren"> <environment-name merge="replace">my Environment</environment-name> <default-unversioned-po-cache-size merge="replace">500</default-unversionedpo-cache-size> <default-versioned-po-cache-size merge="replace">500</default-versioned-pocache-size> <unversioned-po-caching-enable merge="replace">false</unversioned-pocaching-enable> <default-webapi-userid-cache-size merge="replace">500</default-webapi-useridcache-size> </common> --> <!-- Sample connector configuration <server> <reloadable-jar-location>temp</reloadable-jar-location> <reloadable-jar-location-load-only-once>false</reloadable-jar-location-loadonly-once> </server> --> <!-- Sample default work schedule config. <server> <default-work-schedule merge="replace"> <time-schedule>7am-7pm Every Day</time-schedule> <time-zone>cst</time-zone> <holiday-schedule>empty holiday</holiday-schedule> </default-work-schedule> </server> --> <common merge="mergechildren"> <portal-prefix merge="replace"> <process-admin-prefix merge="replace"> <teamworks-webapp-prefix merge="replace"> <webservices merge="mergechildren"> <base-url merge="replace"> </webservices> <xml-serialization merge="mergechildren"> <default-namespace-uri merge="replace"> </xml-serialization> <coach-designer-xsl-url merge="replace"> CoachDesigner.xsl</coach-designer-xsl-url> <office merge="mergechildren">

12 <sharepoint merge="mergechildren"> <default-workspace-site-description merge="replace"><![cdata[this site has been automatically generated for managing collaborations and documents for the Lombardi TeamWorks process instance: <#= tw.system.process.name #> <#= tw.system.process.instanceid #> TeamWorks Link: tw.system.process.instanceid #> ]]></default-workspace-site-description> </sharepoint> </office> </common> <server merge="mergechildren"> < merge="mergechildren"> <mail-template merge="mergechildren"> <client-link merge="replace"> </mail-template> </ > <repository-server-url merge="replace"> <deploy-snapshot-using-https merge="replace">true</deploy-snapshot-usinghttps> <server-port merge="replace">9444</server-port> </server> <authoring-environment merge="mergechildren"> <images-prefix merge="replace"> <portal-prefix merge="replace"> <repository-prefix merge="replace"> <servlet-prefix merge="replace"> <webapi-prefix merge="replace"> <process-help-wiki-url-view merge="replace"> tle=%teamworks_title%</process-help-wiki-url-view> <process-help-wiki-url-edit merge="replace"> %TITLE%&teamworksTitle=%TEAMWORKS_TITLE%</process-help-wiki-url-edit> </authoring-environment> </properties>

13 Edit 100Custom.xml on Process Server 1. Edit WAS_HOME\profiles\profile name\config\cells\cell name\nodes\node name\servers\server name\process-server\config\100custom.xml to overwrite values from the 99Local.xml file. For example: c:\bpm\profiles\procsrv01\config\cells\gascogne01cell\nodes\gascogne Node01\servers\server1\process-server\config\100Custom.xml. 2. Open WAS_HOME\profiles\profile name\config\cells\cell name\nodes\node name\servers\server name\processserver\config\99local.xml. For example: c:\bpm\profiles\procsrv01\config\cells\gascogne01cell\nodes\gascogne Node01\servers\server1\process-server\config\system\99local.xml. 3. Copy all occurrences of from the 99local.xml file, including its enclosing parent xml tags, and paste the same to the 100Custom.xml file. 4. Add merge="mergechildren" to the parent xml tags that contain 5. Add merge="replace" to the xml tag that contains 6. Change to 7. Add the corresponding closing xml tags. 8. For the <client-link> tag that contains copy its parent tags up to the server tag. 9. Add the server section to the 100Custom.xml file. a. Add merge="mergechildren" to the parent xml tags b. Add merge="replace" to the xml tag that contains c. Change to Add the following to the <server> section to specify the correct Process Server secure port: <server-port merge="replace"><ps WC_defaulthost_secure port></server-port> (set the value to WC_defaulthost_secure of Process Server profile).

14 Note: The WC_defaulthost_secure is located in the WAS admin console. Navigate to Servers > Server Types > WebSphere Application Servers > SERVER_NAME > Ports. 11. Open WAS_HOME\profiles\profile name\config\cells\cell name\nodes\node name\servers\server name\process-server\config\ system\99sharepoint.xml. For example: c:\bpm\profiles\procsrv01\config\cells\gascogne01cell\nodes\gascogne Node01\servers\server1\processserver\config\system\99Sharepoint.xml. 12. Copy all occurrences of from the 99Sharepoint.xml file, including its parent xml tags, and paste them to the 100Custom.xml file. 13. Change to Save and close the 100Custom.xml file. Here is a sample Process Server 100Custom.xml file: <properties> <!--Properties file for customer cluster scoped properties. --> <!-- set unversioned-po-caching-enable to false for clustering <common merge="mergechildren"> <environment-name merge="replace">my Environment</environment-name> <default-unversioned-po-cache-size merge="replace">500</default-unversionedpo-cache-size> <default-versioned-po-cache-size merge="replace">500</default-versioned-po-cachesize> <unversioned-po-caching-enable merge="replace">false</unversioned-po-cachingenable> <default-webapi-userid-cache-size merge="replace">500</default-webapi-userid-cachesize> </common> --> <!-- Sample connector configuration <server> <reloadable-jar-location>temp</reloadable-jar-location> <reloadable-jar-location-load-only-once>false</reloadable-jar-location-loadonly-once> </server> --> <!-- Sample default work schedule config. <server> <default-work-schedule merge="replace"> <time-schedule>7am-7pm Every Day</time-schedule> <time-zone>cst</time-zone> <holiday-schedule>empty holiday</holiday-schedule>

15 </default-work-schedule> </server> --> <common merge="mergechildren"> <portal-prefix merge="replace"> <process-admin-prefix merge="replace"> <teamworks-webapp-prefix merge="replace"> <webservices merge="mergechildren"> <base-url merge="replace"> </webservices> <xml-serialization merge="mergechildren"> <default-namespace-uri merge="replace"> </xml-serialization> <coach-designer-xsl-url merge="replace"> achdesigner.xsl</coach-designer-xsl-url> <office merge="mergechildren"> <sharepoint merge="mergechildren"> <default-workspace-site-description merge="replace"><![cdata[this site has been automatically generated for managing collaborations and documents for the Lombardi TeamWorks process instance: <#= tw.system.process.name #> <#= tw.system.process.instanceid #> TeamWorks Link: tw.system.process.instanceid #> ]]></default-workspace-site-description> </sharepoint> </office> </common> <server merge="mergechildren"> < merge="mergechildren"> <mail-template merge="mergechildren"> <client-link merge="replace"> </mail-template> </ > <repository-server-url merge="replace"> <server-port merge="replace">9444</server-port> </server> <authoring-environment merge="mergechildren"> <images-prefix merge="replace"> <portal-prefix merge="replace">

16 <repository-prefix merge="replace"> <servlet-prefix merge="replace"> <webapi-prefix merge="replace"> <process-help-wiki-url-view merge="replace"> e=%teamworks_title%</process-help-wiki-url-view> <process-help-wiki-url-edit merge="replace"> ITLE%&teamworksTitle=%TEAMWORKS_TITLE%</process-help-wiki-url-edit> </authoring-environment> </properties> SSL communication between Process Server and Process Center Server Important: If the Process Center and clustered runtime servers were started before you begin to configure SSL, and the LSW_SERVER table on the Process Center database contains the non-secure port of the Process Server, you must delete the Process Server from the Process Center repository: 1. Stop Process Server. 2. From the Servers tab on the Process Center Console, delete Process Server from the Process Center repository. 3. Delete the record with the non-secure port from the LSW_SERVER table on the Process Center database. 4. Start Process Server. Make sure that the SSL communication between the Process Server and the Process Center Server work by adding the certificates to each other's trust store. 1. Install the Process Server signer certificate in to the Process Center trust store. a) Invoke Process Center WAS_HOME/java/jre/bin/ikeyman.

17 b) Select Key Database File > Open. c) Set the Key database type to JKS. d) Click Browse and set the file location to WAS_HOME/java/jre/lib/security.

18 e) Change the Files of Type to All Files, select cacerts, and click Open. f) Click OK.

19 g) Provide the Password. Default is changeit. h) Select Signer Certificates from the Personal Certificates dropdown menu. i) Click Add.

20 j) Change the Files of Type to All Files, select the location of the Process Server DER file, and click Open.

21 k) Enter a label for the certificate (For example, PS-root) and click OK. l) Close the ikeyman window. 2. Install the Process Center signer certificate in to the Process Server trust store. a) Invoke Process Server WAS_HOME/java/jre/bin/ikeyman. b) Set the Key database type to JKS. c) Click Browse and set the file location to WAS_HOME/java/jre/lib/security. d) Change the Files of Type to All Files, select cacerts, and click Open. e) Click OK. f) Provide the Password. Default is changeit. g) Select Signer Certificates from the Personal Certificates dropdown menu. h) Click Add. i) Change the Files of Type to All Files, select the location of the Process Center DER file, and click Open. j) Enter a label for the certificate (For example, Process Center-root) and click OK. k) Close the ikeyman window. 3. Restart the Process Server and Process Center servers.
22 Disable all unsecured ports on all Process Center and Process Server servers. 1. Log in to the WebSphere administrative console and navigate to Servers > Server Types > WebSphere Application Servers. 2. For each server, click on the server link, then go to Container Settings > Web Container Settings > Web container transport chains. 3. Click on each link for the unsecured port, for example, HttpQueueInboundDefault, and deselect the Enabled checkbox. 4. Repeat these steps for all Application Servers and all Nodes. Verify the Process Server 100Custom.xml file changes in the server 1. Open the TeamWorksConfiguration.running.xml file, which is located in the WAS_HOME\profiles\profile name\config\cells\cell name\nodes\node name\servers\server name\process-server\ directory. Note: The TeamWorksConfiguration.running.xml file may not be available in every environment. Confirm the changes in the 100Custom.xml file. For example: c:\bpm\profiles\procsrv01\config\cells\gascogne01cell\nodes\gascogne Node01\servers\server1\processserver\TeamWorksConfiguration.running.xml Verify the Process Center 100Custom.xml file changes in the server 1. Open the TeamWorksConfiguration.running.xml file, which is located in the WAS_HOME\profiles\profile name\config\cells\cell name\nodes\node name\servers\server name\process-center\ directory. Confirm the changes in the 100Custom.xml. For example: c:\bpm\profiles\procctr01\config\cells\gascogne01cell\nodes\gascogne Node01\servers\server1\process-
23 center\teamworksconfiguration.running.xml *Note: Depending on your environment, you may need to repeat the following steps for the personal certificate: - Export the Process Center root signer certificate - Export the Process Server root signer certificate - Install Process Center signer certificate in Process Server trust store - Install Process Server signer certificate in Process Center trust store Verify your configuration 1. Log in to the Process Center console using an https connection. 2. From the Server tab, select runtime server, and click configure server. Confirm that it is opened in a secure browser with https. Restart the Process Server and Process Center servers 1. Use admin console to stop the clusters. 2. Stop the node agent and deployment manager. 3. Re-start the node agent. 4. Re-start the deployment manager. 5. Use Admin console to start the clusters. Importing an SSL security certificate into Integration Designer In order to connect to an HTTPS enabled server, you need to import the SSL security certificate (X509Certificate ) for the server. The steps described in this procedure are performed using Internet Explorer. 1. Launch your web browser and enter where hostname is the fully-qualified domain name of the process center server, and secure_port is the process center secure SSL port number. 2. On the Security Alert window, click View Certificate. 3. On the Certificate window, click the Details tab. 4. Click Copy to File to specify where to save the certificate file on your system. 5. In the wizard, click Next, accept the default values, and then click Next again. 6. Enter a file name for the security certificate, for example, pc_cert.cer, and click Next. 7. Click Finish. After you have created the SSL certificate, you can import it into the Java JRE that you will be using for Integration Designer. 8. Copy the certificate to IIDInstall\jdk\jre\bin where IIDInstall is the directory where you installed Integration Designer.
24 9. Switch to the same location in the command line and run the keytool command line as follows: a. keytool.exe -import -v -file <certificate file> -keystore..\lib\security\cacerts If you previously imported SSL certificates into the Integration Designer, add the - alias <key name> parameter to specify a different key name to avoid name conflicts. The default value is mykey. b. Enter the keystore password: changeit (this is usually the default password). c. Enter y at the prompt to trust the certificate. Configuring Secure Socket Layer (SSL) communication for a Network Deployment environment The following steps are required to make the communication between the Process Center and the Process Server work with https in a Network Deployment environment. Import the Process Server WAS root SSL certificate into Process Center 1. On the Process center WAS admin console, navigate to Security > SSL certificate and key management > Key stores and certificate.
, and Alias, and click Retrieve signer information.")
25 2. Click CellDefaultTrustStore. 3. Click Signer certificates. 4. Click Retrieve from port. 5. Enter the Host name, secure Port of the Profile (WC_defaulthost_secure of Process Server profile), and Alias, and click Retrieve signer information. You can retrieve the signer information for any of the servers listed.

26 Note: The WC_defaulthost_secure is located in the WAS admin console. Navigate to Servers > Server Types > WebSphere Application Servers > SERVER_NAME > Ports. 6. Click Apply and save your changes. Export the Process Center root signer certificate 1. On the Process center WAS admin console, navigate to Security > SSL certificate and key management > Key stores and certificate > CellDefaultTrustStore > Signer certificates. 2. From the Signer certificates panel, click the root checkbox and select Extract. 3. Specify the File name path where you want to save the certificate and set the Data type to Binary DER data. Click OK. 4. Copy the extracted Process Center root certificate to the Process Server system Import the Process Center WAS root SSL certificate into Process Server 1. On the Process server WAS admin console, navigate to Security > SSL certificate and key management > Key stores and certificates > CellDefaultTrustStore > Signer certificates > Retrieve from port. 2. Enter the Host name, secure Port of the Profile (WC_defaulthost_secure of Process Center profile), and Alias, and click Retrieve signer information. You
27 can retrieve the signer information for any of the servers listed. Note: The WC_defaulthost_secure is located in the WAS admin console. Navigate to Servers > Server Types > WebSphere Application Servers > SERVER_NAME > Ports. 3. Click Apply and save your changes. Export the Process Server root signer certificate 1. On the Process server WAS admin console, go to Security > SSL certificate and key management > Key stores and certificates > CellDefaultTrustStore > Signer certificates. 2. From the Signer certificates panel, click on the Root checkbox and select Extract. 3. Specify the File name path where you want to save the certificate and set the Data type to Binary DER data and click OK. Edit 100Custom.xml on Process Center 1. Edit WAS_HOME\profiles\PC dmgr profile name\config\cells\cell name\nodes\node name\servers\app target server name\processcenter\config\100custom.xml to overwrite values from the 99Local.xml file. For example: c:\bpm\profiles\ PCDmgr01\config\cells\gascogne01Cell\nodes\gascogneNode01\servers\ PC1.AppTarget.PC1Node1.0\process-center\config\100Custom.xml. 2. Open WAS_HOME\profiles\PC dmgr profile name\config\cells\cell name\nodes\node name\servers\app target server name\processcenter\config\99local.xml. For example: c:\bpm\profiles\ PCDmgr01\config\cells\gascogne01Cell\nodes\gascogneNode01\servers\ PC1.AppTarget.PC1Node1.0\process-center\config\system\99local.xml. 3. Copy all occurrences of from the 99local.xml file, including its enclosing parent xml tags, and paste the same to the 100Custom.xml file.
28 4. Add merge="mergechildren" to the parent xml tags that contain 5. Add merge="replace" to the xml tag that contains 6. Change to
29 7. Add the corresponding closing xml tags. 8. For the <client-link> tag that contains copy its parent tags up to the server tag. 9. Add the server section to the 100Custom.xml file. a. Add merge="mergechildren" to the parent xml tags b. Add merge="replace" to the xml tag that contains

30 c. Change to Add the following to the <server> section to specify the correct Process Center secure port: <server-port merge="replace"><pc WC_defaulthost_secure port></server-port> (set the value to WC_defaulthost_secure of Process Center profile). Note: The WC_defaulthost_secure is located in the WAS admin console. Navigate to Servers > Server Types > WebSphere Application Servers > SERVER_NAME > Ports. 11. Open WAS_HOME\profiles\PC dmgr profile name\config\cells\cell name\nodes\node name\servers\app target server name\processcenter\config\ system\99sharepoint.xml. For example: c:\bpm\profiles\ PCDmgr01\config\cells\gascogne01Cell\nodes\gascogneNode01\servers\ PC1.AppTarget.PC1Node1.0\processcenter\config\system\99Sharepoint.xml. 12. Copy all occurrences of from the 99Sharepoint.xml file, including its parent xml tags, and paste them to the 100Custom.xml file.
31 13. Change to Save and close the 100Custom.xml file. Here is a sample Process Center 100Custom.xml file: <properties> <!--Properties file for customer cluster scoped properties. --> <!-- set unversioned-po-caching-enable to false for clustering <common merge="mergechildren"> <environment-name merge="replace">my Environment</environment-name> <default-unversioned-po-cache-size merge="replace">500</default-unversionedpo-cache-size> <default-versioned-po-cache-size merge="replace">500</default-versioned-pocache-size> <unversioned-po-caching-enable merge="replace">false</unversioned-pocaching-enable> <default-webapi-userid-cache-size merge="replace">500</default-webapi-useridcache-size> </common> --> <!-- Sample connector configuration <server> <reloadable-jar-location>temp</reloadable-jar-location> <reloadable-jar-location-load-only-once>false</reloadable-jar-location-loadonly-once> </server> --> <!-- Sample default work schedule config.
32 <server> <default-work-schedule merge="replace"> <time-schedule>7am-7pm Every Day</time-schedule> <time-zone>cst</time-zone> <holiday-schedule>empty holiday</holiday-schedule> </default-work-schedule> </server> --> <authoring-environment merge="mergechildren"> <images-prefix merge="replace"> <portal-prefix merge="replace"> <repository-prefix merge="replace"> <servlet-prefix merge="replace"> <webapi-prefix merge="replace"> <process-help-wiki-url-view merge="replace"> orkstitle=%teamworks_title%</process-help-wiki-url-view> <process-help-wiki-url-edit merge="replace"> topic=%title%&teamworkstitle=%teamworks_title%</process-help-wiki-url-edit> </authoring-environment> <common merge="mergechildren"> <portal-prefix merge="replace"> <process-admin-prefix merge="replace"> <teamworks-webapp-prefix merge="replace"> <webservices merge="mergechildren"> <base-url merge="replace"> </webservices> <xml-serialization merge="mergechildren"> <default-namespace-uri merge="replace">
33 </xml-serialization> <coach-designer-xsl-url merge="replace"> sform/coachdesigner.xsl</coach-designer-xsl-url> <office merge="mergechildren"> <sharepoint merge="mergechildren"> <default-workspace-site-description merge="replace"><![cdata[this site has been automatically generated for managing collaborations and documents for the Lombardi TeamWorks process instance: <#= tw.system.process.name #> <#= tw.system.process.instanceid #> TeamWorks Link: d=<#= tw.system.process.instanceid #> ]]></default-workspace-site-description> </sharepoint> </office> </common> <server merge="mergechildren"> < merge="mergechildren"> <mail-template merge="mergechildren"> <client-link merge="replace"> </mail-template> </ > <repository-server-url merge="replace"> <deploy-snapshot-using-https merge="replace">true</deploy-snapshot-usinghttps> <server-port merge="replace">9443</server-port> </server> </properties> Edit 100Custom.xml on Process Server 1. Edit WAS_HOME\profiles\PS dmgr profile name\config\cells\cell name\nodes\node name\servers\app target server name\processserver\config\100custom.xml to overwrite values from the 99Local.xml file. For example: c:\bpm\profiles\ PSDmgr01\config\cells\gascogne01Cell\nodes\gascogneNode01\servers \server1\ps1.apptarget.ps1node1.0\config\100custom.xml. 2. Open WAS_HOME\profiles\PS dmgr profile name\config\cells\cell name\nodes\node name\servers\app target server name\processserver\config\99local.xml. For example:
34 c:\bpm\profiles\psdmgr01\config\cells\gascogne01cell\nodes\gascog nenode01\servers\ps1.apptarget.ps1node1.0\processserver\config\system\99local.xml. 3. Copy all occurrences of from the 99local.xml file, including its enclosing parent xml tags, and paste the same to the 100Custom.xml file. 4. Add merge="mergechildren" to the parent xml tags that contain 5. Add merge="replace" to the xml tag that contains 6. Change to 7. Add the corresponding closing xml tags. 8. For the <client-link> tag that contains copy its parent tags up to the server tag. 9. Add the server section to the 100Custom.xml file. a. Add merge="mergechildren" to the parent xml tags b. Add merge="replace" to the xml tag that contains c. Change to Search for repository-server-url in the server section of the 99local.xml file and copy it to the server section in the 100Custom.xml. 11. Change to Add the following to the <server> section to specify the correct Process Server secure port: <server-port merge="replace"><ps WC_defaulthost_secure port></server-port> (set the value to WC_defaulthost_secure of Process Server profile). Note: The WC_defaulthost_secure is located in the WAS admin console. Navigate to Servers > Server Types > WebSphere Application Servers > SERVER_NAME > Ports.
35 13. Open WAS_HOME\profiles\PS dmgr profile name\config\cells\cell name\nodes\node name\servers\app target server name\processserver\config\system\99sharepoint.xml. For example: c:\bpm\profiles\psdmgr01\config\cells\gascogne01cell\nodes\gascog nenode01\servers\ps1.apptarget.ps1node1.0\processserver\config\system\99sharepoint.xml). 14. Copy all occurrences of in the 99Sharepoint.xml file, including its parent xml tags, to the 100Custom.xml file. 15. Change to Save and close the 100Custom.xml file. Here is a sample Process Server 100Custom.xml file: <properties> <!--Properties file for customer cluster scoped properties. --> <!-- set unversioned-po-caching-enable to false for clustering <common merge="mergechildren"> <environment-name merge="replace">my Environment</environment-name> <default-unversioned-po-cache-size merge="replace">500</default-unversionedpo-cache-size> <default-versioned-po-cache-size merge="replace">500</default-versioned-pocache-size> <unversioned-po-caching-enable merge="replace">false</unversioned-pocaching-enable> <default-webapi-userid-cache-size merge="replace">500</default-webapi-useridcache-size> </common> --> <xml-serialization merge="mergechildren"> <default-namespace-uri merge="replace"> </xml-serialization> <!-- Sample connector configuration <server> <reloadable-jar-location>temp</reloadable-jar-location> <reloadable-jar-location-load-only-once>false</reloadable-jar-location-loadonly-once> </server> --> <!-- Sample default work schedule config. <server> <default-work-schedule merge="replace"> <time-schedule>7am-7pm Every Day</time-schedule> <time-zone>cst</time-zone>
36 <holiday-schedule>empty holiday</holiday-schedule> </default-work-schedule> </server> --> <authoring-environment merge="mergechildren"> <images-prefix merge="replace"> <portal-prefix merge="replace"> <repository-prefix merge="replace"> <servlet-prefix merge="replace"> <use-portal-for-preview merge="replace">true</use-portal-for-preview> <webapi-prefix merge="replace"> <process-help-wiki-url-view merge="replace"> tle=%teamworks_title%</process-help-wiki-url-view> <process-help-wiki-url-edit merge="replace"> %TITLE%&teamworksTitle=%TEAMWORKS_TITLE%</process-help-wiki-url-edit> </authoring-environment> <common merge="mergechildren"> <portal-prefix merge="replace"> <process-admin-prefix merge="replace"> <teamworks-webapp-prefix merge="replace"> <webservices merge="mergechildren"> <base-url merge="replace"> </webservices> <coach-designer-xsl-url merge="replace"> CoachDesigner.xsl</coach-designer-xsl-url> <office merge="mergechildren"> <sharepoint merge="mergechildren"> <default-workspace-site-description merge="replace"><![cdata[this site has been automatically generated for managing collaborations and documents
37 for the Lombardi TeamWorks process instance: <#= tw.system.process.name #> <#= tw.system.process.instanceid #> TeamWorks Link: tw.system.process.instanceid #> ]]></default-workspace-site-description> </sharepoint> </office> </common> <server merge="mergechildren"> <!-- properties --> < merge="mergechildren"> <mail-template merge="mergechildren" > <client-link merge="replace"> </mail-template> </ > <repository-server-url merge="replace"> <server-port merge="replace">9443</server-port> </server> </properties> SSL communication between Process Server and Process Center Server Make sure that the SSL communication between the Process Server and the Process Center Server work by adding the certificates to each other's trust store. Important: If the Process Center and clustered runtime servers were started before you begin to configure SSL, and the LSW_SERVER table on the Process Center database contains the non-secure port of the Process Server, you must delete the Process Server from the Process Center repository: 1. Stop Process Server. 2. From the Servers tab on the Process Center Console, delete Process Server from the Process Center repository. 3. Delete the record with the non-secure port from the LSW_SERVER table on the Process Center database. 4. Start Process Server. 1. Install the Process Server signer certificate in to the Process Center trust store. a) Invoke Process Center: WAS_HOME/java/jre/bin/ikeyman.
 Click Browse and set the file location to")
38 b) Select Key Database File > Open. c) Set the Key database type to JKS. d) Click Browse and set the file location to WAS_HOME/java/jre/lib/security.


39 e) Change the Files of Type to All Files, select cacerts, and click Open. f) Click OK.
40 g) Provide the Password. Default is changeit. h) Select Signer Certificates from the Personal Certificates dropdown menu. i) Click Add.
41 j) Change the Files of Type to All Files, select the location of the Process Server DER file, and click Open. k) Enter a label for the certificate (For example, PS-root) and click OK.
42 l) Close the ikeyman window. 2. Install the Process Center signer certificate in to the Process Server trust store. a) Invoke Process Server WAS_HOME/java/jre/bin/ikeyman. b) Set the Key database type to JKS. c) Click Browse and set the file location to WAS_HOME/java/jre/lib/security. d) Change the Files of Type to All Files, select cacerts, and click Open. e) Click OK. f) Provide the Password. Default is changeit. g) Select Signer Certificates from the Personal Certificates dropdown menu. h) Click Add. i) Change the Files of Type to All Files, select the location of the Process Center DER file, and click Open. j) Enter a label for the certificate (For example, Process Center-root) and click OK. k) Close the ikeyman window. Disable all unsecured ports on all Process Center and Process Server servers. 1. Log in to the WebSphere administrative console and navigate to Servers > Server Types > WebSphere Application Servers. 2. For each server, click on the server link, then go to Container Settings > Web Container Settings > Web container transport chains. 3. Click on each link for the unsecured port, for example, HttpQueueInboundDefault, and deselect the Enabled checkbox. 4. Repeat these steps for all WebSphere Application Server cluster members on all nodes. For example, if the xxx.apptarget cluster has members on Node1 and Node2, these steps must be performed on both nodes.
43 Verify the Process Server 100Custom.xml file changes in the server 1. Open the TeamWorksConfiguration.running.xml file, which is located in the WAS_HOME\profiles\PS dmgr profile name\config\cells\cell name\nodes\node name\servers\app target server name\process-server\ directory. Confirm the changes in the 100Custom.xml file. For example: c:\bpm\profiles\psdmgr01\config\cells\gascogne01cell\nodes\gascogneno de01\servers\ps1.apptarget.ps1node1.0\processserver\teamworksconfiguration.running.xml Verify the Process Center 100Custom.xml file changes in the server 1. Open the TeamWorksConfiguration.running.xml file, which is located in the WAS_HOME\profiles\PC dmgr profile name\config\cells\cell name\nodes\node name\servers\app target server name\process-center\ directory. Note: The TeamWorksConfiguration.running.xml file may not be available in every environment. Confirm the changes in the 100Custom.xml. For example: c:\bpm\profiles\pcdmgr01\config\cells\gascogne01cell\nodes\gascogneno de01\servers\pc1.apptarget.pc1node1.0\processcenter\teamworksconfiguration.running.xml *Note: Depending on your environment, you may need to repeat the following steps for the personal certificate: - Export the Process Center root signer certificate - Export the Process Server root signer certificate - Install Process Center signer certificate in Process Server trust store - Install Process Server signer certificate in Process Center trust store
44 Restart the Process Server and Process Center servers 6. Use admin console to stop the clusters. 7. Stop the node agent and deployment manager. 8. Re-start the node agent. 9. Re-start the deployment manager. 10. Use Admin console to start the clusters. Verify your configuration 1. Log in to the Process Center console using an https connection. 2. From the Server tab, select runtime server, and click configure server. Confirm that it is opened in a secure browser with https. Importing an SSL security certificate into Integration Designer In order to connect to an HTTPS enabled server, you need to import the SSL security certificate (X509Certificate ) for the server. The steps described in this procedure are performed using Internet Explorer. 1. Launch your web browser and enter where hostname is the fully-qualified domain name of the process center server, and secure_port is the process center secure SSL port number. 2. On the Security Alert window, click View Certificate. 3. On the Certificate window, click the Details tab. 4. Click Copy to File to specify where to save the certificate file on your system. 5. In the wizard, click Next, accept the default values, and then click Next again. 6. Enter a file name for the security certificate, for example, pc_cert.cer, and click Next. 7. Click Finish. After you have created the SSL certificate, you can import it into the Java JRE that you will be using for Integration Designer. 8. Copy the certificate to IIDInstall\jdk\jre\bin where IIDInstall is the directory where you installed Integration Designer. 9. Switch to the same location in the command line and run the keytool command line as follows: a. keytool.exe -import -v -file <certificate file> -keystore..\lib\security\cacerts If you previously imported SSL certificates into the Integration Designer, add the - alias <key name> parameter to specify a different key name to avoid name conflicts. The default value is mykey. b. Enter the keystore password: changeit (this is usually the default password). c. Enter y at the prompt to trust the certificate. Configure Process Designer to access Process Center using SSL

45 1. Navigate to the Process Designer installation location. For example: C:\W751\IBMProcessDesigner Edit the eclipse.ini file 3. Locate -Dcom.ibm.bpm.processcenter.url and change to 4. Save and close the eclipse.ini file. 5. Launch the Process Designer and verify access to the Process Center using SSL. 6. Optional: If you have created and configured your own trust store, you must modify one of the following configuration files to point to the correct location for your trust store: Standalone configuration: NodeDefaultTrustStore Network deployment configuration: CellDefaultTrustStore Note: When the Process Designer is downloaded, by default a trust.p12 file will be included with the zip file. The trust.p12 file that is included reflects what is specified for the NodeDefaultTrustStore (stand-alone server) or CellDefaultTrustStore (network deployment environment) found in the Administrator console under Global Security > SSL certificate and key management > Key stores and certificates. The trust.p12 file from that server location is copied and the password is set to WebAS before it is included in the zip file. If you have configured a custom trust store with a different password or have multiple trust stores, you must manually copy the trust.p12 file from the server to your Process Designer install directory and update the - Djavax.net.ssl.trustStoreType, -Djavax.net.ssl.trustStore, and - Djavax.net.ssl.trustStorePassword properties in the eclipse.ini file.
46 7. Verify your configuration. a. Log in to the Process Designer. b. Right click the Process Apps tab and select Properties. c. Confirm that the Address: (URL) section contains the hostname:secured port secure address.
SSL CONFIGURATION GUIDE
 HYPERION RELEASE 9.3.1 SSL CONFIGURATION GUIDE CONTENTS IN BRIEF About This Document... 2 Assumptions... 2 Information Sources... 2 Identifying SSL Points for Hyperion Products... 4 Common Activities...
How To Enable A Websphere To Communicate With Ssl On An Ipad From Aaya One X Portal 1.1.3 On A Pc Or Macbook Or Ipad (For Acedo) On A Network With A Password Protected (
 On A Network With A Password Protected (") Avaya one X Portal 1.1.3 Lightweight Directory Access Protocol (LDAP) over Secure Socket Layer (SSL) Configuration This document provides configuration steps for Avaya one X Portal s 1.1.3 communication
Avaya one X Portal 1.1.3 Lightweight Directory Access Protocol (LDAP) over Secure Socket Layer (SSL) Configuration This document provides configuration steps for Avaya one X Portal s 1.1.3 communication
Configuring SSL in OBIEE 11g
 By Krishna Marur Configuring SSL in OBIEE 11g This white paper covers configuring SSL for OBIEE 11g in a scenario where the SSL certificate is not in a format that Web Logic Server (WLS) readily accepts
1. If there is a temporary SSL certificate in your /ServerRoot/ssl/certs/ directory, move or delete it. 2. Run the following command:
 C2Net Stronghold Cisco Adaptive Security Appliance (ASA) 5500 Cobalt RaQ4/XTR F5 BIG IP (version 9) F5 BIG IP (pre-version 9) F5 FirePass VPS HSphere Web Server IBM HTTP Server Java-based web server (generic)
Configuring IBM WebSphere Application Server 7 for Secure Sockets Layer and Client-Certificate Authentication on SAS 9.3 Enterprise BI Server Web
 Configuring IBM WebSphere Application Server 7 for Secure Sockets Layer and Client-Certificate Authentication on SAS 9.3 Enterprise BI Server Web Applications Configuring IBM WebSphere 7 for SSL and Client-Certificate
Enterprise Content Management System Monitor. How to deploy the JMX monitor application in WebSphere ND clustered environments. Revision 1.
 Enterprise Content Management System Monitor How to deploy the JMX monitor application in WebSphere ND clustered environments Revision 1.3 CENIT AG Author: Juergen Poiger 25. August 2015 2 Content Disclaimer...
C-Series How to configure SSL
 C-Series How to configure SSL Points of Interest The installer for C-Series products will set up HTTP and HTTPS access by default. If you select the option to Turn on HTTPS only as part of the installation,
DEPLOYING EMC DOCUMENTUM BUSINESS ACTIVITY MONITOR SERVER ON IBM WEBSPHERE APPLICATION SERVER CLUSTER
 White Paper DEPLOYING EMC DOCUMENTUM BUSINESS ACTIVITY MONITOR SERVER ON IBM WEBSPHERE APPLICATION SERVER CLUSTER Abstract This white paper describes the process of deploying EMC Documentum Business Activity
Steps to import MCS SSL certificates on a Sametime Server. Securing LDAP connections to and from Sametime server using SSL
 Steps to import MCS SSL certificates on a Sametime Server Securing LDAP connections to and from Sametime server using SSL Author: Madhu S Dutta / Manoj Palaniswamy, IT Specialist 1 P a g e Configuring
Installing Digital Certificates for Server Authentication SSL on. BEA WebLogic 8.1
 Installing Digital Certificates for Server Authentication SSL on BEA WebLogic 8.1 Installing Digital Certificates for Server Authentication SSL You use utilities provided with the BEA WebLogic server software
ECA IIS Instructions. January 2005
 ECA IIS Instructions January 2005 THIS PAGE INTENTIONALLY BLANK ECA IIS Instructions ii July 22, 2005 Table of Contents 1. Install Certificate in IIS 5.0... 1 2. Obtain and Install the ECA Root Certificate
Securing Adobe connect Server and CQ Server
 Securing Adobe connect Server and CQ Server To Enable SSL on Connect Server and CQ server (Index) Configure custom.ini File Uncomment the SSL TAGs in Server.xml file. Configure the Four components of connect
Setting Up SSL on IIS6 for MEGA Advisor
 Setting Up SSL on IIS6 for MEGA Advisor Revised: July 5, 2012 Created: February 1, 2008 Author: Melinda BODROGI CONTENTS Contents... 2 Principle... 3 Requirements... 4 Install the certification authority
Install and Config For IBM BPM 8.5.5
 PERFICIENT Install and Config For IBM BPM 8.5.5 Install and Configure of BPM v8.5.5 Technical Architect: Chuck Misuraca Change History Table 1: Document Change History Document Revision & Date First Draft
ProjectWise Mobile Access Server, Product Preview v1.1
 ProjectWise Mobile Access Server, Product Preview v1.1 BENTLEY SYSTEMS, INCORPORATED www.bentley.com Copyright Copyright (c) 2011, Bentley Systems, Incorporated. All Rights Reserved. Trademark Notice Bentley
Installing and Configuring DB2 10, WebSphere Application Server v8 & Maximo Asset Management
 IBM Tivoli Software Maximo Asset Management Installing and Configuring DB2 10, WebSphere Application Server v8 & Maximo Asset Management Document version 1.0 Rick McGovern Staff Software Engineer IBM Maximo
RoomWizard Synchronization Software Manual Installation Instructions
 2 RoomWizard Synchronization Software Manual Installation Instructions Table of Contents Exchange Server Configuration... 4 RoomWizard Synchronization Software Installation and Configuration... 5 System
Cisco Prime Central Managing Certificates
 Cisco Prime Central Managing Certificates Version 1.0.5 September, 2015 Americas Headquarters Cisco Systems, Inc. 170 West Tasman Drive San Jose, CA 95134-1706 USA http://www.cisco.com Tel: 408 526-4000
WebSphere Business Monitor V7.0 Configuring a remote CEI server
 Copyright IBM Corporation 2010 All rights reserved WebSphere Business Monitor V7.0 What this exercise is about... 2 Lab requirements... 2 What you should be able to do... 2 Introduction... 3 Part 1: Install
NSi Mobile Installation Guide. Version 6.2
 NSi Mobile Installation Guide Version 6.2 Revision History Version Date 1.0 October 2, 2012 2.0 September 18, 2013 2 CONTENTS TABLE OF CONTENTS PREFACE... 5 Purpose of this Document... 5 Version Compatibility...
CONSOLEWORKS WINDOWS EVENT FORWARDER START-UP GUIDE
 CONSOLEWORKS WINDOWS EVENT FORWARDER START-UP GUIDE BEFORE YOU BEGIN This document assumes some things: You are using ConsoleWorks 4.6 or later (required), it s currently running, and a browser displaying
Installing and Configuring vcloud Connector
 Installing and Configuring vcloud Connector vcloud Connector 2.7.0 This document supports the version of each product listed and supports all subsequent versions until the document is replaced by a new
USING SSL/TLS WITH TERMINAL EMULATION
 USING SSL/TLS WITH TERMINAL EMULATION This document describes how to install and configure SSL or TLS support and verification certificates for the Wavelink Terminal Emulation (TE) Client. SSL/TLS support
SETUP SSL IN SHAREPOINT 2013 (USING SELF-SIGNED CERTIFICATE)
") 12/15/2012 WALISYSTEMSINC.COM SETUP SSL IN SHAREPOINT 2013 (USING SELF-SIGNED CERTIFICATE) Setup SSL in SharePoint 2013 In the last article (link below), you learned how to setup SSL in SharePoint 2013
12/15/2012 WALISYSTEMSINC.COM SETUP SSL IN SHAREPOINT 2013 (USING SELF-SIGNED CERTIFICATE) Setup SSL in SharePoint 2013 In the last article (link below), you learned how to setup SSL in SharePoint 2013
Copyright 2013 EMC Corporation. All Rights Reserved.
 White Paper INSTALLING AND CONFIGURING AN EMC DOCUMENTUM CONTENT TRANSFORMATION SERVICES 7.0 CLUSTER TO WORK WITH A DOCUMENTUM CONTENT SERVER 7.0 CLUSTER IN SECURE SOCKETS LAYER Abstract This white paper
Junio 2015. SSL WebLogic Oracle. Guía de Instalación. Junio, 2015. SSL WebLogic Oracle Guía de Instalación CONFIDENCIAL Página 1 de 19
 SSL WebLogic Oracle Guía de Instalación Junio, 2015 Página 1 de 19 Setting Up SSL on Oracle WebLogic Server This section describes how to configure SSL on Oracle WebLogic Server for PeopleTools 8.50. 1.
Setting Up SSL From Client to Web Server and Plugin to WAS
 IBM Software Group Setting Up SSL From Client to Web Server and Plugin to WAS Harold Fanning ([email protected]) WebSphere L2 Support 12 December 2012 Agenda Secure Socket Layer (SSL) from a Client to
Exchange Reporter Plus SSL Configuration Guide
 Exchange Reporter Plus SSL Configuration Guide Table of contents Necessity of a SSL guide 3 Exchange Reporter Plus Overview 3 Why is SSL certification needed? 3 Steps for enabling SSL 4 Certificate Request
Wavecrest Certificate
 Wavecrest InstallationGuide Wavecrest Certificate www.wavecrest.net Copyright Copyright 1996-2015, Wavecrest Computing, Inc. All rights reserved. Use of this product and this manual is subject to license.
Configuring TLS Security for Cloudera Manager
 Configuring TLS Security for Cloudera Manager Cloudera, Inc. 220 Portage Avenue Palo Alto, CA 94306 [email protected] US: 1-888-789-1488 Intl: 1-650-362-0488 www.cloudera.com Notice 2010-2012 Cloudera,
SolarWinds Technical Reference
 SolarWinds Technical Reference Using SSL Certificates in Web Help Desk Introduction... 1 How WHD Uses SSL... 1 Setting WHD to use HTTPS... 1 Enabling HTTPS and Initializing the Java Keystore... 1 Keys
S/MIME on Good for Enterprise MS Online Certificate Status Protocol. Installation and Configuration Notes. Updated: October 08, 2014
 S/MIME on Good for Enterprise MS Online Certificate Status Protocol Installation and Configuration Notes Updated: October 08, 2014 Installing the Online Responder service... 1 Preparing the environment...
IBM WebSphere Application Server V8.5 lab Basic Liberty profile administration using the job manager
 IBM WebSphere Application Server V8.5 lab Basic Liberty profile administration using the job manager Scenario You are a system administrator responsible for managing web application server installations.
CHAPTER 7 SSL CONFIGURATION AND TESTING
 CHAPTER 7 SSL CONFIGURATION AND TESTING 7.1 Configuration and Testing of SSL Nowadays, it s very big challenge to handle the enterprise applications as they are much complex and it is a very sensitive
How to Implement Transport Layer Security in PowerCenter Web Services
 How to Implement Transport Layer Security in PowerCenter Web Services 2008 Informatica Corporation Table of Contents Introduction... 2 Security in PowerCenter Web Services... 3 Step 1. Create the Keystore
Customer Tips. Xerox Network Scanning HTTP/HTTPS Configuration using Microsoft IIS. for the user. Purpose. Background
 Xerox Multifunction Devices Customer Tips June 5, 2007 This document applies to these Xerox products: X WC Pro 232/238/245/ 255/265/275 for the user Xerox Network Scanning HTTP/HTTPS Configuration using
Deploying EMC Documentum WDK Applications with IBM WebSEAL as a Reverse Proxy
 Deploying EMC Documentum WDK Applications with IBM WebSEAL as a Reverse Proxy Applied Technology Abstract This white paper serves as a detailed solutions guide for installing and configuring IBM WebSEAL
SSL Certificate Generation
 SSL Certificate Generation Last updated: 2/09/2014 Table of contents 1 INTRODUCTION...3 2 PROCEDURES...4 2.1 Creation and Installation...4 2.2 Conversion of an existing certificate chain available in a
IUCLID 5 Guidance and Support
 IUCLID 5 Guidance and Support Web Service Installation Guide July 2012 v 2.4 July 2012 1/11 Table of Contents 1. Introduction 3 1.1. Important notes 3 1.2. Prerequisites 3 1.3. Installation files 4 2.
Configure Single Sign on Between Domino and WPS
 Configure Single Sign on Between Domino and WPS What we are doing here? Ok now we have the WPS server configured and running with Domino as the LDAP directory. Now we are going to configure Single Sign
DESLock+ Basic Setup Guide Version 1.20, rev: June 9th 2014
 DESLock+ Basic Setup Guide Version 1.20, rev: June 9th 2014 Contents Overview... 2 System requirements:... 2 Before installing... 3 Download and installation... 3 Configure DESLock+ Enterprise Server...
DISTRIBUTED CONTENT SSL CONFIGURATION AND TROUBLESHOOTING GUIDE
 White Paper Abstract This white paper explains the configuration of Distributed Content (ACS, BOCS and DMS) in SSL mode and monitors the logs for content transfer operations. This guide describes the end-to-end
RHEV 2.2: REST API INSTALLATION
 RHEV 2.2: REST API INSTALLATION BY JAMES RANKIN REVISED 02/14/11 RHEV 2.2: REST API INSTALLATION 1 TABLE OF CONTENTS OVERVIEW PAGE 3 JAVA AND ENVIRONMENT VARIABLES PAGE 3 JBOSS INSTALLATION PAGE 5 REST
IBM Security QRadar Vulnerability Manager Version 7.2.1. User Guide
 IBM Security QRadar Vulnerability Manager Version 7.2.1 User Guide Note Before using this information and the product that it supports, read the information in Notices on page 61. Copyright IBM Corporation
Configuring Secure Socket Layer and Client-Certificate Authentication on SAS 9.3 Enterprise BI Server Systems That Use Oracle WebLogic 10.
 Configuring Secure Socket Layer and Client-Certificate Authentication on SAS 9.3 Enterprise BI Server Systems That Use Oracle WebLogic 10.3 Table of Contents Overview... 1 Configuring One-Way Secure Socket
ENABLING SINGLE SIGN-ON FOR EMC DOCUMENTUM WDK-BASED APPLICATIONS USING IBM WEBSEAL ON AIX
 White Paper ENABLING SINGLE SIGN-ON FOR EMC DOCUMENTUM WDK-BASED APPLICATIONS USING IBM WEBSEAL ON AIX Abstract This white paper explains how you can use the IBM Tivoli Access Manager for e-business WebSEAL
App Orchestration 2.5
 App Orchestration 2.5 Configuring SSL for App Orchestration 2.5 Prepared by: Andy Zhu Last Updated: July 25, 2014 Contents Introduction... 3 Configure SSL on the App Orchestration configuration server...
Sametime Gateway Version 9. Deploying DMZ Secure Proxy Server
 Sametime Gateway Version 9 Deploying DMZ Secure Proxy Server November 2013 Edition Notice Note: Before using this information and the product it supports, read the information in "Notices." This edition
MadCap Software. Upgrading Guide. Pulse
 MadCap Software Upgrading Guide Pulse Copyright 2014 MadCap Software. All rights reserved. Information in this document is subject to change without notice. The software described in this document is furnished
Adeptia Suite 6.2. Application Services Guide. Release Date October 16, 2014
 Adeptia Suite 6.2 Application Services Guide Release Date October 16, 2014 343 West Erie, Suite 440 Chicago, IL 60654, USA Phone: (312) 229-1727 x111 Fax: (312) 229-1736 Document Information DOCUMENT INFORMATION
Sage 200 Web Time & Expenses Guide
 Sage 200 Web Time & Expenses Guide Sage (UK) Limited Copyright Statement Sage (UK) Limited, 2006. All rights reserved If this documentation includes advice or information relating to any matter other than
isupplier PORTAL ACCESS SYSTEM REQUIREMENTS
 TABLE OF CONTENTS Recommended Browsers for isupplier Portal Recommended Microsoft Internet Explorer Browser Settings (MSIE) Recommended Firefox Browser Settings Recommended Safari Browser Settings SYSTEM
Configuring Business Monitor for Event Consumption from WebSphere MQ
 Configuring Business Monitor for Event Consumption from WebSphere MQ by Seth - Wednesday, June 11, 2014 http://www.sethgagnon.com/configuring-business-monitor-event-consumption-websphere-mq-2/ Overview
Lepide Active Directory Self Service. Configuration Guide. Follow the simple steps given in this document to start working with
 Lepide Active Directory Self Service Configuration Guide 2014 Follow the simple steps given in this document to start working with Lepide Active Directory Self Service Table of Contents 1. Introduction...3
BlackBerry Enterprise Service 10. Version: 10.2. Configuration Guide
 BlackBerry Enterprise Service 10 Version: 10.2 Configuration Guide Published: 2015-02-27 SWD-20150227164548686 Contents 1 Introduction...7 About this guide...8 What is BlackBerry Enterprise Service 10?...9
DMZ Secure Proxy Environment setup for IP Forwarding
 DMZ Secure Proxy Environment setup for IP Forwarding The DMZ Secure Proxy Server for IBM WebSphere Application Server was a new feature introduced in the WebSphere Application Server V7.0 product. An IBM
IBM Security Identity Manager Version 6.0. Security Guide SC14-7699-02
 IBM Security Identity Manager Version 6.0 Security Guide SC14-7699-02 IBM Security Identity Manager Version 6.0 Security Guide SC14-7699-02 Note Before using this information and the product it supports,
CA Nimsoft Unified Management Portal
 CA Nimsoft Unified Management Portal HTTPS Implementation Guide 7.6 Document Revision History Document Version Date Changes 1.0 June 2014 Initial version for UMP 7.6. CA Nimsoft Monitor Copyright Notice
Certificates for computers, Web servers, and Web browser users
 Entrust Managed Services PKI Certificates for computers, Web servers, and Web browser users Document issue: 3.0 Date of issue: June 2009 Copyright 2009 Entrust. All rights reserved. Entrust is a trademark
Bulk Downloader. Call Recording: Bulk Downloader
 Call Recording: Bulk Downloader Contents Introduction... 3 Getting Started... 3 Configuration... 4 Create New Job... 6 Running Jobs... 7 Job Log... 7 Scheduled Jobs... 8 Recent Runs... 9 Storage Device
IBM WEBSPHERE LOAD BALANCING SUPPORT FOR EMC DOCUMENTUM WDK/WEBTOP IN A CLUSTERED ENVIRONMENT
 White Paper IBM WEBSPHERE LOAD BALANCING SUPPORT FOR EMC DOCUMENTUM WDK/WEBTOP IN A CLUSTERED ENVIRONMENT Abstract This guide outlines the ideal way to successfully install and configure an IBM WebSphere
HTTPS Configuration for SAP Connector
 HTTPS Configuration for SAP Connector 1993-2015 Informatica LLC. No part of this document may be reproduced or transmitted in any form, by any means (electronic, photocopying, recording or otherwise) without
AvePoint Meetings 3.2.2 for SharePoint On-Premises. Installation and Configuration Guide
 AvePoint Meetings 3.2.2 for SharePoint On-Premises Installation and Configuration Guide Issued August 2015 Table of Contents About AvePoint Meetings for SharePoint... 4 System Requirements... 5 2 System
CommandCenter Secure Gateway
 CommandCenter Secure Gateway Quick Setup Guide for CC-SG Virtual Appliance - VMware, XEN, HyperV This Quick Setup Guide explains how to install and configure the CommandCenter Secure Gateway. For additional
APNS Certificate generating and installation
 APNS Certificate generating and installation Quick Guide for generating and installing an Apple APNS Certificate Version: x.x MobiDM Quick Guide for APNS Certificate Page 1 Index 1. APPLE APNS CERTIFICATE...
Generating an Apple Push Notification Service Certificate for use with GO!Enterprise MDM. This guide provides information on...
 Generating an Apple Push Notification Service Certificate for use with GO!Enterprise MDM This guide provides information on...... APNs Requirements Tips on Enrolling in the ios Developer Enterprise Program...
PowerChute TM Network Shutdown Security Features & Deployment
 PowerChute TM Network Shutdown Security Features & Deployment By David Grehan, Sarah Jane Hannon ABSTRACT PowerChute TM Network Shutdown (PowerChute) software works in conjunction with the UPS Network
Practice Fusion API Client Installation Guide for Windows
 Practice Fusion API Client Installation Guide for Windows Quickly and easily connect your Results Information System with Practice Fusion s Electronic Health Record (EHR) System Table of Contents Introduction
WHITE PAPER Citrix Secure Gateway Startup Guide
 WHITE PAPER Citrix Secure Gateway Startup Guide www.citrix.com Contents Introduction... 2 What you will need... 2 Preparing the environment for Secure Gateway... 2 Installing a CA using Windows Server
Using Internet or Windows Explorer to Upload Your Site
 Using Internet or Windows Explorer to Upload Your Site This article briefly describes what an FTP client is and how to use Internet Explorer or Windows Explorer to upload your Web site to your hosting
Internet Script Editor (ISE)
") ISE Application, page 1 ISE Functionality, page 1 ISE Requirements, page 2 Secure Socket Layer (SSL) Requirements for ISE, page 2 ISE Installation and Upgrades, page 5 Troubleshooting Tools for Internet
ISE Application, page 1 ISE Functionality, page 1 ISE Requirements, page 2 Secure Socket Layer (SSL) Requirements for ISE, page 2 ISE Installation and Upgrades, page 5 Troubleshooting Tools for Internet
Enable SSL for Apollo 2015
 Enable SSL for Apollo 2015 [1] Obtain proper SSL certificate *.pfx (contains both certificate and private keys) For example, the pfx file contains both certificate and private keys, also the ascii file
A Step-By-Step Guide to Configuring a WebSphere Portal v8.0 Cluster
 A Step-By-Step Guide to Configuring a WebSphere Portal v8.0 Cluster Hunter Tweed WebSphere Portal Level 2 support Team Lead IBM Raleigh Lab May, 2012 Copyright International Business Machines Corporation
Introduction to Mobile Access Gateway Installation
 Introduction to Mobile Access Gateway Installation This document describes the installation process for the Mobile Access Gateway (MAG), which is an enterprise integration component that provides a secure
Kony MobileFabric. Sync Windows Installation Manual - WebSphere. On-Premises. Release 6.5. Document Relevance and Accuracy
 Kony MobileFabric Sync Windows Installation Manual - WebSphere On-Premises Release 6.5 Document Relevance and Accuracy This document is considered relevant to the Release stated on this title page and
F-Secure Messaging Security Gateway. Deployment Guide
 F-Secure Messaging Security Gateway Deployment Guide TOC F-Secure Messaging Security Gateway Contents Chapter 1: Deploying F-Secure Messaging Security Gateway...3 1.1 The typical product deployment model...4
bbc Installing Your Development Environment Adobe LiveCycle ES July 2007 Version 8.0
 bbc Installing Your Development Environment Adobe LiveCycle ES July 2007 Version 8.0 2007 Adobe Systems Incorporated. All rights reserved. Adobe LiveCycle ES 8.0 Installing Your Development Environment
Configuring Load Balancing
 When you use Cisco VXC Manager to manage thin client devices in a very large enterprise environment, a single Cisco VXC Manager Management Server cannot scale up to manage the large number of devices.
Set up SSL in Deployment Solution 7.5
 Set up SSL in Deployment Solution 7.5 Table of Contents Installing certificates... 2 Manually installing certificates... 2 Notification Server/Site Servers... 4 Import Certificate into IIS... 4 Set https
SSO Plugin. J System Solutions. Upgrading SSO Plugin 3x to 4x - BMC AR System & Mid Tier. http://www.javasystemsolutions.com
 SSO Plugin Upgrading SSO Plugin 3x to 4x - BMC AR System & Mid Tier J System Solutions JSS SSO Plugin Upgrading 3x to 4x Introduction... 3 [Prerequisite] Generate a new license... 4 [Prerequisite] Download
Oracle Identity Manager
 Oracle Identity Manager Password Synchronization Module for Microsoft Active Directory Installation and Configuration Guide Release 9.0.4 E10179-01 May 2007 Oracle Identity Manager Password Synchronization
Specops Command. Installation Guide
 Specops Software. All right reserved. For more information about Specops Command and other Specops products, visit www.specopssoft.com Copyright and Trademarks Specops Command is a trademark owned by Specops
Installing BIRT Analytics 4.4
 Pre-requisites... 3 Configuring Microsoft Internet Information Services... 3 Installation... 5 Technical information... 13 PORTS (http / https)... 13 USERS... 13 Windows Services... 13 Linux Process...
OneLogin Integration User Guide
 OneLogin Integration User Guide Table of Contents OneLogin Account Setup... 2 Create Account with OneLogin... 2 Setup Application with OneLogin... 2 Setup Required in OneLogin: SSO and AD Connector...
Generating an Apple Push Notification Service Certificate for use with GO!Enterprise MDM. This guide provides information on...
 Generating an Apple Push Notification Service Certificate for use with GO!Enterprise MDM This guide provides information on...... APNs Requirements Tips on Enrolling in the ios Developer Enterprise Program...
Version 1.0 January 2011. Xerox Phaser 3635MFP Extensible Interface Platform
 Version 1.0 January 2011 Xerox Phaser 3635MFP 2011 Xerox Corporation. XEROX and XEROX and Design are trademarks of Xerox Corporation in the United States and/or other countries. Changes are periodically
SSL Certificate and Key Management
 IBM Software Group SSL Certificate and Key Management Brett Ostrander ([email protected]) Software Engineer June 12, 2012 WebSphere Support Technical Exchange Agenda Chained Certificates Renewing Certificates
IIS, FTP Server and Windows
 IIS, FTP Server and Windows The Objective: To setup, configure and test FTP server. Requirement: Any version of the Windows 2000 Server. FTP Windows s component. Internet Information Services, IIS. Steps:
SSL Configuration on Weblogic Oracle FLEXCUBE Universal Banking Release 12.0.87.01.0 [August] [2014]
![SSL Configuration on Weblogic Oracle FLEXCUBE Universal Banking Release 12.0.87.01.0 [August] [2014]](/thumbs/34/16904074.jpg "SSL Configuration on Weblogic Oracle FLEXCUBE Universal Banking Release 12.0.87.01.0 [August] [2014]") SSL Configuration on Weblogic Oracle FLEXCUBE Universal Banking Release 12.0.87.01.0 [August] [2014] Table of Contents 1. CONFIGURING SSL ON ORACLE WEBLOGIC... 1-1 1.1 INTRODUCTION... 1-1 1.2 SETTING UP
SSL Configuration on Weblogic Oracle FLEXCUBE Universal Banking Release 12.0.87.01.0 [August] [2014] Table of Contents 1. CONFIGURING SSL ON ORACLE WEBLOGIC... 1-1 1.1 INTRODUCTION... 1-1 1.2 SETTING UP
Configuring an Oracle Business Intelligence Enterprise Edition Resource in Metadata Manager
 Configuring an Oracle Business Intelligence Enterprise Edition Resource in Metadata Manager 2011 Informatica Abstract This article shows how to create and configure an Oracle Business Intelligence Enterprise
FlexSim LAN License Server
 FlexSim LAN License Server Installation Instructions Rev. 20150318 Table of Contents Introduction... 2 Using lmtools... 2 1. Download the installation files... 3 2. Install the license server... 4 3. Connecting
IBM WebSphere Application Server Version 7.0
 IBM WebSphere Application Server Version 7.0 Centralized Installation Manager for IBM WebSphere Application Server Network Deployment Version 7.0 Note: Before using this information, be sure to read the
Forward proxy server vs reverse proxy server
 Using a reverse proxy server for TAD4D/LMT Intended audience The intended recipient of this document is a TAD4D/LMT administrator and the staff responsible for the configuration of TAD4D/LMT agents. Purpose
Upgrading Your Web Server from ClientBase Browser Version 2.0 or Above to Version 2.1.1
 Upgrading Your Web Server from ClientBase Browser Version 2.0 or Above to Version 2.1.1 Introduction Successful ClientBase Browser usage depends on proper hardware, setup and installation. This section
Dell SupportAssist Version 2.0 for Dell OpenManage Essentials Quick Start Guide
 Dell SupportAssist Version 2.0 for Dell OpenManage Essentials Quick Start Guide Notes, Cautions, and Warnings NOTE: A NOTE indicates important information that helps you make better use of your computer.
Novell Access Manager
 J2EE Agent Guide AUTHORIZED DOCUMENTATION Novell Access Manager 3.1 SP3 February 02, 2011 www.novell.com Novell Access Manager 3.1 SP3 J2EE Agent Guide Legal Notices Novell, Inc., makes no representations
Smart Policy - Web Collector. Version 1.1
 Smart Policy - Web Collector Version 1.1 Prepared by: "Vincent Le Toux" Date: 29/05/2014 1 Table of Contents Table of Contents Revision History Overview Requirements... 5 Overview... 5 Check that a certificate
DocuSign Connect for Salesforce Guide
 Information Guide 1 DocuSign Connect for Salesforce Guide 1 Copyright 2003-2013 DocuSign, Inc. All rights reserved. For information about DocuSign trademarks, copyrights and patents refer to the DocuSign
Installation Guide for Websphere ND 7.0.0.21
 Informatica MDM Multidomain Edition for Oracle (Version 9.5.1) Installation Guide for Websphere ND 7.0.0.21 Page 1 Table of Contents Preface... 3 Introduction... 4 Before You Begin... 4 Installation Overview...
Configuring a Custom Load Evaluator Use the XenApp1 virtual machine, logged on as the XenApp\administrator user for this task.
 Lab 8 User name: Administrator Password: Password1 Contents Exercise 8-1: Assigning a Custom Load Evaluator... 1 Scenario... 1 Configuring a Custom Load Evaluator... 1 Assigning a Load Evaluator to a Server...