Abstract. Avaya Solution & Interoperability Test Lab
|
|
|
- Whitney Wade
- 10 years ago
- Views:
Transcription
1 Avaya Solution & Interoperability Test Lab Application Notes for Configuring Enterasys Wireless Access Point 3000 (RBT3K-AG) to Support Avaya IP Office, Avaya IP Wireless Telephones and Avaya Phone Manager Pro - Issue 1.0 Abstract These Application Notes describe the procedure for configuring Enterasys Wireless Access Point 3000 (RBT3K-AG) to support Avaya IP Office, Avaya IP Wireless Telephones and Avaya Phone Manager Pro. 1 of 27
 to support Avaya IP Office, Avaya IP Wireless Telephones and Avaya Phone Manager Pro.")
2 1. Introduction These Application Notes describe the steps necessary to configure Enterasys Wireless Access Point 3000 (RBT3K-AG) to support Avaya IP Office, Avaya Wireless Telephones and Avaya Phone Manager Pro. The network infrastructure used for verification is shown in Figure 1. These Application Notes cover the following areas: System IP and Wireless a/b/g radio configurations. Wired Equivalent Privacy (WEP) encryption 802.1x RADIUS authentication with WPA encryption. These Application Notes do not cover the configuration for Avaya IP Wireless Telephones, Avaya Phone Manager Pro, Odyssey RADIUS Server and Clients. For detailed configuration on these devices, refer to the Application Notes listed in Section 7. In the release tested, the Enterasys AP 3000 RBT 3K-AG did not support Spectralink Voice Priority (SVP), which is required for ensuring over the air Quality of Service (QoS). VLAN 1 Avaya IP406 Office Avaya 6408 Digital Telephone VLAN 20 Enterasys AP 3000 RBT3K-AG Avaya Phone Manager Pro Avaya Voice Priority Processor Extreme Alpine 3804 Switch Avaya C360 Stackable Switch Avaya 3626 Wireless Telephone Avaya 3616 Wireless Telephone Avaya 4620SW IP Telephone Odyssey Radius Server Avaya 4610SW IP Telephone 2 Figure 1: Network Configuration 2 of 27

3 Table 1 lists the IP addresses and subnet masks for the tested devices. Device VLAN IP Address/Mask Gateway Avaya IP406 Office VLAN / Avaya Voice Priority Processor VLAN / Avaya C360 Stackable Switch VLAN / Enterasys Wireless Access Point VLAN / (RBT3K-AG) Extreme Alpine 3804 Switch VLAN1 VLAN / /24 Avaya 3626 Wireless Telephone Avaya 3616 Wireless Telephone Avaya Phone Manager Pro Odyssey RADIUS Server VLAN / Table 1: Devices IP Address and Gateway 2. Equipment and Software Validated Table 2 lists the equipment and software version used for the configuration. Equipment Software Avaya IP406 Office IP Office 2.1(29) Avaya Phone Manager Pro V2.1.6 Avaya 4620SW/4610SW IP Telephones R2.01 Avaya 3616/3626 Wireless IP Telephone Avaya Voice Priority Processor R Avaya C360 Stackable Switch R Enterasys Wireless Access Point 3000 (RBT3K-AG) V2.1.2 Extreme Alpine 3804 Switch V7.2.0b25 Dell Laptop with Windows XP Enterasys RoamAbout a/b/g Wireless Card V Odyssey RADIUS Server V Odyssey Client V Table 2: Equipment and Software Validated 3 of 27

4 3. Configure Enterasys AP 3000 (RBT3K-AG) The configuration can be done using a web-based interface. Assume that the IP address has been pre-configured on the Enterasys Wireless Access Point The following sessions display the related configuration using web-based interface Basic System and Wired Equivalent Privacy (WEP) Configuration This section presents the steps of basic system wireless and WEP configuration. The Enterasys Wireless Access Point 3000 (RBT3K-AG) has both a and g radio interfaces. The g radio interface supports both b and g clients. In these Application Notes, the g radio is configured to accept both b and g clients to support the Avaya IP 3616 and 3626 IP wireless Telephones. Note that the Avaya 3626/3616 series wireless Telephones currently only operate in b mode. The 802.1x authentication is applied to the Avaya Phone Manager Pro using Odyssey Client. Step 1. Launch a web browser with the URL Log in the AP with proper user name and password as shown below. 4 of 27

5 2. After logging in, click TCP/IP Settings from the left panel. Disable DHCP Client since static IP address is used. Click Enable for HTTP Server and leave HTTP Port 80 as default. (Optional) Click Enable for HTTPS Server and leaver port 443 as default. Verify the IP address and Subnet Mask are correct. 5 of 27
 Click Enable for HTTPS Server and leaver port 443 as default.")
6 Click OK to login to AP again. 6 of 27

7 3. The following sections display the b/g interface configuration. Click the Radio Settings under b/g Interface from the left panel. Enter 1 for Native VLAN ID. Enter a unique Network Name (e.g. RAbg) as its SSID. Click Enable for Secure Access. Click Enable for Auto Channel Select. Click b & g mixed for Working Mode to accept both b and g clients. Leave other settings as defaults. Click Apply. 7 of 27

8 4. This section presents the WEP configuration. Because the Avaya 3626 and 3616 wireless Telephones do not support 802.1x, the 802.1x authentication needs to be disabled on AP. Click Authentication from left panel and click Disable for 802.1x authentication as shown below. Click Apply when done. 8 of 27

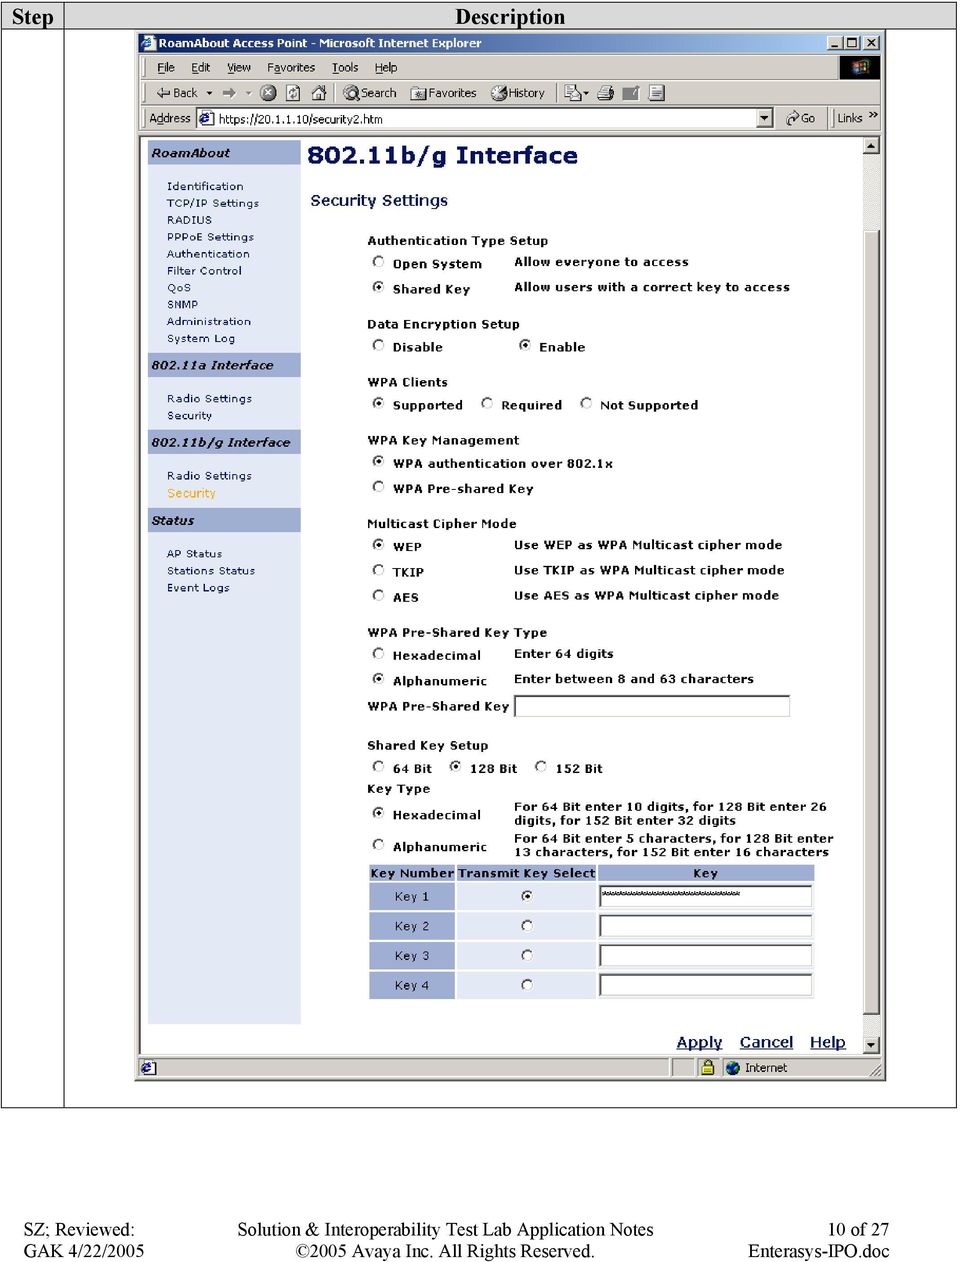
9 5. WEP configuration is shown on the next page. Click Security under b/g Interface from the left panel. Select Shared Key for Authentication Type Setup. This will only allow users who have the correct key to access AP. Click Enable for Data Encryption Setup. Click WEP for Multicast Cipher Mode. Click 128 Bit for Shared Key Setup (Note that Avaya IP 3626/3616 IP Telephones support both 40 and 128 bit key). Click Hexadecimal for Key Type. Enter 26 digits key string in Key1 field. Make sure this key matches the key entered in the IP Wireless Telephone. Click Apply. 9 of 27
. Click Hexadecimal for Key Type.")
10 10 of 27
11 x Authentication Configuration This section presents the 802.1x authentication configuration. This configuration verifies that the Avaya Phone Manager Pro with Odyssey Client can pass 802.1x authentication from the Odyssey RADIUS Server through the AP. Note this configuration does not apply to the Avaya 3626/3616 Wireless Telephones since those telephones do not support 802.1x. Step 1. Configure a Interface. Click the Radio Settings under a Interface from the left panel. Enter 1 for Native VLAN ID. Enter a unique Network Name (e.g. RAa) as its SSID. Click Enable for Secure Access. Leave other settings as defaults as shown below. Click Apply. 11 of 27
 as its SSID.")
12 2. This section presents the RADIUS Server configuration. Click Radius from left panel to enter the radius server information as shown below. Enter IP address for primary RADIUS Server. Leave port number 1812 as default settings. Since only one RADIUS server is used in this configuration, leave IP address in the field for the Secondary RADIUS Server. Enter shared key, is used in this case, in Key field. This Key is shared between the Wireless Access Point and the Radius Server while authenticating the supplicant (Note the Key entered here must match the key entered in the RADIUS Server.). Click Apply. 12 of 27

13 3. This section presents the Authentication configuration. Click Authentication from left panel and click Supported under 802.1x Setup. Click Enable for 802.1x Supplicant. Enter wireless as Username and enter password in fields as shown below. Click Apply when done. 13 of 27

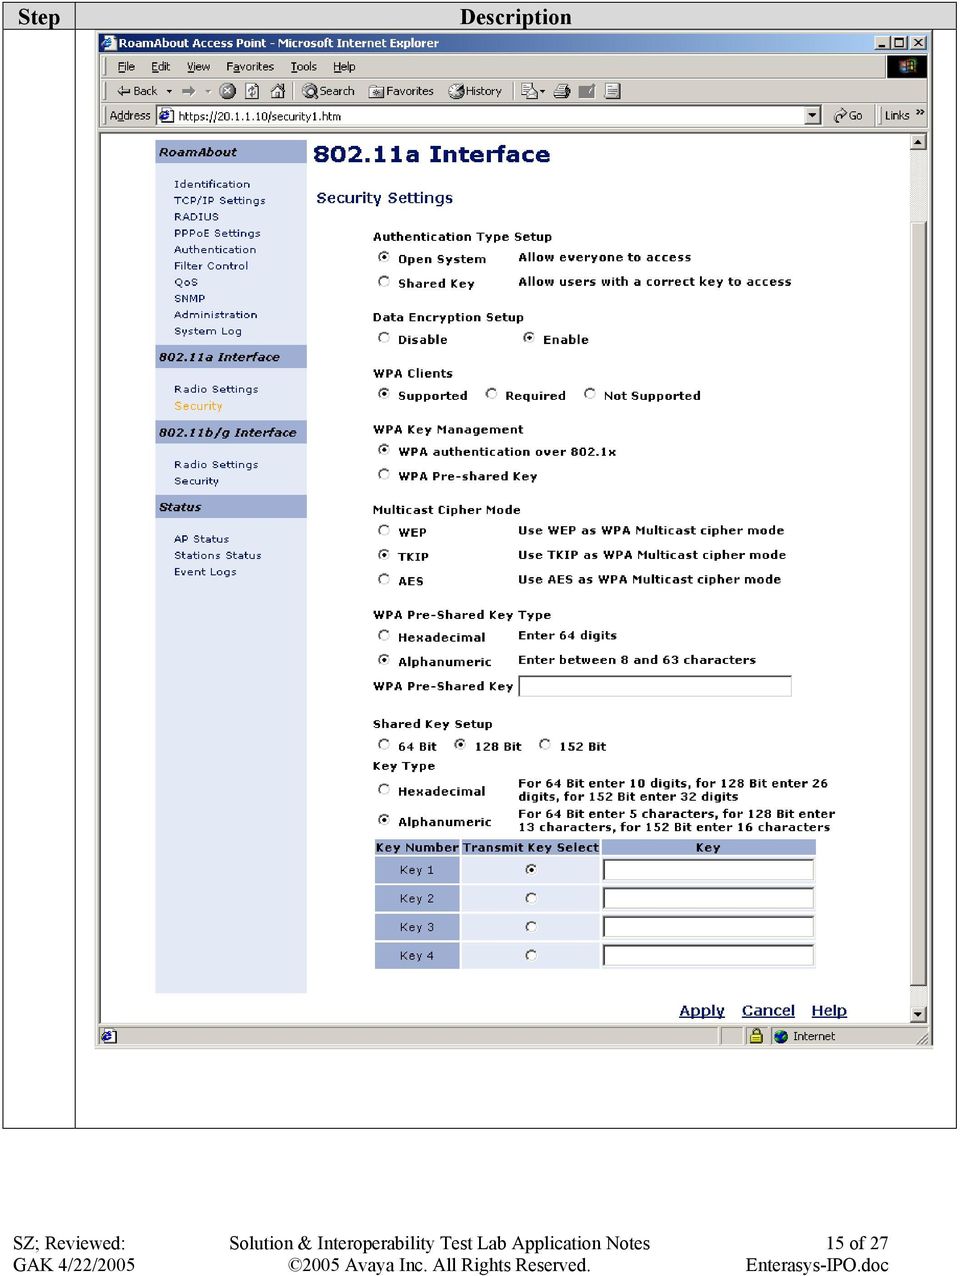
14 4. This section presents the WPA (WiFi Protected Access) configuration associated with the 802.1x. WPA includes Temporal Key Integrity Protocol (TKIP) and 802.1x mechanisms. The combination of these two mechanisms provides dynamic key encryption and mutual authentication. The configuration screen is shown on the next page. Click Security under a Interface from left panel. Click Open System as Authentication Type Setup. Click Enable for Data Encryption Setup. Click Supported for WPA Clients. Click WPA authentication over 802.1x under WPA Key Management. Click TKIP (Temporal Key Integrity Protocol) under Multicast Cipher Mode for key encryption. (Note: Since the TKIP can provide dynamic key and encryption, the manual key entry is not required for client authentication. Leave both the WPA Pre-Shared Key and Shared Key fields blank.) Click Apply when done. 14 of 27
 under Multicast Cipher Mode for key encryption.")
15 15 of 27
16 For detailed Avaya Voice Priority Processor, Odyssey Server and Client configuration, refer to the Application Notes listed in Section 7 and other documents from Funk Software web site at 4. Configure Avaya IP406 Office This section describes the steps necessary to configure the Avaya IP406 Office. IP406 Office is configured using the IP Office Manager application. Assume that a proper license has been installed on the Avaya IP406 Office. Step 1. Configuring interface LAN1. Using the IP Office Manager, browse the configuration tree and select System Configuration and click on the LAN1 tab. Set IP Address to and IP Mask to For the DHCP Mode, select Disabled. Click OK. 16 of 27

17 2. Adding Avaya Voice Priority Processor (AVPP) IP Address. Using the IP Office Manager, browse the configuration tree and select System Configuration and click on the System tab. Enter into AVPP IP Address field. Enter management PC s IP address into TFTP Server and License Server IP Address fields. This is the PC that running IP Office Manager Application. Leave other fields as default. Click OK. 17 of 27

18 3. Configuring the default gateway. Browse the configuration tree and select IP Route. Leave the IP Address and IP Mask fields blank. This sets the default gateway. Enter as gateway IP address Select LAN1 as gateway interface. Enter 1 in Metric field. Click OK. 18 of 27

19 4. Configuring a User. In the IP Office, every extension created requires a user associated with it. The following example shows how to configure a user for a PhoneManager Pro using extension Using the IP Office Manager, browse the configuration tree and select User. Enter information in the fields as shown below 19 of 27

20 Click the Telephony tab. Select VoIP in the Phone Manager Type field. Leave the other parameters as default. Click OK when done. 20 of 27

21 5. Configuring an extension. Using the IP Office Manager Pro, browse the configuration tree and select Extension. Right click Extension and select Add. Extension ID 8007 is assigned by the Avaya IP Office. Leave it unchanged. Enter in the Extension field. Leave other parameters as default. Click OK. 21 of 27
22 Select the VoIP tab. Select G.711 ULAW 64K codec for Compression Mode. Check Out Of Band DTMF. Check Allow Direct Media Path. Click OK when done. Follow Steps 4 and 5 to create extensions for Avaya 3616 and 3626 wireless IP Telephones. 22 of 27
23 6. Save changes to the IP Office. Under the Manager File Menu item, select Save. At the Sending Config to dialog box, select the option to immediately reboot and press OK. If the IP Office Server IP address has been changed, update the IP address of the PC running IP Office Manager and edit the IP Office Manager Preferences setting under the File menu before reconnecting. 5. Verification Steps The following verification steps were used in these Application Notes to verify correct system operation: Verify network connectivity by launching pings between the IP406 Office and the wireless laptop PC. Verify that all pings are successful. Enable WEP on both IP Wireless Telephones. Power up the Avaya 3616 and 3626 IP Wireless Telephones and verify that they can register with IP406 Office. Make a call between these two IP wireless Telephones and verify that the voice quality is good. Make a call from the 3626 IP Wireless Telephone to the 4620SW IP Telephone, and verify that the voice quality is good. While the call is up, make a conference call to the 4620SW IP Telephone. Verify that all three parties are in conference call and voice quality is good. Enable 802.1x on the Odyssey Client and verify that the RADIUS server can authenticate the client. The following screen capture shows the connection status. Note that, under the Connection information, the Status shows open and authenticated. The blue color on Odyssey icon shows the client is connected and authenticated. The blue color on the Key icon shows that data is encrypted using dynamic keys (TKIP). 23 of 27
24 Click icon to show the last authentication results. 24 of 27
25 Click the Key icon to show the Key Encryption. Launch PhoneManager Pro and verify that the PhoneManager can register with IP406 Office. Make a call from the PhoneManager Pro to the 4610SW IP Telephone and verify that voice quality is good. 6. Conclusion These Application Notes illustrate the procedures necessary for configuring the Enterasys Wireless Access Point 3000 (RBT3K-AG) to support Avaya IP406 Office, Avaya IP Wireless Telephones and Avaya Phone Manager Pro. The Enterasys Wireless Access Point 3000 (RBT3K-AG) is able to support a/b/g radio, WPA with 802.1x authentication as well as WEP encryption. 25 of 27
26 7. References Use this URL to access these Application Notes. [1] Application Notes for Configuring 3Com Wireless LAN Access Point 8750 to Support Avaya Communication Manager, Avaya IP Wireless Telephone and Avaya IP Softphone - Issue 1.0 [2] Configuring the Avaya 3606 Wireless Telephone with Compatible b Access Points from Avaya and Other Vendors - Issue 1.0 [3] Configuring the Funk Odyssey Software, Avaya Access Point 3 and Avaya a/b Wireless Client for User Authentication (802.1x) and Data Encryption - Issue 1.0 [4] Implementing Encrypted Conversations between Avaya Softphone Endpoints with Avaya IP Office 403 and Avaya S8300 Media Server Issue 1.0 Use this URL to access the configuration documentations for Odyssey products. 26 of 27
27 Avaya and the Avaya Logo are trademarks of Avaya Inc. All trademarks identified by and are registered trademarks or trademarks, respectively, of Avaya Inc. All other trademarks are the property of their respective owners. The information provided in these Application Notes is subject to change without notice. The configurations, technical data, and recommendations provided in these Application Notes are believed to be accurate and dependable, but are presented without express or implied warranty. Users are responsible for their application of any products specified in these Application Notes. Please any questions or comments pertaining to these Application Notes along with the full title name and filename, located in the lower right corner, directly to the Avaya DeveloperConnection Program at 27 of 27
Configuring Avaya 1120E, 1140E, 1220 and 1230 IP Deskphones with Avaya IP Office Release 6.1 Issue 1.0
 Avaya Solution & Interoperability Test Lab Configuring Avaya 1120E, 1140E, 1220 and 1230 IP Deskphones with Avaya IP Office Release 6.1 Issue 1.0 Abstract These Application Notes describe a solution comprised
Application Notes for Configuring Yealink T-22 SIP Phones to interoperate with Avaya IP Office - Issue 1.0
 Avaya Solution & Interoperability Test Lab Application Notes for Configuring Yealink T-22 SIP Phones to interoperate with Avaya IP Office - Issue 1.0 Abstract These Application Notes describe the configuration
Application Notes for Valcom PagePro IP with Avaya IP Office Issue 1.0
 Avaya Solution & Interoperability Test Lab Application Notes for Valcom PagePro IP with Avaya IP Office Issue 1.0 Abstract These Application Notes describe the configuration steps required for Valcom PagePro
Application Notes for Configuring a SonicWALL Continuous Data Protection (CDP) backup solution with Avaya VoiceMail Pro - Issue 1.
 backup solution with Avaya VoiceMail Pro - Issue 1.") Avaya Solution & Interoperability Test Lab Application Notes for Configuring a SonicWALL Continuous Data Protection (CDP) backup solution with Avaya VoiceMail Pro - Issue 1.0 Abstract These Application
Avaya Solution & Interoperability Test Lab Application Notes for Configuring a SonicWALL Continuous Data Protection (CDP) backup solution with Avaya VoiceMail Pro - Issue 1.0 Abstract These Application
Application Notes for snom 3x0 VoIP Phones with Avaya IP Office Issue 1.0
 Avaya Solution & Interoperability Test Lab Application Notes for snom 3x0 VoIP Phones with Avaya IP Office Issue 1.0 Abstract These Application Notes describe the configuration steps required for snom
Configuring the Avaya B179 SIP Conference Phone with Avaya Aura Communication Manager and Avaya Aura Session Manager Issue 1.0
 Avaya Solution & Interoperability Test Lab Configuring the Avaya B179 SIP Conference Phone with Avaya Aura Communication Manager and Avaya Aura Session Manager Issue 1.0 Abstract These Application Notes
Lab 8.4.5.1 Configuring LEAP/EAP using Local RADIUS Authentication
 Lab 8.4.5.1 Configuring LEAP/EAP using Local RADIUS Authentication Objective Topology Estimated Time: 40 minutes Number of Team Members: Students can work in teams of two. In this lab, the student will
Integrating a Hitachi IP5000 Wireless IP Phone
 November, 2007 Avaya Quick Edition Integrating a Hitachi IP5000 Wireless IP Phone This application note explains how to configure the Hitachi IP5000 wireless IP telephone to connect with Avaya Quick Edition
Abstract. Avaya Solution & Interoperability Test Lab
 Avaya Solution & Interoperability Test Lab Application Notes for Configuring a Virtual Private Network (VPN) for Avaya IP Office using the Edgewater Networks EdgeMarc 4500 VoIP VPN Appliance - Issue 1.0
Application Notes for Revolabs FLX UC 1000 with Avaya IP Office - Issue 0.1
 Avaya Solution & Interoperability Test Lab Application Notes for Revolabs FLX UC 1000 with Avaya IP Office - Issue 0.1 Abstract These Application Notes describe the configuration steps required to integrate
Abstract. Avaya Solution & Interoperability Test Lab
 Avaya Solution & Interoperability Test Lab Application Notes for Configuring the Ascom Wireless IP- DECT SIP Solution with Avaya IP Office in a Converged Voice over IP and Data Network - Issue 1.1 Abstract
Table of Contents. Cisco Wi Fi Protected Access 2 (WPA 2) Configuration Example
 Configuration Example") Table of Contents Wi Fi Protected Access 2 (WPA 2) Configuration Example...1 Document ID: 67134...1 Introduction...1 Prerequisites...1 Requirements...1 Components Used...2 Conventions...2 Background Information...2
Table of Contents Wi Fi Protected Access 2 (WPA 2) Configuration Example...1 Document ID: 67134...1 Introduction...1 Prerequisites...1 Requirements...1 Components Used...2 Conventions...2 Background Information...2
Application Notes for Multi-Tech FaxFinder IP with Avaya IP Office Issue 1.0
 Avaya Solution & Interoperability Test Lab Application Notes for Multi-Tech FaxFinder IP with Avaya IP Office Issue 1.0 Abstract These Application Notes describe the configuration steps required to integrate
Wireless Network Configuration Guide
 CIT Table of Contents Introduction... 1 General Wireless Settings... 1 1. Windows XP Wireless Configuration... 2 2. Windows XP Intel Pro Wireless Tool... 7 3. Windows Vista Using the Windows Wireless Tools...
Application Notes for Configuring a SonicWALL VPN with an Avaya IP Telephony Infrastructure - Issue 1.0
 Avaya Solution & Interoperability Test Lab Application Notes for Configuring a SonicWALL VPN with an Avaya IP Telephony Infrastructure - Issue 1.0 Abstract These Application Notes describe the steps for
Application Notes for Configuring QuesCom 400 IP/GSM Gateway with Avaya IP Office using H.323 trunks Issue 1.0
 Avaya Solution & Interoperability Test Lab Application Notes for Configuring QuesCom 400 IP/GSM Gateway with Avaya IP Office using H.323 trunks Issue 1.0 Abstract These Application Notes describe the configuration
Application Notes for Biamp Tesira SVC-2 and Avaya IP Office Issue 1.0
 Avaya Solution & Interoperability Test Lab Application Notes for Biamp Tesira SVC-2 and Avaya IP Office Issue 1.0 Abstract These Application Notes describe the procedures for configuring Biamp Tesira SVC-2
Application Notes for Configuring the Ascom i62 VoWiFi handset version 2.3.16 with Avaya IP Office Release 7.0 - Issue 1.0
 Avaya Solution & Interoperability Test Lab Application Notes for Configuring the Ascom i62 VoWiFi handset version 2.3.16 with Avaya IP Office Release 7.0 - Issue 1.0 Abstract These Application Notes describe
Avaya Solution & Interoperability Test Lab
 Avaya Solution & Interoperability Test Lab Application Notes for Configuring Ascom Wireless IP-DECT SIP Solution with Avaya IP Office 9.0 in a Converged Voice over IP and Data Network - Issue 1.0 Abstract
TECH BULLETIN NETGEN1 DOOR CONTROLLER WI-FI NETWORK CONFIG
 TECH BULLETIN NETGEN1 DOOR CONTROLLER WI-FI NETWORK CONFIG February 12, 2008 The factory default network configuration for BlueWave Security s Wi-Fi NetGen1 door controllers is a dynamic DHCP IP address,
Using Cisco UC320W with Windows Small Business Server
 Using Cisco UC320W with Windows Small Business Server This application note explains how to deploy the Cisco UC320W in a Windows Small Business Server environment. Contents This document includes the following
SATO Network Interface Card Configuration Instructions
 SATO Network Interface Card Configuration Instructions Table of Contents 1. Reset of wired/wireless interface card... 3 2. Installing the All-In-One Utility (recommended)... 4 3. Configuring wired/wireless
Configuring the CyberData VoIP 4-Port Zone Controller with Audio Out
 NetVanta Unified Communications Technical Note Configuring the CyberData VoIP 4-Port Zone Controller with Audio Out Introduction The CyberData Voice over Internet Protocol (VoIP) zone controller enables
D-Link DAP-1360 Repeater Mode Configuration
 D-Link DAP-1360 Repeater Mode Configuration Outline 1. Package Contents 2. System Requirements 3. Hardware Overview Connections LED s WPS LED/Button 4. Default Settings 5. Configuring your LAN Adapter
Sample Configuration for H.323 Trunk between Avaya IP Office and Cisco Unified Communications Manager 7.0 Issue 1.0
 Avaya Solution & Interoperability Test Lab Sample Configuration for H.323 Trunk between Avaya IP Office and Cisco Unified Communications Manager 7.0 Issue 1.0 Abstract These Application Notes describe
Application Notes for Algo 8028 SIP Door Phone with Avaya IP Office - Issue 1.0
 Avaya Solution & Interoperability Test Lab Application Notes for Algo 8028 SIP Door Phone with Avaya IP Office - Issue 1.0 Abstract These Application Notes describe the configuration steps required for
PePWave Surf Series PePWave Surf Indoor Series: Surf 200, AP 200, AP 400
 PePWave Surf Series PePWave Surf Indoor Series: Surf 200, AP 200, AP 400 PePWave Surf Outdoor Series: Surf AP 200/400-X, PolePoint 400-X, Surf 400-DX User Manual Document Rev. 1.2 July 07 COPYRIGHT & TRADEMARKS
Configuring H.323 over Port Network Address Translation (PNAT) for Avaya IP Endpoints using the Avaya SG200 Security Gateway - Issue 1.
 for Avaya IP Endpoints using the Avaya SG200 Security Gateway - Issue 1.") Configuring H.323 over Port Network Address Translation (PNAT) for Avaya IP Endpoints using the Avaya SG200 Security Gateway - Issue 1.0 Abstract These Application Notes describe how to configure the Avaya
Configuring H.323 over Port Network Address Translation (PNAT) for Avaya IP Endpoints using the Avaya SG200 Security Gateway - Issue 1.0 Abstract These Application Notes describe how to configure the Avaya
Application Notes for Configuring SIP Trunking between Metaswitch MetaSphere CFS and Avaya IP Office Issue 1.0
 Avaya Solution & Interoperability Test Lab Application Notes for Configuring SIP Trunking between Metaswitch MetaSphere CFS and Avaya IP Office Issue 1.0 Abstract These Application Notes describe the steps
Abstract. Avaya Solution & Interoperability Test Lab
 Avaya Solution & Interoperability Test Lab Application Notes for Configuring NetScreen 50, NetScreen 25 and NetScreen-Remote Client Software with Avaya IP Office and Avaya PhoneManager - Issue 1.0 Abstract
Application Notes for Spectralink 84-Series Wireless Telephones and Avaya IP Office Issue 1.0
 ` Avaya Solution & Interoperability Test Lab Application Notes for Spectralink 84-Series Wireless Telephones and Avaya IP Office Issue 1.0 Abstract These Application Notes describe the procedures for configuring
Application Notes for Configuring Cablevision Optimum Voice SIP Trunking with Avaya IP Office - Issue 1.1
 Avaya Solution & Interoperability Test Lab Application Notes for Configuring Cablevision Optimum Voice SIP Trunking with Avaya IP Office - Issue 1.1 Abstract These Application Notes describe the procedures
STEP III: Enable the Wireless Network Card. STEP IV: Print out the Printer Settings pages to determine the IP Address
 Title: How do I configure the wireless printer without a network cable and install the printer driver in Windows? NOTE: For successful wireless setup, you MUST know your network security settings. STEP
USER GUIDE Cisco Small Business
 USER GUIDE Cisco Small Business WBPN Wireless-N Bridge for Phone Adapters December 2011 Cisco and the Cisco Logo are trademarks of Cisco Systems, Inc. and/or its affiliates in the U.S. and other countries.
Step-by-Step Setup Guide Wireless File Transmitter FTP Mode
 EOS Step-by-Step Setup Guide Wireless File Transmitter FTP Mode Infrastructure Setup Windows XP 2012 Canon U.S.A., Inc. All Rights Reserved. Reproduction in whole or in part without permission is prohibited.
Abstract. Avaya Solution & Interoperability Test Lab
 Avaya Solution & Interoperability Test Lab Application Notes for Configuring a Small to Medium Size Business VoIP and Data Network Solution Consisting of HP ProCurve Networking Switches and an Avaya Telephony
Application Notes for MultiTech FaxFinder IP with Avaya IP Office Issue 1.0
 Avaya Solution & Interoperability Test Lab Application Notes for MultiTech FaxFinder IP with Avaya IP Office Issue 1.0 Abstract These Application Notes describe the configuration steps required to integrate
How to convert a wireless router to be a wireless. access point
 How to convert a wireless router to be a wireless access point Thanks for purchasing Edimax Wireless Router. This instruction can be applied if you want to keep your wired router and you need Edimax Wireless
V310 Support Note Version 1.0 November, 2011
 1 V310 Support Note Version 1.0 November, 2011 2 Index How to Register V310 to Your SIP server... 3 Register Your V310 through Auto-Provision... 4 Phone Book and Firmware Upgrade... 5 Auto Upgrade... 6
A Division of Cisco Systems, Inc. GHz 2.4 802.11g. Wireless-G. Access Point with SRX. User Guide WIRELESS WAP54GX. Model No.
 A Division of Cisco Systems, Inc. GHz 2.4 802.11g WIRELESS Wireless-G Access Point with SRX User Guide Model No. WAP54GX Copyright and Trademarks Specifications are subject to change without notice. Linksys
Movie Cube. User s Guide to Wireless Function
 Movie Cube User s Guide to Wireless Function Table of Contents 1. WLAN USB Adapter Connection...3 2. Wireless Setup...4 2.1 Infrastructure (AP)...5 2.2 Peer to Peer (Ad Hoc)...7 2.3 Settings for PC...8
Configuring the WT-4 for ftp (Ad-hoc Mode)
") En Configuring the WT-4 for ftp (Ad-hoc Mode) Windows XP Introduction This document provides basic instructions on configuring the WT-4 wireless transmitter and a Windows XP Professional SP2 ftp server
En Configuring the WT-4 for ftp (Ad-hoc Mode) Windows XP Introduction This document provides basic instructions on configuring the WT-4 wireless transmitter and a Windows XP Professional SP2 ftp server
Step-by-Step Setup Guide Wireless File Transmitter FTP Mode
 EOS Step-by-Step Setup Guide Wireless File Transmitter FTP Mode Ad Hoc Setup Windows XP 2012 Canon U.S.A., Inc. All Rights Reserved. Reproduction in whole or in part without permission is prohibited. 1
Quick Installation Guide DAP-1360. Wireless N 300 Access Point & Router
 DAP-1360 Wireless N 300 Access Point & Router BEFORE YOU BEGIN Delivery Package Access point DAP-1360 Power adapter DC 12V Ethernet cable (CAT 5E) (brochure). If any of the items are missing, please contact
9243060 Issue 1 EN. Nokia and Nokia Connecting People are registered trademarks of Nokia Corporation
 9243060 Issue 1 EN Nokia and Nokia Connecting People are registered trademarks of Nokia Corporation Nokia 9300i Configuring connection settings Nokia 9300i Configuring connection settings Legal Notice
Configuring the WT-4 for ftp (Ad-hoc Mode)
") En Configuring the WT-4 for ftp (Ad-hoc Mode) Mac OS X Introduction This document provides basic instructions on configuring the WT-4 wireless transmitter and a Mac OS X (10.5.2) ftp server for transmission
En Configuring the WT-4 for ftp (Ad-hoc Mode) Mac OS X Introduction This document provides basic instructions on configuring the WT-4 wireless transmitter and a Mac OS X (10.5.2) ftp server for transmission
Configuring CyberData VoIP Ceiling Speakers
 NetVanta Unified Communications Technical Note Configuring CyberData VoIP Ceiling Speakers Introduction The CyberData Voice over IP (VoIP) ceiling speaker connects to existing local area networks (LANs)
EW-7438RPn V2 User Manual
 EW-7438RPn V2 User Manual 09-2013 / v1.0 CONTENTS I. Product Information... 1 I-1. Package Contents... 1 I-2. System Requirements... 1 I-3. LED Status... 1 I-4. Hardware Overview... 3 I-5. Safety Information...
Communication Manager configuration for BLU-103
 Avaya Aura Communication Manager configuration for BLU-103 Application Notes for Configuring BLU-103 VoIP Solution with Avaya Aura Session Manager 6.3 and Avaya Aura Communication Manager 6.3 10653 South
CONNECTING THE RASPBERRY PI TO A NETWORK
 CLASSROOM CHALLENGE CONNECTING THE RASPBERRY PI TO A NETWORK In this lesson you will learn how to connect the Raspberry Pi computer to a network with both a wired and a wireless connection. To complete
A Division of Cisco Systems, Inc. GHz 2.4 802.11g. Wireless-G. USB Network Adapter with RangeBooster. User Guide WIRELESS WUSB54GR. Model No.
 A Division of Cisco Systems, Inc. GHz 2.4 802.11g WIRELESS Wireless-G USB Network Adapter with RangeBooster User Guide Model No. WUSB54GR Copyright and Trademarks Specifications are subject to change without
STATIC IP SET UP GUIDE
 STATIC IP SET UP GUIDE VERIZON D-LINK 2750B & ACTIONTEC GT784 WNV WIRELESS GATEWAY Verizon High Speed Internet for Business Verizon High Speed Internet for Business YOUR NEW STATIC IP CONNECTION AND SET
Quick Start Guide. WRV210 Wireless-G VPN Router with RangeBooster. Cisco Small Business
 Quick Start Guide Cisco Small Business WRV210 Wireless-G VPN Router with RangeBooster Package Contents WRV210 Router Ethernet Cable Power Adapter Product CD-ROM Quick Start Guide Welcome Thank you for
Application Notes for Biamp AudiaFLEX VoIP-2 with Avaya IP Office Issue 1.0
 Avaya Solution & Interoperability Test Lab Application Notes for Biamp AudiaFLEX VoIP-2 with Avaya IP Office Issue 1.0 Abstract These Application Notes describe the configuration steps required for Biamp
Preparing the Computers for TCP/IP Networking
 Configuration Preparing the Computers for TCP/IP Networking Configuring Windows 98, and ME for TCP/IP Networking Verifying TCP/IP Properties Configuring Windows 2000 or XP for IP Networking Install or
The Wireless LAN (Local Area Network) USB adapter can be operated in one of the two following networking configurations :
 USB adapter can be operated in one of the two following networking configurations :") SAGEM Wi-Fi 11g USB ADAPTER Quick Start Guide About this guide This Quick Start Guide describes how to install and operate your SAGEM Wi-Fi 11g USB ADAPTER. Please read this manual before you install the
SAGEM Wi-Fi 11g USB ADAPTER Quick Start Guide About this guide This Quick Start Guide describes how to install and operate your SAGEM Wi-Fi 11g USB ADAPTER. Please read this manual before you install the
Setting up a WiFi Network (WLAN)
") Setting up a WiFi Network (WLAN) How to set up Wi-Fi on your Huawei E960 InZone Step 1: In the address field on your internet browser, type http://192.168.1.1/ Step 2: Type admin into the Password box
Setting up a WiFi Network (WLAN) How to set up Wi-Fi on your Huawei E960 InZone Step 1: In the address field on your internet browser, type http://192.168.1.1/ Step 2: Type admin into the Password box
Fonality. Optimum Business Trunking and the Fonality Trixbox Pro IP PBX Standard Edition V4.1.2- p13 Configuration Guide
 Fonality Optimum Business Trunking and the Fonality Trixbox Pro IP PBX Standard Edition V4.1.2- p13 Configuration Guide Fonality Table of Contents 1. Overview 2. SIP Trunk Adaptor Set-up Instructions 3.
TECHNICAL BULLETIN. Configuring Wireless Settings in an i-stat 1 Wireless Analyzer
 i-stat TECHNICAL BULLETIN Configuring Wireless Settings in an i-stat 1 Wireless Analyzer Before configuring wireless settings, please enable the wireless functionality by referring to the Technical Bulletin
Application Notes for MultiTech FaxFinder FFx40 Software version 1.1.8 with Avaya IP Office 8.0 Issue 1.0
 Avaya Solution & Interoperability Test Lab Application Notes for MultiTech FaxFinder FFx40 Software version 1.1.8 with Avaya IP Office 8.0 Issue 1.0 Abstract These Application Notes describe the configuration
Configuration of Cisco Autonomous Access Point with 802.1x Authentication for Avaya 3631 Wireless Telephone
 Configuration of Cisco Autonomous Access Point with 802.1x Authentication for Avaya 3631 Wireless Telephone Product Summary Manufacturer: Cisco Systems: www.cisco.com Access Point: Cisco Aironet 1130AG
Pre-lab and In-class Laboratory Exercise 10 (L10)
") ECE/CS 4984: Wireless Networks and Mobile Systems Pre-lab and In-class Laboratory Exercise 10 (L10) Part I Objectives and Lab Materials Objective The objectives of this lab are to: Familiarize students
ECE/CS 4984: Wireless Networks and Mobile Systems Pre-lab and In-class Laboratory Exercise 10 (L10) Part I Objectives and Lab Materials Objective The objectives of this lab are to: Familiarize students
Linksys WAP300N. User Guide
 User Guide Contents Contents Overview Package contents 1 Back view 1 Bottom view 2 How to expand your home network 3 What is a network? 3 How to expand your home network 3 Where to find more help 3 Operating
How To Test The Nms Adaptive Suite With An Ip Office On A Windows 2003 Server On A Nms Desktop On A Pnet 2.5 (Tapi) On A Blackberry 2.2 (Tapi) On An Ipo 2
 On A Blackberry 2.2 (Tapi) On An Ipo 2") Avaya Solution & Interoperability Test Lab Application Notes for Configuring NMS Adaptive Suite with Avaya IP Office R8 using Avaya IP Office TAPI Service Provider - Issue 1.0 Abstract These Application
Avaya Solution & Interoperability Test Lab Application Notes for Configuring NMS Adaptive Suite with Avaya IP Office R8 using Avaya IP Office TAPI Service Provider - Issue 1.0 Abstract These Application
Configuring the WT-4 for ftp (Infrastructure Mode)
") Introduction En Configuring the WT-4 for ftp (Infrastructure Mode) This document provides basic instructions on configuring the WT-4 wireless transmitter and a ftp server for transmission over an infrastructure
Introduction En Configuring the WT-4 for ftp (Infrastructure Mode) This document provides basic instructions on configuring the WT-4 wireless transmitter and a ftp server for transmission over an infrastructure
Application Notes for Integrating Verint ULTRA9 VoIP Call Recording Service With Avaya Interaction Center - Issue 1.1
 Avaya Solution & Interoperability Test Lab Application Notes for Integrating Verint ULTRA9 VoIP Call Recording Service With Avaya Interaction Center - Issue 1.1 Abstract Verint Ultra Intelligent Recording
Application Notes for DATEL Call SWEET! Live Outbound Dialer with Avaya IP Office 8.0 Issue 1.0
 Avaya Solution & Interoperability Test Lab Application Notes for DATEL Call SWEET! Live Outbound Dialer with Avaya IP Office 8.0 Issue 1.0 Abstract These Application Notes describe the configuration steps
ALL1682511. 500Mbits Powerline WLAN N Access Point. User s Manual
 ALL1682511 500Mbits Powerline WLAN N Access Point User s Manual Contents 1. Introduction...1 2. System Requirements...1 3. Configuration...1 4. WPS...9 5. Wireless AP Settings...9 6. FAQ... 15 7. Glossary...
Application Notes for Algo 8180 SIP Audio Alerter with Avaya IP Office - Issue 1.1
 Avaya Solution & Interoperability Test Lab Application Notes for Algo 8180 SIP Audio Alerter with Avaya IP Office - Issue 1.1 Abstract These Application Notes describe the configuration steps required
Optimum Business SIP Trunk Set-up Guide
 Optimum Business SIP Trunk Set-up Guide For use with IP PBX only. SIPSetup 07.13 FOR USE WITH IP PBX ONLY Important: If your PBX is configured to use a PRI connection, do not use this guide. If you need
Avaya, Trapeze and Nokia Mobility Solution Abstract
 Avaya, Trapeze and Nokia Mobility Solution Abstract This application note describes the Avaya, Trapeze and Nokia mobility solution. This document is not a user guide or sales brochure. It is a how-to/tips
Wireless Client Configuration Guide. for third-party wireless Ethernet adapters
 Wireless Client Configuration Guide for third-party wireless Ethernet adapters Notice to Users 2002 2Wire, Inc. All rights reserved. This manual in whole or in part, may not be reproduced, translated,
FLX VoIP Registering with Avaya IP Office 500
 FLX VoIP Registering with Avaya IP Office 500 Date: April 5 th, 2012 This technical note gives a detailed description on how to register a Revolabs FLX conference phone with Avaya IP Office 500 PBX. On
Question How do I access the router s web-based setup page? Answer
 http://linksys.custhelp.com/cgi-bin/linksys.cfg/php/enduser/std_adp.php?p_faqid=3676 Question How do I access the router s web-based setup page? Answer All Linksys routers have a built-in web-based setup
DV230 Web Based Configuration Troubleshooting Guide
 DV230 Web Based Configuration Troubleshooting Guide 1. Login settings After getting a DHCP IP address from your P1 W1MAX Modem DV-230), open any Internet browser and type in the URL address: http://10.1.1.254
DATA PROJECTOR XJ-A135/XJ-A145/XJ-A235/ XJ-A245
 DATA PROJECTOR XJ-A135/XJ-A145/XJ-A235/ XJ-A245 E Data Projector Wireless Function Guide Be sure to read the precautions in the User s Guide (Basic Operations) that comes with the Data Projector. Be sure
DATA PROJECTOR XJ-A146/XJ-A246/XJ-A256
 DATA PROJECTOR XJ-A146/XJ-A246/XJ-A256 E Data Projector Wireless Function Guide Be sure to read the precautions in the Setup Guide that comes with the Data Projector. Be sure to keep all user documentation
Wireless G Broadband quick install
 Wireless G Broadband Router quick install guide Model 503693 INT-503693-QIG-0608-02 Thank you for purchasing the INTELLINET NETWORK SOLUTIONS Wireless G Broadband Router, Model 503693. This quick install
Application Notes for Configuring Broadvox SIP Trunking with Avaya IP Office - Issue 1.0
 Avaya Solution & Interoperability Test Lab Application Notes for Configuring Broadvox SIP Trunking with Avaya IP Office - Issue 1.0 Abstract These Application Notes describe the procedures for configuring
Application Notes for the Ingate SIParator with Avaya Converged Communication Server (CCS) - Issue 1.0
 - Issue 1.0") Avaya Solution & Interoperability Test Lab Application Notes for the Ingate SIParator with Avaya Converged Communication Server (CCS) - Issue 1.0 Abstract These Application Notes describe the configuration
Avaya Solution & Interoperability Test Lab Application Notes for the Ingate SIParator with Avaya Converged Communication Server (CCS) - Issue 1.0 Abstract These Application Notes describe the configuration
Step-by-Step Setup Guide Wireless File Transmitter
 EOS Step-by-Step Setup Guide Wireless File Transmitter Server Mode Infrastructure & Ad Hoc Networks for Apple ios Devices 2012 Canon U.S.A., Inc. All Rights Reserved. Reproduction in whole or in part without
Application Notes for Configuring Intelepeer SIP Trunking with Avaya IP Office 7.0 - Issue 1.0
 Avaya Solution & Interoperability Test Lab Application Notes for Configuring Intelepeer SIP Trunking with Avaya IP Office 7.0 - Issue 1.0 Abstract These Application Notes describe the procedures for configuring
Wireless LAN Access Point. IEEE 802.11g 54Mbps. User s Manual
 Wireless LAN Access Point IEEE 802.11g 54Mbps User s Manual Table of Contents Chapter 1 Introduction... 1 1.1 Package Contents...2 1.2 Features...2 1.3 Specifications...2 1.4 Physical Description...3 Chapter
NETVIGATOR Wireless Modem Setup Guide. (TG789Pvn)
") NETVIGATOR Wireless Modem Setup Guide (TG789Pvn) Configure the NETVIGATOR Wireless Modem Make sure that system meets the following requirement prior to NETVIGATOR Wireless Modem usage: - Subscribers who
NETVIGATOR Wireless Modem Setup Guide (TG789Pvn) Configure the NETVIGATOR Wireless Modem Make sure that system meets the following requirement prior to NETVIGATOR Wireless Modem usage: - Subscribers who
DSL-2600U. User Manual V 1.0
 DSL-2600U User Manual V 1.0 CONTENTS 1. OVERVIEW...3 1.1 ABOUT ADSL...3 1.2 ABOUT ADSL2/2+...3 1.3 FEATURES...3 2 SPECIFICATION...4 2.1 INDICATOR AND INTERFACE...4 2.2 HARDWARE CONNECTION...4 2.3 LED STATUS
Application Notes for Avaya IP Office 7.0 Integration with Skype Connect R2.0 Issue 1.0
 Avaya Solution & Interoperability Test Lab Application Notes for Avaya IP Office 7.0 Integration with Skype Connect R2.0 Issue 1.0 Abstract These Application Notes describe the steps to configure an Avaya
Avaya IP Office SIP Configuration Guide
 Valcom Session Initiation Protocol (SIP) VIP devices are compatible with SIP-enabled versions of Avaya IP Office (5.0 and higher). The Valcom device is added to the IP Office system as a SIP Extension.
Avaya Solution & Interoperability Test Lab Application Notes for Configuring Datatal AB Flexi with Avaya IP Office - Issue 1.0
 Avaya Solution & Interoperability Test Lab Application Notes for Configuring Datatal AB Flexi with Avaya IP Office - Issue 1.0 Abstract These Application Notes describe the configuration steps required
Configure WorkGroup Bridge on the WAP131 Access Point
 Article ID: 5036 Configure WorkGroup Bridge on the WAP131 Access Point Objective The Workgroup Bridge feature enables the Wireless Access Point (WAP) to bridge traffic between a remote client and the wireless
Configuring Routers and Their Settings
 Configuring Routers and Their Settings When installing a router on your home network the routers settings are usually defaulted to automatically protect your home, and simplify setup. This is done because
User Manual. PePWave Surf / Surf AP Indoor Series: Surf 200, E200, AP 200, AP 400. PePWave Mesh Connector Indoor Series: MC 200, E200, 400
 User Manual PePWave Surf / Surf AP Indoor Series: Surf 200, E200, AP 200, AP 400 PePWave Mesh Connector Indoor Series: MC 200, E200, 400 PePWave Surf AP Series: Surf AP 200-X, E200-X, 400-X PePWave Surf
Internet Access to a DVR365
 Configuration Details : Internet Access to DVR365 Page : 1 Internet Access to a DVR365 These instructions will show you how to connect your DVR365 to the internet via an ADSL broadband modem/router. The
Motorola AP-5131 Access Point Quick Setup Guide
 Motorola AP-5131 Access Point Quick Setup Guide Ishida / Rice Lake Wireless Communications P/N 109422 Getting Started 1. These instructions were written for the AP-5131 using firmware version 1.1.0.0-045R.
STEP III: Enable the Wireless Network Card
 How do I configure the wireless printer without a network cable and install the printer driver in Macintosh OS X? NOTE: For successful wireless setup, you MUST know your network security settings. STEP
Quick Installation Guide DIR-620. Multifunction Wireless Router Supporting GSM, CDMA, WiMAX with Built-in 4-port Switch
 DIR-620 Multifunction Wireless Router Supporting GSM, CDMA, WiMAX with Built-in 4-port Switch BEFORE YOU BEGIN Delivery Package Multifunction wireless router DIR-620 Power adapter DC 5V/2.5A Ethernet cable
Intel Active Management Technology with System Defense Feature Quick Start Guide
 Intel Active Management Technology with System Defense Feature Quick Start Guide Introduction...3 Basic Functions... 3 System Requirements... 3 Configuring the Client System...4 Intel Management Engine
Ralink Utility User Guide/PC/MAC
 /PC/MAC Connecting through Ralink Utility Before you can access the Ralink Utility, please connect the Powerlink USB adapter to your computer, and disable your previous WiFi adapter which is built-in on
Configuring the WT-4 for Upload to a Computer (Infrastructure Mode)
") Introduction En Configuring the WT-4 for Upload to a Computer (Infrastructure Mode) This document provides basic instructions on configuring the WT-4 wireless transmitter and a computer for transmission
Introduction En Configuring the WT-4 for Upload to a Computer (Infrastructure Mode) This document provides basic instructions on configuring the WT-4 wireless transmitter and a computer for transmission
Chapter 3 Management. Remote Management
 Chapter 3 Management This chapter describes how to use the management features of your ProSafe 802.11a/g Dual Band Wireless Access Point WAG102. To access these features, connect to the WAG102 as described
EPI-3601S Wireless LAN PCI adapter Version 1.2 EPI-3601S. Wireless LAN PCI Adapter. (802.11g & 802.11b up to 108 Mbps) User Manual. Version: 1.
 User Manual. Version: 1.") EPI-3601S Wireless LAN PCI Adapter (802.11g & 802.11b up to 108 Mbps) User Manual Version: 1.2 1 TABLE OF CONTENTS 1 INTRODUCTION...3 2 FEATURES...3 3 PACKAGE CONTENTS...4 4 SYSTEM REQUIREMENTS...5 5 INSTALLATION...5
EPI-3601S Wireless LAN PCI Adapter (802.11g & 802.11b up to 108 Mbps) User Manual Version: 1.2 1 TABLE OF CONTENTS 1 INTRODUCTION...3 2 FEATURES...3 3 PACKAGE CONTENTS...4 4 SYSTEM REQUIREMENTS...5 5 INSTALLATION...5