Web Development Guide. Information Systems
|
|
|
- Winfred Washington
- 10 years ago
- Views:
Transcription
1 Web Development Guide Information Systems Gabriel Malveaux May 2013

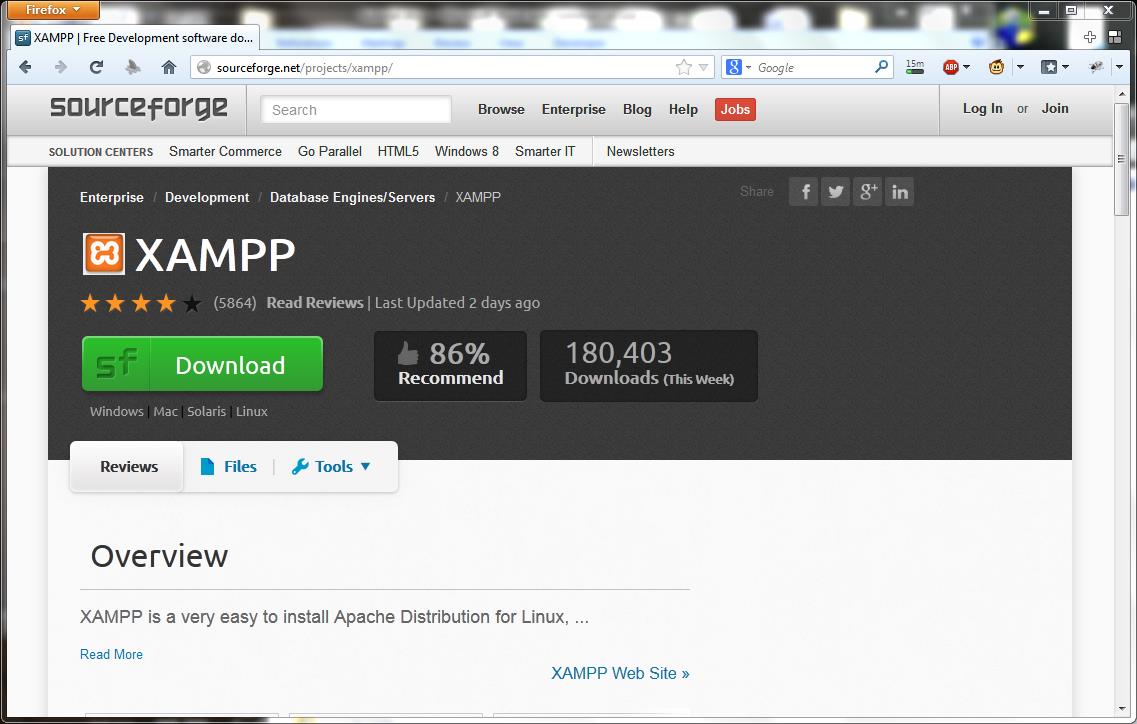
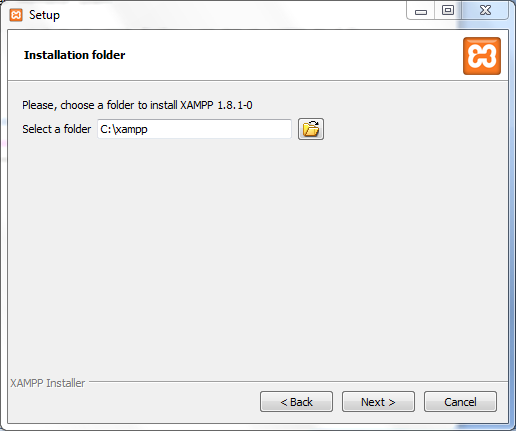
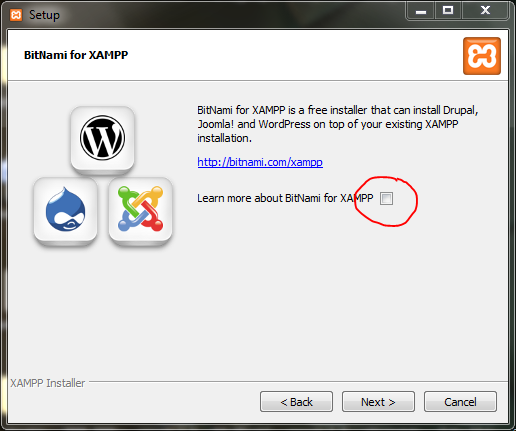
2 Web Development Guide Getting Started In order to get started with your web development, you will need some basic software. In this guide we will download and install an easy to use software package called XAMPP in order to simplify the process of running the Apache webserver and MySQL database. We will then download Aptana, an open source Web IDE that comes with code assist/code completion abilities. It will prove invaluable when developing your own web based information systems. Finally we will run through some basic examples of web pages and code. The appendix will contain more advanced and complex samples and ideas. For this tutorial we are assuming you are running Windows 7 and have not installed any of this software previously. You are encouraged to follow along with the screenshots to limit errors. Step 1: XAMPP Download and Installation Navigate to to pick up the latest copy of the XAMPP software installer. Save the installer to your desktop. When the download is complete, run the installer. Leave all the defaults as they are, except for the following: Uncheck the box to learn more about BitNami Uncheck the box to Start Control Panel Now Follow along with the screenshots to avoid confusion.

3


4

5

6


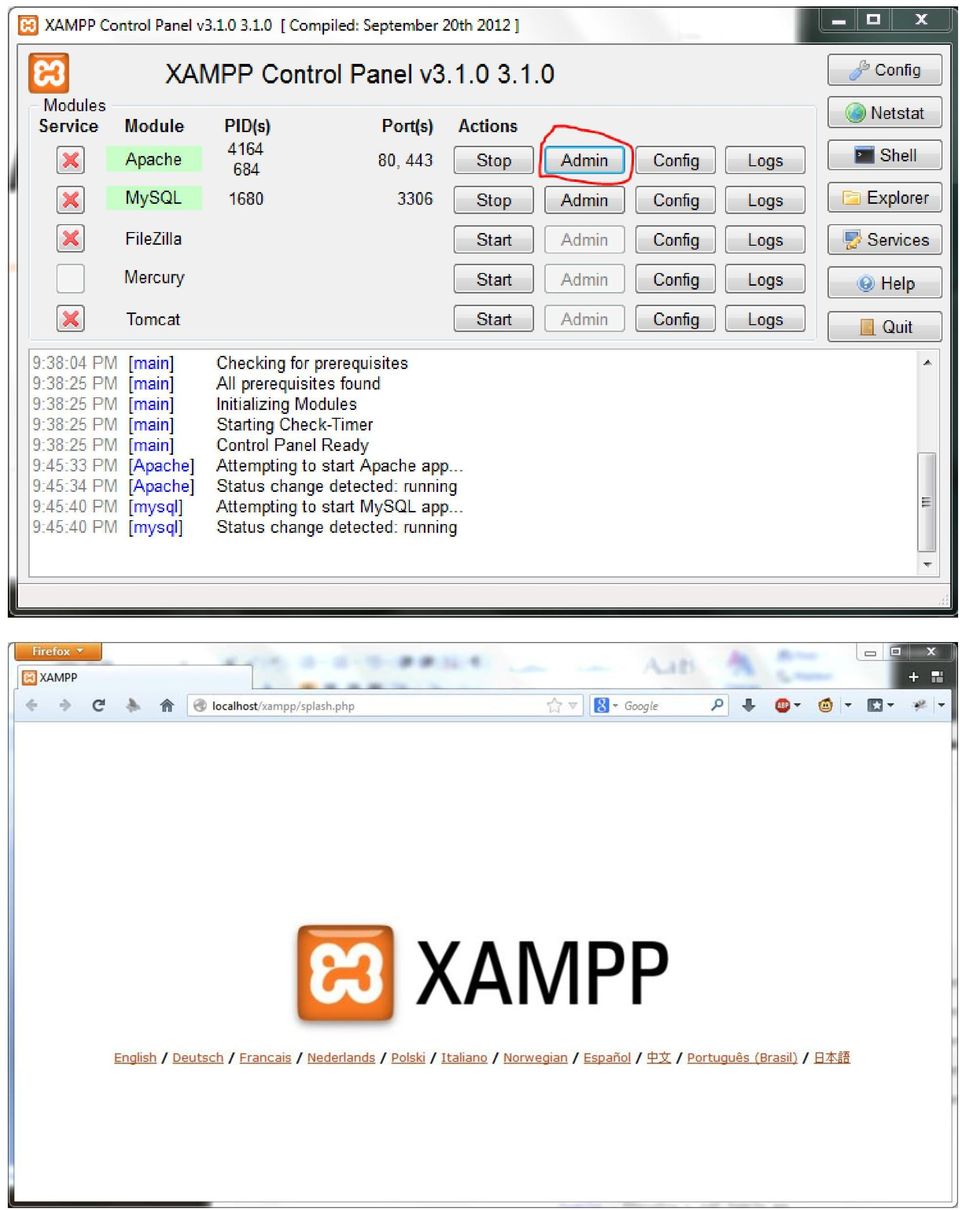
7 Step 2: Running XAMPP, Starting Apache and MySQL, First Run Configuration, Shutdown Procedure At this point you should have XAMPP installed. We will now show how to start the XAMPP Control Panel, start the Apache webserver, start the MySQL databse, and run through first run configuration. We will then go through how to shutdown Apache and MySQL and close XAMPP. Opening XAMPP Control Panel and Starting Apache/MySQL Open the XAMPP Control Panel by opening the Windows Start Menu and finding XAMPP Control Panel in the All Programs List. The Control Panel can take a few moments to initiate.


8 After you have opened the XAMPP Control Panel, you should see the following. Notice that the panel is also available from the system tray.


9 Start the Apache web server and MySQL database by clicking on Start under Actions. The Apache and MySQL modules should turn green in the Control Panel and indicate that they are running. (NOTE: If you use Skype, it is common for MySQL to start but not Apache. The reason is that Skype will occasionally use the same ports as Apache. To fix this, close Skype completely and try to run Apache again.)

10 First Run Configuration You will need to make the following configuration changes only the first time you run Apache and MySQL. In the XAMPP Control Panel, once the Apache Server and MySQL Database have been started, click on the Admin button under Actions for Apache. Your web browser should open to a XAMPP splash page.


11

12 Click on English to continue. Next click on STATUS, in the left side navigation area. Confirm that at least MySQL Database and PHP are Activated. Next click on the SECURITY link under STATUS in the left side navigation. It will take you to a security page. Near the bottom there is a link that will fix security issues. Click on the link to continue.

. Hit Password Changing, to change the password.")
13 On the next page, you have to option of setting a password for the MySQL root user, as well as setting directory protection for the XAMPP folder. You should do so now for the MySQL root user. (For example, give root the password infosys2013). Hit Password Changing, to change the password.
.")
 and that PhpMyAdmin password login is enabled")
14 Restart the MySQL Server by going back to the XAMPP Control Panel and hitting stop, waiting for it to stop and then hitting start to start it up again. Click on SECURITY in the left side navigation to confirm that the MySQL root user has a password (SECURE) and that PhpMyAdmin password login is enabled (SECURE).
 and that PhpMyAdmin password login is enabled")

15 Next, navigate to For the login, enter the user as root and the password as infosys2013 (or whatever you set it to be). You should be taken to the following screen after you log in. You will be using PhpMyAdmin often, so it is recommended you bookmark this page now.

 your installation as you will most likely have trouble for the remainder of its use.")
16 If you have gotten to this point, your Apache and MySQL installation is sound. If not, you should attempt to fix (or redo) your installation as you will most likely have trouble for the remainder of its use. Shutting Down Apache, MySQL and XAMPP Control Panel To shut down Apache and MySQL return to the XAMPP Control Panel and press the Stop button for each module respectively. When both modules have been stopped, you may Quit the XAMPP Control Panel.

17 Step 3: Download and Install Aptana, Basic PHP Example In this next step we will download and install Aptana, an Open Source web IDE (integrated development environment). We will then run through a very basic example of creating a webpage with some PHP. More advanced examples are available in the Appendix of this guide. Downloading and Installing Aptana Navigate to and download the Stand-Alone version. You do not need to sign up to download the program. Save the installer to your desktop. When the download is complete, run the installer. When the installer gets to the Install Location screen, do not install to the default directory. Instead, install to the following directory: C:\Program Files (x86)\aptana\


18 When you must choose which File Associations to make, make sure all boxes are checked.


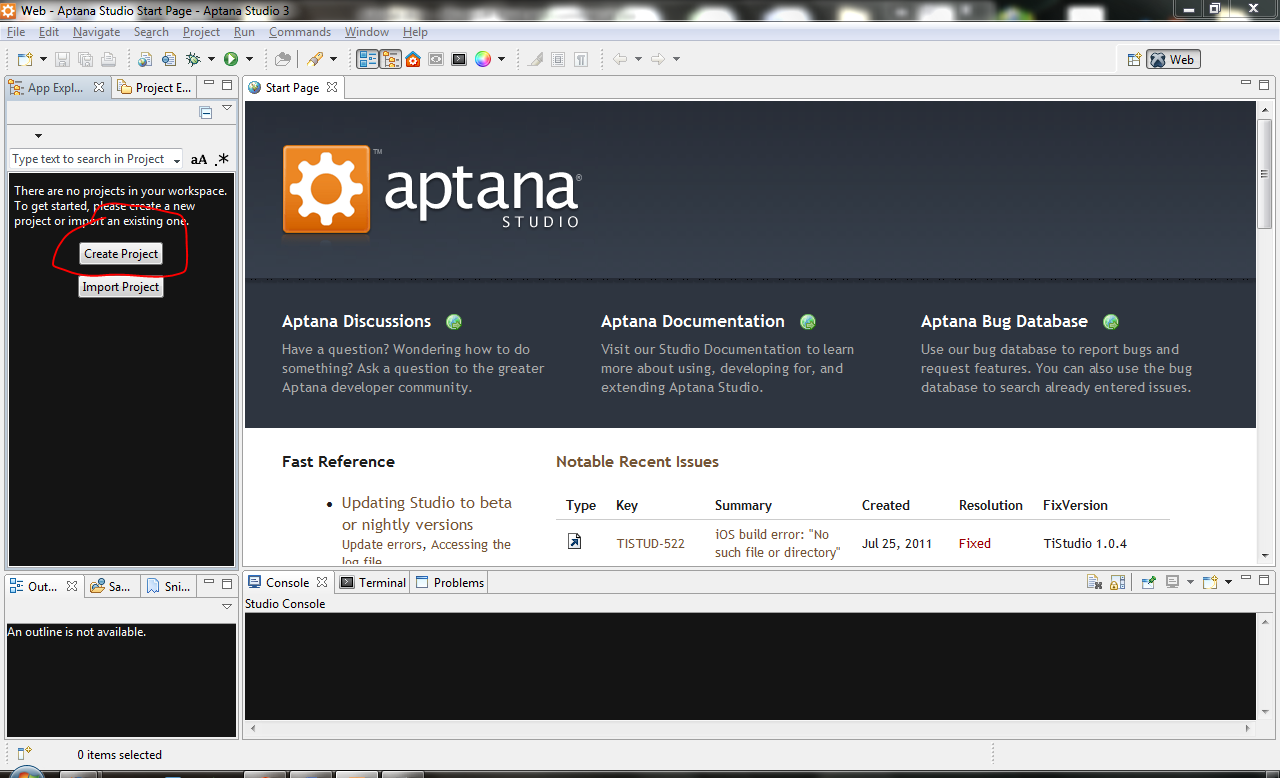
19 When the installer is finished, proceed to the next section. Running Aptana For The First Time Go to the Windows Start Menu, find and run Aptana. It may ask you to Select a Workspace. If so, instead of the default workspace, use this directory instead: C:\xampp\htdocs Check the Use this as the default and do not ask again box and then click OK You should be presented with the following interface.

20 You are now ready to use Aptana to create a basic website. Using Aptana: A Basic Example At this point you should have all the software necessary to create a basic website from scratch. We will now explore a basic example that will combine all the software we have acquired. A Basic Webpage Open the XAMPP Control Panel and start Apache and MySQL. Open Aptana as well. Create a new project in Aptana by going to File > New > PHP Project. We will name the project testone. Make sure it is in the default location that we have set up (C:\xampp\htdocs). PHP Compatibility should be at least 5.3x.

21

22 Next we will add an HTML file to the project. Right-Click in the testone project workspace in the App Explorer on the left side of the IDE window. Select New From Template > HTML > XHTML Transitional (*.html). Name the file index.php

23

24 Your view should change to the following:

25 There are many resources available online on how to write HTML and PHP code. is a highly recommended resource on familiarizing yourself with the languages. Make your file look like the following, then save the file. <!DOCTYPE html PUBLIC "-//W3C//DTD XHTML 1.0 Transitional//EN" " <html xmlns=" xml:lang="en" lang="en"> <head> <meta http-equiv="content-type" content="text/html; charset=utf-8"/> </head> <title>this is the Title Text</title> <body> <h1>this is the most important heading on the page!</h1> <h2>this is a less important heading</h2> <!-- This is an HTML Comment --> <p>this is just a small paragraph. the <code><hr /></code> tag implements a horizontal rule, useful for seperating content on a page as shown below.</p> <hr /> <h3>below is a 3x3 table</h3> <table> <tr><td>this is a cell, inside a table row. (1,1)</td><td>This is a cell,inside a table row (1,2)</td></tr> <tr><td>this is a cell, inside a table row. (2,1)</td><td>This is a cell,inside a table row (2,2)</td></tr> <tr><td>this is a cell, inside a table row. (3,1)</td><td>This is a cell,inside a table row (3,3)</td></tr> </table> </html> </body>
26 You have created a webpage, now let s view it! Open up your browser and navigate to If you have done everything correctly, your page should look like the following: At this point we have successfully created a plain HTML page. This is a very basic example, but for the purposes of this guide it will be enough. Lets Add PHP For the next part, we will write some simple PHP code to improve our webpage. Let us replace the largest heading on the page with the current date. We will do so however, without knowing anything about PHP. The PHP Manual will prove to be very useful when searching for answers to questions such as these. A quick search for php date returns the following page: From the manual we can see that the date() function is just what we need. We will now replace the <h1></h1> tag with the following code: <?php?> $current_date = date('l, F js'); echo '<h1>'.$current_date.'</h1>';

27 You should get the following result:
28 This example shows us how to use PHP functions and variables, as well as how to output HTML. Next we will integrate MySQL into our example. Adding a Database to the Mix In this part of our example, we will go through the basics of how to create databases and table in MySQL, create HTML forms, submit form data to the database, and then display it on a page. This will be a basic walkthrough for more advanced material please see the appendix. Let us recount where we left off in the previous section. We have an HTML page and some PHP code that prints out the current date for us. We will use this page to show the data that our database contains (we have yet to create it). We will also need to create a form to add data to the database. First however, let us create the database! Navigate to

29 After logging into PhpMyAdmin, click on the Databases tab at the top of the page. In the create database form type in testone and press create. The database will be created and added to the list of databases. Click on the one you just created so that we may add tables to it. For this simple example, let us create a table with only two columns. We will call the table test_scores There should be two fields: student and grade both of type VARCHAR and length 100 Creating this table and clicking BROWSE on it will bring up the following screen:

30 We have now created a database called testone, and added a table to it called test_scores. The test_scores table has two fields, student and grade both of type varchar and of length 100. We can now interface with this table using PHP. Add another new page to your Aptana testone project. Right-click in the project App Explorer and Select New From Template > HTML > XHTML Transitional (*.html). Name the file add_student.php

31 On this new page we need to add an HTML form that will allow us to submit a student name and a grade to the Apache server, to be then processed by PHP and added into the MySQL database. The HTML for the form is as follows: <body> <form method="post" action="insert.php"> <input type="text" name="name" placeholder="student Name"/> <input type="text" name="grade" placeholder="student Grade"/> <input type="submit" value="submit" /> </form> <a href="index.php" >View List</a> </body> This form will take the data that was input and pass it onto insert.php. We now need to write insert.php, which will take that form data and insert it into the test_scores table. Let us create that file now. Once again, in the testone App Explorer Right-Click and add a new file from template. This time however select PHP > PHP Template. Name the file insert.php
32 Clear any code between the <?php?> tags. For this example, we are going to assume that the data will always be sound. That is, there will always be a student and a grade input at the same time. In a more serious setting, a validation step must take place that ensures the data is fit to be processed into the database. Therefore, the first thing this script must do is connect to the database. It does so with the following code: /* * Code to Connect to the Database * */ $server = 'localhost'; $username = 'root'; $password = 'infosys2013'; $database = 'testone'; mysql_connect($server,$username,$password) or die(mysql_error()); mysql_select_db($database) or die(mysql_error()); The next thing the script needs to do is insert the submitted values from the form into the test_scores table. To do so we add the following: /* * Get data out of $_POST array * and do a query to insert it into test_scores table * */ $name = $_POST['name']; $grade = $_POST['grade']; $sql = "INSERT INTO `test_scores` (`student`,`grade`) VALUES ('".$name."', '".$grade."')"; $result = mysql_query($sql) or die(mysql_error()); After the data has been added to the table, we should send the user to the homepage, which will show all of the entries we have in the test_scores table. To do so, we add the following line just before the end of the insert.php script: // After processing data into table, redirect back to homepage header('location: We should now be able to fill out the form at and have it inserted into the database. Let us test this now by doing so. We can check to see that it was actually added by going into phpmyadmin and browsing the table.

33 There is now one final part remaining for us. We will alter index.php so that it links to add_student.php and we will make it display the contents of the table test_scores table. First let us add a link to add_student.php. Add the following anchor element to index.php: <a href="add_student.php" >Add a Student</a>
34 Next let us add some PHP code that will fill the table we have made with HTML. First we need to connect to the database. This is the same as in insert.php, so we can just copy the code for the connection. We then create a SELECT query and execute it. The results are displayed as rows within a table. Either replace the old table or add to the index.php page with the following code: <table> <tr><td>student</td><td>grade</td></tr> <?php /* * Code to Connect to the Database * */ $server = 'localhost'; $username = 'root'; $password = 'infosys2013'; $database = 'testone'; mysql_connect($server,$username,$password) or die(mysql_error()); mysql_select_db($database) or die(mysql_error());?> </table> /* * Select query * */ $sql = "SELECT * FROM test_scores"; $result = mysql_query($sql); /* * Output results * */ while($row = mysql_fetch_array($result)) { echo "<tr>"; echo "<td>". $row['student']. "</td>"; echo "<td>". $row['grade']. "</td>"; echo "</tr>"; } Your output should look similar to the following:
35 This concludes this basic example. You can now create HTML pages, databases and tables, as well as use PHP to integrate database data with web pages. For more advanced topics please see the appendix.
36 APPENDIX
37 Web Development Guide Connecting Databases via ODBC Manage ODBC Data Sources In order to manage ODBC Data Sources, open up the Windows Start Menu and search for Run (also located under All Programs > Accessories > Run) In the prompt type the following C:\Windows\SysWOW64\odbcad32.exe and click OK to open up the ODBC Data Source Administrator
38 Adding a Database In order to add a database, open the System DSN tab. These sources will be available to applications systemwide (necessary for our Apache installation). Click the Add button on the right side.
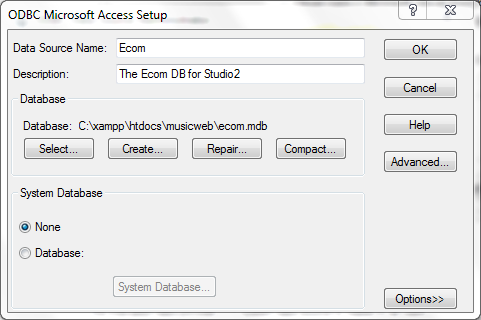
39 In this example we are adding the Ecom database for Studio 2, which we have placed in the htdocs/musicweb/ folder (you may have it in any folder you wish, but make sure you are connecting the same database that you edit). Now when the system calls for a connection to Ecom, it will be able to connect via ODBC.

40 Web Development Guide Alternatives to Microsoft Access: LibreOffice Base connected via ODBC Occasionally you may need to edit a database that you do not have software for. This tutorial focuses on the case of a user who needs to edit a.mdb database file, but does not have Microsoft Access. The solution is to use the open source program, LibreOffice Base and an ODBC connection to communicate with the database. In this tutorial we will first cover how to add an ODBC Data Source. Then we will download LibreOffice and use Base to connect to the database (musicweb.mdb) via ODBC. Manage ODBC Data Sources In order to manage ODBC Data Sources, open up the Windows Start Menu and search for Run (also located under All Programs > Accessories > Run) In the prompt type the following C:\Windows\SysWOW64\odbcad32.exe and click OK to open up the ODBC Data Source Administrator
.")
41 Adding a Database In order to add a database, open the System DSN tab. These sources will be available to applications systemwide (necessary for our Apache installation). Click the Add button on the right side.
. Now when the system calls for a connection to Ecom, it will be able to connect via ODBC.")
42 In this example we are adding the Ecom database for Studio 2, which we have placed in the htdocs/musicweb/ folder (you may have it in any folder you wish, but make sure you are connecting the same database that you edit). Now when the system calls for a connection to Ecom, it will be able to connect via ODBC.
43
44 Download and Install LibreOffice Base is part of the LibreOffice suite, so we will have to download the suite first. Get the installer from and download it to your desktop. Let the installer run through with all of the defaults. When the install is complete, find and run LibreOffice Base. It is very similar to Microsoft Access. When it first opens it will run a database wizard. Select the option to Connect to an Existing Database via ODBC.

45 Hit Next, and then select the ODBC Data Source that you wish to connect to (in our case ecom). If you set up a username and password hit next to enter the login information, otherwise press the Finish button. Save the database as.odb when it asks you in order to proceed to the database view. In order to open up a table view, double click on a table. To design tables, right-click on a table and select Edit in order to bring up table schema.

46
47 Web Development Guide Studio 2.4: MusicWeb This guide is intended as a supplement to Studio 2 Part 4 located at This guide will attempt to walk through the studio keeping in mind the deliverables. We shall walk through how to get the MusicWeb website, including database set up in the XAMPP installation discussed in the Getting Started tutorial. We will then attempt to implement Customer Checkout. We assume that you are using the XAMPP based Apache and MySQL installation and have set up the Ecom ODBC connection as per the ODBC Tutorial associated with this guide. If you have not yet set up the Ecom database, download a populated file from and use it as the ecom ODBC Data Connection, as mentioned in the next section. Uploading MusicWeb to the XAMPP/Apache Installation In order to get MusicWeb installed on our server, we must download the ZIP archive at as well as the populated database (if you do not already have it set up) from Save the archive to your desktop. When it is downloaded, right click on it and Extract All to a folder called musicweb inside the htdocs folder of your XAMPP/Apache installation (you may need to create the musicweb folder). (C:\xampp\htdocs\musicweb)
48 Next, download the file at and overwrite the current func.php in the musicweb directory. This is a critical step as the default installation will not work with modern PHP versions (4+). Now we will check to make sure the installation was successful. Start your web server. (If you have been following this guide you must open the XAMPP Control Panel and then start the Apache web server). When the server is started, open your browser and navigate to If your installation was successful, your screen should look like the following:

49 If you have errors or warnings on your page regarding ODBC connections, you may have not set up ODBC correctly for the Ecom database. Please make sure you follow the ODBC tutorial associated with this guide and have a populated database (such as is available at

50 Implementing the Checkout Process Now that the MusicWeb front-end (customer facing side) is up and running, we would like to implement the checkout process. From a more general view of the process, we will need to get customer specifics such as name, credit card, shipping and billing information. We will also need to submit the customer s cart to production. Carrying out this process will require us to create a form and then a function that will communicate with the database, as we have seen previously through the loading of categories and songs. The first thing we are going to do is build the checkout form. When a customer clicks the checkout button, they will be directed to this form. On the form they will input their information and then have the option to Submit their Order. Download the checkout_form folder at and upload it into your htdocs/musicweb directory. The form was built using the form builder at and then had some elements of the viewcart.php file combined into it. We must now edit the func.php file to take the user to the form, receive the inputs and then process them into the database. First we will add the following lines just before the end of the file (just before the closing?> tag):
![if(isset($_post["checkout"])) { header("location: checkout_form/checkout_form.php"); } These lines will move the user to the checkout form when they click the Checkout >> button.](/docs-images/27/10841623/images/51-0.png "If everything is correctly set up, when the customer clicks on the Checkout >> Button when in the shopping cart, they will be taken to the following form: Next we need to create a function to handle")
51 if(isset($_post["checkout"])) { header("location: checkout_form/checkout_form.php"); } These lines will move the user to the checkout form when they click the Checkout >> button. If everything is correctly set up, when the customer clicks on the Checkout >> Button when in the shopping cart, they will be taken to the following form: Next we need to create a function to handle the inputs received from the form and insert them into the database. The following function will take the form inputs and insert them into the Customer and CreditCard tables. It will also add a CD to the CD table and then create an entry in the Order table from the combination of Customer, CreditCard, and CD information. As a final step, it will empty the shopping cart and send the user back to the homepage. Add the following code just before the closing php (?>) tag in func.php: if(isset($_post["docheckout"])) { session_start();
52 $post=$_post; $cart=$_session['cart']; docheckout($post,$cart); } function docheckout($post,$cart){ //--- Get Customer SHIPPING Info $name = $post['element_1_1'].' '.$post['element_1_2']; $ = $post['element_3']; $shipping_street_address= $post['element_2_1'].' '.$post['element_2_2']; $shipping_city = $post['element_2_3']; $shipping_state = $post['element_2_4']; $shipping_zip = $post['element_2_5']; $shipping_country = $post['element_2_6']; // Country not used in DB //--- Get Customer CREDIT CARD $cc_number = $post['element_4']; $cc_type = $post['element_5']; $cc_exp = $post['element_6_1'].'/'.$post['element_6_2'].'/'.$post['element_6_3'].' 12:00 AM'; //--- Get Customer BILLING Info $billing_street_address= $post['element_7_1'].' '.$post['element_7_2']; $billing_city = $post['element_7_3']; $billing_state = $post['element_7_4']; $billing_zip = $post['element_7_5']; $billing_country = $post['element_7_6']; // Country not used in DB $phone = $post['element_8_1'].$post['element_8_2'].$post['element_8_3']; // Connect to database $conn = odbc_connect('ecom','',''); if (!$conn) { echo odbc_error(); } // INSERT INTO Customer Table $sql = "INSERT INTO `Customer` (`CustomerName`, `CustomerAddress`, `CustomerCity`, `CustomerState`, `CustomerZip`, `CustomerTelephone`, `Customer `)". " VALUES ('".$name."', '".$shipping_street_address."', '".$shipping_city."', '".$shipping_state."', '".$shipping_zip."', '".$phone."', '".$ ."')"; $result = odbc_exec($conn,$sql); // Get CustomerID $sql = "SELECT * from `Customer` WHERE CustomerName='".$name."' AND Customer ='".$ ."' AND CustomerTelephone='".$phone."' ORDER BY 'CustomerID' DESC"; $result = odbc_exec($conn,$sql); $cust_id = odbc_result($result,"customerid"); // INSERT INTO CreditCard Table $sql = "INSERT INTO `CreditCard` (`CC#`, `CCType`, `Exp_Date`, `CustomerID`, `BillingAddr`, `BillingCity`, `BillingState`, `BillingZip`, `BillingTel`)". " VALUES ('".$cc_number."', '".$cc_type."', '".$cc_exp."', '".$cust_id."', '".$billing_street_address."', '".$billing_city."', '".$billing_state."', '".$billing_zip."', '".$phone."')"; $result = odbc_exec($conn,$sql); // --- Create a CDPlaylist and CD $cd = rand(); // give the CD a random number // add to CD table $sql = "INSERT INTO `CD` (`CD#`,`CDTitle`,`CDDescription`) VALUES ('".$cd."','various Artists -".$cd."','description ".$cd."')"; $result = odbc_exec($conn,$sql); // add to CDPlaylist table foreach($cart as $s){ $sql = "INSERT INTO `CDPlaylist` (`CD#`,`SongFileName`) VALUES ('".$cd."','".trim($s['productid'],'songtitle_')."')"; $result = odbc_exec($conn,$sql); } // generate order for Order table $sql = "INSERT INTO `Order` (`CustomerID`,`CD#`,`CC#`,`CD Title`,`CD Description`,`DateTime`) VALUES ('".$cust_id."','".$cd."','".$cc_number."','various Artists -".$cd."','description ".$cd."','".date('m/d/y H:m A')."')"; $result = odbc_exec($conn,$sql); //--- Finish up: Close out cart, redirect to homepage
53 unset($_session['cart']); echo "<p>your Order has been submitted - THANK YOU!</p>"; echo "<p>you will be redirected in 5 seconds...</p>"; sleep(5); header("location: index.php"); } We have now successfully set up the MusicWeb website in our own XAMPP development environment, and have gone a step further and implemented the customer checkout procedure.
54 Database Normalization (Customers, Credit Cards and Orders) It is worthwhile to review the concept of a normalized database and see how it is applicable to this example. Recall that the point of database normalization is to minimize redundancy and dependency. The procedure aims to put data into simple tables and then define relationships between them.
55 The MusicWeb database is a good example of normalization. Let us look at the process of generating an order. An order is defined by a customer, their CD purchase, and their credit card information. Looking at the Order table one would see that it does not store the actual customer name or telephone or address information. Instead it keeps just the CustomerID. The CustomerID is unique to a customer in the Customer table, and all personal information is stored there. This is an example of keeping redundancy to a minimum, as there is no need for both the Order table and the Customer table to keep personal information about the customer. The CreditCard table is the same way. While each card is unique, there can be multiple cards for a given customer.
56 For those still unconvinced about the benefits of normalization, imagine that the customer info, credit card and order tables were combined into one large table. Every time a returning customer pays with a different credit card, a new row would have to be made containing mostly similar information except for credit card information. This scenario could easily develop Insertion or Update Problems. For example if a customer wanted to change their credit card information on record, they would be forced to submit a new order. Furthermore, querying the table could become very costly due to the excess amount of data that would have to be parsed for a simple change. Database design needs to consider the future. In particular, it needs to consider all queries, not just expected queries. A normalized database can be effectively used no matter what the query is. For example, in this case we could ask which credit card type is the most popular. Although this is not exactly a query that the database designer may have anticipated when designing table structure, because the database is normalized we can simply query the CreditCard table and derive the answer. When developing a database for an information system, one should try to make it as normalized as possible. The mission for the information system can change over time, but if the information in the database is in a normalized form then the database can stay the same. A little bit of effective planning can limit costly future changes.
Getting Started with Dynamic Web Sites
 PHP Tutorial 1 Getting Started with Dynamic Web Sites Setting Up Your Computer To follow this tutorial, you ll need to have PHP, MySQL and a Web server up and running on your computer. This will be your
INSTALLING, CONFIGURING, AND DEVELOPING WITH XAMPP
 INSTALLING, CONFIGURING, AND DEVELOPING WITH XAMPP by Dalibor D. Dvorski, March 2007 Skills Canada Ontario DISCLAIMER: A lot of care has been taken in the accuracy of information provided in this article,
MOODLE Installation on Windows Platform
 Windows Installation using XAMPP XAMPP is a fully functional web server package. It is built to test web based programs on a personal computer. It is not meant for online access via the web on a production
HOW TO SETUP AN APACHE WEB SERVER AND INTEGRATE COLDFUSION
 HOW TO SETUP AN APACHE WEB SERVER AND INTEGRATE COLDFUSION Draft version 1.0 July 15 th 2010 Software XAMPP is an open source package designed to take almost all the work out of setting up and integrating
Livezilla How to Install on Shared Hosting http://www.jonathanmanning.com By: Jon Manning
 Livezilla How to Install on Shared Hosting By: Jon Manning This is an easy to follow tutorial on how to install Livezilla 3.2.0.2 live chat program on a linux shared hosting server using cpanel, linux
ilaw Installation Procedure
 ilaw Installation Procedure This guide will provide a reference for a full installation of ilaw Case Management Software. Contents ilaw Overview How ilaw works Installing ilaw Server on a PC Installing
CPE111 COMPUTER EXPLORATION
 CPE111 COMPUTER EXPLORATION BUILDING A WEB SERVER ASSIGNMENT You will create your own web application on your local web server in your newly installed Ubuntu Desktop on Oracle VM VirtualBox. This is a
GO!NotifyLink. Database Maintenance. GO!NotifyLink Database Maintenance 1
 GO!NotifyLink Database Maintenance GO!NotifyLink Database Maintenance 1 Table of Contents Database Maintenance 3 Database Cleanup... 3 Database Backups... 3 Database Configuration... 4 The Procedure via
VP-ASP Shopping Cart Quick Start (Free Version) Guide Version 6.50 March 21 2007
 Guide Version 6.50 March 21 2007") VP-ASP Shopping Cart Quick Start (Free Version) Guide Version 6.50 March 21 2007 Rocksalt International Pty Ltd [email protected] www.vpasp.com Table of Contents 1 INTRODUCTION... 3 2 FEATURES... 4 3 WHAT
VP-ASP Shopping Cart Quick Start (Free Version) Guide Version 6.50 March 21 2007 Rocksalt International Pty Ltd [email protected] www.vpasp.com Table of Contents 1 INTRODUCTION... 3 2 FEATURES... 4 3 WHAT
GETTING STARTED WITH SQL SERVER
 GETTING STARTED WITH SQL SERVER Download, Install, and Explore SQL Server Express WWW.ESSENTIALSQL.COM Introduction It can be quite confusing trying to get all the pieces in place to start using SQL. If
SQL Server Setup for Assistant/Pro applications Compliance Information Systems
 SQL Server Setup for Assistant/Pro applications Compliance Information Systems The following document covers the process of setting up the SQL Server databases for the Assistant/PRO software products form
All the materials and/or graphics included in the IceThemetheme folders MUST be used ONLY with It TheCityTheme from IceTheme.com.
 Terms of Use: All the materials and/or graphics included in the IceThemetheme folders MUST be used ONLY with It TheCityTheme from IceTheme.com. Table of Contents 1- Introduction 3 2- Installing the theme
Online shopping store
 Online shopping store 1. Research projects: A physical shop can only serves the people locally. An online shopping store can resolve the geometrical boundary faced by the physical shop. It has other advantages,
TIMETABLE ADMINISTRATOR S MANUAL
 2015 TIMETABLE ADMINISTRATOR S MANUAL Software Version 5.0 BY GEOFFPARTRIDGE.NET TABLE OF CONTENTS TOPIC PAGE 1) INTRODUCTION 1 2) TIMETABLE SPECIFICATIONS 1 3) SOFTWARE REQUIRED 1 a. Intranet Server (XAMPP
Publish Joomla! Article
 Enterprise Architect User Guide Series Publish Joomla! Article Author: Sparx Systems Date: 15/07/2016 Version: 1.0 CREATED WITH Table of Contents Publish Joomla! Article 3 Install Joomla! Locally 4 Set
FmPro Migrator - FileMaker to SQL Server
 FmPro Migrator - FileMaker to SQL Server FmPro Migrator - FileMaker to SQL Server 1 1.1 1.2 1.3 1.4 1.5 1.6 1.7 1.8 1.9 1.10 1.11 1.12 1.13 1.14 1.15 FmPro Migrator - FileMaker to SQL Server Migration
Backup and Restore MySQL Databases
 Backup and Restore MySQL Databases As you use XAMPP, you might find that you need to backup or restore a MySQL database. There are two easy ways to do this with XAMPP: using the browser-based phpmyadmin
Create e-commerce website Opencart. Prepared by : Reth Chantharoth Facebook : https://www.facebook.com/tharothchan.ubee E-mail : rtharoth@yahoo.
 Create e-commerce website Opencart Prepared by : Reth Chantharoth Facebook : https://www.facebook.com/tharothchan.ubee E-mail : [email protected] Create e-commerce website Opencart What is opencart? Opencart
Site Store Pro. INSTALLATION GUIDE WPCartPro Wordpress Plugin Version
 Site Store Pro INSTALLATION GUIDE WPCartPro Wordpress Plugin Version WPCARTPRO INTRODUCTION 2 SYSTEM REQUIREMENTS 4 DOWNLOAD YOUR WPCARTPRO VERSION 5 EXTRACT THE FOLDERS FROM THE ZIP FILE TO A DIRECTORY
National Fire Incident Reporting System (NFIRS 5.0) NFIRS Data Entry/Validation Tool Users Guide
 NFIRS Data Entry/Validation Tool Users Guide") National Fire Incident Reporting System (NFIRS 5.0) NFIRS Data Entry/Validation Tool Users Guide NFIRS 5.0 Software Version 5.3 Prepared for: Directorate of Preparedness and Response (FEMA) Prepared by:
National Fire Incident Reporting System (NFIRS 5.0) NFIRS Data Entry/Validation Tool Users Guide NFIRS 5.0 Software Version 5.3 Prepared for: Directorate of Preparedness and Response (FEMA) Prepared by:
MyanPay API Integration with Magento CMS
 2014 MyanPay API Integration with Magento CMS MyanPay Myanmar Soft Gate Technology Co, Ltd. 1/1/2014 MyanPay API Integration with Magento CMS 1 MyanPay API Integration with Magento CMS MyanPay API Generating
CEFNS Web Hosting a Guide for CS212
 CEFNS Web Hosting a Guide for CS212 INTRODUCTION: TOOLS: In CS212, you will be learning the basics of web development. Therefore, you want to keep your tools to a minimum so that you understand how things
Migrating MSDE to Microsoft SQL 2008 R2 Express
 How To Updated: 11/11/2011 2011 Shelby Systems, Inc. All Rights Reserved Other brand and product names are trademarks or registered trademarks of the respective holders. If you are still on MSDE 2000,
Migrating helpdesk to a new server
 Migrating helpdesk to a new server Table of Contents 1. Helpdesk Migration... 2 Configure Virtual Web on IIS 6 Windows 2003 Server:... 2 Role Services required on IIS 7 Windows 2008 / 2012 Server:... 2
This installation guide will help you install your chosen IceTheme Template with the Cloner Installer package.
 Introduction This installation guide will help you install your chosen IceTheme Template with the Cloner Installer package. There are 2 ways of installing the theme: 1- Using the Clone Installer Package
Thank you for deciding to read this book. I have written this book for you to learn Joomla! 1.5 as fast as possible.
 Preface Thank you for deciding to read this book. I have written this book for you to learn Joomla! 1.5 as fast as possible. This book is meant to be read cover-to-cover, and all you have to do is read
Installing Drupal 8 on Windows 7 with XAMPP. I am trying to install Drupal 8 on my Windows machine as a development system.
 Installing Drupal 8 on Windows 7 with XAMPP I am trying to install Drupal 8 on my Windows machine as a development system. From reading up the documentation on the Drupal Community Documentation, I learnt
HowTo. Planning table online
 HowTo Project: Description: Planning table online Installation Version: 1.0 Date: 04.09.2008 Short description: With this document you will get information how to install the online planning table on your
Implementing Moodle on a Windows High Availability Environment
 Implementing Moodle on a Windows High Availability Environment Implementing Moodle 1.9 on 2 Microsoft Load Balanced Web Front End Server and a Microsoft SQL Server 2008 R2 Cluster environment Written by:
Aradial Installation Guide
 Aradial Technologies Ltd. Information in this document is subject to change without notice. Companies, names, and data used in examples herein are fictitious unless otherwise noted. No part of this document
ODBC Driver Version 4 Manual
 ODBC Driver Version 4 Manual Revision Date 12/05/2007 HanDBase is a Registered Trademark of DDH Software, Inc. All information contained in this manual and all software applications mentioned in this manual
Tutorial #1: Getting Started with ASP.NET
 Tutorial #1: Getting Started with ASP.NET This is the first of a series of tutorials that will teach you how to build useful, real- world websites with dynamic content in a fun and easy way, using ASP.NET
educ Office 365 email: Remove & create new Outlook profile
 Published: 29/01/2015 If you have previously used Outlook the with the SCC/SWO service then once you have been moved into Office 365 your Outlook will need to contact the SCC/SWO servers one last time
Installing SQL Express. For CribMaster 9.2 and Later
 Installing SQL Express For CribMaster 9.2 and Later CRIBMASTER USER GUIDE Installing SQL Express Document ID: CM9-031-03012012 Copyright CribMaster. 1996, 1997, 1998, 1999, 2000, 2001, 2002, 2003, 2004,
BSDI Advanced Fitness & Wellness Software
 BSDI Advanced Fitness & Wellness Software 6 Kellie Ct. Califon, NJ 07830 http://www.bsdi.cc SOFTWARE BACKUP/RESTORE INSTRUCTION SHEET This document will outline the steps necessary to take configure the
Training module 2 Installing VMware View
 Training module 2 Installing VMware View In this second module we ll install VMware View for an End User Computing environment. We ll install all necessary parts such as VMware View Connection Server and
How To Run Anolicense Server On A Windows 7.5 (For Free) Or 8 (For Ubuntu) Or 9.5.5 For Free (For Microsoft) (For Linux) (Or For Free) ( For
 Or 8 (For Ubuntu) Or 9.5.5 For Free (For Microsoft) (For Linux) (Or For Free) ( For") Quick Start Guide for Installing OLicense-Server for use with SimDiff/SimMerge Contents Installing OLicense-Server... 1 Configuring OLicense-Server... 2 Setting the Port Number... 2 Running OLicense-Server
Quick Start Guide for Installing OLicense-Server for use with SimDiff/SimMerge Contents Installing OLicense-Server... 1 Configuring OLicense-Server... 2 Setting the Port Number... 2 Running OLicense-Server
Voyager Reporting System (VRS) Installation Guide. Revised 5/09/06
 Installation Guide. Revised 5/09/06") Voyager Reporting System (VRS) Installation Guide Revised 5/09/06 System Requirements Verification 1. Verify that the workstation s Operating System is Windows 2000 or Higher. 2. Verify that Microsoft
Voyager Reporting System (VRS) Installation Guide Revised 5/09/06 System Requirements Verification 1. Verify that the workstation s Operating System is Windows 2000 or Higher. 2. Verify that Microsoft
Install SQL Server 2014 Express Edition
 How To Install SQL Server 2014 Express Edition Updated: 2/4/2016 2016 Shelby Systems, Inc. All Rights Reserved Other brand and product names are trademarks or registered trademarks of the respective holders.
FireBLAST Email Marketing Solution v2
 Installation Guide WELCOME to fireblast, one of the Industry s leading Email Marketing Software Solutions for your business. Whether you are creating a small email campaign, or you are looking to upgrade
RDS Migration Tool Customer FAQ Updated 7/23/2015
 RDS Migration Tool Customer FAQ Updated 7/23/2015 Amazon Web Services is now offering the Amazon RDS Migration Tool a powerful utility for migrating data with minimal downtime from on-premise and EC2-based
EventSentry Overview. Part I Introduction 1 Part II Setting up SQL 2008 R2 Express 2. Part III Setting up IIS 9. Part IV Installing EventSentry 11
 Contents I EventSentry Overview Part I Introduction 1 Part II Setting up SQL 2008 R2 Express 2 1 Downloads... 2 2 Installation... 3 3 Configuration... 7 Part III Setting up IIS 9 1 Installation... 9 Part
Password Reset Server Installation Guide Windows 8 / 8.1 Windows Server 2012 / R2
 Password Reset Server Installation Guide Windows 8 / 8.1 Windows Server 2012 / R2 Last revised: November 12, 2014 Table of Contents Table of Contents... 2 I. Introduction... 4 A. ASP.NET Website... 4 B.
WebSpy Vantage Ultimate 2.2 Web Module Administrators Guide
 WebSpy Vantage Ultimate 2.2 Web Module Administrators Guide This document is intended to help you get started using WebSpy Vantage Ultimate and the Web Module. For more detailed information, please see
QUANTIFY INSTALLATION GUIDE
 QUANTIFY INSTALLATION GUIDE Thank you for putting your trust in Avontus! This guide reviews the process of installing Quantify software. For Quantify system requirement information, please refer to the
Video Administration Backup and Restore Procedures
 CHAPTER 12 Video Administration Backup and Restore Procedures This chapter provides procedures for backing up and restoring the Video Administration database and configuration files. See the following
WA1826 Designing Cloud Computing Solutions. Classroom Setup Guide. Web Age Solutions Inc. Copyright Web Age Solutions Inc. 1
 WA1826 Designing Cloud Computing Solutions Classroom Setup Guide Web Age Solutions Inc. Copyright Web Age Solutions Inc. 1 Table of Contents Part 1 - Minimum Hardware Requirements...3 Part 2 - Minimum
SOFTWARE INSTALLATION INSTRUCTIONS CLIENT/SERVER EDITION AND WEB COMPONENT VERSION 10
 3245 University Avenue, Suite 1122 San Diego, California 92104 USA SOFTWARE INSTALLATION INSTRUCTIONS CLIENT/SERVER EDITION AND WEB COMPONENT VERSION 10 Document Number: SII-TT-002 Date Issued: July 8,
How To Install Amyshelf On Windows 2000 Or Later
 Contents I Table of Contents Part I Document Overview 2 Part II Document Details 3 Part III Setup 4 1 Download & Installation... 4 2 Configure MySQL... Server 6 Windows XP... Firewall Settings 13 3 Additional
Shopping Cart Software
 Shopping Cart Software QuickStart Guide 1 Please note: The Quick Start guide covers only the minimum requirements to get your cart up and running; there are many more features for you to take advantage
Upgrading MySQL from 32-bit to 64-bit
 Upgrading MySQL from 32-bit to 64-bit UPGRADING MYSQL FROM 32-BIT TO 64-BIT... 1 Overview... 1 Upgrading MySQL from 32-bit to 64-bit... 1 Document Revision History... 21 Overview This document will walk
Installing Drupal on Your Local Computer
 Installing Drupal on Your Local Computer This tutorial will help you install Drupal on your own home computer and allow you to test and experiment building a Web site using this open source software. This
Setting Up ALERE with Client/Server Data
 Setting Up ALERE with Client/Server Data TIW Technology, Inc. November 2014 ALERE is a registered trademark of TIW Technology, Inc. The following are registered trademarks or trademarks: FoxPro, SQL Server,
Team Foundation Server 2012 Installation Guide
 Team Foundation Server 2012 Installation Guide Page 1 of 143 Team Foundation Server 2012 Installation Guide Benjamin Day [email protected] v1.0.0 November 15, 2012 Team Foundation Server 2012 Installation
Secret Server Installation Windows 8 / 8.1 and Windows Server 2012 / R2
 Secret Server Installation Windows 8 / 8.1 and Windows Server 2012 / R2 Table of Contents Table of Contents... 1 I. Introduction... 3 A. ASP.NET Website... 3 B. SQL Server Database... 3 C. Administrative
MassTransit 6.0 Enterprise Web Configuration for Macintosh OS 10.5 Server
 MassTransit 6.0 Enterprise Web Configuration for Macintosh OS 10.5 Server November 6, 2008 Group Logic, Inc. 1100 North Glebe Road, Suite 800 Arlington, VA 22201 Phone: 703-528-1555 Fax: 703-528-3296 E-mail:
Application note: SQL@CHIP Connecting the IPC@CHIP to a Database
 Application note: SQL@CHIP Connecting the IPC@CHIP to a Database 1. Introduction This application note describes how to connect an IPC@CHIP to a database and exchange data between those. As there are no
Learn how to create web enabled (browser) forms in InfoPath 2013 and publish them in SharePoint 2013. InfoPath 2013 Web Enabled (Browser) forms
 forms in InfoPath 2013 and publish them in SharePoint 2013. InfoPath 2013 Web Enabled (Browser) forms") Learn how to create web enabled (browser) forms in InfoPath 2013 and publish them in SharePoint 2013. InfoPath 2013 Web Enabled (Browser) forms InfoPath 2013 Web Enabled (Browser) forms Creating Web Enabled
Learn how to create web enabled (browser) forms in InfoPath 2013 and publish them in SharePoint 2013. InfoPath 2013 Web Enabled (Browser) forms InfoPath 2013 Web Enabled (Browser) forms Creating Web Enabled
Microsoft Business Intelligence 2012 Single Server Install Guide
 Microsoft Business Intelligence 2012 Single Server Install Guide Howard Morgenstern Business Intelligence Expert Microsoft Canada 1 Table of Contents Microsoft Business Intelligence 2012 Single Server
How To Install And Run Cesview Iii 1.3.3 (For New Users)
") Cesview IIi 1.3 Installation and Automation Guide Contents: New ser Quick Guide Cesview IIi asic Installation o Additional Server Installation Notes o Additional rowser Only (Client) Installation Notes
Cesview IIi 1.3 Installation and Automation Guide Contents: New ser Quick Guide Cesview IIi asic Installation o Additional Server Installation Notes o Additional rowser Only (Client) Installation Notes
Build it with Drupal 8
 Build it with Drupal 8 Comprehensive guide for building common websites in Drupal 8. No programming knowledge required! Antonio Torres This book is for sale at http://leanpub.com/drupal-8-book This version
webkpi SaaS ETL Connector Installation & Configuration Guide
 webkpi SaaS ETL Connector Installation & Configuration Guide SaaS ETL Version 2.5.0.12 Version 1.6 September 2013 webkpi SaaS ETL Connector Version 2.5.0.12 V 1.6 Page 1 Table of Contents Table of Contents
Install Apache on windows 8 Create your own server
 Source: http://www.techscio.com/install-apache-on-windows-8/ Install Apache on windows 8 Create your own server Step 1: Downloading Apache Go to Apache download page and download the latest stable version
Web Design Course. Home Page. Join in. Home. Objectives. Course Content. Assignments & Discussion. Grades. Help. Contact Me aab43@uakron.
 Home Page Web Design Course Join in Navigation Bar: Home Objectives Course Content Assignments & Discussion Grades Help Contact Me [email protected] Welcome to web design course., This course is designed
equate Installation QUICK START GUIDE
 equate Installation QUICK START GUIDE CONTENTS 1 Before You Begin 2 Server Installation 3 Server Configuration 3a Connecting to VirtueMart / Prestashop 4 Client Installation (Windows) 5 Client Installation
Kaseya 2. Installation guide. Version 7.0. English
 Kaseya 2 Kaseya Server Setup Installation guide Version 7.0 English September 4, 2014 Agreement The purchase and use of all Software and Services is subject to the Agreement as defined in Kaseya s Click-Accept
Setting up the Oracle Warehouse Builder Project. Topics. Overview. Purpose
 Setting up the Oracle Warehouse Builder Project Purpose In this tutorial, you setup and configure the project environment for Oracle Warehouse Builder 10g Release 2. You create a Warehouse Builder repository
PHP+MYSQL, EASYPHP INSTALLATION GUIDE
 PHP+MYSQL, EASYPHP INSTALLATION GUIDE EasyPhp is a tool to install and configure an Apache server along with a database manager, MySQL. Download the latest version from http://www.easyphp.org/ as seen
Install MS SQL Server 2012 Express Edition
 Install MS SQL Server 2012 Express Edition Sohodox now works with SQL Server Express Edition. Earlier versions of Sohodox created and used a MS Access based database for storing indexing data and other
Enterprise Data Integration (EDI)
") CHAPTER 14 This feature requires an optional Cisco license. The EDI menu appears only after the license is installed on the Cisco PAM server. See Obtaining and Installing Optional Feature Licenses, page
CHAPTER 14 This feature requires an optional Cisco license. The EDI menu appears only after the license is installed on the Cisco PAM server. See Obtaining and Installing Optional Feature Licenses, page
Your complete guide to installing the info@hand Self-Service Portal and estore.
 Your complete guide to installing the info@hand Self-Service Portal and estore. Install the Portal & estore as shrink-wrapped software, or as add-ons to an existing Joomla! installation. Then configure
Installing Moodle on a Windows x64 Environment
 Installing Moodle on a Windows x64 Environment Installing Moodle 1.9 on a Windows Server 2008 x64 with Microsoft SQL Server 2008 and IIS7. Written by: Alex Pearce Email: [email protected] Blog: www.learninggateway.net/blogs/ajp
USING STUFFIT DELUXE THE STUFFIT START PAGE CREATING ARCHIVES (COMPRESSED FILES)
") USING STUFFIT DELUXE StuffIt Deluxe provides many ways for you to create zipped file or archives. The benefit of using the New Archive Wizard is that it provides a way to access some of the more powerful
USING STUFFIT DELUXE StuffIt Deluxe provides many ways for you to create zipped file or archives. The benefit of using the New Archive Wizard is that it provides a way to access some of the more powerful
Getting Started using the SQuirreL SQL Client
 Getting Started using the SQuirreL SQL Client The SQuirreL SQL Client is a graphical program written in the Java programming language that will allow you to view the structure of a JDBC-compliant database,
MICROSTRATEGY 9.3 Supplement Files Setup Transaction Services for Dashboard and App Developers
 NOTE: You can use these instructions to configure instructor and student machines. Software Required Microsoft Access 2007, 2010 MicroStrategy 9.3 Microsoft SQL Server Express 2008 R2 (free from Microsoft)
Upgrading LytecMD from 9.3.1 to 9.4 on Windows Server 2008. Best Practices. Revision Date: 7/29/2010 PLEASE READ:
 Upgrading LytecMD from 9.3.1 to 9.4 on Windows Server 2008 Best Practices Revision Date: 7/29/2010 PLEASE READ: This installation guide will guide you through the upgrade of LytecMD 9.3.1 to 9.4. If you
Installing OneStop Reporting Products
 Installing OneStop Reporting Products Contents 1 Introduction 2 Product Overview 3 System Requirements 4 Deployment 5 Installation 6 Appendix 2010 OneStop Reporting http://www.onestopreporting.com [email protected]
How to Move an SAP BusinessObjects BI Platform System Database and Audit Database
 How to Move an SAP BusinessObjects BI Platform System Database and Audit Database Technology Used SAP BI Platform 4.1 (this includes SAP BusinessObjects Enterprise 4.1, SAP BusinessObjects Edge 4.1 and
PLEASE NOTE: The client data used in these manuals is purely fictional.
 Welcome! CAREWare Quick Start guides will walk you through the basics of setting up, managing and using the main CAREWare functions. It is intended for non-technical users who just need to get basic information
VP-ASP Shopping Cart QUICK START GUIDE Version 7.00. 18 th Feb 2010 Rocksalt International Pty Ltd www.vpasp.com
 VP-ASP Shopping Cart QUICK START GUIDE Version 7.00 18 th Feb 2010 Rocksalt International Pty Ltd www.vpasp.com 2 P a g e Table of Contents INTRODUCTION... 4 1 FEATURES... 5 2 WHAT DO I NEED TO RUN VP-ASP?...
HELP DESK MANUAL INSTALLATION GUIDE
 Help Desk 6.5 Manual Installation Guide HELP DESK MANUAL INSTALLATION GUIDE Version 6.5 MS SQL (SQL Server), My SQL, and MS Access Help Desk 6.5 Page 1 Valid as of: 1/15/2008 Help Desk 6.5 Manual Installation
MySQL Quick Start Guide
 Fasthosts Customer Support MySQL Quick Start Guide This guide will help you: Add a MySQL database to your account. Find your database. Add additional users. Use the MySQL command-line tools through ssh.
National Fire Incident Reporting System (NFIRS 5.0) NFIRS Data Entry/Validation Tool Users Guide
 NFIRS Data Entry/Validation Tool Users Guide") National Fire Incident Reporting System (NFIRS 5.0) NFIRS Data Entry/Validation Tool Users Guide NFIRS 5.0 Software Version 5.6 1/7/2009 Department of Homeland Security Federal Emergency Management Agency
National Fire Incident Reporting System (NFIRS 5.0) NFIRS Data Entry/Validation Tool Users Guide NFIRS 5.0 Software Version 5.6 1/7/2009 Department of Homeland Security Federal Emergency Management Agency
Sitecore Ecommerce Enterprise Edition Installation Guide Installation guide for administrators and developers
 Installation guide for administrators and developers Table of Contents Chapter 1 Introduction... 2 1.1 Preparing to Install Sitecore Ecommerce Enterprise Edition... 2 1.2 Required Installation Components...
Table of Contents. CHAPTER 1 About This Guide... 9. CHAPTER 2 Introduction... 11. CHAPTER 3 Database Backup and Restoration... 15
 Table of Contents CHAPTER 1 About This Guide......................... 9 The Installation Guides....................................... 10 CHAPTER 2 Introduction............................ 11 Required
Virtual Office Remote Installation Guide
 Virtual Office Remote Installation Guide Table of Contents VIRTUAL OFFICE REMOTE INSTALLATION GUIDE... 3 UNIVERSAL PRINTER CONFIGURATION INSTRUCTIONS... 12 CHANGING DEFAULT PRINTERS ON LOCAL SYSTEM...
LockView 4.3.1 CompX Database & Network Configuration & Installation Manual
 LockView 4.3.1 CompX Database & Network Configuration & Installation Manual Table of Contents CompX Database & Network Configuration & Installation Manual Introduction... 4 Installation Requirements...
SIMIAN systems. Setting up a Sitellite development environment on Windows. Sitellite Content Management System
 Setting up a Sitellite development environment on Windows Sitellite Content Management System Introduction For live deployment, it is strongly recommended that Sitellite be installed on a Unix-based operating
How to Setup, Install & Run a Website on your Local Computer. For WordPress - on an Offline Server - WAMP
 How to Setup, Install & Run a Website on your Local Computer For WordPress - on an Offline Server - WAMP Index: Determine Operating System Status Download WAMP Server Download Latest WordPress Installing
These notes are for upgrading the Linko Version 9.3 MS Access database to a SQL Express 2008 R2, 64 bit installations:
 These notes are for upgrading the Linko Version 9.3 MS Access database to a SQL Express 2008 R2, 64 bit installations: This document substitutes for STEPS TWO and THREE of the upgrade Game Plan Webpage
SonicWALL CDP 5.0 Microsoft Exchange InfoStore Backup and Restore
 SonicWALL CDP 5.0 Microsoft Exchange InfoStore Backup and Restore Document Scope This solutions document describes how to configure and use the Microsoft Exchange InfoStore Backup and Restore feature in
How to configure the DBxtra Report Web Service on IIS (Internet Information Server)
") How to configure the DBxtra Report Web Service on IIS (Internet Information Server) Table of Contents Install the DBxtra Report Web Service automatically... 2 Access the Report Web Service... 4 Verify
How to configure the DBxtra Report Web Service on IIS (Internet Information Server) Table of Contents Install the DBxtra Report Web Service automatically... 2 Access the Report Web Service... 4 Verify
E-Commerce Installation and Configuration Guide
 E-Commerce Installation and Configuration Guide Rev: 2012-02-17 Sitecore E-Commerce Services 1.2 E-Commerce Installation and Configuration Guide A developer's guide to installing and configuring Sitecore
Sage Intelligence Financial Reporting for Sage ERP X3 Version 6.5 Installation Guide
 Sage Intelligence Financial Reporting for Sage ERP X3 Version 6.5 Installation Guide Table of Contents TABLE OF CONTENTS... 3 1.0 INTRODUCTION... 1 1.1 HOW TO USE THIS GUIDE... 1 1.2 TOPIC SUMMARY...
Adobe Dreamweaver CC 14 Tutorial
 Adobe Dreamweaver CC 14 Tutorial GETTING STARTED This tutorial focuses on the basic steps involved in creating an attractive, functional website. In using this tutorial you will learn to design a site
Setting up FileMaker 10 Server
 Setting up FileMaker 10 Server Note : If your current live Database folder is located in the default database folder ( C:\Program Files\FileMaker\FileMaker Server\Data\Databases ), move\copy this folder
Querying Databases Using the DB Query and JDBC Query Nodes
 Querying Databases Using the DB Query and JDBC Query Nodes Lavastorm Desktop Professional supports acquiring data from a variety of databases including SQL Server, Oracle, Teradata, MS Access and MySQL.
BUILDER 3.0 Installation Guide with Microsoft SQL Server 2005 Express Edition January 2008
 BUILDER 3.0 Installation Guide with Microsoft SQL Server 2005 Express Edition January 2008 BUILDER 3.0 1 Table of Contents Chapter 1: Installation Overview... 3 Introduction... 3 Minimum Requirements...
CSCI110 Exercise 4: Database - MySQL
 CSCI110 Exercise 4: Database - MySQL The exercise This exercise is to be completed in the laboratory and your completed work is to be shown to the laboratory tutor. The work should be done in week-8 but
LockView 4.2 CompX Database & Network Configuration & Installation Manual
 LockView 4.2 CompX Database & Network Configuration & Installation Manual Table of Contents CompX Database & Network Configuration & Installation Manual Introduction... 4 Installation Requirements... 5