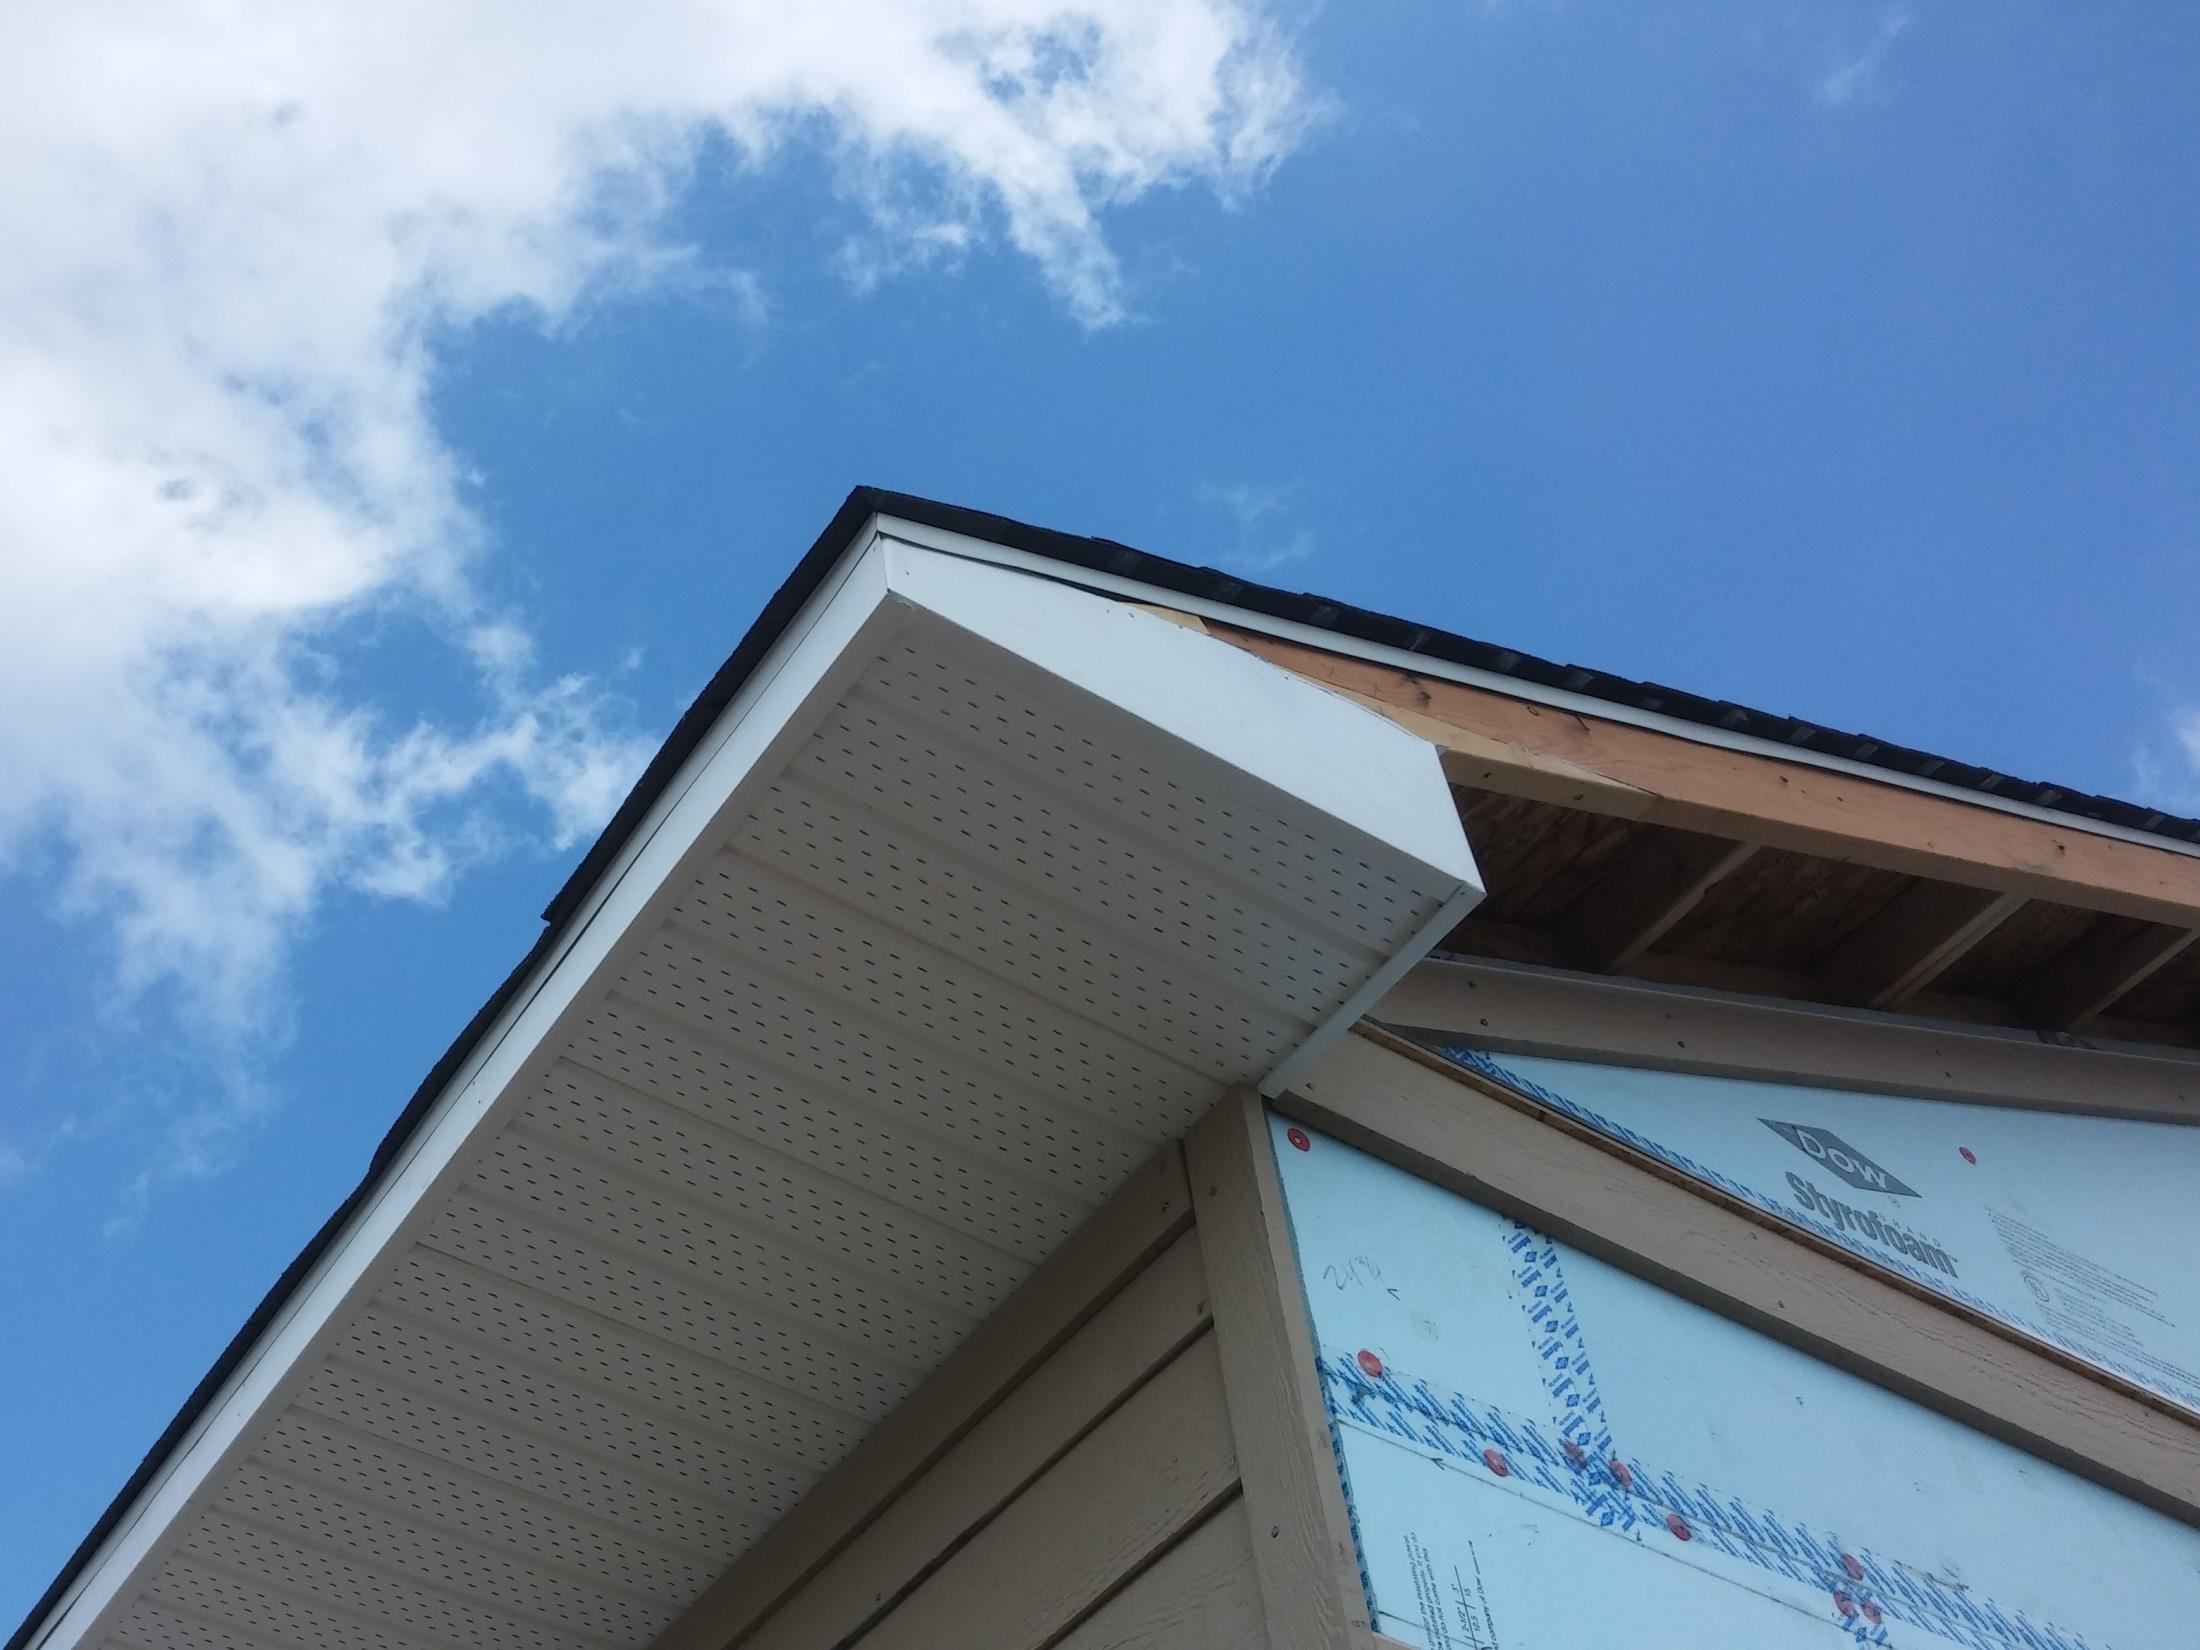
Plans will call for one of two soffit/fascia details:
|
|
|
- Kathleen Ellis
- 8 years ago
- Views:
Transcription
1

2 Plans will call for one of two soffit/fascia details: Ventilated vinyl soffit with bent aluminum fascia OR Ventilated LP Smartside soffit panels with 1x6 rabbeted fascia

3 First, let s talk terminology: Peak Rake Subfascia Fascia Birdbox or Boxing Return Soffit Remember: Rake: Pitched edge of a roof; leads from eave to peak. Eave: Level bottom edge of a roof; overhangs a wall. Eave Dripedge

4 Introduction TOOLS Use 1 ½ roofing nails to install soffit. Use tin snips to cut F-channel, vinyl soffit, and aluminum fascia. NAILS Use roofing nails to install F- channel to house. If nailing directly to framing (like on porches), use 1 ½ nails. If nailing through blueboard, use at least 2 roofing nails (or 16d exterior trim nails.) Use white panel nails to install aluminum fascia.
, use 1 ½ nails.")
 Install painted aluminum fascia to hide subfascia and ends of soffit.")
5 Introduction Installing a system of vinyl soffit has three basic steps: 1) Install F-channel against the house to hold one side of soffit. 3) Install painted aluminum fascia to hide subfascia and ends of soffit. 2) Install vinyl soffit by slotting one side into F-channel and nailing the other to subfascia.
 Install vinyl soffit by slotting one side into F-channel and nailing the")

6 F-Channel On eaves When installing F-channel on eaves (before exterior trim): Soffit is supported on the subfascia by nails, and on the house by F-channel. Install top of F-channel level with the bottom of subfascia.

 Measure down from this mark the height of F-channel (1 ½ ). 1 ½ 3) Chalk a line between the points (this is bottom of the F-channel).")
7 F-Channel On Eaves 1) On each end of the wall make a mark level with the subfascia (this is top of the F-channel). To Install: 2) Measure down from this mark the height of F-channel (1 ½ ). 1 ½ 3) Chalk a line between the points (this is bottom of the F-channel). 4) Install F-channel with the bottom on this line.
 Chalk a line between the points (this is bottom of the F-channel).")

8 F-Channel On Rakes F-Channel on Rakes Always install the top of F-channel level with the bottom of subfascia. On rakes with 2x4 subfascia, push F-channel up to bottom of lookouts. Be careful to maintain a straight line as you nail; F-channel is very flexible. On rakes with 2x6 subfascia, use a 2 level and chalk a line level with the bottom of the subfascia, like on eaves.

. Where birdbox framing is in the way of F-channel, you can either trim it to fit or leave it out entirely.")
9 F-Channel At Birdboxes It is better to run F-channel a little long at the bottom and top of rakes (where soffit will hide it) than to have it be a little short (which will show a gap). Where birdbox framing is in the way of F-channel, you can either trim it to fit or leave it out entirely.


10 Vinyl Soffit F-Channel Inside corners meet at a simple 90 butt-joint. At corners: Outside corners meet at 45 angles so that the inside of the track isn t in the way of the soffit.

 Install two pieces of F-channel (back-to-back) to this blocking.")
11 Vinyl Soffit F-Channel Where two eaves intersect: 1) Install 2x4 blocking or continue subfascia to connect the two eaves. Check with a supervisor to see if the front or sides of soffit should run long. 2) Install two pieces of F-channel (back-to-back) to this blocking. 3) To make life easier, start installing soffit from this point in each direction. This way, if you have to face-nail a piece to hold it in the F-channel, the next piece of soffit can hide that nail. 3) 1) 2)
 To make life easier, start installing soffit from this point in each direction.")
 because it reduces the amount of installation that must be done from ladders/scaffolding.")
12 Vinyl Soffit F-Channel Some supervisors prefer to mount F-channel directly to the back of the 1x4 trim. This requires a little more planning but helps maintain a perfectly straight line. It is also helpful on heights (like tall gables on second-stories) because it reduces the amount of installation that must be done from ladders/scaffolding. Install F-channel to trim using ½ staples or ½ roofing nails. This 1x4 trim is almost always installed directly under F-channel.


13 Vinyl Soffit Vinyl soffit comes in pieces 12 long and 12 wide. It can be ventilated (shown) or solid (rarely used). Measure to the outside edge of the subfascia. To measure each piece, push your tape measure into the F-channel. Use a large speed square to draw a straight, square line and cut piece using tin snips.

14 Vinyl Soffit First Piece Measure and cut your first piece and tack it in place with one nail. Always square the first piece before completely nailing it in. Push a framing square flat against the house in the F-channel, and pivot the piece until its edge lines up perfectly with the square. First piece on eaves will need 4 nails. First piece on rakes will need 2 nails.

 Push piece completely into F-channel.")
15 Vinyl Soffit Installation 1) Each piece clips into the previous one with these folded hooks at the edges. 2) Push piece completely into F-channel. 3) Pull piece taut and install with one roofing nail through nailing flange and into subfascia.
 Pull piece taut and install with one roofing nail through")

16 Vinyl Soffit Best Practices Like most construction materials, soffit will expand and contract given temperature and humidity conditions. Make sure to pull each piece taut. If installed too loose, when pieces expand they will droop and can come unhooked. If installed too tight, when pieces contract they can snap and come unhooked. After they re installed, loose pieces are very easy to see and very difficult to fix.


17 Vinyl Soffit Best Practices The edge of each piece of soffit should land just short of the edge of the subfascia. Pieces that are too long and overhang the subfascia will interfere with the fascia. Always trim long pieces before installing them! Pieces that are too short will be much harder to nail securely into subfascia. Do not install a piece if its edge is more than ½ short of the subfascia s edge. Cut another piece! Perfect! Almost too short! Too long; pieces should never overhang subfascia!

. In those cases: When possible, put nails in the valley of the piece.")
18 Vinyl Soffit Nailing This is ideal: through the hole in the nailing flange. Where the hole is cut, make a new one. Avoid nailing here; it will interfere with the next piece clipping in. Some pieces will need to be face-nailed (nailed somewhere other than through the nail flange). In those cases: When possible, put nails in the valley of the piece. When nailing through this face, do not sink the nail! You don t want to compress the face of the soffit.


19 Vinyl Soffit At Peaks Always run soffit continuously through a peak. Do not stop one course at the peak and start another one going down. You may need to use extra nails through the face of the soffit to help hold it tight into the angle of the peak. Fascia will hide these nails later.


20 Vinyl Soffit Last Piece Cut the last piece to fit as tightly as possible. On eaves: On rakes:


21 Vinyl Soffit Penetrations Penetrations Cut soffit as closely as possible around penetrations.
22 Aluminum Fascia Installation Aluminum ( bent metal ) fascia is custom cut and bent on site to cover the subfascia. The top edge fits under dripedge. The bottom lip tucks under soffit and hides the cut edges.
23 Aluminum Fascia Installation On eaves, always start at the back of the house and move forward. (This way the overlaps hide the gaps.) No one wants to see this gap from their front walk. But from the other side, the overlap disappears. On rakes, always start at the bottom of the rake and move up. (This way water can t drip between the pieces.)

24 Aluminum Fascia Installation Check with the supervisor to see whether they prefer birdbox fascia to be installed before or after rake/eave fascia. Always bend an edge around corners on the first piece in each section. The next piece will overlap this lip and end flush with the corner. This leaves a clean finish with no gaps.

25 Aluminum Fascia Installation Push the bent corner up tight against the bottom of the soffit but not so tight that it begins to bend outward. Work in pairs and push the entire piece as one and at once. Pushing up one corner at a time will cause it to buckle and wrinkle. It is better to have a small gap between soffit and fascia than to have a big wrinkle in the fascia.

26 Aluminum Fascia Nailing Do not nail within 3 of an end; the fascia will pucker in at the nail and pull away at the edge, opening a gap. Install using pairs of white aluminum nails every 2. Overlap pieces by 6. Be very careful with your hammer! Don t dent or scratch the painted aluminum.

27 Aluminum Fascia Installation At Corners: Remember: Bend a lip on the first piece to wrap around any corners. The second piece overlaps this lip and ends flush with the corner. At Peaks: Run the first piece long, notching the bottom lip where it will hit the soffit. Second piece overlaps with a plumb cut.
HfHMD uses LP SmartSide siding and trim.
 HfHMD uses LP SmartSide siding and trim. These products are: More durable than cement fiber board. Much more volunteer-friendly to install. When installed correctly, have a 5/50- year pro-rated warranty.
Chapter 9: INSTALLING ROOFING
 9.1 LEAK BARRIER (ICE AND WATER SHIELD) 9.2 SHINGLE UNDERLAYMENT 9.3 INSTALLING GUTTER APRON AND GABLE D-EDGE 9.4 INSTALLING SHINGLES 9.5 RIDGE VENT AND CAP Tools needed by each volunteer: Hammer (16 oz.
8/18/14. Introduction to. Framing. Terminology and Concepts
 8/18/14 Introduction to Framing Terminology and Concepts Terminology: Framing Level Two points on exactly the same horizontal plane. Square Intersecting lines or faces that form an exact 90 angle. Plumb
Classic Products, Inc. ClickLock Standing Seam Installation Manual
 Classic Products, Inc. ClickLock Standing Seam Installation Manual Classic Products, Inc. 8510 Industry Park Drive Piqua, OH 45356 800.543.8938 Table of Contents page Introduction 1. 1 Starter. 2. 1 Panels.
Installation Manual for STANDING SEAM ROOFING
 Installation Manual for STANDING SEAM ROOFING Absolute Steel Toll Free 877-833-3237 / Phone 480-768-1618 / Fax 480-768-1514 www.metalroofingsource.com Standing Seam features approximately one-inch high
UNIT 4: SHEATHING AND SHINGLING THE ROOF
 KEY CONCEPTS 1. Identify tools needed for roofing 2. Steps to finishing a roof 3. Maintenance of a roof 4. Safety while roofing INSTRUCTIONAL ACTIVITIES 1. Complete Follow Up Worksheet from Unit 3 2. Roof
Residential Roofing Guide
 Residential Roofing Guide TABLE OF CONTENTS Building Detail and Accessories...... 1 Panel Introduction and Handling...... 2 Cutting and Trimming.... 3 Roof Preparation..... 3 Roof Slope..... 3 Re-roofing...
SUPER SHED. Indoor shelter for your outdoor tools.
 SUPER SHED Indoor shelter for your outdoor tools. Not everyone needs a garden shed. But, if you've no more space on your garage wall for that new leaf rake, if you can't find your potting trowel because
How to Install UnderDeck The Original.
 How to Install UnderDeck The Original. TOOLS: Chalk Line Caulk Gun Garden hose or water bucket Gloves Hammer or Screw Gun Power Mitre Saw with OSB Blade Pencil Pliers Safety Glasses Straight Edge / Carpenter
PANELIZED HOME INSTALLATION GUIDELINE
 PANELIZED HOME INSTALLATION GUIDELINE A typical home package will be constructed of Snap-N-Lock Insulated Panels clad with steel skins. 4" panels will be used for the walls, and 6" panels for the roof.
Minimizing Water Intrusion Through Roof Vents in High-Wind Regions
 Minimizing Water Intrusion Through Roof Vents in High-Wind Regions http://www.fema.gov HURRICANE IKE RECOVERY ADVISORY Purpose: To recommend practices for minimizing water intrusion through roof vent systems
BRIDGE & SUPPLY COMPANY. Installation Guide. Ultra 2000. Includes:
 BRIDGE & SUPPLY COMPANY Installation Guide Ultra 2000 Includes: Ultra 2000 Installation Guide Stock Trim Profiles Ultra 2000 Trim Installation Guide Page 2 Table of Contents Ultra 2000 Profile, Colors
Free 12 x 8 Shed Plan With Illustrations, Blueprints & Step By Step Details
 Free 12 x 8 Shed Plan With Illustrations, Blueprints & Step By Step Details Brought To You By: MyShedPlans Click Here To Download 12,000 Shed Plans >> 12 x 8 Basic Shed This 8 12-ft. shed features a simple
Vinyl Brick Mould Field Installation Instructions All Vinyl and Vinyl Clad Windows
 Vinyl Brick Mould Field Installation Instructions All Vinyl and Vinyl Clad Windows Viewed from the exterior. IMPORTANT: Please read before you begin installation. TABLE OF CONTENTS AND TOOL / MATERIAL
HOW TO INSTALL A BEAUTIFUL NEW KITCHEN
 HOW TO INSTALL A BEAUTIFUL NEW KITCHEN Easy to follow step-by-step kitchen cabinet installation TOOL AND MATERIAL LIST Hammer Pry bar Screwdriver Phillips Flathead Level Tape measure Pencil Straight edge
Sun Windows General Information Sun New Construction Window Installation Instructions
 Sun Windows General Information Section 1 G F H H H A. Apply Weather Resistive Barrier B. Apply Sill Flashing Tape C. Place Waterproof Sill Shims D. Caulk Back of Nail Fin Sides & Top, Set Window, Fasten
application instructions
 application instructions ARCHITECTURAL COLLECTION PRIMED BOLD PROFILE 120 SERIES LAP SIDING (D5, T4, D8, T5, Q4) General At the time of manufacture, siding meets or exceeds the performance standards set
Vinyl Siding Estimating and Installation Guide
 Vinyl Siding Estimating and Installation Guide Understanding the Basics Contractors and homeowners alike have depended on the low maintenance sidings from KP Building Products for the best product designs
Stormproof Your Roof. I ve done enough roof repairs to know that storm water that gets past the shingles
 Stormproof Your Roof Self-adhering underlayment provides critical protection in vulnerable locations BY MIKE GUERTIN I ve done enough roof repairs to know that storm water that gets past the shingles and
Installation Guide MATTERHORN METAL ROOFING TO LAST A LIFETIME. MATTERHORN Standing Seam
 Installation Guide MATTERHORN METAL ROOFING TO LAST A LIFETIME MATTERHORN Standing Seam System Components Placement G F J K I A. Standing Seam Panel B. Valley Cleat/Sidewall Counter Flashing D G B C A
!!!!!! !!! Decra Plus DPSW010 DPSTW011 DPSW012 DPSW013 DPSW014 DPSW015 DPSW016 DPSW020 DPSW021 DPSW024 DPSW030 DPSW031 DPSW035 DPSW030 DPSW031 DPSW035
 Decra Plus Drawing no DPSW010 DPSTW011 DPSW012 DPSW013 DPSW014 DPSW015 Description Shown In Decra Brochure Most Commonly Used Detail t~êã=oççñ=b~îéë=aéí~áä=b~îéë=lîéêü~åö=táíü=fåëìä~íéç=c~ëåá~=~åç=pçññáí
Tundra Series Windows January 2016
 Tundra Series Windows January 2016 New Construction Installation Instructions Nail Fin, J-Fin and Brickmold Aplications product. ATTENTION! Read and understand all installation instructions before installing
VAIL Metal Shingles. Application Instructions. Custom-Bilt Metals 13940 Magnolia Ave. Chino, CA 91710
 VAIL Metal Shingles Application Instructions 13940 Magnolia Ave. Chino, CA 91710 VAIL Metal Shingles Application Instructions When installing or walking on VAIL Metal Shingles: 1. OSHA fall protection
All seam allowances are 1/2 unless otherwise noted. All pattern pieces include the seam allowance. Please read all instructions before beginning.
 This structured bag has lots of pretty detailing. It s large enough to carry all of your essentials as well. Make it in a great patchwork, or stick to a single fabric! All seam allowances are 1/2 unless
Installation Instructions
 READ BEFORE INSTALLING UNIT For Through-the-Wall Air Conditioners To avoid risk of personal injury, property damage, or product damage due to the weight of this device and sharp edges that may be exposed:
Fig. 2 WALL-TO-WALL PANEL CONNECTIONS CORNER WALL CONNECTION
 SIPS SCREWS WITH MINIMUM 1" PENETRATION IN WOOD MEMBER IN SIP WALL PANEL CONNECTED TO @ 24" O.C. MAXIMUM OUTSIDE SKIN EACH SIDE OF FRAMING TYP. AS RECOMMENDED BY FOAM CORE AS EACH SIDE OF FRAMING TYP.
Updated October 2004. Vinyl Siding Installation Manual
 Updated October 2004 Vinyl Siding Installation Manual This guide is published by the Vinyl Siding Institute, Inc. (VSI) as a service to the industry. VSI members are manufacturers of vinyl siding and suppliers
Screw Patterns Roof & Walls 403-279-2766 TR-36 MD-36 TSM-32. PBR-Panel
 Screw Patterns Roof & Walls Overlap Underlap ¾ 9 TR-36 36 5/8 6 MD-36 36 ½ 8 TSM-32 32 1¼ 12 PBR-Panel 36 Bottom Edge Screw Pattern apply to every profile except for MD36 (1 screw beside every rib) High
Best Barns USA Assembly Book
 Best Barns USA Assembly Book Revised November 27, 2013 the Easton - R 12'x 20' Manufactured by Reynolds Building Systems, Inc. 205 Arlington Drive Greenville, PA 16125 724-646-3775 This manual is copyrighted.
Gerard Installation Manual Shingle Profiles
 Gerard Installation Manual Shingle Profiles Granite Ridge Shingle Guardian Shingle March 2014 This Installation Manual is designed as an instructional tool to clearly depict to the contractor, installer,
Clad Direct Glaze Window Installation Instructions
 Clad Direct Glaze Window Installation Instructions Sill flashing and sealing: 2. An overview of the proper flashing sequence is shown in figure 1. Please read entire installation instructions carefully
INSTALLATION OF A BAY WINDOW
 INSTALLATION OF A BAY WINDOW Installation of a Bay Window These instructions relate to the replacement of an existing bay window or replacement of a straight window with a new bay window, in an opening
Installing Window and Door Mouldings
 Installing Window and Door Mouldings About Window and Door Mouldings The trim around windows and doors greatly influences the look and style of your interior. They also bridge the gaps and cover spaces
6.0 Implementation: Retrofitting Gable End Walls with L-Bent Straps
 6.0 Implementation: Retrofitting Gable End Walls with L-Bent Straps Order of presentation: To give you a better appreciation of what is involved in doing a gable end bracing retrofit, the first section
2. This is a close up of a typical area where the rocker is rusted out leaving holes under where the rocker moulding would be..
 ROCKER PANELS 55,56,57 CHEVY REPLACEMENT Do not throw away any pieces when you first remove them. There are many supports that are not reproduced and will need to be used again. When disassembling try
Brick Veneer Construction
 Brick Veneer Construction Check list of suggested tools & support items Claw hammer Tape measure 3/4" [19 or 20] Wood chisel Wood or plastic shims Pry bar Utility knife Caulking and caulking gun Power
Window Installation Instructions
 Caution The correct installation methods of windows in full frame or insert applications is critical towards achieving the tested performance of the window and longterm enjoyment and energy savings for
HALE PET DOOR INSTALLATION INSTRUCTIONS HALE STANDARD PANEL MODEL
 HALE PET DOOR INSTALLATION INSTRUCTIONS HALE STANDARD PANEL MODEL Please read these instructions carefully and completely before attempting to install Hale Pet Doors; they will guide you through the steps
ROOF CONSTRUCTION Roof Styles Gable Roof Hip Roof Gambrel Roof
 ROOF CONSTRUCTION The overall appearance of a building is greatly affected by the roof lines and the roofing materials. The designer has many standard designs to choose from and should be able to find
Barewood Octagon and Elongated Windows Installation Instructions
 Step-by-step instructions to a beautiful window. Measuring and Installation of your new window from Century Specialty Windows couldn't be easier with our step-by-step instructions. Quality, function and
 I had repaired enough water damaged sheathing and framing over the years to realize that something was not right. It did not seem to matter what the siding was, any weakness in the systems turned wood
Electrical Wiring Technical Bulletin
 Electrical Wiring Technical Bulletin Overview In general, SIP construction is easier and more cost effective when things are planned and thought out before the panels are manufactured. This process will
We urge you to read and follow the attached installation instructions. Failure to do so may void the warranty of this garden window unit.
 Important Information for New Construction Installations Attention Installer! We urge you to read and follow the attached installation instructions. Failure to do so may void the warranty of this garden
1958-64 WINDOW CHANNEL, WEATHERSTRIP & WHISKER STRIP REPLACEMENT FOR 2-DOOR SEDANS
 By Denny Williams Photos by Denny Williams 1958-64 WINDOW CHANNEL, WEATHERSTRIP & WHISKER STRIP REPLACEMENT FOR 2-DOOR SEDANS Denny Williams - Technical Writer Denny is first and foremost a dyed-in-thewool
Premier & Deluxe 3-Season Room Sliding Glass Door
 DTSSGD-11 Premier & Deluxe 3-Season Room Sliding Glass Door Installation Instructions Screen Door Seal Left Side Track Top Track Assembly Right Side Track Right Side Trim Sliding Glass Door Sliding Screen
DE Frame with C Series Sidelight
 TOOLS REQUIRED Tape measure 6' magnetic level 3' magnetic level Screw gun with clutch adjusted #2 phillips tip #3 phillips tip Screwdriver (used to adjust frame on will using oval slots) Pry Bar Powder
Ceiling Mounted Folding Attic Ladders Installation Instructions
 Ceiling Mounted Folding Attic Ladders Installation Instructions WARNING Before you start installing your new Louisville Ceiling Mounted Folding Attic Ladder, you must read and understand the following:
MGB Chrome Bumper Conversion
 MGB Chrome Bumper Conversion Installation Instructions For 1974 1/2-1980 MGB This kit requires cutting, welding, and painting. Professional installation recommended. Note: Every MGB body is slightly different
Instructions for assembly of your Pop-Up Display
 Instructions for assembly of your Pop-Up Display I: Frame a) With the Pop-Up Frame still in the travel case, open the cloth bag. Make note of the ten black pegs on the top. These pegs represent the TOP
INSTALLATION INSTRUCTIONS for Vinyl Windows with Integral Nailing Fin (JII001)
") Thank you for selecting JELD-WEN products. Attached are JELD-WEN s recommended installation instructions for Vinyl windows with an integral nailing fin. While the use of these installation instructions
Thank you for selecting JELD-WEN products. Attached are JELD-WEN s recommended installation instructions for Vinyl windows with an integral nailing fin. While the use of these installation instructions
K. D. FRAME ASSEMBLY FOR CLOSED STEEL STUD WALLS...Ins 10. FRAME INSTALLATION DETAILS FOR CLOSED STEEL STUD WALLS...Ins 11
 K. D. FRAME ASSEMBLY FOR MASONRY WALLS...........................Ins 2 FRAME INSTALLATION DETAILS FOR MASONRY WALLS......................Ins 3 INSTALLING EXISTING MASONRY WALL ANCHORS IN FRAME..................Ins
CEILING SYSTEMS. Between us, ideas become reality. Installing. Suspended Ceilings. North America Version
 CEILING SYSTEMS Between us, ideas become reality Installing Suspended Ceilings North America Version 1 Installing Armstrong Suspended Ceilings An Armstrong suspended mineral fiber ceiling is functional,
A Telescoping Hive Cover
 A Telescoping Hive Cover The telescoping hive cover is what keeps the weather and elements out of your bee hive; it is like the roof of your house (Figure 1). Commercial hive covers typically feature a
UBBINK SOLAR IN-ROOF SYSTEM
 UBBINK SOLAR IN-ROOF SYSTEM The integrated solar mounting system Installation guide UBBINK SOLAR IN-ROOF SYSTEM Table of contents Solar In-Roof System introduction System components Installation guide
2015 Vinyl Siding Installation Manual to great!
 Go from good... 2015 Vinyl Siding Installation Manual to great! This manual is published by the Vinyl Siding Institute, Inc. (VSI) as a service to the industry. VSI members are manufacturers of vinyl siding
Cable Support System Guide for Andersen Bow, Bay, and Box Projecting Window Units
 for Andersen Bow, Bay, and Box Projecting Window Units Congratulations! You have just purchased one of the many fine Andersen products. Proper assembly, installation and maintenance are essential if the
PREMIUM LAMINATED ASPHALT SHINGLES Dallas, TX Tuscaloosa, AL Phillipsburg, KS
 Application Instructions for THESE ARE THE MANUFACTURER S APPLICATION INSTRUCTIONS FOR THE ROOFING CONDITIONS DESCRIBED. TAMKO BUILDING PRODUCTS, INC. ASSUMES NO RESPONSIBILITY FOR LEAKS OR OTHER ROOFING
Bungalow. Essential Elements. Prominent porch columns,
 Bungalow Essential Elements Prominent porch columns, especially square or battered piers Deep porches One or one and a half stories Roof that is either hipped with low pitch or gabled with moderate to
All-Season Sunroom Sliding Glass Door Installation Instructions
 ASRESGD-08 All-Season Sunroom Sliding Glass Door Installation Instructions Panel Frame Door Frame Left Side Foam Insulator IE241 H Bar Assembly Door Frame Top Track Panel Frame Door Frame Right Side Stationary
Installing the Sno-free Standing Seam System for Metal Roofs
 Installing the Sno-free Standing Seam System for Metal Roofs SFP SSP CLIP SSP STANDING SEAM SFP EXTRUSION SFP RAMP PANEL Step # 1 Mark the location and Install Extrusion Mark the area on the roof to receive
Black Wolf POCKET BILLIARD TABLE INSTALLATION MANUAL. SERVICE DEPARTMENT P.O. BOX 68 BRISTOL, WI 53104
 Black Wolf TM POCKET BILLIARD TABLE INSTALLATION MANUAL www.brunswickbilliards.com SERVICE DEPARTMENT P.O. BOX 68 BRISTOL, WI 53104 51-905710-000 SEPTEMBER 2010 NOTE: Please use the instructions in this
DIY CABINET REFACING INSTALLATION GUIDE
 DIY CABINET REFACING INSTALLATION GUIDE CABINET REFACING INSTALLATION Are you ready to reface your outdated cabinets? This guide will show you how to install your new Facelifters Cabinet Refacing Products
Installation Instructions Double-Hung, Single-Hung, Casement, Awning, Sliding, Picture & Shapes Non-Impact & Impact Resistant Nailing Fin Windows
 Installation Instructions Double-Hung, Single-Hung, Casement, Awning, Sliding, Picture & Shapes Non-Impact & Impact Resistant Nailing Fin Windows americancraftsmanwindows.com Project Requirements: Read
INSTALLATION INSTRUCTIONS IMPERVIA (Vent and Fixed) AWNING, CASEMENT, and LARGE AWNING WINDOW WITH FINS
 AWNING, CASEMENT, and LARGE AWNING WINDOW WITH FINS") 2009 Pella Corporation INSTALLATION INSTRUCTIONS IMPERVIA (Vent and Fixed) AWNING, CASEMENT, and LARGE AWNING WINDOW WITH FINS Part Number: 80WH0100 Installation Instructions for Typical Wood Frame Construction.
2009 Pella Corporation INSTALLATION INSTRUCTIONS IMPERVIA (Vent and Fixed) AWNING, CASEMENT, and LARGE AWNING WINDOW WITH FINS Part Number: 80WH0100 Installation Instructions for Typical Wood Frame Construction.
Replacement Window Installation Guide Non-Impact & Impact Resistant Windows without Nailing Fin
 Replacement Window Installation Guide Non-Impact & Impact Resistant Windows without Nailing Fin americancraftsmanwindows.com Project Requirements: Failure to follow these instructions may void product
KITCHENS. Tip PAGE 1 FITTING YOUR KITCHEN GUIDE. How to mark out a kitchen. Tools required for installing a kitchen STEP ONE STEP TWO STEP THREE
 FITTING YOUR KITCHEN GUIDE How to mark out a kitchen PAGE 1 Before starting on the installation, measure 870mm from the lowest point of the floor and mark a datum line around the room to indicate where
Historical Information
 Historical Information The use of gutters, or eaves troughs, dates from early colonial times when two boards were nailed together to form a functional V-shaped trough placed below the drip edge of the
STEEL BUILDINGS RECOMMENDED INSTALLATION GUIDE
 STEEL BUILDINGS RECOMMENDED INSTALLATION GUIDE 3 TO 30 METRE SPAN TILT UP METHOD SUPPLIED BY: Last update 8 December 2010 2010 FBHS (Aust) Pty Limited FBHS (Aust) Pty Limited ABN 83 126 232 504 trading
Here is your set of Detailed Plans from Copyright 2004 All Rights Reserved
 Here is your set of Detailed Plans from Copyright 2004 All Rights Reserved Materials for the House Here is the list of materials you will need to construct the basic house then to cover it with roofing
Installation Guide. Bath and Wall Surrounds SERIES 7104 1021861-2-B
 Installation Guide and Wall Surrounds SERIES 7104 1021861-2-B Thank You For Choosing Sterling We appreciate your commitment to Sterling value. Please take a few minutes to review this manual before you
Installation Guide for Andersen Architectural Clad Outswing Commercial Doors
 Installation Guide for Andersen Architectural Clad Outswing Commercial Doors Congratulations! You have just purchased one of the many fine Andersen products. Proper assembly, installation and maintenance
Retrofitting an Insulated Cold Roof
 Retrofitting an Insulated Cold Roof As a metal-roofing contractor in the Upper Peninsula of Michigan, I am frequently asked to fix roof leaks that have less to do with roofing than with the way poorly
UNIVERSAL ASSEMBLY INSTRUCTIONS FOR VERSATUBE BUILDINGS CONTRACTOR SERIES 2 X 4 FRAMES
 UNIVERSAL ASSEMBLY INSTRUCTIONS FOR VERSATUBE BUILDINGS CONTRACTOR SERIES 2 X 4 FRAMES Our unique assembly process quickly transforms the individual pieces into a finished structure that will give you
INSTALLATION INSTRUCTIONS for Bifold Doors (JII103)
") Thank you for selecting JELD-WEN products. Attached are JELD-WEN s recommended installation instructions for premium composite, hollow and solid core molded Bifold Doors. Bifolds are designed for fast
Thank you for selecting JELD-WEN products. Attached are JELD-WEN s recommended installation instructions for premium composite, hollow and solid core molded Bifold Doors. Bifolds are designed for fast
STANDARD PROCEDURES FOR INSTALLATION OF METAL ROOF SYSTEMS
 ROOFING APPLICATION STANDARD (RAS) No. 133 STANDARD PROCEDURES FOR INSTALLATION OF METAL ROOF SYSTEMS 1. Scope 1.1 This application standard has been developed to provide consistent information for the
Heavy Glass Frameless Shower Door With Return Panel
 202 Anderson Ave., elvue, KS 66407 Phone: 800-669-9867 Fax: 800-393-6699 www.onyxcollection.com Heavy Glass Frameless Shower Door With Return Panel Full Showers with Return ench Seat with Return FRLSDRPL-0116
Installing the Video Input and TV Tuner Cards in a Compact Computer or a Dual PCI-Slot Tower Computer
 Installing the Video Input and TV Tuner Cards in a Compact Computer or a Dual PCI-Slot Tower Computer This booklet describes how to install the video input and TV tuner cards in a compact Macintosh computer
Roof Tutorial. Chapter 3:
 Chapter 3: Roof Tutorial The majority of Roof Tutorial describes some common roof styles that can be created using settings in the Wall Specification dialog and can be completed independent of the other
Important Information for Installer & Homeowner
 Important Information for Installer & Homeowner Homeowner: Please keep this information for your records, do not discard! Installation Instructions for Wood Frame Construction Replacement (See other side
www.cornholesupplies.com
 www.cornholesupplies.com How To Build Regulation Cornhole Boards Home of the Original Cornhole Bags and Boards Supply List: 1-4' X 8' Piece of Plywood (pre sanded) 4-2" X 4" X 8' Studs (2 by 4s make sure
GARDEN WINDOW GLAZING AND DE-GLAZING INSTRUCTIONS
 GARDEN WINDOW GLAZING AND DE-GLAZING INSTRUCTIONS DE-GLAZING 1.) If there is any PVC cement covering the joints where external glazing bead strips meet, cut through the cement with a utility knife. 2.)
Raising the Roof Creating Roofs in Revit David Cohn
 David Cohn AB322-1 Roofs are one of the most complex architectural elements to model, but with Revit you can create just about any type of roof. This class will explore the best methods for creating various
DETAIL MANUAL. for Standing Seam. 2308 East 23rd Street Chattanooga, TN 37407. 1652 South Lee Hwy. Cleveland, TN 37311
 DETAIL MANUAL for Standing Seam 1652 South Lee Hwy. Cleveland, TN 37311 2308 East 23rd Street Chattanooga, TN 37407 Best Buy Metals Standing Seam Roofing Panels Fig. 2 Standing Seam Panel Has 1 high nail-strip
Can you design a frameless shower enclosure that doesn't leak?
 Can you design a frameless shower enclosure that doesn't leak? With proper design and installation frameless shower enclosures should not have any problems with water leakage, but they are not 100 percent
How to Make a Solar Cooker Kristi Jerger s 5th grade class
 How to Make a Solar Cooker Kristi Jerger s 5th grade class Dublin, Ohio Public Schools Credits: Marlin Languis, Emeritus Professor, Ohio State University Zep Wallace, Computer Specialist, Dublin Ohio Public
Roof-Valley Repair. When I started my roofing business. A Durable
 A Durable Roof-Valley Repair Peel-and-stick membrane and metal flashing are the best practice for new or old valleys By Stephen Hazlett Why did this valley leak? In the process of unzipping this valley,
INSTALLATION MANUAL For Grand Rib-3 / Multi Purpose / & Classic Rib Roofing Panels
 INSTALLATION MANUAL For Grand Rib-3 / Multi Purpose / & Classic Rib Roofing Panels Grand Rib-3 / Multi-Purpose / Classic Rib Grand Rib-3 / Multi-Purpose / & Classic Rib Grand Rib 3 panels are a strong,
InsulView Window Installation Instructions
 InsulView Window Installation Instructions 1. The entire building is normally sheeted with the 2" 2 ½ OR 3 wall panel and the windows installed at a later time. A window retrofit of an existing building
CLIENT. Inspection Report. 271 Front St. Alert Bay, B.C. Island Building Inspections V ANCOUVER I SLAND B. C.
 CLIENT Inspection Report 271 Front St. Alert Bay, B.C. Island Building Inspections 2013 V ANCOUVER I SLAND B. C. Elevation Photos For the Property at 271 Front Street Alert Bay, BC ELEVATION PICTURES Front
Retail Reception kiosk
 Retail Reception kiosk put 42" corner post in below 66" to allow post to extend above kiosk for raised box sign Mini cantilever option - 24" overhead support leg Mini cantilever option - 24" overhead 66/48E
Sheet Metal Bending. By- Prem Mahendranathan
 Sheet Metal Bending By- BENDING n Bending is a manufacturing process by which a metal can be deformed by plastically deforming the material and changing its shape n Deformation about one axis PROFILES
Discount Direct Metal Roofing Plus Rib Roofing Panels Installation Instructions
 Discount Direct Metal Roofing Plus Rib Roofing Panels Installation Instructions All questions and concerns please call 904-696-9700 Discount Direct Metal Roofing Plus Rib metal roofing panels are a strong,
UNIT 3: ROOF TRUSSES KEY CONCEPTS 1. Identify tools needed for rolling trusses 2. Identify proper nails and sizes 3. Setting roof trusses 4.
 KEY CONCEPTS 1. Identify tools needed for rolling trusses 2. Identify proper nails and sizes 3. Setting roof trusses 4. Site Safety and Hazards INSTRUCTIONAL ACTIVITIES 1. Complete Follow Up Worksheet
AMERICAN GOTHIC PLAYHOUSE
 AMERICAN GOTHIC PLAYHOUSE Project Plan #856 Sheet 1 of 5 Pick a spot and get started with the beautiful that your kids will love. The design of the playhouse includes 35 square feet of interior space plus
We urge you to read and follow the attached installation instructions. Failure to do so may void the warranty of this garden window unit.
 Important Information for New Construction Installations Attention Installer! We urge you to read and follow the attached installation instructions. Failure to do so may void the warranty of this garden
4 5/16 Subframe Installation
 4 5/16 Subframe Installation The subframe system is a great installation tool for installing windows in masonry conditions. Typically subframes are used in masonry openings so that windows can be anchored
Table of Contents. Western States Standing Seam SS675 Panel Installation, Flashings & Shop Drawing Detail Guide. Notes to Designer /Installers..
 Western States Standing Seam SS675 Panel Installation, Flashings & Shop Drawing Detail Guide Table of Contents Section Page Section Page Notes to Designer /Installers.. 1 Fastener Placement and Selection.2-3
ROOF CONSTRUCTION Roof Styles Gable Roof Hip Roof Gambrel Roof
 ROOF CONSTRUCTION The overall appearance of a building is greatly affected by the roof lines and the roofing materials. The designer has many standard designs to choose from and should be able to find
Simple Party Clutch. Use interfacing and a magnetic snap to turn your favorite fat quarter into a smart little party bag with a convertible strap.
 Simple Party Clutch Use interfacing and a magnetic snap to turn your favorite fat quarter into a smart little party bag with a convertible strap. Finished bag measures 8 wide x 4 ¼ high x ½ deep. Strap
Asphalt Shingle Application Requirements
 Alberta Allied Roofing Association Asphalt Shingle Application Requirements Section 1 Roof Decks 1.1 General Asphalt Shingles are not permitted to be installed directly over rigid insulation. When Asphalt