User Manual. DG LINK Application Program This document applies to firmware version 2.00 and above.
|
|
|
- Kenneth Hunt
- 7 years ago
- Views:
Transcription
1 User Manual DG LINK Application Program This document applies to firmware version 2.00 and above.

2 Copyright Tektronix Japan, Ltd. All rights reserved. Copyright Tektronix, Inc. All rights reserved. Tektronix products are covered by U.S. and foreign patents, issued and pending. Information in this publication supercedes that in all previously published material. Specifications and price change privileges reserved. Tektronix Japan, Ltd., Kitashinagawa, Shinagawa ku, Tokyo Japan Tektronix, Inc., P.O. Box 500, Beaverton, OR TEKTRONIX and TEK are registered trademarks of Tektronix, Inc.

3 Getting Started Overview Installation Procedure Starting and Exiting DG-LINK Operating Basics Functional Overview Setting the Destination Instrument Loading Data into DG-LINK Controlling Data Display Transferring Data Saving Data to a File Setting the Output Pattern Data and the Output Channel

4 Table of Contents Figure 1 1: Main Control window and dialog box Figure 1 2: Exit DG-LINK confirmation dialog box Figure 2 1: Main Control window Figure 2 2: Change Instrument window Figure 2 3: Remote Instrument Not Connected dialog box Figure 2 4: Select Load Data Format window Figure 2 5: Select File dialog box Figure 2 6: Pattern data display in CSV format Figure 2 7: Setup TLA Data Bit & Type window Figure 2 8: Pattern data display in CSV format Figure 2 9: Data display controls and data range definition cursors Figure 2 10: Setup Data Transfer window Figure 2 11: Correspondence between Data Generator pattern data and the data transferred Figure 2 12: Save Data error dialog box Figure 2 13: Setup Output Channel Data window Figure 2 14: Selected Instrument Not Connected dialog box

5 Table of Contents Table 2 1: Main Control window elements Table 2 2: Data transfer error messages

6 Table of Contents
7 DG-LINK is a Microsoft Windows 2000-based PC software application used to transfer and convert data between TLA 700-Series Logic Analyzers and DG2000-Series Data Generators. It lets you develop data generator test signals based on the data obtained with the TLA 700-Series Logic Analyzer. Since DG-LINK runs on Windows 2000, you can install the software on the TLA 700-Series Logic Analyzer. You can then connect the TLA 700-Series Logic Analyzer to a data generator through the GPIB interface. DG-LINK performs the following tasks: Loads CSV or ASCII (TLA ASCII) format data Saves data in PDA or GPIB command format Transfers the loaded data to the data generator Controls the data generator hardware setups and the output channels Directly transfers data from the TLA 700-Series Logic Analyzer to a data generator Loads data of TLA 600 / TLA 700-Series(Ver. 4.0) to a data generator Loads data of SynaptiCAD s WaveFormerPro, VeriLoggerPro and TestBencherPro (SynaptiCAD), because data format is equivalent to TLA 600 / TLA 700-Series(Ver. 4.0) DG-LINK supports the DG2000-Series Data Generators. The following configuration is required to use DG-LINK: PC with Windows 2000 installed, or a TLA 700 Series Logic Analyzer. GPIB interface card and drivers. For example, a Tektronix S3FG210 (National Instruments GPIB-PCII/IIA) GPIB package. GPIB cable. 80 MB hard disk area. 16 MB RAM.

8 Getting Started This section describes how to install the DG-LINK software onto your system. Make a copy of each of the DG-LINK diskettes before installing the software. Store the original disks in a safe place and use the copies for installation. After you are done installing the software, store the backup disks in another safe place. These installation instructions assume that you are familiar with basic Windows 2000 operations and commands. If necessary, read your Windows 2000 user documentation before installing DG-LINK. Do the following steps to install DG-LINK: 1. Power up your PC (or TLA 700-Series Logic Analyzer). 2. Insert DG-LINK Disk 1 into the floppy disk drive. 3. Double-click the My Computer icon. 4. Select the 3.5 inches FD menu item. The PC displays the contents of the floppy disk drive. 5. Double-click the Setup.exe list item. DG-LINK installation software then displays a series of setup windows. You can click OK to accept the default values, or you can change the values in any of the setup windows. You can click Back in any window to return to the previous window. a. Welcome window. Read the information and then click Next> to proceed. b. Choose Destination Location window. If you want to install the program at a different location, click Browse and choose or create a different directory. Click Next> to proceed. c. Select Program Folder window. The default name for the program folder is displayed; if you want to change the name, type in a new name or click Browse to select an existing name. d. Start Copying Files window. Click Next> to start installation. e. Insert DG-LINK Disk 2 when prompted, and click OK. In the same way, insert DG LINK Disk 3, and then click OK.
. 2. Insert DG-LINK Disk 1 into the floppy disk drive. 3. Double-click the My Computer icon. 4.")
9 Getting Started f. Setup Complete window. You will see the message that Setup has finished installing the DG-LINK program onto your computer. If you want to run the program immediately, select Yes, Launch the program file, and then click Finish. To exit the installation program without running DG-LINK, click Finish. Do not forget to remove DG-LINK Disk 3 from your disk drive. Do the following steps to create a desktop icon that you can use to run DG-LINK: 1. Move the cursor to any non-occupied desktop area,. 2. Click the right mouse button to open the desktop menu. 3. Select New and then Shortcut from the menu to open the Create Shortcut dialog box. 4. Click Refer. 5. Select the following directory folders in order (for default directory settings): Program Files, Sonytek, and Dg-link. The list box now shows the Sample folder and the Dg-link.exe file. 6. Select the Dg-link.exe file and then click Open. Dg-link.exe is displayed in the file name text box. 7. Click Next. 8. Click Finish to finish creating the desktop shortcut icon. The Dg-link.exe shortcut icon appears on the desktop. You can start the DG-LINK program by double-clicking the Dg-link.exe shortcut icon. You have completed the software installation procedure.

10 Getting Started When you complete the installation, you can start DG-LINK. However, you need the GPIB interface installed to execute a file transfer and/or remotely control the Data Generator. You have three ways to start DG-LINK. You can: Double-click the DG-LINK shortcut on the desktop Double-click the DG-LINK.exe file name in the Program Manager window Select DG-LINK from the Start Programs menu. However you start DG-LINK, the program displays its Main Control window and a startup dialog box, as shown in Figure 1 1. The startup dialog box is a reminder for you to specify a destination instrument before attempting to transfer data. To clear the startup dialog box, press the Enter key on the keyboard or click OK in the dialog box. DG-LINK closes the startup dialog box and the Main Control window is available for operations.

11 Getting Started To exit (quit) DG-LINK, click EXIT at the bottom right corner in the Main Control window. A confirmation dialog box appears to confirm your operation (see Figure 1 2). Click Exit in the dialog box to quit DG-LINK. If you do not want to quit DG-LINK, click Cancel in the dialog box. 3
. Click Exit in the dialog box to quit DG-LINK.")
12 Getting Started

13 This chapter describes DG-LINK window functions and operations. Functional overview Setting the data transfer destination instrument Loading the data from the file Controlling data display Transferring the loaded data Saving Data to a file Setting the output pattern data and the output channel

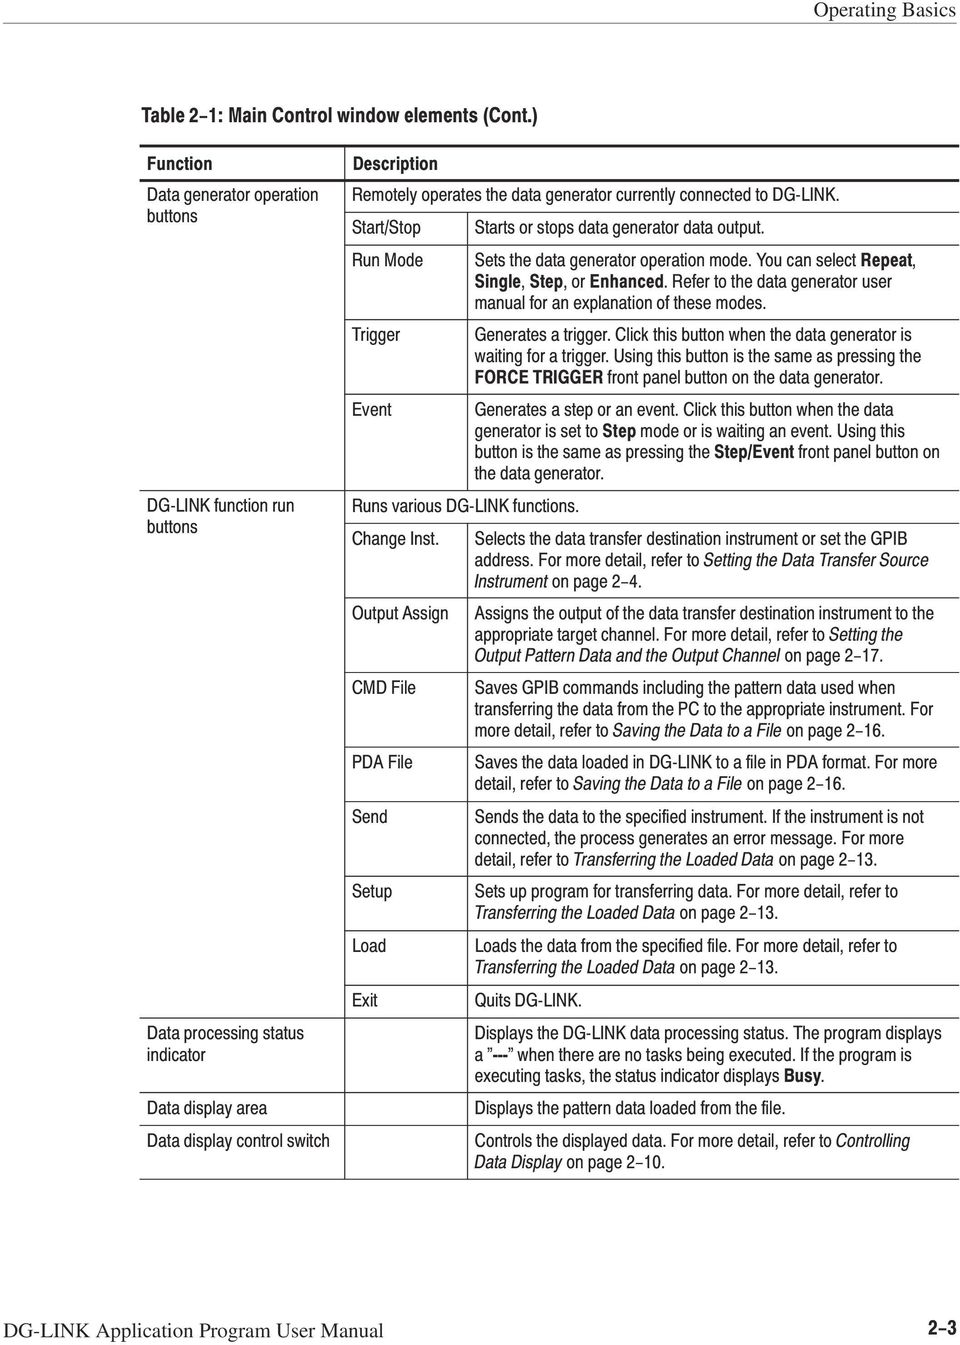
14 DG-LINK operations are done through the Main Control window. Figure 2 1 shows the Main Control window operation areas. Table 2 1 describes the Main Control window elements.

15
16 DG-LINK can control DG2000-Series Data Generators. Note that you can control only one instrument at a time. When two or more data generators are connected to the GPIB bus, you need to specify the instrument to which you are transferring data. Do the following steps to set the destination data generator: 1. Click Change Inst. at the bottom right corner in the Main Control window. The Change Instrument dialog box appears as shown in Figure 2 2. This dialog box lists the current destination data generators and their corresponding GPIB addresses. DG-LINK searches the GPIB bus for the listed instruments and updates the connected instruments list to show the data generators that are actually connected to the GPIB bus. 2. Click the Instrument box to select the instrument type (DG2000-Series or TLA 700). 3. Click on the GpibAdr box to select the GPIB address of the instrument (1 through 32).

17 4. Click CLOSE at the bottom right corner in the window. If DG-LINK can locate the instrument on the GPIB bus, the dialog box closes and you return to the Main Control window. The name of the instrument you selected here is also displayed in the Data Generator Names field at the top right corner of each of the other windows. If DG-LINK cannot locate the remote instrument, it displays the Selected Instrument Not Connected dialog box as shown in Figure 2 3. This situation can occur if the connected data generator is not turned on. Click OK if the settings are correct. Click Re-select to re-enter the instrument settings in the Change Instrument dialog box.

18 DG-LINK can load Comma Separated Value (CSV) format data created by the DG2000-Series Data Generator. DG-LINK can also load TLA-ASCII format data created by the TLA 600 / TLA 700-Series Logic Analyzer. Observe the following restrictions when loading data into DG-LINK: The maximum pattern data width is 136 bits. The length of data that you can load into DG-LINK is limited only by your available PC memory. The maximum pattern data width in each data group is 32 bits for the TLA-ASCII format. Do the following steps to load data into DG-LINK: 1. Click Load at the bottom right corner in the Main Control window. DG-LINK opens the Select Load Data Format window, as shown in Figure 2 4. Click Close to cancel this window operation and return to the previous window. 2. Click the Data Type box to select either CSV, TLA-ASCII or TLA-ASCII2(load data of SynaptiCAD). 3.

19 a. Click the CSV Skip Line box to select the number of data lines to skip from the top of the data file. Use this setting if the data file contains a non-data area (such as comment text) at the start of the data. b. Click the CSV CSV Separator box to select the data separator character used in the data file. You can select Comma, Space, or Tab.. For the CSV format, you must separate each 0 or 1 data character. For example, use the following format: 0,1,0,1,0,1.... If you omit part of the data or use more than one separator type in a data file, DG-LINK will not recognize the data. 4. click the TLA Data Type box to select the mode of data conversion. You can select BIN (binary), HEX (hexadecimal), or DEC (decimal).. The TLA-ASCII format converts data on a block-by-block basis. The mode of data conversion set here will be used for initialization of block conversion; you can change it later if the conversion has been performed in different ways for different blocks. For the TLA-ASCII format, the blocks of the data must be separated by spaces or tabs. It is recommended that tabs be used for the purpose of reducing the data processing time. 5. the TLA Data Type box is unworkable, because the file includes data type.. The TLA-ASCII2 format converts data on a block-by-block basis. The mode of data conversion set here will be used for initialization of block conversion; you can change it later if the conversion has been performed in different ways for different blocks. For the TLA-ASCII2 format, the blocks of the data must be separated by spaces or tabs. It is recommended that tabs be used for the purpose of reducing the data processing time. 6. After selecting the data type settings, click Load. DG-LINK opens the Select File dialog box as shown in Figure 2 5.

20 7. Select the data file to load. 8. Click OK. DG-LINK responds in either of two ways: a. If you loaded a CSV file, DG-LINK returns you to the Main Control window and displays the pattern data, as shown in Figure 2 6. You can click Cancel to cancel the file load and return to the previous window.

21 b. If you loaded a TLA-ASCII format file, DG-LINK displays the Set Up TLA Data Bit & Type window as shown in Figure 2 7. This window lets you set up a more detailed data display structure. The total number of data bits you set is displayed in the TotalDataBit field.. The maximum data bit width for each block (group) is 32 bits. The maximum number of data bits for all blocks combined is 136 bits. Click Analyze Data at the bottom right corner of the window. After completion of the data conversion, DG-LINK returns you to the Main Control window and displays the pattern data, as shown in Figure 2 8.
22 Each signal of the loaded data is named block name + sequence number. The latter is a sequential number beginning with the least significant bit (LSB) in each block (0, 1, 2, and so on). The name of each signal is used as the data (group) name in the Data Generator after the data transfer. You can control the display of the loaded data using the data display control switches. You can also define the range of the data to be transferred by using the data range definition cursors. Figure 2 9 shows the Main Control window display controls. The names and functions of the controls used to control data display and the functions of the range definition cursors are described in the following text.
23 If the number of loaded data bits is 12 or more, you can scroll them by clicking to move the displayed data vertically. The marker in the scroll bar shows the displayed data relative to the overall data record loaded into DG-LINK. Click to scroll the pattern data horizontally. The marker in the scroll bar shows the displayed data relative to the overall data record loaded into DG-LINK. Click to change the number of pattern data points displayed in the window. The initial value is the total number of points of the loaded data. Start and End cursors define a range of data to transfer. The default Start and End cursor locations are at the left and right ends of the display area, respectively. If you do not define a range, DG-LINK transfers data depending on the following conditions, whichever is shorter: The total number of points of the loaded data
24 The maximum number of points of data that can be loaded into the destination instrument Do the following steps to move the cursors to define a range of data: 1. Move the mouse pointer to the data display area. The pointer changes to a cross (+) cursor. 2. Move the + cursor to the left or right end in the data display area. The + cursor changes to a cursor. 3. Move the cursor to the right or left direction while holding down the mouse button. You can move either the Start or End cursor.
25 To transfer the data, first you must set the destination pattern memory to which the loaded data is to be transferred. Then, with the data number, you must specify the data to be actually transferred. When necessary, in the pattern memory of the Data Generator set the first position in which the data is to be written. Do the following steps to set pattern and transfer data: 1. Click Setup at the bottom right corner of the Main Control window. The Setup Data Transfer window in Figure 2 10 is displayed. 2. Click on the Data Index field to select the data pattern displayed. Note that this field is not displayed on the DG2030 Data Generator. 3. Click on the PatternData field to select the pattern data. 4. Click on the Load# field to select the data number of the data to be transferred. If you change the data number, the data name in the LoadName field will also change. The loaded data is listed in the LoadDataNameList field. You can scroll the data list by using the scroll bar to the right of the box.
26 5. Enter the data transfer start position in the Xfer Point field. Figure 2 11 shows the correspondence between the data generator pattern data and the data transferred. 6. Click Set at the bottom right corner in the window. The settings take effect. The settings can be initialized or the data items can be sorted in a defined order by selecting the following: Initialize - Initializes correspondence between loaded data and pattern data. Auto - Assigns the pattern data to the data number for Data 0 as the start number and the subsequent data numbers in ascending order. When the last data item is reached, the assignment returns to the first item. 7. Click CLOSE. The Setup Data Transfer window closes and you return to the Main Control window.
27 . Correspondence between the pattern data and the loaded data is made for all pattern data. This means that the data currently defined in the data generator is overlapped with the new data. Be sure to save the contents of the data generator in external media such as floppy disks if it contains important data. To transfer data, click Send at the bottom right corner of the window. If the instrument connection and the settings are correct, the data is immediately transferred.. The data currently defined in the Data Generator is overlapped with the new data by performing the data transfer. Be sure to save the contents of the Data Generator in external media such as floppy disks if it contains important data. If a problem concerning the instrument conditions or the settings is detected during data transfer, DG-LINK displays a dialog box with an error message. Table 2 2 lists the error messages and most likely cause of the message.
28 DG-LINK is capable of saving data in one of two formats: PDA and GPIB command. This section describes the differences between these formats and how to save the data in each format. The PDA format allows the data to be saved in the same format used to save data and settings to a floppy disk. You can then copy this file to a floppy disk and load the data and settings on a data generator. Do the following steps to save the data in PDA format: 1. Click PDA File at the bottom right corner in the Main Control window. A dialog box appears to select the destination file. 2. In the dialog box, select the destination file and its location. Then, click OK. The data is saved. The GPIB command format allows GPIB commands to be saved to a file. These commands include the pattern data used when transferring the data from the PC to the appropriate instrument via GPIB connection. You can load the saved data elsewhere to enable it to be transferred to the desired destination via interface such as GPIB. Do the following steps to save the data in GPIB command format: 1. Click CMD File at the bottom right corner in the Main Control window. A dialog box appears to select the file to contain the file. 2. In the dialog box, select the file and its location. Then, click OK. The data is saved. If the data length saved is shorter than the minimum data length of the appropriate instrument, DG-LINK displays the dialog box shown in Figure 2 12, regardless of the format to which you are saving.
29 The minimum data length is 64 words for the DG2020 and DG2020A, 90 words for the DG2030, and 360 words for the DG2040. If you click Continue, the data will be adjusted to meet the minimum requirements and the data will be saved. If you click Cancel data saving, the data saving will be canceled. DG-LINK enables you to set up the pattern data output channels of the destination data generator. The setting procedure is as follows: 1. Click Output Assign at the bottom right corner in the Main Control window. The Set Up Output Channel window in Figure 2 13 is displayed. If the instrument you have selected is not connected to the GPIB bus, DG-LINK displays the dialog box shown in Figure To select an instrument, click Re-select. After you move to the Change Instrument window and the setup is completed, you return to the Set Up Output Channel Data window. To quit the output channel setup mode, click Close setup.
30 2. For the DG2030 and DG2040, select the output channel by clicking on the Ch# field. For the DG2020 or DG2020A, first click on the Pod field. If you select an undefined pod, a warning dialog box will be displayed. 3. Click on the Pattern# field to select the data pattern to be output to the appropriate channel. Select None for the channel(s) not to be used for output. 4. Click Set at the bottom right corner in the window to enable the settings. If you click Initialize, the settings are reset to the initial values. 5. Click CLOSE. The Setup Channel Data window is closed, and you return to the Main Control window.
Windows XP Pro: Basics 1
 NORTHWEST MISSOURI STATE UNIVERSITY ONLINE USER S GUIDE 2004 Windows XP Pro: Basics 1 Getting on the Northwest Network Getting on the Northwest network is easy with a university-provided PC, which has
Guide to Installing BBL Crystal MIND on Windows 7
 Guide to Installing BBL Crystal MIND on Windows 7 Introduction The BBL Crystal MIND software can not be directly installed on the Microsoft Windows 7 platform, however it can be installed and run via XP
Pacesetter BES Lettering Installation Guide
 Pacesetter BES Lettering Installation Guide ii Pacesetter BES Lettering Instruction Manual Copyright Copyright 2009 Pulse Microsystems Ltd. All rights reserved. This Installation Guide is copyrighted by
How To Write Tvalue Amortization Software
 TimeValue Software Amortization Software Version 5 User s Guide s o f t w a r e User's Guide TimeValue Software Amortization Software Version 5 ii s o f t w a r e ii TValue Amortization Software, Version
BIGPOND ONLINE STORAGE USER GUIDE Issue 1.1.0-18 August 2005
 BIGPOND ONLINE STORAGE USER GUIDE Issue 1.1.0-18 August 2005 PLEASE NOTE: The contents of this publication, and any associated documentation provided to you, must not be disclosed to any third party without
Embroidery Fonts Plus ( EFP ) Tutorial Guide Version 1.0505
 Tutorial Guide Version 1.0505") Embroidery Fonts Plus ( EFP ) Tutorial Guide Version 1.0505 1 Contents Chapter 1 System Requirements.................. 3 Chapter 2 Quick Start Installation.................. 4 System Requirements................
Embroidery Fonts Plus ( EFP ) Tutorial Guide Version 1.0505 1 Contents Chapter 1 System Requirements.................. 3 Chapter 2 Quick Start Installation.................. 4 System Requirements................
Model 288B Charge Plate Graphing Software Operators Guide
 Monroe Electronics, Inc. Model 288B Charge Plate Graphing Software Operators Guide P/N 0340175 288BGraph (80207) Software V2.01 100 Housel Ave PO Box 535 Lyndonville NY 14098 1-800-821-6001 585-765-2254
Microsoft Windows 7 Ultimate 64 Bit SP1 Operating System Recovery Media for 300 GB Solid State Drives Instructions
 xx ZZZ Microsoft Windows 7 Ultimate 64 Bit SP1 Operating System Recovery Media for 300 GB Solid State Drives Instructions *P071303400* 071-3034-00 Copyright Tektronix. All rights reserved. Licensed software
Introduction 1-1 Installing FAS 500 Asset Accounting the First Time 2-1 Installing FAS 500 Asset Accounting: Upgrading from a Prior Version 3-1
 Contents 1. Introduction 1-1 Supported Operating Environments................ 1-1 System Requirements............................. 1-2 Security Requirements........................ 1-3 Installing Server
STATISTICA VERSION 10 STATISTICA ENTERPRISE SERVER INSTALLATION INSTRUCTIONS
 Notes: STATISTICA VERSION 10 STATISTICA ENTERPRISE SERVER INSTALLATION INSTRUCTIONS 1. The installation of the STATISTICA Enterprise Server entails two parts: a) a server installation, and b) workstation
MY WORLD GIS. Installation Instructions
 MY WORLD GIS Version 4.1 Installation Instructions Copyright 2007 by Northwestern University. All rights reserved. Created August 15, 2002 Last Revised April 14, 2008 2. Launching the Installer On the
File Management Utility. T u t o r i a l
 File Management Utility T u t o r i a l Contents System Requirements... 2 Preparing Files for Transfer to GlobalMark... 2 Application Launch... 2 Printer Setup... 2 Communication Status... 4 Communication
English. TI.GRAPH LINKé. FOR WINDOWSë FOR THE TI.92 Plus CONDENSED GUIDEBOOK. Texas Instruments Instructional Communications. Guidebook developed by:
 English TI.GRAPH LINKé FOR WINDOWSë FOR THE TI.92 Plus CONDENSED GUIDEBOOK Guidebook developed by: Texas Instruments Instructional Communications TI-GRAPH LINK is a trademark of Texas Instruments Incorporated.
Meridian 1 Meridian 1 Attendant PC LAN Interface Installation Guide
 Meridian 1 Meridian 1 Attendant PC LAN Interface Installation Guide Document Number: P0874391 Document Release: Standard 1.00 Date: November 1997 Year Publish FCC TM 1997 All rights reserved Printed in
32 Transferring Projects and Data
 32 Transferring Projects and Data This Chapter explains how to transfer GP-Pro EX project files to the GP and how to transfer the project files stored on the GP to your PC. Please start by reading 32.1
Important Notes for WinConnect Server ES Software Installation:
 Important Notes for WinConnect Server ES Software Installation: 1. Only Windows 8/8.1 Enterprise, Windows 8/8.1 Professional (32-bit & 64-bit) or Windows Server 2012 (64-bit) or Windows Server 2012 Foundation
SMART CONSOLE Software and Firmware Upgrade Procedure
 Smart Console Technical Document 114-01 20/04/07 SMART CONSOLE Software and Firmware Upgrade Procedure Overview Professional and Elite Series This document describes the process of upgrading both the software
AdminToys Suite. Installation & Setup Guide
 AdminToys Suite Installation & Setup Guide Copyright 2008-2009 Lovelysoft. All Rights Reserved. Information in this document is subject to change without prior notice. Certain names of program products
WA2262 Applied Data Science and Big Data Analytics Boot Camp for Business Analysts. Classroom Setup Guide. Web Age Solutions Inc.
 WA2262 Applied Data Science and Big Data Analytics Boot Camp for Business Analysts Classroom Setup Guide Web Age Solutions Inc. Copyright Web Age Solutions Inc. 1 Table of Contents Part 1 - Minimum Software
Stellar Phoenix Exchange Server Backup
 Stellar Phoenix Exchange Server Backup Version 1.0 Installation Guide Introduction This is the first release of Stellar Phoenix Exchange Server Backup tool documentation. The contents will be updated periodically
16.4.3 Lab: Data Backup and Recovery in Windows XP
 16.4.3 Lab: Data Backup and Recovery in Windows XP Introduction Print and complete this lab. In this lab, you will back up data. You will also perform a recovery of the data. Recommended Equipment The
Virtual Office Remote Installation Guide
 Virtual Office Remote Installation Guide Table of Contents VIRTUAL OFFICE REMOTE INSTALLATION GUIDE... 3 UNIVERSAL PRINTER CONFIGURATION INSTRUCTIONS... 12 CHANGING DEFAULT PRINTERS ON LOCAL SYSTEM...
SA-9600 Surface Area Software Manual
 SA-9600 Surface Area Software Manual Version 4.0 Introduction The operation and data Presentation of the SA-9600 Surface Area analyzer is performed using a Microsoft Windows based software package. The
User Guide Win7Zilla
 User Guide Win7Zilla Table of contents Section 1: Installation... 3 1.1 System Requirements... 3 1.2 Software Installation... 3 1.3 Uninstalling Win7Zilla software... 3 Section 2: Navigation... 4 2.1 Main
Kaspersky Password Manager USER GUIDE
 Kaspersky Password Manager USER GUIDE Dear User! Thank you for choosing our product. We hope that this documentation helps you in your work and provides answers you may need. Any type of reproduction or
e-dpp 4.0.2 May 2013 Quick Installation Guide Microsoft Windows 2003 Server, XP, Vista, 7 Access Database
 e-dpp 4.0.2 May 2013 Microsoft Windows 2003 Server, XP, Vista, 7 Access Database ELTECHS Engineering and Consulting Co., Ltd., Japan www.eltechs.co.jp Tel No. +81 (47) 490-1010 Fax No. +81 (47) 490-1011
Windows XP Managing Your Files
 Windows XP Managing Your Files Objective 1: Understand your computer s filing system Your computer's filing system has three basic divisions: files, folders, and drives. 1. File- everything saved on your
Xerox DocuPrint P12 Print Driver User Guide
 Xerox DocuPrint P12 Print Driver User Guide Xerox Corporation 800 Phillips Road Webster, New York 14580 1998 Xerox Corporation. Xerox, The Document Company, the stylized X, and the identifying product
Microsoft Excel v5.0 Database Functions
 Microsoft Excel v5.0 Database Functions Student Guide Simon Dupernex Aston Business School Version 1.0 1 Preface This document is an introduction to the database functions contained within the spreadsheet
OPTAC Fleet Viewer. Instruction Manual
 OPTAC Fleet Viewer Instruction Manual Stoneridge Limited Claverhouse Industrial Park Dundee DD4 9UB Help-line Telephone Number: 0870 887 9256 E-Mail: optac@stoneridge.com Document version 3.0 Part Number:
Quick Start Using DASYLab with your Measurement Computing USB device
 Quick Start Using DASYLab with your Measurement Computing USB device Thank you for purchasing a USB data acquisition device from Measurement Computing Corporation (MCC). This Quick Start document contains
OPTAC Fleet Viewer. Instruction Manual
 OPTAC Fleet Viewer Instruction Manual Stoneridge Limited Claverhouse Industrial Park Dundee DD4 9UB Help-line Telephone Number: 0870 887 9256 E-Mail: optac@stoneridge.com Document version 4.0 Part Number:
TECHNICAL BULLETIN. Configuring Wireless Settings in an i-stat 1 Wireless Analyzer
 i-stat TECHNICAL BULLETIN Configuring Wireless Settings in an i-stat 1 Wireless Analyzer Before configuring wireless settings, please enable the wireless functionality by referring to the Technical Bulletin
STATISTICA VERSION 9 STATISTICA ENTERPRISE INSTALLATION INSTRUCTIONS FOR USE WITH TERMINAL SERVER
 Notes: STATISTICA VERSION 9 STATISTICA ENTERPRISE INSTALLATION INSTRUCTIONS FOR USE WITH TERMINAL SERVER 1. These instructions focus on installation on Windows Terminal Server (WTS), but are applicable
Installing the Microsoft Network Driver Interface
 Installing the Microsoft Network Driver Interface Overview This guide explains how to install the PictureTel Live200 Microsoft Network Driver Interface (NDIS) software you have downloaded from PictureTel's
User Guide for Windows 10
 User Guide for Windows 10 System requirements E10684 First Edition July 2015 To facilitate a smoother transition from your previous operating system, read the system requirements below before upgrading
Software User's Guide
 Software User's Guide Brother QL-series The contents of this guide and the specifications of this product are subject to change without notice. Brother reserves the right to make changes without notice
TimeValue Software Due Date Tracking and Task Management Software
 User s Guide TM TimeValue Software Due Date Tracking and Task Management Software File In Time Software User s Guide Copyright TimeValue Software, Inc. (a California Corporation) 1992-2010. All rights
Legal Notes. Regarding Trademarks. 2012 KYOCERA Document Solutions Inc.
 Legal Notes Unauthorized reproduction of all or part of this guide is prohibited. The information in this guide is subject to change without notice. We cannot be held liable for any problems arising from
Getting Started on the Computer With Mouseaerobics! Windows XP
 This handout was modified from materials supplied by the Bill and Melinda Gates Foundation through a grant to the Manchester City Library. Getting Started on the Computer With Mouseaerobics! Windows XP
Navigator Software. Contents 1. NAVIGATOR SOFTWARE 2. INSTALLATION 3. USING NAVIGATOR SOFTWARE 3.1 STARTING THE PROGRAM 3.
 Navigator Software Contents 1. NAVIGATOR SOFTWARE 2. INSTALLATION 3. USING NAVIGATOR SOFTWARE 3.1 STARTING THE PROGRAM 3.2 SYSTEM SET UP 3.3 LOAD DATA FILE 3.3.1 LOADING PARTIAL FILES 3.4 DATA TABLE WINDOW
Chapter 3 Software Installation
 Software Installation Chapter 3 Software Installation This chapter provides information on how to install the CyberSerial PCI s drivers and utilities for the following operating systems: Windows 95/98
10.3.1.6 Lab - Data Backup and Recovery in Windows XP
 5.0 10.3.1.6 Lab - Data Backup and Recovery in Windows XP Introduction Print and complete this lab. In this lab, you will back up data. You will also perform a recovery of the data. Recommended Equipment
Screen Capture. User s Guide. For ClassPad Series. http://edu.casio.com. http://edu.casio.com/products/classpad/ http://edu.casio.
 For ClassPad Series E Screen Capture User s Guide CASIO Education website URL http://edu.casio.com ClassPad website URL http://edu.casio.com/products/classpad/ ClassPad register URL http://edu.casio.com/dl/
Using These Manuals. How to Use the. Software User Guide. Display examples: 1. Understanding How to Use Your Camera.
 Software User Guide For the safe use of your camera, be sure to read the Safety Precautions thoroughly before use. Types of software installed on your computer varies depending on the method of installation
Using SSH Secure Shell Client for FTP
 Using SSH Secure Shell Client for FTP The SSH Secure Shell for Workstations Windows client application features this secure file transfer protocol that s easy to use. Access the SSH Secure FTP by double-clicking
Handout: Word 2010 Tips and Shortcuts
 Word 2010: Tips and Shortcuts Table of Contents EXPORT A CUSTOMIZED QUICK ACCESS TOOLBAR... 2 IMPORT A CUSTOMIZED QUICK ACCESS TOOLBAR... 2 USE THE FORMAT PAINTER... 3 REPEAT THE LAST ACTION... 3 SHOW
KEYBOARD SHORTCUTS. Note: Keyboard shortcuts may be different for the same icon depending upon the SAP screen you are in.
 KEYBOARD SHORTCUTS Instead of an SAP icon button, you can use a keyboard shortcut. A keyboard shortcut is a key or combination of keys that you can use to access icon button functions while you are working
Deposit Direct. Getting Started Guide
 Deposit Direct Getting Started Guide Table of Contents Before You Start... 3 Installing the Deposit Direct application for use with Microsoft Windows Vista... 4 Running Programs in Microsoft Windows Vista...
Internet Explorer 7. Getting Started The Internet Explorer Window. Tabs NEW! Working with the Tab Row. Microsoft QUICK Source
 Microsoft QUICK Source Internet Explorer 7 Getting Started The Internet Explorer Window u v w x y { Using the Command Bar The Command Bar contains shortcut buttons for Internet Explorer tools. To expand
Installing S500 Power Monitor Software and LabVIEW Run-time Engine
 EigenLight S500 Power Monitor Software Manual Software Installation... 1 Installing S500 Power Monitor Software and LabVIEW Run-time Engine... 1 Install Drivers for Windows XP... 4 Install VISA run-time...
Productivity Software Features
 O P E R A T I O N S A N D P R O C E D U R E S F O R T H E P R O D U C T I V I T Y S O F T W A R E Productivity Software Features Remote CS-230 calibration and set-up on a personal computer. CS-230 calibration
Guide for Remote Control PDA
 030.0051.01.0 Guide for Remote Control PDA For Use with Bluetooth and a PC Running Windows 7 Table of Contents A. Required Parts... 3 B. PC Software Installation... 3 C. Configure PC Software... 4 D. Testing
Windows 7 Printer Driver Installation procedure
 Windows 7 Printer Driver Installation procedure This is to explain how to install Windows Vista printer driver for Mitsubishi digital printer to Windows 7. * Although CP9550D/DW is shown through this document,
Premier Installation 2013.1 Guide for SQL Server Administrators
 for Depreciation, Tracking, Planning, and Reporting Premier Installation 2013.1 Guide for SQL Server Administrators Premier Installation Guide Version 2013.1 Contents Chapter 1. Introduction Supported
Installation Instruction STATISTICA Enterprise Small Business
 Installation Instruction STATISTICA Enterprise Small Business Notes: ❶ The installation of STATISTICA Enterprise Small Business entails two parts: a) a server installation, and b) workstation installations
APBA Baseball Version 5.75 Installation and Upgrade Guide
 APBA Baseball Version 5.75 Installation and Upgrade Guide APBA Games 816 Curie Drive Alpharetta, GA 30005 http://www.apbagames.com/ Copyright 2012 APBA International, Inc. All Rights Reserved Contents
GUARD1 PLUS Mini-Attendant File Manager User's Guide Version 2.71
 GUARD1 PLUS Mini-Attendant File Manager User's Guide Version 2.71 Copyright 2002 TimeKeeping Systems, Inc. GUARD1 PLUS and THE PIPE are registered trademarks of TimeKeeping Systems, Inc. Introduction This
History of Revisions. Ordering Information
 No part of this document may be reproduced in any form or by any means without the express written consent of II Morrow Inc. II Morrow, Apollo, and Precedus are trademarks of II Morrow Inc. Windows is
Surf it Easy. User Guide
 Surf it Easy User Guide User Manual Version 1.1 2004 CoSoSys SRL Surf it Easy User Manual Table of Contents Table of Contents... I 1. Introduction... 1 2. System Requirements... 2 3. Installation... 2
Photo Loader. CASIO LCD Digital Camera Image Loading Software Macintosh version. Version 1.1. Instruction manual B K851PSM4DMX-E
 Photo Loader Version 1.1 CASIO LCD Digital Camera Image Loading Software Macintosh version Instruction manual B K851PSM4DMX-E Macintosh is a trademark of Apple Computer Inc. CompactFlash and the logo are
FAS Asset Accounting FAS CIP Accounting FAS Asset Inventory SQL Server Installation & Administration Guide Version 2011.1
 FAS Asset Accounting FAS CIP Accounting FAS Asset Inventory SQL Server Installation & Administration Guide Version 2011.1 2011 Sage Software, Inc. All rights reserved. Published by Sage 2325 Dulles Corner
Parallels Desktop for Mac
 Parallels Software International, Inc. Parallels Desktop for Mac Quick Start Guide 3.0 (c) 2005-2007 Copyright 2006-2007 by Parallels Software International, Inc. All rights reserved. Parallels and Parallels
StrikeRisk v6.0 IEC/EN 62305-2 Risk Management Software Getting Started
 StrikeRisk v6.0 IEC/EN 62305-2 Risk Management Software Getting Started Contents StrikeRisk v6.0 Introduction 1/1 1 Installing StrikeRisk System requirements Installing StrikeRisk Installation troubleshooting
STATISTICA VERSION 12 STATISTICA ENTERPRISE SMALL BUSINESS INSTALLATION INSTRUCTIONS
 STATISTICA VERSION 12 STATISTICA ENTERPRISE SMALL BUSINESS INSTALLATION INSTRUCTIONS Notes 1. The installation of STATISTICA Enterprise Small Business entails two parts: a) a server installation, and b)
DTAP3000 DTSX3000 Control Visualization Software LAS2.0 Data Conversion Guide
 User s Manual DTAP3000 DTSX3000 Control Visualization Software LAS2.0 Data Conversion Guide 1st Edition Blank Page < Introduction > i Introduction About this Manual Thank you for purchasing the DTSX3000
Handheld LPC Utility Software for Windows. Operation Manual
 Handheld LPC Utility Software for Windows MODEL S388-70 Operation Manual Read this manual carefully and understand the warnings described in this manual before operating the product. Keep this manual handy
Use Remote Desktop capabilities to Access your Work PC from home over VPN
 Use Remote Desktop capabilities to Access your Work PC from home over VPN With Remote Desktop on Windows XP Professional, you can have access to a Windows session that is running on your computer when
itunes Song Library and/or Music CD Conversion Software Installation & Operational Instructions
 itunes Song Library and/or Music CD Conversion Software Installation & Operational Instructions Copyright 2010 Southwestern Microsystems Inc. All rights reserved. Revision: B Dated: 5/22/2011 General Information
Changing Your Cameleon Server IP
 1.1 Overview Technical Note Cameleon requires that you have a static IP address defined for the server PC the Cameleon server application runs on. Even if the server PC has a static IP address, you may
AccXES Account Management Tool Administrator s Guide Version 10.0
 AccXES Account Management Tool Administrator s Guide Version 10.0 701P41531 May 2004 Trademark Acknowledgments XEROX, AccXES, The Document Company, and the identifying product names and numbers herein
VERITAS Backup Exec TM 10.0 for Windows Servers
 VERITAS Backup Exec TM 10.0 for Windows Servers Quick Installation Guide N134418 July 2004 Disclaimer The information contained in this publication is subject to change without notice. VERITAS Software
Contents. Hardware Configuration... 27 Uninstalling Shortcuts Black...29
 Contents Getting Started...1 Check your Computer meets the Minimum Requirements... 1 Ensure your Computer is Running in Normal Sized Fonts... 7 Ensure your Regional Settings are Correct... 9 Reboot your
Windows 95. 2a. Place the pointer on Programs. Move the pointer horizontally to the right into the next window.
 Word Processing Microsoft Works Windows 95 The intention of this section is to instruct basic word processing skills such as creating, editing, formatting, saving and closing a new document. Microsoft
13 Managing Devices. Your computer is an assembly of many components from different manufacturers. LESSON OBJECTIVES
 LESSON 13 Managing Devices OBJECTIVES After completing this lesson, you will be able to: 1. Open System Properties. 2. Use Device Manager. 3. Understand hardware profiles. 4. Set performance options. Estimated
Human Resources Installation Guide
 Human Resources Installation Guide Installing HR i Index Copyright 2001 Jenzabar, Inc. You may print any part or the whole of this documentation to support installations of Jenzabar software. Where the
DIGICLIENT 8.0 Remote Agent Software
 DIGICLIENT 8.0 Remote Agent Software MODEL: D17800 Series Instruction Manual English Version 1.0 Copyright 2007 Digimerge Technologies Inc Table of Contents Table of Contents About the DigiClient 8.0...
Installing LearningBay Enterprise Part 2
 Installing LearningBay Enterprise Part 2 Support Document Copyright 2012 Axiom. All Rights Reserved. Page 1 Please note that this document is one of three that details the process for installing LearningBay
Software User's Guide
 BROTHER QL-500/550/650TD/1050/1050N Software User's Guide QL-500 QL-650TD QL-550 QL-1050/1050N 1 Contents Contents....................................................................................2................................................................................4
SOS Suite Installation Guide
 SOS Suite Installation Guide rev. 8/31/2010 Contents Overview Upgrading from SOS 2009 and Older Pre-Installation Recommendations Network Installations System Requirements Preparing for Installation Installing
Important. Please read this User s Manual carefully to familiarize yourself with safe and effective usage.
 Important Please read this User s Manual carefully to familiarize yourself with safe and effective usage. The latest software and User's Manual are available for download from our site: http://www.eizo.com
Intel Rapid Storage Technology
 Intel Rapid Storage Technology User Guide August 2011 Revision 1.0 1 Document Number: XXXXXX INFORMATION IN THIS DOCUMENT IS PROVIDED IN CONNECTION WITH INTEL PRODUCTS. NO LICENSE, EXPRESS OR IMPLIED,
Microsoft Office. Mail Merge in Microsoft Word
 Microsoft Office Mail Merge in Microsoft Word TABLE OF CONTENTS Microsoft Office... 1 Mail Merge in Microsoft Word... 1 CREATE THE SMS DATAFILE FOR EXPORT... 3 Add A Label Row To The Excel File... 3 Backup
Merging Labels, Letters, and Envelopes Word 2013
 Merging Labels, Letters, and Envelopes Word 2013 Merging... 1 Types of Merges... 1 The Merging Process... 2 Labels - A Page of the Same... 2 Labels - A Blank Page... 3 Creating Custom Labels... 3 Merged
Cisco Cable DVB/DAVIC Management Program
 CHAPTER 3 This chapter describes the supplied by Cisco for configuring and monitoring the Cisco DVB CAR100. It includes the following sections: Introducing the Minimum PC Requirements for the Installing
SharpdeskTM R3.1. Installation Guide Version 3.1.01
 SharpdeskTM R3.1 Installation Guide Version 3.1.01 1 Copyright 2000-2004 by Sharp Corporation. All rights reserved. Reproduction, adaptation or translation without prior written permission is prohibited,
Installing a Westell USB Network Adapter
 Installing a Westell USB Network Adapter Before You Begin Before you begin installing your Westell USB Network adapter: 1. Make sure the computer with the USB adapter meets the minimum system requirements
F-Series Desktop User Manual F20. English - Europe/New Zealand
 F-Series Desktop User Manual F20 en English - Europe/New Zealand Contents Key to icons and text...3 What is F-Series Desktop?...4 How do I install F-Series Desktop onto my computer?...4 How do I subscribe
Software User's Guide
 PT-18R/PT-2430PC/PT-9600/ PT-9700PC/PT-9800PCN Software User's Guide The contents of this guide and the specifications of this product are subject to change without notice. Brother reserves the right to
User's Guide. Using RFDBManager. For 433 MHz / 2.4 GHz RF. Version 1.23.01
 User's Guide Using RFDBManager For 433 MHz / 2.4 GHz RF Version 1.23.01 Copyright Notice Copyright 2005 Syntech Information Company Limited. All rights reserved The software contains proprietary information
Magaya Software Installation Guide
 Magaya Software Installation Guide MAGAYA SOFTWARE INSTALLATION GUIDE INTRODUCTION Introduction This installation guide explains the system requirements for installing any Magaya software, the steps to
User Manual V1.3. NCB File Converter. @alahlincb. /alahlincb. 9 2000 1000 www.alahli.com
 User Manual V1.3 NCB File Converter @alahlincb /alahlincb 9 2000 1000 www.alahli.com The National Commercial Bank File Converter User Manual Copyright 2013 The National Commercial Bank Page 2 of 44 Table
DIRECT INTERNET DATA. User s Guide
 DIRECT INTERNET DATA User s Guide Iridium Satellite LLC Rev. 2; June 15, 2001 DIRECT INTERNET DATA ------------------------------------------------------------------------------------- TABLE OF CONTENTS
Setting Up Power POS in Windows 95/98
 Setting Up Power POS in Windows 95/98-64 - Power Pos Windows 95/98 Installation on Server or Stand-Alone PC Load the program onto the machine that will be the SERVER or the STAND ALONE PC. 1. Left click
BioWin Network Installation
 BioWin Network Installation Introduction This document outlines procedures and options for installing the network version of BioWin. There are two parts to the network version installation: 1. The installation
Chief Architect X6. Download & Installation Instructions. Chief Architect, Inc. 6500 N. Mineral Dr. Coeur d Alene, Idaho 83815 www.chiefarchitect.
 Chief Architect X6 Download & Installation Instructions Chief Architect, Inc. 6500 N. Mineral Dr. Coeur d Alene, Idaho 83815 www.chiefarchitect.com Contents Chapter 1: Installation What s Included with
CANON FAX L360 SOFTWARE MANUAL
 CANON FAX L360 SOFTWARE MANUAL Before You Begin the Installation: a Checklist 2 To ensure a smooth and successful installation, take some time before you begin to plan and prepare for the installation
Installation and initial configuration of UI View32, with PMap Server 7 and Precision Mapping Streets and Traveler 8.0 on Microsoft Vista
 Installation and initial configuration of UI View32, with PMap Server 7 and Precision Mapping Streets and Traveler 8.0 on Microsoft Vista Background: UI View is considered one of the best Automated Position
Page 1 S5.5 Monitoring Software Manual Rev 1.2 for Software Ver 1.0
 Trantec S5.5 Monitoring Software Manual Initial Setup Minimum PC Requirements 1.6 GHz CPU, 256 MB Memory, 1 available USB port, Windows XP Recommended PC >2.0 GHz CPU, 512 MB (XP) 1 GB (Vista) memory,
SYSTEM REQUIREMENTS...
 Contents INTRODUCTION... 1 BillQuick HR Setup Checklist... 2 SYSTEM REQUIREMENTS... 3 HARDWARE REQUIREMENTS... 3 SOFTWARE REQUIREMENTS... 3 Operating System Requirements... 3 Other System Requirements...