Build a kids playhouse
|
|
|
- Ashley Cox
- 9 years ago
- Views:
Transcription
1 Build a kids playhouse Build a playhouse where kids can dream away the summer! Full plans and building details included. By Dan Michie For months, I tried to draw plans for a playhouse for my grandson, Bryton, but I just couldn t get things going. Then, one Saturday morning, my good friend Marc was over for coffee. While discus?sing my woodworker s block, Marc said we should just build it now! After a quick trip to the lumberyard with my truck and trailer, we were building without any plans set down on paper. If this kind of cowboy construction isn t for you, here are proper plans and instructions that take all the guesswork out of a project that will make the little ones in your life very happy. Skill

2 Instructions A Solid Foundation and Frame Before you cut any lumber, start by clearing the ground. A flat, well-drained spot is best. I used four x vertical support posts resting on precast deck blocks set on top of 8"-deep holes filled with crushed stone for drainage. As you place these blocks according to the plans on page 3, add or remove crushed stone from beneath them so the top ends of all posts are level. Next, attach the x6 front and back rim joists to the posts using 3"-long, brown, ceramic-coated deck screws. Repeat the process for the side rim joists that sit between the front and back rim joists. With these in place, install the floor joists, fastening them to the front and back rim joists. Although it may seem unnecessary, these joists should sit on galvanized joist hangers installed on " centres. Deck screws will hold perfectly well for a while, but corrosion will make them weak enough to break. Anchor the joist hangers with corrosion-proof nails that do not extend through the x6 rim joists. With the ground-level floor frame complete, it s time to move on up. Measure " up from the top of the first-floor joists to mark the bottom of where the second-floor joists should go. If you ll be installing a plastic slide for the playhouse, as I did, double-check that it works with the second-floor height you use. Now is the time to adjust the height of the second-floor frame if your slide is different from mine. Attach the second-floor rim joists in the same way as the first-floor version, using deck screws initially, ensuring that everything is level and square. It s important to reinforce the front and back rim joints later with 3/8"-diameter x 5 /"-long, hot-dipped galvanized carriage bolts. Even a little corrosion can cause screws to shear off eventually when used outdoors, which is one reason deck screws are not permitted by code in applications involving shear forces. When it comes to installing the second-floor joists, attach them to the front and back rim joists. This arrangement makes for a clean look on the front, as the floorboards will run from side to side. Take a look at the plans and you ll see a pair of extra joists set flush against the inside faces of the x supports. These extra joists support the flooring around the posts. The rest of the floor joists are on " centres. Floored With the floors framed, now it s time to install the floorboards that cover the joists. The first-floor boards are 7" long, so if you buy ' boards, you will have no waste. As you work, install the floorboards tightly to each other, with no gaps. A gap-free floorboard assembly such as this isn t typical, but it means that small toys won t go missing, nor will small fingers get stuck between the boards. Use two screws where each floorboard meets a joist, as you would when building a deck. This setup keeps everything nice and tight. The second-floor boards are 67 /" long, which means they stop short of the side joists. Those extra joists on the inside of the xs provide enough support for the floorboard ends. The exposed ends will be covered up later by the side walls and trim. Wall It In The walls keep the second storey safe and are as simple as they come, built by stacking x6s one on top of the other, edge to edge, giving the playhouse a log-cabin look. Start with the wall at the back of the playhouse. On top of the back second-floor rim joist, install a 70 /"-long x6 wall board. Screw this piece and the ones following to the xs in the corners. Continue adding boards to the back wall in this fashion until all eight are installed. The top edge of the top board sits /" taller than the xs. The side walls are built a little differently because they don t extend all the way to the front of the playhouse. Instead, they stop partway, leaving room for the open porch. Start walling in one side by fastening a /"-long x6 to the side face of one of the back xs. At the other end of this board, toe screw the bottom edge to the side rim joist below. This joint will get strong later, as front wall boards are added. Continue by adding four more boards in the same way, each one on top of the edge of the one below. The next two levels of side wall boards must accommodate the 6"-wide windows, so they re shorter than the ones beneath. Fasten a pair of "-long x6s on each side of what will become your window opening, then span the top of this opening with the uppermost side rim joist. The other side wall is simply a mirror image of the first one.

3 With both side walls complete, add a x6 across the outside faces of the x support posts at the top, extending all the way from one post to the other. This board is the upper front rim joist, and it should be level with the top boards of the side walls, also /" taller than the x support posts. Unlike the side and back walls, the two short walls flanking the front door sit on top of the floorboards. The first board on each wall needs to be ripped /" narrower to allow for the thickness of the floor it sits on. Without this step, the joints between the front wall boards won t line up with the joints on the adjoining side walls. As you work, fasten the ends of the front wall boards to the ends of the side wall boards, capping the side wall s end-grain. The lowest front wall boards on each side of the doorway should also be anchored by screws driven up through the floorboards. As you work your way up, make allowances for any small windows you may want to install next to the door. Finish up by adding the top front wall board that ties the two side walls together. Walls with an angle The roof starts with the front and back gable ends. Build these in a similar fashion to the other walls of the playhouse, but with a triangular shape. If you have a mitre saw that s capable of cutting a shallow angle of approximately 30, count yourself lucky. If not, you ll need to cut the ends of the gable end boards with a handheld saw. Either way, plan on actually making the cuts later, after arranging all boards, with their ends still square, on the ground. Begin by laying down a 78 /"-long x6 first, then four more square-ended x6s, edge to edge. Each new gable end level is shorter than the one beneath it, so it s a good time to use some scraps. Don t worry about how ragged the arrangement looks at this stage. As long as each board is long enough to be trimmed properly at an angle later, you re fine. You should now have a step-shaped, four-board pyramid in front of you, ready to cut to final shape. Measure and mark /" up from each bottom corner of the longest bottom board. From each of these marks, you want a 30 slope to the centre of the top board. I had misplaced my protractor when I got to this step, but I had a trick up my sleeve. I merely found the centre of the bottom board (39 /" from either end if you ve cut it right), then extended this point upward to the top edge of the top board. Snap a chalkline down from this centre mark on the top board to each of the /" marks at the ends of the bottom board. Cut along the lines (with a handheld circular saw or a shallow-angle mitre saw) and you have your angle. If you re making a window in the front gable end, as I did, cut the opening now and screw the boards together at their angled ends. You can frame this opening later for strength and good looks. Build the back gable end now, the same as the front, except without the window.

4 Raising the Roof If you didn t have help with this project so far, you ll need some now to put the roof together. Before you haul those gable ends up, attach x6 soffits at right angles to the outside faces of the gable ends, flush to their top edges. Also attach the side soffits with screws to the tops of the side walls. The front and back gable ends rest on the upper front rim joist and top back wall board, respectively. When the gable ends are up, attach them to the ends of the side soffits and then add six x purlins. The uppermost pair of purlins are " down from the peak. The following pairs of purlins are spaced " on centre. Add a bit more support by attaching a x6 that overlaps the uppermost back wall board and the bottom board of the back gable end and sits on top of the back xs. I built a secret loft into this playhouse. Well, it s not exactly a secret, but only my grandson can fit into the little space that is above the front porch of the playhouse. To build the loft, secure a /"-thick x /"-wide support strip onto the front xs to support the ends of the loft floorboards. Reinforce this support with two 3/8"-diameter x 3 /"-long carriage bolts, located a foot or so in from the ends. Remember, deck screws can t be trusted for the long-term for shear loads. Next, fasten 3 5"-long x6 floorboards to the top of the front wall and the support strip. I m sure your little one will get a kick out of this loft space. I covered the roof with a product called Ondora, which fastened directly to the purlins. I also used a proprietary ridge cap to seal it all off. Windows and a door To make the playhouse look better and to strengthen the walls, I added frames around many of the window openings. All frame pieces have a /"-wide x 3/"-deep groove on their outside faces, which locks in with the surrounding wall. You should rip these grooves on long x6 boards on the tablesaw before cutting the pieces to their final lengths. You can make multiple passes with a regular blade or a single pass with a dado blade. The rectangular window s side frame members are butted between the top and bottom pieces, with everything held in place with screws driven from the inside faces of the frames into the end-grain of the wall boards. The door also gets a similar frame for its top and sides. To simplify the trim for the octagonal window in the front wall, I didn t add grooves. Instead, cut the inner trim from x6 lumber, then use "-thick x "-wide wood for the outer trim. All of these pieces get a.5 angle cut on their ends. Fasten each piece of outer trim to a piece of inner trim, positioned " in from its front edge. (I used my nailer for this work.) Once you have eight inner and outer trim pairs, you can assemble a window by sliding each piece into place.

5 Secure the frame with screws driven from inside of the wall into the outer trim pieces. For the gable end window, I went for an even simpler solution: trim ripped from a x6. For this step, I d say trim to your taste. The door is made with four?36"-long x6 fence boards. They are attached to the horizontal "-long x6s across their inside-facing top and bottom edges and are spaced /8" apart. I cut a 8 3/" x 8 3/" window near the top of the door, rounding the edges with a 3/8"-radius roundover bit. To hang the door, I used two garden-gate strap hinges. Ladder, Wall and Railing To ensure my grandson would be safe on the second floor, I added a front railing. The top edge of this T-shaped railing is made from a x6 ripped into one 3 /"-wide piece and one "-wide piece. The wider wood forms the horizontal part of the T, and the narrower part fastens underneath for the vertical part of the railing profile, inset /" from the rear edge. The top surface of the railing is best placed level with the top of the fourth wall board from the floor. Add five " x " balusters fastened with screws to the railing at the top, and more screws are driven up through the floorboards and into the bottom ends of the balusters. Depending on your particular playhouse design, you may want to add railings at the sides, as I did. To hide the end-grain ends at the wall corners, I added trim. Make sure to mitre the trim at the back wall to match the angle of the soffits. I also hid the second-storey floorboard ends. Cover the x posts on the first floor with x6s butted together and add two x6s to cover the outer sides of each x support post on the second floor. With the trim on, it s time to build the ladder. The stringers are 77" long and the treads are 8" long, with an 8" rise between each one. You may have to adjust the length of your ladder, depending on the slope of your lawn. I built mine by routing angled dados on the inside faces of the stringers to accept the ends of the treads. Fasten the stringers to treads with three deck screws per joint, then attach the ladder to the post trim and a baluster with carriage bolts. The optional climbing wall uses x6s for its support legs and 5/ boards for the surface. The whole thing measures 30" wide x 66" long. The climbing blocks are made from offcuts of wood with routered edges for hand- and footholds. Attach the climbing wall to one of the second-floor rim joists with carriage bolts. To provide your little ones with more help getting up this wall, drill a hole in the vertical part of the railing, then knot a rope through it that trails down the climbing wall. I finished everything with a cedar-coloured stain before attaching any extras, such as handles and a steering wheel.

6 I must admit I wasn t surprised that my grandson took to the playhouse. What little boy or girl wouldn t want one of these? It s the ultimate place to play and dream away the summer.

7 Tools and Materials Part Material Size (T x W x L*) All parts made of SPF lumber. **Some parts trimmed to accommodate windows. ***Total length required Support Posts 3 /" x 3 /" x 8' Front/Back rim joists /" x 5 /" x 70 /" Side rim joists /" x 5 /" x 67 /" Floor joists /" x 5 /" x 67 /" First floor boards 5/ x 5 /" x 7" Second floor boards 5/ x 5 /" x 67 /" Back wall boards /" x 5 /" x 70 /" Long side wall boards /" x 5 /" x /" Short side wall boards /" x 5 /" x 8" Bottom front wall boards /" x /" x " Front wall boards /" x 5 /" x " Top front wall board /" x 5 /" x 67 /" Bottom gable end boards /" x 5 /" x 78 /" Gable end boards /" x 5 /" x 6' *** Side soffits /" x 5 /" x 67 /" Front/back soffits /" x 5 /" x 5" Purlins /" x 3 /" x 67 /" Back support strip /" x 5 /" x 60 /" Front support strip /" x /" x 67 /" Loft floor boards /" x 5 /" x 5" Side Window rails /" x 3 /" x 6" Side window stiles /" x 3 /" x 9 /" Front window rails /" x 3 /" x 8 3/8" Front window stiles /" x 3 /" x 8 /" Octagonal window frame /" x 5 /" x /" Octagonal window trim " x " x 5 /" Door frame rail /" x 5 /" x 5" Door frame stiles /" x 5 /" x 36 /" Door boards 3/" x 5 /" x 36" Door boards support 3/" x 5 /" x " Front railing top /" x 3 /" x 60 /" Front railing bottom /" x " x 60 /" Balusters " x " x 8" Side railings tops /" x 3 /" x 0 /" Side railings bottoms /" x " x 0 /" Second floor trim / x /" x 8" Back-wall corner trim 5/8" x 5" x 56" Side-wall corner trim (rear) 5/8" x 5/8" x 9 /" Front-wall corner trim 5/8" x 5/8" x 37" Side-wall corner trim front 5/8" x " x 37" First-floor post trim /" x 5 /" x 39 3/" Second-floor post trim /" x 5 /" x 38 /" Ladder stringers /" x 5 /" x 77" Ladder treads /" x 5 /" x 8" Climbing wall supports /" x 5 /" x 66" Climbing wall boards 3/" x 5 /" x 30" Climbing blocks Other Material Slide Roofing Deck blocks Rope 8'-long Qty ** vari es 7 sq. ft.

8 * Length indicates grain direction

9 Plan

10
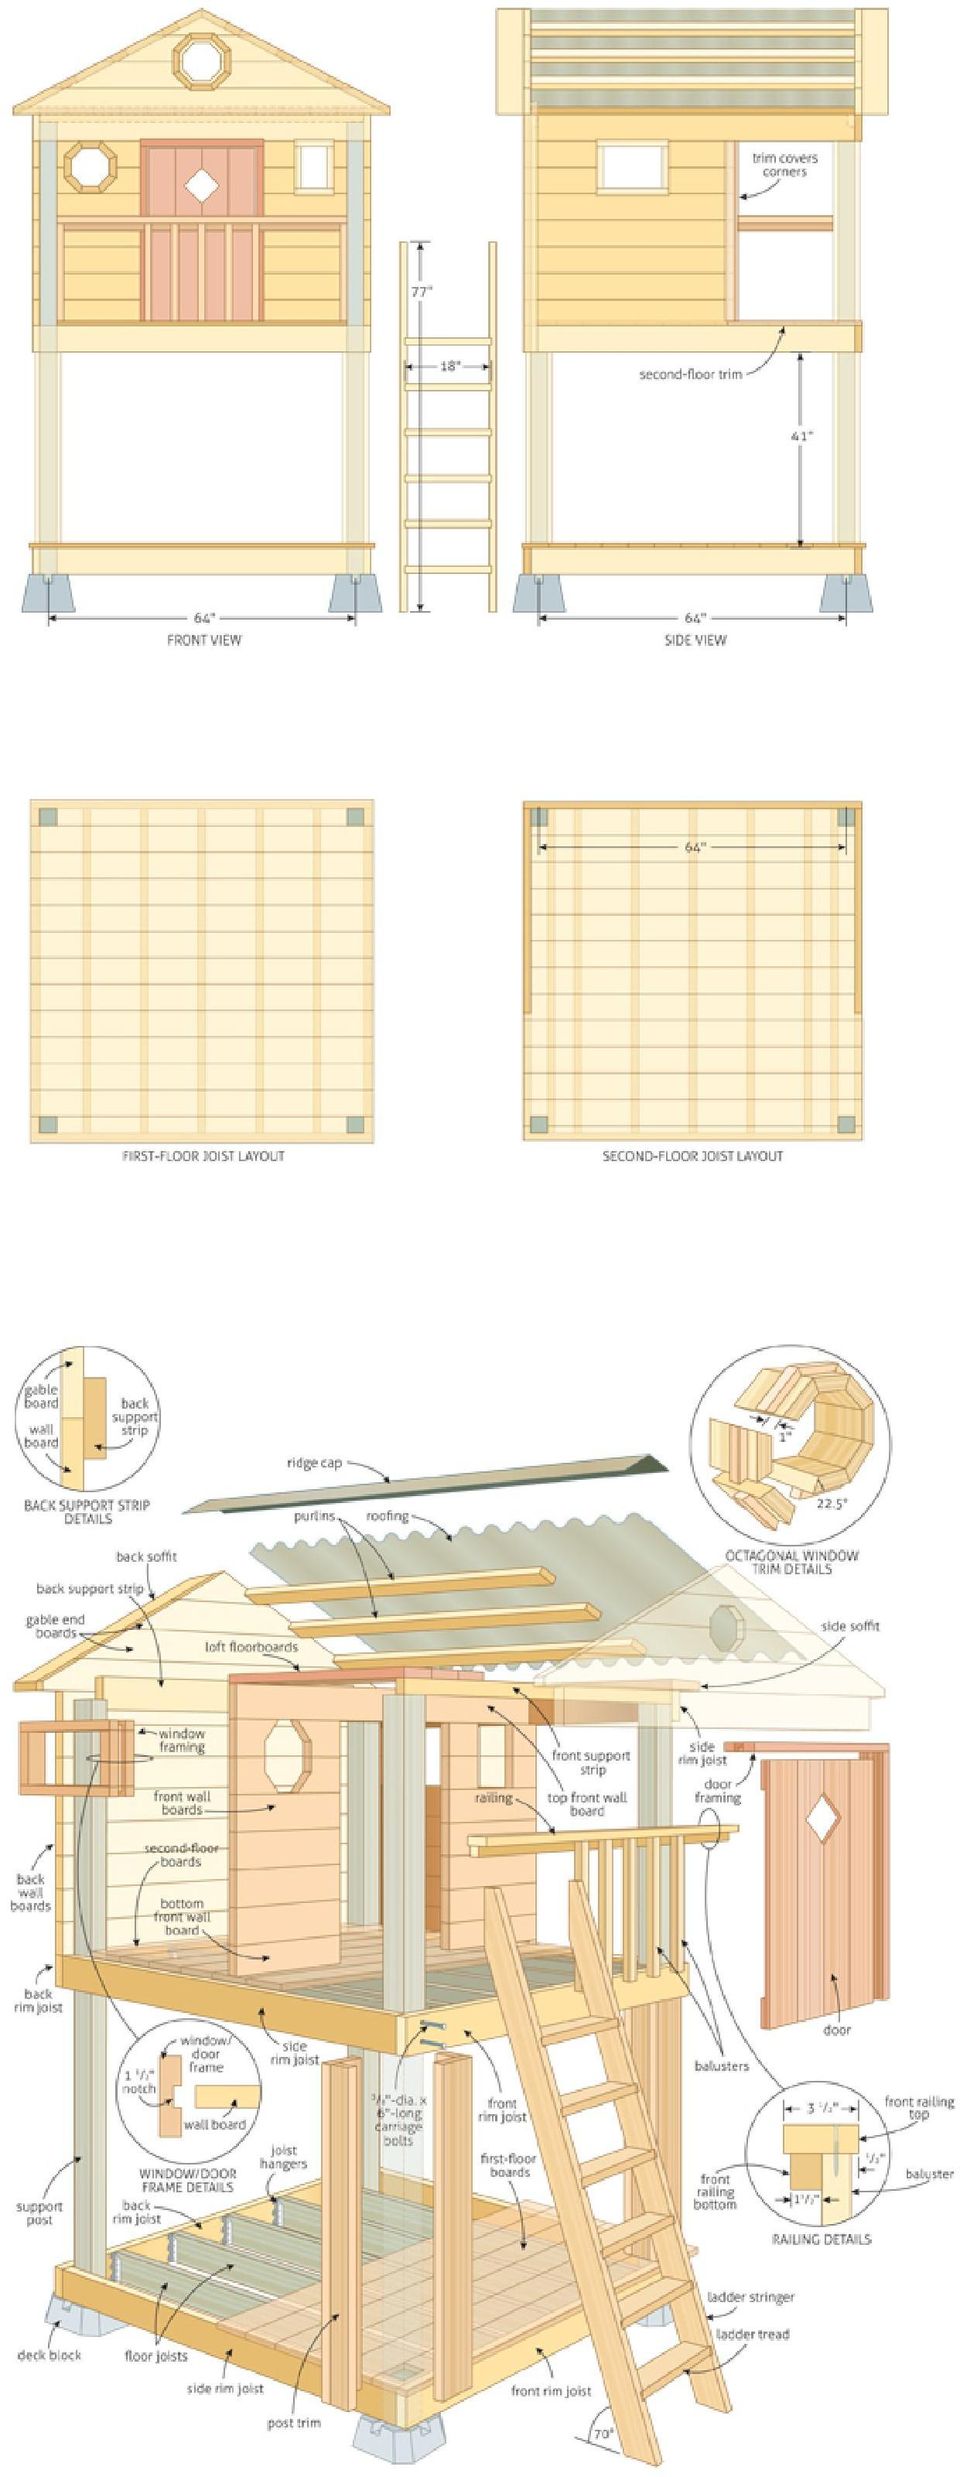
11 Illustration by Len Churchill

SUPER SHED. Indoor shelter for your outdoor tools.
 SUPER SHED Indoor shelter for your outdoor tools. Not everyone needs a garden shed. But, if you've no more space on your garage wall for that new leaf rake, if you can't find your potting trowel because
Free 12 x 8 Shed Plan With Illustrations, Blueprints & Step By Step Details
 Free 12 x 8 Shed Plan With Illustrations, Blueprints & Step By Step Details Brought To You By: MyShedPlans Click Here To Download 12,000 Shed Plans >> 12 x 8 Basic Shed This 8 12-ft. shed features a simple
Cedar Cottage Doghouse Plans
 Overlapping cedar shingles add an element of charm to this medium size doghouse. The walls, floor, and trim are constructed of solid cedar, making it naturally weather resistant and provides excellent
AMERICAN GOTHIC PLAYHOUSE
 AMERICAN GOTHIC PLAYHOUSE Project Plan #856 Sheet 1 of 5 Pick a spot and get started with the beautiful that your kids will love. The design of the playhouse includes 35 square feet of interior space plus
A Simple Approach to Raised-Panel
 A Simple Approach to Raised-Panel 82 FINE HOMEBUILDING Wainscot BY GARY STRIEGLER Stock molding and MDF panels transform a room 1 2 3 4 3 5 6 Raised-panel wainscot speaks of a time when craftsmen had an
BUILD A CARPORT. 2 - Planning the carport. 3 - Designing the carport
 BUILD A CARPORT You only need basic DIY and woodworking skills to build a carport. The most important part of the job is setting the supporting posts truly vertical - a job for which another pair of hands
Best Barns USA Assembly Book
 Best Barns USA Assembly Book Revised November 27, 2013 the Easton - R 12'x 20' Manufactured by Reynolds Building Systems, Inc. 205 Arlington Drive Greenville, PA 16125 724-646-3775 This manual is copyrighted.
SHELVES. www.tedswoodworking.com
 SHELVES It's rare that bookshelves look as interesting as the objects you display on them. After all, how much can you decorate the edges of your shelves and sides? This unit is unusual because the shelves
TREX SELECT RAILING. Installation Instructions 1 800 BUY TREX PARTS G * I ** H *
 TREX SELECT RAILING NOTE: All Trex Select Railing lengths are manufactured at ON CENTER dimensions (spanning from center of each post): 67-5/8" (76.8 cm) for 6' (.83 m) on center, and 9-5/8" (35.3 cm)
Ceiling Mounted Folding Attic Ladders Installation Instructions
 Ceiling Mounted Folding Attic Ladders Installation Instructions WARNING Before you start installing your new Louisville Ceiling Mounted Folding Attic Ladder, you must read and understand the following:
Ladder Shelf Plans Final dimensions: 25 L x 21 W x 72 H
 Ladder Shelf Plans Final dimensions: 25 L x 21 W x 72 H Copyright 2011. MLCS Woodworking. Page 1 Router bits and supplies needed: 3/8 Rabbeting bit (#10691) 1 Bottom Cleaning bit (#7941) Top and Bottom
How to Install UnderDeck The Original.
 How to Install UnderDeck The Original. TOOLS: Chalk Line Caulk Gun Garden hose or water bucket Gloves Hammer or Screw Gun Power Mitre Saw with OSB Blade Pencil Pliers Safety Glasses Straight Edge / Carpenter
KITCHENS. Tip PAGE 1 FITTING YOUR KITCHEN GUIDE. How to mark out a kitchen. Tools required for installing a kitchen STEP ONE STEP TWO STEP THREE
 FITTING YOUR KITCHEN GUIDE How to mark out a kitchen PAGE 1 Before starting on the installation, measure 870mm from the lowest point of the floor and mark a datum line around the room to indicate where
COMPLIMENTARY WOODWORKING PLAN
 COMPLIMENTARY WOODWORKING PLAN Adirondack Chair This downloadable plan is copyrighted. Please do not share or redistribute this plan in any way. It has been created for Wilton Tools, a division of WMH
TREX SELECT RAILING Installation Instructions
 TREX SELECT RAILING NOTE: All Trex Select Railing lengths are manufactured at ON CENTER dimensions (spanning from center of each post): 67-5/8" (76.8 cm) for 6' (.83 m) on center, and 9-5/8" (35.3 cm)
Chapter 10 - Scaffolding Systems
 Chapter 10 - Scaffolding Systems Contents Chapter 10 - Scaffolding Systems... 10-1 Check and Oil the Pump Jacks... 10-4 Set Pump Jack Brackets... Error! Bookmark not defined. Set Pump Jack Poles... 10-5
Unlike a porch, which is protected by a roof,
 Rehabbing a Rotted 34 Professional Deck Builder January/February 2013 Porch Stair A template helps to fit the bottom tread neatly around the posts by Emanuel Silva Unlike a porch, which is protected by
How to Build a Poker Table
 How to Build a Poker Table www.pokertablematerials.com 10-Person Poker Table- 96 x 48 These are step by step instructions for building a poker table. The table will measure 48" x 96" and have a 4" wide
AZEK Rail Install Guide
 TRIM MOULDING DECK PORCH RAIL PAVERS AZEK Rail Install Guide Installing AZEK Rail with CableRail by Feeney... 1 Installing CableRail by Feeney for AZEK Rail... 7 Installing AZEK Rail Stairs with CableRail
Gate Leg Drop Leaf Table Plans
 Preparing the table top blanks: Cut and glue enough 3/4 stock to make three panels 40 long by 24 wide (they will be cut to final size at a later time). While the glue dries we will work on the legs. Preparing
HfHMD uses LP SmartSide siding and trim.
 HfHMD uses LP SmartSide siding and trim. These products are: More durable than cement fiber board. Much more volunteer-friendly to install. When installed correctly, have a 5/50- year pro-rated warranty.
PANELIZED HOME INSTALLATION GUIDELINE
 PANELIZED HOME INSTALLATION GUIDELINE A typical home package will be constructed of Snap-N-Lock Insulated Panels clad with steel skins. 4" panels will be used for the walls, and 6" panels for the roof.
Installing Window and Door Mouldings
 Installing Window and Door Mouldings About Window and Door Mouldings The trim around windows and doors greatly influences the look and style of your interior. They also bridge the gaps and cover spaces
Protecting Your Home From Hurricane Wind Damage
 T H E W I N D Protecting Your Home From Hurricane Wind Damage During a hurricane, homes may be damaged or destroyed by high winds and high waves. Debris can break windows and doors, allowing high winds
8/18/14. Introduction to. Framing. Terminology and Concepts
 8/18/14 Introduction to Framing Terminology and Concepts Terminology: Framing Level Two points on exactly the same horizontal plane. Square Intersecting lines or faces that form an exact 90 angle. Plumb
How to Build Your Own CornHole Game
 How to Build Your Own CornHole Game DIMENSIONS Here is a diagram with the basic measurements for the Cornhole board game. SUPPLIES 1/2 thick sheet of plywood one 4 x4 or two 2 x4 s 8 long 2 4 s (4) 4 1/2
Wren Kitchens Installation Tips... 3. Carefully check your kitchen delivery... 4. Measuring out and marking up... 5. Fitting the base cabinets...
 tra 1 Index Wren Kitchens Installation Tips... 3 Carefully check your kitchen delivery... 4 Measuring out and marking up... 5 Fitting the base cabinets... 6 Fitting the corner cabinets... 7 The 972mm or
Children s Furniture Projects
 This is an excerpt from the book Children s Furniture Projects by Jeff Miller Copyright 2002 by The Taunton Press www.taunton.com CHILD S ROCKER KIDS ARE ALWAYS IN MOTION. It s not easy to get them even
DIY CABINET REFACING INSTALLATION GUIDE
 DIY CABINET REFACING INSTALLATION GUIDE CABINET REFACING INSTALLATION Are you ready to reface your outdated cabinets? This guide will show you how to install your new Facelifters Cabinet Refacing Products
Hive Top Ventilation Shims
 Hive Top Ventilation Shims When preparing your bee hives for the winter, it is very important to provide for ventilation at the top of the hive. Through out the winter, the bees are expelling a lot of
SAMPLE INSTRUCTIONS. Best Barns USA Assembly Book. the Denver. 12'x 12' or 12'x16' Revised November 29, 2010
 Best Barns USA Assembly Book Revised November 29, 2010 SAMPLE INSTRUCTIONS the Denver 12'x 12' or 12'x16' Manufactured by Reynolds Building Systems, Inc. 205 Arlington Drive Greenville, PA 16125 724-646-3775
Happily PHOTOGRAPHY BY MICHAEL ANDERSON AND LARRY OKREND
 Ever Happily Rafter 18 HANDY APRIL/MAY 2012 PHOTOGRAPHY BY MICHAEL ANDERSON AND LARRY OKREND An easy-tobuild hip roof makes this gazebo a doable project for any DIYer BY JENNY STANLEY Figuring out precise
PANEL CONCEPTS LLLP.
 The Small Cottage Company DO-IT-YOURSELF CABINS & COTTAGES PANEL CONCEPTS INC. PANEL CONCEPTS LLLP. 2826 Gold 331 Creek N. M-33, Road Mio, Gold Michigan Creek, Montana 4864759733 (989) 826-6511 (406) 288-8585
Protecting Your Home from Wind Damage
 Protecting Your Home from Wind Damage During severe thunderstorms or hurricanes, homes may be damaged or destroyed by high winds. Debris flying through the air can break windows and doors, allowing high
Wood Projects Outdoors. Post Hole Specifications. Deck Span Tables. www.jon Eakes.com
 Wood Projects Outdoors Post Hole Specifications & Deck Span Tables www.jon Eakes.com Building Fences The depth of the fence posts into the ground must be at least one foot below the frost level for your
www.cornholesupplies.com
 www.cornholesupplies.com How To Build Regulation Cornhole Boards Home of the Original Cornhole Bags and Boards Supply List: 1-4' X 8' Piece of Plywood (pre sanded) 4-2" X 4" X 8' Studs (2 by 4s make sure
Installation Instructions
 Installation Instructions Issued: March 10, 2004 GeoDeck Deck and Railing System (ICC-ES Legacy Report No. 21 71, former BOCA Report No. 21 71) Design and Installation Manual Congratulations! You have
Taking Wainscot Up Stairs
 Taking Wainscot Up Stairs raised MDF panels and stock moldings bring this elegant trim detail to the rest of the house BY GARY STRIEGLER I credit a lot of the success of my business to the trimwork we
The tablesaw may be your shop s most valuable cutting. Crosscut Sleds. Foolproof. Innovative approach guarantees perfect results
 Foolproof Crosscut Sleds Innovative approach guarantees perfect results B Y A L A N T U R N E R The tablesaw may be your shop s most valuable cutting tool, but for precise, repeatable crosscuts it needs
DECKING INSTALLATION, CARE & MAINTENANCE INSTRUCTIONS. 866.729.2378 MOISTURESHIELD.COM limited lifetime warranty 866.729.2378 WWW.MOISTURESHIELD.
 DECKING INSTALLATION, CARE & MAINTENANCE INSTRUCTIONS 866.729.2378 MOISTURESHIELD.COM limited lifetime warranty Welcome To The Even Greater Outdoors. Congratulations on choosing MoistureShield for your
Router Table Plans. www.bobsplans.com
 www.bobsplans.com Router Table Plans Increase the capabilities of your router with this weekend project. Features a sliding fence with EZ-Mount clamps. These clamps are simple to make and grip tightly
KITCHEN INSTALLATION GUIDE
 KITCHEN INSTALLATION GUIDE The step-by-step guide to installing your new kitchen right The materials and tools you ll need This brochure is your guide to preparing and installing your new kitchen. Inside
These instructions will show you how to install an internal door into a non-loadbearing partition wall. The instructions are split into three parts.
 No 8 in the series of 'How to' brochures produced by PlaceMakers, New Zealand How to Frame and Hang a Door These instructions will show you how to install an internal door into a non-loadbearing partition
HOW TO INSTALL A BEAUTIFUL NEW KITCHEN
 HOW TO INSTALL A BEAUTIFUL NEW KITCHEN Easy to follow step-by-step kitchen cabinet installation TOOL AND MATERIAL LIST Hammer Pry bar Screwdriver Phillips Flathead Level Tape measure Pencil Straight edge
Retrofitting an Insulated Cold Roof
 Retrofitting an Insulated Cold Roof As a metal-roofing contractor in the Upper Peninsula of Michigan, I am frequently asked to fix roof leaks that have less to do with roofing than with the way poorly
Build Your Own Workbench:
 Build Your Own Workbench: Home-built design beats store-bought hands-down I f you re interested in building self-reliance skills, a solid workbench is key to growing your capabilities. In fact, it s even
How to build a Pizza Oven in 4 days
 How to build a Pizza Oven in 4 days Preparation day (slab) 1. Foundation 1500 deep x 1300 wide x 75mm deep Required 20 bags cement pre mix. If you already have a concrete base, you save this prep day DAY
RadianceRail Installation Guide
 RadianceRail Installation Guide Installing RadianceRail with CableRail by Feeney... 2 Installing CableRail by Feeney for RadianceRail... 7 Installing RadianceRail Stairs with CableRail by Feeney... 10
BUILD A TABLETOP LOOM
 BUILD A TABLETOP LOOM From 1" x 2" stock (actual 3/4" x 1"1/2) cut: 4 pieces 15" long 4 pieces 5"1/2 long Use the above to make 2 frames for the front and back of the loom. From 1" x 4" stock (actual 3/4"
WHI 90-Minute Rated Veneered Door Frame Installation Instructions
 No. 940-03-10 INSTALLATION INSTRUCTIONS 90 MINUTE RATED VENEERED DOOR FRAME DOOR REQUIREMENTS: Consult the door manufacturer to make sure that the doors are qualified for the hardware to be installed,
Build a Trade-Show Booth for Under $200!
 Build a Trade-Show Booth for Under $200! This corner booth, with a seven foot front and sweeping 4x8 backdrop, assembles in less than 20 minutes and can be built in one weekend. Materials Tools 4 x8 x3/4
Installation Manual for STANDING SEAM ROOFING
 Installation Manual for STANDING SEAM ROOFING Absolute Steel Toll Free 877-833-3237 / Phone 480-768-1618 / Fax 480-768-1514 www.metalroofingsource.com Standing Seam features approximately one-inch high
Stair Parts Installation. Tricks
 Stair Parts Installation Tips & Tricks Introduction Your DIY staircase guide Welcome to the Stairpart home installation guide. Your stairway is both a functional and focal point in your home, so keeping
Chapter 6 ROOF-CEILING SYSTEMS
 Chapter 6 ROOF-CEILING SYSTEMS Woodframe roof-ceiling systems are the focus of this chapter. Cold-formed steel framing for a roof-ceiling system also is permitted by the IRC but will not be discussed;
MGB Chrome Bumper Conversion
 MGB Chrome Bumper Conversion Installation Instructions For 1974 1/2-1980 MGB This kit requires cutting, welding, and painting. Professional installation recommended. Note: Every MGB body is slightly different
Chapter 3 Installing Over-the-Post Railing on an L-Shaped Stair
 49 Chapter 3 Installing Over-the-Post Railing on an L-Shaped Stair In this chapter: The Over-the-Post Balustrade System Determining the Rail Centerline Using Rail Bolts Making a Pitch Block Laying Out
READ THE INSTRUCTIONS SEVERAL TIMES BEFORE STARTING ASSEMBLY
 1954-87 CHEV BED INSTRUCTIONS (Revised Nov 2002) Thank you and congratulations on your purchase of the finest Street Rod Pickup Bed on the market today. The following instructions should help you assemble
The Hive Bodies. In the Beekeeper s Work Shop. Building a Bee Hive: The Hive Bodies. by Stephen E. Tilmann
 The Hive Bodies In the Beekeeper s Work Shop The hive body is the heart of a managed bee hive colony (Figure 1). It is where the queen lays her eggs, the house bees raise the brood and the workers store
THE TRIMLINE 10' x 20' CANOPY
 THE TRIMLINE 10' x 20' CANOPY Instructions for Assembly Please, assemble the TrimLine at home the first time, not at an event. Before beginning assembly of your TrimLine, please take time to review the
POST AND FRAME STRUCTURES (Pole Barns)
") POST AND FRAME STRUCTURES (Pole Barns) Post and frame structures. The following requirements serve as minimum standards for post and frame structures within all of the following structural limitations:
POST AND FRAME STRUCTURES (Pole Barns) Post and frame structures. The following requirements serve as minimum standards for post and frame structures within all of the following structural limitations:
How to secure your property after a disaster
 How to secure your property after a disaster The Red Guide to Recovery HOuse secured properly Board-Up of Windows, Doors and Roof Hole. Lot secured with Perimeter Fencing. Fires, floods, tornadoes, hurricanes,
Responsibilities of a Volunteer Leader
 Responsibilities of a Volunteer Leader Inspecting tools for safe conditions. Removing unsafe tools from use and immediately notifying site supervisor. Teaching safe tool use to volunteers on your crew.
Assembly Instructions Basic Folding-Leg Box Frame Style
 Assembly Instructions Basic Folding-Leg Box Frame Style Basic Folding Leg Cornhole Board Concept 1 2 12 3 1 2 3 15 16 4 1 4 52 9 R1 3 4 6 21 48 12 1 4 Bolt Washer 9 13 16 35 Washer Double Nut CornholePlayers.net
Owner's Manual & Assembly Instructions
 Owner's Manual & Assembly Instructions PM01 BASE KIT Model No. FDN1014 717090311 CAUTION: SOME PARTS HAVE SHARP EDGES. CARE MUST BE TAKEN WHEN HANDLING THE VARIOUS PIECES TO AVOID A MISHAP. FOR SAFETY
VERSARAIL ALUMINUM STAIR RAILING INSTALLATION INSTRUCTIONS. Owner's Manual. Version. www.barretteoutdoorliving.com. Models
 Models VERSARAIL ALUMINUM STAIR RAILING 73013153 INSTALLATION INSTRUCTIONS 73013154 73013155 73013156 Owner's Manual Version 1.0 VERSASTAIR_BOM V1 3/2012 www.barretteoutdoorliving.com VERSARAIL ALUMINUM
How to Install Hardwood Flooring Over a Sub Floor
 How to Install Hardwood Flooring Over a Sub Floor Installation Preparation Instructions Read the entire instructions before starting your project. 1) INSPECT EACH PLANK (see fig. a) Wood is a natural product
CHARISMA SHOWER/TUB DOOR INSTALLATION INSTRUCTIONS
 CHARISMA SHOWER/TUB DOOR INSTALLATION INSTRUCTIONS IMPORTANT DreamLine reserves the right to alter, modify or redesign products at any time without prior notice. For the latest up-to-date technical drawings,
Chapter 3 Pre-Installation, Foundations and Piers
 Chapter 3 Pre-Installation, Foundations and Piers 3-1 Pre-Installation Establishes the minimum requirements for the siting, design, materials, access, and installation of manufactured dwellings, accessory
RECLINE IN THE SUMMERTIME Get comfortable on the patio or deck with this sturdy reclining lounge chair
 RECLINE IN THE SUMMERTIME Get comfortable on the patio or deck with this sturdy reclining lounge chair As early as the eighth century B.C., the Greeks used a piece of furniture called the kline, for lounging
INSTALLATION INSTRUCTIONS for Premium Pocket Windows (JII022) IMPoRtaNt INFoRMatIoN & glossary. safety & HaNdlINg
 IMPoRtaNt INFoRMatIoN & glossary. safety & HaNdlINg") Thank you for selecting JeLd-weN products. Attached are JeLd-weN s recommended installation instructions for pocket (replacement) double-hung, casement, awning, picture or transom windows, designed to
Thank you for selecting JeLd-weN products. Attached are JeLd-weN s recommended installation instructions for pocket (replacement) double-hung, casement, awning, picture or transom windows, designed to
Easy Six Cube Bookshelf. Copyrighted Material. Page 1
 Compare to: Land of Nod Cube Collection, 6 Cube Bookshelf Skill Level: Beginner Easy Six Cube Bookshelf I love the storage cubes in kids rooms because they give you an opportunity to have your children
majestic install ation guide barcelona three sided enclosure 24mm surface mounted wall channels and underframe to base
 majestic install ation guide barcelona three sided enclosure 24mm surface mounted wall channels and underframe to base These Instructions are for a left and right handed unit. The diagrams show a left
PUMP JACK SYSTEM AND ACCESSORIES
 Pump Jack Model # 2200 A low cost, easy to operate, safe, portable scaffolding built of rugged steel. It's perfect for shingling, siding, sheathing, insulating, painting, building, roofing, home repair
Residential Decks. Planning and Development Services Department
 Building Safety Division 8500 Santa Fe Drive Overland Park, KS 66212 (913) 895-6225 Fax (913) 895-5016 Email: [email protected] Planning and Development Services Department Residential Decks
STAIR TREAD & RISER INSTALLATION GUIDELINES
 STAIR TREAD & RISER INSTALLATION GUIDELINES ARTISTIC FINISHES DOES NOT WARRANTY THE COMPLETENESS OR ACCURACY OF ANY INSTALLATION. THE INSTALLATION CONTRACTER MUST HAVE THE EXPERIENCE AND KNOWLEDGE TO COMPLETE
Screw Patterns Roof & Walls 403-279-2766 TR-36 MD-36 TSM-32. PBR-Panel
 Screw Patterns Roof & Walls Overlap Underlap ¾ 9 TR-36 36 5/8 6 MD-36 36 ½ 8 TSM-32 32 1¼ 12 PBR-Panel 36 Bottom Edge Screw Pattern apply to every profile except for MD36 (1 screw beside every rib) High
glass & Glazing Products
 glass & Glazing Products WallMaker Create an unlimited variety of bright, beautiful and secure interior environments with the easy-to-install Stylmark WallMaker glass wall system. This versatile system
Handicap Ramp. Design and Construction. Guidelines
 Handicap Ramp Design and Construction Guidelines January 2015 Created June 2006 Rev 10/30/2007 Rev 11/6/2010 Rev 10/5/2012 Rev 1/31/2015 Rockwell Collins Retiree Volunteers RCRV and Wheelchair Ramp Assistance
The WANZ Guide to Window Installation
 The WANZ Guide to Window Installation as described in E2/AS1 Amendment 5 Ver. 1.1 Page 2 of 74 Contents Overview Page 5 Objective Page 5 Scope Page 5 Opening Preparation Page 7 Step P1 Preliminary Check
MODEL# SLA001-3 "SLIDE & LOCK" A-FRAME POOL LADDER
 MODEL# SLA001-3 "SLIDE & LOCK" A-FRAME POOL LADDER IMPORTANT INSTRUCTIONS: : Read all instructions carefully & completely to become familiar with parts, assembly, safety and proper use of this product.
FRONT WINDSHIELD SEAL INSTALLATION
 FRONT WINDSHIELD SEAL INSTALLATION Tech Article From Newsletter 16.1-1st Quarter of 2010 Replacing your Front Windshield Seal ISN T AS HARD AS YOU MAY THINK! Recently, we retooled our front window seal
Go-kart for little race-drivers
 Go-kart for little race-drivers Drill and drive. Go-kart What it lacks in speed, it more than makes up for in fun: the go-kart will excite little race-drivers. 1 Introduction It s only a go-kart, but it
Window Installation Instructions
 Caution The correct installation methods of windows in full frame or insert applications is critical towards achieving the tested performance of the window and longterm enjoyment and energy savings for
HOW-TO LAY HARDBOARD OR PLYWOOD FLOOR OVERLAY
 HOW-TO HOW-TO LAY HARDBOARD OR PLYWOOD FLOOR OVERLAY Most floor coverings, if laid over uneven wooden floors, will wear unevenly and look unsightly. The answer is to cover the old boards with hardboard
BUILDINGA 1/10 SCALE FLATBED TRAILER
 VOLUME 1, ISSUE 1 BUILDINGA 1/10 SCALE FLATBED TRAILER BUILT, DESIGNED & WRITTEN BY NATHAN MYERS MATERIALS: FEATURES: While the design was kept simple to allow anyone to be able to build their own trailer,
2&3 SECTION LOFT LADDER
 TWIST CATCH ASSEMBLY A4 A2 A1 A3 A7 A6 A5 2&3 SECTION LOFT LADDER Images feature the 3 section loft ladder, but the same instructions apply to both 2 & 3 section ladders Installation and Operating Instructions
Custom Cabinets. A Faster, Easier Approach to. Create desks, bookcases, pantries, and more with a slick hybrid design
 Create desks, bookcases, pantries, and more with a slick hybrid design and problemsolving pocketscrew joinery BY MIKE MAINES A Faster, Easier Approach to Custom Cabinets When designed and constructed properly,
REDWOOD. Adirondack Chair. Naturally beautiful Easy to use Practical and economical Durable and stable Resistant to decay and insects
 B U I L D I T W I T H REDWOOD Adirondack Chair R E D W O O D Naturally beautiful Easy to use Practical and economical Durable and stable Resistant to decay and insects Adirondack Chair BUILD THE CHAIR
DIRECTIONS FOR ASSEMBLING BASE & WALL CABINETS
 DIRECTIONS FOR ASSEMBLING BASE & WALL CABINETS TheRTAStore.com STEP 1: CLEAR A WORK SPACE Place your RTA cabinet panels on a smooth, scratch resistant surface in a large, open area. (Some people like to
March 14, 2007. Installation of Bay, Bow and Garden Windows
 March 14, 2007 Re: Installation of Bay, Bow and Garden Windows Attached are the Atrium Companies, Inc recommendation for the installation of bay, bow and garden windows. These instructions were developed
INSTALLATION MANUAL For Grand Rib-3 / Multi Purpose / & Classic Rib Roofing Panels
 INSTALLATION MANUAL For Grand Rib-3 / Multi Purpose / & Classic Rib Roofing Panels Grand Rib-3 / Multi-Purpose / Classic Rib Grand Rib-3 / Multi-Purpose / & Classic Rib Grand Rib 3 panels are a strong,
BUTTERFLY SHOWER DOOR INSTALLATION INSTRUCTIONS
 BUTTERFLY SHOWER DOOR INSTALLATION INSTRUCTIONS IMPORTANT DreamLine reserves the right to alter, modify or redesign products at any time without prior notice. For the latest up-to-date technical drawings,
Brick Veneer Construction
 Brick Veneer Construction Check list of suggested tools & support items Claw hammer Tape measure 3/4" [19 or 20] Wood chisel Wood or plastic shims Pry bar Utility knife Caulking and caulking gun Power
Residential Deck Safety, Construction, and Repair
 Juneau Permit Center, 4 th Floor Marine View Center, (907)586-0770 This handout is designed to help you build your deck to comply with the 2006 International Residential Building code as modified by the
2.9 WINDOW & DOOR BUCKS
 2.9 WINDOW & DOOR BUCKS Bucks provide attachment surfaces for windows and doors while holding back concrete from these openings during concrete placement. Mark the center and edges of openings as you place
Balance Beam Plans. Copyright 2007 Ben MacLeod Email: [email protected] Website: www.betterplans.net
 Balance Beam Plans Copyright 2007 Ben MacLeod Email: [email protected] Website: www.betterplans.net Balance Beam Plans By Ben MacLeod Copyright 2007 Tools required: -Mitre saw, circular saw, jig saw,
STEADYfast Stabilizer Installation Notes Fifth Wheel and Travel Trailers 11/23/13
 STEADYfast Stabilizer Installation Notes Fifth Wheel and Travel Trailers 11/23/13 (See Supplemental Instructions for trailers with heavy duty round footplates and/or Power Leveling Systems) PHONE SUPPORT
Picnic Table Plans. Made out of a single sheet of plywood, it s also portable! By Kevin Ayer. This children's picnic table would
 Picnic Table Plans Made out of a single sheet of plywood, it s also portable! By Kevin Ayer Materials One 4- by 8-foot sheet of 3 4-inch AC plywood Twelve 11 4-inch wood screws Primer and exterior paint