RECLINE IN THE SUMMERTIME Get comfortable on the patio or deck with this sturdy reclining lounge chair
|
|
|
- Brett Newton
- 8 years ago
- Views:
Transcription
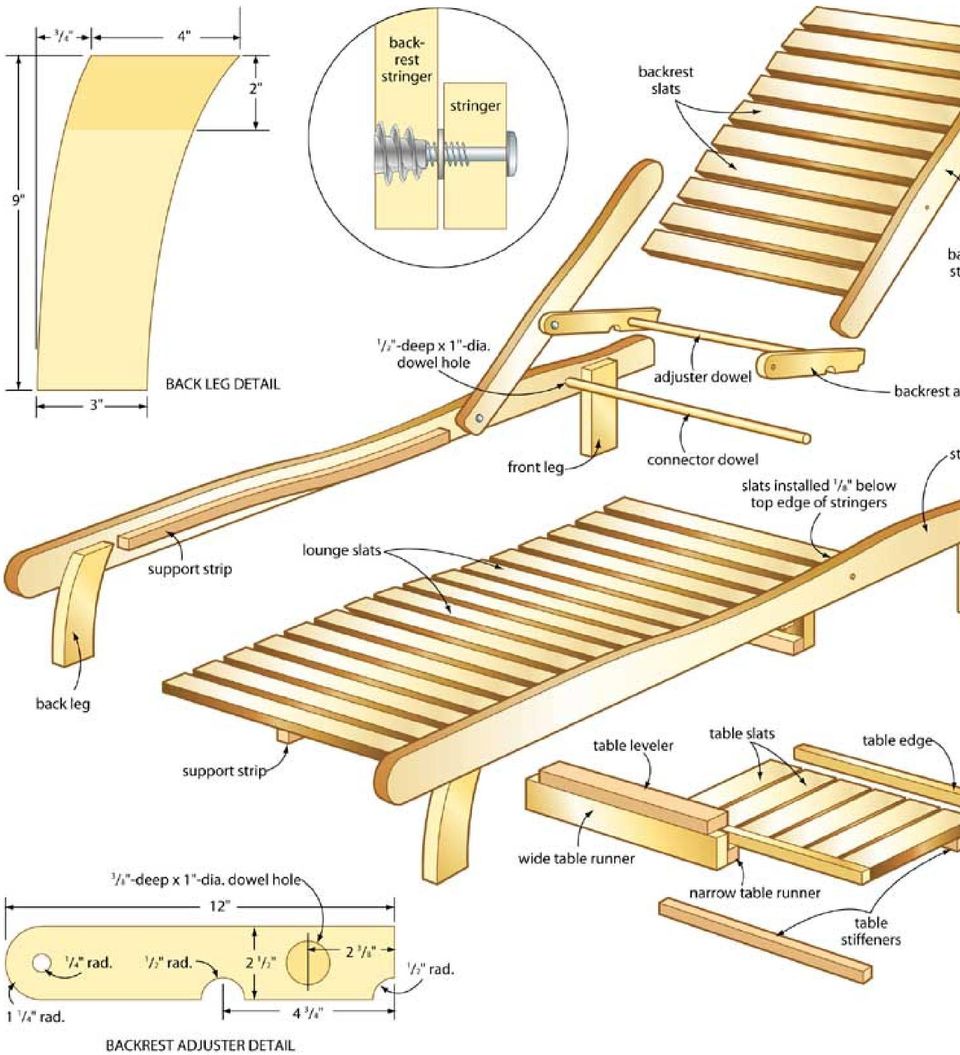
1 RECLINE IN THE SUMMERTIME Get comfortable on the patio or deck with this sturdy reclining lounge chair As early as the eighth century B.C., the Greeks used a piece of furniture called the kline, for lounging during meals instead of sitting on a chair. The kline was also used at social gatherings involving wine, music and conversation, the same things we enjoy when relaxing outdoors in Canadian summers. The 19th century produced a European version of the kline, the chaise lounge, which is, in turn, the predecessor of this lounger. Today you ll find the lounge chair in prominent use around pools, on decks, at the cottage or on the topsides of luxury ocean liners. This project aims to enhance the lazy summer day s experience of a cool drink and a good book. And better yet, although this simple, elegant design is long on history, it s short on construction time. Begin by preparing the parts you ll need, beginning with a template for the stringers. A piece of scrap 1/4" plywood or even heavy cardboard measuring 4" x 78" will do the trick. Draw the profile for the stringers on You can adjust the incline of the lounger s back by moving the prop from one notch to the next. Or flatten the chair for summertime snoozing. The side table holds your book and refreshments this material, including an optional freehand undulation behind the seat back and where your hips will rest on the lounge. Once you are satisfied with the profile of your template, trace it onto two pieces of wood, then cut them out with a bandsaw or jigsaw. With both stringers cut, clamp or screw them together so you can sand both at the same time to identical profiles. I used a belt sander with an 80- grit abrasive for this job. Tip the machine forward a bit so the front roller gets into any curved areas of your stringers. If you screw the stringers together where the leg bolt holes will go later, you ll avoid making unnecessary marks on the wood. When you re done, separate the stringers and lay them out so they re at the ready on your workbench. Using the top end of your plywood stringer template, transfer the shape to the wood you roughed-out for the backrest stringers. Saw these, then sand the edges as you did with the main stringers. At this point you can cut, sand and finish all pieces on the materials list. This not only saves time, but glue squeeze-out won t stain your project as it would bare wood. Next, lay out the slats for the lounge surface. I used a piece of 1/2" ply as a spacer between slats to make sure the spacing was consistent. Once you re satisfied with this positioning, mark where the centre of each slat will join with the main stringers. These marks indicate where you ll plunge slots for the #10 biscuits that secure the slats. These biscuits work together with 5/8" x 5/8" support strips fastened to the inside of the stringers with screws to support the weight of people using the lounge. Add these later. You will need: For the lounge surface Size Qty. Stringers 1 3/8" x 3 1/2" x 75" 2 Support strips 5/8" x 5/8" x 37" 2

2 Backrest stringers 1 3/8" x 3 1/2" x 32" 2 Back legs 1 3/8" x 3 1/2" x 9" 2 Front legs 1 3/8" x 5" x 9" 2 Lounge slats 3/4" x 2 1/2" x 22" 16 Backrest slats 3/4" x 2 1/2" x 19" 10 Wide table runners 5/8" x 1 3/8" x 25" 2 Narrow table runners 5/8" x 5/8" x 25" 2 Table slats 5/8" x 2 1/2" x 14" 5 Table edges 5/8" x 5/8" x 14" 2 Table stiffeners 5/8" x 5/8" x 12" 2 Table levelers 3/8" x 1 1/4" x 22" 2 Adjusters 3/4" x 2 1/2" x 12" 2 Adjuster dowel 1" dia. x 20"* 1 Connector dowel 1" dia. x 23"* 1 Hardware Leg and backrest bolts/inserts 5/16" x 3" 10 Adjuster bolts/inserts 5/16" x 2" 2 Adjuster dowel screws #6 x 1 1/2" 2 Table runner screws #8 x 2 1/2" 4 *Custom-cut dowel length to fit your lounge RECLINE IN THE SUMMERTIME (part 2) Next, drill all holes for the leg bolts and dowels. The plans show where the parts go. I used a Forstner bit for this job because it cuts such clean edges, although you could use a sharp brad-point bit instead. You can now cut the dowel that fits between the main stringers to length. Set the slats between the stringers so you can measure the required dowel length exactly. The pull-out beverage tray is stabilized by levelling strips (above). The back of the lounge chair reclines at various angles, thanks to notches in the backrest adjuster (below). This project was made entirely with Douglas fir

3 Fasten the legs to the stringers with 5/16"-dia. x 3" connecting bolts that thread into metal inserts set into the wood. Install the threaded inserts, test-fit the legs, then set them aside. Now it s time for glue. I used a weatherproof glue for securing the slats, beginning with those on one stringer first. Set them in place with biscuits, then use your 1/2" plywood block to check and adjust spacing. Adjust the slats so they re all square to one stringer, then let everything dry before repeating the process with the other stringer. You ll find that this second side takes a bit of patience, since the slats you put in want to wiggle out as you work on the others. I fixed this problem with a loose pipe clamp installed across the stringers at one end of the frame. Tighten it slowly as you add slats and things should go well. It also helps to keep a scrap of wood underneath the slats, so they don t fall down if their biscuits happen to pull away from the wood. Once all the slats are loosely in place, persuade the one-inch dowel into place between the stringers as a final assembly step. Clamp the lounge along its length when all pieces are in position, checking again for spacing and check for square before allowing the glue to dry. The plans show the added support strip required underneath the slats along each stringer. If you ve made your stringers curved, custom-cut the support strip to match this shape using the stringer template as a guide. Duplicating the assembly process with the backrest will be a snap after the practice you ve had. When it s dry, bolt the completed backrest to the lounge stringers, as shown in the plans. With the main part of the project finished, fasten the legs. Next comes the adjustable backrest prop assembly. Fasten the two adjuster pieces to either side of the backrest using two-inch bolts and washers. The plans show how the washers act as spacers, ensuring that the backrest adjusters operate freely. With these parts in place, measure the distance between them and cut a length of dowel to go between the parts. Be sure the adjusting unit is square to the backrest, then secure the dowel with glue and one #6 x 1 1/2" screw at each end. Now it s time to move on to the sliding table. Make up the two L-shaped runner assemblies using the wide and narrow table runner parts. The table surface itself is made using the same method as the lounge, with slats connected to edge pieces. I used glue and a brad nail gun shooting 1 1/2" fasteners to attach the table edges and stiffeners to the table slats. When the table is ready, clamp the L-shaped runners to the underside of the lounge, then slip the table in place. When you re happy with the sliding action, mark the rail positions and remove the assembly. You ll need to attach the leveler pieces to the runners before securing the assembly to the lounge. These allow the table to pull out without tipping forward. Place the levelers 1 1/2" back from the runner ends so they sit just inside the stringers. Whether you re at home next to the barbeque, at the cottage or eating peeled grapes while discussing Plato, you ll enjoy the fruits of CLICK THESE THUMBNAILS FOR LARGER IMAGES

4 your labour relaxing on your own version of the kline lounger.

5
Children s Furniture Projects
 This is an excerpt from the book Children s Furniture Projects by Jeff Miller Copyright 2002 by The Taunton Press www.taunton.com CHILD S ROCKER KIDS ARE ALWAYS IN MOTION. It s not easy to get them even
How to Build Your Own CornHole Game
 How to Build Your Own CornHole Game DIMENSIONS Here is a diagram with the basic measurements for the Cornhole board game. SUPPLIES 1/2 thick sheet of plywood one 4 x4 or two 2 x4 s 8 long 2 4 s (4) 4 1/2
www.cornholesupplies.com
 www.cornholesupplies.com How To Build Regulation Cornhole Boards Home of the Original Cornhole Bags and Boards Supply List: 1-4' X 8' Piece of Plywood (pre sanded) 4-2" X 4" X 8' Studs (2 by 4s make sure
COMPLIMENTARY WOODWORKING PLAN
 COMPLIMENTARY WOODWORKING PLAN Adirondack Chair This downloadable plan is copyrighted. Please do not share or redistribute this plan in any way. It has been created for Wilton Tools, a division of WMH
How to Build a Poker Table
 How to Build a Poker Table www.pokertablematerials.com 10-Person Poker Table- 96 x 48 These are step by step instructions for building a poker table. The table will measure 48" x 96" and have a 4" wide
Assembly Instructions Basic Folding-Leg Box Frame Style
 Assembly Instructions Basic Folding-Leg Box Frame Style Basic Folding Leg Cornhole Board Concept 1 2 12 3 1 2 3 15 16 4 1 4 52 9 R1 3 4 6 21 48 12 1 4 Bolt Washer 9 13 16 35 Washer Double Nut CornholePlayers.net
Picnic Table Plans. Made out of a single sheet of plywood, it s also portable! By Kevin Ayer. This children's picnic table would
 Picnic Table Plans Made out of a single sheet of plywood, it s also portable! By Kevin Ayer Materials One 4- by 8-foot sheet of 3 4-inch AC plywood Twelve 11 4-inch wood screws Primer and exterior paint
Gate Leg Drop Leaf Table Plans
 Preparing the table top blanks: Cut and glue enough 3/4 stock to make three panels 40 long by 24 wide (they will be cut to final size at a later time). While the glue dries we will work on the legs. Preparing
MGB Chrome Bumper Conversion
 MGB Chrome Bumper Conversion Installation Instructions For 1974 1/2-1980 MGB This kit requires cutting, welding, and painting. Professional installation recommended. Note: Every MGB body is slightly different
Cedar Cottage Doghouse Plans
 Overlapping cedar shingles add an element of charm to this medium size doghouse. The walls, floor, and trim are constructed of solid cedar, making it naturally weather resistant and provides excellent
BUILD A TABLETOP LOOM
 BUILD A TABLETOP LOOM From 1" x 2" stock (actual 3/4" x 1"1/2) cut: 4 pieces 15" long 4 pieces 5"1/2 long Use the above to make 2 frames for the front and back of the loom. From 1" x 4" stock (actual 3/4"
Go-kart for little race-drivers
 Go-kart for little race-drivers Drill and drive. Go-kart What it lacks in speed, it more than makes up for in fun: the go-kart will excite little race-drivers. 1 Introduction It s only a go-kart, but it
Vinyl Brick Mould Field Installation Instructions All Vinyl and Vinyl Clad Windows
 Vinyl Brick Mould Field Installation Instructions All Vinyl and Vinyl Clad Windows Viewed from the exterior. IMPORTANT: Please read before you begin installation. TABLE OF CONTENTS AND TOOL / MATERIAL
UPLIFT Height Adjustable Standing Desk (T-Frame) DIRECTIONS FOR ASSEMBLY AND USE - - ALSO - - Watch our assembly video
 DIRECTIONS FOR ASSEMBLY AND USE - - ALSO - - Watch our assembly video") UPLIFT Height Adjustable Standing Desk (T-Frame) DIRECTIONS FOR ASSEMBLY AND USE - - ALSO - - Watch our assembly video http://bit.ly/9ywwh! CAUTION MAKE SURE NO OBSTACLES ARE IN THE DESK S PATH AND ALL
UPLIFT Height Adjustable Standing Desk (T-Frame) DIRECTIONS FOR ASSEMBLY AND USE - - ALSO - - Watch our assembly video http://bit.ly/9ywwh! CAUTION MAKE SURE NO OBSTACLES ARE IN THE DESK S PATH AND ALL
The JIG is UP Or A couple hours up front pays in the long run.
 Ed Simon Page 1 of 5 The JIG is UP Or A couple hours up front pays in the long run. A large part of the fun of beekeeping is the construction and assembly of the equipment. Since it is a hobby, I decided
Router Table Plans. www.bobsplans.com
 www.bobsplans.com Router Table Plans Increase the capabilities of your router with this weekend project. Features a sliding fence with EZ-Mount clamps. These clamps are simple to make and grip tightly
Hive Top Ventilation Shims
 Hive Top Ventilation Shims When preparing your bee hives for the winter, it is very important to provide for ventilation at the top of the hive. Through out the winter, the bees are expelling a lot of
SHOP NOTES METAL SHAPER FOR YOUR SHOP
 SHOP NOTES METAL SHAPER FOR YOUR SHOP A METAL SHAPER is indispensable for certain machining operations where flat surfaces must be produced within very close limits, such as machining flats on castings,
Home Storage Projects
 This is an excerpt from the book Home Storage Projects by Paul Anthony Copyright 2001 by The Taunton Press www.taunton.com KITCHEN WORK STATION IN MANY KITCHENS, counter space is at a premium. There just
VERSARAIL ALUMINUM STAIR RAILING INSTALLATION INSTRUCTIONS. Owner's Manual. Version. www.barretteoutdoorliving.com. Models
 Models VERSARAIL ALUMINUM STAIR RAILING 73013153 INSTALLATION INSTRUCTIONS 73013154 73013155 73013156 Owner's Manual Version 1.0 VERSASTAIR_BOM V1 3/2012 www.barretteoutdoorliving.com VERSARAIL ALUMINUM
Ladder Shelf Plans Final dimensions: 25 L x 21 W x 72 H
 Ladder Shelf Plans Final dimensions: 25 L x 21 W x 72 H Copyright 2011. MLCS Woodworking. Page 1 Router bits and supplies needed: 3/8 Rabbeting bit (#10691) 1 Bottom Cleaning bit (#7941) Top and Bottom
PROJECT PLAN. Stackable shelves
 PROJECT PLAN Stackable shelves This article originally appeared in The Family Handyman magazine. For subscription information, visit www.familyhandyman.com Please note that pages that appeared in the magazine
30 minutes in class, 2 hours to make the first time
 Asking questions and defining problems Developing and using models Planning and carrying out investigations 30 minutes in class, 2 hours to make the first time 3 12 x 24 x ¾ inch plywood boards 1 x 12
SHELVES. www.tedswoodworking.com
 SHELVES It's rare that bookshelves look as interesting as the objects you display on them. After all, how much can you decorate the edges of your shelves and sides? This unit is unusual because the shelves
Easy Six Cube Bookshelf. Copyrighted Material. Page 1
 Compare to: Land of Nod Cube Collection, 6 Cube Bookshelf Skill Level: Beginner Easy Six Cube Bookshelf I love the storage cubes in kids rooms because they give you an opportunity to have your children
DIY CABINET REFACING INSTALLATION GUIDE
 DIY CABINET REFACING INSTALLATION GUIDE CABINET REFACING INSTALLATION Are you ready to reface your outdated cabinets? This guide will show you how to install your new Facelifters Cabinet Refacing Products
The tablesaw may be your shop s most valuable cutting. Crosscut Sleds. Foolproof. Innovative approach guarantees perfect results
 Foolproof Crosscut Sleds Innovative approach guarantees perfect results B Y A L A N T U R N E R The tablesaw may be your shop s most valuable cutting tool, but for precise, repeatable crosscuts it needs
Stair Parts Installation. Tricks
 Stair Parts Installation Tips & Tricks Introduction Your DIY staircase guide Welcome to the Stairpart home installation guide. Your stairway is both a functional and focal point in your home, so keeping
IN00419 (rev A) Aqua 6 Glide Quadrant and Off-set Quadrant Enclosure
 Aqua 6 Glide Quadrant and Off-set Quadrant Enclosure") IN00419 (rev A) Aqua 6 Glide Quadrant and Off-set Quadrant Enclosure Instruction suitable for both Quadrant & Off-set Quadrant variations. Instruction suitable for both Right and Left Hand fixing variations
IN00419 (rev A) Aqua 6 Glide Quadrant and Off-set Quadrant Enclosure Instruction suitable for both Quadrant & Off-set Quadrant variations. Instruction suitable for both Right and Left Hand fixing variations
Happily PHOTOGRAPHY BY MICHAEL ANDERSON AND LARRY OKREND
 Ever Happily Rafter 18 HANDY APRIL/MAY 2012 PHOTOGRAPHY BY MICHAEL ANDERSON AND LARRY OKREND An easy-tobuild hip roof makes this gazebo a doable project for any DIYer BY JENNY STANLEY Figuring out precise
Wine Rack & Glass Storage Bench Chris Gardner
 Wine Rack & Glass Storage Bench Chris Gardner Quantity Length Width Material Part 2 48 16 3/4 birch plywood top, bottom 2 14 16 3/4 birch plywood sides 2 14 13 3/4 birch plywood support dividers 2 3 15
Building an Off-Center Fixture for Turning Pendants
 Building an Off-Center Fixture for Turning Pendants Turning a pendant off-center with most available metal pendant chucks means that you will have a significant amount of mass off center, which will limit
3/4 PIPE CLAMP WITH STAND
 3/4 PIPE CLAMP WITH STAND Model 94053 ASSEMBLY AND OPERATING INSTRUCTIONS (3/4 DIAMETER PIPE NOT INCLUDED.) 3491 Mission Oaks Blvd., Camarillo, CA 93011 Visit our Web site at: http://www.harborfreight.com
Black Wolf POCKET BILLIARD TABLE INSTALLATION MANUAL. SERVICE DEPARTMENT P.O. BOX 68 BRISTOL, WI 53104
 Black Wolf TM POCKET BILLIARD TABLE INSTALLATION MANUAL www.brunswickbilliards.com SERVICE DEPARTMENT P.O. BOX 68 BRISTOL, WI 53104 51-905710-000 SEPTEMBER 2010 NOTE: Please use the instructions in this
Panel/Hand Saw Kit Assembly Instructions
 Panel/Hand Saw Kit Assembly Instructions PLEASE READ THE FOLLOWING INSTRUCTIONS BEFORE BEGINNING Brief Summary You will be performing the following Tasks: 1. Determining the degree of shaping laying out
Installation Instructions
 READ BEFORE INSTALLING UNIT For Through-the-Wall Air Conditioners To avoid risk of personal injury, property damage, or product damage due to the weight of this device and sharp edges that may be exposed:
Repairing the Seam of the WaterRower Tank
 Repairing the Seam of the WaterRower Tank The following instructions are for repairing a WaterRower that is leaking water around the seam, the 1 overlap between the top and bottom halves of the tank. While
Beer Complet. Project from www.craftsmanspace.com
 Beer Complet Project: Beer Complet Page 1 of 57 Carefully make the items by following the measurements given on particular pictures. The measurements are given in millimeters, while the measurements given
Congratulations on your new IKEA Kitchen, and on the money you saved!
 Congratulations on your new IKEA Kitchen, and on the money you saved! INSTALLATION GUIDE FOR YOUR AKURUM KITCHEN Seven steps to a brand new kitchen It s time to discover another major advantage of investing
Seismic Installation for Attic Storage System
 Your Performance Partner Seismic Installation for Storage System CONTENTS SSafety Precautions................................. 2 Required Tools..................................... 2 Parts and Fastener
AstroSystems Digital Setting Circles for Zhumell, GSO, Apertura and Astro-Tech
 AstroSystems Digital Setting Circles for Zhumell, GSO, Apertura and Astro-Tech Components 1 Sky Commander Digital Setting Circle Computer 2 Encoders 10,000 step 1 Sky Commander Digital Setting Circle Manual
Part #20195 WORKBENCH BRACKET SYSTEM INSTRUCTIONS
 Part #20195 WORKNH RKT SYSTM INSTRUTIONS The astwood Workbench rackets are fabricated from 3/16" thick, high strength steel and are designed to be used with wood or steel legs and framing members. Precision
Beautifully Traditional
 Arcade 800mm Single Sliding Door Quadrant - nickel Arcade 900mm Single Sliding Door Quadrant - nickel ARC48 ARC49 INSTALLATION INSTRUCTIONS A www.arcadebathrooms.com IMPORTANT - Please read before installation
How To Launch A Rocket From A Formica
 Building the Basic Bottle Rocket Launch Pad Materials: -Formica double-sink countertop cutout. This can be easily and cheaply obtained from a local company that manufactures and/or installs countertops.
Balance Beam Plans. Copyright 2007 Ben MacLeod Email: sales@betterplans.net Website: www.betterplans.net
 Balance Beam Plans Copyright 2007 Ben MacLeod Email: sales@betterplans.net Website: www.betterplans.net Balance Beam Plans By Ben MacLeod Copyright 2007 Tools required: -Mitre saw, circular saw, jig saw,
Chapter 3 Installing Over-the-Post Railing on an L-Shaped Stair
 49 Chapter 3 Installing Over-the-Post Railing on an L-Shaped Stair In this chapter: The Over-the-Post Balustrade System Determining the Rail Centerline Using Rail Bolts Making a Pitch Block Laying Out
It's large enough to handle most welding job shop projects, yet small enough to make it a worth while home-workshop tool
 It's large enough to handle most welding job shop projects, yet small enough to make it a worth while home-workshop tool H Craft Print Project No. 272 ERE'S a metal bender that will enable you to bend
Installing the Video Input and TV Tuner Cards in a Compact Computer or a Dual PCI-Slot Tower Computer
 Installing the Video Input and TV Tuner Cards in a Compact Computer or a Dual PCI-Slot Tower Computer This booklet describes how to install the video input and TV tuner cards in a compact Macintosh computer
Installation Instructions
 READ BEFORE INSTALLING UNIT For Slider Casement Air Conditioners To avoid risk of personal injury, property damage, or product damage due to the weight of this device and sharp edges that may be exposed:
Chelsea Loft Bed WARNING:
 Chelsea Loft Bed WARNING: Failure to follow these warnings and assembly instructions could result in serious injury or death. Read all instructions before assembling bunk bed. KEEP INSTRUCTIONS FOR FUTURE
Modular Locomotive System Instruction Manual for HBK8 George Body Kit
 Modular Locomotive System Instruction Manual for HBK8 George Body Kit Roundhouse Engineering Co. Ltd. Units 6-10 Churchill Business Park. Churchill Road, Wheatley. Doncaster. DN1 2TF. England. Tel. 01302
Garage Workbench Plans
 www.bobsplans.com Garage Workbench Plans Every home woodworker knows the importance of making efficient use of the available space in his or her shop. This workbench is designed to provide the maximum
Pole Lathe and Shave Horse Design
 Pole Lathe and Shave Horse Design These pictures and accompanying words are Copyright Michael Hughes February 2002. They are not to be re-produced, in part or whole, without permission from the author.
Splitting the feed screw nuts and adjusting backlash on a Bridgeport Milling Machine.
 Splitting the feed screw nuts and adjusting backlash on a Bridgeport Milling Machine. Bridgeport manufactures their milling machines with 0.005 backlash in the feedscrews, which increases over time due
How To Make A Thomas Bunk Bed
 pottery barn kids THOMAS BUNK BED WARNING: Failure to follow these warnings and assembly instructions could result in serious injury or death. Read all instructions before assembling bunk bed. KEEP INSTRUCTIONS
Assembly GUIDE. display wine cellar kits. Required. Suggested. Questions? 888.373.6057. or visit wineracksamerica.com
 Page 1 Middle Ladder End Ladder Display Tray Screwless Connector Package Contents * All models follow the same assembly procedure varying only in the number of middle ladders your rack will require. Depending
DIY Motorcycle-to-Pickup Loading Ramp
 DIY Motorcycle-to-Pickup Loading Ramp By Kent Hartland Fig 1. Unloading the bike. Notice the orange ratchet strap holding the ramp tight to the tail gate. Also, the rear wheels of the truck are in a shallow
MODEL# SLA001-3 "SLIDE & LOCK" A-FRAME POOL LADDER
 MODEL# SLA001-3 "SLIDE & LOCK" A-FRAME POOL LADDER IMPORTANT INSTRUCTIONS: : Read all instructions carefully & completely to become familiar with parts, assembly, safety and proper use of this product.
Build Your Own Workbench:
 Build Your Own Workbench: Home-built design beats store-bought hands-down I f you re interested in building self-reliance skills, a solid workbench is key to growing your capabilities. In fact, it s even
Double Glider Assembly Instructions.
 Double Glider Assembly Instructions. Thank you for purchasing your new Torrans Manufacturing Company s Lawn Glider. Assembly of the Glider can be accomplished by one person however, it is advised that
POD Visor Instructions
 POD Visor Instructions Please read fully before beginning assembly and mounting the Visor Parts List - Visor Left Part (LV), Visor Right Part (RV) Qty 2, Aluminum Crossbars Hardware - Qty 17, 1/4" X 3/4"
ROVs in a Bucket Building an Underwater Robot. 3.0 ROV Thrusters & Propeller Attachment. 3.1 Propulsion
 3.0 ROV Thrusters & Propeller Attachment 3.1 Propulsion ROV s move forward and back, up and down, and to the left and right. They can make all of these moves without the benefit of a rudder. With three
6mm Two Door Offset Quadrant
 Installation Guide 6mm Two Door Offset Quadrant 226MBJ 0914RN Offset Quadrant 226MBJ.indd 1 07/08/2015 14:03 Cu w Before you Start Please read this Installation Guide fully. Although these instructions
Total Quantity: IMPORTANT: Plans are to be used with 3 x6 Plexiglass (SKU #298-017).
.") # Materials: Quantity Each: 4x4x8 3 2x4x8 2 2x8x8 1 4x8x3/4 plywood 1 3 x6 corkboard (can be 18 of the 1 x1 pieces) 1 3 x6 plexiglass 1 8 door casing 3 Primer 1 qt. Total Quantity: TIPS FOR SUCCESSFUL
# Materials: Quantity Each: 4x4x8 3 2x4x8 2 2x8x8 1 4x8x3/4 plywood 1 3 x6 corkboard (can be 18 of the 1 x1 pieces) 1 3 x6 plexiglass 1 8 door casing 3 Primer 1 qt. Total Quantity: TIPS FOR SUCCESSFUL
Important Information
 Single Door Quadrant Instruction Manual ESQ Important Information Toughened glass is completely safe for use in our shower enclosures and bath screens; providing our products are installed according to
FTC 2015-2016 DIY Mountain Build Guide
 FTC 2015-2016 DIY Mountain Build Guide Assembly Instructions Check out the DIY2015-2016 Prints and BoM for individual part details. Release 1.0 9/10/15 Page 1 This guide and Bill of Materials are for constructing
CHARISMA SHOWER/TUB DOOR INSTALLATION INSTRUCTIONS
 CHARISMA SHOWER/TUB DOOR INSTALLATION INSTRUCTIONS IMPORTANT DreamLine reserves the right to alter, modify or redesign products at any time without prior notice. For the latest up-to-date technical drawings,
FRONT WINDSHIELD SEAL INSTALLATION
 FRONT WINDSHIELD SEAL INSTALLATION Tech Article From Newsletter 16.1-1st Quarter of 2010 Replacing your Front Windshield Seal ISN T AS HARD AS YOU MAY THINK! Recently, we retooled our front window seal
Assembly and Usage Instructions
 Assembly and Usage Instructions A Product 5885 West Van Horn Tavern Road Columbia, MO 65203 www.caldwellshooting.com Instruction #1001667 Limited Warranty Every Caldwell product is warrantied to be free
Hollow or Cinder Block Wall Mount Job Aid
 Summary This Job Aid covers: Hollow or Cinder Block Wall Mount Job Aid Hollow or Cinder Block wall Mount Bracket Installing the Mount Bracket into Cinder Block This Job Aid supports the Technician audience.
SPIRAL STAIR KIT INSTALLATION MANUAL
 SPIRAL STAIR KIT INSTALLATION MANUAL Effective January 1, 2014 If you have any questions, please call the location that your Stair Kit was purchased from: Broomall, Pennsylvania 1-800-52-7427 Ontario,
HOW-TO LAY HARDBOARD OR PLYWOOD FLOOR OVERLAY
 HOW-TO HOW-TO LAY HARDBOARD OR PLYWOOD FLOOR OVERLAY Most floor coverings, if laid over uneven wooden floors, will wear unevenly and look unsightly. The answer is to cover the old boards with hardboard
Installation Instructions
 Installation Instructions READ BEFORE INSTALLING UNIT For Low Profile Window Air Conditioner INSTALLATION WARNINGS AND CAUTION Carefully read the installation manual before beginning. Follow each step
pottery barn kids MADELINE BUNK BED
 pottery barn kids MADELINE BUNK BED! WARNING: Failure to follow these warnings and assembly instructions could result in serious injury or death. To help prevent serious or fatal injuries from entrapment
IMPORTANT INFORMATION
 Curved Quadrant Instruction Manual CQ IMPORTANT INFORMATION Toughened glass is completely safe for use in our shower enclosures and bath screens; providing our products are installed according to our guidelines.
AZEK Rail Install Guide
 TRIM MOULDING DECK PORCH RAIL PAVERS AZEK Rail Install Guide Installing AZEK Rail with CableRail by Feeney... 1 Installing CableRail by Feeney for AZEK Rail... 7 Installing AZEK Rail Stairs with CableRail
Ceiling Mounted Folding Attic Ladders Installation Instructions
 Ceiling Mounted Folding Attic Ladders Installation Instructions WARNING Before you start installing your new Louisville Ceiling Mounted Folding Attic Ladder, you must read and understand the following:
FRONT BUMPER INSTALLATION INSTRUCTIONS 2007-2011 DODGE / MERCEDES SPRINTER
 Aluminess Products Inc 9402 Wheatlands Ct. #A Santee, CA 92071 619-449-9930 FRONT BUMPER INSTALLATION INSTRUCTIONS 2007-2011 DODGE / MERCEDES SPRINTER Please read before beginning Stainless steel hardware
HSC 2001 - Industrial Technology Band 4/5 INDUSTRIAL TECHNOLOGY FOLIO
 Statement of Intent I intend to construct a slim boy which will suit my needs and will be compatible with my furniture in my bedroom in my house. This will be very handy and useful to everyone in my home.
Dining Tables by Kim Carleton Graves
 This is an excerpt from the book Dining Tables by Kim Carleton Graves Copyright 2001 by The Taunton Press www.taunton.com Vineyard Table The vineyard table is almost as old a design as the trestle table,
Rudder Repair and refinish
 Rudder Repair and refinish Montgomery 23 Dauntless The before photograph A receipt found inside the boat showed a previous owner had enlisted a boat yard to perform maintenance on the rudder by shortening
Convertible Crib and Changer (M668)
") Model No.: M668 PO #: Serial #: Convertible Crib and Changer (M668) THIS PRODUCT IS NOT INTENDED FOR INSTITUTIONAL OR COMMERCIAL USE. If you have any questions or missing parts, please contact us. DO NOT
Model No.: M668 PO #: Serial #: Convertible Crib and Changer (M668) THIS PRODUCT IS NOT INTENDED FOR INSTITUTIONAL OR COMMERCIAL USE. If you have any questions or missing parts, please contact us. DO NOT
Responsibilities of a Volunteer Leader
 Responsibilities of a Volunteer Leader Inspecting tools for safe conditions. Removing unsafe tools from use and immediately notifying site supervisor. Teaching safe tool use to volunteers on your crew.
Owner's Manual & Assembly Instructions
 Owner's Manual & Assembly Instructions PM01 BASE KIT Model No. FDN1014 717090311 CAUTION: SOME PARTS HAVE SHARP EDGES. CARE MUST BE TAKEN WHEN HANDLING THE VARIOUS PIECES TO AVOID A MISHAP. FOR SAFETY
PITCHED ROOF STRUCTURES
 PITCHED ROOF STRUCTURES for framed and frameless photovoltaic modules Needed tools and materials: cordless screwdriver 10mm and 13mm spanners 5mm Allen key bolts, screws and tools for fixing the system
REDWOOD. Adirondack Chair. Naturally beautiful Easy to use Practical and economical Durable and stable Resistant to decay and insects
 B U I L D I T W I T H REDWOOD Adirondack Chair R E D W O O D Naturally beautiful Easy to use Practical and economical Durable and stable Resistant to decay and insects Adirondack Chair BUILD THE CHAIR
March 14, 2007. Installation of Bay, Bow and Garden Windows
 March 14, 2007 Re: Installation of Bay, Bow and Garden Windows Attached are the Atrium Companies, Inc recommendation for the installation of bay, bow and garden windows. These instructions were developed
STEADYfast Stabilizer Installation Notes Fifth Wheel and Travel Trailers 11/23/13
 STEADYfast Stabilizer Installation Notes Fifth Wheel and Travel Trailers 11/23/13 (See Supplemental Instructions for trailers with heavy duty round footplates and/or Power Leveling Systems) PHONE SUPPORT
Surviving Glue-Ups. No movie chase scene could provide. A guide to stress-free gluing and clamping. Compliments of Fine Woodworking
 Compliments of Fine Woodworking Surviving Glue-Ups A guide to stress-free gluing and clamping B y G a r y R o g o w s k i No movie chase scene could provide as many heart-pounding thrills as gluing up
Easy Assembly Instructions & Rules
 Model #64-2000 Easy Assembly Instructions & Rules 4-in-1 Casino Table DO NOT RETURN TO STORE. FOR ALL RETURNS AND WARRANTY COVERAGE PLEASE CALL GLD PRODUCTS: 1-800-225-7593 Please provide model number,
A. Title Page. B. Project Proposal And Project Management
 A. Title Page B. Project Proposal And Project Management i. Project Proposal - Identification Of Needs - Areas Of Investigation - Criteria To Evaluate Success ii. Action Plans iii. Time Plans iv. Finance
Installation Manual. SKU# 21000 series (Base Rails) SKU# 22000 series (Overhead Racks)
 SKU# 22000 series (Overhead Racks)") Installation Manual SKU# 21000 series (Base Rails) SKU# 22000 series (Overhead Racks) Welcome to the world of TracRac! We re delighted that you have chosen TracRac, the ultimate sliding truck rack system.
Installation Manual SKU# 21000 series (Base Rails) SKU# 22000 series (Overhead Racks) Welcome to the world of TracRac! We re delighted that you have chosen TracRac, the ultimate sliding truck rack system.
VersaRack Installation Instructions. masterack. Tools Required:
 masterack Versaack Installation Instructions ll of us at asterack wish to thank you for your purchase of the Versaack. We are proud of this product and hope that you fi nd it a functional as well as a
IMPORTANT INSTALLATION GUIDE VALENCIA SQUARE CORNER SHOWER READ ALL INSTRUCTIONS CAREFULLY BEFORE STARTING THE INSTALLATION
 INSTALLATION GUIDE VALENCIA SQUARE CORNER SHOWER SEALANT REQUIRED TO COMPLETE THIS INSTALLATION: (Not supplied) Sika Sikasil NG (Arctic White) To seal the WHITE shower door and returns to the shower tray.
1958-64 WINDOW CHANNEL, WEATHERSTRIP & WHISKER STRIP REPLACEMENT FOR 2-DOOR SEDANS
 By Denny Williams Photos by Denny Williams 1958-64 WINDOW CHANNEL, WEATHERSTRIP & WHISKER STRIP REPLACEMENT FOR 2-DOOR SEDANS Denny Williams - Technical Writer Denny is first and foremost a dyed-in-thewool
KITCHENS. Tip PAGE 1 FITTING YOUR KITCHEN GUIDE. How to mark out a kitchen. Tools required for installing a kitchen STEP ONE STEP TWO STEP THREE
 FITTING YOUR KITCHEN GUIDE How to mark out a kitchen PAGE 1 Before starting on the installation, measure 870mm from the lowest point of the floor and mark a datum line around the room to indicate where
Rack installation instructions
 Rack installation instructions Review the documentation that comes with the rack cabinet for safety and cabling information. Before you install the server in a rack cabinet, review the following guidelines:
THE CRACKER BARREL OLD COUNTRY STORE ROCKING CHAIR ASSEMBLY INSTRUCTIONS
 THE CRACKER BARREL OLD COUNTRY STORE ROCKING CHAIR ASSEMBLY INSTRUCTIONS Manufacturer of Solid Hardwood Rocking Chairs Since 1834 Thank you for purchasing a quality rocking chair from Cracker Barrel Old
SERVICE MANUAL. Corpus 3G. Seat system for electric wheelchair
 SERVICE MANUAL US Corpus 3G Seat system for electric wheelchair How to contact Permobil Head Office of the Permobil group Produced and published by Permobil AB, Sweden Version 4, 2014-07 Item No.: 205260-US-0
Turning the table. Shape shifter: The picnic table splits into twobenches (opposite) to suit your space and seating needs.
 to suit your space and seating needs.") Turning the table Shape shifter: The picnic table splits into twobenches (opposite) to suit your space and seating needs. 62 PRIL/MY 2002 COTTGE LIFE ...from eating to seating. These convertible benches
Turning the table Shape shifter: The picnic table splits into twobenches (opposite) to suit your space and seating needs. 62 PRIL/MY 2002 COTTGE LIFE ...from eating to seating. These convertible benches