INTRODUCTION SAFETY PRECAUTIONS
|
|
|
- Dwight Carson
- 7 years ago
- Views:
Transcription
1 Featuring

2

3 INTRODUCTION Thank you for purchasing a Monitor mixer, brought to you with pride by the SPIRIT team of Andy, Colin, Chris, James, Simon, Mukesh, Graham, Martin, Paul, Tony and Peter, with the support of many others - we hope you will have as much fun using it as we did building it! SAFETY PRECAUTIONS For your own safety and to avoid invalidation of the warranty please read this section carefully. The SPIRIT MONITOR mixer must only be connected through the Power Supply supplied. The wires in the mains lead are coloured in accordance with the following code: Earth: Neutral: Live: Green and Yellow (Green/Yellow - US) Blue (White - US) Brown (Black - US) As the colours of the wires in the mains lead may not correspond with the coloured markings identifying the terminals in your plug, proceed as follows: l The wire which is coloured Green and Yellow must be connected to the terminal in the plug which is marked with the letter E or by the earth symbol. l The wire which is coloured Blue must be connected to the terminal in the plug which is marked with the letter N. l The wire which is coloured Brown must be connected to the terminal in the plug which is marked with the letter L. Ensure that these colour codings are followed carefully in the event of the plug being changed. To avoid the risk of fire, replace the mains fuse only with the correct value fuse, as marked on the rear panel. Page
 Blue (White - US) Brown (Black - US) As the colours of the")
4 Connecting Up 4 INPUTS Page

5 USING MONITOR Mono Input Channel XLR Input The UltraMic Plus padless input preamp is designed to accept BALANCED or UNBALANCED signals at a wide range of input levels up to +8dBu. When using microphones, professional dynamic, condenser or ribbon mics are best because these will be LOW IMPEDANCE. You can use low-cost HIGH IMPEDANCE mics, but the level of background noise will be higher. If you press the 48V switch down the socket provides a suitable powering voltage for professional condenser mics (this is also known as Phantom Power). Each input is provided with a male XLR-type SPLIT OUT connector, which enables mic signals to be fed directly to a Front-of-House mixer without the need for specials cables or splitter boxes. Always provide 48V powering from the Monitor console if required, and turn off the powering at the FOH console. An internal jumper option is provided to allow the ground connection to the SPLIT OUT connector to be lifted to prevent ground loops in certain installations. ONLY connect condenser microphones with the 48V powering OFF (switch UP), and ONLY turn the 48V powering on or off with all output faders DOWN, to prevent damage to the mixer or external devices. If the SPLIT OUT connectors are used to feed another mixer, the MONITOR console should be powered up first, or the faders on the FOH console should all be down when the MONITOR is powered up or split feeds connected. DO NOT turn on the +48V when using unbalanced sources or line level signals, which may be damaged by the phantom power voltage on pins & of the XLR connector, and ONLY connect the SPLIT OUT feed to inputs which can tolerate phantom power voltages if the powering is in use. PHASE REVERSE Pressing this switch reverses the polarity of the input, providing a convenient method of compensating for incorrect wiring or microphone placement. In some circumstances it may be found that pressing PHASE REVERSE will help with feedback avoidance. The switch should normally be released when not required. Note that the SPLIT OUT feed is NOT affected by this switch. SENS (Sensitivity) This knob sets how much of the source signal is sent to the rest of the mixer. Too high, and the signal will distort as it overloads the channel. Too low, and the level of any background hiss will be more noticeable and you may not be able to get enough signal level to the output of the mixer. Setting the knob to the `0 mark gives unity gain for line level signals. See `Setting Up & Troubleshooting on page 8 to learn how to set SENS correctly. Page 4 00Hz HI-PASS FILTER Pressing this switch activates a steep 8dB per octave filter which reduces the level of bass frequencies only. Use this in live PA situations to clean up the mix, reducing stage rumble or popping from microphones. INSERT POINT The unbalanced, pre-eq insert point is a break in the channel signal path, allowing limiters, compressors, special EQ or other signal processing units to be added in the signal path. The Insert is a -pole A gauge jack socket which is normally bypassed. When a jack is inserted, the signal path is broken, just before the EQ section. The Send may be tapped off as a line level, pre-fade, pre-eq send of a mic source if required, using a lead with tip and ring shorted together so that the signal path is not interrupted. EQUALISER Powerful, corrective Equalisation (EQ) is essential in live situations to cope with varying venue acoustics and original signals which may be far from ideal. Each Monitor input is provided with a comprehensive 4-Band EQ section, with two swept mids for extra control. HF EQ Turn clockwise to boost high (treble) frequencies (khz and above) by up to 5dB, adding crispness to cymbals, vocals and electronic instruments. Turn anticlockwise to cut by up to 5dB, reducing hiss or excessive sibilance which can occur with certain types of microphone. Set the knob in the centre-detented position when not required. MID EQ (HMID & LMID) There are two pairs of knobs which work together to form HI and LO MID frequency EQ sections. The lower knob in each pair provides 5dB of boost and cut, just like the HF EQ knob, but the frequency at which this occurs can be set by the upper knob over a range of 550Hz to khz (HMID) or 80Hz to.9khz (LMID). This allows some truly creative improvement of the signal in live situations, because the mid bands cover the range of most vocals. Listen carefully as you use these controls together to find how particular characteristics of, for instance, a vocal signal can be enhanced or reduced. Set the gain (lower) knob to the centre-detented position when not required. Note: Q is set at.5. LF EQ Turn clockwise to boost low (bass) frequencies (60Hz and below) by up to 5dB, adding warmth to vocals or extra punch to synths, guitars and drums. Turn anticlockwise to cut low frequencies by up to 5dB for reducing hum, stage rumble or to improve a mushy sound. Set the knob to the centredetented position when not required. EQ SWITCH The EQ switch bypasses the Equalisation section when released. Alternately pressing and releasing the switch provides an easy way of comparing the equalised and unequalised signals.
.")
6 7 8 9 MONITOR SENDS These controls route the input channel signal to any one or more Monitor busses and the associated Monitor Outputs, allowing a number of unique monitor mixes to be created. The sends are arranged as a group of mono sends (-8) and two stereo pairs (9/0 & /). Each group of sends is normally POST-FADE, POST-EQ but may be switched to PRE-FADE, POST-EQ by pressing the corresponding PRE switch. All sends are muted when the MUTE switch (9) is pressed. Sends 9- are arranged as two stereo pairs, with a send level control and a PAN control to position the channel signal in the stereo image. With the PAN control centered, the signal is fed equally to both sends in the pair. You get most control when the input Sensitivity is set up correctly, giving maximum travel on the send controls. See the `Setting Up & Troubleshooting section on page 8 for help in setting a suitable signal level. MUTE All monitor sends are disabled when the MUTE switch is down, and the associated amber LED illuminates to show that the switch is pressed. FADER The FADER provides overall level control of any Monitor Sends which are selected as post-fade. You get most control when the input Sensitivity is set up correctly, giving full travel on the fader. See the `Setting Up & Troubleshooting section on page 8 for help in setting a suitable signal level. SIGNAL LED This green LED illuminates to show that a signal with a level greater than -0dB is present in the channel. PFL/PEAK When the latching PFL switch is pressed, the pre-fade, post-eq signal is fed to the headphones and engineer s wedge outputs, replacing the selected wedge source and illuminating the SOLO/PFL LED on the Master section to show that a PFL is active. The adjacent red LED lights to identify the selected channel. This is a useful way of listening to any required input signal without interrupting any of the monitor sends, for making adjustments or tracing problems. When the PFL switch is released the LED serves as a PEAK indicator which illuminates approximately 4dB before clipping to give warning of a possible overload. The signal is sampled at two points in the EQ section and at the Insert Send. 0 Page 5

7 OUTPUT SECTION MONITOR OUTPUTS These outputs provide summing of the corresponding input channel monitor sends, and drive XLR-type output sockets from impedance balanced outputs. A break-point is included before each output socket for the connection of an external graphic equaliser. Outputs -8 are configured as mono sends, and outputs 9/0 and / are arranged as stereo pairs. MUTE The monitor send is completely disabled when the MUTE switch is pressed, and the adjacent LED illuminates to warn that the mute is active. HIGH PASS FILTER (-8 only) A variable High Pass Filter is provided to reduce the level of stage-driven low frequency feedback, or particularly to tailor the output frequency to match the frequency range of smaller wedge monitor speakers which may not be able to tolerate high levels of LF signal. Rotate the control fully anticlockwise when the filter is not required. 60Hz Filter (9- only) A fixed 60Hz high-pass filter is provided on outputs 9/0 and /, which might typically be used for in-ear monitor transmitters, effects sends or FOH PA. The filter helps to clean up the mix and reduce large low frequency transients. T/B Pressing the T/B (Talkback) switch routes the talkback mic signal to the monitor output and simultaneously dims the monitor signal to allow the engineer s voice to be heard over the mix. The Talkback level is set by the T/B SENS control on the Master section. Talkback is disabled when the DIM switch is pressed. DIM Pressing the DIM switch attenuates the monitor output by 6dB as an immediate way of eliminating feedback while the source of the problem is identified. FADER The 00mm fader controls the overall level of each output. The 0 mark gives unity gain from the fader, leaving 5dB in hand. FX RETURNS The signal from either of the two stereo FX Returns may be mixed directly to the Monitor output at a level set by the local control (overall level is set by the FX RET and FX RET controls on the Master section). The RET/RET switch selects FX Return when released, and FX Return when pressed. On outputs -8 the FX Return signal will be a mono sum of left and right, and on 9-0 and - the signal will be fed in stereo. Note that FX Return may be globally switched from the Master section to be the House Mic signal if required. FOH Facility A sub-grouping facility is included on outputs -0 to allow the console to be used as a FOH mixer. Pressing the - switch routes the post-fade, post-insert signal to the Monitor / busses, enabling these outputs to be used as a stereo final mix. The PAN control positions the monitor signal in the stereo image (outputs -8 only). Final mix level is controlled by the - Monitor Fader. HOUSE On the stereo output pairs (9/0 and /) the HOUSE control injects an ambience signal picked up from the stereo House Mic inputs into the monitor outputs, which is particularly important when feeding in-ear monitors. MNTR (Monitor - Engineer s Wedge) A separate monitor mix may be created for the Engineer s Wedge monitor or Headphones. The POST EQ/PRE EQ switch selects the source for the mix as before or after the Graphic EQ insert point, and will normally be post-eq (switch released). Rotate the MNTR control fully anticlockwise when not required. SOLO When the latching SOLO switch is pressed, the post- or pre-graphic EQ signal (as selected by the POST EQ/PRE EQ switch) is fed to the headphones and engineer s wedge outputs, replacing the selected wedge source and illuminating the SOLO/PFL LED on the Master section. The adjacent red LED lights to identify the active solo. This is a useful way of listening to any required output signal without interrupting any of the monitor sends, for making adjustments or tracing problems. In the case of outputs -8 the SOLO signal will be mono to left and right, while 9/0 and / are fed as stereo. BARGRAPH METERS -colour peak reading BARGRAPH METERS are provided to monitor the final output, giving you a constant warning of excessive peaks in the signal which might cause overloading. Aim to keep the signal within the amber segments at peak levels for best performance. Similarly, if the output level is too low and hardly registering at all on the meters, the level of background noise may become significant. Take care to set up the input levels for best performance. The source for the meter may be selected as PRE or POST the Graphic EQ insert point, as set by the adjacent METER switch. With the switch released the meter will be fed from the POST-EQ signal. Page 6
 A variable High Pass Filter is provided to reduce the level of stage-driven low frequency feedback, or particularly to tailor the output frequency to match the frequency")
8 MASTER SECTION WEDGE SOURCE The Engineer s Wedge outputs are normally fed from a mix of the MNTR feeds from outputs -. The pre-fade wedge signal feeds the headphones and meters and the post-fade signal feeds the XLR outputs. Pressing the WEDGE SOURCE switch selects monitor outputs - as the source for the wedge outputs, and would be used to monitor those outputs when the mixer is used as a FOH console with outputs -0 submixing to -. When any PFL or SOLO switch is pressed the source for the Wedges is switched to the PFL/SOLO signal without interrupting the other outputs from the mixer, to allow individual signals to be monitored. The original wedge source is restored when the PFL/SOLO switches are released. BARGRAPH METERS -colour peak reading BARGRAPH METERS are provided to monitor the wedge outputs, giving you a constant warning of excessive peaks in the signal which might cause overloading. Aim to keep the signal within the amber segments at peak levels for best performance. Similarly, if the output level is too low and hardly registering at all on the meters, the level of background noise may become significant. Take care to set up the input levels for best performance. The source for the meter is selected by the WEDGE SOURCE switch (see above). FADER The 00mm fader controls the overall level of the wedges output. The 0 mark gives unity gain from the fader, leaving 5dB in hand. PHONES This control sets the level to the PHONES jack. The source for the Phones is selected by the WEDGE SOURCE switch. When any PFL or SOLO switch is pressed the source for the Headphones is switched to the PFL/SOLO signal without interrupting the other outputs from the mixer, to allow individual signals to be monitored. The original phones source is restored when the PFL/SOLO switches are released. SOLO/PFL TRIM The TRIM control provides +/-5dB level adjustment of the SOLO/PFL signal to allow for differences in operating levels. Note that the position of this control does not affect the level to the meters. HOUSE MICS Two balanced XLR inputs are provided for House Mics, and the HOUSE SENS control sets the input level. Pressing +48V switches on the powering voltage for condenser microphones if required. ONLY connect condenser microphones with the 48V powering OFF (switch UP), and ONLY turn the 48V powering on or off with all output faders DOWN, to prevent damage to the mixer or external devices. FX RETURNS Two balanced Stereo Returns are included for the outputs of effects units and are made available for mixing directly to the Monitor outputs at a level set by the FX RET or FX RET controls. If a mono source is used, plugging into the Left jack only automatically feeds the signal to both Left and Right. Pressing the HOUSE switch replaces the FX Return signal with the House Mics signal (at a level set by the HOUSE SENS control), to allow the House Mics signal to be fed to any of the monitor outputs. Note that the House Mics signal can be injected directly into outputs 9/0 and / without using this facility. T/B SENS A balanced XLR input is provided for a local talkback microphone, and this controls sets the level that this mic signal is fed to the selected monitor outputs. MASTER T/B Pressing this switch routes the Talkback signal to ALL monitor outputs and simultaneously dims the monitor signals to allow the engineer s voice to be heard over the mix. The Talkback level is set by the T/B SENS control. Talkback is disabled when the Master DIM switch is pressed. MASTER DIM Pressing the DIM switch attenuates ALL monitor outputs and the wedges output by 6dB as an immediate way of eliminating feedback while the source of the problem is identified. The previous level is restored when the switch is released. LAMP CONNECTOR (not illustrated) Two 4-pin XLR-type connectors are fitted at either end of the console for the mounting of V gooseneck lamps (Littlite or similar). The connector pinout is as follows: Pin - V AC () Pin - No connection Pin - V AC () Pin 4 - V AC () Page 7

9 Setting Up & Troubleshooting Initial Set Up Once you have connected up your system (see the sections on connection and wiring earlier in this manual for guidance) you are ready to set initial positions for the controls on your mixer. The front panel drawing on page 7 shows typical initial control positions which may serve as a useful guide to setting up the mixer for the first time. Set up individual input channel as follows: l l l l Connect your sources (microphone, keyboard etc.) to the required inputs. Note: Phantom powered mics should be connected before the 48V is switched on. The input provides very wide gain range without the need for a pad. When using LINE level sources, set the INPUT SENS control fully anticlockwise as a preliminary position. Set Monitor faders at 0, input faders at 0, and set power amplifier levels to suit the application. Make sure that the EQ switches are released to bypass the EQ sections. Provide a typical performance level signal and press the PFL button on the first channel, monitoring the level on the L/R bargraph meters. Adjust the input sensitivity until the meter display is in the amber section, with occasional peaks to the first red LED at a typical maximum source level. This allows sufficient headroom to accommodate peaks and establishes the maximum level for normal operation (but see note below). l l l Feed the signal to selected monitor outputs by setting the appropriate monitor sends to an initial working level (approx. position 7 on the send knob). Listen to the signal by feeding the selected monitor signal to the engineer s wedge by turning up the MNTR control on the appropriate outputs, checking that the wedge source is selected to MNTR. Repeat this procedure on other channels as required. As more channels are added to the mix, the meters may move into the red section. Adjust the overall level using the Monitor Output faders if necessary. Listen carefully for the characteristic sound of `feedback. If you cannot achieve satisfactory input level setting without feedback, check microphone and speaker placement and repeat the exercise. If feedback persists, it may be necessary to use a Graphic Equaliser to reduce the system response at particular resonant frequencies. Note: The initial settings should only be regarded as a starting point for your mix. It is important to remember that many factors affect the sound during a live performance, for instance the channel EQ settings or even the size of the audience! Each monitor mix can now be built up progressively, listening carefully for each component in the mix and watching the meters for any hint of overload. If this occurs, back off the appropriate Input Fader slightly until the level is out of the red segments, or adjust the Monitor Faders. Troubleshooting No Power l Is the mains supply present? Check the mains outlet with another device. l Is the power lead firmly connected? Condenser Mic Not Working l Is the 48V turned on? l Is there an unbalanced device connected to the SPLIT OUT connector? l Is the mic cable a balanced -wire type? Meters not showing any signal l Has the input gain been set correctly (see above)? l Are the Monitor faders set at a working level., and are input faders set high enough? l Is the MUTE switch released on the relevant channels? l If monitoring on the wedge outputs, is the appropriate Monitor output feeding the wedges (MNTR control set to working level), and the wedge source selected to MNTR? l Is there a PFL/AFL pressed on another channel? No Monitor output, or output low level l Is the MUTE switch released? l Is a Graphic EQ or other external device connected to the graphic Insert, and is this device switched on and set up correctly? l Are the local or Master DIM or T/B switches released? Headphones Distorting l Are the headphones less than 00W impedance? l Is the Phones level set too high? Hum on outputs when SPLIT OUT sockets are used l Check for ground loops, and try isolating the SPLIT OUT ground connection by removing the internal jumper which is normally fitted (see below). RB8 REV JMP SPLIT OUTPUT PIN GROUNDING LINK - GROUNDED NO LINK - GROUND LIFT SPIRIT MO SPIRIT B Page 8

10 APPLICATIONS Live Monitor with Effects BAND INSTRUMENTS/VOCALS Page 9

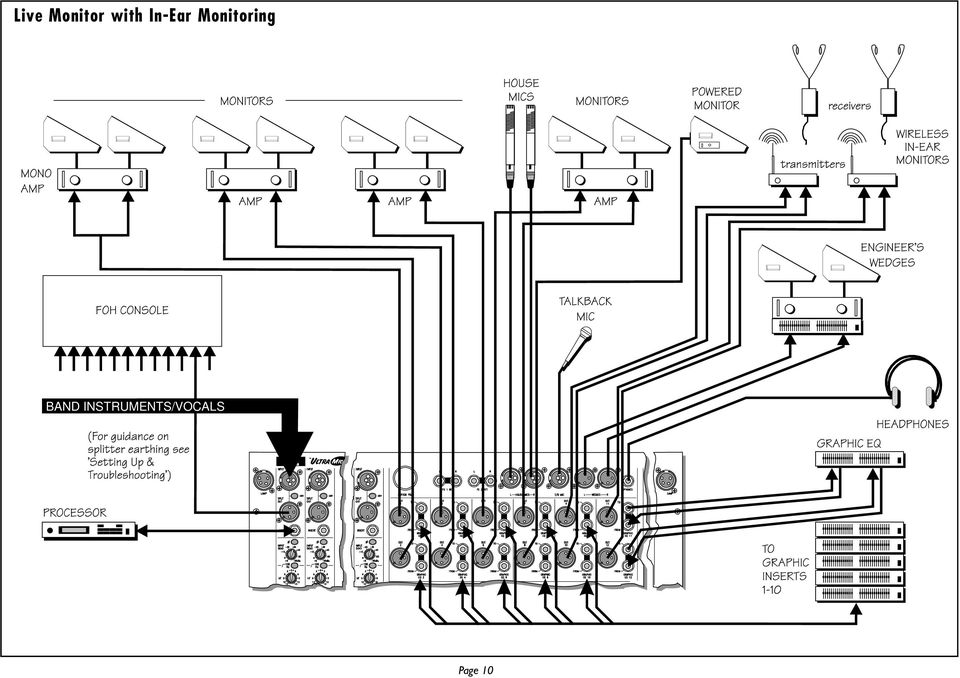
11 Live Monitor with In-Ear Monitoring BAND INSTRUMENTS/VOCALS Page 0
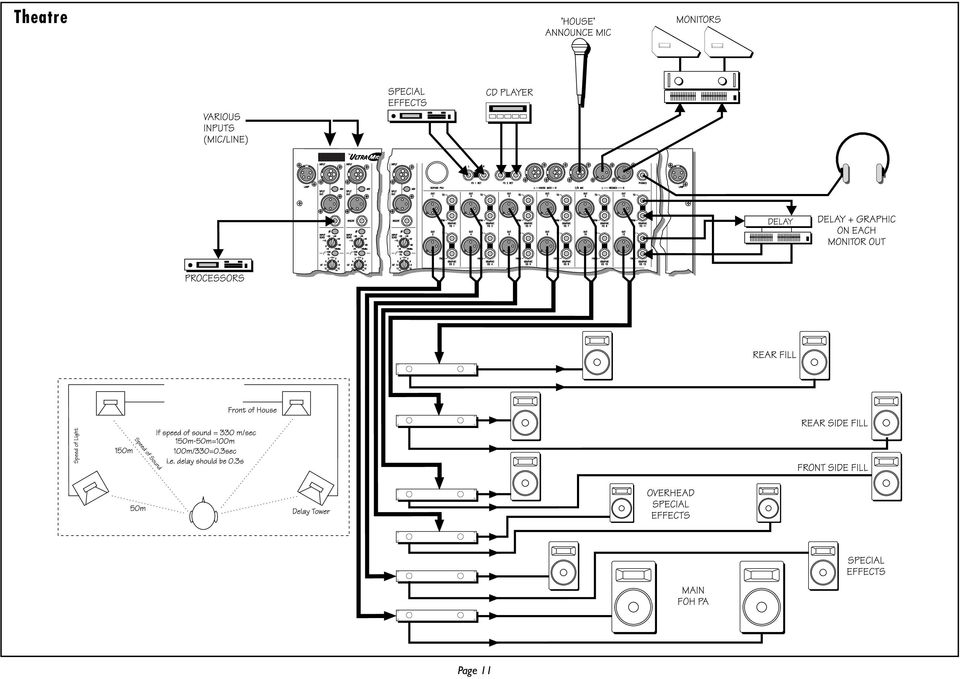
12 Theatre Page
13 FOH Console Page

14 FOH Console with Subgrouping Page

15 System Block Diagram MIC INPUT +48V +48V PHASE INPUT SENS 00Hz PEAK DETECT PEAK DETECT & PFL ON PFL MNTR -8 MNTR 9 MNTR 0 MNTR MNTR TALKBACK T/B ALL DIM ALL PFL SOLO L SOLO R WEDGE L WEDGE R PFL SOLO L SOLO/PFL TRIM PHONES PHONES SPLIT SPLIT OUTPUT (Internal Link) Link - Grounded No Link - Ground Lift INSERT SIGNAL DETECT TIP: SEND RING: RETURN SIG EQ MUTE MONITOR 4 5 SOLO R WEDGE SOURCE MNTR - MASTER T/B MASTER DIM WEDGE DIM SOLO L WEDGE/SOLO METER L WEDGE L -8 PRE 6 7 DIM WEDGE R INPUT FADER 9-0 PAN 8 9 OUT OUT PFL/SOLO ENABLE SOLO R WEDGE/SOLO METER R FX RET LEFT HOUSE FX RET 9- PRE - PAN 0 RET LEVEL MNTR SOLO - PAN MONO OUTPUT ( of 8 Shown) * FOH MODE SUBGROUPING MNTR POST EQ PRE EQ METER POST EQ PRE EQ FX RET RIGHT FX RET LEFT FX RET RET RET T/B ALL DIM ALL TALKBACK SIGNAL HIGH PASS OFF-60Hz FADER MUTE TB & DIM GRAPHIC EQ (INSERT) TO FROM METER OUT (-8) FX RET RIGHT SOLO DIM T/B STEREO OUTPUT ( of Shown) +48V * FOH MODE SUBGROUPING LEFT HOUSE MICS RIGHT T/B MIC +48V HOUSE SENS T/B SENS RET RET RET LEVEL HOUSE 60Hz MNTR FADER MUTE TB & DIM - WEDGE SOURCE SELECT ( ONLY) WEDGE SOURCE SELECT ( ONLY) (9-0 only) MNTR POST EQ PRE EQ GRAPHIC EQ (INSERT) TO FROM METER POST EQ PRE EQ METER OUT 9 () TB & DIM GRAPHIC EQ (INSERT) TO FROM METER T/B ALL DIM ALL TALKBACK SIGNAL OUT 0 () DIM T/B Page 4
 * FOH MODE SUBGROUPING MNTR POST EQ PRE EQ METER POST EQ PRE EQ FX RET RIGHT FX RET LEFT FX RET RET RET T/B ALL DIM ALL TALKBACK SIGNAL HIGH")
16 Connecting Leads Balanced Y Leads (Balanced) Unbalanced Headphone Splitter Y Leads (Unbalanced) Insert Leads Lamp Connections Page 5
 Insert Leads Lamp")
17 Control Position Sheet You may freely copy this page to mark control positions to assist in resetting the desk between performances.

18 INPUTS MONITOR CONSOLE Typical Starting Out Control Positions Page 7

19 Dimensions mm (.5") 87.5 mm (.44") Console channel 40 channel dim. x dim. y Width without end trim (for flight case mounting) dim x mm (57.7") mm (67.7") dim y 70.6 mm (5.96") 64.6 mm (6.96") Specifications Noise Measured RMS, Hz to khz Bandwidth. Inputs at unity gain and terminated 50W Output Noise 4 inputs routed, sends down, unity < -80dBu EIN Mic max. gain (50W terminated) -9dBu THD+N Mic sens. -0dBu, unity, send at max., +0dBu at all khz <0.005% Crosstalk (@khz) Typical Channel send range Channel fader range Mute attenuation Adjacent output isolation CMRR Typical at max khz Typical at any 50Hz Frequency Response Input to output, medium gain, via output (Hi-pass filter off) 5Hz to 45kHz 5Hz to 5kHz Typical Input and Output levels Maximum output Maximum signal into mic input Maximum signal into FX return & insert return Maximum sensitivity of FX return (Output unity) Maximum level into Talkback mic input Maximum level into House mic input Headphones (@ 00W) Input and Output Impedance Mic Input FX returns Monitor Outputs, Wedge & Inserts >90dB >80dB >00dB >90dB >85dB >65dB <-db <-db >+dbu +8dBu +dbu -5dBu +dbu +8dBu 50mW.8kW 8.6kW 75W Page 8
 Typical Channel send range Channel fader range Mute attenuation Adjacent output isolation CMRR Typical at max gain @ khz Typical at any gain @ 50Hz Frequency Response Input to")
20 A Harman International Company Part No. No: ZM09-0

R S E R I E S M I X E R S R - 2 0 0 R - 1 6 0 4 R - 2 0 0 4
 R SERIES MIXERS R-200 R-1604 R-2004 THE R SERIES MIXERS The R Series of mixers from Wharfedale Professional are designed to offer a superior quality audio performance in an easy to use, great value package.
ZMR 80 STEREO MODULAR ZONER USERS MANUAL
 ZMR 80 STEREO MODULAR ZONER USERS MANUAL Lime Technologies http://limetechnologies.co.uk Tel: 08712 233127 ZMR80 Stereo Modular Zoner Mixer Introduction The modular construction of the ZMR80 allows it
Zone Mixer. 6 channels configurable from 24 inputs. 3 zone outputs. Expandable via Sys-Link TM Built-in comp/limiter, ducking and alarm functions
 GR 1 Zone Mixer W H E N Y O U R E M I X I N G W I T H P R O F E S S I O N A L S 6 channels configurable from 24 inputs. 3 zone outputs. Expandable via Sys-Link TM Built-in comp/limiter, ducking and alarm
SYSTEM MIX PLUS. Owner's Manual DIGITAL MUSIC CORPORATION
 SYSTEM MIX PLUS Owner's Manual 1 Table of Contents 1. Introduction.................. 2 1.1 Overview 1.2 Unpacking 2. Operation................... 3 2.1 Front Panel 2.2 Rear Panel 3. Mixer.....................
MMX-842USB Best.-Nr. 20.2650 MMX-1282USB Best.-Nr. 20.2660
 6-KANAL- UND 10-KANAL- AUDIO-MISCHPULT 6-CHANNEL AND 10-CHANNEL AUDIO MIXER TABLE DE MIXAGE AUDIO 6 CANAUX ET 10 CANAUX MIXER AUDIO A 6 CANALI E A 10 CANALI MMX-842USB Best.-Nr. 20.2650 MMX-1282USB Best.-Nr.
CX Zoner Installation & User Guide
 CX Zoner Installation & User Guide Cloud Electronics Limited 140 Staniforth Road, Sheffield, S9 3HF England Tel +44 (0)114 244 7051 Fax +44 (0)114 242 5462 e-mail info@cloud.co.uk web site http://www.cloud.co.uk
Soundcraft EFX/EPM User Guide Issue 1210
 USER GUIDE Soundcraft EFX/EPM User Guide Issue 1210 User Guide Soundcraft EFX/EPM User Guide Issue 1210 1 IMPORTANT Please read this manual carefully before using your mixer for the first time. This equipment
QUALITY AV PRODUCTS INMATE/INMATE USB PROFESSIONAL 19" MIXER. User Guide and Reference Manual
 INMATE/INMATE USB PROFESSIONAL " MIXER User Guide and Reference Manual INTRODUCTION Welcome to the NEWHANK INMATE and INMATE USB professional " mixers series user manual. INMATE and INMATE USB both offer
MONITORING SIGNAL FLOW FUNCTION. Figure 11-1: Monitor Block Diagram.
 MONITORING SIGNAL FLOW Figure 11-1: Monitor Block Diagram. FUNCTION The Monitoring section in the Soundcraft Vi Series has three individual monitoring outputs: Monitor A 3 channel (LCR) format (it can
PS 29M DUAL CHANNEL BELTPACK IN METAL CASE
 PS 29M DUAL CHANNEL BELTPACK IN METAL CASE USER MANUAL October 2013 This product is designed and manufactured by: ASL Intercom BV Zonnebaan 42 3542 EG Utrecht The Netherlands Phone: +31 (0)30 2411901 Fax:
USER GUIDE PRO-EQ PLATINUM
 USER GUIDE PRO-EQ PLATINUM Welcome Thank you for making Fishman a part of your acoustic experience. We are proud to offer the finest acoustic amplification products available: high-quality professional-grade
1 All safety instructions, warnings and operating instructions must be read first.
 ONYX USER MANUAL 2 Dateq ONYX Manual Safety instructions EN Safety instructions 1 All safety instructions, warnings and operating instructions must be read first. 2 All warnings on the equipment must be
Understanding the DriveRack PA. The diagram below shows the DriveRack PA in the signal chain of a typical sound system.
 Understanding the DriveRack PA The diagram below shows the DriveRack PA in the signal chain of a typical sound system. The diagram below shows all the pieces within a sound system that the DriveRack PA
allen&heath Kernick Industrial Estate Penryn Cornwall TR10 9LU UK sales@allen-heath.com www.allen-heath.com
 QX Large Format Cover:QX Large Format Cover 09/03/2010 16:18 Page 1 allen&heath all ranges allen&heath Kernick Industrial Estate Penryn Cornwall TR10 9LU UK tel: +44 (0)1326 372070 fax: +44 (0)1326 377097
KEYBOARD EXTENDED RANGE. Sixty Owner, s Manual P/N 049254
 THE SOUND THAT CREATES LEGENDS KEYBOARD EXTENDED RANGE Sixty Owner, s Manual P/N 049254 INTRODUCTION Your new Fender KXR 60 Keyboard Amplifier is the result of Fender s ongoing dialog with many of today
Funktional Technologies. Model: Chocolate Box
 Funktional Technologies Model: Chocolate Box November 2013 The Funktional Technologies Chocolate Box is a 2U analog & digital professional audio device. It incorporates two Cadac K type analog input modules.
a reliable choice to go on-air
 DT a reliable choice to go on-air P R O D U C T I O N O N - A I R C O N S O L E 16 module positions Modern D(rop) T(hrough design) Play-out Control Module Program and Sub busses Ideal for production and
1402VLZ4 14-Channel. Compact Mixer. FEATURES: 14-channel mixer featuring our signature high-headroom, low-noise design APPLICATIONS:
 0VLZ -Channel FEATURES: -channel mixer featuring our signature high-headroom, low-noise design 6 boutique-quality Onyx mic preamps Ultra-wide 60 db gain range 8.5 db dynamic range + dbu line input handling
IMPORTANT Please read this manual carefully before using your mixer for the first time.
 MH2 User Guide 1 IMPORTANT Please read this manual carefully before using your mixer for the first time. Harman International Industries Ltd. 2005 All rights reserved Parts of the design of this product
SESSION ACOUSTIC DI USER S GUIDE
 SESSION ACOUSTIC DI USER S GUIDE INTRODUCTION Inspired by the LR Baggs Handcrafted Video Sessions and our experience in some of Nashville s great studios, Session Acoustic DI brings our signature studio
AIRMAX. User Manual Version: 1.0.0.0
 AIRMAX User Manual Version: 1.0.0.0 D&R Electronica Weesp BV Rijnkade 15B 1382GS Weesp The Netherlands Phone: +31 (0)294-418014 Fax: +31 (0)294-416987 Website: http://www.d-r.nl E-mail: info@d-r.nl AirMax
5 CHANNEL MIXER. S Class Signal Processors
 0 10 0 10 0 10 0 10 5 CHANNEL MIXER S Class Signal Processors Table Of Contents Introduction and Features 3 Front and Rear Panel Layout 4 Operating the S mix Setting up the S mix 5 Connecting the Input
MANUAL ENGLISH Mini-GIG Order code: D2280
 MANUAL ENGLISH Mini-GIG Highlite International B.V. Vestastraat 2 6468 EX Kerkrade the Netherlands Table of contents Warning... 2 Unpacking Instructions... 2 Safety Instructions... 2 Operating Determinations...
X-Desk User s Guide 82S6XD0U0A
 X-Desk User s Guide This documentation is intended to be readalong side the X-Desk Installation Guide which is available for download from our website www.solidstatelogic.com 82S6XD0U0A Contents Introduction
F(t) Forssell Technologies Inc
 Forssell Technologies Inc") F(t) Forssell Technologies Inc SMP-2Aa Microphone Preamplifier User Manual Forssell Technologies Inc Sandpoint Idaho USA (208) 263-0286 Introduction The Forssell Technologies Inc SMP-2A is a 2 channel,
F(t) Forssell Technologies Inc SMP-2Aa Microphone Preamplifier User Manual Forssell Technologies Inc Sandpoint Idaho USA (208) 263-0286 Introduction The Forssell Technologies Inc SMP-2A is a 2 channel,
OPERATING INSTRUCTIONS
 OPERATING INSTRUCTIONS OPERATING INSTRUCTIONS MAG & Electric Blue Amplifier Heads and Combos Thank you for purchasing your Ashdown Engineering Amplifier. If you live in the UK, please register your purchase
BXR. Owner, s Manual. One hundred BASS EXTENDED RANGE P/N 040695
 THE SOUND THAT CREATES LEGENDS BASS EXTENDED RANGE BXR One hundred Owner, s Manual P/N 040695 BXR 100 Owner s Manual Congratulations on your purchase of the Fender BXR 100 Bass amplifier. The Fender BXR
OPERATORS MANUAL. Klark Teknik Group, Klark Teknik Building, Walter Nash Road, Kidderminster. Worcestershire. DY11 7HJ. England.
 OPERATORS MANUAL Klark Teknik Group, Klark Teknik Building, Walter Nash Road, Kidderminster. Worcestershire. DY11 7HJ. England. Tel:+44 1562 741515 Fax:+44 1562 745371 Email:sales@ktgplc.com Website: midasconsoles.com
PERSONAL MONITOR MIXER/HEADPHONE AMP. S Class Signal Processors
 PERSONAL MONITOR MIXER/HEADPHONE AMP S Class Signal Processors Table Of Contents Features 3 Front and Rear Panel Layout 4 Operating the S monitor 5-7 Specifications 8 Wiring Guide 8 Copyright 2003, Samson
ELECTRICAL AUDIO EApreq
 ELECTRICAL AUDIO EApreq (Preliminary Info) The EAPreq is a two channel transformer-based microphone preamp/equalizer. The preamp is designed to allow the character of the input transformer to color the
Ivory 2 Series. TLAudio. user manual MONO VALVE PROCESSOR
 TLAudio user manual Ivory 2 Series 5051 MONO VALVE PROCESSOR TL Audio Ltd, Letchworth, Herts, SG6 1AN, UK email: info@tlaudio.co.uk web: http://www.tlaudio.co.uk CONTENTS 1 INTRODUCTION 2 PRECAUTIONS 3
INTRODUCTION. Please read this manual carefully for a through explanation of the Decimator ProRackG and its functions.
 INTRODUCTION The Decimator ProRackG guitar noise reduction system defines a new standard for excellence in real time noise reduction performance. The Decimator ProRackG was designed to provide the maximum
Contents. Safety Warnings... 1
 Contents Safety Warnings... 1 Unpacking the GQ600... 1 Introduction... 2 GQ600 Filter Characteristics... 2 1/3 Octave Centre Frequencies... 4 Front Panel Functions... 5 Rear Panel Functions... 6 Specifications...
User Guide FFFA001106. www.focusrite.com
 User Guide FFFA001106 www.focusrite.com TABLE OF CONTENTS OVERVIEW.... 3 Introduction...3 Features.................................................................... 3 Box Contents...3 System Requirements....4
TELIKOU Intercom System. TM-200 Main Station. Instruction Manual
 Intercom System TM-200 Main Station Instruction Manual TELIKOU Systems All Rights Reserved I. Introduction Thank you for choosing TELIKOU intercom product. TM-200 main station is suitable for television
eela-audio EA916 Journalist Unit USB Audio module with Telephone Hybrid User manual
 eela-audio EA916 Journalist Unit USB Audio module with Telephone Hybrid User manual EA Broadcast / Eela Audio, Het Riet 8 A, 5431NM Cuijk, The Netherlands http://www.eela-audio.com e-mail: sales@eela-audio.com
TELIKOU Intercom System. MS-500(4+1 channel) Main Station Instruction Manual
 Main Station Instruction Manual") TELIKOU Intercom System MS-500(4+1 channel) Main Station Instruction Manual TELIKOU Systems All Rights Reserved While TELIKOU makes every attempt to maintain the accuracy of the information contained in
TELIKOU Intercom System MS-500(4+1 channel) Main Station Instruction Manual TELIKOU Systems All Rights Reserved While TELIKOU makes every attempt to maintain the accuracy of the information contained in
PRO DI PRO D2. User Guide. Direct Box. Stereo Direct Box
 www.radialeng.com PRO DI Direct Box PRO D2 Stereo Direct Box User Guide 1638 Kebet Way, Port Coquitlam BC V3C 5W9 tel: 604-942-1001 fax: 604-942-1010 email: info@radialeng.com web: www.radialeng.com PRO
POWERED MIXERS. From Fender Pro Audio. Owner's Manual for SRM 6302 / 8302 P/N 050804 REV A
 POWERED MIXERS From Fender Pro Audio 6 3 0 2 / 8 3 0 2 Owner's Manual for SRM 6302 / 8302 P/N 050804 REV A Fender Musical Instruments 7975 North Hayden Road, Scottsdale, Arizona 85258 U.S.A. Fender knows
PSP3. Stereo M/S preamplifier. User manual
 PSP3 Stereo M/S preamplifier User manual AETA AUDIO 361, avenue du Général de Gaulle 92140 Clamart FRANCE Tél. +33 (0)1 41361212 Fax +33 (0)1 41361213 Telex 631178 Web : http://www.aetausa.com 55 000 020
Radio for Everyone...
 Radio for Everyone... P R O D U C T I O N O N A I R C O N S O L E Eight dual inputs Built in auto Silence detector 4 USB in/out stereo channels Play out USB control section included AES 3 digital program
How To Use The Gr8A Power Amplifier
 GR8A 8 Channel Amplifier USER GUIDE Publication AP4298 Limited One Year Warranty This product has been manufactured in the UK by ALLEN & HEATH and is warranted to be free from defects in materials or workmanship
MPA SERIES MIXER-AMPLIFIER
 MPA SERIES MIXER-AMPLIFIER Installation and User Guide Contents Safety Information... 4 Safety Notes regarding Installation...4 Conformities... 4 Safety Considerations and Information...4 Caution - High
Owner s Manual AWM910 JENSEN AWM910 COMPACT DISC PLAYER RADIO CD COMPACT MUSIC SYSTEM MUTE AUX BAND AUX IN PUSH PUSH PWR VOL ALARM T/F AUD SPK A SPK B
 AWM910 Owner s Manual COMPACT DISC PLAYER PUSH 1 2 3 4 5 6 RPT SCAN RDM H M PUSH PWR VOL ALARM SET ON/OFF EQ T/F AUD RADIO CD COMPACT MUSIC SYSTEM MUTE AUX BAND CD AUX IN A B A+B JENSEN AWM910 Thank You!
Active Speaker System LX523 AUDAC PROFESSIONAL AUDIO EQUIPMENT. Active Speaker System with remote input LX523. User Manual & Installation Guide
 Active Speaker System LX523 AUDAC PROFESSIONAL AUDIO EQUIPMENT Active Speaker System with remote input LX523 User Manual & Installation Guide AUDAC PROFESSIONAL AUDIO EQUIPMENT User Manual & Installation
To reduce the risk of electrical shocks, fire, and related hazards:
 Owner s Manual 1 Contents 1. Safety Notes 5 2. Introduction 6 3. Features 7 4. Installation Guide 8 5. Front Panel Explained 9 6. Rear Panel Explained 10 7. Software Control Panel 12 8. Advanced User Tips
Radio for Ever yone...
 Radio for Ever yone... P R O D U C T I O N Eight dual inputs Built in auto Silence detector 4 USB in/out stereo channels Play out USB control section included AES 3 digital program output optional Drop
OWNER S MANUAL CMX-16A 16-CHANNEL STEREO MIC/LINE MIXER
 OWNER S MANUAL CMX-16A 16-CHANNEL STEREO MIC/LINE MIXER CMX-16A 16-CHANNEL STEREO MIC/LINE MIXER Congratulations on your choice of mixers you have purchased one of the finest compact mixing consoles on
Kit 106. 50 Watt Audio Amplifier
 Kit 106 50 Watt Audio Amplifier T his kit is based on an amazing IC amplifier module from ST Electronics, the TDA7294 It is intended for use as a high quality audio class AB amplifier in hi-fi applications
1 ULTRA-DI DI100 User Manual. User Manual ULTRA-DI DI100. Professional Battery/Phantom Powered DI-Box
 1 ULTRA-DI DI100 User Manual User Manual ULTRA-DI DI100 Professional Battery/Phantom Powered DI-Box 2 ULTRA-DI DI100 User Manual Table of Contents Thank you... 2 1. Control Elements... 7 2. DI100 Configurations...
************* OWNER'S MANUAL BAMF800/2 BAMF1250/2 BAMF1800/2 BAMF2200/2 BAMF2600/2 BAMF1200/4 BAMF1600/4 BAMF2000/1D BAMF4000/1D BAMF5500/1D
 ************* OWNER'S MANUAL BAMF800/2 BAMF1250/2 BAMF1800/2 BAMF2200/2 BAMF2600/2 BAMF1200/4 BAMF1600/4 BAMF2000/1D BAMF4000/1D BAMF5500/1D INTRODUCTION Power Acoustik amplifiers provide high-performance
Universal Host. Desktop Digital Hybrid. User Guide. JK Audio
 Universal Host Desktop Digital Hybrid User Guide JK Audio Introduction Universal Host will allow you to send and receive audio through your multi-line PBX, ISDN, VoIP or analog telephone. While this may
www.fishman.com USER GUIDE PREFIX PREMIUM BLEND
 www.fishman.com USER GUIDE PREFIX PREMIUM BLEND Welcome Thank you for making Fishman a part of your acoustic experience. We are proud to offer you the finest acoustic amplification products available;
Radio for Everyone...
 Radio for Everyone... P R O D U C T I O N O N - A I R C O N S O L E Eight dual inputs Drop through design Budget friendly 4 USB in/out stereo channels Play out USB control section included Ideal for Production,
innkeeper PBX Desktop Digital Hybrid User Guide JK Audio
 innkeeper PBX Desktop Digital Hybrid User Guide JK Audio Introduction Innkeeper PBX will allow you to send and receive audio through your multi-line PBX, ISDN or analog telephone. While this may seem like
innkeeper PBX Desktop Digital Hybrid User Guide JK Audio Warranty
 Warranty Innkeeper PBX is covered by a 2-year warranty to be free from defective workmanship and materials. In the event that the innkeeper PBX needs repair, you must call us to get an authorization, and
Tone Hammer 500. Owners Manual. Manual Version 1.0
 Tone Hammer 500 Owners Manual Manual Version 1.0 1. Incorporating the preamp from the popular Tone Hammer preamp/di pedal this superlight bass head combines three bands of flexible EQ, a colorful "Drive"
VACUUM TUBE COMPRESSOR
 1960 VACUUM TUBE COMPRESSOR OPERATORS MANUAL CONTENTS SAFETY CONSIDERATIONS page 1 INTRODUCTION page 2 APPLICATIONS page 2 INSTALLATION page 3 CONTROL DESCRIPTIONS: page 5 Compressor page 5 Microphone
innkeeper PBX Desktop Digital Hybrid User Guide JK Audio Warranty
 Warranty Innkeeper PBX is covered by a 2-year warranty to be free from defective workmanship and materials. In the event that the innkeeper PBX needs repair, you must call us to get an authorization, and
Stage 112. Owner, s Manual P/N 039080
 THE SOUND THAT CREATES LEGENDS Stage 112 Owner, s Manual P/N 039080 Standard Strat / General Purpose / Any Position Try this: On Me Drive Channel for a real bluesy sound, use Me neck pick- up with Me guitar
Congratulations! Thank you!
 TM-47 ORDERCODE D1370 Congratulations! You have bought a great, innovative product from DAP Audio. The DAP Audio Microphone range brings excitement to any venue. Whether you want simple plug-&-play action
Mbox Basics Guide. Version 6.7 for LE Systems on Windows XP or Mac OS X. Digidesign
 Mbox Basics Guide Version 6.7 for LE Systems on Windows XP or Mac OS X Digidesign 2001 Junipero Serra Boulevard Daly City, CA 94014-3886 USA tel: 650 731 6300 fax: 650 731 6399 Technical Support (USA)
Innkeeper PBX. Desktop Digital Hybrid. User Guide. JK Audio
 Innkeeper PBX Desktop Digital Hybrid User Guide JK Audio Introduction Innkeeper PBX will allow you to send and receive audio through your multi-line PBX, ISDN or analog telephone. While this may seem like
USER MANUAL. 914 Power Amplifier MODEL: P/N: 2900-300280 Rev 1
 KRAMER ELECTRONICS LTD. USER MANUAL MODEL: 914 Power Amplifier P/N: 2900-300280 Rev 1 Contents 1 Introduction 1 2 Getting Started 2 2.1 Achieving the Best Performance 2 3 Overview 3 3.1 Energy Star 3
PRO MPA II. ART PRO MPA II Microphone Preamplifier USER S GUIDE
 PRO MPA II ART PRO MPA II Microphone Preamplifier USER S GUIDE IMPORTANT SAFETY INSTRUCTIONS READ FIRST This symbol, wherever it appears, alerts you to the presence of uninsulated dangerous voltage inside
Generating Element. Frequency Response. Polar Pattern. Impedance. Output Level
 Generating Element Frequency Response Polar Pattern Impedance Output Level Weight Pro 7: Dynamic Pro 7 ic: ic Electret Pro 7: 100 Hz - 12 khz Pro 7 ic: 35 Hz - 12 khz Pro 7: Heil Cardioid Pro 7 ic: Cardioid
Valvestate. 8280, 8240, 8080, 8040, 8020 & 8010 Combos
 Valvestate 8100 & 8200 Heads & 8280, 8240, 8080, 8040, 8020 & 8010 Combos Marshall Amplification plc Denbigh Road, Bletchley, Milton Keynes, MK1 1DQ, England Tel: (01908) 375411 Fax: (01908) 376118 Web
A/DA PEDAL PREAMP APP-1 USER S MANUAL
 A/DA PEDAL PREAMP APP-1 USER S MANUAL APP-1 Users Manual V.2 A/DA s new APP 1 Pedal Preamp is built around our new patent pending D TORSION CORE technology, which is very responsive, reacting to the signal
Features, Benefits, and Operation
 Features, Benefits, and Operation 2014 Decibel Eleven Contents Introduction... 2 Features... 2 Rear Panel... 3 Connections... 3 Power... 3 MIDI... 3 Pedal Loops... 4 Example Connection Diagrams... 5,6
PBXport. Rackmount PBX Digital Hybrid. User Guide. JK Audio
 PBXport Rackmount PBX Digital Hybrid User Guide JK Audio Introduction PBXport will allow you to send and receive audio through your multiline PBX, ISDN or analog telephone. While this may seem like a simple
Smarthome SELECT Bluetooth Wireless Stereo Audio Receiver and Amplifier INTRODUCTION
 Smarthome SELECT Bluetooth Wireless Stereo Audio Receiver and Amplifier INTRODUCTION The Smarthome SELECT Bluetooth Wireless Stereo Audio Receiver and Amplifier is a multi-functional compact device. It
Hear The Future...Now! SIEM-2T/SIEM-2R
 Hear The Future...Now! SIEM-2T/SIEM-2R UHF PLL Mono In Ear Monitoring System 856 59508-03 ATTENTION Please pay high attention to the following information. The guideline published by Occupational Safety
www.fishman.com USER GUIDE SA220
 www.fishman.com USER GUIDE SA220 Whenever this symbol appears, it alerts you to the presence of important operating and maintenance (servicing) instructions in the user s manual for this amplifier. Wherever
MIXER AMPLIFIER SAMSON S83 / S63
 MIXER AMPLIFIER SAMSON S83 / S63 Introduction S83/S63 Features Guided Tour - S83 4 Overview 4 Channel 5 Main Section 6 Rear Panel 8 Guided Tour - S63 Overview Channel Main Section Rear Panel 4 Connecting
MXP124/MXP124FX STEREO MIXERS OWNER S MANUAL
 MXP124/MXP124FX STEREO MIXERS OWNER S MANUAL Important Safety Information EMC Notice * MXP124 and MXP124FX can be used in following electromagnetic environment: residential, commercial and light industrial,
Basics. Mbox 2. Version 7.0
 Basics Mbox 2 Version 7.0 Copyright 2005 Digidesign, a division of Avid Technology, Inc. All rights reserved. This guide may not be duplicated in whole or in part without the express written consent of
Message from the Development Team. Contents. Message from the Development Team..2. Panel Controls and Terminals...3. Using the UR22mkII...
 EN Contents Contents Message from the Development Team..2 Panel Controls and Terminals...3 Front Panel...3 Rear Panel...5 Software...7 Using the UR22mkII...10 Connections...10 Configuring Audio Driver
TI-101 Telephone Interface Manual
 TI-101 Telephone Interface Manual 3/04 Page 1 Contents 1. INTRODUCTION... 4 1.1 2 Wire to 4 Wire Conversion... 4 1.2 Level Control... 4 1.3 Dynamic Range Control... 4 1.4 Equalization of Receive Signal...
BXR 300C BXR 300R. Owner, s Manual P/N 040294
 THE SOUND THAT CREATES LEGENDS BXR 300C BXR 300R Owner, s Manual P/N 040294 INTRODUCTION The Fender BXR 300 AMPLIFIER is the most recent effort in state of the art bass amplifier technology, and is a member
STEREO PREAMPLIFIER INSTRUCTIONS FOR USE
 XX STEREO PREAMPLIFIER INSTRUCTIONS FOR USE Thank you for purchasing the Musical Fidelity A5 CR Preamplifier. Used properly and carefully, it should give many years of outstanding musical reproduction.
Music Sound Engineering and Production (Intermediate 2)
") Music Sound Engineering and Production (Intermediate 2) 7876 . September 2000 HIGHER STILL Music Sound Engineering and Production Intermediate 2 Support Materials Sound Engineering and Production Intermediate
Music Sound Engineering and Production (Intermediate 2) 7876 . September 2000 HIGHER STILL Music Sound Engineering and Production Intermediate 2 Support Materials Sound Engineering and Production Intermediate
IMPORTANT SAFETY INSTRUCTIONS
 IMPORTANT SAFETY INSTRUCTIONS When using this electronic device, basic precautions should always be taken, including the following: 1. Read all instructions before using the product. 2. Do not use this
USER GUIDE LOUDBOX MINI
 USER GUIDE LOUDBOX MINI Whenever this symbol appears, it alerts you to the presence of important operating and maintenance (servicing) instructions in the user s manual for this amplifier. Wherever this
Silverado Special ELECTRONIC SPECIFICATIONS
 Silverado Special ELECTRONIC SPECIFICATIONS Note:All measurements were taken with a line voltage of 120 VAC All noise specifications are unweighted. All voltages and watts are RMS. All measurements taken
TUBE PREAMP 530. modern Rock. Operator s Manual. Please, first read this manual carefully!
 TUBE PREAMP 530 modern Rock Operator s Manual Please, first read this manual carefully! The 530 "modern Rock" an all-tube preamplifier delivers stunning professional quality tube sounds in a modern, exceptionally
JTM Series JTM60. Valve Combo
 JTM Series JTM Valve Combo Marshall Amplification plc Denbigh Road, Bletchley, Milton Keynes, MK DQ, England Tel: (98) 75 Fax: (98) 78 Web Site - http://www.marshallamps.com Whilst the information contained
RD-27 ROBERTS. FM RDS/DAB digital radio with. Sound for Generations. Please read this manual before use
 ROBERTS RD-7 Sound for Generations FM RDS/DAB digital radio with Please read this manual before use Contents Controls... Battery operation... 3 Mains operation... 3 Operating your radio - DAB... 4 Selecting
MA-4150 ORDERCODE D6149 Highlite International B.V.
 MA-4150 ORDERCODE D6149 Highlite International B.V. Vestastraat 2 6468 EX Kerkrade The Netherlands Congratulations! You have bought a great, innovative product from DAP Audio. The DAP Audio MA-4150 brings
CLASS-D MONO BLOCK POWER AMPLIFIERS BZA-1000D / BZA-2000D OWNER'S MANUAL
 CLASS-D MONO BLOCK POWER AMPLIFIERS BZA-1000D / BZA-2000D OWNER'S MANUAL Table of Contents Table of Contents Introduction & Features Specification Features & Controls Installation & Precautions System
MIDI control allows the Split Personality to be used remotely in rack systems, or integrated into MIDI controlled setups for easy preset recall.
 Introduction Trying to drive multiple amplifiers can typically be a frustrating experience. The Decibel Eleven Split Personality is an active AB/Y switcher that enables musicians to run multiple amplifiers
ELAN AUDIO. Operational Description. News Work Station NWS-01
 ELAN AUDIO 2 STEEL COURT SOUTH GUILDFORD WA 6055 PHONE (08) 9277 3500 FAX (08) 9478 2266 email poulkirk@elan.com.au web www.elan.com.au Operational Description. News Work Station NWS-01 The NWS-01 News
PRINCETON CHORUS OWNER S MANUAL P/N 030780
 THE SOUND THAT CREATES LEGENDS PRINCETON CHORUS OWNER S MANUAL P/N 030780 PRINCETON CHORUS OWNER S MANUAL The Fender PRINCETON CHORUS amplifier presents the player with the best value of any amplifier
Getting Started with a blank desk...3. Understanding the Rear Panel and Top Connectors...3. Understanding the Front Panel...5
 2nd Edition Table of contents Getting Started with a blank desk...3 Understanding the Rear Panel and Top Connectors...3 Understanding the Front Panel...5 Controlling Channel Faders...6 Changing INPUT PATCH...7
Focusrite Saffire 6 USB. User Guide
 Focusrite Saffire 6 USB User Guide 1 IMPORTANT SAFETY INSTRUCTIONS 1. Read these instructions. 2. Keep these instructions. 3. Heed all warnings. 4. Follow all instructions. 5. Do not use this apparatus
For Firmware V1.2 Check www.allen-heath.com for the latest firmware available. Publication AP9031
 For Firmware V1.2 Check www.allen-heath.com for the latest firmware available Publication AP9031 Limited One Year Manufacturer s Warranty This product is warranted to be free from defects in materials
VoiceTone T1 USER S MANUAL
 VoiceTone T1 USER S MANUAL Important Safety Instructions 1 Read these instructions. 2 Keep these instructions. 3 Heed all warnings. 4 Follow all instructions. 5 Do not use this apparatus near water. 6
Professional Tube Microphone Preamp
 TUBE MP Professional Tube Microphone Preamp USER S GUIDE Introduction Thank you for purchasing the TUBE MP-and congratulations: You now own one of the most sophisticated pieces of audio signal-processing
Open Pro Tools. Click File/ New Session and name your session.
 RECORD USING MIC BOOTH Open Pro Tools. Click File/ New Session and name your session. If you are working to video click File/ Import / Video and select your video. When the video pops up as a track a small
Wireless. with Personal Mix Control and EP3 Dynamic Earphones
 Wireless In-Ear Monitor Systems with Personal Mix Control and EP3 Dynamic Earphones Why In-Ear Monitors? Clarity is first among the many reasons to make the switch from traditional floor monitors to wireless
Core Mix-4 USB ORDERCODE D2304. Highlite International B.V. Vestastraat 2 6468 EX Kerkrade The Netherlands
 Core Mix-4 USB ORDERCODE D2304 Highlite International B.V. Vestastraat 2 6468 EX Kerkrade The Netherlands Congratulations! You have bought a great, innovative product from DAP Audio. The DAP Audio Core