USER GUIDE SA220
|
|
|
- Silas Cox
- 9 years ago
- Views:
Transcription
1 USER GUIDE SA220

2 Whenever this symbol appears, it alerts you to the presence of important operating and maintenance (servicing) instructions in the user s manual for this amplifier. Wherever this symbol appears, it alerts you to the presence of uninsulated dangerous voltage inside the enclosure that may be sufficient to constitute a risk of shock. CAUTION Risk of electric shock. Do not open. No user serviceable parts inside. Refer servicing to qualified personnel. Do not expose to rain or moisture. Important Safety Instructions To ensure your personal safety and the safety of others, operate this apparatus only after reading these instructions and heeding the warnings listed below. 1. Read these instructions. 2. Keep these instructions. 3. Heed all warnings. 4. Follow all instructions. 5. Do not use this apparatus near water. 6. Clean only with a dry cloth. 7. Do not block the ventilation openings. Install in accordance with the manufacturer's instructions. 8. Do not install near any heat sources such as radiators, heat registers, stoves or other apparatus (including amplifiers) that produce heat. 9. Do not defeat the safety purpose of the polarized or grounding-type plug. A polarized plug has two blades with one wider than the other. A grounding-type plug has two blades and a third grounding prong. The wide blade or the third prong are provided for your safety. If the provided plug does not fit into your outlet, consult an electrician for replacement of the obsolete outlet. 10. Protect the power cord from being walked on or pinched, particularly at the plugs, convenience receptacles and the point where they exit from the apparatus. 11. Use only attachments/accessories specified by the manufacturer. 12. Use only with a cart, stand, tripod, bracket or table specified by the manufacturer, or sold with the apparatus. When a cart is used, use caution when moving the cart/apparatus combination to avoid injury from tip-over. 13. Unplug this apparatus during lightning storms or when unused for long periods of time. 14. Refer all servicing to qualified service personnel. Servicing is required when the apparatus has been damaged in any way, such as a power-supply cord or plug is damaged, liquid has been spilled or objects have fallen into the apparatus, the apparatus has been exposed to rain or moisture, does not operate normally, or has been dropped. 15. Do not expose the apparatus to dripping or splashing liquids and do not place objects filled with liquids (such as a beverage container or a vase) on the apparatus. 16. Warning To reduce the risk of fire or electric shock, do not expose this apparatus to moisture. 17. The apparatus should be connected to mains outliet with a protective earthing connection. Disconnect device is Mains Plug, which should remain readily operable. Copyright 2008 FISHMAN TRANSDUCERS, INC. All rights reserved. No part of this document may be reproduced in any form without the written permission of FISHMAN TRANSDUCERS, INC. 2

3 Welcome Thank you for making Fishman a part of your acoustic experience. We are proud to offer the finest acoustic amplification products available; high-quality professional-grade tools which empower you to sound your very best. Before using your SA220, carefully read the following sections: Important Safety Instructions (Page 2) Getting Started (Page 4 and 5) Save Your Packing Materials The box and packing materials for the SA220 were specially designed to protect the amplifier during shipping. Save all this stuff in case you need to re-ship the SA220. Troubleshooting Should you have any problems, please check with your installer or refer to the online installation guide for this product. Technical support, troubleshooting tips and installation information can be found at Hear This! The SA220 amplifier is capable of cleanly reproducing the sound of your instrument at very high volume levels. Prolonged repeated exposure to high sound pressure levels (SPLs) without protection can cause permanent hearing loss. OSHA has set guidelines and specified permissible sound-exposure limits for those who work in high SPL environments. Permissible Noise Exposures Duration per day, hours Sound level dba slow response / / /4 or less 115 To ensure against permanent hearing loss, wear hearing protection when you perform with amplification. SA220 Tested to Comply With FCC Standards FOR HOME OR OFFICE USE 3

4 Getting Started Here are some basic setup tips to help get you going. To operate your SA220 safely, please read the entire manual, especially the Important Safety Instructions on page 2. Setting the SA220 on its Stand SA220 is intended for use with the included tripod speaker stand in portable applications where the amplifier and stand are to be placed directly on a level, solid, flat surface. Do not substitute the speaker stand with a non-fishman part or attempt to mount or suspend the SA220 in a permanent or temporary method other than that as described in this guide or by Fishman. 1. Locate the stand in a place that is free of obstructions, where it may be accidentally pushed over, or where it may be a trip hazard. 2. Loosen the lower of the two large thumbscrews and spread the tripod legs. Follow the height warnings printed on the stand for safe operation (Figure 1). Setting the height outside this area is forbidden. Tighten the thumbscrew before placing the SA220 on the stand. 3. Remove the safety pin and loosen the top large thumbscrews. Extend the top tube to the third hole or lower if you are seated while performing. Replace the safety pin. Allow the tube to rest on this pin and tighten the top thumbscrew (Figure 2). 4. Lift the SA220 using the handle on the back of the unit while supporting the weight with your other hand. A guide is molded into the underside of the SA220 and acts as an aid in positioning the SA220 onto the tripod. Once positioned, lower the SA220 onto the tripod until it rests firmly on the tube. Warning: Follow the height warnings printed on the stand for safe operation. Setting the height outside this area is forbidden. Safety Pin Loosen Tighten Max. stand diameter: 43inches / 110cm Figure 1. Figure 2. 4

5 Cabling Precautions When making your cable connections, always be sure to route the cables so that the audience, performers, or anyone else will not trip over them or accidentally pull the SA220 over. Setting SA220 Controls 1. Plug the provided AC line cord into the back of the amplifier. 2. Locate the Power switch and switch it off, then connect the power cord. 3. Plug the SA220 into an electrical outlet with the appropriate AC voltage. 4. Push in the Mute switch and turn on the Power switch. You should see the front panel power LED glow green. 5. Connect your instrument to the Channel 1 input with a shielded 1/4-inch cable. 6. Play aggressively and raise the Channel 1 Gain knob until the Clip LED flashes, then back off the Gain until no clipping occurs. 7. Set the controls as shown here. 8. Push the Mute switch (out) and slowly raise the Master Volume to the desired level. 5

6 Front Panel Controls The following pages describe the functions of each control or jack on the SA220 front and rear panels. Refer to these numbered diagrams for each numbered control on the following pages. 1. Mute The Mute switch shuts off the signals from Channels 1 and 2 to the speakers and all the XLR outputs. The mute does not affect the Aux Input, Monitor Input, Tuner Out or the effects sends. 2. Master Volume Set the overall level of the SA220 with the Master Volume. Note: Controls 3 through 13 are identical for both channels. 3. Clip LED The Clip LED will light when the Gain level is too high and the signal becomes distorted. If the light comes on when you play, lower the Gain until the distortion goes away. 4. Gain Use the Gain knob to set the level of the signal. 5. Phase Use the Phase switch in conjunction with the Anti-Feedback filter to eliminate acoustic feedback. To learn more about acoustic feedback, see page High Boost highs to add air to the sound of the instrument. With the knob set at 12 o clock, the control is effectively out of the circuit. 7. Anti-Feedback If you encounter low-frequency feedback, sweep this control to isolate and eliminate it. To learn more about acoustic feedback, see page Mid This control affects how well the instrument blends in or stands out in the mix. At loud volumes a midrange cut will achieve a more natural sound. With the dial set at 12 o clock, the control is effectively out of the circuit. 9. Reverb Level Controls the amount of digital reverb in the channel. 10. Low Boost here to add weight to the sound. In general, boost bass at low volumes and flatten it out (or cut) at higher levels. With the dial set at 12 o clock, the control is effectively out of the circuit. 6

7
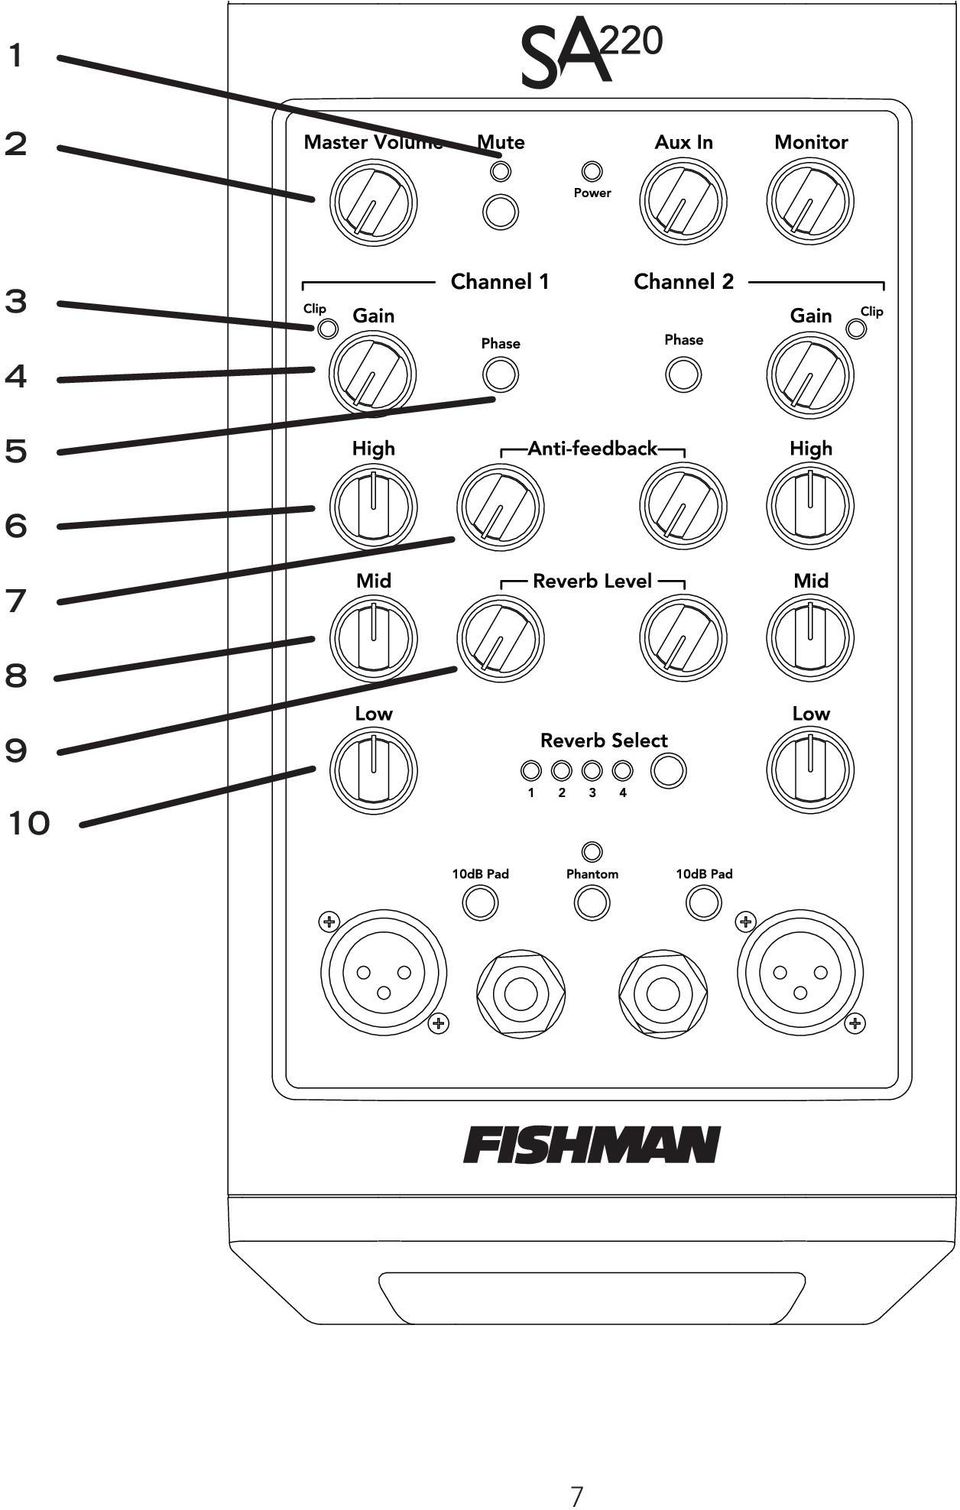
8 Front Panel Controls (cont.) dB Pad If you have a high output pickup and the Clip LED comes on at low Gain settings, push this switch in for a more usable range. 12. XLR Mic Input You may also connect an outboard preamp with balanced XLR out to this input /4 Instrument Input Accepts all types of passive or active acoustic pickups. Note: If you attempt to plug in both the XLR and 1/4-inch inputs at the same time, the XLR shuts off. 14. Aux In Use this to control the level of a device plugged into the Aux Input. Note that the Aux channel is independent of the Mute switch, so you can play pre-recorded music on your breaks. 15. Monitor Use this to control the level of the device you plug into the Monitor Input. See page 16 on Monitor input applications. 16. Reverb (Select) Press the Reverb button to select among four preset reverb effects. 17. Phantom Power Provides 48V to the XLR input for use with a condenser Microphone. The Phantom LED will light to indicate 48V is being supplied to the XLR jack. For more information on Phantom Power, see page 17. 8

9
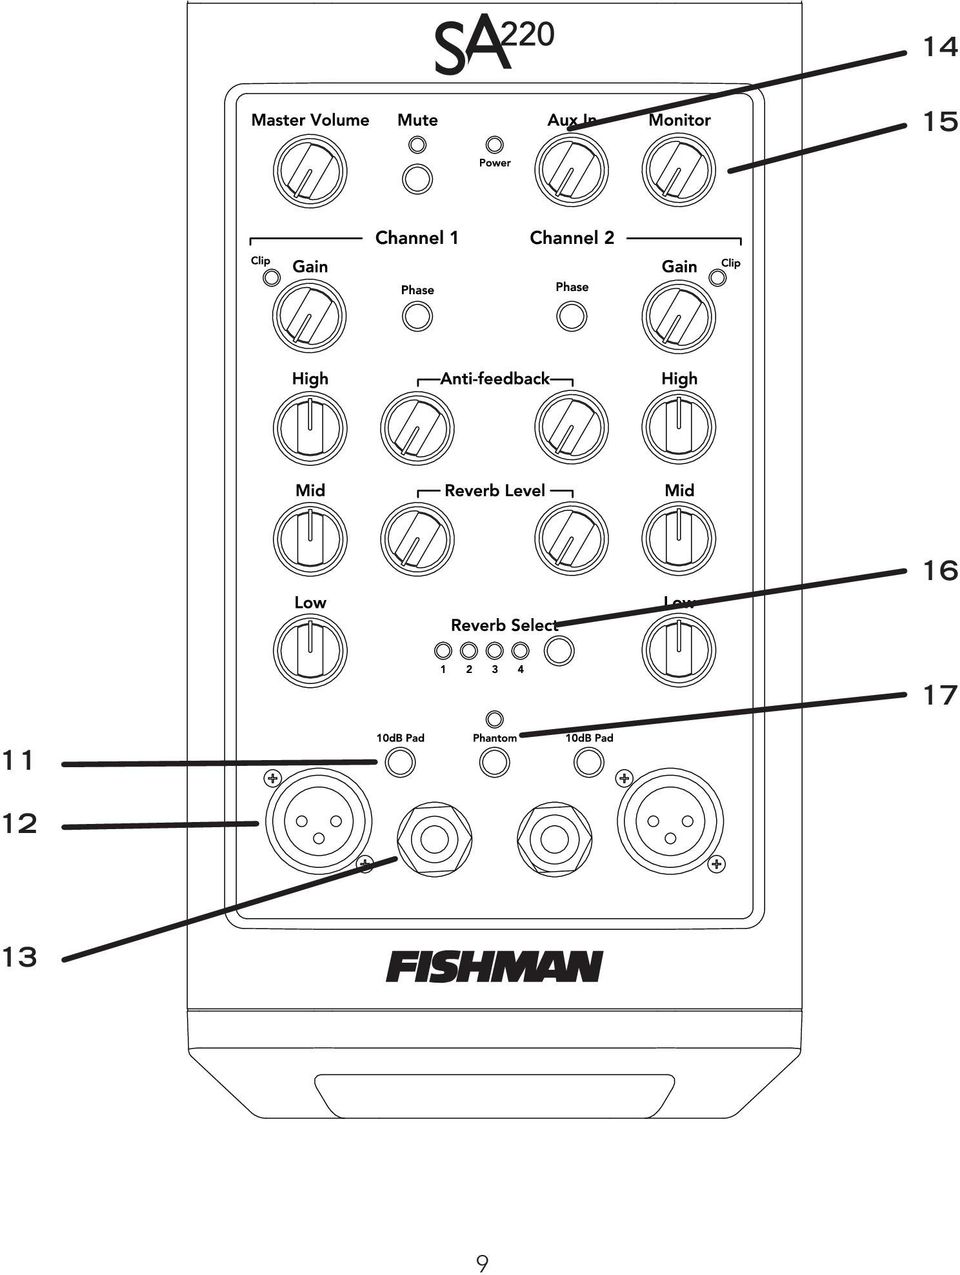
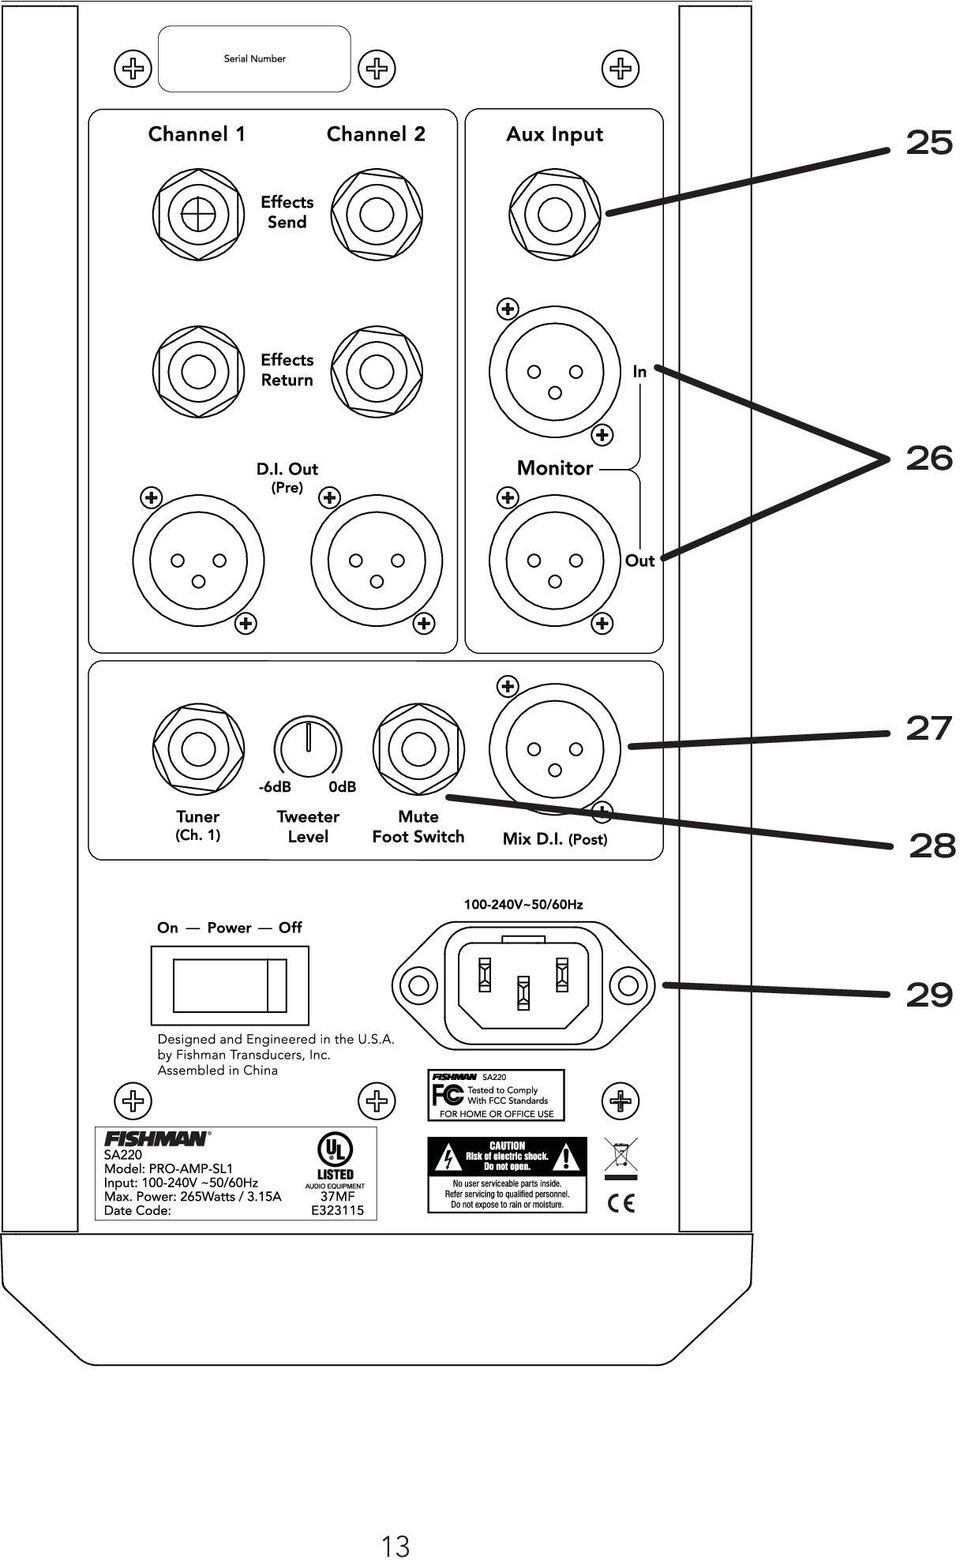
10 Rear Panel Controls 19. Channel 1 & 2 Effects Loop (Send) Patch an external effect (delay, reverb, chorus) through the send and return jacks for each channel. Use a standard 1/4-inch shielded instrument cable to connect the effects send to the input of the effect. This serial effects loop is located post- EQ and is compatible with battery-operated stompbox-style effects processors. 20. Channel 1 & 2 Effects Loop (Return) This is the effects return for each channel. Connect the Channel 2 return jack to the output of the effect. 21. Channel 1 & 2 D.I. Out (Pre-EQ) Use this output when you want a flat D.I. signal to go to the board. This pre-eq output is always ground isolated to prevent ground loop hum. 22. Tuner Out Plug in an electronic tuner here. This output receives only the Channel 1 signal and is independent of the mute, so you can tune with the speakers and the XLR outs muted. The Tuner Out may also be used as pre-eq unbalanced D.I. out for Channel Tweeter Level Set the front panel controls flat and adjust the tweeter level to where it sounds best to you. 24. AC Power The SA220 has a universal power supply and can accept voltages from around the world. For amplifiers purchased in the USA, Canada and Mexico, plug in the supplied detachable AC power cable. For amplifiers purchased outside the USA and Canada, you will need to supply your own detachable AC cable. This cable must have an IEC-style 320 connector at one end, and a male AC plug appropriate for your region at the other. Disconnect device is Mains Plug, which should remain readily operable. 10
 This is the effects return for each channel. Connect the Channel 2 return jack to the output of the effect. 21. Channel 1 & 2 D.I.")
11

12 Rear Panel Controls (cont.) 25. Aux Input Plug in a line level stereo audio source such as a CD or MP3 player in this input. The 1/4 inch stereo (TRS) Aux Input mixes the signals to mono when amplified. 26. Monitor In & Out The monitor feature on the SA220 allows two performers, each with a SA220, to send their own mix to each other. The Monitor level on the front panel then blends in the other players mix. It essentially acts as a monitor, allowing the performer to hear the other player more easily. The Monitor In may also be used as another audio input, just like the Aux Input. The Monitor Out can serve a secondary function as another line level mix output. This output is always ground isolated to prevent ground loop hum. 27. Mix D.I. (Post) Plug in here when you wish to send signals from both Channels and Aux Input to a mixing console. This post-eq output is always ground isolated to prevent ground loop hum. 28. Mute Foot Switch Plug a mono, on/off (latching type) foot switch into this jack for remote access to the Mute feature. The Mute Footswitch duplicates and overrides the front panel Mute switch. 29. AC Power Input Connect the SA220 to the AC mains supply here. 12

13
14 About Acoustic Feedback There are two features provided to help control acoustic feedback, the Phase switch and the Anti-Feedback notch control. Feedback usually occurs in the lowest octaves of your instrument. The natural resonances which produce an instrument s tone also react with amplified sound. The louder an instrument is amplified, the more it will interact. Feedback occurs when a note on the instrument resonates in sync with the amplified sound, reinforcing and building to a sustained howl. Phase Switch The Phase switch flips the polarity of your instrument signal from positive to negative, changing its relationship to the sound coming from the amplifier. One phase setting usually provides better resistance to feedback than the other and will vary depending on the instrument and playing environment. Another approach to determining optimal phase is the selection which sounds or feels most natural when playing. In certain playing environments the Phase switch may not have an audible impact. When not using the Phase switch for feedback suppression, it is recommended to leave it in the out (+) position. The Phase switch also affects the signal polarity to the balanced D.I. and Monitor outputs, synchronizing the amplifier with other sound systems in use. Anti-Feedback - The Anti-Feedback control is a variable frequency notch filter designed to subdue a resonant peak on the instrument which is prone to feedback. Turning the knob adjusts the center frequency of the filter, ranging from subsonic (off) to 330Hz at full clockwise. When not being used for feedback, the Anti-Feedback notch can also be used as a tone control to subdue an unpleasant frequency in a microphone or room. Play a note which accentuates the offending frequency and turn the control until the intensity is diminished. 14

15 Setting Phase and Anti-Feedback The Phase and Anti-feedback controls can be used to restrict the two most dominant feedback notes, allowing greater volume before feedback than otherwise possible. In most cases, the Phase switch is used to control the lower dominant note while the Anti-Feedback notch is used to control the higher. 1. Start with the Anti-Feedback control turned down completely. 2. Turn up the level of the amp until feedback begins. 3. Flip between the two Phase positions. Each position will produce a different dominant feedback frequency. Listen to the frequencies and select the Phase position which allows the higher note to feedback while subduing the lower. 4. Adjust the Ant-Feedback clockwise until it subdues the frequency of the higher feedback note. Since optimal tone is a matter of taste, one can also experiment with reversing the order, using the Phase switch to control the upper feedback note and the Anti-Feedback notch for the lower. 15

16 Monitor Feature The monitor feature on the SA220 allows two performers, each with a SA220, to cross-feed their EQ d and mixed outputs to each other. This allows each player to turn up the other player s mix as heard through through their own SA220. Connect two SA220s as shown, then turn up the Monitor knob to mix in the other performer s SA220. Channel 1 Channel 2 Aux Input Channel 1 Channel 2 Aux Input Effects Send Effects Send Effects Return In In Effects Return In In D.I. Out (Pre) Monitor Out Out D.I. Out (Pre) Out Monitor Out -6dB 0dB -6dB 0dB Tuner (Ch. 1) Tweeter Level Mute Foot Switch Mix D.I. (Post) Tuner (Ch. 1) Tweeter Level Mute Foot Switch Mix D.I. (Post) 16
 Monitor Out Out D.I. Out (Pre) Out Monitor Out -6dB 0dB -6dB 0dB Tuner (Ch.")
17 Phantom Power FAQs Q: I have heard 48V phantom power can damage some audio devices. True? A: Yes, phantom power can damage the following: 1: An unbalanced dynamic mic that has been modified for XLR. 2: A balanced line-level device that is not designed to accept phantom power (ex: some effects processors). Contact the manufacturer to confirm compatibility. 3: Some older balanced wireless receivers can be damaged by phantom power. Consult the manufacturer of the wireless unit for compatibility. 4: An instrument preamp or stompbox with an unbalanced output that is modified for XLR. 5. Many ribbon microphones. Q: Which devices are safe with 48V phantom power? A: All the following can be used safely with phantom power: 1: All balanced condenser microphones. 2: All balanced dynamic microphones. 3: Many new wireless units. Check with the manufacturer for compatibility. 4: A preamp/d.i. designed for phantom-power operation, such as the Fishman Pro-EQ Platinum. 17

18 Block Diagram CH. 1 PHASE FX FX SEND RETURN CH. 1 REVERB LEVEL TUNER OUTPUT MIC PREAMP 20dB CH. 1 MIC INPUT CLIP LED CH. 2 REVERB LEVEL FX FX SEND RETURN CHANNEL CH. 1 BALANCED MUTE D.I. OUTPUT POST SIGNAL CHANNEL MUTE IN Ch. 1 INPUT HI-PASS GAIN GAIN LOW, MID, HIGH NOTCH BUFFER 60Hz 16dB 18dB MONITOR LEVEL 10dB Pad Ch. 1 Gain MONITOR INPUT POST SIGNAL CHANNEL CH. 1 BALANCED MUTE D.I. OUTPUT MASTER VOLUME CHANNEL MUTE MONITOR OUT POST MIX D.I. OUTPUT 15dB PAD POWER TWEETER AMPLIFIERS CROSSOVER LEVEL HI AUX INPUT AUX LEVEL LIMITER HI-PASS LOW DIGITAL REVERB 80Hz LIMITER TIP = LEFT RING = RIGHT REVERB SELECT MUTE (FRONT PANEL) SLEEVE MUTE FOOT SWITCH TIP JACK MUTED WHEN CONTACT CLOSED. FOOT SWITCH JACK OVERRIDES FRONT PANEL SWITCH. 18 CLIP LED IN Ch. 2 INPUT HI-PASS GAIN GAIN LOW, MID, HIGH NOTCH BUFFER 60Hz 16dB 18dB 10dB Pad Ch. 2 Gain CH. 2 PHASE MIC PREAMP 20dB CH. 2 MIC INPUT PHANTOM POWER +48V

19 Technical Specifications Channel 1 & 2 D.I. Out Output Impedance 600 Ohm balanced Phantom power tolerant, ground isolated Channel 1 & 2 Effects Sends: Output Impedance 2k Ohm Output Level -10dBV Nominal Channel 1 & 2 Effects Returns: Input Impedance Input Voltage 20k Ohm +3dBV (1.4Vrms max) -10dBV Nominal Sends and returns are compatible with battery operated effects processors Mix D.I. Out: Output Impedance 600 Ohm balanced Phantom power tolerant, ground isolated Tuner Out: Output Impedance 5k Ohm Speaker System: Woofer Tweeter Tweeter Level Crossover Amplifier: Woofer Tweeter Physical: Dimensions Weight Ship Weight Six 4 patented dual-gap woofers with neodymium magnet One 1 soft dome, neodymium magnet, ferrofluid cooled Up to 6dB cut 4kHz (Bi-amplified with active crossover) 200Watts 20Watts 6.7 x 5.6 x (16.92cm x 14.34cm x 105.5cm) 24 lbs (11 kg) without stand and carry bag 43 lbs (19.5 kg) Specifications and information in this manual subject to change without notice. 19

20 Fishman and Fishman Transducers are trademarks or tradenames of Fishman Transducers Inc Rev I, 6-09

USER GUIDE LOUDBOX MINI
 USER GUIDE LOUDBOX MINI Whenever this symbol appears, it alerts you to the presence of important operating and maintenance (servicing) instructions in the user s manual for this amplifier. Wherever this
Spider IV 15. Pilot s Handbook Manuel de pilotage Pilotenhandbuch Pilotenhandboek Manual del Piloto 取 扱 説 明 書
 Spider IV 15 Pilot s Handbook Manuel de pilotage Pilotenhandbuch Pilotenhandboek Manual del Piloto 取 扱 説 明 書 40-00-0187 Pilot s Handbook available @ www.line6.com/manuals Rev D Important Safety Instructions
USER GUIDE PRO-EQ PLATINUM
 USER GUIDE PRO-EQ PLATINUM Welcome Thank you for making Fishman a part of your acoustic experience. We are proud to offer the finest acoustic amplification products available: high-quality professional-grade
IMPORTANT SAFETY INSTRUCTIONS
 IMPORTANT SAFETY INSTRUCTIONS Before you install or use the apparatus, you must read and understand these Important Safety Instructions. At all times when using the apparatus you must follow these Important
The Bouncer Bluetooth Stereo Speaker
 The Bouncer Bluetooth Stereo Speaker 1 Welcome to JLab! Thank you for purchasing The Bouncer Bluetooth Speaker! Enjoy your music wirelessly from any smartphone, tablet, laptop, or other Bluetooth enabled
Tone Hammer 500. Owners Manual. Manual Version 1.0
 Tone Hammer 500 Owners Manual Manual Version 1.0 1. Incorporating the preamp from the popular Tone Hammer preamp/di pedal this superlight bass head combines three bands of flexible EQ, a colorful "Drive"
www.fishman.com USER GUIDE PREFIX PREMIUM BLEND
 www.fishman.com USER GUIDE PREFIX PREMIUM BLEND Welcome Thank you for making Fishman a part of your acoustic experience. We are proud to offer you the finest acoustic amplification products available;
User Manual DIGITAL MONITOR SPEAKERS MS /MS. 24-Bit/192 khz Digital 40/20-Watt Stereo Near Field Monitors
 User Manual DIGITAL MONITOR SPEAKERS MS /MS 24-Bit/192 khz Digital 40/20-Watt Stereo Near Field Monitors 2 DIGITAL MONITOR SPEAKERS /MS20 User Manual User Manual Table of Contents Thank you... 2 Important
Evolution Digital HD Set-Top Box Important Safety Instructions
 Evolution Digital HD Set-Top Box Important Safety Instructions 1. Read these instructions. 2. Keep these instructions. 3. Heed all warnings. 4. Follow all instructions. 5. Do not use this apparatus near
CAUTION RISK OF ELECTRIC SHOCK NO NOT OPEN
 Evolution Digital HD Set-Top Box Important Safety Instructions 1. Read these instructions. 2. Keep these instructions. 3. Heed all warnings. 4. Follow all instructions. 5. Do not use this apparatus near
VoiceTone T1 USER S MANUAL
 VoiceTone T1 USER S MANUAL Important Safety Instructions 1 Read these instructions. 2 Keep these instructions. 3 Heed all warnings. 4 Follow all instructions. 5 Do not use this apparatus near water. 6
Model PS-4001 Power Supply User Instructions
 Model PS-4001 Power Supply User Instructions 9350-7710-000 Rev E 9/2009 PROPRIETARY NOTICE The product information and design disclosed herein were originated by and are the property of Bosch Security
1 ULTRA-DI DI100 User Manual. User Manual ULTRA-DI DI100. Professional Battery/Phantom Powered DI-Box
 1 ULTRA-DI DI100 User Manual User Manual ULTRA-DI DI100 Professional Battery/Phantom Powered DI-Box 2 ULTRA-DI DI100 User Manual Table of Contents Thank you... 2 1. Control Elements... 7 2. DI100 Configurations...
SUB 10 ACTIVE STUDIO SUBWOOFER
 USER S MANUAL SUB 10 ACTIVE STUDIO SUBWOOFER CONTENTS page INTRODUCTION GENERAL INFORMATION 3 REAR PANEL REAR PANEL 4 INPUTS/OUTPUTS 4 SWITCHES 5 INDICATORS 6 TECHNICAL SPECIFICATIONS TECHNICAL SPECIFICATIONS
USER MANUAL Stand Alone Power Supply PSQ 2909 / PSQ 3909 / PSQ 4909 PSQ 2920 / PSQ 3920 / PSQ 4920
 USER MANUAL Stand Alone Power Supply PSQ 2909 / PSQ 3909 / PSQ 4909 PSQ 2920 / PSQ 3920 / PSQ 4920 [This page intentionally left blank] Warning for Your Protection 1. Read these instructions. 2. Keep these
User Guide ACT-32T Bodypack Transmitters
 User Guide ACT-T s All rights reserved. Do not copy or forward without prior approvals MIPRO. Specifications and design subject to change without notice. MN 0/0 CE5 A IMPORTANT SAFETY INSTRUCTIONS WARNING.
Operation Manual. Multi Channel Power Amplifier DPA-430L
 Operation Manual Multi Channel Power Amplifier DPA-430L Welcome A personal welcome to you from the management and employees of Inter-M All of the co-workers here at Inter-M are dedicated to providing excellent
VIEW. SLX300 SpeakerLinX IP Zone. Amplifier Installation and Setup Guide. AVoIP
 VIEW SLX300 SpeakerLinX IP Zone Amplifier Installation and Setup Guide TM AVoIP ClearOne 5225 Wiley Post Way Suite 500 Salt Lake City, UT 84116 Telephone 1.800.283.5936 1.801.974.3760 Tech Sales 1.800.705.2103
BXR. Owner, s Manual. One hundred BASS EXTENDED RANGE P/N 040695
 THE SOUND THAT CREATES LEGENDS BASS EXTENDED RANGE BXR One hundred Owner, s Manual P/N 040695 BXR 100 Owner s Manual Congratulations on your purchase of the Fender BXR 100 Bass amplifier. The Fender BXR
Stage 112. Owner, s Manual P/N 039080
 THE SOUND THAT CREATES LEGENDS Stage 112 Owner, s Manual P/N 039080 Standard Strat / General Purpose / Any Position Try this: On Me Drive Channel for a real bluesy sound, use Me neck pick- up with Me guitar
PB-1000 SB-1000 POWERED SUBWOOFERS OWNER S MANUAL
 PB-1000 SB-1000 POWERED SUBWOOFERS OWNER S MANUAL Thank you, and congratulations on purchasing your new SVS subwoofer! Prepare to be pleasantly shocked at what an SVS subwoofer will bring to your home
USER GUIDE ELLIPSE AURA RETAIL
 USER GUIDE ELLIPSE AURA RETAIL Welcome Thank you for making Fishman a part of your acoustic experience. We are proud to offer you the finest acoustic amplification products available; high-quality professional-grade
MPA-101. WARNING: Improper installation could result in damage to the amplifier and/or speakers. Read all instructions before installation.
 MPA-101 WARNING: Improper installation could result in damage to the amplifier and/or speakers. Read all instructions before installation. The lightning flash with arrowhead, within an equilateral triangle,
TABLETOP CONTROLLER USER'S MANUAL
 TABLETOP CONTROLLER USER'S MANUAL Preface TABLETOP CONTROLLER USER S MANUAL CLEARONE PART NO. 800-151-891 OCTOBER 2009 (REV. 2.1) 2009 ClearOne Communications, Inc. All rights reserved. No part of this
OWNER S MANUAL PB-2000 SB-2000 POWERED SUBWOOFERS
 OWNER S MANUAL PB-2000 SB-2000 POWERED SUBWOOFERS Thank you, and congratulations on purchasing your new SVS subwoofer! Prepare to be pleasantly shocked at what an SVS subwoofer will bring to your home
XPanel V2. Remote Control Panel. User Manual. XILICA Audio Design
 XPanel V2 Remote Control Panel User Manual XILICA Audio Design Important Safety Instructions 1. READ THESE INSTRUCTIONS All the safety and operating instructions should be read before the product is operated.
HDVD 800. Pure audio in perfection. Instruction manual
 HDVD 800 Pure audio in perfection Instruction manual Contents Contents Important safety instructions... 2 The HDVD 800 headphone amplifier... 4 Package contents... 5 Product overview... 6 Overview of the
INTRODUCTION SAFETY PRECAUTIONS
 O W N E R ' S M A N U A L INTRODUCTION Thank you for your purchase of a FISHMAN product. Please read this manual carefully. If you have any further questions please call our PRODUCT INFORMATION LINE at
KEYBOARD EXTENDED RANGE. Sixty Owner, s Manual P/N 049254
 THE SOUND THAT CREATES LEGENDS KEYBOARD EXTENDED RANGE Sixty Owner, s Manual P/N 049254 INTRODUCTION Your new Fender KXR 60 Keyboard Amplifier is the result of Fender s ongoing dialog with many of today
BIG GAMES HOME VIDEO ARCADE ASSEMBLY INSTRUCTIONS
 TM BIG GAMES HOME VIDEO ARCADE ASSEMBLY INSTRUCTIONS IN-HOME ASSEMBLY OF YOUR BIGGAMES HOME VIDEO ARCADE MAY BE AVAILABLE IN YOUR AREA FOR AN ADDITIONAL CHARGE. FOR INFORMATION, PLEASE CALL (800) 749-4345.
Important Safety Instructions
 PR-D7 GB Revision 1 Important Safety Instructions 1. Read these instructions. 2. Keep these instructions. 3. Heed all warnings. 4. Follow all instructions. 5. Do not use this apparatus near water. 6. Clean
PS 29M DUAL CHANNEL BELTPACK IN METAL CASE
 PS 29M DUAL CHANNEL BELTPACK IN METAL CASE USER MANUAL October 2013 This product is designed and manufactured by: ASL Intercom BV Zonnebaan 42 3542 EG Utrecht The Netherlands Phone: +31 (0)30 2411901 Fax:
User Guide. MT-91 / MT-90 / MT-92 Interlinking Transmitter Module MT-90/MT-92 MT-91
 User Guide MT-9 / MT-90 / MT-9 MT-90/MT-9 All rights reserved. MN 04/08 Do not copy or forward without prior approvals MIPRO. Specifications and design subject to change without notice. CE5 0 4 A MT-9
1 All safety instructions, warnings and operating instructions must be read first.
 ONYX USER MANUAL 2 Dateq ONYX Manual Safety instructions EN Safety instructions 1 All safety instructions, warnings and operating instructions must be read first. 2 All warnings on the equipment must be
Rock-Ola Music Center Set-Up and Installation Guide For all Q-Series models 230V, Export
 Part No. 61745-01 Rock-Ola Music Center Set-Up and Installation Guide For all Q-Series models 230V, Export IMPORTANT SAFETY INSTRUCTIONS a. Read these instructions. b. Keep these instructions. c. Follow
XP112a XP115a. Owner's Manual
 XP112a XP115a Owner's Manual If you want to dispose this product, do not mix it with general household waste. There is a separate collection system for used electronic products in accordance with legislation
IMPORTANT SAFETY INSTRUCTIONS
 IMPORTANT SAFETY INSTRUCTIONS When using this electronic device, basic precautions should always be taken, including the following: 1. Read all instructions before using the product. 2. Do not use this
COMPANION 2 Series II MULTIMEDIA SPEAKERS
 COMPANION 2 Series II MULTIMEDIA SPEAKERS Owner s Guide Guia del usuario Notice d utilisation Français English SAFETY INFORMATION Please read this owner s guide Please take the time to follow the instructions
Conference Phone UserÕs Manual. Part No. 54-2070-01R1 Printed in Korea. 2002 Bogen Communications, Inc.
 Part No. 54-2070-01R1 Printed in Korea. 2002 Bogen Communications, Inc. UserÕs Manual Notice Every effort was made to ensure that the information in this guide was complete and accurate at the time of
************* OWNER'S MANUAL BAMF800/2 BAMF1250/2 BAMF1800/2 BAMF2200/2 BAMF2600/2 BAMF1200/4 BAMF1600/4 BAMF2000/1D BAMF4000/1D BAMF5500/1D
 ************* OWNER'S MANUAL BAMF800/2 BAMF1250/2 BAMF1800/2 BAMF2200/2 BAMF2600/2 BAMF1200/4 BAMF1600/4 BAMF2000/1D BAMF4000/1D BAMF5500/1D INTRODUCTION Power Acoustik amplifiers provide high-performance
Instruction Manual. 5.1 Power Amplified Home Theatre Speaker System w/ Remote Control DSS-200
 R Instruction Manual DSS-200 R 5.1 Power Amplified Home Theatre Speaker System w/ Remote Control Read this manual carefully to get the excellent acoustics from this unit. SPECIFICATIONS SAFETY INFORMATION
Active Monitor Box McCrypt S.T.E.V.E. 15. Order No. 30 17 06
 Active Monitor Box McCrypt S.T.E.V.E. 15 Order No. 30 17 06 1 McCrypt Active Monitor 15 Introduction Dear Customer, Thank you for purchasing this McCrypt Active Monitor. You have chosen a quality product
ATTENTION RISQUE D ÉLECTROCUTION! NE PAS OUVRIR!
 Quick Start Guide ATTENTION RISQUE D ÉLECTROCUTION! NE PAS OUVRIR! CAUTION: TO REDUCE THE RISK OF ELECTRIC SHOCK, DO NOT REMOVE COVER (OR BACK). NO USER-SERVICEABLE PARTS INSIDE. REFER SER- VICING TO QUALIFIED
innkeeper PBX Desktop Digital Hybrid User Guide JK Audio
 innkeeper PBX Desktop Digital Hybrid User Guide JK Audio Introduction Innkeeper PBX will allow you to send and receive audio through your multi-line PBX, ISDN or analog telephone. While this may seem like
innkeeper PBX Desktop Digital Hybrid User Guide JK Audio Warranty
 Warranty Innkeeper PBX is covered by a 2-year warranty to be free from defective workmanship and materials. In the event that the innkeeper PBX needs repair, you must call us to get an authorization, and
PRINCETON CHORUS OWNER S MANUAL P/N 030780
 THE SOUND THAT CREATES LEGENDS PRINCETON CHORUS OWNER S MANUAL P/N 030780 PRINCETON CHORUS OWNER S MANUAL The Fender PRINCETON CHORUS amplifier presents the player with the best value of any amplifier
Achat 115MA full-range speaker. user manual
 Achat 115MA full-range speaker user manual Musikhaus Thomann Thomann GmbH Hans-Thomann-Straße 1 96138 Burgebrach Germany Telephone: +49 (0) 9546 9223-0 E-mail: [email protected] Internet: www.thomann.de
Focusrite Saffire 6 USB. User Guide
 Focusrite Saffire 6 USB User Guide 1 IMPORTANT SAFETY INSTRUCTIONS 1. Read these instructions. 2. Keep these instructions. 3. Heed all warnings. 4. Follow all instructions. 5. Do not use this apparatus
HD udta Quick-Start Guide
 HD udta Quick-Start Guide Vyve Broadband HD Set-Top Box Important Safety Instructions 1. Read these instructions. 2. Keep these instructions. 3. Heed all warnings. 4. Follow all instructions. 5. Do not
Register your product and get support at. www.philips.com/welcome AS111. User manual
 Register your product and get support at www.philips.com/welcome AS111 User manual Contents 1 Important 4 Safety 4 English 2 Your docking speaker for AndroidTM 5 Introduction 5 What's in the box 5 Overview
Prescott. CD Alarm Clock Radio INSTRUCTION MANUAL
 1215205 Prescott CD Alarm Clock Radio INSTRUCTION MANUAL Important Safety Instructions CAUTION RISK OF ELECTRIC SHOCK DO NOT OPEN The lightning flash with arrowhead symbol, within an equilateral triangle
OPERATING INSTRUCTIONS
 OPERATING INSTRUCTIONS OPERATING INSTRUCTIONS MAG & Electric Blue Amplifier Heads and Combos Thank you for purchasing your Ashdown Engineering Amplifier. If you live in the UK, please register your purchase
PRO MPA II. ART PRO MPA II Microphone Preamplifier USER S GUIDE
 PRO MPA II ART PRO MPA II Microphone Preamplifier USER S GUIDE IMPORTANT SAFETY INSTRUCTIONS READ FIRST This symbol, wherever it appears, alerts you to the presence of uninsulated dangerous voltage inside
CELO5. User & Installation Manual. www.audac.eu
 CELO5 User & Installation Manual www.audac.eu 2 Introduction 5 High-end Slim Ceiling Speaker The CELO5 is the 5 version of AUDAC s CELO High-end Slim ceiling speaker series with an RMS power of 50 Watt
 K1800FX User s manual Version 1.1 April 2006 IMPORTANT SAFETY INSTRUCTIONS DETAILED SAFETY INSTRUCTIONS: 1) Read these instructions. 2) Keep these instructions. 3) Heed all warnings. 4) Follow all instructions.
Congratulations! Thank you!
 TM-47 ORDERCODE D1370 Congratulations! You have bought a great, innovative product from DAP Audio. The DAP Audio Microphone range brings excitement to any venue. Whether you want simple plug-&-play action
POWERED MIXERS. From Fender Pro Audio. Owner's Manual for SRM 6302 / 8302 P/N 050804 REV A
 POWERED MIXERS From Fender Pro Audio 6 3 0 2 / 8 3 0 2 Owner's Manual for SRM 6302 / 8302 P/N 050804 REV A Fender Musical Instruments 7975 North Hayden Road, Scottsdale, Arizona 85258 U.S.A. Fender knows
Silverado Special ELECTRONIC SPECIFICATIONS
 Silverado Special ELECTRONIC SPECIFICATIONS Note:All measurements were taken with a line voltage of 120 VAC All noise specifications are unweighted. All voltages and watts are RMS. All measurements taken
CINEMA SB100 powered soundbar speaker
 CINEMA SB100 powered soundbar speaker quick-start guide Thank You For Choosing This JBL Product The JBL Cinema SB100 powered soundbar speaker is a complete, integrated sound system that will dramatically
2XWSXWFKDQQHOV 3KDVH &+ CH 2 &+ CH 4 &+ CH 6 L1 X X L2 X X L3 X X
 INSTALLATION INSTRUCTIONS ENGLISH Version 1 1 January 2004 EUROLIGHT LD6230 IMPORTANT SAFETY INSTRUCTIONS DETAILED SAFETY INSTRUCTIONS: 1) Read these instructions 2) Keep these instructions 3) Heed all
HOME THEATER SYSTEM. Instruction Manual. Model ASR150. Please read the instruction manual carefully before using your unit.
 SURROUND SOUND HOME THEATER SYSTEM Instruction Manual Model ASR150 Please read the instruction manual carefully before using your unit. For support visit : www.1800customersupport.com GENERAL TABLE OF
innkeeper PBX Desktop Digital Hybrid User Guide JK Audio Warranty
 Warranty Innkeeper PBX is covered by a 2-year warranty to be free from defective workmanship and materials. In the event that the innkeeper PBX needs repair, you must call us to get an authorization, and
MAC 2.2/2.3/2.4 PROFESSIONAL STEREO AMPLIFIERS
 MAC././.4 PROFESSIAL STEREO AMPLIFIERS OWNER'S MANUAL www.altoproaudio.com Version. NOV 007 English IMPORTANT SAFETY INSTRUCTI CAUTI RISK OF ELECTRIC SHOCK DO NOT OPEN TO REDUCE THE RISK OF ELECTRIC SHOCK
Universal Host. Desktop Digital Hybrid. User Guide. JK Audio
 Universal Host Desktop Digital Hybrid User Guide JK Audio Introduction Universal Host will allow you to send and receive audio through your multi-line PBX, ISDN, VoIP or analog telephone. While this may
DIGITAL CABLE TV RECEIVER OPERATION MANUAL DVB-C8080AL DIGITAL CABLE RECEIVER DEAR CONSUMER
 DIGITAL CABLE TV RECEIVER OPERATION MANUAL DVB-C8080AL DIGITAL CABLE RECEIVER DEAR CONSUMER GREAT APPRECIATION FOR PURCHASING OUR PRODUCT TO ENSURE THE BEST PERFORMANCE AND THE HIGHEST SAFETY, PLEASE READ
MXP124/MXP124FX STEREO MIXERS OWNER S MANUAL
 MXP124/MXP124FX STEREO MIXERS OWNER S MANUAL Important Safety Information EMC Notice * MXP124 and MXP124FX can be used in following electromagnetic environment: residential, commercial and light industrial,
User Manual EUROLIVE B1220DSP. Digital Processor-Controlled 600-Watt 12" PA Speaker System with Integrated Mixer
 User Manual Digital Processor-Controlled 600-Watt 12" PA Speaker System with Integrated Mixer 2 User Manual Table of Contents Thank you... 2 Important Safety Instructions... 3 Legal Disclaimer... 3 Limited
ANI-9005. Instruction Manual DIGITAL INDOOR/OUTDOOR TV ANTENNA OMNI-DIRECTIONAL WITH AMPLIFIER INTRODUCTION:
 INTRODUCTION: This is a specially designed new concept antenna for digital indoor, outdoor analogue, and terrestrial HDTV broadcasting reception. It is the best solution for home reception and digital
Setup Guide. www.audioengineusa.com D1. Premium 24-bit DAC
 Setup Guide www.audioengineusa.com D1 24-bit DAC Premium 24-bit DAC Contents Introduction Package Contents Cleaning Features Overview Quick Setup Troubleshooting Specifications Contact Us About Audioengine
Albrecht DR314. DAB/DAB+/FM Radio 1.) User Manual
 User Manual") Albrecht DR314 DAB/DAB+/FM Radio 1.) User Manual -1- Important Safety Notes TO PREVENT FIRE OR SHOCK HAZARD, DO NOT USE THIS PLUG WITH AN EXTENSION CORD, RECEPTACLE OR OTHER OUTLET UNLESS THE BLADES CAN
Albrecht DR314 DAB/DAB+/FM Radio 1.) User Manual -1- Important Safety Notes TO PREVENT FIRE OR SHOCK HAZARD, DO NOT USE THIS PLUG WITH AN EXTENSION CORD, RECEPTACLE OR OTHER OUTLET UNLESS THE BLADES CAN
Power Supply Guide Version 1.0 for D-Show
 Power Supply Guide Version 1.0 for D-Show Digidesign 2001 Junipero Serra Boulevard Daly City, CA 94014-3886 USA tel: 650 731 6300 fax: 650 731 6399 Technical Support (USA) tel: 650 731 6100 fax: 650 731
To reduce the risk of electrical shocks, fire, and related hazards:
 Owner s Manual 1 Contents 1. Safety Notes 5 2. Introduction 6 3. Features 7 4. Installation Guide 8 5. Front Panel Explained 9 6. Rear Panel Explained 10 7. Software Control Panel 12 8. Advanced User Tips
USER GUIDE MANUAL DCT700. One-way Application
 USER GUIDE MANUAL DCT700 One-way Application CAUTION: CAUTION RISK OF ELECTRIC SHOCK TO REDUCE THE RISK OF ELECTRIC SHOCK, DO NOT REMOVE COVER (OR BACK). NO USER-SERVICEABLE PARTS INSIDE. REFER SERVICING
Doorbell Intercom Security System
 Doorbell Intercom Security System POWER IN USE OFF A B C LOCK CALL TALK Installation Guide Model WHDB-301 EXPLANATION OF GRAPHIC WARNING SYMBOLS This symbol is intended to alert the user to the presence
User Manual EUROPOWER PMP2000. 800-Watt 14-Channel Powered Mixer with Multi-FX Processor
 User Manual EUROPOWER PMP2000 800-Watt 14-Channel Powered Mixer with Multi-FX Processor 2 EUROPOWER PMP2000 User Manual Table of Contents Thank you... 2 Important Safety Instructions... 3 Legal Disclaimer...
BOSE. Link AL8 HOMEWIDE WIRELESS AUDIO LINK
 BOSE Link AL8 HOMEWIDE WIRELESS AUDIO LINK Français English SAFETY INFORMATION Please read this owner s guide Please take the time to follow the instructions in this owner s guide carefully. It will help
Fast Track Solo Guide
 Fast Track Solo Guide Legal Notices 2013 Avid Technology, Inc., ( Avid ), all rights reserved. This guide may not be duplicated in whole or in part without the written consent of Avid. Avid, the Avid logo,
igroove SXT Owner's Manual
 TM igroove SXT Owner's Manual Important Safety Safety Information Information 1. READ these instructions. 2. KEEP these instructions. 3. HEED all warnings. 4. FOLLOW all instructions. 5. DO NOT use this
EKX Passive Loudspeakers
 EKX Passive Loudspeakers EKX-12, EKX-15, EKX-15S, and EKX-18S en User Manual en 3 Table of contents 1 Safety 4 1.1 Important Safety Instructions 4 1.2 Precautions 4 1.3 Suspension 5 2 Description 6 2.1
EUROLIVE F1220A. User Manual A50-56333-00001
 User Manual A50-56333-00001 * presence! operating *! Important safety instructions This symbol, wherever it appears, alerts you to the of uninsulated dangerous voltage inside the enclosure - voltage that
Hear The Future...Now! SIEM-2T/SIEM-2R
 Hear The Future...Now! SIEM-2T/SIEM-2R UHF PLL Mono In Ear Monitoring System 856 59508-03 ATTENTION Please pay high attention to the following information. The guideline published by Occupational Safety
OWNER S MANUAL. Model One
 OWNER S MANUAL Model One 1 Important Safety Instructions 1. Read these instructions. 2. Keep these instructions. 3. Heed all warnings. 4. Follow all instructions. 5. WARNING To reduce the risk of fire
DIGITAL MONITOR SPEAKERS MS20/MS40
 User s Manual Version 1.1 August 2005 IMPORTANT SAFETY INSTRUCTIONS DETAILED SAFETY INSTRUCTIONS: 1) Read these instructions. 2) Keep these instructions. 3) Heed all warnings. 4) Follow all instructions.
2 series II COMPANION MULTIMEDIA SPEAKERS
 COMPANION MULTIMEDIA SPEAKERS Quick Setup Guide and Safety Information GuÍa rápida de instalación y información de seguridad Notice de montage et informations relatives à la sécurité 2 series II For additional
TELIKOU Intercom System. MS-500(4+1 channel) Main Station Instruction Manual
 Main Station Instruction Manual") TELIKOU Intercom System MS-500(4+1 channel) Main Station Instruction Manual TELIKOU Systems All Rights Reserved While TELIKOU makes every attempt to maintain the accuracy of the information contained in
TELIKOU Intercom System MS-500(4+1 channel) Main Station Instruction Manual TELIKOU Systems All Rights Reserved While TELIKOU makes every attempt to maintain the accuracy of the information contained in
Hegel H1 High End Integrated Amplifier
 Hegel H1 High End Integrated Amplifier www.hegel.com [email protected] USER GUIDE Congratulations on your new HEGEL! Our products are based on a simple philosophy: The component shall reproduce the original
MCA Series Multi-Channel Amplifiers. Operation Manual
 MCA Series Multi-Channel Amplifiers Operation Manual February 2012 Biamp Systems, 9300 SW Gemini Drive, Beaverton, Oregon 97008 U.S.A. (503) 641-7287 www.biamp.com IMPORTANT SAFETY INSTRUCTIONS IMPORTANT
Altec Lansing Computer Speaker System
 Altec Lansing Computer Speaker System User Guide ACS45.1 IMPORTANT If you experience any difficulties with your computer speaker system, please call us. It may be a simple problem that we can help you
10B-LR 10B-STD 10B-SUB OWNER S MANUAL
 10B-LR 10B-STD 10B-SUB OWNER S MANUAL INTRODUCTION: The 10B crossover is available in three stock versions; 10B-SUB incorporating frequencies more suitable to sub-woofer applications (40Hz to 500hz), 10B-STD
Digital Satellite Receiver
 USER GUIDE Digital Satellite Receiver Models DSR207, DSR317, DSR505, and DSR530 CONTENTS IMPORTANT SAFETY INSTRUCTIONS...1 DSR BASICS SYMBOLS/ICONS...6 Front Panel...6 Back Panel...7 CONNECTING YOUR DSR...10
Basics. Mbox 2. Version 7.0
 Basics Mbox 2 Version 7.0 Copyright 2005 Digidesign, a division of Avid Technology, Inc. All rights reserved. This guide may not be duplicated in whole or in part without the express written consent of
Sound Spot SFQ-07. User Manual
 Sound Spot SFQ-07 User Manual Safety Information The lightning flash with arrowhead symbol, within an equilateral triangle is intended to alert the user to the presence of uninsulated "dangerous voltage"
LOXONE 12 Channel Amplifier
 LOXONE 12 Channel Amplifier Item no.: 200110 Thank you for purchasing the Loxone Twelve Channel Amplifier. The versatility of the Amplifier makes it the perfect choice for almost every type of custom multi-room
AM / FM Tuner + RDS. Model: TU-101. www.pulse-audio.co.uk
 AM / FM Tuner + RDS Model: TU-101 www.pulse-audio.co.uk 1 Safety Information The lightning bolt within a triangle is intended to alert the user to the presence of dangerous voltage levels within the product
HA2500 2 VX2515 VX2510 250 WATT 1 X 15 BASS COMBO 250 WATT 2 X 10 BASS COMBO
 HA2 2 VX21 VX21 HA2 2 2 WATT 1 X 1 BASS COMBO 2 WATT 2 X 1 BASS COMBO Introduction 2 Features 3 Guided Tour Front Panel 4- Rear Panel 6-7 Setting Up and Using the VX21 & VX21 8-9 About Equalization 1-11
ANTENNA DISTRIBUTION SYSTEM USER'S GUIDE
 Model User Guide ANTENNA DISTRIBUTION SYSTEM USER'S GUIDE 2009 Shure Incorporated 27AS8862 (Rev.4) Printed in U.S.A. POWERING ON/POWERING OFF THE Last powered on First powered off To avoid damaging internal
AM/FM ALARM CLOCK RADIO
 AM/FM ALARM CLOCK RADIO Instruction Manual JL-206 Please read this manual carefully before operating and save it for future reference. Have a question? Please visit http:// INTRODUCTION Thank you for purchasing
PERSONAL MONITOR MIXER/HEADPHONE AMP. S Class Signal Processors
 PERSONAL MONITOR MIXER/HEADPHONE AMP S Class Signal Processors Table Of Contents Features 3 Front and Rear Panel Layout 4 Operating the S monitor 5-7 Specifications 8 Wiring Guide 8 Copyright 2003, Samson
INTRODUCTION. Please read this manual carefully for a through explanation of the Decimator ProRackG and its functions.
 INTRODUCTION The Decimator ProRackG guitar noise reduction system defines a new standard for excellence in real time noise reduction performance. The Decimator ProRackG was designed to provide the maximum